

Nec POWERMATE PROFESSIONAL SERVICE MANUAL

PROPRIETARY NOTICE AND LIABILITY DISCLAIMER
The information disclosed in this document, including all designs and related
materials, is the valuable property of NEC Computer Systems Division, Packard Bell NEC,
Inc. (hereinafter “NECCSD”) and/or its licensors. NECCSD and/or its licensors, as appr opriate, reserve all patent, copyright and other proprietary rights to this document, including
all design, manufacturing, reproduction, use, and sales rights theret o, except to t he extent
said rights are expressly granted to others.
The NECCSD product(s) discussed in this document are warrant ed in accordance with the
terms of the Warranty Statement accompanying each product. However, actual
performance of each such product is dependent upon factor s such as system configuration,
customer data, and operator control. Since implementation by customers of each product
may vary, the suitability of specific product configurations and applications must be
determined by the customer and is not warranted by NECCSD.
To allow for design and spec ification impr oveme nts, t he info rmat ion in t his document is
subject to change at any time, without not ice. Reproduction of this document or port ions
thereof without prior written approval of NECCSD is prohibited.
NEC is a registered trademark of NEC Corporation, and FastFacts, MagicEye, MultiSync, and PowerMate
are either trademarks or registered trademarks of NEC Technologies, Inc.; these trademarks are used
under license by Packard Bell, NEC.
All other product, brand, or trade names used in this publication are the trademarks or registered
trademarks of their respective trademark owners.
First Printing — May 1997
Copyright 1997 Copyright 1997
NEC Computer S ystems Division NEC Corp oration
Packard Bell NEC, Inc. 7-1 Shiba 5-Chome, Minato-Ku
1414 Massachusetts Avenue Tokyo 108-01, Japan
Boxborough, MA 01719-2298 All Rights Reserved
All Rights Reserved

Contents
Preface.........................................................................................................................xv
Abbreviations...............................................................................................................xvii
Section 1 Technical Information
System Chassis............................................................................................................1-3
System Board..............................................................................................................1-4
Processor and Secondary Cache............................................................................1-7
System BIOS........................................................................................................1-7
I/O Addressing......................................................................................................1-9
System Memory....................................................................................................1-10
Interrupt Controller............................................................................................... 1-11
Plug and Play ........................................................................................................1-12
iii
ISA Bus................................................................................................................1-12
PCI Local Bus ......................................................................................................1-12
PCI/IDE Ports......................................................................................................1-13
Parallel Interface...................................................................................................1-13
Serial Interface......................................................................................................1-14
Infrared Interface..................................................................................................1-15
Video Board................................................................................................................1-15
Video Support ......................................................................................................1-15
Video Playback.....................................................................................................1-16
Audio ..........................................................................................................................1-17
SCSI Board .................................................................................................................1-18
Diskette Drive..............................................................................................................1-19
Hard Disk Drive...........................................................................................................1-19
IDE Hard Drives...................................................................................................1-19
SCSI Hard Disk....................................................................................................1-20
Sixteen-Speed CD-ROM.............................................................................................. 1-20
CD-ROM Reader Operation..................................................................................1-20
CD-ROM Reader Settings.....................................................................................1-21
Power Supply..............................................................................................................1-22
Keyboard.....................................................................................................................1-22
Mouse .........................................................................................................................1-22
Speakers......................................................................................................................1-22
Specifications............................................................................................................... 1-23

iv Contents
Section 2 Setup and Operation
Unpacking and Repacking............................................................................................2-1
System Setup...............................................................................................................2-1
Keyboard, Mouse, and Power Cable Connection...................................................2-1
Monitor Connection..............................................................................................2-3
Speaker and Microphone Connections...................................................................2-3
Starting Up..................................................................................................................2-7
Th e Setup Utility.......................................................................................................... 2-7
When to Use Setup...............................................................................................2-8
How to Start Setup...............................................................................................2-9
How to Use Setup.................................................................................................2-10
Main Menu ...........................................................................................................2-10
System Date/Time..........................................................................................2-11
Diskette Drive................................................................................................2-11
IDE Devices...................................................................................................2-11
Language.......................................................................................................2-13
Boot Options.................................................................................................2-13
Power-On COM1 Ring..................................................................................2-16
Video Mode...................................................................................................2-16
Mouse............................................................................................................2-16
Base Memory.................................................................................................2-17
Extended Memory..........................................................................................2-17
BIOS Version................................................................................................2-17
Advanced Menu....................................................................................................2-17
Processor Type..............................................................................................2-18
Processor Speed.............................................................................................2-18
Cache Size.....................................................................................................2-18
Peripheral Configuration................................................................................2-18
Advanced Chipset Configuration....................................................................2-20
Power Management Configuration.................................................................2-22
Plug and Play Configuration...........................................................................2-24
Event Logging Configuration.........................................................................2-26
Security Menu.......................................................................................................2-27
Enter Password and Set Administrative Password..........................................2-29
Unattended Start............................................................................................2-29
Security Hot Key (CTRL-ALT-)....................................................................2-30
Exit Menu.............................................................................................................2-30

Contents v
Exit Saving Changes......................................................................................2-30
Exit Discarding Changes................................................................................2-31
Load Setup Defaults.......................................................................................2-31
Discard Changes............................................................................................2-31
Fla sh Utility .................................................................................................................2-31
NECCSD Bulletin Board Service..........................................................................2-32
Fla sh Utility .......................................................................................................... 2-34
SCSISelect Utility........................................................................................................2-35
LANDesk Client Manager............................................................................................2-35
LANDesk Client Manager Setup...........................................................................2-35
Features................................................................................................................2-35
PC Health Indicator ..............................................................................................2-35
Managing Workstations .................................................................................2-35
PC Health Meter............................................................................................2-36
PC Health Description....................................................................................2-36
Inventory..............................................................................................................2-37
Using DMI............................................................................................................ 2-37
NEC MagicEye Technology..................................................................................2-38
Video Drivers..............................................................................................................2-38
Changing Display Properties.................................................................................2-39
Windows 95...................................................................................................2-39
Windows NT 4.0............................................................................................2-40
CD Restore..................................................................................................................2-41
Selecting CD Restore Options...............................................................................2-41
Restore Individual Files..................................................................................2-41
System Recovery........................................................................................... 2-41
Restoring Individual Files......................................................................................2-42
Selecting Files................................................................................................2-43
Checking Selected Files..................................................................................2-43
Restoring the Files .........................................................................................2-44
Recovering the System..........................................................................................2-44
Windows NT 4.0 Application CD Installation Instructions............................................2-45
McAfee VirusScan Installation ..............................................................................2-45
LANDesk Client Manager Installation ...................................................................2-46
Local Mode...................................................................................................2-46
Administrator Mode.......................................................................................2-47
Driver CD Installation Instructions...............................................................................2-48

vi Contents
Driver Installation Guidelines................................................................................2-48
Guidelines for Windows 95 Installations.........................................................2-48
Guidelines for Windows NT Installations........................................................2-49
Driver Installation For the Windows 95 Operating System.....................................2-49
Preparation.................................................................................................... 2-49
NEC 16X CD-ROM Drivers..........................................................................2-50
PIIX3 IDE Drivers.........................................................................................2-50
Matrox Mystique Video Drivers.....................................................................2-51
Yamaha Audio Drivers...................................................................................2-52
Driver Installation for the Windows NT Operating System....................................2-53
Preparation.................................................................................................... 2-53
PIIX3 IDE Drivers.........................................................................................2-53
Matrox Mystique Video Drivers.....................................................................2-54
Yamaha Audio Drivers...................................................................................2-55
Number Nine Imagine 128 Series 2 Video Drivers..........................................2-56
Section 3 Option Installation
General Rules For In stalling Opt ions ............................................................................ 3-1
Precautions........................................................................................................... 3-1
Optional Hardware................................................................................................3-2
Removing the System Unit Cover ................................................................................3-3
Removing the Cover............................................................................................. 3-3
Replacing the System Unit Cover..........................................................................3-5
Adding Internal Options...............................................................................................3-6
Expansion Boards.................................................................................................3-7
Slot Locations................................................................................................3-8
Expansion Board Installation..........................................................................3-8
Expansion Board Removal.............................................................................3-10
SIMM Upgrade.....................................................................................................3-11
Checking the Memory in the System..............................................................3-11
SIMM Removal.............................................................................................3-13
SIMM Installation ..........................................................................................3-13
Video Upgrade .....................................................................................................3-14
Data Storage Devices............................................................................................3-16
Device Support.............................................................................................. 3-16
Device Slots...................................................................................................3-16
Device Preparation.........................................................................................3-18

Contents vii
Device Cables................................................................................................ 3-18
Diskette Drive Signal Cable............................................................................ 3-19
IDE Signal Cables..........................................................................................3-20
SCSI Cable....................................................................................................3-20
System Power Cables.....................................................................................3-21
Cabling an IDE or SCSI Device.....................................................................3-21
Cabling a Diskette Drive ................................................................................3-22
Storage Device Installation....................................................................................3-23
3 1/2-Inch Drive Installation...........................................................................3-23
Removing the Side Panel................................................................................3-26
Removing the Front Panel..............................................................................3-27
In stalling t he 5 1/4-In ch Device......................................................................3-29
Replacing the Front and Side Panels...............................................................3-31
Adding External Options..............................................................................................3-31
Parallel Printer ......................................................................................................3-32
Serial Devices.......................................................................................................3-32
SCSI Devices........................................................................................................3-33
Section 4 Maintenance a nd Troubleshooting
Online Services............................................................................................................4-2
NEC’s FastFacts Service.......................................................................................4-2
NECCSD Bulletin Board Service..........................................................................4-3
E-mail/Fax Technical Support Service ...................................................................4-5
Internet.................................................................................................................4-5
NECCSD Technical Support Services...................................................................4-6
Maintenance ................................................................................................................4-6
System Cleaning....................................................................................................4-6
Keyboard Cleaning................................................................................................4-7
Mouse Cleaning....................................................................................................4-7
Troubleshooting...........................................................................................................4-8
Error Messages.....................................................................................................4-8
Diagnosing and Solving Problems .........................................................................4-11
Beep Codes...........................................................................................................4-17
CMOS Batt er y Replacement................................................................................. 4-17

viii Contents
Section 5 Repair
Disassembly and Reassembly........................................................................................5-1
System Unit Cover Removal.................................................................................5-2
Side Panel Removal..............................................................................................5-4
Expansion Board Removal....................................................................................5-4
SIMM Removal....................................................................................................5-5
Front Panel Assembly Removal.............................................................................5-7
Blank Panel and Metal Cover Plate Removal.........................................................5-7
3 1/2-Inch Diskette Drive Removal.......................................................................5-8
3 1/2-Inch Hard Disk Drive Removal....................................................................5-10
5 1/4-Inch Device Removal...................................................................................5-11
Power Supply Removal.........................................................................................5-13
System Board Removal.........................................................................................5-15
Processor Subsystem Removal..............................................................................5-16
Illustrated Parts Breakdown.........................................................................................5-17
Appendix A Connector Pin Assignments
I/O, Power Supply, and Chassis Intrusion Connectors..................................................A-1
Parallel Interface Connector ..................................................................................A-2
Serial Interface Connectors ...................................................................................A-3
Keyboard and Mouse Connectors..........................................................................A-4
USB Connectors...................................................................................................A-5
Audio/MIDI Connectors....................................................................................... A-5
Power Supply Connector ......................................................................................A-6
Chassis Intrusion Connector..................................................................................A-7
Storage Device Connectors..........................................................................................A-7
Diskette Drive Connector......................................................................................A-8
IDE Connectors....................................................................................................A-9
LED Connectors..........................................................................................................A-10
Hard Drive LED Connector.................................................................................. A-10
Power LED Connector.......................................................................................... A-11
Reset Button Connector........................................................................................A-11
Infrared Connector................................................................................................A-12
Sleep Connector....................................................................................................A-12
Power On Connector ............................................................................................A-13
ISA, PCI, and SIMM Connectors.................................................................................A-13

Contents ix
ISA Pin Assignments............................................................................................. A-13
PCI Pin Assignments.............................................................................................A-15
SIMM Sockets......................................................................................................A-16
Appendix B System Board Settings
Changing Jumper Settings............................................................................................B-2
System Board Jumper Locations...........................................................................B-3
Changing System Board Jumper Settings ..............................................................B-4
Processor/Bus Speed Jumpers ........................................................................B-4
BIOS Recovery..............................................................................................B-6
Clearing CMOS .............................................................................................B-7
Denying Access to CMOS Setup....................................................................B-8
Clearing the Password....................................................................................B-10
Appendix C Hard Disk Drive Specifications
Hard Disk Drive Specifications.................................................................................... C-1
Appendix D CD-ROM Reader Specifications and Jumper Settings
CD-ROM Reader Specifications...................................................................................D-1
CD-ROM Reader Connectors and Jumper Settings......................................................D-2
List of Figures
1-1 System Controls and Storage Device Slots.....................................................1-3
1-2 Rear Panel Features........................................................................................ 1-4
1-3 IDE Hard Disk Drive Jumper Settings............................................................1-20
1-4 CD-ROM Reader Controls and Indicators......................................................1-21
1-5 CD-ROM Jumper Settings.............................................................................1-22
2-1 Voltage Selector Switch................................................................................. 2-2
2-2 Keyboard/Mouse Connections........................................................................ 2-2
2-3 Monitor Signal Cable Connection...................................................................2-3
2-4 Right Speaker................................................................................................2-4
2-5 Speaker Cables...............................................................................................2-4
2-6 Connecting the Two Speakers........................................................................2-5
2-7 Attaching the Microphone and Y-Cable..........................................................2-6
2-8 Connecting the AC Adapter........................................................................... 2-6

x Contents
2-9 Power Button.................................................................................................2-7
2-10 Main Menu ....................................................................................................2-9
2-11 Display Properties Window – Windows 95.....................................................2-39
2-12 Display Properties Window – Windows NT 4.0..............................................2-40
3-1 Cover Screws.................................................................................................3-4
3-2 Releasing the System Unit Cover....................................................................3-5
3-3 System Unit Cover Replacement....................................................................3-6
3-4 System Board Upgrade Sockets and Connectors............................................ 3-7
3-5 Expansion Slot Locations...............................................................................3-8
3-6 Removing a Slot Cover.................................................................................. 3-9
3-7 Inserting the Expansion Board........................................................................3-10
3-8 Removing a SIMM......................................................................................... 3-13
3-9 Inserting the SIMM........................................................................................ 3-14
3-10 Aligning the Video Module with the Socket................................................... 3-15
3-11 Storage Device Slots......................................................................................3-17
3-12 System Board Cable Connectors.................................................................... 3-19
3-13 Diskette Drive Signal Cable............................................................................ 3-19
3-14 IDE Cable Connectors ...................................................................................3-20
3-15 SCSI Connectors ...........................................................................................3-20
3-16 Power Cable Connectors................................................................................3-21
3-17 Connecting IDE Device Cables...................................................................... 3-22
3-18 Connecting 1.2-MB Diskette Drive Cables.....................................................3-22
3-19 Locating the Power Supply............................................................................3-24
3-20 Removing the Power Supply Screws..............................................................3-25
3-21 Securing a 3 1/2-Inch Drive............................................................................3-26
3-22 Removing Side Panel Screws.........................................................................3-27
3-23 Removing the Front Panel..............................................................................3-28
3-24 Removing the Slot Cover...............................................................................3-28
3-25 Attaching the Device Rails.............................................................................3-29
3-26 Inserting the Device.......................................................................................3-30
3-27 Aligning the Front Panel.................................................................................3-31
3-28 Connecting a Printer Cable.............................................................................3-32
3-29 Connecting an RS-232C Cable.......................................................................3-33
3-30 Connecting a SCSI Cable...............................................................................3-34

Contents xi
4-1 Removing the Mouse Ball Cover....................................................................4-8
4-2 Battery Socket Location................................................................................. 4-18
4-3 Battery Removal............................................................................................4-18
5-1 Cover Screws.................................................................................................5-3
5-2 Releasing the System Unit Cover....................................................................5-3
5-3 Removing Side Panel Screws.........................................................................5-4
5-4 Expansion Board Removal.............................................................................5-5
5-5 System Board SIMM Sockets........................................................................ 5-6
5-6 Removing a SIMM......................................................................................... 5-6
5-7 Removing the Front Panel..............................................................................5-7
5-8 Removing the Slot Cover...............................................................................5-8
5-9 3 1/2-Inch Diskette Drive Cables....................................................................5-8
5-10 Diskette Drive Screws....................................................................................5-9
5-11 Diskette Drive Removal.................................................................................5-9
5-12 3 1/2-Inch Hard Disk Drive Cables.................................................................5-10
5-13 Removing the 3 1/2-Inch Drive......................................................................5-11
5-14 Removing the Device.....................................................................................5-12
5-15 Removing the Device Rails.............................................................................5-12
5-16 Power Supply Screws ....................................................................................5-13
5-17 Power Supply Ducting (266-MHz Models)....................................................5-14
5-18 System Board Removal..................................................................................5-15
5-19 Processor Subsystem Removal.......................................................................5-16
5-20 PowerMate Professional Series Illustrated Parts Breakdown ..........................5-20
A-1 System Board Chassis Intrusion, Power, and I/O Connector Locations........... A-2
A-2 Par allel Interface Connector ...........................................................................A-2
A-3 Ser ial Interface Connector..............................................................................A-3
A-4 PS/ 2- S tyle Keyboard and Mouse Interface Connecto r s...................................A-4
A-5 Storage Device Connector Locations............................................................. A-7
A-6 LED Connectors............................................................................................A-10
A-7 Hard Disk LED Connector.............................................................................A-10
A-8 Power LED Connector...................................................................................A-11
A-9 Reset Button Connector.................................................................................A-11
A-10 Infrared Connector.........................................................................................A-12

xii Contents
A-11 Sleep Connector.............................................................................................A-12
A-12 Power On Connector .....................................................................................A-13
A-13 PCI, ISA, and SIMM Connector Locations....................................................A-13
B-1 Locating System Configuration Jumpers.........................................................B-3
List of Tables
1-1 PowerMate Professional Series System Configurations...................................1-1
1-2 System Board Feature Components................................................................1-6
1-3 System Memory Map.....................................................................................1-8
1-4 I/O Address Map...........................................................................................1-9
1-5 Interrupt Level Assignments...........................................................................1-11
1-6 Parallel Port Addressing and Interrupts ..........................................................1-13
1-7 Serial Port Addressing and Interrupts.............................................................1-14
1-8 Matrox Mystique Video Board Support.........................................................1-16
1-9 Number Nine Imagine Video Board Support.................................................. 1-16
1-10 Audio Subsystem Resources..........................................................................1-18
1-11 Specifications.................................................................................................1-23
2-1 Navigation Keys.............................................................................................2-10
2-2 Hot Key Parameters.......................................................................................2-24
2-3 Security Passwords........................................................................................2-28
3-1 Recommended Memory Upgrade Path........................................................... 3-12
4-1 NECCSD Service and Information Telephone Numbers.................................4-1
4-2 System Error Messages..................................................................................4-9
4-3 PCI Error Messages.......................................................................................4-10
4-4 Problems and Solutions ..................................................................................4-12
4-5 Diagnostic Beep Codes..................................................................................4-17
5-1 PowerMate Professional Series System Unit Disassembly Sequence...............5-1
5-2 PowerMate Pr ofessional Series Field-Replaceable Parts List...........................5-15
5-3 PowerMate Professional Series Options.........................................................5-19
5-4 PowerMate Professional Series Documentation and Packaging....................... 5-19

Contents xiii
A-1 System Board Connectors..............................................................................A-1
A-2 Par allel Interface Pin Assignments..................................................................A-3
A-3 Ser ial Interface Pin Assignments..................................................................... A-4
A-4 Keyboard and Mouse Pin Assignments...........................................................A-4
A-5 USB Port Pin Assignments.............................................................................A-5
A-6 Microphone In Pin Assignments.....................................................................A-5
A-7 Line In Pin Assignments .................................................................................A-5
A-8 Line Out Pin Assignments..............................................................................A-5
A-9 MIDI Pin Assignments...................................................................................A-6
A-10 Power Connector Pin Assignments.................................................................A-6
A-11 Chassis Intrusion Pin Assignments..................................................................A-7
A-12 Diskette Drive Pin Assignments......................................................................A-8
A-13 I DE Interface Pin Assignments.......................................................................A-9
A-14 Hard Disk LED Pin Assignments....................................................................A-10
A-15 Power LED Pin Assignments.........................................................................A-11
A-16 Reset Pin Assignments...................................................................................A-11
A-17 Infrared Pin Assignments................................................................................A-12
A-18 Sleep Pin Assignments ...................................................................................A-12
A-19 Power On Pin Assignments ............................................................................A-13
A-20 ISA Bus Pin Assignments...............................................................................A-14
A-21 PCI Connector Pin Assignments.....................................................................A-15
A-22 SIMM Socket Pin Assignments......................................................................A-16
B-1 System Board Jumper Settings.......................................................................B-4
C-1 Quantum 3.2-GB Hard Disk Specifications ....................................................C-1
C-2 4-GB Seagate Hard Disk Specifications..........................................................C-3
D-1 Specifications for Sixteen-Speed NEC CD-ROM Reader................................D-1
D-2 Jumper A Settings..........................................................................................D-3
D-3 Jumper B Settings..........................................................................................D-4

xiv Contents

xv
Preface
This service and reference manual for NEC PowerMate® Professional Series computer
systems contains hardware and interface information for users who need an overview of
system de sign . T he ma nua l also includ es system s et up information, pro cedures for ins talling
o ption s, and illustrated parts list s. The manual is written for NEC-trained customer
engineers, system analysts, service center perso nnel, and dealers.
The manual is organized as follows:
Section 1 — Technical Information, provides an overview of the system features,
hardware design, interface ports, and internal devices. System specifications are listed,
including dimensions, weig ht, e nvir onment, safety compliance, po wer c onsumption, and
memory.
Section 2 — Setup and Operation, includes unpacking, setup, and operation information.
It c ontains proc edur es for configur ing the syste m th rough the Setup ut ility prog ram and
reinsta lling the system software. Th is se ction includes p roce dures fo r r estorin g the
operat ing system, various drivers, and application programs. Information on using the BIOS
Update utility is also included .
Section 3 — Option Installation, provides installation procedures for adding optional
expansion boards, diskette and hard disk storage devices, and system and video memory.
Section 4 — Maintenance and Troubleshooting, provides information on cleaning the
system and identifying system malfunctions.
Section 5 — Repair, includes disassembly procedures along with an exploded view
diagram of the system. Also included are parts lists for field-replaceable parts.
Appendix A — Connector Pin Assignments, provides a list of the system board’s internal
and external connector pin assignments.
Appendix B — System Board Settings, inc ludes information on setting jumpers for
clearing passwords, resetting CMOS, disabling Setup access, and recovering from a
corrupted BIOS.
Appendix C — Hard Disk Specifications, includes specifications for the IDE and SCSI
hard disk drives provided with the computer.
Appendix D — CD-ROM Reader Specifications and Jumper Settings, provides
specification and jumper setting information for the CD-ROM reader pr ovided with the
computer.
An Index is provided at the end of this guide.

Abbreviations
xvii
Aampere
AC alternating current
ASIC app lic ation-s p ecif ic integrated
circuit
AT adva nc ed technology (IBM PC)
ATA AT attachment
ATAPI AT attachment packet interface
BBS Bulletin Boar d System
BCD binary-coded decimal
BCU BIOS C u stomized Utility
BIOS basic input/output system
bit binary digit
BUU BIOS Up grade Utility
bpi bits per inch
bps bits per second
C capacitance
Ccentigrade
cache high-s peed buffer stor age
CAM constantly a ddressable memory
CAS column addres s strobe
CD-ROM compact disk-ROM
CGA Color Graphics Adapter
CGB Color G rap hic s Boar d
CH channel
clk clock
cm centimeter
CMOS complementa ry meta l oxide
semiconduct or
COM communication
CONT contrast
CPGA ceramic pin grid array
CPU central processing unit
DAC digital-to-analog converter
DACK DMA acknowledge
db decibels
DC direct current
DIP dual in-line package
DMA direct memor y acces s
DMAC DMA controller
DOS disk operating sys tem
DRAM dynamic RAM
ECC error checking and cor rection
ECP enhanced capabilit ies port (ECP)
EGA Enhanc ed G rap hic s Adapter
EPP Enhanc ed P arallel Port
EPROM erasable and programmable ROM
EVGA Enha nc ed Video Grap hic s Array
F Fa hrenheit
FAX facsimile transmission
FCC Feder al Communica tions
Commission
FG f rame ground
FIFO first-in/first-out
FM fr equ ency modulation
FRU field-replaceable unit
ftp file transfer pr otocol
GB gigabyte
GND ground
HEX hexadecimal
HGA Hercules Graphics Adapter
Hz hertz
IC integrated circuit
ID identification
IDE intelligent device electronics
in. inch
IPB illust rat ed p art s brea kdown
ISA Industry Sta ndard Architect ure
I/O input/output
IPC integrated peripheral contr oller
ips inches per second
IR infrared
IRQ interrupt request
K kilo (1024)
k kilo (1000)

xviii Abbreviations
KB kilobyte
kg kilogram
kHz kilohertz
lb pound
LED light-emitting diode
Mmega
mA milliamps
max maximum
MB megabyte
MDA Monochrome Display Adapter
MFM modified frequency modu lation
MHz megahertz
MIC microphone
MIDI musical instrument device
interface
MPC multimedia PC
mm millimeter
MPEG Motion Picture Experts Group
ms millisecond
NC not connect ed
NMI Non-maskable Interrupt
ns nanosec ond
PAL progra mmab l e arr ay logic
PC personal computer
PCI Peripheral Component
Interconnect
PDA p ersonal digit al assistant
PFP plastic flat package
PIO parallel input/outp ut
pixel pic ture element
PROM pr ogrammable ROM
RAM ra ndom-access memory
RAMD AC RAM digit al-to- analog converter
RG B r ed g reen b l ue
RGBI red green blu e int ens ity
RM retention mechanism
ROM read-only memory
rpm revolutions per minu te
Rread
RTC real-time clock
R/W read/write
Sslave
SCSI Small Computer System Interface
SG s i gnal grou nd
SIM M single inline memory module
SVGA Super Video G rap hic s Arr ay
SW switch
TSC Technical Support Center
TTL transistor/transistor logic
tpi tracks per inch
V volt
Vac volts , alternating cur rent
Vdc volts, direct current
VESA video electronic s standards
association
VGA Video Graphics Array
VRAM video RAM
Wwatt
Wwrite
WWW wor l d-wide web

Section 1
Technical Information
This section provides technical information about PowerMate® Professional Series
computers. PowerMate Professional Series computers are Int el® Pentium® II processorbased systems with MMX™ and cache memory enhancements.
Depending on the model, the PowerMat e Professional Series computer comes with a
Pentium II 233-MHz or 266-MHz microprocessor and t he Windows® 95 or Windows
NT® 4.0 operating system. Multimedia and SCSI configurations are available in six models
as described in Table 1-1.
Table 1-1 PowerMate Professional Series System Configurations
Model Number
MT-2550-24874X 233-MHz
MT-2560-24874X 266-MHz
MT-2560-24874C 266-MHz
MT-2550-24874C 233-MHz
Processor
Pentium II
Pentium II
Pentium II
Pentium II
Operating
System
Windows 95 32 MB 2 MB
Windows 95 32 MB 2 MB
Windows NT
4.0
Windows NT
4.0
System
Memory
32 MB 2 MB
32 MB 2 MB
Video Memory
synchronous
graphics RAM
(SGRAM) on
Matrox Mystique
video board
synchronous
graphics RAM
(SGRAM) on
Matrox Mystique
video board
synchronous
graphics RAM
(SGRAM) on
Matrox Mystique
video board
synchronous
graphics RAM
(SGRAM) on
Matrox Mystique
video board
Hard Disk
3. 2- GB IDE
®
3. 2- GB IDE
3. 2- GB IDE
3. 2- GB IDE
MT-2560-2784S 266-MHz
Pentium II
Windows NT
4.0
32 MB 4 MB video RAM
(VRAM) on
Number Nine
Imagine™ 128
Series 2 video
board
4. 35- GB SCSI
1-2 Technical Information
Table 1-1 PowerMate Professional Series System Configurations
Model Number
MT-2560-2785S 266-MHz
Processor
Pentium II
Operating
System
Windows NT
4.0
System
Memory
64 MB 4 MB VRAM on
Video Memory
Number Nine
Imagine 128
Series 2 video
board
Hard Disk
4. 35- GB IDE
All PowerMate Professional Series configurations come with the following common
hardware:
3 1/2-inch diskette drive
512-kilobyte (KB) burst-rate synchronous secondary cache (BSRAM)
sixteen-speed (maximum) CD-ROM reader
8-watt ( W) external speakers.
The PowerMat e P r ofessional SCSI configuration comes with the above features and an
Adaptec SCSI cont r oller board.
NOTE:
All PowerMate Professional Series
systems contain audio connecto r s on the system
board that are accessible on the rear of the
system unit.
The following paragraphs give an overview of the PowerMate Pr ofessional Series systems.
Differences between the systems are noted as they occur.
Technical Information 1-3
SYSTEM CHASSIS
The chassis provides an enclosure for the system board, power supply, six PCI/ISA
expansion slots, and six storage device slots. The expansion slots include two 8-/16-bit ISA
slots, o ne shared PCI/ I S A slot, and three 32-bit PCI slots. One PCI slot contains either a
Matrox Mystique or a Number Nine Imagine 128 Series 2 video board, depending on the
model.
The six storage device slots accommodate up t o four accessible devices and two internal
hard disk drive devices. The accessible devices include the standard one-inch high 3 1/2inch 1.44-MB diskette drive and up to t hree 1.6- inch high 5 1/4-inch storage devices. The
internal device slots support up to two 1- inch high 3 1/2-inch hard disks.
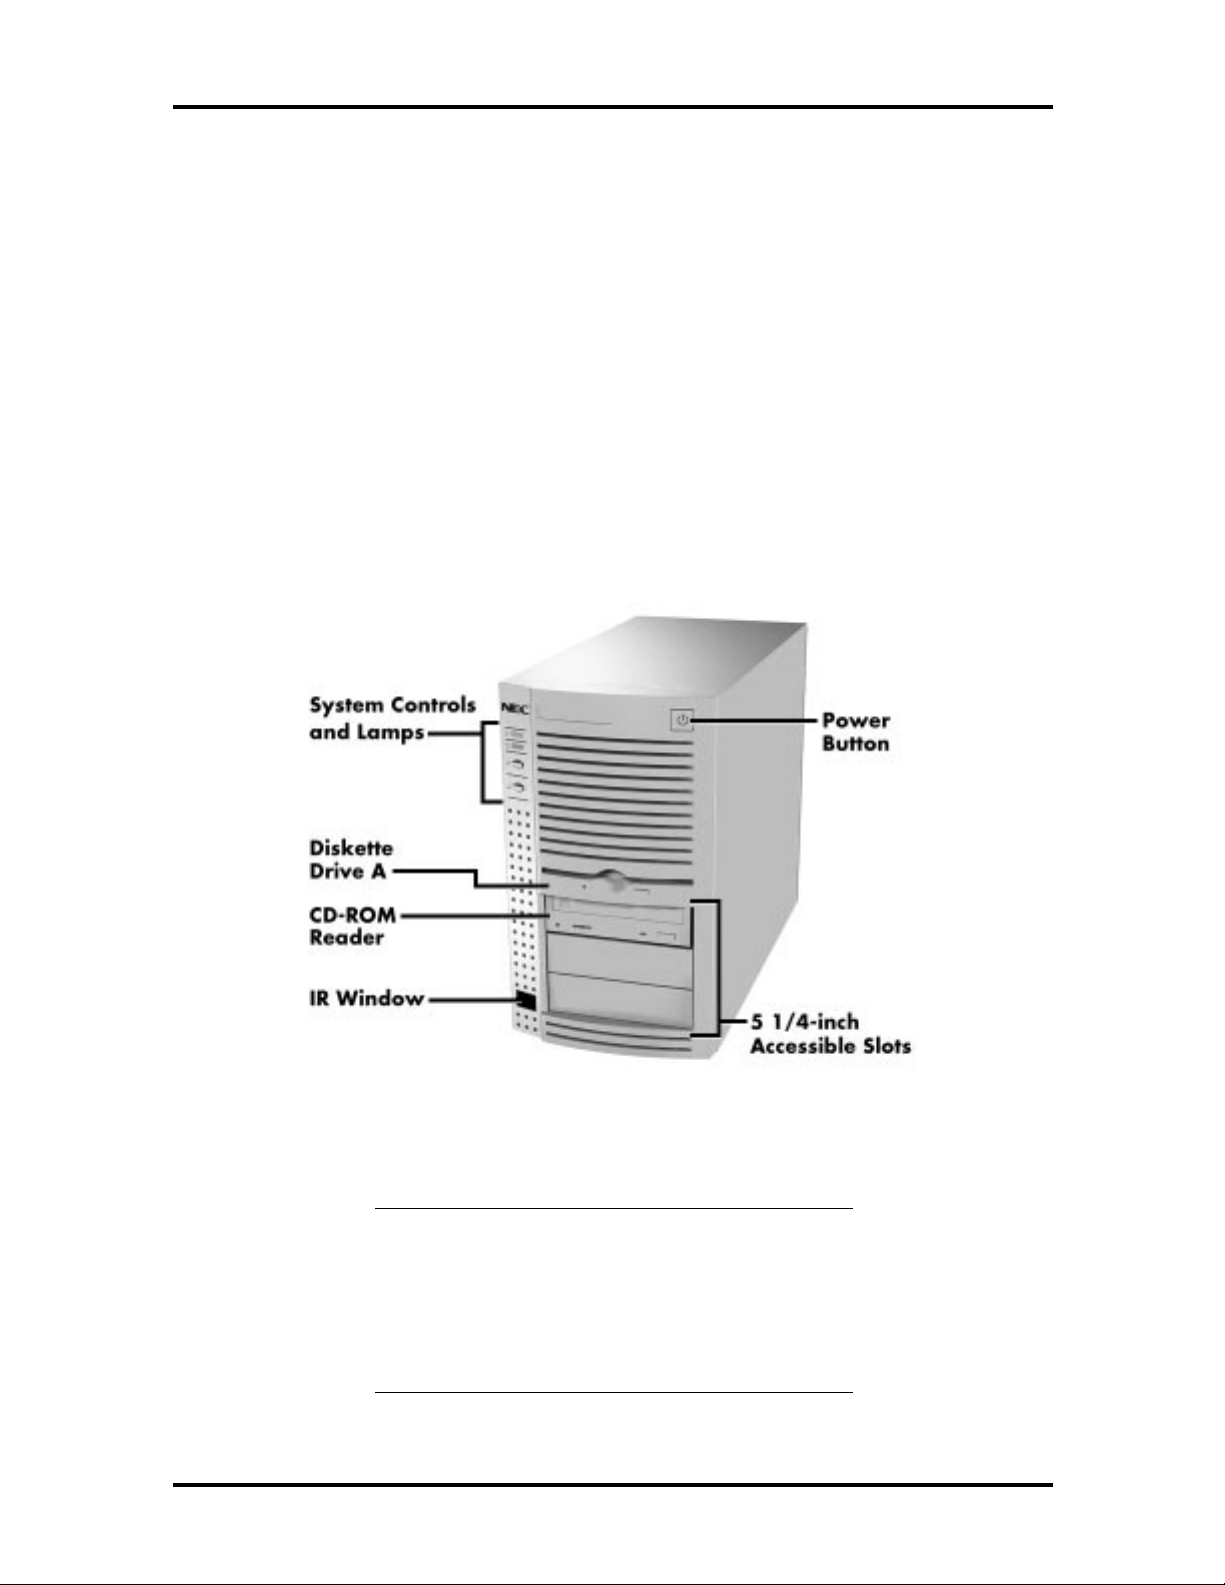
Figure 1-1 shows the front panel features and the locations of the accessible storage device
slots in a system. Figure 1-2 shows the features on the rear panel of the system chassis.
Figure 1-1 System Controls and Storage Device Slots
NOTE:
The Matrox Mystique video board
insta lled in some mod els contains a vid eo module
feature connector, in addition to the standard
VGA connector. The Number Nine Imagine 128
Series 2 video board inst alled in some models
contains only the standard VGA connector.

1-4 Technical Information
Figure 1-2 Rear Panel Features
SYSTEM BOARD
The system board includes the following features:
Intel Pentium II microprocessor r unning at 233- or 266-MHz (model dependent)
Intel 82440FX PCI chipset used for PCI/ISA, memory, and peripheral control
PC87308 Super I/O controller (integrates standard PC I/O functions: two serial
port s, one EPP/ECP-capable parallel port , floppy disk interface, real time clock,
CMOS RAM, keyboard contro ller, and support for an IrDA-compatible infrared
interface)
PCI and ISA peripheral connectors on the system board
Support for up to 256 MB of 60 nanosecond (ns) single in-line memory modules
(SIMMs)
Intel BIOS in a 2-MB flash memory device supports system setup and PCI autoconfiguration
Sound Blaster Pro™-compatible Yamaha audio chip
Expansion slots for up to five add-in boards
Three dedicated PCI slots
Two dedicated ISA-bus slots
One combination slot for either a PCI or an ISA add-in board

Technical Information 1-5
NOTE: One expansion slot contains either a
Matro x Mystique or a Number Nine Imagine 128
Series 2 video board as standard equipment. In
SCSI models, a SCSI adapter board is also
installed.
200-watt power supply (switch-selectable for 115 and 230 Vac operation)
Two RS-232C-compatible 9-pin serial connectors
One multimode, 25-p in Cen tro nics®-compatible parallel port
Two Universal Serial Bus (USB) connector s
Six device s lots:
One 1-inch high 3 1/2-inch slot (contains standard 1.44-MB diskette drive)
Three 1.6-inch high 5 1/4-inch slots (one slot contains the standard CD-ROM
reader
Two internal 1-inch high 3 1/2-inch slots ( one slot contains the standard hard
disk)
PS/2®-style keyboard and mouse connecto r
Speaker mounted on t he system board
Password protection and padlock slot for system security
Hardware management ASIC (NEC MagicEye™) chip mounted on the system
board (see Section 2).
Table 1-2 lists the major chips on the system board. See Appendix A, “Connector Pin
Assignments,” for a list of the system board connector s. S ee Appendix B, “System Board
Sett ings,” for a description of system board switches.

1-6 Technical Information
g
g
Table 1-2 System Board Feature Components
Chip Function
Pentium II Chip 233/66-MHz or 266/66-MHz Intel P entium II
processor
82440FX Chipset:
82371SB PCI/ISA IDE
Xccelerator (PIIX3)
82441FX PCI Bridge and
Memory Controll er (PMC)
82442FX Data Bus Accelerator
(DBX)
PC87307 I/O Controller Multifunction I/O device:
-- Centronic s-compatibl e ( standar d mode)
Prov ides interf ac e between PCI and ISA bus;
supports up to four PCI/IDE devices;
mode 3 and mode 4 support ; Logical bl oc k
addressing (LBA) and Extended Cyli nder
Head Sector (ECHS) translation modes and
ATAPI devices on both I DE interfac es
Prov ides CPU interface control and inte
DRAM control ; supports a full y synchr onous
PCI bus interface plus CPU-to-DRA M and
PCI-to-DRAM data buff er ing
Connects to the CPU data bus, memory dat a
bus, and PMC private data bus; works in
parallel with PMC to provide a high
performance mem or y subsystem for
Pentium II-based systems
•
Multi mode parallel port
-- Enhanced capabilities port (ECP)
-- Enhanced parallel port (EPP)
rated
•
Two RS-232C serial port s that support an
IrDA and Consumer I R c ompliant Infrared
interface
•
Integrated real-time clock with Cent ur y
calendar functionality and 242-byte
battery-back ed CM OS RAM
•
Integrated 8042A k ey boar d c ontroller
•
Flex ible IRQ and DMA mappin
are automat ically c onfigured during boot
up; the I/O controller can also be manually
confi gur ed in the Setup program
•
Supports industry-standard fl oppy
controller
; interfaces

Technical Information 1-7
Processor and Secondary Cache
The PowerMat e P r ofessional uses a Pentium II processo r with an internal clock speed of
233 MHz or 266 MHz. The external speed of the 233-MHz and 266-MHz processors is
66 MHz.
Each processo r has 32 KB of write-back primary cache and a math coprocesso r . The
32-KB primary cache provides 16 KB for instructions and 16 KB for data.
The processor is an advanced pipelined 32-bit addressing, 64-bit data pro cesso r designed to
optimize multitasking operating systems. The 64-bit registers and data paths support 64- bit
addresses and data types.
To use t he Pentium II processor’s power, the system features an optimized 64-bit memory
interface and 512 KB of secondary write-back cache incorporated into the processor.
The processor is compatible with 8-, 16-, and 32-bit software written for the Intel386™,
Intel486™, Pentium, and Pentium Pro processors. The Pentium II processor is contained on
a Single Edge Contact (S . E.C.) cart r idge that plugs into the system board at Slot 1, which is
a 242-pin edge connector. The processo r subsystem consists of the following components:
processo r car d ( including the processor and seco ndary cache)
t hermal plate
back cover.
When the processo r subs yst em is mou nted in Slot 1, it is secured b y a r et ention mecha nism
(RM) attached to the system board. The RM acts as an insertion guide and prevents
movement of the pro cessor after installation. The processor heatsink is also stabilized by
supports that attach t o the motherboard.
System BIOS
The system BIOS is from Intel/American Megatrends Incorporated (AMI) and provides
ISA a nd PCI compatibility. The BIOS is contained in a 2- MB flash memory d evic e on the
system board. The BIOS provides the Power- On Self Test (POS T), the system Setup
pro gr am, a PCI and ID E auto -configuration ut ility, an d BIOS recovery co de.
The system BIOS is always shadowed. Shadowing allows any BIOS rout ine to be executed
from fast 32-bit onboard DRAM instead of from the slower 8-bit flash device.
NEC’s Flash ROM allows fast, econo mical BIOS upgrades. NEC Flash ROMs are
reprogrammable system and video EP ROMs. With NEC’s Flash ROM, a ROM BIOS
change is expedited in the following ways:
is fa st and easily done usin g a F lash utilit y
eliminates the ex pen sive replacement of ROM BIOS chips, and reduces system
maintenance costs

1-8 Technical Information
reduces inadvertent system board damage that can take place when replacing
ROMs
facilitates adop ting new technology while maintain ing corp orate st andards
gives network administrators company-wide control of BIOS revisions.
The BIOS programs execute the Po wer - On Self-Test, initialize processo r controllers, and
interact with the display, diskette drives, hard disks, communication devices, and
peripherals. The syste m BIOS also conta in s the Setu p utility. The hardware setup default
copies the RO M BIOS into RAM (sh adow ing) fo r max imum perf ormance.
The Flash ROM allows the system and video BIOS to be upgraded with the BIOS Update
utility, witho ut remo v ing the ROM (see Sect ion 2 for further in formation on the BIOS
Updat e utility) . The Flas h ROM supports the repro gr ammin g of t he s yst em BIOS an d the
video BIOS.
The syst em memory map is shown in Table 1 -3 .
Table 1-3 System Memory Map
Memory Space Size Function
100000-8000000 130048 KB Extended memory ( c onfigurabl e/upgradable)
E0000-FFFFF 64 K B AMI System BI O S
EC000-EFFFF 16 KB FLASH boot block ( available as UMB)
EA000-EBFFF 8 KB ECSD (Plug and Play configuration area)
E9000-E9FFF 4 KB Reserved for BIOS
E8000-E8FFF 4 KB OE M logo (available as UMB)
E0000-E7FFF 32 KB BIO S r eserved (current ly available as UMB)
C8000-DFFFF 96 KB Avail able HI DOS memory (open to IS A and P CI
bus)
A0000-C7FFF 160 KB Available HI DOS memory (normally reserved for
Video BIO S )
9FC00-9FFFF 1 KB Extended BIOS data
80000-9FBFF 127 K B Extended conventional memory
00000-7FFFF 512 KB Conventi onal base memory

Technical Information 1-9
I/O Addressing
The processo r communicates with I/O devices by I/O mapping. The hexadecimal (hex)
addresses of I/O devices are listed in Table 1-4.
Table 1-4 I/O Address Map
Address (Hex) I/O Device Name
0000-000F PIIX3 - DMA controller 1 (channel 0-3)
0020-0021 PIIX3 - Interrupt controller 1
002E-002F 87308B I/O base configuration registers
0040-0043 PIIX3 - Timer 1
0048-004B PIIX3 - Timer 2
0060 Keyboard c ontroller byte - Reset IRQ
0061 PIIX3 - NMI, speaker c ontrol
0064 Keyboar d c ontroller, c ommand/stat us byt e
0070, bi t 7 PIIX3 - Enable NMI
0070, bi ts 6 through 0 PIIX3 - Real time clock, address
0071 PIIX3 - Real t ime cloc k , data
0078-0079 Reserved - board configurati on
0080-008F PIIX3 - DMA page registers
00A0-00A1 PIIX3 - Interrupt controller 2
00C0-00DE PIIX3 - DMA controller 2
00F0 Reset numeric err or ( numeric data pr oc essor)
0170-0177 Secondary IDE channel
01F0-01F7 Primary IDE channel
0200-0207 Game port
0220-022F Yamaha audio
0278-027F Parallel port 2
02F8-02FF Onboard serial port 2
0330-0331 MPU-401 (MIDI)
0376 Secondary IDE channel com mand port
0377 Secondary IDE channel stat us port
0378-037F Parallel port 1
0388-038B Yamaha audio
03BC-03BF Parallel port 3

1-10 Technical Information
Address (Hex) I/O Device Name
03E8-03EF Serial port 3
03F0-03F5 Floppy channel 1
03F6 Primary IDE channel com mand port
03F7 (write) Floppy channel 1 command
03F7, bit 7 Fl oppy disk change channel 1
03F7, bit 6 through 0 Primary IDE channel status port
03F8-03FF Onboard serial port 1
04D0-04D1 Edge/level triggered
LPT + 400h ECP port, LPT + 400h
0608-060B Yamaha audio
0CF8* PCI c onfiguration address register
0CF9 Turbo and r eset c ontrol register
Table 1-4 I/O Address Map
0CFC-0CFF* PCI configur ation data register
FF00-FF07 IDE bus master regi ster
FFA0-FFA7 IDE primary c hannel
0FF0-0FF7 Yamaha audio
* Only a ccessible by DWORD accesses.
System Memory
Configurations ship with 32 MB or 64 MB of memory: 640 KB of base memory and 31 MB
or 63 MB of extended memory. System memory can be expanded up to 256 MB using
opt ional single in-line memory modules (SIMMs) installed in SIMM sockets on the system
board.
The memory configuration consists of two banks (bank 0 and bank 1) with two so ckets
each. The memory sockets accept 32-bit, 60-ns for faster, 4- , 8- , 16- , 32-, or 64- MB
SIMMs. The sockets accept E xtended Data Out ( EDO) mode or Fast Page (FM) mode
SIMMs and support par ity, non-parity, or error checking and correction (ECC).
The SIMMs are 1 MB x 32 bit (4 MB) , 2 MB x 32 bit (8 MB), 4 MB x 32 bit (16 MB) ,
8 MB x 32 bit (32 MB), and 16 MB x 32 bit (6 4 MB). When the standard SIMMs are
removed, four 64-MB SIMMs may be installed for a t otal of 256 MB.
CAUTION:
SIMMs must match the t in metal
plating used on the system board SIMM sockets.
When adding SIMMs, use tin-plated SIMMs
only.

Technical Information 1-11
SIMMs install directly in the four sockets on the system board. T he four sockets are
assigned as Bank 0 (2 sockets) and Bank 1 (2 sockets) . All configurations have two SIMMs
insta lled in Ba nk 1.
SIMMs must be installed in pairs of the same memory type and size. Both so ck ets must be
populated within a bank for t he system to wo r k . No switch or jumper settings are required
when the memory is changed. The system BIOS auto matically detects the SIMMs. See
“Checking the Memory in the System” in Section 3 for the valid configurations.
Interrupt Controller
The interrupt controller operates as an interrupt manager for the entire system environment.
The controller accepts requests from peripherals, issues interrupt requests t o the processor,
resolves interrupt priorities, and provides vectors for the processor to deter mine which
interrupt routine to execute. The interrupt cont r oller has priority assignment modes that can
be reconfigured at any time during system operations.
The interrupt levels are described in Table 1-5. Interrupt- level assignments 0 through 15 are
listed in order of decreasing priority. See Section 2, “Setup and Operation,” for information
on changing the interrupts using Setup.
Table 1-5 Interrupt Level Assignments
Interrupt Priority In t errupt Device
NMI I/O channel chec k
IRQ00 Reserved, Int er val T imer
IRQ01 Reserved, K ey boar d buffer full
IRQ02 Reserved, Cascade interrupt f r om slav e
IRQ03 Serial Port 2 (COM2)
IRQ04 Serial Port 1 (COM1)
IRQ05 Audio/LPT 2 plug and play option/user-avai lable
IRQ06 Diskette Drive Controller
IRQ07 Parallel Port 1 (LPT1)
IRQ08 Real-tim e c lock
IRQ09 User-available

1-12 Technical Information
Table 1-5 Interrupt Level Assignments
Interrupt Priority In t errupt Device
IRQ10* USB (SCSI board for SCSI configur ations)
IRQ11* Video Boar d
IRQ12 Onboard mouse port (availabl e if no PS/ 2 mouse)
IRQ13 Reserved, M ath Coprocessor
IRQ14 Primary IDE
IRQ15 Secondary IDE if present, or else user-availabl e
* These interrupts are selected and used by the installed expansion boards.
Plug and Play
The system comes with a Plug and Play BIOS that supports Plug and Play technology. Plug
and Play eliminates co mplicat ed setup proce dures fo r ins talling Plug an d Play expan sio n
boards. With Plug and Play, adding a Plug and Play expansion board is done by turning off
t he system, insta lling the board, an d turning on t h e system. There are no jumpers to s et and
no system resource conflicts to r esolve. Plug and Play automatically configures the board.
ISA Bus
The system board uses t he IS A bus for t r ansferring data between the processor and I/O
peripherals and expansion boards. The ISA bus supports 16-bit data transfers and typically
operat es at 8 MHz. ISA expansion slot connector pin assignments are provided in
Appendix A.
PCI Local Bus
The 32-bit PCI-bus is the primary I/O bus for the system. The PCI-bus is a highly integrat ed
I/O interface that offers the highest performance local bus available for the Pentium II
processor. T he bus support s burst modes that send large chunks of data across the bus,
allowing fast displays of hig h-resolutio n images.
Th e hig h-band width PCI- b us eliminate s t he d ata bott lene ck fou nd in trad itional syste ms,
maintains maximum performance at high clock speeds, and provides a clear upgrade path to
future technologies.
PCI expansion slot connector pin assignments are provided in Appendix A.

Technical Information 1-13
PCI/IDE Ports
The system board pro vides two high-performance PCI/IDE ports: a primary channel and a
secondary channel. Each port suppo r ts up to t wo devices for a total of four IDE devices.
The primary PCI/IDE port has an enhanced IDE interface that supports PIO Mode 4
devices with 16 MB per second 32-bit wide data transfers on the high-performance PCI
local bus. The installed hard disk drive is connected to the primary PCI/IDE port. In
multimedia configurations, the installed CD-ROM reader is connected to the seco ndary
PCI/IDE port.
Parallel Interface
The system has a 25-pin parallel bidirectional enhanced parallel port on the system board.
Port specifications conform to the IBM-PC standards. The port supports Enhanced
Ca pab ilities P ort (E CP) and Enhanced Parallel Por t (EPP) modes for dev ices that require
ECP or EPP protocols. The protocols allow high-speed bidirectional transfer over a parallel
port. This increases parallel port functionality by supporting more devices.
The BIOS has automatic ISA printer port sensing. If the BIOS detects an ISA printer port
mapped to the same address, the built-in printer por t is disabled. The BIOS also sets the
first parallel interface port it finds as LPT1 and the second port it finds as LPT2. The
interrupt is selected to either IRQ5 or IRQ7 via Setup. Software- selectable base addresses
are 3BCh, 378h, and 278h.
I/O addresses and interrupts for t he parallel port are given in Table 1-6.
NOTE:
Any interrupts used for the built-in
parallel p ort are not available fo r I SA paralle l
ports.
Table 1-6 Parallel Port Addressing and Interrupts
Starting I/O Address Interrupt Level Port
378 IRQ05 LPT1
278 IRQ05 LPT1 or LPT2
3BC IRQ05 LPT1 or LP T2
378 IRQ07 LPT1
278 IRQ07 LPT1 or LPT2
3BC IRQ07 LPT1 or LP T2
Parallel interface signals are output through the system board’s 25-pin, D-subconnector .
This connector is located at the rear of the system unit. Pin locations for the parallel
interface connector ar e given in Appendix A.
1-14 Technical Information
Serial Interface
The system has two 16C550 UART-compatible serial ports (COM1 and COM2) integrated
on the I/O cont r oller. The serial ports suppo rt the standard RS-232C interface and the IR
interface (see Table 1-7). The buffered high-speed serial ports suppor t transfer rates up to
19.2 KB. These port s allow the installation of high-speed serial devices for faster data
transfer rat e s.
I/O addresses and interrupt levels for the two channels are given in Table 1-7. The interrupt
level is selectable via Setup to either IRQ3 or IRQ4. S oftware selectable base addresses are
3F8h, 2F8h, 3E8h, and 2E8h.
NOTE:
serial port s ar e no t available for ISA parallel
ports.
Table 1-7 Serial Port Addressing and Interrupts
Any interrupts used for the built-in
Starting I/O Address Interrupt Level Port
3F8h IRQ04 COM1
2F8h IRQ03 COM2*
3E8h IRQ04 COM3
2E8h IRQ03 COM4
* Used for IrDA data transfer
See Section 2, “Setup and Operation,” for information on resetting the port through Setup.
Serial interface specifications include:
Baud rate up to 19. 2 KB per second
Word length - 5, 6, 7, o r 8 bits
Stop bit - 1, 1.5, or 2 bits
Start bit - 1 bit
Parity bit - 1 bit (odd parity or even parity).
Serial interface signals are out put through the system board’s 9-pin, D-subconnector. The
connector s ar e located at the rear of the system unit. Pin locations for the serial interface
connector ar e sho wn in Appendix A.
 Loading...