


NEC PowerMate eco
Getting Started Guide
Contents
System Setup....................................................................................................................... 3
System Features................................................................................................................... 4
Release Notes....................................................................................................................... 7
Playing DVD Movies in Windows 2000........................................................................ 7
Installing the USB Driver in Windows XP.....................................................................7
Support Services .................................................................................................................. 8
Memory Upgrade................................................................................................................. 8
Installing a Memory Module.......................................................................................... 8
Removing a Memory Module...................................................................................... 12
How to Set Up a Healthy Work Environment ..................................................................... 13
Making Your Computer Work for You........................................................................ 13
Arrange Your Equipment ............................................................................................ 14
Adjust Your Chair ....................................................................................................... 14
Adjust Your Input Devices.......................................................................................... 15
Adjust Your Monitor................................................................................................... 17
Vary Your Workday.................................................................................................... 18
Pre-existing Conditions and Psychosocial Factors........................................................ 19
Checking Your Comfort: How Do You Measure Up?................................................... 19
Checking Your Chair ............................................................................................. 19
Checking Your Keyboard....................................................................................... 19
Checking Your Mouse........................................................................................... 19
Checking Your Monitor ......................................................................................... 19
Checking You........................................................................................................ 19
NEC PowerMate Desktop Computer 3-Year Limited Warranty........................................... 21
End User Software License Agreement............................................................................... 23
Regulatory Statements........................................................................................................ 25
NEC PowerMate eco Getting Started Guide 1

Proprietary Notice and Liability Disclaimer
The information disclosed in this document, including all designs and related materials, is the
valuable property of NEC S ol u tions (Am er ica), Inc. (herein after “NE C S AM ”) and/or its
licensors. NECSAM and/or its licensors, as appropriate, reserve all patent, copyright and other
proprietary rights to this document, including all design, manufacturing, reproduction, use, and
sales r ights ther eto, except to the ext en t said righ ts are expr es sly grant ed to others.
The NE C S AM product(s ) di s cu s s ed in this docu m ent ar e warranted in accordance with th e terms
of th e Warranty Sta tement accom panyin g ea ch product. Howe v er, act u al performance of each
such product is dependent upon factors such as system configuration, customer data, and
opera tor control. Sin ce implementation b y cust om ers of each product may vary, the suitability of
specific prod u ct configur ations and appli cations must be determined by the cus tomer an d i s not
warranted by NECSAM.
To allow for design and specification improvements, the information in this document is subject
to change at any time, without notice. Reproduction of this document or portions thereof without
prior written approval of NECSAM is prohibited.
As an E
S
PowerMate eco is a trademark of NEC Solutions ( America), Inc. N EC is a registe red trademark of NEC
Corp orat ion and/or on e or more of its subsidiaries. All are us ed under license. E
registered tr ademar k of t he U.S. government . M icros oft an d Windows are registe red tra demark s of
Microsoft Corporation. Transme ta and Crusoe are trad emarks of Transmeta Corporation .
All other product, brand, or trade names used in this publication are the trademarks or registered
trademarks of their respective trademark owners.
NERGY STAR
guidelines for energy efficiency.
TAR
partner, NECSAM has determined that this product meets the E
NERGY STAR
NERGY
is a U.S.
Copyright – June 2002
NEC Solutions (America) , Inc.
15 Business Park Way
Sacramento, CA 95828
All Rights Reserved
2 NEC PowerMate eco Getting Started Guide
System Setup
Use th e fol lowing procedur e to q u ickly set up the PowerMate eco™ microdes k top system.
Note
See the figures in the next section, “System Features,” to locate connectors and
controls.
1.
Check th at you have th e fol lowing system component s:
PowerMate eco microdesktop computer
USB keyboard
USB mouse
AC adapter and power cord.
2.
Connect the keyboard and mouse:
Connect the USB mouse to one of the two USB ports on the bottom of your USB
keyboard.
Connect t he ke yboard to a USB port on the left s ide or back of the Powe rMa te eco
system.
3.
Connect the power cables:
Connect the AC adap ter to the DC p ower p ort on the back of the PowerMate eco
system.
Connect the power cable to the AC adapter an d t o a surge protect or (recommended ) or
a properly grounded wall outlet.
Do not cover or place objects on the AC adapter. Keeping the adapter
cl ear of o bjects lets the adap ter cool properly du r ing u se.
Only use the AC adapter that comes with your NEC PowerMate eco system. Although other
adapters look similar, using them can damage your system.
4.
Power on an d st ar t:
Press the power button on the front of th e PowerMate eco system.
Adjust the LCD brightness controls.
5.
Follow the on-screen instructions to complete the Microsoft® Windows® setup.
During the Microsoft Windows setup procedure, you must choose your
operating system, Microsoft Windows XP Professional, or Microsoft Windows 2000 Professional.
Once you choose the operating system, you cannot change it. The NEC PowerMate eco Product
Recovery CD that ships with your system only restores the operating system you choose during
the initial Microsoft Windows setup.
Note
The NEC PowerMate eco Application and Driver CD provides PowerMate eco drivers
and utilities for users who load their own operating system.
NEC PowerMate eco Getting Started Guide 3

of serious injury. To reduce your risk of injury, set up and use your computer in the manner
described in the section “How to Set Up a Healthy Work Environment” in this document.
System Features
See th e followin g fi g ures to id en tify PowerM ate eco system fea tures .
Prolonged or improper use of a computer workstation may pose a risk
PowerMate eco system – front featur es
A
– LCD Panel
B
– Left Speaker
C
– LCD Display/Audio Controls
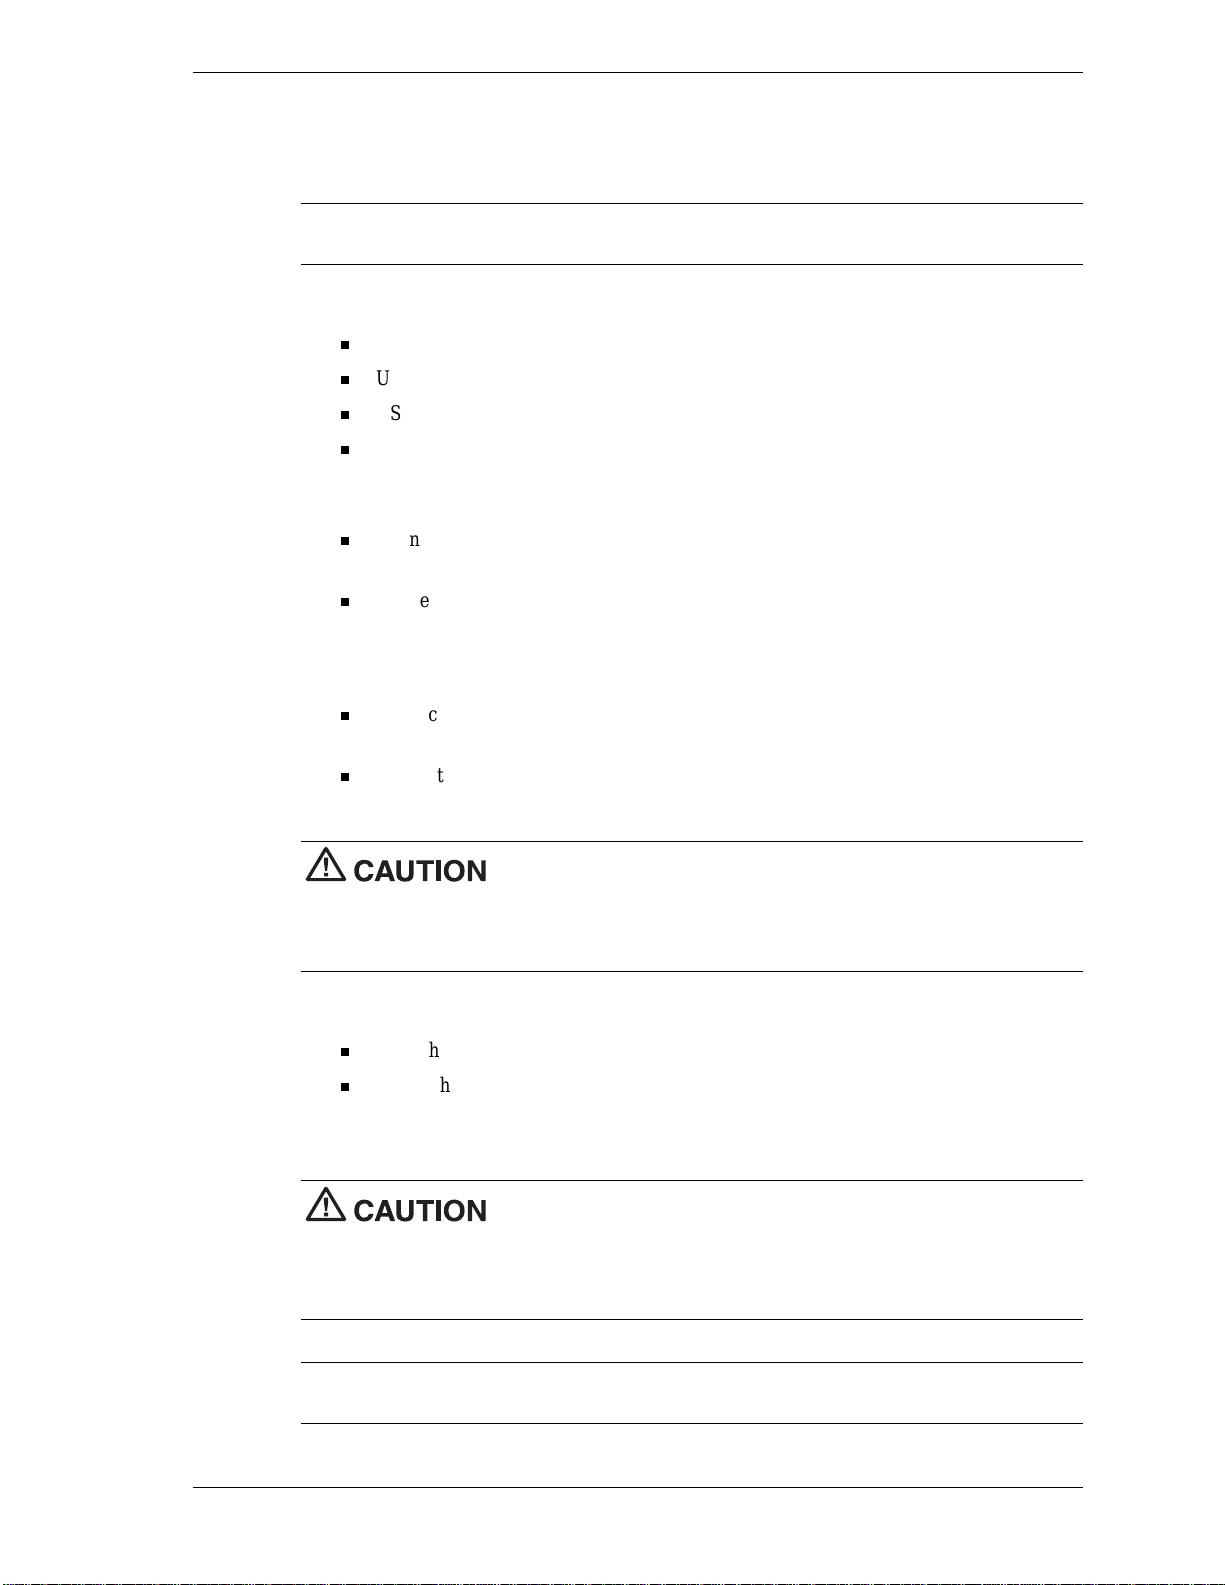
System co ntr ols an d LED s
A
– Optical/Hard Drive LED
B
– Power Button
C
– Power LED
D
– Optical Driv e
E
– Right Speaker
F
– Control Panel
D
– Decrease LCD Brightness Button
E
– Increase LCD Brightness Button
F
– Volum e Control
4 NEC PowerMate eco Getting Started Guide
Typical optical drive features
A
– Drive Status LED
B
– Disc Eject Button
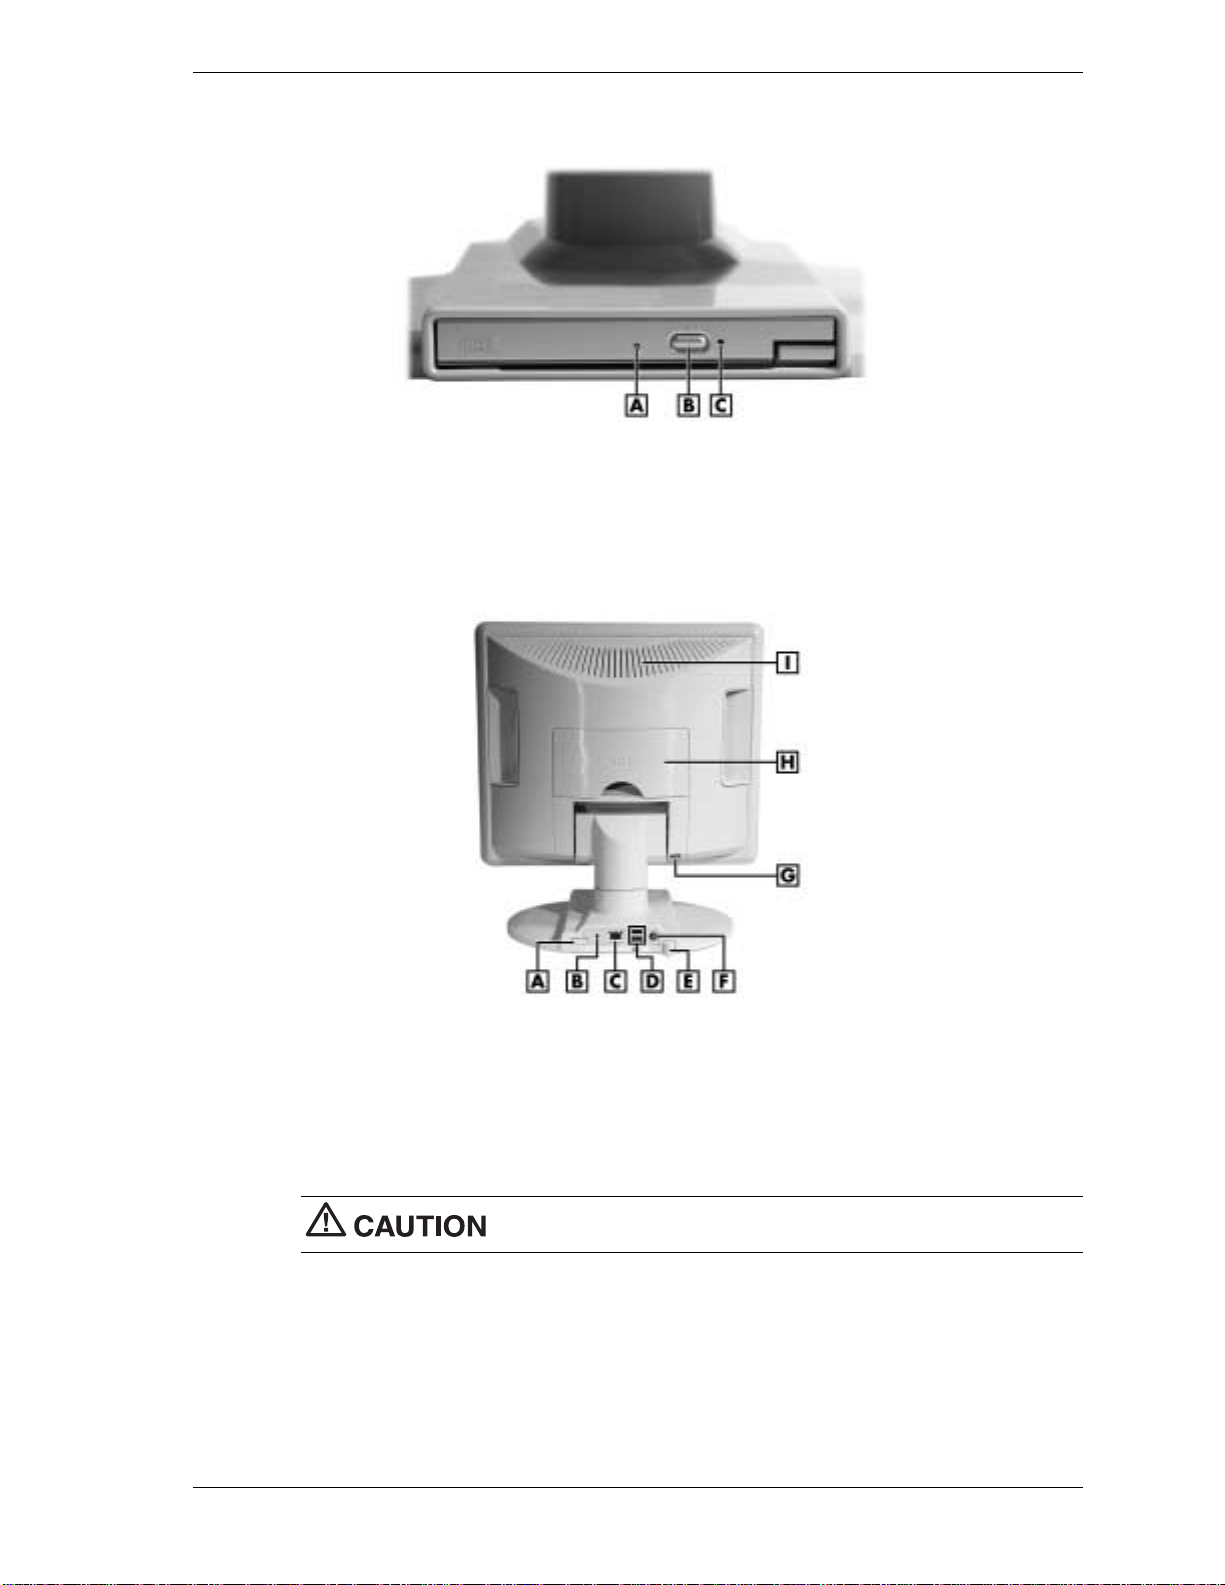
PowerMate eco system - back features
A
– Optical Drive Release Button
B
– Kensington
C
– LAN Port
D
– USB Ports
E
– USB Cable Lock
®
Lock Slot
C
– Em ergen cy Eject Hole
F
– DC Power Port
G
– Rear Cover Lock
H
– I/O Connector Cover
I
– Vents
Do not block vents whi le the NEC P owerM ate eco syst em is i n use.
NEC PowerMate eco Getting Started Guide 5
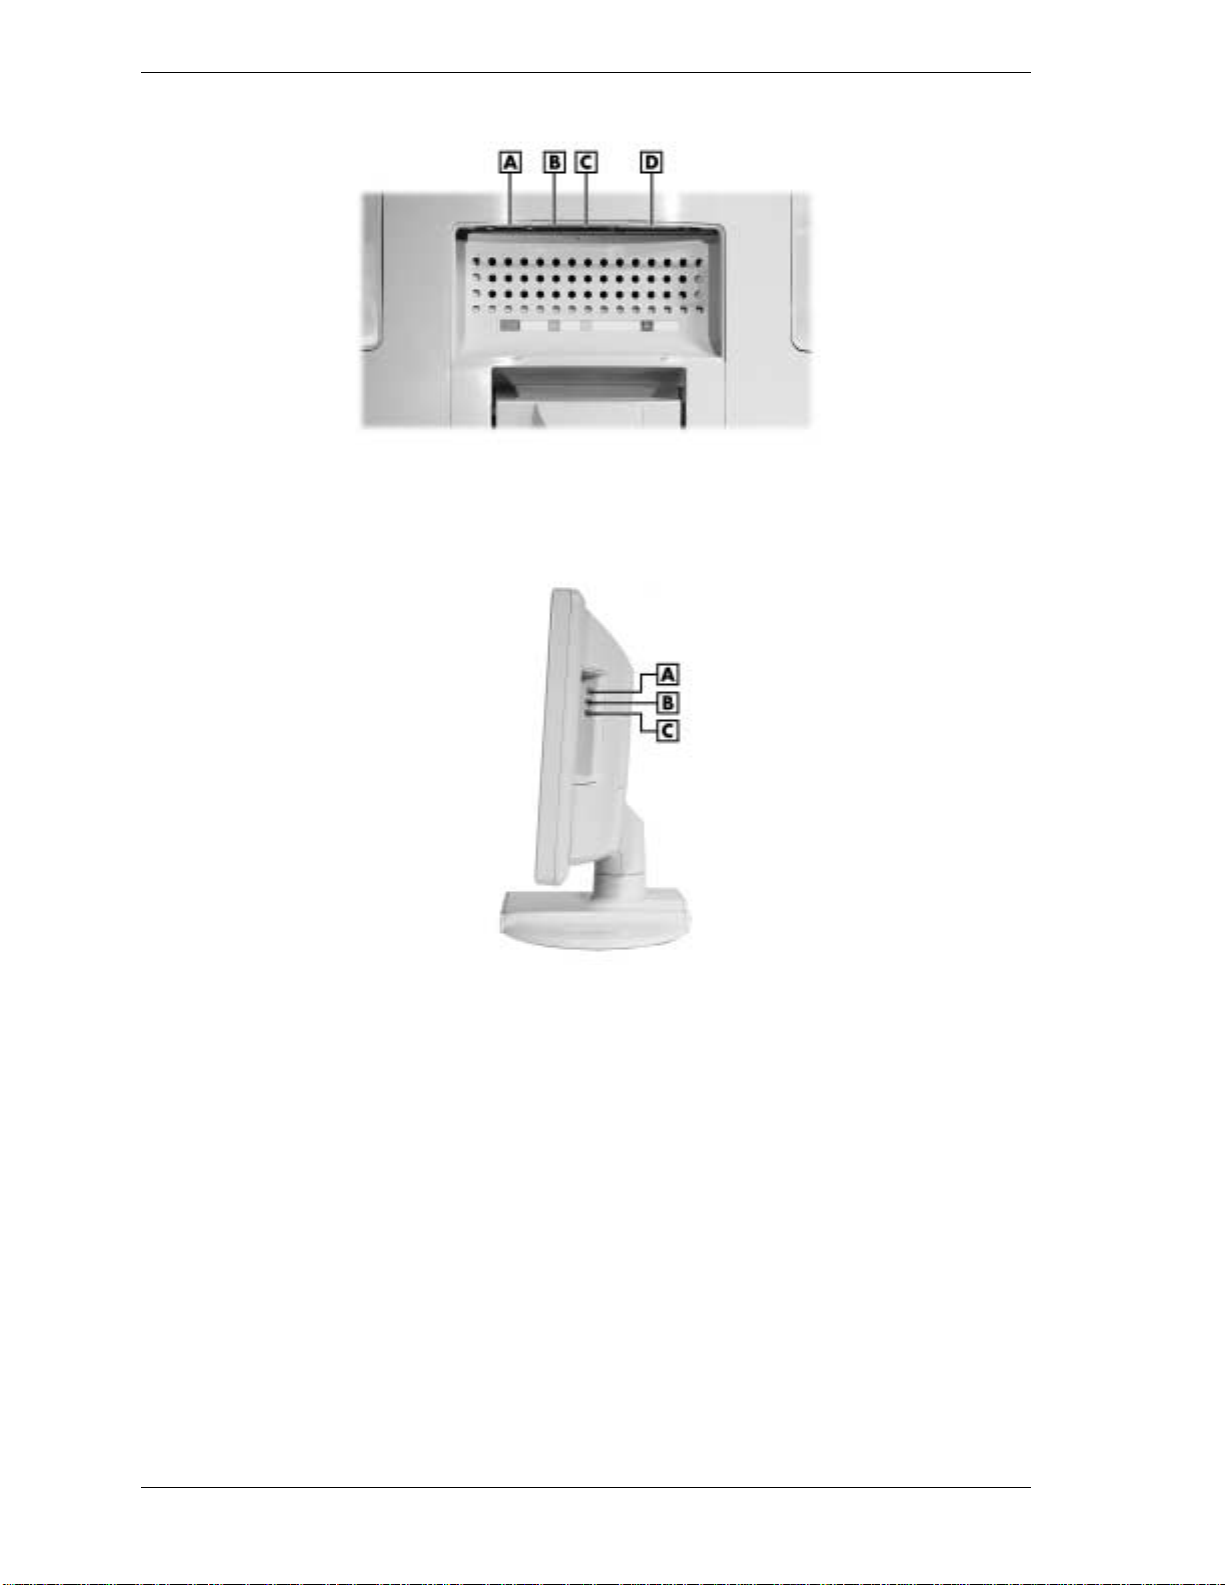
I/O connectors
A
– Serial Port
B
– PS/2
A
– Line Out Jack
B
– Line In Jack
®
Keyboard Port
C
– PS/2 Mouse Port
D
– Pri nter Port
Right side features
C
– Microphone Jack
6 NEC PowerMate eco Getting Started Guide
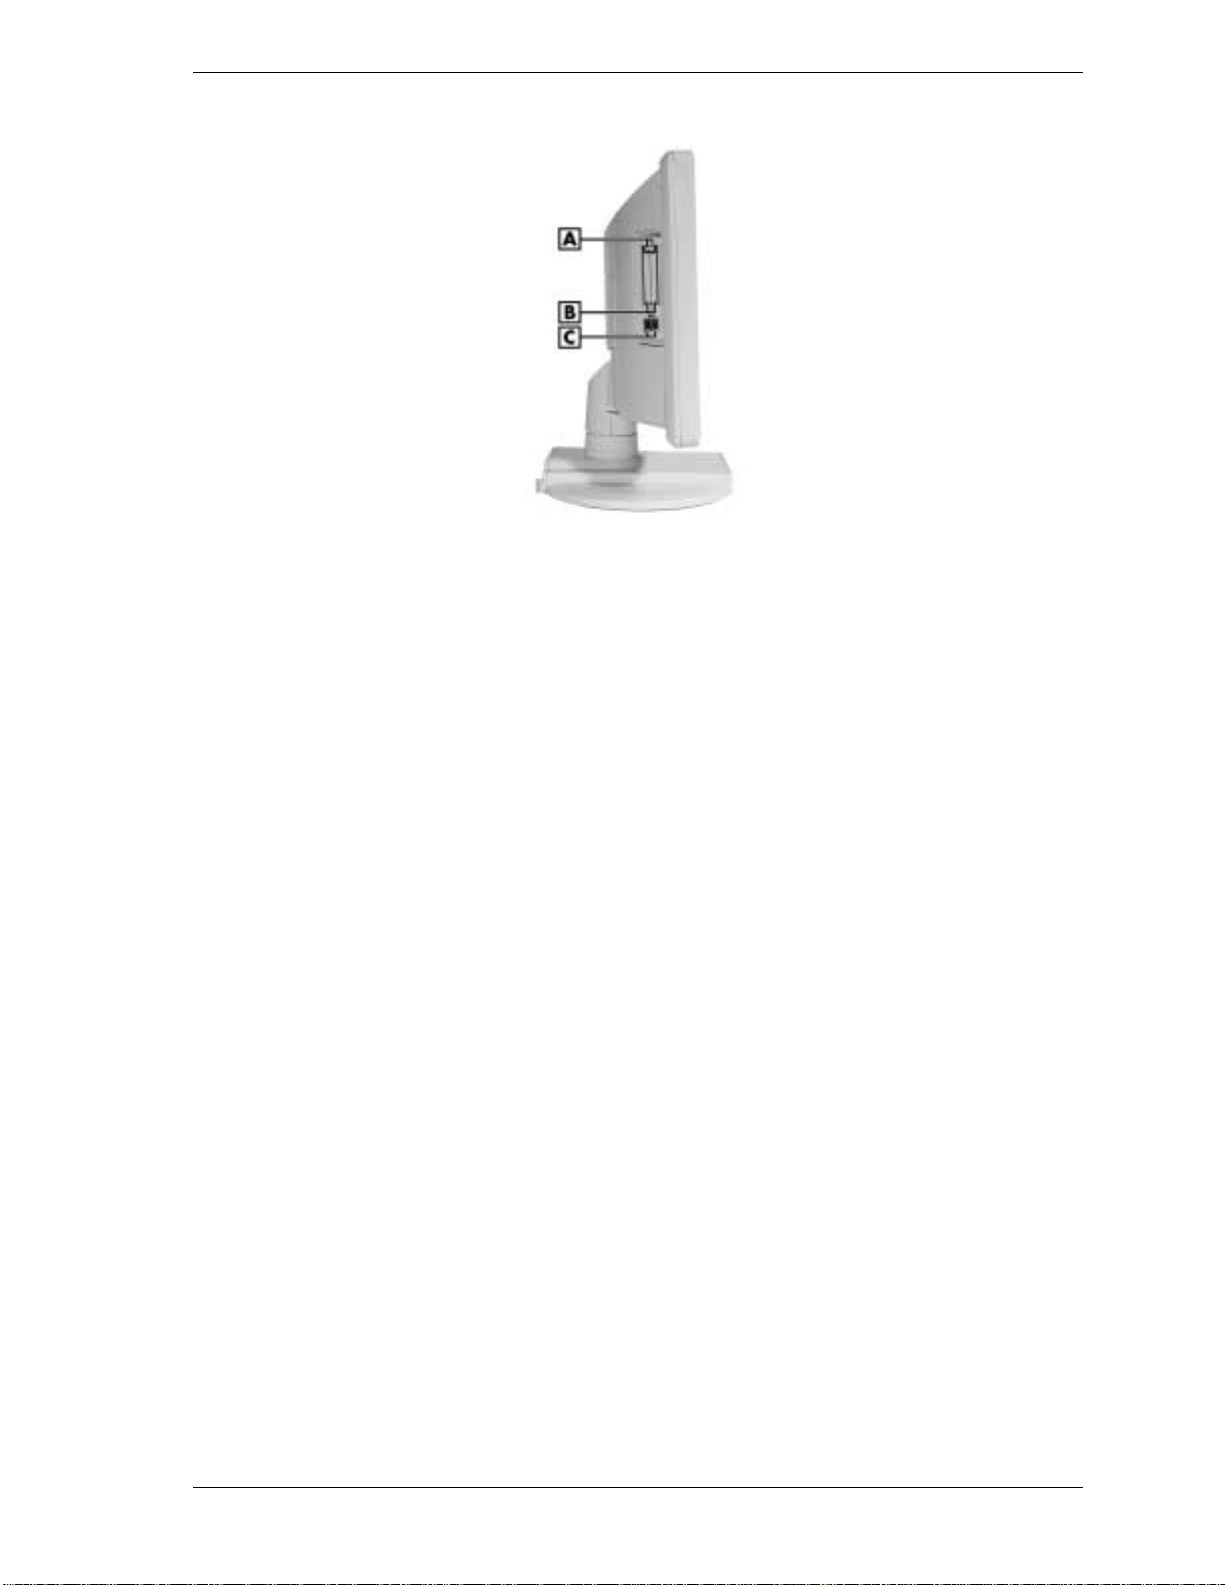
Left side features
A
– PC Card Eject Buttons (2)
B
– PC Card Slots (2)
Release Notes
Please s ee the foll o wi ng infor mation for issues reg arding syst em operat ion.
Playing DVD Movies in Windows 2000
If you are using a combination DVD-ROM and CD-RW drive on a system with Windows 2000,
you might need to adjust th e volum e when you play a DVD movie.
To adjust the sound, use the software DVD player (installed from the NEC PowerMate eco
SoftDVD Software C D) as follows:
1.
On the CyberLink® PowerDVD™ Configuration menu, choose the tool menu (hammer and
nail icon).
2.
Ch oos e the A udio tab.
3.
4.
5.
Advanced
Click
.
Select the Miscellaneous tab.
In the Dynamic Range Compression section, select “Noisy Environment” to increase the
volume. (The default setting is “Normal Environment.”)
C
– USB Ports (2)
Installing the USB Driver in Windows XP
The syst em comes with a USB driver already in s t alled. I f you l oa d your own operating system
software or need to reload the USB driver, install it from the NEC PowerMate eco Application
and Dri ver CD.
If you ar e install in g the USB driver on a PowerMate eco system runnin g Windows XP, you
might need to reboot the system to complete the installation.
The installation process requires a restart of the system. If th e installat i on pr ocess disa bles your
USB keyboard and USB mouse, reboot the system by pressing and holding the power button for
about four seconds. Pr ess the power button to restart the system.
NEC PowerMate eco Getting Started Guide 7

Support Services
See the following table for available support services from NEC Solutions (America), Inc.
Service Contac t Info rmatio n
NEC Solutions (America), Inc. Web site www.necsol utio n s -am. c om
Support services Web site support.neccomp.com
Phone to support services 1- 800-632-4525
E-mail to support services tech-support@nec-computers.com
Memory Upgrade
System memory in the NEC PowerMate eco is upgradeable to 640 MB of synchronous dynamic
rand om acces s memory (SDRAM). The PowerMate eco has on e 144-pin mem ory slot for a
PC-133 Small Outline Dual Inline Memory Module (SO-DIMM). The slot supports a 128-MB,
256-MB, or 512-MB (when available) SO-DIMM. The memory slot is located behind the back
cover at the rear of th e LCD unit.
See the following procedures to install, and if necessary, remove a memory module.
Support services
Installing a Memory Module
Follow these steps to upgrade the system memory.
1.
Save your work and ex it Windows. Po w er off the system, di s con nect the AC power ada p ter,
and di scon nect any peripher al devices.
system AC power adapter before removing the back cover. Power is removed only when the AC
power adapter is unplugged from its power source.
2.
Carefully position the system on a clean, flat, soft surface, with the LCD panel facing down.
surface is clean, flat, smooth and free of any objects before positioning the system face down.
3.
Remove t he back cover as follows.
If installed, remove the cover lock.
Releas e the back cover by press ing in on th e bot tom edges of the cover ( s ee the
following figure).
To prevent electric shock, turn off system power and unplug the
To prevent damage to your LCD panel screen, be sure your work
Carefully lift and remove the cover.
8 NEC PowerMate eco Getting Started Guide
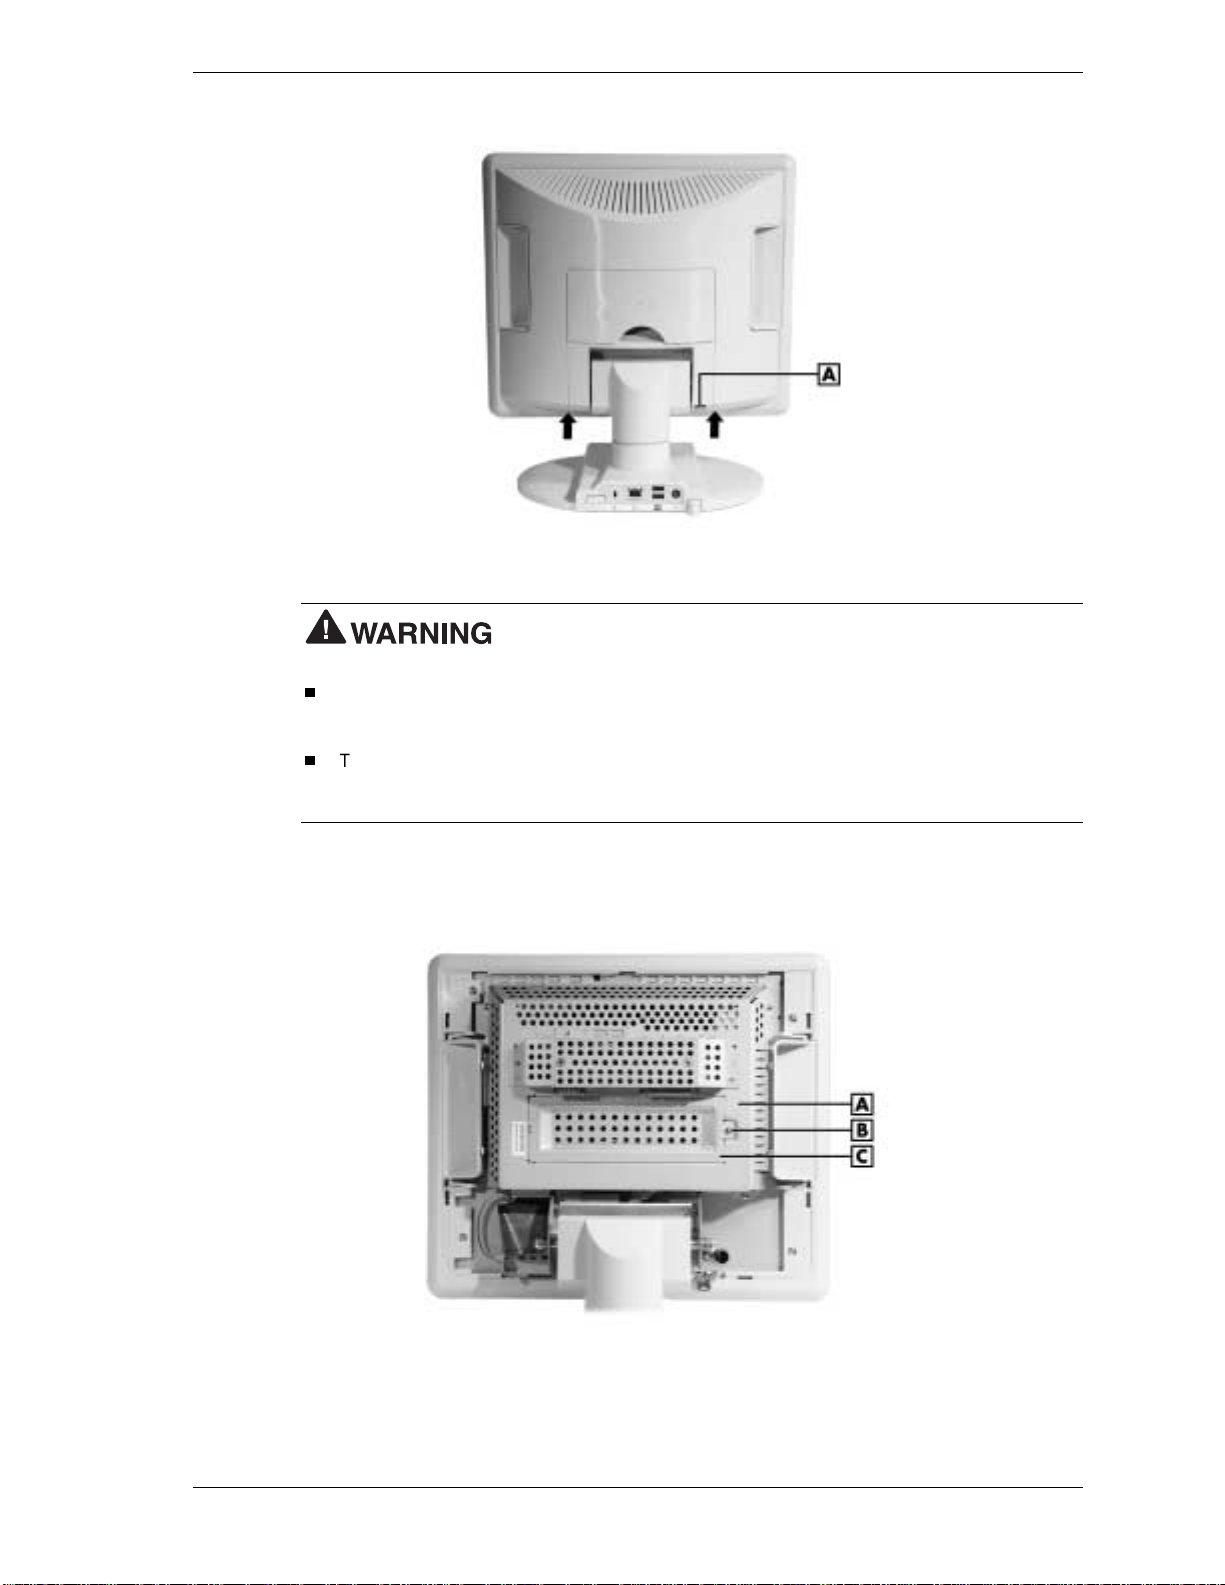
Releasing the rear cover
A
– Cover Lock Location
To prevent personal injury, follow these precautions before you
proceed:
To a void a b urn, w ait
system board shield and memory slot cover. During system operation, the system board
shield and memory slot cover become hot.
To prevent injury by electric shock, make sure the AC power adapter is unplugged from its
power source. Power is removed only when the AC power adapter is unplugged from its
power source.
at least
30 minutes after powering off the system before you touch the
4.
Remove t he screw securing th e memory slot co ver and rem ove t he cover.
Locating the memory slot cover and screw
A
– System Board Shield
B
– Screw
C
– Memory Slot Cover
NEC PowerMate eco Getting Started Guide 9

5.
Install the memory module as follows.
Note
To remove an already installed memory module , se e “Removing a Memory Module”
following this procedure.
Before handling any internal components, discharge static electricity
from yourself by touching a nearby unpainted me ta l surface.
Locate the alignment notch on the memory module (see the following figure).
Align the notch with the key in the slot connector.
Holding the mem or y modu le at a 45- d egree angl e, insert the module connector in to the
socket. Firmly push the mod u le into the socket.
Press d own on the edge of the mem or y modu le until the locking tabs on the sides of the
socket s n ap into pl ace, securing the module.
Installing the memory module
A
– Locking T ab
B
– Module Alignment Notch
10 NEC PowerMate eco Gettin g St arted Guide
C
– Memory Module

6.
Inserting th e tabbed end first, rep lace the mem ory slot cover . Secur e it wi th the reta in ing
screw.
Replacing the memory slot cover
B
A
– Tabbed End of Memory Slot Cover
7.
Replace t he rear cover as follows.
– Screw
Press the cover l ock in for th e cover replacement.
Insert the top cover tabs in to the top cover slots on the LCD unit ( s ee the followi ng
figure).
Pre s s the side an d bott om cover tabs into the side and bott om slots on the LCD unit.
Locating the cover slots and cover lock
A
– Top Cover Slots
B
– Right Side Cover Slots
C
– Bottom Cover Slots
D
– Cover Lock
E
– Left Side Cover Slots
NEC PowerMate eco Getting Started Guide 11

Secure the cover b y pressing in on all of the sid e an d bottom ta bbed area s as shown in
the foll o wi ng figure until they click in place.
Securing the rear cover
8.
Position the system on its base. Reconnect peripheral devices and the AC adapter.
Removing a Memory Module
If you are replacing a memory module, remove the installed memory module as follows.
from yourself by touching a nearby unpainted me ta l surface.
1.
Press the locking tabs away from the sides of the module until the module pops up at an
angle.
2.
Pull th e memory modul e ou t of the slot along the angle and store it in a stat ic-free ba g .
Removing the memory module
Before handling any internal components, discharge static electricity
A
– Locking tab (1 of 2)
12 NEC PowerMate eco Gettin g St arted Guide

How to Set Up a Healthy Work Environment
Prolonged or improper use of a computer workstation may pose a risk
of serious injury. To reduce your risk of injury, set up and use your computer in the manner
described in this section.
Contact a doctor if you experience pain, tenderness, swelling, burning, cramping, stiffness,
throbbing, weakness, soreness, tingling and/or numbness in the hands, wrists, arms, shoulders,
neck, back, and/or legs.
Making Your Computer Work for You
Computers are everywhere. More and more people sit at computers for longer periods of time.
The following information explains how to set up your computer to fit your physical needs. This
information is based on ergonomics — the science of m aking the wor kplace fit the needs of the
worker.
Some nerve, tendon, and mu scle disor d ers (mu sculoskeletal disor ders) ma y be associat ed with
repetitive activities, improper work environments, and incorrect work habits. Examples of
musculoskeletal disorders that may be associated with certain forms of repetitive activities
include: carpal tunnel syndrome, tendinitis, tenosynovitis, de Quervain’s te nosynovitis, and
trigger finger, as well as other nerve, tendon, and muscle disorders.
Although some s tudi e s have shown an ass ociation be tween in creasi ng hours of keyboa rd us e and
the development of some musculoskeletal disorders, it is still unclear whether working at a
computer causes such disorders. Some doctors believe that using the keyboard and mouse may
aggravate existing musculoskeletal disorders.
Some people are more susceptible to developing these disorders due to preexisting conditions or
psychos ocial fa ctors (see “Pr eexisting Condi tions and Psychosocial Fact or s ” later in the
document).
To reduce your risk of developing these disorders, follow the instructions in this document. If
you experience discomfor t while working at your com p u ter or afterwards, even at night, contact
a doctor as soon as possible. Signs of discomfort might include pain, tenderness, swelling,
burnin g, c rampi ng, st iffn ess, throbbing , weakness, soreness , ting ling and/or numbness in t he
hands , wrists, arm s, shoulders, neck, back , and/or leg s.
NEC PowerMate eco Getting Started Guide 13
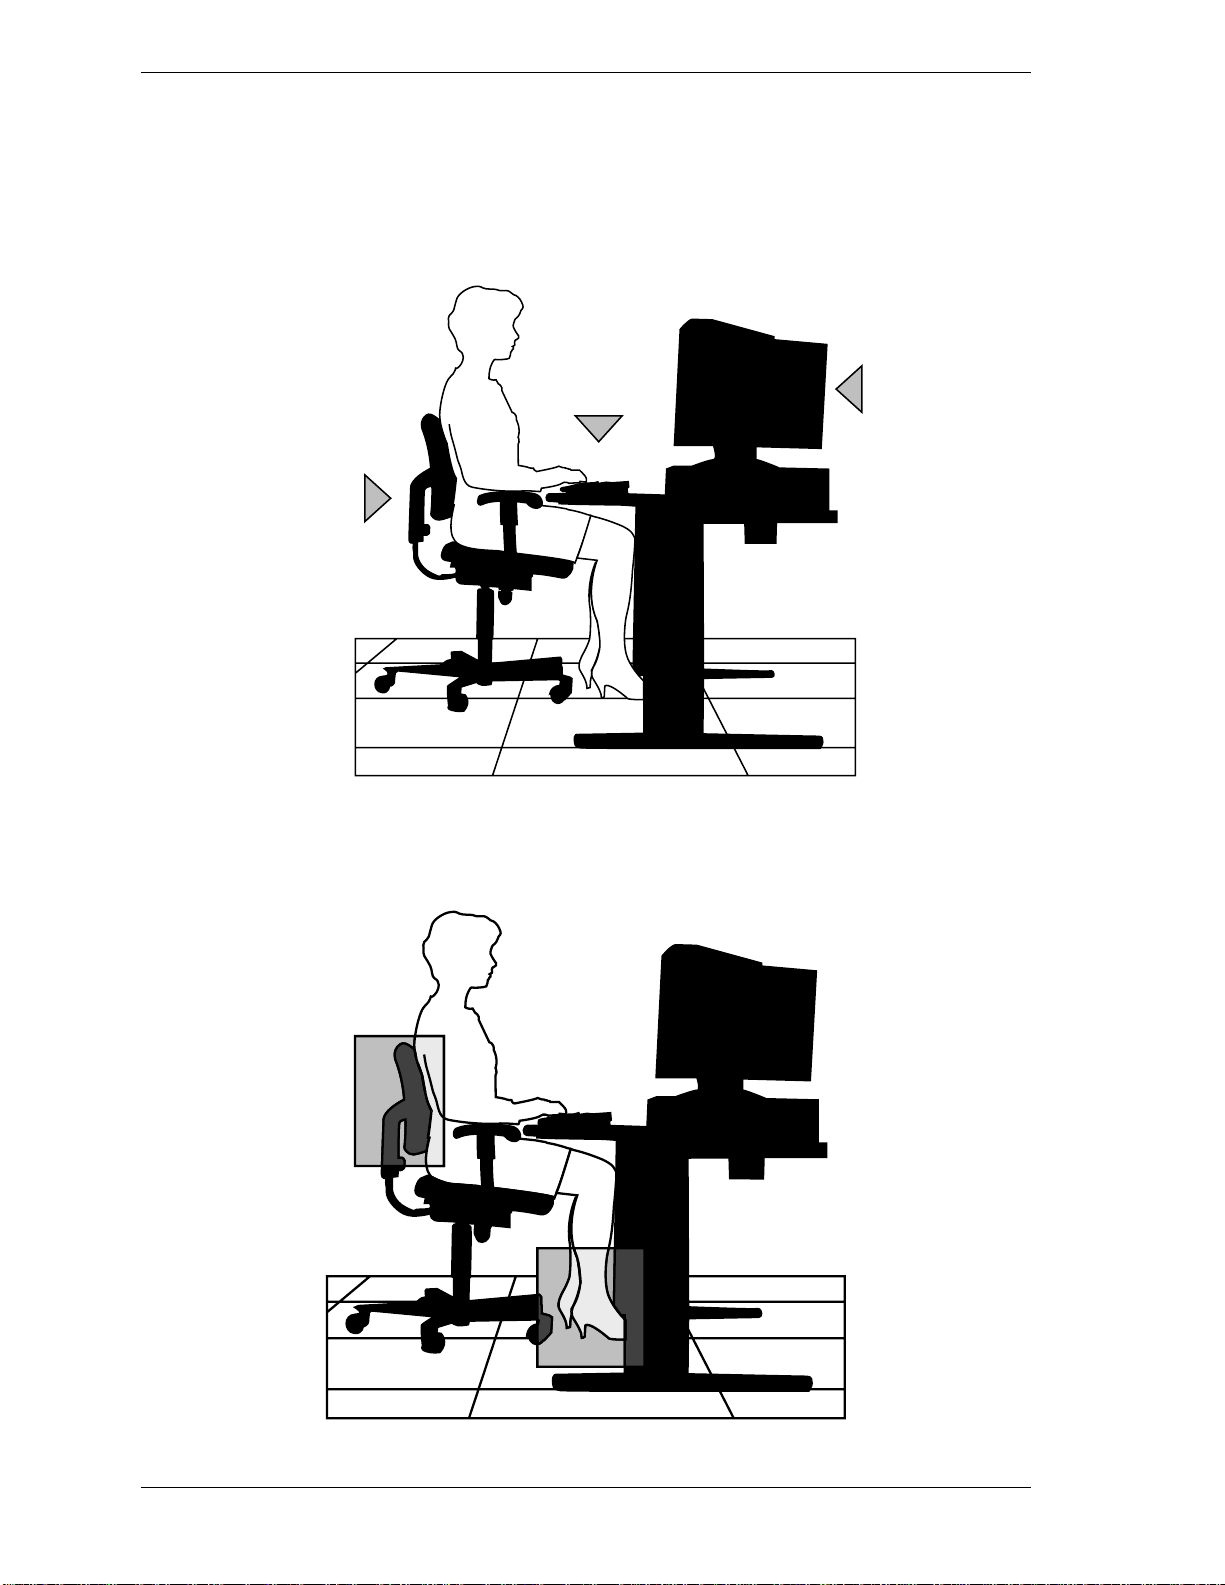
Arrange Your Equipment
Adjust
your chair
Adjust
your keyboard
and mouse
Adjust
your monitor
Arrange your eq ui pment so that you can work in a natura l and relax ed position. Place items that
you use frequently within easy reach. Adjust your workstation setup to the proper height (as
described in this ) by lowering t he ta ble or st a nd that hol ds your computer equi pment or raising
the sea t h eight of your chair. To cr eate more desk s p ace, you can put your computer base on the
floor.
Adjust Your Chair
Your chair should be adjustable and stable. Vary your posture throughout the day.
14 NEC PowerMate eco Gettin g St arted Guide

Check the following:
Keep your body in a relaxed yet upright position. The backrest of your chair should support
the inward cur ve of your back.
Use the entire seat and backrest to support your body. Tilt the backrest slightly backwards.
The a ngle forme d by your t highs and back sh ould be 90° or m ore.
Your seat depth shoul d allow your lower back t o c omforta bly con tact the ba c krest. Ma ke
sure that the backs of your lower legs do not press again st the front of t he ch air.
Extend your lower legs slightly so that the angle between your thighs and lower legs is 90°
or more.
Place your feet flat on the fl oor. Only use a footrest when attempt s to a d just your chair and
workstation fail to keep your feet flat.
Be sure th at you have adequat e clearance bet w een the top of your thi ghs and th e underside
of your workstation.
Use armrests or forearm supports to support your forearms. If adjustable, the armrests or
forearm supports should initially be lowered while all the other adjustments discussed in
this document are made. On ce all these adjustmen ts are completed, raise the armrests or
adjust the forearm supports until they touch the forearms and allow the shoulder muscles to
relax.
Adjust Your Input Devices
Follow these points in positioning your keyboard and mouse.
Position your keyboard directly in front of you. Avoid reaching when using your keyboard
or mouse.
If you use a mouse, position it at the same height as the keyboard and next to the keyboard.
Keep your wrists s tr aight an d u se your entire arm when moving a mouse. D o not grasp th e
mouse tightly. Grasp the mouse lightly and loosely.
Adju s t th e keyboa rd height so tha t your elbows are near your body a nd your for e arm s a re
parallel to the floor, with your forearms resting on either armrests or forearm supports, in
the manner described previously. If you do not have armrests or forearm supports, your
upper arms should hang comfortably at your sides.
Adju s t your keyb oard slop e s o t hat you r wrists are straigh t whi le you are typing.
NEC PowerMate eco Getting Started Guide 15

Type with your hands and wrists float ing above the keyboard. Use a wris t pad only to r e s t
your wrists between typing. Avoid resting your wrists on sharp edges.
Type with your wrists straight. Instead of twisting your wrists sideways to press hard-toreach ke ys, move your whole arm. K e ep from ben ding your wrists, han ds, or fingers
sideways.
Press the keys gently; do not bang them. Keep your shoulders, arms, hands, and fingers
relaxed.
16 NEC PowerMate eco Gettin g St arted Guide

Adjust Your Monitor
Correct placem ent and adju s tment of the monitor can reduce eye, s houlder , and neck fatigue.
Check the following when you position the monitor.
Adjust the monitor height so that the top of the screen is at or slightly below eye level. Your
eyes should look slightly downward when viewing the middle of the screen.
Position your monitor no closer than 12 inches and no farther away than 28 inches from
your eyes. The optimal dis tance is betwe en 14 and 18 in ches.
Rest your eyes period ically by foc using on a n object at le ast 20 fe et away. Blink often .
Position the monitor at a 90° angle to windows an d other lig h t sources to min im ize glare
and reflections. Adjust the monitor tilt so that ceiling lights do not reflect on your screen.
If reflected light makes it hard for you to see your screen, use an anti-glare filter.
Clean your monit or r eg ularly. Use a lint-fr ee, non-a brasive cloth and a non- alcohol, n eutral,
non-abrasive cleaning solution or glass cleaner to minimize dust.
Adjust the monitor’s brigh tness and con trast controls to en h ance readability.
Use a document hol d er placed close to the screen.
Position whatever you are looking at most of the time (the screen or reference material)
directly in front of you to mini m ize turning your head while you are typing.
Get regu lar eye check - ups.
NEC PowerMate eco Getting Started Guide 17

Vary Your Workday
If you use you r com puter for prolonged peri ods, follow these i nstr uctions.
Vary your tasks throughout the day.
Take frequent short breaks that involve walking, standing, and stretching. During these
breaks, stretch muscles and joints that were in one position for an extended period of time.
Relax muscles and joints that were active.
Use a timer or reminder software to remind you to take breaks.
To enhance blood circulation, alter your sitting posture periodically and keep your hands
and wrists warm.
Note
Human Factors Engineering of Visual Display Terminal Workstations. ANSI/HFS Standard
No. 100-1988. The Human Factors Society, Inc., P.O. Box 1369, Santa Monica, California 90406.
For more information on workstation setup, see the American National Standard for
18 NEC PowerMate eco Gettin g St arted Guide

Pre-existing Conditions and Psychosocial Factors
Pre-existing conditions that may cause or make some people more susceptible to
musculoskeletal disorders include th e following: hereditary factors, vascul ar disor d ers, obesity,
nutr itional d efi cienci es ( e.g., Vitamin B defici ency), endocrine disord ers (e.g., diabetes),
horm onal imbalances, connective t issue di s orders (e.g., arthr itis), prior traum a ( to the hands,
wrists, arms, shoulders, neck, back, or legs), prior musculoskeletal disorders, aging, fluid
retention due to pregnancy, poor physical conditioning and dietary habits, and other conditions.
Psychosocial factors associated with these disor ders include: workplace stress, p oor job
satisfaction, lack of support by management, and/or lack of control over one’s work.
Contact a doctor if you experience pain, tenderness, swelling, burning, cramping, stiffness,
throbbing, weakness, soreness, tingling and/or numbness in the hands, wrists, arms, shoulders,
neck, back, and/or legs.
Checking Your Comfort: How Do You Measure Up?
Use this checklist to see if you are setting up your work environment to fit your physical needs.
Checking Your Chair
Do you sit in an upright position with the backrest supporting your lower back?
When sitting, are your feet fl at on the floor?
Do you periodi c ally adjust your chai r and your pos ture ?
Checking Your Keyboard
Is your keyboard an gled so your wrists are strai ght wh en you t ype?
Is your keyboard directly in front of you?
Do you avoid resting your wr ists on sharp edg e s ?
Do you press th e keys gentl y and not bang on them ?
Checking Your Mouse
Is your mouse a t t he sam e heigh t as the keyboard and ne xt to the keyboard?
Are your wrists straight and your touch light when moving the mouse?
Checking Your Monitor
Did you adjust your monitor so that the top of the screen is at or slightly below eye level?
Do you periodi c ally r e s t your eyes b y blinking often or look ing awa y from the scr ee n?
Is your monitor no closer than 12 inch es an d n o fa r ther away th an 2 8 inches fr om your
eyes?
Do you use a document h ol der placed close to the scr een?
Checking You
Is your work area set up to promote a natural and relaxing working position with frequently
used work items within close reach?
Do you tak e frequent short break s ?
Do you stretch and wal k during your breaks?
NEC PowerMate eco Getting Started Guide 19

Do you vary your tasks during the day?
Do you have regular eye checkups?
Do you cont act your d oc tor i f you feel a ny sustained d iscom fort?
For more information on workstation setup, see the American National Standard for Human
Factors Engineering of Visual Display Terminal Workstations. ANSI/HFS Standard No. 100-
1988. The Human Factors Society, Inc., P.O. Box 1369, Santa Monica, California 90406
This information was prepared in consultation with Dr. David Rempel of the University of
California/San Francisco Ergonomics Program and Mr. M.F. Schneider of HUMANTECH, Inc.,
Ann Arbor, Michigan.
20 NEC PowerMate eco Gettin g St arted Guide

NEC PowerMate Desktop Computer
3-Year Limited Warranty
NEC Solutions (America) , Inc. (“NECSAM”), warrants this hardware product against defects in material and
workmanship under normal use for a p eriod of t hree (3) yea rs from th e d a te of origin al purchase (as
establ ished by the date of pur ch ase on your s ales receipt) from NECSAM or an auth or ized NEC SA M dealer.
WHO IS COVERED
This war r anty may be enf orced by th e en d user purchaser. Th i s warranty is non-transferabl e.
WHAT IS COVERED
The warranty in cludes thr ee-year coverage for all defects in mat er ial and work manship in th e NE C
PowerMate desktop computer.
WHAT IS NOT COVERED
1.
Any hardware product that is not distributed in the U.S.A. or Canada by NECSAM or which is not
purchas e d in the U.S. A. or Ca nada from NECSA M or from a n authoriz e d NECS A M dealer. Aut horized
NECSAM d ealers can be identifi ed b y an NEC window decal . Any dealer who does n ot d isplay this decal
may be an unauthorized dealer. If you are not certain as to whether a dealer is authorized, please contact
NECSAM at
2.
Any hardware product on which the serial number has been defaced, modified or removed.
3.
Damage, deterioration or malfunction resulting from, but not limited to:
a.
Accident (such as spilled liquids or dropping), misuse, abuse, neglect, fire, water, lightning or other acts
of nat ure, unauthorized product modificat ion, or usage not in accordance with the NECSAM hardware
product instructions.
b.
Repair or attempted repair by someone other than NECSAM or an NECSAM authorized service
provider.
1-800-632-4525
.
4.
Carr ying cases, p ens, extern al cabinets, magnetic media , or any accessories used in con nection with the
hard ware product. (Note: A sep arate limited warranty for acces sori es/options are pr ovi d ed wi th the
accessories/options.)
5.
Use of parts and components not supplied by NECSAM.
6.
Softwa re produ cts (plea se r efer to the a pp licable end user license agr eement).
7.
Damage t o or loss of any programs, data, or rem ovable s torage.
HOW TO OBTAIN WARRANTY SERVICE
1.
In the United States and Canada, please call NECSAM Technical Support at
1-800-632-4525
. Please have
the foll o wing req uired information r eady when making your cal l: Model num ber, serial n um ber and date
of pu rcha s e . Please be prepa red t o provide informa tion t o assi s t i n diagnosing your pr oblem over the
phone.
2.
If th e NECSAM technician determines that you have a hardware defect an d i f the problem can not be
resolved o v er the ph one, the techn ician wil l assign a cal l notifica tion num ber. If service is needed on your
hardware product, NECSAM will arrange for packaging delivery and pick up of the hardware product.
(Not e : If you c hoose your own courier, you assume th e r isk of loss or damage during shipping.) You
must return the hardware product in a secure package (as provided by NECSAM or the original NECSAM
packa ging). If you n eed packaging, plea s e ask the NECS A M tech nician.
3.
Whenever warranty service i s r equired , the original dated sales slip ( or a copy) may be req u ired as proof of
warranty coverage.
NEC PowerMate eco Getting Started Guide 21

4.
NECSAM ma y r ep air or replace the defect ive par t(s) or unit with a new part (s) or unit or at NECSAM’s
sole option with a refurbished part or unit that is not new but has been functionally tested. Any exchanged
part or unit replaced under this warranty will become the property of NECSAM.
5.
It is your responsi bility prior to re turni ng the har dware produ c t to back up any confidentia l, pr oprie ta ry,
personal information, or data, programs, personal configuration settings or other information stored on the
product (“user info rma tion”) and remove any asset tags, confidential, proprietary and personal
information. NECSAM will not be responsible for any damage to or loss of any “user information” stored
on the product or its component s in any m e dia.
LIMITATION OF LIABILI TY
NECSAM MAKES NO OTHER EXPRESS WARRANTY WITH RESPECT TO THIS HARDWARE
PRODUCT. ANY IMPLIED WARRANTIES, INCLUDING BUT NOT LIMITE D TO ANY IMPLIED
WARRANTIES OF MERCHANTABILITY OR FITNESS FOR A PARTICULAR PURPOSE, ARE
LIMITED IN DURATION TO THE PERIOD OF THE EXPRESS WARRANTY SET FORTH ABOVE,
AND NO WARRANTIES, WHETHER EXPRESS OR IMPLIED WILL APPLY AFTER SUCH PERIOD.
NECSAM’S SOLE LIABILITY FOR ANY DEFECTIVE HARDWARE PRODUCT IS LIMITED TO THE
REPAIR OR REPLACEMENT OF THE PRODUCT AT OUR SOLE OPTION. UNDER NO
CIRCUMSTANCES WILL NECSAM BE LIABLE IN ANY WAY TO THE END-USER OR ANY THIRD
PARTY FOR ANY DAMAGES IN CONNECTION WITH THE HARDWARE PRODUCT OR ITS SALE,
PURCHASE OR USE, INCLUDING, BUT NOT LIMITED TO, ANY LOSS OF DATA, LOSS OF
BUSINESS, LOSS OF PROFITS, LOSS OF USE OF THE HARDWARE PRODUCT OR ANY
ASSOCIATED PERIPHERALS, DOWN-TI ME , C HARGES FOR YOUR TIME AND EFFORT, OR ANY
INDIRECT, SPEC IAL, INC I DENT AL OR CONSEQUENTI AL DAMAGES WHETHER OR NOT
FORESEEABLE AND WHETHER OR NOT BASED ON BREACH OF WARRANTY, CONTRACT OR
NEGLIGENCE, EVEN IF NECSAM HAS BEEN ADVISED OF THE POSSIBILITY OF SUCH
DAMAGES.
Some states or jurisdictions do not allow the limitation of how long an implied warranty lasts or the exclusion
or limitation of incidental or consequential damages so the above limitations or exclusions may not apply to
you. T his limited warranty gives you sp ec ifi c legal ri ghts and you may als o have ot her righ ts that m ay vary
from state to state or jurisdiction to jurisdiction.
22 NEC PowerMate eco Gettin g St arted Guide

End User Software License Agreement
IMPORTANT -- READ CAREFULLY BEFORE OPENING SOFTWARE PACKET(S) AND/OR
USING THE SOFTWARE. BY OPENING THE SEALED PACKET(S) CONTAINING THE
SOFTWARE AND/OR USING THE SOFTWARE, YOU INDICATE YOUR ACCEPTANCE OF THE
FOLLOWING SOFTWARE LICENSE AGREEMENT AND ANY OTHER ASSOCIATED
DOCUMENTATION.
__________________________________________________________________
This software license agreement, including any additional provisions set forth in any other associated
documentation, is a legal agreement between you (either an individual or an entity) and NEC Solutions
(America), Inc. (“NECSAM”). By openin g the seal ed softwar e packet( s) and/ or using th e software, you are
agreei ng to be bound by the t erms of th is agreement. I f you do not agree to the terms of t his agreem ent,
promptly return the unopened software packet(s) and the accompanying items (including any hardware,
written materials, and binders or other containers) to the place you obtained them for a full refund.
1. GRANT OF LICENSE. This License Agreement permits you to use one copy of the software
program(s) included in this packa ge (the “SOFTWARE”) on a single computer. The SOFTWARE is in
“use” on a computer when it is loaded into temporary memory (i.e. RAM) or installed into permanent
memory (e.g., hard disk, CD-ROM, or other storage device) of that computer. However, installation on a
network server for the sole purpose of internal distribution shall not constitute “use” for which a separate
license is required, provided you have a separate license for each computer to which the SOFTWARE is
distr ibut ed. If the SOFTWARE is not accompan ied by a new comput er system , you m ay not use or cop y the
SOFTWARE.
2. COPYRIG HT. The SOFT WARE (includin g any images, “applets”, phot ograph s, anima tions, vi deo,
audio, music and text incorporated into the SOFTWARE) is owned by NECSAM or it licensors and is
protected by United States copyright laws and international treaty provisions and all other applicable national
laws. All right s ar e reserved. Th erefor e, you mu st trea t th e SOFTWA RE li ke an y oth er cop yr ight ed ma t eria l
(e. g., a book or m usi cal re cord ing) e xcept that if the SOFT WARE i s not copy p rot ected you may e ith er ( a)
make one copy of the SOFTWARE solely for backup or archival purposes, or (b) transfer the SOFTWARE to
a single hard disk provided you keep the original solely for backup or archival purposes. You may not copy
the user documentation accompan ying the SOF TWARE.
3. SOFTWARE MEDIA. You may receive the SOFTWARE in disk media, or on a CD-ROM, or
installed on the hard disk drive or ROM of your computer, or in multiple forms of media. Regardless of the
number or type(s) o f media you r eceive, you m ay use on ly the m edia a ppropri ate for your s ingle com puter.
You may not use the other media on anoth er computer or load , rent, lease, or transfer them to another user
except as part of the permanent tran s fer (as provi d ed below) of all SOFTWARE and user d ocu mentation.
4. OTHER RESTRICTIONS. You may not rent or lease the SOFTWARE, but you may transfer the
SOFTWARE on a p erman en t bas is pr ovi ded you retain n o copies and the reci pi ent a gr ees to th e t erm s of t hi s
Agreement. If the SOFTWARE is an update or has been updated, any transfer must include the most recent
update and all prior versions. To the maximum extent permitted by applicable law, you may not reverse
engineer, decompile, or disassemble the SOFTWARE.
5. U.S. GOVERNMENT RESTRICTED RIGHTS. The SOFTWARE i s provided with RESTRICTED
RIGHTS. Use, duplication, or disclosure by the United States Government is subject to restrictions as set
forth in subpar agraph (c)(1)(ii) of the Rights in Technical Data and Computer Softwar e clause at DFARS
252.227-7013 or subparagraphs (c)(1) and (2) of the Commercial Computer Software -- Restricted Rights at
48 CFR 52.227-19, as applicable. Manufacturer is NEC Solutions (America), Inc., 15 Business Park Way,
Sacramento, CA 95828, or its suppliers.
6. TRADEMA RK. The trademar k s cont a in ed in th e SOF TWARE ar e owned b y th eir r es pect ive own er s.
No right, licen se, or int er est to su ch tr ad emar k is grant ed h ereun der , and you agr ee th at n o such righ t, licen se,
or int er es t shall be as s erted by you wi th respect to such tr ademark s.
NEC PowerMate eco Getting Started Guide 23

7. SUPPORT. For product support, please refer to NECSAM’s support number provided in the
documen tation for the SOFTWARE or for your comput er. Should you have any questi ons con cerning this
Agr ee men t , or i f you de si r e to con t a ct NE C SA M for an y other r ea s on, p l ea s e r efe r t o t h e a d dr es s pr ovi d ed i n
the documentation for your computer.
8. LIMITED WARRANTY. THE SOFTWARE IS DISTRIBUTED AND LICENSED “AS IS”,
WITH NO WARRANTIES WHATSOEVER, EXPRESS OR IMPLIED. NECSAM WARRANTS
THAT THE MEDIA CONTAINING THE SOFTWARE IS FREE FROM DEFECTS IN MATERIALS
AND WORKMANSHIP FOR A PERIOD OF SIXTY (60) DAYS AFTER RECEIPT BY YOU. ANY
HARDWARE ACCOMPANYING THE SOFTWARE SHALL BE WARRANTED PURSUANT TO
NECSAM’s THEN-CURRENT HARDWARE LIMITED WARRANTY. SOME
STATES/JURISDICTIONS DO NOT ALLOW LIMITATIONS ON DURATION OF AN IMPLIED
WARRANTY, SO THE ABOVE LIMITATION MAY NOT APPLY TO YOU.
DUE TO THE COMPLEX NATURE OF COMPUTER SOFTWARE, NECSAM AND ITS
LICENSORS DO NOT WARRANT THAT THE SOFTWARE IS COMPLETELY ERROR FREE,
WILL OPERATE WITHOUT INTERRUPTION, OR IS COMPATIBLE WITH ALL EQUIPMENT
AND SOFTWARE CONFIGURATIONS. YOU EXPRESSLY ASSUME ALL RISK FOR USE OF
THE PROGRAM.
CUSTOMER REMEDIES. NECSAM’s an d it s licen sor s’ en tir e li abi lit y and your excl u sive r em edy sh al l be,
at NECSAM’s op tion , ei th er (a ) ret urn of th e ac tua l pri ce pa id by you for th e S OFT WARE , or ( b) r ep air or
replacement of the media that does not meet this Limited Warranty and which is returned to NECSAM with a
copy of your receip t. This Limit ed Warranty is void i f failure ha s resulted fr om accident, a buse, misuse or
misapplication. Any replacement media will be warranted for the remainder of the original warranty period
or thirty (30) days, whichever is longer.
9. NO OTHER WARRANTIES. TO THE MAXIMUM EXTENT PERMITTED BY
APPLICABLE LAW, NECSAM AND ITS LICENSORS DISCLAIM ALL OTHER WARRANTIES,
EITHER EXPRESS OR IMPLIED, INCLUDING, BUT NOT LIMITED TO IMPLIED
WARRANTIES OF MERCHANTABILITY AND FITNESS FOR A PARTICULAR PURPOSE,
WITH REGARD TO THE SOFTWARE. IMPLIED WARRANTIES, IF ANY, ON THE SOFTWARE
ARE LIMITED TO THIRTY (30) DAYS. THIS LIMITED WARRANTY GIVES YOU SPECIFIC
LEGAL RIGHTS. YOU MAY HAVE OTHERS WHICH VARY FROM STATE/JURISDICTION TO
STATE/JURISDICTION.
10. NO LIABILITY FOR CONSEQUENTIAL DAMAGES. TO THE MAXIMUM EXTENT
PERMITTED BY APPLICABLE LAW, IN NO EVENT SHALL NECSAM OR ITS LICENSORS BE
LIABLE FOR ANY CONSEQUENTIAL, RELIANCE, INCIDENTAL, SPECIAL, DIRECT OR
INDIRECT DAMAGES WHATSOEVER (INCLUDING WITHOUT LIMITATION, DAMAGES FOR
LOSS OF BUSINESS PROFITS, BUSINESS INTERRUPTION, LOSS OF BUSINESS
INFORMATION, PERSONAL INJURY, OR ANY OTHER LOSS WHETHER FOR CONTRACT,
TORT, STRICT L IABILITY OR OTHERWISE ) ARISING OUT OF O R IN CONNECTION WITH
THE USE OF OR INABILITY TO USE THIS PRODUCT, EVEN IF NECSAM OR ITS SUPPLIERS
HAVE BEEN ADVISED OF THE POSSIBILITY OF SUCH DAMAGES. IN ANY CASE, NECSAM’S
AND ITS LICENSORS’ ENTIRE LIABILITY UNDER ANY PROVISION OF THIS AGREEMENT
SHALL BE LIMITED TO THE AMOUNT ACTUALLY PAID BY YOU FOR THE SOFTWARE.
BECAUSE SOME STATES/JURISDICTIONS DO NOT ALLOW THE EXCLUSION OR
LIMITATION OF LIABILITY FOR CONSEQUENTIAL OR INCIDENTAL DAMAGES, THE
ABOVE LIMITATION MAY NOT APPLY TO YOU.
11. GOVERNING LAW AND SEVERABILITY. This Software License Agreement and Limited
Warran ty ar e g overn ed b y th e laws of th e Sta t e of Cali for ni a, U.S. A. In the event that an y of the pr ovisions of
this Agreement or the appli cation of any such provisions to the parties h ereto with respect to their obligati ons
hereunder shall be held by a court of competent jurisdiction to be unlawful or unenforceable, the remaining
provisions of this Agreement shall remain in full force and effect, and shall not be affected, impaired, or
invalidated in any manner.
24 NEC PowerMate eco Gettin g St arted Guide
Regulatory Statements
The following regulatory statements include the Federal Communications Commission (FCC)
Radio Frequency Interference Statement , com p liance st atement for Canada, informati on about
batter y dispos al an d repl aceme nt, LCD pan e l disp os al, and th e D e claration of Conf ormi ty.
FCC Statement for United States Only
Changes or modifications to this unit not expressly approved by the
party respons ible for comp liance coul d voi d the user’s authority to operate the equ ipment.
Note This equipment has been tested and found to comply with the limits for a Class B digital
device, purs uant t o Part 15 of th e FCC Rules. T hese l imits are de s igne d to provide reasonable
protection against harmful interference in a residential installation. This equipment generates,
uses an d can ra diate radi o frequency energy and, if not ins talled and used in accor dance with the
instructi ons , may cause har mful int er ference to radio commu n ications.
However, there is no guarant ee that interference will not occur in a part icular installation. If this
equip ment does cau se harmfu l in terfer ence to radi o or televisi on reception, which can be
deter mined by turning the equipmen t off and on, the user is encou r aged to tr y to cor rect the
interference by one or more of the following measures.
Reorient or relocate the receiving antenna.
Incr ease the separation bet ween the equipment an d r eceiver.
Connect the equi pment to an out let on a cir cuit different from th e one to which th e r eceiver
is conn ected.
Consult the dealer or an experienced radio/TV technician for help.
Canadian Department of Communications Compliance Statement
This Class B digital apparatus meets all requirements of the Canadian Interference-Causing
Equipment Regulations (pursuant to ICES-003 Issue 2, Revision 1).
Avis de conformité aux normes du ministere des communications du Canada
Cet equipment ne depasse pas les limites de Classe B d’émission de bruits radioelectriques pour
les appareill numerique, lelles que prescribes per le Reglement sur le brouillage radioélectrique
elebil por le minisieredes Communications du Canada.
Battery Replacement
A lith iu m battery maintains system con fi guration infor mation. In the event th at the battery fails
to maintain system configuration information, NEC Solutions (America), Inc. recommends the
replacement of the batt er y. F or batt er y r ep lacemen t informa tion, call your authorized NEC
dealer or NEC Solutions (America), Inc. Support Services.
There is a danger of explosion if the batt ery is incorrectly rep laced.
Replace only with the same or equivalent type recommended by the manufacturer. Discard used
batteries according to the manufacturer ’s instructions.
Il y a danger d’explosion s’il y a replacement in cor rect de
la batterie. Remplacer uniquement avec une batterie du même type ou d’un type recommandé
par le constructeur. Mettre au rébut les batteries usagées conform ément aux instructions du
fabricant.
NEC PowerMate eco Getting Started Guide 25

Battery Disposal
The CMOS battery is made of lithium. Contact your local waste management officials for other
information regarding the environmentally sound collection, recycling, and disposal of the
batteries.
LCD Panel Disposal
The LCD lamp in your computer’s LCD panel contains mercury.
Do not pl ace a used LCD panel in your r egular tra sh. The pa n el mu s t be collected , recycled, or
dis posed o f in an envir onmen tally approved manner.
Contact your local waste management officials for other information regarding the
environmentally sound collection, recycling, and disposal of the LCD panel.
26 NEC PowerMate eco Gettin g St arted Guide

NEC Solutions (America), In c.
DECLARATION OF CONFORMITY
We, the Responsible Party
NEC Solution s (A merica), Inc.
15 Business Park Way
Sacramento, CA 95828
declare that the product
NEC PowerMate eco
is in conformity with part 15 of the FCC Rules. Operation of
this product is subject to the following two condition s:
(1) this device may not cause harmful interference, and
(2) this device must accept any interference received,
includin g inter f eren c e that may cause undesir ed operation.
NEC PowerMate eco Getting Started Guide 27

'%&(& ('
819-200903-000
06/2002
28 NEC PowerMate eco Gettin g St arted Guide
 Loading...