


PROPRIETARY NOTICE AND LIABILITY DISCLAIMER
The information disclosed in this document, including all designs and related
materials, is the valuable property of NEC Computer Systems Division, Packard
Bell NEC, Inc. (hereinafter “NECCSD”) and/or its licensors. NECCSD and/or its
licensors, as appropriate, reserve all patent, copyright and other proprietary righ ts
to this document, including all design, manufacturing,reproduction , use, and sales
rights thereto, except to the extent said rights are expressly granted to others.
The NECCSD product(s) discussed in this document are warranted in accordance
with the terms of the Warr anty Statement accompanying each product. However,
actual performance of each such product is dependent upon factors such as system
configuration, customer data, and operator control. Since implementation by
customers of each product may vary, the suitability of specific product
configurations and applications must be determined by the customer and is not
warranted by NECCSD.
To allow for design and specification improvements, the information in this
document is subject to change at any time, without notice. Reproduction of this
document or portion s thereof with out prior written approval of NECCSD is pr ohibited.
NEC is a registered trademark of NEC Corporation and FastFacts, MultiSync, and PowerMate are either
trademarks or registered trademarks of NEC Technologies, Inc.; these trademarks are used under
license by Packard Bell, NEC.
All other product, brand, or trade names used in this publication are the trademarks or registered
trademarks of their respective trademark owners.
First Printing — November 1996
Copyright 1996
NEC Computer Systems Division
Packard Bell NEC, Inc.
1414 Massachusetts Avenue
Boxborough, MA 01719-2298
All Rights Reserved

Contents
Using This Guide
Text Conventions......................................................xiii
Related Documents ...................................................xiv
1 Introducing Your Computer
Front Features ..........................................................1-2
System Controls and Lamps.................................1-5
IR Window..........................................................1-7
Diskette Drive A..................................................1-7
CD-ROM Reader.................................................1-9
Back Features...........................................................1-11
External Connectors.............................................1-15
Power Supply Features ........................................1-17
Speakers...................................................................1-18
Microphone ..............................................................1-19
2 Getting Started
Using a Mouse..........................................................2-1
Using Online Documentation.....................................2-2
Where To Go From Here ..........................................2-4
3 Installing Options
Option Installation Procedures ..................................3-2
General Rules ......................................................3-2
Safety Precautions ...............................................3-3
Cover Removal and Replacement .............................. 3-4
Removing the Desktop Cover...............................3-5
Replacing the Desktop Cover ...............................3-8
Removing the Minitower Cover............................3-9
Replacing the Minitower Cover............................3-12
Contents iii

Expansion Boards.....................................................3-13
Locating Expansion Slots.....................................3-14
Installing an Expansion Board.............................. 3-15
Installing an Expansion Board in the Inside Slot ...3-19
Removing an Expansion Board ............................ 3-21
Removing an Expansion Board from
the Inside Slot...................................................3-23
System Board Options ..............................................3-24
SIMM Upgrade ........................................................3-25
Checking System Memory....................................3-26
Removing a SIMM .............................................. 3-28
Installing a SIMM ...............................................3-29
Video Upgrade..........................................................3-31
Overdrive Processor Upgrade....................................3-33
Removing the Processor.......................................3-33
Installing the OverDrive Processor .......................3-35
Data Storage Devices................................................3-36
Locating Device Slots ..........................................3-37
Preparing the Device............................................3-39
Device Cables......................................................3-39
Diskette Drive Signal Cable ............................3-40
IDE Signal Cables ..........................................3-41
System Power Cables......................................3-43
Cabling Storage Devices ......................................3-43
IDE Device Cabling........................................3-44
Diskette Drive Cabling....................................3-45
Installing Desktop Storage Devices ......................3-46
Removing the Desktop 3 1/2-Inch
Drive Bracket............................................... 3-46
Installing the Desktop 3 1/2-Inch Drive ...........3-47
Removing the Desktop Front Panel..................3-48
Installing the Desktop 5 1/4-Inch Device .........3-50
Replacing the Desktop Front Panel..................3-52
Replacing the Desktop 3 1/2-Inch Drive
Bracket ........................................................3-53
iv Contents

Installing Minitower Storage Devices ...................3-54
Installing the Minitower 3 1/2-Inch Drive........3-54
Removing the Minitower Side Panel................3-57
Removing the Minitower Front Panel ..............3-59
Installing the Minitower 5 1/4-Inch Device......3-60
Replacing the Minitower Side and
Front Panels.................................................3-62
Adding External Options...........................................3-64
Connecting a Parallel Printer................................3-64
Connecting an RS-232C Device ...........................3-66
4 Setting System Parameters
The Setup Utility ......................................................4-1
When to Use Setup ..............................................4-2
How to Start Setup ..............................................4-3
How to Use Setup................................................4-4
Main Menu...............................................................4-5
System Date/Time ...............................................4-6
Diskette Drive......................................................4-6
IDE Devices ........................................................4-6
IDE Device Configuration Submenu................4-7
IDE Device Configuration...............................4-7
IDE Translation Mode ....................................4-8
Language.............................................................4-10
Boot Options .......................................................4-10
Boot Options Submenu ...................................4-10
Boot Sequence ................................................4-10
System Cache .................................................4-11
Boot Speed .....................................................4-11
Num Lock ......................................................4-11
Setup Prompt..................................................4-11
Hard Disk Pre-Delay.......................................4-12
Typematic Rate Programming.........................4-12
Scan User Flash Area .....................................4-13
Boot Virus Detection ......................................4-13
Video Mode.........................................................4-13
Mouse .................................................................4-14
Contents v

Base Memory ......................................................4-14
Extended Memory................................................4-14
BIOS Version ......................................................4-14
Advanced Menu........................................................4-14
Processor Type ....................................................4-15
Processor Speed...................................................4-15
Cache Size...........................................................4-15
Peripheral Configuration......................................4-15
Peripheral Submenu........................................4-15
IDE Interface (Primary and Secondary)...........4-16
Floppy Interface..............................................4-16
Serial Port (1 and 2) Address ..........................4-16
Serial Port 2 IR Mode.....................................4-16
Parallel Port Interface.....................................4-17
Parallel Port Type...........................................4-17
Audio Interface...............................................4-17
Hardware Monitor Interface............................ 4-17
PCI LAN Interface ......................................... 4-18
Advanced Chipset Configuration..........................4-18
Advanced Chipset Submenu............................ 4-18
Base Memory Size..........................................4-19
ISA LFB Size.................................................4-19
ISA LFB Base Address................................... 4-19
Video Palette Snoop........................................4-20
Latency Timer (PCI Clock).............................4-20
Banks 0, 1 and 2 SIMM Detected....................4-20
Power Management Configuration .......................4-20
Power Management Submenu .........................4-21
IDE Drive Power Down..................................4-21
Inactivity Timer (Minutes) ..............................4-22
Hot Key..........................................................4-22
Plug and Play Configuration ................................4-23
Plug and Play Submenu ..................................4-23
Boot with PnP OS...........................................4-24
ISA Shared Memory Size................................4-24
ISA Shared Memory Base Address..................4-25
Event Logging Configuration ...............................4-26
vi Contents

Security Menu ..........................................................4-26
Set User Password and Set
Administrative Password...................................4-28
Unattended Start..................................................4-29
Security Hot Key (Ctrl-Alt-) ................................4-29
Exit Menu ................................................................4-29
Exit Saving Changes............................................ 4-30
Exit Discarding Changes......................................4-30
Load Setup Defaults ............................................4-31
Discard Changes..................................................4-31
Flash Utility..............................................................4-32
LANDesk Client Manager.........................................4-33
PC Health Indicator .............................................4-33
Managing Workstations ..................................4-33
PC Health Meter.............................................4-34
PC Health Description ....................................4-34
Inventory.............................................................4-35
Using DMI ..........................................................4-36
Heceta Capabilities ..............................................4-36
CD Restore...............................................................4-37
Selecting CD Restore Options..............................4-37
Restore Individual Files...................................4-37
System Recovery ............................................4-38
Restoring Individual Files ....................................4-39
Selecting Files.................................................4-40
Checking Selected Files................................... 4-40
Restoring the Files ..........................................4-41
Recovering Your System......................................4-41
5 Setting System Board Jumpers
Changing Processor Jumper Settings .........................5-2
BIOS Recovery.........................................................5-5
Clearing CMOS........................................................5-7
Denying Access To Setup .........................................5-9
Clearing Your Password ...........................................5-10
PCI Expansion Slots.................................................5-12
Contents vii

6 Using Voyetra Sound Software
Power Bar ................................................................6-2
Audio Mixer.............................................................6-3
Adjusting the Sound Using Software ....................6-4
Adjusting the Sound Using the Speakers...............6-4
CD Player.................................................................6-4
WAV Player.............................................................6-5
Recording Digital Audio Files ..............................6-5
Playing Digital Audio Files ..................................6-6
Editing Digital Audio Files...................................6-6
MIDI Player .............................................................6-6
7 24-Hour Information Services
NEC’s FastFacts Service ..........................................7-2
NECCSD Bulletin Board Service..............................7-4
America Online Service.............................................7-7
Compuserve Online Service ...................................... 7-8
E-Mail/Fax Technical Support Service......................7-9
Internet.....................................................................7-10
NECCSD Technical Support Services.......................7-11
8 Solving System Problems
Problem Checklist.....................................................8-2
Solutions To Common Problems ...............................8-3
System Problems .................................................8-3
Diskette Drive Problems ......................................8-5
Monitor Problems................................................8-6
Keyboard/Mouse Problems ..................................8-7
CD-ROM Problems .............................................8-7
Speaker Problems ................................................8-8
Microphone Problems ..........................................8-8
Replacing the CMOS Battery....................................8-9
Diagnostic Diskette...................................................8-12
viii Contents

Getting Help .............................................................8-12
Getting Help From Your Company.......................8-13
Getting Help From Your NECCSD Dealer...........8-13
Getting Help From NECCSD's Technical
Support Center.................................................. 8-13
NECCSD Warranty/Non-Warranty Repair Service 8-14
A Setting Up a Healthy Work Environment
Making Your Computer Work For You.....................A-1
Arrange Your Equipment ..........................................A-3
Adjust Your Chair ....................................................A-4
Adjust Your Input Devices........................................ A-6
Adjust Your Monitor ................................................ A-8
Vary Your Workday .................................................A-10
Pre-Existing Conditions and Psychosocial Factors.....A-11
Checking Your Comfort:
How Do You Measure Up?.................................... A-12
Checking Your Chair ...........................................A-12
Checking Your Keyboard.....................................A-12
Checking Your Mouse .........................................A-12
Checking Your Monitor .......................................A-12
Checking You......................................................A-13
B Limited Warranty
How Long Is the Warranty?......................................B-1
Who Is Protected?.....................................................B-1
What Is Covered and What Is Not Covered?.............. B-1
What We Will Pay For and What We Will
Not Pay For...........................................................B-2
How You Can Get Warranty Service.........................B-3
Limitation of Damages and Implied Warranties .........B-4
How State Law Relates to the Warranty....................B-5
For Information, Telephone 1-800-632-4525.............B-5
C Reviewing System Interrupts
Contents ix

Index
List of Tables
Quick Reference to Information About Your
Computer .............................................................. 2-5
Navigation Keys ....................................................... 4-4
Hot Key Parameters.................................................. 4-23
Security Passwords................................................... 4-27
Interrupt Level Assignments...................................... C-1
x Contents

Using This Guide
The PowerMate P2166M/P2200M Series User’s Guide
provides a quick reference to information about your
computer.
The guide contains the following information:
Chapter 1, Introducing Your Computer, provides a look
at system components. See this chapter to familiarize
yourself with your system.
Chapter 2, Getting Started, gives you information about
using a mouse, using online documentation, and what
you should do after your system is up and running.
The chapter includes a quick-reference chart for finding
information about a variety of topics.
Chapter 3, Installing Options, provides installation
procedures for internal and external options.
Chapter 4, Setting System Parameters, describes the
Setup utility and explains how to use it to configure your
system.
Chapter 5, Setting System Board Jumpers, provides
information on changing jumper settings when
reconfiguring your system.
Chapter 6, Using Voyetra® Sound Software, explains
how to use Voyetra’s Multimedia Sound Software to
play music CDs, record, play and edit .WAV files, and
play MIDI files.
Chapter 7, 24-Hour Information Services, lists the
services available to you for information and help and
describes how to access the services.
Using This Guide xi

Chapter 8, If You Have a Problem, contains
troubleshooting tips for solving simple problems and
provides information on where you can find help when
you cannot solve a problem yourself.
Appendix A, Setting Up a Healthy Work Environment,
contains guidelines to help you use your computer
productively and safely. This appendix also instructs
you on how to set up and use your computer to reduce
your risk of developing nerve, muscle, or tendon
disorders.
!
Prolonged or improper use of a computer
workstation may pose a risk of serious injury. To
reduce your risk of injury, set up and use your
computer in the manner described in Appendix A,
Setting Up a Healthy Work Environment.
Appendix B, Limited Warranty, provides warranty
information, policies, and restrictions.
WARNING
xii Using This Guide
Appendix C, Reviewing System Interrupts, provides a
list of interrupt settings.
TEXT CONVENTIONS
This guide uses the following text conventions.
Warnings, cautions, and notes have the following
meanings:
W arnings alert you t o situations that coul d result in
serious personal injury or loss of life.
Cautions indicate situations that can damage the
hardware or software.
!
WARNING
!
CAUTION
NOTE
Notes give important information about the
material being described.
Names of keyboard keys are printed as they appear on
the keyboard, for example,
Text or keystrokes that you enter appear in boldface
type. For example, type
File names are printed in uppercase letters.
Ctrl, Alt
return
and press
Enter
, or
Enter
Using This Guide xiii
.
.

RELATED DOCUMENTS
In addition to this guide, the following printed
documentation ships with your PowerMate
P2166M/P2200M Series system.
NEC PowerMate Quick Setup/Roadmap
Quick Setup contains information for quickly getting
your system up and running. Read this information to set
up the system for the first time.
The Quick-Reference Roadmap gives you a look at the
documentation, NECCSD tools, software applications,
and services available to you.
How Does Your Workplace Measure Up?
This brochure provides information for setting up and
using your computer productively and safely.
Information includes guidelines to reduce the risk of
injury associated with using a computer.
Windows 95 User’s Guide
This guide is a quick reference to information about
using Windows 95.
®
Your system comes with the following online documentation
on the hard disk:
xiv Using This Guide
PowerMate System Documentation
This online documentation is your comprehensive source
of information about your system. It contains a System
Tour, User's Guide, Product Information Center, Option
Installation Center, and Support Center.
Healthy Environment
This is an online help file that complements the “How
Does Your Workplace Measure Up?” brochure.
Using Windows 95
Comes with Windows 95 systems. Contains information
for using Windows 95.

Most of your application programs provide extensive online
help. Some programs provide separate online user’s guides
for specific applications.
Windows 95 provides extensive online help and “wizards”
to guide you through procedures.
In addition to the documentation that ships with the system,
the following documentation is available from NECCSD:
PowerMate P2166M/P2200M Series Service and
Reference Manual
(part number 819-181682-000) which provides
information for maintaining, troubleshooting, and
repairing the PowerMate P2166M/P2200M Series
system. This guide also includes hardware and interface
information for programmers, engineers, and others who
need to know how the system is designed.
To purchase the service and reference manual, call
NECCSD at 1-800-632-4525 (U.S.) or your local
NECCSD sales provider (outside U.S.).
NEC FastFacts
NEC FastFacts is an automated service that sends the
latest information about NECCSD and its products
directly to a fax machine. The service is available 24
hours a day, 7 days a week.
With FastFacts, you can obtain product literature and
technical information bulletins. By using FastFacts, you
can be kept up-to-date on the latest technical information
for your system.
See “NEC’s FastFacts Service” in Chapter 7 for
information about using FastFacts.
Using This Guide xv

Introducing Your
1
Computer
!
Prolonged or improper use of a computer
workstation may pose a risk of serious injury. To
reduce your risk of injury, set up and use your
computer in the manner described in Appendix A,
Setting Up a Healthy Work Environment.
Once you set up your computer, the next thing is to become
familiar with the system. PowerMate P2166M/P2200M
Series systems come in a minitower or a desktop
configuration. The following information provides a brief
overview of the front and back features of your system.
For a comprehensive source of information about your
computer, see the online NEC PowerMate Series System
Documentation in the Windows
Documentation group.
WARNING
®
95 NEC Online
Introducing Your Computer 1-1
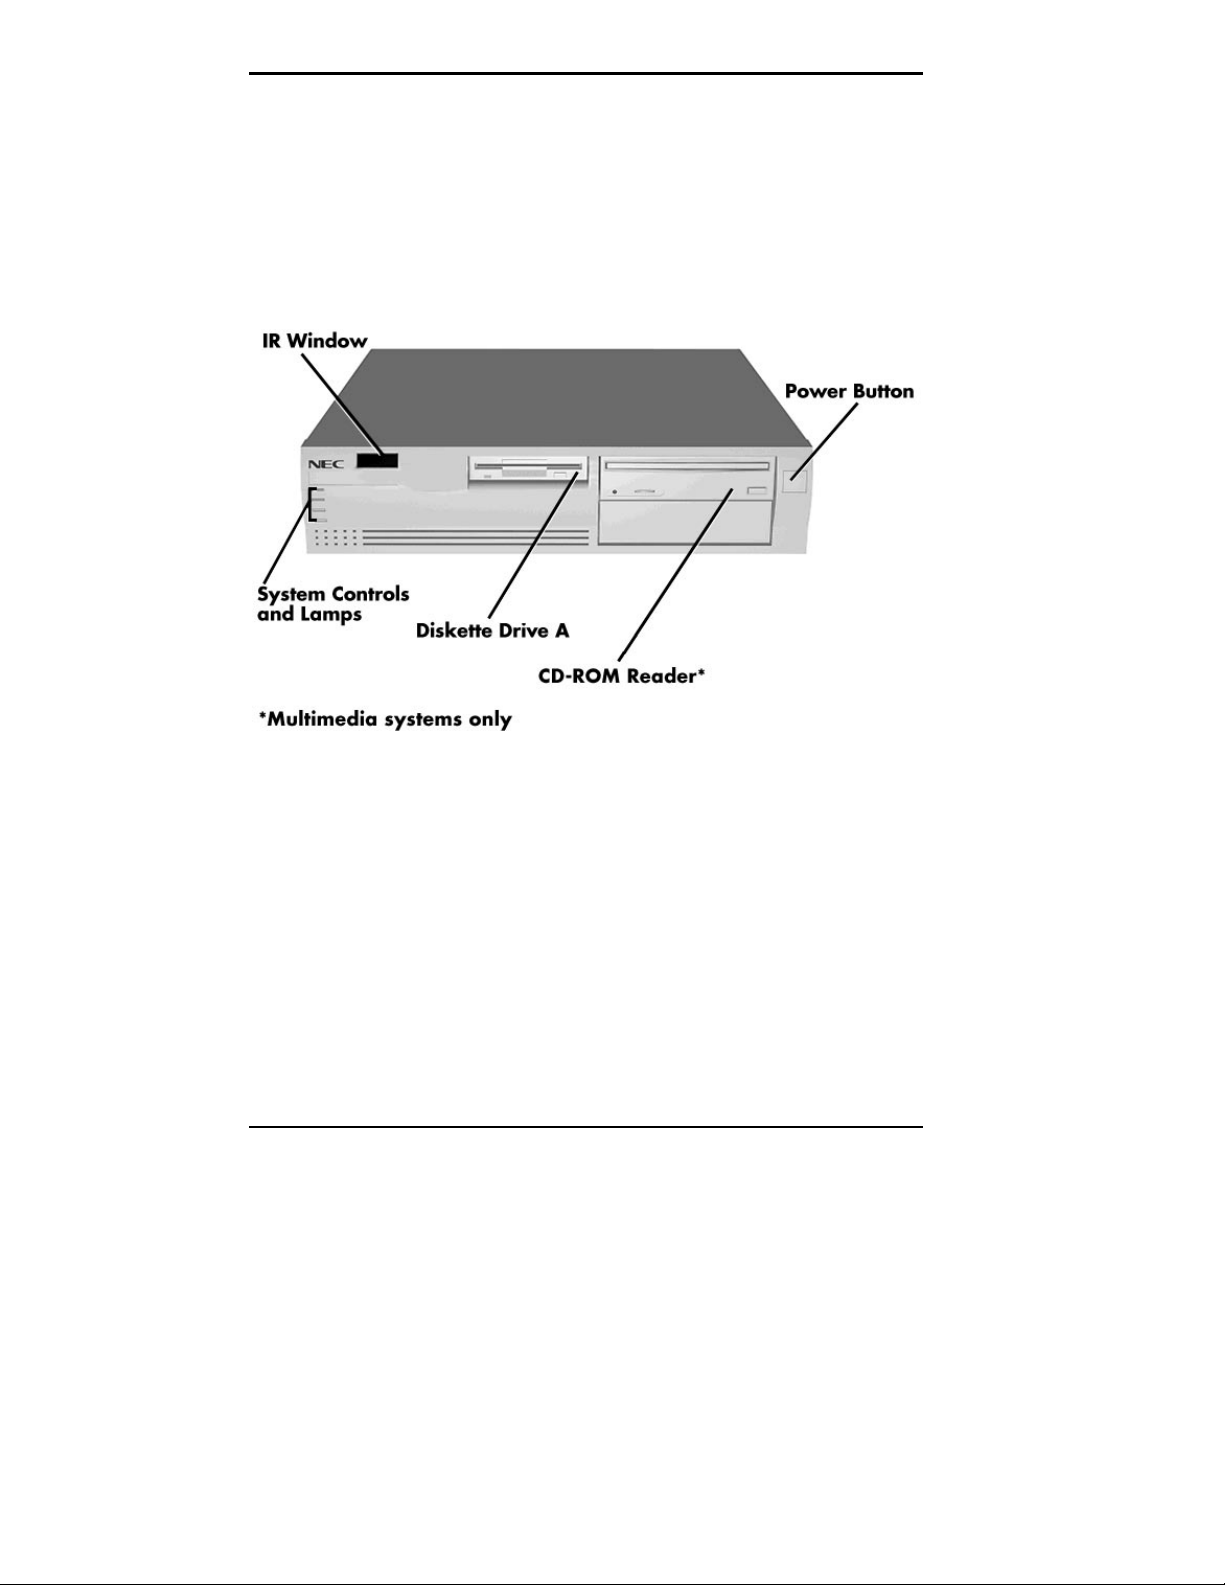
FRONT FEATURES
The following figures show the features on the front of the
desktop and minitower systems. A brief description follows
the figures.
1-2 Introducing Your Computer
Front features — desktop models
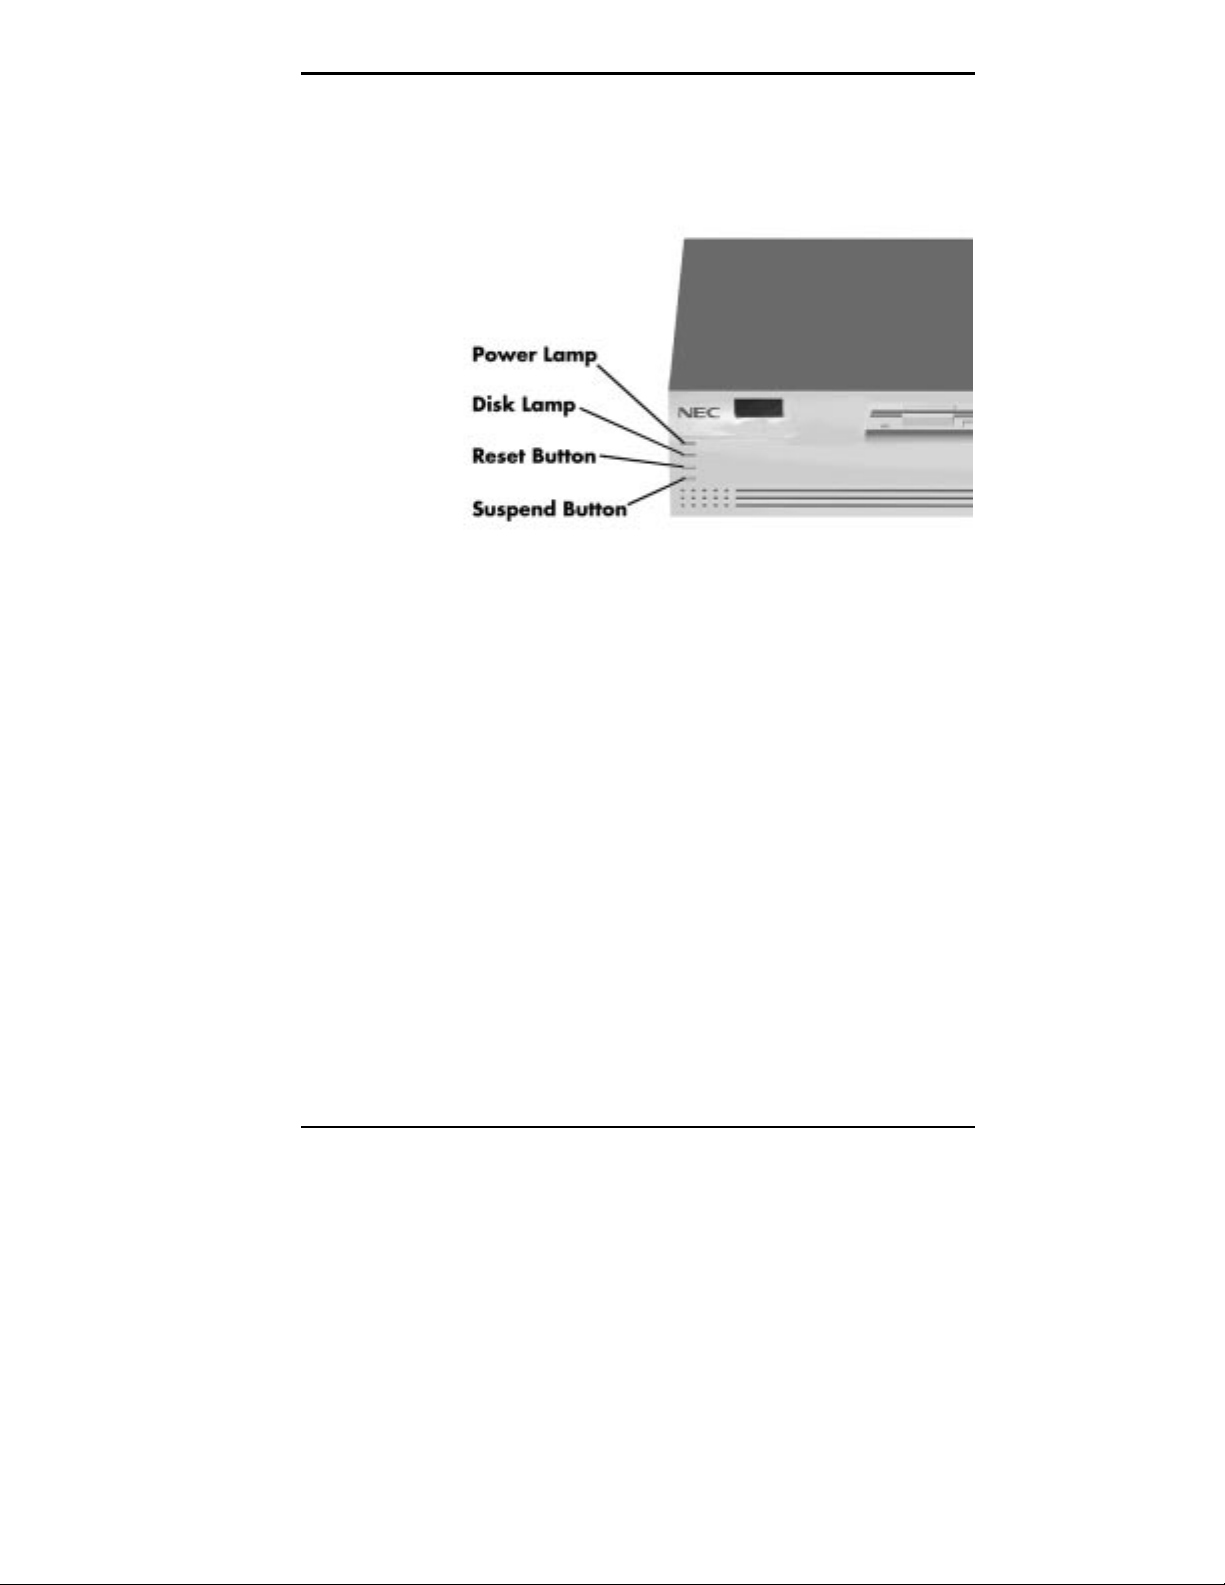
The following figure shows the system controls and lamps
called out in the previous figure.
System controls and lamps — desktop models
Introducing Your Computer 1-3
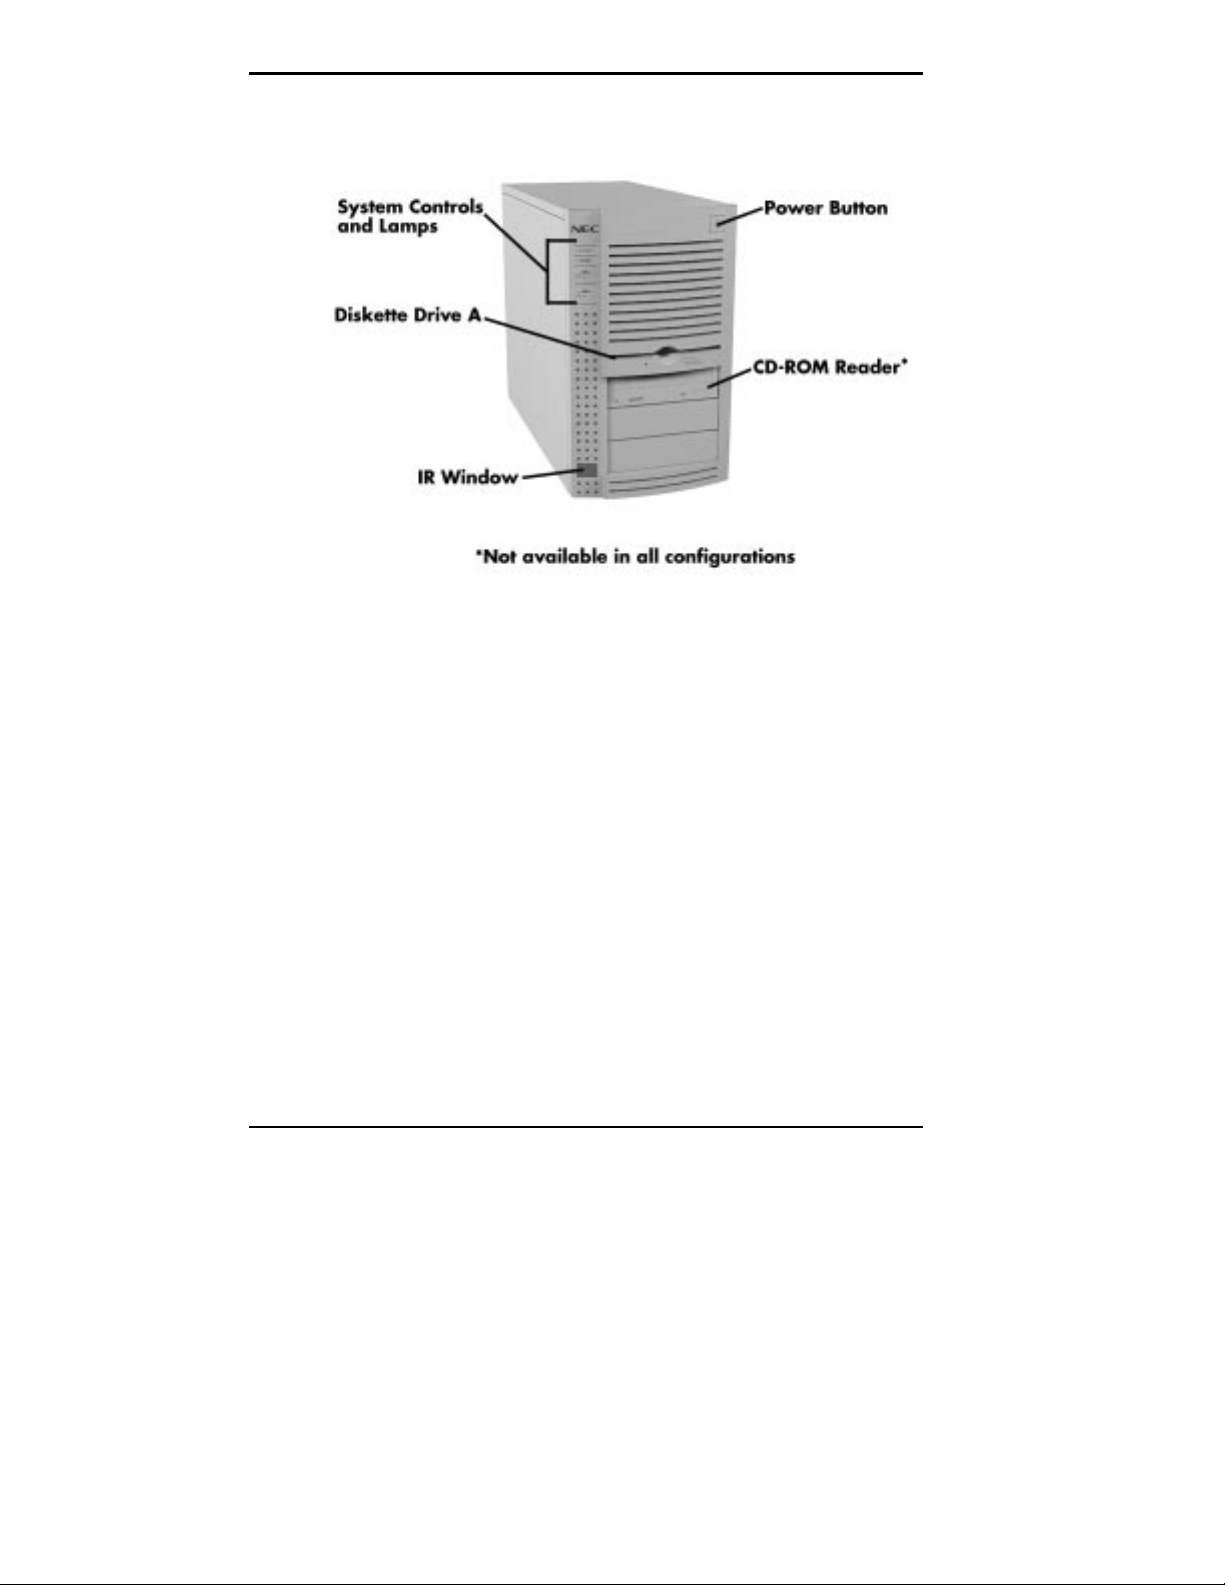
Front features — minitower models
The following figure shows in detail the system controls and
lamps called out in the previous figure.
1-4 Introducing Your Computer
System controls and lamps — minitower models
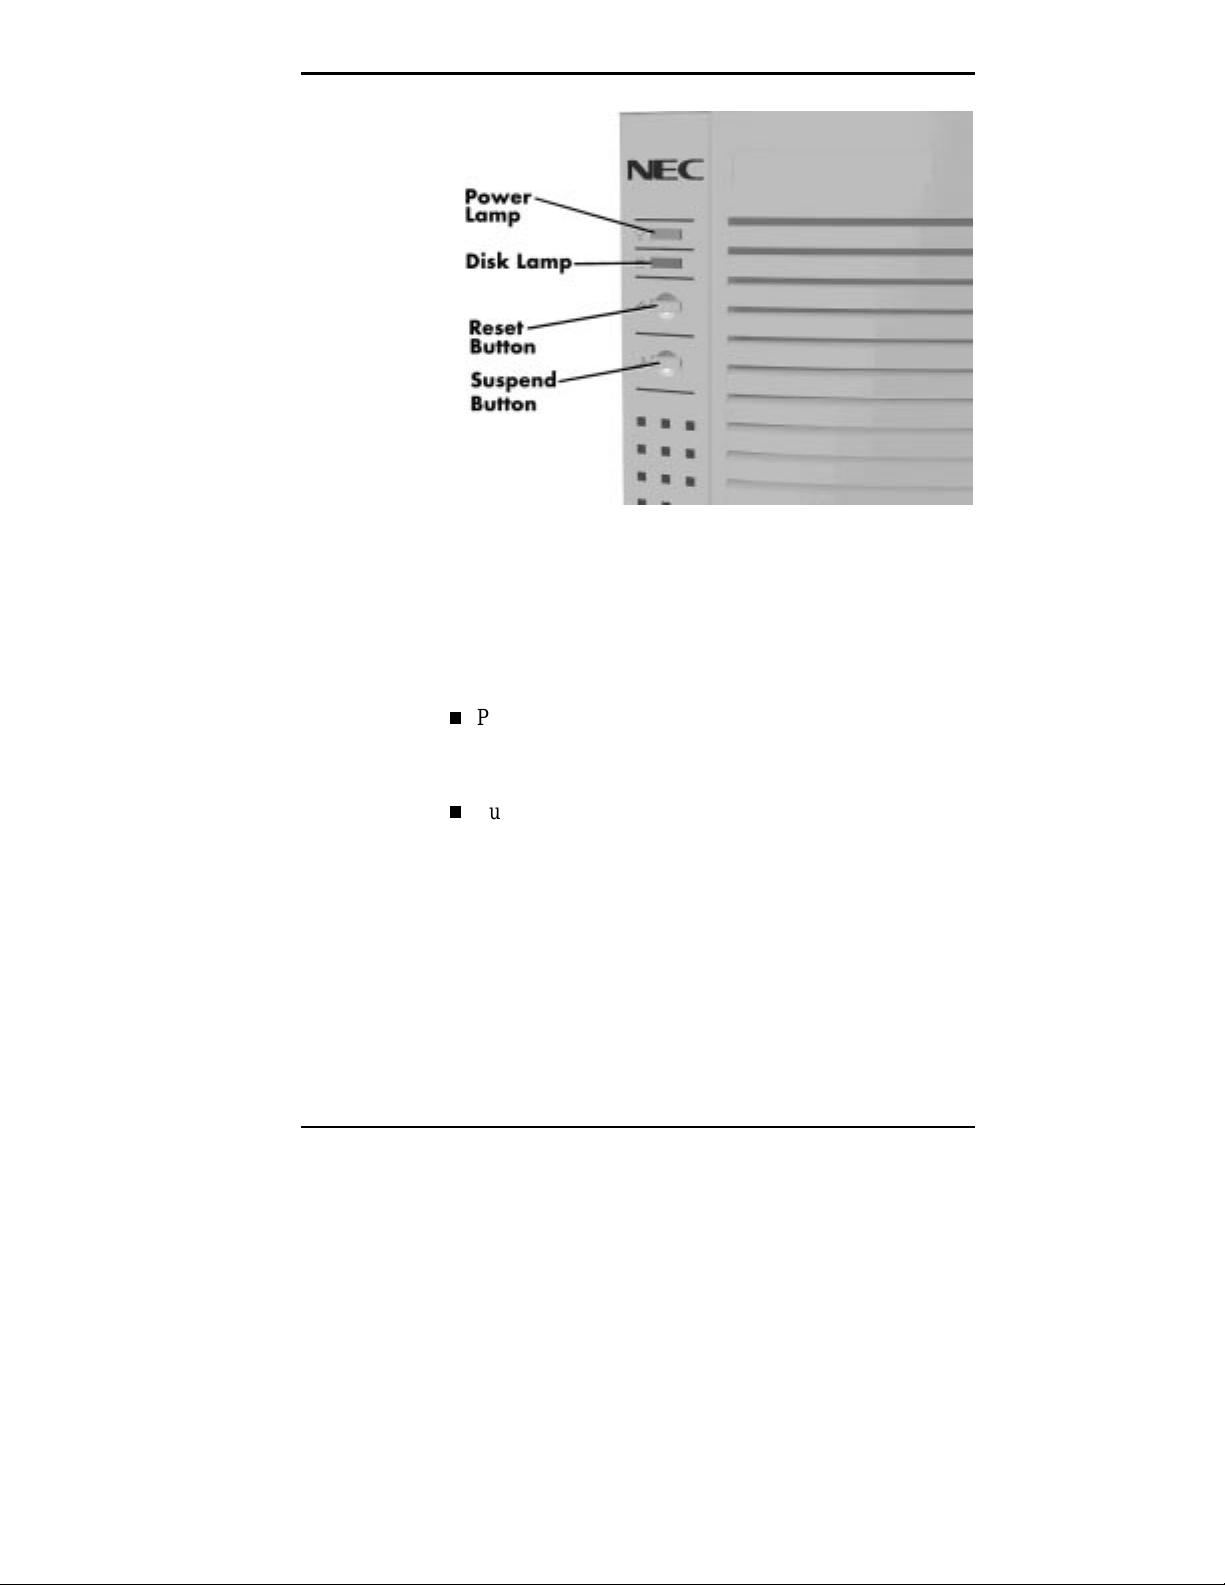
System Controls and Lamps
System controls let you select specific system operations.
Lamps let you know the status of system operation. Your
computer has the following controls and lamps:
Power button
Press this button to turn on system power. Press it again
to turn off the power.
Suspend button
Lets you initiate a power-saving mode of computer
operation. Press this button to suspend system operation
when you plan to be away from your computer for a
short time. Press any key or move your mouse to resume
system operation at the point where you stopped it.
A blinking system unit power lamp lets you know that
the system is in a power-saving mode.
If you have a DDC-2 compliant monitor, your monitor
also will go into power-saving mode.
Introducing Your Computer 1-5
Reset button
The reset button lets you manually restart your system
when it does not respond to keyboard commands.
!
Resetti ng your system can resul t i n t he loss of dat a.
Press the reset button only when all other methods
of restarting your computer fail.
Power lamp
The power lamp indicates whether system power is on or
off. It also lets you know if the system is operating in a
power-saving mode.
A steady green lamp indicates that the power is on to all
system components. A blinking green lamp indicates that
the system is in Suspend mode with full power
reduction.
CAUTION
Disk lamp
Indicates whether or not your hard disk is active. A
green lamp tells you that the hard disk is reading or
writing data.
Do not turn off the system, unless absolutely
necessary, while the di sk l amp is lit. To do so can
damage your hard disk or data.
1-6 Introducing Your Computer
!
CAUTION

IR Window
The IR (infrared) window is the system’s IR port. The IR
port supports two-way wireless communications. The
interface uses infrared as the transmission medium instead
of a traditional cable.
The IR port lets you transfer files to or from portable
devices such as laptops and personal digital assistant (PDA)
products using application software supporting IrDA data
transfer. Your system comes with LapLink
wireless data transfer.
With IrDA software, you can transfer data at speeds of up
to 115 kilobytes per second (Kbps) and at distances up to
3 feet from the IR window.
Diskette Drive A
Diskette drive A loads and starts programs from a diskette.
Diskette drive A is your primary “bootable” drive.
®
software for
Diskette drive A features — desktop models
Introducing Your Computer 1-7
Diskette drive A features — minitower models
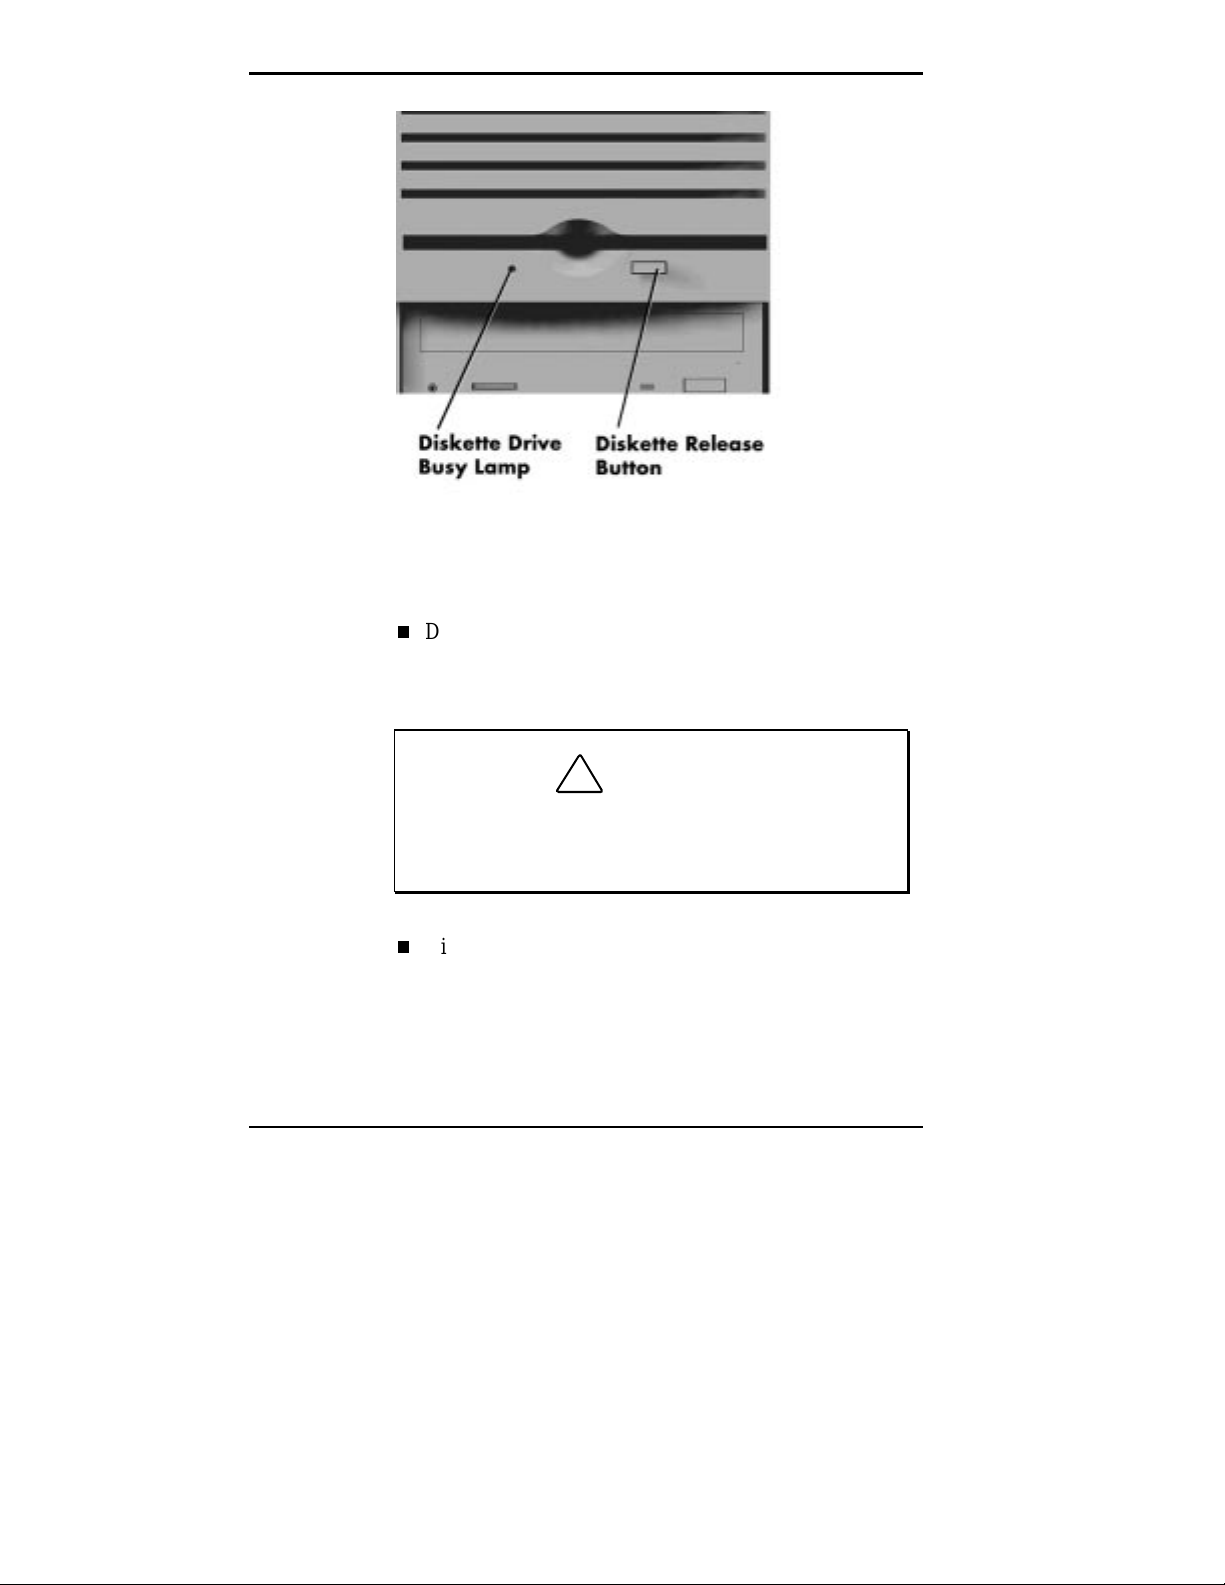
Your diskette drive has the following features:
Diskette drive busy lamp
Lights when your diskette drive is reading to or writing
from a diskette.
To prev ent damage to y our di skette dr iv e and data,
do not turn off the system or remove a diskette
while the diskette drive busy lamp is lit.
Diskette release button
Press this button to release a diskette from the diskette
drive.
1-8 Introducing Your Computer
!
CAUTION

CD-ROM Reader
A sixteen-speed CD-ROM reader is a standard feature in
multimedia models. The CD-ROM reader is assigned as
drive F.
Use the CD-ROM reader to load and start programs from a
compact disc (CD). You can also use the CD-ROM reader
to play your audio CDs.
with a bootable CD. To enable the system to boot
from the CD-ROM, see “Boot Options” in Chapter 4.
The CD-ROM reader operates at different speeds depending
on whether the CD you are using contains data or music.
This allows you to get your data faster and to see smoother
animation and video.
NOTE
You can boot your system f rom the CD- ROM
NOTE
The CD-ROM reader in your system might
look different from the one shown here.
Introducing Your Computer 1-9
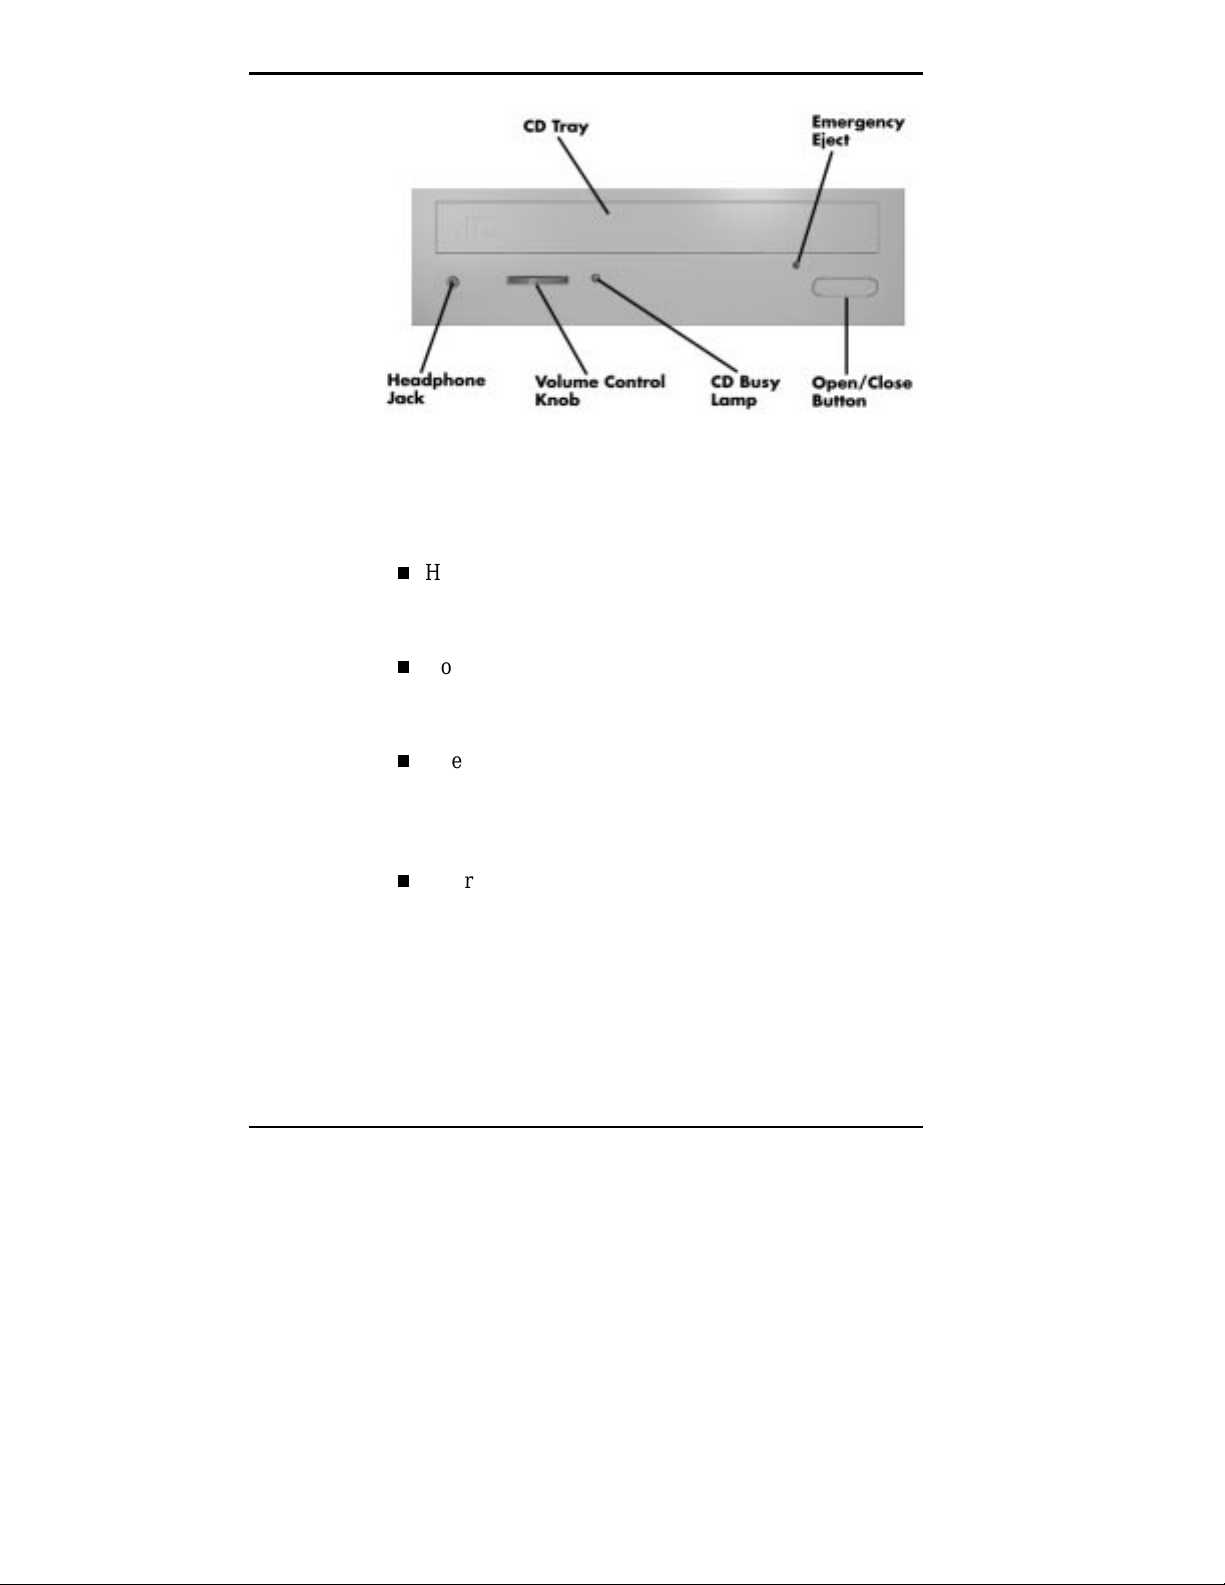
CD-ROM reader features
The CD-ROM reader has the following features:
Headphone jack
Allows the connection of an optional set of headphones
with a stereo mini-jack plug.
Volume control knob
Lets you adjust the volume of an optional set of
headphones.
Open/close button
Opens or closes the reader’s loading tray. Press this
button when the computer power is on to insert or
remove a CD into or out of the reader.
Emergency eject hole
Allows the manual ejection of a CD if the eject function
is disabled by software or if a power failure occurs. To
manually eject the CD, insert a paper clip into the hole
and press inward to open the CD tray.
1-10 Introducing Your Computer

CD busy lamp
Lights when the reader is retrieving data, music, or
graphics/audio from a CD. Do not eject the CD or turn
off the system unit when the lamp is on.
CD tray
Provides a surface for loading a CD into the reader.
Press the open/close button to open or close the CD tray.
NOTE
have t urned it on i ts side, t here are f our tabs on the
inside of the CD tray that can be t urned 180o to hold
the CD in place.
BACK FEATURES
On the back of your computer, you’ll find external
connectors, power supply features, and expansion board
slots.
If your system is a desktop model and you
Introducing Your Computer 1-11

The following figure shows these features in the desktop
model.
Rear features — desktop models
1-12 Introducing Your Computer
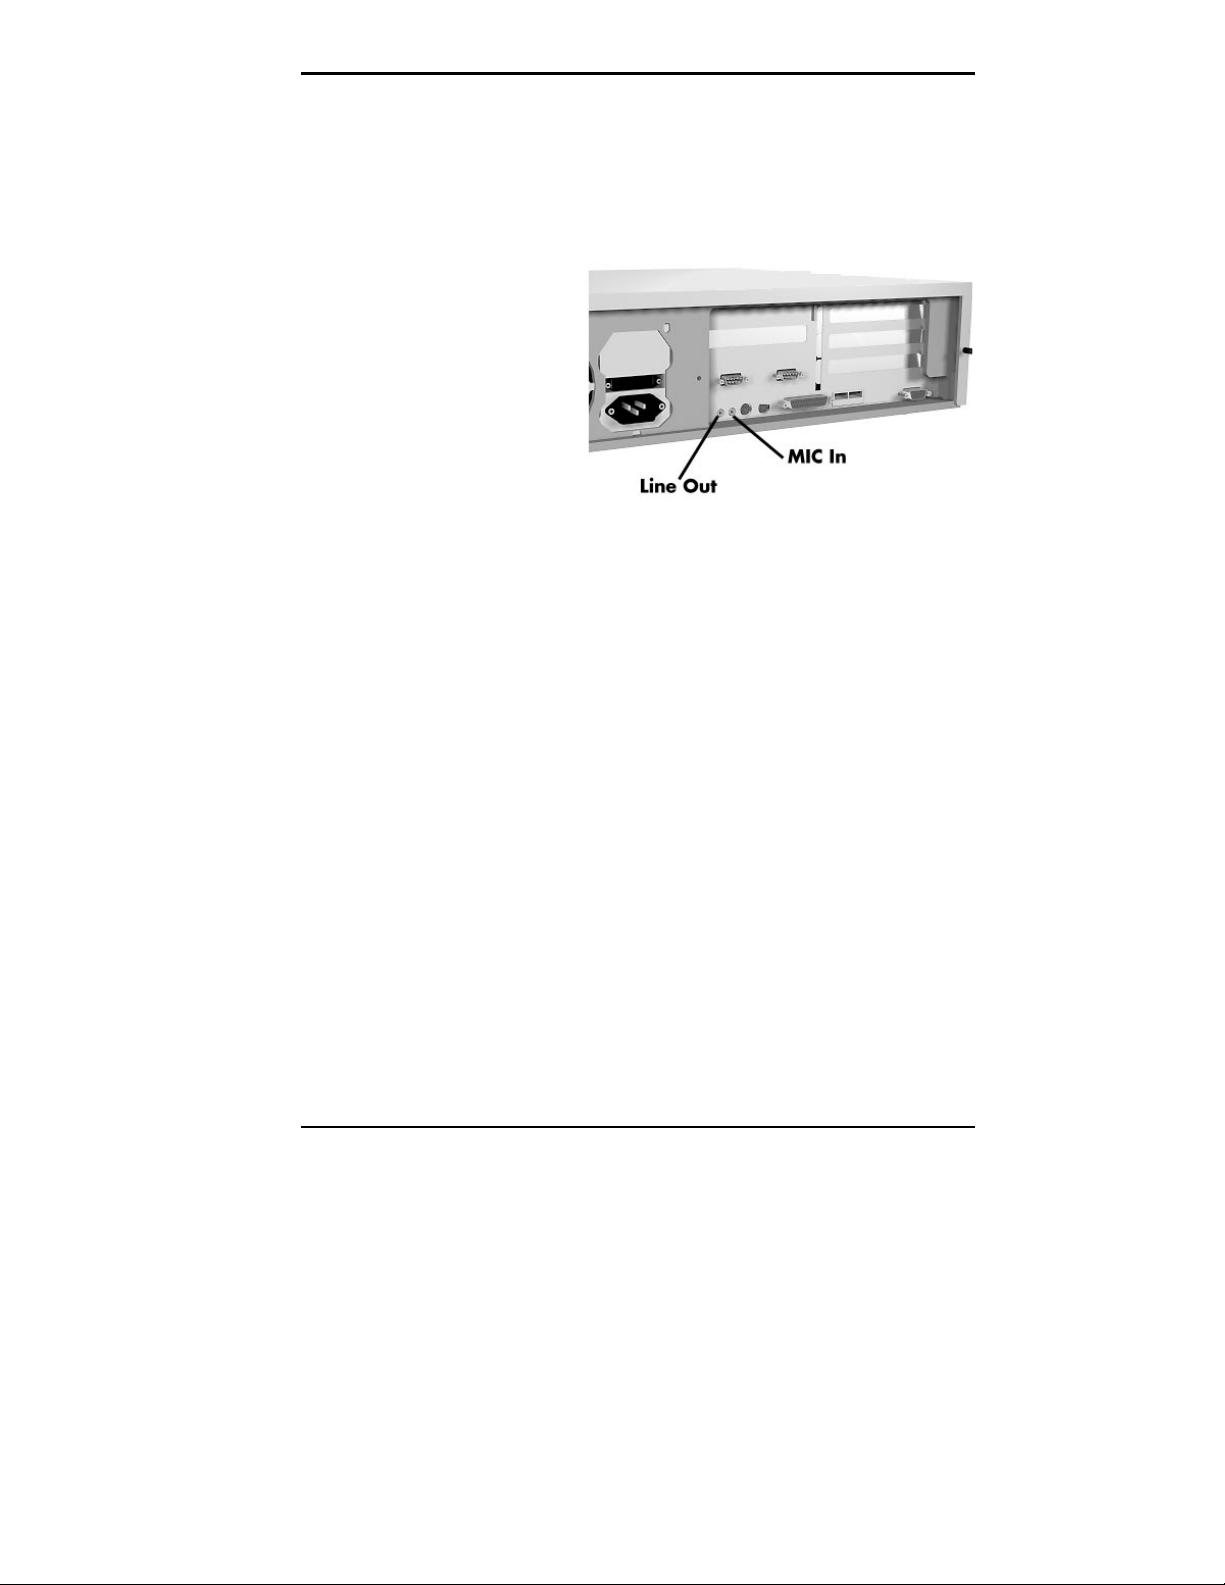
The following figure identifies the audio connectors called
out previously.
Audio connectors — desktop models
Introducing Your Computer 1-13

The following figure shows the connectors from the rear of
the minitower model.
Rear features — minitower models
The following figure identifies the audio connectors that
were called out previously.
1-14 Introducing Your Computer
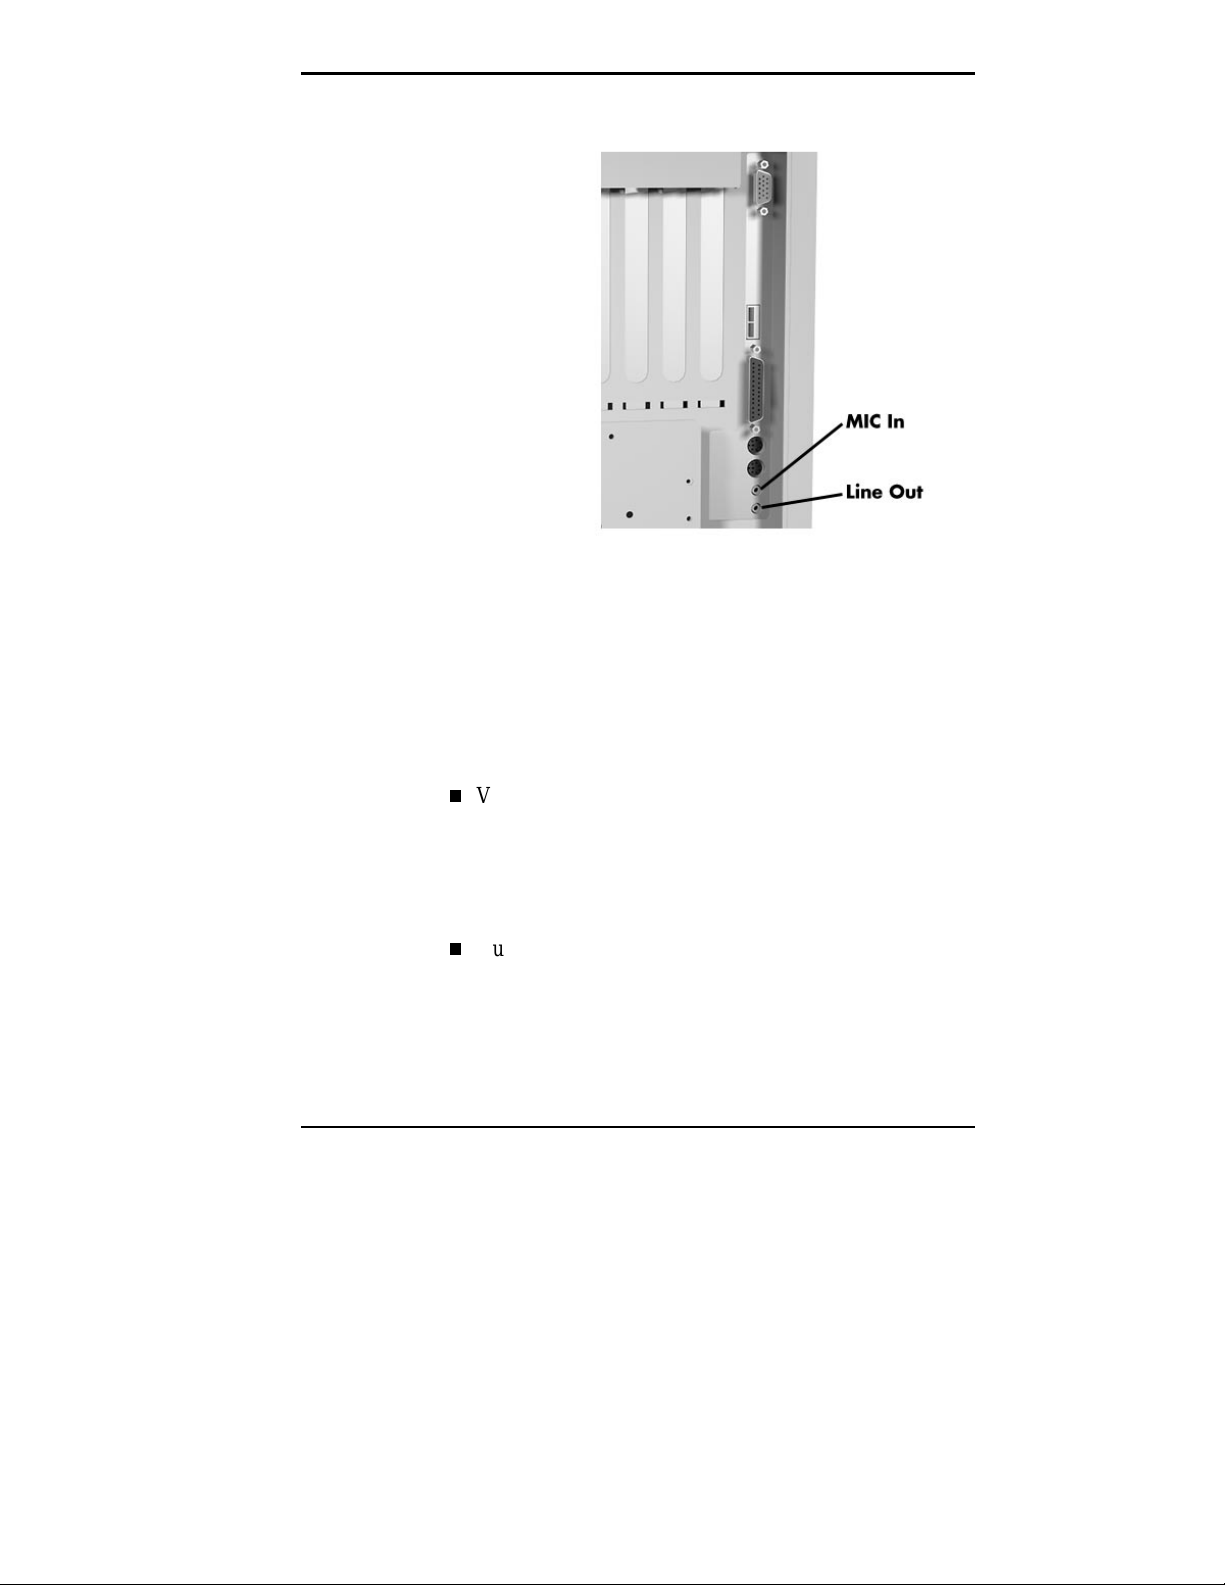
Audio connectors — minitower models
External Connectors
External connectors let you attach peripheral devices, such
as a monitor, keyboard, mouse, and printer to your system.
Your system has the following external connectors:
VGA monitor connector
Attach the signal cable from your monitor to this
connector. Supports an NEC MultiSync
other video graphics array (VGA)-compatible monitor
with a 15-pin connector.
Audio connectors
These connectors come integrated on multimedia models.
The connectors include microphone in and line out jacks.
®
monitor or
Introducing Your Computer 1-15

The microphone in jack lets you connect a
microphone for recording audio information in your
data system files.
The line out jack allows you to connect an amplified
output device such as powered speakers, stereo tape
recorder, or an external amplifier for audio output.
Use this jack to connect the stereo speakers that
come with your system.
Printer Port
Use this port to connect a parallel printer with a 25-pin
connector to the system.
Serial Ports
Attach a serial device with a 9-pin connector to each
serial port. Serial devices include a pointing device,
serial printer, or modem.
Keyboard port
Attach the keyboard that comes with your computer to
this connector.
The keyboard port supports a personal system (PS)/2®compatible, 101-key or 104-key keyboard (in the U.S.
and Canada) or a 102-key keyboard (in the United
Kingdom and Germany) with a 6-pin mini DIN
connector.
Mouse port
Attach the mouse that comes with your computer to this
port. The mouse port supports a PS/2-compatible
mouse.
1-16 Introducing Your Computer
 Loading...