


NEC 2600
Owner’s Manual

NEC 2600/2610 Quick Reference Guide
Battery
The phone battery should
be charged before being
used for the first time.
Turn On Phone
Press and hold the P key
for approximately two
seconds to turn on the
phone.
Turn Off Phone
Press and hold the P key
for approximately two
seconds to turn off the
phone.
Standby Mo de
Once the phone is power ed
on, the phone enters the
standby mode. The phone
stays in the standby mode
until a call is placed or
received, a menu is
accessed, or the phone is
powered off.
Place a Call
Enter in the telephone
number and press
Note that the phone must
have cellular service to
place a call.
S.
Answer a Call
When the phone rings,
S to answer the
press
call. Note that the phone
must have cellular service
to receive a call.
End a Call
Press E.
Access and Navigate
Menus
Press M to display the
main menu. P ress
the contents of the menus
and submenus. Select a
menu item by pressing
M when the item is
either
highlighted or by pressing
the corresponding menu
item number.
I to view
Storing a Phone
Number into the
Phone Book
Press M21. Enter the
phone number; press
Use the keypad to enter a
name associated with the
phone number; press
M again to accept
Press
the displayed phone book
location; or enter a specific
location and press
M.
M.
M.
Dial a Phone
Number Stored in
the Phone Book
Press B. Use I to locate
the desired phone number
and press
S.
Adjust Earpiece
Volume
With a call in progress, press
I to increase or decrease
the earpiece volume.
Adjust Keypad
Volume
With the phone in the
standby mode, press
increase or decrease the
keypad volume.
I to

NEC 2600/2610 Quick Reference Guide
Set Ringer Volume
Press M441.
Select one of five settings.
E.
Press
Set Ringer Type
Press M442.
Select one of six settings.
E.
Press
Store Vo ice Mail
Phone Number
You can easily store the
voice mail service phone
number into your phone.
Enter in the voice mail
phone number and press
M34to store the
number into the phone.
Once the voice mail
number is stored, you can
press and hold
retrieve messages.
1 to
Retrieve Voice Mail
If voice mail service is
available through your
cellular service provider
and the voice mail phone
number is set up in your
phone, press and hold
to retrieve your voice mail
messages.
1
Retrieve Text
Messages
If text messaging service is
available through your
cellular service provider,
M32 to easily
press
view your text messages.
I to scroll through
Press
each line of the messages.
E to exit.
Press
Set Time and Date
Press M461. Enter
in the hour; press
key down arrow). Enter in
the minutes; press
(scroll
N
. Press
N
M to select a.m. or p.m.
Enter in the month (1-12);
. Enter in the day (1-
press
N
31); press
year; press
. Enter in the
N
E.
View Own Number
With the phone in the
standby mode, press
C.
Lock/Unlock Keypad
Your phone keypad can be
easily and quickly locked to
prevent inadvertent key
pressing when the phone is
turned on. Press
lock the keypad; press
M5 to
M5 again to unlock the
keypad.
Lock/Unlock Phone
Your phone can be locked
to prevent unauthorized
use.
To
your phone:
lock
M0. As prompted,
Press
enter your 4-digit password.
(The initial password
programmed into your
phone is usually
1 to completely
Press
lock your phone or press
0000
.)
2 to partially lock your
phone. Press
To
unlock
Press
enter your 4-digit password.
Press
phone. Press
E.
your phone:
M0. As prompted,
3 to unlock your
E.

Table of Contents
Chapter 1: Getting Started. . . . . . . . . . . . . . . . . . . . .1
Phone Activation. . . . . . . . . . . . . . . . . . . . . . . . . . . . . . . . . . . . 1
Phone Safety & Performance . . . . . . . . . . . . . . . . . . . . . . . . 1
NEC Authentic Accessories™ . . . . . . . . . . . . . . . . . . . . . . . . 1
Connecting & Disconnecting the Battery. . . . . . . . . . . . . 1
Charging the Battery . . . . . . . . . . . . . . . . . . . . . . . . . . . . . . . . 2
NiMH and Li-Ion Battery Charging Times . . . . . . . . . . . . . 2
Voice Mail Messaging & Text Messaging . . . . . . . . . . . . . 3
Phone Password . . . . . . . . . . . . . . . . . . . . . . . . . . . . . . . . . . . . 3
Phone Layout . . . . . . . . . . . . . . . . . . . . . . . . . . . . . . . . . . . . . . . 4
Menu Tree Overview . . . . . . . . . . . . . . . . . . . . . . . . . . . . . . . . 5
Display Icons. . . . . . . . . . . . . . . . . . . . . . . . . . . . . . . . . . . . . . . . 6
Service Indicators . . . . . . . . . . . . . . . . . . . . . . . . . . . . . . . . . . . 6
Call & Message Indicators. . . . . . . . . . . . . . . . . . . . . . . . . . . . 6
Operation Indicators . . . . . . . . . . . . . . . . . . . . . . . . . . . . . . . . 6
Menu Navigation Keys. . . . . . . . . . . . . . . . . . . . . . . . . . . . . . . 6
Chapter 2: Basic Operations . . . . . . . . . . . . . . . . . . .7
Turning On Phone. . . . . . . . . . . . . . . . . . . . . . . . . . . . . . . . . . . 7
Turning Off Phone . . . . . . . . . . . . . . . . . . . . . . . . . . . . . . . . . . 7
Standby Mode . . . . . . . . . . . . . . . . . . . . . . . . . . . . . . . . . . . . . . 7
Signal Strength . . . . . . . . . . . . . . . . . . . . . . . . . . . . . . . . . . . . . 7
Battery Charge Indicator. . . . . . . . . . . . . . . . . . . . . . . . . . . . . 8
Placing a Call. . . . . . . . . . . . . . . . . . . . . . . . . . . . . . . . . . . . . . . . 8
Placing an Emergency Call. . . . . . . . . . . . . . . . . . . . . . . . . . . 9
Ending a Call. . . . . . . . . . . . . . . . . . . . . . . . . . . . . . . . . . . . . . . . 9
Answering a Call . . . . . . . . . . . . . . . . . . . . . . . . . . . . . . . . . . . . 9
Adjusting Earpiece Volume. . . . . . . . . . . . . . . . . . . . . . . . . 10
Adjusting Keypad Volume. . . . . . . . . . . . . . . . . . . . . . . . . . 10
Accessing and Navigating Menus. . . . . . . . . . . . . . . . . . . 10
Setting Ringer Volume . . . . . . . . . . . . . . . . . . . . . . . . . . . . . 10
Selecting Ringer Type . . . . . . . . . . . . . . . . . . . . . . . . . . . . . . 11
Viewing Your Phone Number. . . . . . . . . . . . . . . . . . . . . . . 11
Retrieving Voice Mail. . . . . . . . . . . . . . . . . . . . . . . . . . . . . . . 11
Retrieving Text Messages. . . . . . . . . . . . . . . . . . . . . . . . . . . 11
Using the Phone Book. . . . . . . . . . . . . . . . . . . . . . . . . . . . . . 11
Using the Phone Notepad . . . . . . . . . . . . . . . . . . . . . . . . . . 12
Setting the Time and Date. . . . . . . . . . . . . . . . . . . . . . . . . . 12
-i-

Table of Contents
Chapter 3: Menus . . . . . . . . . . . . . . . . . . . . . . . . . . . 13
Menu Navigation. . . . . . . . . . . . . . . . . . . . . . . . . . . . 13
Main Menu. . . . . . . . . . . . . . . . . . . . . . . . . . . . . . . . . . 14
1. Call Logs . . . . . . . . . . . . . . . . . . . . . . . . . . . . . . . . . 14
Dialed (Call Log). . . . . . . . . . . . . . . . . . . . . . . . . . . . . . . . . . . . 15
Received (Call Log). . . . . . . . . . . . . . . . . . . . . . . . . . . . . . . . . 15
Missed (Call Log) . . . . . . . . . . . . . . . . . . . . . . . . . . . . . . . . . . . 15
Call Log Options Menu . . . . . . . . . . . . . . . . . . . . . . . . . . . . . 16
Air Time. . . . . . . . . . . . . . . . . . . . . . . . . . . . . . . . . . . . . . . . . . . . 18
Clear Call Logs & Air Time Counter . . . . . . . . . . . . . . . . . . 18
2. Phone Boo k . . . . . . . . . . . . . . . . . . . . . . . . . . . . . . 18
Add to Phone Book. . . . . . . . . . . . . . . . . . . . . . . . . . . . . . . . . 19
View by Name. . . . . . . . . . . . . . . . . . . . . . . . . . . . . . . . . . . . . . 20
View by Location. . . . . . . . . . . . . . . . . . . . . . . . . . . . . . . . . . . 20
View by (Phone) Number. . . . . . . . . . . . . . . . . . . . . . . . . . . 20
Locking the Phone Book. . . . . . . . . . . . . . . . . . . . . . . . . . . . 21
Clearing the Phone Book . . . . . . . . . . . . . . . . . . . . . . . . . . . 21
Phone Book Options Menu . . . . . . . . . . . . . . . . . . . . . . . . . 21
3. Message. . . . . . . . . . . . . . . . . . . . . . . . . . . . . . . . . . 24
Voice Messages . . . . . . . . . . . . . . . . . . . . . . . . . . . . . . . . . . . . 24
Text Messages . . . . . . . . . . . . . . . . . . . . . . . . . . . . . . . . . . . . . 25
Text Message Viewer. . . . . . . . . . . . . . . . . . . . . . . . . . . . . . . 26
SMS Menu . . . . . . . . . . . . . . . . . . . . . . . . . . . . . . . . . . . . . . . . . 27
Clear All Text Messages. . . . . . . . . . . . . . . . . . . . . . . . . . . . . 28
Store As Voice Mail Number . . . . . . . . . . . . . . . . . . . . . . . . 28
4. Settings . . . . . . . . . . . . . . . . . . . . . . . . . . . . . . . . . . 28
Lock . . . . . . . . . . . . . . . . . . . . . . . . . . . . . . . . . . . . . . . . . . . . . . . 29
Auto Lock. . . . . . . . . . . . . . . . . . . . . . . . . . . . . . . . . . . . . . . . . . 29
Set (Change) Password . . . . . . . . . . . . . . . . . . . . . . . . . . . . . 29
Call . . . . . . . . . . . . . . . . . . . . . . . . . . . . . . . . . . . . . . . . . . . . . . . . 29
Any Key Answer. . . . . . . . . . . . . . . . . . . . . . . . . . . . . . . . . . . . 29
DTMF Length . . . . . . . . . . . . . . . . . . . . . . . . . . . . . . . . . . . . . . 30
Transmit DTMF Tone . . . . . . . . . . . . . . . . . . . . . . . . . . . . . . . 30
Text Message . . . . . . . . . . . . . . . . . . . . . . . . . . . . . . . . . . . . . . 31
Roll Off Order . . . . . . . . . . . . . . . . . . . . . . . . . . . . . . . . . . . . . . 31
Word Wrap . . . . . . . . . . . . . . . . . . . . . . . . . . . . . . . . . . . . . . . . 32
Sort Order . . . . . . . . . . . . . . . . . . . . . . . . . . . . . . . . . . . . . . . . . 32
Audio. . . . . . . . . . . . . . . . . . . . . . . . . . . . . . . . . . . . . . . . . . . . . . 33
-ii-

Table of Contents
Ring volume . . . . . . . . . . . . . . . . . . . . . . . . . . . . . . . . . . . . . . . 33
Ring type . . . . . . . . . . . . . . . . . . . . . . . . . . . . . . . . . . . . . . . . . . 33
Network . . . . . . . . . . . . . . . . . . . . . . . . . . . . . . . . . . . . . . . . . . . 33
Voice Privacy. . . . . . . . . . . . . . . . . . . . . . . . . . . . . . . . . . . . . . . 33
Select Phone Number . . . . . . . . . . . . . . . . . . . . . . . . . . . . . . 34
Activate Network. . . . . . . . . . . . . . . . . . . . . . . . . . . . . . . . . . . 34
Network Priority. . . . . . . . . . . . . . . . . . . . . . . . . . . . . . . . . . . . 35
Clock . . . . . . . . . . . . . . . . . . . . . . . . . . . . . . . . . . . . . . . . . . . . . . 35
Set Clock. . . . . . . . . . . . . . . . . . . . . . . . . . . . . . . . . . . . . . . . . . . 35
Set Alarm, Auto On, Auto Off . . . . . . . . . . . . . . . . . . . . . . . 36
Environment. . . . . . . . . . . . . . . . . . . . . . . . . . . . . . . . . . . . . . . 37
One-Touch Dialing . . . . . . . . . . . . . . . . . . . . . . . . . . . . . . . . . 37
Fixed Digit Dialing . . . . . . . . . . . . . . . . . . . . . . . . . . . . . . . . . 37
Language. . . . . . . . . . . . . . . . . . . . . . . . . . . . . . . . . . . . . . . . . . 38
Wakeup Message . . . . . . . . . . . . . . . . . . . . . . . . . . . . . . . . . . 38
Handsfree. . . . . . . . . . . . . . . . . . . . . . . . . . . . . . . . . . . . . . . . . . 38
Handsfree Switch . . . . . . . . . . . . . . . . . . . . . . . . . . . . . . . . . . 38
Backlight. . . . . . . . . . . . . . . . . . . . . . . . . . . . . . . . . . . . . . . . . . . 39
Auto Answer. . . . . . . . . . . . . . . . . . . . . . . . . . . . . . . . . . . . . . . 39
Reset Settings. . . . . . . . . . . . . . . . . . . . . . . . . . . . . . . . . . . . . . 39
View Own Number. . . . . . . . . . . . . . . . . . . . . . . . . . . . . . . . . 39
5. Lock/Unlock Keypad . . . . . . . . . . . . . . . . . . . . . . 40
6. Silent Mode. . . . . . . . . . . . . . . . . . . . . . . . . . . . . . . 40
7. Non Public Mode. . . . . . . . . . . . . . . . . . . . . . . . . . 40
Acquire New System . . . . . . . . . . . . . . . . . . . . . . . . . . . . . . . 41
Search for System . . . . . . . . . . . . . . . . . . . . . . . . . . . . . . . . . . 41
View Stored Systems . . . . . . . . . . . . . . . . . . . . . . . . . . . . . . . 42
8. Digits Editing . . . . . . . . . . . . . . . . . . . . . . . . . . . . . 42
Manual Pause. . . . . . . . . . . . . . . . . . . . . . . . . . . . . . . . . . . . . . 43
Auto Pause . . . . . . . . . . . . . . . . . . . . . . . . . . . . . . . . . . . . . . . . 43
Link to Phone Book. . . . . . . . . . . . . . . . . . . . . . . . . . . . . . . . . 43
9. Mute . . . . . . . . . . . . . . . . . . . . . . . . . . . . . . . . . . . . . 44
Mic Mute . . . . . . . . . . . . . . . . . . . . . . . . . . . . . . . . . . . . . . . . . . 44
All Mute . . . . . . . . . . . . . . . . . . . . . . . . . . . . . . . . . . . . . . . . . . . 44
Unmute. . . . . . . . . . . . . . . . . . . . . . . . . . . . . . . . . . . . . . . . . . . . 44
0. Phone Lock . . . . . . . . . . . . . . . . . . . . . . . . . . . . . . . 45
-iii-

Table of Contents
Chapter 4: Safety & Performance. . . . . . . . . . . . . 46
Safety Precautions . . . . . . . . . . . . . . . . . . . . . . . . . . . . . . . . . 46
Phone Performance . . . . . . . . . . . . . . . . . . . . . . . . . . . . . . . . 57
Technical Information. . . . . . . . . . . . . . . . . . . . . . . . . . . . . . 57
Battery Care & Disposal. . . . . . . . . . . . . . . . . . . . . . . . . . . . . 57
Chapter 5: Warranty & Service . . . . . . . . . . . . . . . 58
Limited Warranty. . . . . . . . . . . . . . . . . . . . . . . . . . . . . . . . . . . 58
NEC Service Support . . . . . . . . . . . . . . . . . . . . . . . . . . . . . . . 61
NEC Wireless Marketing . . . . . . . . . . . . . . . . . . . . . . . . . . . . 61
Index. . . . . . . . . . . . . . . . . . . . . . . . . . . . . . . . . . . . . . . 62
-iv-

Chapter 1: Getting Started
Phone Activation
Before you can use your new NEC cellular telephone, the
phone must be activated by a cellular service provider.
Please contact your local cellular service provider for any
questions regarding phone activation.
Phone Safety & Performance
Prior to operating your cellular phone, please read this manual thoroughly including “Chapter 4: Safety & Performance”
on page 46.
NEC Authentic Accessories™
NEC recommends using only NEC Authentic Accessories
with your cellular phone to ensure optimum quality performance.
Connecting & Disconnecting the Battery
Your phone is powered by a rechargeable battery. (See “Battery Care & Disposal” on page 57 for important battery
information.) To connect the battery to your phone, place
the grooved end of the battery against the base of the
phone. Lower the battery toward the phone to lock into
place. T o remov e the battery , check that the phone is turned
off. (Note that failure to power off the phone before removing the battery can possibly result in loss of stored numbers
or messages.) Slide the locking latch located above the battery upward and carefully lift the battery away from the
phone.
Battery
Locking Latch
-1-
Battery
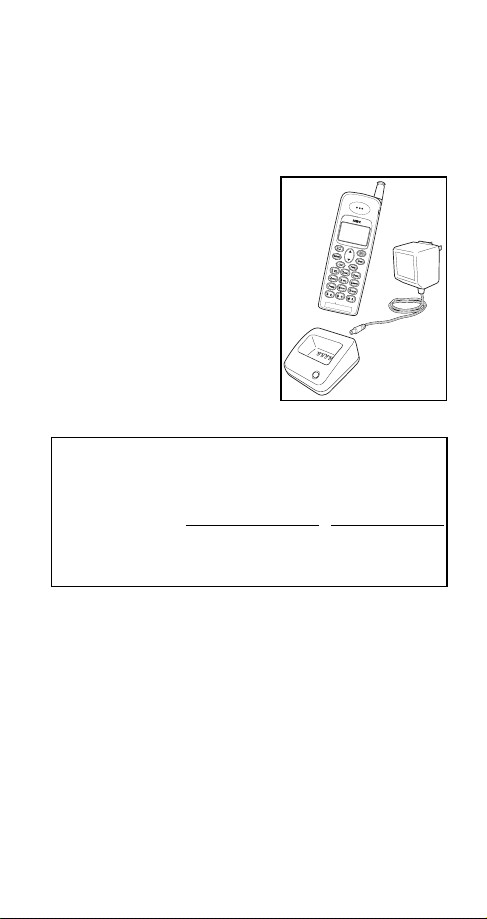
Charging the Battery
A new phone battery must be fully charged before
being used for the first time.
charged through the setup described and shown below.
The charging times listed below indicate the charging duration with the phone powered off.
Charging Setup: Phone,
Standard or Ra pi d A C A dap ter, &
Charging Stand
Plug the AC adapter into a standard AC electrical outlet. Insert the
adapter plug into the charging
stand jack. Place the phone in the
charging stand. The red LED indicator on the charging stand illuminates while the battery is charging,
and turns off when charging is
complete.
Battery Charging
With Standard Charger With Rapid Charger
Standard NiMH ~ 4 hours < 2 hours
Slim Li-Ion N/A < 2 hours
Extended Li-Ion N/A < 2 hours
The phone battery can be
NiMH and Li-Ion
Times
(in digital mode)
-2-

Voice Mail Messaging & Text Messaging
Voice mail messaging and text messaging services, when
available, are provided by your cellular service provider.
Before you can receive either voice or text messages with
your phone, you must subscribe to these cellular service
provider options. Contact your cellular service provider for
information on availability and setup of these services. See
“Voice Messages” on page 24 and “Text Messages” on
page 25 for information on retrieving messages.
Phone Password
When your phone is activated, a 4-digit password is programmed into the unit. The password locks and unlocks
your phone, and provides access to restricted phone settings. The initial password programmed into the phone is
usually
additional information on your security password.
. Check with your cellular service provider for
0000
-3-
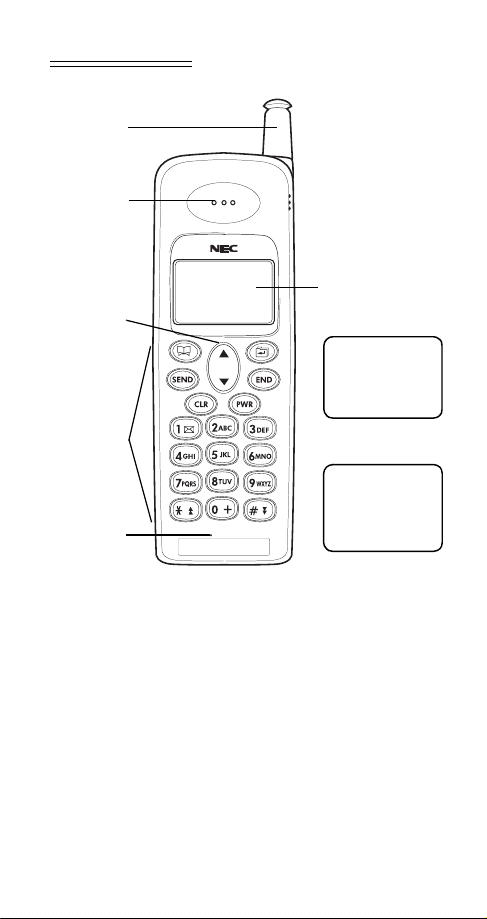
HONE LAYOUT
P
Antenna
Earpiece
Scroll Key
Phone Keys
Microphone
Display Screen
!
;
(
12: 00am
Jan01
S
Standby Mode
Display Example
\ !
I n
Call in Progress
Display Example
ERVI C
(
;
555
Use
E
1212
+
+
-4-

ENU TREE OVERVIEW
M
M
Menu Options
1 Call Logs
2 Phone Book
3 Message
4 Settings
5 Lock
Keypad
1 Add to Phone Book
2 View by Name
3 View by Location
4 View by Number
5 Lock Phone Book
6 Clear Phone Book
1 Lock
2 Call
3 Text Message
4 Audio
5 Network
6 Clock
7 Environment
8 Handsfree
9 Reset settings
0 View Own N umber
1 Dialed
2 Received
3 Missed
4 Air Time
5 Clear
z
1 Voice Messages
2 Text Messages
3 Clear All Text Messages
4 Store as Voice Mail number
z
z
z
6 Silent Mode
7 Non Pub Mode
8 Digits Editing
9 Mute (Available only with a call in progress)
0 Phone Lock
1 Off
2 On
1 Manual Pause
2 Auto Pause
3 Link to Phone Book
Enter
Password
z
Check with your cellular service provider for availability and service.
z
Only available when phone is used with a handsfree adapter.
Must have rights to a non-public or private system.
1 Full
2 Partial
3 Unlock
-5-
1 Acquire New System
2 Search for System
3 View Stored Systems
1 Mic Mute
2 All Mute
3 Unmute

ISPLAY ICONS
D
Service Indicators
Digital or Analo g
!
/
or
Service
Call & Message Indicators
\
<>
[]
Operation Indicators
Battery Charge
+
Indicator (fully
charged status
shown)
Cellular Signal
;(
Strength
Battery Charging
~
in Progress
Silent Mode
S
Setting Ac ti va ted
ENU NAVIGATION KEYS
M
Key Action Key Action
Display Main Menu
M
or select a flashing
menu or submenu
selection.
Scroll to view entire
I
menu and submenu
contents. Adjust
earpiece and keypad
volume by pressing
top portion of key to
increase or bottom
portion of key to
decrease.
=
@
@
{||}
Exit any menu and
E
return to standby
state display.
Press to return to
C
next higher menu
level; press and hold
to return to sta n dby
mode display.
Call in Progress
Voice Mail Mes-
sage Received
Text Message
Received
Phone Full Lock
Setting Activated
Phone Partial
Lock Setting
Activated
Alarm Clock
Setting Activated
In Standby,
Keypad Volume
Adjusted; During
Conversation,
Earpiece
Volume Adjusted
-6-

Chapter 2: Basic Operations
Turning On Phone
Press and hold the P key for approximately two seconds
to turn on the phone.
The cellular signal strength indicator, the battery charge
indicator, the time, the date, and the cellular service provider(s) indicator appear on the displ ay. (See “Display Icons”
on page 6.)
The cellular service provider
!
;
(
12: 00am
Jan01
S
ERVI C
E
Turning Off Phone
Press and hold the P key for approximately two seconds
to turn off the phone.
Standby Mo de
Once the phone is powered on, the phone enters the
standby mode. (The above screen illustration depicts the
phone in standby mode.) The standby mode remains displayed until a call is placed or received, a menu is accessed,
or the phone is powered off. Note that the phone must have
cellular service to either send or receive phone calls.
Signal Strength
The cellular signal is indicat ed on the displa y as ;( with the
maximum of six bars indicating a strong signal. Although
you can use the phone without extending the phone
antenna, extending the antenna can increase the strength
of the received cellular signal.
indication, shown in this
+
example as SERVICE,
appears on the phone display
as the name of the current service provider when the phone
is operating on a recognized
provider’s system. When the
phone operates on an unrecognizable system, HOME or
ROAM is displayed.
-7-

Battery Charge Indicator
The battery charge indicator (+) shows the charge level of
the battery. When the battery charge drops to a low level,
the phone displays the following warning message:
While displaying the recharge notification, the phone also
sounds a short tone at ten-second intervals. Once the
recharge message displays and the short tone sounds, the
phone battery has approximately one minute of use
remaining. The phone then automatically powers off. See
“Charging the Battery” on page 2.
RECHARGE
BATTERY
Placing a Call
With the phone in the standby mode, key in the telephone
number and press
ing the phone is in use. Note that the phone must have cellular service to either send or receive phone calls.
Correcting Digit Entry Error
If you make a mistake entering a phone number, press
once to delete the last entered digit, or press and
C
hold
Dialing a phone number stored in phone book
With the phone in the standby mode, press B to access
the phone book, use the
phone number, and press
Calling Last Number Dialed
With the phone in the standby mode, press S to call the
last number dialed.
Dialing a phone number on notepad
During a call, you can use your phone as a notepad or
scratchpad to record a phone number provided to you.
Once the call in progress is completed and you press
to terminate the call, you can dial the displayed notepad
phone number by pressing
from Notepad to the Phone Book” on page 20 for storing
the notepad information to your phone book.
S. The phone icon (
to erase all of the entered digits.
C
key to locate the desired
I
.
S
S
) appears indicat-
\
. See “Adding Numbers
E
-8-

With your phone powered on and operating in normal, unrestricted conditions, you can place a call for emergency service (for
example, 911) by entering in the phone numb e r d igits and press-
.
ing
S
Under c ertain cond itions , suc h as partial or full phone lock (see “0.
Phone Lock” on page45), calls can be restricted. To he lp e nsure
that emergency calls can be placed, even under these restricted
conditions, your phone contains a preprogrammed emergency
number. If the emergency number you dial matches the preprogrammed number, the c all is placed regardless of any restrictions.
The preprog rammed numb er is usually 911; howeve r, your service
provider may change the number if necessary. If you are uncertain as to the numbe r that has been preprogrammed, contact
your service p rovid e r .
You can also program an emergency number into a speed-dial,
one-touch location (see “One-T ouch Dialing” on page37); however, please note that the one-touch dialing feature does not operate when the phon e is se t to fu ll lock. If the pho ne is in full lock, you
must dial the digits of the emergency number .
Ending a Call
Pl acing an Eme rg ency Call
Press E. Note that if you are within the menu system (see
“Menu Navigation” on page 13), pressing
exits the menu system; pressing
phone to the standby mode and ends the call.
E once only
E twice returns the
Answering a Call
When the phone rings, press S to answer the call. Note
that the phone must have cellular service to either send or
receive phone calls.
Caller Identification
If caller identification is available in your area, the phone
number and/or name of the incoming call may be displayed when the call is received. Contact your cellular service provider on the availability of caller identification.
Call Waiting
If call waiting is available in your area, the phone sounds a
tone during a call in progress to indicate a second call is
incoming. To answer the incoming call, press
again to return to the initial call in progress. Contact
S
your cellular se rvice provider on the avai lability of call
waiting.
S
; press
-9-

Any Key Answer Setting
If the any key answer setting is turned on, any key except
P
or E can be pressed to answer an incoming call. See
“Any Key Answer” on page 29.
Ring Alert
The type and volume of the incoming call ringer alert can
be adjusted. See “Selecting Ringer Type” on page 11 and
“Setting Ringer Volume” on page10.
Adjusting Earpiece Volume
The scroll key can be used to adjust the earpiece volume
during a phone call. With a call in progress, press
increase or to decrease the earpiece volume.
I
to
Adjusting Keypad Volume
The scroll key can be used to adjust the keypad volume.1
With the phone in the standby state (no call in progress),
I
to increase or to decrease the keypad volume.
press
Accessing and Navigating Menus
The phone menus can be accessed by pressing the M key.
By pressing
of menus and submenus can be viewed by pressing
“Chapter 3: Menus” on page13 for detailed menu navigation information.
M
, the Main Menu is displayed. The contents
Additional Menu Selection
Information
?
For several menu selections, additional
usage information is provided to assist
?
you with making the appropriate selection. These helpful usage tips are identified with the marker shown on the left.
I
. See
Setting Ringer Volume
The incoming call ringer volume can be set to one of five
settings. Press
appears with the currently selected ring volume setting
flashing on the display. The available settings are 1 for minimum, 2 for low, 3 for medium, 4 for maximum, and 5 for
escalating (ringer volume increases as ring alert continues
to sound). Press the corresponding number for the desired
ringer volume setting. The phone ri ngs yo ur selection. P r ess
E
to save your selection and exit the ring volume menu.
M
44
1
. The ring volume menu
1. When the phone is connected to a handsfree
headset accessory, keypad tones sound through
the headset earpiece.
-10-

Selecting Ringer Type
The incoming call ringer alert can be set to one of several
selections. Press
appears with the currently selected ringer selection f lashing
on the display. The available settings are 1, 2, 3, 4, 5, and 6.
Press the appropriate corresponding phone key to hear a
setting. The phone rings your selection. Press
the selected setting and exit the ring type menu.
M442. The ring type menu
E
to save
Viewing Your Phone Number
To view the phone number of your cellular phone, press
C with the phone in the standby mode. The phone num-
ber appears on the bottom line of the display for approximately three seconds. (See “View Own Number” on page 39
for another way to view your phone number.)
Retrieving Voice Mail
If voice mail service is available through your cellular provider, you can easily retrieve your voice mail messages by
pressing and holding
mode. If the voice mail retrieval phone number has been set
up in your phone, the phone number is automatically
dialed. Follow your cellular service provider instructions for
voice mail retrieval.
Storing Voice Mail Number
See “Store As Voice Mail Number” on page28.
1 with the phone in the standby
Retrieving Text Messages
If text messaging service is available through your cellular
provider, you can easily view any text messages received in
your phone by pressing
standby mode. See “Text Messages” on page 25.
M32 with the phone in the
Using the Phone Book
Up to 99 phone numbers can be stored in the phone book.
Once phone number entries are stored, the phone book is
at your fingertips for easy dialing. To dial a phone number
stored in the phone book, press
standby mode to access phone book. Use the
locate the desired phone number and press
view, edit, or delete phone book entries, see “2. Phone
Book” on page18 and “Phone Book Options Menu” on
page 21.
B with the phone in the
I key to
S. To add,
-11-

Using the Phone Notepad
During a phone call, you can use your phone as a notepad
or scratchpad to record a phone number. Once the call in
progress has ended, you can then either dial the phone
number or store the phone number to the phone book.
\ !
(
;
00m58s
INUSE
Call in Progress
See “Dialing a phone number on notepad” on page8 and
“Adding Numbers from Notepad to the Phone Book” on
page 20.
+
;
(
\ !
00m58s
5551 1 1 1
INUSE
With a call in
progress, press the
number keys to
record a phone
number.
+
!
(
;
00m58s
5551 1 1 1
After the call in
progress is ended,
the displayed
recorded phone
number can be
dialed or saved t o the
phone book.
+
Setting the Time and Date
To access the clock menu for setting the correct time and
date, press
tings are displayed. Key in the correct hour; press
key down arrow). Key in the correct minutes; press
M461. The current time and date set-
(scroll
N
. Press
N
M to select either a.m. or p.m. Key i n th e co r re ct mo nt h by
entering in the corresponding number from 1 through 12
for the desired month; press
month from 1 through 31; press
played, press
clock menu.
corresponding four digits of the correct year, and press
to save the time and date settings, and to exit the clock
menu.
E
to save the clock entry and to exit the
1
If the correct year is not displayed, key in the
. Key in the correct day of the
N
. If the correct year is dis-
N
E
1. The year must be entered before the day when
entering the date “Febr uar y 29” durin g a leap
year.
-12-

Chapter 3: Menus
Menu Navigation
The phone contains menus and submenus to access and
select the phone settings. (See “Menu Tree Overview” on
page 5.) You can navigat e through all menus and submenus
by using the
of the menu and submenu listings has an assigned menu or
submenu number. You can select and access a menu by
pressing the assigned menu number on the keypad or by
pressing
the display.
You can return to the previously displayed menu by pressing
E or by pressing and holding C.
You can quickly access menus by using the assigned menu
and submenu numbers as shortcuts. Note that the menu
shortcuts are provided for each menu and submenu.
I key to scroll through the menu listings. Each
M when the desired menu listing is flashing on
C. You can return to the standby display by pressing
-13-
Main Menu
M
The Main Menu con tain s all o f the
menu and submenu settings.
With the phone in the standby
mode, the Main Menu can be
accessed and displayed by press-
M. The Main Menu is dis-
ing
played on the right.
Press I to scroll
through and vie w
the entire Main Menu
1. Call Logs
With the phone in the standby
mode, the Call Log Menu can be
accessed by pressing
The Call Log Menu is displa yed on
the right.
the entire Call Log Menu
M1.
Press I to scroll
through and view
Mai n menu
1.Cal l
Logs
2.Phone
Boo k
3.Message
4.Setti ngs
5.Loc k
Ke y pad
6.Si l e nt
Mod e
7.Non Pu b
Mode
8.Di gi ts
Editing
9.Mute
0.Loc k
Phon e
Menu Shortcut
M1
Cal l Log
menu
1.Dial ed
2.Recei ved
3.Mi ssed
4.Ai r Ti m e
5.Cl e ar
-14-

Menu Shortcut
Dialed (Call Log)
Your phone maintains a list of up to 20 of the last phone
numbers you dialed.
calls, press
dialed phone number log by pressing
displayed phone number
dialed phone number log. (See “Call Log Options Menu” on
page 16 for information on dialing, editing, and storing call
log entries.)
M11
Received (Call Log)
Your phone maintains a list of up to 20 of the last incoming
calls you received.
calls, press
received phone number log by pressi ng
a displayed phone number
the received phone number log. (See “Call Log Options
Menu” on page 16 for information on dialing, editing, and
storing call log entries.)
M12
Missed (Call Log)
Your phone maintains a list of up to 20 of the last incoming
calls you missed.
calls, press
missed phone number log by pressing
displayed phone number
missed phon e numb er lo g . (See “Call Log Options Menu” on
page 16 for information on dialing, editing, and storing call
log entries.)
To view the list of the last 20 unanswered
M13
M11
To view the list of the last 20 outgoing
1
. Scroll through the contents of the
2
in the log or press E to exit the
Menu Shortcut
To view the list of the last 20 received
1
. Scroll through the contents of the
2
in the log or press E to exit
Menu Shortcut
M1
1
. Scroll through the contents of the
2
in the log or press E to exit the
I. Press S to dial a
M1
2
I. Press S to dial
3
I. Press S to dial a
1. If the dialed, receiv ed, or missed phone number log
does not contain any call information, the phone
beeps and the call log menu remains displayed
when an attempt to view the log is made.
2. When a phone number stored in a call log is viewed ,
only the last 10 digits of the phone number are displayed; however, all digits of the phone number (up
to a maximum of 15 digits) are displayed and dialed
when S is pressed.
-15-
 Loading...