

NEC NEFAX655e USER MANUAL

Safety Information

I Safety Information
For USA / Canada Users
As an Energy Star Parntner, NEC has determined that this machine meets the Energy Star
Guidelines for Energy Efficiency.
What is an Energy Star Machine?
Energy Star Machines have a feature that allows them to automatically turn off or “ go to
sleep” after a period of inactivity, ensuring night and weekend shut off.

Safety Information II
IMPORTANT SAFETY INSTRUCTIONS
•
Make sure that the electrical outlet that you use is located near the Facsimile.
•
Only connect the Facsimile to an earthed socket outlet.
IMPORT SAFETY INSTRUCTIONS IMPORTANT MESURES DE
When using your telephone equipment, basic
safety precautions should always be followed to
reduced the risk of fire, electric shock and
injury to persons, including the following:
1. Do not use this product near water,
for example, near a bath tub, wash
bowl, kitchen sink or laundry tub, in
a wet basement or near a swimming
pool.
2. Avoide using a telephone ( other
than a cordless type ) during an
electrical storm. There may be a
remote risk of electric from
lightning.
3. Do not use the telephone to report a
gas leak in the vicinity of the leak.
4. Use only the power cord and
batteries indicated in this manual. Do
not dispose of batteries in a fire.
They may explode. Check with local
codes for possible special disposal
instructions.
SAVE THESE INSTRUCTIONS
Certaines mesures de s
é
curité doivent
étre
prises pendant l’utilisation de matérial
téléphonique afin de réduire les risques
d’incendie, de choc électrique et de
blessures. En voici quelquesunes:
1. Ne pas utiliser l’appareil prés de l’eau,
p.ex., pr
é
s d’une baignoire, d’un lavabo,
d’un
é
vier de cuisine, d’un bac à lsver,
dans un sous-sol humide ou pr
é
s d’une
piscine.
2. Éviter d’utiliser le
téléphonique ( sauf
s’il s’agit d’un appareil sans fil )
pendant un orage électrique. Ceci peut
presenter un risque de choc électrique
causé par la foudre.
3. Ne pas utiliser l’appareol
téléphonique
pour signaler une fuite de gaz s’il est
situe prèes de la fuite.
4. Utiliser seulement le cordin d’alimentation
et le type de piles indiqu
é
s dans ce manuel.
Ne pas jeter les piles dans le feu: elles
peuvent exploser. Se confrmer aux
règlements pertlnents quant à
l’
élimination des poles.
CONSERVER CES INSTRUCTIONS

III Safety Information
LASER SAFETY
This FAX contains a page printer which operates by means of a laser. There is no
possibility of danger from the laser, provided the FAX is operated according to the
instructions in this manual provided.
Since radiation emitted by the laser is completely confined within protective housing, the
laser beam cannot escape from the machine during any phase of user operation.
INTERNAL LASER RADIATION (for all Uers)
Maximum Radiation power: 7.3x10 (W) Wave Length: 770-810 (nm)
This is a Class lllb Laser Diode Assy. That has an invisible laser beam. The printer head
unit is NOT A FIELD SERVICE ITEM. Therefore the printer head unit should not be
opened under any circumstances.
For United States Users
Laser Safety
This FAX is certified as a Class 1 Laser product under the U.S. Department of Health
Services (DHHS) Radiation Performance Standard according to the Food, Drug and
Cosmetic Act of 1990. This means that the FAX does not produce hazardous radiation.
CDRH Regulations
The Center for Devices and Radiological Health (CDRH) of the U.S. Food and Drug
Administration implemented regulations for laser products on August 2, 1976.
Compliance is mandatory for products marketed in the United States. The label shown
below indicates compliance with the CDRH regulations and must be attached to laser
productd marketed in the United States.
WARNING:
Use of controls, adjustment or performance of procedures other than
those specified in this manual may result in hazardous radiation
exposure.
-4

Safety Information IV
USER INSTRUCTIONS (For U.S.A.Users)
FCC PART15-RADIO FREQUENCY DEVICES WARNING
The following applies to the Facsimile Unit (NEFAX655e) only without the NEC
Network option installed.
WARNING:
This equipment has been tested and found to comply with limits for
a Class B digital device, pursuant to Part 15 of the FCC Rules. These
limits are designed to provide reasonable pr otection against harmful
interference in a residential installation. This equipment generates,
users, and radiates radio frequency energy and, if not installed and
used in accordance with the instructions, may cause harmful
interference to radiocommunications. However, there is no
guarantee that interference will not occur in a patricular
installation. If this equipment does cause harmful interference to
radio or television receiption, which can be determined by one or
more following measures:
•
Reorient or relocate the receiving antenna.
•
Increase the separation between the equipment and the receiver.
•
Connect the equipment into an outlet on a circuit different from that to which the
receiver is connected.
•
Consult the dealer or an experienced radio-TV technician for help.
•
Any changes or modifications not expressly to operate this equipment.
FCC : Declaration of Conformity
Product Type Facsimile
Product Name NEFAX655e
Option / Accessories 2nd Paper Cassette; PCL5e printer kit; 8MB memory for fax;16MB
memory for printer.
This Devices complies with Part 15 of the FCC Rules. Operation is subject to following
Conditions:
1. This devices may not cause harmful interference, and
2. this devices must accept any interference received, including interference that may cause
undesired operation.

V Safety Information
Note: *A LAN adapter (NEC Network option) is to be used only in industrial
areas.
*This device must be used with shielded interface cables. The use of non-
shielded cables is likely to result in interference with radio
communications and is prohibited under FCC Rules.
*The design and production of this unit conforms to FCC regulations,
and any change or modifications must be registered with the FCC and
are subject to FCC control. Any change made by the purchaser or user
without first contacting the manufacturer will be to penalty under FCC
regulations.
FCC PART 15 - RADIO FREQUENCY DEVICES WARNING
The Facsimile Unit (NEF AX655e) with the NEC Network option installed meets the FCC
Class A requirements when the network cable is attached either of the IEEE 802.3
connectors.
WARNING:
This equipment has been tested and found to comply with limits for
a Class A digital device, pursuant to Part 15 of the FCC Rules. These
limits are designed to provide reasonable pr otection against harmful
interference when the equipment is operated in a commercial
environment. This equipment generate, users, and radiate radio
frequency energy and, if not installed and used in accordance with
the instruction manual, may cause harmful interference to radio
communications.
Operation of this equipment in a residental area is likely to cause
harmful interference at his own expence. This device must be used
with shielded cables likely to result in interference with radio
communications and is prohibited under the FCC Rules. The design
and production of this unit conform to FCC regulations, and any
changes or modifications must be registered with thw FCC and are
subject to FCC control. Any changes made by the purchaser or user
without first contacting the manufacturer will be subject to penalty
under FCC regulations.

Safety Information VI
FCC PART 68 - TELECOMUNICATION DEVICES
This equipment complies with Part 68 of the FCC Rules. On the rear panel of this
equipment is a label that contains, among other information, the FCC registration number
and Ringer Equivlence Number (REN) for this equipment. If requested, provide this
information to your telephone company.
This equipment uses THE FOLLOWING USOC JACKS : RJ11C
The REN is useful to determine the quantity of devices you may connect to your telephone
line and still have all of those devices ring when your number is called. In most, but not all
areas, the sum of the RENs of all devices should not exceed five (5.0). T o be certain of the
number of devices you may connect to your line, as determined by the REN, you should
call your local telephone company to determine the maximum REN for your calling area.
If your telephone equipment causes harm to the telephone network, the Telephone
Company may discontinue your service temporarily. If possible, they will notify you in
advance. But if advance notice isn’t practical, you will be notified as soon as possible. You
will be advised of your right to file a complaint with the FCC.
Your telephone company may make changes to its facilities, equipment, operations, or
procedures that could affect the proper operation your equipment. If they do, you will be
given advance notice so as to give you an opportunity to maintain uninterrupted service.
The telephone company may ask you to disconnect this equipment from network until
problem has been corrected or you are sure that the equipment is not malfunctioning.
This equipment may not be used on coin service provided by the telephone company.
Connection to party lines is subject to state tariffs. (Contact your state public utility
commision or corporation commission for information.)
CUSTOMER INFORMATION FOR PRIVATELY OWNED COIN PHONES
To comply with state tariffs, the telephone company must be given notification prior to
connection.
WARNING FOR THE SETTING OF HEADER AND FOOTER
The Telephone Consumer Protection Act of 1991 makes it unlawful for any person to use
a computer or other electronic device to send any message via a telephone fax machine
unless such message clearly contains in a margin at the top or bottom of each transmitted
page or on the first page of the transmission, the date and time it is sent and an
identification of the business or other entity, or other individual sending the message and
the telephone number of the sending machine or such business, other entity, or individual.
(Refer to Chapter 4 Facsimile Programming page 4-30 and 4-36)
Telephone line cord
The 26AWG telephone line cord should only be used on this machine.

VII Safety Information
USER INSTRUCTIONS (For Canada Users)
INTERFERENCE-CAUSING EQUIPMENT STANDARD (ICES-003 ISSUE 3)
WARNING
The following applies to the Facsimile Unit (NEFAX655e) only without the NEC
Network option installed.
This Class B digital apparatus complies with Canadian ICES-003. Cent apparel
numérique de la classe B est conforme à la norme NMB-003 du Canada.
INTERFERENCE-CAUSING EQUIPMENT STANDARD (ICES-003 ISSUE 3 )
WARNING
The following applies to the Facsimile Unit (NEF AX655e) with the NEC Network optoin
installed.
This Class A digital apparatus complies with Canadian ICES-003. Cent apparel
numérique de la classe A est conforme à la norme NMB-003 du Canada.
IC CS-03-TELECOMUNICATION DEVICE
Note: Industry Canada (IC) label identifies certified equipment. This certification
means that the equipment meets certain telecommunications network
protective, operational, and safety requirements. IC does not guarantee the
equipment will operate to the user’s satisfaction.
Before installing this equipment, users should ensure that it is
permissible to be connected to the facilities of the local
telecommunication company. The equipment must also be installed using
an acceptable method of connection. In some cases, the company’s inside
wiring associated with a single line individual service may be extended
by means of a certified connector assembly (telephone extension cord).
The customer should be aware that compliance with the above conditions
may not prevent degradation of service in some situations.
Repairs to certified equipment should be made by an authorized
Canadian maintenance facility designated by the supplier. Any repairs or
alterations made by the user to this equipment, or equipment
malfunctions, may give the telecommunications company cause to
request the user to disconnect the equipment.
Users should ensure for their own protection that the electrical ground

Safety Information VIII
connections of the power utility, telephone lines, and internal metallic
water pipe system, if present, are connected together. This precaution
may be particularly important in rural areas.
CAUTION
Users should not attempt to make such connections themselves, but should
contact the appropriate electric inspection authority, or electrician, as
appropriate.
Note: The Ringer Equivalence Number (REN) assigned to each terminal device
provides an indication of the maximum number of terminals allowed to be
connected to a telephone interface. The termination on an interface may
consist of devices subject only to the requirement that the sum of the
Ringer Equivalence Numbers of all the devices does not exceed 5 .
HEARING AID-COMPATIBILITY (For U.S.A./ Canada Users)
This equipment complies with the FCC / IC guide lines for hearing aid-compatibility.
OZONE RELEASE (For all Users)
During printer operation, a small quantity of ozone is released. This amount is not large
enough to harm being adversely. However, be sure the room where the FAX is being used
has adequate ventilation, especially if you are printing a high volume of materials, or if the
FAX is being used continuously over a long period.
IX Safety Information
LABELS

Table of Contents
i
Table of Contents
Chapter 1 - Introduction
Introduction to the NEFAX655e Units.......................................................................................1-1
Important Safeguards..................................................................................................................1-2
Multi-Tasking.............................................................................................................................1-4
Machine Components.................................................................................................................1-5
Chapter 2 - Basic Operations
Sending a Document...................................................................................................................2-1
Dialing Methods.........................................................................................................................2-5
Receiving a Document ......................................................................................................... 2-62-6
Making Copies..........................................................................................................................2-10
Chapter 3 - Advanced Facsimile
Using the Function Menu...........................................................................................................3-1
Broadcast....................................................................................................................................3-2
Timer TX (Delay Transmission)................................................................................................3-3
Mailbox TX................................................................................................................................3-4
Print Mailbox RX.......................................................................................................................3-5
Print Memory RX.......................................................................................................................3-6
Polling TX..................................................................................................................................3-7
Polling RX..................................................................................................................................3-9
Continuous Polling RX ............................................................................................................3-10
Relay Initiate ............................................................................................................................3-11
Using Combination Dial...........................................................................................................3-12
JOURNAL Key........................................................................................................................3-13
REPORT Key...........................................................................................................................3-14
Reports......................................................................................................................................3-15
SCHEDULE Key......................................................................................................................3-16
PIN CODE Key........................................................................................................................3-17
SPEAKER Key.........................................................................................................................3-18
F Codes.....................................................................................................................................3-19

Table of Contents
ii
Chapter 4 - Facsimile Programming
Accessing The User Program Area............................................................................................4-1
Initial User Data .........................................................................................................................4-5
Machine Operations ...................................................................................................................4-7
Document Scan Settings...........................................................................................................4-13
Dial Registration ......................................................................................................................4-18
TX Operation............................................................................................................................4-27
RX Operation ...........................................................................................................................4-31
Line 2 Setting...........................................................................................................................4-39
Reports .....................................................................................................................................4-41
Chapter 5 - Internet Fax(Option)
Internet Fax ................................................................................................................................5-1
Setting up the Internet Fax .........................................................................................................5-3
Advanced Operations of Internet Fax ......................................................................................5-14
Error Messages.........................................................................................................................5-16
Chapter 6 - PC Printing & Scanning
Set Printer...................................................................................................................................6-1
Memory Allocations...................................................................................................................6-7
PCL4 Emulation.........................................................................................................................6-8
Printer Messages ......................................................................................................................6-10
GDI Printer Feature(option)....................................................................................................6-11
Scanning (TWAIN Driver Option) ..........................................................................................6-15
Class 1 Fax/Modem..................................................................................................................6-17
Chapter 7 - Maintenance & Supplies
Loading the Paper.......................................................................................................................7-1
Clearing Paper Jams...................................................................................................................7-4
Changing Toner Cartridge..........................................................................................................7-9
Maintenance .............................................................................................................................7-12
Chapter 8 - Troubleshooting
Troubleshooting .........................................................................................................................8-1
Chapter 9 - Specifications
Physical Specifications...............................................................................................................9-1
Electrical Specifications.............................................................................................................9-2
Operational Specifications .........................................................................................................9-2
Facisimile Specifications............................................................................................................9-4
Optional Accessories Specifications..........................................................................................9-4
Environmental Specifications ....................................................................................................9-9
Appendix - Unpacking & Installation
Unpacking .................................................................................................................................A-1
Setting Up Fax Unit...................................................................................................................A-3
Final Checkout ........................................................................................................................A-11
Setting Up the (Optional) 2nd Paper Cassette.........................................................................A-13

Chapter 1
Introduction

Introduction to the NEFAX655e Units
1 - 1 Introduction
Introduction to the NEFAX655e Units
The NEFAX655e is a multi-function device that in addition to the Fax capability,
allows you to Print, Scan and Copy.
How to Use This Manual
This manual explains the functions and operation of the NEFAX655e unit. It also
gives some troubleshooting tips as well as general precautions to be observed
during operations.
To ensure the best performance and effective use of your unit, read this manual
carefully from cover to cover. After you have read the manual, keep it near your
Fax unit for handy reference. It should be helpful in solving any operational
questions you may have.
This manual is written to cover the base machine with all the options installed. If
your unit does not have these options installed, just skip that section. If you
choose to upgrade your unit in the future, you will already have the necessary
information. Call your Sales or Service Representative to order options and
schedule their installation.
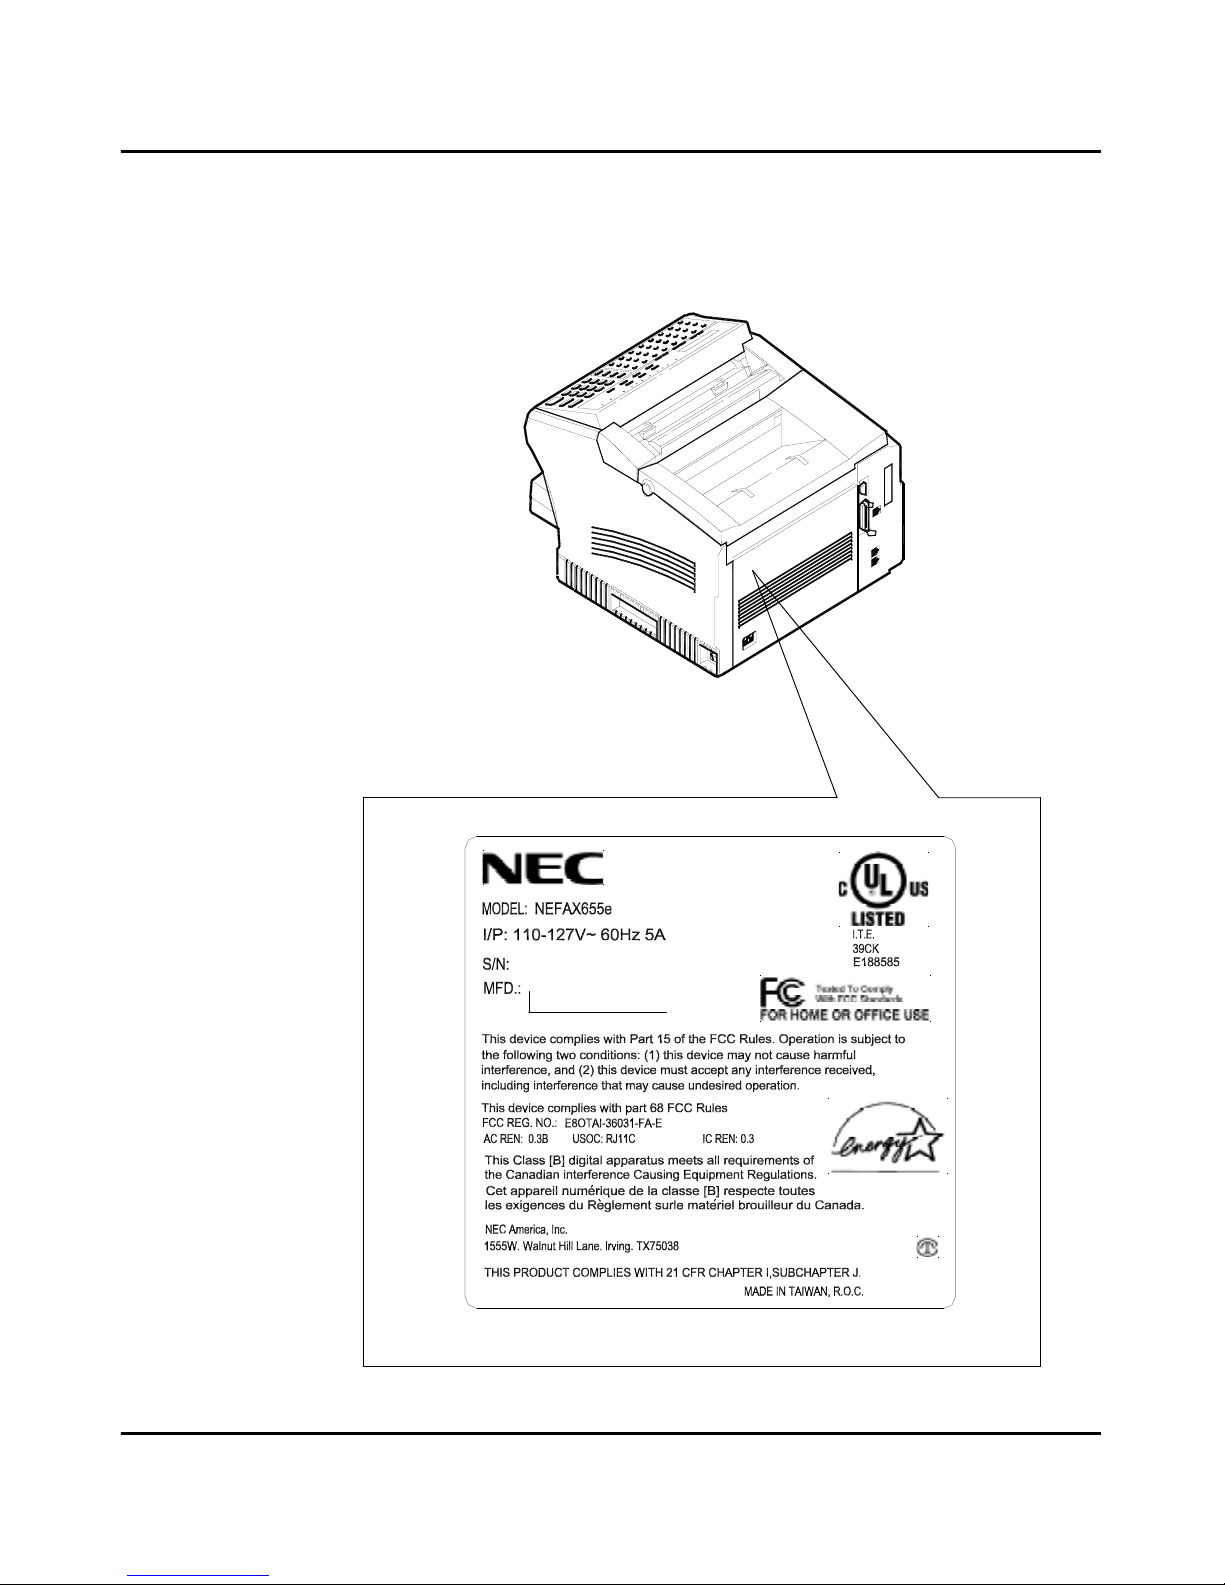
Agency Certification
Your NEFAX655e unit complies with FCC rules, and other agency certification
requirements. Refer to the Appendix section of this manual for details.
This unit is Energy Star qualified.
Machine Components
1 - 5 Introduction
Machine Components
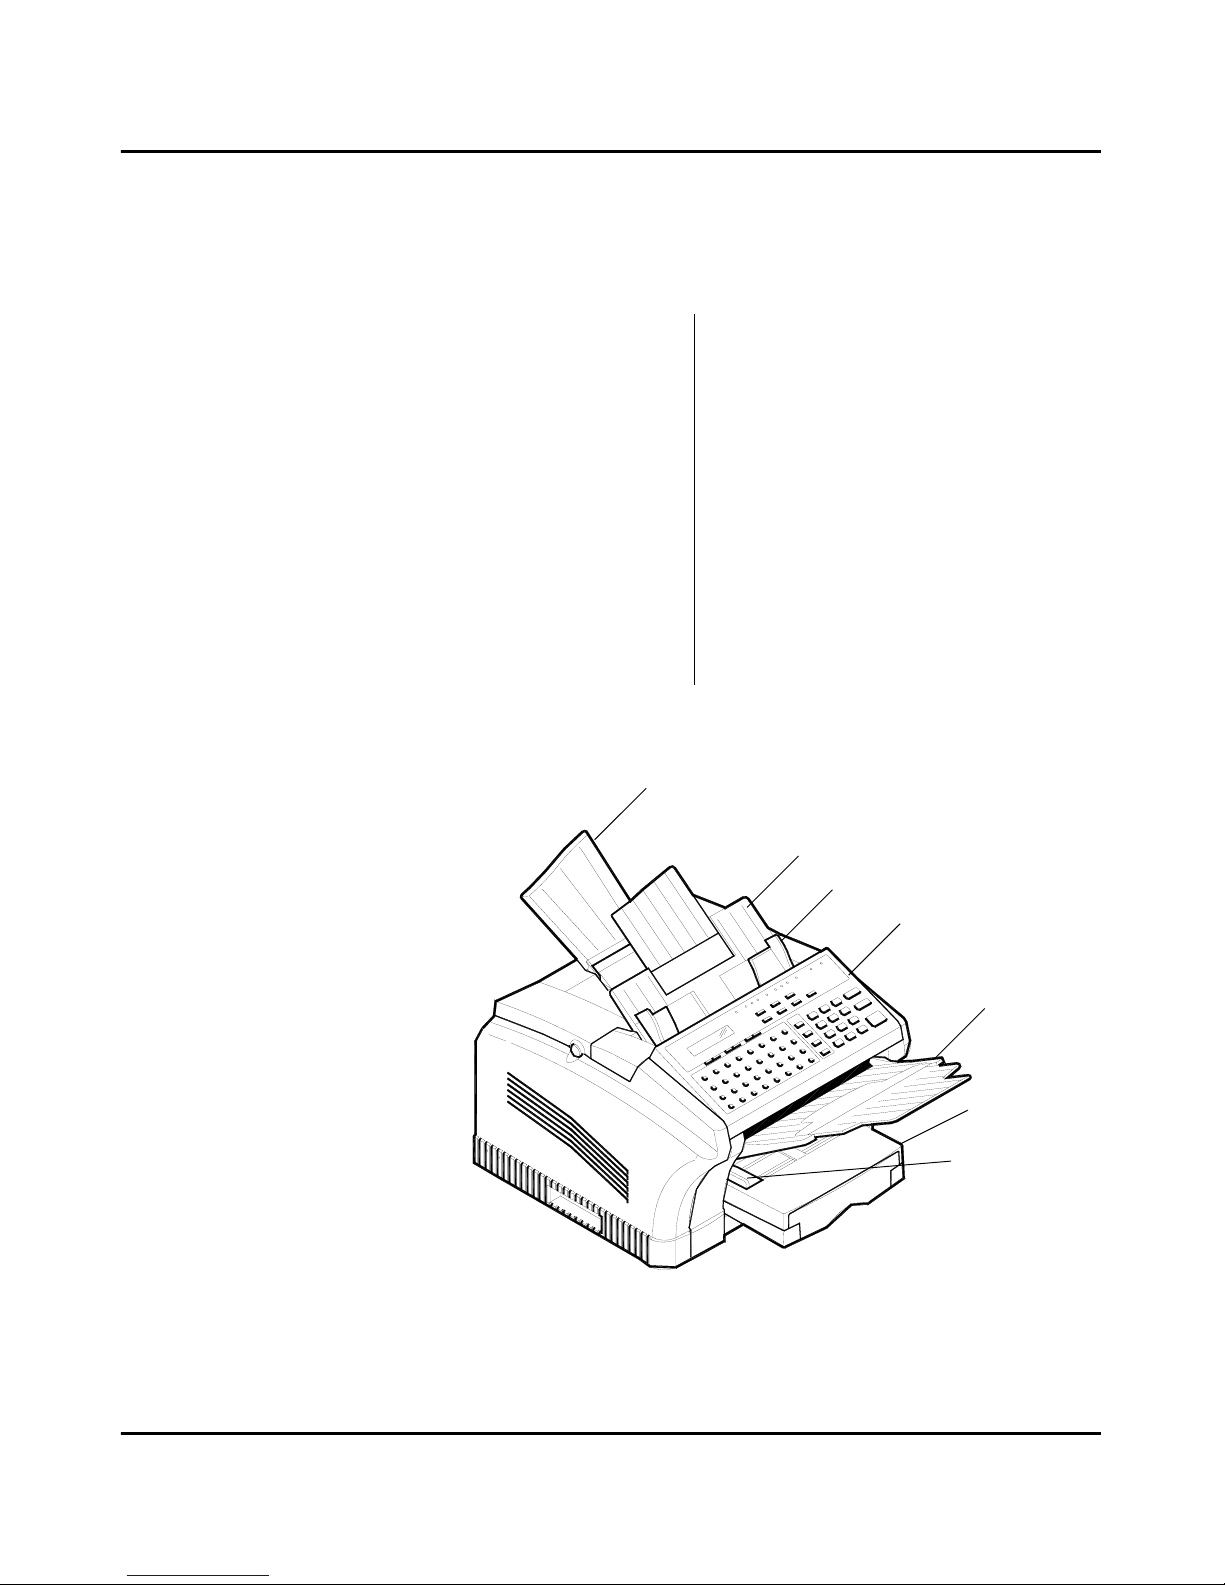
External Components: Front
1 Document Exit Tray
This tray catches the original document after
it passes through the scanner.
2 Control Panel / Scanner Cover
The controls on the panel perform the
various faxing, copying, and printing
functions. Lift this panel to remove
document feed jams.
3 Document Feed Tray
Load your document face down on this tray
for faxing or copying.
4 Document Alignment Guides
Adjust these Guides to fit the width of your
original documents.
5 Paper T r ay
You can load up to 250 sheets of Letter-size,
A4, or Legal-size paper into the standard
Tray.
You can add another 500 sheets with the
optional Paper Feed Unit (2nd cassette).
6 Bypass Feed Tray
You can feed single sheet of special types of
paper, i.e. pre-printed letterhead &
envelopes.
7 Paper Exit T r ay
This Tray catches the paper after printing.
7
3
4
2
1
5
6
Machine Components
1 - 9 Introduction
/PAU S E
*
7
PQRS
1
REDIAL
SPEED DIAL
GHI
4
MAIL
0
TUV
8
#
9
WXYZ
START
3
2
JKL
5
MNO
6
ABC
DEF
STOP
COPY
F
N
V
33
17
57
25
49
41
09
01
38373634 35
2018 19
58
26
Y
Z
50
Q
R
59
27
60
28
51
S
52
42
I
J
10
A
B
43
K
44
11
C
12
2221
61
29
T
53
62
30
U
54
L
45
D
13
M
46
E
14
02 03 04 05 06
39 40
23 24
56
64
32
63
31
55
W
X
16
4847
O
15
G
P
H
0807
PROGRAM
CAP
.
@
-/&
+/-
FUNCTION Y ES NO
<
PIN CODE<DELETE
STD
FINE
EX-FINE
HALF TONE
LIGHT
NORM DARK
SLEEP
AUTO RX. ERROR
TYPE ORG.
HALF TONE
RESOLUTION
SCHEDULE JOURNAL
REPORT
WAKEUP
><
SPEAKER
7 8 9 10 11 12 13 14 15
16
Panel Description
7. Function key
The Function key allows to access to the Function Menu. Set Functions by pressing the Function
key first and then selecting the desired function using the numeric keys or the Function key.
8. Program key
Press the Program key to enter the set menu and program your desired function using either
numeric keys or the arrow shown on the display.
9. Yes key
Press Yes key to accept the selections made under Program and Function menus.
10. No key
Press No key to reject the selections made under the Program and Function menus.
11. Pin Code key
This key is used to input a personal identification number for some telephone systems when you
dial an outside number.
12. Delete key
When in a Program mode, it is used to Delete an entry.
13. Schedule key
Press this key to view the transaction in memory file, such as memory transmission or polling.
14. Journal
Press this key to view the transaction result the same as in an activity report. This shows the
session number, remote ID or dial number and result.
15. Report key
Chooses your desired report, press Report key to print out the report when needed.
16. Arrow keys
( )
Used to move the cursor to the right or left one position or to scroll through the menu. Use the
key to enter ITU-T Sub-address in setting the One-Touch or Speed Dial keys.
Important Safeguards
Introduction 1 - 2
Important Safeguards
Always follow these important safeguards:
1
Read all of these instructions before using your unit.
2
Do not use this unit near water; for example, near a bath tub, sink or swimming pool.
3
Avoid using the telephone during an electrical storm. There may be a
remote risk of electric shock from lightning.
4
Do not use the telephone to report a gas leak in the vicinity of this unit.
5
Use only the power cord and batteries indicated in this manual. Do not dispose of batteries in a fire. They may explode. Check with local codes for
possible special disposal instruction.
6
Plug the power cord only into a
3- conductor (grounded) outlet rated for
at least 15 amperes.
•
Never ground the power cord to a
gas pipe or a water pipe.
•
Keep the power cord away from hot
surfaces.
•
A void using an extension cord if at all
possible. If you must use an
extension cord, use only a
3-conductor cord rated for at least 15
amperes. Cords rated for less might overheat and become a fire hazard.
•
Do not operate your unit if any part of it is damaged, or if any part has
been dropped, until it is checked by a qualified technician.
7
Do not install your unit in areas that are:
•
Damp or humid
•
Exposed to direct sunlight
•
Extremely dusty
•
Poorly ventilated
•
Subject to extreme temperature or humidity changes. For example, do
not locate your unit near an air conditioner or heater.
8
Install your unit with space around it to provide adequate ventilation.

Important Safeguards
1 - 3 Introduction
9
Do not place the unit near a television or radio. If the unit is too close it
may interfere with the reception.
10
Place your unit on a firm, level surface.
11
Do not place heavy objects on the ADF (Automatic Document Feeder) or
the Exit Tray.
12
Do not disassemble your unit or try to repair it yourself, other than as
instructed in this Operator Guide. Call an authorized service representative
for all necessary repairs. Incorrect assembly can cause electrical hazards
and possible damage to the machine.

Multi-Tasking
Introduction 1 - 4
Multi-Tasking
The NEFAX655e can perform multiple operations at the same time. One
operation can run in the foreground, while another one runs in the background.
For example, you can scan, copy, or print documents into memory for later
transmission while receiving a fax.
Operation Concurrent Operation Result
Copy Fax Reception
GDI/PCL4 Printing
Memory Fax Transmission
PC-Fax Transmission or
Reception
The received fax is stored in memory, and prints once
copy operation is complete.
The print job is stored in memory, and prints once copy
operation is complete.
Faxing begins while copying continues.
Faxing begins while copying continues.
Fax Reception Copy
GDI/PCL4 Printing
Fax Transmission
The Copy job will be stored in memory, then printed
out when reception (RX) is complete.
Prints a document during reception.
Scans a document into memory for transmission.
Fax
Transmission
Copy
GDI/PCL4 Printing
The available memory is shared by both jobs and their
operations happen simultaneously.
The document will be printed from the PC during a Fax
operation.
PC-Fax
Reception
Copy
Parallel Port Printing
Fax Transmission
The copy operation starts by scanning a document into
memory, and prints as fax is being transmitted.
The print operation occurs while the PC is receiving the
fax.
TX works when PC-Fax is complete. Scans document
into memory for transmission.
PC-Fax Transmit Copy
Parallel Port Printing
Fax Transmission
The copy operation starts by scanning document into
memory first, and prints as a fax is being transmitted.
A Parallel Port can be used for printing during the PCFAX operation.
Scans a document into memory for transmission.
Machine Components
Introduction 1 - 6
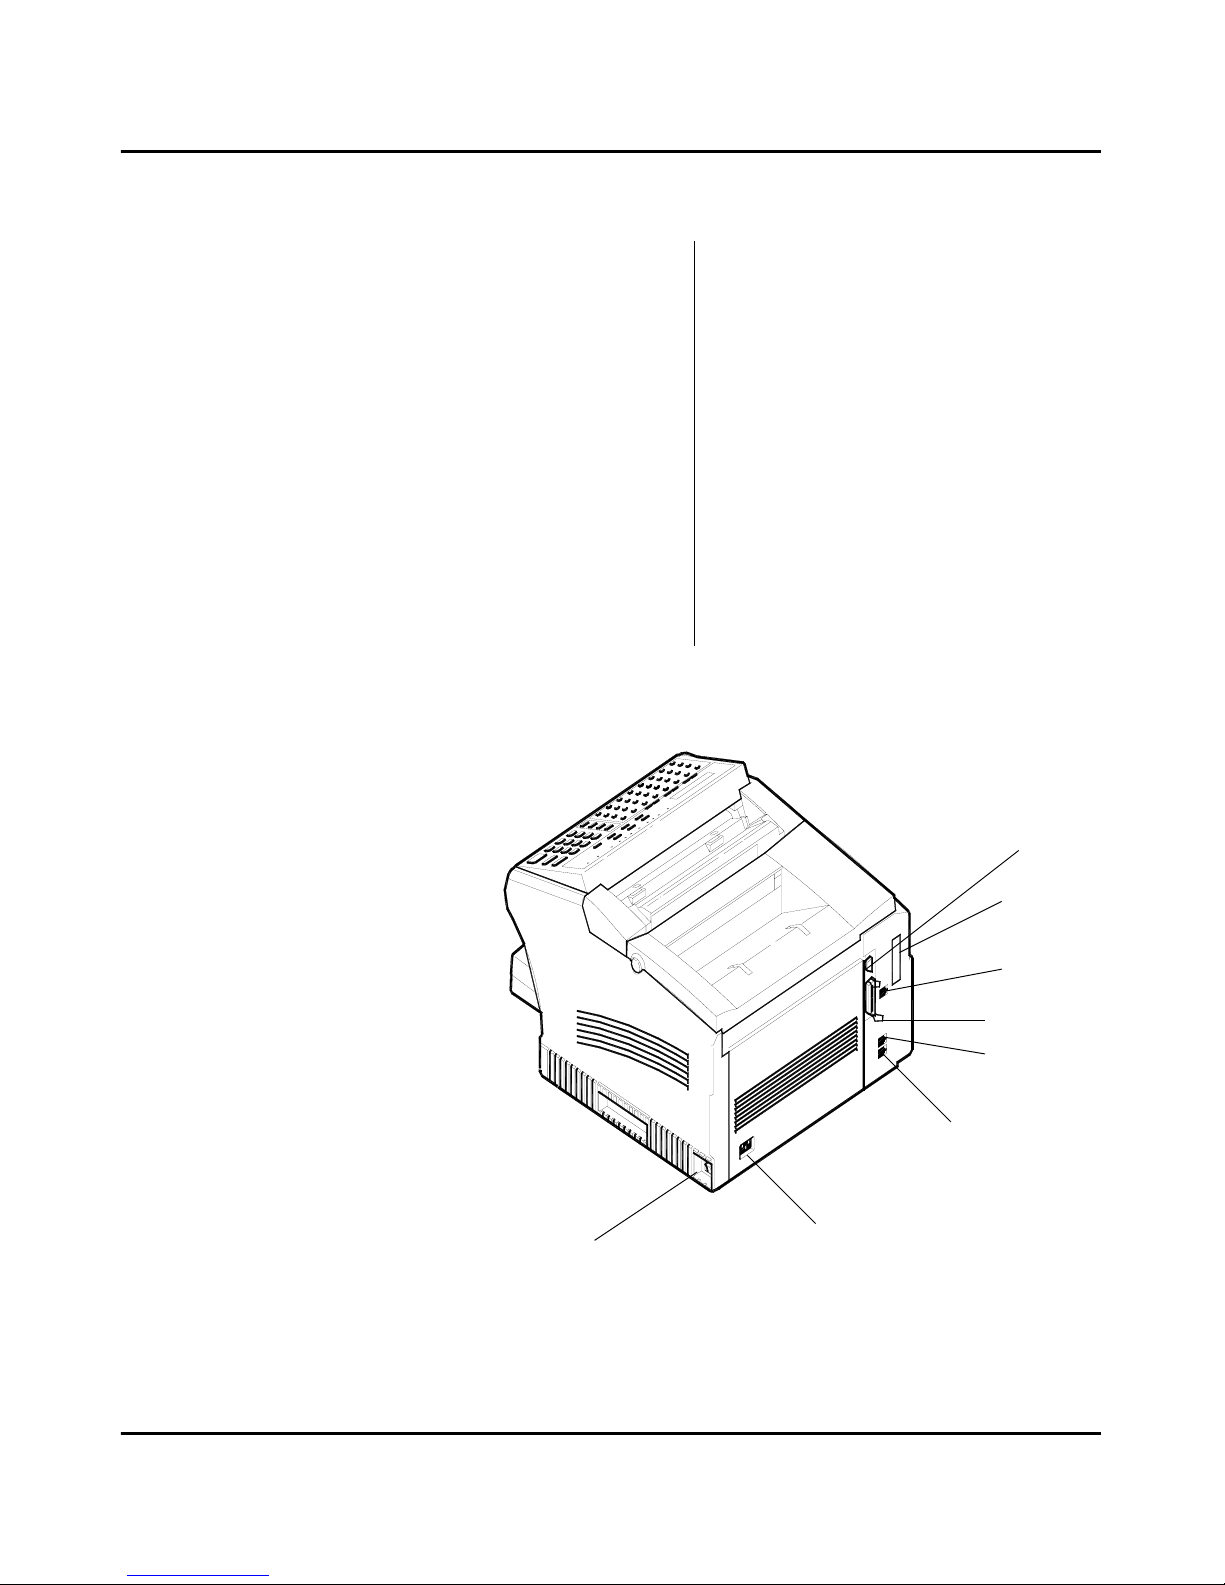
External Components: Rear
8 AC Power Connector
Plug the AC power cord in here.
9 Main ON/OFF Switch
Use to turn the unit ON and OFF.
10 Te lephone Line Connector
Plug the telephone cable from this connector
into the wall socket of the telephone line.
11 Telephone Hand Set Connector -or-
External Line
Use this connector to plug in the telephone
cord from the telephone set.
12 Parallel Connector
Provides connection between this unit and a
host computer for GDI printing or PCL4 or
5e printing.
13 Serial Connector (RS232)
Provides connection between this unit and a
host computer for Class 1 PC faxing and
Tw ain-compliant scanning. This interface
can also be used for printing.
14 Network Connector (Optional NIC or
I-Fax* Card)
Provides connection between the unit and the
Network.
15 Dual Line Connector (Optional)
Plug the telephone cable from this connector
into the wall socket for the second line.
Note*: I-Fax stands for
Internet Fax, refer to chapter 5
14
13
15
12
11
10
8
9
10
Machine Components
1 - 7 Introduction
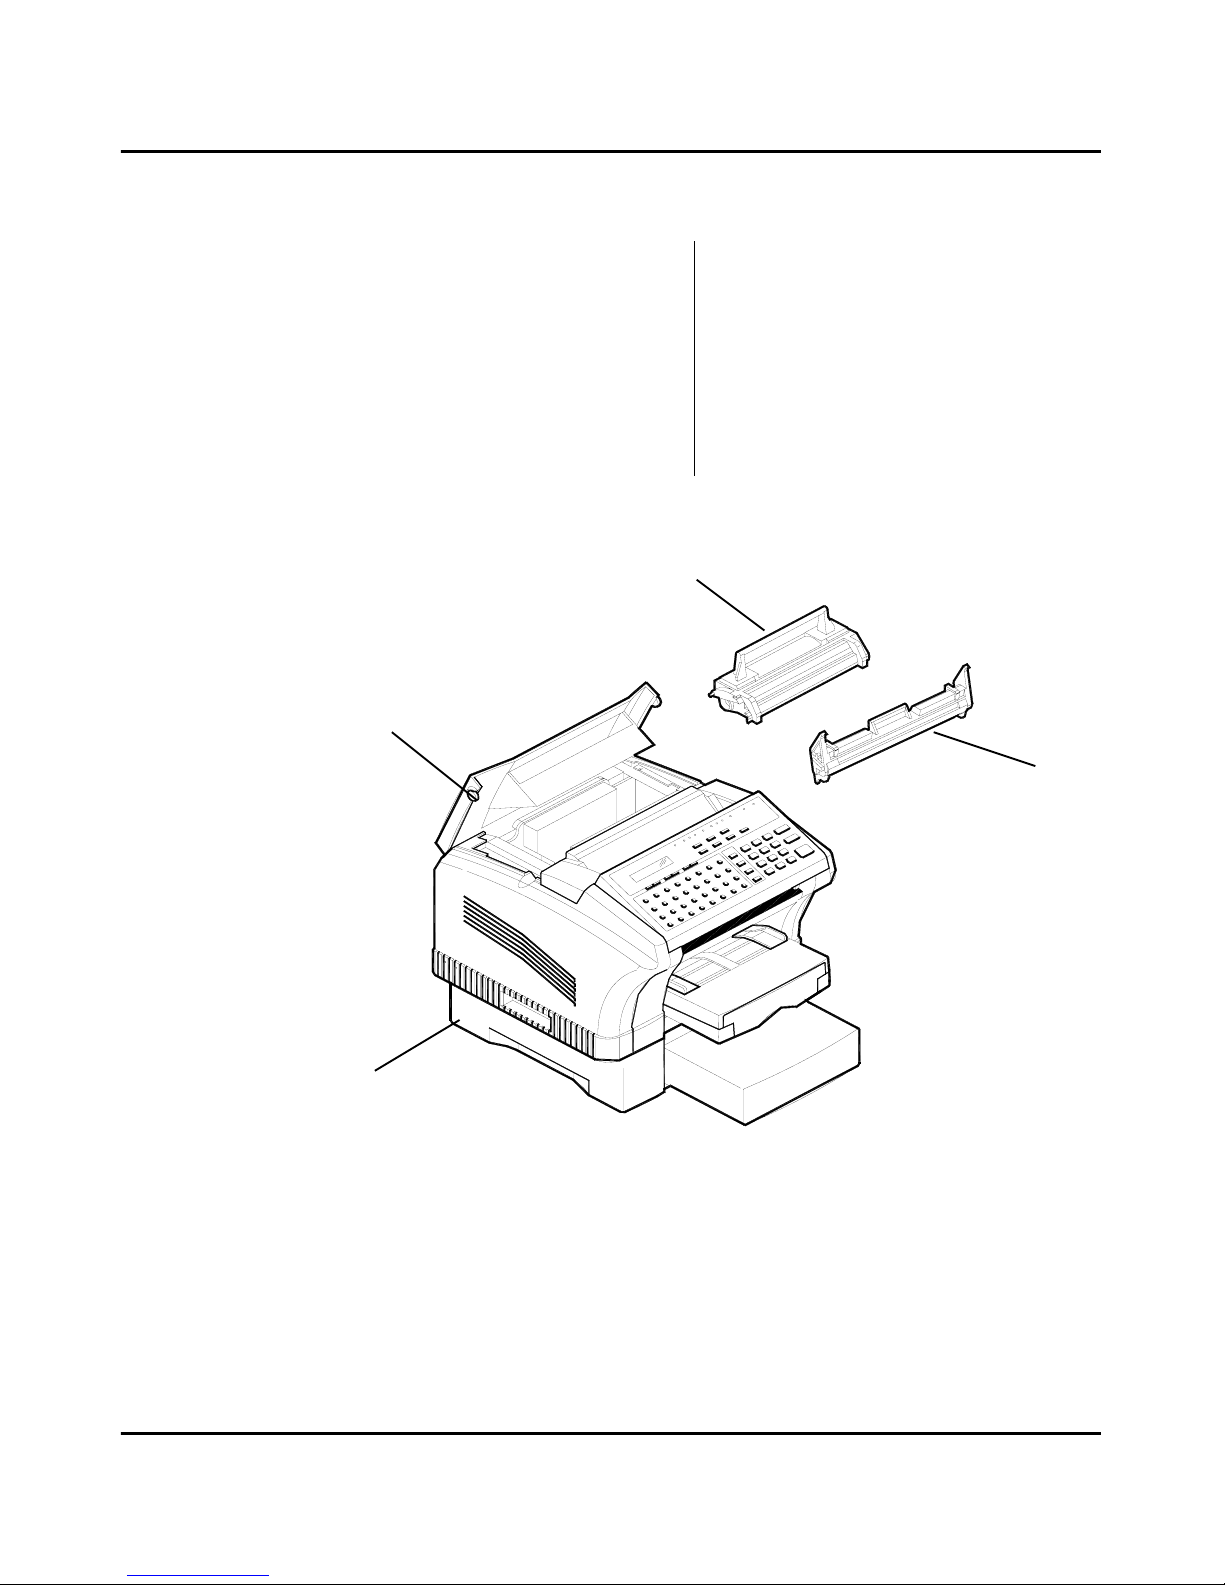
External Components: Internal and Optional
16 Top Cover / Cover Release Buttons
Press these two buttons to open the Top
Cover to check and clear paper jams, to
change the Toner and Drum, or to clean the
interior of the unit.
17 Toner Cartridge
The Toner Cartridge contains the toner
particles used in imaging.
18 Drum Cartridge
This Drum Cartridge transfers toner to the
paper.
19 Paper Feed Unit (2nd cassette) (Optional)
When installed, it permits your unit to print
up to 750 uninterrupted pages without
reloading paper. (750 pages of standard
weight Letter/A4 size paper including
standard Tray.)
16
17
18
19
Machine Components
Introduction 1 - 8
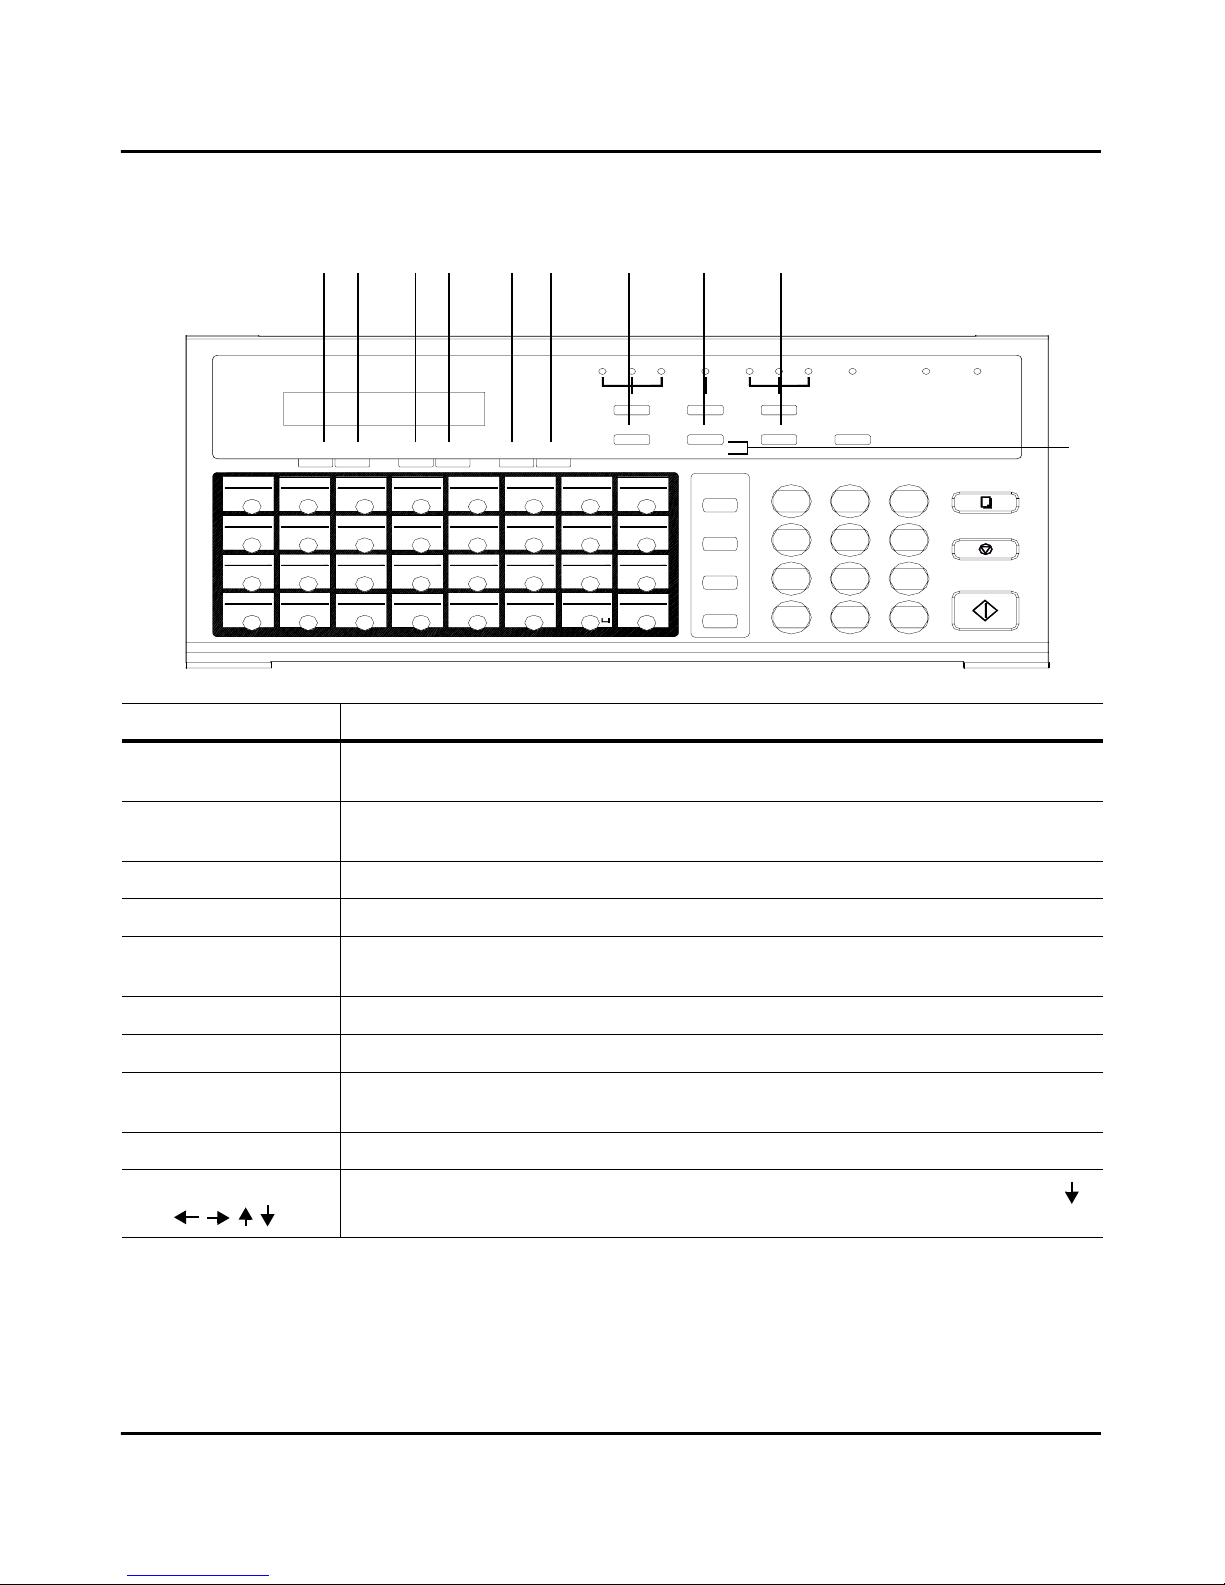
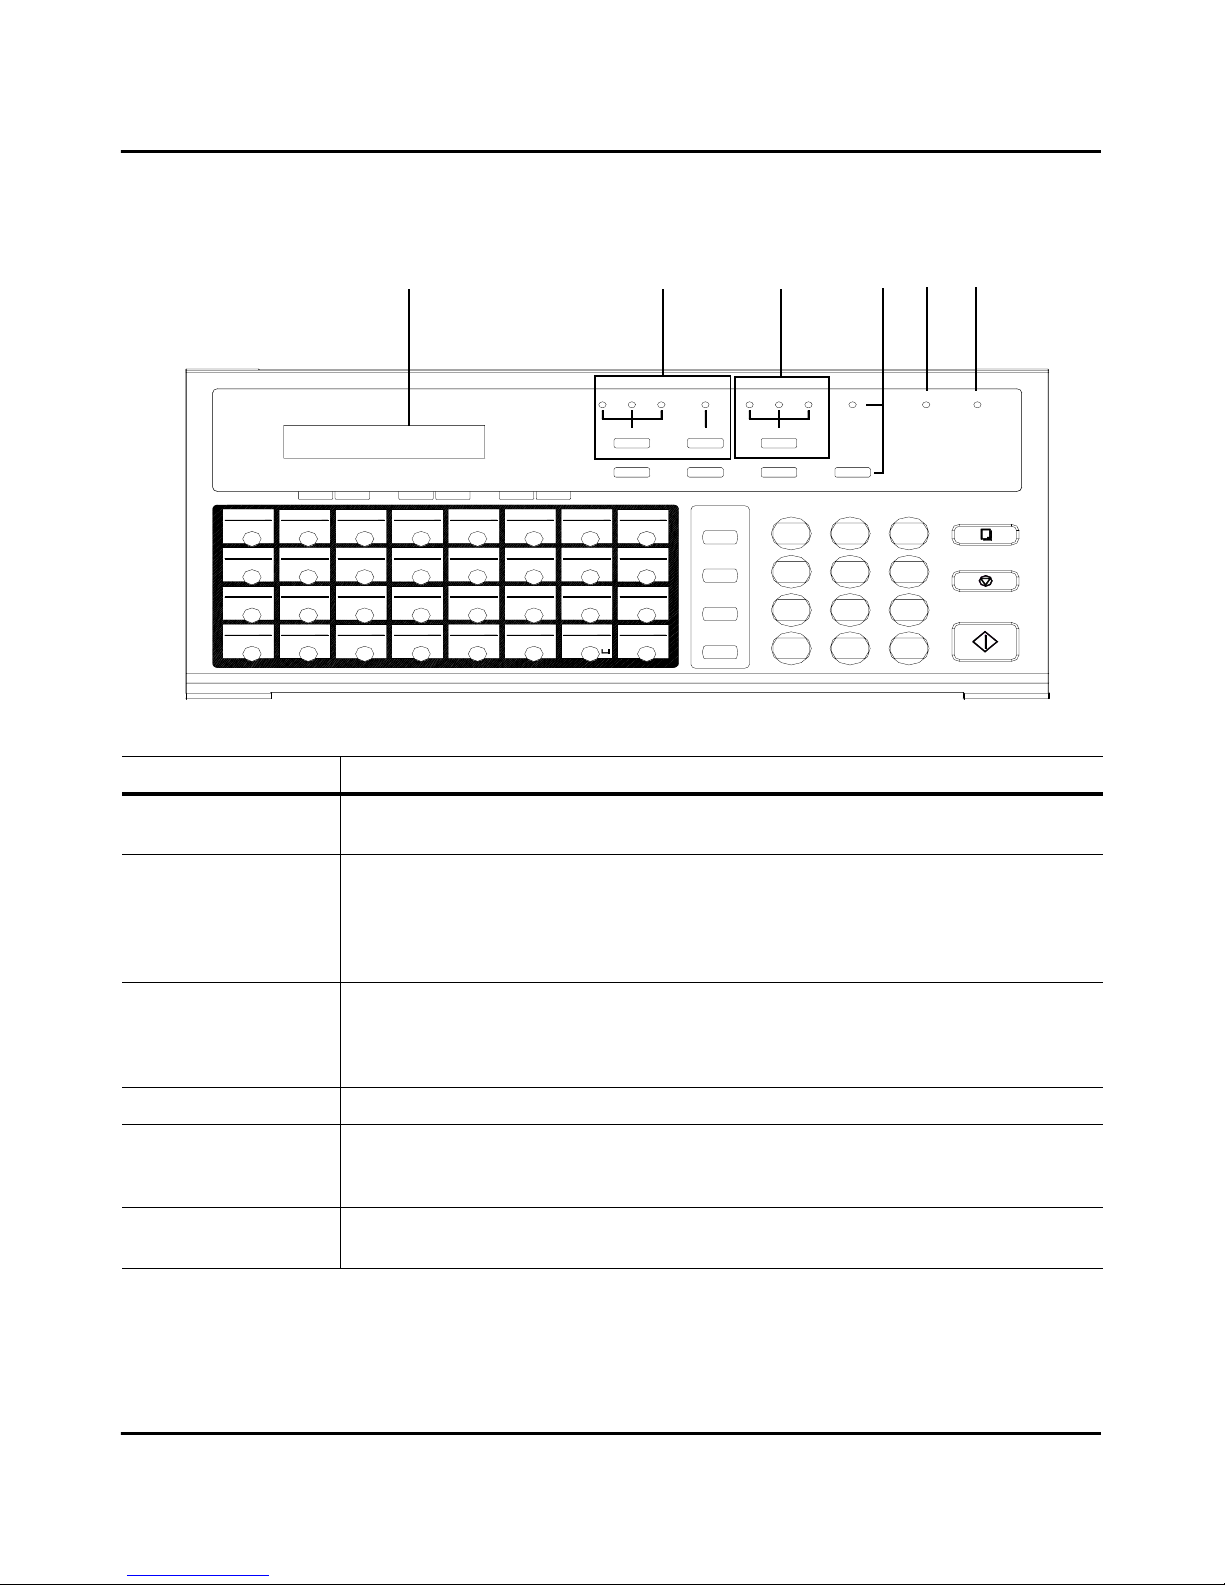
Control Panel Layout
Note*: I-Fax stands for Internet Fax, refer to chapter 5.
1
/PAU S E
*
7
PQRS
1
REDIAL
SPEED DIAL
GHI
4
MAIL
0
TUV
8
#
9
WXYZ
START
3
2
JKL
5
MNO
6
ABC
DEF
STOP
COPY
F
N
V
33
17
57
25
49
41
09
01
38373634 35
2018 19
58
26
Y
Z
50
Q
R
59
27
60
28
51
S
52
42
I
J
10
A
B
43
K
44
11
C
12
2221
61
29
T
53
62
30
U
54
L
45
D
13
M
46
E
14
02 03 04 05 06
39 40
23 24
56
64
32
63
31
55
W
X
16
4847
O
15
G
P
H
0807
PROGRAM
CAP
.
@
-/&
+/-
FUNCTION Y ES NO
<
PIN CODE<DELETE
STD
FINE
EX-FINE
HALF TONE
LIGHT
NORM DARK
SLEEP
AUTO RX. ERROR
TYPE ORG.
HALF TONE
RESOLUTION
SCHEDULE JOURNAL
REPORT
WAKEUP
><
SPEAKER
2 3 6 5 4
Panel Description
1. Display
The LCD Display provides you with instructions and information about fax, I-Fax*, copying,
printing, programming, and operational functions.
2. Resolution keys
Press this key to select the desired resolution for scanning:
Standard:
Use for normal documents. This is the default.
Fine:
Use for documents with fine lines or characters.
Ex-Fine:
Use for very fine maps, drawings, or extremely detailed originals.
Half Tone:
Use for photographs or shaded drawings.
3. Original Type key
Press this key to select the type of original you are using:
Normal
: Use this for most of the regular documents.
Light
: Use for documents with very fine or light characters.
Dark
: Use for documents that are dark.
4. Wakeup key
Press this key to turn the machine in standby mode.
5. Auto RX Light
This light indicates the receiving mode of the Facsimile:
ON:
The facsimile receives documents automatically.
OFF:
The facsimile receives documents manually.
6. Error Light
The Error Light illuminates if there is a problem with the unit such as a paper jam. After the
problem has been corrected or when the Stop key is pressed, the light turns OFF.
Machine Components
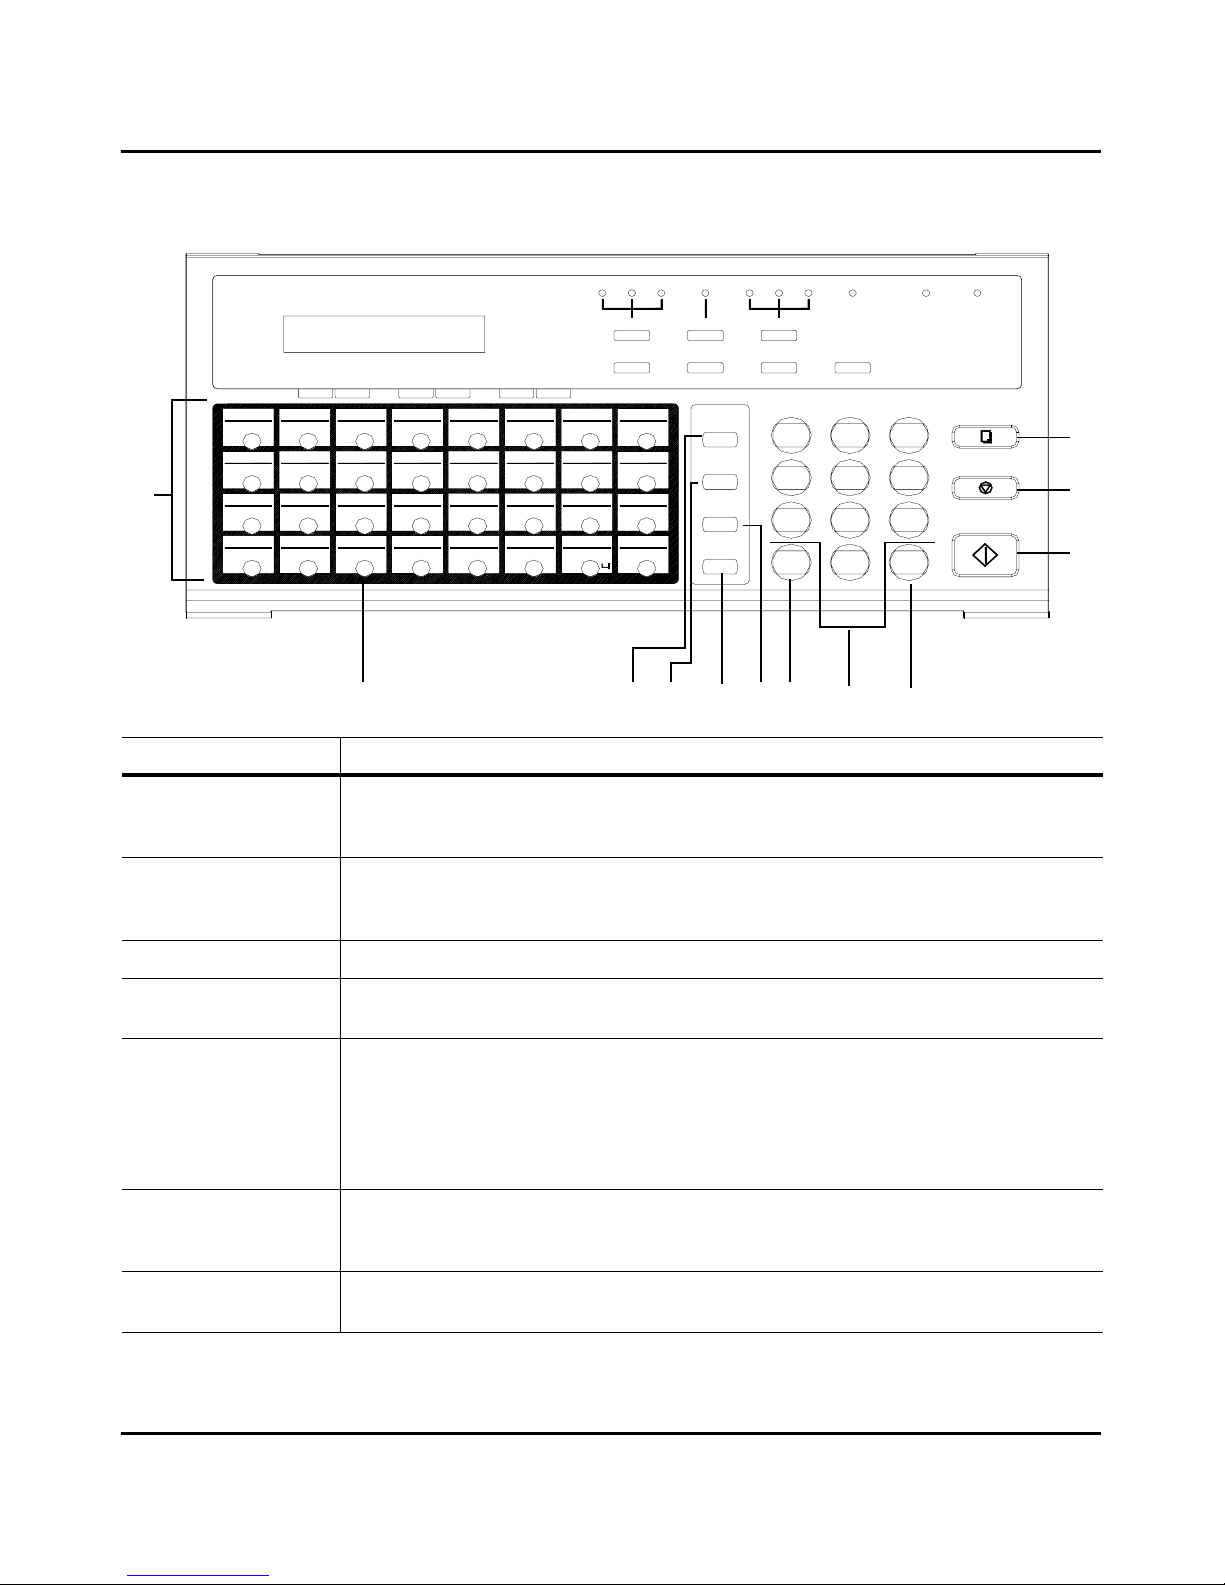
Introduction 1 - 10
Panel Description
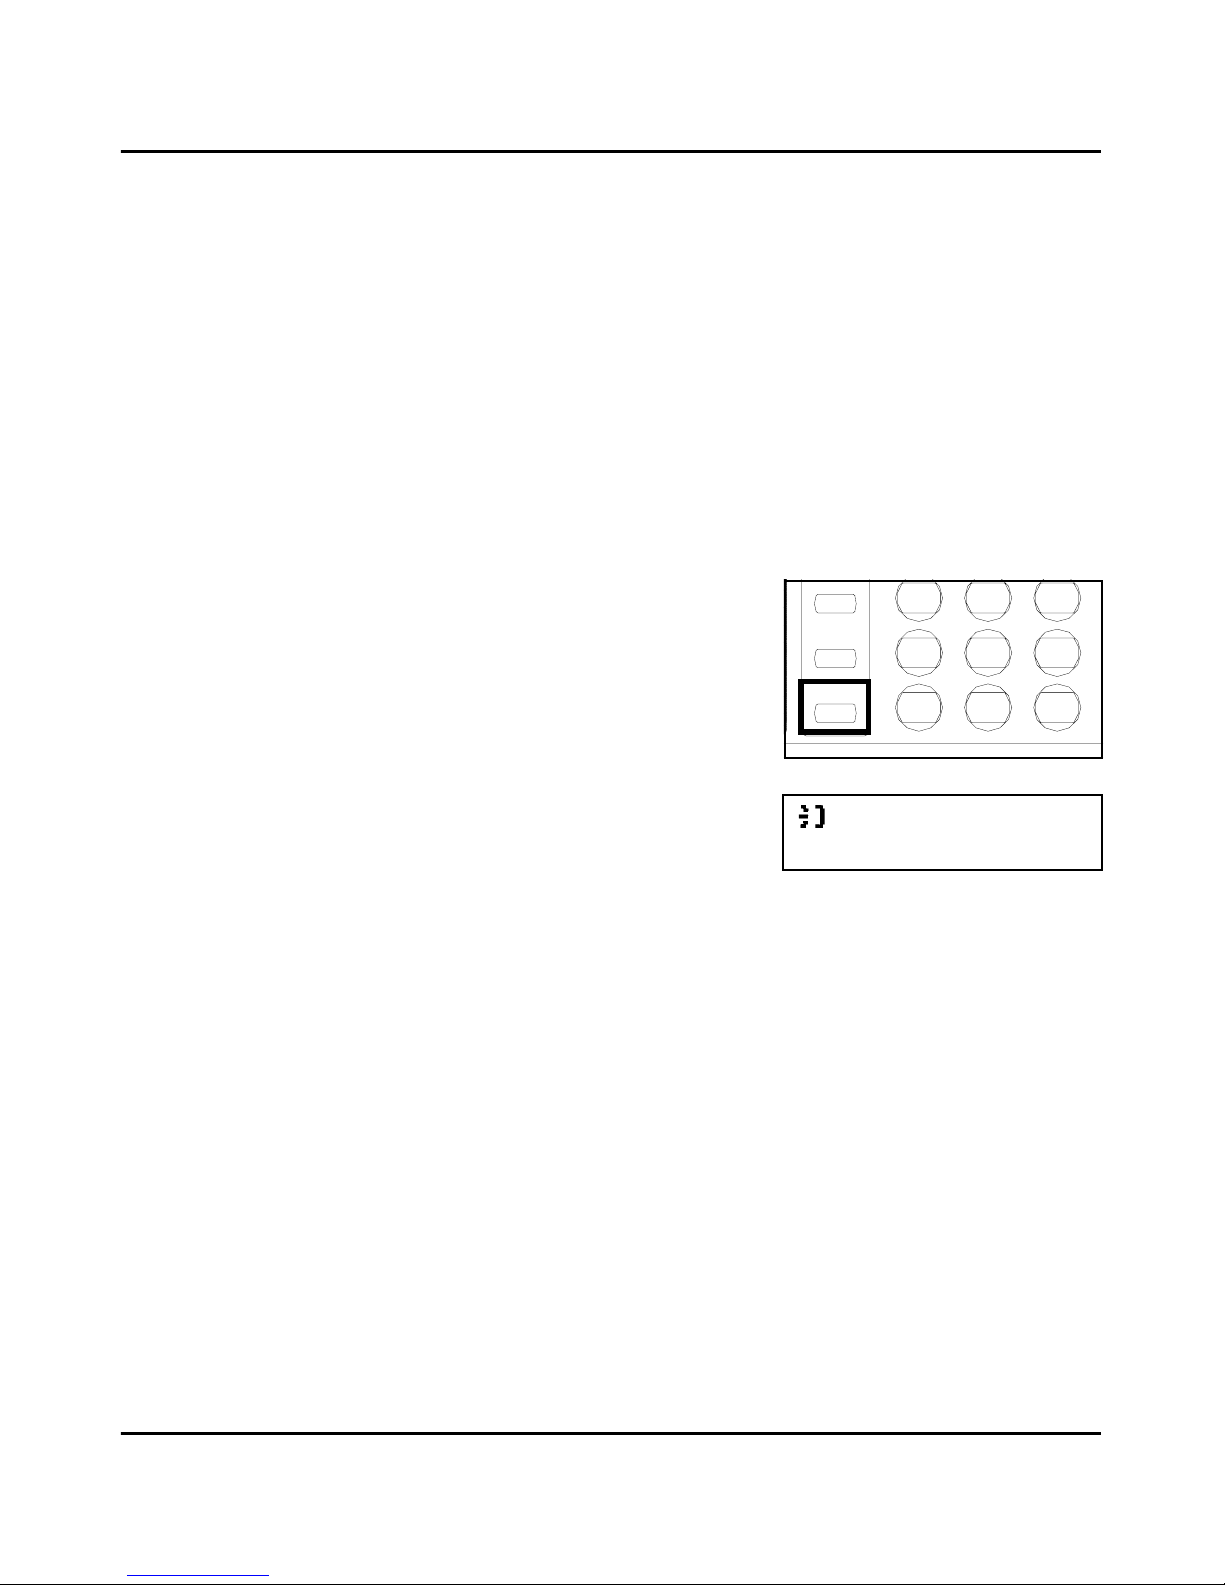
17. One-Touch keys
The One-Touch keys are used to store frequently dialled numbers. Any of the keys can be assigned
as One-Touch keys or Group Dial keys. In addition, the last eight keys can be used as Program
keys. Each Group key can hold up to 50 One-Touch or Speed Dial numbers.
18. The “+” key
Used to register a combination dial in a One-Touch or Speed Dial key. This symbol must follow
the initial number and be followed by a number stored in the One-Touch, Speed Dial key, or
entered via the Ten-Key Pad.
19. Mail key
Use this key to receive or transmit E-Mail.(With optional I-Fax card)
20. Speed Dial key
Use this to initiate speed dialling. Press the Speed Dial key and your three-digit code to start a
transmission.
21. Redial/Pause key Redial
: Press this key to redial the last telephone number called.
Pause
: Press this key to insert a pause in the number being stored. When you press this key, a “P”
is inserted within a number causing a 2.5 second delay when dialing. This is useful if you must dial
a prefix, such as 9 to pause briefly in order to access an outside telephone line. (A “P” after a series
of numbers adds 10 seconds to the normal time the machine waits for a remote receiver to answer
a call.)
22. Speaker key
Press this key to switch the unit to the telephone line for direct (manual) dial from the machine
keypad. When pressed first, it also allows you to hear the dialing when using One-Touch, Speed
Dial, etc.
23. “*” key
Press the “*” key for tone dialing while your unit is set for pulse dialing. (This key is only effective
when the Speaker key is used.)
/PAUSE
*
7
PQRS
1
REDIAL
SPEED DIAL
GHI
4
MAIL
0
TUV
8
#
9
WXYZ
START
3
2
JKL
5
MNO
6
ABC
DEF
STOP
COPY
F
N
V
33
17
57
25
49
41
09
01
38373634 35
2018 19
58
26
Y
Z
50
Q
R
59
27
60
28
51
S
52
42
I
J
10
A
B
43
K
44
11
C
12
2221
61
29
T
53
62
30
U
54
L
45
D
13
M
46
E
14
02 03 04 05 06
39 40
23 24
56
64
32
63
31
55
W
X
16
4847
O
15
G
P
H
0807
PROGRAM
CAP
.
@
-/&
+/-
FUNCTION YES NO
<
PIN CODE<DELETE
STD
FINE
EX-FINE
HALF TONE
LIGHT
NORM DARK
SLEEP
AUTO RX. ERROR
TYPE ORG.
HALF TONE
RESOLUTION
SCHEDULE JOURNAL
REPORT
WAKEUP
><
SPEAKER
17
18 19 20 22 21 23 24 25
26
27
28

Machine Components
1 - 11 Introduction
24. Keypad
Using the twelve keys work for the internal telephone in the fax unit just like the keypad on regular
touch tone telephones. You can use the keypad to dial a remote unit directly or to assign codes and
telephone numbers to One-Touch and Speed Dial locations.
25. “#” key
Press the “#” key to access an internal line or a PSTN line when your unit is set for use over a PBX
line.
26. Copy key
Press the Copy key to initiate copying documents that are loaded on the Document Feed Tray.
27. Stop key
Use this key to stop copying, transmitting, dialling waiting to dial or scanning. You can also press
Stop to return from any operation mode back to the standby status.
28. Start key
Press the Start key to begin transmitting, scanning, copying or manual Fax reception.
Panel Description

Machine Components
Introduction 1 - 12
Definition of Display Symbols
The LCD shows the date, time of day, amount of memory available for use, fax
numbers, fax conditions, and other information by means of either a message or
graphic. The following table is a list of icons that can appear on the LCD.
Signifies a fax or telephone
number.
Shown while the remote fax
number is being rung.
Prompts you to enter a fax
number.
Shown while the user’s local fax is
being rung.
Indicates the pause function is set
into the destination fax number.
Example: 0P412641267
Indicates the number of pages.
Example: A single page.
Indicates when the Internal PBX
function is set into the
destinations fax number.
Shown while a document is being
transmitted to the other party.
Indicates when the Sub Address
is set into the destination fax
number.
Example: 4126412:8108
Shown while a document is being
received from the other party.
Indicates that a polling
transmission function has been
stored in memory.
Indicates that a document to be
transmitted by the timer
transmission function has been
stored in memory.
Indicates when the External PBX
to PSTN function is set into the
destination fax number

Machine Components
1 - 13 Introduction

Chapter 2
Basic Operations
Sending a Document
2 - 1 Basic Operations
Sending a Document
Note: To use some of the fax functions such as One-Touch and Speed
Dial you must first program your unit. If your unit has not yet been
programmed, refer to Chapter 4 Programming.
Using Memory Transmit
Since your fax unit provides multi access capabilities, you can scan documents
into memory for transmission, even if your unit is in the process of transmitting
data from memory, receiving data or printing a file from the PC.
Note: If the unit runs out of memory during scanning, you can use
manual transmission by pressing the Speaker key or by using the Direct
Transmit ADF TX procedure.
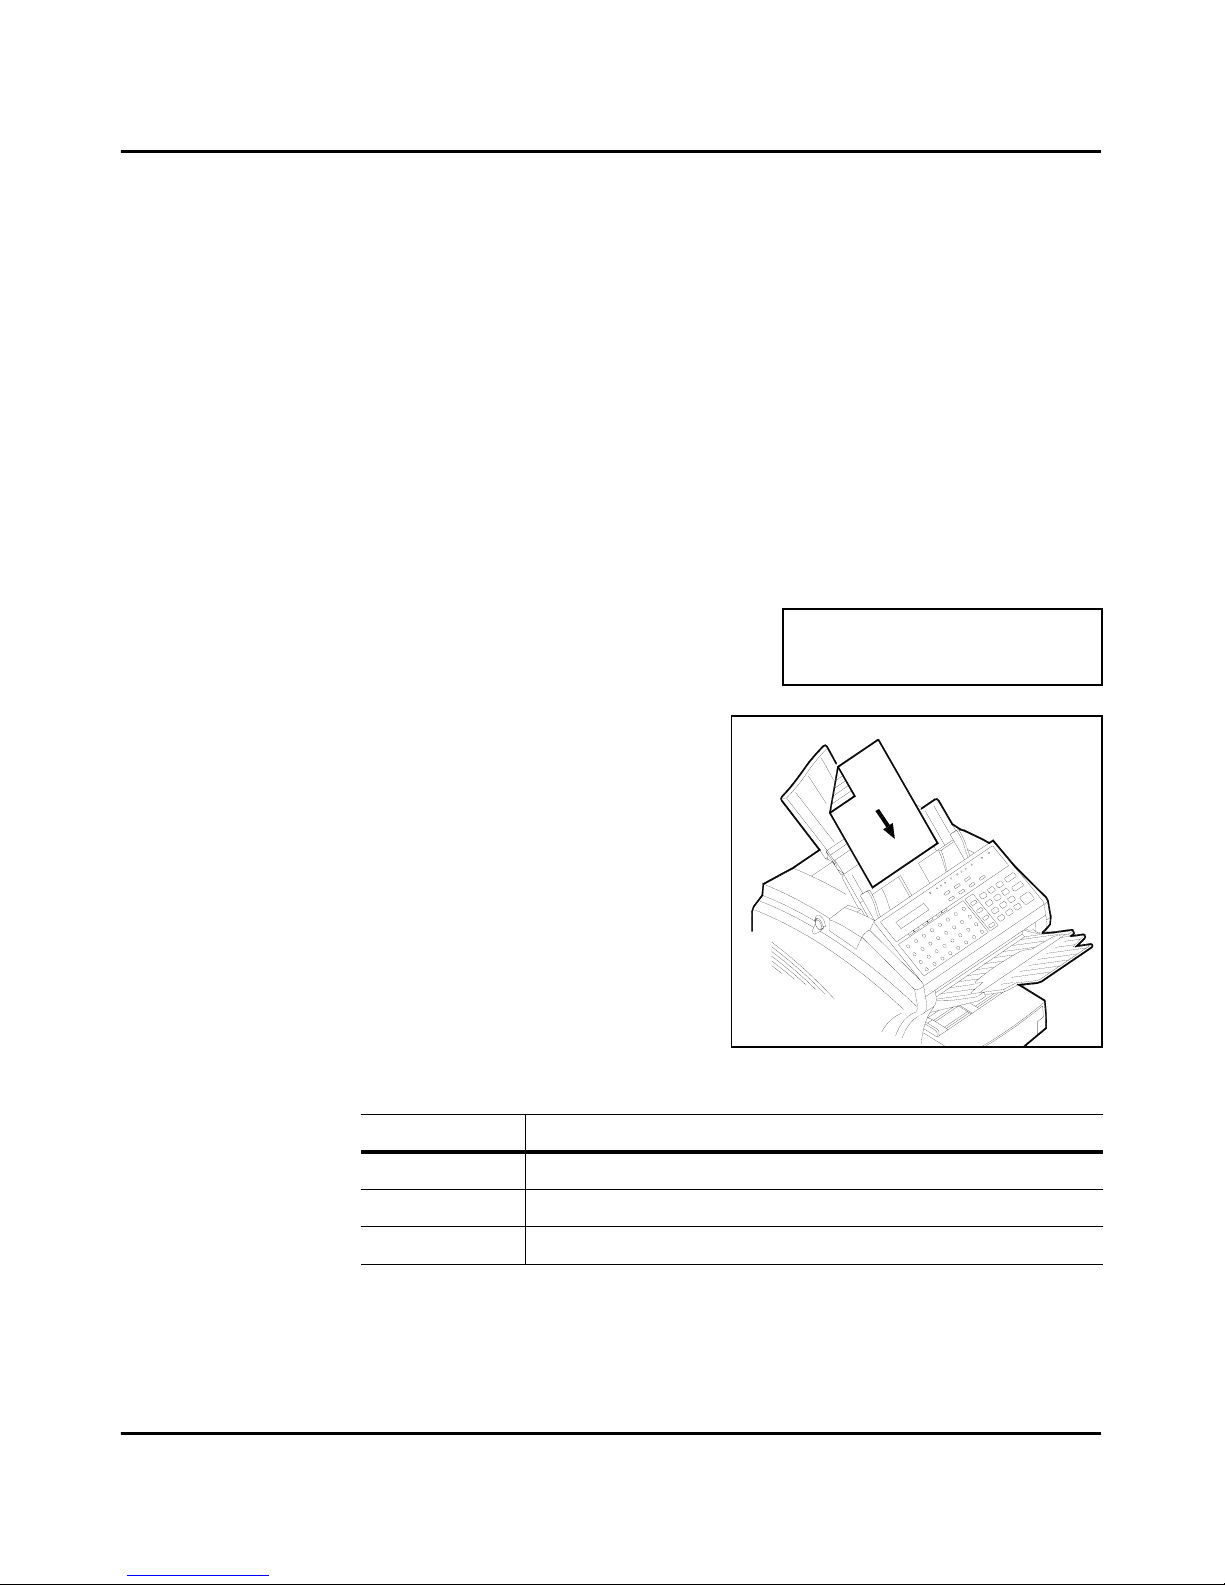
1
Place your document face down on the
Document Feed Tray.
2
Adjust the Document Side Guides to
touch the edges of the document.
3
Use the TYPE ORG. key to select the desired contrast:
Use this setting for this
Normal Regular documents. (Default)
Dark Documents that are dark.
Light Documents having very fine or light characters.
NOV.07 12:34 100%
-SET DOC. FACE DOWN-
Sending a Document
Basic Operations 2 - 2
4
Use the Resolution key to select the desired resolution:
5
If you are sending a photograph, press the Half Tone key for best results.
6
Enter the remote Fax number using the
numeric Key Pad.
•
The unit scans the document into
memory and sends it to the location you selected.
•
The unit automatically returns to standby mode when finished
transmitting.
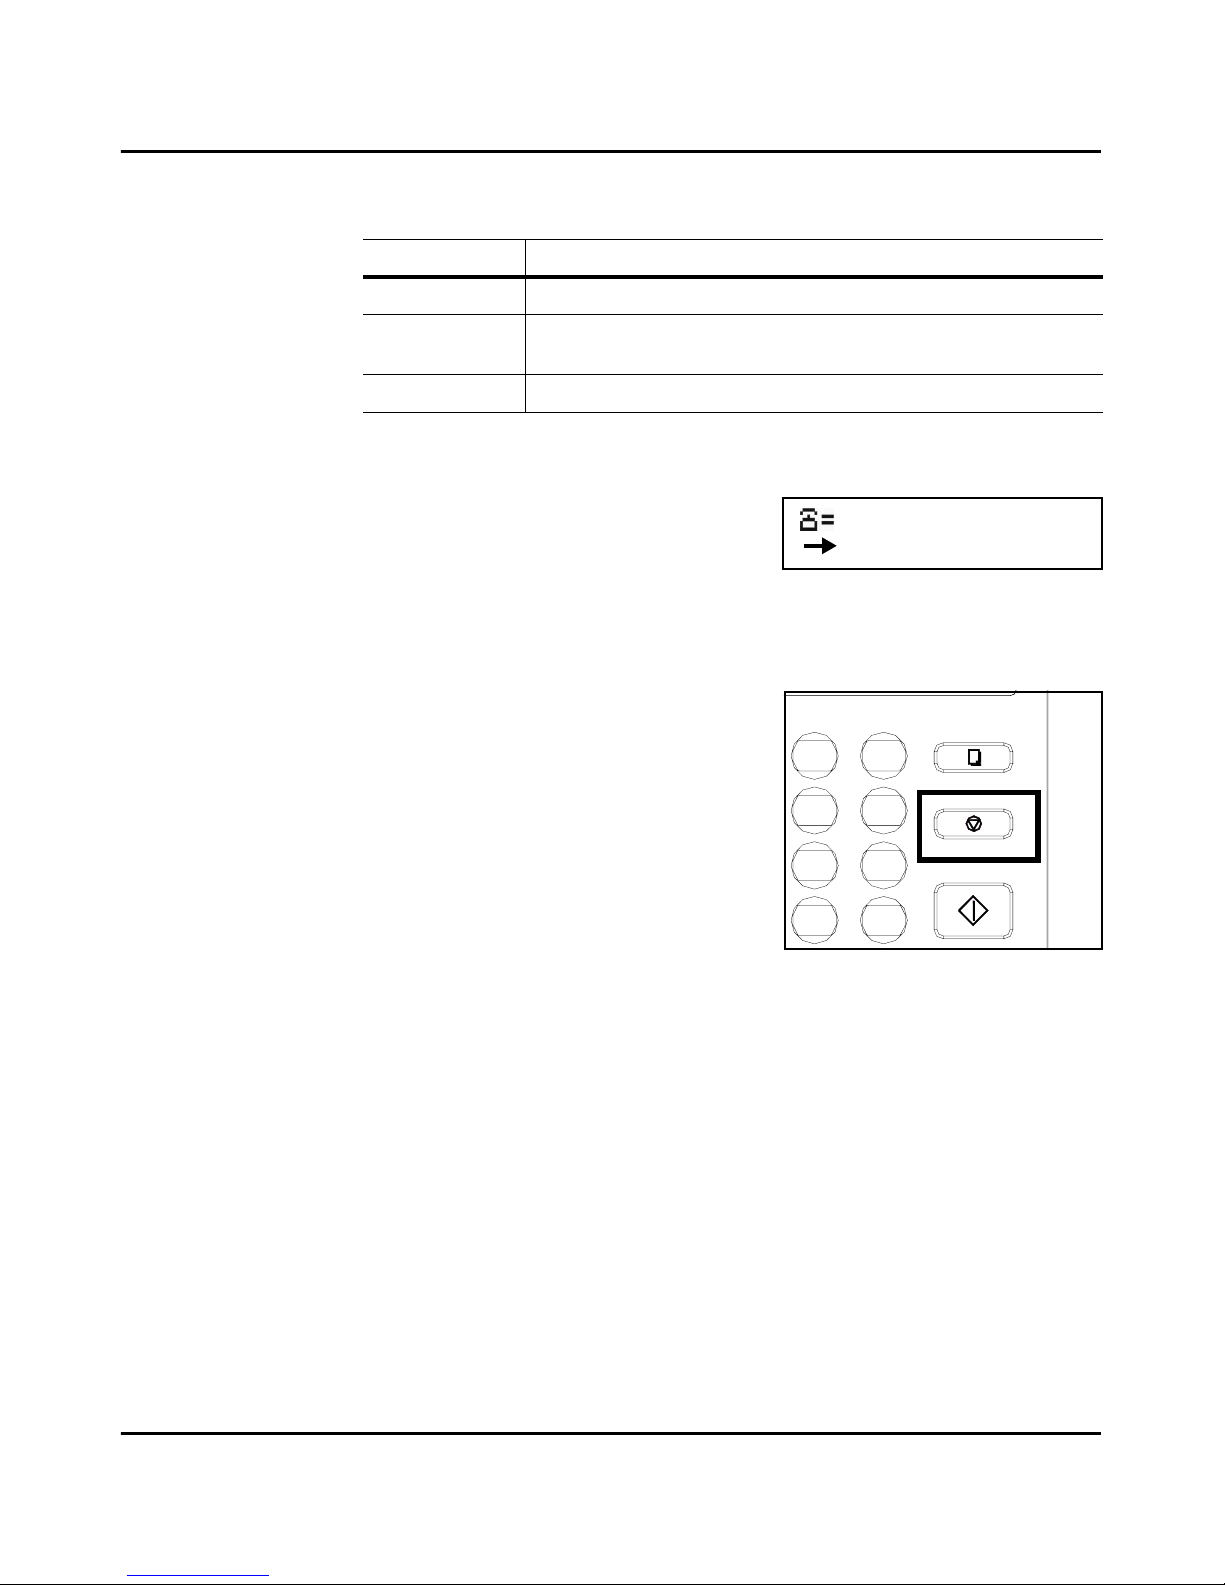
7
To stop a transmission, press the Stop key.
Memory Overflow Transmit
Memory Overflow Transmit works the same as Memory Transmit with one
special exception. When your unit senses it will run out of memory of the next
page of your document is scanned, it will stop and ask if you wish to send what is
already stored in memory. When you answer YES, it dials the number and sends
those pages. When sufficient memory has been freed up, it begins scanning again.
It then places a second call automatically and sends the remainder of the pages.
On a report all of this activity is logged as one session.
Use this setting for this
Standard Documents with standard size characters, such as typed documents.
Fine Documents with smaller size characters, like newsprint.
(Copy Default)
Extra Fine Documents with very fine or light characters.
ENTER FAX NO.
or FUNCTION
0
TUV
8
#
9
WXYZ
START
3
2
JKL
5
MNO
6
ABC
DEF
STOP
COPY
Sending a Document
2 - 3 Basic Operations
Using the Speaker key
Use the Speaker dial sequence when it is necessary to listen to the “Handshake”.
This is an important troubleshooting aid to see if a transmission fault is phone
related or not. It is possible to dial a location using any combination of TEN-Key,
One Touch Dial, or Speed Dial Directories.
1
Place your document face down on the Document Feed Tray.
2
Adjust the Document Side Guides to touch the edges of the document.
3
Use the TYPE ORG. key to select the desired contrast.
4
Use the Resolution key to select the desired resolution.
5
Press the Speaker key.
6
Enter the remote fax number using one of
the entry methods.
7
Listen until the remote fax unit answers,
then press the Start key.
8
To stop a transmission already in progress,
press the Stop key.
/PAUSE
*
7
PQRS
REDIAL
SPEED DIA L
GHI
4
0
TUV
8
#
9
WXYZ
JKL
5
MNO
6
SPEAKER
(7776665555)
-PUSH START KEY-
 Loading...