

Page 1

Express5800/320Ma:
Site Planning Guide
NEC Solutions (America), Inc.
NR573
Page 2

Notice
The information contained in this document is subject to change without notice.
UNLESS EXPRESSLY SET FORTH IN A WRITTEN AGREEMENT SIGNED BY AN AUTHORIZED REPRESENTATIVE
OF NEC, NEC MAKES NO WARRANTY OR REPRESENTATION OF ANY KIND WITH RESPECT TO THE
INFORMATION CONTAINED HEREIN, INCLUDING WARRANTY OF MERCHANTABILITY AND FITNESS FOR A
PURPOSE. NEC assumes no responsibility or obligation of any kind for an y errors contained herein or in connection with
the furnishing, performance, or use of this document.
Software described in NEC (a) is the property of NEC and/or its licensees, (b) is furnished only under license, and (c) may
be copied or used only as expressly permitted under the terms of the license.
NEC documentation describes all supported features of the user interfaces and the application programming interfaces
(API) developed by NEC and/or its licensees. Any undocumented f eatures of these interfaces are intended solely for use
by NEC personnel and are subject to change without warning.
This document is protected by copyright. All rights are reserved. No part of this document may be copied, reproduced, or
translated, either mechanically or electronically, without the prior written consent of NEC Solutions (America), Inc.
The NEC Solutions (America), Inc. logo, Express5800/320Ma, and the Express5800/320Ma logo, are trademarks of NEC
Solutions (America), Inc. ActiveService Network is a trademark of Stratus Technologies Bermuda, Ltd. All other
trademarks and trade names are the property of their respective owners.
Manual Name: Express5800/320Ma: Site Planning Guide
Part Number: NR573
Express5800/320Ma Software Release Number: 4.1.0
Publication Date: January 2006
NEC Solutions (America), Inc.
10850 Gold Center Drive, Suite 200
Rancho Cordova, CA 95670
© 2006 NEC Solutions (America), Inc. All rights reserved.
Page 3

Contents
Preface vii
1. Welcome to Site Planning for Express5800/320Ma 3.2 GHz, 3.6 GHz,
and Dual-Core systems 1-1
Site Planning Overview 1-1
Site Planning for Fault-Tolerant Systems 1-2
Site Planning Checklist 1-3
System Documentation 1-5
2. Cabinet and Monitor Requirements 2-1
Cabinet Requirements 2-1
Monitor Requirements 2-4
3. Space Planning 3-1
Room Requirements 3-1
Planning for Cables 3-2
4. Electrical (AC) Power Planning 4-1
Redundant Power Sources 4-1
AC Power Service Requirements 4-2
Power Outlet Requirements 4-4
Connecting a System Directly to Two Separate Power Sources 4-5
NEC-Supplied Power Cords 4-6
System Power Cords 4-7
PDU Power Cords 4-8
Power Cords for Optional Components 4-9
5. UPS Planning 5-1
Contents iii
Page 4

Contents
Qualified APC UPS Models 5-1
Communicating with a UPS over a Network 5-2
Connecting Power to Systems, PDUs, and a UPS 5-3
Connecting a System Directly to a UPS 5-4
6. Network and Telephone Line Planning 6-1
Network Cable Requirements 6-1
Telephone Line Requirements 6-2
Site Planning for Systems in an ftGateway Group 6-3
7. Rack Configuration Planning 7-1
Using PDUs 7-1
Determining PDU Requirements 7-2
Sample PDU Usage Calculation 7-4
Appendix A. System Specifications A-1
System Specifications A-1
Rack-Mountable System Specifications A-7
Appendix B. Electrical Circuit and Wiring Information B-1
Fault Protection Requirements B-1
Grounding Considerations B-1
Circuit Wiring Diagrams B-3
Electrical Power Connectors B-9
Appendix C. Standards Compliance C-1
Index Index-1
iv Express5800/320Ma: Site Planning Guide
Page 5

Figures
Figure 2-1. Rail Clearance 2-3
Figure 4-1. Rack-Mounted System Connected Directly to AC Power 4-6
Figure 4-2. Pedestal System Connected Directly to AC Powe r 4-6
Figure 5-1. Power Cord Connections for Systems, PDUs, and a UPS 5-3
Figure 5-2. Rack-Mountable Systems: A-Side Power Connected
Directly to a UPS 5-4
Figure 5-3. Pedestal Systems: A-Side Power Connected Directly to
a UPS 5-5
Figure A-1. Pedestal System - Front View A-2
Figure A-2. Pedestal Express5800/320Ma 3.2 GHz systems -
Rear View A-3
Figure A-3. Pedestal Express5800/320Ma 3.6 GHz systems-
Rear View A-4
Figure A-4. Rack-Mountable System - Front View A-7
Figure A-5. Rack-Mountable Express5800/320Ma 3.2 GHz system -
Rear View A-8
Figure A-6. Rack-Mountable Express5800/320Ma 3.6 GHz or Dual-Core
System - Rear View A-9
Figure B-1. Star Ground Example B-2
Figure B-2. Power Input Labeling B-3
Figure B-3. Single-Phase 120-Volts AC Circuit Connection B-4
Figure B-4. Single-Phase 240-Volts AC Circuit Connection B-5
Figure B-5. Split-Phase 120/240 Volts AC Circuit Connection B-6
Figure B-6. Three-Phase 208-Volts AC, Y-, or
Connection, Phase-to-Neutral B-7
Figure B-7. Three-Phase 208-Volts AC, Y-, or
Connection, Phase-to-Phase B-8
Figure B-8. Three-Phase 380V AC, Y-, or
Phase-to-Neutral B-9
∆-Source Circuit
∆-Source Circuit
∆-Source Circuit Connection,
Figures v
Page 6

Tables
Table 1-1. Ethernet PCI Adapters 1-4
Table 1-2. Optical Fibre Channel PCI Adapters 1-4
Table 1-3. Express5800/320Ma Documentation 1-6
Table 4-1. AC Power Service Requirements 4-2
Table 4-2. Worksheet for Determining A-Side Power Requirements 4-3
Table 4-3. Worksheet for Determining B-Side Power Requirements 4-3
Table 4-4. Worksheet for Determining External Power Requirements 4-3
Table 4-5. Worksheet: A-Side External Power Outlet Requirements -
PDUs Used 4-4
Table 4-6. Worksheet: B-Side External Power Outlet Requirements -
PDUs Used 4-4
Table 4-7. Worksheet: A-Side External Power Outlet Requirements -
No PDUs 4-5
Table 4-8. Worksheet: B-Side External Power Outlet Requirements -
No PDUs 4-5
Table 4-9. System Power Cords to AC Power 4-7
Table 4-10. Systems: Power Cords to a UPS 4-8
Table 4-11. PDU Power Cords to AC Power 4-9
Table 4-12. System Power (Jumper) Cables to a PDU 4-9
Table 4-13. Po wer Cords for Optional Components 4-9
Table 5-1. APC Symmetra Models for PDUs or for Multiple Systems 5-1
Table 5-2. APC UPS Models for a Single Rack-Mountable System 5-2
Table 5-3. APC UPS Models for a Single Pedestal System 5-2
Table 6-1. Customer-Supplied Ethernet Cables 6-2
Table 7-1. Current and Rack-Space Requirements 7-2
Table 7-2. Calculating A-Side PDU and Rack-Space Requirements 7-3
Table 7-3. Sample: Current and Rack-Space Requirements 7-4
Table 7-4. Sample: Calculating A-Side PDU and Rack-Space
Requirements 7-4
Table A-1. Pedestal System Specifications A-5
Table A-2. Cabinet Dimensions A-10
Table A-3. Rack-Mountable System Specifications A-11
Table B-1. Connectors for AC Power Outlets B-10
Table C-1. EMI Standards C-2
Table C-2. Immunity Standards C-2
Table C-3. Safety Standards C-2
Table C-4. Noise Standards C-2
vi Express5800/320Ma: Site Planning Guide
Page 7

Purpose of This Manual
The Express5800/320Ma: Site Planning Guide documents the site requirements and
customer responsibilities related to preparing a site for the installation of
Express5800/320Ma 3.2 GHz, 3.6 GHz, or Dual-Core systems.
Audience
This manual is intended for those responsible for pr eparing a site for the installatio n of
an Express5800/320Ma 3.2 GHz, 3.6 GHz, or Dual-Core system.
Notation Conventions
This document uses the notation conventions described in this section.
Warnings, Cautions, and Notes
Warnings, cautions, and notes provide special information and have t he following
meanings:
WARNING
!
A warning indicates a situation where failure to take
or avoid a specified action could ca use bodily harm or
loss of life.
Preface
CAUTION
!
A caution indicates a situation where failure to t ake or
avoid a specified action could damage a hardwar e device,
program, system, or data.
NOTE
A note provides important information about the opera tion
of an Express5800/320Ma system.
Preface vii
Page 8

Preface
Typographical Conventions
The following typographical conventions are used in Express5800/320Ma document s:
• The bold font emphasiz es w ords in t e xt or indicates text that you type or the name
of a screen object. For example:
Before handling or replacing a PCI adapter, make sure that you are properly
grounded by using a grounded wrist strap.
In the System Properties dialog box, click the Hardware tab.
• The italic font introduces new terms. For example:
Many hardware components are custom er -r ep la cea b le un its (CRUs), which
can be replaced on-site by system adm inistrators with minimal tr aining or tools.
copy filename1 filename2
• The monospace font indicates message text. For example:
The operation completed successfully.
Getting Help
If you have a technical question about Express5800/320Ma hardware or software, try
these online resources first:
• Online support from NEC Technical Support. You can find the latest technical
information about an Express5800/320Ma through online product support at the
NEC Technical Support Web site:
http://support.necsam.com/servers/
• Online product support for Microsoft
®
products. Your primary source for
support is the computer manufacturer wh o provided your software, or an
authorized Microsoft Support Provider . You can also find the latest technical
information about Microsoft Windows
®
and other Microsoft products through online
product support at the Microsoft Help and Support Web site:
http://support.microsoft.com/
If you are unable to resolve your questions with t he help available at these online sites,
and the Express5800/320Ma system is covere d by a service agreement, please
contact NEC Technical Support (866-269-1239).
viii Express5800/320Ma: Site Planning Guide
Page 9

Notices
Preface
• All regulatory notices are provided in Appendix C, “Standards Com pliance” of this
site planning guide.
• Although this guide documents modem functionality, modems are not a v ailab le f or
all systems. Ask your sales representative about modem availability.
• ActiveService Network (ASN) is not currently availa ble, but may be ordered in the
future.
Preface ix
Page 10

Preface
x Express5800/320Ma: Site Planning Guide
Page 11

Chapter 1
Welcome to Site Planning for
Express5800/320Ma 3.2 GHz, 3.6 GHz,
For an overview of the information you need to know and of the tasks you need to
perform to prepare a site for a n Expr ess5800/ 32 0Ma 3.2 GHz, 3. 6 GH z, or Du al- Core
system, see:
• “Site Planning Overview” on page 1-1
• “Site Planning for Fault-Tolerant Systems” on page 1-2
• “Site Planning Checklist” on page 1-3
• “System Documentation” on page 1-5
Site Planning Overview
Site planning for fault-tolerant systems includes:
• Space planning
Provide adequate space for the system or cabinet and for a desk or table to
accommodate components outside a cabinet. Also provide enough space for
servicing the systems and components.
and Dual-Core systems
1-
• Purchasing an appropriate cabinet and monitor
If you do not purchase a monitor from NEC Solutions (Amer ica) , Inc., provide a
monitor that meets the system’s requirements.
If you do not purchase the cabinet that NEC Solutions (America), Inc. references,
provide a cabinet that meets the system’s requirements.
• Electrical (AC) power planning
Provide electrical power sources that meet the system’s requirements, optionally
including the purchase of a qualified uninterruptible power supply (UPS).
• Network and telephone line planning
Provide sufficient network and analog telephone lines.
Welcome to Site Planning for Express5800/320Ma 3.2 GHz, 3.6 GHz, and Dual-Core systems 1-1
Page 12

Site Planning for Fault-Tolerant Systems
Use the “Site Planning Checklist” on page 1-3 to track your site preparation progress.
For a list of other documents related to your Express5800/320Ma system, see “System
Documentation” on page 1-5.
During the site planning and preparation processes, work closely with your facilities
group or contractor to determine space, power, and environmental requirements. Enlist
their help to provide a suitable location with sufficient alternating current (AC) power,
heating, ventilation and air conditioning (HVAC) capabilities, and network and
telephone connections.
If your system is covered by a service agreem ent and you need help with site planning,
contact the NEC Technical Support. If you have a contract with the NEC Technical
Support to install the system, contact them after you have pre pared the installation site
and moved the system to the site. For more information about NEC Technical Support,
visit http://support.necsam.com/servers.
See Appendix A, “System Specifications” for Express5800/320Ma 3.2 GHz, 3.6 GHz,
or Dual-Core system specifications and the Express5800/320Ma: Peripherals Site
Planning Guide for specifications of other components.
Site Planning for Fault-Tolerant Systems
Consider the following specific fault-tolerant features of Express5800/320Ma 3.2 GHz,
3.6 GHz, and Dual-Core systems for site planning:
• Lockstep technology means that the Express5800/320Ma 3.2 GHz and 3.6 GHz
systems contain redundant hardwa re. The Express5800/320Ma 3.2 GHz and 3.6
GHz systemssystems contain two enclosures, each cont aining a full computing
environment that consists of a CPU element and an I/O element.
If a component in a CPU element malf unctions, the correspon ding CPU element in
the other enclosure, which is processing the same information in lockstep,
continues processing without interruption. If a component in the I/O element
malfunctions, the system fails operation over to the corresponding element in the
other enclosure and continues to operate normally. Th e only consequences are
that the system is less fault tolerant, and any I/O throughput distributed between
the enclosures may be reduced. To restore full fault tolerance , an enclosure can
be replaced without taking the system offline.
• Express5800/320Ma 3.2 GHz and 3.6 GHz systems can connect to the
ActiveService Network (ASN).
Connecting a system to the ASN allows the NEC Technical Support to remotely
diagnose, troubleshoot, and resolve problems online.
1-2 Express5800/320Ma: Site Planning Guide
Page 13

T o e nable connectivity to th e ASN, a modem can be attached directly to the system
and managed by Windows Server software or two partnered Virtual Technician
Modules (VTMs) in the system. The VTMs can also connect to the ASN through
their Ethernet ports, if the network to which they are attached has Internet access.
Systems that connect to the ASN using partnered VTMs provide the highest level
of availability. VTMs provide ASN connectivity even when the operating system is
not operational. VTMs also allow internal adminis trators to re mo te ly se rvice the
system over a t elephone line or IP netw ork, regardless of the state of the operating
system.
Without VTMs, ASN connectivity is only possible if the operating system is
operational.
Site Planning Checklist
Referring to the information in this document, answer t he following questions:
Planning for ASN Connectivity
❏ Will your system use VTMs to connect to the ASN?
❏ If your system uses VTMs, will you connect them to a network so that you can
manage the server from a remote system? Are there mainten ance network
connections to which you can connect the VTMs?
Site Planning Checklist
❏ If your VTMs are connected to a netw ork, does the network have Internet
connectivity so that the system can connect to the ASN without a modem?
❏ If your system uses an ASN modem, do you have an external analog telephone line
available for the modem?
NOTE
A dedicated phone line provides the most reliable service.
ASN calls routed through a PBX may be slo w due to load
on the PBX, or may not complete successfu lly due to
disconnections. If you must use a PBX, do not route the
telephone extension through a switchboard; instead,
provide a direct-dial analog number.
❏ Do you hav e an additional telephone line and telephon e near the operator’ s station
for voice communications when calling for support?
Planning for Optional Components
❏ The system contains four 10/100/1000 megabits-per-second (Mbps) Ethernet
ports. Will your system additionally include any of the following PCI adapters for
network communications? If so, indicate how many of each and plan network
connections for all Ethernet ports you will use.
Welcome to Site Planning for Express5800/320Ma 3.2 GHz, 3.6 GHz, and Dual-Core systems 1-3
Page 14

Site Planning Checklist
Table 1-1. Ethernet PCI Adapters
Adapter Number of Ports
U575 Dual-Port Copper Gigabit Ethernet Adapter
❏ Will your system connect to an EMC® CLARiiON® AX100 ® storage system? If so,
the system requires one pair of U531 Optical Fibre Channel PCI Adapter s, which
are provided when you order the storage system.
❏ Will your system connect to EMC CLARiiON CX or to EMC Symmetrix
systems? If so, the syst em requires one pair of opt ical fibre channel PCI ad apters,
as described in Table 1-2.
Table 1-2. Optical Fibre Channel PCI Adapters
Attachment Method PCI Adapter
®
storage
Through a Storage Area
Network (SAN) or switch
Directly attached U526 Optical Fibre Channel PCI Adapter, two of which are
U525 Optical Fibre Channel PCI Adapter, two of which are
provided in the AK415 Attachment Kit
provided in the AK419 Attachment Kit
❏ Will you supply your own monitor or will NEC Solutions (America), Inc. supply the
monitor?
NOTE
Use the USB keyboard and mouse supplied by NEC
Solutions (America), Inc..
❏ Will the components in a cabinet include a keyboard-video-mouse (KVM) switch?
Planning AC Power
❏ Will you provide power through a power distribution unit (PDU)?
❏ Will you provide power from a UPS?
❏ What are the AC power requirements of your system, including all optional
components?
❏ Is the AC power service wired properly?
❏ What are the lengths and types of the power cords that are provided with your
system? What type of receptacles do you need to provide?
Planning Space for Your System
❏ Will your system and its external components fit where you plan to place them?
1-4 Express5800/320Ma: Site Planning Guide
Page 15

System Documentation
❏ If you are rack-mounting the system, what is the height of the cabinet you will use
and what is the total height of the systems and components that will be installed in
the cabinet? Will the items fit into the cabinet? What components will be located
outside the cabinet?
❏ What are the lengths and types of the cables that will connect to your system?
❏ Have you creat ed a sketch of how y ou plan to arrange the system at th e installation
site? Consider the av ailab le ca b le lengths , t he placement of e xt ernal devices , an d
the location of network and voice communication connections.
On the sketch, sho w the following:
• Location of the system and its external components
• Power cords, and telephone and interface cables
• Locations of AC pow er receptacles, phone jacks, Ethernet jacks, switches,
and/or hubs
NOTE
Make sure that all cords and ca bles are long enough to
reach between their respectiv e components and
connectors. Route all cables out of the way of foot traffic.
Working with Other Groups
❏ Have you pr ovided y our f acilities gr oup and contractors with the sketch and cop ies
of the following?
• Tables 4-2, 4-3, and 4-4, worksheets for determining AC power requirements
• Tables 4-5 and 4-6 or Tables 4-7 and 4-8, worksheets for determining the
number of external power outlets required
• Appendix B, “Electrical Circuit and Wiring Information”
• Any notes you have about site planning
❏ Have you reviewed and discussed the requirements with the facilities personnel
and contractors to ensure that all site modifications are understood and
implemented?
If you have any questions about the number and types of components, contact your
Express5800/320Ma account executive or distributor.
System Documentation
When you receive your system, you receive a printed copy of the Express5800/320Ma:
Installation Guide. The software installation program lets you install an online copy of
Welcome to Site Planning for Express5800/320Ma 3.2 GHz, 3.6 GHz, and Dual-Core systems 1-5
Page 16

System Documentation
this document, along with other Express5800/320Ma system documentation, on your
system. You also have the option to install documentation on a remote system. The
Express5800/320Ma Help and Manuals folder on the Windows desktop, contains
these documents.
To order additional documentation, visit the NEC Technical Support Web site:
http://support.necsam.com/servers/
Express5800/320Ma Express5800/320MaExpress5800/320MaTable 1-3 lists
Express5800/320Ma 3.2 GHz, 3.6 GHz, or Dual-Core system documents and the tasks
described in each document.
Table 1-3. Express5800/320Ma Documentation
Document Task
Express5800/320Ma: Site Planning
Guide
Express5800/320Ma: Installation Guide Install your system, including mounting the
Express5800/320Ma: Operation and
Maintenance Guide
Release Notes: Express5800/320Ma Learn the contents of the latest
Prepare a site for installation of your
Express5800/320Ma 3.2 GHz, 3.6 GHz, or
Dual-Core system.
system in a cabinet
Find the part number of a customer-rep lac eab l e
unit (CRU)
Respond to Mini-Setup questions on your new
Express5800/320Ma system
Install Express5800/320Ma System software
and Windows Server on your new system
Start up, shut down, and operate your system
Troubleshoot system hardware
Remove and replace CRUs
Express5800/320Ma software release
Learn the latest information about the product
Learn about significant known problems and
how to work around or avoid the problems
1-6 Express5800/320Ma: Site Planning Guide
Page 17

Table 1-3. Express5800/320Ma Documentation (Continued)
Document Task
System Documentation
Express5800/320Ma: Software
Installation and Configuration Guide
Express5800/320Ma ActiveService
Network Configuration Guide
Express5800/320Ma Virtual Technician
Module User’s Guide
Express5800/320Ma: System
Administrator’s Guide
Respond to Mini-Setup questions
Install or reinstall Express5800/320Ma System
software and Windows Server software
Upgrade software and BIOS, BMC, and VTM
firmware
Configure Express5800/320Ma System
software
Connect a UPS to your system
Configure your system for support by the NEC
ActiveService Network (ASN)
†
Configure the VTMs
Configure and use VTMs to remotely control,
monitor, and troubleshoot your system
Use tools that are provided by Windows Server
software or Express5800/320Ma System
Software and by other vendors to manage the
system
Use ftServer Management Console (ftSMC) to
administer or troubleshoot Express5800/320Ma
systems
Express5800/320Ma Software
Availability Manager User’s Guide
Express5800/320Ma: PCI Adapter
Guide
Express5800/320Ma: Technical
Reference Guide
Monitor the performance of critical system
components and the status of user applications
Install, configure, replace, or troubleshoot PCI
adapters
Consult technical reference information for
Express5800/320Ma systems
Change BIOS settings
† ActiveService Network (ASN) is not currently available, but may be ordered in the future.
Welcome to Site Planning for Express5800/320Ma 3.2 GHz, 3.6 GHz, and Dual-Core systems 1-7
Page 18

System Documentation
1-8 Express5800/320Ma: Site Planning Guide
Page 19

Chapter 2
For requirements related to supplying your own cabinet and monitor, see:
• “Cabinet Requirements” on page 2-1
• “Monitor Requirements” on page 2-4
Cabinet Requirements
If you are providing your own cabinet for an Express5800/320Ma 3.2 GHz, 3.6 GHz, or
Dual-Core systems, make sure the cabinet contains a rack that is 19-in. wide and that
meets the Electronic Industries Association (EIA) 310-D standard.
Make sure that:
• The cabinet contains two front and two rear v ertical EIA rails, one in each corner of
the cabinet, that have the EIA universal square-hole pattern as defined in the EIA
310-D specification.
• The front vertical rails extend at least 0.5 in. (1.27 cm) beyond the inside edge of
the accessory leg, if present, to allow the mounting rails to be fit ted. See Figure 2-1.
Cabinet and Monitor Requirements
2-
• The distance between the front and r ear vertical rails is between 24 .5 in. and 30 in.
(62.23 cm and 76.20 cm).
• The vertical mounting rails accept 10-32 cage nuts and mounting hardware.
• The distance between the front vertical rails and the inside of the front door is at
least 3.0 in. (7.62 cm).
• The distance between the rear of t he system chassis and the inside of the rear do or
is at least 6.0 in. (15.24 cm).
• The vertical mounting rails are plated or some other method is used to ensure
continuity for g rounding between installed equipment.
• Cable management brac kets are pro vided to support and constrain data and power
cords so that the cables do not interfere with air flow out of the rear of the
enclosures, and so that the connectors do not disconnect or break.
• The cabinet provides enough stability so that system components pass T elcordia
®
GR-63-CORE Section 5.4.2 regulations for operational vibration.
Cabinet and Monitor Requirements 2-1
Page 20

Cabinet Requirements
• To prevent stray voltages, all components are grounded together through the
vertical mounting rails to the cabinet frame, and then to local building ground. To
ensure signal quality , us e a grounding cable pr ovided by NEC Solutions (America),
Inc. for local building ground.
• There is a plan for maintaining cables and wires to the cabinet by either running
them under the floor or placing them overhead in an overhead cable tray.
• Air flows through the cabinet from f ront to back.
• Filler panels cover any unused rack space to prevent air recirculation.
• V ents are evenly distributed on the front and rear doors and comprise at least 63%
of the surface area.
Figure 2-1 shows the required rail clearance between the front vertical rails and the
inside edge of an accessory leg.
NOTE
If your cabinet does not ha v e ve nted front and rear doors,
you can remove the doors from the cabinet while your
Express5800/320Ma 3.2 GHz or 3.6 GHz system is
operating.
2-2 Express5800/320Ma: Site Planning Guide
Page 21
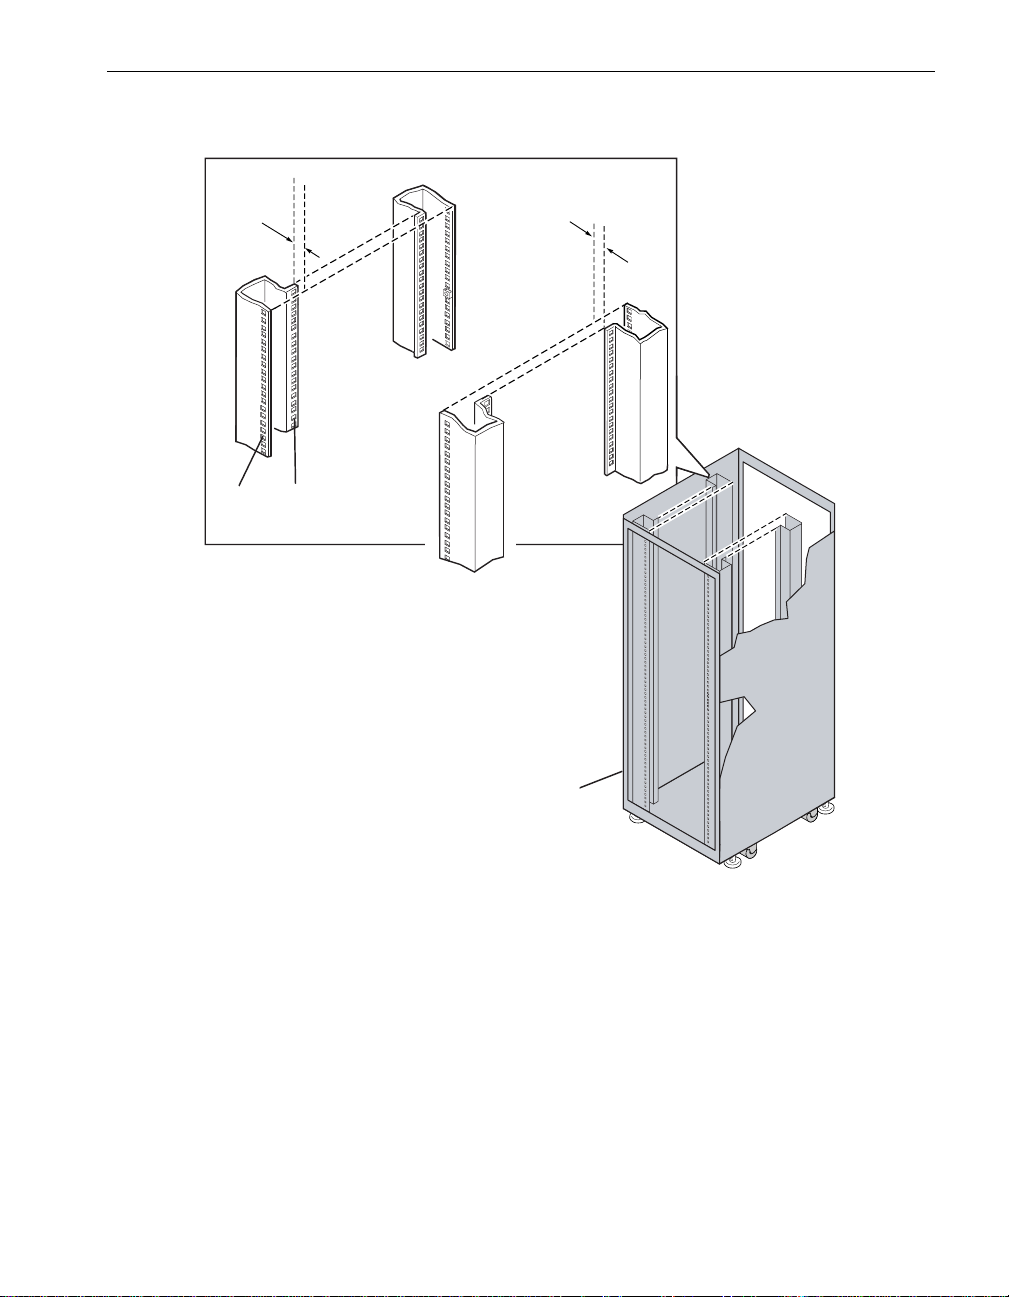
Figure 2-1. Rail Clearance
0.5-inch
(1.27-cm)
minimum
1 2
Cabinet Requirements
0.5-inch minimum
3
msys182
1 Front vertical EIA rail
2 Accessor y leg
3 Front of cabinet
Cabinet and Monitor Requirements 2-3
Page 22

Monitor Requirements
Monitor Requirements
If you are using a monitor that is not supplied by NEC Solutions (America), Inc., make
sure that:
• The monitor accepts universal 100–240 VAC, 50/60 Hz power.
• The VGA cable has a 15-pin D-sub connector.
• The power cord for the monitor is long enough to reach the power source.
• The plug type on the power cord is compatible with the external power source at
the site.
Use the keyboard and mouse provided by NEC Solutions (America), Inc..
2-4 Express5800/320Ma: Site Planning Guide
Page 23

Chapter 3
For information about planning sufficient space for your Exp ress5800/320Ma 3.2 GHz,
3.6 GHz, or Dual-Core system, see:
• “Room Requirements” on page 3-1
• “Planning for Cables” on page 3-2
Room Requirements
To ensure that the installation site provides a properly equipped, cooled, and sized
environment, make sure that the site:
• Provides clearances for air circulation and servicing the system
Locate the front and rear of the system at least 2.5 ft (0.76m) a w a y from w alls an d
other obstructions.
• Maintains reasonable temperat ure and humidity lev els and has a thermometer and
humidistat to monitor room temperature and humidity
Space Planning
3-
• Is as free of dust as possible
Dust buildup in the system can impede air circulation and heat transfer, causing
components to become less reliable as the ambient t emperature rises.
• Provides a table or desktop for external devices such as a telephone, keyboard,
and mouse
• Provides cutouts in the floor for routing cables, if the site has an elevated floor
CAUTION
!
Do not place the system in an area of high electrostatic
discharge. Static electricity may damage components.
Do not locate components near transformers or other
electromagnetic devices.
See Appendix A, “System Specifications” for the dimensions of system components.
Space Planning 3-1
Page 24

Planning for Cables
Planning for Cables
To accommodate cables from your Express5800/320Ma 3.2 GHz o r 3.6 G Hz system,
make sure to provide:
• Two telephone lines:
– One telephone line for use when calling for service
– One telephone line for the ASN modem
• Ethernet jacks, switches, or hubs, as needed
• Two electrically separate grounded AC wall outlets, or a UPS and a wall outlet,
within reach of the power cords f rom the system or PDUs and addition al outlets f or
any components that do not connect to a PDU
Make sure that cables you plan to connect to the system are long enough to reach
between the system and external comp on e nt s or co nn ections. S
3-2 Express5800/320Ma: Site Planning Guide
Page 25

Chapter 4
For information about planning appropriate AC electrical power for your
Express5800/320Ma 3.2 GHz, 3.6 GHz, oe Dual-Core system, see:
• “Redundant Power Sources” on page 4-1
• “AC Power Service Requirements” on page 4-2
• “Power Outlet Requirements” on page 4-4
• “Connecting a System Directly to Two Separate Power Sources” on page 4-5
• “NEC-Supplied Power Cords” on page 4-6
Related Topics
• Chapter 5, “UPS Planning”
• Chapter 7, “Rack Configuration Planning”
Redundant Power Sources
Express5800/320Ma 3.2 GHz, 3.6 GHz, and Dual-Core systems require at least two
separate and independent AC power sources–an A-side power source and a B-side
power source–that provide power to the system’s power receptacles, labeled,
respectively, A and B. Either source must be capable of continuing to provide power if
power to the other source is lost.
Electrical (AC) Power Planning
4-
The A-side power source provides power to components th at do not require two
sources of power: a KVM switch. If you use an uninterruptible power supply (UPS), the
UPS is the A-side power source.
The B-side power source provides power to the oth e r side of ea ch syste m .
The wattage required from the A-side power source will always be equal to or greater
than the wattage required from the B-side power source.
Electrical (AC) Power Planning 4-1
Page 26

AC Power Service Requirements
AC Power Service Requirements
Table 4-1 describes the nominal input line voltage (volts AC) and frequency (Hz)
required for your system and opt ional components. The table al so provides a reference
to a table that lists the receptacles to provide for each component.
Table 4-1. AC Power Service Requirements
Nominal Input Voltage;
Component
Nominal Frequency Range Receptacle
Express5800/320Ma 3.2 GHz, 3.6
GHz, or Dual-Core system
PDU 200–240V; 50/60 Hz See Table 4-11.
KVM switch 100–240V; 50/60 Hz See Table 4-13.
100–240V; 50/60 Hz See Table 4-9.
The power service must be properly wired and grounded a ccording to local standar ds
and regulations. See Appendix B for electrical circuit and wiring information.
NOTE
Circuit breakers must provide a protective earth ground
current at a maximum of 3.5 milliamperes for each AC
power cord.
Use the following worksheets to determine AC power requirements for the site.
• In Table 4-2, determine the power requirements at the A-side power source.
• In Table 4-3, determine the power requirements at the B-side power source.
• In Table 4-4, determine the power requirements for components outside of the
cabinet. These components can share a power source with the A-side or B-side
components.
To determine power requirements
Provide information in Tables 4-2, 4-3, and 4-4 as follows:
1. In the Quantity column, write the number of each type of component.
2. Multiply the entry in the Qua nt ity colu m n by the number in the @ Power (Watts)
column, and enter the result in the AC Power (Extended) column.
3. Add the values in the AC Power (Extended) column, and enter the sum on the
bottom line. This value indicates the maximum power requirement for each power
source.
4-2 Express5800/320Ma: Site Planning Guide
Page 27

AC Power Service Requirements
Table 4-2. Workshee t for Determining A-Side Pow e r R eq uirements
@ Power
System Component Quantity
Express5800/320Ma 3.2 GHz, 3.6
(Watts)
x 650 =
GHz, or Dual-Core system
KVM switch x 20 =
TOTAL A-SIDE POWER REQUIREMENTS
Table 4-3. Workshee t for Determining B-Side Pow e r R eq uirements
@ Power
System Component Quantity
Express5800/320Ma 3.2 GHz, 3.6
GHz, or Dual-Core system
TOTAL B-SIDE POWER REQUIREMENTS
Table 4-4. Worksheet for Determining External Power Requirements
System Component Quantity
Other external components
(Watts)
x 650 =
@ Power
(Watts)
AC Power
(Extended)
AC Power
(Extended)
AC Power
(Extended)
TOTAL EXTERNAL POWER REQUIREMENTS
Electrical (AC) Power Planning 4-3
Page 28

Power Outlet Requirements
Power Outlet Requirements
If you do use a pair of PDUs in the cabinet, use Tables 4-5 and 4-6 to determine the
total number of power outlets required outside the cabinet.
1. In the Quantity column, write the number of each type of component.
2. Multiply the value in the Quantity column by the value in the Outlets column, and
enter the total in the Subtotal column.
3. Add the values in the Subtotal column and enter the sum next to TOTAL NUMBER
OF A-SIDE POWER OUTLETS and TOTAL NUMBER OF B-SIDE POWER
OUTLETS.
Table 4-5. Workshee t: A -Sid e External Power Outlet Requiremen ts - PDUs Use d
Component Quantity Outlets Subtotal
PDUs x 1
Other external components
TOTAL NUMBER OF A-SIDE PO WER OUTLETS
Table 4-6. Workshee t: B -Sid e External Power Outlet Requiremen ts - PDUs Use d
Component Quantity Outlets Subtotal
PDUs x 1
Other external components
TOTAL NUMBER OF B-SIDE PO WER OUTLETS
If you do not use PDUs in the cabinet, use Tabl es 4-7 and 4-8 to determine the number
of power outlets required outside the cabinet.
1. In the Quantity column, write the number of each type of component.
2. Multiply the value in the Quantity column by the value in the Outlets column, and
enter the total in the Subtotal column.
3. Add the values in the Subtotal column and enter the sum next to TOTAL NUMBER
OF A-SIDE POWER OUTLETS and TOTAL NUMBER OF B-SIDE POWER
OUTLETS.
4-4 Express5800/320Ma: Site Planning Guide
Page 29

Connecting a System Directly to Two Separate Power Sources
Table 4-7. Workshee t: A -Side External Power Outlet Requirem ents - No PDUs
Component Quantity Outlets Subtotal
Express5800/320Ma 3.2 GHz, 3.6
GHz, or Dual-Core systems+
TOTAL NUMBER OF A-SIDE POWER OUTLETS
Table 4-8. Workshee t: B -Side External Power Outlet Requirem ents - No PDUs
Component Quantity Outlets Subtotal
Express5800/320Ma 3.2 GHz, 3.6
GHz, or Dual-Core systems
TOTAL NUMBER OF B-SIDE POWER OUTLETS
x 1
x 1
Connecting a System Directly to Two Separate Po wer Sources
If you do not connect your Express5800/320Ma 3.2 GHz or 3.6 GHz system or PDUs
to a UPS, provide two AC power sources that are as electrically independent of each
other as the installation site allows. At a minimum, the two pow er sou rce s mu st be
powered by separate circuit breakers (maximum of 2 0A) to AC power and, if po ssible,
be independent of each other beyond that level. The more electrical separation
between the two power sources, the less likely they will both fail at the same time. Due
to redundancy in Express5800/320Ma 3.2 GHz and 3.6 GHz syste ms, power to eit her
side of the system keeps the system in operation, although the system is no longer
fault-tolerant with regard to power.
Figure 4-1 shows how to connect a rack-mounted Express5800/320Ma 3.2 GHz,
3.6GHz, or Dual-Core system directly to two separate AC power sources, and
Figure 4-2 shows how to connect a pedestal system directly to two separate power
sources.
Electrical (AC) Power Planning 4-5
Page 30

NEC-Supplied Power Cords
Figure 4-1. Rack-Mounted System Connected Directly to AC Power
1
Figure 4-2. Pedesta l Sy ste m Co nn ec te d D ir ec tly to AC Power
4
4
4
3
3
asys001
3
4
3
1
2
asys002
1 A-side system power cord
2 B-side system power cord
3 AC power outlets
4 Circuit breakers (maximum of 20A)
NEC-Supplied Po wer Cords
NEC Solutions (America), Inc. supplies power cords for:
4-6 Express5800/320Ma: Site Planning Guide
Page 31

• Express5800/320Ma 3.2 GHz, 3.6 GHz, and Dual-Core systems
• PDUs
• KVM switches
WARNING
!
Place all power cords out of the way of foot traffic.
Power cords described as Domestic are made with American Wire Gauge (AWG)
cordage and are intended for use in North America. Refer to UL 62 and CSA C22.2,
No. 49.
Power cords described as International are made with International Harmonized
cordage and are intended for use outside of North America.
System Power Cords
Table 4-9 lists the available power cords for Express5800/320Ma 3.2 GHz, 3.6 GHz,
and Dual-Core systems that connect directly to an AC power source (not to a PDU or
to a UPS).
Table 4-10 lists the available power cords that connect Express5800/320Ma 3.2 GHz,
3.6 GHz, and Dual-Core systems to qualified UPS models from American Power
Conversion (APC).
NEC-Supplied Power Cords
Table 4-9. System Power Cords to AC Power
Marketing
Locale Plug Type Rating Length
North America and Japan
locking power cord
International, locking power
cord
North America (Chicago) NEMA 5-15 15A/127V 7 ft B50101
North America (domestic) NEMA 5-15 15A/127V 15 ft B50104
Australia AS/NZS 3112:1993 10A/250V 4.5m B50124
China GB1002-1996 10A/250V 4.5m B50162
Europe (Continental) CEE 7 VII 16A/250V 4.5m B50112
Israel SI 32:1971 16A/250V 4.5m B50132
Italy CEI23-16 10A/250V 4.5m B50136
Electrical (AC) Power Planning 4-7
NEMA L6-20 20A/250V 15 ft
(4.5m)
IEC 60309
(formerly IEC 309)
16A/250V 4.5m B50153
ID
B50161
Page 32

NEC-Supplied Power Cords
Table 4-9. System Power Cords to AC Power (Continued)
Locale Plug Type Rating Length
Marketing
ID
Japan NEMA 5-15 15A/127V 15 ft
South Africa/India SABS164-1:1992
Switzerland SEV 1011-S24507 10A/250V 4.5m B50140
United Kingdom BS 1363/A, 13A/250V 4.5m B50116
Table 4-10. Systems: Power Cords to a UPS
Locale
North America
(Chicago) and Japan
North America
(Domestic) and
Japan
International 250V IEC 320 C14 to
PDU Power Cords
B50160
(4.5m)
13A/250V 4.5m B50152
ZA/3
Voltage
Rating Plug Types Length Marketing ID
120V NEMA 5-15 to IEC 60320
(formerly 320) C13
250V NEMA L6-20 to
IEC 60320 C13
IEC 60320 C13
15 ft
(4.5m)
15 ft
(4.5m)
3.5m B50301
B50104
B50161
The AA-P41104 PDU supplies power to Express5800/320Ma 3.2 GHz, 3.6 GHz, and
Dual-Core systems. Table 4-11 lists the available power cords to connect PDUs directly
to an AC power source or to the APC
®
Smart-UPS® and APC Symmetra® UPS models.
Table 4-12 describes the gray and black power (jumper) cables that are provided to
connect Express5800/320Ma 3.2 GHz, 3.6 GHz, and Dual-Core systems to PDUs.
4-8 Express5800/320Ma: Site Planning Guide
Page 33

NEC-Supplied Power Cords
Table 4-11. PDU Power Cords to AC Pow er
Locale Plug Type Rating Length Marketing ID
North America
and Japan
North America IEC 60320 C19 to
International
† Use this power cord to connect the PDU directly to the AC power mains or to a UPS.
Table 4-12. System Power (Jumper) Cables to a PDU
Length Rating Plug Type to System Plug Type to PDU Marketing ID
2.0m 10A/250V IEC 320 C13 IEC 60320 (formerly
†
IEC 60320 (formerly 320)
C19 to NEMA L6-20P
NEMA L6-30P
(Receptacle must be fused
at no more than 20A)
†
IEC 60320 C19 to
IEC 60309
Power Cords for Optional Components
Table 4-13 lists the available power cords to connect to KVM switches directly to
external AC power sources.
Table 4-13. Power Cords for Optional Components
20A/250V
50–60 Hz
30A/250V
50–60 Hz
20A/250V
50–60 Hz
IEC 320) C14
15 ft
(4.5m)
15 ft B50156
15 ft
(4.5m)
B50155
B50154
B50502
Locale Rating Plug Type Length Marketing ID
North America and Japan 15A/120V NEMA 5-15 7 ft B501-01
North America and Japan 15A/120V NEMA 5-15 10 ft B501-02
United States (Domestic) 15A/127V NEMA 5-15 10 ft B501-06
Australia 10A/250V AS/NZS 3112:1993 2.5m B501-21
China (CCC) 10A/250V GB1002-1996 2.5m B50162-8F
Europe (Continental) 16A/250V CEE 7 VII 2.5m B501-09
India 13A/250V SABS164-1:1992;
ZA/3
Israel 16A/250V SI 32:1971 2.5m B501-29
Italy 16A/250V CEI23-16; 2.5m B501-33
Electrical (AC) Power Planning 4-9
2.5m B501-49
Page 34

NEC-Supplied Power Cords
Table 4-13. Power Cords for Optional Components (Continued)
Locale Rating Plug Type Length Marketing ID
New Zealand 10A/250V AS/NZS 3112:1993 2.5m B501-21
South Africa 13A/250V SABS164-1:1992;
ZA/3
Switzerland 10A/250V SEV 1011-S24507 2.5m B501-37
United Kingdom 13A/250V BS1363/A 2.5m B501-13
2.5m B501-49
4-10 Express5800/320Ma: Site Planning Guide
Page 35

Chapter 5
For information about planning for an uninterruptible power supply (UPS) to use with
your Express5800/320Ma 3.2 GHz, 3.6 GHz, and Dual-Core system, see:
• “Qualified APC UPS Models” on page 5-1
• “Communicating with a UPS over a Network” on page 5-2
• “Connecting Power to Systems, PDUs, and a UPS” on page 5-3
• “Connecting a System Directly to a UPS” on page 5-4
Qualified APC UPS Models
NEC Solutions (America), Inc. has qualified certain UPS models from American Power
Conversion Corporation (APC) for use with Express5800/320Ma 3.2 GHz, 3.6 GHz,
and Dual-Core systems. The qualified APC Symmetra and APC Smart-UPS models
are listed in Tables 5-1, 5-2, and 5-3.
NOTE
Site planning information for the UPS, which you must
supply , is of a general nature only. Do not rely exclusively
on the UPS information in this document. Contact APC at
http://www.apcc.com for detailed UPS specifications,
documentation, and ordering information.
UPS Planning
5-
Table 5-1. APC Symmetra Models for PDUs or for Multiple Systems
AC Power
Locale APC Symmetra Model
North America SYH2K6RMT-P1, SYH4K6RMT-P1,
SYH6K6RMT-P1, SYA8K16RMP, or
SYA12K16RMP
With SYA8K16RMP and SYA12K16RMP, also
order AP7582, a rack PDU extender.
UPS Planning 5-1
Input
120V 120V or 208V
AC Power
Output
Page 36

Communicating with a UPS over a Network
Table 5-1. APC Symmetra Models for PDUs or for Multiple Systems
AC Power
Locale APC Symmetra Model
Japan SYH2K6RMJ-P1, SYH4K6RMJ-P1, or
SYH6K6RMJ-P1
Rest of the world SYK2K6RMI, SYK4K6RMI, SYK6K6RMI,
SYA8K16RMI, or SYA12K16RMI
Table 5-2. APC UPS Models for a Single Rack-Mountable System
Locale Smart-UPS AC Power Input A C Power Output
North America Model SUA1500RM2U 120V 120V
Japan Model SUA1500RMJ2U 80V to 123V 100V
Rest of the world Model SUA1500RMI2U 160V to 286V 120V or 208V
Table 5-3. APC UPS Models for a Single Pedestal System
Locale Smart-UPS AC Power Input AC Power Output
North America Model SUA1500 120V 120V or 208V
Japan Model SUA1500J 80V to 123V 100V
Input
100V 100V or 200V
230V 230V or 240V
AC Power
Output
Rest of the world Model SUA1500I 160V to 286V 230V or 240V
Communicating with a UPS over a Network
Use the following additional tools to enable an Expres s5800/320Ma system and a UPS
to communicate over the network:
• APC Network Management Card EX (APC part number AP9617)
An APC Network Management Card EX is a standar d component of the Symmet ra
UPS, but you must purchase the network card for the APC Smart-UPS.
• APC PowerChute
When you install your Express5800/320Ma system, download PowerChute
Network Shutdown from APC, and install and configure the tool on the system, as
described in the Express5800/320Ma: Software Installation and Configuration
Guide. PowerChute Network Shutdown monitors the UPS for an imminent power
loss, and initiates a shutdo wn of the system before power is lost.
5-2 Express5800/320Ma: Site Planning Guide
®
Network Shutdown for the Exp ress5800/320Ma system
Page 37

Connecting Power to Systems, PDUs, and a UPS
Connecting Power to Systems, PDUs, and a UPS
When you plan for PDUs, note the following:
• Only the top PDU is connected to the UPS.
• The bottom PDU is connected directly to an AC power main.
• The UPS can be connected to the same AC power main that the bottom PDU is
connected to, or the UPS can be connected to another AC power main.
Figure 5-1 shows how to connect systems to PDUs and a UPS to the top PDU.
Figure 5-1. Power Cord Connections for Systems, PDUs, and a UPS
9 9
8 8
7
3
3
1
2
1 A-side PDU
2 B-side PDU
3 B-side system power cables (black)
4 A-side system power cables (gray)
5 PDU power cords
6UPS
7 UPS power cord
8 AC power outlets
UPS Planning 5-3
4
4
5
6
5
asys003
Page 38

Connecting a System Directly to a UPS
9 AC power (mains) distribution circuit breaker (maximum of 20A)
Connecting a System Directly to a UPS
You can connect the A-side power connectors of your system directly to a UPS, as
shown in Figure 5-3.
Figure 5-2. Rack-Mountable Systems: A-Side Power Connected Directly to a UPS
1 B-side system power cord
2 A-side system power cord
3UPS
4 UPS power cord
5 AC power outlets
6 Circuit breakers (maximum of 20A)
6
5
1
2
3
6
5
4
asys004
5-4 Express5800/320Ma: Site Planning Guide
Page 39

Connecting a System Directly to a UPS
Figure 5-3 shows how to connect a UPS to pedestal Express5800/320Ma 3.2 GHz and
3.6 GHz systems.
Figure 5-3. Pedestal Sy ste m s : A-Side Power Connected Directly to a UPS
6
5
6
5
4
3
1 B-side system power cord
2 A-side system power cord
3UPS
4 UPS power cord
5 AC power outlets
6 Circuit breakers (maximum of 20A)
1
2
asys005
UPS Planning 5-5
Page 40

Connecting a System Directly to a UPS
5-6 Express5800/320Ma: Site Planning Guide
Page 41

Chapter 6
Network and Telephone Line Planning
For information about planning network and telephone lines for your
Express5800/320Ma 3.2 GHz, 3.6 GHz, or Dual-Core system, see:
• “Network Cable Requirements” on page 6-1
• “Telephone Line Requirements” on page 6-2
• “Site Planning for Systems in an ftGateway Group” on page 6-3
Network Cable Requirements
Ethernet PCI adapters are typically supplied in pairs and teamed in software for fault
tolerance. Each member of the pair requires a ca ble .
WARNING
!
Make sure Ethernet cables can be route d out of the
way of foot traffic.
Table 6-1 describes the Ethernet cables you must supply. Be sure to provide a cable of
sufficient length for the distance between the system and a wall jack or hub.
6-
NOTE
See the Express5800/320Ma: PCI Adapter Guide for
more information about the adapters NEC Solutions
(America), Inc. supplies for your Express5800/320Ma
system.
Network and Telephone Line Planning 6-1
Page 42

Telephone Line Requirements
Table 6-1. Customer-Supplied Ethernet Ca bles
Component Quantity Cable
†
VTM Ethernet port
10/100/1000-Mbps
system Ethernet port
Dual-port
10/100/1000Base-T
Ethernet PCI Adapter
(gigabit copper adapter for
servers)
2 24 AWG Unshielded Twisted Pair (UTP)
2 or 4
2 for each pair of
10/100/1000Base-T
Ethernet ports
EIA/TIA-V erified, Category-3 or Category-5
wire, with RJ-45 modular connectors
terminated with pair-wiring adhering to the
EIA/TIA 568-A or EIA/TIA 568-B standard.
For connections to an Ethernet hub or switch,
provide a straight-through cable.
For 100- or 1000-Mbps (fast Ethernet)
operation, provide full-duplex, or Category-5
Ethernet cables.
The maximum allowable distance from an
Ethernet port to a switch or a hub is 100
meters (328 ft).
Dual-port 1000Base-SX
Ethernet PCI Adapter
(gigabit fiber-optic adapter
for servers)
† Some systems may not contain Virtual Technician Modules (VTMs), a system management module
that provides remote access to and management of the system.
2 for each pair of
1000Base-SX
Ethernet ports
Multimode, 62.5- or 50-micron, DUAL fiber
cable with LC-type connectors to the PCI
adapter, and connectors on the other end that
are compatible with the network switch. The
maximum distance between the U574 PCI
adapter and a switch is 902 ft (275m).
Telephone Line Requirements
Generally, two telephone lines are required to ensure technical support for your
Express5800/320Ma 3.2 GHz or 3.6 GHz system:
• One telephone line for use when calling for service
• One analog telephone connection point for the modem
A 7-ft (2.13m) telephone cable, part number AW-B202 45, is shipped with the
modem assembly.
NOTES
1. If you implement ftGateway groups, you do not need
to supply telephone connection points for each
system. See “Site Planning for Systems in an
ftGateway Group” for more information.
6-2 Express5800/320Ma: Site Planning Guide
Page 43

Site Planning for Systems in an ftGateway Group
2. If your system will be configured with VTMs whose
network ports are connected to a network with
Internet access, your system will not have a modem
installed for ASN support, and the second telephone
line will not be necessary.
3. A dedicated phone line provides the most reliable
service. ASN calls routed through a PBX might be
slow due to the load on the PBX, or might not
complete successfully because the calls can become
disconnected. If you must use a PBX, do not route the
telephone extension through a switchboard; instead,
provide a direct-dial analog number.
Site Planning for Systems in an ftGateway Group
Multiple Express5800/320Ma systems at a site can share a single telephone
connection to the ASN by implementing an ftGateway group. Unless VTMs are
installed in each system, the systems in the group must be connected to a single
physical Ethernet subnetwork. One system acts as a gateway for ASN connectivity.
This gateway system requires an analog telephone line that connects to the modem.
Other systems in the gateway group, called gateway slaves, connect to the gateway
system over the network. In this case, Ethernet connections are required for each
system, but only two analog telephone lines for each site are required.
Members of an ftGateway group:
• Are limited to a maximum of 20 Express5800/320Ma systems.
• Must connect to the same subnetwork through system Ethernet ports, ports of
Ethernet adapters, or VTMs. An ftGateway group that contains
Express5800/320Ma 3.2 GHz, 3.6 GHz, or Dual- Core systems can con sist of one
of the following:
– Slave systems with no remote management adapter in a group with an
ftGateway system that has VTMs
– Slave systems that have VTMs in a group with an ftGateway system that has
VTMs
Using VTMs provides the highest level of manageability b y allo wing the system to
be serviced even when the operating system is not operational.
NOTE
You cannot mix VTMs and ftServer Access Adapters in
the same ftGateway group. ftServer Access Adapters are
Network and Telephone Line Planning 6-3
Page 44

Site Planning for Systems in an ftGateway Group
system management adapters used in earlier models of
Express5800/320Ma systems.
Make sure that only layer 1 and layer 2 devices separate the gateway and slave
systems. During a connection, the gateway system assign s the slave system a
temporary IP address from an IP addr ess range reserved by NEC Solutions (America),
Inc. and uses that address for all traffic.
6-4 Express5800/320Ma: Site Planning Guide
Page 45

Chapter 7
For information about planning a rack configuration, see:
• “Using PDUs” on page 7-1
• “Determining PDU Requirements” on page 7-2
• “Sample PDU Usage Calculation” on page 7-4
Using PDUs
Express5800/320Ma 3.2 GHz, 3.6 GHz, and Dual-Core systems have tw o power
receptacles. Correspondingly, two power distribu tion units (PDUs) provide power to the
receptacles.
Use of PDUs is optional unless you have a support agreement with NEC Solutions
(America), Inc. If you do have a support agreement with NEC Solutions (America), Inc.,
use pairs of PDUs to provide AC power to systems and components in a cabinet if six
or more power cords would otherwise exit from the cabinet.
The A-side (top) PDU provides power to:
Rack Configuration Planning
7-
• The A-side of each system
• A KVM switch
The B-side (bottom) PDU provides power to the other side of each system.
Because the A-side PDU always uses at least as many power cords an d consumes at
least as much power as the B-side PDU, plan the cabinet configuration so that the
A-side PDU can support the configuration.
Rack Configuration Planning 7-1
Page 46

Determining PDU Requirements
NOTES
1. Connect each PDU to a separate AC power source.
2. Install a maximum of two pairs of PDUs in a rack.
Use the information in “Determining PDU Requirements” on page 7-2 to plan the rack
configuration for your Express5800/320Ma system. “Sample PDU Usage Calculation”
on page 7-4 shows how to use the information you gather for planning the rack
configuration.
Determining PDU Requirements
Using the nominal voltage rating of the power receptacle at your site and the total
wattage of the components that will draw power from the A-side PDU, complete the
information in Tables 7-1 and 7-2. This information will help you determine the current
that the Express5800/320Ma 3.2 GHz, 3.6 GHz, and Dual-Core systems and
rack-mounted components will draw and whether you need a second pair of PDUs.
To complete Table 7-1
1. Obtain the voltage available at your location. Consult a facilities manager at your
site to make sure you know the correct voltage.
2. For each type of component you plan to place in the rack, calculate the required
current, as follows: Divide the wattage of the element, listed in th e W atts column of
Table 7-1, by the voltage a vailab le at yo ur site. Multiply the result by 1.25 and enter
the value in the Current column.
Table 7-1. Current and Rack-Space Requirements
Component Watts Current Rack Space
Express5800/320Ma 3.2 GHz, 3.6
650 4U
GHz, and Dual-Core
KVM switch 20 1U
7-2 Express5800/320Ma: Site Planning Guide
Page 47

To complete Table 7-2
1. In column 1, write the names of each system or component in the rac k. If you ha ve
more than one system, use a row for each system.
2. In column 2, write the cumulative number of rac k units (Us): Add t he number of Us
(see Table 7-1) for the component to the value in the space above and write the
result.
3. In column 3, write the cumulative n umber of outlets required. F or each component,
add 1 to the value in the space above and write the result.
4. In column 4, write the cumulative current required. For each component, add the
current for the compon ent, which you entered in Table 7-1, to the value in the space
above and write the result.
You need another pair of PDUs if the cumulative number of outlet s exceeds 8 or if the
cumulative current exceeds 15A. Use the informa tion in column 2 to plan the size and
number of racks required.
Table 7-2. Calculating A-Side PDU and Rack-Space Requirements
Determining PDU Requirements
2. Cumulative
1. Component
PDU Pair 2U 0 0.00
Space Used
3. Cumulative
Number of Outlets
4. Cumulative
Current (A)
Rack Configuration Planning 7-3
Page 48

Sample PDU Usage Calculation
Sample PDU Usage Calculation
Table 7-3 shows how to use the information from Table 7-1 to calculate the current
when the PDU is connected to a NEMA L6-20R receptacle in the United States, with a
power voltage of 208V.
Table 7-3. Sample: Current and Rack-Space Requirements
Component Watts Current Rack Space
Express5800/320Ma Dual-Core
system
KVM switch 20 0.12 1U
650 3.91A 4U
Table 7-4 and the explanation which follows show how to use the information from
Table 7-3 to determine when you need to buy an additional pair of PDUs or calculate
the size and number of cabinets you need.
Table 7-4. Sample: Calculating A-Side PDU and Rack-Space Requirements
3. Cumulative
2. Cumulative
1. Component
PDU pair 2 0 0.00
Express5800/320Ma 3.2 GHz, 3.6
GHz, or Dual-Core system
KVM switch 8 3 4.15
Express5800/320Ma 3.2 GHz, 3.6
GHz, or Dual-Core system
PDU pair 19 0 0
Express5800/320Ma 3.2 GHz, 3.6
GHz, or Dual-Core system
Space Used (U)
6 1 3.91
15 5 11.06
23 1 3.91
Number of
A-Side Outlets
4. Cumulative
Current (A)
Express5800/320Ma 3.2 GHz, 3.6
GHz, or Dual-Core system
29 3 9.62
In this calculation, components were added one by one, calculating:
• The total current demanded by the components
• The total space used in the rack
• The total number of outlets required
7-4 Express5800/320Ma: Site Planning Guide
Page 49

Sample PDU Usage Calculation
In this example, two PDUs can provide enough current for the KVM switch, and two
Express5800/320Ma 3.2 GHz, 3.6 GHz, or Dual-Core system systems. This set of
components occupies six outlets in the PDU and 17U of rack space.
To add any more components, you require another pair of PDUs.
Rack Configuration Planning 7-5
Page 50

Sample PDU Usage Calculation
7-6 Express5800/320Ma: Site Planning Guide
Page 51

Appendix A
NOTE
The system temperature and humidity requirements,
defined in Table A-1 and Table A-3 are the minimum
requirements the site must provide.
System Specifications
Figure A-1 shows the front of a pedestal Express5800/320Ma 3.2 GHz or 3.6 GHz
systems system, its bezel pulled forward. Figure A-2 shows the rear of a typical
pedestal Express5800/320Ma 3.2 GHz system, and Figure A-3 shows the rear of a
pedestal Express5800/320Ma 3.6 GHz systems, specifying the locations of the
connectors at the back of the system. Table A-1 lists specifications for the pedestal
Express5800/320Ma 3.2 GHz, 3.6 GHz, and Dual-Core systems system.
System Specifications
A-
System Specifications A-1
Page 52

System Specifications
Figure A-1. Pedestal System - Front View
asys006a
A-2 Express5800/320Ma: Site Planning Guide
Page 53

System Specifications
Figure A-2. Pedestal Express5800/320Ma 3.2 GHz systems - Rear View
1
2
3
4
5
6
7
asys007
1 Ports on a PCI adapter in slot 1
2 System 10/100/1000-Mbps Ethernet ports (4)
3 USB ports (3)
4 VGA (monitor) port
5 Serial (COM) ports (2)
6 Power receptacles (2)
7 VTM 10/100-Mbps Ethernet port (2)
System Specifications A-3
Page 54

System Specifications
Figure A-3. Pedestal Express5800/320Ma 3.6 GHz systems- Rear View
1
2
3
4
5
6
7
8
9
asys008
1 PCI slot 3
2 PCI slot 2
3 PCI slot 1
4 System 10/100/1000-Mbps Ethernet ports (4)
5 USB ports (3)
6 VGA (monitor) port
7 Serial (COM) ports (2)
8 Power receptacles (2)
9 VTM 10/100-Mbps Ethernet ports (2)
A-4 Express5800/320Ma: Site Planning Guide
Page 55

System Specifications
Table A-1. Pedestal System Specifications
Power
Input power A-side enclosure: 650W
B-side enclosure: 650W
Nominal input voltage (AC) 100-230 volts +/- 10% 240V + 6%/-10%; 50/60 Hz
Protective earth ground current 3.5 milliamperes maximum for each AC power cord
Physical Dimensions of System in a Pedestal Case
Height 23.25 in. (59.05 cm.)
Width 8.62 in. (21.89 cm); 12.88 in. (32.72 cm)
Depth 31.38 in. (79.71 cm)
Weight, including 8 DIMMS, 4
processors, and 6 disks
Environmental
Operating temperature 41
Storage temperature -38
Operating altitude 0 ft to 10,000 ft (0m to 3,048m)
Maximum rate of temperature
change during operation
Relative humidity during
operation
Relative humidity during storage 8% to 80%
Heat dissipation 4432 BTUs per hour
Two enclosures: 110 lb (49.9 kg), fully loaded
Case: 68 lb (30.84 kg)
°F to 95°F (5°C to 35°C)
For every 800 ft (243.8m) above 2,000 ft (609.6m),
lower the maximum operating temperature (35°C) by
°C.
1
° F to 140° F (-40° C to 60° C)
18°F/hr (10
0.30°F/min (0.17°C/min)
20% to 80% (noncondensing)
°C/hr) or
System Specifications A-5
Page 56

System Specifications
Table A-1. Pedestal System Specifications (Continued)
Features
Processors
Memory Eight physical dual data rate (DDR) inline memory
Ports Four 10/100/1000-Mbps Ethernet ports
Express5800/320Ma 3.2 GHz systems: One or two
Intel Xeon 3.2 GHz processors with Hyper-Threading
Technology in each CPU-I⁄ O enclosure
Express5800/320Ma 3.6 GHz systems: Two Intel
Xeon 3.6 GHz processors with Hyper-Th rea d i ng
Technology in each CPU-I⁄ O enclosure
Express5800/320Ma Dual-Core systems: Two
Dual-Core Intel Xeon 2.8 GHz processors with
Hyper-Threading Technology in each
CPU-I ⁄ O enclosure
module (DIMM) slots in each CPU-I⁄ O enclosure
Two AC power connectors, one VGA port, two serial
ports, and three USB ports
PCI slots
Express5800/320Ma 3.2 GHz systems: One
user-configurable, low-profile PCI adapter slot operating
at 64-bits and 100 MHz in each CPU-I⁄ O enclosure
(you can add two full-height PCI adapter slots in each
CPU-I/O enclosure with the optional AK533 riser
assembly kit)
Express5800/320Ma 3.6 GHz and Dual-Core
systems
full-height PCI adapter slots operating at 64-bits and
100 MHz, all user-configurable, in each
CPU-I ⁄ O enclosure
VTM Virtual Technician Module (VTM)
The VTM is a system management module.
When VTMs are installed, two 10/100-Mbps Ethernet
ports dedicated to the VTMs are present.
Disk drives Six Serial ATA (SATA) disk drives
A-6 Express5800/320Ma: Site Planning Guide
: One low-profile PCI adapter slot and two
Page 57

Rack-Mountable System Specifications
Figure A-4 shows the front of a rack-mountable Express5800/320Ma 3.2 GHz, 3.6 GHz
and Dual-Core system, mounted in a rack with its bezel pulled forward. The fr ont views
of the systems are identical. Figure A-5 shows the rear of a rack-mountable
Express5800/320Ma 3.2 GHz system, and Figure A-6 shows the rear of a
rack-mountable Express5800/320Ma 3.6 GHz or Dual-Core system, specifying the
locations of the connectors at the back of the system. Table A-3 lists the specifications
for the rack-mountable Express5800/320Ma 3. 2 GHz, 3.6 G Hz and Dual-Core syst em
systems.
Figure A-4. Rack-Mountable System - Front View
Rack-Mountable System Specifications
asys009
System Specifications A-7
Page 58

Rack-Mountable System Specifications
Figure A-5. Rack-Mountable Express5800/320Ma 3.2 GHz system - Rear View
1
1 PCI slot 1
2 System 10/100/1000-Mbps Ethernet
ports (4)
3 USB ports (3)
4 VGA (monitor) port
5 Serial (COM) ports (2)
6 Power receptacles (2)
7 VTM 10/100-Mbps Ethernet ports (2)
8 Telephone cord port
32
45
67
asys010
A-8 Express5800/320Ma: Site Planning Guide
Page 59

Rack-Mountable System Specifications
Figure A-6. Rack-Mountable Express5800/320Ma 3.6 GHz or Dual-Core System - Rear View
2
1
3
1 PCI slot 3
2 PCI slot 2
3 PCI slot 1
4 System 10/100/1000-Mbps Ethernet ports (4)
5 USB ports (3)
6 VGA (monitor) port
7 Serial (COM) ports (2)
8 Power receptacles (2)
9 VTM 10/100-Mbps Ethernet ports (2)
10 Telephone cord port
54
67
9
8
asys011
System Specifications A-9
Page 60

Rack-Mountable System Specifications
Table A-2. Cabinet Dimensions
24U Shipping Container
Height (including pallet) 56 in. (1.42m)
Width 41 in. (1.04m)
Depth 53 in. (1.35m)
38U Shipping Container
Height (including pallet) 79.75 in. (2.03m)
Width 41 in. (1.04m)
Depth 53 in. (1.35m)
24U Cabinet
Height (including casters) 50 in. (1.27m)
Width 27.5 in. (70 cm)
Depth 41 in. (1.04m)
Weight, empty 275 lb (125 kg)
Weight, empty with pallet and shipping container 436 lb (197.8 kg)
38U Cabinet
Height (including casters) 74 in. (1.9m)
Width 27.5 in. (70 cm)
Depth 41 in. (1.04m)
Weight, empty 344 lb (156 kg)
Weight, empty with pallet and shipping container 512 lb (232.2 kg)
A-10 Express5800/320Ma: Site Planning Guide
Page 61

Rack-Mountable System Specifications
Table A-3. Rack-Mountable System Specifications
Power
Input power A-side enclosure: 650W
B-side enclosure: 650W
Nominal input voltage (AC) 100-230 volts +/- 10% 240V + 6%/-10%; 50/60 Hz
Protective earth ground current 3.5 milliamperes maximum for each AC power cord
Physical Dimensions
Height 7.0 in. (17.78 cm; 4U)
Width 17.50 in. (44.45 cm)
Depth 30 in. (76.2 cm), excluding screws and bezel
Weight, including 8 DIMMS, 4
processors, and 6 disks
Environmental
Operating temperature 41
Storage temperature -38
Operating altitude 0 ft to 10,000 ft (0m to 3,048m)
Maximum rate of temperature
change during operation
Relative humidity during
operation
Relative humidity during storage 8% to 80%
Heat dissipation 4432 BTUs per hour
Two enclosures: 110 lb (49.9 kg), fully loaded
Rails and shelf unit: 13.8 lb (6.26 kg)
° F to 95° F (5° C to 35° C)
For every 800 ft (243.8 m) above 2000 ft (609.6 m),
lower the maximum operating temperature (35°C) by
°C.
1
° F to 140° F (-40° C to 60° C)
18
° F/hr (10° C/hr) or 0.30° F/min (0.17° C/min)
20% to 80% (noncondensing)
System Specifications A-11
Page 62

Rack-Mountable System Specifications
Table A-3. Rack-Mountable System Specifications (Continued)
Features
Processors
Express5800/320Ma 3.2 GHz: One or two Intel Xeon
3.2 GHz processors with Hyper-Threading Technology
in each CPU-I⁄ Oenclosure
Express5800/320Ma 3.6 GHz: Two Intel Xeon 3.6
GHz processors with Hyper-Threading Technology in
each CPU-I⁄ O enclosure
Express5800/320Ma Dual-Core: Two Dual-Core
Intel Xeon 2.8 GHz processors with Hyper-Threading
Technology in each CPU-I⁄ O enclosure
Memory Eight physical dual data rate (DDR) inline memory
module (DIMM) slots in each CPU-I⁄ O enclosure
Ports Two 10/100/1000-Mbps Ethernet ports in each
CPU-I ⁄ O enclosure
Two AC power connectors, one VGA port, two serial
ports, and three USB ports
PCI slots
Express5800/320Ma 3.2 GHz systems: One
user-configurable, low-profile PCI adapter slot operating
at 64-bits and 100 MHz in each CPU-I⁄ O enclosure
(you can add two full-height PCI adapter slots in each
CPU-I/O enclosure with the optional AK533 riser
assembly kit)
Express5800/320Ma 3.6 GHz and Dual-Core
systems: One low-profile PCI adapter slot and two
full-height PCI adapter slots operating at 64-bits and
100 MHz, all user-configurable, in each
CPU-I ⁄ O enclosure
VTM A Virtual Technician Module (VTM), a system
management module CPU-I⁄ O enclosure
When VTMs are installed, a 10/100-Mbps Ethernet
ports dedicated to the VTM is present for each VTM.
Disk Drives Three Serial ATA (SATA) disk drives in each
CPU-I ⁄ O enclosure
A-12 Express5800/320Ma: Site Planning Guide
Page 63

Appendix B
Electrical Circuit and Wiring Information
For electrical circuit and wiring information that you need to provide to the contractor
and/or facilities personnel responsible for wiring the power at the system installation
site, see:
• “Fault Protection Requirements” on page B-1
• “Grounding Considerations” on page B-1
• “Circuit Wiring Diagrams” on page B-3
• “Electrical Power Connectors” on page B-9
Fault Protection Requirements
Each enclosure in Express5800/320Ma 3.2 GHz, 3.6 GHz, or Dual-Core systems
contains internal fault/overload current pr otection. However, the system relies on the
power distribution system at your site for protect ion against potential faults in the p ower
cords and the wiring in the system base.
• If you are using a pair of PDUs in the cabinet, use 30A or less circuit breakers in
each power distribution br anch that feeds the PDUs.
B-
• T o connect a single system t o power , use 20A or less circuit breakers in each powe r
distribution branch that feeds the systems.
Grounding Considerations
The system obtains an earth reference ground thr ough the power cords attached to the
system. Similarly, each peripheral device connected to the system obtains ground
through its power cord. For each peripheral device, you must ensure that a
high-integrity safety-ground conductor is installed as part of the wiring system (in
accordance with U.S. national electric code NFPA 70 or the equivalent). The
international safety standard (EN60950) for electronic data processing (EDP)
equipment also requires a ground conducto r, but calls it a protective earth (PE) ground.
Depending upon local conditions, ground potentials may differ between the system
base and any peripheral devices connected to the system base . All grounds in the
system must return to the same reference point in the power distribution system, as
close as possible to zero (0) volt potential relative to earth reference ground. Ear th
Electrical Circuit and Wiring Information B-1
Page 64

Grounding Considerations
reference ground is typically a metal stake in the ground to which the ground
conductors from one or more buildings are attached.
As shown in Figure B-1, a star ground is often used to obtain the same earth reference
ground. Each earth reference ground, such as the system base ground, is returned
separately to a common point where a zero-volt (0V) earth ground exists. The star
ground ensures that all equipment is at the same potent ial and that no noise or sa fety
problems associated with an unpredictable or uncharacterized grounding system will
occur.
Figure B-1. Star Ground Example
1
2
3
1 To monitor
2 T o Express5800/320Ma 3.2 GHz, 3.6 GHz, or
Dual-Core system
3 Earth reference ground (0V)
B-2 Express5800/320Ma: Site Planning Guide
Page 65

Circuit Wiring Diagrams
The following circuit wiring diagrams show how the hot, ground, and/or neutral AC
signals should be connected to the system’s power input plug:
• Figure B-3 illustrates a single-phase 120-volts AC circuit connection.
• Figure B-4 illustrates a single-phase 240-volts AC circuit connection.
• Figure B-5 illustrates a split-phase 120/240-volts AC circuit connection.
• Figure B-6 illustrates a three-phase 208-volts AC, Y-, or ∆-source circuit
connection, phase-to-neutral.
• Figure B-7 illustrates a three-phase 208-volts AC, Y-, or ∆-source circuit
connection, phase-to-phase.
• Figure B-8 illustrates a three-phase 380V AC, Y-, or ∆-sourc e circ uit conn e ctio n,
phase-to-neutral.
In the diagrams in this appendix, the power inputs for Express5800/320Ma 3.2 GHz,
3.6 GHz, or Dual-Core system are labeled X and Y, as shown in Figure B-2, to
eliminate any ambiguities in the nomenclature. For single-phase applications, the X
input is connected to the L (Line) hot input, and the Y input is connected to the N
(Neutral) input. However, for split-phase or thre e-phase applications, the X and Y
inputs are connected to L1, L2, or L3 (separate lines). Therefore, for split-phase or
three-phase applications, both X and Y can be electrically hot with respect to the
system base (earth reference ground). Figure B-2 shows the physical locations of the
X and Y inputs on the system base.
Circuit Wiring Diagrams
Figure B-2. Power Input Labeling
Y
Power input A or B (Face View)
Electrical Circuit and Wiring Information B-3
X
G (PE)
Page 66

Circuit Wiring Diagrams
Figure B-3 shows a single-phase 120-volts AC circuit connection. Note that this
application requires a single-pole circuit breaker.
Figure B-3. Single-Phase 120-Volts AC Circuit Connection
Circuit A or B
15A Maximum
L
120V
N
0V
G (PE)
Wall
Power Cord
X Y G (PE)
To power input A or B
B-4 Express5800/320Ma: Site Planning Guide
Page 67

Circuit Wiring Diagrams
Figure B-4 shows a single-phase 240-volts AC circuit connection. Note that this
application requires a single-pole circuit breaker.
Figure B-4. Single-Phase 240-Volts AC Circuit Connection
Circuit A or B
Single system: 20A maximum
PDU: 30A maximum
L
240V
N
0V
G (PE)
Wall
Power Cord
X Y G (PE)
To power input A or B
Electrical Circuit and Wiring Information B-5
Page 68

Circuit Wiring Diagrams
Figure B-5 shows a split-phase 120/240-volts AC circuit connection. Note that this
application requires a double-pole circuit breaker.
Figure B-5. Split-Phase 120/240 Volts AC Circuit Connection
Circuit A or B
Single system: 20A maximum
PDU: 30A maximum
Power Cord
L1
L2
N
G (PE)
Wall
240V
120V
0V
120V
X Y G (PE)
To power input A or B
B-6 Express5800/320Ma: Site Planning Guide
Page 69

Circuit Wiring Diagrams
Figure B-6 shows a three-phase 208-volts AC, Y-, or ∆-source circuit connection,
which is a phase-to-neutral source connection. Note that the X input on the system can
be connected from L1, L2, or L3. This application requires a single-po le circuit breaker.
Figure B-6. Three-Phase 208-Volts AC, Y-, or ∆-Source Circuit Connection, Phase-to-Neutral
L1
208V
Circuit A or B
Single system: 20A maximum
PDU: 30A maximum
L2
L3
N
G (PE)
208V
120V
120V
0V
120V
Wall
Powe r Cord
XYG (PE)
To power input A or B
Electrical Circuit and Wiring Information B-7
Page 70

Circuit Wiring Diagrams
Figure B-7 shows a three-phase 208-volts AC, Y-, or ∆-source circuit connection,
which is a phase-to-phase source connection. Note that the X and Y inputs on the
system can be connected from L1 and L2, L2 and L3 , or L1 an d L3 . Th is ap plication
requires a double-pole circuit breaker.
Figure B-7. Three-Phase 208-Volts AC, Y-, or ∆-Source Circuit Connection, Phase-to-Phase
L1
208V
208V
120V
120V
0V
Circuit A or B
Single system: 20A maximum
PDU: 30A maximum
L2
L3
N
G (PE)
120V
Wall
Power Cord
XYG (PE)
To power input A or B
B-8 Express5800/320Ma: Site Planning Guide
Page 71

Electrical Power Connectors
Figure B-8 shows a three-phase 380V AC, Y-, or ∆-source circuit connection, which is
a phase-to-neutral source connection. Note that the system’s X input ca n be connected
to L1, L2, or L3. This application requires a single-pole circuit breaker.
Figure B-8. Three-Phase 380V AC, Y-, or ∆-Source Circuit Connection, Phase-to-Neutral
L1
L2
Circuit A or B 220V
Single system: 20A maximum
PDU: 30A maximum
L3
N
G (PE)
380V
380V
220V
0V
220V
Wall
Powe r Cord
XYG (PE)
To power input A or B
Electrical Power Connectors
Table B-1 describes the connectors that NEC Solutions (America), Inc. uses to connect
Express5800/320Ma 3.2 GHz, 3.6 GHz, or Dual-Core system and peripheral devices
to AC power outlets.
Electrical Circuit and Wiring Information B-9
Page 72

Electrical Power Connectors
Table B-1. Connectors for AC Power Outlets
Connector Configuration Rating Description
NEMA L6-20 20A, 250 volts AC 2-pole, 3-wire
NEMA 5-15 15A, 125 volts AC 2-pole, 3-wire
NEMA L6-30 30A, 250 volts AC 2-pole, 3-wire
CEE (7) VII 20A, 250 volts AC 2-pole, 3-wire
CEI-23-16 16A, 250 volts AC 2-pole, 3-wire
SI 32/1971 16A, 250 volts AC 2-pole, 3-wire
B-10 Express5800/320Ma: Site Planning Guide
Page 73

Electrical Power Connectors
Table B-1. Connectors for AC Power Outlets (Continued)
Connector Configuration Rating Description
IEC 60309
(formerly
IEC 309)
SABS
164-1:1992
BS 1363/A 13A, 250 volts AC 2-pole, 3-wire
16-20A, 250 volts AC 2-pole, 3-wire
16A, 250 volts AC 2-pole, 3-wire
SEV
1011-S24507
AS/NZS
3112-1993
SAA/3/15
AS/NZS
3112-1993
Electrical Circuit and Wiring Information B-11
10A, 250 volts AC 2-pole, 3-wire
15A, 250 volts AC 2-pole, 3-wire
15A, 250 volts AC 2-pole, 3-wire
Page 74

Electrical Power Connectors
Table B-1. Connectors for AC Power Outlets (Continued)
Connector Configuration Rating Description
GB1002-1996 10A, 250 volts AC 2 pole, 3-wire
B-12 Express5800/320Ma: Site Planning Guide
Page 75

Appendix C
Standards Compliance
Express5800/320Ma systems comply with the electromagnetic interference (EMI),
immunity, safety, and noise regulations listed in Tables C-1 throu gh C-4. All necessary
agency labels are on the system.
NOTES
1. This system must be configured with the components
listed and described in the product configuration
specifications. Deviations from this list of components
will void agency certification.
2. You must install all wiring, including power and
communications cables, in compliance with local and
national electrical code (in the United States, national
electrical code NFPA 70). In addition, you must use
shielded communications cables to remain in
compliance with Federal Communications
Commission (FCC) and other international
Electromagnetic compatibility (EMC) regulations.
C-
3. All EMC emissions compliance tests are performed at
a third-party certified test laboratory. You can obtain
compliance reports for these tests from your
Express5800/320Ma account representative, who will
contact the Product Compliance Group in the NEC
Solutions (America), Inc. engineering organization.
Standards Compliance C-1
Page 76

Standards Compliance
Table C-1. EMI Standards
Standard Description Country/Region
FCC Part 15 Class A Code of Federal Regulations 47 (1998)
Class A
EN 55022 Limits and methods of measurement of radio
disturbance characteristics of Information
Technology Equipment
AS/NZS 3548 Limits and methods of measurement of radio
disturbance characteristics of Information
Technology Equipment
CNS13438 Chinese National Standard 13438 Taiwan
VCCI Class A Voluntary Control Council for Interference b y
Information Technology Equipment
Table C-2. Immunity Standards
Standard Description Country/Region
EN 50082-1 Generic Immunity Standard,
Electromagnetic Compatibility, Residential,
Commercial, and Light Industrial
EN 55024 Limits and methods of measurement of
immunity characteristics of Information
Technology Equipment
North America
European Union
Australia/New Zealand
Japan
European Union
European Union
Table C-3. Safety Standards
Standard Description Country/Region
UL 60950 Safety of Information Technology Equipment North America
EN 60950 Saf ety of Information Technology Equipment European Union
Table C-4. Noise Standards
Standard Description Country/Region
ISO 9614-2 Acoustics. Determination of Sound Power
Levels of Noise Source using Sound Intensity
ISO 7779 Measurements of Airborne Noise emitted by
Computers and Business Equipment
C-2 Express5800 /320Ma: Site Planning Guide
European Union
European Union
Page 77

VCCI Note
BSMI Note
Standards Compliance
Standards Compliance C-3
Page 78

Standards Compliance
C-4 Express5800 /320Ma: Site Planning Guide
Page 79

IndexIndex-
A
ActiveService Network (ASN). See ASN
AK533 riser assembly kit, A-6, A-12
American Power Conversion. See APC
APC
Network Management Card EX, 5-2
PowerChute Network Shutdown, 5-2
qualified UPS, 5-1
AS/NZS 3112-1993 connector, B-11
A-side power source, 4-1
ASN, site planning, 1-2, 1-3, 3-2
B
BS 1363/A connector, B-11
B-side power source, 4-1
C
cabinets
configuration planning, 7-1
requirements, 2-1
specifications, A-10
cables
Ethernet network, 6-1
planning for, 3-2
supplied, 3-2
telephone, 3-2
CEE (7) VII connector, B-10
CEI-23-16 connector, B-10
checklist for site planning, 1-2
circuit, electrical
planning information, B-1
wiring diagrams, B-3
compliance, standards, C-1
connectors (AC), B-9
cooling requirements, 3-1
See also environmental requirements, 3-1
D
documentation, ordering, 1-6
E
earth reference ground, B-1
electrical connectors, B-9
electrical grounding, B-1
electrical wiring, B-1
electromagnetic interference, C-2
environmental requirements
maximum rate of temperature
change, A-5, A-11
operating humidity, A-5, A-11
operating temperature, A-5, A-11
storage humidity, A-5, A-11
Ethernet network cables, 6-1
F
ftGateway, site planning information, 6-3
G
GB1002-1996 connector, B-12
grounding the system, 2-2, B-1
H
hubs, network, 3-2
I
IEC 309 connector, B-11
IEC 60309 connector, B-11
immunity regulations, C-2
J
jacks, Ethernet, 3-2
Index-1
Page 80

Index
K
KVM switches
power service requirements, 4-2
M
monitors
power cords, 4-9
requirements, 2-4
N
NEC Technical Support, 1-2
NEMA 5-15 connector, B-10
NEMA L6-20 connector, B-10
NEMA L6-30 connector, B-10
network (Ethernet) cables, 6-1
noise regulations, C-2
P
power (AC)
cords
monitors, 4-9
storage enclosures, 4-9
systems, 4-7
electrical requirements, 4-2
PDU connections, illustrated, 5-3
service requirements, 4-2, 4-4, 4-5
A-side, 4-4
B-side, 4-4
sources, 4-1
sources, no UPS, 4-5
system connections, illustrated, 4-5, 4-6
UPS connections, illustrated, 5-4, 5-5
wall outlets, 3-2, 4-4
printed documentation, ordering, 1-6
protective earth ground, B-1
R
racks
requirements, 2-1
room requirements, 3-1
SEV 1011-S24507 connector, B-11
SI 32/1971 connector, B-10
single-phase circuit connections
120 V AC, B-4
240 V AC, B-5
site planning checklist, 1-2
space planning, 3-1
specifications
AC power, 4-2
pedestal system, A-1
rack-mountable system, A-7
split-phase circuit connections
120–240 V AC, B-6
standards compliance, C-1
star ground, B-2
switches, network, 3-2
system power cords, 4-7
T
Technical Support, 1-2
Technical Support, getting assistance, 1-2
telephone lines
for ASN modem assembly, 1-3, 6-2
for support calls, 1-3, 6-2
three-phase circuit connections
208 V AC, B-7, B-8
380 V AC, B-9
U
UPS
PDU connections, 5-3
pedestal system connections, 5-5
site planning, 5-1
system connections, 5-4
V
Virtual Technician Modules. See VTMs
VTMs, site planning, 1-3
W
wiring, electrical, B-1
S
SAA/3/15 AS/NZS 3112-1993 connector, B-11
SABS 164-1:1992 connector, B-11
safety regulations, C-2
Index-2 Express5800/320Ma: Site Planning Guide
 Loading...