


NOTICE
Note that when converting this document from its original format to a .pdf file,
some minor font and format changes may occur causing slight variations. When
viewing and pr inting t his docume nt, w e canno t gua rant ee tha t your spe cific PC or
printer will support all of the fonts or graphics. Therefore, when you view the
document fonts may be substituted and your individual printer may not have the
capabili ty to print the document correctly.


EliteMail CTI
LX Lite
User’s Guide

To access your mailbox by computer
1. Launch Mailbox Manager.
2. When the system greets you, enter:
Host name
Extension
Security
To access your mailbox by telephone from inside your organization
1. Call the voice messaging system.
2. When the system greets you, enter:
Personal ID
Security Code
For assistance, call:
Name
Extension

INTRODUCTION
Welcome to EliteMail CTI LX Lite User’s Guide, this is about a simple yet powerful voice messaging system that can
greet your callers and record your messages. You will find it quick and easy to use.
On the Telephone
The voice messaging system lets you control how your mailbox receives messages and plays them back. You can
change these settings whenever you like, from any telephone. The telephone options consist of:
K
Menu Conversation
The menu conversation leads you quickly to your destination. You will hear a menu of options. Enter the number
associated with the option to perform the particular task. The voice messaging system’s menu options are
diagrammed as “Syst em Menu s” on page 55.
K
1 for Yes, 2 for No
If you prefer, ask you system manager to set up your mailbox with the 1 for Yes, 2 for No conversation. This
conversation leads you step by step through all of your options with easy, yes-and-no questions. Just enter 1 for
Yes, 2 for No.
K
Shortcuts
To perform routine tasks quickly, you can enter a sequence of numbers in advance of the conversation questions or
menus.
K
Rotary Telephones
If your system uses dial pulse detection, you can use a rotary dial (pulse tone) telephone to send and receive
messages and to change your feature settings.
K
Help
When the system conversation asks you a question, enter 3 to hear a Help menu of options.
K
Softkeys:
If equipped you can use the softkeys on your display telephone. The visual display of softkeys quickly leads you to
your destination. You will see a menu of options. Press the softkey associated with the option to perform the
particular task for your feature settings.
On the Computer
If your system has TeLANophy®, you can manage live telephone calls and all types of messages visually on your
computer screen. TeLANophy is a suite of unified messaging and call management modules. TeLANophy consists
of:
K
ViewMail
All of your voice messages are brought together in one window with ViewMail. You can access and prioritize your
messages and respond to them by using your personal computer.
K
ViewMail for Microsoft® Messaging
You can access all of your messages — voice mail and e-mail — in your Microsoft Inbox, whether you are using
Exchange, Outlook 98, Outlook 2000, or Outlook 2003.
®
1

K
ViewCall® Plus
All of your inbound and outbound calls can be managed visually from your desktop computer. You can customize
your call control applications by integrating ViewCall Plus with other applications, such as Microsoft’s Office suite.
K
Help
For more detailed information about TeLANophy, use the:
I
Online Help system (press F1 or use the Help menu)
I
“Introducing TeLANophy” tutorial
2

SETTING UP YOUR MAILBOX
First, fill in the blanks on the inside front cover of this guide and perform the procedure To access your mailbox from
inside your organization provided on the inside front cover. This makes your mailbox ready to use and enrolls you on
the system as a subscriber.
The system will ask you a few simple questions to record your name, spell your name (if required), record a personal
greeting, and set your security code.
You should set a security code that only you know. This prevents someone else from hearing your messages and
changing your mailbox settings. You can change your security codes as often as you like.
After you have set up your mailbox by telephone, you can also begin using TeLANophy. Contact your system manager
to get TeLANophy set up on your desktop.
To set up your mailbox
1. Access your mailbox (see inside front cover).
2. Answer the system questions. Enter 1 for Yes, 2 for No. If you are not sure, enter 2. You can always change the
option later.
3. When the system asks you if you are satisfied with your settings, enter 1 to confirm.
CHECKING AND LEAVING MESSAGES
Depending on your system, you can use a telephone or computer to:
K
Check new messages
K
Leave a message to one or more subscribers or guests
K
Leave a message to a group
K
Review messages
K
Redirect a message
K
Modify or cancel a message after leaving it
K
Archive a message
K
Record a conversation
Checking New Messages
Checking new messages by telephone
New messages are messages that you have not yet heard. The system notifies you when you have new messages.
The system plays all urgent messages first, then all regular messages. It also sorts your messages by sender. If the
system does not know who left a message, it says that the message is from your message box.
After you listen to the messages from a subscriber, you can reply immediately; you do not have to dial the subscriber’s
extension.
3
To check new messages by telephone
1. Access your mailbox.
2. Press the New softkey or enter 4 to check new messages. Follow the system instructions. Enter 1 for Yes, 2 for
No.
Optional Playback Feature s
The system manager can set up special options for your mailbox to:
K
Play your new messages automatically each time you call the system.
K
Provide additional security by always requiring both a personal ID and a security code to play messages.
K
Identify you automatically when you are using your assigned extension. This option is turned on by default.
K
Tell you how long it will take to play your messages.
,
One or more of these features may not be available at your site.
,
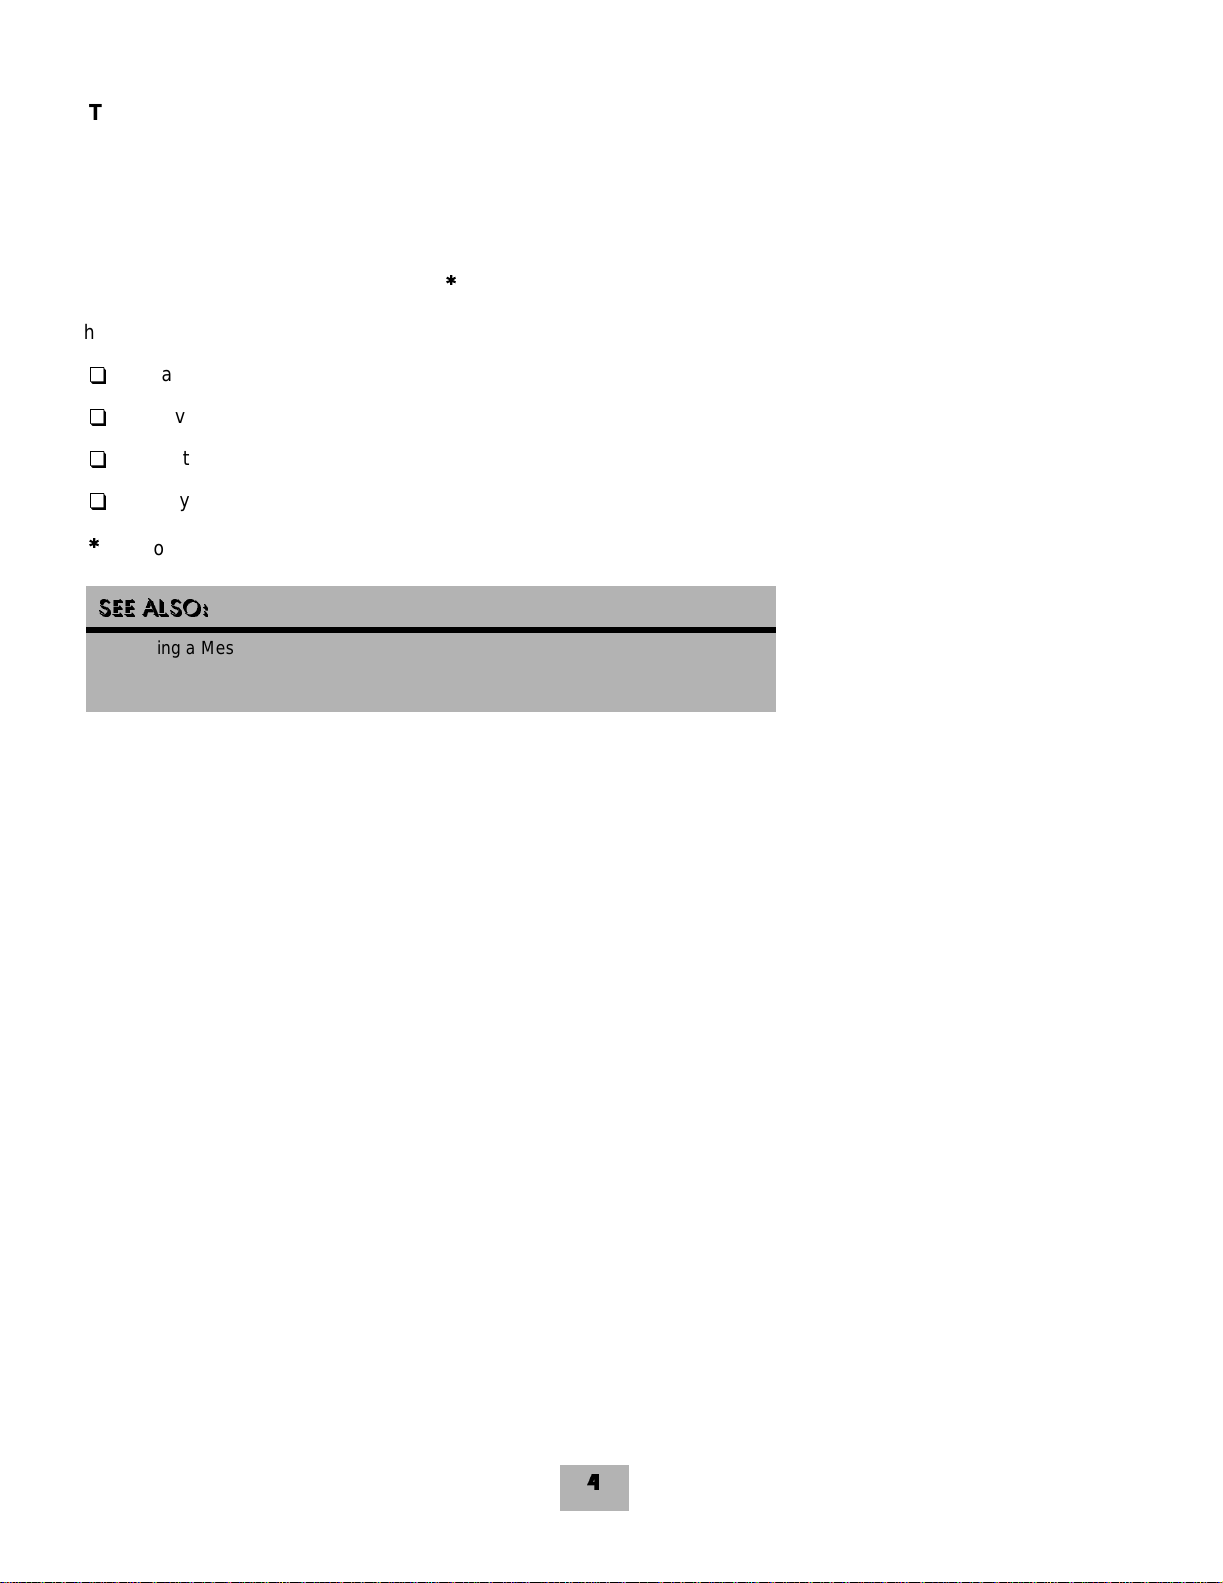
SEE ALSO:
“Modifying a Message” on page 16
“Canceling a Message” on page 17
“E-Mail Integration Package *” on page 54
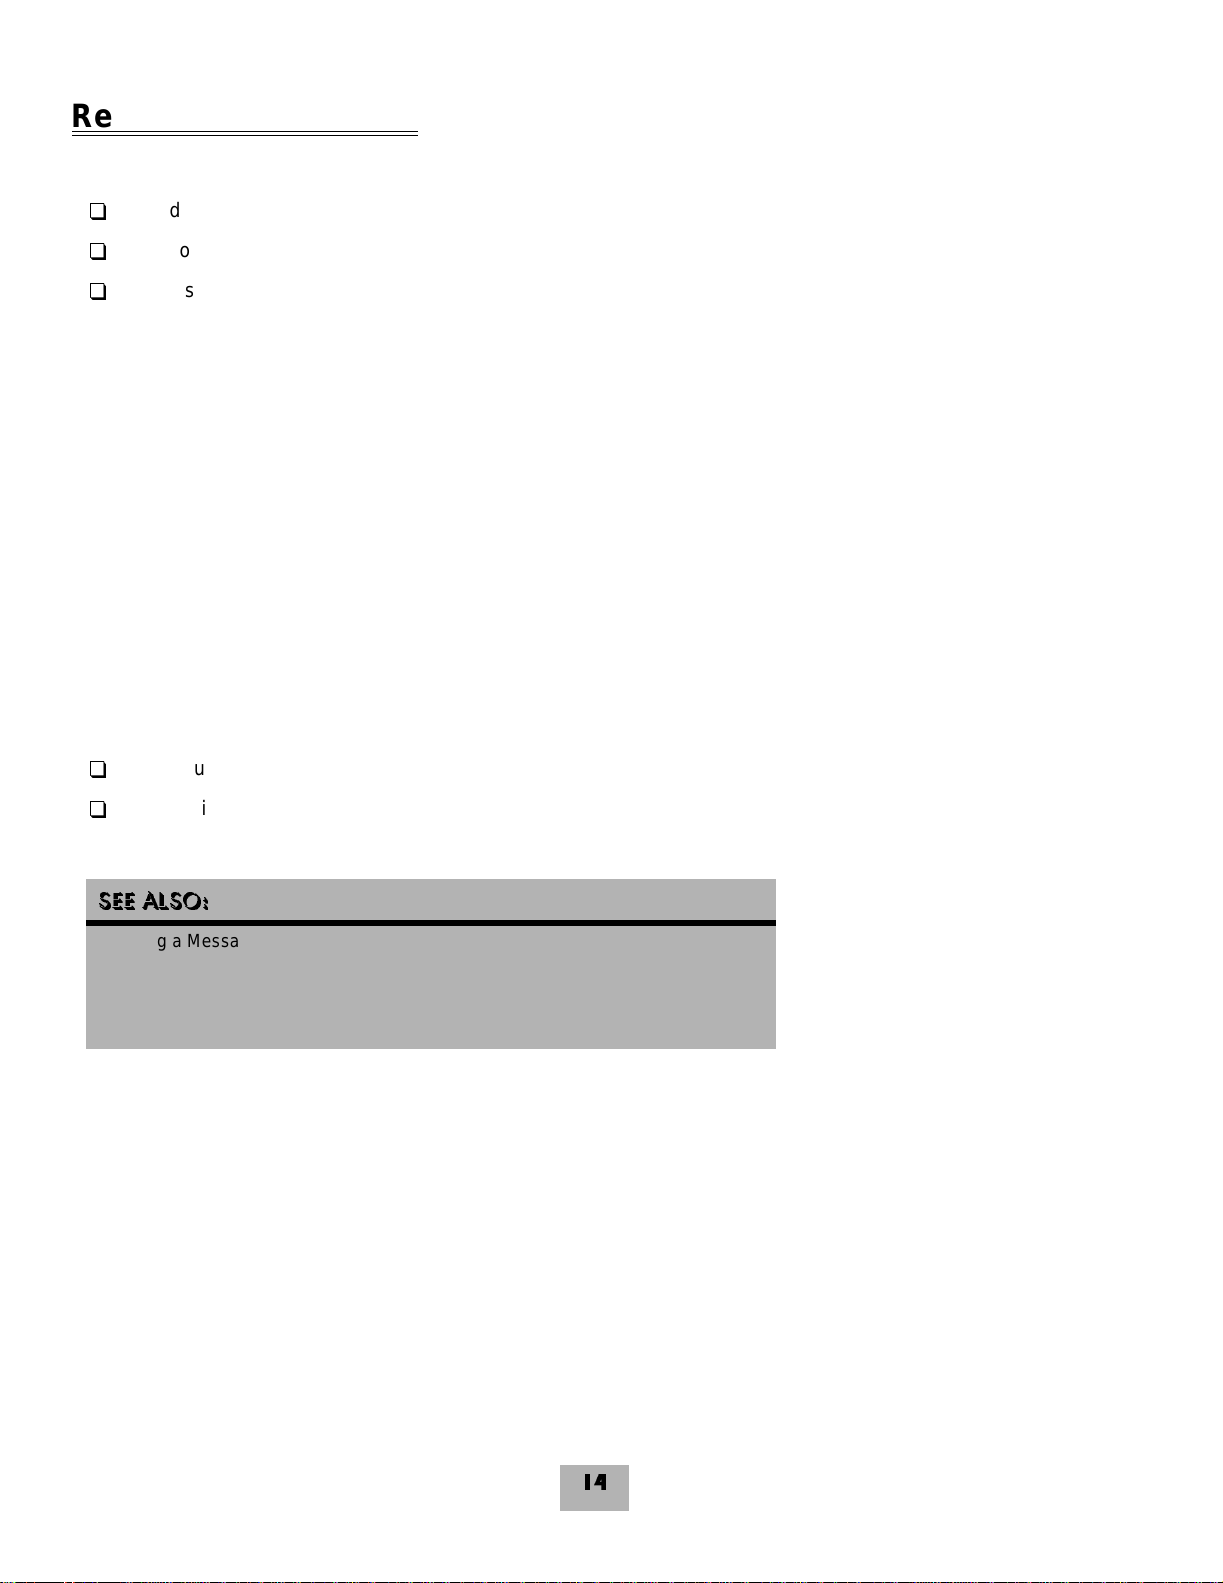
Checking New Messages by Computer
If your system uses ViewMail or ViewMail for Microsoft Messaging, you can check messages visually from your
computer.
Information about each message is provided on the screen. When available, names, telephone numbers, and a
subject are included with messages. ViewMail also provides the length of the message and the time it was sent.
You can listen to messages either with a computer sound device or a telephone.
To check new messages from your computer
1. Double-click the message to open it.
2. Use the VCR-style buttons to play and respond to the message.
4

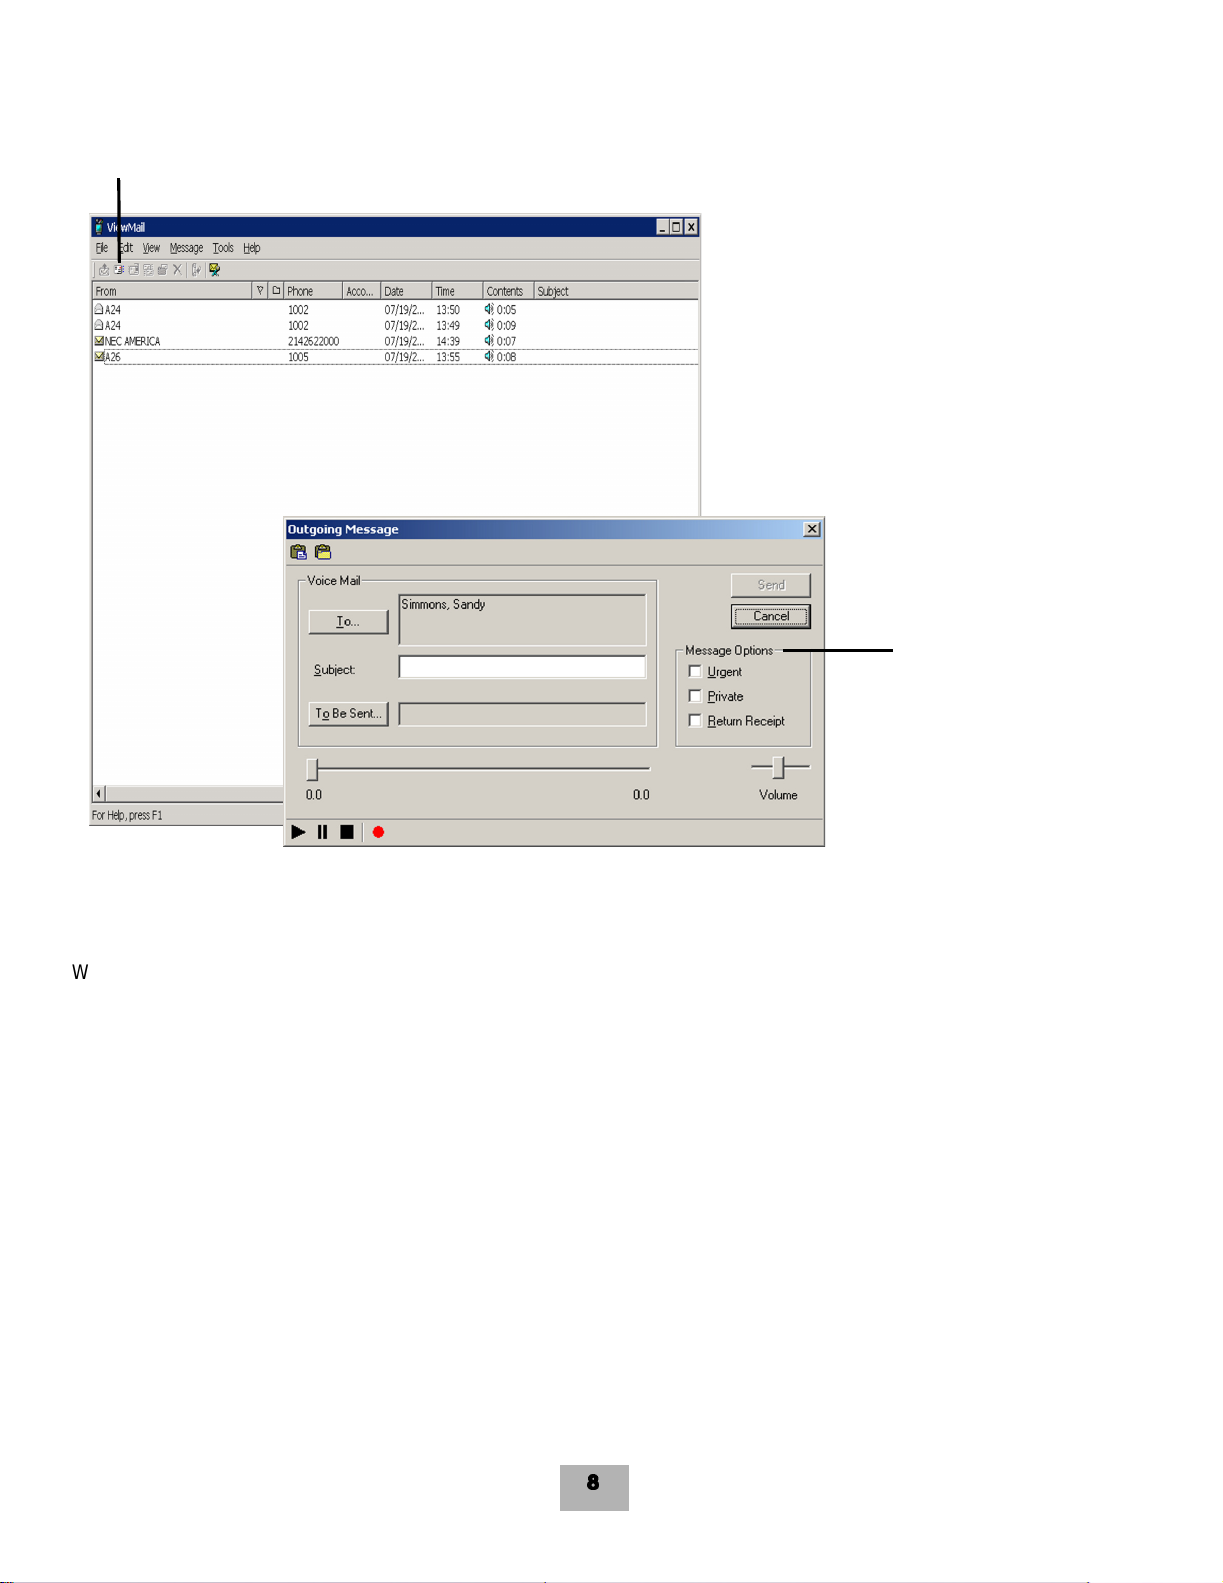
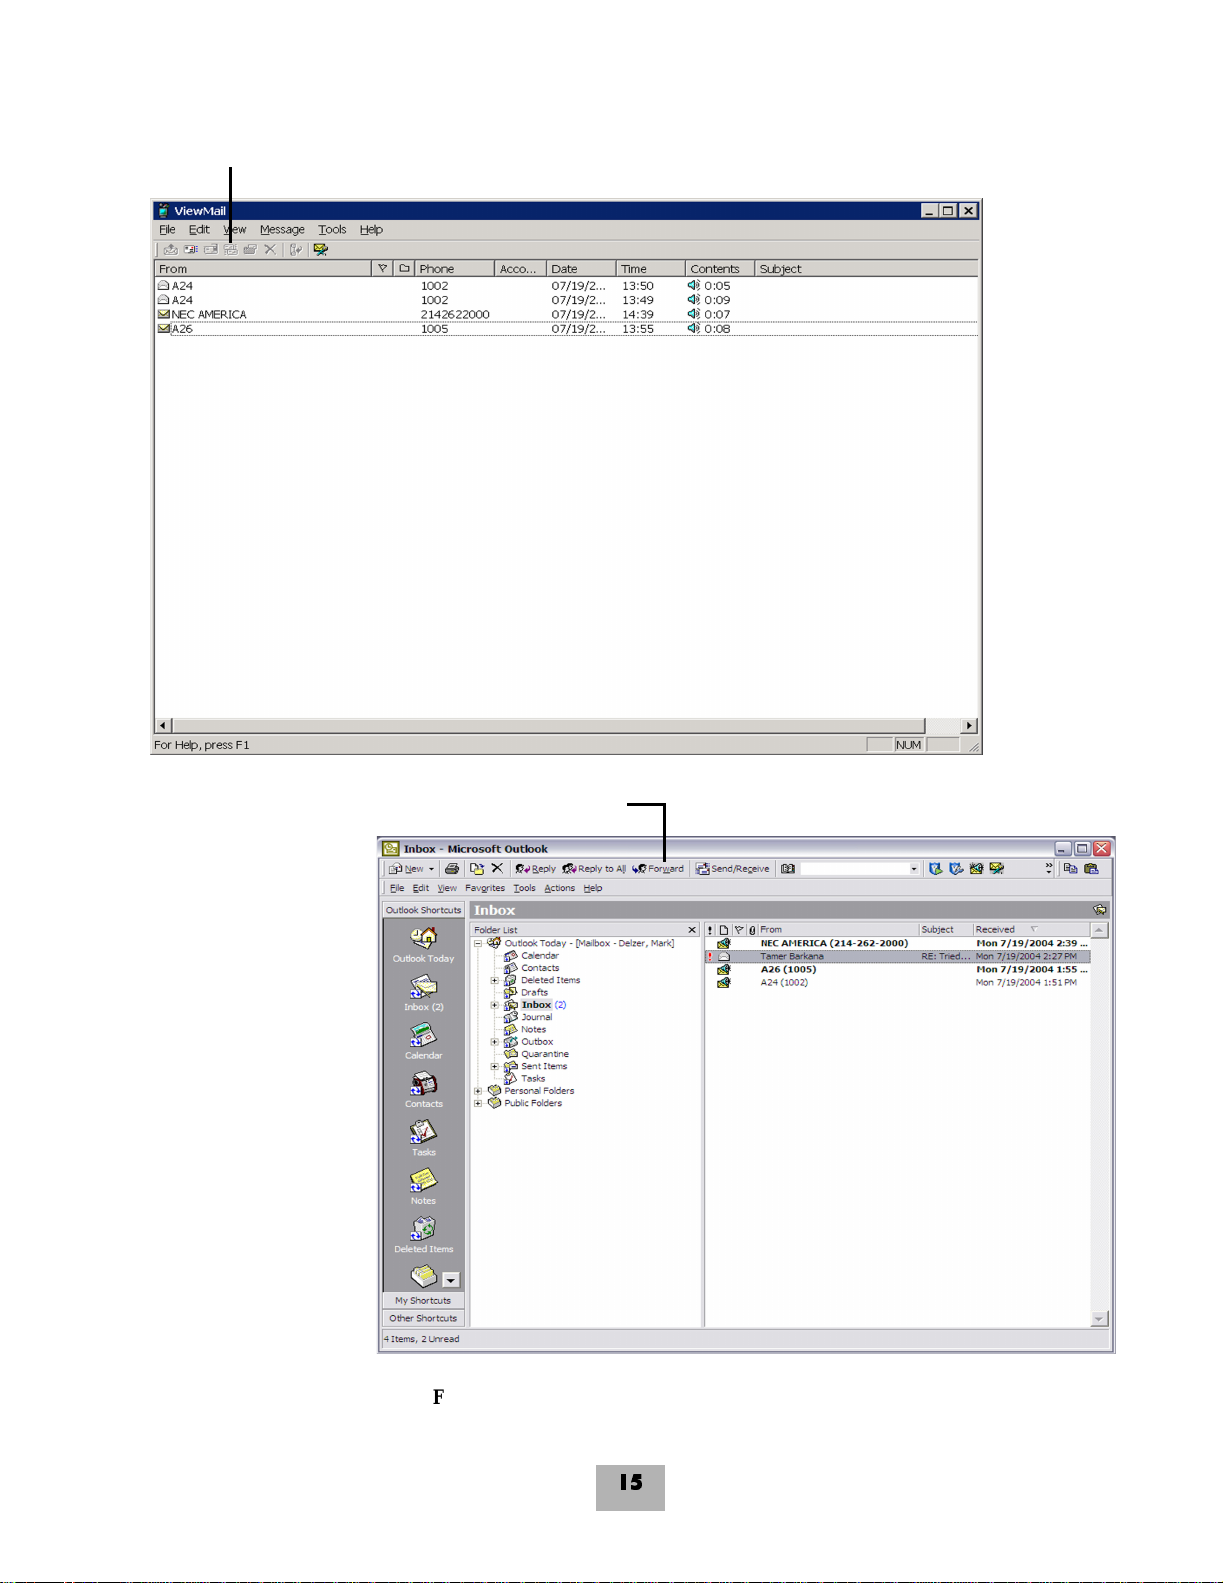
New Message
Figure 1. New Message Check
5
Urgent Message

Leaving a Message by Telephone
The system lets you leave voice messages for subscribers, groups, or guests. If you call a subscriber’s extension and
the call is unanswered, your call is automatically routed to the subscriber’s mailbox, where you can leave a message.
You can also leave messages directly from a subscriber’s mailbox.
Directory Assistance
Your system may use automatic directory assistance, numeric directory assistance, or both, to help callers find
subscribers’ extension numbers.
Callers with letters on their telephones can use automatic directory assistance, which identifies subscribers by their
last names. All callers can use numeric directory assistance, which groups subscribers by department, location, or
other categories.
Special Delivery Options
When you leave a subscriber message, you can mark it with one or more of these special delivery options:
Urgent The message is played first, before regular messages.
Private The message cannot be redirected.
Return Receipt The system tells you when a subscriber has heard the message.
Future Delivery The message is delivered at the time and on the day you specify.
SEE ALSO:
“Modifying a Message” on page 16
“Canceling a Message” on page 17
“E-Mail Integration Package *” on page 54
To leave another subscriber a message
1. Call another subscriber. When the subscriber does not answer, the call is forwarded to voice mail.
2. Leave a message.
3. Follow the system instructions. Enter 1 for Yes, 2 for No.
To leave a message directly in a subscriber’s mailbox
1. Access your mailbox (see inside front cover).
2. Press the LVMSG softkey or enter 5 to leave any messages.
3. On the telephone, you may be asked spell the subscriber’s name or enter the extension number. You can
alternate between name and number by pressing the # key twice.
When spelling a subscriber’s last name, use a “wild-card” number (typically 0 or 1) for any letter in the last name
you do not know.
4. Enter 2 until you hear the name of the subscriber you want, then enter 1.
6

5. Record your message at the beep. The message must be at least three seconds long to be delivered.
6. Enter # to start over or , to stop recording.
Sending a Me ssage by Computer
Depending on the optional TeLANophy applications on your system, you can use ViewMail or ViewMail for Microsoft
Messaging to send voice messages by computer.
To send a message by computer
1. If you are using ViewMail, click Send. If you are using ViewMail for Microsoft Messaging, click New voice
message.
2. Click To and then use the address book to select recipients’ names.
3. Type in a subject and set delivery options as needed.
4. Use the VCR-style buttons and your telephone or a sound device to record the message. You can also add
sounds from the clipboard or from a WAV file.
5. To send the message, choose Send.
7
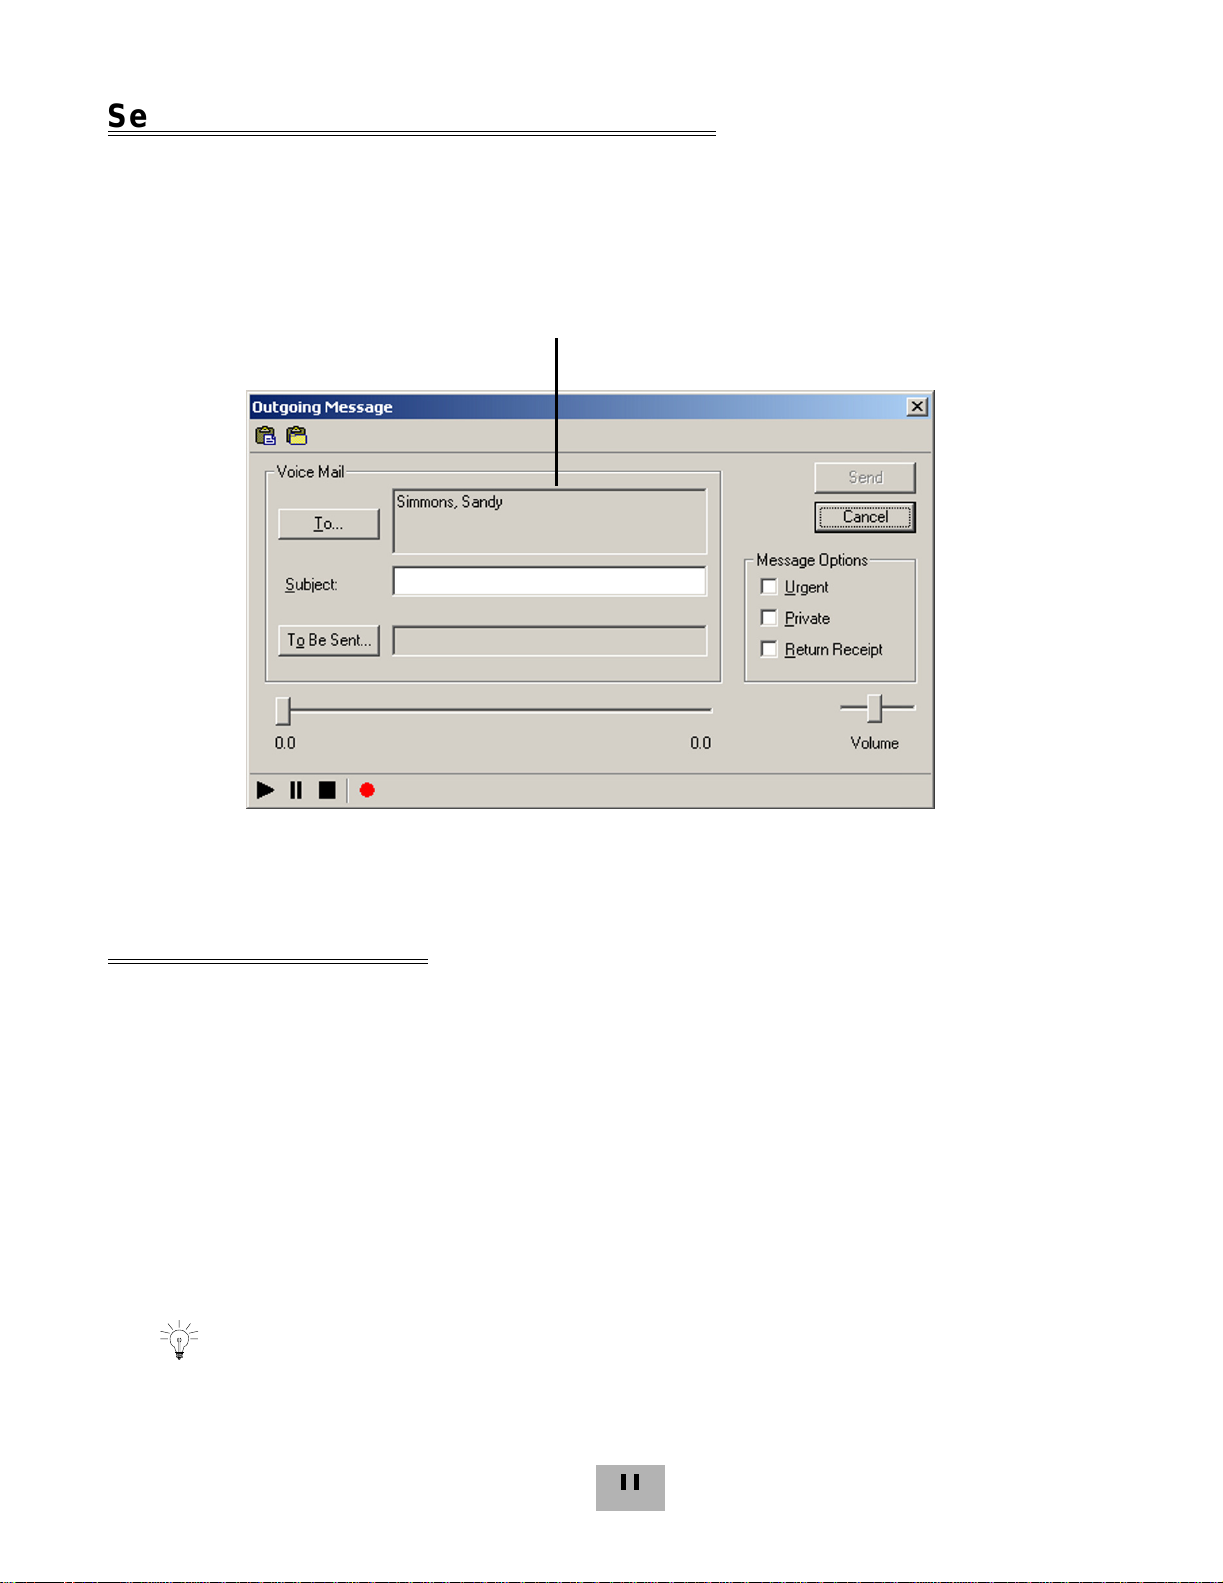
For composing and sending a message
With ViewMail for Microsoft Messaging, you can send a ViewMail message to another subscriber by using the
ViewMail address book.
You also can send a ViewMail message to someone outside the voice messaging system. When you use the Microsoft
Messaging address book, the ViewMail message is sent as an e-mail message with an attached WAV file.
For selecting special
delive ry options
Figure 2. Sending a Message
8
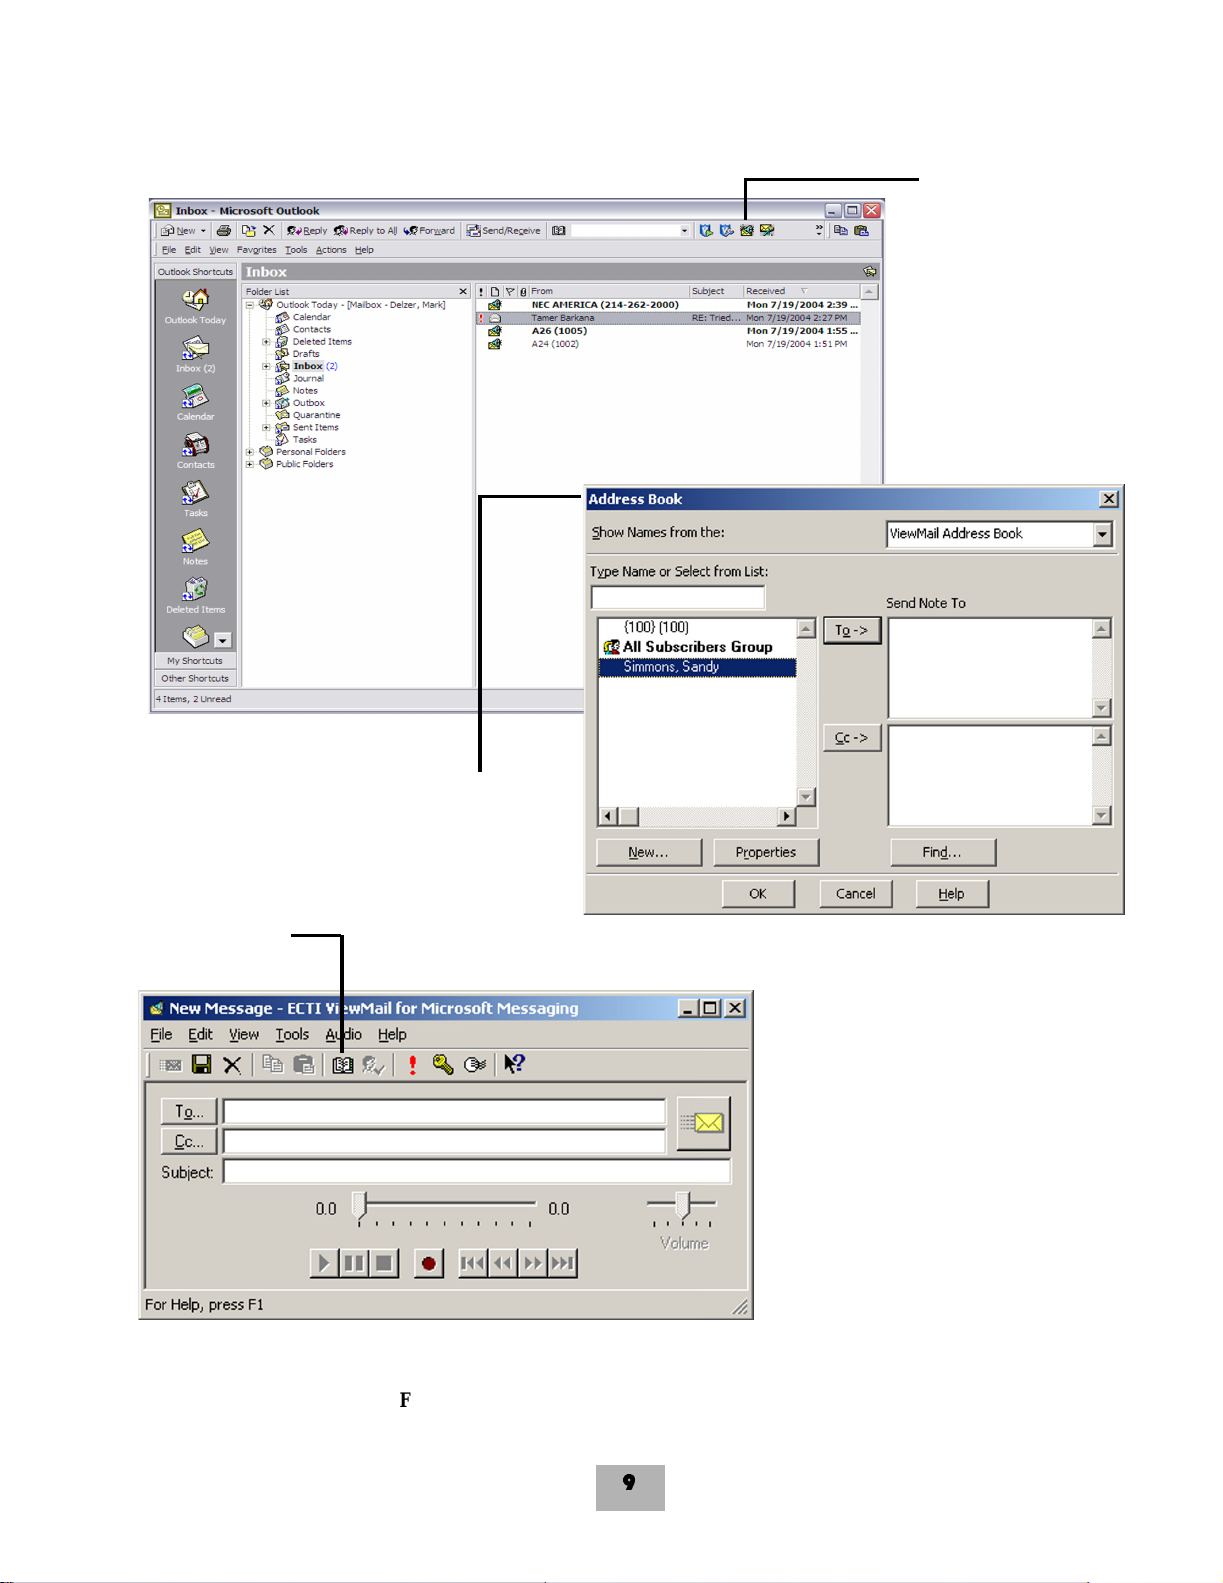
For compos ing
and sending a
message
For selecting
an address
For addressing a new
message to multiple
subscribers or
message groups
Figure 3. Sending a Message via Microsoft Messaging
9

Leaving a Group Message
You can leave a message for more than one subscriber by:
K
Leaving the message for a message group.
K
Adding names to the address list.
A message group is a mailing list of subscribers and/or guests. Your system manager can create message groups or
you can create your own message groups.
To leave a group message by telephone
1. Access your mailbox (see inside front cover).
2. Press the LVMSG softkey or dial 5 to leave a message.
3. Spell the group name, or enter the special group ID and group number. Enter 2 until you hear the name of the
group you want, then enter 1.
4. After the beep, record your message. The message must be at least 3 seconds long to be delivered.
To leave a message to several subscribers by telephone
1. Leave a message for the first subscriber.
2. Enter , to stop recording.
3. Follow the system instructions to add a subscriber as a message recipient.
4. Repeat step 3 for each subscriber you want to receive the message.
To find out who has not heard a gr oup message by telephone
1. Start to leave a new message to the group.
2. The system says that some members have not heard your last message. Enter 1 to review the message.
3. Listen to the message or enter 2 to interrupt it.
4. Enter 2 to avoid canceling the message.
5. Enter 7 to list who has not heard the message.
6. Enter , to stop the list.
10
Sending a Group Message by Computer
.
With ViewMail and ViewMail for Microsoft Messaging, you can either choose more subscriber names or a group name
from the ViewMail address book.
For addressing a message to multiple
subscribers or message groups
Figure 4. Sending a Group Message
Reviewing Messages
You can review old messages and archived messages by telephone or by computer.
Reviewing Messages by Telephone
After you have heard a new message, the system saves it for a set amount of time (for example, until midnight).
To review messages by telephone
1. Access your mailbox.
2. Press the Old softkey or dial 6 to review old messages.
3. Follow the system instructions. Enter 1 for Yes, 2 for No.
Press the Next softkey or dial * to skip a message. Press the ARCHV softkey or dial 3 7 to archive a message
11

SEE ALSO:
Online Help
ViewMail, Opening messages
ViewMail for Microsoft Messaging, To set preferences for saving sent
voice messages
Reviewing Messages by Computer*
ViewMail and ViewMail for Microsoft Messaging list all of your opened (old) messages in your mailbox until the system
deletes them at the set time, usually at midnight every night.
To review an old message by computer
1. Double-click the message.
2. Use the VCR-style buttons to play the message.
* This feature may not be available at your site.
12

Opened Message
New Message
Opened
Message
New
Message
Figure 5. Reviewing Messages via Computer
13
Redirecting a Message
The system lets you:
K
Redirect a message to another subscriber.
K
Record an introduction to the message.
K
Use special delivery options.
The system does not let you redirect messages that are designated as private by the original sender, otherwise enter
the extension number.
To redirect a message by telephone
1. While listening to a message press the ">>>>" softkey to get to more options, then press the REDIR softkey.
2. Spell the last name of the subscriber to whom you are redirecting the message or press # twice to enter the
extension number.
3. Enter 1 to confirm the recipient of the redirected message.
Note: A message that is marked Private by the sender cannot be redirected.
To redirect a message by computer*
You can redirect a message to other subscribers using ViewMail and ViewMail for Microsoft Messaging. When you
redirect a voice message, the New Message form opens as follows:
K
The subject contains “FW:” to indicate the message is being redirected.
K
The original voice message is included.
* This feature may not be available at your site.
SEE ALSO:
“Leaving a Message by Telephone” on page 6
“Changing Message Delivery Options” on page 37
Online Help
ViewMail, Redirecting messages
ViewMail for Microsoft Messaging, Forwarding a voice message
To redirect a message by computer
1. Select the message.
2. Click Redirect.
3. Click To and then use the address book to select recipients’ names.
4. Type in a subject and set delivery options as needed.
5. Use the VCR-style buttons and your telephone or a sound device to record an introduction.
6. Choose Send to send your message.
Note: A message that is marked "Private" by the sender cannot be redirected.
14
For redirecting the message to other subscribers, groups, or guests
For redirecting a message
Figure 6. Redirecting Messages via Computer
15

Modifying a Message
Depending on system settings, you can use one or more of these message options after you record a message:
K
Modify the message.
K
Modify its delivery options.
K
Mark it for special delivery.
K
Redirect it to others.
To modify a message by telephone
1. Record a message.
2. Enter , 4 to stop recording.
3. While modifying, you can enter 4 to add to the end of the message or 5 to listen to it. If you have a touchtone
telephone, you can enter 6 to rerecord the message.
4. Enter , when you finish modifying.
SEE ALSO:
“Leaving a Message by Telephone” on page 6
“Redirecting a Message” on page 14
“Canceling a Message” on page 17
Online Help:
ViewMail, Changing or revoking sent messages
ViewMail for Microsoft Messaging, Revoking a voice message you have sent
To modify a message by computer*
With ViewMail, you can modify a voice message you have sent if the recipient has not opened it.
ViewMail displays the message in your ViewMail mailbox until the person has opened it. If the message is still in your
mailbox, simply open and modify it.
With ViewMail for Microsoft Messaging, you can modify the message by telephone or delete it and send a new
message.
* This feature may not be available at your site.
16

Unopened sent message
For modifying message
delivery options for an
unopened message
Figure 7. Modifying a Message via Computer
Canceling a Message
If the recipient has not heard your last message, the system lets you cancel it. You can then record a new message.
To cancel a message by telephone
1. Start to leave another message to the same subscriber.
2. If the subscriber has not yet heard your last message, the system asks if you want to review it.
3. Enter 1 to review it.
4. When you hear the message you want to cancel, enter 5 to cancel it.
5. Enter 1 to confirm the cancellation.
17

SEE ALSO:
“Modifying a Message” on page 16
Online Help:
ViewMail, Changing or revoking sent messages
ViewMail for Microsoft Messaging, Revoking a voice message you have sent
Canceling a Message by Computer*
With ViewMail or ViewMail for Microsoft Messaging, you can cancel a voice me ssage you have sent if the recipient has
not opened it. A message remains in your mailbox until the recipient opens it.
To cancel a message by computer
1. Select the message.
2. Click Delete.
With ViewMail for Microsoft Messaging, all unopened voice messages you have sent appear in the Unopened folder,
which is located in the Sent Items folders.*
* This feature may not be available at your site.
The unopened folder does display unopened voice messages sent to subscribers of the voice messaging
system but not voice messages sent to e-mail addresses.
18

For canceling a message that has been sent
Figure 8. Canceling a Message via Computer
Archiving a Message
The system saves old messages for a set time (for example, until midnight). To keep a message for a longer period,
you can archive it. The system manager can tell you how long your system saves archived messages.
You can hear your archived messages when you review messages. The only difference between archived messages
and old messages is that archived messages are typically saved for a longer period of time.
After you listen to your archived messages, the system gives you the option of archiving the messages again.
WARNING. After listening to an archived message you must press the ARCHV softkey or
dial 3 7 to archive it again or it will be deleted.
To archive a message by telephone
While listening to a message, press the ARCHV softkey or dial 3 7 to archive it again or it will be deleted.
19

SEE ALSO:
Online Help:
ViewMail, Archiving and saving messages
ViewMail for Microsoft Messaging, Saving a voice message temporarily
ViewMail for Microsoft Messaging, View columns
Archiving Messages by Computer*
You can archive a message using ViewMail or ViewMail for Microsoft Messaging.
When the number of archived days reaches zero, the voice message is deleted with other old voice messages.
In the ViewMail mailbox, archived messages appear with an Archive icon. The number of days the voice message
remains archived is displayed in the Archive Days column, which appears before the Phone column in the ViewMail
mailbox.
With ViewMail for Microsoft Messaging, you can see how many days are left for an archived message by opening the
voice message.
* This feature may not be available at your site.
To archive a message by computer
1. Select the message.
2. If you have ViewMail, click Archive. If you have View Mail for Microsoft Messa ging, select Archive Voice Message
from the File menu.
As the archive time decreases for a message, you can archive it again, which resets the archive time to the
maximum value.
20

.
For archiving messages
Figure 9. Archiving a Message via Computer
Recording a Conversation by Telephone
You can record a telephone conversation and manage the recorded message just as you would a voice mail message.
The recorded message can be addressed to another subscriber while you are recording, or you can forward it to a
subscriber or group of subscribers after it has been saved in your message box. Recorded messages can also be
archived.
Depending on how the telephone is set up, you may be able to manage your recording sessions using the buttons in
the list on the next page.
To record a conv ersation by telephone
1. During a telephone conversation, press RECORD on the telephone.
2. Press END or hang up to stop recording.
21

To redirect or save a conversation by tel ephone
1. To save a recorded message to your mailbox, press END or disconnect the call.
2. To redirect the recorded message, enter a subscriber’s extension while you are recording. The recorded
message is automatically sent when you press END.
OR
Press ADDRESS to end the recording and disconnect the call. Then follow the address conversation to redirect
the message.
Live Record Telephone Button Options
Pause Pauses and resumes the recording.
Address Ends the recording and disconnects the call. Then follow the address conversation to
review, delete, or address the recorded message with an optional introduction.
End Ends the recording without disconnecting the call. The recorded message is automatically
sent to the specified address. Or, if no address is specified, the message is sent to your
mailbox.
Erase Erases the recorded message without disconnecting the caller.
Rerecord Erases the existing recorded message and starts a new recording.
To record a conv ersation by computer
1. If you are using ViewMail, click Live record. If you are using ViewMail for Microsoft Messaging, click New live
record message.
2. If you are using View M ail, the Live R eco rd Me ssage dialog box appears. To begin recordin g, choose Live reco rd.
If you are using ViewMail for Microsoft Messaging, the New Message dialog box appears. To begin recording,
click Record.
3. Click Pause to stop recording temporarily. Click Resume to restart.
4. To end the recording, click Stop or hang up. Or click Cancel to stop and erase the recording.
5. To review the message, click Play.
6. To send the message to your mailbox, click Send.
7. If the Request Redirect dialog box appears, click Yes to forward the message. Click No to save the recorded
message in your mailbox.
CAUTION. The use of monitoring, recording, or listening devices to eavesdrop, monitor,
retriev e, or record telephone conversations or other sound act ivities, whether or not
contemporaneous with transmission, m ay be illega l i n certain circumstances under federal
or state laws. Legal advice should be sought prior to implement ing any pract ice that
monitors or r ecor ds a ny tel ep ho ne co nv er sati on . So m e fe de ra l an d s t ate la ws re qu ire so me
form of notification to all parties to a telep hone conversation, such as using a beep tone or
other not ification methods or requiring the consent of all parties to th e telephone
conversation, prio r to monitori ng or recording the telephone conversati on. Some of these
laws incorporate strict penalties.
22

Changing Your Mailbox Setup
Mailbox Manager allows you to control your personal mailbox settings, such as:
K
Your profile
K
Security code
K
Recorded and spelled names
K
Greetings
K
Playback options
K
Call transfer options
K
Call screening options
K
Call holding options
K
Message delivery options
K
Message groups
You can also change most of these setup options for your personal mailbox by telephone. When you make a change,
the system leads you step by step through a series of simple yes-and-no questions.
To make changes to your TeLANophy applications, refer to the application’s online Help.
Working with the Mailbox Manager
The Mailbox Manager allows you to control how you and your callers interact with the voice messaging system by
telephone.
The first time you use the Mailbox Manager, you enter the host name, your extension, and your security code in the
Connect dialog box.
Figure 10. The Connect Dialog Box
23

The Menu bar allows you to navigate through the screens of the Mailbox Manager.
t.
Menu Bar
Figure 11. The Menu Bar
Always click Logout to exi
Click Save frequently to save changes as you make them. If you move to another screen within
Mailbox Manager without saving changes first, you are prompted to save before proceeding.
24

The Profile screen is where the system stores your name, extension number, delivery number, and other settings.
Figure 12. The Mailbox Manager - Profile Screen
To change your profile
1. Access the Mailbox Manager (see the inside front cover).
2. Click Profile.
3. Confirm and change settings as needed.
4. Click Save.
You must select a recording device before you can record greetings, your recorded name, or the
names of groups. If your computer is equipped with a microphone and speakers, select My computer.
Otherwise, select My phone.
25

To use the Control bar
Listen
Record
Playback
1. On the Control bar, click to select telephone or computer playback.
2. On the Control bar, click to listen to your recorded name.
3. On the Control bar, click to record your name with your recording device.
Telephone Pick up the handset when the telephone rings, w ait for the beep, then speak into the han dset.
Computer Wait for the tone, then speak into the microphone.
4. Click to stop recording.
Stop
Figure 13. The Control Bar
Changing Your Security Code
Your security code prevents others from u sing your perso nal ID to listen to yo ur messages. Change your security code
as often as you like. Your security code should be 3 to 10 digits long.
If you forget your security code, call your system manager.
To change your security code by computer
1. Access the Mailbox Manager (see inside front cover).
2. Click Profile.
3. Click Change Code.
4. In the Change Security Code dialog box, type your old and new passwords in the corresponding fields.
5. Click OK and then click Save.
26

Figure 14. The Security Code Screen
To change your security code by telephone
1. Access your mailbox by telephone (see inside front cover).
2. If using Softkeys press SETUP, PERS, CODE. Otherwise enter 7 7 4 to change your security code.
3. Follow the system instructions. Enter 1 for Ye s, 2 for No.
You must select a recording device before you can record greetings, your recorded name, or the
names of groups. If your computer is equipped with a microphone and speakers, select My computer.
Otherwise, select My phone.
27

Changing Your Recorded and Spelled Names
The system uses your recorded name to identify both you and your messages to other callers. You can change your
recorded name only by telephone.
The system uses your spelled nam e for t he dire ctory. Callers can enter the first letters of yo ur name to lo cate you in the
directory. You can also remove your name from this directory (so that callers cannot learn your extension number).
To add or remove your name from automatic directory assistance, enter 1 when asked to change your directory listing
status after changing your recorded name.
To add or remove your name from the directory by telephone
1. Access your mailbox by telephone (see inside front cover).
2. If using Softkeys press SETUP, PERS, DIR. Otherwise enter 7 7 7 to change your directory listing.
3. Follow the system instructions to change your spelled name. Enter 1 for Yes, 2 for No.
To change your recorded name by computer
1. Access the Mailbox Manager (see inside front cover).
2. Click Profile.
3. On the Control bar, click to record your name with your recording device:
Telephone Pick up the handset when the telephone rings, w ait for the beep, then speak into the han dset.
Computer Wait for the tone, then speak into the microphone.
4. Click to stop recording.
To change your recorded name by teleph one
1. Access your mailbox by telephone (see inside front cover).
2. If using Softkeys press SETUP, PERS, >>>>, RCNAM. Otherwise enter 7 7 5 to change your directory listing.
3. Follow the system instructions to record your name. Enter 1 for Yes, 2 for No.
To change your spelled name by tele phone
1. Access your mailbox by telephone (see inside front cover).
2. If using Softkeys press SETUP, PERS, SPELL. Otherwise enter 7 7 6 to change your directory listing.
3. Follow the system instructions to change your spelled name. Enter 1 for Yes, 2 for No.
28

Changing Your Greetings
Callers hear a greeting before they leave a message. Your mailbox can have one of three greetings: standard, busy,
or alternate. You can rerecord or switch between greetings by telephone or by computer.
St andard Greeting
The standard greeting plays when your extension is unanswered. A typical standard greeting is: “Hello, this is Pat
Green. I am not at my desk right now. Please leave a message.”
Busy Greeting
The busy greeting plays when your extension is busy., A typical busy greeting is: “Hello, this is Pat Green. I am on the
telephone now. Please leave a message.” For callers to hear your busy greeting, you must activate it.
If you do not want to use a sepa rate busy greeting, then record a standard greeting for all situations when you are
unavailable. For example: “Hello, this is Pat Green. I am not available at this time. Please leave a message.”
,
This feature may not be available at your site.
Alternate Greeting
The alternate greetin g plays for special occasi on s, such as a vacatio n. A typica l alterna te gre eting i s: “Hell o, this is Pat
Green. I am out of the office today and will return tomorrow.”
When your alternate greeting is active, the system plays it instead of any of your other greetings.
System-Generated Greetings
If you do not record greetings in your own voice, the system plays greetings that include your recorded name or your
extension. For example:
K
For a standard greeting, “Pat Green is not available right now.”
K
For a busy greeting, “Extension 1 2 3 is busy.”
K
For an alternate greeting, “Pat Green is out today.”
To switc h between yo ur greetings by computer
1. Access the Mailbox Manager (see inside front cover).
2. Click Greetings.
3. From the Choose a Greeting list box, select a greeting.
4. For This Greeting is, select the Enabled check box.
5. Click Save.
29

For changing the
Greeting type
Figure 15. The Greetings Screen
To rerecord your standard, alternate, or busy greet ing by computer
1. Access the Mailbox Manager (see inside front cover).
2. Click Greetings.
3. From the Choose a Greeting list box, select the greeting to rerecord.
4. On the Control bar, click to record the greeting with your recording device:
Telephone Pick up the handset when the telephone rings, w ait for the beep, then speak into the han dset.
Computer Wait for the tone, then speak into the microphone.
5. Enter to stop recording.
To switch betw een your standard and alternate greeting by telephone
1. Access your mailbox by telephone (see inside front cover).
2. If using Softkeys press SETUP, GREET, SWTCH, otherwise enter 7 4 5.
30

To rerecord yo ur standard , alternate, or busy greet ing by teleph one
1. Access your mailbox by telephone (see inside front cover).
2. To rerecord your greeting perform one of the following:
K
Standard — If using Softkeys press SETUP, GREET, STD, otherwise enter 7 4 6 1.
K
Alternate — If using Softkeys press SETUP, GREET, >>>>, ALT, otherwise enter 7 4 7 1.
K
Busy — If using Softkeys press SETUP, GREET, >>>>, BUSY, otherwise enter 7 4 8 1.
3. Enter to stop recording.
To activate your busy greeting by telephone
1. Access your mailbox by telephone (see inside front cover).
2. If using Softkeys press SETUP, GREET, >>>>, BUSY, otherwise enter
7 4 8 to hear your busy greeting.
3. Follow the system instructions to activate your busy greeting. Enter 1 for Yes, 2 for No.
Playback Options
The Playback options screen stores settings for how messages are played. These options are not available by
telephone. Without Mailbox Manager, you need to ask your system manager to change these opti ons. The Playback
options consist of:
K
Announce
New e-mail messages. If the optional e-mail integration package is installed, the system includes new e-mail
messages in the total when announcing the number of new messages.
Voice message length. The system announces the total length, in minutes, of new voice messages.
K
Telephone Conversation Type
Menu mode covertness. This conversation plays menus of options. Enter the number associated with the option to
perform the particular task.
Yes/No conversation. This conversation leads you step by step through all of your options with easy, yes-and-no
questions. Enter 1 for Y es, 2 for No.
K
Voice message time stamp
Announce time stamp before message. The system plays the time and date that the message was recorded
before playing the message.
Announce time stamp after messages. The system plays the time and date that the message was recorded after
playing the message.
To change your playback options by computer
1. Access the Mailbox Manager (see inside front cover).
2. Click Playback.
3. Confirm and change the settings as needed.
4. Click Save.
31

Announce
Conversation
Listening to
a Message
Options
Options
Option
Figure 16. The Mailbox Manager - Playback Screen
Changing Call Transfer Options
The voice messaging system is set up to transfer calls to your extension as a receptionist would. When you are
unavailable or on another call, the system take s a messag e for yo u. If you will be away for a while, you can tu rn of f call
transfer or have your calls transferred to a different telephone number.
Turn on call transfer before transferring your calls to a different telephone number. You can enter up to 9 digits for the
new telephone number.
To turn call transfer on or off by telephone
1. Access your mailbox (see inside front cover).
2. If using Softkeys press SETUP, TRFR, ON/OFF. Otherwise enter 7 6 4 to turn call transfer on or off.
3. Follow the system instructions. Enter 1 for Ye s, 2 for No.
32

To change the nu m ber to which calls are trans ferred by telephone
1. Access your mailbox (see inside front cover).
2. If using Softkeys press SETUP, TRFR, CHG#. Otherwise enter 7 6 4 1 4.
3. Follow the system instructions. Enter 1 for Ye s, 2 for No.
SEE ALSO:
“Changing Call Screening Options” on page 34
“Changing Call Holding Options” on page 36
To turn call transfer on or off by computer
1. Access the Mailbox Manager (see inside front cover).
2. Click Transfer/Screening.
3. To turn call transfer on, for Transfer Incoming Calls To, select My extension. To turn call transfer off, select My
Voicemail.
4. Click Save.
To change the nu m ber to which calls are transferred by computer
1. Access the Mailbox Manager (see inside front cover).
2. Click Transfer/Screening.
3. For Transferring Incoming Calls To, select This number. Type the telephone number or extension.
4. Click Save.
33

.
Turn Transfer
On or Off here
Turn Screening
On or Off here
Select Screening
Options here
Turn Holding
On or Off here
Figure 17. The Transfer Screen
Changing Call Screening Options
When available, the system can use a variety of call screening options.* You can select these options on the Transfer/
Screening screen of the Mailbox Manager.
If your system manager has set up call screening for your extension, you can turn call screening on and off by
telephone.
* This feature may not be available at your site.
What you hear when you pick up the telephone depends on which of the following options you have selected.
K
Announce before connecting caller
The sy stem plays a beep before transferring the call.
K
Screen Name
The system asks the caller’s name before ringing your extension. The system plays “Call from <caller’s name
spoken by the caller>” before transferring the call.
34

K
Remember Screen Name
The system asks and plays the caller’s name, and if the caller leaves a message, will append the caller’s name to the
beginning of the message.
K
Tell me who the call is for
The system says, “Call for <your name>” before transferring the call.
Two or more of these options may be combined. For example, if you select Screen name and Ask Me If I Want to Take
the Call, the system asks the caller’s name, then rings your extension. When you answer the call, the system plays the
caller’s recorded name, then asks if you want to take the call.
To change call screening options by computer
1. Access the Mailbox Manager (see inside front cover).
2. Click Transfer/Screening.
3. Select the Screening check box.
4. Select the Transfer/Screening options as needed.
5. Click Save.
To turn call screening on or off by telephone
1. Access your mailbox by telephone (see inside front cover).
2. If using Softkeys press SETUP, TRFR, SCRN. Otherwise enter 7 6 4 1 5.
3. Follow system prompts to turn Call Screening on or off.
35

Turn Screening
On or Off here
Select Screening
Options here
Figure 18. Selecting Screening Options
Changing Call Holding Options
The system can hold a call until your extension is available. * When call holding is turned on a nd your exten sion is busy,
the system asks callers if they want to hold until you are available or to leave a message. The system also tells callers
how many calls are holding ahead of theirs.
If your system manager has set up call holding for you, you can turn call holding on and off. Your system manager sets
the number of calls that the system can hold for you.
,
This feature may not be available at your site.
To turn call holding on or off by computer
1. Access your mailbox by telephone (see inside front cover).
2. Click Transfer/Screening.
3. To turn call holding on, select the Holding check box. To turn it off, clear the check box.
4. Click Save.
36

To turn call holding on or off by telephone
1. Access your mailbox by telephone (see inside front cover.
2. If using Softkeys press SETUP, TRFR, >>>>, HLDING. Otherwise enter 7 6 4 1 6.
3. Follow system prompts to turn call holding on or off.
Changin g Me ss ag e De liv ery Options
The system can deliver messages to several different telephone numbers. You can set a range of minutes, hours, and
days that a message delivery telephone number is in effect.
You can tell the system to deliver only urgent messages or to delay message delivery to any of the numbers.
To change message deliver y options by c om puter
1. Access your mailbox by telephone (see inside front cover).
2. Click Notification.
3. To edit a message delivery device, select the device and click Edit.
To add a new device, click Add.
4. On the Message Delivery screen, confirm and change the settings as needed and click OK.
5. Click Save.
37

Times to Deliver
Messages
Days to Deliver
Messages
Types of Messages to
Deliver and How Often
Name of the Device
Telephone Number
to Reach the Device
Figure 19. Message Delivery Screen
If changing message delivery by telephone, you may not be able to enter a pager number that requires special dialing
characters (for example, a sem icolon tha t repr esent s a 3- second pa use). Cont act your system m anage r for assista nce.
Enter # to insert a 1-second pause where you want the system to pause between digits that it is
dialing.
To change mes sage deliver y by telephone
1. Access your mailbox (see inside front cover).
2. To change your message delivery options for your:
K
Work phone, if using softkeys press SETUP, >>>>, DELIV, WORK. If using menu mode enter 7 6 6 5 4,
otherwise follow the prompts for setup options.
K
Home phone, If using softkeys press SETUP, >>>>, DELIV, HOME. If using menu mode enter 7 6 6 5 5,
otherwise follow the prompts for setup options.
K
Pager phone, if using softkeys press SETUP, >>>>, DEL IV, PAGER. If using menu mode enter 7 6 6 5 6,
otherwise follow the prompts for setup options.
K
Spare phone, if using softkeys press SETUP, >>>>, DELIV, >>>>, SPARE. If using menu mode enter
7 6 6 5 7, otherwise follow the prompts for setup options.
38

3. The particular delivery type must be enabled to change the number and schedule.
If using softkeys press ON/OFF to turn on or off delivery for that number. If using menu mode enter 1 to turn on
delivery for that number or 2 to turn off delivery, otherwise follow the prompts for setup options.
4. If using Softkeys press PH# to change the telephone number. If using menu mode enter 4, otherwise follow the
system instructions to change the telephone number. After you enter a telephone number, enter , to end the
entry.
5. If using Softkeys press SCHED to change the phone number. If using menu mode enter 5, otherwise follow the
system instructions.
6. Change any remaining message delivery numbers by repeating the procedure.
Using Groups
You can create your own message groups. When you send a message to a group, the message is sent to all members
of the group. Each group you create has a number or a name.
There are three types of message groups: private, open, and local access. When you create a private group, only you
can send messages to it. When you create an open group, other subscribers also can send messages to it. When you
create a local access group, only subscribers calling from an extension within the company can send messages to it.
To create a group by telephone
1. Access your mailbox (see inside front cover).
2. If using softkeys press SETUP, >>>>, GRPS, CREATE. If using menu mode enter 7 5 4, otherwise follow the
prompts for setup options.
3. For numbered gro up s , en ter a 3- digit g roup num ber. For named groups, ente r th e first three letters of the group’ s
name.
4. Record a name for the group. Enter , when you are finished.
5. Enter 1 to make the group an open group or 2 to make it a private group.
6. Follow the system instructions to add members to the group. You can add them by name or extension number.
7. Enter , when you are finished adding members.
8. Enter 1 to leave a message for this group now. Otherwise, enter 2.
Guests do not have extension numbers, so add them to the group by spelling their names or by
enteri ng their personal IDs.
To create a group by computer
1. Access the Mailbox Manager (see inside front cover).
2. Click Groups.
3. Click Create Group.
4. In the Create/Modify Group dialog box, type a name for the group.
39
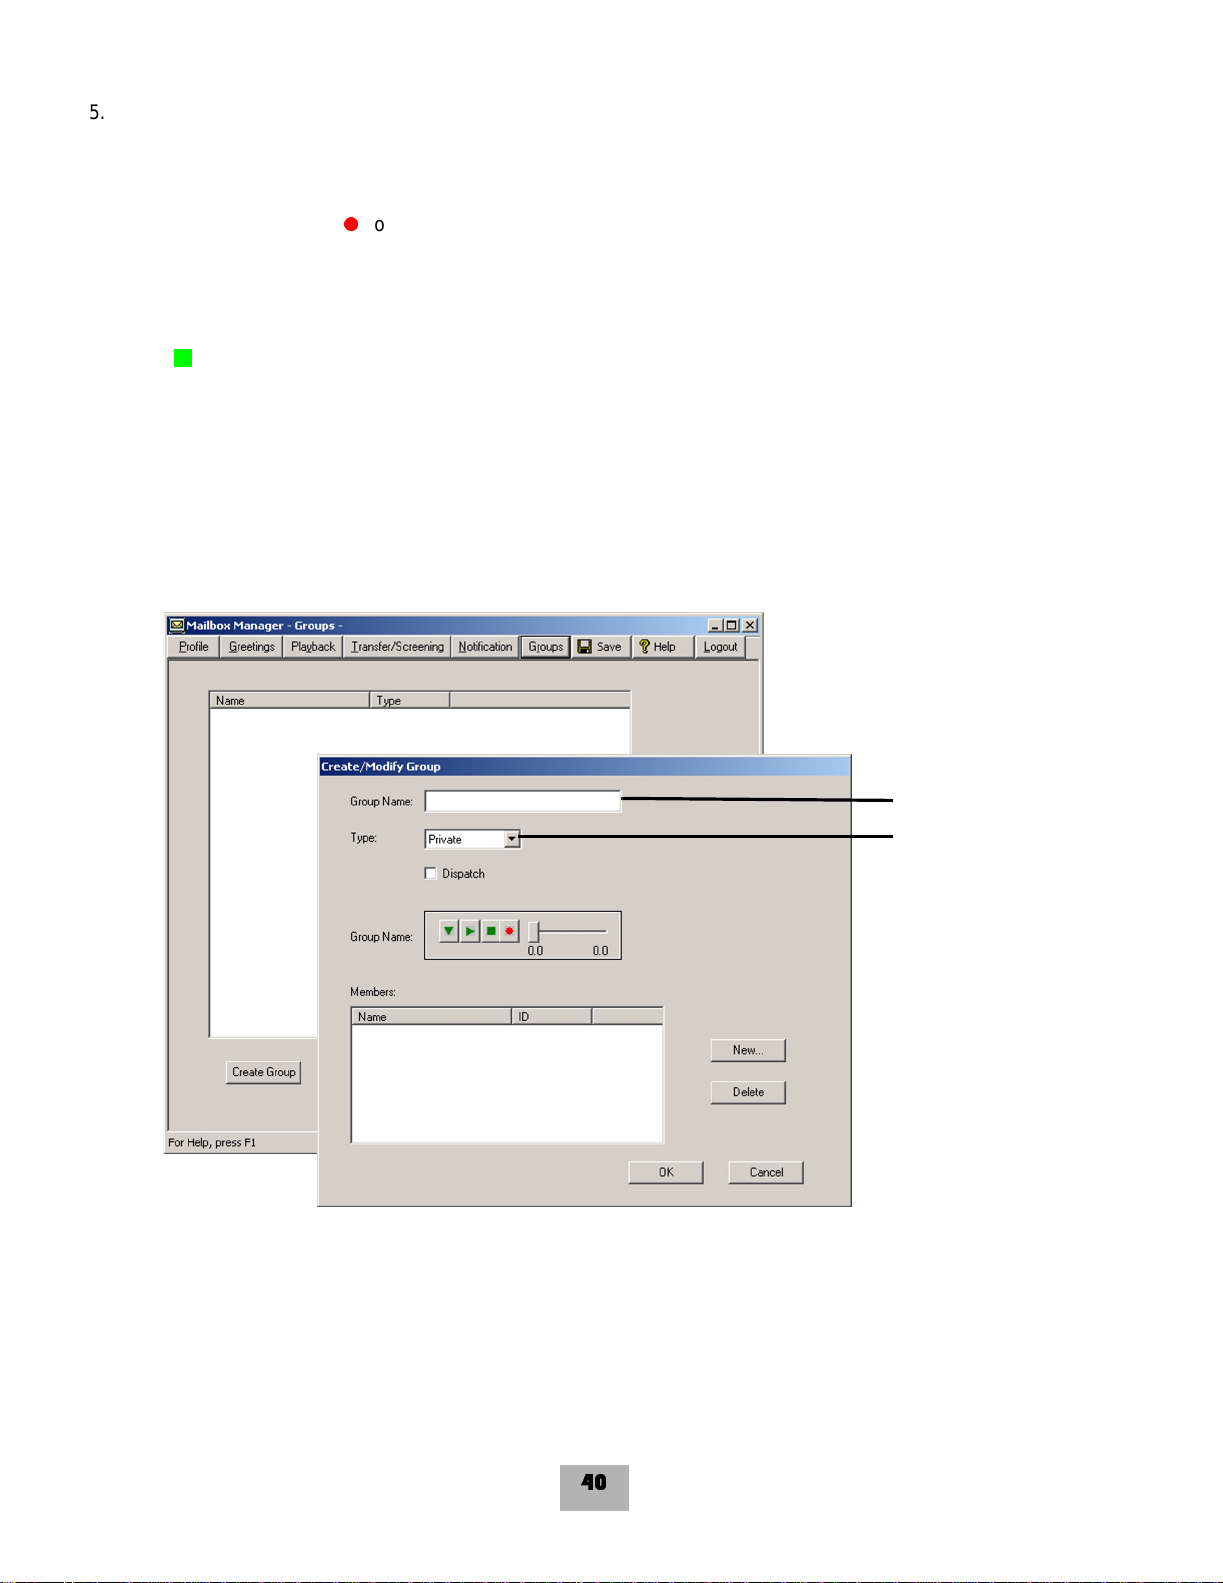
5. Select a type for the group.
6. If the group will be used to dispatch messages to the first member available, select the Dispatch check box.
Otherwise, each message sent to the group will be delivered to all members.
7. On the Control bar, click to record the group name with your recording device:
Telephone Pick up the handset when the telephone rings, w ait for the beep, then speak into the han dset.
Computer Wait for the tone, then speak into the microphone.
8. Click to stop recording.
9. To add members to the group, click New. Use the Member Properties dialog to search for enrolled subscribers.
10. When you are finished adding members, click OK.
11. Click OK to accept the group.
12. Click Save.
Figure 20. Creating a Group Screen
Group Name
Group Type
40

Changing Groups
You can add and delete members of your message groups.*
You can also delete any message group that you own, or change the group’s number, spelled name, or recorded
name.
To change a group by computer
1. Access the Mailbox Manager (see inside front cover).
2. Click Groups.
3. Select the group you want to edit, then click Modify Group.
4. In the Create/Modify Group dialog box, make the desired changes and click OK.
5. Click Save.
* This feature may not be available at your site.
Figure 21. Creating/Modifying Group Screen
41
Click to open list
of enrolled
subscribers

To add or delete group members by telephon e
1. Access your mailbox (see inside front cover).
2. If using softkeys press SETUP, >>>>, GRPS, EDIT, if using menu mode enter 7 5 5, otherwise follow the system
prompts to edit a group.
3. Enter the group name or group number. Enter 2 until you hear the name of the group you want, then enter 1.
4. Enter 4 to add members to a group.
OR
Enter 5 to delete members from the group.
When deleting group members, enter the first three letters of the person’s last name, or enter three wild-card
numbers (for example, 1 1 1) to list each group member, then choose the member’s name you want to delete.
5. To confirm your additions or deletions, enter 1.
6. Enter , when you are finished adding or deleting members.
To change a group name or number by telephone
1. Access your mailbox (see inside front cover).
2. If using softkeys press SETUP, >>>>, GRPS, EDIT, if using menu mode enter 7 5 5, otherwise follow the system
prompts to change a group name.
3. Enter the first three letters of the group name.
OR
Enter the first three digits of the group number.
4. Enter 1 to confirm, or enter 2 to hear the name of the next group.
5. Enter 7 to change the group name or group number.
6. Follow the system instructions to change the group’s recorded name. Enter 1 for Yes, 2 for No.
To hear a list of y our groups and group member s by telephon e
1. Access your mailbox (see inside front cover).
2. If using softkeys press SETUP, >>>>, GRPS, EDIT, if using menu mode enter 7 5 6, otherwise follow the system
prompts to list your group members.
3. Follow the system instructions. Enter 1 for Ye s, 2 for No.
42

USING VIEWCALL PLUS
The system can display caller identification data when it has the additionally required
With ViewCall Plus, you can identify, manage, and track your incoming and outgoing calls from your computer.
Three integrated ViewCall Plus windows work together to control your telephone call: the Telephone Window, the Call
Log window, and the Contact List window.
For TAPI- (telephone application programming interface) and TSAPI- (telephony server application programming
interface) compliant teleph one system s, ViewCall P lus also of fer s an enhan ced mod e that add s even mo re features,
such as the contact list and call log.
SCREENING AND MANAGING CALLS
With ViewCall Plus, you can identify callers and manage your calls from your computer.
Identifying and Screening Calls
When you receive a call through the system or with a system using TAPI, the Telephone window displays the call on
your computer screen. There are several ways to identify the caller before picking up the telephone:
If Call Screening is on, you can click Who is it? to play the caller’s recorded name.
The system can also ask callers to enter the telephone or account number. The system then
matches this data to your contact list and displays the caller contact list and displays the caller
contact inform ation.
Click Monitor to listen to a message as it is being recorded. If you decide to speak with the caller,
click Take Call to pull the call out of your mailbox and transfer the call to your extension.
equipment and system compatibility. This does require additional equipment and system
compatibility though. The system can also match the telephone number to your contact list or
PIM (Personal Information Manager) and display caller contact information.
SEE ALSO:
Online Help:
ViewCall Plus, Screening calls, Placing calls on Hold
43

Managing Calls
After you have identified the caller, ViewCall Plus supplies you with several tools to manage your telephone calls.
Connect an incoming call to your telephone.
Ask the caller to hold.
Ask the caller to transfer to another extension.
Ask the caller to leave a message.
44

TAPI-compliant Systems*
For TAPI-compliant systems, ViewCall Plus offers the following enhanced mode options:
Select an identified caller’s name and click this button
to call the person back.
Select a name in your contact list and click this button
to dial the contact.
,
This feature may not be available at your site.
Tracking Calls
Call Log
You can use ViewCall Plus to ke ep tr act o f your cal ls. The C all Log window recor ds all call activity for your extension.
It also displays information such as caller names, telephone numbers, and the caller’s location.
You may want to create more than one call log. For example, it may be useful to begin a new call log each
week or each month.
45

Contact List
The Contact List window stores and displays general notes and reminders with each contact name. ViewCall Plus
provides an online address book — or you can integrate ViewCall Plus with a PIM.
You can use several contact lists or PIMs at once. For example, you can keep personal contacts in a list
on your computer and you can keep business contacts in a list on the LAN.
Contact
List
Call
Log
Active
Call
List
Figure 22 . ViewCall Plus Contact PI M Screen
46

USING E-MAIL INTEGRATION
The optional E-Mail Integration package that you can use with your voice messaging system is called
E-Mail Notify/Delivery.
E-Mail Notify/Delivery
E-Mail Notify/Delivery lets you know when new e-mail messages arrive. When you check voice messages over the
telephone, you hear the number of new e-mail messages you have received and information about those messa ges.
E-Mail Notify/Delivery can also alert you to voice messages in your e-mail inbox.
E-Mail Notifi cation
Subscribers can receive an e-mail notifying them of a new voice mail and/or the actual voice mail delivered to their
inbox as a .wav attachment. (IMAP4-compliant Mail Servers only.)
Checking E-Mail by Telephone
To check your e- m ail messages
1. Access your mailbox (see inside front cover).
2. If prompted, enter your e-m ail password, followed by , . If your password uses an y letter s, refer to the password
chart later in this section.
3. Enter 4 to check new e-mail messages. Enter 6 for old (archived) messages.
4. Follow the system instructions. Enter 1 for Ye s, 2 for No.
SEE ALSO:
“Your E-Mail Password” on page 48.
If you do not have a security code for the voice messaging system, you may be asked to create one the first
time you check your e-mail by telephone.
Changing Your E-Mail Setup Options
In your setup options, you can change whether e-mail messages are included in your message totals.
To turn your e-mail totaling on or off by computer
1. Access the Mailbox Manager (see inside front cover).
2. Click Playback Options.
3. In the Announce group, select the New E-Mail Messages check box. To turn it off, clear the check box.
4. Click Save.
47

To turn your e-mail totaling on or off by te lephone
1. Access your mailbox by telephone (see inside front cover). If prompted, enter your e-mail password, followed by
,
.
2. Enter 7 7 8 4 to turn e-mail totaling on or off.
Your E-Mail Password
In addition to entering your security code, you may be required to enter your e-mail password to check your e-mail
messages by telephone.
Using Numbers Only
If you are using a touchtone tel ephon e and your e-mail passwo rd uses num bers onl y, enter the digits followed by , .
For example: 5 4 3 , . You do not need to use the password chart.
If you are using a rotary telephone, your password must be numbers only. Your system must be set up to work with
rotary telephones.
Using Letters and Numbers
If your e-mail password uses any letters, enter # # when asked.
K
To enter a letter, refer to the password chart.
K
To enter a digit, enter 1 followed by the digit. (Refer to the password chart.)
K
Enter , to end.
Your e-mail password canno t use any o ther punctu ation or sym bol s. Do not u se you r tele phone to match letters. Use
the password chart.
48

Password Chart
A = 21 N = 62 1 = 11
B = 22 O = 63 2 = 12
C = 23 P = 71 3 = 13
D = 31 Q = 01 4 = 14
E = 32 R = 72 5 = 15
F = 33 S = 73 6 = 16
G = 41 T = 81 7 = 17
H = 42 U = 82 8 = 18
I =43 C=83 9=19
J = 51 W = 91 0 = 10
K=52 X=92 *=End
L = 53 Y = 93
M - 61 Z = 02
For example:
TODAY = # # 81 63 31 21 93
,
49

This Page is Intentionally Left Blank.
50

USING QUICK MESSAGE ACTIONS AND SHORTCUTS
You can use quick message actions while listening to a message. For example, enter 3 4 # to repeat the message.
After accessing your mailbox, you can use the shortcuts for specific tasks. A shortcut is your personal ID + your
security code + a number sequence of menu options. For example, to turn on call transfer, enter your personal ID +
your security code + 7 6 4 1.
Quick Message Actions
While listening to a message, enter 3 to hear a menu of quick message actions.
After you h ave le arne d the quick action numbers, you can enter a num ber fight away to take action. Except a s note d,
these actions are available for both new and old messages.
After using a quick message acti on, you can continue with the next part of the conversation or take more action on a
message. For example, you can:
K
Enter 3 4 to replay to a message, then 3 5 to check the next message.
K
Enter 3 9 to redirect a message. After you finish redirecting the message, you can enter 3 4 to reply to the
original sender. After you reply, you can enter 3 6 to delete the message.
When you exit the quick message actions, the system saves your message as an old message. The system also
saves your message as old when you enter 3 5 to check the next message.
Quick
Task
Reply
Check the next message
Delete
Archive
Hear when the message was sent
Redirect
Save as new (new messages only)
Repeat t he message
Exit quickly, if you are using a touchtone
telephone
Message
Action
34
35
36
37
38
39
30
3#
*
51

Shortcuts
Use shortcuts to accelerate your responses to the system.
Voice Messaging
Enter your personal ID and security code (if required), then enter the following shortcuts to do these tasks.
Task Shortcut
Check new messages
Leave a mess age
Review old messages
Change setup options
Switch personal greetings
Change your standard greeting
Change you r al t ernate greeting
Change your busy gre eting
Change your security code
Turn call tran sfer off
Turn call tran sfer on
Change the telephone number for call transfer
4
5
6
7
745
746
747
748
774
7642
7641
76414
Turn call scre ening options off
Add a message group
Edit a mess ag e gro up
List your me ssage groups
Change your recorded name
76415
754
755
756
775
52

Main Menu
Ta sk Shortcut
Check new messages
Leave a mess age
Review old messages
Change setup options
Change call transfer, Message del ivery
Change your security code, Voice mailbox names
Switch personal greetings
1
FOR YES 2 FOR NO * CURRENT MENU
Quick Message Actions
Repeat t he message
4
5
6
7
76
77
745
Task Shortcut
3#
Save message as new (new messages only)
Check the next message
Delete a message
Archive a message
Hear when the message was sent
Redirect the message
Exit quickly (touchtone telephones only)
1
FOR YES 2 FOR NO * CURRENT MENU
30
35
36
37
38
39
*
53

Message Playback Options
For Press
Slower
Softer/Louder
Faster
Backward
Pause
Forward
Exit
To access your mailbox from outside your organization
1. Call the Voice Messaging system.
2. When the system greets you, enter your personal ID:
4
5
6
7
8
9
*
and your security code:
E-Mail Integration Packa ge *
Enter your personal ID and security code (if required), then enter the following shortcuts to do these tasks.
Ta sk Shortcut
Edit your e-mail messages
Check ol d e-mail messag es
Turn e-mail totaling on or off
,
This feature may not be available at your site.
54
46
66
7784

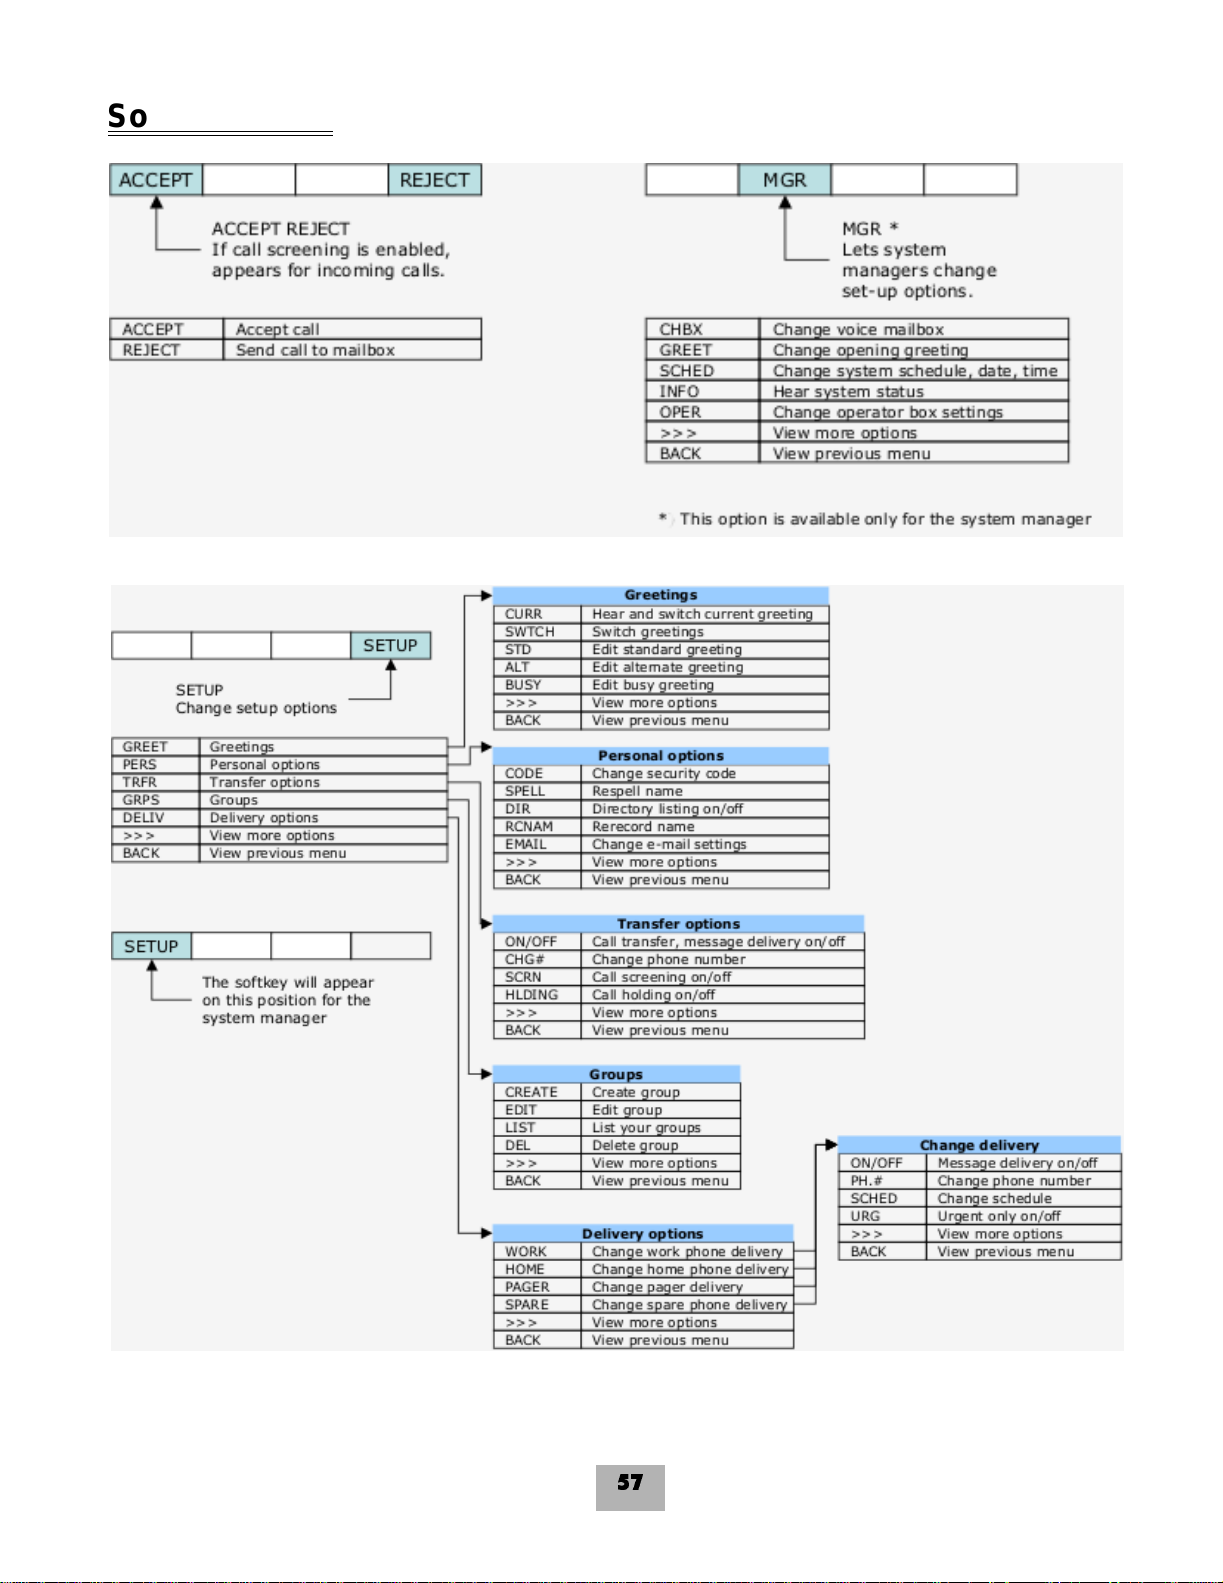
System Menus
,
EDIT GROUPS
456
S
R
E
B
S
M
R
E
E
M
B
M
E
E
T
M
E
L
D
E
D
D
A
456
7
R
/
F
E
N
F
B
O
O
M
/
E
U
X
N
L
N
A
O
U
F
D
E
Y
E
N
R
L
H
O
O
N
C
H
F
O
S
P
Y
T
E
E
F
N
G
G
I
E
N
N
T
G
A
A
O
R
H
H
N
U
C
CHANGE DELIV ERY
C
4
5
7
E
M
A
N
S
P
S
U
R
O
E
R
B
G
M
E
E
M
G
N
T
A
S
H
I
L
CHANGE TRANSFER
C
6
F
R
F
/
E
O
N
B
/
O
M
N
U
O
G
N
N
G
I
E
N
N
N
I
E
O
D
E
H
L
R
P
O
C
H
S
E
G
L
L
N
F
L
L
A
F
A
A
H
C
C
MESSAGE DELIVERY
O
C
4
-
M
U
N
E
N
O
H
P
E
G
N
*
A
F
H
F
CHANGE FAX DELIVERY*
C
O
45678
F
F
F
F
F
F
O
O
F
F
/
/
O
O
N
N
/
/
O
O
N
N
O
O
E
E
N
N
E
E
O
O
N
N
H
H
O
O
P
P
H
H
P
P
E
R
R
E
E
K
A
G
M
R
P
A
O
O
S
P
H
W
5
E
L
U
D
E
H
C
S
E
G
N
R
A
E
H
B
C
*
F
F
O
/
N
O
E
N
O
H
P
X
A
F
45678
E
G
A
S
S
E
M
T
X
E
N
K
Y
C
L
E
P
H
E
C
NEW MESSAGES
R
456
S
E
G
A
S
S
E
S
G
E
A
M
S
S
W
E
E
M
N
E
K
V
C
A
E
E
H
L
MAIN MENU
C
456
G
N
I
T
E
E
R
G
T
N
E
R
R
U
C
R
A
E
GREETINGS
H
9
0
R
E
V
P
I
M
L
A
W
E
T
E
D
S
N
/
E
T
M
S
C
I
E
V
E
I
T
H
E
C
L
R
E
A
D
7
S
N
S
O
E
I
G
T
A
P
S
O
S
E
P
M
U
T
D
E
L
S
O
E
W
G
E
N
I
A
V
H
E
C
R
A
E
T
R
E
*
I
R
V
X
D
A
A
A
E
E
S
F
R
H
45
*
S
E
X
A
F
W
E
N
L
L
A
R
E
V
I
L
E
D
7
8
9
-
T
-
E
T
E
E
R
S
G
G
N
D
I
R
T
A
E
D
E
N
R
A
G
T
S
H
C
T
T
I
I
D
W
E
S
#
E
G
A
S
S
E
M
E
H
T
T
A
E
P
E
R
G
E
N
R
I
G
T
E
E
E
T
R
A
G
N
R
Y
E
S
T
U
L
B
A
T
T
S
G
I
I
G
N
D
D
N
I
E
E
I
4
5
-
V
I
E
L
G
E
A
D
S
S
L
E
A
M
I
C
E
E
H
P
T
S
T
Y
T
I
R
E
D
E
S
MESSAGE OPTIONS
E
456
7
S
S
P
P
P
U
U
P
U
O
O
U
O
R
R
O
R
G
G
R
G
G
R
R
A
U
U
A
O
O
E
Y
Y
E
T
T
E
T
T
A
L
S
I
E
E
I
D
R
D
L
E
GROUPS
C
6
S
E
R
G
E
A
H
S
T
S
O
E
M
O
T
E
H
S
T
S
E
D
R
N
D
E
D
S
A
45678
S
E
G
A
S
S
E
M
W
E
N
K
Y
C
L
E
P
H
E
C
OLD MESSAGES
R
E
T
E
L
E
D
4
-
S
N
A
R
T
L
L
A
C
E
G
N
R
A
E
H
F
TRANSFER & DELIVERY
C
9
E
G
A
R
S
E
S
V
P
E
I
M
M
L
A
E
T
E
D
S
H
/
E
T
T
M
C
I
E
V
I
H
C
R
A
T
E
T
A
R
E
*
I
R
P
X
D
A
E
A
E
E
R
F
R
H
4
PERSONAL OP TIONS
SETUP OPTIONS
Y
T
I
R
U
C
E
S
E
G
E
N
D
A
O
H
C
C
456
S
G
N
S
I
P
T
U
E
O
E
R
R
G
G
567
E
E
M
M
A
A
N
N
D
L
R
L
O
E
C
P
E
S
R
E
E
R
R
Y
R
E
S
V
N
I
O
L
I
E
T
D
P
O
&
L
R
A
E
N
F
O
S
S
N
R
A
E
R
P
T
G
N
I
T
S
I
L
Y
R
O
F
T
F
C
O
E
/
R
N
I
O
D
7
5
Y
R
E
V
I
L
E
D
E
G
A
S
S
E
M
#
* This feature may not be available at your site.
55

Softkey Menus
56
Softkey Menus
.
57

Notes
58

Notes
59

Notes
60


© 2004 NEC Unified Solutions, Inc.
The material contained herein is subject
to change without prior notice at the sole
discretion of NEC Unified Solutions, Inc.
®
term
D
is a registered trademark of NEC
Corporation. EliteMail is a trademark of
NEC America, Inc.
TeLANophy is a trademark of Active
Voice, Inc.
Docume n t Re vision 1
For more information contact:
NEC Unified Solutions, Inc.
6555 N State Highway 161
Irving, TX 75039-2402
www.cng.nec.com
INT-1057 (CTI)
 Loading...