

Page 1
ultiline Telephone
User Guide
NEC
LEVEL II
Page 2
ELECTRA PROFESSIONAL
TELEPHONES
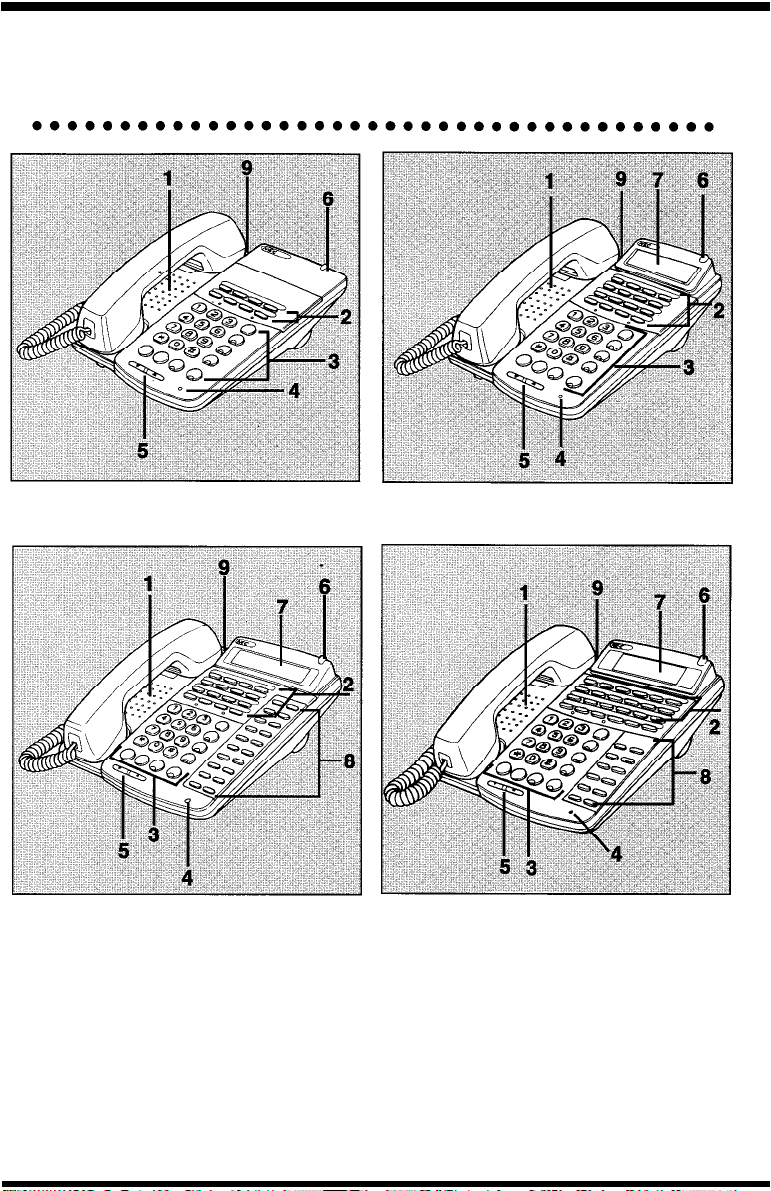
8 Line Non Display 16 Line Display
16 Line Non Display with
20
DSS/BLF
1. Speaker
2. Line Keys/Feature Access Keys
3. Dialpad/Dedicated Function Keys
4. Microphone
5. Volume Control
One Touch Keys
24 Line Display with
12
DSS/BLF
6. Large LED
7. Alphanumeric Display
8. One Touch Keys
9. Hookswitch
One Touch Keys
Page 3
8 Line Non Display
16 Line Non Display
16 Line Display
Page 4
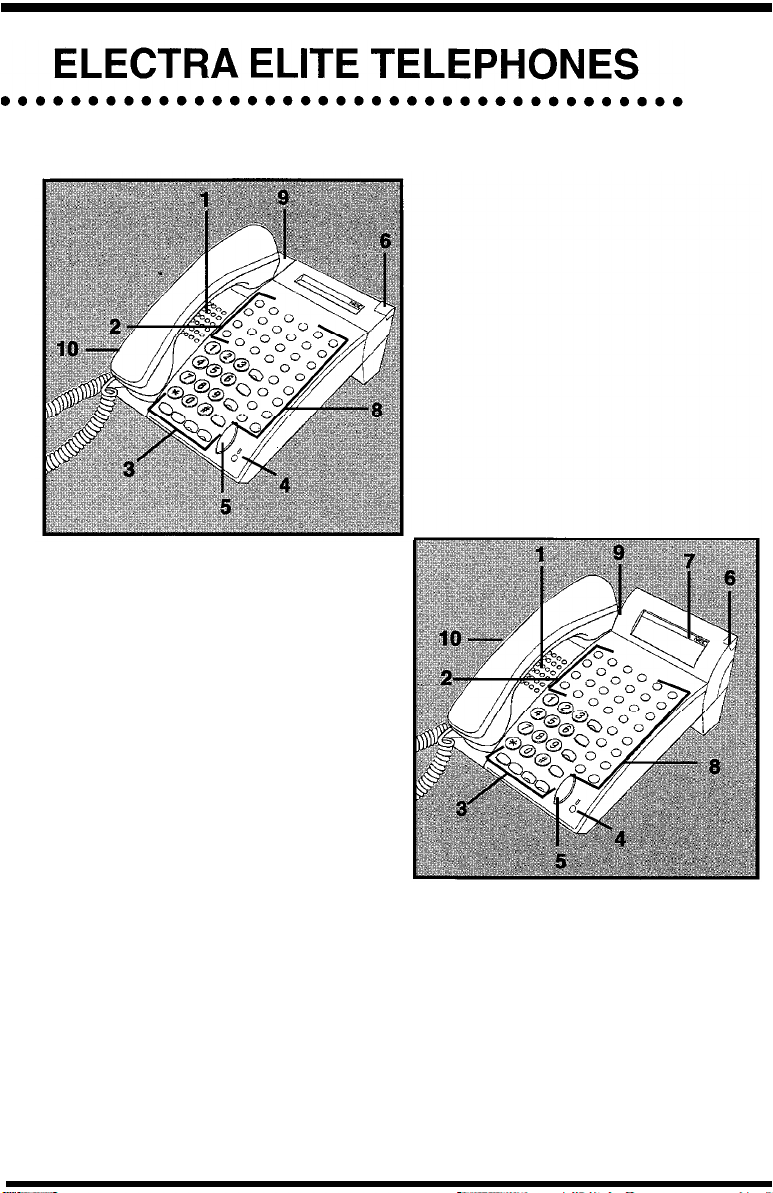
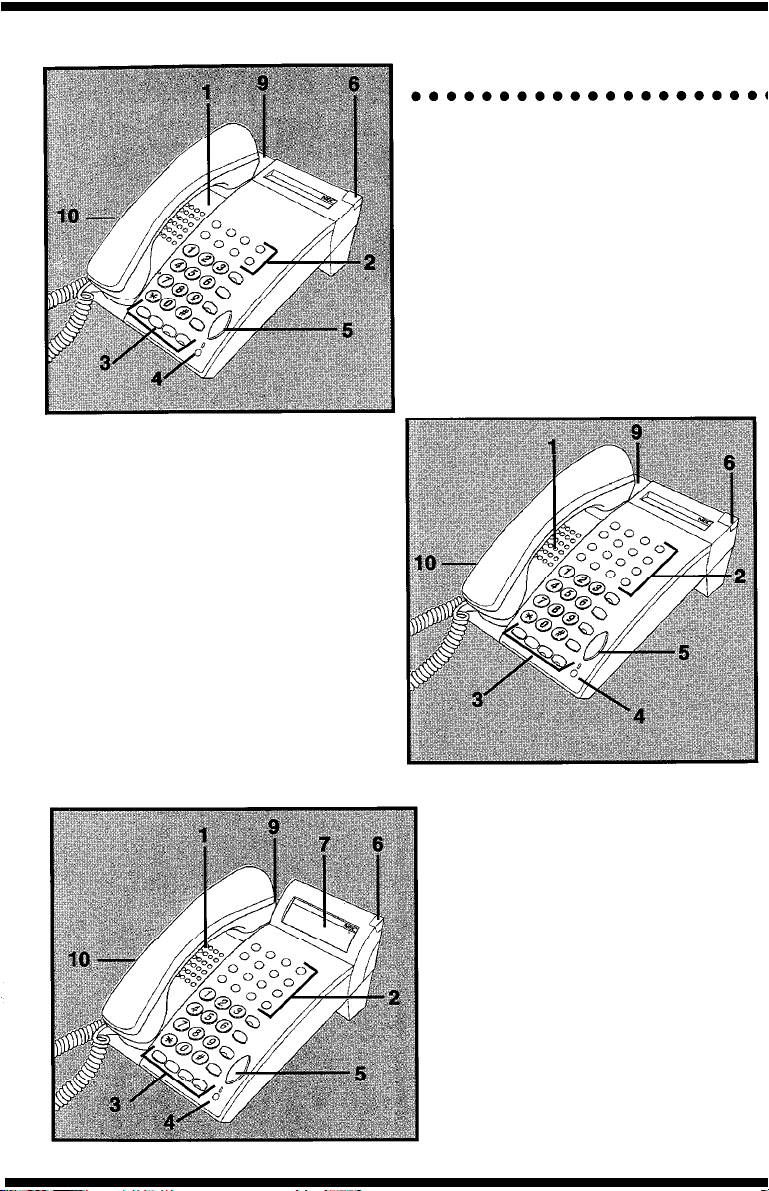
16 Line Non Display with
16
DSS/BLF
1. Speaker
2. Line Keys/Feature
3. Dialpad/Dedicated
4. Microphone
One Touch
Access Keys
Function Keys
Keys
16 Line Display with
16
DSS/BLF
5.
Volume Control
6.
Large LED
7.
Alphanumeric Display
8. One Touch Keys
9.
Hookswitch
10. Built-in Headset Jack
One Touch Keys
Page 5
Table of Contents
l e*e*eeee*eeeeeeeee**eeeeee*eeee
Placing Calls
Microphone Control
Speakerphone Calls
Holding Calls
l eeeeeeeeeeeeeeeeeeeeeeeeeeeeeee
Transferring Calls
Conference
Call Park
Station Busy/No Answer Options
CO/PBX Dialing Options
Call Pickup
Paging
Background Music
Call Forwarding
System
l eeeeeeeee.eeeeeeeeeeeeeeeeeeeeee
l eeeeeeeeeeeeeeeeeeeeeeeeeeeeee
.
l eeeeeeeeeeeeeeeeeeeeeeeeeeeeee
Customized Message
Station Outgoing Lockout
Account Code Entry
Account Code Forced/Verified
DISA
Password
Pages14&15
Character Entry Codes and Quick Reference Guide
l eeeeeeeeeeeeeeeeeeeeeeeeeeeeee
ACD/UCD
Volume Control
Programming
Page 6
GENERAL INFORMATION
The following should be considered when reviewing this User Guide:
Instructions are provided for Electra Professional and Electra Elite
telephones. When using an Electra Professional telephone, note that
ANS=Answer, TRF=Transfer, SPKR=Speaker, CNF=Conf,
FNC=Feature,
All operational instructions assume Prime Line Pickup is assigned to
intercom dial tone, Ringing Line Preference is assigned to all telephones, a
Call Appearance and Call Arrival key has been assigned to all multiline
telephones and only a single tenant has been assigned in the system.
All access codes listed are standard; some may vary based on system
assignment.
Access to many features is based on system assignments. Not all features
may be available from your telephone.
Telephones equipped with displays will provide useful call processing
information such as digits dialed, recall indications, feature confirmation, etc.
LNR/SPD=Redial.
LED INDICATIONS
FUNCTION
CO LINE KEYS:
Incoming Call
Held Call -Your Telephone
Held Call
Call in Progress
Hold Recall
LARGE LED:
Incoming
Incoming Intercom, TIE Line or DID
Call
Message from Attendant
Voice Mail Message
Feature (FNC) KEY:
DND Set
Call Forward Set
Callback Request
ICM LED:
Incoming Call
Call in Progress
Held Call
Other Telephone
Your Telephone
Other Telephone
CO/PBX,
DIT or ANA Call
LAMP STATUS
Rapid Flashing Red
Slow Flashing Green
Slow Flashing Red
Steady Green
Steady Red
Intermittent Flashing Green
Rapid Flashing Green
Rapid Flashing Red
Slow Flashing Green
Slow Flashing Red
Intermittent Flashing Red
Intermittent Flashing Red
Slow Flashing Red
Flashing Red
Steady Red
Flashing Red Conf LED
Page 7
ANSWERING CALLS
l eeeeeeeeeeeeeeeeeeeeeeeeeeeeeeeeeeeeee
RINGING CALLS
Lift handset
Converse
NOTE
: When assigned the Delayed Ringing feature, incoming calls will first ring at a primary
station. If the call is unanswered after a preprogrammed time interval, calls will also ring at the
assigned secondary station.
RINGING
Lift handset
Converse
NOTE 1 : A Call Arrival
Access Key.
NOTE 2 : A Call Appearance key must be available to answer an incoming outside call
CALLS TO A
key must be assigned to appear and ring at a
CALL ARRIVAL KEY
Line Key/Feature
VOICEANNOUNCE CALLS
Ensure
Adjust
Respond handsfree
NOTE: The handset may be used at any time during the conversation.
MIC
LED is lit
Speaker
volume (V or A) as needed
CAMP-ON (CALL WAITING)
Receive camp-on tone while on another call:
Replace handset to disconnect present call
OR Press
Hold
and press the
Hookswitch
to converse with second party
CALL ALERT NOTIFICATION
With a call in progress:
Receive Call Alert Notification
Press
Hold,
converse with
NOTE 1 : The second call may be placed on Hold if the CO Line appearance is assigned or if a
Call Appearance
NOTE 2 : Press flashing Line Key, Call Appearance key or Conf key to return to the first call.
key is available.
second
party
Page 8
PLACING CALLS
INTERNAL CALLS
Lift handset
Dial station number or “0” for the attendant
OR
Press
Feature Access Key
Station Selection
Voice announce after tone burst or wait for ringing call to be answered
NOTE 1: When calling a
ringing to voice or voice to ringing.
NOTE 2: To directly
multiline
access
a personal voice mailbox, dial 7 after dialing the station number.
OUTSIDE CALLS
Lift handset
Dial trunk access code
OR
Press idle
Dial telephone number
Converse
Outside Line Key
or
One Touch Key
telephone, dialing 1 after the station number will change
e 9
programmed for Direct
LAST
Lift handset
Press Redial
Dial Last Number Redial code
Converse
CO/PBX
(LNR/SPD)
NUMBER REDIAL
STATION/SYSTEM SPEED DIAL
Lift handset
Press Redial
D Station Speed Dial
D System Speed Dial
OR
Press
Speed Dial
Converse
(LNR/SPD)
and dial Speed Dial Memory location:
Feature Access Key
80-99
00-79
or
One Touch Key
programmed for Station
TRUNK QUEUING
After dialing trunk access code or pressing a busy Line Key and receiving trunk
busy indication:
Dial Trunk Queue set code 78
Replace handset
NOTE: When a line is available, your telephone
will
ring;
lift
handset and place call.
Page 9

MICROPHONE CONTROL
Press
Feature (FNC)
Dial
MIC
NOTE 1: Lit
NOTE 2:
MIC
On/Off code
MIC
LED indicates
ON/OFF key may be assigned to a Feature Access Key or One Touch Key.
1
M/C
on.
SPEAKERPHONE CALLS
ä
Press
Speaker;
Ensure
MIC
Place internal or outside call
Converse
Press
Speaker
NOTE: The handset may be used at any time during the conversation.
operation or to monitor a call,
LED lights
LED is lit
to disconnect call
press Speaker
(LED lights) and replace handset.
To resume handsfree
HOLDING CALLS
NON-EXCLUSIVE HOLD
With a call in progress:
Press
Hold
NOTE 1: To retrieve a held call, press the flashing Line Key, Call Appearance key or Conf key
(internal calls).
NOTE 2: Calls on Non-Exclusive Hold can be retrieved from any multiline telephone with the held
line appearance or Call Appearance key
NOTE 3: After a preprogrammed time, the held call will recall to the originating station.
recall condition, Exclusively Held calls can be retrieved from any station with the held line
appearance or Call Appearance key.
EXCLUSIVE HOLD
With a call in progress:
Press
Feature (FNC)
Press
Hold
Once in a
Page 10

TRANSFERRING CALLS
l eeeeee*eeeeeeeeeeeeeeeeeeeeeeeeeeeeeee
USING MANUA
With a call in progress:
Press
Transfer
Dial station number
Announce call (optional)
Replace handset
NOTE 1:
ons and unscreened transfers will recall to the attendant telephone. After answering the recall,
pressing Feature (FNC) 86 will transfer the call to the personal voice mailbox of the station
number dialed.
NOTE 2: To return to the original party, press flashing Line Key, Call Appearance
key or
NOTE 3: A Feature Access Key or One Touch Key may be assigned for DSS.
NOTE 4:
station number.
the called station is busy replace handset to initiate a camp-on. Unanswered
Conf
key.
Jo
transfer a
call directly to
DIAL
a personal voice mailbox, dial 7 after dialing the
USING DIRECT STATION
SELECTION (DSS)
With a call in progress:
Press
Transfer
Press programmed
Announce call (optional)
Replace handset
DSS
camp-
CONFERENCE
l eeeee*eeeeeee*‘*eeeee*eeeeeeeeeeee*ee*e
With a call in progress:
Press
Conf
Place second call (internal or external)
Announce conference
Press
Conf
to establish conference
NOTE 1: Repeat above procedure to add an additional party. (Maximum 2 outside parties.)
NOTE 2: An unsupervised conference may be established by pressing the Conf key again, after
the conference has been established. The parties may continue to converse in private. Press the
flashing Conf key to return to the conversation.
CALL PARK - SYSTEM
l eeeeeeeeeeeeeeeeeeeeeeeeeeeeeeeeeeeeee
SET
With a call in progress:
Press
Transfer
Dial Call Park Set code
Dial Call Park location
Replace handset
NOTE: If the dialed Call Park location is busy, dial another Call Park location (O-9).
RETRIEVE
From any station:
Lift handset
Dial Call Park Retrieval
code
Dial Call Park location
Converse
Page 11

STATION BUSY/NO ANSWER
OPTIONS
CALLBACK
ANSWER
When calling a busy multiline telephone:
Dial Automatic Callback code
CALLBACK REQUEST
SET
When calling a busy or unanswered
multiline telephone:
Dial Callback Request code
Replace handset
NOTE: Callback messages are automatically canceled once the originating station is called.
When both telephones are idle
originating telephone rings:
Lift handset
Call is placed automatically
ANSWER
Receive display and/or
(FNC)
LED message indication:
ä
Lift handset
Dial
request originator is
automatically called
Repeat above procedure to
respond to additional messages
Feature
TONE OVERRIDE
SET
When calling a busy multiline telephone:
Dial Tone Override code 5
to send tone
Wait for signalled party to answer
*
handsfree, a visual indication only
NOTE: An Override Tone will be sent each time “*“is pressed.
be provided on the telephone’s display.
ANSWER
With a call in progress:
Receive tone override signal *
Press
Converse with second party
STEP CALL
When calling a busy telephone:
Dial 2 to advance to the next station number in that
Hold
O’s group
Page 12

STATION BUSY/NO ANSWER
OPTIONS (Continued)
VOICE OVER
ORIGINATE
When calling a busy telephone:
Dial Voice Over code
Announce message
ANSWER
With a call in progress:
Receive Voice Over
announcement
Press
Converse with Voice Over
NOTE: The Whisper Page Access Code may be assigned to a Feature Access Key or
One Touch Key.
Hold
originator
Press
Answer
between parties
key to alternate
WHISPER PAGE
With a call in progress:
Receive Voice Over
announcement
Press
Feature (FNC)
Dial 65
Converse with Voice Over
originator while monitoring first
call
Press
Feature (FNC)
Dial
Converse with first caller while
monitoring Voice Over originator
CO/PBX DIALING OPTIONS
SAVE
SAVE
With an originating outside call
in progress:
Press
Dial
Replace handset
REPEAT
Feature (FNC)
called number is stored
REPEAT
Lift handset
Press
Dial
Redial (LNR/SPD)
call is placed
Page 13

CO/PBX
DIALING OPTIONS
(Continued)
STORE & REPEAT
STORE
With an outside call
in progress:
Press
Feature (FNC)
Dial
Dial number to be stored
Press
Feature (FNC)
Complete conversation and
replace handset
NOTE: Store
Repeat and Save
Repeat features cannot be used simultaneously
AUTOMATIC REDIAL
After originating a busy or unanswered outside call:
Press
Speaker
Replace handset
Press
Feature (FNC)
Press Redial
Call is repeatedly dialed until answered, canceled or the
maximum number of redial attempts is reached
Lift handset when the called party answers
NOTE
NOTE 2: System programming determines waiting time and number of redial attempts.
Press Speaker to cancel Automatic Redial.
REPEAT
Lift handset
Press Redial
Dial
call is placed
CALLER ID
ANSWER
Receive incoming ringing or
transferred outside call: desired number is displayed
Review telephone display for
calling party’s name or number
Answer call accordingly
NOTE 1: Caller ID will be displayed even when station is busy or in DND mode, allowing the
user to identify the incoming call.
NOTE 2: On a system-wide basis, the last 10 calls received with Caller ID information are
stored and are accessible with the SCROLL key
NOTE 3:
NOTE 4:
progress.
Least Cost Routing (LCR) is required to automatically dial Caller ID calls,
Press lit Line Key to review calling party’s name or number while the call is in
PLACING CALLER ID CALLS
Press SCROLL repeatedly until
Lift handset to automatically dial
displayed number
Converse
Page 14

CALL PICKUP SYSTEM
Upon hearing ringing at another
telephone:
Lift handset
Dial Call Pickup code:
D All Calls
D
CO/PBX
D
Night Call Piokup
Converse
Line
PAGING
Lift handset
Dial Paging code:
Infernal
D All Zones
D Zone A
D Zone B
D Zone C
Page
Wait for Meet-Me Answer or replace handset
.
External
int.
D All Zones
D
Zone A
D
Zone B
D
Zone C
CALL PICKUP DIRECT
Upon hearing ringing or voice
announcement at another telephone:
Lift handset
Dial Call Pickup Direct code
Dial station number of the
telephone to be answered
Converse
ext. 59
MEET-ME ANSWER
Lift handset
Dial Meet-Me Answer code:
D Internal page
D External page
Converse
BACKGROUND MUSIC
SET/CANCEL
Press
Feature (FNC)
Dial BGM On/Off code
NOTE: A BGM key may be assigned in system programming to set/cancel the Background
Music feature.
Page 15

CALL FORWARD ALL CALLS
(CF/A)
DO NOT DISTURB (DND)
SET
Press
Feature (FNC)
Dial Call Forward
code
Select operation:
D
DND:
Press
Feature (FNC)
D Call Forward All: Dial destination
station
or voice mail and press
set
CANCEL
Press
Feature (FNC)
Dial Call Forward
code
Press
Feature (FNC)
cancel
Feature (FNC)
NOTE 1: The Feature (FNC) LED will flash intermittently when your telephone is in
Forward/DND.
NOTE 2: While set, Call Forward
NOTE 3: If
NOTE 4: A
When setting
Call ForwardAII/Do
Call
Forward All and Do Not Disturb are both set, the feature set last is activated.
CFA/DND
key may be assigned in system programming to set/cancel this feature.
Call
Forward All, a destination station must be entered. A lit LED indicates that
Not Disturb is set.
All
will override Call Forward Busy/No Answer setting.
Call
CALL FORWARD BUSY/
NO ANSWER
SET
Press Speaker
Dial Call Forward
code
destination station number
or voice mail
Press Speaker
NOTE 1: The Feature (FNC) LED will flash intermittently when your telephone is in
NOTE 2: While set, Call Forward All will override
NOTE 3: A CF
When setting Call Forward Busy/No Answer, a destination station must be entered. A lit LED
indicates that CF
B/NA
key may be assigned in system programming to set/cancel this feature.
is set.
(B/NA)
set
CANCEL
Press Speaker
Dial Call Forward cancel
code
Press Speaker
Forward.
Forward Busy/No Answer setting.
CALL FORWARD DESTINATION
FROM DESTINATION STATION
SET
Press Speaker
Dial Call Forward All Destination
set code
Dial your station number
Dial destination station number or
voice mail
Press Speaker
CANCEL
Press Speaker
Dial Call Forward All Destination
cancel code
Dial your station number
Press Speaker
Page 16

CUSTOMIZED MESSAGE
From a display telephone:
Press
Feature (FNC)
Dial Customized Message code
Dial
to scroll through messages
Dial
to select message
Dial return date and time if required (Month/Day, Hour/Minute, using
4-digit,
Press
NOTE: When your telephone is set for Do Not Disturb, other display telephones will receive
your message upon calling your station.
24-hour
clock)
Feature (FNC)
STATION OUTGOING LOCKOUT
CHANGING LOCKOUT CODE
Press
Speaker
Dial Lockout Change access code
Dial current Lockout code
Dial new Lockout code
Press
Speaker
NOTE
NOTE 2: When Lockout code is set for the first time, station is automatically restricted.
NOTE 3: Lockout code may be a maximum of 10 digits.
digits, press the Speaker to enter.
NOTE 4: When set, Station Outgoing Lockout restricts
By default, Lockout code is set at 0000000000 (10 zeros).
If the new Lockout code is less than 10
outgoing calls.
SET/CANCEL STATION OUTGOING LOCKOUT
Press
Speaker
Dial Station Lockout
D Set code
D Cancel code
Dial Lockout code
Press
Speaker
Page 17

ACCOUNT CODE ENTRY
With an outside call in progress:
Press
Feature (FNC)
Dial
Dial Account Code (16 digits maximum)
Press
Feature (FNC)
NOTE 1: The outside party will not hear digits being dialed.
NOTE 2: The Account Code Entry Code may be assigned to a. Feature Access Key or
One Touch Key.
With an outside call on hold:
Dial Account Code Entry Code
Dial Account Code (16 digits maximum)
Retrieve held call
ACCOUNT CODE FORCED/VERIFIED
To place an outside call:
Lift handset
Dial Forced Account access code
Dial Forced Account Code
Dial trunk access code
NOTE:
When calling from a station that is assigned the Account Code Forced/Verified
feature, outgoing calls will only be processed after the dialed Account Code is verified.
e 9 and outside number
(up to 13 digits)
PASSWORD
SETTING YOUR DISA PASSWORD
Lift handset
Dial
DISA
Password set access code
Dial your
Dial your current
Default 0000000000 (10 zeros)
Dial your new
Replace handset
NOTE 1: Password may be a maximum of 10 digits.If the new password is less than 10 digits,
replace the handset to enter.
NOTE 2: It is recommended that your
prevent unauthorized use.
DISA
ID code
DISA
DISA
password
password
DISA
password be 10 digits and be changed frequently to
Page 18

ACD/UCD
l eeeeee*eeeee*eeeeeeeeeeeeeeeeeeeeeeeee
LOG ON
Press
Speaker
Dial access code
Dial
Press
Speaker
NOTE : A LOG key may be assigned in system programming to Log On/Off from
the
group. A lit LED indicates that the station is logged-on.
LOG OFF
Press
Speaker
Dial access code
Dial
Press
Speaker
BREAK MODE
SET
Press
Speaker
Dial
Press
Speaker
NOTE 1: Break Mode is only available while an agent is logged-on.
NOTE 2: A Break key may be assigned in system programming to set/cancel Break Mode.
A
LED indicates that the station is in Break Mode.
CANCEL
Press
Speaker
Dial 42
ANSWERING CALL USING A HEADSET
Press
HEADSET
Converse
Press
HEADSET
to answer
to hang up
VOLUME CONTROL
l eeeeeeeeeeeeeeeeeeeeeeeeeeeeeeeeeeeeee
OFF-HOOK RINGING
VOLUME
Lift handset
Dial
Dial Off-Hook Ringing
Volume code
Press or A to set level
Replace handset
NOTE 1: Press
NOTE 2: When the telephone is idle,
or A during audible telephone activity to adjust handset or speaker volume
or A is used to adjust display contrast.
RINGING VOLUME
Press
Speaker
Dial 60
Dial
Ringing
Press
Press
Volume code
or A to set level
Speaker
Page 19

PROGRAMMING
RESETTING Feature (FNC) LED
Press
Feature (FNC)
Dial 99
Press Feature (FNC)
MOTE: Resetting the Feature (FNC) LED
Callback Request settings.
STATION SPEED DIAL - DIAL ACCESS
Press
Feature (FNC)
Press
Redial (LNWSPD)
Dial Speed Dial Memory location 80-99
Dial trunk access code i.e. (if necessary)
Dial telephone number to be stored
(24 digits maximum)
Press
Hold
(if entering name) and
dial name of party (13 letters maximum)
Press
Feature (FNC)
NOTE 1: Press Redial
NOTE 2: Refer to Character Entry Codes when entering name of party
will
cancel Call Forward All Calls, Do Not Disturb and
insert a pause or Recall to store a hookflash.
FEATURE ACCESS KEYS
STATION SPEED DIAL
(OUTSIDE NUMBERS)
Press
Feature (FNC)
Press
Redial (LNWSPD)
Press
Feature Access Key
to be programmed
Dial
Dial trunk access code
necessary)
Dial telephone number to be
stored (16 digits maximum)
Press
Feature (FNC)
NOTE 1: Press Redial
NOTE 2: Busy Lamp Field status indication will be provided on keys programmed for DSS.
(if
to insert a pause and Recall to inset? a hookflash.
DSS/BLF
FEATURE ACCESS
Press
Press
Press
to be programmed
Dial
stored
OR
Dial feature access code to be
stored as indicated in the
Quick Entry Guide
Press
(STATIONS) AND
Feature (FNC)
Redial (LNWSPD)
Feature Access Key
and station number to be
Feature (FNC)
Page 20

ONE TOUCH KEYS
STATION SPEED DIAL
(OUTSIDE NUMBERS) FEATURE ACCESS
Press
Feature (FNC)
Press Redial
Press
One Touch Key
programmed programmed
Dial
Dial trunk access code i.e. (if stored
necessary)
Dial telephone number to be
stored (16 digits maximum)
Press
Feature (FNC)
NOTE 1: Press Redial
NOTE 2: Busy Lamp Field status indication will be provided on keys programmed for DSS.
(LNR/SPD)
to be
(LNR/SPD)
to insert a pause and Recall to insert a hookflash.
DSS/BLF
Press
(STATIONS) AND
Feature (FNC)
Press Redial
Press
One Touch Key
Dial
and station number to be
to be
OR Dial feature access code to be
stored as indicated in the
Quick Entry Guide
Press
Feature (FNC)
Page 21

QUICK REFERENCE GUIDE
OUTSIDE CALLING
Outside Call
Last CO/PBX Number Redial
Speed Dial
Save/Store
Trunk Queue
Automatic Redial
Repeat
-Access
INTERNAL CALLING
Station Call
Automatic Callback
Callback Request
Tone Override Reach Busy Station l Dial *
Voice Over Originate
Quick Transfer to Voice Mail
WITH A CALL IN PROGRESS
Hold
Exclusive Hold
Transfer
Quick Transfer to Voice Mail
Conference
Call Park System
Save
Repeat
Store
Repeat
Whisper Page
Save
Store
Dial 9 l Dial Telephone Number
Redial (LNWSPD) l Dial *
Redial (LNWSPD)
Redial (LNWSPD) l Dial #
Receive Trunk Busy Indication
Receive Busy
Feature (FNC) l Redial
Dial Station Number or
Reach Busy Station l Dial 0
Reach Busy/No Answer Station
Reach Busy Station
Dial station number or
Hold
Feature (FNC) l Hold
Transfer* Dial Station Number
Transfer
Conf
SET: Transfer l Dial 4 *
RETRIEVE: Dial 4 #
Feature (FNC)
Feature (FNC) l Dial 7 l Dial Number to Store
Feature (FNC)
Receive Voice Over
Dial station number or
Place 2nd Call Conf
Dial 00-99
Speaker
DSS
Dial 6
DSS
Dial O-9
Dial 9
l
Feature (FNC)
Dial 78
Replace Handset
key
Dial #
key l Dial 7
DSS
Dial O-9
key l Dial 7
Dial 65
FROM THE INTERCOM
Internal Paging
External Paging
Call Pickup All Calls
Call Pickup Direct
Dial 51-54
Dial 55-59
Dial 68
Dial 67 l Dial Station Number
FROM AN IDLE TELEPHONE
Microphone Control
Call Forward
Call Forward Busy/No Answer
FNC LED Reset
AII/DND
Feature (FNC) l Dial
SET
(CF/A
CANCEL:
SET Speaker
CANCEL:
Feature (FNC) l Dial
Page
Page
Feature (FNC)
only)
Feature (FNC)
Feature (FNC)
Dial 43
Speaker l Dial
1
Dial 60 l Dial Destination Station
Dial
69 l Feature (FNC)
Dial Dest. Station
44
Speaker
99
Feature (FNC)
Speaker
Page 22

CHARACTER ENTRY CODES
Character
Blank
II
#
$
%
&
Code
032
033
034
035
036
037
Character Code
064
A 065
B
C
D
E
F
066
067
068
069
070
Character
\
a
b
C
d
e
f
Cod
e
W
087
W I 119
Page 23

QUICK ENTRY GUIDE FOR PROGRAMMING
FEATURE ACCESS KEYS AND ONE TOUCH KEYS
FEATURE
Microphone On/Off
Call Forward
Do Not Disturb
Call Forward
Save
Store
Whisper Page
Quick Transfer to Voice Mail
Background Music
Voice Over Originate .
Call Forward Busy/No Answer
Internal Paging All Zone
Internal Paging Meet-Me
External Paging All Zone
External Paging Meet-Me
Call Pickup All Calls
Call Pickup Direct
AlI
AII/DND Cancel
Repeat
Repeat
Set
Set
Set
Set
Set
PRESS
# l 60 l Dial Destination
Feature (FNC) l Feature (FNC)
l 60 l Answer l Feature (FNC) l Feature (FNC)
# l 69 l Answer l Feature (FNC) l Feature (FNC)
#
65
l
86
#
26
1 l 43 l Dial Destination
Feature (FNC)
1
1 l 5*
1 l 55
1 l 5#
1 l 68
1 l 67
Answer
l
Answer l Speaker
l
NOTE 1: When pressed, the Answer key
NOTE 2: Other features may be programmed in addition to those listed above. Refer to
the Electra Mail User Guide for features related to Voice Mail.
will
not appear in the display. This is normal operation.
Page 24

The material contained herein is subject to change without prior notice at the
sole discretion of NEC America, Inc.
NEC
NEC America, Inc.
NEC
01997 NEC America, Inc.
8-97
 Loading...