

Page 1

NOTICE
Note that when converting this document from its original format
to a .pdf file, some minor font and format changes may occur.
When viewing and printing this document, we cannot guarantee
that your specific PC or printer will support all of the fonts or
graphics. Therefore, when you view the document, fonts may be
substituted and your individual printer may not have the
capability to pr int the document corre ctly.
Page 2

Page 3
Multiline Telephone
User Guide
Page 4

Page 5

Table of Contents
ELITE IPK TELEPHONES ........................................................1
GENERAL INFORMATION .......................................................3
ANSWERING CALLS ..................................................................4
Ringing Calls ......... ... ................................................................. ... ... .... ... ... .4
Ringing Calls To A Second Incoming Extension/CAR/VE Key ..................4
Voice Announce Calls ........ ... .................................................................... .4
Camp-on (Call Waiting) ..............................................................................5
Off-Hook Signaling ... .... ... .................................................................... .......5
PLACING CALLS ........................................................................ 5
Internal Calls ...................................... ... .... ... ... ... .... ....................................5
Outside Calls ..............................................................................................6
Trunk Queuing ............................................................................................6
Last CO/PBX Number Redial .....................................................................6
Speed Dial - System/Group/Station ...........................................................7
MICROPHONE CONTROL ........................................................9
SPEAKERPHONE CALLS ..........................................................9
GROUP LISTEN .......................................................................... 9
HOLDING CALLS ....................................................................10
Page 6

TRANSFERRING CALLS ........................................................ 10
CONFERENCE .......................................................................... 11
CALL PARK - SYSTEM ............................................................ 12
CALL PARK – STEP CALL ...................................................... 13
STATION BUSY/NO ANSWER OPTIONS .............................. 14
Callback ................................. .......................... .......................... ...............14
Message Waiting ......................................................................................15
Tone Override ..........................................................................................16
Department Step Call ...............................................................................16
Voice Over ................................................................................................17
CO/PBX DIALING OPTIONS .................................................. 18
Save Number Dialed ................................................................................18
Memo Dial ................................................................................................19
Repeat Redial ...........................................................................................20
Caller ID ...................................................................................................21
Answer ........................................................................................................21
Temporary Memory .....................................................................................21
CALL PICKUP ........................................................................... 22
Group Call Pickup ....................................................................................22
Directed Call Pickup .................................................................................23
PAGING ...................................................................................... 23
Meet-Me Answer ......................................................................................24
BACKGROUND MUSIC ........................................................... 25
Page 7

CALL FORWARDING ...............................................................25
All Calls (CF/A) .........................................................................................25
Call Forward Busy/No Answer (B/NA) ......................................................26
SELECTABLE DISPLAY MESSAGING ..................................28
SET RELOCATION ...................................................................29
CODE RESTRICTION, DIAL BLOCK ..................................... 29
ACCOUNT CODE ENTRY ........................................................ 30
AUTOMATIC CALL DISTRIBUTION (ACD) .........................32
Agent Log In .............................................................................................32
AIC Agent Log In .......................................... ... ... .... ... ... ............................32
Multiple AIC Agent Log In ...................... .... ... ............................................33
Rest Mode ....................................... ... ... ...................................................34
Queue Status Display ................................... ... ... .... ... ... ... ... .... ... ... ............34
Answering a Call Using a Headset ...........................................................35
Using the Headset with Automatic Answer for ACD Agents ....................35
STATION SPEED DIAL — DIAL ACCESS ............................36
LINE KEYS/PROGRAMMABLE FUNCTION KEYS ............. 37
Function Numbers ....................................................................................38
Character Entry ........................................................................................42
Page 8

THIS PAGE INTENTIONALLY LEFT BLANK
Page 9
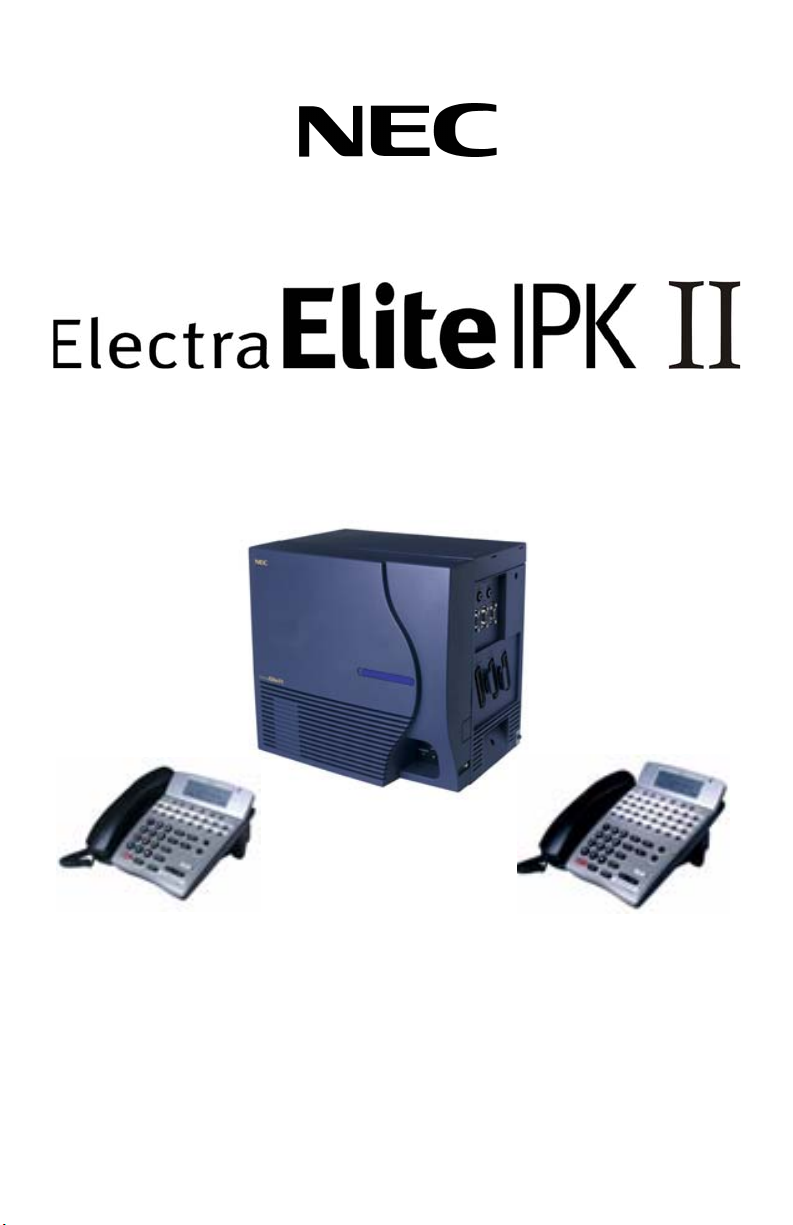
ELITE IPK TELEPHONES
1
9
3
13
8-Button Non Display
1
9
3
13
16-Button Display
8
5
4
8
7
12
11
6
8
2
1
9
3
13
6
4
7
6
10
2
11
12
5
8-Button Display
10
2
11
12
4
5
1 Speaker 6 Large LED 11 Directory
Key (DIR)
2 Line Keys/
Programmable Function
Keys
3 Dialpad/Dedicated
7 Alphanumeric
3x24 Character
12 Message
Key (MSG)
LCD Display
8 Hookswitch 13 MIC Key
Function Keys
4 Microphone 9 Headset Jack
5 Volume Control 10 Soft Keys
1
Page 10
10
7
6
8
1
9
3
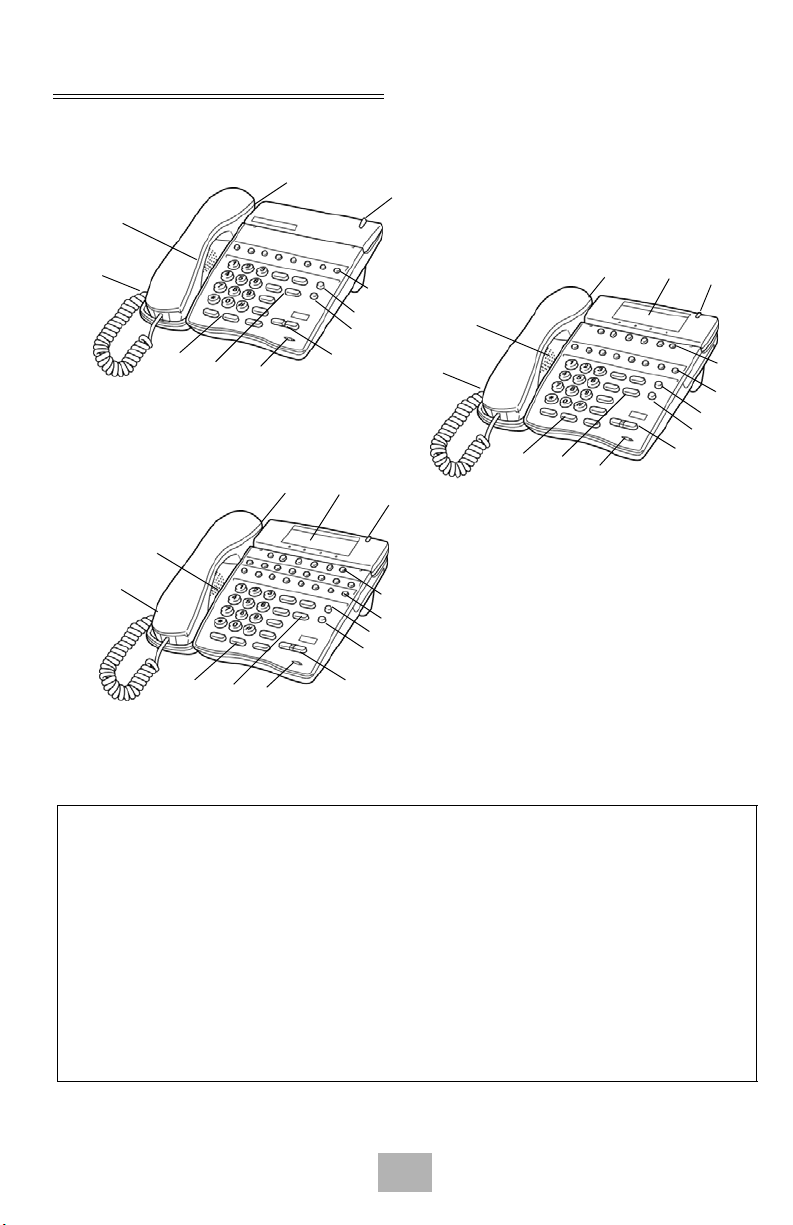
32-Button Display
with 16 DSS/BLF
One Touch Keys
13
2 (all rows)
11
12
5
4
7
8
1
9
3
13
4
6
10
2
11
12
5
16-Button Multiline
Liquid Display
1 Speaker 6 Large LED 11 Directory Key
(DIR)
2 Line Keys/
Programmable Keys
3 Dialpad/Dedicated
7 Alphanumeric
Display
12 Message Key
(MSG)
8 Hookswitch 13 MIC Key
Function Keys
4 Microphone 9 Built-in
Headset Jack
5 Volume Contr ol 10 Softkeys
2
Page 11

GENERAL INFORMATION
The following should be considered when reviewing this User Guide:
P All operational instructions assume Prime Line Pickup is assigned to
intercom dial tone, Ringing Line Preference is assigned to all telephones,
a Line and Second Incoming Extension key has been assigned to all
multiline telephones.
P All access codes listed are standard; some may vary based on system
assignment.
P Access to many features is based on system assignments. Not all
features may be available from your telephone.
P Telephones equipped with displays will provide useful call processing
information such as digits dialed, recall indications, feature confirmation,
etc.
3
Page 12

ANSWERING CALLS
Ringing Calls
1. Lift the handset.
2. Converse.
Note: When assigned the Delayed Ringing feature, incoming calls will
first ring at a primary station. If the call is unanswered after a
preprogrammed time interval, calls will also ring at the assigned
secondary station.
Ringing Calls To A Second Incoming Extension/CAR/VE Key
1. Lift the handset.
2. Converse.
Note 1: A Second Incoming Extension key must be assigned to
appear and ring.
Note 2: A Line key must be available to answer an incoming outside
call.
Voice Announce Calls
1. Ensure the MIC LED is lit.
2. Adjust the Speaker volume (W or V) as needed.
3. Respond handsfree.
Note: The handset may be used at any time during the conversation.
4
Page 13

Camp-on (Call Waiting)
Receive camp-on tone while on another call:
1. Replace the handset to disconnect present call.
- OR -
Press Hold and press the Hookswitch to converse with the
second party.
Off-Hook Signaling
With a call in progress:
1. Receive Off-Hook Signaling.
2. Press the Answer key, then converse with the second party.
Note 1: The second call may be placed on Hold.
Note 2: Press the flashing Line key or Conf key to return to the first
call.
PLACING CALLS
Internal Calls
1. Lift the handset.
2. Dial a station number or 0 for the attendant.
- OR -
Press the Programmable Function Key programmed for Direct
Station Select.
3. Voice announce after the tone burst or wait for the ringing call to
be answered.
Note 1: When calling a multiline telephone, dialing 1 after the station
number will change ringing to voice or voice to ringing.
Note 2: To directly access a personal voice mailbox, dial 8 after
dialing the station number.
5
Page 14

Outside Calls
1. Lift the handset.
2. Dial the trunk access code, i.e. 9.
- OR -
Press an idle Outside Line key.
3. Dial the telephone number.
4. Converse.
Trunk Queuing
After pressing a busy Line key and receiving the trunk busy indication:
1. Dial # or press Trunk Queuing/Camp On key
(Service Code 751: 35).
2. Replace the handset.
Note: When a line is available, your telephone will ring; lift the
handset and place the call.
Last CO/PBX Number Redial
1. Without lifting the handset, press the Redial key.
The last dialed number is displayed.
2. To redial the last number, press #.
- OR -
Search for the desired number from the Redial List by pressing
the Redial softkey or Volume Up or Volume Down keys.
3. Lift the handset or press Speaker to place the call.
6
Page 15

Speed Dial - System/Group/Station
To dial a Station Speed Dialing number:
1. Press the Speaker key.
2. Dial #7 (default Service Code).
Note: To preselect, press a line key in step 1 (instead of Speaker).
3. Dial the Station Speed Dial buffer number (0~9).
1 = Station Speed Dial buffer 1
2 = Station Speed Dial buffer 2
“ “ “ “ “
0 = Station Speed Dial buffer 10
Note 1: The stored number dials out.
Note 2: Unless you preselect, Trunk Group Routing selects the trunk
for the call. The system may optionally select a specific Trunk
Group for the call.
Note 3: If you have a DSS Console, you may be able to press a DSS
Console key to chain to a stored number.
To dial a System Speed dialing number:
1. Press the Speaker key.
2. Dial #2 (default Service Code).
- OR -
Press the Redial key.
- OR -
Press the System Speed Dialing key (Service Code 751: 27).
Note: To preselect, press a line key in step 1 (instead of Speaker).
3. Dial the Station Speed Dial buffer number (Default: 000~999).
The stored number dials out.
7
Page 16

Note 1: Initially (at default), there are 1000 System Speed Dial
buffers.
Note 2: Unless you preselect, Trunk Group Routing selects the trunk
for the call. The system may optionally select a specific Trunk
Group for the call.
Note 3: If you have a DSS Console, you may be able to pr ess a DSS
Console key to chain to a stored number.
To dial a Group Speed Dialing number:
1. Press the Speaker key.
2. Dial #4 (default Service Code).
- OR -
Press the Redial key.
- OR -
Press the Group Speed Dialing key (Service Code 751: 28).
Note: To preselect, press a line key in step 1 (instead of Speaker).
3. Dial the Group Speed Dial buffer number (none at default).
The stored number dials out.
Note 1: Initially, there are no Group Speed Dial buffers assigned.
Note 2: Unless you preselect, Trunk Group Routing selects the trunk
for the call. The system may optionally select a specific Trunk
Group for the call.
Note 3: If you have a DSS Console, you may be able to pr ess a DSS
Console key to chain to a stored number.
8
Page 17

MICROPHONE CONTROL
1. Press the MIC key.
2. A lit MIC LED indicates that the MIC is on.
SPEAKERPHONE CALLS
1. Press the Speaker key and the LED lights.
2. Ensure that the MIC LED is lit.
3. Place internal or outsid e call.
4. Converse.
5. Press the Speaker key to disconnect call.
Note: The handset may be used at any time during the conversation.
To resume handsfree operation or to monitor a call, press the
Speaker key (the LED lights) and re place the handset.
GROUP LISTEN
To initiate Group Listen:
1. Place or answer call using the handset.
2. Press Speaker twice (but do not hang up).
Note 1: Speaker flashes slowly.
Note 2: You can talk to the caller through your handset. Your
co-workers hear your caller’s voice over your telephone’s
speaker.
Note 3: When you press Speaker once, you turn your Speakerphone
on. The second press turns on Group Listen. Pressing the
Speaker key a third time cancels the Group Listen feature.
9
Page 18

HOLDING CALLS
System Hold Exclusive Hold
With a call in progress:
1. Press Hold.
With a call in progress:
1. Press the Exclusive Hold
key (Service Code 751: 45).
Note 1: To retrieve a held call, press the flashing Line key or Conf key
(internal calls).
Note 2: Calls on System Hold can be retrieved from any multiline
telephone with the held line appearance.
Note 3: After a preprogrammed time, the held call will recall to the
originating station.
TRANSFERRING CALLS
Using Manual Dial Using Direct Station Selection
(DSS)
With a call in progress:
1. Press the Transfer key.
2. Dial the station number.
3. Announce the call
(optional).
4. Replace the handset.
With a call in progress:
1. Press the Transfer key.
2. Press the programmed
DSS.
3. Announce the call
(optional).
4. Replace the handset.
Note 1: If the called station is busy, replace the handset to initiate a
camp-on. Unanswered camp-ons and unscreened transfers will
recall to the transferring station.
Note 2: To return to the origin al party, press the flashing Line key or
Conf key.
Note 3: A Programmable Function Key may be assigned for DSS.
10
Page 19

Note 4: To transfer a call directly to a personal voice mailbox, dial 8
after dialing the station number.
CONFERENCE
1. Establish intercom or trunk call.
2. Press Conf or Conference key (Service Code 751: 07).
3. Dial the extension you want to add.
- OR -
Access outside call.
Note: To get the outside call, you can either press a line key or dial a
trunk/trunk group access code.
4. When called party answers, press Conference key twice.
Note: If you cannot add additional parties to your Conference, you
have exceeded the system’s Conference limit.
5. Repeat steps 2~4 to add more parties.
11
Page 20

CALL PARK - SYSTEM
To Park a call in a system orbit:
Note: You can Park Intercom or trunk calls.
1. Press the Park key (Service Code 752: *04 + orbit).
Note: The Park key LED lights.
2. Use Paging to announce call.
3. Press Speaker to hang up.
Note: If not picked up, the call will recall to you.
- OR -
1. Press the Transfer key.
2. Dial #6 and the Park orbit (01~64).
Note: If you hear busy tone, the orbit is busy. Try another orbit.
3. Use Paging to announce call.
4. Press Speaker to hang up.
Note: If not picked up, the call will recall to you.
To pick up a parked call:
1. Lift the handset.
2. Press the Park key (Service Code 752:
- OR -
1. Press the Speaker key.
2. Dial
6 and the Park orbit (01~64).
*
12
04 + orbit).
*
Page 21

CALL PARK – STEP CALL
(Version 2000 or higher software is required)
To Park a call in the first available system orbit:
Note: You can Park Intercom or trunk calls.
1. Press the Hold or Transfer key.
2. Dial #6.
Note: If you hear busy tone, the orbit is busy. Proceed to step 3.
3. Dial
.
*
Note: Program 20-11-27 must be enabled in the Multiline Terminal’s
Class of Service.
4. Press Speaker to hang up.
Note: If not picked up, the call will recall to you.
- OR -
Press the Hold or Transfer Key.
1.
2. Press the DSS/BLF key programmed as #6*.
(The park location will be displayed in the LCD.)
3. Press Speaker to hang up.
13
Page 22

STATION BUSY/NO ANSWER OPTIONS
Callback
To place a Callback:
1. Call unavailable (busy or unanswered) extension.
2. Dial # or press Callback key (Service Code 751: 35).
3. Hang up.
4. Lift the handset when the busy extension calls you back.
Note 1: If the unavailable extension was unanswered (not busy), the
Callback goes through after your co-worker use s their
telephone for the first time.
Note 2: If you have Callback Automatic Answer, you automatically
place a call to the formerly busy extension when you lift the
handset. If you do not have Callback Automatic Answer, you
must press the ringing line appearance to place the call.
To cancel a Callback:
1. Press idle Speaker key and dial 770.
- OR -
Press Camp-On key (Service Code 751: 35).
14
Page 23

Message Waiting
To leave a Message Waiting:
1. Call busy or unanswered extension.
2. Dial 0 or press Message Waiting key (Service Code 751: 38).
3. Hang up.
To answer a Message Waiting:
Note: When you have a message, your MW LED flashes.
1. Press the Speaker key and dial *0.
- OR -
Press the Message Waiting key (Service Code 751: 38).
Note: If the called extension does not answer, dial 0 or p ress your
Message Waiting key to automatically leave them a message.
To cancel all your Messages Waiting:
Note: This includes messages you have left for other extensions and
messages other extension have left for you.
1. Press the Speaker key.
2. Dial 773.
3. Hang up.
To cancel the Messages Waiting you have left at a specific extension:
1. Press the Speaker key.
2. Dial 771.
3. Dial number of extension you do not want to have your messages.
4. Hang up.
15
Page 24

Tone Override
To send off-hook signals to an extension busy on a call:
Note: Your extension may send off-hook signals automatically.
1. Dial *.
- OR -
Dial 709.
2. Press the Off-Hook Signaling key (Service Code 751: 33).
Note 1: You hear Ring Busy Tone.
Note 2: The called extension hears Call Alert Notification.
To answer Tone Override:
1. Receive Tone Override.
2. Press the Hold key and talk with the party.
Department Step Call
To make a Step Call:
1. Place a call to a busy Department Group member.
- OR -
Place a call to a Department Group pilot number.
2. Dial Department Step Code (2) to call the next available
Department Group member.
3. Repeat step 2 to call other Department Group members.
16
Page 25

Voice Over
To initiate a Voice Over to a busy extension:
1. Press Voice Over key (Service Code 751: 48).
- OR -
Dial 6.
Note: Y o u hear an alert tone and the Voice Over key flashes. You can
talk to the called party after the alert tone ends.
To respond to a Voice Over alert tone to your extension:
Note: You can only respond if you have a Voice Over key.
1. Press the Voice Over key (Service Code 751: 48).
Note: The Voice Over key lights steadily (green) and you can talk to
the interrupting party.
To return to your original call:
1. Press the Voice Over key.
Note 1: Your V oice Over key flashes re d when you ar e t alki ng to your
original call.
Note 2: T o switch between your origin al call and the interrupting party,
just keep pressing the Voice Over key.
17
Page 26

CO/PBX DIALING OPTIONS
Save Number Dialed
To save the outside number you just dialed (up to 24 digits):
Note: Use this feature before hanging up.
1. Press the Save Number Dialed key (Service Code 751: 30).
To redial a saved number:
1. Press an idle trunk line key.
Note: This selects a specific trunk for the call.
2. Press the Save Number Dialed key (Service Code 751: 30).
Note: The stored number dials out.
- OR -
1. Press the Speaker key.
2. Dial 715.
Note 1: Save Number Dialed automatically selects a trunk from the
same group as your original call.
Note 2: The stored number dials out.
18
Page 27

Memo Dial
To store a number while you are on a call:
1. While on a call, press Memo Dial key (Service Code 751: 31).
2. Dial number you want to store.
3. Press Memo Dial key again and continue with conversation.
To call a stored Memo Dial number:
1. Do not lift the handset.
2. Press the Memo Dial key (Service Code 751: 31).
3. Press the Speaker key.
- OR -
Press a configured line key.
Note: The stored number dials out.
To check to see the stored Memo Dial number:
1. Do not lift the handset.
2. Press Memo Dial key (Service Code 751: 31).
Note: The stored number displays.
3. Press Exit to return to the main LCD screen.
To cancel (erase) a stored Memo Dial number:
1. Press the Speaker key.
2. Press the Memo Dial key (Service Code 751: 31).
19
Page 28

Repeat Redial
To use Repeat Redial (if the outside party you call is unavailable or
busy):
1. Place a trunk call.
Note: Listen for busy tone or ring-no-answer.
2. Press the Feature + Redial keys.
- OR -
Press the Repeat Redial key (Service Code 751: 29).
Note: Y our Repeat Redial key flashes while you wait for the system to
redial.
3. Press Speaker to hang up.
Note 1: The system periodically redials the call.
Note 2: System programming determi ne s the waiting time and the
number of redial attempts.
4. Lift the handset when called party answers.
Note: When using trunks with answer supervision the Repeat Redial
feature will automatically cancel.
To cancel Repeat Redial:
1. Press the Feature key.
2. Press the Redial key.
- OR -
1. Press Repeat Redial Key (Service Code 751: 29).
20
Page 29

Caller ID
Answer
Receive incoming ringing or transferred outside call:
1. Review the telephone display for the calling party’s name or
number.
2. Answer the call accordingly.
Temporary Memory
An unanswered call will cause the Call History key (Service Code 751: 08) to flash,
indicating a new call has been placed in the temporary memory. If enabled in
programming, the telephone’s display will show “CHECK LIST”.
1. Press the Call History key (Service Code 751: 08) or press the
LIST Softkey and CID.
Note: The last addition to the list is displayed.
2. Press the ARROW DOWN softkey to scroll through the list of
numbers in memory.
3. Press the DEL softkey to delete the entry and scroll to the next
entry.
4. The Call History key will remain on as long as entries remain in
memory.
5. T o place a call back to a number in the temporary memory list, with
the number to be dialed displayed, press a line or Speaker key.
Note: The outgoing call is placed.
21
Page 30

CALL PICKUP
Group Call Pickup
To answer a call ringing another telephone in your Pickup Group:
1. Pick up the handset or press the Speaker key.
2. Press the Group Call Pickup key (Service Code 751: 24).
- OR -
Dial 756 or
Note: Service Code
To answer a call ringing a telephone in another Pickup Group when you do not know the
group number:
#.
*
# can pick up any call in the group, plus any
Ring Group calls. Service Code 756 cannot pick up Ring Group
calls.
*
1. Pick up the handset or press the Speaker key.
2. Press the Group Call Pickup key (Service Code 751: 25).
- OR -
Dial 769.
To answer a call ringing a telephone in another Pickup Group when you know the group
number:
1. Pick up the handset or press the Speaker key.
2. Press Group Call Pickup key (Service Code 751: 26 + group).
- OR -
Dial 768 and the group number (01~64).
22
Page 31

Directed Call Pickup
To use Directed Call Pickup to intercept a call to a co-worker’s extension:
1. Pick up the handset or press the Speaker key.
2. Dial
**
.
3. Dial the number of extension whose call you want to intercept.
Note: If more than one call is coming in, the system sets the priority
for which call it will answer first.
PAGING
To make an Internal Page announcement:
1. Press the zone’s Internal Paging key [Service Code 751: 21
01~64 for zones (00 for All Call).
- OR -
1. Press the Speaker key or lift the handset.
2. Dial 701 and the Paging Zone number (0~9 or 00~64).
Note: Dialing 0 or 00 calls All Call Internal Paging.
3. Dial *1 and the Combined Paging Group code 1~8 or 0 (for
Internal/External All Call).
Note 1: Display indicates the Combined Paging as an External Page.
Note 2: If the Internal Page Zone is busy or if there are no exte nsions
in a page group, the page will be announced as an External
Page only.
4. Make announcement.
5. Press Speaker to hang up.
23
Page 32

To Page an external zone:
1. Press External Paging key (Service Code 751: 19 for External
Paging zones or 20 for External All Call Paging).
2. Make announcement.
- OR -
1. Press the Speaker key or pick up the handset.
- OR -
2. Dial 703 and the External Paging Zone code (1~8 or 0 for All Call).
- OR -
1 and the Combined Paging Group code (1~8 or 0 for
Dial
*
Internal/External All Call).
Note 1: Display indicates the Combined Paging as an External Page.
Note 2: If the Internal Page Zone is busy or if there are no extensions
in a page group, the page may be announced as an External
Page only.
3. Make announcement.
Meet-Me Answer
To join a Meet Me Internal Page:
1. Press the Speaker key or pick up the handset.
2. Dial 763 (if your extension is in the zone called).
- OR -
Dial 764 and the zone number (if your extension is not in the
zone called).
- OR -
Press the Meet Me Conference/Paging Pickup key (Service
Code 751: 23) if your extension is in the zone called.
Note: You connect to the other party.
24
Page 33

To join a Meet Me External Page:
1. Press the Speaker key or pick up the handset.
2. Dial 765.
3. Dial the announced External Paging Zone (0~8).
Note: You connect to the other party.
BACKGROUND MUSIC
To turn Background Music on or off:
1. Press the Speaker key.
2. Dial 725.
3. Press Speaker to hang up.
CALL FORWARDING
All Calls (CF/A)
To set Call Forward – Immediate at a forwarding station:
1. Pick up the handset or press the Speaker key.
2. Dial the Call Forward - Immediate Service Code (default: 741).
- OR -
Press the Call Forwarding Programmable Function Key
(Service Code 751: 10).
3. Dial 1 (Set).
4. Dial the destination extension or off-premise number.
5. Press the Speaker key or hang up.
Note: Your Call Forwarding Programmable Function Key flashes.
25
Page 34

To cancel Call Forward – Immediate at a forwarding station:
1. Pick up the handset or press the Speaker key.
2. Dial the Call Forward - Immediate Service Code (default: 741).
- OR -
Press the Call Forwarding Programmable Function Key
(Service Code 751: 10).
3. Dial 0 (Cancel).
4. Press the Speaker key or hang up.
Note: Your Call Forwarding Programmable Function Key goes off.
Call Forward Busy/No Answer (B/NA)
To set Call Forward – Busy/No Answer at a forwarding station:
1. Pick up the handset or press the Speaker key.
2. Dial the Call Forward - Busy/No Answer Service Code
(default: 744).
- OR -
Press the Call Forwarding Programmable Function Key
(Service Code 751: 13).
3. Dial 1 (Set).
4. Dial the destination extension or off-premise number.
5. Press the Speaker key or hang up.
26
Page 35

To cancel Call Forward – Busy/No Answer at a forwarding station:
1. Pick up the handset or press the Speaker key.
2. Dial the Call Forward - Busy/No Answer Service Code
(default: 744).
- OR -
Press the Call Forwarding Programmable Function Key
(Service Code 751: 13).
3. Dial 0 (Cancel).
4. Press the Speaker key or hang up.
To set Call Forward – Both Ring at a forwarding station:
1. Pick up the handset or press the Speaker key.
2. Dial the Call Forward - Both Ring Service Code (default: 745).
- OR -
Press the Call Forwarding Programmable Function Key
(Service Code 751: 14).
3. Dial 1 (Set).
4. Dial the destination extension number.
5. Press the Speaker key or hang up.
To cancel Call Forward – Both Ring at a forwarding station:
1. Pick up the handset or press the Speaker key.
2. Dial the Call Forward - Both Ring Service Code (default: 745).
- OR -
Press the Call Forwarding Programmable Function Key
(Service Code 751: 14).
3. Dial 0 (Cancel).
4. Press the Speaker key or hang up.
27
Page 36

SELECTABLE DISPLAY MESSAGING
To select a message:
1. Press the Speaker key.
2. Press the Text Message key (Service Code 751: 18 + 01~20).
3. Use Volume Up or Volume Down keys to scroll through the
messages if desired.
4. For messages 1~8 and 10, enter digits to append the message if
needed.
Note: Y ou can appen d messages 1-8 and 10 with digi ts (e.g., the time
when you will be back).
5. Press Speaker to hang up.
Note 1: Intercom calls to extensions with Selectable Display
Messaging set will receive a DND signal and receive the
display message on their telephone’s display instead of
ringing the extension.
Note 2: To allow calls to ring through and have the message
displayed on the calling extension’s display, cancel DND by
pressing DND + 0.
You enter the time in 24-hour format.
*
To cancel a message:
1. Press the Speaker key
2. Press the Text Message key (Service Code 751: 18 + 00~20)
3. Press Speaker to hang up.
28
Page 37

SET RELOCATION
To exchange two terminals:
1. Pick up the handset or press the Speaker key.
2. Dial the Extension Data Swap Service Code - not assigned at
default.
3. Dial the Extension Data Swap Password - not assigned at
default.
4. Dial the extension to be swapped with or relocated to.
5. When successfully completed, confirmation tone will be heard
and the display will show completed.
6. Press the Speaker key twice.
CODE RESTRICTION, DIAL BLOCK
To set Dial Block:
1. Press the Speaker key.
2. Dial 600 (default).
3. Dial the 4-digit Dial Block Code (user defined).
4. Dial 1.
Note: Confirmation tone is heard.
5. Press the Speaker key to hang up.
29
Page 38

To release Dial Block:
1. Press the Speaker key.
2. Dial 600.
3. Dial the 4-digit Dial Block Code.
4. Dial 0.
Note: Confirmation tone is heard.
5. Press the Speaker key to hang up.
Note: At default, Dial Block restriction Class per Extension is denied.
ACCOUNT CODE ENTRY
To enter an Account Code any time while on a trunk call:
The outside caller cannot hear the Account Code digits you enter. You
can use this procedure if your system has Optional Account Codes
enabled. You may also be able to use this procedure for incoming calls.
1. Dial
2. Dial your Account Code (1~16 digits, using 0~9 and #).
3. Dial *.
.
*
- OR -
Press your Account Code key (Service Code 751: code 50).
Note: If Account Codes are hidden, each digit you dial will show an
“
” character on the telephone’s display.
*
- OR -
Press your Account Code key (Service Code 751: code 50).
30
Page 39

To enter an Account Code before dialing the outside number:
If your system has Forced Account Codes, you must use this procedure.
If it has Verified Account Codes, you can use this procedure instead of
letting the system prompt you for your Account Code. You may also use
this procedure if your system has Optional Account Codes. If your
system has Verified Account Codes enabled, be sure to choose a code
programmed into your Verified Account Code list.
1. Access trunk for outside call.
Note: You can access a trunk by pressing a line key or dialing a code
(except 9).
2. Dial *.
- OR -
Press your Account Code key (Service Code 751: code 50).
3. Dial your Account Code (1~16 digits, using 0~9 and #).
Note: If you make an incorrect entry, your system may automatically
alert the operator. If Account Codes are hidden, each digit you
dial will show an “
” character on the telephone’s display.
*
4. Dial *.
- OR -
Press your Account Code key (Service Code 751: code 50).
5. Dial the number you want to call.
Note: If you hear “stutter dial tone after dialing the number, ARS is
requesting that you enter an Automatic Route Selection
Authorization Code.
31
Page 40

AUTOMATIC CALL DISTRIBUTION (ACD)
Agent Log In
To log in:
1. Press the ACD LOG IN/LOG OUT key (Service Code 752:
- OR -
Press the Speaker key and dial the Log In service code (Default
5).
*
2. Dial the log in code (up to 20 digits).
Note: This step is not required if the ID code is disabled.
AIC Agent Log In
To log in:
1. Press the ACD LOG IN/LOG OUT key (Service Code 752:
- OR -
Press the Speaker key and dial the AIC Log In service code not assigned at default.
2. Dial the log in code (up to 20 digits).
Note: This step is not required if the ID code is disabled.
*
*
10).
10).
3. Dial the Agent Identity Code (AIC) (up to four digits).
Note: The ACD LOG IN/LOG OUT key lights.
32
Page 41

Multiple AIC Agent Log In
To log in:
1. Press the ACD LOG IN/LOG OUT key (Service Code 752:
*
- OR -
Press the Speaker key and dial the AIC Log In service code not assigned at default.
2. Dial 0 to cancel the log out option.
3. Dial the Agent Identity Code (AIC) (up to four digits).
Note: The ACD LOG IN/LOG OUT key lights.
4. Repeat steps 3 and 4.
Note: This step is not required if only using two AIC log ins.
To log out (for single or multiple agent AIC log ins):
Note: All AIC log ins become logged out.
1. Press the ACD LOG IN/LOG OUT key (Service Code 752: *10) +
1 to accept.
2. Press the Speaker key and dial the AIC Log In service code not assigned at default.
10).
Note: The ACD LOG IN/LOG OUT key goes off.
33
Page 42

Rest Mode
To set the manual Rest Mode:
1. From an idle state, press the ACD Rest Mode key (Service Co de
752:
Note 1: The ACD Rest Mode key lights. If the Rest Mode key is
Note 2: This operation is not available for the System Supervisor.
To cancel the manual Rest Mode:
13).
*
pressed while the agent is on an active call, the key will flash
until the agent hangs up.
1. Press the ACD Rest Mode key (Service Code 752:
Note: The ACD Rest Mode key light goes off.
13).
*
Queue Status Display
When Logged Into ACD Group:
1. From an idle state, press the Queue Status Display key
(Service Code 752:
Note 1: The display indicates the number of calls in queue, the trunk
name, and the length of time the call has been waiting.
Note 2: When the Queue Status Display key is pressed, the queue
status of the extension’s group is displayed. When the
extension is not in an ACD group, the Queue Status of group
1 is displayed instead.
Note 3: When an agent logs in using an AIC code, the Queue Status
of the default ACD group is displayed.
2. Press W and V to scroll through the Queue S t atus Displays of all
the ACD Groups.
*
19).
3. Press the CLEAR key to return the telephone to an idle state.
34
Page 43

When Logged Out of ACD Group:
When ACD agents are logged out and a call is placed into the ACD
queue, the telephones of the logged out agents will display the Queue
Status and hear the alarm according to the settings defined in system
programming.
Pressing the Queue Status Display key will return the telephone to idle
until the timer expires again.
Answering a Call Using a Headset
1. Press the Headset key to answer.
2. Converse.
3. Press the Headset key to hang up.
Using the Headset with Automatic Answer for ACD Agents
1. With the multiline terminal in an idle state, press the Feature key.
2. Press the HEADSET key (Service Code 751: 05).
Note 1: The Headset key blinks when Automatic Headset is
activated.
Note 2: To cancel Automatic Headset, repeat these steps.
35
Page 44

STATION SPEED DIAL — DIAL ACCESS
To store a Station Speed Dialing number (display telephones only):
1. Press the Speaker key.
2. Dial 755.
3. Dial the Station Speed Dial buffer number to be programmed (0~9).
1 = Station Speed Dial buffer 1
2 = Station Speed Dial buffer 2
" " " " " "
0 = Station Speed Dial buffer 10
4. Dial the Access Code (e.g., 9) - if required.
5. Dial telephone number you want to store (up to 24 digits).
Note: V a lid e ntries ar e 0~9, # an d
store a Flash, press Recall.
. To enter a pause, press MIC. To
*
6. Press Hold.
7. Enter the name associated with the Speed Dialing number
(display telephones only):
Key for Entering Names
Use this
keypad
digit . . .
1
2 Enter characters: A-C, a-c, 2
3 Enter characters: D-F, d-f, 3
4 Enter characters: G-I, g-i, 4
5 Enter characters: J-L, j-l, 5
6 Enter characters: M-O, m-o, 6
7 Enter characters: P-S, p-s, 7
8 Enter characters: T-V, t-v, 8
9 Enter characters: W-Z, w-z, 9
0
Enter characters:
Enter characters:
When you want to. . .
36
Page 45

Key for Entering Names
Use this
keypad
digit . . .
*
# # = Accepts an entry (only required if two letters on the same key are
Conf Clears the character entry one character at a time (used when entering
Exit Clears all the entries from the point of the flashing cursor and to the right
Enter characters:
needed - ex: TOM). Pressing # again = Space.
the Name).
(used when entering the Number, this clears both the number and name).
When you want to. . .
8. Press Hold.
9. Press the Speaker key to hang up.
LINE KEYS/PROGRAMMABLE FUNCTION KEYS
The following functions can be assigned to Line Keys if allowed by Class
of Service.
To Program a Line key as a Programmable Function Key:
1. Press the Speaker key.
2. Dial Service Code 751.
3. Press the Line Key to be programmed.
4. Dial the code for the desired feature plus additional data if
required.
5. Press Speaker to hang up.
Note 1: Service Code 00 will erase the function from the key.
Note 2: In some cases, the Hold key needs to be pressed before
pressing the Speaker key.
37
Page 46

Function Numbers
[1] Normal Function Code (00 - 99) (Service Code 751)
Function
Number
00
01
02
03
04
05
06
07
08
09
10
11
12
13
14
15
16
17
18
19
20
21
Not Defined
DSS / One-Touch Extension number or any
Microphone Key (ON/OFF)
DND Key
BGM (ON/OFF)
Headset
Transfer Key
Conference Key
Incoming Call Log
Day/Night Mode Switch Mode number (1~8)
Call Forward - Immediate
Call Forward - Busy
Call Forward - No Answer
Call Forward - Busy/No
Answer
Call Forward - Both Ring
Follow Me
--- Not Used ---
--- Not Used --Text Message Setup Message Numbers (01~20)
External Group Paging External Paging Number (1~8)
External All Call Paging
Internal Group Paging Internal Paging Number
Function Number List
Function Additional Data
numbers (up to 24 digits).
Press HOLD to write.
(01~64)
38
Page 47

Function
Number
22
23
24
25
26
27
28
29
30
31
32
33
34
35
36
37
38
39
40
41
42
43
44
45
Function Number List
[1] Normal Function Code (00 - 99) (Service Code 751)
Function Additional Data
Internal All Call Paging
Meet-Me Answer to Internal
Paging
Call Pickup
Call Pickup for Another Group
Call Pickup for Specified
Group
Speed Dial -Common/ Private Speed Dial Number (Common
Speed Dial - Group Speed Dial number (Group)
Repeat Redial
Saved Number Redial
Memo Dial
Meet - Me Conference
Override (Off-Hook Signaling)
Break - In
Camp On
Step Call
DND / FWD Override Call
Message Waiting
Room Monitoring
Handset Transmission Cutoff
Buzzer Extension Number
Boss - Secretary Call Extension Number
Series Call
Common Hold
Exclusive
Call Pickup Group Number
/ Private)
39
Page 48

Function
Number
46
47
48
49
50
51
52
53
54
55
56
57
58
59
60
61
63
64
65
66
Function Number List
[1] Normal Function Code (00 - 99) (Service Code 751)
Function Additional Data
Department Group Log Out
Reverse Voice Over Extension Number
Voice Over Extension Number
Call Redirect Extension Number or Voice
Mail Number
Account Code
General Purpose Relay Relay No (0, 1~8)
Automatic Answer with Delay
Message Setup
Automatic Answer with Delay
Message Start
External Call Forward by Door
Box
Extension Name Change
General Purpose LED
Operation
General Purpose LED
Indication
Automatic Transfer at
Department Group Call
Delayed Transfer at
Department Group Call
DND at Department Group
Call
--- Not Used --Outgoing Call Without Caller
ID (ISDN)
--- Not Used ---
--- Not Used --CTI
Incoming Group Number
Extension Group Number
(1~8 or 01~64)
Extension Group Number
(1~8 or 01~64)
Extension Group Number
(1~8 or 01~64)
40
Page 49

Function
Number
67
68
69
70
71
72
73
74
75
76
77
78
79
80
81
82
83
84
85
Function Number List
[1] Normal Function Code (00 - 99) (Service Code 751)
Function Additional Data
--- Not Used ---
--- Not Used ---
--- Not Used ---
--- Not Used --Message Change for Voice
Attendant
Keypad Facility Key
Keypad HOLD Key
Keypad RETRIEVE Key
Keypad Conference Key
Toll Restriction in Credit -
Extension Number
Voice Mail (In-Skin) Extension Number or Pilot
Conversation Recording Voice Mail
Automated Attendant (In-Skin) Extension Number or Pilot
Tandem Ringing 1 = Set
Automatic Transfer to Transfer
Key
Dterm IP Call Log
Conversation Recording
Function (VMSU)
Drop Key
Directory Dialing
Extension Number or
Department Group Number
Number
Number
0 = Cancel Extension Number
to Tandem Ring
Trunk Line No. (001~200)
0 = Pause
1 = Re-recording
2 = Address
3 = Erase
4 = Urgent Page
41
Page 50

[1] Normal Function Code (00 - 99) (Service Code 751)
Function
Number
86
87
88
89
90
91
92 ~ 99
Private Call Refuse
Caller ID Refuse
Dial-In Mode Switching
Do-Not-Call Setup
Do-Not-Call Data Registration
Live Recording Key
--- Not Used ---
Character Entry
Use this
keypad
digit . . .
1
Enter characters:
Function Number List
Function Additional Data
Key for Entering Names
When entering names, refer to this chart.
When you want to. . .
2 Enter characters: A-C, a-c, 2
3 Enter characters: D-F, d-f, 3
4 Enter characters: G-I, g-i, 4
5 Enter characters: J-L, j-l, 5
6 Enter characters: M-O, m-o, 6
7 Enter characters: P-S, p-s, 7
8 Enter characters: T-V, t-v, 8
9 Enter characters: W-Z, w-z, 9
0
*
# # = Accepts an entry (only required if two letters on the same key are
Enter characters:
Enter characters:
needed - ex: TOM). Pressing # again = Space.
42
Page 51

Key for Entering Names
When entering names, refer to this chart.
Use this
keypad
digit . . .
Conf Clears the character entry one character at a time (used when entering
the Name).
Exit Clears all the entries from the point of the flashing cursor and to the right
(used when entering the Number, this clears both the number and name).
When you want to. . .
43
Page 52

Notes
44
Page 53

Page 54

© 2006 NEC Unified Solutions, Inc.
The material contained herein is subject
to change without prior notice at the sole
discretion of NEC Unified Solutions, Inc.
Electra Elite is a registered trademark of
NEC America, Inc.
Document Revision 2
For more information contact:
NEC Unified Solutions, Inc.
6555 N State Highway 161
Irving, TX 75039-2402
www.necunified.com
INT-1099 (IPK II)
 Loading...