

Page 1

LCD MONITOR
User’s Manual
MultiSync CB651Q
MultiSync CB751Q
MultiSync CB861Q
MODEL: CB651Q, CB751Q, CB861Q
Please nd your model name in the label on the rear side of the monitor.
Page 2

Index
Index ............................................................................................................................................................. English-ii
SUPPLIER’S DECLARATION OF CONFORMITY ....................................................................................... English-1
Important Information ................................................................................................................................... English-3
Safety Precautions, Maintenance & Recommended Use ............................................................................ English-4
Contents ....................................................................................................................................................... English-6
Installation .................................................................................................................................................... English-7
Parts Name and Functions ........................................................................................................................... English-10
Setup ............................................................................................................................................................ English-14
Connection and Setting ................................................................................................................................ English-16
Basic Operation ............................................................................................................................................ English-20
OSD (On-Screen-Display) Controls ............................................................................................................. English-25
OS User Manual ........................................................................................................................................... English-33
Mosaic Connect Network and Security Guide. ............................................................................................. English-58
Controlling the LCD monitor via RS-232C Remote Control ......................................................................... English-62
Controlling the LCD monitor via LAN Control ................................................................................................ English-64
Troubleshooting ............................................................................................................................................ English-67
Specications - CB651Q .............................................................................................................................. English-69
Specications - CB751Q .............................................................................................................................. English-70
Specications - CB861Q .............................................................................................................................. English-71
Manufacturer’s Recycling and Energy Information ....................................................................................... English-72
[Notice] About the MPEG-4 AVC, MPEG-4 Visual license included in this product ...................................... English-74
WARNING ....................................................................................................................................... English-3
CAUTION ........................................................................................................................................ English-3
Safety Precautions and Maintenance ............................................................................................. English-4
Recommended Use ........................................................................................................................ English-4
Ergonomics ..................................................................................................................................... English-4
Cleaning the LCD Panel ................................................................................................................. English-5
Cleaning the Cabinet ...................................................................................................................... English-5
Attaching Mounting Accessories ..................................................................................................... English-8
Control Panel .................................................................................................................................. English-10
Terminal Interface ........................................................................................................................... English-11
Wireless Remote Control ................................................................................................................ English-12
Operating Range for the Remote Control ....................................................................................... English-13
Wiring Diagram ............................................................................................................................... English-16
Before making connections: ........................................................................................................... English-16
External Computer and Touch Connection ..................................................................................... English-17
Audio and Video Equipment ........................................................................................................... English-17
RS-232C Connection ...................................................................................................................... English-18
LAN Connection .............................................................................................................................. English-18
USB Connection ............................................................................................................................. English-18
Connecting a Personal Computer ................................................................................................... English-19
Connecting a Player or Computer with HDMI ................................................................................. English-19
Connecting a USB device ............................................................................................................... English-19
Power ON and OFF Modes ............................................................................................................ English-20
Power Indicator ............................................................................................................................... English-21
Aspect ............................................................................................................................................. English-21
Displayable/playable les ............................................................................................................... English-22
General setting ............................................................................................................................... English-25
Audio setting ................................................................................................................................... English-26
Screen setting ................................................................................................................................. English-27
Display setting ................................................................................................................................ English-28
Adjust setting*
[Application] .................................................................................................................................... English-30
Settings ........................................................................................................................................... English-31
Network functions ........................................................................................................................... English-32
1. Introduction ................................................................................................................................. English-33
2. Sidebar ....................................................................................................................................... English-34
3. Mosaic User guides for Connect &Canvas ................................................................................. English-42
4. Files ............................................................................................................................................ English-52
5. Settings ....................................................................................................................................... English-55
6. Browser ....................................................................................................................................... English-55
7. Keeper ........................................................................................................................................ English-56
8. Touch Menu ................................................................................................................................ English-57
Connecting to a Network ................................................................................................................ English-64
Disposing of your old NEC product ................................................................................................. English-72
Energy Saving ................................................................................................................................ English-72
WEEE Mark (European Directive 2012/19/EU and amendments) ................................................. English-73
1
................................................................................................................................ English-29
Page 3

SUPPLIER’S DECLARATION OF CONFORMITY
This device complies with Part 15 of FCC Rules. Operation is subject to the following two conditions. (1) This device may not cause
harmful interference, and (2) this device must accept any interference received, including interference that may cause undesired
operation.
U.S. Responsible Party: NEC Display Solutions of America, Inc.
Address: 3250 Lacey Rd, Ste 500
Downers Grove, IL 60515
Tel. No.: (630) 467-3000
Type of Product: Display Monitor
Equipment Classication: Class B Peripheral
Model: CB651Q
CB751Q
CB861Q
Cable information
CAUTION: Use the attached specied cables with this color monitor so as not to interfere with radio and television reception.
For USB and mini D-Sub 15-pin, please use a shielded signal cable with ferrite core.
For D-Sub 9-Pin and HDMI please use a shielded signal cable.
Use of other cables and adapters may cause interference with radio and television reception.
FCC Information
WARNING: The Federal Communications Commission does not allow any modications or changes to the unit EXCEPT those
specied by NEC Display Solutions of America, Inc. in this manual. Failure to comply with this government regulation could void your
right to operate this equipment.
1. Please use the supplied power cord or equivalent to ensure FCC compliance.
2. This equipment has been tested and found to comply with the limits for a Class B digital device, pursuant to part 15 of the FCC Rules.
These limits are designed to provide reasonable protection against harmful interference in a residential installation. This equipment
generates, uses and can radiate radio frequency energy, and, if not installed and used in accordance with the instructions, may
cause harmful interference to radio communications. However, there is no guarantee that interference will not occur in a particular
installation. If this equipment does cause harmful interference to radio or television reception, which can be determined by turning the
equipment off and on, the user is encouraged to try to correct the interference by one or more of the following measures:
• Reorient or relocate the receiving antenna.
• Increase the separation between the equipment and receiver.
• Connect the equipment into an outlet on a circuit different from that to which the receiver is connected.
• Consult the dealer or an experienced radio/TV technician for help.
English
If necessary, the user should contact the dealer or an experienced radio/television technician for additional suggestions.
The user may nd the following booklet, prepared by the Federal Communications Commission, helpful: “How to Identify and
Resolve Radio-TV Interference Problems.” This booklet is available from the U.S. Government Printing Ofce, Washington, D.C.,
20402, Stock No. 004-000-00345-4.
Windows is a registered trademark of Microsoft Corporation.
NEC is a registered trademark of NEC Corporation.
MultiSync is a trademark or registered trademark of NEC Display Solutions, Ltd. in Japan and other countries.
All other brands and product names are trademarks or registered trademarks of their respective owners.
The terms HDMI and HDMI High-Denition Multimedia Interface, and the HDMI Logo are trademarks
or registered trademarks of HDMI Licensing Administrator, Inc. in the United States and other countries.
GPL/LGPL Software Licenses
The product includes software licensed under GNU General Public License (GPL), GNU Lesser General Public License (LGPL), and
others. For more information on each software, see “readme.pdf” inside the “about GPL&LGPL” folder on the NEC website.
English-1
Page 4

NOTE: (1) The contents of this user’s manual may not be reprinted in part or whole without permission.
(2) The contents of this user’s manual are subject to change without notice.
(3) Great care has been taken in the preparation of this user’s manual; however, should you notice any questionable points,
errors or omissions, please contact us.
(4) Notwithstanding article (3), NEC will not be responsible for any claims on loss of prot or other matters deemed to result
from using this device.
Adobe and the Adobe logo are either registered trademarks or trademarks of Adobe Systems Incorporated in the United States and/or
other countries.
Statement
The image shown in this manual is indicative only. If there is inconsistency between the image and the actual product, the actual
product shall govern.
English-2
Page 5

Important Information
WARNING
TO PREVENT FIRE OR SHOCK HAZARDS, DO NOT EXPOSE THIS UNIT TO RAIN OR MOISTURE. ALSO, DO NOT
USE THIS UNIT’S POLARIZED PLUG WITH AN EXTENSION CORD RECEPTACLE OR OTHER OUTLETS UNLESS THE
PRONGS CAN BE FULLY INSERTED.
REFRAIN FROM OPENING THE CABINET AS THERE ARE HIGH VOLTAGE COMPONENTS INSIDE. REFER SERVICING
TO QUALIFIED SERVICE PERSONNEL.
CAUTION
TO REDUCE THE RISK OF ELECTRIC SHOCK, MAKE SURE POWER CORD IS UNPLUGGED FROM WALL SOCKET. TO
FULLY DISENGAGE THE POWER TO THE UNIT, PLEASE DISCONNECT THE POWER CORD FROM THE AC OUTLET.
DO NOT REMOVE COVER (OR BACK). NO USER SERVICEABLE PARTS INSIDE. REFER SERVICING TO QUALIFIED
SERVICE PERSONNEL.
This symbol warns user that uninsulated voltage within the unit may have sufcient magnitude to cause electric
shock. Therefore, it is dangerous to make any kind of contact with any part inside this unit.
This symbol alerts the user that important literature concerning the operation and maintenance of this unit has been
included. Therefore, it should be read carefully in order to avoid any problems.
CAUTION: Please use the power cord provided with this display in accordance with the table below. If a power cord is not
supplied with this equipment, please contact NEC. For all other cases, please use the power cord with the plug
style that matches the power socket where the monitor is located. The compatible power cord corresponds to
the AC voltage of the power outlet and has been approved by, and complies with, the safety standards in the
country of purchase.
This equipment is designed to be used in the condition of the power cord connected to earth. If the power cord is
not connected to the earth, it may cause electric shock. Please make sure the power cord is earthed properly.
English
Plug Type North America European Continental U.K. Chinese
Plug Shape
Region
Voltage
* When operating this monitor with its AC 125-240V power supply, use a power supply cord that matches the power supply
voltage of the AC power outlet being used.
NOTE: This product can only be serviced in the country where it was purchased.
Use the power cord which has BSMI mark at both ends when you use this monitor in Taiwan.
• The intended primary use of this product is as an Information Technical Equipment in an ofce or domestic environment.
• The product is intended to be connected to a computer and is not intended for the display of television broadcast signals.
U.S.A./
Canada
120* 110 230 230 220
Taiwan EU U.K. China
CB651Q
CB751Q
English-3
Page 6

Safety Precautions, Maintenance & Recommended Use
Safety Precautions and Maintenance
FOR OPTIMUM PERFORMANCE, PLEASE NOTE THE
FOLLOWING WHEN SETTING UP AND USING
THE MULTI-FUNCTION MONITOR:
• DO NOT OPEN THE MONITOR. There are no user
serviceable parts inside and opening or removing covers
may expose you to dangerous shock hazards or other
risks. Refer all servicing to qualied service personnel.
• Do not bend, crimp or otherwise damage the power cord.
• Do not place any heavy objects on the power cord.
Damage to the cord may cause shock or re.
• The power supply cord you use must have been
approved by and comply with the safety standards of your
country. (e.g. Type H05VV-F 3G 0.75 mm
in Europe).
• In the UK use a BS-approved power cord with a molded
plug having a black (5 A) fuse installed for use with this
monitor.
• The power cable connector is the primary means of
detaching the system from the power supply. The monitor
should be installed close to a power outlet, which is easily
accessible.
• Do not spill any liquids into the cabinet or use your
monitor near water.
• Do not insert objects of any kind into the cabinet slots
as they may touch dangerous voltage points, which can
be harmful or fatal, or may cause electric shock, re or
equipment failure.
• Do not place this product on a sloping or unstable cart,
stand or table, as the monitor may fall, causing serious
damage to the monitor.
• Do not mount this product upside down for an extended
period of time as it may cause permanent damage to the
screen.
• Do not use the monitor outdoors.
• If glass is broken, handle with care.
• For reliable performance and long useful life of this
product, it is mandatory to not cover any vents on the
monitor.
• If monitor or glass is broken, do not come in contact with
the liquid crystal and handle with care.
• Allow adequate ventilation around the monitor, so that
heat can properly dissipate.
• Do not block ventilated openings or place the monitor
near a radiator or other heat sources.
• Do not put anything on top of the monitor.
• Handle with care when transporting. Save packaging for
transporting.
• It is recommended to wipe holes clean a minimum of
once a month.
• To ensure the monitor’s reliability, please clean the holes
at the rear side of the cabinet at least once a year to
remove dirt and dust.
• When using a LAN cable, do not connect to a peripheral
device with wiring that might have excessive voltage.
• Do not use the monitor in high temperature, humid, dusty,
or oily areas.
2
should be used
• Do not use monitor under rapid temperature and humidity
change condition and avoid cold air from air-conditioning
outlet directly, as it may shorten the lifetime of the monitor
or cause condensation. If condensation of water has
happened, let the monitor stand unplugged until the
condensation has disappeared.
Connecting to a TV*
• Cable distribution system should be grounded (earthed)
in accordance with ANSI/NFPA 70, the National Electrical
Code (NEC), in particular Section 820.93, Grounding of
Outer Conductive Shield of a Coaxial Cable.
• The screen of the coaxial cable is intended to be
connected to earth in the building installation.
Under the following conditions immediately disconnect your
monitor from the wall outlet and refer servicing to qualied
service personnel:
• If the power supply cord or plug is damaged.
• If liquid has been spilled, or objects have fallen into the
monitor.
• If the monitor has been exposed to rain or water.
• If the monitor has been dropped or the cabinet has been
damaged.
• If you notice any structural damage such as cracks or
unnatural wobbling.
• If the monitor does not operate normally by following
operating instructions.
Recommended Use
Ergonomics
To realize the maximum ergonomic benets, we recommend
the following:
• For the monitor’s optimum performance, allow 20 minutes
for warming up. Avoid reproduction of still patterns on
the monitor for long periods of time to avoid image
persistence (after image effects).
• Rest your eyes periodically by focusing on an object at
least 5 feet away. Blink often.
• Position the monitor at a 90° angle to windows and other
light sources to minimize glare and reections.
• Adjust the monitor’s brightness, contrast controls to
enhance readability.
• Get regular eye checkups.
• Use the preset Size and Position controls with standard
signals.
• Use the preset Color Setting.
• Use non-interlaced signals.
• Do not use primary color blue on a dark background, as
it is difcult to see and may produce eye fatigue due to
insufcient contrast.
• Suitable for entertainment purposes at controlled
luminous environments, to avoid disturbing reections
from the screen.
* The product you purchased may not have this feature.
English-4
Page 7

Cleaning the LCD Panel
• When the LCD panel is dusty, please gently wipe with a
soft cloth.
• Clean the LCD monitor surface with a lint-free, nonabrasive cloth. Avoid using any cleaning solution or glass
cleaner!
• Please do not rub the LCD panel with hard material.
• Please do not apply pressure to the LCD panel surface.
• Please do not use OA cleaner as it will cause
deterioration or discoloration on the LCD panel surface.
Cleaning the Cabinet
• Unplug the power supply
• Gently wipe the cabinet with a soft cloth
• To clean the cabinet, dampen the cloth with a neutral
detergent and water, wipe the cabinet and follow with a
dry cloth.
NOTE: DO NOT clean with benzene thinner, alkaline
detergent, alcoholic system detergent, glass
cleaner, wax, polish cleaner, soap powder, or
insecticide. Rubber or vinyl should not be in
contact with the cabinet for an extended period
of time. These types of uids and materials can
cause the paint to deteriorate, crack or peel.
English
English-5
Page 8

Contents
Your new monitor box* should contain the following:
• LCD monitor • Clamper
• Power cord*1 • Stylus pen x 3
• HDMI Signal Cable • Wireless Remote Control and AAA Batteries x 2*
• VGA Cable • Setup Manual
• USB Cable • RS-232C adapter
Setup Manual
Setup Manual RS-232C adapter
2
1
Wireless Remote Control
and AAA Batteries x 2*
* Remember to save your original box and packing material to transport or ship the monitor.
*1 Type and number of power cords included will depend on the where the LCD monitor is to be shipped. When more than one
power cord is included, please use a power cord that matches the AC voltage of the power outlet and has been approved by
and complies with the safety standard of your particular country.
*2 Depending on the country where the LCD monitor is shipped to, AAA batteries are not included in the box contents.
2
USB Cable VGA Cable Stylus pen × 3
Clamper
HDMI Signal CablePower cord*
English-6
Page 9

Installation
For proper installation it is strongly recommended to use a
trained, NEC authorized service person. Failure to follow
NEC standard mounting procedures could result in damage
to the equipment or injury to the user or installer. Product
warranty does not cover damage caused by improper
installation. Failure to follow these recommendations could
result in voiding the warranty.
Mounting
DO NOT mount the monitor yourself. Please ask your
supplier. For proper installation it is strongly recommended to
use a trained, qualied technician. Please inspect the location
where the unit is to be mounted. Mounting on wall or ceiling
is the customer’s responsibility. Not all walls or ceilings are
capable of supporting the weight of the unit. Product warranty
does not cover damage caused by improper installation, remodeling, or natural disasters. Failure to comply with these
recommendations could result in voiding the warranty.
DO NOT block ventilated openings with mounting
accessories or other accessories.
For NEC Qualied Personnel:
To ensure safe installation, use two or more brackets to
mount the unit. Mount the unit to at least two points on the
installation location.
Stability Hazard.
The device may fall, causing serious personal injury or death.
To prevent injury, this device must be securely attached to
the oor/wall in accordance with the installation instructions.
• When used in a video wall conguration for a longer
time, slight expansion of the monitors may happen due to
temperature changes. Due to this it is recommended that
over one millimeter gap is kept between adjacent monitor
edges.
• When installing, do not apply pressure to the screen or
excessive force to any part of the monitor by pushing
or leaning on it. This may cause the monitor to become
distorted or damaged.
To prevent the LCD monitor from falling off from the wall or
ceiling, NEC strongly recommends using a safety wire.
Please install LCD monitor in a spot of the wall or ceiling
strong enough to support the monitor.
Prepare the LCD monitor using mounting accessories such
as hook, eyebolt or mounting parts and then secure the LCD
monitor with a wire. The safety wire must not be tight.
Please make sure the mounting accessories are strong
enough to support the LCD monitor before mounting it.
English
Please note the following when mounting
on wall or ceiling
• NEC recommends mounting interfaces that comply with
UL1678 standard in North America.
• NEC strongly recommends using size M8 screw
(20-22 mm + thickness of bracket and washers in
length). If using screws longer than 20-22 mm, check the
depth of the hole. (Recommended Fasten Force:1000 1200N•cm). Bracket hole should be under Φ 8.5 mm.
• Prior to mounting, inspect the installation location to
ensure that it is strong enough to support the weight of
the unit so that the unit will be safe from harm.
• For detailed information, refer to the instructions included
with the mounting equipment.
• Make sure that there is no gap between the monitor and
the bracket.
Unit
No thread 4 mm
under Φ 8.5 mm
No gap
20-22 mm
Mounting Bracket
Washers
Screw
Thickness of bracket
and washers
English-7
Page 10

Mounting location
D
C
• The ceiling and wall must be strong enough to support the
monitor and mounting accessories.
• DO NOT install in locations where a door or gate can hit
the unit.
• DO NOT install in areas where the unit will be subjected
to strong vibrations and dust.
• DO NOT install the monitor next to a location where the
main power supply is fed into the building.
• DO NOT install the monitor in a location where people
can easily grab and hang onto the unit or the mounting
equipment.
• Allow for adequate ventilation or provide air conditioning
around the monitor, so that heat can properly dissipate
away from the monitor and from the mounting equipment.
Maintenance
• Periodically check for loose screws, gaps, distortions,
or other problems that may occur with the mounting
equipment. If a problem is detected, please refer to
qualied personnel for service.
• Regularly check the mounting location for signs of
damage or weakness that may occur over time.
2. Ventilation Requirements
When mounting in an enclosed space or recessed area,
leave adequate room between the monitor and the enclosure
to allow heat to disperse, as shown below.
150 mm
150 mm
100 mm
Must be under 40 Degree Celsius.
Allow adequate ventilation or provide air conditioning around
the monitor, so that heat can properly dissipate away from
the unit and the mounting equipment; especially when you
use monitors in a multiple screen conguration.
NOTE: The sound quality of the internal speakers will be
different depending on the acoustics of the room.
27 mm
150 mm
Attaching Mounting Accessories
The monitor is designed for use with the mounting system.
1. Attach Mounting Accessories
Be careful to avoid tipping the monitor when attaching
accessories.
B
A
inch Spec. (A x B) Standard screw
(C x D)
CB651Q 600 x 400 mm M8 x 25 mm 4
CB751Q 800 x 400 mm M8 x 25 mm 4
CB861Q 800 x 600 mm M8 x 25 mm 4
Mounting accessories can be attached with the monitor in
the face down position. To avoid damaging the front face,
place the protective sheet on the table underneath the LCD
monitor. The protective sheet was wrapped around the LCD
monitor in the original packaging. Make sure there is nothing
on the table that can damage the monitor.
NOTE: Prior to installation, be sure to place the monitor
on a at area with adequate space.
Quantity
English-8
Page 11

Installing an Option Board
1. Turn off the main power switch.
2. Remove the attached slot cover by unscrewing the
installed screws.
3. Insert the Option Board into the monitor and x it in place
with the removed screws. (Recommended Fasten Force:
139 - 189N•cm).
English
NOTE: Unless your monitor is purchased as part of a
special bundle package, no Option Boards will
be in the box or installed in the monitor. These
are optional accessories available for separate
purchase. Please contact your supplier for a list of
Option Boards available for your monitor.
Make sure the board is inserted into the slot in the
correct orientation.
Do not apply excessive force to manipulate the
Option Board before xing it with screws.
Do not insert diagonally.
English-9
Page 12

Parts Name and Functions
1 2 3
Control Panel
1
Tap to enter energy-saving, press at least 2 seconds to enter
standby mode.
2 Remote control signal receive
Receive the remote signal.
3 USB2.0 (Front)
Connect USB devices such as mobile hard disk, U disk, USB
Keyboard and mouse, USB drives, etc.
English-10
Page 13

Terminal Interface
4
1
765 8 9 1 0 !
2
3
2
English
1 USB2.0 (Rear side)
Connect USB devices such as mobile hard disk, U disk, USB
Keyboard and mouse, USB drives, etc.
USB 2.0 (Rear bottom)
USB interface of system.
2 TOUCH
Touch signal output to the external computer.
3 HDMI IN
HDMI signal input, connect to devices with HDMI output
interface (personal computer with HDMI output, set-top box,
or another video device).
4 VGA IN
External computer image input.
5 AUDIO IN
External computer audio input.
6 SPDIF
Optical output.
7 RS-232C
Serial interface, used for mutual transfer of data between
devices.
8 AUDIO OUT
Audio output to the external speaker.
NOTE: This connector is not a Headphone terminal.
9 LAN
Connecting RJ-45 terminals.
0 AC Inlet
AC power input, connecting AC power supply.
! AC SWITCH
To open or shut down AC power supply. “I” means power on,
“O” means power off.
English-11
Page 14

6
%
3
!
(
=
t
$
r
q
Wireless Remote Control
1 2
4
8
0
#
&
)
w
y u
1
Power on/off
2
Mute switch
3 Start
Built-in computer Windows key
4 Space
Built-in computer Space key
5 Alt+Tab
Built-in computer spacebar Alt + Tab
6 Alt+F4
Built-in computer program window close button
7 Numeric keys
Numeric input keys
8 Display
Display channel information
9
Non-function
0 Input
Input signal source selection key, choose different sourced
according to need
! Home
System main screen button
5
7
9
@
^
*
-
e
i
@ Menu
Setting menu button, press this button to pop up
# Red
Lock and unlock Buttons and Touch function
$ Green
Lock and unlock Buttons function
% Yellow
Lock and unlock Touch function
^ Blue
Freeze and zoom
&
One key for blank screen
*
Backspace key
( p
Direction key, press this button for upwards selection
) t
Direction key, press this button for left selection
- u
Direction key, press this button for right selection
= q
Direction key, press this button for downwards selection
q Enter
Conrmation key, press this key to conrm selection state
w
Quickly start writing software
e Back
Return key
r PgUp
Built-in computer page (previous page)
t PgDn
Built-in computer page (next page)
y CH.+ / CH-.
Non-function
u VOL+ / VOL-
Volume switch key
i F1-F12
Built-in computer F1 - F12 function keys
NOTE: All computer - related function keys are not available without a built-in computer.
English-12
Page 15

Operating Range for the Remote
Control
Point the top of the remote control toward the LCD monitor’s
remote control sensor during button operation.
Use the remote control within a distance of about 8 m (26 ft.)
from the remote control sensor, or at a horizontal and vertical
angle of within 30° and within a distance of about 4 m (13 ft.).
English
Caution: Important, the remote
control system may not
function when direct sunlight
or strong illumination strikes
the remote control sensor,
or when there is an object in
the path.
Handling the remote control
• Do not expose to strong shock.
• Do not allow water or other liquid to splash on the
remote control. If the remote control gets wet, wipe it dry
immediately.
• Avoid exposure to heat and steam.
• Except to install the batteries, do not open the remote
control.
English-13
Page 16

Setup
1. Determine the installation location
CAUTION: Installing your LCD monitor must be done by a
qualied technician. Contact your supplier for
more information.
CAUTION: MOVING OR INSTALLING THE LCD MONITOR
MUST BE DONE BY FOUR OR MORE PEOPLE.
Failure to follow this caution may result in injury if
the LCD monitor falls.
CAUTION: Do not mount or operate the monitor upside
down.
CAUTION: This LCD monitor has internal temperature
sensors.
If the LCD monitor becomes overheated, a
“Caution” warning will appear. If the “Caution”
warning appears, stop using the unit and allow it
to cool.
IMPORTANT: To avoid scratching the LCD panel, always
place a soft cloth, such as a blanket that is
larger than the monitor’s screen area, on the
table before laying the monitor face down.
2. Install the remote control batteries
The remote control is powered by two 1.5V AAA batteries.
To install or replace batteries:
A B C
A. Press and slide to open the cover.
B. Align the batteries according to the (+) and (–) indications
inside the case.
C. Replace the cover.
CAUTION: Incorrect usage of batteries can result in leaks or
bursting.
NEC recommends the following battery use:
• Place “AAA” size batteries matching the (+) and (-) signs
on each battery to the (+) and (-) signs of the battery
compartment.
• Do not mix battery brands.
• Do not combine new and old batteries. This can shorten
battery life or cause liquid leakage of batteries.
• Remove dead batteries immediately to prevent battery
acid from leaking into the battery compartment.
• Do not touch exposed battery acid, it may injure your skin.
NOTE: If you do not intend to use the Remote Control for
a long period of time, remove the batteries.
3. Connect external equipment
(See page 16 and page 19)
• To protect the external equipment, turn off the main power
before making connections.
• Refer to the user’s manual of your equipment for further
information.
NOTE: Do not connect/disconnect cables when turning on
the monitor or other external equipment, as this
may result in a loss of the monitor image.
English-14
Page 17

4. Connect the supplied power cord
• The equipment should be installed close to an easily
accessible power outlet.
• Fasten the power cord to the LCD monitor by attaching
the clamper.
• Fully insert the prongs into the power outlet socket.
A loose connection may cause image degradation.
NOTE: Please refer to the “Important Information” section
of this user’s manual for proper selection of an AC
power cord.
(Recommended Fasten Force: 139 - 189N•cm)
11.Recommended Adjustments
To reduce the risk of the “Image Persistence”, please
activate “DATE &TIME” function.
English
5. Cable information
CAUTION: Use the attached specied cables with this
color monitor so as not to interfere with radio
and television reception.
For USB and mini D-Sub 15-pin, please use a
shielded signal cable with ferrite core.
For D-Sub 9-Pin and HDMI please use a
shielded signal cable.
Use of other cables and adapters may
cause interference with radio and television
reception.
6. Switch on the power of all the attached
external equipment
When connected with a computer, switch on the power of the
computer rst.
7. Operate the attached external equipment
Show the signal on the screen from the desired input source.
8. Adjust the sound
Make volume adjustments when required.
9. Adjust the screen
Make adjustments to the image position, if necessary.
10.Adjust the Image
Make adjustments such as backlight or contrast when
required.
English-15
Page 18

Connection and Setting
Wiring Diagram
USB devices
Computer
Computer
Computer
Power amplier/stereo Amplier
Computer (RS-232C)
Stereo Amplier
Internet
USB devices
CAUTION: For the safety of you and the machine, please do not connect any power plug before connection.
NOTE: Do not connect or disconnect cables when turning on the monitor’s main power or other external equipment’s
power,as this may result in a loss of the monitor image.
NOTE: Use an audio cable without a built-in resistor. Using an audio cable with a built-in resistor turns down the sound.
Before making connections:
* First turn off the power of all the attached equipment and make connections.
* Refer to the user’s manual included with each separate piece of equipment.
* We strongly recommend connecting or disconnecting a USB storage device to the monitor when the monitor’s main power is off.
Connected equipment Connecting terminal Input signal name
AV
PC
Please set appropriate setting for input signal.
HDMI IN1 HDMI 1 HDMI 1 HDMI 1
HDMI IN2 HDMI 2 HDMI 2 HDMI 2
HDMI IN3 HDMI 3 HDMI 3 HDMI 3
HDMI IN1 HDMI 1 HDMI 1 HDMI 1
HDMI IN2 HDMI 2 HDMI 2 HDMI 2
HDMI IN3 HDMI 3 HDMI 3 HDMI 3
VGA IN VGA Audio IN VGA
Connecting audio
terminal
Input button in
remote control
English-16
Page 19

External Computer and Touch Connection
USB Cable
TOUCH
Audio Cable
AUDIO IN
VGA Cable
VGA IN
or
USB Cable
TOUCH
HDMI Cable
HDMI IN
Computer
1) Connect to external computer
a. Use VGA cable to connect to VGA output port of external computer, and meanwhile use audio cable to connect to external
computer audio output interface.
b. Use HDMI cable to connect to HDMI output port of external computer.
2) Use USB cable to connect to external computer USB port.
3) After cable connection, plug in power cord, and switch power on.
4) Start external computer.
5) Press
key, and the equipment is power on.
6) Press the INPUT key to switch to VGA/HDMI channel
English
NOTE:
External computer input, equipment’s best resolution is 3840*2160.
Recommended computer conguration:
1GB Available Hard Drive
2.0GHz Processor, 1GB Memory
More than 256 color display cards
VGA OUT / HDMI OUT, Audio-OUT, USB Interface
Support Resolution 800*600,1024*768,1920*1080,3840*2160
Audio and Video Equipment
HDMI Cable
HDMI IN
1) Use HDMI cable to connect audio and video equipment with HDMI output.
2) After cable connection, plug in power cord, and switch power on.
3) Press
4) Press INPUT key to switch to HDMI port.
to turn equipment on.
DVD Disk Player
English-17
Page 20

RS-232C Connection
Serial Port Cable
Computer
After using serial port cable to connect central control equipment and machine, certain function of the machine can be controlled
via central control equipment, such as: machine ON/OFF, and adjustment of sound volume, etc.
LAN Connection
Network Cable
LAN
Internet
USB Connection
USB
USB Cable
USB Device
English-18
Page 21

Connecting a Personal Computer
Connecting your computer to your LCD monitor will enable you to reproduce your computer’s video signal output.
Some display cards may not be able to support the required resolution for proper image reproduction.
Your LCD monitor shows proper image by adjusting the factory preset timing signal automatically.
<Typical factory preset signal timing>
Resolution
640 x 480 31.5 kHz 60 Hz Yes Yes
800 x 600 37.9 kHz 60 Hz Yes Yes
1024 x 768 48.4 kHz 60 Hz Ye s Ye s
1280 x 720 45.0 kHz 60 Hz Ye s No
1280 x 768 47.8 kHz 60 Hz Ye s Ye s
1280 x 960 60.0KHz 60 Hz Ye s Ye s
1280 x 1024 64.0KHz 60 Hz Yes Yes
1360 x 768 47.7KHz 60 Hz Ye s Ye s
1440 x 900 55.9KHz 60 Hz Yes Yes
1680 x 1050 65.3KHz 60 Hz Yes Yes
1920 x 1080 67.5KHz 60 Hz Yes Yes
3840 x 2160 67.4KHz 30 Hz No Yes
3840 x 2160 135KHz 60 Hz No Yes
Scannibg frequency
Horizontal Vertical HDMI (4k/60Hz)
VGA
HDMI
Connecting a Player or Computer with HDMI
• Please use an HDMI cable with the HDMI logo.
• It may take a moment for the signal to appear.
• Some display cards or drivers may not display an image correctly.
• Please check display card when image is compressed with 1920 x 1080.
• To output HDMI audio, set [HDMI1], [HDMI2] or [HDMI3] at INPUT in the OSD or choose [HDMI1], [HDMI2] or [HDMI3] by
the remote control INPUT button.
• If the monitor’s main power is turned on after a connected computer is turned on, sometimes images are not displayed.
In this case, please turn off the computer then turn it on again.
English
Connecting a USB device
USB: USB downstream port.
Connect USB devices such as mobile hard disk, U disk, USB keyboard and mouse, USB drives, etc.
please use this port.
• Please make sure the connector shape and orientation is correctly aligned when connecting the USB device or cable.
• Please refer to the specications page for power supply information (see page 69, page 70 and page 71).
• When you use the USB port for power supply, please use a USB cable that supports 500mA.
• Do not bind the USB cable. It may cause heat or re.
English-19
Page 22

Basic Operation
Power ON and OFF Modes
The LCD monitor power indicator will turn blue while powered on.
NOTE: The Main Power switch must be in the ON position in order to power up the monitor using the remote control or the
Power button.
OFF
Main Power Switch
ON
Using the remote control
POWER ON button
Power Button
English-20
Page 23

Power Indicator
LED indicator status Machine status
Glowing blue Running or booting.
Glowing red Standby.
Blinking between blue and
red slowly
Blinking between blue and
red fastly
NOTE: If the indicator is blinking red in a combination
of long and short, a certain failure might have
occurred, please contact your supplier.
Energy saving (Turn off the
backlight).
Shutting down or received
remote control signal.
Aspect
Source Aspect ratio
VGA 4:3
16:9
HDMI 4:3
16:9
PTP*
* Point To Point optimize touch performance when 3840 x 2160 input. (not
available under System or not 3840 x 2160 input timing)
English
English-21
Page 24

Displayable/playable les
Still
Supported formats
Files extension Supported
.jpg .jpeg .jpe Baseline, Progressive
.PNG Interlace, non-interlace
.bmp .gif Only supports static display of GIF images, does not support moving images
Motion image
Supported formats
File extension Codec
.v H.264 – MPEG Audio Layer3 (Abbreviation: MP3)
H.264 – AAC-LC (Abbreviation: AAC)
.3gp H.264 – AAC, MPEG4 – AAC
.avi MPEG1 – MP3, MJPEG – MP3, Xvid-SP – MP3
MPEG2 – MPEG Audio Layer2 (Abbreviation: MP2)
MJPEG – ADPCM, MJPEG – LPCM
H.264 – ADPCM, H.264 – LPCM
.m4v H.264 – AAC
.mkv MPEG4 – MP2, H.264 – AAC, H.265 – AAC
VP8 – Vorbis, VP9 – Vorbis
.mov MPEG4 – ADPCM, MPEG4 – LPCM, MPEG4 – MP3
MPEG4 – AAC, H.264 – MP3
H.264 – AAC, H.265 – AAC
MJPEG – ADPCM, MJPEG – LPCM
.mp4 MPEG4 – MP3, MPEG4 – AAC
H.264 – MP3, H.264 – AAC, H.265 – AAC, H.264 – HE-AAC
.mpg/.mpeg MPEG1 – MP3, MPEG1 – MP2
MPEG2 – MP3, MPEG2 – MP2
MPEG2 – AAC, MPEG2 – LPCM
.ts MPEG2 – MP2, MPEG2 – AAC
H.264 – MP2, H.264 – AAC, H.265 – AAC
BGM
Supported formats
File extension Audio codec
.aac AAC
.ac FLAC
.m4a AAC
.mp2 MPEG1/2 layer2
.mp3 MPEG1/2 layer3
.ogg Vorbis
.wav LPCM/ADPCM
English-22
Page 25

Information
Item Conditions
Resolution MPEG-1 MP@HL,1080P@30 fps
MPEG-2 MP@HL,1080P@30 fps
MPEG-4 Visual Simple prole
H.264 Main and High prole level 5.2, 4K*2K 60 fps
H.265 Main/Manin10 prole,
High Tier@ Level 5.1 4K*2K@60 fps
Motion JPEG MJPEG baseline decoding 1280*720p@30fps
Resolution .bmp Up to 8000x8000
.gif Up to 8000x8000
.jpeg/.jpg Progressive: up to 7000x7000
Base-line: up to 8000x8000
.png Interlace :up to 8000x8000
Non-Interlace: up to 8000x8000
Movie bit rate - Up to 135 Mbps
Audio sample rate - Up to 48 kHz
Audio bit rate MP2 Up to 384 kbps
MP3 Up to 320 kbps
ADPCM Up to 384 kbps
LPCM Up to 1.5Mbps
AAC Up to 576kbps
English
English-23
Page 26

Compatible USB memory
Format a USB memory in the FAT32 format or NTFS format for using it in the Media Player. Refer to the computer’s instruction
user’s manual or Help le on how to format a USB memory.
Please use a USB memory with this monitor in accordance with the drawing below.
If the physical size of the USB device is larger than than the supported sizes listed below, please use a USB extension cable.
USB memory
Under 20 mm
Unlimited
NOTE: Check the format if this device cannot recognize the connected USB memory.
It is not guaranteed to work with all USB memories sold commercially.
Please connect the USB memory to the USB port.
FAT32 format supports read and write, NTFS format only supports reading ,does not support writing.
Extension cable
English-24
Page 27

OSD (On-Screen-Display) Controls
Swipe your nger up from the bottom of the screen or press the input button on the remote control or launcher interface to
access the OSD Menu.
OSD Settings
General setting
Adjustment Item Problem / Option
1
Input*
Volume
Brightness
*1 The switching of the signal input take a few seconds.
Direct
OPTION Select the OPTION input.
Home Select the Home input.
HDMI1 Select the HDMI1 input.
HDMI2 Select the HDMI2 input.
HDMI3 Select the HDMI3 input.
VGA Select the VGA input.
Direct
Too soft Increase or decrease output volume level.
Too loud
Direct
Brightness of backlight is reduced.
English
Click the button in the upper right corner to enter the settings for Audio, screen, Display, and Adjust. see page 26,
page 27, page 28, and page 29.
English-25
Page 28
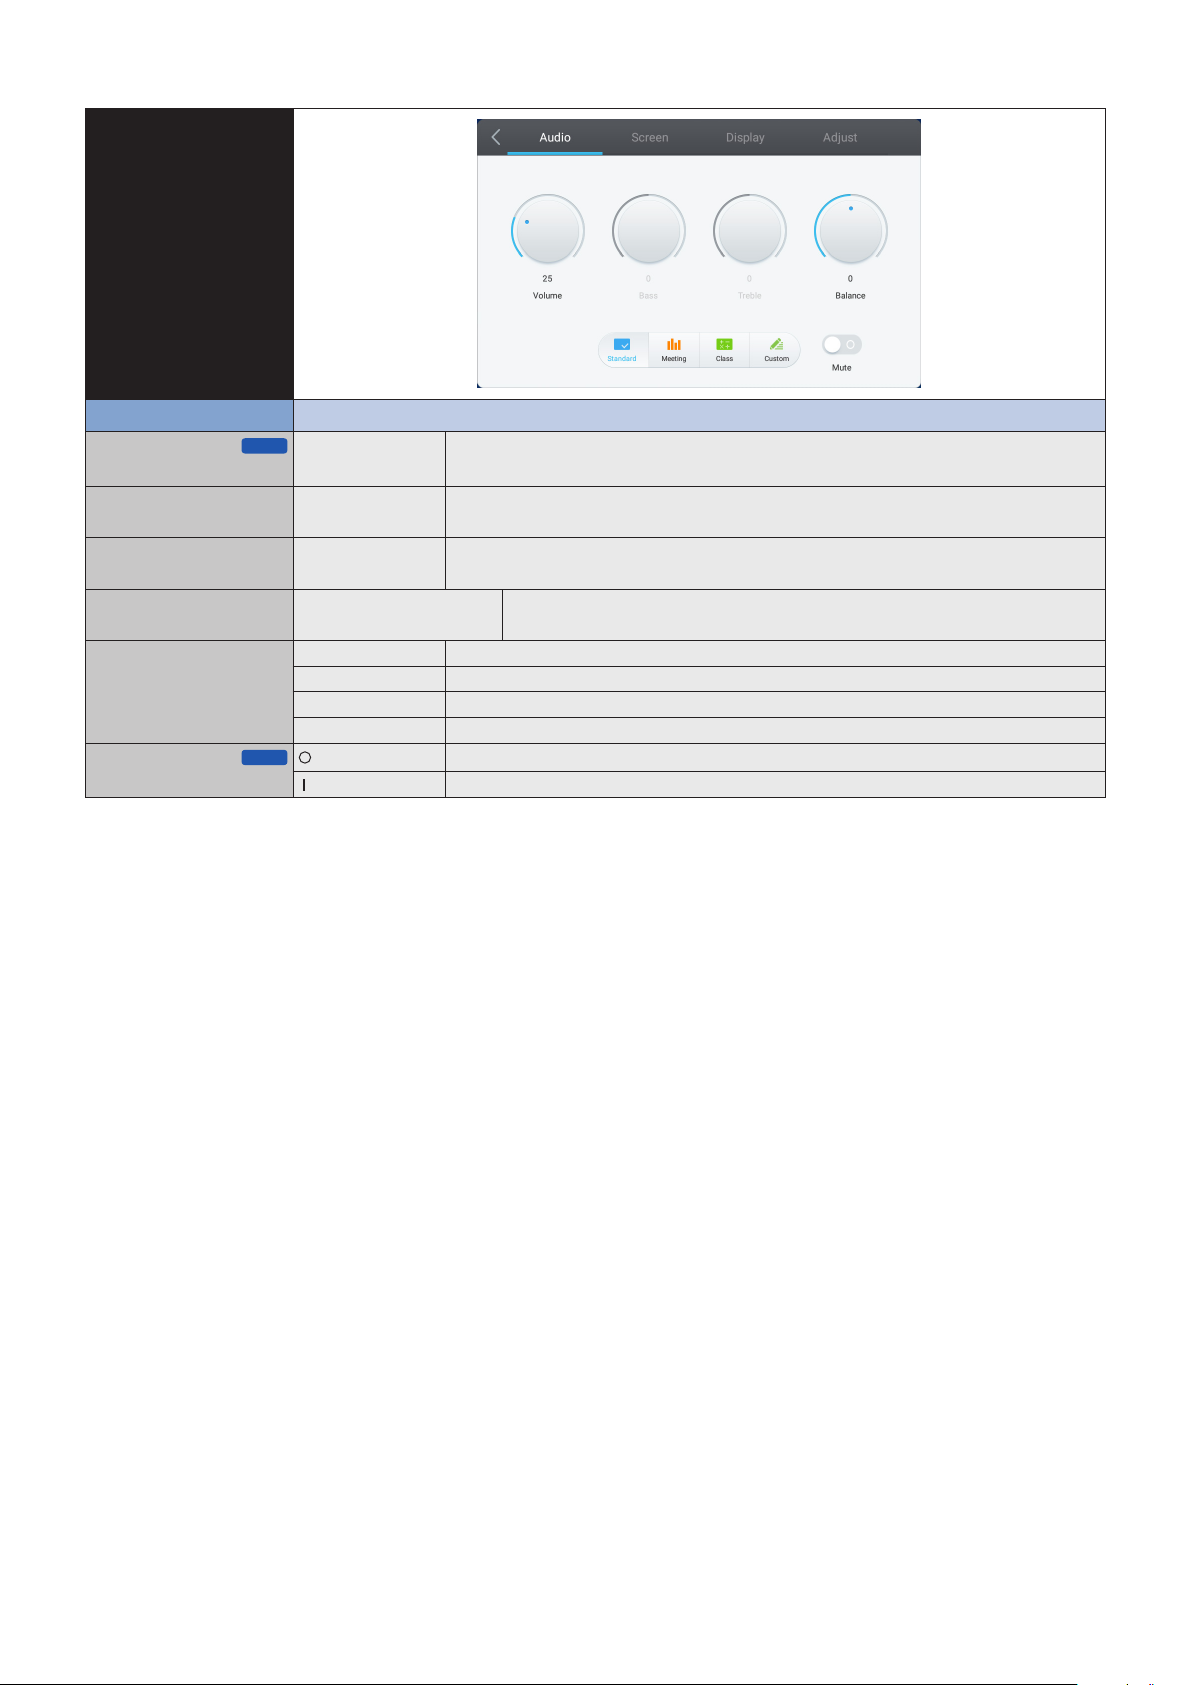
OSD Settings
Audio setting
Adjustment Item Problem / Option
Direct
Volume
Bass Too weak To accentuate or reduce the low frequency sound.
Treble Too weak To accentuate or reduce the high frequency range of audio signals.
Balance Left side speaker louder Adjust left and right speaker balance.
Sound Mode Standard Standard
Mute
Too soft Increase or decrease output volume level.
Too loud
Too strong
Too strong
Right side speaker louder
Meeting Sound quality suitable for the conference.
Class Sound quality suitable for the classroom.
Custom Custom sound quality.
Direct
Return the sound volume to the previous level.
Turn off the sound.
English-26
Page 29

OSD Settings
Screen setting
Adjustment Item Problem / Option
Aspect ratio 16:9 Displays all picture in 16:9 aspect ratio.
4:3 Displays all picture in 4:3 aspect ratio.
PTP* Display the picture point to point.
* Point To Point, to optimize touch performance when 3840 x 2160 input. (not avalilable under system or not 3840 x 2160 input timing)
English
English-27
Page 30

OSD Settings
Display setting
Adjustment Item Problem / Option
Brightness*
Contrast Too weak Adjusts the image brightness in relationship to the input signal.
Picture Mode Standard For general windows environment and monitor default setting.
Color Temp Standard Greenish white
*1 Adjust the Brightness when you are using the monitor in a dark room and feel the screen is too bright.
1
Too dark Adjusts the image brightness in relationship to the background.
Too bright
Too strong
HighBright Higher brightness setting.
Cinema A setting that boosts dark tones; best suited for movies.
Custom Displays a picture on a screen set by Image Settings adjustments.
Cold Bluish white
Warm Reddish white
English-28
Page 31

OSD Settings
Adjust setting*
1
Adjustment Item Problem / Option
English
H Position
Too far to the left
Controls the horizontal position of the image within the Display area of the LCD
Too far to the right
V Position
Too low
Controls the vertical position of the image within the Display area of the LCD.
Too high
Clock
Too narrow
Too wide
Press remote u to expand the width of the image on the right of the screen.
Press remote t to narrow the width of the image on the left.
Phase Adjusts the visual “noise” on the image.
2
Auto*
*1 Only VGA input.
*2 For best results, use the Auto Adjust in conjunction with the adjustment pattern. See page 27 for SCREEN ADJUSTMENTS.
Adjust H/V Position, Clock and Phase automatically.
English-29
Page 32

[Application]
Click with the touch pen.
or
Click
with the touch pen. Then, click with the touch pen.
English-30
Page 33

OSD Settings
Settings
Adjustment Item Problem / Option
Wireless & networks Ethernet*
1
SHARE SAMBA Service SAMBA sharing service.
Device Display Set the wallpaper that is build into the system.
Sound Touch sounds: ON/OFF
Storage To display the internal system and USB disk.
Apps View each application.
Personal Security Credential storage (Certicate Authorities)
Language & input Set display language, keyboard and input method.
Startup and
shutdown
Input setting Change the Input name to Nickname.
Other Setting Floating Style
System Date & time Set automatic or manually date and time.
About Device Version information of each software.
*1 When DHCP is turned on, connect the DHCP server to the network.
*2 When the Wake on LAN function is enabled, the standby power will be 2W or less.
Set the wired network.
Network: On/Off, LOCAL NETWORK SETTING, IP adress, Default gateway, Netmask,
DNS, Proxy
Language: Deutsch, English, Español, Français, Italiano, Svenska, Pусский, 中文,
Startup and shutdown
option
Startup
channel
Last shutdown channel
Default startup channel (Select the source)
Standby after startup (black screen) : Turn off the backlight.
NOTE: Press the Screen Off button on the remote control to return
the screen.
Timer switch Close power off reminder.
Setting
Boot time /
Off time
Floating Annotation
Settings
SystemDock
Channel Settings
Select the time of each, and select day of the week
or everyday or the business days.
Set the Toolbar.
Slide Toolbar / Universal system Toolbar
Set the SystemDock.
Available in all channel / Available in Home
Disable in all channel
Wake on LAN*
2
Wake on LAN function is turn On / Off.
English
日本語
English-31
Page 34

OSD Settings
Network functions
Menu Function
External Control
(NaviSet Administrator 2)
1
AMX*
*1 HINT: When using a device that supports AMX Device Discovery, all AMX NetLinx control systems will recognize the device and download the appropriate
Device Discovery Module from an AMX server.
Select this setting if AMX Device Discovery will detect the device.
Select this setting if External Control or NaViSet Administrator 2 via LAN is Enables.
To turn on or off for the detection from AMX Device Discovery when connecting to a network supported by an
AMX’s NetLinx control system.
English-32
Page 35

OS User Manual
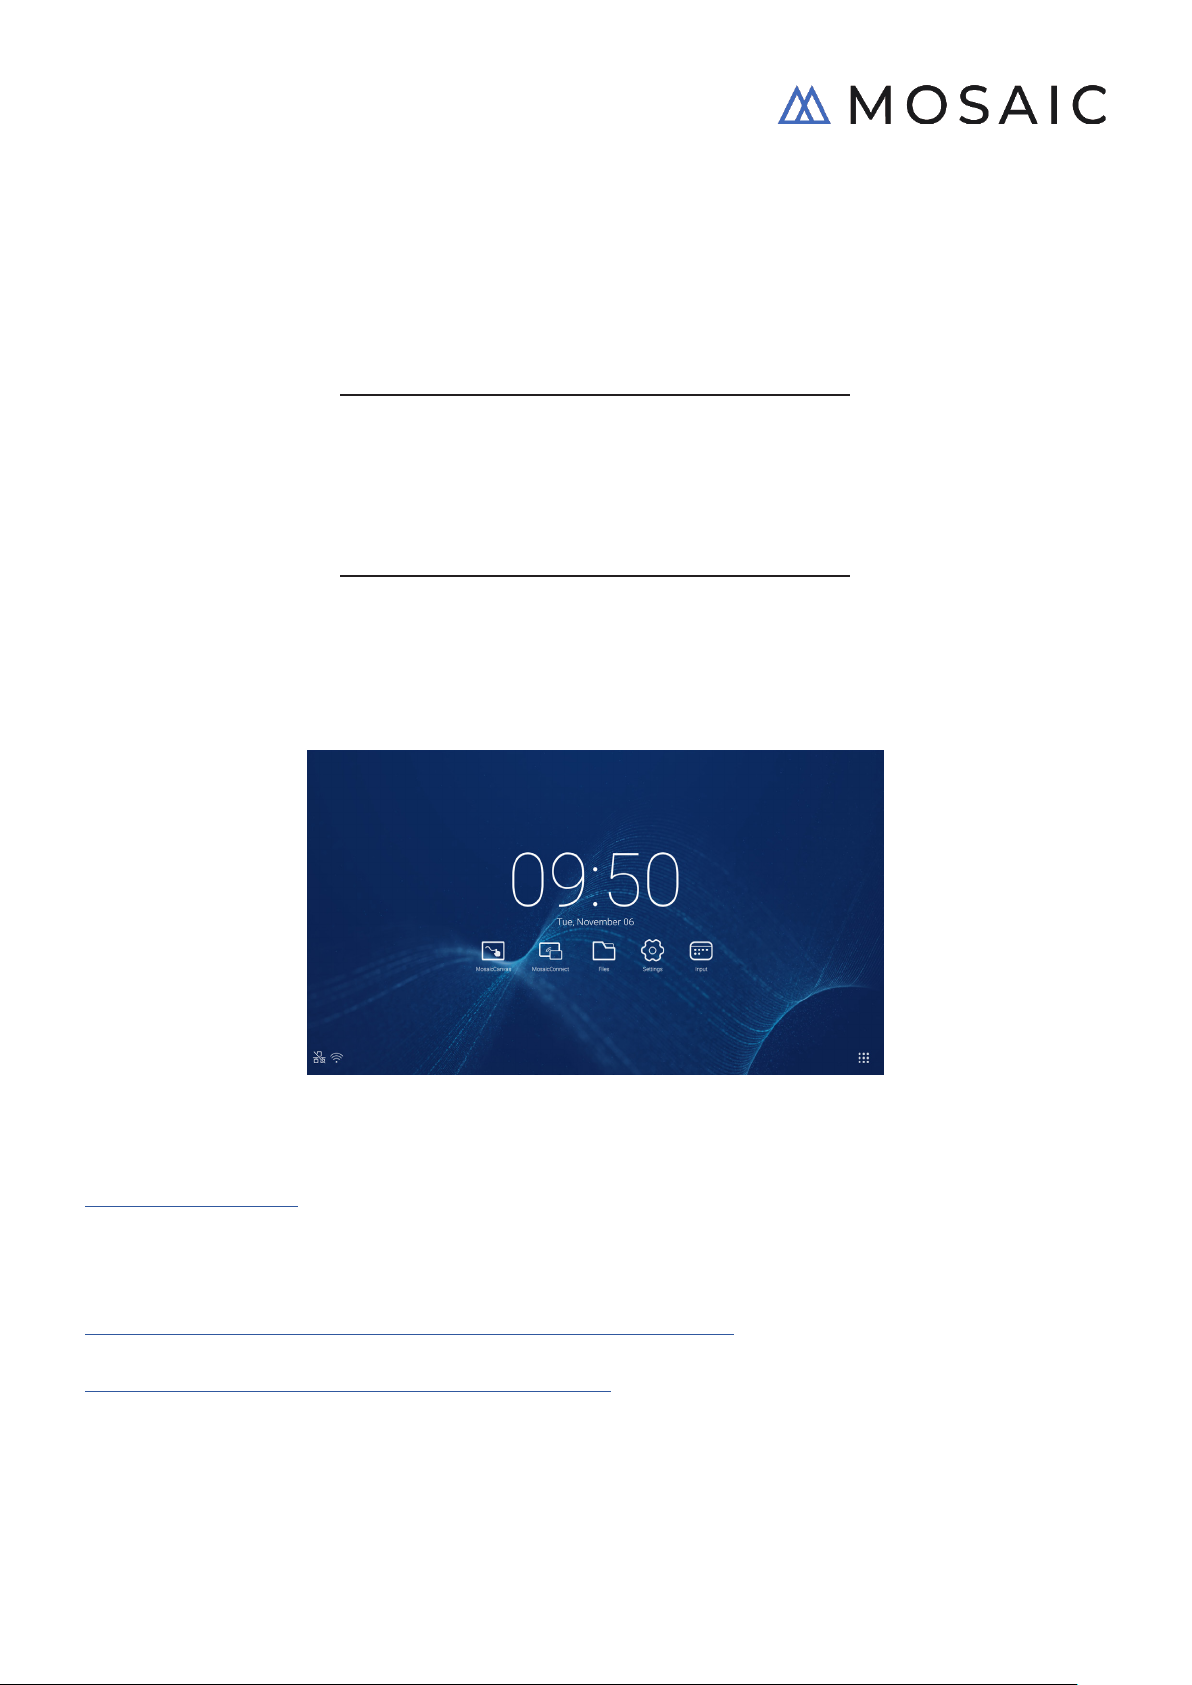
1. Introduction
OS is an application operating system for intelligent tablet computers. You can instantly access the Launcher interface by
opening the machine, as shown in Fig. 1-1.
Figure 1-1 Launcher interface
Click the
button on the right bottom to access the apps, as shown in Fig. 1-2.
English
Figure 1-2 APPS
English-33
Page 36

2. Sidebar
Click the button with u or t on sidebar of both sides to call it out. For example, Fig. 2-1 is shown how to call out the sidebar
on the right side. The functions of the sidebar include the Back key, Home key, recent tasks, annotation tools, screen freezing,
small tools, and input switch.
A valid path can be set for the sidebar on the Settings.
Figure 2-1 Sidebar button
2.1 Back key
Click to return to the last operating interface.
2.2 Home key
Click to return to the desktop.
2.3 Recent tasks
Click to pop out the window and thumbnails of recently used applications are displayed.
Tap thumbnail to start or switch applications. To delete the thumbnail of the application, Swipe (ick) the thumbnail to be deleted
left or right.
By tapping [Clean All the Processes] displayed at the bottom of the screen, you can delete all thumbnails.
Deleting the thumbnail of the application can end the application.
English-34
Page 37

2.4 Annotation tools
Click to pop out the annotation tools as shown in Fig. 2-4-1. The tool includes such functions as annotation, gesture erasing,
screenshot, and exit. When the quick whiteboard is being used, this function is unavailable.
Figure 2-4-1 Annotation tool
1. Annotation. After accessing this mode, you access the annotation mode completely, and you can directly write and note
on the interface. You can switch the pen color with red or black.
2. Screenshot saving. Click
3. Exit. Click
to exit the annotation mode.
to save the current screenshot.
2.5 Screen freezing
Click the button to pop out the screen freezing tools. You can freeze the screen, and at the same time zoom in or out the
current screen.
Figure 2-5-1 Screen freezing tools
English
1. Zoom in. Click the
2. Zoom out. Click the
3. Return. Click the
4. Exit. Click the
button to zoom in the current screen.
button to zoom out the current screen.
button to return to the original size of the screen.
button to exit the screen freezing.
2.6 Small tools
Click to pop out the tool choice box, including spotlight, count down, stop watch, and air class.
2.6.1 spotlight
Click the icon to open the spotlight, as shown in Fig. 2-6-1-1. The spotlight can be used to make audience focus their
attention on the location you need to emphasize.
Figure 2-6-1-1 Spotlight interface
1. Drag in the black area to move the location emphasized by the spotlight.
2. Setting. Click to pop out the window, as shown in Fig. 2-6-1-2.
Figure 2-6-1-2 setting
● Scale. Drag the slider to adjust the range of the spotlight.
● Alpha. Drag the slider to set the transparency of the part sheltered by the spotlight.
3. Turn off the spotlight. Click
to turn off the spotlight.
English-35
Page 38

2.6.2 count down
Click the count down button to pop out the count down small tool, as shown in Fig. 2-6-2-1.
Click the “START” button to start the count down, as shown in Fig. 2-6-2-2. Click “PAUSE” to pause the count down. Click
the “RESET” button to reset the count down to the initial status.
Figure 2-6-2-1 Initial interface of the count down Figure 2-6-2-2 Count down interface
2.6.3 stop watch
Click the button to start the stop watch, as shown in Fig. 2-6-3-1. Such functions as stop watch, pausing the stop watch,
continuing the stop watch, and reset are included.
Figure 2-6-3-1 Stop watch
2.6.4 Air class
Click enter the class, After students scan the QR code to join the class, teacher click “ENTER THE CLASS”.
Please make sure you are in the same network with the IFP.
Fig 2-6-4-1 QR code
Fig 2-6-4-2 Menu bar
English-36
Page 39

2.6.4.1 Voter
Click the button, and the answer bar appears on the lowest corner of the teaching interface. Click “single choice” or
“multiple choice” to select the question type.
Fig 2-6-4-1-1 Voter
Answer. Click Begin to start answering question. After students answer the question, their names turn blue.
English
Fig 2-6-4-1-2 Voter
Answers statistics. Click Finish to nish answering questions, and you can access the answers statistics page.
Fig 2-6-4-1-3 Answers statistics
English-37
Page 40

Choose the right answer(s), and calculate the accuracy.
Fig 2-6-4-1-4 Answers statistics
Explain. Click the
question explanation while checking the answers situation.
explanation button on the answers statistics to access the teaching page. Users can view the
Fig 2-6-4-1-5 Explain
2.6.4.2 Judge
Click the button, and the answer bar appears on the lowest corner of the teaching interface.
Fig 2-6-4-2-1 Judge
English-38
Page 41

Answer. Click Begin to start answering question. After students answer the question, their names turn blue.
Fig 2-6-4-2-2 Voter
Answers statistics. Click Finish to nish answering questions, and you can access the answers statistics page. Choose
the right answer(s), and calculate the accuracy.
English
Fig 2-6-4-2-3 Answers statistics
Explain. Click the
question explanation while checking the answers situation.
explanation button on the answers statistics to access the teaching page. Users can view the
Fig 2-6-4-2-4 Explain
English-39
Page 42

2.6.4.3 Responder
Click the button to access the responder part. Students can respond by pressing the [OK] key.
Fig 2-6-4-3-1 Responder
2.6.4.4 Selector
Click the button to access the selector. User can randomly pick not less than one person in air class.
Fig 2-6-4-4-1 Selector
Set the number of people and click ‘START’, it will randomly pick the name from air class.
Fig 2-6-4-4-2 Select result
English-40
Page 43

2.6.4.5 Message
After activating the message, students can publish the message comments on the mobile phone. The message
comments are showing on the tablet computer in real time.
Fig 2-6-4-5-1 Message
2.6.4.6 Manager
Click the Manager button to pop out the QR code, for ease of students in the class to join in air class.
English
2.7 Input switch
Click to move to the input signal selection screen.
Fig 2-6-4-6-1 Manager
English-41
Page 44
3. Mosaic User guides for Connect &Canvas
3.1 Introduction
Mosaic is a suite of collaboration products designed to simplify how people share content and collaborate with each other. This
document gives a high-level overview of Mosaic Canvas, a digital whiteboard tool, and Mosaic Connect, a wireless presentation
solution. Both tools are included as standard on NEC’s CB series display.
3.2 System requirements
To run Mosaic Connect and Canvas, we recommend the following specication:
Attendees can join via the following methods:
Platform Connection
Windows* Windows application, guest app
Mac* OS Mac application, AirPlay
iOS* iOS, AirPlay
Android* Android application
Web* Chrome
* Less than 1920x1080 is supported
3.3 Installation and activation
Both Canvas and Connect are pre-installed on the CB series display. There is no requirement to activate the software. To launch
either application, tap the icon on the CB series home screen.
Getting the App
Mosaic client app is available through Android and iOS app stores
The easiest way to get the correct version is by visiting
https://connectmosaic.com on the device. The browser will automatically detect your device and provide a link to download the
app.
Alternately you go directly to each store through the below links
Play Store -
https://play.google.com/store/apps/details?id=com.displaynote.mosaic&hl=en_GB
iTunes –
https://apps.apple.com/us/app/mosaic-connect-app/id1450158906
English-42
Page 45

3.4 Mosaic Connect home screen
The home screen contains the following information:
● Joining instructions and Web URL for attendees
● Session ID
● PIN (optional)
● Overview of connected attendees
● Settings
● New session
● Exit Mosaic Connect
● Shared items
● Home button
English
3.5 Creating a session
When the user rst launches Mosaic Connect, a session ID will be generated. The user can also create a new session from
Mosaic Connect by clicking or tapping on ‘new session’, at the bottom of the screen.
3.6 Joining a session
If it’s the user’s rst time using Mosaic Connect, they need to visit www.connectmosaic.com where they’ll nd instructions on
how to join a session.
Please note, this page will adapt to attendee’s hardware. i.e. Windows users will get Windows software and Mac users will get
Mac software.
Users can choose to join via the web (Chrome and Firefox)
English-43
Page 46

3.7 Joining via native application
Once a user has downloaded and opened the native application, the following screen is displayed:
To join, the user should enter the session ID ( shown on the display), their name and then press Connect. If a PIN is required,
this is an additional step. Once a user connects, their name will be shown on the home screen.
3.8 Joining via AirPlay
To join via airplay, swipe up on your Apple device and select “screen mirroring”.
To start presenting, select the name of the display you would like to present to - you can nd this on the top right-hand corner of
the home screen. You will be prompted to enter a password: the password is the same as the session ID.
Once connected, your name will appear on the list of connected attendees on the right-hand side. Finally, double tap your name
on the touch display to present your screen.
English-44
Page 47

3.9 Joining via web
To connect via web, go to www.connectmosaic.com and choose the option ‘connect via web’.
Enter your name, session ID and PIN if required.
Choose to present either your entire screen or specic application window and then click share.
English
3.10 Client Toolbars
Once you’re connected to the session, you can use the Mosaic Connect toolbar to:
● Share/stop sharing your screen
● Pause sharing
3.11 Managing attendees from the main display
Users of Mosaic Connect can use the home screen to invite an attendee to present. To do so, go to the home screen and
double tap a user’s name.
Before sharing their screen, each user will get a prompt asking them to conrm if they would like their screen to be wirelessly
presented. If they select Yes, it will be shown on the main display. If they select No, Mosaic Connect will remain at the home
screen.
Mosaic Connect enables back control of any connecting Windows PC.
3.12 Settings
Settings are accessible via the Mosaic Connect home screen. Settings are arranged as following
● General
● Display
● Network & Connections
● Security
English-45
Page 48

3.13 General
Includes device information, such as version, serial number and IP address. Allows user to edit and save the room name,
making the solution easily recognised if the user has more than one version deployed.
3.14 Display
Here, the user can change the background image that appears on the Connect home screen. Also includes recommended
image size.
English-46
Page 49

3.15 Network and connections
Users can choose to turn on/off AirPlay connections and Cloud connections.
3.16 Security
Users can choose to allow local connections only (i.e. connect to sessions while on the same network). They can enable or
disable a PIN.
English
English-47
Page 50

3.17 Mosaic Canvas
Both Canvas and Connect are pre-installed on the CB series display. There is no requirement to activate the software. To launch
either application, tap the icon on the CB series home screen.
Launching Mosaic Canvas will open up a blank workspace and toolbar as follows:
3.18 Mosaic Canvas toolbar
The Mosaic Canvas toolbar contains the following tools and subsets:
● Pen
Pen thickness
Pen colour
Line tool
Arrow tool
● Cursor
Cursor
Object grouping
● Highlighter
Highlighter thickness
Highlighter colour
● Shape
Shape ll
Shape style
Shape thickness
● Text
Sticky Note
● Eraser
● Attachments
English-48
Page 51

3.19 Saving/downloading a board
Each board can be downloaded to the local device. User can choose to download a Current board (the board they are working
on) or All boards (every board in that session).
● To download boards
● Tap download PDF in the top right hand corner.
● Select Current board or All boards
English
● Choose folder (this is where you’ll save the board)
English-49
Page 52

3.20 Adding boards
Mosaic Canvas allows users to add multiple boards:
To add a board
● Select add board from the bottom of the screen
● Add either new board or a duplicate board. Note: choosing duplicate board makes a copy of your existing board.
● Give your board a name
● Press add
English-50
Page 53

3.21 Renaming, duplicating and deleting a board
To rename, duplicate or delete a board, tap the three dots in the top left-hand corner of your board.
Choose to either:
● Rename
● Duplicate
● Delete board
3.22 Saving, opening and exiting boards
To save a board, choose the menu icon in the bottom left of the screen.
English
From here you can:
● New. Open a new board
● Open. Open a previously saved board
● Save/Save As…. Save your current board
● Exit. Exit Mosaic Canvas
3.23 Undo and redo
To undo or redo an action, choose the undo redo button at the right-hand side of the display.
English-51
Page 54

4. Files
Click to pop out the le browsing as shown in Fig. 4-1. It can browse the les saved in the system such as document,
whiteboard writing, video, picture, and audio. In addition, it can automatically identify external USB device, browse les
according to category, search for the les, etc.
Fig 4-1 File browsing
4.1 Browsing according to category
Users can browse resources stored in the system according to category, including document, whiteboard writing (pages saved
by the whiteboard and quick screenshot), video, picture, and audio.
● All. When accessing internal storage module, all resources are displayed by default.
● Doc. Click Doc to browse PPT, Word, Excel, PDF documents.
● Note. Click Note to browse les and quick screenshot saved by the whiteboard.
● Picture. Click Picture to browse the stored pictures, formats like .jpg, .jpeg, .png, .bmp, and .gif are supported.
● Media. Click Media to browse the stored videos, formats like .avi, .v, .m4v, .mkv, .mov, .mp4, .mpeg, .mpg .3gp, and .ts
are supported
● Search. In the input box on the right upper corner of the interface, enter the resource name you want to search, and click
to search for the resources. For example, by entering “word”, you can nd resources whose name is “word”.
4.2 Resource operation
Users can edit the resources stored in the system, including creating, selecting, selecting all, cancelling selecting, copying,
pasting, cutting, deleting, renaming, and more.
1. Selecting. Click the
Then you can select resources as required.
button to switch to , and a selecting box pops out on the left upper corner of the resources.
Fig 4-2-1 Selecting interface
English-52
Page 55

2. Selecting all. By clicking the button, you can select all resources under the current directory.
Fig 4-2-2 Selecting all interface
English
3. Cancelling selecting. Click
4. Creating. Click “Creating” to create new folders under the current directory.
5. Copying. When the resource is selected, the copy button will appear. Click
6. Cutting. When the resource is selected, the cutting button will appear. Click
7. Deleting. Click
8. Pasting. When there is any resource being copied or cut currently, the
copied/cut resource to the specied location as required. You can execute the pasting operation only when the default
folder is displaying “all” resource locations.
9. Renaming. Click
10. More. Insert USB to Click
11. Select a certain resource, the resource operation menu will pop out at the bottom of the window. You can perform
operations such as deleting, copying, cutting, pasting, and renaming on the current resource.
to delete the selected resource.
to rename the selected resource.
to cancel all resources that have been selected currently.
Fig 4-2-3 New Folder
to copy the currently selected resource.
to cut the currently selected resource.
button is available. Users can paste the
to pop out the “send to” button. You can send the selected le to the target folder.
English-53
Page 56

4.3 Ordering menu
● Click the ordering button to pop out the menu as shown in Fig. 4-3-1. You can order the resources, including ordering
according to the name, type, o size, and time. Resources are ordered according to name by default.
Fig 4-3-1 Ordering menu
1. Name. When “ordering according to name” is selected, the displayed resources will be ordered according to resource
name.
2. Type. When “ordering according to type” is selected, the displayed resources will be ordered according to resource type.
3. Size. When “ordering according to size” is selected, the displayed resources will be ordered according to resource size.
4. Time. When “ordering according to time” is selected, the displayed resources will be ordered according to resource time.
● Tile. Click
shown in Fig. 4-3-2.
to display the resources in the form of icon. The resources are displayed in the form of icon by default, as
Fig 4-3-2 Tile display
● List. Click
to switch to display the resources in the form of detailed information, as shown in Fig. 4-3-3.
Fig 4-3-3 List display
4.4 Exit
Click to exit the le browsing, and return to the homepage.
English-54
Page 57

5. Settings
Click the button to open setting, as shown in Fig. 5-1. You can tap to click and select the setting option, including wireless &
networks, share, device, personal, and system.
English
Fig 5-1 Setting menu
5.1 Wireless & networks
You can set whether to enable the network, and view the network, including the IP address, mask, and gateway.
5.2 Share
SAMBA sharing service and Network function (External Control and AMX).
5.3 Device
Display: setting wallpaper, and others.
Storage: Show the storage about this device.
Sound: Touch sound and sound output settings.
Apps: all apps in this device.
5.4 Personal
Setting language & input, Startup and shutdown, Security, Input Setting, Other Setting, etc.
Language & Input: Set display language, keyboard and input method.
Startup and shutdown: Set Startup channel, Standby after startup (black screen)
Input Setting: Change the Input name to Nickname.
Other Setting: Set the Toolbar; Set the SystmeDock and Set wake on LAN
5.5 System
Setting Date & time, and About Device.
6. Browser
When the network is normally connected, click the button and enter the website to access the web page.
English-55
Page 58

7. Keeper
Click to pop out the Keeper interface as shown in Fig. 7-1. You can perform memory optimization, garbage clean, and
hardware checking on the intelligent tablet computer.
Fig 7-1 Keeper
● One Key Optimize. Click
key.
● Memory Clean. Click
● Garbage Clean. Click
to optimize memory, clean the disk garbage and check hardware problem in one
to optimize the memory.
Fig 7-2 Memory Clean
to clean the disk garbage.
● Version information. Click
● Exit. Click
to exit the Keeper and return to the main interface.
Fig 7-3 Garbage Clean
to view the system version and touch pen version information of the machine.
English-56
Page 59

8. Touch Menu
Finger sliding upwards from the bottom of the screen to access the Touch Menu.
Fig 8-1 General Setting
OPTION: Select the OPTION input.
Home: Select the Home input.
HDMI: Select the HDMI input.
VGA: Select the VGA input.
* The switching of the signal input will take a few seconds.
English
English-57
Page 60

Mosaic Connect Network and Security Guide.
Published October 2018.
Introduction
Mosaic Connect is a wireless presentation solution allowing individual connected devices to share their screen to a large format
display. Mosaic Connect is available on multiple platforms:
● Windows software, available for Windows 10. This allows the Mosaic Connect software to be deployed securely across
existing hardware.
Note: features vary per platform
Infrastructure
All inbound and outbound data from our backend layer is encrypted and transmitted over TLS or DTLS with 2048-bit asymmetric
encryption and 256-bit symmetric encryption using certicates from third party credited authorities. Network communication is
protected using the latest in technology to secure all video, audio and data.
Using the TLS and DTLS cryptography protocols, previously referred to as SSL, we provide protection using a 2048-bit
asymmetric key in conjunction with a 256-bit symmetric session key. More information on network ports used can be found
further within this document.
The backend tier provides four public services; REST API, XMPP and STUN / TURN.
We use a combination of both Azure and Amazon services to provide a resilient and redundant backend whilst providing the
lowest latency possible.
SaaS
Application services
REST & WebSocketsAPI
Clients
Port 443 TLS
Port 443 TLS
Application Servers
XMPP
Port 443 TLS
STUN/TURN
Port 443 TLS
Port 443 TLS
Mosaic Connect Box
Mosaic Client
Figure 1. Mosaic Connect Architecture
English-58
Page 61

Amazon AWS
Amazon AWS is a market leading cloud service managed by Amazon, a trusted provider of cloud services that offers
geographical dispersion - allowing us to have a server closer to the end user, which reduces latency in cloud connectivity.
All our cloud services running on Amazon AWS are running under a Virtual Private Cloud (VPC) and each environment has its
own virtual network protected by Amazon’s availability zone and rewall.
Amazon AWS servers are geographically dispersed and have many certications and third-party assessments, including ISO/
IEC 27001:2005, SOC 1 and SOC 2 and CSA STAR certication
1
. Further information can be found in their security whitepaper2.
Mosaic Connect features
The Mosaic Connect software consumes a REST API provided by our SaaS layer which is credential secured. All
communication with the REST API and our XMPP services are over TLS (port 443) with 2048-bit asymmetric encryption and
256-bit symmetric encryption.
For video calls, STUN is used to establish a peer to peer connection. If this fails, then the client will attempt to use our relay
service using the TURN protocol.
In addition to DTLS encryption, we also encrypt data through Secure Real-Time Protocol, which safeguards IP communications
from hackers, so that your video and audio data is kept private point to point.
Meeting ID and PIN
For each meeting a unique meeting ID is generated using our SaaS layer which is used as a means for the clients to connect to
that specic meeting. If there is an Internet connection, this meeting ID will be 6 digits long.
If no Internet is available (or local connections only is enabled) the Meeting ID will be 10 digits long. This 10 digit meeting ID is
generated using the device IP address, which enables connection from different subnets on the same network.
If devices connect using the 6 digit meeting ID, connection is attempted locally, however if this is not possible then the
connection is made via XMPP. The host can also specify a PIN which is congured at the box directly, and on each client
connecting would request conrmation of the PIN.
English
Cloud
If Mosaic Connect has access to the Mosaic Connect Cloud, then it will be able to allow devices connecting to it from outside of
its local network – e.g. A Chromebook client on a remote network and a Windows client connected on another network within
your organisation,
This can be restricted by deactivating access to the cloud in Mosaic Connect settings. The Mosaic Connect hardware units can
also function solely using their access point with each connecting device ingbe assigned an IP address.
Updates
An Internet connection is required for updates. The updates are downloaded over a secure connection (using port 443) and are
installed on demand. A notication will appear in the Mosaic Connect user interface to indicate an available update that the user
can install.
Security
The clients and boxes are authenticated on our servers using a 4-step authentication process with SASL
administrators can remove a client or box from the authorised zone temporarily and permanently.
All data transferred between the user’s device and Mosaic Connect is peer to peer (P2P) and is over TLS or DTLS with 2048-bit
asymmetric encryption and 256-bit symmetric encryption. If a P2P connection fails to connect between the client and Mosaic
Connect, then the software will relay the data via our TURN server over TLS TCP port 443.
3
. At any time,
Access Point and Wi-Fi
The Mosaic Connect unit offers an internal access point, secured with WPA2 with PSK encryption, allowing clients to connect
directly to the box and in so creating a local network.
The Mosaic Connect unit can also connect as a Wi-Fi client to an external Access Point and network.
For Airplay Mirroring and Airplay Video the box publishes services on the connected networks using Zero-conguration
networking
4
.
English-59
Page 62

Signaling, camera and screen
sharing via Port 443 TLS
Signaling, camera and screen
sharing via Port 443 TLS
PC, MacBook or
Chrombook
LocalNetwork
PC, MacBook or
Chrombook
Signaling via
Port 443 TLS
Camera and Screen
shared via DTLS
PC, MacBook or
Chrombook
SaaS
Configured DHCP or Static IP
PC, MacBook or
Chrombook
Signaling via
Port 443 TLS
Mosaic Connect
Figure 3. Network architecture of Mosaic Connect, internal and external connections.
In a typical conguration Mosaic Connect is connected to an existing network infrastructure, either using a static IP or DHCP.
Clients can connect either via the access point on the Mosaic Connect unit or via the existing network infrastructure.
When connected locally then signalling data is communicated over port 443 TLS and video and audio over DTLS. When the
client is connected from a remote network then all signalling, video and audio data are relayed via our SaaS tier via port 443
TLS. See Figure 3.
English-60
Page 63

Firewall and Proxy
Firewall
● For remote connections, receiver and clients need to be able to access the Internet through these ports;
TCP 80
TCP 443
UDP 53
● For local connections (i.e. clients on the same network or connecting through Mosaic Connect Access Point) the
following ports are used;
TCP 1-65535 (It will be selected from available ones)
UDP 1025 – 65535
TCP 4700, 7000, 7100 (For Airplay connections)
If there is Layer 7 ltering or proxy with protocol ltering on these ports then the following protocols will need to be allowed;
• HTTP
• HTTPS
• DTLS
• XMPP
• Bonjour protocols
• SRTP
• DNS
• STUN
• TURN
• ICE
English
Our SaaS provides services at the following FQDNs;
• netcheck.connectmosaic.com
• api.connectmosaic.com
• xmpp.connectmosaic.com
• stt01.connectmosaic.com
• stt02.connectmosaic.com
• stt03.connectmosaic.com
• stt04.connectmosaic.com
• stt05.connectmosaic.com
Proxy support
The Mosaic Connect Windows/OSX software support proxy conguration. The following proxy types are supported.
● HTTP Proxy (with or without authentication)
● SOCKS 5 (with or without authentication)
● Proxy with Auto-Conguration File (PAC). Windows only.
● System proxy. Windows only.
English-61
Page 64

Controlling the LCD monitor via RS-232C Remote Control
This LCD monitor can be controlled by connecting a personal computer with an RS-232C (reverse type) terminal.
Functions that can be controlled by a personal computer are:
• Power ON or standby.
• Switching between input signals.
• Sound Mute ON or OFF.
Connection
LCD Monitor + computer.
• Please turn off the monitor’s main power when connecting a computer to the monitor.
• Please turn on the connecting computer rst then turn on the monitor’s main power.
If you turn on the computer and monitor in reverse order, the com port may not work.
• When controlling the monitor connected with an RS-232C cable, please refer to the Control command diagram
(See page 66) or see the “External_Control.pdf” le on the NEC website.
Computer
RS-232C Cable
NOTE: If your computer is equipped only with a 25-pin serial port connector, a 25-pin serial port adapter is required. Contact
your supplier for details.
For the pin assignment, please see “2) RS-232C input/output” on page 63.
To control the monitor via commands sent from a computer connected with an RS-232C cable, please use the control
command. Instructions for the control command can be found in the Control Command Diagram (see on the next page) .
English-62
Page 65

1) Interface
PROTOCOL RS-232C
BAUD RATE 9600 [bps]
DATA LENGTH 8 [bits]
PARITY NONE
STOP BIT 1 [bit]
FLOW CONTROL NONE
This LCD monitor uses RXD, TXD and GND lines for RS-232C control.
The reverse type cable (null modem cable) (not included) should be used for RS-232C control.
2) PIN ASSIGNMENT
RS-232C input/output
Pin No Name
1 NC
2 TXD
3 RXD
4 NC
5 GND
6 NC
7 NC
8 NC
9 NC
1
6
D-Sub 9-pin (Monitor side)
5
9
This LCD monitor uses RXD, TXD and GND lines for RS-232C control.
When attached converter is used, 2 pin TXD and 3 pin RXD are interchanged.
English
English-63
Page 66

Controlling the LCD monitor via LAN Control
Connecting to a Network
Using a LAN cable allows you to specify the Network Settings and the Alert Mail Settings by using an HTTP server function.
To use a LAN connection you are required to assign an IP address.
Example of LAN connection:
Server
Hub
LAN cable
(not supplied)
NOTE: Use a category 5 or higher LAN cable.
English-64
Page 67

External Control
Connecting external device
There are two ways to connect an external device to the monitor.
• RS-232C terminal.
Connecting an external device to the RS-232C terminal of the monitor with an RS-232C cable.
• LAN port.
Connecting an external device to the LAN port of the monitor with a LAN cable.
For further information regarding the type of LAN cable to use, please consult your network administrator.
English
English-65
Page 68

Connecting interface
RS-232C Interface
PROTOCOL RS-232C
BAUD RATE 9600 [bps]
DATA LENGTH 8 [bits]
PARITY NONE
STOP BIT 1 [bit]
FLOW CONTROL NONE
LAN interface
PROTOCOL TCP
PORT NUMBER 7142
COMMUNICATION SPEED AUTO setting (10/100Mbps)
Control command diagram
For other commands, please see “External_Control.pdf” le on the NEC website.
Function (Monitor ID = 1) Code Data
Power ON 01 30 41 30 41 30 43 02 43 32 30 33 44 36 30 30 30 31 03 73 0d
Power OFF 01 30 41 30 41 30 43 02 43 32 30 33 44 36 30 30 30 34 03 76 0d
01 30 41 30 45 30 41 02 30 30 36 30 30 30 31 31 03 72 0d
Input Source Select HDMI1
Input Source Select HDMI2
Input Source Select HDMI3
Input Source Select VGA (RGB) 01 30 41 30 45 30 41 02 30 30 36 30 30 30 30 31 03 73 0d
Input Source Select Home
Sound Mute ON 01 30 41 30 45 30 41 02 30 30 38 44 30 30 30 31 03 09 0d
Sound Mute OFF 01 30 41 30 45 30 41 02 30 30 38 44 30 30 30 32 03 0a 0d
or
01 30 41 30 45 30 41 02 31 31 30 36 30 30 31 31 03 72 0d
01 30 41 30 45 30 41 02 30 30 36 30 30 30 31 32 03 71 0d
or
01 30 41 30 45 30 41 02 31 31 30 36 30 30 31 32 03 71 0d
01 30 41 30 45 30 41 02 30 30 36 30 30 30 38 32 03 78 0d
or
01 30 41 30 45 30 41 02 31 31 30 36 30 30 38 32 03 78 0d
01 30 41 30 45 30 41 02 30 30 36 30 30 30 38 37 03 7D 0d
or
01 30 41 30 45 30 41 02 31 31 30 36 30 30 38 37 03 7D 0d
English-66
Page 69

Troubleshooting
No picture
• The signal cable should be completely connected to the
display card/computer.
• The display card should be completely seated in its slot.
• Check the main Power Switch, it should be in the ON
position.
• Power Switches for the monitor and computer should be
in the ON position.
• Make sure that a supported resolution has been selected
on the display card or system being used. If in doubt,
please refer to the user’s manual of the display card or
system to change the resolution.
• Check the monitor and your display card with respect to
compatibility and recommended signal timings.
• Check the signal cable connector for bent or pushed-in
pins.
• Check for HDCP (High-bandwidth Digital Content
Protection) content. HDCP is a system for preventing
illegal copying of video data sent over a digital signal.
If you are unable to view material via the digital inputs,
this does not necessarily mean that the monitor is not
functioning properly. With the implementation of HDCP,
there may be cases in which certain content is protected
by HDCP and might not be displayed due to the decision/
intention of the HDCP community (Digital Content
Protection, LLC).
• The monitor automatically goes into standby at the preset
time period after the video signal was lost. Press the
power on button on the remote control or press the power
button on the monitor.
• If you unplug the signal cable when starting the computer,
images may not be displayed. Turn off the monitor and
the computer and then connect the signal cable and turn
on the computer and the monitor.
Power Button does not respond
• Unplug the power cord of the monitor from the AC outlet
to turn off and reset the monitor.
• Check the main Power Switch on the monitor.
Image persistence
• Please be aware that LCD Technology may experience
a phenomenon known as Image Persistence. Image
Persistence occurs when a residual or “ghost” image of
a previous image remains visible on the screen. Unlike
CRT monitors, the image persistence of LCD monitors is
not permanent, but single still image being displayed for a
long period of time should be avoided. To alleviate image
persistence, put the monitor into standby via remote
control or turn the monitor’s main power off for as long
as the previous image was displayed. For example, if an
image was on the monitor for one hour and a residual
image remains, the monitor should be in standby or main
power off for one hour to erase the image.
NOTE: As with all personal display devices, NEC
DISPLAY SOLUTIONS recommends displaying
moving images, using a moving screen saver, or
changing still images at regular intervals whenever
the screen is idle, or turning it into standby or main
power off of the monitor when not in use.
The image is blinking
• If you use a signal repeater or distributor or a long
cable, this may cause image roughness or blink for a
moment. In this case please connect the cable to the
monitor directly without using a repeater or a distributor,
or replace the cable with a higher quality cable. Using
a twisted pair extender may cause image roughness
depending on the environment where the monitor is in or
the cable you are using. For further information please
ask your supplier.
The image is unstable, unfocused or swimming is
apparent
• The signal cable should be completely attached to the
computer.
• Check the monitor and your display card with respect to
compatibility and recommended signal timings.
• If text looks garbled, change the video mode to noninterlaced and use a 60 Hz refresh rate.
• The image may be distorted when turning the power on or
changing the settings.
LED on the monitor is not lit (no blue or red color can be
seen)
• The main Power Switch should be in the ON position and
the power cord should be connected.
• Make certain the computer is not in a power-saving mode
(touch the keyboard or move the mouse).
LED colors, except for blue, are blinking or glowing
• A certain failure might have occurred, please contact your
supplier.
• The monitor could be in standby.
Press the power on button on the remote control or press
the power button on the monitor.
The behavior of application is unstable
• End the application. To do this, please see “2. Sidebar”
section on page 34.
NOTE: If you end the application in this way, the updated
data will not be saved.
English
English-67
Page 70

No Sound
• Check to see if the audio cable is properly connected.
• Check to see if MUTE is activated. Use the remote control
to enable or disable the Mute function.
• Check to see if VOLUME is set to a minimum.
• Check to see if the computer supports an audio signal
through HDMI.
If unsure, contact your supplier.
• When LINE OUT is not functioning, check to see if
SURROUND is ON.
The Remote Control is not functioning
• Check the batteries status of the Remote Control.
• Check if the batteries are inserted correctly.
• Check if the Remote Control is pointing at the remote
control sensor of the monitor.
• The remote control system may not function when direct
sunlight or strong illumination strikes the remote control
sensor of the monitor, or when there is an object in the
path.
The Timer Switch function is not working properly
• The “Timer Switch” function will be disabled when the
“OFF TIME” is set.
• If the “OFF TIME” function is enabled and the power to
the LCD monitor is turned off when the power supply is
interrupted unexpectedly, then the “OFF TIME” will be
reset.
Interference in TV
• Check components for shielding, move away from
monitor if necessary.
RS-232C or LAN control is not available
• Check RS-232C (reverse type) or the LAN cable.
A category 5 or higher LAN cable is required for
connection.
Media Player function does not recognize the USB
storage device
• Please check a USB storage device is connected to the
USB.
The monitor goes into standby automatically
• Please check “OFF TIME “setting.
Either light vertical or horizontal stripes may appear, depending on the specic image pattern. This is not a product fault or degradation.
English-68
Page 71

Specications - CB651Q
Product Specications
LCD Module Pixel Pitch:
Frequency Horizontal:
Pixel Clock 25-148.5 MHz (Analog)
Viewable Size 1428.48 (H) x 803.52 (V)
Input Signal
VGA 15pin Mini D-sub Analog RGB
HDMI HDMI Connector Digital RGB HDMI (4k/60Hz, HDCP2.2/1.4)
Home 1920 x 1080
Output Signal
HDMI HDMI Connector Digital RGB N/A
AUDIO
AUDIO
Input
AUDIO
Output
Speaker Output * Internal Speaker 12 W + 12 W (Stereo)
Control RS-232C In:
USB Hub USB2.0 Front × 2
Power Supply
Power Consumption 160 W (Max. 400 W)
Operational Environment Temperature:
Storage Environment Temperature:
Dimension 1488.4 x 896.8 x 87.5 mm (without wall mount)
Weight 39.15 kg (without wall mount)
VESA compatible mounting interface 600 mm x 400 mm (M8, 4 Holes)
Power Management N/A
Power supply for OPS
Protective glass Material:
Accessories Setup manual
Stereo Mini Jack Analog Audio Stereo L/R 0.5 Vrms
HDMI Connector Digital Audio PCM 32, 44.1, 48 KHz (16, 20, 24 bit), 2 ch
Stereo Mini Jack Analog Audio Stereo L/R, ≤150 mVrms, 32 ohm
Resolution:
Brightness(max):
Contrast Ratio:
Viewing Angle:
Vertical:
Sync
Humidity:
Altitude:
Humidity:
Thickness:
Surface treatment:
Transparency:
Surface hardness:
Impact resistance:
* Speaker spec: 16 W, 8 Ω
0.372 mm x 0.372 mm
UHD 3840 x 2160 (pixels)
(R + G + B + W design)
Color:
1.07B (10-bit(D))
min: 300 cd/m
typ: 350 cd/m
Brightness with AG Glass
1300:1
178° (Horizontal&Vertical)
min: 121.8 KHZ
typ: 135 KHZ
max: 140 KHZ
min: 47 HZ
typ: 60 HZ
max: 63 HZ
25.0-300 MHz (Digital)
0.7 Vp-p/75 ohm
1920 x 1080 (60HZ)
Separate: TTL level (Pos./Neg.)
Composite sync on Green Video: 0.3 Vp-p Neg.
9 Pin D-sub
LAN:
RJ45 10BASE-T/100BASE-TX x 1
Side port × 3
Side port (For touch) × 2
Bottom port × 1
4.0-1.6 A @ 100-240 V AC, 50/60 Hz
0~40°C
10~90%
5000 m (16404 ft)
-20~60°C
10~90%
1488.4 x 896.8 x 114.5 mm (with wall mount)
43.05 kg (±2 kg) (with wall mount)
18 V / 5.5 A
Tempered glass
4.0 mm
Anti-Glare coating
≥88%
Haze:
3-8%
7H
Ball drop test: 500 g steel ball, 1.2 m High
Power Cord
Remote Control
AAA Battery x 2
Stylus pen x 3
Signal cable
RS-232C Adapter × 1
2
2
English
English-69
Page 72

Specications - CB751Q
Product Specications
LCD Module Pixel Pitch:
Frequency Horizontal:
Pixel Clock 25-148.5 MHz (Analog)
Viewable Size 1649.664 (H) x 927.936 (V)
Input Signal
VGA 15pin Mini D-sub Analog RGB
HDMI HDMI Connector Digital RGB HDMI (4k/60Hz, HDCP2.2/1.4)
Home 1920 x 1080
Output Signal
HDMI HDMI Connector Digital RGB N/A
AUDIO
AUDIO
Input
AUDIO
Output
Speaker Output * Internal Speaker 12 W + 12 W (Stereo)
Control RS-232C In:
USB Hub USB2.0 Front × 2
Power Supply 4.3-1.8 A @ 100-240 V AC, 50/60 Hz
Power Consumption 210 W (Max. 430 W)
Operational Environment Temperature:
Storage Environment Temperature:
Dimension 1709.4 x 1020 x 86.8 mm (without wall mount)
Weight 52.55 kg (without wall mount)
VESA compatible mounting interface 800 mm x 400 mm (M8, 4 Holes)
Power Management N/A
Power supply for OPS
Protective glass Material:
Accessories Setup manual
Stereo Mini Jack Analog Audio Stereo L/R 0.5 Vrms
HDMI Connector Digital Audio PCM 32, 44.1, 48 KHz (16, 20, 24 bit), 2 ch
Stereo Mini Jack Analog Audio Stereo L/R, ≤150 mVrms, 32 ohm
Resolution:
Brightness(max):
Contrast Ratio:
Viewing Angle:
Vertical:
Sync
Humidity:
Altitude:
Humidity:
Thickness:
Surface treatment:
Transparency:
Surface hardness:
Impact resistance:
* Speaker spec: 16 W, 8 Ω
0.4296 mm x 0.4296 mm
UHD 3840 x 2160 (pixels)
(R + G + B + W design)
Color:
1.07B (10-bit(D))
min: 300 cd/m
typ: 350 cd/m
Brightness with AG Glass
1100:1
178° (Horizontal&Vertical)
min: 121.8 KHZ
typ: 135 KHZ
max: 140 KHZ
min: 47 HZ
typ: 60 HZ
max: 63 HZ
25.0-300 MHz (Digital)
0.7 Vp-p/75 ohm
1920 x 1080 (60HZ)
Separate: TTL level (Pos./Neg.)
Composite sync on Green Video:0.3 Vp-p Neg.
9 Pin D-sub
LAN:
RJ45 10BASE-T/100BASE-TX x 1
Side port × 3
Side port (For touch) × 2
Bottom port × 1
0~40°C
10~90%
5000 m (16404 ft)
-20~60°C
10~90%
1709.4 x 1020 x 113.8 mm (with wall mount)
56.45 kg (±2 kg) (with wall mount)
18 V / 5.5 A
Tempered glass
4.0 mm
Anti-Glare coating
≥88%
Haze:
3-8%
7H
Ball drop test: 500 g steel ball, 1.2 m High
Power Cord
Remote Control
AAA Battery x 2
Stylus pen x 3
Signal cable
RS-232C Adapter x 1
2
2
English-70
Page 73

Specications - CB861Q
Product Specications
LCD Module Pixel Pitch:
Frequency Horizontal:
Pixel Clock 25-148.5 MHz (Analog)
Viewable Size 1895.04 (H) x 1065.96 (V)
Input Signal
VGA 15pin Mini D-sub Analog RGB
HDMI HDMI Connector Digital RGB HDMI (4k/60Hz, HDCP2.2/1.4)
Home 1920 x 1080
Output Signal
HDMI HDMI Connector Digital RGB N/A
AUDIO
AUDIO
Input
AUDIO
Output
Speaker Output * Internal Speaker 12 W + 12 W (Stereo)
Control RS-232C In:
USB Hub USB2.0 Front × 2
Power Supply 6.2-2.5 A @ 100-240 V AC, 50/60 Hz
Power Consumption 365 W (Max. 620 W)
Operational Environment Temperature:
Storage Environment Temperature:
Dimension 1957.1 x 1159.8 x 86.8 mm (without wall mount)
Weight 67.3 kg (without wall mount)
VESA compatible mounting interface 800 mm x 600 mm (M8, 4 Holes)
Power Management N/A
Power supply for OPS
Protective glass Material:
Accessories Setup manual
Stereo Mini Jack Analog Audio Stereo L/R 0.5 Vrms
HDMI Connector Digital Audio PCM 32, 44.1, 48 KHz (16, 20, 24 bit), 2 ch
Stereo Mini Jack Analog Audio Stereo L/R, ≤150 mVrms, 32 ohm
Resolution:
Brightness(max):
Contrast Ratio:
Viewing Angle:
Vertical:
Sync
Humidity:
Altitude:
Humidity:
Thickness:
Surface treatment:
Transparency:
Surface hardness:
Impact resistance:
* Speaker spec: 16 W, 8 Ω
0.4935 mm x 0.4935 mm
UHD 3840 x 2160 (pixels)
(R + G + B design)
Color:
1.07B (10-bit(D))
min: 300 cd/m
typ: 350 cd/m
Brightness with AG Glass
1200:1
178° (Horizontal&Vertical)
min: 121.8 KHZ
typ: 135 KHZ
max: 140 KHZ
min: 47 HZ
typ: 60 HZ
max: 63 HZ
25.0-300 MHz (Digital)
0.7 Vp-p/75 ohm
1920 x 1080 (60HZ)
Separate: TTL level (Pos./Neg.)
Composite sync on Green Video: 0.3 Vp-p Neg.
9 Pin D-sub
LAN:
RJ45 10BASE-T/100BASE-TX x 1
Side port × 3
Side port (For touch) × 2
Bottom port × 1
0~40°C
10~90%
5000 m (16404 ft)
-20~60°C
10~90% (Over 40°C / below 60%)
1957.1 x 1159.8 x 113.8 mm (with wall mount)
71.2 kg (±2 kg) (with wall mount)
18 V / 5.5 A
Tempered glass
4.0 mm
Anti-Glare coating
≥88%
Haze:
3-8%
7H
Ball drop test: 500 g steel ball, 1.2 m High
Power Cord
Remote Control
AAA Battery x 2
Stylus pen x 3
Signal cable
RS-232C Adapter x 1
2
2
English
English-71
Page 74

Manufacturer’s Recycling and Energy Information
NEC DISPLAY SOLUTIONS is strongly committed to environmental protection and sees recycling as one of the company’s top
priorities in trying to minimize the burden placed on the environment. We are engaged in developing environmentally-friendly
products, and always strive to help dene and comply with the latest independent standards from agencies such as ISO
(International Organisation for Standardization) and TCO (Swedish Trades Union).
Disposing of your old NEC product
The aim of recycling is to gain an environmental benet by means of re-use, upgrading, reconditioning or reclamation of
material. Dedicated recycling sites ensure that environmentally harmful components are properly handled and securely
disposed. To ensure the best recycling of our products, NEC DISPLAY SOLUTIONS offers a variety of recycling procedures
and gives advice on how to handle the product in an environmentally sensitive way, once it has reached the end of its life.
All required information concerning the disposal of the product and country-specic information on recycling facilities can be
found on our following websites:
https://www.nec-display-solutions.com/p/greenvision/en/greenvision.xhtml (in Europe),
https://www.necdisplay.com (in USA).
Model: CB651Q-GLM310A-G / CB751Q-GLA210A-G / CB861Q-GLA410A-G
Test voltage: 115V/230V
mode Power consumption LED color
Normal Operation*
Energy Saving Mode*
(A key energy saving)
Energy Saving Mode*
(AUTO STANDBY)
Power Off Less than 0.5W Red
Note:
*1: Under system without any option,with factory settings.
*2: Short press power key,system will shut down backlight power.
*3: No signal input,system will shut down to standby mode.
1
1, *2
1, *3
159.7W/158.8W (CB651Q) Blue
201.8W/200.1W (CB751Q)
361.6W/355.7 (CB861Q)
19.0W/18.8W (CB651Q) Red and blue alternation
24.2W/24.1W (CB751Q)
19.1W/18.9W (CB861Q)
Less than 0.5W Red
Energy Saving
This monitor features an advanced energy saving capability. When a Display Power Management signal is sent to the monitor,
the Energy Saving mode is activated. The monitor enters a single Energy Saving mode.
For additional information visit:
https://www.necdisplay.com/ (in USA)
http://www.nec-display-solutions.com/ (in Europe)
https://www.nec-display.com/global/index.html (Global)
For ErP requirement/For ErP (Network standby) requirement:
Settings -> Other settings -> Wake on LAN -> ON (Default OFF)
Power consumption: 2 W or less.
Time for power management function: 35 sec.
(Except for a condition that the monitor has plural signal inputs.)
Power consumption: 0.5 W or less
Time for power management function:5 min. (Default setting)
(Except for a condition that the monitor has plural signal inputs.)
English-72
Page 75

WEEE Mark (European Directive 2012/19/EU and amendments)
Disposing of your used product: In the European Union
EU-wide legislation as implemented in each Member State requires that used electrical and electronic products
carrying the mark (left) must be disposed of separately from normal household waste. This includes monitors
and electrical accessories, such as signal cables or power cords. When you dispose of such products, please
follow the guidance of your local a uthority or ask the shop where you purchased the product, or if applicable,
follow applicable legislation or agreement you may have. The mark on electrical and electronic products may
only apply to the current European Union Member States.
Outside the European Union
If you wish to dispose of used electrical and electronic products outside the European Union, please contact your local authority
and ask for the correct method of disposal.
For EU: The crossed-out wheeled bin implies that used batteries should not be put to the general household
waste! There is a separate collection system for used batteries, to allow proper treatment and recycling in
accordance with legislation.
According to EU directive 2006/66/EC and amendments, the battery can’t be disposed improperly. The battery shall be
separated to collect by local service.
English
English-73
Page 76

[Notice] About the MPEG-4 AVC, MPEG-4 Visual license
included in this product
1. MPEG-4 AVC
THIS PRODUCT IS LICENSED UNDER THE AVC PATENT PORTFOLIO LICENSE FOR THE PERSONAL USE OF
A CONSUMER OR OTHER USES IN WHICH IT DOES NOT RECEIVE REMUNERATION TO (i) ENCODE VIDEO IN
COMPLIANCE WITH THE AVC STANDARD (“AVC VIDEO”) AND/OR (ii) DECODE AVC VIDEO THAT WAS ENCODED BY
A CONSUMER ENGAGED IN A PERSONAL ACTIVITY AND/OR WAS OBTAINED FROM A VIDEO PROVIDER LICENSED
TO PROVIDE AVC VIDEO. NO LICENSE IS GRANTED OR SHALL BE IMPLIED FOR ANY OTHER USE. ADDITIONAL
INFORMATION MAY BE OBTAINED FROM MPEG LA, L.L.C. SEE HTTP://WWW.MPEGLA.COM.
2. MPEG-4 Visual
THIS PRODUCT IS LICENSED UNDER THE MPEG-4 VISUAL PATENT PORTFOLIO LICENSE FOR THE PERSONAL AND
NON-COMMERCIAL USE OF A CONSUMER FOR (i) ENCODING VIDEO IN COMPLIANCE WITH THE MPEG-4 VISUAL
STANDARD (“MPEG-4 VIDEO”) AND/OR (ii) DECODING MPEG-4 VIDEO THAT WAS ENCODED BY A CONSUMER
ENGAGED IN A PERSONAL AND NONCOMMERCIAL ACTIVITY AND/OR WAS OBTAINED FROM A VIDEO PROVIDER
LICENSED BY MPEG LA TO PROVIDE MPEG-4 VIDEO. NO LICENSE IS GRANTED OR SHALL BE IMPLIED FOR
ANY OTHER USE. ADDITIONAL INFORMATION INCLUDING THAT RELATING TO PROMOTIONAL, INTERNAL AND
COMMERCIAL USES AND LICENSING MAY BE OBTAINED FROM MPEG LA, LLC. SEE HTTP://WWW.MPEGLA.COM.
English-74
Page 77

GPL/LGPL Software Licenses Used by the Product
Thank you for purchasing an NEC product.
GPL/LGPL software
The product includes software licensed under GNU General Public License (GPL) or GNU Lesser General Public License
(LGPL).
We disclose the software’s source codes so that you may get, copy, distribute and modify it licensed under GPL or LGPL.
For the full text of GPL and LGPL, refer to the next page and later.
• We cannot answer any question relating to the contents of the source codes.
• There is no guarantee or warranty for the disclosed GPL/LGPL software perse, which does not inuence the conditions of the
warranty or guarantee for the product.
[Getting the source codes]
Request the source codes from the following website.
https://form.nec.jp/nec-display/root_en/2755e4/Inquiry.do?d=2755e4
The product includes software licensed under the licenses below.
For the license agreements below, refer to each document. (Next page and later)
Open Source Software Version License
picasso 2.5.2 Apache License 2.0
gson 2.3.1, 2.7.0, 2.8.0 Apache License 2.0
RxJava 2.1.0 , 2.1.1, 2 .1.13 Apache License 2.0
RxAndroid 2.0.1, 2.0.2 Apache License 2.0
RxBinding 2.0.0 Apache License 2.0
Arouter 1.3 .0 Apache License 2.0
EventBus 2.4.0, 3.0.0 Apache License 2.0
netty 4.1.2 Apache License 2.0
okhttp 3.2.0, 3.4.1, 3.8.0 Apache License 2.0
retrot 2.0.0, 2.1.0, 2.2.0, 2.3.0 Apache License 2.0
stetho 1.3.1, 1.5.0 BSD
protobuff 3.2.0, 3.3.1 BSD
greenDAO 3.0.0 Apache License 2.0
ViewPagerIndicator 2.4.1 Apache License 2.0
jjdxm_ijkplayer 1.0.5 Apache License 2.0
FileDownloader 1. 5.1 Apache License 2.0
dagger 2.11 Apache License 2.0
zxing 3.3.0 Apache License 2.0
glide 3 .7. 0 BSD
MIT
Apache License 2.0
cropview 1.0.0 Apache License 2.0
nanohttpd 2.2.0 Apache License 2.0
recyclerview-animators 1.3.0 Apache License 2.0
fastjson 1.2.45 Apache License 2.0
Noto Sans - Apache License 2.0
kernel 3 .10 .0 GPL V2
AOSP 5.1.1 Apache License 2.0
openssl 1.0. 2j BSD
1.0.2i BSD
ffmpeg 3.4 .1 LGPL
WebRTC 55 BSD
qxmpp 0.9.6 LGPL
QtAV 1.12. 0 BSD
English
English-75
Page 78

GNU GENERAL PUBLIC LICENSE
Version 2, June 1991
Copyright (C) 1989, 1991 Free Software Foundation, Inc.
51 Franklin Street, Fifth Floor, Boston, MA 02110-1301, USA
Everyone is permitted to copy and distribute verbatim copies of this license document, but changing it is not allowed.
Preamble
The licenses for most software are designed to take away your freedom to share and change it. By contrast, the GNU General
Public License is intended to guarantee your freedom to share and change free software--to make sure the software is free for
all its users. This General Public License applies to most of the Free Software Foundation’s software and to any other program
whose authors commit to using it. (Some other Free Software Foundation software is covered by the GNU Lesser General
Public License instead.) You can apply it to your programs, too.
When we speak of free software, we are referring to freedom, not price. Our General Public Licenses are designed to make
sure that you have the freedom to distribute copies of free software (and charge for this service if you wish), that you receive
source code or can get it if you want it, that you can change the software or use pieces of it in new free programs; and that you
know you can do these things.
To protect your rights, we need to make restrictions that forbid anyone to deny you these rights or to ask you to surrender the
rights. These restrictions translate to certain responsibilities for you if you distribute copies of the software, or if you modify it.
For example, if you distribute copies of such a program, whether gratis or for a fee, you must give the recipients all the rights
that you have. You must make sure that they, too, receive or can get the source code. And you must show them these terms so
they know their rights.
We protect your rights with two steps: (1) copyright the software, and (2) offer you this license which gives you legal permission
to copy, distribute and/or modify the software.
Also, for each author’s protection and ours, we want to make certain that everyone understands that there is no warranty for
this free software. If the software is modied by someone else and passed on, we want its recipients to know that what they
have is not the original, so that any problems introduced by others will not reect on the original authors’ reputations.
Finally, any free program is threatened constantly by software patents. We wish to avoid the danger that redistributors of a
free program will individually obtain patent licenses, in effect making the program proprietary. To prevent this, we have made it
clear that any patent must be licensed for everyone’s free use or not licensed at all.
The precise terms and conditions for copying, distribution and modication follow.
TERMS AND CONDITIONS FOR COPYING, DISTRIBUTION AND MODIFICATION
0. This License applies to any program or other work which contains a notice placed by the copyright holder saying it may
be distributed under the terms of this General Public License. The “Program”, below, refers to any such program or work,
and a “work based on the Program” means either the Program or any derivative work under copyright law: that is to say, a
work containing the Program or a portion of it, either verbatim or with modications and/or translated into another language.
(Hereinafter, translation is included without limitation in the term “modication”.) Each licensee is addressed as “you”.
Activities other than copying, distribution and modication are not covered by this License; they are outside its scope. The
act of running the Program is not restricted, and the output from the Program is covered only if its contents constitute a work
based on the Program (independent of having been made by running the Program). Whether that is true depends on what the
Program does.
1. You may copy and distribute verbatim copies of the Program’s source code as you receive it, in any medium, provided that
you conspicuously and appropriately publish on each copy an appropriate copyright notice and disclaimer of warranty; keep
intact all the notices that refer to this License and to the absence of any warranty; and give any other recipients of the Program
a copy of this License along with the Program.
You may charge a fee for the physical act of transferring a copy, and you may at your option offer warranty protection in
exchange for a fee.
2. You may modify your copy or copies of the Program or any portion of it, thus forming a work based on the Program, and
copy and distribute such modications or work under the terms of Section 1 above, provided that you also meet all of these
conditions:
a) You must cause the modied les to carry prominent notices stating that you changed the les and the date of any
change.
b) You must cause any work that you distribute or publish, that in whole or in part contains or is derived from the
Program or any part thereof, to be licensed as a whole at no charge to all third parties under the terms of this License.
c) If the modied program normally reads commands interactively when run, you must cause it, when started running
for such interactive use in the most ordinary way, to print or display an announcement including an appropriate
copyright notice and a notice that there is no warranty (or else, saying that you provide a warranty) and that users may
redistribute the program under these conditions, and telling the user how to view a copy of this License. (Exception: if
the Program itself is interactive but does not normally print such an announcement, your work based on the Program is
not required to print an announcement.)
English-76
Page 79

These requirements apply to the modied work as a whole. If identiable sections of that work are not derived from the
Program, and can be reasonably considered independent and separate works in themselves, then this License, and its terms,
do not apply to those sections when you distribute them as separate works. But when you distribute the same sections as part
of a whole which is a work based on the Program, the distribution of the whole must be on the terms of this License, whose
permissions for other licensees extend to the entire whole, and thus to each and every part regardless of who wrote it.
Thus, it is not the intent of this section to claim rights or contest your rights to work written entirely by you; rather, the intent is to
exercise the right to control the distribution of derivative or collective works based on the Program.
In addition, mere aggregation of another work not based on the Program with the Program (or with a work based on the
Program) on a volume of a storage or distribution medium does not bring the other work under the scope of this License.
3. You may copy and distribute the Program (or a work based on it, under Section 2) in object code or executable form under
the terms of Sections 1 and 2 above provided that you also do one of the following:
a) Accompany it with the complete corresponding machine-readable source code, which must be distributed under the
terms of Sections 1 and 2 above on a medium customarily used for software interchange; or,
b) Accompany it with a written offer, valid for at least three years, to give any third party, for a charge no more than your
cost of physically performing source distribution, a complete machine-readable copy of the corresponding source code,
to be distributed under the terms of Sections 1 and 2 above on a medium customarily used for software interchange; or,
c) Accompany it with the information you received as to the offer to distribute corresponding source code. (This
alternative is allowed only for noncommercial distribution and only if you received the program in object code or
executable form with such an offer, in accord with Subsection b above.)
The source code for a work means the preferred form of the work for making modications to it. For an executable work,
complete source code means all the source code for all modules it contains, plus any associated interface denition les, plus
the scripts used to control compilation and installation of the executable. However, as a special exception, the source code
distributed need not include anything that is normally distributed (in either source or binary form) with the major components
(compiler, kernel, and so on) of the operating system on which the executable runs, unless that component itself accompanies
the executable.
If distribution of executable or object code is made by offering access to copy from a designated place, then offering equivalent
access to copy the source code from the same place counts as distribution of the source code, even though third parties are
not compelled to copy the source along with the object code.
4. You may not copy, modify, sublicense, or distribute the Program except as expressly provided under this License. Any
attempt otherwise to copy, modify, sublicense or distribute the Program is void, and will automatically terminate your rights
under this License. However, parties who have received copies, or rights, from you under this License will not have their
licenses terminated so long as such parties remain in full compliance.
5. You are not required to accept this License, since you have not signed it. However, nothing else grants you permission to
modify or distribute the Program or its derivative works. These actions are prohibited by law if you do not accept this License.
Therefore, by modifying or distributing the Program (or any work based on the Program), you indicate your acceptance of this
License to do so, and all its terms and conditions for copying, distributing or modifying the Program or works based on it.
6. Each time you redistribute the Program (or any work based on the Program), the recipient automatically receives a license
from the original licensor to copy, distribute or modify the Program subject to these terms and conditions. You may not
impose any further restrictions on the recipients’ exercise of the rights granted herein. You are not responsible for enforcing
compliance by third parties to this License.
7. If, as a consequence of a court judgment or allegation of patent infringement or for any other reason (not limited to patent
issues), conditions are imposed on you (whether by court order, agreement or otherwise) that contradict the conditions of this
License, they do not excuse you from the conditions of this License. If you cannot distribute so as to satisfy simultaneously
your obligations under this License and any other pertinent obligations, then as a consequence you may not distribute the
Program at all. For example, if a patent license would not permit royalty-free redistribution of the Program by all those who
receive copies directly or indirectly through you, then the only way you could satisfy both it and this License would be to refrain
entirely from distribution of the Program.
If any portion of this section is held invalid or unenforceable under any particular circumstance, the balance of the section is
intended to apply and the section as a whole is intended to apply in other circumstances.
It is not the purpose of this section to induce you to infringe any patents or other property right claims or to contest validity of
any such claims; this section has the sole purpose of protecting the integrity of the free software distribution system, which
is implemented by public license practices. Many people have made generous contributions to the wide range of software
distributed through that system in reliance on consistent application of that system; it is up to the author/donor to decide if he or
she is willing to distribute software through any other system and a licensee cannot impose that choice.
This section is intended to make thoroughly clear what is believed to be a consequence of the rest of this License.
8. If the distribution and/or use of the Program is restricted in certain countries either by patents or by copyrighted interfaces,
the original copyright holder who places the Program under this License may add an explicit geographical distribution limitation
excluding those countries, so that distribution is permitted only in or among countries not thus excluded. In such case, this
License incorporates the limitation as if written in the body of this License.
9. The Free Software Foundation may publish revised and/or new versions of the General Public License from time to time.
Such new versions will be similar in spirit to the present version, but may differ in detail to address new problems or concerns.
Each version is given a distinguishing version number. If the Program species a version number of this License which applies
to it and “any later version”, you have the option of following the terms and conditions either of that version or of any later
version published by the Free Software Foundation. If the Program does not specify a version number of this License, you may
choose any version ever published by the Free Software Foundation.
English
English-77
Page 80

10. If you wish to incorporate parts of the Program into other free programs whose distribution conditions are different, write
to the author to ask for permission. For software which is copyrighted by the Free Software Foundation, write to the Free
Software Foundation; we sometimes make exceptions for this. Our decision will be guided by the two goals of preserving the
free status of all derivatives of our free software and of promoting the sharing and reuse of software generally.
NO WARRANTY
11. BECAUSE THE PROGRAM IS LICENSED FREE OF CHARGE, THERE IS NO WARRANTY FOR THE PROGRAM, TO
THE EXTENT PERMITTED BY APPLICABLE LAW. EXCEPT WHEN OTHERWISE STATED IN WRITING THE COPYRIGHT
HOLDERS AND/OR OTHER PARTIES PROVIDE THE PROGRAM “AS IS” WITHOUT WARRANTY OF ANY KIND, EITHER
EXPRESSED OR IMPLIED, INCLUDING, BUT NOT LIMITED TO, THE IMPLIED WARRANTIES OF MERCHANTABILITY
AND FITNESS FOR A PARTICULAR PURPOSE. THE ENTIRE RISK AS TO THE QUALITY AND PERFORMANCE OF THE
PROGRAM IS WITH YOU. SHOULD THE PROGRAM PROVE DEFECTIVE, YOU ASSUME THE COST OF ALL NECESSARY
SERVICING, REPAIR OR CORRECTION.
12. IN NO EVENT UNLESS REQUIRED BY APPLICABLE LAW OR AGREED TO IN WRITING WILL ANY COPYRIGHT
HOLDER, OR ANY OTHER PARTY WHO MAY MODIFY AND/OR REDISTRIBUTE THE PROGRAM AS PERMITTED
ABOVE, BE LIABLE TO YOU FOR DAMAGES, INCLUDING ANY GENERAL, SPECIAL, INCIDENTAL OR CONSEQUENTIAL
DAMAGES ARISING OUT OF THE USE OR INABILITY TO USE THE PROGRAM (INCLUDING BUT NOT LIMITED TO
LOSS OF DATA OR DATA BEING RENDERED INACCURATE OR LOSSES SUSTAINED BY YOU OR THIRD PARTIES OR
A FAILURE OF THE PROGRAM TO OPERATE WITH ANY OTHER PROGRAMS), EVEN IF SUCH HOLDER OR OTHER
PARTY HAS BEEN ADVISED OF THE POSSIBILITY OF SUCH DAMAGES.
END OF TERMS AND CONDITIONS
Apache License
Version 2.0, January 2004
http://www.apache.org/licenses/
TERMS AND CONDITIONS FOR USE, REPRODUCTION, AND DISTRIBUTION
1. Denitions.
“License” shall mean the terms and conditions for use, reproduction, and distribution as dened by Sections 1 through 9 of this
document.
“Licensor” shall mean the copyright owner or entity authorized by the copyright owner that is granting the License.
“Legal Entity” shall mean the union of the acting entity and all other entities that control, are controlled by, or are under
common control with that entity. For the purposes of this denition, “control” means (i) the power, direct or indirect, to cause
the direction or management of such entity, whether by contract or otherwise, or (ii) ownership of fty percent (50%) or more of
the outstanding shares, or (iii) benecial ownership of such entity.
“You” (or “Your”) shall mean an individual or Legal Entity exercising permissions granted by this License.
“Source” form shall mean the preferred form for making modications, including but not limited to software source code,
documentation source, and conguration les.
“Object” form shall mean any form resulting from mechanical transformation or translation of a Source form, including but not
limited to compiled object code, generated documentation, and conversions to other media types.
“Work” shall mean the work of authorship, whether in Source or Object form, made available under the License, as indicated
by a copyright notice that is included in or attached to the work (an example is provided in the Appendix below).
“Derivative Works” shall mean any work, whether in Source or Object form, that is based on (or derived from) the Work and
for which the editorial revisions, annotations, elaborations, or other modications represent, as a whole, an original work of
authorship. For the purposes of this License, Derivative Works shall not include works that remain separable from, or merely
link (or bind by name) to the interfaces of, the Work and Derivative Works thereof.
“Contribution” shall mean any work of authorship, including the original version of the Work and any modications or
additions to that Work or Derivative Works thereof, that is intentionally submitted to Licensor for inclusion in the Work by the
copyright owner or by an individual or Legal Entity authorized to submit on behalf of the copyright owner. For the purposes
of this denition, “submitted” means any form of electronic, verbal, or written communication sent to the Licensor or its
representatives, including but not limited to communication on electronic mailing lists, source code control systems, and issue
tracking systems that are managed by, or on behalf of, the Licensor for the purpose of discussing and improving the Work, but
excluding communication that is conspicuously marked or otherwise designated in writing by the copyright owner as “Not a
Contribution.”
“Contributor” shall mean Licensor and any individual or Legal Entity on behalf of whom a Contribution has been received by
Licensor and subsequently incorporated within the Work.
2. Grant of Copyright License. Subject to the terms and conditions of this License, each Contributor hereby grants to You
a perpetual, worldwide, non-exclusive, no-charge, royalty-free, irrevocable copyright license to reproduce, prepare Derivative
Works of, publicly display, publicly perform, sublicense, and distribute the Work and such Derivative Works in Source or Object
form.
English-78
Page 81

3. Grant of Patent License. Subject to the terms and conditions of this License, each Contributor hereby grants to You a
perpetual, worldwide, non-exclusive, no-charge, royalty-free, irrevocable (except as stated in this section) patent license to
make, have made, use, offer to sell, sell, import, and otherwise transfer the Work, where such license applies only to those
patent claims licensable by such Contributor that are necessarily infringed by their Contribution(s) alone or by combination of
their Contribution(s) with the Work to which such Contribution(s) was submitted. If You institute patent litigation against any
entity (including a cross-claim or counterclaim in a lawsuit) alleging that the Work or a Contribution incorporated within the
Work constitutes direct or contributory patent infringement, then any patent licenses granted to You under this License for that
Work shall terminate as of the date such litigation is led.
4. Redistribution. You may reproduce and distribute copies of the Work or Derivative Works thereof in any medium, with or
without modications, and in Source or Object form, provided that You meet the following conditions:
1. You must give any other recipients of the Work or Derivative Works a copy of this License; and
2. You must cause any modied les to carry prominent notices stating that You changed the les; and
3. You must retain, in the Source form of any Derivative Works that You distribute, all copyright, patent, trademark, and
attribution notices from the Source form of the Work, excluding those notices that do not pertain to any part of the
Derivative Works; and
4. If the Work includes a “NOTICE” text le as part of its distribution, then any Derivative Works that You distribute must
include a readable copy of the attribution notices contained within such NOTICE le, excluding those notices that do not
pertain to any part of the Derivative Works, in at least one of the following places: within a NOTICE text le distributed
as part of the Derivative Works; within the Source form or documentation, if provided along with the Derivative Works;
or, within a display generated by the Derivative Works, if and wherever such third-party notices normally appear. The
contents of the NOTICE le are for informational purposes only and do not modify the License. You may add Your own
attribution notices within Derivative Works that You distribute, alongside or as an addendum to the NOTICE text from the
Work, provided that such additional attribution notices cannot be construed as modifying the License.
You may add Your own copyright statement to Your modications and may provide additional or different license terms
and conditions for use, reproduction, or distribution of Your modications, or for any such Derivative Works as a whole,
provided Your use, reproduction, and distribution of the Work otherwise complies with the conditions stated in this
License.
5. Submission of Contributions. Unless You explicitly state otherwise, any Contribution intentionally submitted for inclusion
in the Work by You to the Licensor shall be under the terms and conditions of this License, without any additional terms or
conditions. Notwithstanding the above, nothing herein shall supersede or modify the terms of any separate license agreement
you may have executed with Licensor regarding such Contributions.
6. Trademarks. This License does not grant permission to use the trade names, trademarks, service marks, or product names
of the Licensor, except as required for reasonable and customary use in describing the origin of the Work and reproducing the
content of the NOTICE le.
7. Disclaimer of Warranty. Unless required by applicable law or agreed to in writing, Licensor provides the Work (and
each Contributor provides its Contributions) on an “AS IS” BASIS, WITHOUT WARRANTIES OR CONDITIONS OF ANY
KIND, either express or implied, including, without limitation, any warranties or conditions of TITLE, NON-INFRINGEMENT,
MERCHANTABILITY, or FITNESS FOR A PARTICULAR PURPOSE. You are solely responsible for determining the
appropriateness of using or redistributing the Work and assume any risks associated with Your exercise of permissions under
this License.
8. Limitation of Liability. In no event and under no legal theory, whether in tort (including negligence), contract, or otherwise,
unless required by applicable law (such as deliberate and grossly negligent acts) or agreed to in writing, shall any Contributor
be liable to You for damages, including any direct, indirect, special, incidental, or consequential damages of any character
arising as a result of this License or out of the use or inability to use the Work (including but not limited to damages for loss of
goodwill, work stoppage, computer failure or malfunction, or any and all other commercial damages or losses), even if such
Contributor has been advised of the possibility of such damages.
9. Accepting Warranty or Additional Liability. While redistributing the Work or Derivative Works thereof, You may
choose to offer, and charge a fee for, acceptance of support, warranty, indemnity, or other liability obligations and/or rights
consistent with this License. However, in accepting such obligations, You may act only on Your own behalf and on Your sole
responsibility, not on behalf of any other Contributor, and only if You agree to indemnify, defend, and hold each Contributor
harmless for any liability incurred by, or claims asserted against, such Contributor by reason of your accepting any such
warranty or additional liability.
END OF TERMS AND CONDITIONS
English
English-79
Page 82

MIT License
Copyright (c) <year> <copyright holders>
Permission is hereby granted, free of charge, to any person obtaining a copy of this software and associated documentation
les (the “Software”), to deal in the Software without restriction, including without limitation the rights to use, copy, modify,
merge, publish, distribute, sublicense, and/or sell copies of the Software, and to permit persons to whom the Software is
furnished to do so, subject to the following conditions:
The above copyright notice and this permission notice shall be included in all copies or substantial portions of the Software.
THE SOFTWARE IS PROVIDED “AS IS”, WITHOUT WARRANTY OF ANY KIND, EXPRESS OR IMPLIED, INCLUDING
BUT NOT LIMITED TO THE WARRANTIES OF MERCHANTABILITY, FITNESS FOR A PARTICULAR PURPOSE AND
NONINFRINGEMENT. IN NO EVENT SHALL THE AUTHORS OR COPYRIGHT HOLDERS BE LIABLE FOR ANY CLAIM,
DAMAGES OR OTHER LIABILITY, WHETHER IN AN ACTION OF CONTRACT, TORT OR OTHERWISE, ARISING FROM,
OUT OF OR IN CONNECTION WITH THE SOFTWARE OR THE USE OR OTHER DEALINGS IN THE SOFTWARE.
BSD License
For Stetho software
Copyright (c) 2015, Facebook, Inc. All rights reserved.
Redistribution and use in source and binary forms, with or without modication, are permitted provided that the following
conditions are met:
* Redistributions of source code must retain the above copyright notice, this list of conditions and the following disclaimer.
* Redistributions in binary form must reproduce the above copyright notice, this list of conditions and the following disclaimer in
the documentation and/or other materials provided with the distribution.
* Neither the name Facebook nor the names of its contributors may be used to endorse or promote products derived from this
software without specic prior written permission.
THIS SOFTWARE IS PROVIDED BY THE COPYRIGHT HOLDERS AND CONTRIBUTORS “AS IS” AND ANY EXPRESS
OR IMPLIED WARRANTIES, INCLUDING, BUT NOT LIMITED TO, THE IMPLIED WARRANTIES OF MERCHANTABILITY
AND FITNESS FOR A PARTICULAR PURPOSE ARE DISCLAIMED. IN NO EVENT SHALL THE COPYRIGHT HOLDER OR
CONTRIBUTORS BE LIABLE FOR ANY DIRECT, INDIRECT, INCIDENTAL, SPECIAL, EXEMPLARY, OR CONSEQUENTIAL
DAMAGES (INCLUDING, BUT NOT LIMITED TO, PROCUREMENT OF SUBSTITUTE GOODS OR SERVICES; LOSS OF
USE, DATA, OR PROFITS; OR BUSINESS INTERRUPTION) HOWEVER CAUSED AND ON ANY THEORY OF LIABILITY,
WHETHER IN CONTRACT, STRICT LIABILITY, OR TORT (INCLUDING NEGLIGENCE OR OTHERWISE) ARISING IN ANY
WAY OUT OF THE USE OF THIS SOFTWARE, EVEN IF ADVISED OF THE POSSIBILITY OF SUCH DAMAGE.
Copyright 2008 Google Inc. All rights reserved.
Redistribution and use in source and binary forms, with or without modication, are permitted provided that the following
conditions are met:
* Redistributions of source code must retain the above copyright notice, this list of conditions and the following disclaimer.
* Redistributions in binary form must reproduce the above copyright notice, this list of conditions and the following disclaimer in
the documentation and/or other materials provided with the distribution.
* Neither the name of Google Inc. nor the names of its contributors may be used to endorse or promote products derived from
this software without specic prior written permission.
THIS SOFTWARE IS PROVIDED BY THE COPYRIGHT HOLDERS AND CONTRIBUTORS “AS IS” AND ANY EXPRESS
OR IMPLIED WARRANTIES, INCLUDING, BUT NOT LIMITED TO, THE IMPLIED WARRANTIES OF MERCHANTABILITY
AND FITNESS FOR A PARTICULAR PURPOSE ARE DISCLAIMED. IN NO EVENT SHALL THE COPYRIGHT OWNER OR
CONTRIBUTORS BE LIABLE FOR ANY DIRECT, INDIRECT, INCIDENTAL, SPECIAL, EXEMPLARY, OR CONSEQUENTIAL
DAMAGES (INCLUDING, BUT NOT LIMITED TO, PROCUREMENT OF SUBSTITUTE GOODS OR SERVICES; LOSS OF
USE, DATA, OR PROFITS; OR BUSINESS INTERRUPTION) HOWEVER CAUSED AND ON ANY THEORY OF LIABILITY,
WHETHER IN CONTRACT, STRICT LIABILITY, OR TORT (INCLUDING NEGLIGENCE OR OTHERWISE) ARISING IN ANY
WAY OUT OF THE USE OF THIS SOFTWARE, EVEN IF ADVISED OF THE POSSIBILITY OF SUCH DAMAGE.
Code generated by the Protocol Buffer compiler is owned by the owner of the input le used when generating it. This code is
not standalone and requires a support library to be linked with it. This support library is itself covered by the above license.
English-80
Page 83

END-USER LICENSE AGREEMENT (EULA)
IMPORTANT - READ CAREFULLY: This End- User License Agreement (the “License Agreement” or the “Agreement”) is
a legally binding document between you (meaning the entity that the individual represents that has obtained access to the
Software for its internal productive use and not for resale and referred to below as “Licensee” or “you”) and DisplayNote
Technologies of United Kingdom (“Licensor”, “us” or “we”) for limited access to the Software (as dened below). BY CLICKING
THE “AGREE” OR “ACCEPT” OR SIMILAR BUTTON AT THE END OF THIS AGREEMENT, OR BY INSTALLING, COPYING,
OR OTHERWISE USING THE SOFTWARE, OR AUTHORIZING ANYONE ELSE TO DO SO, YOU ARE REPRESENTING
TO US THAT YOU ARE: (I) AUTHORIZED TO BIND THE LICENSEE; AND (II) AGREEING ON BEHALF OF THE LICENSEE
THAT THE TERMS OF THIS AGREEMENT SHALL GOVERN THE RELATIONSHIP OF THE PARTIES WITH REGARD TO
THE SOFTWARE; AND (III) WAIVING ANY RIGHTS, TO THE MAXIMUM EXTENT PERMITTED BY APPLICABLE LAW, TO
ANY CLAIM CONCERNING THE ENFORCEABILITY OR VALIDITY OF THIS AGREEMENT. NO OTHER AGREEMENTS OR
TERMS SHALL APPLY TO LICENSEE’S USE OF THE SOFTWARE UNLESS SUCH OTHER AGREEMENT OR TERMS HAVE
BEEN SIGNED BY AN AUTHORIZED REPRESENTATIVE OF LICENSOR.
IF YOU DO NOT AGREE TO THE TERMS OF THIS AGREEMENT ON BEHALF OF LICENSEE, CLICK ON THE “CANCEL”
OR “DECLINE” OR OTHER SIMILAR BUTTON AT THE END OF THIS AGREEMENT AND/OR IMMEDIATELY CEASE ANY
FURTHER ATTEMPT TO INSTALL OR USE THE SOFTWARE, AND EXIT NOW.
1. Denitions and Interpretation
In these terms and conditions, unless the context otherwise requires, the following expressions have the following
meanings:
“Agreement” means the binding agreement that shall come into effect between the Licensee and the
Licensor following the Licensee’s acceptance of these terms and conditions and which shall
incorporate these terms and conditions;
“Cloud Services” means collectively the online facilities, tools, services or information that the Licensor makes
available through a website or Software either now or in the future;
English
“Software” means the Licensor’s product which comprises a software application for use of streaming
video wirelessly from a computer to a software based receiver installed on a secondary
computer by means of local Wi-Fi network and/or through Cloud Services.
“Software License(s)” means a license key(s) or registration code(s) supplied by the Licensor for the Software (which
may include Cloud Services) to enable use of the Software.
2. Property of the Licensor
The copyright, database rights and any other intellectual property rights (including, but not limited to, trademarks, patents
and designs) in the programs and data which constitute the Software are and remain the property of the Licensor or its
suppliers. You are licensed to use the Software only if you accept all of the terms and conditions set out below.
3. License
Licensor grants to you a non-exclusive license to install and use the Software on computer(s) or device(s) owned, leased
and/or controlled by you.
4. License Restrictions
You may not use, copy, modify or transfer the Software (including any related documentation) or any copy, in whole or in
part, including any print-out of all or part of any database, except as expressly provided for in this License Agreement.
If you transfer possession of any copy of the Software to another party, your license is automatically terminated. You
may not translate, reverse engineer, decompile, disassemble, modify or create derivative works based on the Software,
except as expressly permitted by the law of this License Agreement. You may not vary, delete or obscure any notices of
proprietary rights or any product identication or restrictions on or in the Software.
5. Transfer
5.1 The Software is licensed only to you. You may not rent, lease, sub-license, sell, assign, pledge, transfer or
otherwise dispose of the Software, on a temporary or permanent basis, without the prior written consent of
the Licensor.
5.2 We may transfer our rights and obligations under this License to another organization, but this will not affect
your rights or our obligations under this License.
English-81
Page 84

6. Provision of Cloud Services
6.1 We shall use commercially reasonable efforts to make Cloud Services available to you based on the
availability from our suppliers.
6.2 Notwithstanding Section 6.1, we do not provide any guarantee that provision of the Cloud Services shall be
error-free or without interruption and we reserve the right to alter or suspend provision of the Cloud Services
without prior notice to you. By accepting these terms and conditions you acknowledge that the Cloud
Services may change in form or nature at any time, and may become unavailable.
6.3 The Cloud Services are provided “as is” and on an “as available” basis. We give no warranty that the Cloud
Services will be free of defects and or faults.
6.4 We accept no liability for any disruption or non-availability of the Cloud Services for any reason.
7. Ownership of Software and Copies
The Software and related documentation are copyrighted works of authorship, and are also protected under applicable
database laws. The Licensor or its suppliers retain ownership of the Software, all subsequent copies of the Software
and all intellectual property rights subsisting therein, regardless of the form in which the copies may exist. This License
Agreement is not a sale of the original Software or any copies thereof.
8. Undertakings
You undertake to:
8.1 Use the Software only within the bounds of the terms and conditions of this License Agreement;
8.2 Ensure that, prior to use of the Software by your employees or agents (where relevant), all such parties are
notied of the terms and conditions of this License Agreement; and
8.3 Reproduce and include our copyright notice (or such other party’s copyright notice as specied on the
Software) on all and any copies of the Software, including any partial copies of the Software.
9. Limited Warranty
We warrant that:
9.1 the Software will, when properly used on an operating system for which it was designed, perform substantially
in accordance with the functions described on our website for a period of 30 days from the date that the
Software License was provided to you (“Warranty Period”);
9.2 if, within the Warranty Period, you notify us in writing of any defect or fault in the Software as a result of
which it fails to perform substantially in accordance with the description on our website, we will, at our sole
option, either repair or replace the Software, provided that you make available all the information that may be
necessary to help us to remedy the defect or fault, including sufcient information to enable us to recreate the
defect or fault. For the purposes of any warranty claims or queries, please contact us as set forth below.
9.3 The Licensor shall not be liable under the said warranty above if the Software fails to operate in accordance
with the said warranty as a result of any modication, variation or addition to the Software not performed
by the Licensor or caused by any abuse, corruption or incorrect use of the Software, including use of the
Software with equipment or other software which is incompatible.
10. Disclaimer Of All Other Warranties
THE FOREGOING WARRANTY IS MADE IN LIEU OF ANY OTHER WARRANTIES, REPRESENTATIONS OR
GUARANTEES OF ANY KIND, WHETHER EXPRESSED OR IMPLIED, INCLUDING, BUT NOT LIMITED TO, ANY
IMPLIED WARRANTIES OF QUALITY, MERCHANTABILITY, FITNESS FOR A PARTICULAR PURPOSE OR
ABILITY TO ACHIEVE A PARTICULAR RESULT. YOU ASSUME THE ENTIRE RISK AS TO THE QUALITY AND
PERFORMANCE OF THE SOFTWARE. THE LICENSOR DOES NOT WARRANT THAT THE SOFTWARE WILL MEET
YOUR REQUIREMENTS OR THAT ITS OPERATION WILL BE UNINTERRUPTED OR ERROR FREE.
11. Limitation of Liability
The Licensor’s entire liability and your exclusive remedy shall be:
11.1 The replacement of any Installation Media either with new Installation Media or with the download of the
required installation.
11. 2 Regardless of whether any remedy set forth herein fails of its essential purpose of otherwise, our maximum
aggregate liability under or in connection with this License whether in contract, tort (including negligence) or
otherwise, shall in all circumstances be limited to one hundred United States dollars (US$100).
English-82
Page 85

12. Exclusion of Consequential Damages
IN NO EVENT SHALL LICENSOR OR ANY OF ITS SUPPLIERS BE LIABLE TO LICENSEE OR ANY THIRD PARTY FOR
SPECIAL, INDIRECT, CONSEQUENTIAL, PUNITIVE OR INCIDENTAL DAMAGES, INCLUDING BUT NOT LIMITED TO
LOSS OF REVENUES AND LOSS OF PROFITS, WHETHER ARISING UNDER CONTRACT, WARRANTY, OR TORT
(INCLUDING NEGLIGENCE OR STRICT LIABILITY) OR ANY OTHER THEORY OF LIABILITY ARISING OUT OF OR
IN CONNECTION WITH THE USE OF OR INABILITY TO USE THE SOFTWARE EVEN IF LICENSOR HAS BEEN
ADVISED OF THE POSSIBILITY OF SUCH DAMAGES. Nothing in this License Agreement limits liability for fraudulent
misrepresentation.
13. Your Statutory Rights
This License Agreement gives you specic legal rights and you may also have other rights that vary from country to
country. Some jurisdictions do not allow the exclusion of implied warranties, or certain kinds of limitations or exclusions of
liability, so the above limitations and exclusions may not apply to you. Other jurisdictions allow limitations and exclusions
subject to certain conditions. In such a case the above limitations and exclusions shall apply to the fullest extent
permitted by the laws of such applicable jurisdictions. If any part of the above limitations or exclusions is held to be void or
unenforceable, such part shall be deemed to be deleted from this License Agreement and the remainder of the limitation
or exclusion shall continue in full force and effect. Any rights that you may have as a consumer (i.e. a purchaser for private
as opposed to business, academic or government use) are not affected.
14. Privacy
Use of the Software and the Cloud Services is also governed by the Licensor’s Privacy Policy and Data Protection Policy
which is available at www.displaynote.com.
15. Ter m
This License Agreement is effective until terminated. You may terminate it at any time by destroying the Software together
with all copies in any form. It will also terminate upon conditions set out elsewhere in this License Agreement or if you fail
to comply with any term or condition of this License Agreement or if you voluntarily return the Software to the Licensor.
You agree upon such termination to destroy the Software together with all copies in any form.
English
16. General
16.1 This Agreement shall be construed in accordance with the laws of the United Kingdom without regard to its
conict of laws provisions. The terms of the U.N. Convention on Contracts for the International Sale of Goods
shall not apply.
16.2 You and we agree that any dispute, claim or controversy arising out of or relating in any way to the Software
and this License Agreement shall be determined by binding arbitration. You agree that, by agreeing to the
terms of this License Agreement, that you and we are each waiving the right to a trial by jury or to participate
in a class action. This arbitration provision shall survive termination of this License Agreement.
16.3 16.3 This License Agreement constitutes the complete and exclusive statement of the License Agreement
between the Licensor and you with respect to the subject matter of this License Agreement and supersedes
all proposals, representations, understandings and prior agreements, whether oral or written, and all other
communications between us relating to that subject matter. Any terms and conditions of a purchase order or
other document issued by Licensee shall be superseded by the terms and conditions of this Agreement. This
Agreement may be amended only by a written agreement executed by Licensee and Licensor.
16.4 Any Clause in this License Agreement that is found to be invalid or unenforceable shall be deemed deleted
and the remainder of this License Agreement shall not be affected by that deletion.
16.5 Failure or neglect by either party to exercise any of its rights or remedies under this License Agreement will
not be construed as a waiver of that party’s rights nor in any way affect the validity of the whole or part of this
License Agreement nor prejudice that party’s right to take subsequent action.
Any questions concerning this License Agreement or the Software should be directed to the Licensor. Contact details are
available from www.displaynote.com
English-83
 Loading...