

USER'S MANUAL
AccuSync
Audio Base
To learn about other special offers, register online at www.necmitsubishi.com/ productregistration
AudioBase 9/29/00, 11:26 AM1
®

Index
Warning.................................................................................................. 1
Contents ............................................................................................... 2
Quick Start ....................................................................................... 2-3
Controls ................................................................................................ 4
Specifications...................................................................................... 4
Recommended Use ............................................................................. 5
Troubleshooting .................................................................................. 6
Avertissement ......................................................................................7
Contenu ................................................................................................ 8
Mise en marche rapide .................................................................. 8-9
Commandes ........................................................................................ 10
Fiche technique ................................................................................. 10
Usage recommandé ........................................................................... 11
Dépannage .......................................................................................... 12
AudioBase 9/29/00, 11:26 AM2
WARNING
TO PREVENT FIRE OR SHOCK HAZARDS, DO NOT EXPOSE THIS UNIT TO RAIN OR MOISTURE. ALSO, DO NOT USE
THIS UNIT'S POLARIZED PLUG WITH AN EXTENSION CORD RECEPTACLE OR OTHER OUTLETS UNLESS THE PRONGS
CAN BE FULLY INSERTED.
REFRAIN FROM OPENING THE CABINET AS THERE ARE HIGH VOLTAGE COMPONENTS INSIDE. REFER SERVICING
TO QUALIFIED SERVICE PERSONNEL.
CAUTION
CAUTION: TO REDUCE THE RISK OF ELECTRIC SHOCK, MAKE SURE POWER CORD IS UNPLUGGED FROM
WALL SOCKET. TO FULLY DISENGAGE THE POWER TO THE UNIT, PLEASE DISCONNECT THE POWER
CORD FROM THE AC OUTLET.DO NOT REMOVE COVER (OR BACK). NO USER SERVICEABLE PARTS
INSIDE. REFER SERVICING TO QUALIFIED SERVICE PERSONNEL.
This
symbol warns user that uninsulated voltage within the unit may have sufficient magnitude to cause
electric shock. Therefore, it is dangerous to make any kind of contact with any part inside this unit.
This symbol alerts the user that important literature concerning the operation and maintenance of this
unit has been included. Therefore, it should be read carefully in order to avoid any problems.
Canadian Department of Communications Compliance Statement
DOC: This Class B digital apparatus meets all requirements of the Canadian
Interference-Causing Equipment Regulations.
C-UL: Bears the C-UL Mark and is in compliance with Canadian Safety Regulations
according to C.S.A. 22.2 No. 950.
FCC Information
1.
Use the attached specified cables with the
radio and television reception.
(1)
Please use the supplied power cord or equivalent to ensure FCC compliance.
(2) Please use the supplied shielded video signal cable, 15-pin mini D-SUB to
DVI cable or DVI-D to DVI-D cable.
2.
This equipment has been tested and found to comply with the limits for a Class B digital
device, pursuant to part 15 of the FCC Rules. These limits are designed to provide
reasonable protection against harmful interference in a residential installation. This
equipment generates, uses, and can radiate radio frequency energy, and, if not installed
and used in accordance with the instructions, may cause harmful interference to radio
communications. However, there is no guarantee that interference will not occur in a
particular installation. If this equipment does cause harmful interference to radio or
television reception, which can be determined by turning the equipment off and on, the user
is encouraged to try to correct the interference by one or more of the following measures:
• Reorient or relocate the receiving antenna.
• Increase the separation between the equipment and receiver.
• Connect the equipment into an outlet on a circuit different from that to which the receiver
is connected.
• Consult your dealer or an experienced radio/TV technician for help.
AccuSync Audio Base
so as not to interfere with
If necessary, the user should contact the dealer or an experienced radio/television technician
for additional suggestions. The user may find the following booklet, prepared by the Federal
Communications Commission, helpful: ”How to Identify and Resolve Radio-TV Interference
Problems.“ This booklet is available from the U.S. Government Printing Office, Washington,
D.C., 20402, Stock No. 004-000-00345-4.
AudioBase 9/29/00, 11:26 AM3
1
Contents
Audio Base
USER'S MANUAL
AccuSync
®
To learn about other special offers, register online at www.necmitsubishi.com/ productregistration
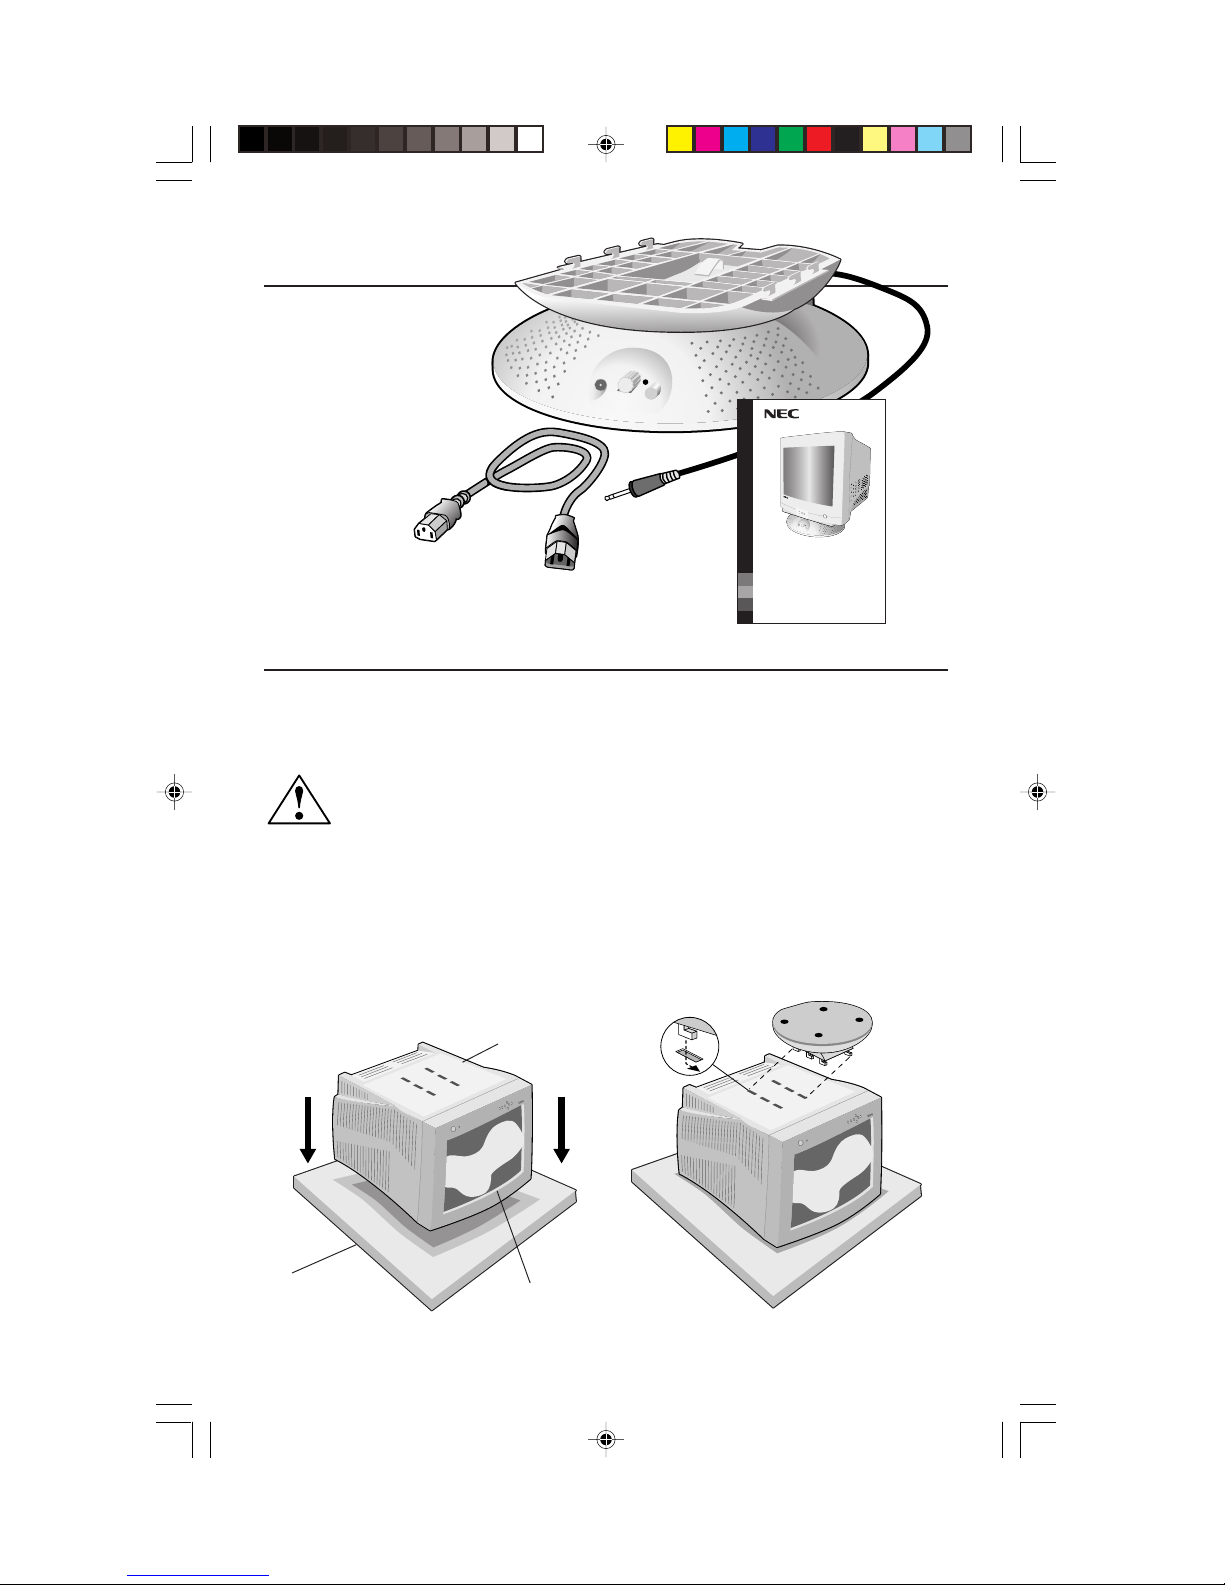
The audio base contains the
following additional items.
• Audio Base
• Captive Audio Cable
• Audio Base Manual
• Power Cord
Quick Start
If the audio base is not attached to the monitor, please use the following steps to
attach the audio base to the monitor.
If the audio base is already attached to the monitor proceed to Step 1-B.
MAKE SURE THE MONITOR IS DISCONNECTED FROM THE SYSTEM AND
IS UNPLUGGED FROM THE WALL OUTLET BEFORE ANY WORK IS DONE
ON THE MONITOR.
STEP 1-A. With the monitor unplugged from your system and the wall outlet,
carefully turn the monitor upside down on a firm table (Figure 1-A).
STEP 2-A. Position the locking tabs on the audio base with the holes in the
monitor and slide the audio base in place (Figure 2-A).
Figure 1-A
Firm Table
AudioBase 9/29/00, 11:26 AM4
Figure 2-A
Bottom of monitor
Top of monitor
2
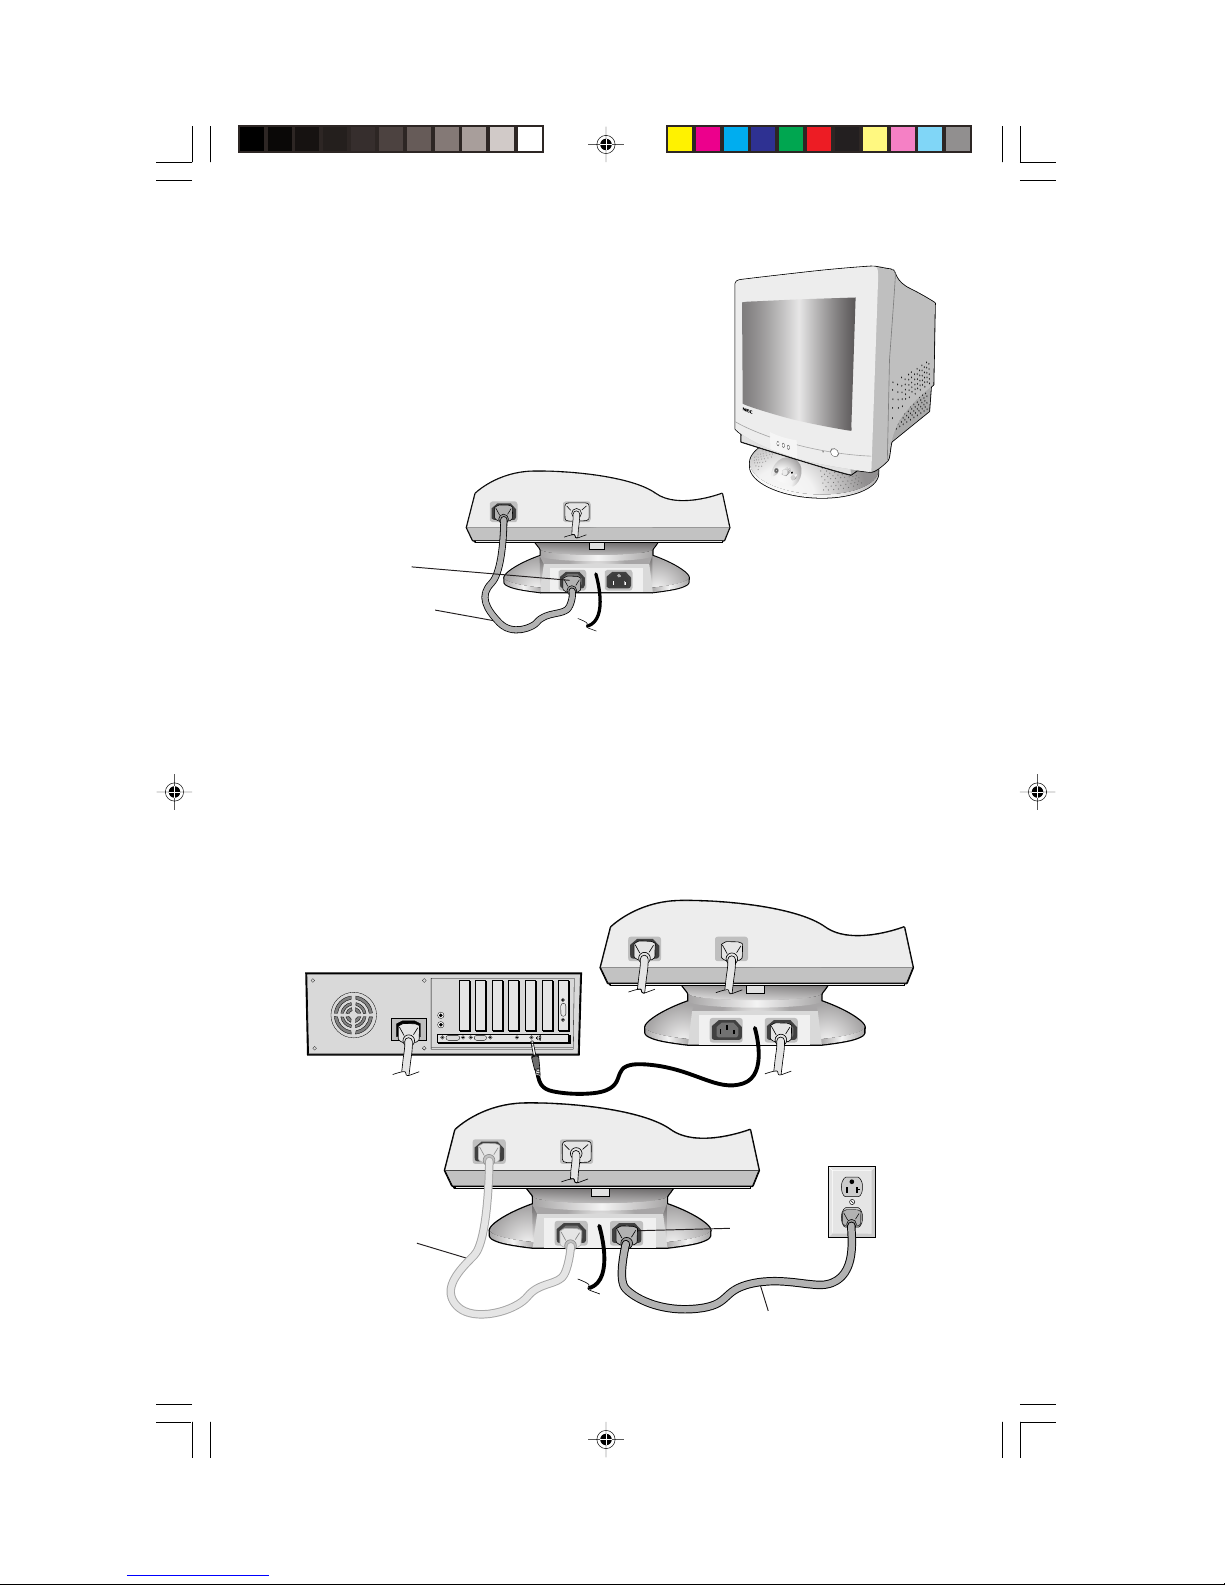
Figure 3-A
STEP 3-A. Having successfully installed your
audio base, carefully turn the monitor
right side up (Figure 3-A).
STEP 4-A. Connect one end of the short power
cord to the connector on the
audio base and the other end to
the monitor (Figure 4-A).
Figure 4-A
AC OUT
Short Power Cord
STEP 1-B. Connect one end of the short power cord to the connector on the
audio base and the other end to the monitor (Figure 4-A).
STEP 2-B. Connect the captive audio cable to the audio (line) output jack of
your computer system (Figure 1-B).
STEP 3-B. Connect one end of the long power cord to the AC-IN connector on
the audio base and the other end into the AC wall outlet (Figure 2-B).
STEP 4-B. Reconnect your monitor to your computer system as shown in the
monitor User’s Manual.
STEP 5-B.
Turn on the audio base and adjust the controls for best
sound performance.
Figure 1-B
Figure 2-B
Short Power Cord
AudioBase 9/29/00, 11:27 AM5
AC IN
Long Power Cord
3

Controls
Power: Press the power button to turn the audio base on or off. An indicator light
next to the power button will glow to show power is on.
Volume: Turn this control clockwise to increase volume level and counterclockwise
to decrease volume level.
Headphone Output Jack: Headphones can be used to listen to audio in private.
When the headphone plug is inserted into the headphone jack, the speakers are
automatically disconnected and sound is heard through the headphones.
NOTE: Headphones not included. The headphone plug required is a mini stereo
type measuring 3.5mm (1/8”).
Specifications
Speakers Two 2.2 inch / 57mm full range
Power 1 + 1 Watts @ 8 Ohms with 10% THD
Input Impedance > 10k Ohms
Input Sensitivity 500mV input for full output
Frequency response 150Hz - 10kHz
Power Requirements AC 100-240V
Current Rating 3.15A (Audio 0.15A. AC OUT 3A)
Headphone Jack Type 3.5mm Stereo
Audio Input Plug Type 3.5mm Stereo
Dimensions 10.2 in (W) x 1.8 in (H) x 9.5 in (D)
260mm (W) x 45mm (H) x 243mm (D)
Weight 1.6 lbs / 0.72kg
Environmental Considerations
Operating Temperature 0° C to 35° C
Humidity 30% to 80% (Non-Condensing)
Altitude 0 to 10,000 Feet
Storage Temperature -20° C to +60° C
Humidity 10% to 90%
Altitude 0 to 45,000 Feet
System Hardware Requirements PC or MAC with sound capabilities
Note: Technical specifications are subject to change without notice.
AudioBase 9/29/00, 11:27 AM6
4

Recommended Use
Safety Precautions and Maintenance
FOR OPTIMUM PERFORMANCE, PLEASE NOTE
THE FOLLOWING WHEN SETTING UP
AND USING THE AUDIO BASE:
• DO NOT OPEN THE AUDIO BASE. There are no user serviceable parts inside
and opening or removing covers may expose you to dangerous shock hazards
or other risks. Refer all servicing to qualified service personnel.
• Do not spill any liquids into the audio base or use your audio base near water.
• Do not insert objects of any kind into the audio base slots, as they may touch
dangerous voltage points, which can be harmful or fatal or may cause electric
shock, fire or equipment failure.
• Do not place any heavy objects on the power cord. Damage to the cord may
cause shock or fire.
• Keep the audio base away from high capacity transformers, electric motors
and other devices such as external speakers or fans, which may create strong
magnetic fields.
• When operating the audio base with its AC 220-240V worldwide power
supply, use a power supply cord that matches the power supply voltage of the
AC power outlet being used. The power supply cord you use must have been
approved by and comply with the safety standards of your country. (Type
H05VV-F should be used except in UK)
NOTE: The audio base is to be used only with NEC MultiSync and AccuSync
monitors.
• In UK, use a BS-approved power cord with molded plug and a black (5A) fuse
installed for use with this audio base. If a power cord is not supplied with this
audio base, please contact your supplier.
Immediately unplug your audio base from the wall outlet and refer servicing to
qualified service personnel under the following conditions:
• When the power supply cord or plug is damaged.
• If liquid has been spilled, or objects have fallen into the audio base.
• If the audio base has been exposed to rain or water.
• If the audio base has been dropped or the cabinet damaged.
• If the audio base does not operate normally by following operating
instructions.
• Allow adequate ventilation around the audio base so that heat can
properly dissipate. Do not block ventilated openings or place the
audio base near a radiator or other heat sources.
CAUTION
• The power cable connector is the primary means of detaching the
system from the power supply. The audio base should be installed
close to a power outlet which is easily accessible.
• Handle with care when transporting. Save packaging for transporting.
AudioBase 9/29/00, 11:27 AM7
5

Troubleshooting
Symptoms Possible Problem Solution Note
No sound from No power to unit. Make sure all connecting plugs Provided power has been
speakers between the audio base and verified, it is possible to test the
Volume level on Check volume level of sound Check with an alternate audio
sound card or other card, audio source and Windows
audio source may mixer and raise as necessary,
be too low.
Volume is too low. Make sure the volume control is
Distortion (i.e. Speaker is being Make sure the audio base is Depending on your sound card,
static, hissing, overdriven by an connected to line-out jack you may also turn off the
crackling) amplified audio (unamplified) of sound card and amplifier on the sound card
source. not speaker-out jack (amplified). (check your sound card manual).
Volume level on Check volume level of sound
sound card or other card or audio source and lower
audio source may as necessary.
be too high and
causing speaker to
be overdriven.
Sound card or Check speakers with another For this check, disconnect
specific sound file/ audio source (CD-ROM player) speakers from sound card and
track may be root to see if sound card or specific plug into headphone jack on
of problem. file/track may be the problem. front of CD-ROM player or
Sound from Audio cable is not Make sure the audio connector is
only one properly properly inserted in the audio
speaker connected. jack on the rear side.
computer are fully seated. Make unit by disconnecting the audio
sure the wall power outlet or cable that is connected to the
power strip has power. Make computer and reconnecting it to
sure the power switches on the an alternate audio power source
power strip and audio base are such as a portable CD player.
turned on.
®
source as mentioned above.
not at zero.
alternate line-level audio source.
AudioBase 9/29/00, 11:27 AM8
6

AVERTISSEMENT
AFIN D’ÉVITER TOUT RISQUE D’INCENDIE OU D’ÉLECTROCUTION, NE PAS EXPOSER CET APPAREIL À LA PLUIE OU À
L’HUMIDITÉ. NE PAS UTILISER LA FICHE D’ALIMENTATION POLARISÉE AVEC UNE PRISE DE CORDON DE RALLONGE
OU AUTRE PRISE SAUF SI LES BROCHES PEUVENT ÊTRE ENTIÈREMENT INTRODUITES.
NE PAS OUVRIR LE BOÎTIER, LEQUEL CONTIENT DES COMPOSANTS À HAUTE TENSION. CONFIER TOUS TRAVAUX
À DU PERSONNEL TECHNIQUE QUALIFIÉ.
ATTENTION
RISQUE DE DÉCHARGE ÉLECTRIQUE • NE PAS OUVRIR
ATTENTION : POUR ÉVITER TOUT RISQUE D'ÉLECTROCUTION, NE PAS OUVRIR LE COUVERCLE (L'ARRIÈRE). À L'INTÉRIEUR, AUCUNE
PIÈCE NE NÉCESSITE L'INTERVENTION DE L'UTILISATEUR. EN CAS DE PROBLÈME, S'ADRESSER À DU PERSONNEL TECHNIQUE QUALIFIÉ.
Ce symbole est une mise en garde contre les risques d'électrocution que présentent certaines parties dépourvues
d'isolation à l'intérieur de l'appareil. Il est donc dangereux d'établir le moindre contact avec ces parties
Ce symbole prévient l'utilisateur que des directives d'utilisation et de maintenance de cet appareil sont fournies avec
ce guide d’utilisateur. Par conséquent, celles-ci doivent être lues attentivement pour éviter tout incident.
.
Déclaration de conformité – Département des Communications du Canada
DOC : Cet appareil numérique de classe B respecte toutes les exigences du Règlement
sur le matériel à l'origine d'interférences du Canada.
C-UL : Ce produit porte la marque «C-UL» et est conforme aux règlements de sécurité
canadiens selon CAN/CSA 22.2 No. 950.
Informations FCC
1.
Utiliser les câbles spécifiés fournis avec les
avec la réception radio et télévision
(1) Prière d'utiliser le câble d'alimentation fourni ou équivalent pour assurer la conformité FCC.
(2) Veuillez utiliser le câble de signal vidéo blindé fourni, un mini D-SUB à 15 broches vers le câble
DVI
ou un DVI-D vers le câble DVI-D.
2.
Cet appareil a été testé et s’avère conforme avec les spécifications d'équipements de Classe B, section 15
de la réglementation FCC. Ces spécifications ont été établies pour garantir une protection raisonnable
contre les interférences nuisibles dans une installation résidentielle. Cet appareil génère, utilise et peut
émettre des fréquences radio et, s'il n'est pas installé et utilisé selon les directives de ce guide, il peut
perturber les communications radio. Cependant, il n'est pas garanti qu'aucune interférence ne se produira
dans une installation donnée.
Si cet appareil provoque des interférences nuisibles à la réception radio ou télévision, ce que vous pouvez
déterminer en allumant et en éteignant l'appareil, essayez de remédier au problème en prenant une ou
plusieurs des mesures suivantes :
• Réorienter ou repositionner l'antenne de réception.
• Augmenter la distance entre l'appareil et le récepteur.
• Connecter l'appareil à une prise de courant sur un circuit différent de celui sur lequel le récepteur
est connecté.
• Consulter son revendeur ou un technicien radio/TV pour obtenir de l'aide.
Si nécessaire, l'utilisateur doit contacter le revendeur ou un technicien radio/TV afin d'obtenir des
informations supplémentaires. L'utilisateur peut se procurer le livret utile suivant, préparé par la Federal
Communications Commission : «How to Identify and Resolve Radio-TV Interference Problems» (Comment
cerner et résoudre les problèmes d’interférences radio/TV). Ce livret est disponible auprès du U.S.
Government Printing Office, Washington, D.C., 20402, Stock No. 004-000-00345-4.
AccuSync Audio Base
.
afin de ne pas provoquer d'interférences
AudioBase 9/29/00, 11:27 AM9
7

Contenu
Audio Base
USER'S MANUAL
AccuSync
®
To learn about other special offers, register online at www.necmitsubishi.com/ productregistration
La base audio conteint
suivants supplémentaires
les élémants :
• La base audio
• Câble de audio captif
• La base audio manual
de l’utilisateur
• Cordon
d’alimentation
Mise en marche rapide
Si la base audio n’est pas attachée au moniteur, employez s’il vous plaît les
étapes suivantes pour attacher la base audio au moniteur.
Si la base audio est déjà attachée au moniteur, procédez à l’étape 1-B.
S’ASSURER QUE LE MONITEUR EST DÉBRANCHÉ DU SYSTÈME ET
DÉBRANCHÉ DE LA PRISE DE COURANT AVANT D’EFFECTUER QUELQUE
TRAVAIL QUE CE SOIT SUR LE MONITEUR.
Étape1-A. Le moniteur étant débranché du systéme et de la prise de courant,
renverser soigneusement le moniteur sur une table solide (Figure 1-A).
Étape 2-A. Positionner toutes les pattes de blocage sur la base audio avec les
trous dans le moniteur et glissez la base audio en place (Figure 2-A).
Figure 1-A
Entreprise table
AudioBase 9/29/00, 11:27 AM10
Figure 2-A
Bottom d’écran
Surmonte d’écran
8

Étape 3-A. Une fois la nouvelle la base audio posée,
remettre soigneusement le moniteur à
l’endroit (Figure 3-A).
Étape 4-A. Connecter une extrémité du short cordon
d’alimentation au connecteur de la base
audio et l’autre extrémité au moniteur
(Figure 4-A).
Figure 4-A
OUT AC
Short Power Cordon
Figure 3-A
Étape 1-B.
Connecter une extrémité du short cordon d’alimentation au connecteur
de la base audio et l’autre extrémité au moniteur (Figure 4-A).
Étape 2-B. Connecter la câble de audio captif à la prise de sortie audio (ligne)
de votre systéme informatique (Figure 1-B).
Étape 3-B. Connecter une extrémité du long cordon d’alimentation au
connecteur AC-IN sur la base audio et l’autre extrémité à la prise de
courant (Figure 2-B).
Étape 4-B. Reconnecter le moniteur à votre systéme informatique comme illustré
dans le manuel de l’utilisateur du moniteur.
Étape 5-B.
Mettre la base audio en marche et ajuster les commandes en
vue d’une performance sonore optimale.
Figure 1-B
Figure 2-B
Short Power Cordon
DEDANS AC
AudioBase 9/29/00, 11:27 AM11
9
De La Longue Power Cordon

Commandes
Power: Appuyer sur le bouton POWER pour mettre la base audio en marche ou
à l’arrêt. Un témoin lumineux au-dessus du bouton s’allumera pour montrer que
l’appareil est sous tension.
Volume: Touner cette commande en sens horaire pour augmenter le niveau
sonore. Tourner en sens anti-horaire pour baisser le niveau sonore.
Prise de sortie pour casque d’écoute: On peut utiliser un casque d’écoute pour
écoute privée. Lorsque la fiche du casque d’écoute est insérée dans la prise du
casque d’écoute, les haut-parleurs sont débranchés automatiquement et le son se
fait entendre à travers les écouteurs.
REMARQUE: Le casque d’écoute n’est pas compris. La fiche requise pour le
casque d’écoute est une mini-fiche de type stéréo mesurant 3,5 mm (1/8 po).
Fiche technique
Haut-parleurs Deux 2,2 po/57 mm gamme complète
Puissance 1 + 1 Watts à 8 Ohms avec THD 10%
Impédance d’entrée Supérieure à 10 k Ohms
Sensibilité d’entrée Entrée de 500 mV pour sortie complète
Plage de fréquences 150 Hz à 10 kHz
Alimentation nécessaire 110-240 V C.A.
Courant nominal 3,15 A (Audio 0,15A AC OUT 3A)
Type de prise du casque d’écoute 3,5 mm stéréo
Type de prise d’entrée audio 3,5 mm stéréo
Dimensions 10,2 po (L) x 1,8 po (H) x 9,5 po (P)
260 mm (L) x 45 mm (H) x 243 mm (P)
Poids 1,6 lbs / 0,72 kg
Environment
Température de service 0° C à 35° C
Humidité 30 à 80% (sans condensation)
Altitude 0 à 10,000 pieds
Température de stockage -20° C à +60° C
Humidité 10 à 90% (sans condensation)
Altitude 0 à 45,000 pieds
Exigences en matériel informatique PC ou MAC avec capacités sonores
REMARQUE: Les caractéristiques techniques peuvent être modifiées sans préavis.
AudioBase 9/29/00, 11:27 AM12
10

Usage recommandé
Consignes de sécurité et d’entretien
POUR UN FONCTIONNEMENT OPTIMAL, PRIÈRE DE
NOTER CE QUI SUIT POUR LE RÉGLAGE ET
L'UTILISATION LA BASE AUDIO
• NE PAS OUVRIR LA BASE AUDIO. Aucune pièce intérieure ne nécessite l'intervention de
l'utilisateur, et l'ouverture ou la dépose des couvercles peut entraîner des risques de
décharges électriques dangereuses ou d'autres risques. Confier tous travaux à du personnel
technique qualifié.
• Ne pas renverser de liquides dans le boîtier, ni utiliser la base audio près de l'eau.
• Ne pas introduire d'objets de quelque nature que ce soit dans les fentes du boîtier car ceux-
ci pourraient toucher des endroits sous tension dangereuse, ce qui peut provoquer des
blessures, voire être fatal, ou peut occasionner une décharge électrique, un incendie ou une
panne de l'appareil.
• Ne pas placer d'objets lourds sur le cordon d'alimentation. Un cordon endommagé peut
occasionner une décharge électrique ou un incendie.
• Ne pas placer cet appareil sur un chariot, un support ou une table inclinée ou instable, afin
d'éviter que le moniteur ne tombe, occasionnant de sérieux dommages au moniteur.
• Maintenir la base audio éloigné des transformateurs à haute capacité, des moteurs
électriques et de tous autres dispositifs tels que des haut-parleurs ou ventilateurs externes,
lesquels peuvent créer des champs magnétiques puissants.
• Pour l'utilisation la base audio avec l'alimentation CA mondiale de 220-240 V, utiliser un
cordon d'alimentation qui correspond à la tension de l'alimentation fournie à la prise de
courant CA. Le cordon d'alimentation utilisé doit être agréé et en conformité avec les normes
de sécurité de son pays. (Type H05VV-F à utiliser sauf au Royaume-Uni.)
REMARQUE : La base audio doit être utiliser seulement avec les moniteurs MultiSync et
AccuSync.
• Au Royauma-Uni, utiliser un cordon d'alimentation certifié BS avec une prise mouiée ayant
un fusible noir (SA) installé pour l'utilisation avec la base audio. Si un cordon d'alimentation
n'est pas fourmi avec la base audio, veuiller contacter votre fournisseur.
Débrancher immédiatement le moniteur de la prise murale et confier la réparation à du
personnel technique qualifié dans les cas suivants :
• Lorsque le cordon d'alimentation ou la fiche est endommagé(e).
• Si du liquide a été renversé ou des objets sont tombés à l'intérieur du la base audio.
• Si la base audio a été exposé à la pluie ou à de l'eau.
• Si la base audio est tombé ou le boîtier est endommagé.
• Si la base audio ne fonctionne pas normalement en suivant les directives d'utilisation.
•
Prévoir une aération suffisante autour la base audio pour que la chaleur puisse
se dissiper correctement. Ne pas obstruer les ouvertures de ventilation ni placer
la base audio près d'un radiateur ou autre source de chaleur. Ne rien poser sur
la base audio.
• La fiche du cordon d'alimentation est le moyen principal de débrancher le
AVERTISSEMENT
système de l'alimentation. La base audio doit être installé à proximité d'une
prise de courant facilement accessible.
Manipuler avec soin lors du transport. Conserver l'emballage pour le transport.
•
:
AudioBase 9/29/00, 11:27 AM13
11

Dépannage
Symptôme Problème Possible Solution Remarque
Pas de son dans
les haut-parleurs
Distorsion (à
savoir, parasites,
crépitements,
sifflements)
Son provenant
d’un seul hautparleur
L’appareil n’est pas S’assurer que toutes les prises Après s’être assuré de
branché. de connexion entre la base l’alimentation en courant, il est
Le niveau du Vérifier le volume de la carte Effectuer la vérification avec
volume de la carte son, de la source audio et du une autre source audio, comme
son ou de l’autre mélangeur Windows
source audio est besoin est, l’augmenter.
peut-être trop
faible.
Le volume est trop S’assurer que la commande du
faible. volume n’est pas à zéro.
Surcharge du haut- S’assurer que la base audio est En fonction de la carte son que
parleur due à une raccordée à la prise de sortie vous avez, il peut être possible
amplification de la de ligne (non amplifiée) de la de déconnecter l’amplificateur de
source audio. carte son et non à la prise de la carte son (se reporter au
Le volume de la Vérifier le volume de la carte
carte son ou de son ou de la source audio et, si
toute autre source besoin ets, le baisser.
audio est peut-être
trop élevé, causant
une surcharge du
haut-parleur.
La carte son ou la Vérifier les haut-parleurs en Pour cette vérification,
piste sonore les reliant à une autre source déconnecter les haut-parleurs de
spécifique est peut- audio (lecteur de CD-ROM) la carte son et se brancher sur la
être à l’origine du pour voir si le problème prise pour casque d’écoute située
problème. provient de la carte son ou de sur le devant du lecteur de CD-
Le câble audio S’assurer que le connecteur
n’est pas raccordé audio est bien inséré dans la
adéquatement. prise audio située à l’arrière.
audio et l’ordinateur sont bien possible, pour vérifier l’appareil,
enfoncées. Vérifier que la de débrancher le câble audio qui
prise électrique murale ou la va à l’ordinateur et de le relier à
multiprise est alimentée en une autre source audio, telle
courant. S’assurer que les qu’un lecteur de CD portable.
interrupteurs de la multiprise
et la base audio sont bien
ouverts.
®
et, si on l’a mentionné plus haut.
sortie de haut-parleur manuel de description de votre
(amplifiée). carte son).
la piste sonore spécifique. ROM, ou sur toute autre source
audio semblable.
AudioBase 9/29/00, 11:27 AM14
12

DÉCLARATION DE CONFORMITÉ
Cet appareil est conforme à l’article 15 du règlement de la FCC. L’utilisation est soumise à
deux conditions. 1) Cet appareil ne peut pas occasionner d’interférences nuisibles, et 2)
cet appareil doit accepter toutes interférences reçues, y compris les interférences qui
peuvent occasionner un mauvais fonctionnement.
Partie responsable américaine : NEC-Mitsubishi Electronics Display of
America, Inc.
Adresse : 1250 N Arlington Heights Road
Itasca, Illinois 60143
N° tél. : (630) 467-3000
Type de produit : La Base Audio
Classification de l’appareil : Périphérique classe B
Modèle : N9001
Nous déclarons par la présente que les appareils mentionnés ci-dessus sont
conforme aux normes techniques spécifiées dans le règlement de la FCC.
AudioBase 9/29/00, 11:27 AM15
N° de pièce 15500641
Imprimé aux États-Unis

DECLARATION OF CONFORMITY
This device complies with Part 15 of FCC Rules. Operation is subject to the following two conditions. (1) This device may not cause harmful interference, and (2) this device must accept any
interference received. Including interference that may cause undesired operation.
U.S. Responsible Party: NEC-Mitsubishi Electronics Display of
America, Inc.
Address: 1250 N Arlington Heights Road
Itasca, Illinois 60143
Tel. No: (630) 467-3000
Type of Product: Computer Peripheral
Equipment Classification: Class B Peripheral
Model: N9001
We hereby declare that the equipment specified above conforms to the technical
standards as specified in the FCC rules.
AudioBase 9/29/00, 11:27 AM16
Part No. 15500641
Printed in U.S.A.
 Loading...