

Page 1

NEC MobilePro 750C
User’s Guide
Page 2

PROPRIETARY NOTICE AND L IABILITY DISCLAIME R
The information disclosed in this document, including all designs
and related materials, is the valuable property of NEC Computer
Systems Division, Packard Bell NEC, Inc. (NECCSD, PBNEC)
and/or its licensors. NECCSD and/or its licensors, as appropr iate,
reserve all patent, copyright and other proprietary rights to this
document, including all design, manufacturing, reproduction, use,
and sales ri g h ts thereto, except to the extent sa i d rig h ts are expressly
granted to ot hers.
The NE CCS D pr oduct( s) disc ussed in t his document ar e war ra nted
in accordance with the terms of the Warranty Statement accompanying each product. However, actual performance of each such
product is dependent upon factors such as system configuration,
cust omer da ta, a nd operat or control. Since implementation b y customers of each pr odu ct may va r y, the s uit abilit y of sp ecific pr oduct
configur a tions a nd app lica tions mus t be det ermined by the cu st omer
and is not warra nted by NECCSD.
To allow for desi gn a nd sp ecific a t ion impr ovements, t he infor ma tion
in this document is subject to change at any time, without notice.
Reproduction of this document or portions thereof without prior
writ ten app roval of N ECCSD is prohibit ed.
NEC is a registered trademark and MobilePro is a trademark of NEC Corporation, used under
license.
Microsoft and Windows are registered trademarks of Microsoft Corporation in the U.S.A.,
and/or other countries.
All other product, brand, or trade names used in this publication are the property of their respective owners.
First Prin t ing — March 1998
Copyright 1998
NEC Computer Systems Division, Pa cka rd Bell NEC, I nc.
1414 Massachusetts Avenue
Boxborough, MA 01719
All Rights Reserved
Page 3

Contents
Using this Guide
Text Conventions...............................................................................v
1 Quick Start
Features Overview.............................................................................1-1
About Quick Start..............................................................................1-2
Using Your MobilePro H/PC for the First Time ............................ 1-2
Installing the Batteries.............................................................. 1-3
MobilePro Quick Setup............................................................1-5
Windows C E Services Desktop Software Installa tion................ 1-6
MobilePro H/PC Software CD Installation...............................1-7
2 Gett ing Familiar with Your Mo bile Pro 750C
What’s in the Box..............................................................................2-2
Introducing MobilePro Features.........................................................2-2
Opening the Display Panel.................................................................2-6
Using the Stylus................................................................................. 2-7
Recharging the Main Battery Pack................................................2-8
Battery Replacement.....................................................................2-9
Main Battery...........................................................................2-10
Back-Up Battery......................................................................2-12
Battery Precautions.......................................................................2-16
Taking Care of the MobilePro............................................................2-17
Precautions...................................................................................2-18
Storage Requirements ................................................................... 2-19
Routine Cleaning..........................................................................2-20
3 Using the Mo bilePro
Powering On and Off......................................................................... 3-2
Making Display Panel Adjustments....................................................3-3
Contrast........................................................................................3-3
Backlight......................................................................................3-4
Contents iii
Page 4

Application Shortcut Keys.................................................................3-5
Assigning Application Shortcut Keys............................................3-6
Enabling the Display Linkage Switch.................................................3-8
Voice Recording................................................................................3-9
Using the Voice Recorder..............................................................3-10
PC Cards...........................................................................................3-10
Inserting PC Cards........................................................................3-10
Removing PC Cards .....................................................................3-12
Compact Flash Cards.........................................................................3-12
Inserting Compact Flash Cards.....................................................3-13
Removing Compact Flash Cards...................................................3-14
Transferring Data..............................................................................3-15
Connecting Exter nal Devices.............................................................. 3-16
Connect ing the AC Adapter ...........................................................3-16
Connecting the PC Connect C able.................................................3-17
Connect ing the VGA Cable...........................................................3-19
Connecting the Inter nal Modem..................................................... 3-21
Remote Access Service Setup............................................................. 3-22
Printing Your Documents...................................................................3-24
Upgrading ROM/RAM......................................................................3-24
Resetting the MobilePro.....................................................................3-25
4 Troubleshooting
5 Specifications
A Modem Co mmands
Index
iv Contents
Page 5

Using this Guide
This guide introdu c es you to your NEC MobilePr o™
Handheld P ersonal Computer (H/PC). Read t he f ollowing
sections.
Chapter 1 , Quick Start, p rovides all the information you
need to get your MobilePro 750C working and
synchronized with your desktop or notebook c omputer.
Chapter 2, Getting Familiar with Your MobilePr o 750C ,
intr oduces you t o your Mob ilePro features, battery
installation, the disp lay panel, and general unit care.
Cha pter 3, Using the MobilePro, s hows you how to
power on and off, make display panel adjustments , connect ext ernal devices, and more.
Cha pter 4 , Troubles hooting, walks you t hrough some
common problems and poss ible soluti ons.
Chapter 5, Specif ic ations, details the hardware specifi-
cations for your MobilePro.
Read t his user’ s guide to become familiar with your
MobileP ro. F or software op erat ion det ails, see the software
guide that comes with the unit.
TEXT CONVENTIONS
To make this guide as easy to use as possible, text is set up
as f ollows .
Warnings, c autions, a nd notes have the following
format:
Using this Guide v
Page 6
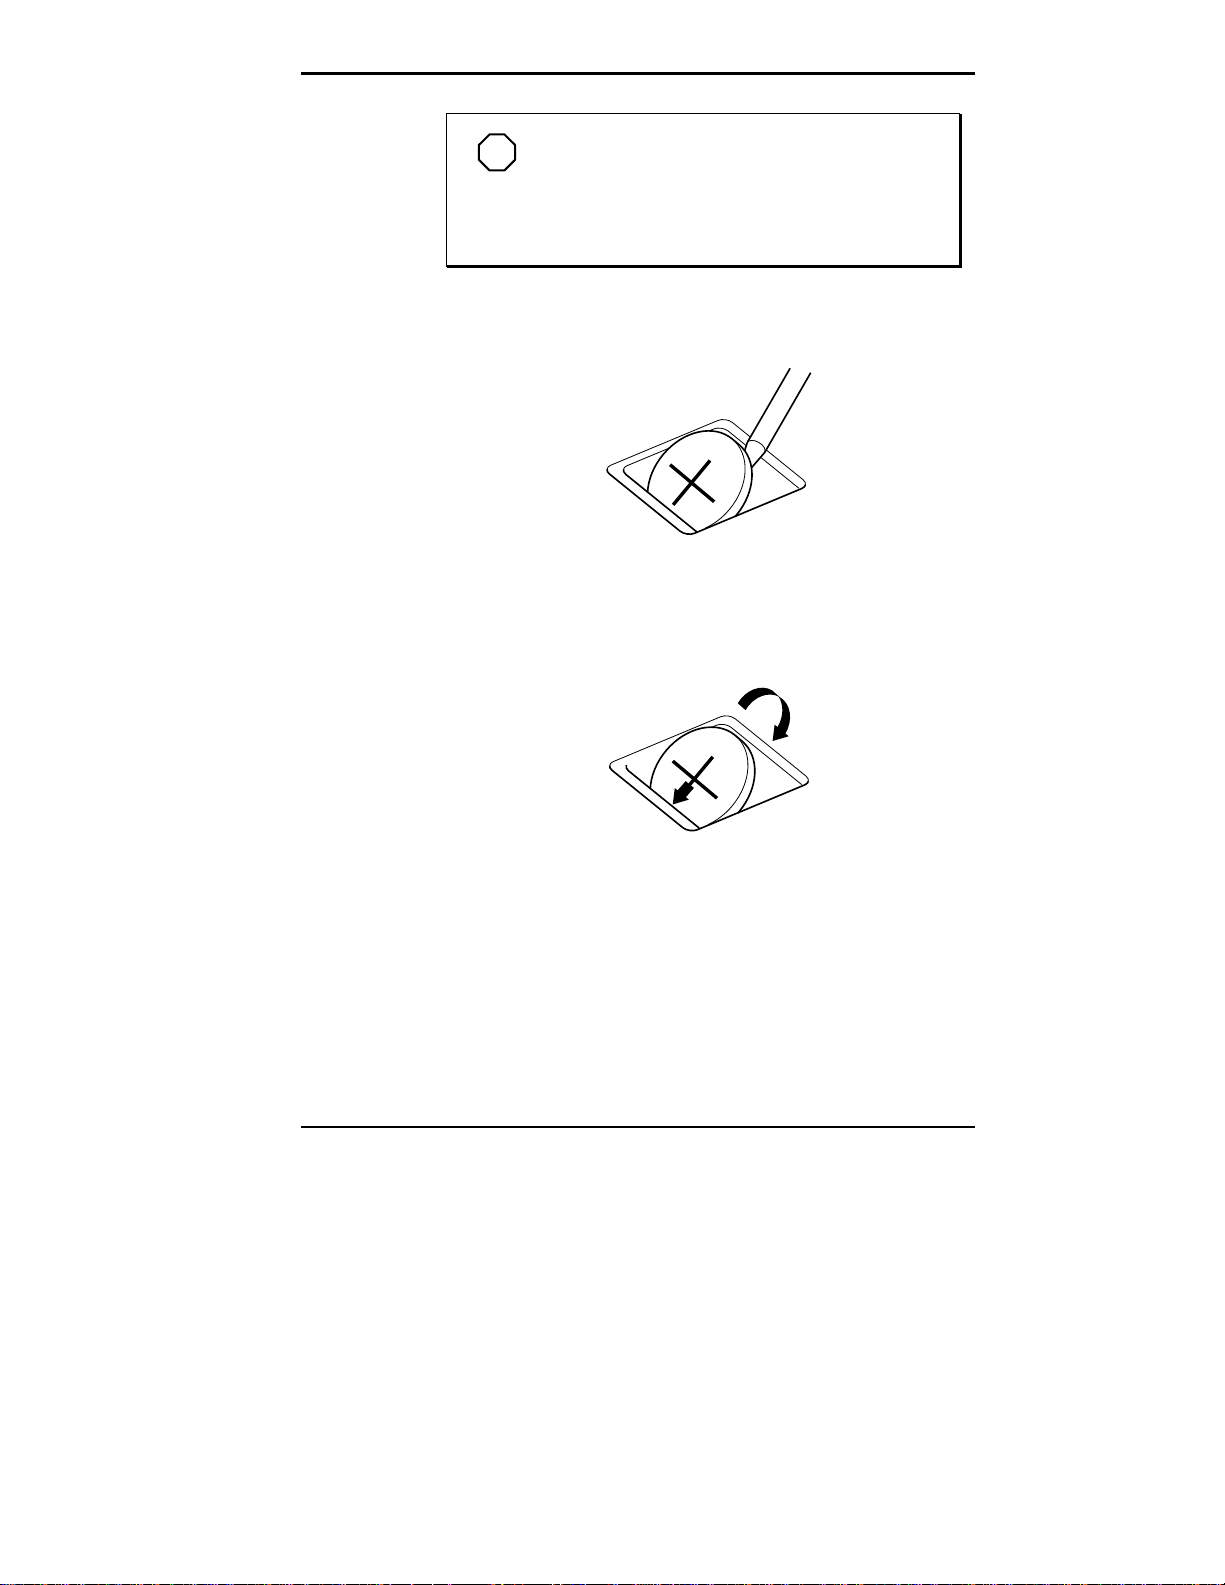
!
W arnings alert you t o situations that coul d result in
serious personal injur y or loss of life.
Cautions indicate situations that can damage the
system hardware or software.
NOTE
Notes give particularly important information
about whatever is being described.
WARNING
!
CA UT ION
vi Using this Guide
Names of keys are p rinted as they appear on the key-
board, for example,
Text tha t you must type or keys that you must pres s ar e
Ctrl, Alt
presented in bold type. For example, type
Enter
.
, or
Enter
.
dir
and press
Page 7

1
FEATURES OVERVIEW
Quick Start
Congr atul ations and tha nk you for purc hasing the N EC
MobileP ro Handheld PC (H/PC) . This c hapter shows you
how you ca n quickly setu p and begin t o u se it either on its
own or as a powerfu l desktop c ompanion.
Your new M obilePro 750C has the following key features:
A 256-color LCD screen, with a backlight key on the
keyboard tha t lets you toggle between standard (low) or
full backlight.
A large keyboar d f or true "touch typing"
A Compact Flash™ slot
A PC Car d slot for T ype I or T ype II PC C ards
16 MB RAM (upgradeable to 32 MB)
An AC a dapter for running your MobilePro H/PC us ing
AC p ower
A low-power, hardware-based 33.6 Kbps fax/modem
A microphone and spea ker for digital voice r ecording
and playback
Quick Start 1-1
Page 8
ABOUT QUICK START
The MobilePro 750C H/PC uses the Microsoft® Windows
CE 2 .0 operating system, which has a user int erfac e ver y
similar to the Mi c rosoft Windows 95 and Microsoft W indows NT operating systems. This chapter assumes that you
ar e already f amiliar with at least one of t hes e op erating
systems.
Our pur pose here is to get you very quickly up t o speed
with your new MobilePro. The information in this chapter
has intentionally been kept concise. References are inclu ded
to the ot her ar eas where you can find more det ailed information.
NOTE
For additional product inform ation, please
reference the Readme file on the Mobi lePro H/PC
Software CD or t he Readme First sheet in the carton box.
®
Using Your MobilePro H/PC for the First Time
The Mob ilePro r equires two t ypes of ba tteries :
1 rechargeable Lithium-Ion (Li-Ion) main battery
1 CR2032 3-volt coin cell backup battery
!
W hen using the MobilePro f or the fir st tim e, install
and charge the main battery before removing the
protective insulating tab from the backup battery
compartment.
1-2 Quick Start
CA UT ION
Page 9
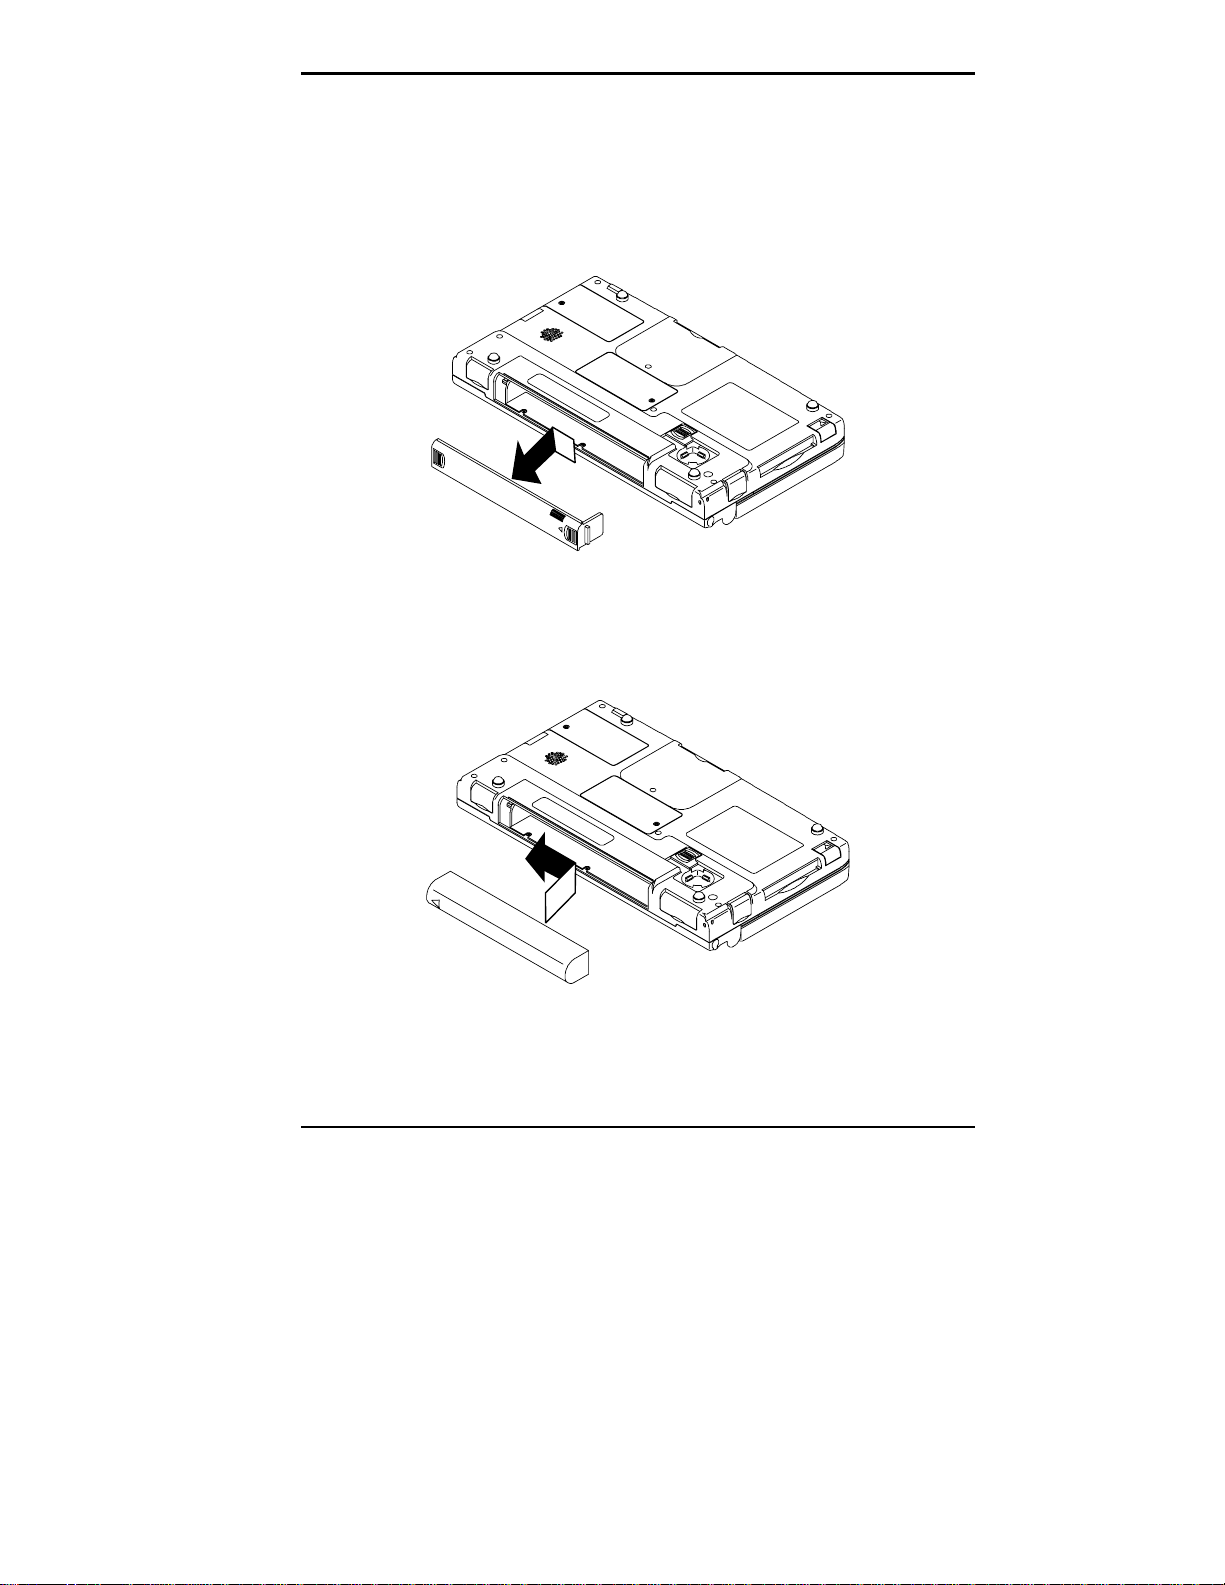
Installing the Batteries
Slide the main battery cover lock to the unlocked posi-
1.
tion.
Slide the main battery bay cover toward the arrow and
2.
remove it.
Put the Lithium-Ion battery pack in the bay. Slide the
3.
battery toward the arrow.
Opening the main battery bay cover
Fir mly press the batter y u ntil it is secu re.
4.
Inserting the batt er y
Quick Start 1-3
Page 10
Replace the main battery bay cover.
5.
Replacing the main bat tery bay cover
Slide the battery cover lock to the locked position.
6.
Remove the backup battery protective insu lating sheet
7.
by firmly pulling on the sheet tab that p rotrudes from the
backup battery compartment.
1-4 Quick Start
Tab
Removing the insulating sheet
Page 11
!
Be sure to read the section “B att ery Pr ecauti ons” f or
important battery handling information.
NOTE
You can only operate the MobilePro H/PC
when the battery cover lock is in the locked posi tion.
For opti mum dat a protection, be sure to install both
the main battery and the back-up battery before
turning on the power.
To ensure max imum perform ance, the bat tery pack
included wit h y our M obilePro comes charged to only
50% capacity from the fac tory . You must charge the
battery prior to using it for the first time. See “Recharging the Main Battery Pack” in Chapter 2.
CA UT ION
MobilePro Quick Setup
Open your MobileP ro so that you c an acc es s the keyboard
and view the LCD display. The syst em automat ic ally powers on and br ings you to the Setup Wizard.
The Set up Wizard guides you throu gh the initial conf igura tion of t he M obilePro. A step - by-step process lets you:
Calibrate the touch screen
Set you r local and visit ing Time Zones
Set the system Time and Date
Enter owner identification information
Quick Start 1-5
Page 12
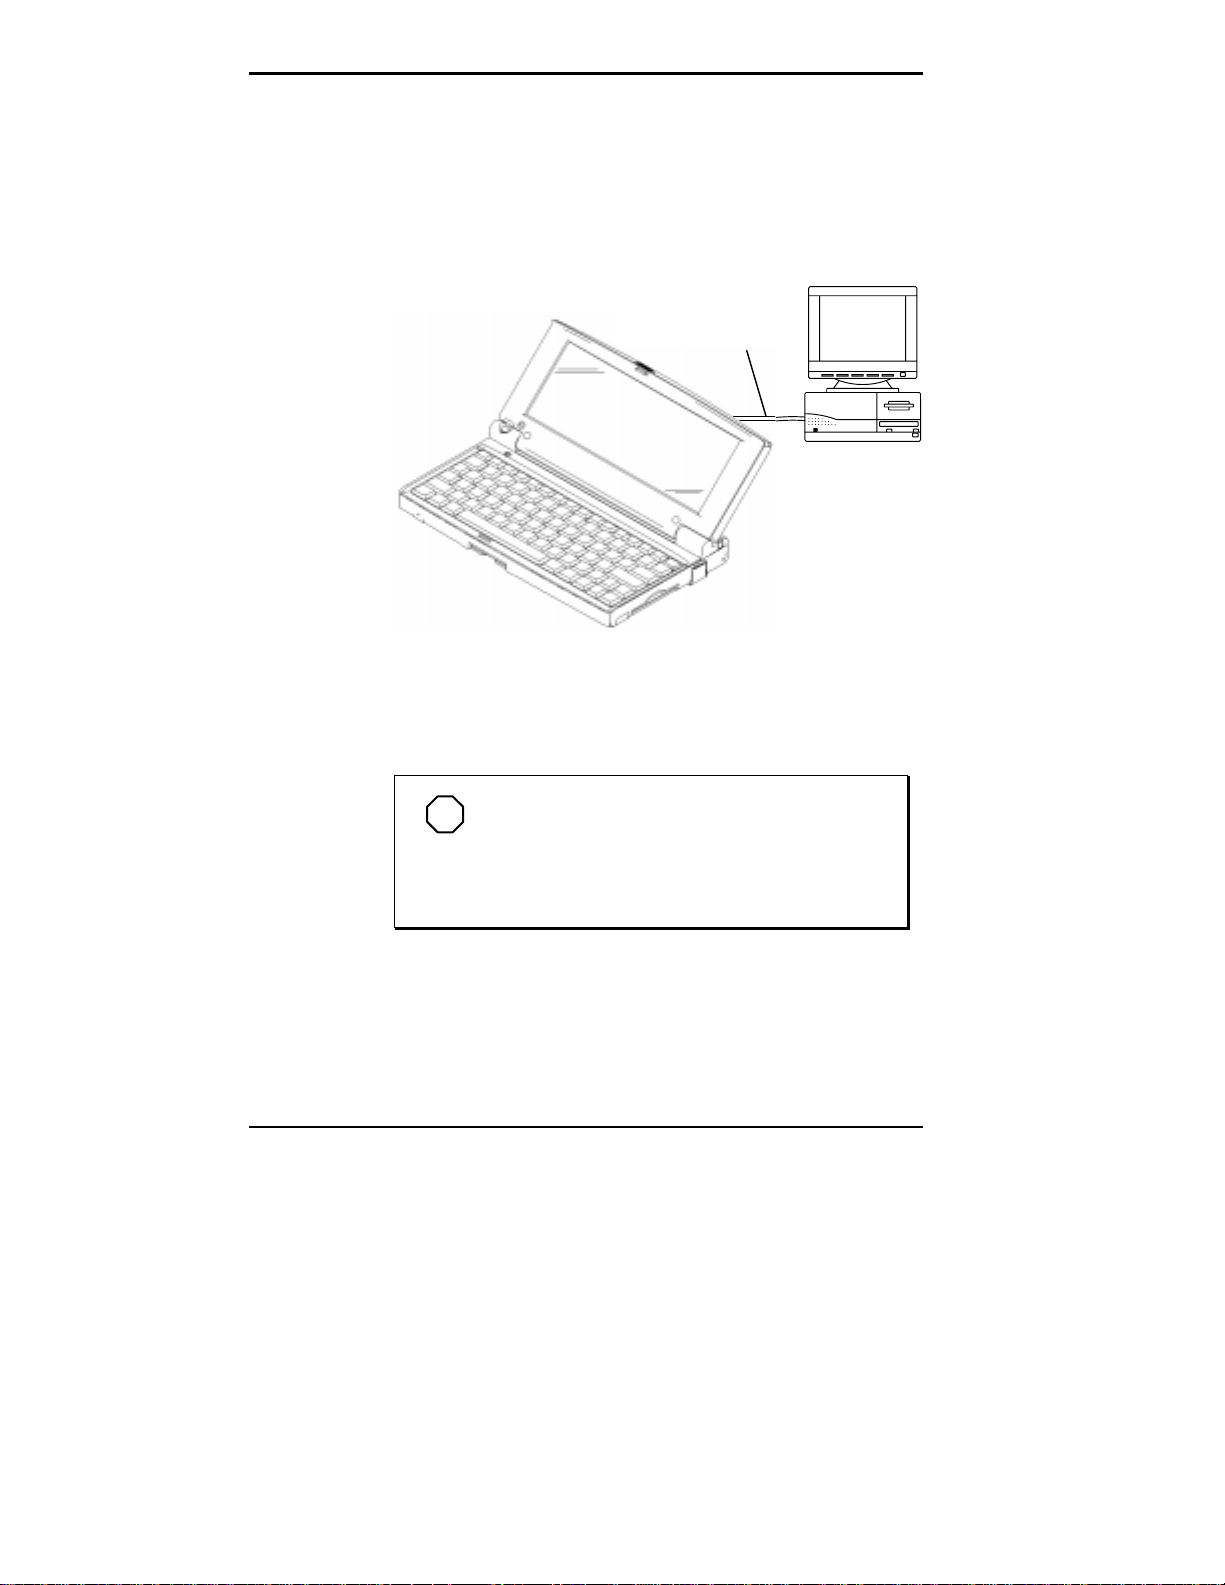
After the Setup Wizard completes, you are ready to configure the MobilePro to partner with your desktop (or notebook) compu ter. Before continu ing, connect t he MobilePr o
PC Connect serial cable to an ava ilable 9-pin serial por t on
your desktop (or notebook) c omp uter. Plug the other end
into the serial port at the back of the MobilePro.
PC Connect Cable
PC Connect Cable
Connecting the c able to the computer
Windows CE Servi ces Desktop Software Installation
NOTE
Your desktop (or notebook) system must be
running Windows 95 or Windows NT 4.0 in order to
use the Windows CE 2.0 Desktop Services Software.
Microsoft W indows CE Services Desktop software provides the key fea tures for t ransferr i ng and synchronizing informa tion between your MobilePr o and desktop ( or
notebook) s ystem. You should install it before installing any
other Windows CE software.
1-6 Quick Start
Page 13

Insert the “Desktop Softwar e f or Microsoft Windows C E”
CD. If your system is configured for auto-insert notification, the Setup program is automatically launched. Otherwise, ma nu ally ru n the Setup program in the main directory.
The Setup program guides you t hrough the s teps that will
let your system communicate with the MobilePro.
MobilePro H/PC Software CD Installation
NOTE
Your desktop system must be running Windows 95 or Windows NT 4.0 i n or der to use the MobilePro H/PC Software Suite.
Insert the MobilePro H/PC Software CD. Run the Setup
program in the main directory.
The Setup program guides you t hrough the s teps to install
the bonus software applications.
Quick Start 1-7
Page 14
2
Getting Familiar with
Your MobilePro 750C
Your NEC M ob ilePro™ H andheld PC ( H/PC) lets you :
Edit, crea te, send, and receive documents including
spreadsheets and e-mail
Manage your schedule and contacts
Access the Internet with the internal modem
Synchronize dat a with your notebook or desktop c om-
puter.
This c hapter introduces you t o the MobilePr o features, display panel, s tylus, and complete battery installation procedures.
NOTE
Before using y our MobilePro, r ead this chapter for detai ls about installing the batteries. Do not
attempt to use the unit without the batteries installed. Be sure you have c ompl eted all the steps in
Chapter 1, "Quick Start."
Getting Familiar with Your MobilePro 750C 2-1
Page 15

WHAT’S IN THE BOX
Your MobilePro ships with a number of accessories. When
you unp ack the MobilePro, check tha t you have all of the
items list ed b elow and that they are in good condition. If
anything is missing or damaged, immediat ely c ontact the
vendor who sold you the unit.
MobilePro 750 C (a stylus ships in a holder in the Mo-
bilePr o)
Mobil ePro AC Adapt er
Mobi lePro VG A Cab l e
MobilePro PC Connect Cable (ser ial cab le)
MobileP ro Modem Ca ble (telephone ca ble)
One (1) rechargeable Lithium-Ion Battery Pack (main
battery)
One (1) CR2032 Back-Up Battery (backup or subbattery, installed)
Microsoft W indows CE Services 2.0 CD-ROM and Mi crosoft Windows CE PC Companion User’s Guide
MobileP ro H/PC Sof twar e CD containing NEC bonus
software ap plicat ions
MobilePro 750C H/PC User’s Guide (this docu ment)
NEC MobilePro H/PC Resource Guide
INTRODUCING MobilePro FEATURES
The MobilePro p rovides many features tha t you ca n see in
the following figu res. Feature descriptions follow each
figure. The front and side of the unit is shown fi rst.
2-2 Getting Familiar with Your MobilePro 750C
Page 16
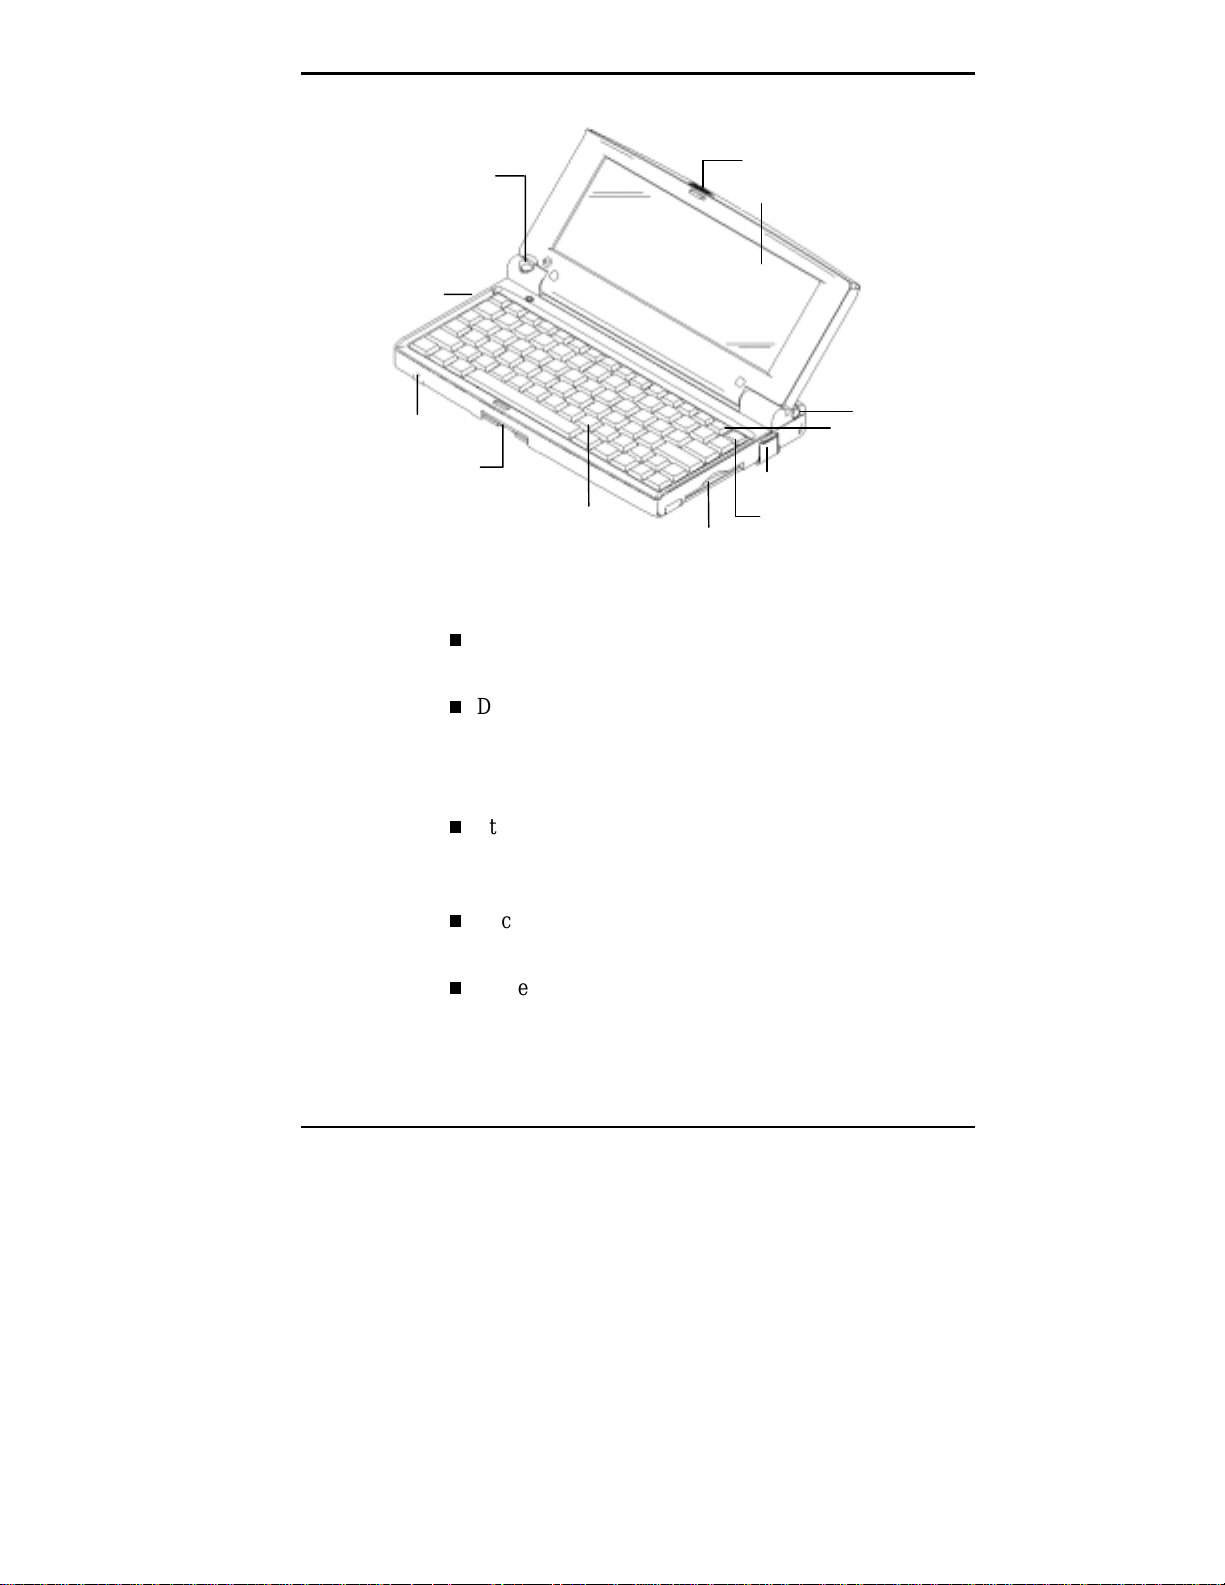
Record Button/
Notific ati on LE D
AC Power Port
Microphone
Compact Flash
Card Slot
Display Panel Latch
Display Panel
Stylus
Backlight
Key
Modem Port
Keyboard
PC Card Slot
Power Button
Front and s ide features
Display Panel Latc h — secur es the displa y panel when
it is closed.
Display Panel (with built-in touc h screen) — p rovides a
clear view of inf ormation s tored or input int o the unit.
The touch screen lets you a c tivat e functions by touching
the screen wi th th e stylus.
Stylus — a “pen” p roviding a means of input to use on
the touc h screen. Pull the stylus out of the holder t o use
it.
Backlight Key — toggles the backlight between standard
and fu ll settings.
Modem Port — provides connection access to the inter nal modem using the modular modem cabl e.
Getting Familiar with Your MobilePro 750C 2-3
Page 17

Power B utton — allows you to power on and off t he u nit
when it is open.
PC Car d Slot — let s you inst all one Type I or Type I I
PC Card.
Keyboa rd — gives you a means of entering da ta using
your f i ngertips .
Compac t Fla sh Card Slot — lets you ins tall one Compact Flash Card.
Microphone — lets you recor d your voice.
AC P ower Por t — lets you connect the AC adapt er to
run your unit on AC power.
Recor d Button — allows you to start /stop digital voice
recording.
Notifi c ation LED — this light flashes as a r eminder of
appointments. It is located within the Record button.
(S ee y our Microsoft Windows CE Handheld PC (H/PC)
User’s Guide for details on setting up appointments.)
The bottom and back of the M obilePro also inclu de a number of impo rtant featur es. These are shown in the fol l o wi n g
figure and described after the figur e.
2-4 Getting Familiar with Your MobilePro 750C
Page 18

IrDA Port
VGA Port
Speaker
Main Batt ery
Bay Cover
ROM B ay Cover — protects the ROM bay a nd the installed ROM boards.
Battery Cover Lock — secures the cover that protects
the main battery and back-up battery bays.
Serial Port
ROM Bay Cover
Batte ry Cover Lo ck
Sub Battery Bay Cover
RAM Ba y Co v er
PC Card
Eject Button
Reset Button
Bottom view
Sub Battery (back-up battery) Bay Cover — protects
the back-up battery and the back-up battery bay.
RAM Bay Cover — protects the RAM b ay and t he in-
stalled RAM boards.
PC Card Eject Button — allows you to remove an installed PC card.
Reset Button — lets you do a “Soft Reset” to the MobilePro in case of malfunctions. Your data is preserved
if it ha s been saved in a f ile.
Serial Port — p rovides a c onnec tion point for the PC
connect s erial cable.
Getting Familiar with Your MobilePro 750C 2-5
Page 19

Main Battery Bay Cover — protects the main battery
bay and the inst alled bat tery.
VGA Port — provides a connection p oint for the VGA
cable.
Infrared (IrDA) Port — allows the MobilePro to com-
municate without c ables with similar l y equ ipped devices,
including other MobilePros.
Spea ker — lets you listen to digital a udio. You can pro-
gra m M obilePro audio to remind you of ap pointments,
notify you of operation events, or pla y applicationassociated sounds. (See your Microsoft Windows CE
Handheld PC (H/PC) User’s Guide for det ails.)
OPENING THE DISPLAY PANEL
Open the Dis play Panel as follows .
Slide the display panel latch to the right .
1.
Lift the displa y panel up and towa rds the b ack of the
2.
unit.
2-6 Getting Familiar with Your MobilePro 750C
Page 20
Opening the display panel
!
CA UT ION
When the MobilePro H/PC is not i n use or when you
are carrying it, keep the display panel closed. This
helps prevent accidental damage to the touch
screen or keyboard.
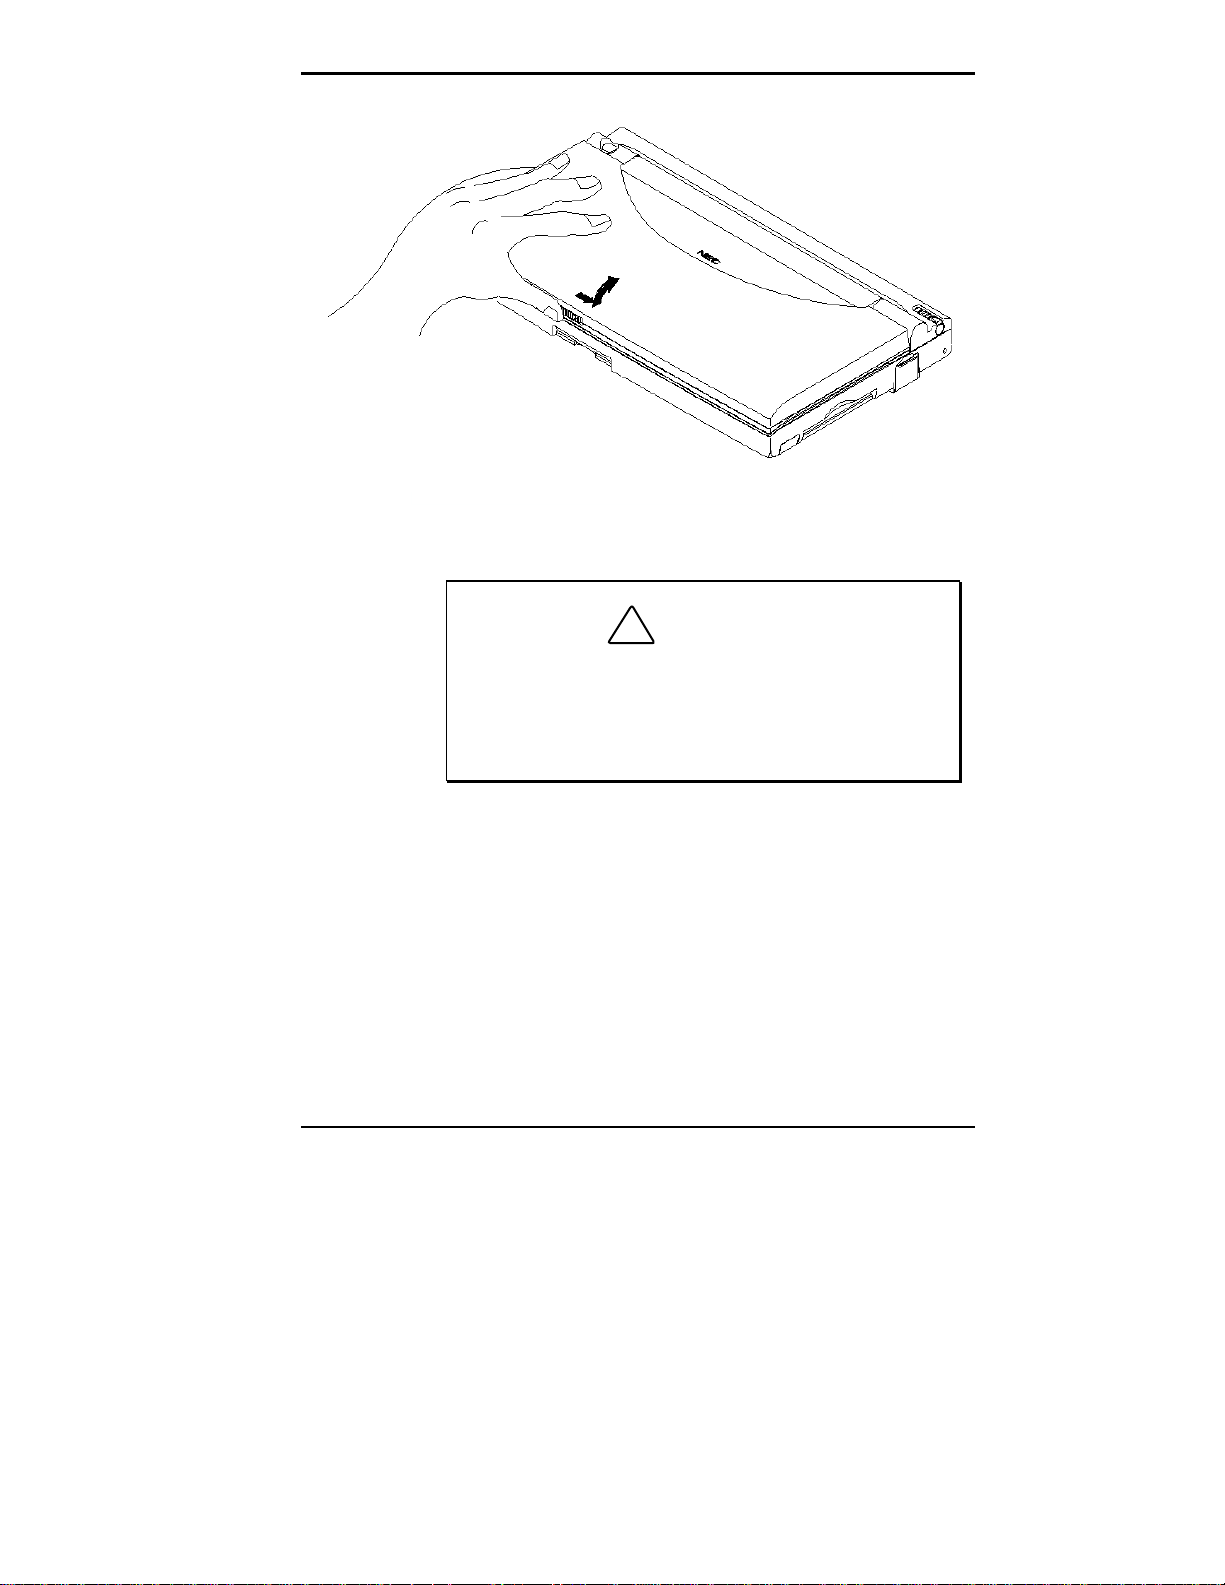
USING THE STYLUS
To use the st y l us, follow these step s.
Loca te the stylus holder on t he b ack right of the Mo-
1.
bilePro. T o remove the stylus , slide it a way from the
unit.
Open the Mob ileP ro display panel.
2.
Getting Familiar with Your MobilePro 750C 2-7
Page 21
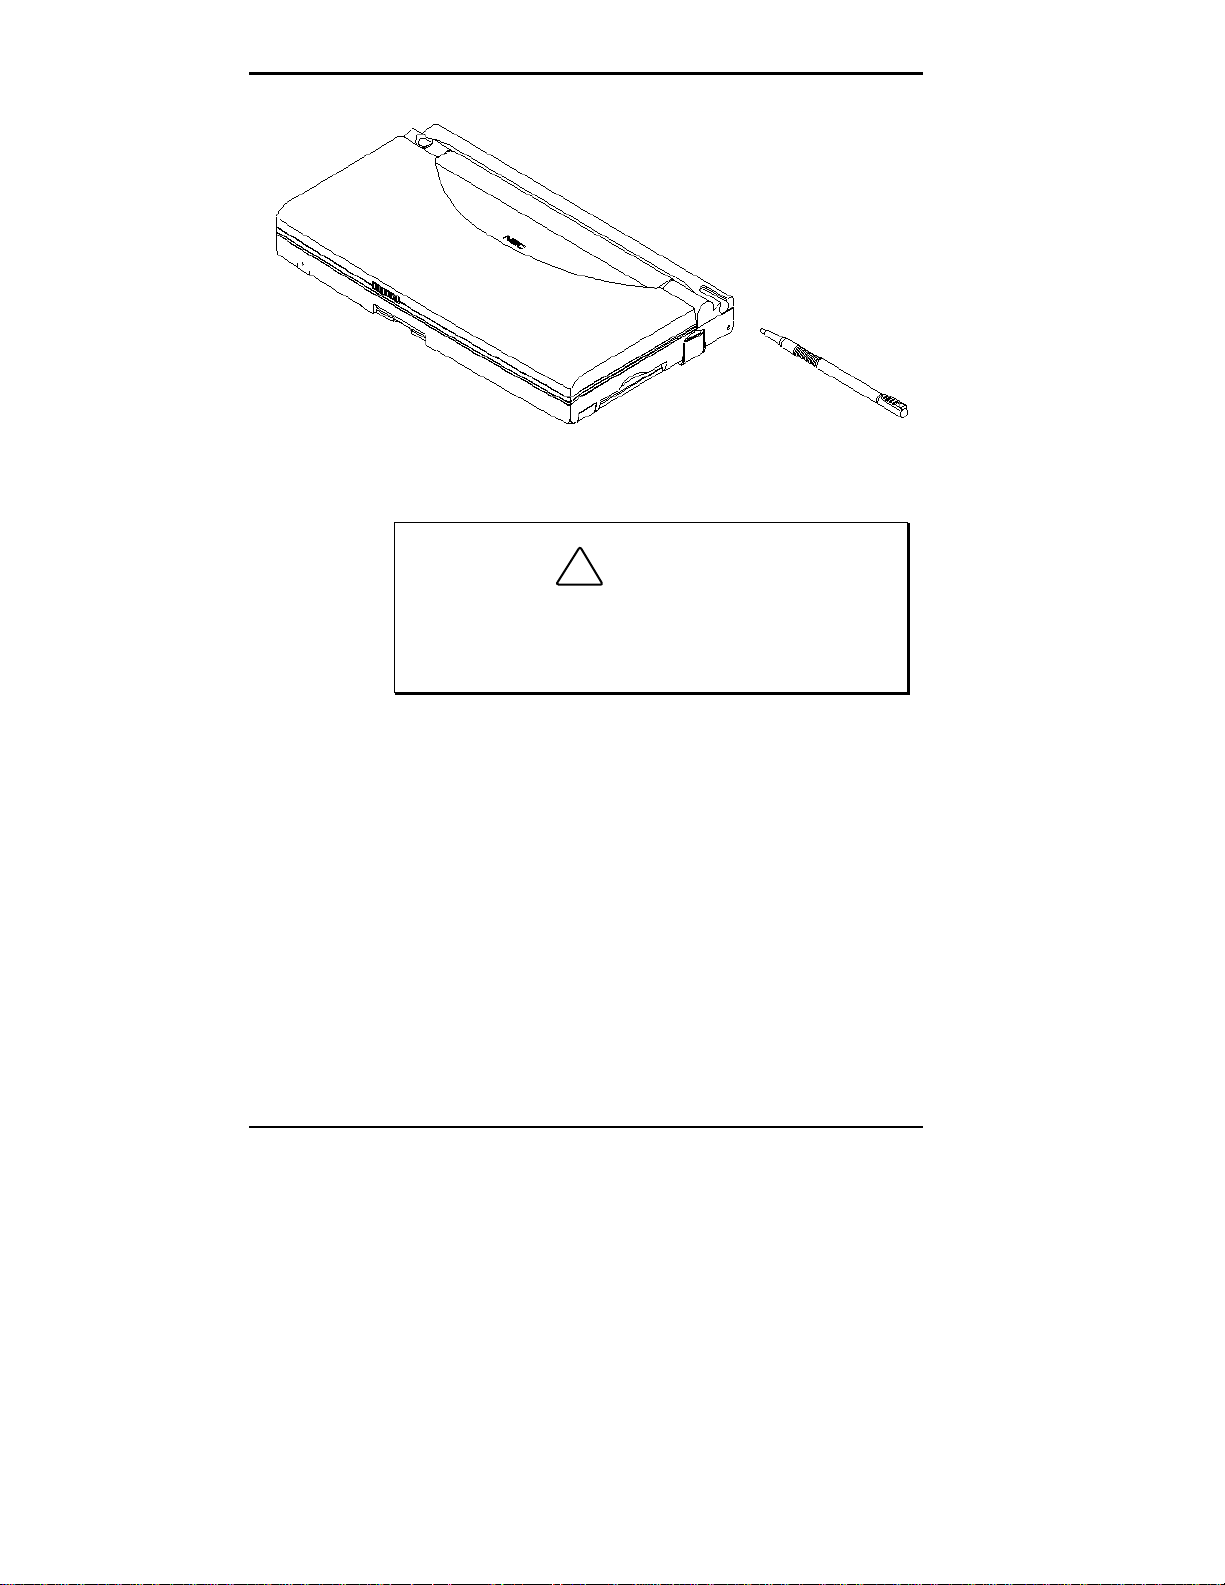
Using the st y lus
!
Never use a device other than an approv ed stylus
with your MobilePro H/PC. Hard-pointed or sharp
objects can dam age the touch screen.
CA UT ION
Gently touch the pointed tip of the stylus to select an
3.
object on the screen. W hen you are done us ing the stylus, return it t o its convenient holder on the MobilePr o.
Recharging the Main Battery Pack
The main b attery pack c ontains rechargeable Lit hium-Ion
cells. R echarge a batter y pac k wh en y ou see t h e following
message.
Main Batteries Very Low
To recharge a battery pack installed in the battery bay, connect the AC Adapter. See “Connecting the AC Adapter” in
Chapter 3.
2-8 Getting Familiar with Your MobilePro 750C
Page 22

It t akes approx imately 4. 5 hours to recharge a f ully depleted battery pack regardl ess of the sy stem po wer state.
NOTE
Through normal use, t he capaci ty of a bat ter y
pack will gradually decline. Should you notice that
the battery does not stay charged as long as expected, it is probably nec essary to replace t he battery with a new one. Please refer to the section
“Battery Replacement” in this chapter. A battery
pack should recharge approx imat ely 300 ti mes during the life of the battery.
Battery Replacement
Note the following when replacing batteries:
If the main battery becomes weak, the MobilePro automatically turns off. Recharge or replace the main battery
immediately if the power goes off.
When replacing the back-up battery, always use a
CR2032 battery.
!
Only use a CR2032 battery as your back-up battery.
Installing another battery type can result in an explosion or fire.
See “Battery Precautions” later in this chapter, for
more batt er y handling information.
If you fail to replace a depleted main battery for an ex-
WARNING
tended peri od of time and the back-up battery is weak,
the content s of the Mob ilePro memory may be los t.
Getting Familiar with Your MobilePro 750C 2-9
Page 23
Main Battery
If you use the MobilePro without the back-up battery in-
stalled, MobilePro memory may be unstab le. The contents of MobilePr o memory may b e los t if the main
battery is removed.
Always back u p your data onto your notebook or desk-
top computer before replacing the back-up battery.
Should you notice the life of a charged battery p ack is short,
replace it with a new one. Follow these ins truc tions below
to replace a battery pack.
1.
Sa ve you r data, turn of f unit p ower, a nd c l ose the display panel. Di sconnect a ny c ables a ttac hed t o the unit,
such as the AC adapter cable.
NOTE
If you receive messages indicating that both
the main battery and the sub-battery (back-up battery) are very low, replace the back-up battery first.
If a drained mai n battery is not repl aced, the backup battery drains more quickly than normal.
Have a new Lithium-Ion battery pack available.
2.
Slide the battery cover lock to the unlocked position.
3.
Slide the main battery bay cover toward the arrow and
4.
remove the cover .
2-10 Getting Familiar with Your MobilePro 750C
Page 24
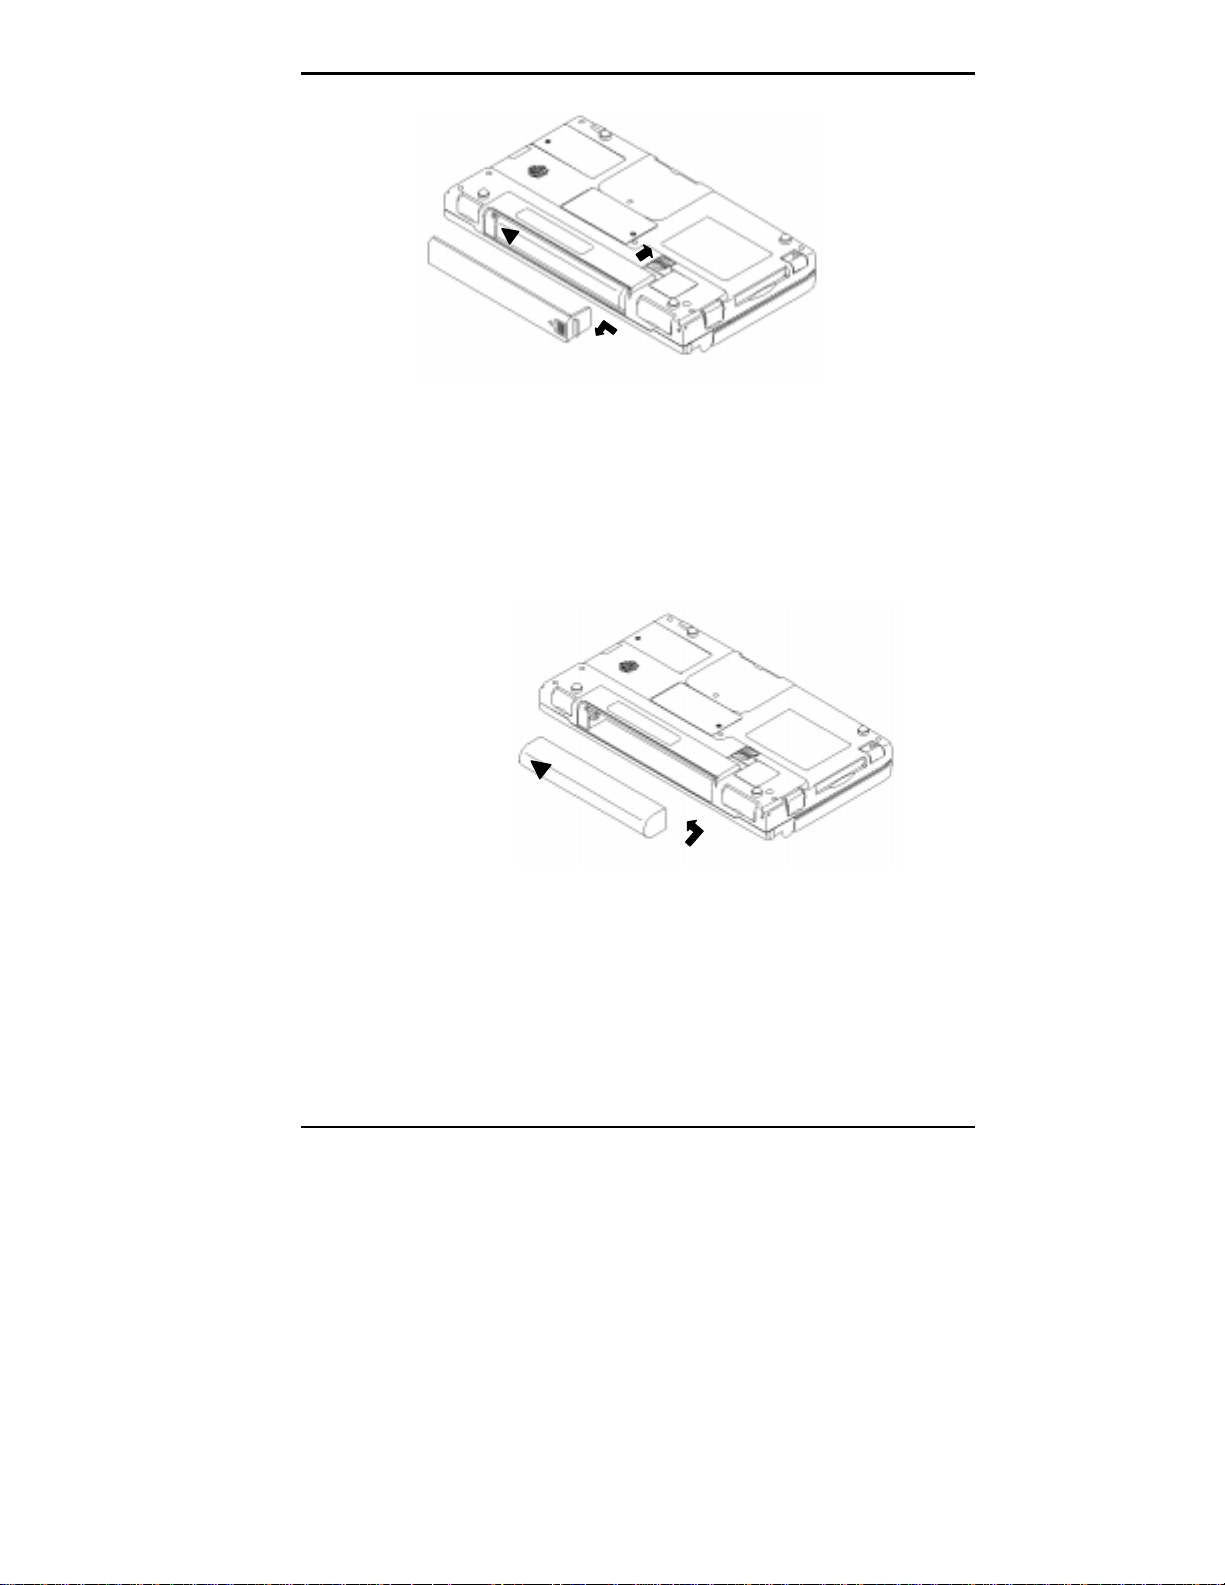
Opening the bat tery bay cover
Slide the battery away from the arrow on the battery
5.
and remove the battery.
Put the new Lithium-Ion battery pack in the bay. Slide
6.
the battery in the direction of the arrow.
Inserting the battery
Fir mly press the b attery until it is secur ely in t he bay.
7.
Replace the main battery bay cover and slide the battery
8.
cover lock to the locked position.
Getting Familiar with Your MobilePro 750C 2-11
Page 25

Back-Up Battery
A low battery message appears when back-up battery
power is depleted. Be sure to replace the back-up battery
immediately as des c ribed next .
Replacing the bay cov er
NOTE
The unit only operates when the batt ery cover
lock is i n the locked position.
When you see t h e following messa g e, the bac k -up bat-
1.
tery must be replaced.
Backup Battery Very Low
Sa ve you r data, tur n of f unit power, remove the stylus,
and clos e the display panel.
2-12 Getting Familiar with Your MobilePro 750C
Page 26

NOTE
If you receive messages indicating that both
the main battery and the sub-battery (back-up battery) are very low, replace the back-up battery first.
If a drained mai n battery is not repl aced, the backup battery drains more quickly than normal.
Disconnect any cables a tta c hed t o the unit, such a s the
2.
AC adapter cable.
Have a new back-up battery available.
3.
!
Only replace the back-up battery with a CR2032
Lithium battery.
Using another battery type can result in an explosion or fire.
WARNING
Getting Familiar with Your MobilePro 750C 2-13
Page 27

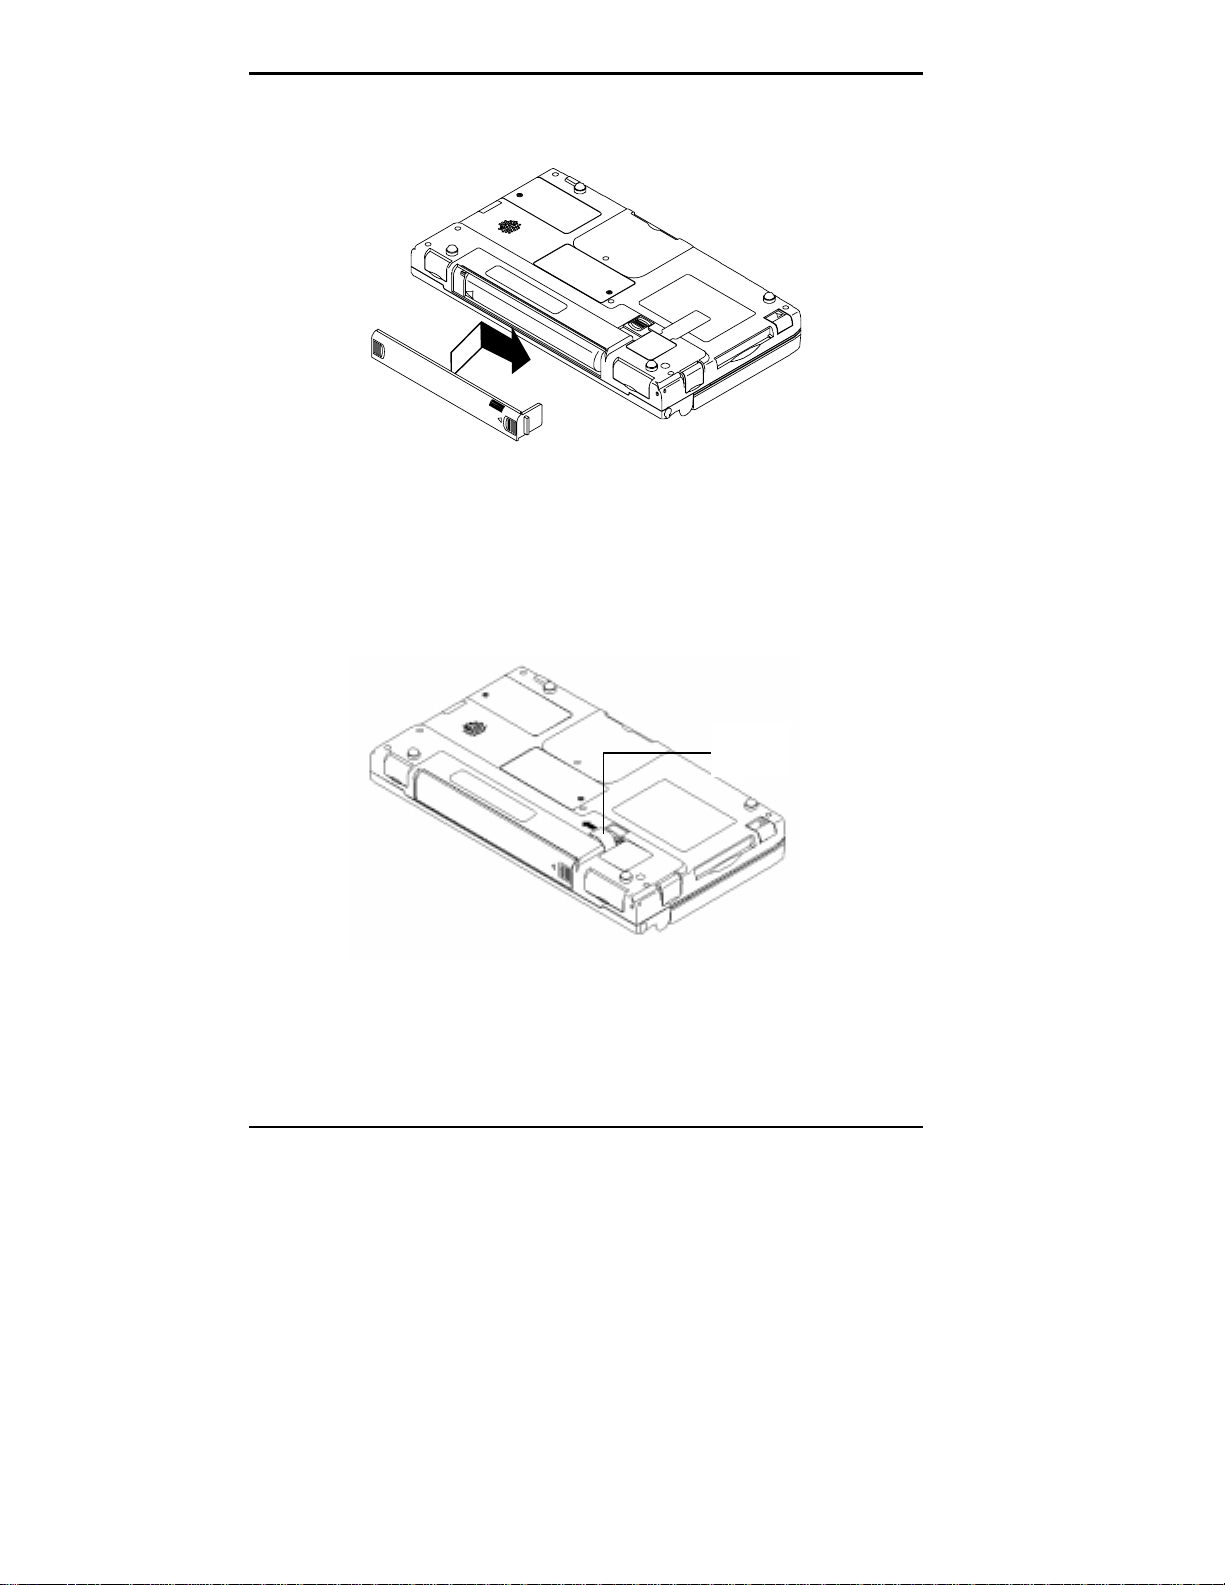
Tu rn the unit over and locate the battery cover lock on
4.
the bottom of the MobilePro. Slide the lock to the unlocked position.
Locked Position
Releasing the Bat tery Cover Lock
Using a small screwdriver, remove the s c rew and s ub-
5.
battery bay cover.
2-14 Getting Familiar with Your MobilePro 750C
Removing the bay c ov er
Page 28
NOTE
When you loosen the screw, you can rem ove
the sub-battery bay c over by l ooseni ng the screw for
fiv e rounds. It is not nec essary to remov e t he screw
completely.
Use the stylus to remove the drained battery f rom the
6.
bay.
Removing the bat tery
Angle the new battery into the bay and insert it with the
7.
positive (+) notation f acing up .
Inserting the battery
Replace the sub-battery bay cover and slide the lock to
8.
the lo cked positi o n .
Tighten the screw to secure the b ay cover.
9.
Getting Familiar with Your MobilePro 750C 2-15
Page 29

Battery Precautions
Read the following battery handling precautions to insu re
your safet y.
Heed these warnings when handling batt eries. Failure to do so may result in personal injury.
There is a danger of explosion if the battery is
incorrect ly repl aced. Repl ace only wit h the same
type recom mended by the manufacturer.
The CR2032 battery m ay ex plode i f m ishandl ed.
Do not recharge, disassemble, or dispose of the
back-up battery by bur ning it.
Discard used batteries according to the manufactur er’s instruc ti ons. Never dispose of batt eri es
by burning them.
Dispose of used batteries promptly.
!
WARNING
Keep batteri es away f r om childr en.
Do not subject batteries to impact.
Do not subject batteri es to heat sources including direct sunlight , open f i res, m icrowav e ov ens,
and high-voltage containers.
Do not recharge batteries unless they are specif ically desi gned for rechargi ng.
Do not disassemble batteries.
Do not solder or punctur e batteries.
2-16 Getting Familiar with Your MobilePro 750C
Page 30

!
Do not use a battery that is damaged or deform ed, has any rust on it s casing, i s di scolored,
overheats, or emit s a foul odor.
To prevent data loss, always replace weak
batteries as soon as possible. Replace the backup battery f irst. Always use the Mobil ePro H/PC
with a back-up batt er y .
WARNING (cont’d)
TAKING CARE OF THE MobilePro
The NEC MobilePro is a durable, dependable unit built for
ext en sive use and travel. Foll o w these guidelin es to maintain the condition a nd performance of your MobilePro.
!
Immediately turn off and unplug the MobilePro under the following condit ions:
CA UT ION
The power cord is damaged or frayed.
Liquid spills on or into the unit.
Someone drops the uni t or damages the casing.
Getting Familiar with Your MobilePro 750C 2-17
Page 31

Precautions
Follow thes e p recau tions when using your MobilePro and
AC adapter.
Always plug the AC adapter cord into an easily accessi-
ble outlet. It is important to be able to easily shut off
power by unplugging the AC adapter if needed.
Avoid dropping or b umping the Mob ilePro or the AC
adapter.
Do not s tack hea vy objects on the MobilePro or the AC
adapter.
When using the AC adapter, make sure the power source
falls within the unit’s compatible range of 100–240 volts
AC. Never use the AC adapter if the voltage falls outside of this ra nge. (Watch for this when traveling to
other countries .)
Tu rn off the M obilePro power before att aching or removing devices.
Do not push any f oreign objects into the MobileP ro
bays, connectors, and s lots.
Avoid using the unit or AC adapter for ext ended periods
in direct sunlight.
Do not u se the unit in hu mid or dust y environments.
Tu rn off the M obilePro power before cleaning the s ys tem.
Avoid exposi ng the MobilePro or AC ada pter to extr eme
changes in temperat ure or humidity. If it is una voidable,
allow your MobilePro to a djust t o room temperature b efore use.
2-18 Getting Familiar with Your MobilePro 750C
Page 32

When cleaning the system, use a s oft, c lean, dr y cloth.
Avoid wiping the dis p lay surfac e with abrasive ma teria l,
including r ough fab ric. D o not use a c leaning solut i on;
this ma y damage the plastic .
If the AC adapter becomes extremely hot, unplug the
ada pter and let it cool.
Keep the AC ada pter away from the I rDA port to ensure
stable communicat ion/tr ansfer operations.
Storage Requirements
Store the MobilePro a nd AC ada pter in an environment that
meets the following conditions:
Maintain storage temperatures between 14°F and 140°F
(–10°C and 60°C).
If the temperature of the Mobi lePro suddenly rises
or falls (for example, when you move the system
from a warm place to a cold place) vapor
condenses inside the system. Turning on the unit
under this condition can damage the int er nal system
components.
!
CA UT ION
Bef ore t urni ng on the Mobi l ePro, wai t unti l t he unit ’s
internal temperature equalizes with the new environment and any internal humidity c an evaporate.
Keep the stora ge area free from vibration and magneti c
fields.
Keep the unit and its components away from organic
solvents or corrosive gases.
Avoid leaving the unit and its components in direct sun-
light or near heat sources.
Getting Familiar with Your MobilePro 750C 2-19
Page 33

Routine Cleaning
Clean or dus t your system as follows.
Never
spray cleaners that contai n caustic m aterials on the
MobilePro.
These cleaners are usually hi gh in alkalini ty, which
is measured in pH. Using these cleaner s can cause
the plastic surface to crack or discolor.
Dis play scr een — Carefully wipe the LCD s creen with a
soft c l oth or a screen wipe desi gned for that pu rpose.
Sp ecial scr een wi pes are avai l abl e thro ugh you r local
computer deal er.
Unit case — NEC recommends that you carefu lly wipe
the ca se with a s lightly damp, almost dry cloth.
!
use harsh solutions, household cleaners, or
CA UT ION
2-20 Getting Familiar with Your MobilePro 750C
Page 34

3
Using the MobilePro
This chapter details how to use the MobilePro. (See the software manual that came with the unit for additional software
operating instruc tions.) I nstructions inc l u de how to:
Power on and off
Make dis play panel adjustments
Set application shortcu t keys
Record audio
Install PC cards
Install Compact Flash™ cards
Transf er data using the IrDA p ort
Connect the cab les for the modem, VGA, a nd serial ports
Configure Inbox for remote dial-up
Pr int using Mi c rosoft Pocket applications
Upgrade ROM/RAM
Reset the MobilePro.
NOTE
As a general operati on r ule, frequently back up
and synchronize data bet ween your MobilePro H/PC
and your desktop or notebook computer.
Using the MobilePro 3-1
Page 35

POWERING ON AND OFF
Power on t he M obilePro as follows.
Slide the display panel latch to the right . Lift the display
1.
panel up towards the rear of the unit.
Do not push the display panel beyond its predesigned stop point as you open the panel.
Locate and press the Power button. To power off the unit,
2.
pr es s the Power button a second time.
!
CA UT ION
3-2 Using the MobilePro
Power Button
Powering on and off the MobilePro
Page 36

NOTE
The first time you install the main battery, the
MobilePr o automatic ally powers when you open the
display panel.
The first time you power on the Mobil eP r o H/PC,
screen contrast may need adjustment. Follow the instructions in “ M ak ing Display Panel A djustments.”
You can power on or off with the display panel
opened or closed. (It depends on the setting.)
If the MobilePro H /PC is not used for a s pecific length of
time, it automatica lly shuts of f. You can select how long the
unit remains on through the Power selection in the Windows
Control Pa nel. On the Windows CE deskt op , pr es s the St art
but ton and select Sett ings to ac cess the C ontrol P anel. (See
the softwar e user’s guide for det ails .)
MAKING DISPLAY PANEL ADJUSTMENTS
You ca n adjust the contrast and backlight features in the MobilePro. Make these adjustments as descr i b ed in the next two
sections, “Contr ast” and “Backlight. ”
Contrast
Adjust the contr ast on the MobilePro H/PC to ma ke it darker
or light er as f ollows.
Open the dis play panel and power on the unit.
1.
Press the
2.
key and either the less-t han/F11 key or the
Alt
greater-than/F12 key si multaneously f or the following r esults:
Alt F11
Alt F12
lightens the screen (less contrast).
darkens the screen (more co n trast).
Using the MobilePro 3-3
Page 37

F11, F12 Keys
Adjusting t he c ontrast
NOTE
You can also adjust the c ontrast through the
Control Panel. See the software user’s guide for details.
Backlight
You ca n toggle the ba c klight sett ing between sta ndard and
full by p ressing the Backlight b utton.
twice as fast as when the backlight is standard.
Using the backlight set to full while using the AC
Adapter does not deplet e the battery.
W hen you tur n on the Mobi l ePro, the bac kl ight setti ng
is always standard.
3-4 Using the MobilePro
NOTE
Keeping the backlight full depletes the battery
Page 38

Toggle the b acklight as follows.
Open the display panel and loca te the Backlight key on
1.
upper-right side of the keyboard.
With p ower on, press the Backlight key to toggle the
2.
bac klight between standard and fu ll.
APPLICATION SHORTCUT KEYS
The MobilePro H /PC has programmable function keys (F1 to
F10 keys) that let you lau nc h applications directly. The key
defaults are listed in the following table.
Backlight Key
Toggling the back light
Using the MobilePro 3-5
Page 39

Default Application Shortcut Keys
KEY APPLICATION
F1 Inbox
F2 Microsoft Internet Pocket Explorer
F3 Calendar
F4 Contacts
F5 Tasks
F6 Micr osof t Pocket Word
F7 Micr osof t Pocket Excel
F8 Micr osof t Pocket PowerPoint
F9 Calculator
F10 Voice Recorder
Assigning Application Shortcut Keys
Application la unch keys are programmed through the "Mo-
bilePro Settings" applet in the Control Panel. Using this ap-
plica tion you ca n manually assign p rograms to fu nc tion keys
F1 through F10 as well as CTRL-F1 through CTRL-F10.
Your MobilePro includes a template that you can attach to
the keyboard directly above t he function keys. The template
provides a quic k reference for each key’s default function.
Use the following s teps to assign applic ation shortcu t keys.
1.
2.
3-6 Using the MobilePro
Tap Start on the Taskbar to access Settings, then select
Control Pa nel.
Double t ap on the M ob ilePro Settings icon to launch the
dialog box shown in the following f igure.
Be sure you have the “Quick Launch” tab s elected.
Page 40

Settings dialog box
Scroll or tap on the s hortcu t key you want to select. As-
3.
sign the application us ing the following buttons:
Defau l t — selects the factory-assigned a pplication
listed in t he Default Application Shor tcut K eys table.
Brows e — opens a directory dialog so you can locate
the ap plicat ion you want to assign.
Brows e dialog box
Using the MobilePro 3-7
Page 41

Delete — r emoves the curr ent ly assigned application
refer ence s o you can s elect another app lication.
ENABLING THE DISPLAY LINKAGE SWITCH
You ca n configur e you r MobilePro H/PC to power on or off
by simply op ening or closing the dis play cover. The display
linkage swit c h acts as a switch for both t he p ower and the
bac klight.
Opening the M obilePro p owers on the unit. To power on t he
unit while it is op en, use the Power butt on.
Closing the MobilePro powers off the unit and insures t hat
the bac klight is off as well.
Use the following p rocedur e t o enable the disp lay linkage
switch.
Tap Start on the Taskbar to access Settings, then select
1.
Control Pa nel.
Double t ap on the M ob ilePro Settings icon to launch the
2.
dialog box shown in the following f igure.
3-8 Using the MobilePro
Be sure you have the “Power O f f” ta b selected.
Power off settings
Page 42

Select either to enable suspend mode with battery power
3.
or ex ternal AC power.
VOICE RECORDING
Recording voic e memos with t he M ob ilePro is easy, even with
the unit closed:
Hold your MobilePro with the microphone fac i ng you.
1.
Pr es s and hold the Record bu tton. A s hort beep will sound
2.
indicating that you shou ld begin speaking.
Press the
Record Button
Microphone
Recording voice mem os
When you are finished speaking relea se the but ton. You
3.
will hear a beep indica ting that the voice memo has been
saved.
To review or edit your voice memos, ru n the Voice Memo
4.
application. Refer to the next section, “ Us i ng the Voice
Recorder.”
Using the MobilePro 3-9
Page 43

NOTE
Recording works best if you positi on the mi crophone about three inc hes away f r om your mout h while
speaking.
Mem or y r equired for voice memo storage varies depending on user settings. Refer to “Using the V oice
Recorder" f or further details.
Using the Voice Recorder
The Mob ileP ro H/PC features a voice recor der application
that lets you record and play voice memos. The app lic ation
feat ures it ' s own online documentation detailing how to open,
play, and edit audio files.
PC CARDS
Your MobilePro comes with a PC card slot that supports one
Type I or one Type II PC card. When using a PC card in the
MobilePro, we recommend that you als o use AC p ower. The
batteri es alone may not p rovide enough power for some PC
ca rds to opera te properly.
NOTE
using PC cards or the internal modem. Using the
adapter can help you avoid pot ential data loss caused
by the high-energy c onsumption of some PC cards.
Inserting PC Cards
Follow these pr o cedures to i n stall a PC card.
Sa ve you r data a nd power off the MobilePro.
1.
With the PC card facing up, insert it into the PC card slot.
2.
3-10 Using the MobilePro
We r ec ommend using the A C adapter when
Page 44

PC Card
Inserting a PC car d
Verify that the PC card is fitted securely into position.
3.
!
Make sure you align the PC card correctly for i nsertion. Inserti ng a PC card incorrectl y can damage the
card and/or the MobilePro.
CA UT ION
Using the MobilePro 3-11
Page 45
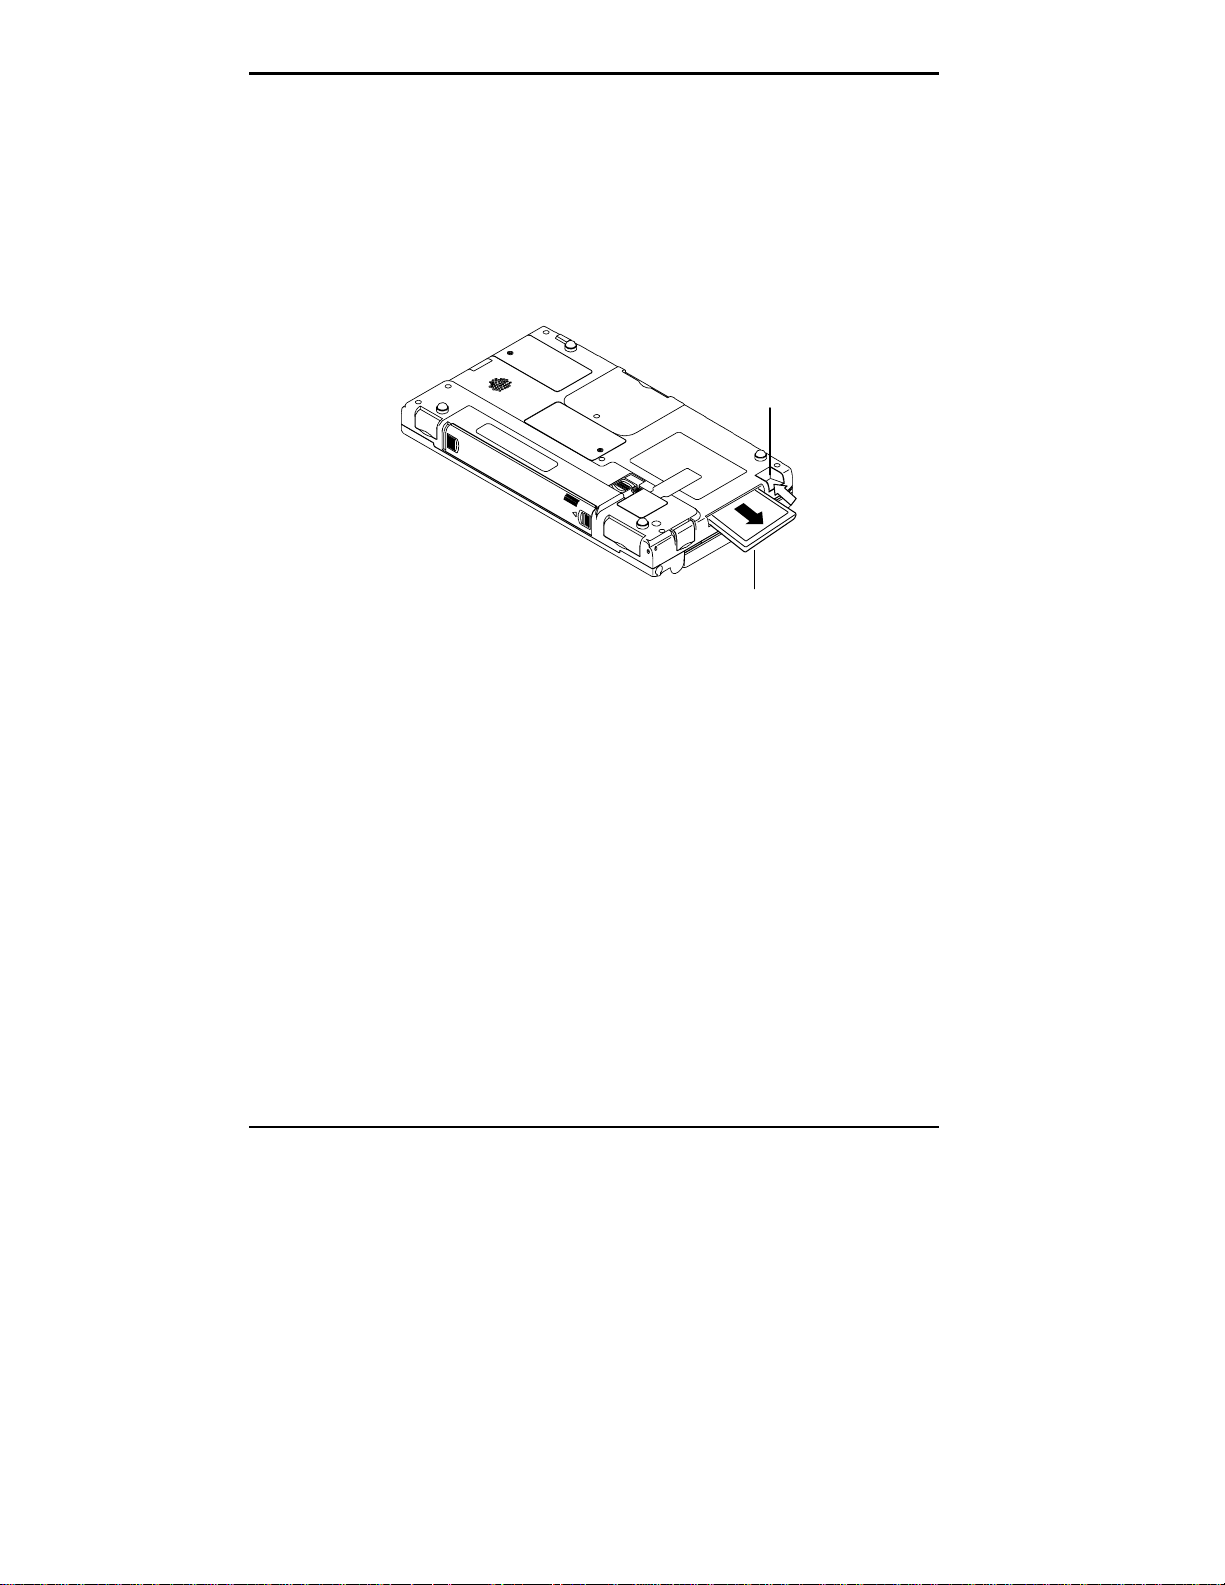
Removing PC Cards
Remove a PC card from the M obilePro as follows :
Sa ve you r data a nd power off the MobilePro.
1.
Locate the PC card slot’s Eject button and press it to re-
2.
lease the card from the slot.
PC Card
Eject Button
Once the card is r elea s ed, pull it the rest of the way out of
3.
the slot.
COMPACT FLASH CARDS
Your MobilePro comes with a Compact Flash card slot that
supports one Compact Flash card. When using a Compact
Fla sh card in the MobilePro, we recommend that you also use
AC power. The batteries alone may not provide enou gh
power for some Compact Flash cards to operate properly.
3-12 Using the MobilePro
PC Card
Removing a PC card
Page 46

NOTE
We recommend using the AC adapter when
using Compact Flash cards. Using the adapter can
help you avoi d pot enti al data l oss caused by the highenergy consumption of some Compact Flash cards.
Inserting Compact Flash Cards
Follow these pr o cedures to i n stall a Compact Flash card .
Sa ve you r data a nd power off the MobilePro.
1.
With the Compact Flash card facing up, insert it into the
2.
Compact Flash card slot.
Comp act Flash Card
Verify that the Compact Flash card is fitted securely into
3.
position.
Inserting a Compact Flash card
Using the MobilePro 3-13
Page 47

!
Make sure you al ign the Compact Flash card correctly
for i nsert ion. Inserting a Compact Fl ash card incorrectly c an damage the card and/or the MobilePro.
Removing Compact Flash Cards
Remove a Compact F lash ca rd from t he M ob ilePro a s follows:
Sa ve you r data a nd power off the MobilePro.
1.
Release the card f rom the slot by pulling it out with your
2.
fingert ips.
CA UT ION
Compact
Flash Card
3-14 Using the MobilePro
Removing a Compact Flash card
Page 48

TRANSFERRING DATA
With t he M obilePro H /PC, you can send and receive data to
and from another similarly equ i pped device using t he infrared
(Ir D A) c ommunication port. Communicate with another MobilePr o as follows.
Open the display panels on the two M ob ilePro units tha t
1.
you want to use for communication.
Position the MobileP ro units so tha t communicati on ports
2.
face each other. Posi tion the units from 0 to 20 inches
apart.
Positioning t he M obileP r os
Be sure that nothing obs tru c ts the p ath bet ween t he com-
3.
munication ports on bot h units, and tha t the ports are
aligned properly.
Using the MobilePro 3-15
Page 49

Send your data by us ing the “Send To” selection in the
4.
Windows C E Pocket E xplorer File menu.
Highlight the file you wish to tra nsfer a nd c hoose “Infra-
red Recipient” fr om t he S end To selections. Your f ile will
be transf erred to t he other Mob ileP ro. The receiving MobilePr o can use t he File/Receive comman d to r eceive the
infrared transmission.
NOTE
If the units are too far apart or if something
blocks the path bet ween the two ports, data m ay not
be sent or received correctly.
CONNECTING EXTERNAL DEVICES
A number of ex ternal accessories come with you r MobilePro
to help you optimize unit p erformanc e. They include t he following:
AC Ada pter
PC Connect Cable (serial ca ble)
VGA Cable
Telephone Line
The following s ections provide instructions for connecting
these ac cesso ries .
Connecting the AC Adapter
NEC recommends using t he AC ada pter if you
have your MobileP ro H/PC on for long periods
ar e recharging the ba ttery p ack
ar e u sing PC c ards or Compact F lash cards
3-16 Using the MobilePro
Page 50

ar e u sing the inter nal modem
Using AC power saves ba ttery life for when you are on the go
and helps prevent da ta loss.
!
Follow these precautions whenever you use the AC
adapter and the Mobi lePro.
When using the AC adapter, make sure the AC
outlet is near the MobilePr o and easi ly accessible.
Keep the main battery installed when running on
AC power.
When com m uni cati ng or sendi ng transm i ssions for
a long time, use the AC adapter to conserve
power.
Connect the AC adapt er as f ollows:
CA UT ION
Insert the plug on the AC adapter cable into the AC power
1.
port on the left side of the MobilePro.
Plug the AC adapter into a working AC outlet.
2.
Power on the MobilePro.
3.
Connecting the PC Connect Cable
The PC Connect serial c able lets you connect the M ob ilePro
direct ly to a deskt op or noteb ook c omputer.
You ca n also use the cab l e along with a D B 9 Male/ Male null
modem adapter to c onnect an external modem or other ser i al
device to your MobilePro. (The adapter does not ship wit h
the MobilePro but can be purchased at a computer retail
store.)
Using the MobilePro 3-17
Page 51

Connect the cab le as follows :
Loca te the serial por t cover on t he M ob ilePro, and open it.
1.
Align and a tta c h the connector on the PC Connect C able
2.
to the serial port on the MobilePro.
Connecting the P C Connec t cable
Connect the other end of the cab le to the ser ial port on
3.
your desktop or notebook computer.
PC Connect Cable
PC Connect Cable
3-18 Using the MobilePro
Connecting the c able to the computer
Page 52

For an external modem, connect the other end of the cab le
4.
to the nu ll modem ada pter, then connect the adapter t o the
modem cable. The maximum data rate will be 19,200 bps
unless you alter the default setting for the MobilePro serial
port.
Make sure you properly align the cable connectors
and ports. Incorrec t connection can damage t he MobilePro H/PC and the comput er .
Connecting the VGA Cable
The VGA D i rect C onnection cable lets you c onnect the MobilePro directly to a MultiSync monit or tha t has VG A outpu t.
NOTE
You can only display Microsoft Pocket
PowerPoint files using an external monitor. Windows
CE 2.0 doesn’t provide additional ext er nal display support.
!
CA UT ION
Connect the cab le as follows :
Loca te the VGA port cover on the MobilePro a nd open it.
1.
Using the MobilePro 3-19
Page 53

Align and a tta c h the connector on the MobilePro VGA c a-
2.
ble to the VGA port on the MobilePro.
Connecting the V GA cable
Connect the other end of the VGA ca ble to the monitor ca -
3.
ble connect or. P ower on the ext ernal monitor.
Launch Microsoft Pocket P owerPoint and open the file
4.
you want to show.
Access the “Set Up Show… ” selection from the Tools
5.
menu and set the entr y in the “View Show on” drop-down
field to “Ext erna l VGA.”
Select “View Show” from the View menu.
6.
3-20 Using the MobilePro
Page 54

VGA Cable
VGA Ca ble
Monitor Cable
Connecting the c able to the monitor
!
Make sure you properly align the c able connectors
and ports. Incorrec t connection can damage the MobilePro H/PC and the moni tor.
Connecting the Internal Modem
Use the following steps to connect a phone cable to the int ernal modem.
Loca te the modem cover on the MobileP ro and op en it by
1.
pulling down t he t op of the cover .
ar ef ully plug t he R J-11 c onnector int o the modem con-
C
2.
nector .
CA UT ION
Using the MobilePro 3-21
Page 55

Connect the other RJ-11 connector into an active ( analog)
3.
phone jack.
RJ-11 Connector
Connecting the telephone line
!
Do not connect the internal modem to a digital privat e
branch exchange connec tor, or the digital side of an
integrated digital network. Use only analog phone
connections. F ailure to do so may r esul t in expl osi on
or fire.
During thunderstorms be sure to disconnect the modem phone cable f r om the MobilePro H/PC. Failure to
do so may result in explosion or fire.
WARNING
REMOTE ACCESS SERVICE SETUP
You ca n easily send a nd receive email messages using the
feat ures provided by M icrosof t Pocket O utlook. Using the Inbox through a Microsoft NT Server remote access service
(RAS) account you can access your cor p or ate email account.
Other network t ypes may be different.
Use t h ese st eps to configure your Mob ilePro’s i n ternal modem after you have establis hed a RAS account.
3-22 Using the MobilePro
Page 56

Pr es s Start on the Ta skbar and sc roll up to Pr ograms. Ac-
1.
cess the Communicat ions selection and open Remote Networking.
Doub le tap on Make a N ew Connection, and name it “On-
2.
board Modem.”
In the dia log box, D ial Up Connec tion, select the port for
3.
the on board Modem.
Pr es s TC P/IP Sett ings and be s ure that the checkb oxes in
4.
the General tab and Name Servers t ab are enabled.
Tap OK and Next to continue. Enter your RAS telephone
5.
number ( provided by your system administrator).
Tap Finish to clos e the Dial Up Connection setup.
6.
Open Inb ox and tap t he Options butt on on the Toolbar to
7.
open the Op tions dia l og box.
Tap on the S ervices tab, and ta p Add… to open the Serv-
8.
ices list.
Select Internet Mail and double tap on it. When prompted,
9.
type in a unique name (for example, “Dial Up”) and tap
OK.
Fill in the required fields in the Service Definition dialog
10.
box. These include:
Connection – select t he Onboar d Modem.
POP3 Host – obt ain this number fr om you r system ad-
ministrator.
User I D and Password – your corpora te codes.
Enter the optional SMTP Host provided by your system
administ rat or and your corporate Internet email address in
the return address field.
Using the MobilePro 3-23
Page 57

Select any other f eatures you wa nt to enab le, then pr es s
11.
Finish. You can now acces s your c orporate email r emotely using your MobileP ro.
PRINTING YOUR DOCUMENTS
You ca n print doc uments cr eated in Microsoft Pocket a pplicat i ons directly f rom your M ob ilePro. Select Print… from the
Micr osoft P oc ket application’s File menu.
Use a printer that supports PCL emulation connected to the
MobilePro serial port, or print via the infrared port if the
printer has an infrared port. Refer to the documentation that
comes with your pr inter to s et it for PCL emulation and seria l
or i n frared communicati o n . T h e seri al cables for the MobilePro and printer must be connected to each ot her by a null
modem adapter.
UPGRADING ROM/RAM
You can upgrade MobilePro ROM/RAM by replacing the
cur rently inst alled ROM /RAM module with an upgr aded
ROM/RAM module.
user data and program memory. M ak e sure you per form a full backup to your desktop or not ebook before
continui ng.
Upgrade ROM/RAM as follows:
Sa ve you r data to a notebook or desktop c omp uter, power
1.
off the MobilePro, and clos e t he dis play panel.
Disconnec t any peripheral devices a tta c hed t o the Mo-
2.
bilePro, such as the AC adapter.
3-24 Using the MobilePro
NOTE
Changing the RAM or ROM module erases all
Page 58

Remove the main and back-up batteries. See “Battery Re-
3.
placement ” for details.
Tu rn over the M obilePro and locate the scr ew that secures
4.
the RO M or R AM bay cover.
Using a small screwdriver, remove the s c rew and t he b ay
5.
cover. (The M obilePro does not power on when the ROM
bay c over is removed.)
With the small screwdriver, remove the screw on the
6.
ROM or RAM module.
Gently lift up the RO M or RAM module to disconnect it
7.
from its connector and r emove it from the bay.
Inser t the upgraded ROM or RAM module into the b ay,
8.
aligning the c onnector on the module wit h the one in the
bay.
Gently press on t he module ju st above the connector s until
9.
the connection is secure.
Replace the bay cover and cover screw.
10.
Install the main a nd back-u p batteries. See “Installing
11.
Batteries” for details.
NOTE
The MobilePro will not power on unless the
ROM bay cover is secure and the batt er y lock is in
the locked position.
RESETTING THE MobilePro
Occasionally, you may need to reset your MobileP ro H/PC.
Before resetting the MobilePro, back up your data to the
desktop or notebook c omputer, if possible.
Using the MobilePro 3-25
Page 59

When you res et the MobileP ro, you may lose stored data and
unit parameter settings.
Reset t he M ob ilePro as follows.
Remove the stylu s from its holder and op en t he dis play
1.
panel.
Power on the MobilePro. (You c annot r eset the unit with-
2.
out the power on.)
Close t he dis play panel and tu rn the MobilePro over.
3.
Locate the Reset button on the bottom of the MobilePro.
4.
Using the stylus, press the Reset button. This resets the
5.
unit.
3-26 Using the MobilePro
Reset Button
Resetting the MobilePro
Page 60

4
Troubleshooting
Your MobilePro H/P C is designed to provide many hours of
service while you are a t home or on the road.
For optimum per f ormance, frequently back u p and sync hronize the MobilePro da ta with your noteb ook or desktop
comput er. T hen if something happ ens , most of your data is
still availa b l e. If you ha ve p roblems, c heck the informat ion
in the following table for possible s olutions.
Troubleshooting
PROBLEM RESOLUTION
The MobilePro
has no power.
Check the main battery.
Check the back-up battery.
If you are using an AC adapter, make sure
the connections are correct and secure.
Make sure the battery bay cover lock is in
the locked position.
Check that the ROM bay cover is properly
secure.
Nothing
appears on the
screen.
Try pr essing t he Power button again (t he
unit might have turned itself off if it was not
used for a specified time).
Adjust the contrast.
Check the power connections.
Troubleshooting 4-1
Page 61

Troubleshooting (cont'd)
PROBLEM RESOLUTION
Nothing
appears on the
screen. (cont'd)
A low battery
message
appears.
When using a
PC card, such
as a modem,
the unit powers
off.
The AC adapter
doesn't work.
The keyboard
doesn't
respond.
Try r echarging t he m ain battery pack or
replacing the sub-battery.
Check that the ROM bay cover is properly
secure.
Recharge the main batt ery.
Connect the AC adapter to the unit when
using PC cards that require large amounts
of energy.
Make sure that the main battery and backup battery are installed.
Check that the AC adapter connections are
secure.
Verify that the AC outlet being used is
working. Do this by pl ugging in another
electric device, such as a lamp.
Reset the unit.
Check that you have not set the "disable
keyboard" of a handwriting recogniti on
application.
4-2 Troubleshooting
The serial port
doesn’t wor k .
The IrDA port
doesn’t wor k .
Check that the cable connections are
secure.
Check that nothi ng obst r uct s t he path
between the transmitting and receiving IR
ports.
Check the procedure that you are using
against the instructi ons in “Transferring
Data” in the software user’s guide.
Page 62

Troubleshooting (cont'd)
PROBLEM RESOLUTION
The PC card
cannot be
accessed.
The touch
screen does not
respond.
The Reset
button does not
respond.
Make sure the card is inserted correctly and
seated properly.
Connect the unit to AC power using the
adapter. Some cards do not operate
properly unless the AC adapter is
connected.
Calibrate the stylus input. (See the software
user’s guide for calibration i nst r uct ions.)
Reset the unit.
Remove the main bat t ery and back-up
battery. Reinstall the batteries and make
sure they are seated properly. Try resetting
the unit again.
This procedure results in the loss of the
memory contents i ncl uding all stored data,
settings, and fil es.
Be sure to make regular backups.
For further assistance, call NECCSD Support
Services:
1-800-632-4525
Troubleshooting 4-3
Page 63

5
Display
CPU
User Data Ent ry M et hods
Random Access Memory (RAM)
Specifications
The followin g specificatio n s are standard except where
noted.
640 x 240, 256 color, backlight, liquid crystal display
(LCD) touch-screen
NEC Vr4111, 80-MHz processor, optimized for Windows
CE
80-key Q W ERT Y keyb oard wit h stylus
Touch panel (input via stylus)
16 megabytes (MB); expandable to32MB
Read-Only Memory (ROM)
16 MB
Speaker
One b uilt -in speaker
Inf rared (IrDA) Communication
Baud rate: 115.2 Kbps maximum
Distance: 0 to 20 inches
Specifications 5-1
Page 64

Serial Interface
Baud rate — 115.2 Kbps maximum
I/O Ports
Serial port (Direct Cable connect ion)
IrDA port
VGA port (output)
Modem
Data — 33.6 Kbps (AT command)
Fax — 9.6 Kbps (Fax control command Class I)
PC Card Slot
One Type I or Type II slot
Compact Flash Card Slo t
One Compact Flash card slot
Power
Main battery — one rechargea ble Lithium-ion (L i- Ion)
battery pack (included). Battery life is a s follows:
5-2 Specifications
With st andard bac klight, approximately 8 hours un-
der typical op erating c onditions.
With full b acklight, app roximat ely 5 hours under
typic al operating condit ions.
Back-Up Battery — one 3V Lithium battery (CR2032
included)
Memory backup — approximately 1 week (with depleted
main battery) at ambient temperature of 73°F (23°C)
Page 65

Recharge Time
Accessories
Dimensions
Use the AC adapter to recharge the MobilePro main
battery
Recha rging time is a pproximately 4.5 hours when the
syst em is on or off
AC adapter — S1424-21A Listed Direct Plug-In Power
Unit
Input Voltage - 100 to 240V AC; 60Hz, 13W
Output Voltage - 9.5V DC 1000 mA
Direct Connection Cabl e
Modem Ca ble
VGA Cable
9.65 in. (W) x 5.43 in. (D) x 1.24/1.5 in. (H)
Weight
1.88 lb. (include batteries)
Operating Environment
Temperature — 32° to 104°F (0° to 40°C)
Humidity — 35% to 85% (N o c ondens ation)
Storage Environmen t
Temperature — 14° to 140°F (–10° to 60°C)
Humidity — 35% to 85% (N o c ondens ation)
Specifications 5-3
Page 66

Available Options
Lithium-Ion Rechargeable Battery Pack (S1424-25A)
Stylus Pack (S1424-17A)
32-MB RAM Module (S1424-18B)
Direct Connection Cabl e (S1424-12S)
VGA Cable (S1424-12V)
AC Adapter (S1424-21A)
5-4 Specifications
Page 67

A
Command
A/ Repea t last co mmand
A Answer a call
B0 Select ITU-T modulation at 300 and
B1 Select Bell modulation at 300 and 1200bps X
Dn Dial, where n =
E0 Disa ble command echo
E1 Enable command echo X
H0 Go on-hook
H1 Go off-hook
L0 Set lowest spea ker volume
L1 Set speaker volu me to low X
L2 Set speaker volu me to medium
L3 Set speaker volu me to high
M0 Speaker is always of f
M1 Speaker is on du ring call c onnection X
M2 Speaker is always of f
M3 Speaker is off during dialing and on during
Modem Commands
AT Commands
Description
1200bps
P — Pulse dial
T — Tone dial
W — Wait for dial tone
, — Pause
! — Flash hook
@ — Wait for 5 seconds silence
; — Return to command mode
^ — Toggle calling tone ena b le/disable
call connection
Defau l t
Modem Commands A-1
Page 68

AT Commands (cont’d)
Command
Description
O0 Go into online data mode withou t retrain
sequence
O1 Go online data mode with retra in sequence
P Set pulse dial
Q0 Enable result c ode X
Q1 Disable result code
Sn=m Write m to S-register n
Sn? Retu rn the valu e of S-regis ter n
T Set dial tone
V0 Set numeric result c ode
V1 Set verb ose result code X
W0 CONNECT reports DTE speed X
W1 CONNECT reports DTE speed, carrier
speed a nd protoc ol
W2 CONNECT reports carrier speed
X0 Report CONNECT message only
Ignore dial tone and busy s ignal
X1 Report CONNECT message according to
ATW
Ignore dial tone and busy t one s i gnal
X2 Report CONNECT message according to
ATW
Ignore b usy signal
X3 Report CONNECT message according to
ATW
Ignore dial tone
X4 Report CONNECT message according to
ATW
Y0 D i sable long s pace disc onnect X
Y1 E nable long space disconnect
Z Soft reset
&C0 CD is always on
&C1 CD follows the state of carrier X
&D0 Ignore DTR
Defau l t
X
Modem Commands A-2
Page 69

AT Commands (cont’d)
Command
&D1 Go to command mode on ON-to- OFF
Description
Defau l t
DTR transition
&D2 Hang-up and go to command mode on ON -
X
to-OFF DTR transition. Disable auto
answer
&D3 Reset on ON-to-OFF DTR transition
&F Recall default setting
&G0 Disable gu ard tone X
&G1 Disable gu ard tone
&G2 Enable 1800Hz guard tone
&K0 Disabl e fl ow c ontrol
&K3 Enable RTS/CTS flow contr ol X
&K4 Enable XON/XOFF flow control
&K5 Enable transpar ent XON/XOFF flow
control
&K6 Enable both RTS/CTS and XON/XOFF
X Fax
flow cont rol
&P0 Set 10pps pulse dial with 39% make/break
X
ratio
&P1 Set 10pps pulse dial with 33% make/break
ratio
&P2 Set 20pps pulse dial with 39% make/break
ratio
&P3 Set 20pps pulse dial with 33% make/break
ratio
&Q0 Select direct asynchronous op eration
&Q5 Select to try a reliable (error-corrected)
X
link
&Q6 Select normal (speed-buff ering) mode
&S0 DSR always active
&S1 DSR is on during carrier is detected X
&V Display current c onf iguration
\N0 Select normal mode connection
Modem Commands A-3
Page 70

AT Commands (cont’d)
Command
Description
Defau l t
\N1 Select normal mode connection
\N2 Select LAPM and MNP connection
\N3 Select LAPM, MNP and normal mode
X
connection
\N4 Select only LAPM c onnection
\N5 Select only MNP c onnection
\V0 Disable extended result c ode
\V1 Enable extended result code
%C0 Disable data compression
%C1 Enable MNP 5 data compression
negotiation
%C2 Enable V.42 bis data compression
%C3 Enable both V.42 bis and MNP5 data
X
compression
+MS Select modulation ( see the next table for
values )
The command format is :
+MS=<mod>,<automode>,<min_rate>,<m
ax_rate>
Modulation Values
<mod> Modulation Possible Rate
0 V.21 300
1 V.22 1200
2 V.22 bis 2400, 1200
9 V.32 9600, 4800
10 V.32 bis 14400, 12000, 9600, 7200, 4800
11 V.34 336000,31200, 28800, 26400, 24000,
21400, 19200, 16800, 14400, 12000,
9600, 7200, 4800, 2400
<automode>
0 Disables automatic modula tion negotiation
1 Enables automatic modulation negotiation using V.8
bis/V.8 or V.32 bis Annex A.
Modem Commands A-4
Page 71

S-Registers
Register Function
S0 Rings to Auto answer 0-255
S1 Ring Counter 0-255
S2 Escape Character 0-255 ASCII
S3 Carriage Return Character 0-255 ASCII
S4 Line Feed Character 0-255 ASCII
S5 Backspace Character 0-255 ASCII
S6 Wait Time for Dial Tone 2-255 s
S7 Wait Time for Carrier 1-255 s
S8 Pause Time for Dial Delay
Modifier
S9 Carrier Detect Response
Time
S10 Car rier L oss Dis c onnect Time 1-255 0.1s
S11 DTMF Tone Du ration 20-255 ms
S12 Escape Prompt Delay 0-255 0.02s
S24 Sleep Inactivity Timer 0-255 s
S25 Delay to DTR Off 0-255 0.01s
S26 RTS-CTS Delay 0-255 0.01s
S29 Flash Dial Modif i er 0-255 0.01s
S30 Disconnect I nactive Timer 0-255 10s
S32 XON Character 0-255 ASCII
S33 XOFF Character 0-255 ASCII
S36 LAPM Failure Control
S37 Line Connection Speed
S38 Delay Before F orce Ha ng- up 0-255 s
S46 Data Compr ession Control
S48 V.42 Negotiati on Contr ol
Range Units
0-255 s
1-255 0.1s
Defau l t
0
43
13
10
8
2
50
2
6
14
95
50
0
5
1
70
0
17
19
7
0
20
Modem Commands A-5
Page 72

Result Codes
Numeric
0 OK
1 CONNECT
2 RING
3 NO CARRIER
4 ERROR
5 CONNEC T 1200
6 NO DIAL TONE
7 BUSY
8 NO ANSWER
9 CONNEC T 0600
10 CONNECT 2400
11 CONNECT 4800
12 CONNCET 9600
13 CONNECT 7200
14 CONNECT 12000
15 CONNECT 14400
16 CONNECT 19200
17 CONNECT 38400
18 CONNECT 57600
19 CONNECT 115200
33 FAX
35 DATA
40 CARRIER 300
46 CARRIER 1200
47 CARRIER 2400
48 CARRIER 4800
49 CARRIER 7200
50 CARRIER 9600
51 CARRIER 12000
52 CARRIER 14400
53 CARRIER 16800
54 CARRIER 19200
55 CARRIER 21600
Verbose
Modem Commands A-6
Page 73

Result Codes (cont’d)
56 CARRIER 24000
57 CARRIER 26400
58 CARRIER 28800
59 CONNECT 16800
61 CONNECT 21600
62 CONNECT 24000
63 CONNECT 26400
64 CONNECT 28800
66 COMPRESSION: CLASS5
67 COMPRESSION: V.42 bis
69 COMPRESSION: NONE
70 PROTOCOL: NONE
77 PROTOCOL: LAPM
78 CARRIER 31200
79 CARRIER 33600
80 PROTOCOL: ALT
84 CONNECT 33600
91 CONNECT 31200
+F4 +FCERROR
Modem Commands A-7
Page 74

Index
A
AC
adapter, 2-4, 3-17
power port, 2-4
Application shortcu t keys, 3 - 5
Assigning shortcut keys, 3-6
Audio ap p lic ation
using, 3-10
Audio memos, 3 - 9
B
Backlight, 3-4
Backlight key, 2-3
Back-up batteries
battery low message, 2-13
replacement, 2-12
Battery
cover lock, 2-5
installation, 1-3
precautions, 2-16
types, 1-2
C
Caring for the MobilePro, 2-17
Cleaning your Mob ilePro, 2-20
Compact Flash card, 2-4
removing, 3 - 14
Connecting ex ternal devices , 3-1 6
Contras t, 3-3
Control keys, 3-5
D
Data transmission, 3-15
Default keys, 3-5
Desktop system
connecting t o, 3-17
Direct Connection Cabl e, 3-17 ,
3-19
Display panel, 2-6
adjustments, 3-3
contrast, 3- 3
latch, 2-3
Display Panel
backlight, 3-4
E
Eject button
PC card, 2-5
Email
remote access, 3-22
External modem, 3-17
F
Features
AC Power port, 2-4
Backlight key, 2-3
Battery cover lock, 2-5
bottom, 2-4
Compact Flash card slot, 2-4
display panel la tch, 2 - 3
infrared port, 2-6
keyboard, 2-4
LCD Panel/Touch P anel, 2- 3
main battery bay cover, 2-6
microphone, 2-4
modem, 2-3
Notification LED, 2-4
Index 1
Page 75

PC card eject button, 2-5
PC card slot, 2-4
RAM b ay cover, 2-5
Record button, 2-4
Reset button, 2-5
ROM bay cover, 2- 5
serial port, 2-5
speaker, 2-6
stylus, 2-3
summary l isting, 1-1
VGA port, 2-6
Finding the stylus, 2-7
Func tion keys, 3-5
I
Inbox
setup for RAS, 3-22
Infrared port, 2-6
Inserting PC cards, 3-10, 3-12
K
Keyboa rd, 2 - 4
L
LCD /Tou c h Panel
enabling for power c ontrol, 3-8
M
Main batteries
replacement,
2-10
Main battery bay cover, 2-6
Making display p anel adjus tments,
3-3
Microphone, 2 - 4
Microsoft Pocket P owerPoint
displaying on external monitor,
3-19
MobilePro
care, 2-17
features, 1-1
Modem, 2- 3
external, 3-17
internal, 3-21
using, 3-21
Monitor
connecting t o, 3-19
N
Notebook system
connecting t o, 3-17
Notification LED, 2-4
O
Opening the display panel, 2-6
P
PC card
eject button, 2-5
inserting, 3-10, 3-12
removal, 3-12
slot, 2-4
Power
off, 3-2
on, 3- 2
Precautions, 2-18
Printing, 3-24
Pr oblem solving, 4-1
Q
Quick start
instructions, 1-2
R
RAM
bay c over, 2-5
Index 2
Page 76

upgrading, 3-24
RAS setup, 3-22
Record switch, 2-4
Removing the st ylus, 2 - 7
Replacing batteries, 2-9
Reset button, 2-5
Resetting the MobilePro, 3-25
ROM
bay c over, 2-5
upgrading, 3-24
S
Serial port, 2-5
Setting a MobilePro time-out, 3-3
Setup
desktop software, 1-7
first-time instructions, 1-2
MobilePro Software Suite, 1-7
Setup Wizar d
using, 1-5
Shor tcut keys , 3-5
Specific ations, 5-1
Storage r eq uir ements, 2-19
Stylus, 2-3, 2-7
System
resetting, 3-25
V
VGA port, 2-6, 3-19
Voice Recor der
using, 3-10
W
Windows CE
desktop software setup, 1-7
T
Touch panel
calib rat ion, 1-5
Transmitting dat a, 3 - 15
Troubleshooting, 4- 1
U
Upgrading
ROM/RAM, 3-24
Index 3
Page 77

BATTERY RE PLACE ME NT
!
There i s a danger of explosi on if t he battery i s incorrectl y replaced. Replace only with the same or equivalent type recommended by the manufacturer. Discard used batteries
according to the manufac turer’s instructi ons.
Il y a danger d’explosion s’il y a replacement incorrect de la
batterie. Remplacer uniquement avec une batterie du même
type ou d’un type recommandé par l e constructeur. Met tre au
rébut les batteries usagées conformém ent aux instr uctions du
fabri cant.
WARNING
!
ATTENTION
BATTERY DIS POS AL
The main battery is a Lithium-Ion (Li-Ion) battery. The back-up (sub) battery is a Lithium battery.
Contact you r local waste ma nagement officia l s for ot her informa tion regar ding environmentally sound collection, recycling, and dispos al of Lithium-Ion and Lithium batter ies . For additiona l informat ion on the proper
collection or disposal of rechargeable batteries, please call 1-800-8BATTERY.
Page 78
(For United States Use Only)
FEDERAL COMMUNICATIONS COMMISS ION
RADIO FREQUENCY INTERFERENCE STATEMENT
!
WARNING
Changes or modifications to this unit not expressly approved by
the party responsible for compliance could void the user’s
authority to operate the equipment.
NOTE
This is a Class B Digital Device. This equipment has
been tested and found to comply with the limits for a Clas s B
digital device, pursuant to Part 15 of the FCC Rules. These
limits are designed to provide reasonable protection against
harmful interference in a residential installation. This
equipment generates, uses and can radiate radio frequency
energy and, if not installed and used in accordance with the
instructions, may cause harmful interference to radio
communications.
FCC PART 68
This equipment complies with Part 68 of FCC rules. On the bottom of this
equipment is a label that contains, among other information, the FCC registration
number and r inger equivalence number (REN) for this equipment. If requested,
this information must be provided to the telephone company.
All applicable registration jack USCOs, any facility interface codes and service
order codes associated with the service the equipment must be connected.
The REN is used to determine the quantity of devices that may be connected to the
telephone line. Excessive RENs on the telephone line may result in the devices
not ringing in response to an incoming call. In most, but not all areas, the sum of
Page 79

the RE Ns sh ould n ot ex ceed five (5). To be certain of the number of devices that
may be connected to the line, as determined by the total RENs contact the
telephone company to determine the maximum REN for the calling area.
If the MobilePro causes harm to the telephone network, the telephone company
will notify you in advance that temporary termination of service may be required.
But if advance notice isn’t possible, the telephone company will notify the
customer as soon as possible. Also, you will be advised of your right to file a
complaint with the FCC if you believe it is necessary.
The telephone company may make changes in its facilities, equipment, operations,
or procedures that could affect the operation of the equipment. If this happens, the
telephone company will advise you in advance to make the necessary
modifications to maintain uninterrupted service.
If you have trouble with the MobilePro, please contact NECCSD Support Services
at 1-800-632-4525 for repair and warranty information. If the trouble is impacting
the telephone network, the telephone company may request you remove the
equipment from the network until the problem is resolved.
The equipment cannot be used with public coin telephones provided by the
telephone company. Connection to Party Line Service is subject to state tariffs.
(Contact the state public utility commission, public service commission or
corporation commission for information.)
The Telephone Consumer Protection Act of 1991 makes it unlawful for any
person to use a computer or other electric device to send any message via a
telephone fax machine unless such message clearly contains in a margin at the top
or bottom of each transmitted page or on the first page of the transmission, the
date and time it is sent and an identification of the business or other entity, or
other individual sending the message and the telephone number of the sending
machine or such business, other entity, or individual. In order to program this
information into your MobilePro refer to the bFax manual on the CD-ROM. If you
are using a different communication software program, refer to its manual.
Page 80

IC CS-03
NOTICE
“
This certification means that the equipment meets telecommunications network
protective, operational and safety requirements as prescribed in the appropriate
Terminal Equipment Technical Requirements document. The Department does
not guarantee the equipment will operate to the user’s satisfaction.
Before installing this equipment, users should ensure that it is permissible to be
connected to the facilities of the local telecommunications company. The
equipment must also be installed using an accepta ble meth od of conn ection . Th e
customer should be aware that compliance with the above conditions may not
prevent degradation of service in some situations.
Repairs to certified equipment should be coordinated by a representative
designated by the supplier. Any repairs or alterations made by the user to this
equipment, or equipment malfunctions, may give the telecommunications
company cause to request the user to disconnect the equip ment.
Users should ensure for their own protection that the electrical ground
connections of the power utility, telephone lines and internal metallic water pipe
system, if present, are connected together. This precaution may be particularly
important in rural areas.
: The Industry Canada label identifies certified equipment.
CAUTION:
should contact the appropriate electric inspection authority, or electrician, as
appropriate.”
NOTICE:
“
device provides an indication of the maximum number of terminals allowed to be
connected to a telephone interface. The termination on an interface may consist of
any combination of devices subject only to the requirement that the sum of the
Ringer Equivalence Number of all the devices does not exceed 5.”
Users should not attempt to make such connections themselves, but
The Ringer Equivalence Number (REN) assigned to each terminal
Page 81

FCC PART 15 CLASS B
NOTICE
This equipment has been tested and found to comply with the limits for a Class B
digital device, pursuant to Part 15 of the FCC Rules. These limits are designed to
provide reasonable protection against harmful interface in a residential
installation. This equipment generates, uses and can radiate radio frequency
energy and, if not installed and used in accordance with the instructions, may
cause harmful interference to radio communications. However, there is no
guarantee that interference will not occur in a particular installation. If this
equip men t does cause ha rm ful i nt erfer en ce to ra dio or tel evision recep tion . I f th is
equip men t does cause ha rm ful in ter feren ce to r ad io or t elevisi on r ecept ion , whi ch
can be determined by turning the equipment off and on, the user is encouraged to
try to correct the interference by one or more of the following measure:
Reorient or reloca te the receiving an tenn a.
Increase the separation between the equipment and receiver.
Connect the equipment into an outlet on a circuit different from that to
which the receiver is conn ected.
Consult the dealer or an experienced radio/TV technician for help.
Page 82

FCC WARNING
Changes or modifications not expressly approved by the party responsible for
compliance could void the user’s authority to operate the equipment.
Properly shielded and grounded cables and connectors must be used for
connection to host computer and/or peripherals in order to meet FCC emission
limits.
AC adapter with ferrite core must be used for RF interference suppression.
Page 83

Declaration of Conformity
This device complies with Part 15 of the FCC Rules. Operation is subject to the
following two conditions: (1) this device may not cause harmful interference, and
(2) this device must accept any interferen ce received, inclu d ing i nter ference that
may cause undesired operation.
Trade/Model Name:
Model No.(s): S1424-04A03
Responsible Part y: NEC C ompu t er System Division, A Di visi on of
Packard Bell NEC, Inc.
NEC MobilePro 750C
1414 Massachusetts Avenue
Boxborough, Massachusetts 01719
1-800-632-4525
Type of Product: Portable Adapter
Equipment Classification: Class B Peripheral
We hereby declare that the equipment specified above conforms to the
technical standards as specified in the FCC Rules.
 Loading...