

Page 1

User Manual
S-Series
en
English
Page 2
Important safety information
PLEASE READ CAREFULLY BEFORE INSTALLING PRODUCT IN VEHICLE
This is the safety alert symbol. It is used to alert you to potential personal injury hazards. Obey all safety
messages that follow this symbol to avoid possible injury or death.
WARNING indicates a potentially hazardous situation which, if not avoided, could result in death or serious
injury.
CAUTION indicates a potentially hazardous situation which, if not avoided, may result in minor or moderate
injury.
CAUTION used without the safety alert symbol indicates a potentially hazardous situation which, if not
avoided, may result in property damage.
S-Series
Removing original equipment, adding accessories or modifying your vehicle could affect the vehicle’s safety or make it illegal to operate
in some jurisdictions.
Follow all product instructions and all instructions in your vehicle owner’s manual regarding accessories or modifications.
Consult your country’s and/or state’s laws regarding operation of a vehicle with any accessories or modifications.
It is your sole responsibility to place, secure and use your Navman in a manner that will not cause accidents, personal injury or property
damage. Always observe safe driving practices.
Do not mount your Navman in a way that may interfere with the safe operation of the vehicle, the deployment of air bags or other safety
equipment.
Do not operate your Navman while driving.
Before you use your Navman for the first time, familiarize yourself with your device and its operation.
On main roads, the distance to an exit calculated by the Navman may be further than the distance shown on road signs. Road signs
show the distance to the start of an exit while the Navman shows the distance to the next intersection, i.e., the end of the exit ramp or
road. To prepare to exit a road, always follow distance information on road signs.
The use of information regarding safety or speed camera locations may be subject to local laws in the country of use. You are
responsible for checking that you can legally use the information in your country or in the country where the information will be used.
Do not handle the Navman while it is hot. Let the product cool, out of direct sunlight.
At full power, prolonged listening to the Navman via headphones or earphones can damage the ear of the user.
Do not expose the Navman to direct sunlight in an unattended vehicle for prolonged periods. Overheating may damage the unit.
To discourage theft, do not leave the Navman, mounting bracket or any cables in plain view in an
unattended vehicle.
Home Charger-specific safety information
To charge your Navman from the mains power, use the home charger (Model: PSAA05R-050; Input: 100-240V AC 50-60Hz; Output: 5V
DC 1A Max) supplied by Navman as an accessory (may be sold separately). Using other home chargers with your Navman could result
in serious injury or property damage.
Never use the charger if the plug or cord are damaged.
Do not expose the charger to moisture or water. Do not use the charger in a high moisture environment. Exposure to water may cause
electrical sparks or fires.
Never touch the charger when your hands or feet are wet.
Allow adequate ventilation around the charger when using it to operate your Navman or charge the Navman internal battery. Do not
cover the charger with paper or other objects that will reduce ventilation. Do not use the charger while it is inside a carrying case or
other container.
Ensure that the charger is connected to a power source with the correct fitting and voltage requirements. The voltage requirements can
be found on the home charger casing and/or packaging.
Do not attempt to service the charger as this could result in personal injury. Replace the charger if it is damaged or exposed to
excess moisture.
2
Page 3

S-Series
Internal battery-specific safety information
The Navman contains a non-replaceable internal lithium-ion polymer battery. The battery may burst or explode if mishandled, releasing
hazardous chemicals. To reduce the risk of fire or burns, do not disassemble, crush or puncture the battery.
Recycle or dispose of the battery safely and properly according to local laws and regulations. Do not dispose of the battery in
fire or water.
Only use the correct mains power charger (sold separately) or in-vehicle charger supplied by Navman to charge the Navman
internal battery.
Only use the Navman internal battery with the Navman unit.
The Navman battery will stop charging when the ambient temperature is less than 0ºC (32ºF) or more than 45ºC (113ºF).
Warning Notice to Drivers in the United States
State law may prohibit drivers in states such as Arizona, California and Minnesota from mounting objects on their windshields while
driving. Please make sure you research and follow your most current State laws. An alternative mounting option is provided in the box
with your product, also, stores offer additional mounting alternatives. Navman does not take any responsibility for any fines, penalties, or
damages that may be incurred as a result of disregarding this notice.
Failure to adhere to these warnings and cautions may lead to death, serious injury or property damage. Navman disclaims all
liability for installation or use of the Navman that causes or contributes to death, injury or property damage or that violates any
law.
3
Page 4

Contents
Important safety information...................................................................................................................2
Welcome................................................................................................................................................7
Important information for using the manual.......................................................................................7
Getting to know your Navman................................................................................................................8
Components .....................................................................................................................................8
S30 Deluxe/S30 Traffic.................................................................................................................8
S80 Deluxe...................................................................................................................................9
How do I get started?...........................................................................................................................10
How do I turn my Navman on for the first time? ..............................................................................10
How do I adjust the volume?...........................................................................................................14
How do I monitor the battery status?............................................................................................... 14
What are the main screens I will use?..................................................................................................15
Main Menu screen ..........................................................................................................................15
Map screens ...................................................................................................................................15
How do I navigate with GPS? ..............................................................................................................16
How do I go from A to B?.....................................................................................................................17
What if I miss a turn?......................................................................................................................17
How do I search for an address? ....................................................................................................18
Case Study: How do I search for an address?............................................................................18
Using the Keyboard screen ........................................................................................................20
Using the Destination Search screen..........................................................................................20
How do I create a trip with multiple stops? ......................................................................................22
Case Study: How do I navigate to multiple addresses? ..............................................................22
How do I skip a waypoint during a multi-stop trip? ......................................................................26
How do I search for a Point of Interest (POI)?.................................................................................27
Case Study: How do I search for a Point of Interest?..................................................................27
How do I save Favourites and My Home?............................................................................................30
How do I save a Favourite or My Home? ........................................................................................30
How do I navigate to a Favourite?...................................................................................................31
How do I navigate to My Home? .....................................................................................................31
How do I edit the name of a Favourite? ..........................................................................................32
How do I delete a Favourite? ..........................................................................................................33
How do I navigate to a recent location? ...............................................................................................34
How do I view my route?......................................................................................................................35
3D Map screen ...............................................................................................................................35
2D Map screen ...............................................................................................................................37
Traffic Overview screen ..................................................................................................................39
Route Overview screen...................................................................................................................41
Turn-by-Turn screen .......................................................................................................................43
How do I use the Map Menu? .........................................................................................................45
How do I avoid an area?.................................................................................................................46
How do I add an Avoid Area?.....................................................................................................46
How do I delete an Avoid Area? ................................................................................................. 46
How do I delete all Avoid Areas?................................................................................................46
How do I preview a route? ................................................................................................................... 47
How do I view my route statistics? .......................................................................................................48
How do I view statistics on my current route? .............................................................................48
How do I view statistics of my trips to date?................................................................................49
How do I view my trip logs?........................................................................................................50
How do I manage my NavPix?..........................................................................................................51
Album management ...................................................................................................................51
4
S-Series
Page 5

S-Series
NavPix management................................................................................................................53
How do I add or edit a NavPix description?..............................................................................54
How do I navigate to a NavPix? ................................................................................................... 55
How do I save a NavPix to a favourite?........................................................................................56
How do I save a NavPix to a POI? ...............................................................................................57
How do I make a hands-free call?........................................................................................................58
How can I pair my Navman with a Bluetooth mobile phone?...........................................................58
How can I pair my Navman with a Bluetooth headset? ...............................................................58
How can I make a phone call using the Dial screen?...................................................................... 59
How do I receive a phone call?....................................................................................................... 60
How do I add a contact to my Navman?..........................................................................................60
How can I make a phone call to a contact?.....................................................................................60
How do I view my call history? ........................................................................................................61
How do I receive current traffic information? ........................................................................................62
How does my Navman receive traffic information? .........................................................................62
How will I know when a Traffic Event occurs?................................................................................. 63
How do I view a list of all events on my route?................................................................................ 64
How do I view traffic details?........................................................................................................... 65
How do I know if a detour is recommended? ..................................................................................66
Traffic Messages.............................................................................................................................67
What can I customize?.........................................................................................................................68
Route Options.................................................................................................................................69
Route Calculation 1/4 ................................................................................................................. 69
Road Types 2/4 ..........................................................................................................................70
Driver Alerts 3/4..........................................................................................................................71
Data Recording 4/4.....................................................................................................................72
Map Display....................................................................................................................................73
Map Display 1/3..........................................................................................................................73
Map Display 2/3..........................................................................................................................74
Select Map 3/3............................................................................................................................75
Map POIs........................................................................................................................................76
Volume ...........................................................................................................................................77
Screen Display................................................................................................................................78
POI Alerts .......................................................................................................................................79
GPS................................................................................................................................................80
GPS Status 1/2...........................................................................................................................80
Set GPS Mode 2/2......................................................................................................................81
Language........................................................................................................................................82
Traffic..............................................................................................................................................83
Traffic System Status.................................................................................................................. 83
Traffic Event Notification.............................................................................................................84
Select event sorting type ............................................................................................................ 85
Power .............................................................................................................................................86
Select Keyboard .............................................................................................................................87
How does predictive text (abc, def…) work?...............................................................................87
Units ...............................................................................................................................................88
Units 1/2 .....................................................................................................................................88
Units 2/2 .....................................................................................................................................89
Start-up........................................................................................................................................... 90
Bluetooth preferences.....................................................................................................................91
Saved Information...........................................................................................................................92
Tutorial............................................................................................................................................93
About ..............................................................................................................................................94
Shop Demo.....................................................................................................................................94
What is NavDesk? ...............................................................................................................................95
Can I use NavDesk with my computer? ......................................................................................95
How do I install a map for the first time? .....................................................................................95
How do I install NavDesk onto my computer? .................................................................................96
NavDesk features ...........................................................................................................................97
How do I keep NavDesk up-to-date? ..............................................................................................98
NavDesk Preferences.................................................................................................................98
My Maps .........................................................................................................................................99
How do I install maps onto my Navman?..................................................................................100
5
Page 6

How do I install maps from DVD?............................................................................................. 100
How do I remove maps from my Navman? ............................................................................... 102
How do I know which map contains a particular city or town?...................................................102
My Map Preferences.................................................................................................................102
What is a Major Road Network map? ....................................................................................... 103
NavAlbum .....................................................................................................................................104
Toolbar ..................................................................................................................................... 105
How do I use NavAlbum?..............................................................................................................106
How can I view and edit pictures or albums on my computer?..................................................106
What else can I do with pictures and albums on my computer?................................................ 107
NavAlbum Preferences.............................................................................................................108
Image Search ...............................................................................................................................109
How do I download NavPix from the internet? ....................................................................... 109
How do I import NavPix to NavAlbum? ..................................................................................109
Mileage Reporter .......................................................................................................................... 110
How do I input my trip data?..................................................................................................... 110
How do I export a mileage report?............................................................................................111
How do I delete travel logs from my Navman?.......................................................................... 111
Mileage Reporter preferences .................................................................................................. 111
My subscriptions........................................................................................................................... 112
Alerts ........................................................................................................................................112
How do I install Safety Camera information? ............................................................................112
How do I know which Safety Camera information is available? ................................................112
Purchase a Subscription...........................................................................................................112
Activate your Subscription ........................................................................................................113
How do I update Safety Camera information on my Navman?..................................................113
Custom POIs ................................................................................................................................ 114
How do I install custom Points of Interest? ...............................................................................114
How do I delete a Custom POI File from my Navman?............................................................. 115
Voice Transfer ..............................................................................................................................116
How do I install a voice file?...................................................................................................... 116
How do I remove a voice file?...................................................................................................116
How do I backup my Navman? .....................................................................................................117
Reference ..........................................................................................................................................118
How do I insert a Memory Card?...................................................................................................118
S30 Deluxe/S30 Traffic.............................................................................................................118
S80 Deluxe............................................................................................................................... 118
How do I remove a Memory Card?........................................................................................... 118
Point of Interest categories ........................................................................................................... 119
Traffic and other TMC Events.......................................................................................................121
For more information..........................................................................................................................124
S-Series
6
Page 7

S-Series
Welcome
Thank you for purchasing this Navman. This manual has been prepared to guide you through the operation of your
Navman from first set-up through to continuous use. Please read this manual carefully before using your Navman for
the first time. Keep this manual in a safe place and use as your first point of reference.
Important information for using the manual
It is important to understand the terms and typographical conventions used in this manual.
Formatting
The following formatting in the text identifies special information:
Convention Type of Information
Bold Navman components or items displayed on screen, including buttons, headings, field names and options.
Italics
Icons
The following icons are used throughout this manual:
Icon Description
Terms
The following terms are used throughout this manual to describe user actions.
Term Description
Tap Press and release an item displayed on the touch screen.
Tap and hold Tap and hold an item displayed on the touch screen for 2-3 seconds.
Select Tap an item in a list or tap a command from a menu.
Indicates the name of a screen.
Case study
Warning
7
Page 8

S-Series
Getting to know your Navman
We recommend that you familiarize yourself with the Navman's basic operations.
Components
S30 Deluxe/S30 Traffic
Power switch
Slot for memory card
Battery indicator
Cradle socket
Socket for in-car charger, USB cable, home charger and TMC
accessory kit (sold separately)
Speaker
8
Page 9

S-Series
S80 Deluxe
Slot for memory card
Power switch
Battery indicator
Microphone
Cradle socket
Socket for in-car charger, USB cable, home charger and TMC cradle
(sold separately)
Speaker
9
Page 10

S-Series
How do I get started?
Note: The first time you use your Navman, it may take up several minutes to establish a GPS connection. For more information about
GPS, refer to the GPS Frequently Asked Questions guide on the enclosed DVD.
How do I turn my Navman on for the first time?
To get started for the first time, complete the following steps:
1. Read the Important Safety Information on page 2.
2. Position your Navman
Follow the instructions below to position your Navman in your vehicle:
Note: Ensure that your Navman does not obstruct the driver's view, or interfere with the operation of the vehicle airbags and
safety devices.
S30 Deluxe/S30 Traffic
10
Page 11

S-Series
S80 Deluxe
11
Page 12

3. Turn your Navman on
Slide the power switch to the ON position.
Your Navman will turn on and display the Language screen.
4. Select your preferred language
From the Select Language screen, tap your preferred language.
S-Series
To prevent the Select Language screen from displaying on each start-up, clear the Show on start-up
check box.
You can change your preferred language while using your Navman (see "Language" on page 82).
5. Read the warning message
a) The Safety Agreement screen will display after you have selected your preferred language.
Read the Safety Agreement message.
b) To confirm that you have read and understood the message, tap Accept.
The Tutorial will display.
12
Page 13

S-Series
6. View the Tutorial
When you have accepted the Safety Agreement, the first Tutorial screen will display.
To prevent the Tutorial from displaying again on start-up, clear the Show on start-up check box.
To move forward through the Tutorial screens, tap
To view the previous screen, tap
.
.
To view the Tutorial again while using your Navman, see "Tutorial" on page 93.
Note: If you have maps installed from multiple continents, you may be prompted to select the maps you require.
To use maps from a different continent at a later time, you can select a different map via the Select Map screen in the
Select Map 3/3 preferences; refer to page 75.
When you have finished the Tutorial, the 3D Map screen will display. If you have a GPS fix, your current location will
be displayed on the map.
13
Page 14

How do I adjust the volume?
The volume on your Navman can be adjusted by the volume control on the Volume preference screen.
S-Series
To mute the volume from the map screens, tap
To adjust the volume, tap and hold
For more information on how to adjust the volume on your Navman, see “Volume” on page 77.
to display the Volume preference screen.
and then tap .
How do I monitor the battery status?
Your Navman has an internal battery that when fully charged, should provide power for up to 3 hours.
The battery indicator light on the top of the Navman indicates the level of internal battery charge:
Green - battery full
Orange - battery charging
You can monitor battery power status on the Power screen.
To access the Power screen, tap
and hold on the map screens.
How do I charge the battery?
The Battery Status bar displays External Power while the battery is charging; when the battery is fully charged, the
Battery Status bar will display at 100%.
To charge your Navman in a vehicle, plug the in-vehicle charger into
other end into the vehicle power socket.
To charge your Navman using your computer, plug the large end of the USB cable directly into a USB port on
your computer (not a USB hub) and plug the small end into
charging, ensure your Navman is turned off.
To charge your Navman using a mains power socket, plug the mains power charger cable into
bottom of the Navman and the mains power charger power pack into the power socket.
Note: The mains power charger is not included with all models and may be purchased separately.
14
on the bottom of your Navman and the
on the bottom of your Navman. To begin
on the
Page 15

S-Series
What are the main screens I will use?
Main Menu screen
The Main Menu screen is your starting point for searching for a destination. The Main Menu button allows you to
enter an address for your destination, customize preferences, receive updated traffic information and make and
receive phone calls.
The Main Menu can be accessed from the map screens by tapping
or by tapping the status bar at the
bottom of any screen.
Note: The Main Menu screens may differ from those displayed above, depending on your Navman model.
Map screens
There are five map screens used to view the route to your destination:
3D Map
2D Map
Traffic Overview (if available)
Route Overview
Turn-by-Turn™
The Map screens can be accessed from the Main Menu screen by tapping
You can cycle through the different map screens by pressing
on any map screen (the name of the map screen
will display briefly as your cycle through).
.
For more information on the map screens, see "How do I view my route?" on page 35.
For information on using the Map menu from the 3D Map and 2D Map screens, see "How do I use the Map
Menu?" on page 45.
15
Page 16

S-Series
How do I navigate with GPS?
The Global Positioning System (GPS) is available at any time, free of charge, and is accurate to within 5m (15ft).
GPS navigation is made possible by a network of satellites that orbit the Earth at around 20,200km (12,552mi). Each
satellite transmits a range of signals which are utilized by GPS receivers, such as your Navman, to determine an
exact location. Although a GPS receiver can detect signals from up to 12 satellites at any time, only four signals are
required to provide a position or "GPS fix" (latitude and longitude), for vehicle navigation systems.
How does my Navman receive GPS signals?
Your Navman receives GPS signals via the internal GPS antenna. To guarantee the optimum GPS signal strength,
ensure your Navman is outdoors, or in a vehicle outdoors, and has an unobstructed view of the sky. GPS reception is
not usually affected by weather, however, very heavy rain or snow may have a negative effect on your reception.
How do I view my GPS status?
You can view your GPS status at any time from the map screens or the Viewfinder screen. displays green
when a GPS fix is established and red when a GPS fix is unavailable. To indicate the reception strength of a GPS fix,
displays between one and four green vertical bars.
To view your GPS status in more detail, see "GPS Status" on page 80.
To set your GPS mode, see “Setting your GPS mode” on page 81.
For more information about GPS, refer to the GPS Navigation - Frequently Asked Questions guide on the
NavDesk DVD.
16
Page 17

S-Series
How do I go from A to B?
Your Navman is equipped with maps that provide street-level detail for door-to-door navigation, including Points of
Interest such as accommodation, parking areas, petrol stations, railway stations and airports.
When you ... Then ...
know the address of your destination use the address-entry wizard to enter the address on page 18.
want to make multiple stops
need to find a named site, feature, landmark or
public venue
want to navigate to a NavPix™ location use the Go To NavPix screen to navigate to a preinstalled NavPix on page 55.
WARNING For your safety, enter destination information before you start a journey. Do not enter a destination while driving.
What if I miss a turn?
Back-On-Track™ Automatic Rerouting
You will be redirected if you make a wrong turn. A message informing you that your route is being re-calculated will
display at the top of the screen.
use the Multi-stop Trip Planner screen to enter multiple waypoints on page 22.
search for a Point of Interest on page 27.
To cancel a route re-calculation tap
. A warning will display, asking you to confirm the cancellation. If confirmed,
both the re-calculation and your current route will be cancelled.
17
Page 18
S-Series
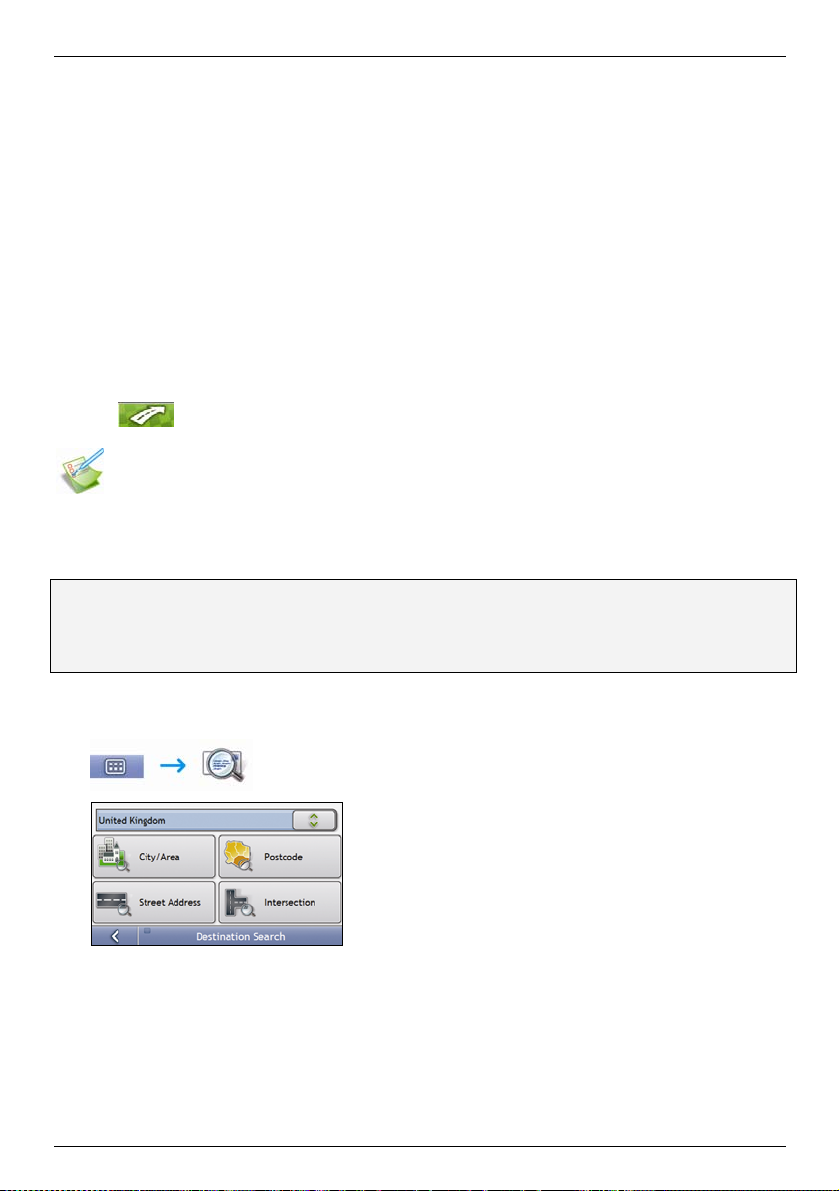
How do I search for an address?
Enter a destination using the Destination Search, Keyboard and Preview screens, which used together form an
address-entry wizard.
This section provides a case study to help guide you through setting your destination.
Note: In some countries, you can search for your destination by postcode or zip code. If you are in the United Kingdom, and you know
the postcode of your destination, you can search for it from the Destination Search screen by tapping Postcode, then entering a
postcode of up to eight characters.
Quick Steps
1. Open the Destination Search screen
2. Select the country
3. Search for the city/area
4. Search for the street
5. Search for the house number
6. Tap
.
Case Study: How do I search for an address?
This case study will show you how to enter an address and how to navigate to it.
The address we will be using in this example is:
Note: The below address is fictitious and used as an example only.
1 Navman Street
Horley
Surrey
RH6 8LD
United Kingdom
Tip: Before you enter your destination address, ensure that you have set your route preferences. For more information, see “Route
Options” on page 69.
1. Open the Destination Search screen
The Destination Search screen will display.
Note: If this is the first time you are setting your destination and you have maps from more than one country installed, then the
Select a map screen will display instead of the Destination Search screen. Go directly to step 2b.
The next time you perform this procedure, the Destination Search screen will open as expected.
18
Page 19

S-Series
2. Select the country
Note: If you only have the maps of one country installed and selected, that country is selected for your destination by default and cannot
be changed. Go to step 3.
a) From the Destination Search screen, tap .
The Select a map screen will display.
b) Select United Kingdom from the list.
The Destination Search screen will display.
3. Search for the City/Area
a) From the Destination Search screen, tap City/Area.
The Keyboard screen will display.
b) Use the Keyboard screen to search for Horley as the city or area of your destination, then tap the search
result.
The Destination Search screen will display.
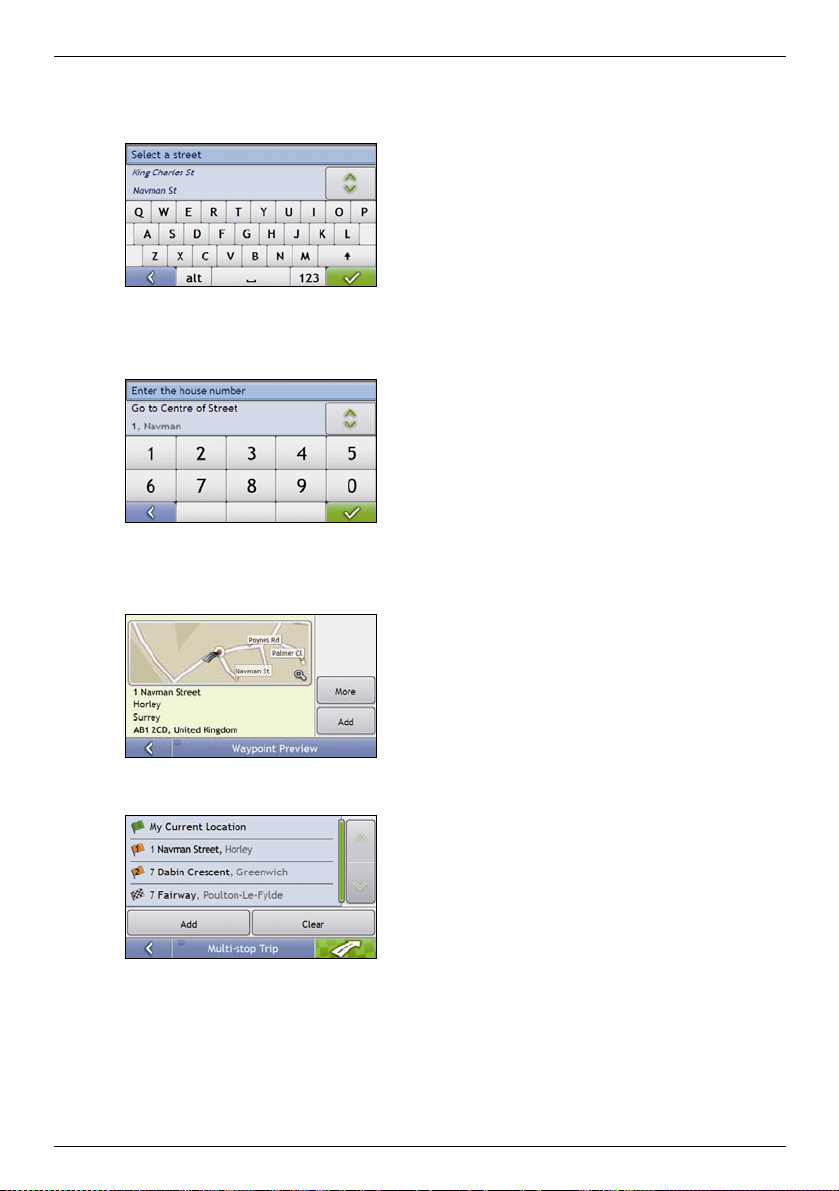
4. Search for the street name and house number
a) From the Destination Search screen, tap Street Address.
The Keyboard screen will display.
19
Page 20

S-Series
Using the Keyboard screen
The Keyboard screen will display when you are required to enter text, such as when searching for a street name.
Search results will be listed in matching order, with the closest matches appearing at the top of the list. A maximum
of 99 results will display.
The Keyboard screen can display with various layouts depending on the information you need to enter, including
alphabet, number, alternate characters and combinations of these.
You can also choose the type of keyboard you prefer from alphabetic, QWERTY and keypad. For more information,
see “Keyboard” on page 87.
As you select each character, the first two results will display. Tap , then scroll to see more search results.
To select a character or a search result, tap the character or search result.
To delete a character, tap .
To display more characters, tap 123, alt or abc, if available.
Using the Destination Search screen
The Destination Search screen is used to select your destination by area, street, postal or ZIP code, Points of
Interest, intersection, city, area, state or country.
As you specify each part of the address, it will display at the top of the screen.
The available options will change to reflect the parts of the address still to be completed.
20
Page 21

S-Series
b) Use the Keyboard screen to enter Navman street as the street name of your destination, then tap the
search result.
Note: There may be multiple matches for a particular street name. Long streets that run through several neighbouring
areas, and common street names will produce search results ordered by their city or area name.
c) Use the Keyboard screen to enter 1 as the house number of your destination, then tap the search result.
The Preview screen will display.
Note: If house numbers are available, but not the one that you require, you may have to choose the same street in a
neighbouring area. Press and select another search result. If house numbers are not available for your selected
section of the street the Preview screen will display.
d) Complete one of the following:
If you want to ... Then ...
navigate to your selected destination
view the position on the map screen
view more information about your
destination
add the destination to a multi-stop trip tap Add.
save the destination as My Home
save the destination as a favourite
tap
Your route is calculated; the 3D Map screen will display.
tap the map to display the position on the 2D Map screen.
tap More.
The Destination Details screen will display.
The Multi-stop Trip Planner screen will display. The address is listed as a
waypoint on the multi-stop trip. See “How do I create a trip with multiple
stops?” on page 22.
tap Save.
tap Save as My Home.
tap Save.
tap Save as Favourite.
.
The New Favourite screen will display.
The New Favourite screen will display.
21
Page 22

S-Series
How do I create a trip with multiple stops?
You can use the Multi-stop Trip Planner screen to set multiple stops or waypoints for your trip. Your route will be
calculated to go via each of these points in the specified order.
You can save up to 198 multi-stop trips, each with up to 14 waypoints.
Note: Waypoints added, updated or deleted after a multi-stop trip has commenced will not affect the current route.
Quick Steps
1. Start your Multi-stop trip
2. Select the country
3. Search for the city/area
4. Search for the street and house number
5. Add additional waypoints
6. Tap
.
Case Study: How do I navigate to multiple addresses?
This case study will show you how to set a multi-stop trip by entering multiple waypoints.
The address we will be using in this example is:
Note: The below address is fictitious and used as an example only.
1 Navman Street
Horley
Surrey
RH6 8LD
United Kingdom
Tip: Before you enter your destination address, ensure that you have set your route preferences. For more information, see “Route
Options” on page 69.
1. Open your Multi-stop Trip screen
The Multi-stop Trip Planner screen will display.
22
Page 23

S-Series
a) Tap Add.
The Add to Trip Menu will display.
b) Tap Address.
The Destination Search screen will open.
Note: You can also add waypoints using favourites, recent destinations, POI locations and NavPix.
2. Select the country
Note: If you only have the maps of one country installed and selected, that country is selected for your destination by default and cannot
be changed. Go to step 3.
a) From the Destination Search screen, tap .
The Select a map screen will display.
b) Select United Kingdom from the list.
The Destination Search screen will display.
3. Search for the City/Area
a) From the Destination Search screen, tap City/Area.
The Keyboard screen will display.
b) Use the Keyboard screen to search for Horley as the city or area of your destination, then tap the search
result.
The Destination Search screen will display.
23
Page 24
4. Search for the street name and house number
a) From the Destination Search screen, tap Street Address.
The Keyboard screen will display.
b) Use the Keyboard screen to enter Navman Street as the street name of your destination, then tap the
search result.
Note: There may be multiple matches for a particular street name. Long streets that run through several neighbouring
areas, and common street names will produce search results ordered by their city or area name.
c) Use the Keyboard screen to enter 168 as the house number of your destination.
The Preview screen will display.
Note: If house numbers are available, but not that you require, you may have to choose the same street in a neighbouring
area. If house numbers are not available for your selected section of the street the Destination Preview screen will display.
S-Series
d) Tap Add.
The waypoint is automatically saved and the Multi-stop-Trip screen will display.
24
Page 25
S-Series
e) Complete one or more of the following:
If you want to ... Then ...
add another waypoint
Note: Waypoints added after a multi-stop
trip has commenced will not be included in
the current route.
navigate to your selected destination
change the order of your waypoints
delete all waypoints tap Clear.
delete one waypoint
save the multi-stop trip as a favourite
tap Add.
The Add To Trip Menu will display.
return to step 1a.
tap .
The Preview screen will display.
tap .
The 3D Map screen will display the calculated route.
tap a destination point to move.
The Preview screen will display.
tap Up or Down.
The Multi-stop Trip Planner screen will redisplay.
tap a destination point to delete.
The Preview screen will display.
tap Delete.
The Multi-stop Trip Planner screen will redisplay.
tap Save.
The New Favourite screen will display.
tap Save as Favourite.
The Favourite will be saved.
25
Page 26

How do I skip a waypoint during a multi-stop trip?
To skip a waypoint during a multi-stop trip, complete the following:
1. Tap the map.
The Map Menu will display.
2. Tap Route, then Skip Waypoint.
The next waypoint will be skipped and the route recalculated to the following waypoint.
S-Series
26
Page 27

S-Series
How do I search for a Point of Interest (POI)?
A POI is a named site, feature, landmark or public venue which can be displayed as an icon on the map. POIs are
grouped by type, such as petrol stations, parks, beaches and museums.
Select a POI using the Destination Search, Keyboard and Preview screens, which used together form a POI-entry
wizard.
Tip: You can also quickly search for certain POIs based upon your current location via the Main Menu screen.
This section provides a case study to help guide you through finding or setting your POI as a destination.
Quick Steps
1. Open the Destination Search screen
2. Select a country
3. Search for the City/Area
4. Search for a POI
5. Tap
This case study will show you how to enter an address and navigate to it.
The address used in this example is:
Note: The below address is fictitious and used as an example only.
Waterloo Railway Station
Road A301
Waterloo
London
SE1 8UD
United Kingdom
1. Open the Destination Search screen
.
Case Study: How do I search for a Point of Interest?
The Destination Search screen will display.
Note: If this is the first time you are setting your destination and you have maps from more than one country installed, then the
Select a map screen will display instead of the Destination Search screen. Go directly to step 2b.
The next time you perform this procedure, the Destination Search screen will open as expected.
27
Page 28

S-Series
2. Select the country
Note: If you only have the maps of one country installed and selected, that country is selected for your destination by default and cannot
be changed. Go to step 3.
a) From the Destination Search screen, tap .
The Select a map screen will display.
b) Select United Kingdom from the list.
The Destination Search screen will display.
3. Search for the city/area
a) From the Destination Search screen, tap City/Area.
The Keyboard screen will display.
b) Use the Keyboard screen to search for London as the city or area of your destination, then tap the search
result.
The Select POI Category screen will display.
Tip: The list of categories is divided into Enabled Categories which are set to display an icon on the map screens, and Other POI
Categories which will not display an icon.
28
Page 29

S-Series
4. Search for a POI
a) Either tap Search by name to search in all POI categories, or select a category from the list.
The Keyboard screen will display.
b) Use the Keyboard screen to search for Waterloo Railway Station as your destination, then tap the
search result.
The Preview screen will display.
c) Complete one of the following:
If you want to ... Then ...
navigate to your selected destination
view your position on the map screen
make a phone call to the POI tap Call.
view more information about your
destination
add the destination to a multi stop trip tap Add.
save the destination as My Home
save the destination as a favourite
tap
Your route is calculated and displayed on the 3D Map screen.
tap the map to display the position on the 2D Map screen..
Note: This feature is not available on all models.
tap More.
The Destination Details screen will display.
The Multi-stop Trip Planner screen will display. The address is listed as a
waypoint on the multi-stop trip. See “How do I create a trip with multiple
stops?” on page 22.
tap Save.
tap Save as My Home.
tap Save.
tap Save as Favourite.
.
The New Favourite screen will display.
The New Favourite screen will display.
29
Page 30

S-Series
How do I save Favourites and My Home?
You can save up to 200 destinations as favourites, one of which can be saved as My Home.
You can save a favourite from the Preview screen after searching for an address, or from the Map Menu on the 3D or
2D Map screens. For more information, see "How do I use the Map Menu?" on page 45.
Can I save a NavPix to a Favourite?
You can save a NavPix to any of your existing favourites. For more information, see "How do I save a NavPix to a
Favourite?" on page 56.
How do I save a Favourite or My Home?
1. Search for an address until the Preview screen is displayed.
2. Tap Save.
The New Favourite screen will display.
3. To change the name of the favourite, tap
.
The Keyboard screen will display.
4. After you have entered a name for the favourite, tap
The New Favourite screen will display.
5. Complete one of the following:
If you want to ... Then . ..
save as a Favourite tap Save as Favourite.
save as My Home tap Save as My Home.
The favourite is saved. The Preview screen will display.
The favourite is saved as My Home. The Preview screen will display.
.
30
Page 31

S-Series
How do I navigate to a Favourite?
1. Tap the Favourite destination you want to travel to.
The Preview screen will display.
2. Tap
Your Navman will calculate the route from your current location. The 3D Map screen will display.
.
How do I navigate to My Home?
If you have not set an address as My Home, the first time you try to navigate to My Home you will be prompted to
search for an address using the address-entry wizard.
Option 1 - Via the Main Menu
Your Navman will calculate the route from your current location. The 3D Map screen will display.
Option 2 - Via the Favourite Destinations screen
1. From the Favourite Destinations screen, select My Home.
The Preview screen will display.
2. Tap
Your Navman will calculate the route from your current location. The 3D Map screen will display.
.
31
Page 32

How do I edit the name of a Favourite?
1. From the Favourite Destinations screen, select a favourite to edit.
The Favourite Preview screen will display.
2. Tap Edit.
The Edit Name screen will display.
S-Series
3. To edit the name of the favourite, tap
4. After you have edited the favourite name, tap
The Edit Name screen will display.
5. Complete one of the following:
If you want to ... Then ...
rename the Favourite tap Save.
save as My Home tap Save as My Home.
The favourite is saved. The Favourite Preview screen will display.
The favourite is saved as My Home. The My Home Preview screen will display.
.
.
32
Page 33

S-Series
How do I delete a Favourite?
1. From the Favourite Destinations screen, select a favourite to delete.
The Preview screen will display.
2. Tap Delete.
The favourite is deleted. The Favourite Destinations screen will display.
33
Page 34
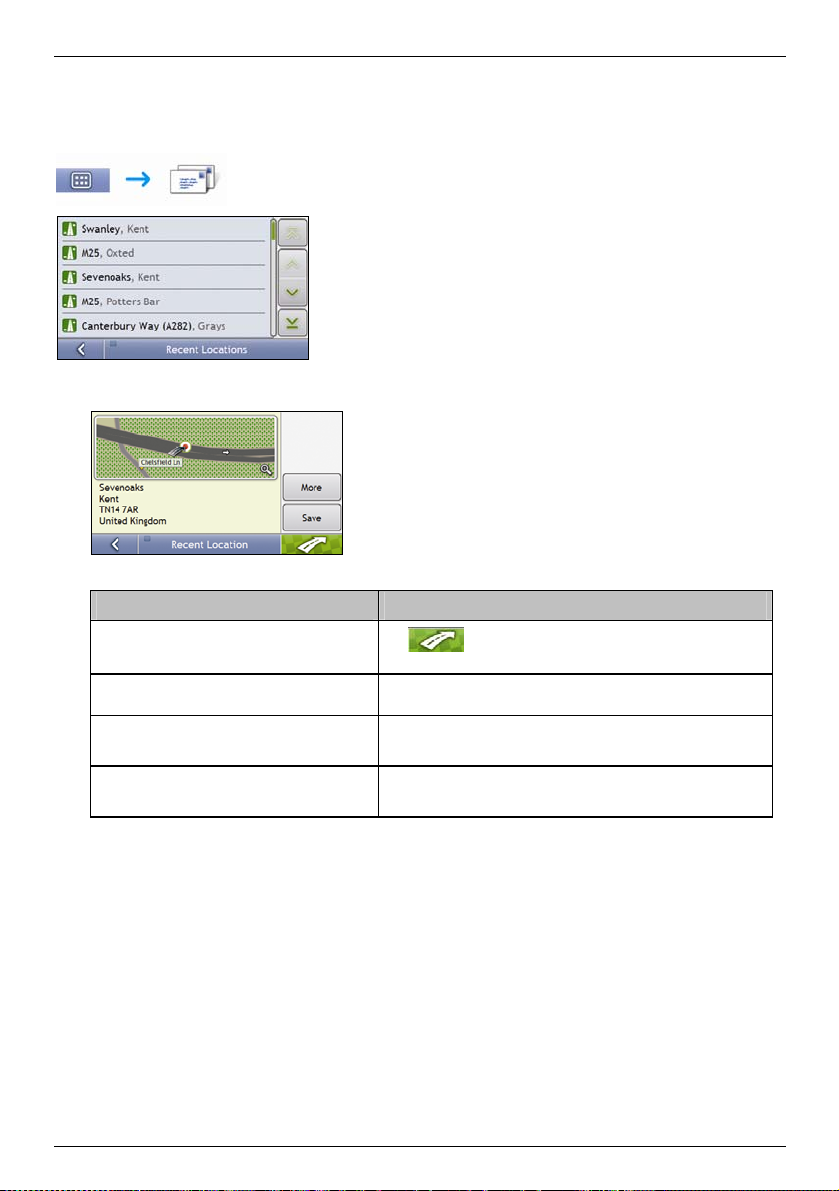
How do I navigate to a recent location?
To make navigating to an address easier, your Navman will automatically save all your start locations and
destinations in a list of recent locations.
S-Series
1. Tap a recent location.
The Preview screen will display.
2. Complete one of the following:
If you want to ... Then ...
calculate the route and open the 3D Map screen
view the full address details of the recent location tap More.
save the recent location as My Home
save the recent location as a favourite
Tap
The 3D Map screen will display.
The Recent Destination Details screen will display.
tap Save.
tap Save as My Home.
tap Save.
tap Save as Favourite.
.
The New Favourite screen will display.
The New Favourite screen will display.
34
Page 35

S-Series
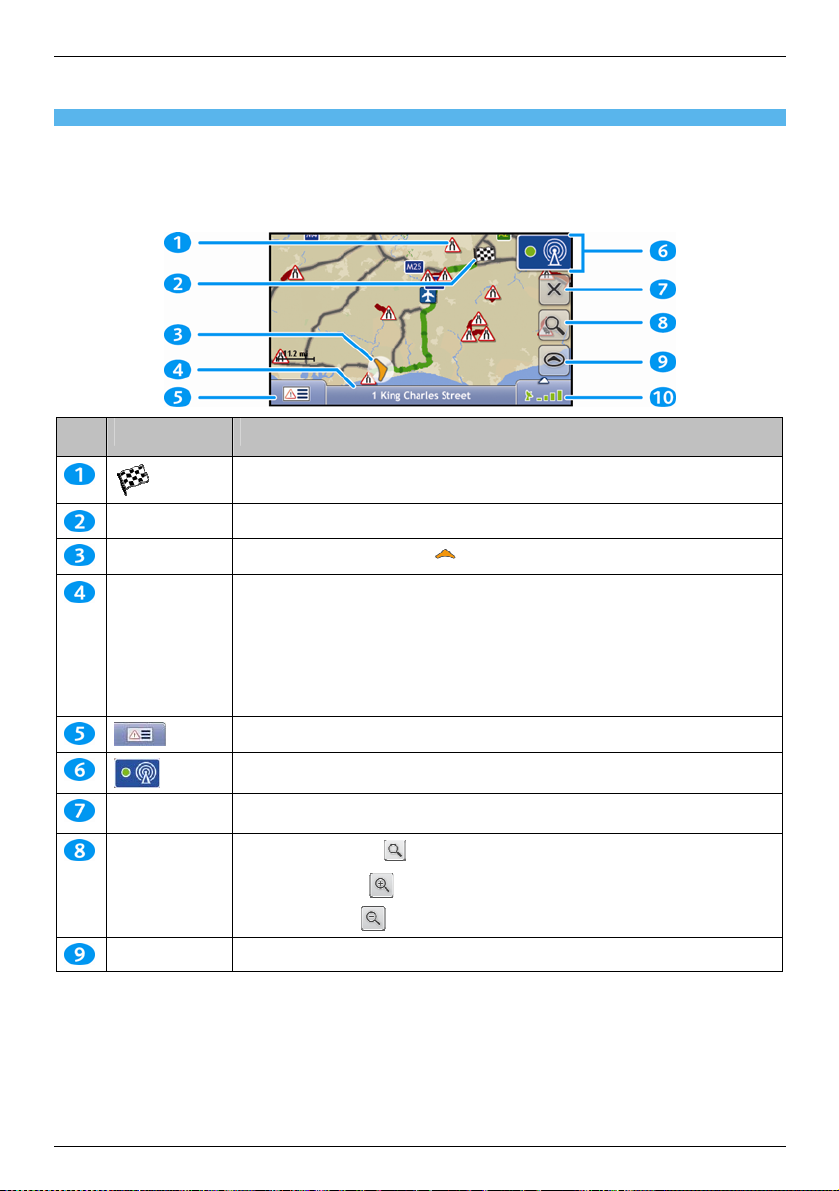
How do I view my route?
When a route has been calculated, the 3D Map screen will display. You will be directed to your destination by spoken
and visual instructions.
The Map button cycles through the 3D Map, 2D Map, Traffic Overview, Route Overview and Turn-by-Turn™ screens.
3D Map screen
The 3D Map screen displays your current position and follows your direction of travel.
Tap and drag the screen, to move across the map.
Tap the map to view the Map Menu (see "How do I use the Map Menu?" on page 45).
Note: Depending on the country you are travelling in, the colour of the direction and distance buttons may differ from the above example.
Item Description
Next instruction The direction and name of the street to turn in to.
Direction and
distance of next turn
Route Your current route is highlighted.
Current position
Speed indicator Displays when you exceed your set speed limit. For more information, see “Driver Alerts 3/4” on
Status bar Displays one of the following:
Main Menu
Distance and Time
Information
Cancel route Cancels your current route.
The direction and distance to your next turn.
Note: To repeat the spoken prompt of your next turn, tap the turn arrow.
Your current position is marked with .
page 71.
The name of the street you are located on
Speed warnings
Active POIs.
Tap to display the Main Menu screen.
Note: The Status Bar is replaced by current Traffic events, when Traffic is enabled. For more
information, see “Traffic” on page 58.
The Main Menu button allows you to enter an address for your destination, customize preferences,
receive updated traffic information and make and receive phone calls.
Tap to expand and see the following options:
Time
km/h or mph (Speed)
TTG (Time to Go)
DTG (Distance to Go)
ETA (Estimated Time of Arrival).
Tap to cycle through the options.
35
Page 36

Item Description
Zoom
To view zoom options, tap
S-Series
.
To zoom out, tap
.
To zoom in, tap .
Map The Map button allows you to cycle through different map screens.
Mute/unmute volume,
TMC, Bluetooth™,
phone, battery, GPS
and compass
information.
Tap to expand and see the following options:
Mute/unmute volume.
TMC traffic status indicator. For more information, see “How does my Navman
receive traffic information?” on page 76.
Bluetooth and phone indicator.
The icon is grey when Bluetooth is on but a phone has not been paired.
Battery charge indicator.
GPS status indicator.
The icon displays green when a GPS fi is established and red when a GPS fix is
unavailable. To indicate the reception strength of a GPS fix between one and
four green vertical bars are displayed.
Compass indicator.
36
Page 37

S-Series
2D Map screen
The 2D Map screen shows your current position (if a GPS fix is active) and surrounding street names. If a route has
been calculated, the route and turns are highlighted. The 2D Map screen follows your direction of travel unless the
Map Display preference is set to North (see “Map Display” page 74).
Tap and drag the screen, to move across the map.
Tap the map, to view the Map Menu (see "How do I use the Map Menu?" on page 58).
Note: Depending on the country you are travelling in, the colour of the direction and distance buttons may differ from the above example.
Item Description
Next instruction The direction and name of the street to turn in to.
Direction and
distance of next turn
Route Your current route is highlighted.
Status bar Displays one of the following:
Main Menu The Main Menu button allows you to enter an address for your destination, customize preferences,
Distance and Time
Information
Current position
Cancel route
Zoom
The direction and distance of your next turn.
Note: To repeat the spoken prompt of your next turn, tap the turn arrow.
The name of the street you are located on
Speed warnings
Active POIs.
Tap to display the Main Menu screen.
Note: The Status Bar is replaced by current Traffic events, when Traffic is enabled. For more
information, see “Traffic” on page 58.
receive updated traffic information and make and receive phone calls.
Tap to expand and see the following options:
Time
km/h or mph (Speed)
TTG (Time to Go)
DTG (Distance to Go)
ETA (Estimated Time of Arrival).
Tap to cycle through the options.
Your current position is marked with .
Cancels your current route.
To view zoom options, tap .
To zoom out, tap .
To zoom in, tap .
37
Page 38

Item Description
Map The Map button allows you to cycle through different map screens.
Mute/unmute volume,
TMC, Bluetooth™,
phone, battery, GPS
and compass
information.
Tap to expand and see the following options:
Mute/unmute volume.
TMC traffic status indicator. For more information, see “How does my Navman
receive traffic information?” on page 76.
Bluetooth and phone indicator.
The icon is grey when Bluetooth is on but a phone has not been paired.
Battery charge indicator.
GPS status indicator.
The icon displays green when a GPS fi is established and red when a GPS fix is
unavailable. To indicate the reception strength of a GPS fix between one and
four green vertical bars are displayed.
Compass indicator.
S-Series
38
Page 39
S-Series
Traffic Overview screen
Depending on your Navman model, traffic information may not be available or may require a traffic cradle.
The Traffic Overview screen displays a general overview of the traffic situation on your route, including all events in
the immediate vicinity.
Tap and drag the screen, to move across the map.
Tap the map, to view the Map Menu (see “How do I use Map Menu?” on page 45)
Item Description
Event icon Displays icon to indicate type of event.
Current position
Status bar Displays one of the following:
Cancel route Cancels your current route.
Zoom
Map The Map button allows you to cycle through different map screens.
Your final destination.
Your current position is marked with
The name of the street you are located on
Speed warnings
Active POIs.
Tap to display the Main Menu screen.
Note: The Status Bar is replaced by current Traffic events, when Traffic is enabled. For more
information, see “Traffic” on page 58.
Tap to display the Event List screen.
Tap to display the Traffic System Status screen.
To view zoom options, tap .
To zoom out, tap .
To zoom in, tap .
.
39
Page 40

Item Description
Mute/unmute
volume, TMC,
Bluetooth™,
phone, battery,
GPS and compass
information.
Tap to expand and see the following options:
Mute/unmute volume.
TMC traffic status indicator. For more information, see “How does my Navman
receive traffic information?” on page 76.
Bluetooth and phone indicator.
The icon is grey when Bluetooth is on but a phone has not been paired.
Battery charge indicator.
GPS status indicator.
The icon displays green when a GPS fi is established and red when a GPS fix is
unavailable. To indicate the reception strength of a GPS fix between one and
four green vertical bars are displayed.
Compass indicator.
S-Series
40
Page 41

S-Series
Route Overview screen
The Route Overview screen gives you a bird’s eye view of your trip.
Note: A route must first have been calculated for this screen to be available.
Tap and drag the screen, to move across the map.
Tap the map to view the Map Menu (see "How do I use the Map Menu?" on page 45).
Note: Depending on the country you are travelling in, the colour of the direction and distance buttons may differ from the above example.
Item Description
Next instruction The direction and name of the street to turn in to.
Direction and
distance to next
turn
Route Your current route is highlighted.
Scale bar Displays map scale.
Main Menu The Main Menu button allows you to enter an address for your destination, customize preferences,
Status bar
Current position
Distance and Time
Information
Note: To repeat the spoken prompt of your next turn, tap the turn arrow.
Your final destination.
The direction and distance of your next turn.
Note: To repeat the spoken prompt of your next turn, tap the turn arrow.
receive updated traffic information and make and receive phone calls.
Displays one of the following:
The name of the street you are located on
Speed warnings
Active POIs.
Tap to display the Main Menu screen.
Note: The Status Bar is replaced by current Traffic events, when Traffic is enabled. For more
information, see “Traffic” on page 58.
Your current position is marked with ; if visible.
Tap to expand and see the following options:
Time
km/h or mph (Speed)
TTG (Time to Go)
DTG (Distance to Go)
ETA (Estimated Time of Arrival).
Tap to cycle through the options.
41
Page 42

Item Description
Cancel route Cancels your current route.
Zoom
To view zoom options, tap .
To zoom out, tap .
To zoom in, tap .
Map The Map button allows you to cycle through different map screens.
Mute/unmute
volume, TMC,
Bluetooth™, phone,
battery, GPS and
compass
information.
Tap
to expand and see the following options:
Mute/unmute volume.
TMC traffic status indicator. For more information, see “How does my Navman
receive traffic information?” on page 76.
Bluetooth and phone indicator.
The icon is grey when Bluetooth is on but a phone has not been paired.
Battery charge indicator.
GPS status indicator.
The icon displays green when a GPS fi is established and red when a GPS fix is
unavailable. To indicate the reception strength of a GPS fix between one and
four green vertical bars are displayed.
Compass indicator.
S-Series
42
Page 43

S-Series
Turn-by-Turn screen
The Turn-by-Turn screen displays the next four turns of your route, the turn direction, the street name and the
distance to the turn. You can view all the turns in the list, using the up and down arrows. A route must first have been
calculated for this screen to be available.
Note: A route must first have been calculated for this screen to be available.
Note: Depending on the country you are travelling in, the colour of the direction and distance buttons may differ from the above example.
Item Description
Direction of turn The direction of the turn. Your next turn is highlighted.
Distance to turn The distance to your next turn. Your next turn is highlighted.
Instruction The direction and name of the street to turn in to. Your next turn is highlighted.
Next turn Your next turn is at the top of the list.
Upcoming turns The direction and distance of upcoming turns.
Main Menu The Main Menu button allows you to enter an address for your destination, customize
Status bar Displays one of the following:
Distance and Time
Information
Scroll buttons Allow you to view each turn by moving up and down through the list.
Map The Map button allows you to cycle through different map screens.
Note: To Repeat the spoken prompt of your next turn, tap the turn arrow.
preferences, receive updated traffic information and make and receive phone calls.
The name of the street you are located on
Speed warnings
Active POIs.
Tap to display the Main Menu screen.
Note: The Status Bar is replaced by current Traffic events, when Traffic is enabled. For more
information, see “Traffic” on page 58.
Tap to expand and see the following options:
Time
km/h or mph (Speed)
TTG (Time to Go)
DTG (Distance to Go)
ETA (Estimated Time of Arrival).
Tap to cycle through the options.
43
Page 44
Item Description
Mute/unmute
volume, TMC,
Bluetooth™, phone,
battery, GPS and
compass
information.
Tap to expand and see the following options:
Mute/unmute volume.
TMC traffic status indicator. For more information, see “How does my Navman
receive traffic information?” on page 76.
Bluetooth and phone indicator.
The icon is grey when Bluetooth is on but a phone has not been paired.
Battery charge indicator.
GPS status indicator.
The icon displays green when a GPS fi is established and red when a GPS fix is
unavailable. To indicate the reception strength of a GPS fix between one and
four green vertical bars are displayed.
Compass indicator.
S-Series
44
Page 45

S-Series
How do I use the Map Menu?
The Map Menu allows you to access navigational functions from the 3D Map and 2D Map screens.
Displaying the Map Menu
1. Tap to display the 3D Map or 2D Map screen.
2. Tap and drag to move around the map to your selected location.
3. Tap the map.
The Map Menu will display.
Map Menu options
The following options are available via the Map Menu:
Menu Option Description
Navigate To Calculates a route from your current location, if your Navman has a GPS fix.
Show Details
Nearest POI
Add to Trip Adds the location to your multi-stop trip.
Route
Add Avoid Area Allows you to add an Avoid Area by tapping and dragging the map.
Un-Avoid Area Deletes the selected Avoid Area.
Displays the Preview screen from where you can:
View details of the location
Add the location to your multi-stop trip
Save the location as a favourite
Navigate to the location.
Note: If the cross-hairs are positioned over a traffic event, Show Details will instead display the Traffic
Event Details screen. For more information, see "How do I view the Event Details screen?" on page 64.
Displays the Select POI Category screen. Select the Category, then Search for a POI to navigate to. For
further information, see "How do I search for a Point of Interest?" on page 27.
Displays the Route sub-menu from where you can:
Set as Start. Sets the location as your departure point.
Demonstrate. Starts the route demonstration, demonstrating navigation from your current position
or departure point.
Stop Demonstration. Stops the route demonstration.
Skip Waypoint. Skips the next stop on your multi-stop trip.
Show Summary. Displays a summary of your route, including your departure and destination
addresses, total distance and total estimated time to your destination.
Detour. Detours your route to avoid the next 1, 2, 5, 10 or 20 kilometres or the next 1, 2, 5, 10 or
20 miles.
45
Page 46

S-Series
How do I avoid an area?
Your Navman can calculate a route that avoids a specified area on the map. Avoid Areas are displayed as shaded
areas.
CAUTION If no alternative route around an Avoid Area exists, the route calculation will fail.
CAUTION If your destination is in an Avoid Area, you will be routed into that Avoid Area.
How do I add an Avoid Area?
1. Tap the 3D Map or 2D Map screen to display the Map Menu.
2. Select Add Avoid Area.
3. Tap and drag to set the Avoid Area to the correct size and position.
The Avoid Area is added.
How do I delete an Avoid Area?
1. Find the Avoid Area that you want to delete.
2. Tap the Avoid Area to display the Map Menu.
3. Select Un-Avoid Area.
The Avoid Area is deleted.
How do I delete all Avoid Areas?
The Saved Information screen will display.
1. Tap Delete Avoid Areas.
2. When the Caution dialog-box opens, tap Yes to confirm.
All Avoid Areas are permanently deleted.
46
Page 47

S-Series
How do I preview a route?
Route demonstration allows you to:
Preview a route.
Plan and view a route without a GPS fix, such as when you are inside a building.
The following steps will show you how to preview one route.
1. Select a departure point
If you have a GPS fix, you do not need to select a departure point unless you want the demonstrated route to start
elsewhere.
a) Tap the 3D Map or 2D Map screen at your departure point.
The Map Menu will display.
b) Tap Route.
The Route submenu will display.
c) Tap Set As Start.
The Map Menu will close, and the selected point is set as your departure point.
2. Select a destination point
Set a destination either by using the address entry wizard or by using the Map Menu:
a) Locate your destination.
b) Tap your destination to display the Map Menu.
c) Tap Navigate To.
The Map Menu will close and the map screen will display the calculated route.
3. Demonstrate the route
Once the route has been determined, you can demonstrate the route by completing the following:
a) Tap the map screen to display the Map Menu.
b) Tap Route.
The Route submenu will display.
c) Tap Demonstrate.
The 3D Map screen will display the calculated route in Route Demonstration mode.
47
Page 48

How do I view my route statistics?
The Navman provides information on your:
distance travelled
average speed
maximum speed
time taken for trip
stationary time.
Trip information is presented in two different ways. These are:
information for the current trip
information for all trips to date, or since the tripmeter was last reset.
How do I view statistics on my current route?
The Tripmeter - Current Route screen is used to view statistical information for your current trip.
The Tripmeter - Current Route screen will display.
Complete one of the following:
If you want to ... Then ...
view statistics for your trips to date
reset the tripmeter
tap to display the Tripmeter - Global screen.
tap Reset.
tap Yes to reset.
The Tripmeter - Current Route screen will display.
S-Series
48
Page 49

S-Series
How do I view statistics of my trips to date?
The Tripmeter - Global screen is used to view statistical information for all of your trips to date, or since the trip meter
was last reset.
The Tripmeter - Global screen will display.
Complete one of the following:
If you want to ... Then ...
view your trip logs
tap to display the Trip Recorder screen.
view statistics for your current
route
reset the tripmeter
tap to display the Tripmeter - Current Route screen.
tap Reset.
A Warning dialog box will display.
tap Yes to reset.
The Tripmeter - Global screen will display.
49
Page 50

S-Series
How do I view my trip logs?
Note: Trip Recorder is only available on some models.
The Trip Recorder screen is used to record trip logs of your current trip. The Trip Recorder only records trip logs if
you have chosen to record the logs.
The Trip Recorder screen will display.
Complete one of the following:
If you want to ... Then ...
View statistics for your trips to date
stop recording your trip logs tap Stop Logging.
tap to display the Tripmeter – Global screen.
delete your trip logs
tap Stop Logging.
tap Delete Logs to remove the logs.
50
Page 51

S-Series
How do I manage my NavPix?
Pictures with a GPS fix are called NavPix and can be used to navigate to the photographed location.
Album management
The albums contain all your NavPix and display them as thumbnails. You can store your NavPix in customizable
albums on the Navman internal memory or on your memory card.
Element Description
Browse
Copy
Delete
Album title The title of the album.
NavPix thumbnail
Scroll buttons
Displays the Select an Album screen, from where you can select another album.
Copies selected NavPix from the displayed album to the memory card, or from the memory card to
the NavPix album.
Deletes selected NavPix from the displa yed album.
Displays the previous screen.
A NavPix thumbnail in the displayed album.
To select a NavPix, tap the thumbnail.
To select multiple NavPix, tap and hold the first thumbnail, then drag across the other
When a NavPix is selected it displays with a green border.
Note: If the NavPix has been given a title it will display beneath the NavPix. If the NavPix has not
been given a title, the file name of the NavPix will display.
Use the scroll buttons to scroll through the NavP ix.
Displays if the picture is a NavPix, with embedded GPS coordinates.
The NavPix Details screen will display.
thumbnails.
51
Page 52

S-Series
How do I copy NavPix to my memory card?
NavPix can be copied from the albums on your Navman internal memory to your memory card and vice versa.
Note: The first time a NavPix is copied to your memory card, a folder will be created on the memory card called NavPix.
1. From the Album screen, tap Browse.
The Select an Album screen will display.
2. Select the Album you want to view.
3. Tap and hold, then drag across the screen to select the NavPix you want to copy.
As each NavPix is selected, a green border will appear around it.
To cancel a selection, tap and drag over the picture(s) again.
4. When you have finished the selection, tap Copy.
5. A warning screen will display, asking you to confirm or cancel the procedure.
If confirmed, the NavPix will be copied.
How do I delete NavPix from an Album?
NavPix can be deleted from an Album on your Navman internal memory or your memory card.
Note: When a NavPix has been saved as a Favourite destination, you will not delete the Favourite if you subsequently remove
the NavPix.
1. From the Album screen, tap Browse.
The Select an Album screen will display.
2. Select the Album you want to view.
3. Tap and hold, then drag across the screen to select the NavPix you want to delete.
As each NavPix is selected, a green border will appear around it.
To cancel a selection, tap and drag across the NavPix again.
4. When you have finished the selection, tap Delete.
5. A warning screen will display, asking you to confirm or cancel the procedure.
If confirmed, the NavPix will be deleted.
Tip: You can also delete a single NavPix via the Photo Details screen.
52
Page 53

S-Series
NavPix management
The NavPix Details screen displays information about your NavPix. Tap a NavPix to display the Photo Details
screen.
Element Description
Thumbnail
NavPix Title The title of the NavPix; tap Edit to add a title or edit the existing title.
Show on Map
Time / Date and Location
Coordinates
Assign
Edit
Delete
A thumbnail of the NavPix.
Tap to display the NavPix in full-screen.
When selected, displays an icon on the map at the location the NavPix was taken.
Note: Show on map is available only if this is a NavPix with embedded GPS coordinates.
Tap to return to your album.
Displays the time and date the NavPix was taken. Displays the GPS coordinates if
available.
Tap the scroll buttons to scroll through your album.
Allows you to save a NavPix to an existing favourite, if GPS coordinates are associated with
the NavPix.
Allows you to edit the name of the NavPix using the Keyboard screen.
Deletes a NavPix from the album on your Navman or memory card.
Your route will be calculated and displayed on the 3D Map screen.
Note: This button is only available if this is a NavPix with embedded GPS coordinates.
53
Page 54
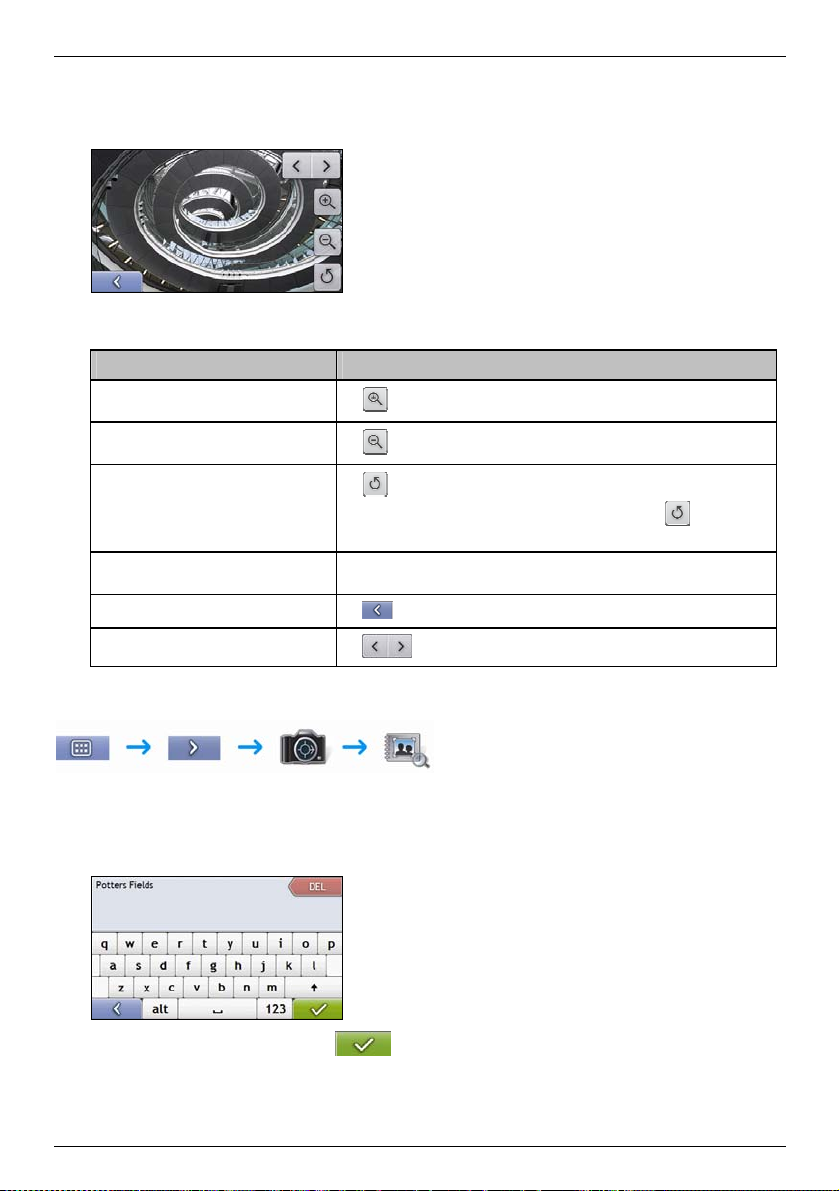
How do I view a NavPix in full-screen?
1. From the NavPix Details screen, tap the thumbnail of the NavPix.
The NavPix will appear in full-screen.
Note: The icons disappear after a few seconds; tap the screen to have them reappear.
2. Complete the following:
If you want to ... Then ...
zoom into the NavPix
zoom out of the NavPix
rotate the NavPix
view parts of the NavPix not displayed onscreen
return to the NavPix Details screen
scroll through your NavPix
tap .
tap .
tap .
The NavPix will rotate 90 degrees anticlockwise each time
NavPix is saved at the new angle.
tap and hold the NavPix, then drag across the screen.
tap .
tap .
How do I add or edit a NavPix description?
S-Series
is tapped; the
1. From the NavPix Details screen, tap Edit.
The Keyboard screen will display.
2. Tap each character as required.
The description will appear at the top of the screen.
3. When the description is completed, tap
.
The NavPix Details screen will display, with a new description under the thumbnail.
54
Page 55

S-Series
How do I navigate to a NavPix?
Your Navman contains preinstalled NavPix that you can navigate to. If you have not yet navigated to a NavPix,
three of the preinstalled NavPix will display on the Go To NavPix screen. Otherwise, three of your recently used
NavPix are displayed.
Note: To navigate to a NavPix location, either a GPS fix must have been available when the NavPix was taken, or GPS coordinates
have been added using NavDesk.
How do I navigate to a recent NavPix?
1. Tap the NavPix you want to navigate to.
The Preview screen will display.
2. Tap
.
Your Navman will calculate the route from your current location. The 3D Map screen will display.
How do I navigate to a NavPix I have downloaded, or was preinstalled?
1. Tap a NavPix.
The NavPix Details screen will display.
2. Tap
Your Navman will calculate the route from your current location. The 3D Map screen will display.
.
55
Page 56

How do I save a NavPix to a favourite?
Note: When a NavPix is saved to an existing favourite, only the image, and not the GPS coordinates, are associated with
the favourite.
1. From the Album screen, select and tap a NavPix.
The NavPix Details screen will display.
2. From the NavPix Details screen, tap Assign.
The Save Photo screen will display.
3. Complete the following:
If you want to ... Then ...
edit the name of the favourite
save the NavPix as a Favourite (when GPS
coordinates are associated with a picture)
save a picture to an address
tap .
The Keyboard screen will display.
Enter a name for your Favourite, then tap
tap Save as Favourite and select A new favourite from the list.
The NavPix is saved as a new Favourite and the Photo Details screen
will display.
Note: You cannot save a NavPix as a favourite if GPS coordinates are not
available.
tap Save as Favourite and select a favourite from the list.
The NavPix is saved to a favourite and the Photo Details screen will
display.
.
S-Series
56
Page 57
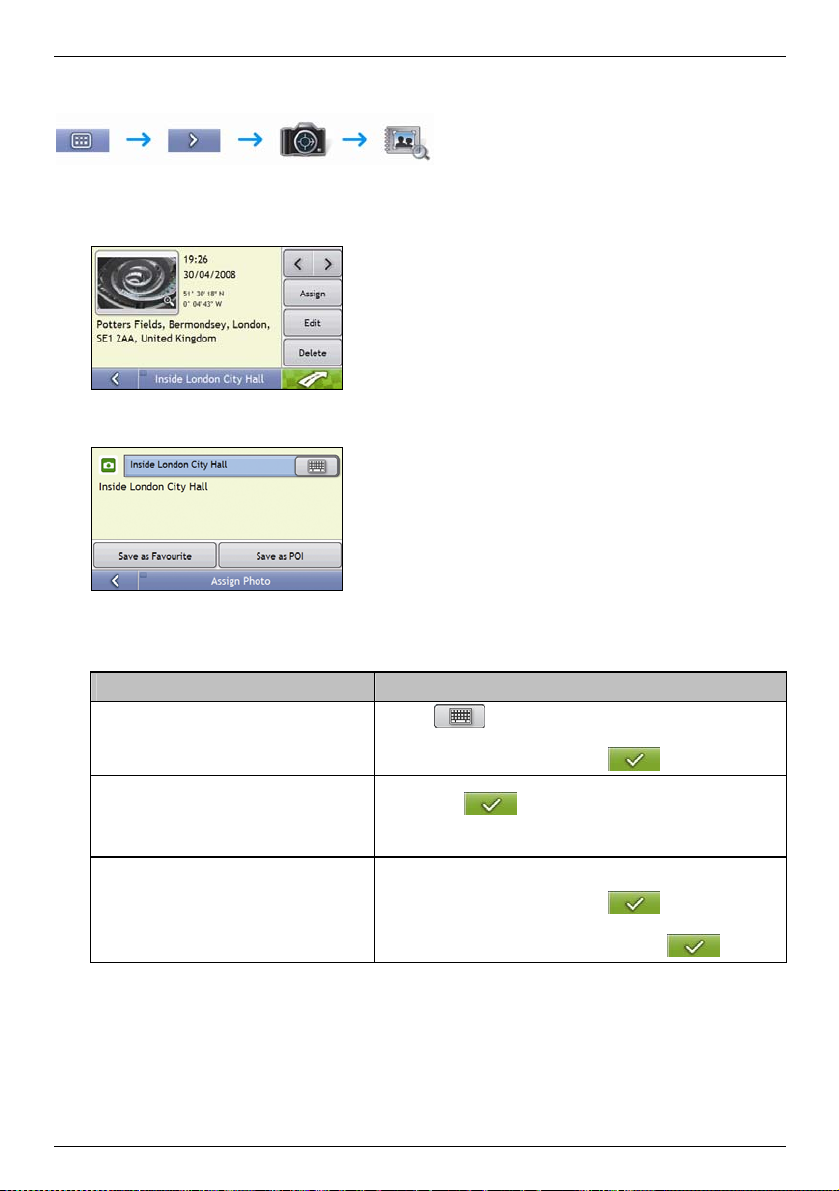
S-Series
How do I save a NavPix to a POI?
Note: Only a NavPix with embedded GPS coordinates can be saved as a POI.
1. From the Album screen, select and tap a NavPix.
The NavPix Details screen will display.
2. From the NavPix Details screen, tap Assign.
The Save Photo screen will display.
3. Tap Save as POI.
The Select POI Categories screen will display.
4. Complete the following:
If you want to ... Then ...
edit the name of the POI
save the NavPix as a POI (when GPS
coordinates are associated with a picture)
create a new custom POI category and save a
NavPix as a POI
tap .
The Keyboard screen will display.
Enter a name for your POI, then tap .
tap Save as POI and select POI Category from the list.,
then tap .
Note: You cannot save a NavPix as a favourite if GPS coordinates are
not available.
tap A new category to create a custom POI category.
The keyboard screen will display.
Enter a name for your POI, then tap .
The Select POI Categories screen will display the new POI category.
select the POI Category from the list, then tap .
57
Page 58

S-Series
How do I make a hands-free call?
Hands-free calling is not available on all models.
If you have a mobile phone with Bluetooth wireless technology, you can use your Navman as a hands-free car kit.
Models with Bluetooth capabilities can exchange information over a distance of about 10 metres (30 feet) without
requiring a physical connection.
Note: Before you can use this feature you must pair your mobile phone with your Navman. Ensure that the Bluetooth wireless feature of
your mobile phone is turned on before you begin pairing.
How can I pair my Navman with a Bluetooth mobile phone?
1. Tap
.
2. Your Navman will search for nearby Bluetooth devices. Ensure your mobile phone has Bluetooth turned on and
is in discoverable mode (refer to your mobile phone user manual for more information).
The Search screen will display a list of nearby Bluetooth devices.
3. Select your mobile phone from the list of local Bluetooth devices.
The Warning screen will display.
4. Tap Yes.
The Waiting screen will display.
If you are prompted for a passcode or device PIN, enter 1234.
5. Tap OK.
The Phone menu screen will display.
Note: When you pair your mobile phone with your Navman, a connection is established between them. The 12 most recently paired
phones will display on the Connect to Phone screen. You can then disconnect or connect your mobile phone by tapping
Connect to Phone screen.
on the
How can I pair my Navman with a Bluetooth headset?
Note: Your Navman can only be paired with a mono headset, not a stereo headset.
1. Tap
2. Your Navman will search for nearby Bluetooth headsets. Ensure your headset is turned on and is in
3. Select your headset from the list of local Bluetooth devices.
4. Tap Yes.
5. Tap OK.
.
discoverable mode (refer to your headset user manual for more information).
The Search screen will display a list of nearby Bluetooth headsets.
Note: If Bluetooth is currently turned off, your Navman will automatically turn Bluetooth on.
The Warning screen will display.
The Waiting screen will display.
If you are prompted for a passcode or device PIN, enter 1234.
The phone menu screen will display.
58
Page 59

S-Series
How can I make a phone call using the Dial screen?
1. Enter the number you want to call.
Note: The number of the last call displays when you next access the Dial screen. The number will be cleared as you start entering the
number.
To delete the last digit entered, tap .
To clear the entire number, tap and hold
Tip: International calls require a country code to be included in the phone number. On your Navman, the country code is
separated from the rest of the number sequence by a +. If you are making an international call, tap and hold 0 until the + sign displays.
2. Tap to place the call.
The Dialling screen will display.
.
3. Complete the fallowing:
If you want to… Then…
enter other numbers such as an
extension number
adjust sound so that the other party
cannot hear you
adjust the volume
make and receive calls via your
Navman
make and receive calls via your
mobile phone
end or cancel the call
tap .
tap to mute.
tap to unmute.
tap to increase the volume.
tap to decrease the volume.
tap .
tap .
tap .
59
Page 60
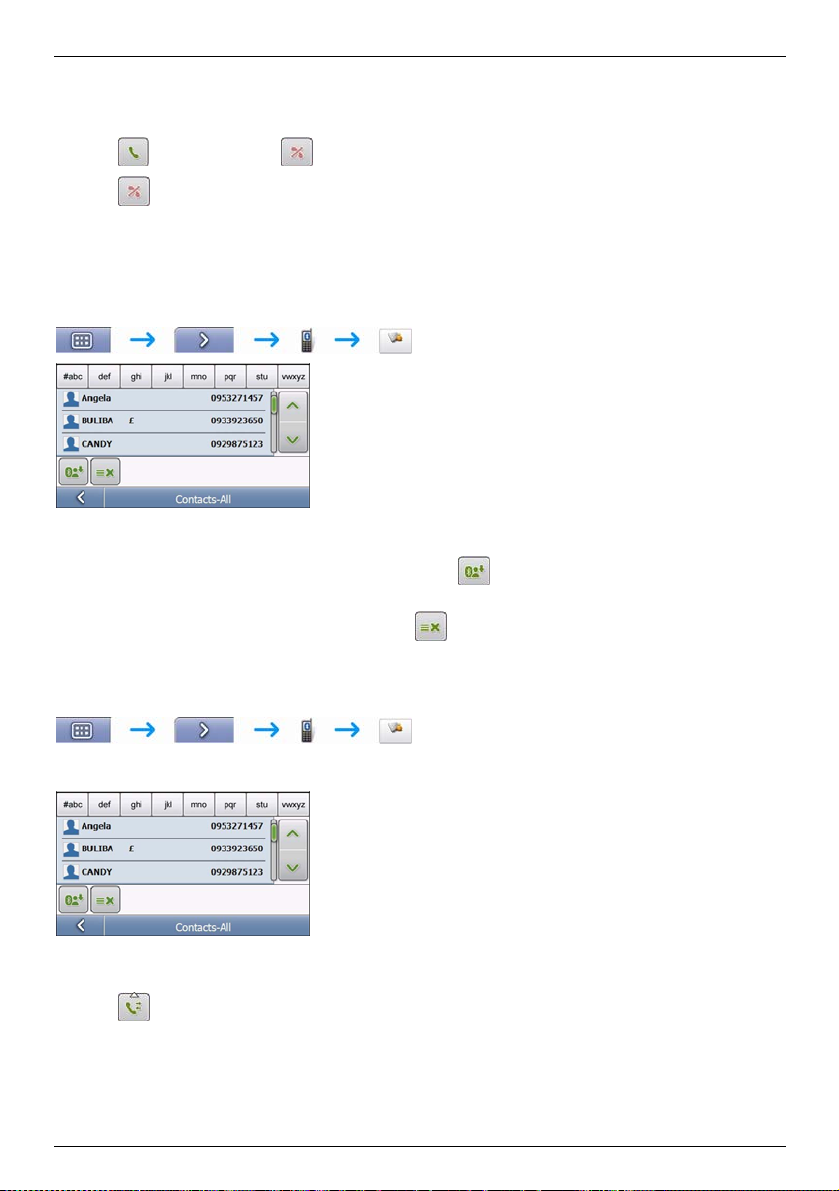
How do I receive a phone call?
When you receive a call, the Incoming call screen will display.
S-Series
Tap
Tap
to answer the call or to reject the call.
to end or cancel the call.
How do I add a contact to my Navman?
Your Navman uses contacts created on your mobile phone. To add a new contact to your Navman, you must first
add it to your mobile phone. Refer to your mobile phone user manual for more information.
Note: If there are no contacts on your Navman, you will be prompted to transfer the contact list from your phone. Your phone may
disconnect, then reconnect to your Navman during the transfer.
To synchronise the contact list with your mobile phone, tap . Your phone may disconnect, then reconnect
to your Navman during the transfer.
To delete a contact from your Navman contacts, tap
.
How can I make a phone call to a contact?
Note: If there are no contacts on your Navman, you will be prompted to transfer the contact list from your phone. Your phone may
disconnect, then reconnect to your Navman during the transfer.
1. Select a contact from the list.
The Details screen will display.
2. Tap
to expand and see calling options.
60
Page 61

S-Series
3. Complete the following:
If you want to… Then…
call the contact at their home
call the contact at their work
call the contact on their mobile
delete contact from your contact list
tap .
tap .
tap .
tap and then tap Yes to confirm.
How do I view my call history?
From the Call log screen you can view a list of Incoming Calls, Outgoing Calls and Missed Calls.
Note: The call history lists the calls made during the time your Navman is connected to a mobile phone.
Icon Description
1. To call a number in your call history, select a number from the list.
Missed calls
Outgoing calls
Incoming calls
2. Tap
Note: Tap to sort through the calls and to view the Incoming Calls, Outgoing Calls and Missed Calls.
to place a call.
Tap
Tap
to end or cancel the call.
to delete the number from your call history.
61
Page 62

S-Series
How do I receive current traffic information?
Traffic information is only available in selected countries.
Your Navman can receive current traffic information for all main roads and motorways, enabling you to avoid
potential delays on your route. Event messages and traffic icons will display as they occur. If an event message
obscures your current location, the map will adjust to display both the message and your location.
How does my Navman receive traffic information?
You can receive current traffic information on your Navman via the Navman Traffic cradle using the Traffic Message
Channel (TMC) service. The TMC service is subscription-free. The traffic cradle may be sold separately.
The Traffic Message Channel (TMC) broadcasts real-time traffic and weather information via the FM Radio Data
System (RDS). FM radio stations transmit TMC data on a cycle of several minutes, with hundreds of events able to
be broadcast to TMC receivers, such as the Navman Traffic module.
Traffic status
Your current traffic status is indicated by the colour of the TMC icon.
To view your current traffic status from the map screens, tap
and then tap .
The following table describes the three traffic status icons:
Traffic Status Description
The TMC status is grey if traffic is currently inactive due to one of the following conditions:
Your Navman or Traffic module is connecting to the TMC service.
Your Navman or Traffic module cannot receive TMC data. This may be due to poor radio coverage in the
local vicinity.
You are in a country that is not supported by the Navman Traffic module.
Tap to display the Traffic Overview screen.
The TMC status is orange if one of the following conditions apply:
You have navigated into a country that is not supported by Navman Traffic, but there are still traffic events
listed on the Event List screen.
You have separated your Navman from the Navman Traffic module, or the Navman Traffic module is not
receiving power but there are still traffic events listed on the Event List screen.
Tap to display the Traffic Overview screen.
The TMC status is green if your Navman or Traffic module is active and receiving traffic events.
Tap to display the Traffic Overview screen.
Your traffic status is displayed in more detail on the Traffic System Status screen.
62
Page 63

S-Series
How will I know when a Traffic Event occurs?
Incoming events are handled according to your Traffic preferences. For more information, see "How do I customize
Traffic preferences?" on page 77.
When travelling through an area in which you can receive traffic status, your Navman will decode these events and
display them on-screen. An icon will display at the event location on the map screens, and an audible warning is
given if an event is on your route. Where the extent of an event is a specific distance, the road will be highlighted and
arrows will indicate the direction affected.
A message will display at the bottom of the screen with the road name, the section of road affected and the type of
event that has occurred. The message remains on screen for 8 seconds and is added to the Event List.
63
Page 64

S-Series
How do I view a list of all events on my route?
Your Navman creates a list of events as they are received, which is displayed on the Event List screen. This screen
can only be viewed if the TMC icon is green or orange.
From the Traffic Overview screen, tap
Item Description
Event description Displays details of the Event, including:
Event icon Displays icon to indicate type of event. See page 121 to view list of icons.
Position indicator
Scroll buttons Allow you to view all events by moving up and down through the list.
Event number Displays the number of events in current list.
Name of road and direction in which Event is taking place.
Location of where Event begins and ends.
> indicates an Event from a location, to a location.
<> indicates an Event between locations.
Type of Event.
Tap to return to the previous screen.
Tap to display the Select event sorting type screen, where you can sort events by distance, road name
or age.
Displays your position in the Event List screen.
.
64
Page 65

S-Series
How do I view traffic details?
There are several ways to view details of an event received by your Navman.
Choose one of the following:
Location Option
From any of the screens used to view your route
From the Traffic Overview screen
From the Map Menu
Tap the Event message when it appears on screen.
The Event Details screen will display.
Tap
The Event List screen will display.
Select and tap the event you want to view.
The Event Details screen will display.
Tap and hold the traffic icon, which displays at the location of the event.
The Map View menu will display.
Tap Show Details.
The Event Details screen will display.
.
Item Description
Event description Displays Event details, including:
Time Event was received, or last updated.
Name of road on which Event is taking place.
Location of where Event begins and ends.
> indicates an Event from a location, to a location.
<> indicates an Event between locations.
Type of Event.
Event icon Displays icon to indicate type of Event.
Detour information Displays details of detour recommendation, if any. For more information, see "How do I know if a
Event number Displays the number of the event currently displayed and the total number of events in the list.
detour is recommended?" on page 65.
Tap to return to the previous screen.
Tap to view next Event in list.
Tap to view previous Event in list.
Tap to initiate a new route to avoid the event.
Only available if a detour or re-route is available.
Note: Un-avoid area is represented by and is displayed when a re-route has been
calculated.
65
Page 66

S-Series
How do I know if a detour is recommended?
When a Traffic or Clearance event occurs on your route, a detour will always be recommended. The detour event
message will display in the status bar on map screens.
Note: Detours are only recommended for Traffic or Clearance Events on a calculated route.
How do I avoid an event on my route?
From the Traffic Overview screen, tap .
1. From the Event List screen, tap the event.
The Event Details screen will display.
2. If a detour has been calculated to avoid an event on your route,
is available; tap to accept the new
route and avoid the event.
The 3D Map screen will display.
How do I cancel a detour around an event on my route?
If you have chosen to avoid an event and a new route has been calculated, you can cancel the detour around the
event and return to your original route.
1. From the Event List screen, tap the Event you want to un-avoid.
The Event Details screen will display.
2. Re-route information displays at the bottom of the screen.
If a re-route has been calculated,
The 3D Map screen will display.
is available; tap to accept the new route.
How do I automatically avoid all traffic and clearance events on my route?
To automatically avoid all traffic and clearance events see Traffic preferences on page 83.
66
Page 67

S-Series
Traffic Messages
The Event Details screen displays detour status information.
Detour Not Available messages
If a detour is not available, one of the following messages will display:
Message Description
This Event is not locatable
A specific location for the Event cannot be identified.
This clearance is not locatable
This Event does not affect your route
The Event is not on the current leg of your journey, or is behind your current position.
This clearance does not affect your route
You are avoiding this Event
The Event is not on the current leg of your journey.
You have accepted this clearance
You are too distant to re-route
The Event is currently too distant to affect your journey.
You are too distant to accept this clearance
Detour not found
Clearance route not found
A detour / re-route could not be calculated.
Detour recommended messages
If a detour is recommended, one of the following messages will display:
Message Description
Finding detour....
Recalculating route.....
Detour distance.....
Clearance change
Your Navman is calculating a new route. During calculation, the % complete will display.
Note: Exiting this screen before the new route is calculated will cancel the operation.
A detour has been calculated.
The difference between the distance of your current route and the proposed route is displayed.
67
Page 68

What can I customize?
There are various customization options available to enhance your navigation experience.
S-Series
To move forward through the Preferences screens, tap
To revisit the previous screen, tap
.
.
68
Page 69

S-Series
Route Options
You can enhance your navigation experience by modifying aspects of your route and route calculation.
Route Calculation 1/4
Complete the following:
If you want to... Then...
change the route type move the Route Type slider towards Fastest time to give high priority to the fastest time
change the preference for motorways move the Preference for Motorways slider towards Less often to use roads other than
Your preferences are automatically saved.
when calculating a route.
move the Route Type slider towards Shortest distance to give high priority to the shortest
distance when calculating a route.
Note: Selecting Shortest distance over Faster time can cause much longer journey time.
motorways where possible when calculating a route.
Note: This option may not completely remove Motorways from a route.
move the Preference for Motorways slider towards More often to use motorways where
possible when calculating a route.
69
Page 70

Road Types 2/4
Complete the following:
If you want to... Then...
avoid toll roads select the Toll roads check box in the Avoid column.
receive a warning if your route includes
toll roads
avoid unsurfaced roads select the Unsurfaced roads check box in the Avoid column.
receive a warning if your route includes
unsurfaced roads
avoid ferry routes select the Ferry routes check box in the Avoid column.
receive a warning if your route includes
ferry routes
Your preferences are automatically saved.
select the Toll roads check box in the Warn column. The warning will display at the start of
every trip containing a toll road.
select the Unsurfaced roads check box in the Warn column. The warning will display at the
start of every trip containing unsurfaced roads.
Note: Avoiding ferry routes may prevent you from navigating between certain countries,
even when a bridge or tunnel exists.
select the Ferry routes check box in the Warn column. The warning will display at the start
of every trip containing ferry routes.
S-Series
70
Page 71

S-Series
Driver Alerts 3/4
Complete the following:
If you want to... Then...
enable a visual warning if the Main Menu
screen is accessed in a moving vehicle
enable a warning chime when travelling at or
above the speed and select your preferred
speed when limit unavailalble
select the Warn me not to operate my Navman while driving check box.
select the Enable speed warning check box and select your preferred speed from
the Speed box.
Note: Your set speed limit will only display for roads where speed data is not
available. Navman accepts NO liability whatsoever for you receiving any speeding
fines or points on your license through using this device. Navman does not guarantee
the accuracy of the data contained within this database either expressed or implied.
Your preferences are automatically saved.
71
Page 72

Data Recording 4/4
Complete the following:
If you want to... Then...
record a GPS log of your trips select the Enable GPS data logging check box.
record mileage that can be
imported into NavDesk to create
expense reports
select the Enable trip recording check box.
Your preferences are automatically saved.
S-Series
72
Page 73

S-Series
Map Display
You can change the look and behaviour of the Map screens by customizing the Map Display preferences.
Map Display 1/3
Complete the following:
If you want to... Then...
change the map colour scheme select your preferred scheme from the Map Scheme box.
set the screen contrast to automatically adjust select the Auto day/night option.
improve screen contrast in light or dark
conditions
Your preferences are automatically saved.
select either the Day or the Night option to manually adjust the contrast.
73
Page 74
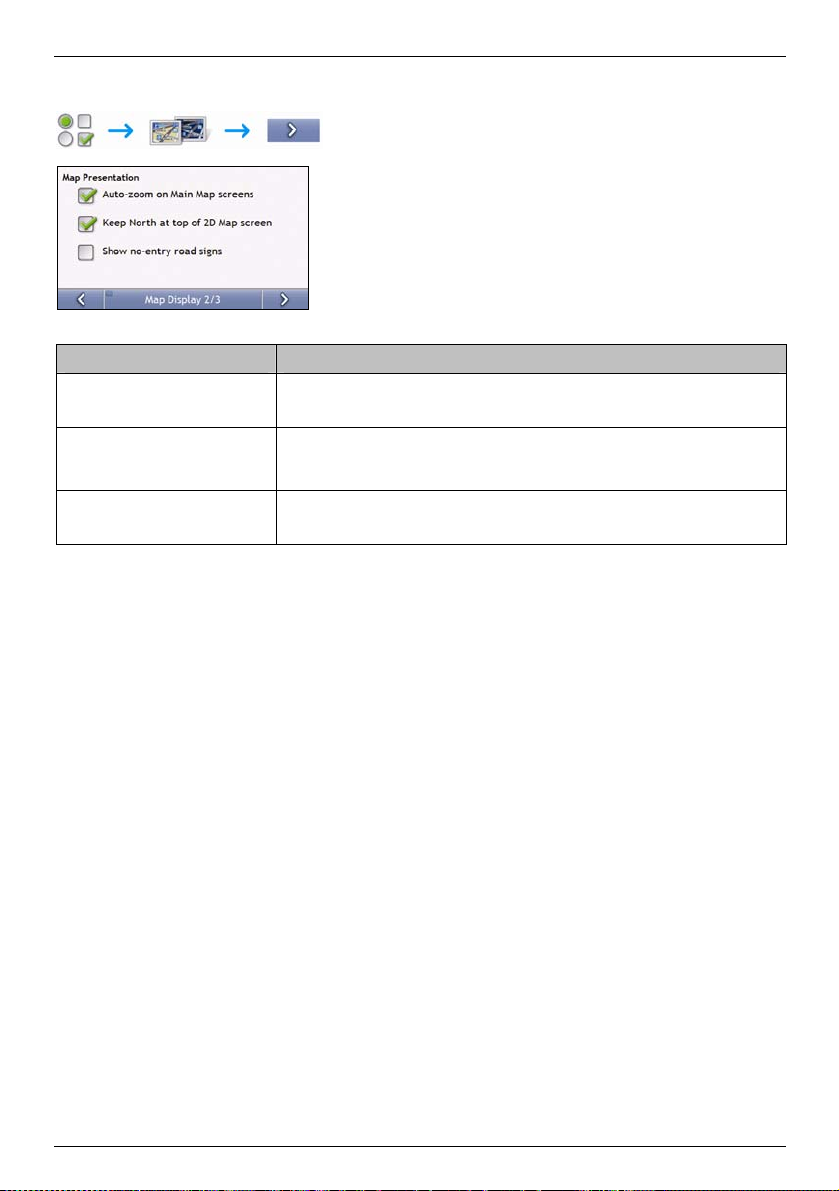
Map Display 2/3
S-Series
Complete the following:
If you want to... Then...
enable automatic zooming during
navigation
display North at the top of the 2D Map
screen
display “no entry” icons on “no entry”
roads on the 2D Map and 3D Map
screens
select the Auto-zoom on main map screens check box. If selected, the 3D Map screen will
automatically zoom in or out, depending on your speed, to allow optimal viewing of your
route.
select the Keep North at top of 2D Map screen check box.
Note: If not selected, the direction you are travelling in will display at the top of the 2D Map
screen.
select the Show no-entry road signs check box.
Your preferences are automatically saved.
74
Page 75

S-Series
Select Map 3/3
Complete the following:
If you want to... Then...
use maps from a different continent select a different continent from the maps you are currently using. When selected, the maps
for the new continent will load and the 3D Map screen will display.
Your preferences are automatically saved.
75
Page 76

S-Series
Map POIs
Points of Interest (POIs) are grouped into categories. You may choose to either display (or hide) icons of all POI
categories on the map screens, or only display the icons from selected categories.
For example, you may only be interested in entertainment venues and want to disable other categories such as
schools.
Complete the following:
If you want to... Then...
display all POI icons (ie, icons from all categories) Tap Turn All On.
display no POI icons Tap Turn All Off.
select a specific POI category icon for display on the
map screens
select the required POI category checkbox;
repeat until all required categories are selected.
Your preferences are automatically saved.
76
Page 77

S-Series
Volume
Complete the following:
If you want to... Then...
increase or decrease the volume move the Volume slider towards High to increase the volume.
move the Volume slider towards Low to decrease the volume.
hear a tone when you tap the touch
screen
hear keyboard characters spoken to
you
Your preferences are automatically saved.
select the Audio check box.
select the Speak keyboard letters check box.
77
Page 78

Screen Display
S-Series
Complete the following:
If you want to... Then...
change the screen brightness move the Screen Brightness slider towards Bright to increase screen brightness.
move the Screen Brightness slider towards Dim to decrease screen brightness.
Warning: Your Navman can heat up when the Brightness scale is set above 70% - i.e., when
more than seven rectangles are coloured - therefore, use lower brightness whenever acceptable.
Your preferences are automatically saved.
78
Page 79

S-Series
POI Alerts
The POI Alert preferences allow you to set a warning chime and/or visual warning to Point of Interest categories that
you have installed via NavDesk (Custom POIs). You may also be able to set warnings to certain POI categories that
were preinstalled on your Navman or available by subscription, such as Safety Cameras.
If you have a route set, the warnings will occur when you are a certain distance (set by the Warning Distance
preference) from the POI on your route.
If you do not have a route set, the warnings will occur when you are in the vicinity of the POI.
3. Tap a custom POI category.
The activation preferences for the selected category will display.
4. Complete the following:
If you want to... Then...
display locations in this category on the map select the Display on the map check box.
enable a warning chime when locations in this
category are in close proximity
enable a visual warning when locations in this
category are in close proximity
select the distance at which the warnings will
activate
select the With an audible alert check box.
select the With a visual alert check box.
move the Warning distance slider to select the distance at which the
warnings will activate.
Your preferences are automatically saved.
79
Page 80

S-Series
GPS
GPS Status 1/2
Signals are transmitted by Global Positioning System (GPS) satellites orbiting the Earth. The GPS Status screen
provides a visual representation of the information being received.
Latitude and longitude are displayed, along with ground speed and the heading in degrees. The strength of each
satellite is displayed on a bar chart.
The satellites available from your current position are shown as grey, red and green coloured bars:
Bar colour Description
Grey No signal.
Red A valid signal, but not being used to fix your position.
Green A valid signal being used to fix your position.
Resetting your GPS fix
Occasionally, the GPS fix may need to be reset. This may occur if the receiver has been transported a long distance
since last being used; for example, to a different country, and is still trying to establish the previous position.
Complete the following:
If you want to... Then...
reset the GPS tap Reset GPS.
80
Page 81

S-Series
Set GPS Mode 2/2
Complete the following:
If you want to... Then...
use GPS select the Normal option.
use WAAS select the WAAS (only available in USA) option.
use EGNOS select the EGNOS (only available in Europe) option.
Note:
WAAS - Wide Area Augmentation System is a navigation system developed for civil aviation by the Federal Aviation Administration
(FAA), a division of the United States Department of Transportation (DOT).
EGNOS - European Geostationary Navigation Overlay Service is a satellite based augmentation system (SBAS) under development by
the European Space Agency, the European Commission and EUROCONTROL.
Tip: You should only change the default setting if you are experiencing poor GPS performance.
Your preferences are automatically saved.
81
Page 82

Language
S-Series
Complete the following:
If you want to... Then...
enable voice guidance select the Enable voice guidance check box.
change the voice scheme select your preferred voice scheme from the Voice Guidance box.
Note: Only voice schemes that are compatible with the chosen language are displayed.
change the on-screen language select your preferred language from the Language box and tap Yes.
Your language preference is saved and the map screen is displayed.
Your preferences are automatically saved.
82
Page 83

S-Series
Traffic
You can view your current traffic system status and change options by customizing the traffic preferences.
Traffic System Status
OR
From the Traffic Overview screen:
The Tuner section displays the name and frequency of the radio station currently being used to receive traffic event
information. A bar shows the strength of the traffic signal being received; the more green bars, the stronger the
signal.
Complete the following:
Your preferences are automatically saved.
If you want to... Then...
change your preferred radio station select your preferred radio station from the Preferred Station dropdown.
83
Page 84

Traffic Event Notification
OR
From the Traffic Overview screen:
S-Series
Complete the following:
If you want to ... Then ...
turn on/ off traffic event notification select the Notify me about nearby traffic events check box to receive traffic
be notified about events that affect your current
route
be notified only when a detour is recommended select the Only notify me if a detour is recommended check box
automatically accept recommended detours and
have a new route calculated
event notification.
clear the Notify me about nearby traffic events check box to turn off traffic
event notification.
Note: Event icons will still display on the 3D and 2D Map screens.
select the Only notify me about events on my route check box.
select the Automatically accept recommended detours check box.
Your preferences are automatically saved.
84
Page 85

S-Series
Select event sorting type
From the Traffic Overview screen:
Complete one the following:
If you want to ... Then ...
sort events by distance select the Distance check box.
sort events by road name select the Road name check box.
sort events by age select the Age check box
only see events that occur on your route select the Only show events on my route check box.
Your preferences are automatically saved.
85
Page 86

Power
S-Series
The Battery Status bar shows the percentage of power left in the Navman battery; the words External Power will
display when the battery is charging from an external power source.
To charge the battery, see "Internal battery" on page 14.
86
Page 87

S-Series
Select Keyboard
Complete the following:
If you want to... Then...
use an alphabetic keyboard for entering information select the Use alphabetic type (a, b, c...) option.
use a QWERTY keyboard for entering information select the Use QWERTY type option.
use a keypad-type keyboard (predictive text) when
searching for an address
Your preferences are automatically saved.
select the Use keypad type (abc, def...) for address searches check box.
How does predictive text (abc, def…) work?
Predictive text allows addresses to be searched by a single key-press for each letter, as opposed to the multiple keypresses. As you enter a letter of an address, your Navman will compare all possible combinations against the maps
you have installed and determine which address you intended to type.
For example:
To enter London, tap JKL MNO MNO DEF MNO MNO.
Your Navman will compare all possible combinations and display London as a search result. You can add further
letters to narrow the search.
87
Page 88

Units
You can change the units used by your Navman by customizing the measurements preferences.
Units 1/2
Complete the following:
If you want to... Then...
change the time format select either the 12 hour or 24 hour option
change the distance units1 select your preferred distance unit type from the Distance Units options.
Your preferences are automatically saved.
S-Series
1
Only available when AU English, UK English or US English language is selected.
88
Page 89

S-Series
Units 2/2
Complete the following:
If you want to ... Then ...
change the latitude, longitude position
format
Your preferences are automatically saved.
select either the Decimal degrees or the Degrees, minutes and seconds option.
89
Page 90
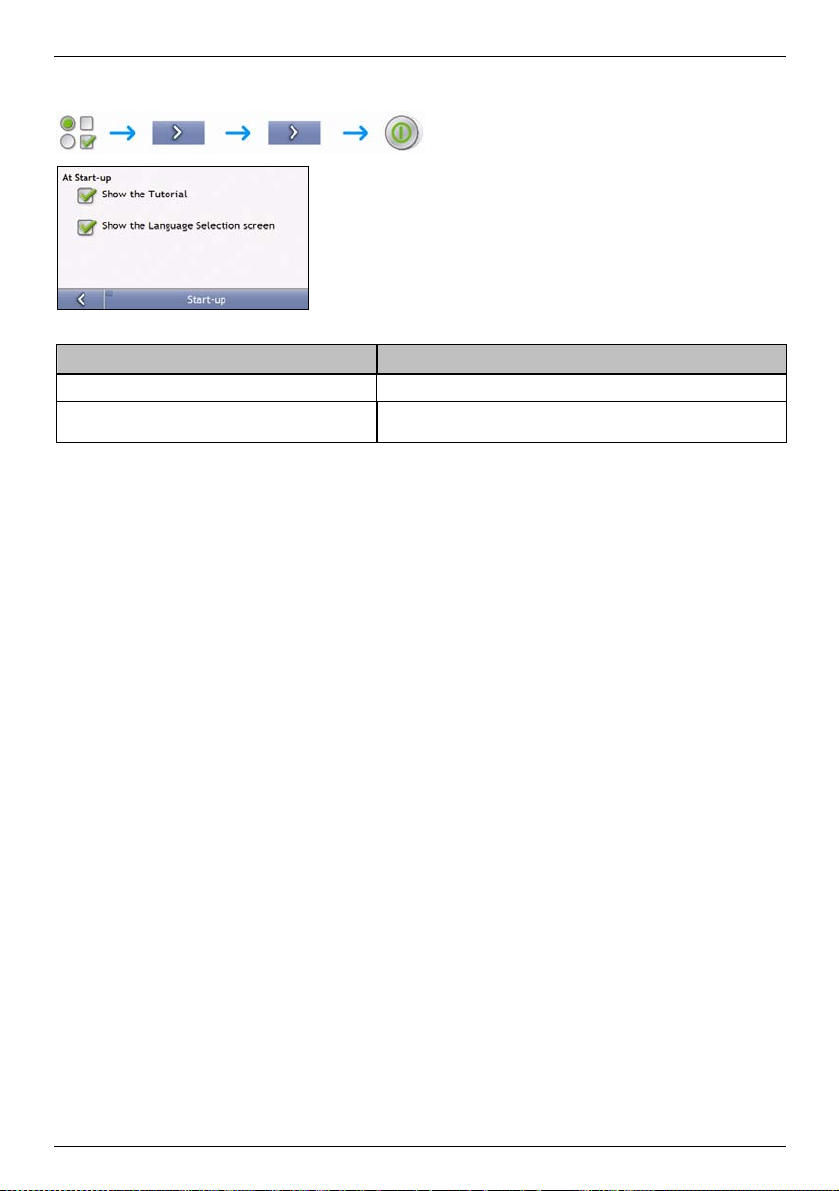
Start-up
Complete the following:
If you want to... Then...
show the Tutorial when you turn on your Navman
show the Language Selection screen when you turn on
your Navman
Your preferences are automatically saved.
select the Show the Tutori al checkbox.
select the Show the Language Selection screen checkbox.
S-Series
90
Page 91

S-Series
Bluetooth preferences
If you want to… Then…
enable Bluetooth
select the Enable Bluetooth check box.
to automatically connect to the last
paired mobile phone
Your preferences are automatically saved.
select the Auto-connect to last paired device check box.
Note: This option is not available on all models.
91
Page 92

Saved Information
Complete the following:
If you want to... Then...
delete recent locations tap Delete Recent Locations.
delete favourites tap Delete Favourite Destinations.
delete avoid areas tap Delete Avoid Areas.
restore factory default settings tap Restore Factory Defaults.
Note: The Restore Factory Defaults option does not delete recent locations or saved
favourite destinations.
clear all settings; for example, for use in
a rental car
When the warning dialog box displays, tap Yes.
complete all of the above.
S-Series
92
Page 93

S-Series
Tutorial
The Tutorial displays when you turn your Navman on, unless you have cleared the Show tutorial on start-up
check box.
You can view the Tutorial at any other time:
To prevent the Tutorial from displaying again on startup, clear the Show tutorial on startup check box
to clear it.
To move forward through the Tutorial screens, tap
To revisit the previous screen, tap
.
.
93
Page 94

About
This preference contains copyright and trademark information.
Shop Demo
Complete the following:
If you want to... Then...
enable a shop demonstration of
Smart to be played
tap Shop Demo on the preference screen. After a short delay, a route will be demostrated.
S-Series
94
Page 95

S-Series
What is NavDesk?
NavDesk is a suite of tools you can use to access greater functionality and product information via your computer.
NavDesk allows you to:
obtain software updates
search online for local POIs
manage maps
manage custom POIs
manage safety camera subscriptions
report trip mileage
transfer pictures from your Navman using NavAlbum
browse the Navman website for special offers.
Can I use NavDesk with my computer?
Ensure your computer has the following minimum system requirements before installing NavDesk:
IBM compatible PC,
Microsoft® Windows XP SP2 or Vista x32,
Internet Explorer 6 or higher,
DVD drive,
USB port,
Internet connection for activation.
Note: For Windows 2000 and XP users, Microsoft .NET 2.0 will be installed on your computer as part of the installation of NavDesk.
How do I install a map for the first time?
The most common task performed using NavDesk is the installation of a new map to your Navman internal memory
or memory card. Complete the following procedures:
Step Action
1 Install NavDesk on your computer (see "How do I install NavDesk onto my computer?" on page 96).
2 Check for software updates for NavDesk on your Navman (see "How do I keep NavDesk up-to-date?" on page 98).
3 Install one or more maps on your Navman (see "How do I install maps onto my Navman?" on page 100).
95
Page 96

S-Series
How do I install NavDesk onto my computer?
Note: Before you begin:
Ensure that your computer meets the minimum system requirements for NavDesk, especially:
i. Ensure that Internet Explorer 6 or higher is installed on your computer before you install NavDesk, even if it is not your default browser.
ii. Windows XP users, ensure that Windows XP Service Pack 2 or higher has been applied before you install NavDesk.
1. Close all programs on your computer.
2. Insert the NavDesk Application Installer DVD into your computer DVD drive.
The NavDesk installer will start.
If your computer does not automatically launch the DVD, start the installation manually:
Start Run.
Type D:\Install.exe where “D” is the letter assigned to your DVD drive, then click OK.
3. Select your preferred language for NavDesk.
4. Click Install NavDesk.
5. Follow the screen prompts to install NavDesk:
Review and accept the Licence Agreement for NavDesk when prompted.
Select a destination folder for NavDesk when prompted.
When the installation has finished, click Finish.
NavDesk will open.
6. If prompted to connect your Navman to your computer, complete the following:
Plug the large end of the USB cable directly into a USB port on your computer (not a USB hub) and plug
the small end into the USB Socket (
Tip: Where possible, plug the USB cable into a USB port at the back of your computer.
Slide the Power switch to the ON position to turn your Navman on.
The following screen will display on your Navman.
) on the bottom of your Navman.
7. If prompted to update your Navman software, follow the on-screen prompts.
You are now ready to use NavDesk to install maps to your Navman.
96
Page 97

S-Series
NavDesk features
Depending on your Navman model, some NavDesk features may not be available.
Start All Programs Navman NavDesk
Element Description
Menu bar Menus that provide access to basic NavDesk functionality.
Navman online Displays the Navman website.
My Maps Application used to install and manage maps.
My Subscription Information on your current subscriptions, including safety camera subscription.
NavAlbum
Application used to transfer NavPix from your Navman to your computer. The software enables
you to:
Manage albums
Copy
Delete
Move NavPix or albums between the NavPix library on your Navman and the NavPix
library on your computer.
Image Search
Custom POIs Application that allows you to import custom POIs.
Mileage Reporter Uses data recorder on your Navman allowing you generate expense reports on the mileage/
Voice Transfers Application that allows you to install or remove voice files from your Navman.
Activation Application used to activate a product key when you purchase a subscription or maps.
Search and download NavPix from a website.
Note: This feature is powered by Flickr.
estimated fuel usage of your trip.
97
Page 98

S-Series
How do I keep NavDesk up-to-date?
We recommend that you regularly use NavDesk to check the Navman server for NavDesk software updates.
How do I update NavDesk?
Start All Programs Navman NavDesk Tools Options General
Select Auto check for updates checkbox.
When you select this option, every time you access NavDesk, the latest service packs and bug fixes if available are
downloaded from the Navman server and applied to your Navman.
Note: Updating software is different from upgrading software. To upgrade NavDesk, you must first purchase a new version of NavDesk
from a retailer, then install it on your Navman.
NavDesk Preferences
Tools Options General
Complete one of the following:
If you want to ... Then ...
upgrade from a previous version of
NavDesk
change the NavDesk measurement to
metric units
change the NavDesk measurement to
decimals
Follow the instructions in the Installation Guide or Upgrade Guide that came with your
NavDesk upgrade.
Select the Use metric units check box.
Select the Decimal degrees check box.
98
Page 99

S-Series
My Maps
The My Map application allows you to install new maps, remove maps from your device and purchase new maps.
Start All Programs Navman NavDesk My Maps
Element Description
Zoom In Click to zoom in.
Continent A drop down list of continents that have maps available for your Navman.
Map Source A list of maps on the DVD or available for purchase via the Navman store website.
My Navman A list of maps installed on your Navman.
Zoom Out Click to zoom out.
Find City
Globe A map of the world or a continent selected indicating the maps:
Click to open the Find City window to search for a city or town.
on the current DVD,
installed on your Navman or memory card, or
available from Navman.
99
Page 100

S-Series
How do I install maps onto my Navman?
Your Navman comes with one or more pre-activated maps.
You can install maps from the enclosed DVDs to a memory card or your Navman internal memory; however you may
need to purchase a Map Product Key to activate the maps.
Which map should I install?
If you are not sure which map contains the town or city that you want to install, you can use the Find City window to
identify the correct map. For more information, see "How do I know which map contains a particular city or town?" on
page 102.
How do I install maps from DVD?
1. Open NavDesk, if it is not already open:
Start All Programs Navman NavDesk
2. Click My Maps.
The My Maps application will display.
3. Insert a Map DVD into your computer DVD drive.
The maps that are already installed on your Navman are green.
The maps that are unlocked and ready to be installed to your Navman are yellow.
The maps that require activation before being installed to your Navman are red.
The maps that are available for purchase from Navman are blue.
Note: If your computer opens Windows Explorer when the DVD is inserted, close the Windows Explorer window.
4. Complete the following:
If the map to be installed is ... Then ...
yellow go to step 7.
red the map needs to be activated via the Internet before it can be installed; continue to
step 5.
5. If you connect to the Internet via a dial-up connection, connect to the Internet now.
100
 Loading...