

Page 1

@
Preventative Maintenance Guide
Product Support Website: www.nautilus.com/support
Page 2
Nautilus T9 Series Treadmills
Daily
• Inspect the power cord and wal[king belt for wear,
, Check the position of the walking belt. Verify it does not rub against the frame, Evenly space the be,It on the deck
within 0.25inches of each side rail. Adiust the bek if necessary.
• Check the optional side hand rails. Fastenthem securely.
, Remove potential hazards from the treadmill area.
Cleaning
Clean the treadmill on a regular basis he_psto improve operation and increase component _ifespan.
Da ily
• Keep the treadmi_ arid controller free of du_ and debris. Use a damp sponge to wipe the exteriors and walking bek.
Do not soak sudaces. DWall surfaces thoroughly.
Dry mop the deck under the belt onl[y.Do not add any lubricants--adding lubricants can ruin the proprietary friction-
control sudace. Do not use detergents or cleaning agents on any par of the deck. Do not let liquid enter the treadmill
or controller, if it does, have a NautiBs ÷ approved technician inspect and test the equipment for safety by a before
using it again.
WeeMy
• Elevate the treadmill to maximom incline and vacuum the floor under it. This prevents excess dust and di_ from
interfering with operation.
If using the magnetic key, check it for rust: If you see rust, replace the magneL Rust en the magnetic key causes
power-up problems.
Treadmill Integer
_ angerous voltages are present under the treadmill hood:. Use caution when performing service to the e]ectrica_
components under the hood.
Depending upon the treadmill environment, dust and or lint can accumu_ate under the hood. Clean the interior of the
treadmill by doing:
1. Turnthe treadmill circuit breaker off. Unplug the treadmill power cord.
2. Remove the two screws on the treadmill hood.
S.Lift off the hood,
4. Cban inside the unit.
5, Reinstal_the hood and the _o screws,
6. Plug in the trea@nill power cord end switch on the trea@ni_[circuit breaker.
Page 3
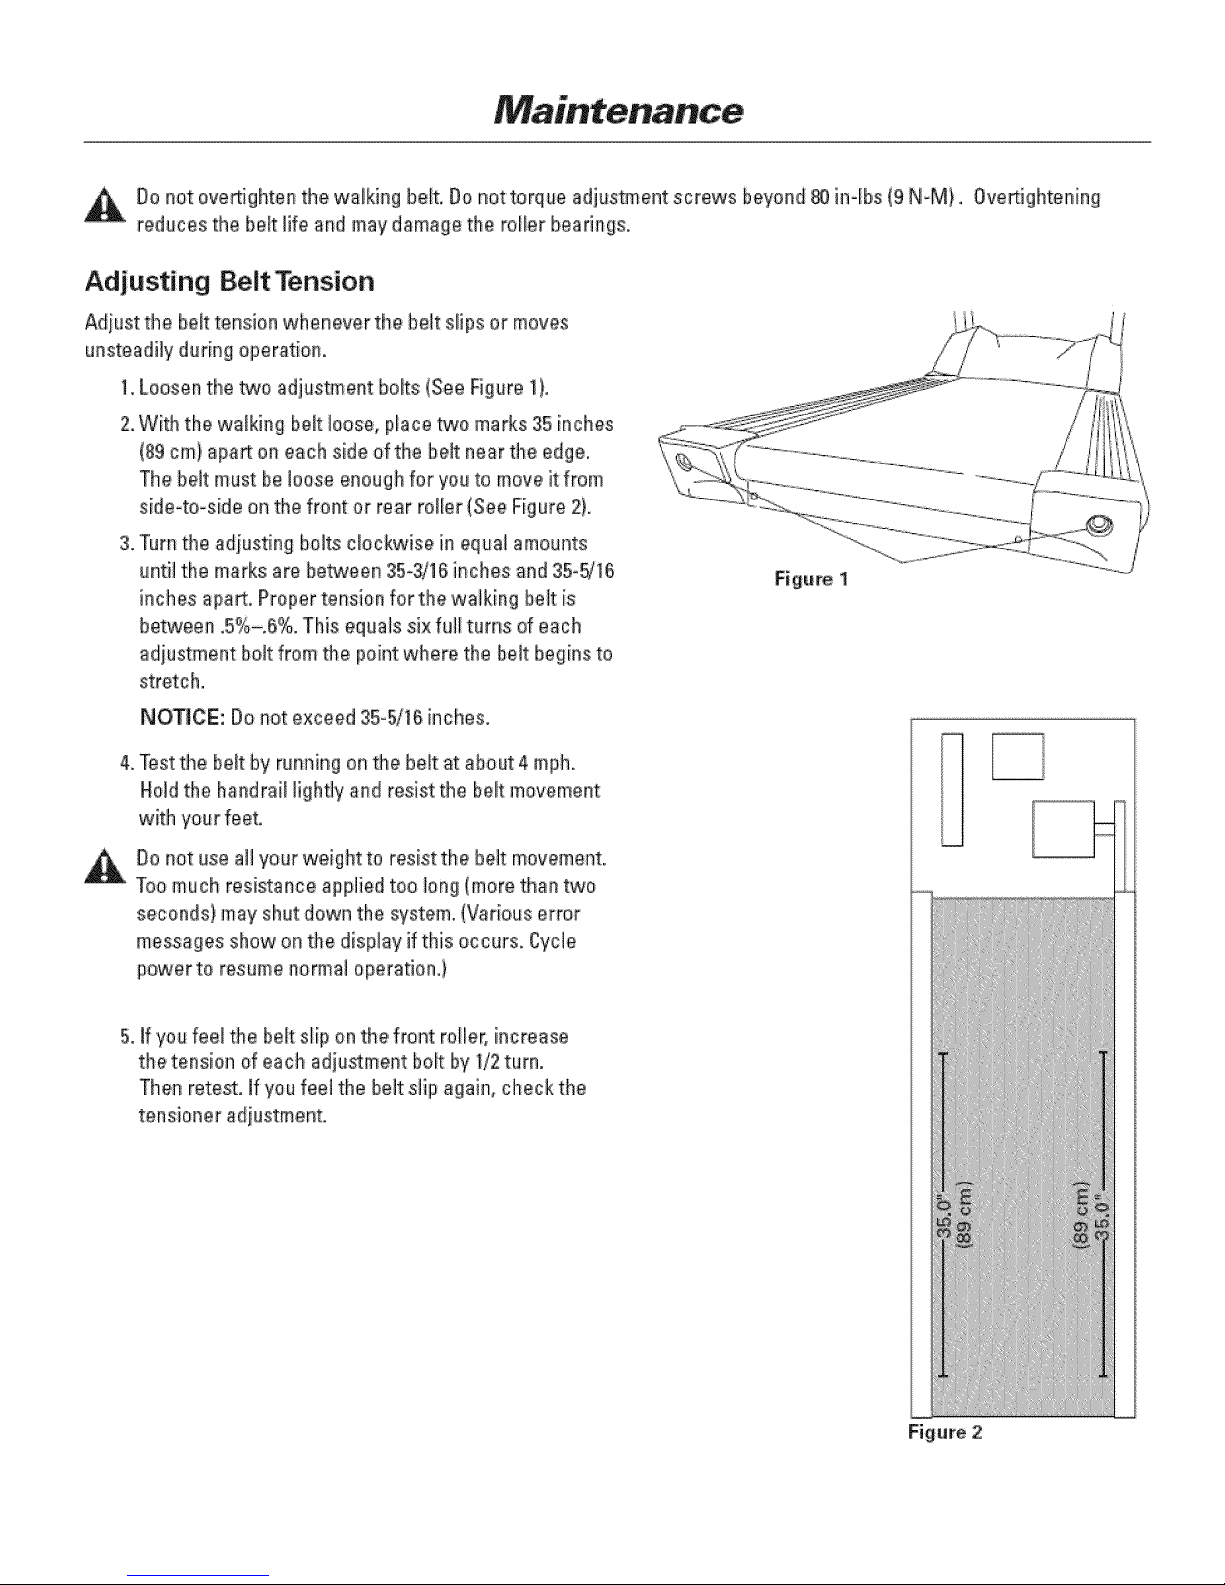
Do not ove_ighten the walking heft. Be not torque adj_stment screws beyond _ in@s {9 N-M}. 0ve_ightening
reduces the beff life and may damage the rolbr bearings.
Adjusting Belt Tension
Adiust the heft tension whenever the heft s_ipsor moves
unsteadily during operatiom
1.Loosen the _o adiustment bolts (See Rgore 1}.
2.With the w'a[k#_gbek loose, place two marks 35inches
(89 cm} apa_ on each side of the heft near the edge,
The belt must be loose enough for you to move it from
side-to-side on the front or rear ro_ler(See Figure 2}.
3. Turn the adiusting bolts cbckwise in equa_amounts
until the marks are be_een S5o_q6inches and 35°d16
inches a£art, Proper tension for the walking heft is
between .5%-.6%. This equaB six fu]_turns of each
adiustment heft from the point where the belt begins to
stretch.
NOTICE: #o not exceed 35o5/16inches,
4.Test the belt by running on the belt at about 4 mph.
Hold the handrail lightly arid resist the belt movement
with your feel
Figere 1
Bo not ose a_lyour weight to resist the beff movement.
Too much resistance applied too bng (more than two
seconds) may shut down the system. {Various error
messages show on the display if this occurs, Cycle
power to resume normal operation.)
5. ff you feel the boutslip on the,front rotle_, increase
the tension of each adjo£ment bolt by 1/2turn.
Then rete£. If you fee_the holt sli_ agai_s,check the
tensioner adiustmenL
Figure 2
Page 4

Oonotcutthebe_t.Doingso can cause the rear rol_er to fall and snap the alignment pins on the end c:ap.
Adjusting Belt Tracking
Adiust the be_ttracking whenever the belt moves to one side
or the other. Stay off the bek when adiu_ments.
1.Sta_ the treadmill at minimum speed and grade.
2,Increase speed to 6 m#h. Make the following
2=1 If the belt moves to the right: turn the right
adia_ment bok 1/4-tam c_ockwise.
2=2 If the belt moves to the left: turn the _efl
adiu_ment bok 1/4°turn clockwise.
3. Run the treadmill for 5 mim_tes after making the initia_
adiustmenL Observe how the belt tracks. # the belt
continues to move away from the cente5 adiust the
apprepriat_ side untN propedy centered.
Page 5
Nautilus U916/R916
Roati n÷ M aint÷nanc÷
Upon receiving your machine, use a soft, clean towel to wipe off the dust, which may have accumulated during shipping.
Your new machine will require minor assembly, Refer to the "lnsta]lation Instructions" section for details.
Cleaniag
1. DO NOT USE G_SS CL_NERS OR ANY OTHERHOUSEHOLD CLEANERSON THECONSOLE. C_eanthe console daily
with a water-dampened cloth and wipe dry after cleaning.
2. Clean the exterior of the machine daily using soap and water or a diluted, non-mineral 5ased househoN cleaner such
as Fanta_ic®,.
[n:spection
,
Frame: Inq_ect the frame for any rust, bubN[ng, or paint chi#s during the weekIy cbaning. The,salt in perspiration
can damage the unpainted surfaces. Repair the damaged area with a touch-up paint kit purchased from Nautilus (call
Cu_omer Se_ice for order information).
Page 6
Chat:king the Battery Charge
Using your multimeter, touch the red lead to the positive termina_ of the battew and the black lead to the negative
terminal.
2. If the voltage level is less than 6.1 VDC, charge the battery.
Rechargi N the Batt÷W Back-Up
The CommerciaF Series U916 and R916 bikes are both self-powered (cordless)with a rechargeable batteW back-up.
Typically, the bike can be operated without Nugging in the battery charger. If, however,, the console flickers during
o#eration or the console disNay does not _igN u# while using the machine, then use the battew charger to recharge the
batteW back-up.
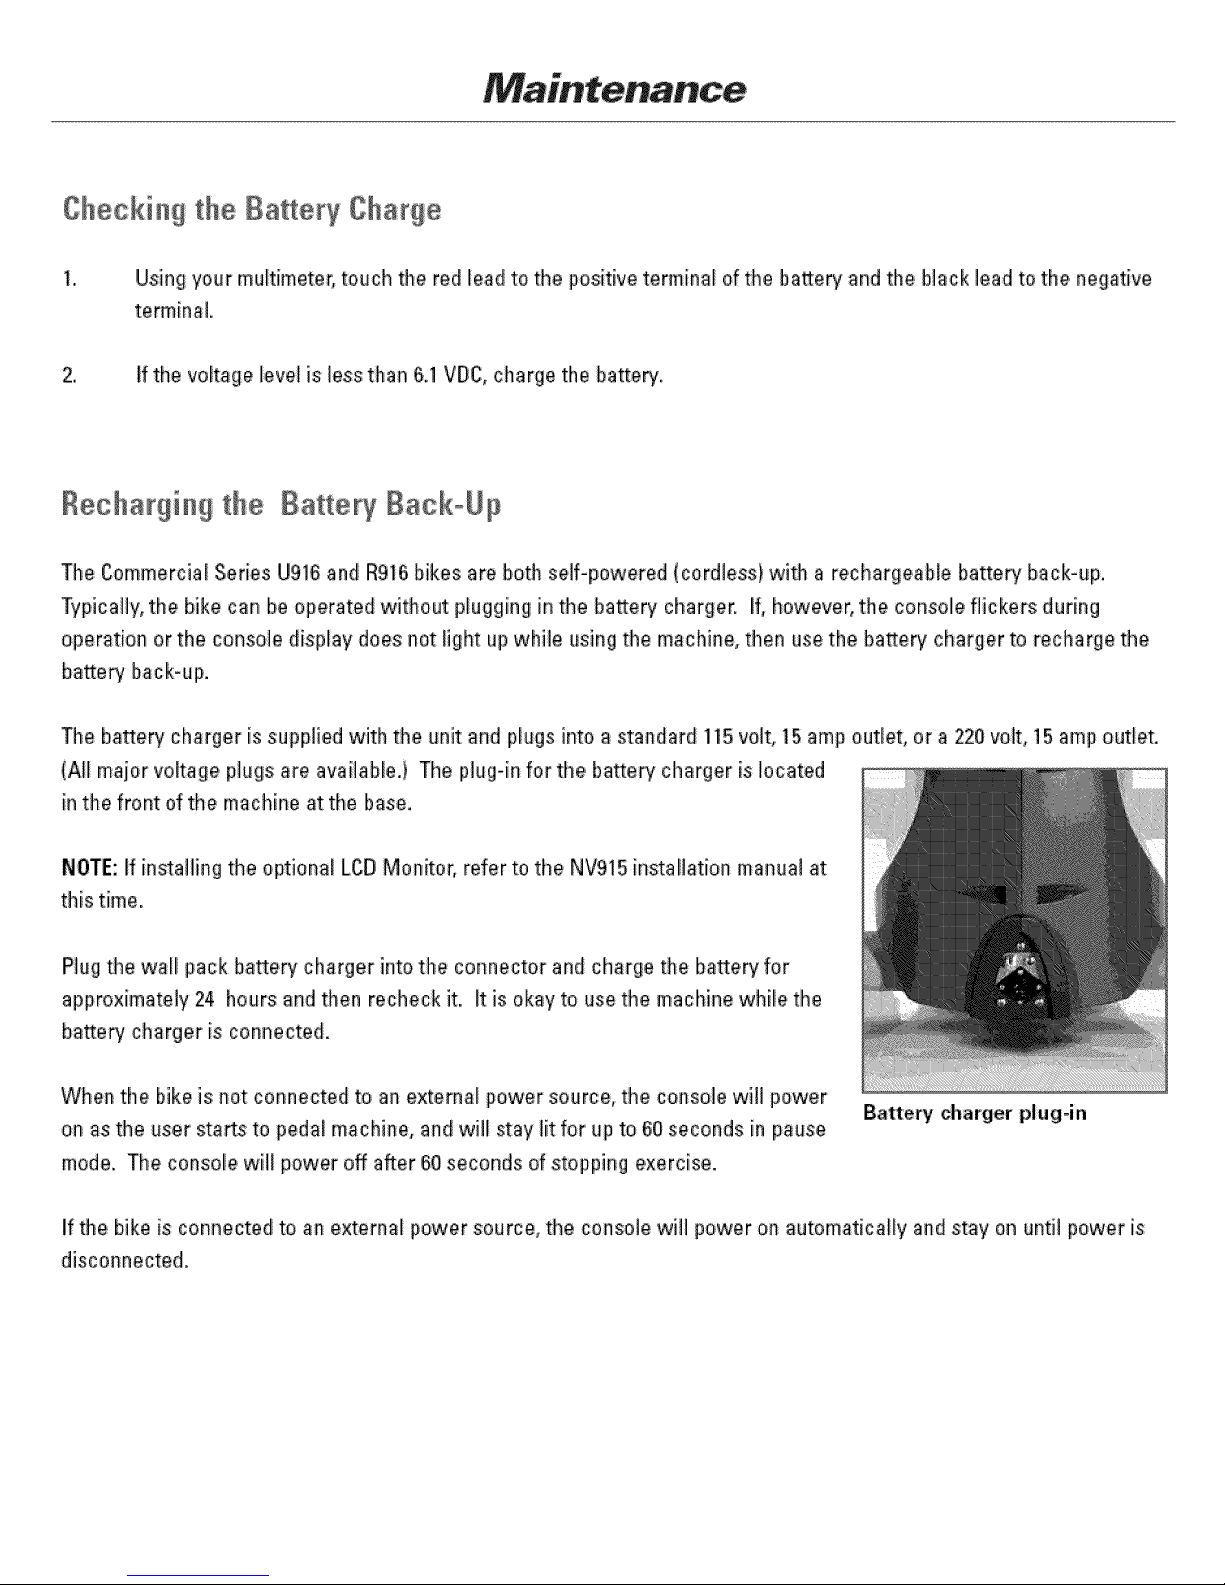
The bakery charger is suf_Nied with the unit and plugs into a standard 115 volt, 15 amp outlet, or a 220 volt, 15 amp outlet.
{A[[ maior voltage Nugs are available.} The Nug-in for the battery charger is located
in the front of the machine at the base.
NOTE: If in.ailing the optiona_ LCD Monito5 refer to the NV915 installation manual at
this time.
Plug the wail pack battew charger into the connector and charge the bakery for
approximatNy 24 hours and then recheck it. it is okay to use the machine while the
battery charger is connected.
When the bike is net connected to an external power source, the console will power
on as the user starts to pedal machine, and wil_ stay lit for up to 60 seconds in pause
mode. The consNe wil_ power off a_er 60 seconds of stopping exercise.
If the bike is connected to an externa_ power source, the console will power on automatically and stay on until power is
disconnected.
Bakery charger plug-in
Page 7
Nautilus E916 Elliptical
Upon receiving your machine, use a soft, clean towel to wipe off the dust, which
may have accumulated during shippingo Your new machine will require, minor
assembly. Refer te theqnstaLlation Instructions" section for details.
Cleaning
= DO NOT USE GLASS CLEANERS ORANY OTHERHOUSEHOLD CLEANERS
ONTHE CONSOLE. Clean the console daily with a water-dampened c_oth and
wipe dry after cbaning.
2. Clean the exterior of the machine daity using soap and water or a diluted,
nonomineral based househokt c_eaner such as Fantastic@.
inspection
Frame: Inspect the frame for any rust, bubNing, or paint chips during the
weekly cleaning. The salt in perspiration can damage the unpainted surfaces.
Repair the damaged area with atouch-up paint kit purchased from NautiNs
{call Customer Service for order information).
C ecki g the B :cryCBa ge
1. Using your multimeter, touch the red _ead to the positive terminal of the
battery and the black lead to the negative terminal
2. If the voltage [eve_is [ess than &1 VDC, charge the battery.
Page 8
th® Bal:1e yBacko J l}
The Cemmercia_ Series EV918arid E916e4@tica_are both self=powered
(cordless) with a rechargeable battery back=up.Typica!ly, the elliptical can
be operated without #lugging in the battery charger. If, however, the console
flickers during operation or the console dis#lay does not _ight up whi_e using the
machine, then use the battery charger to recharge the battery back-up.
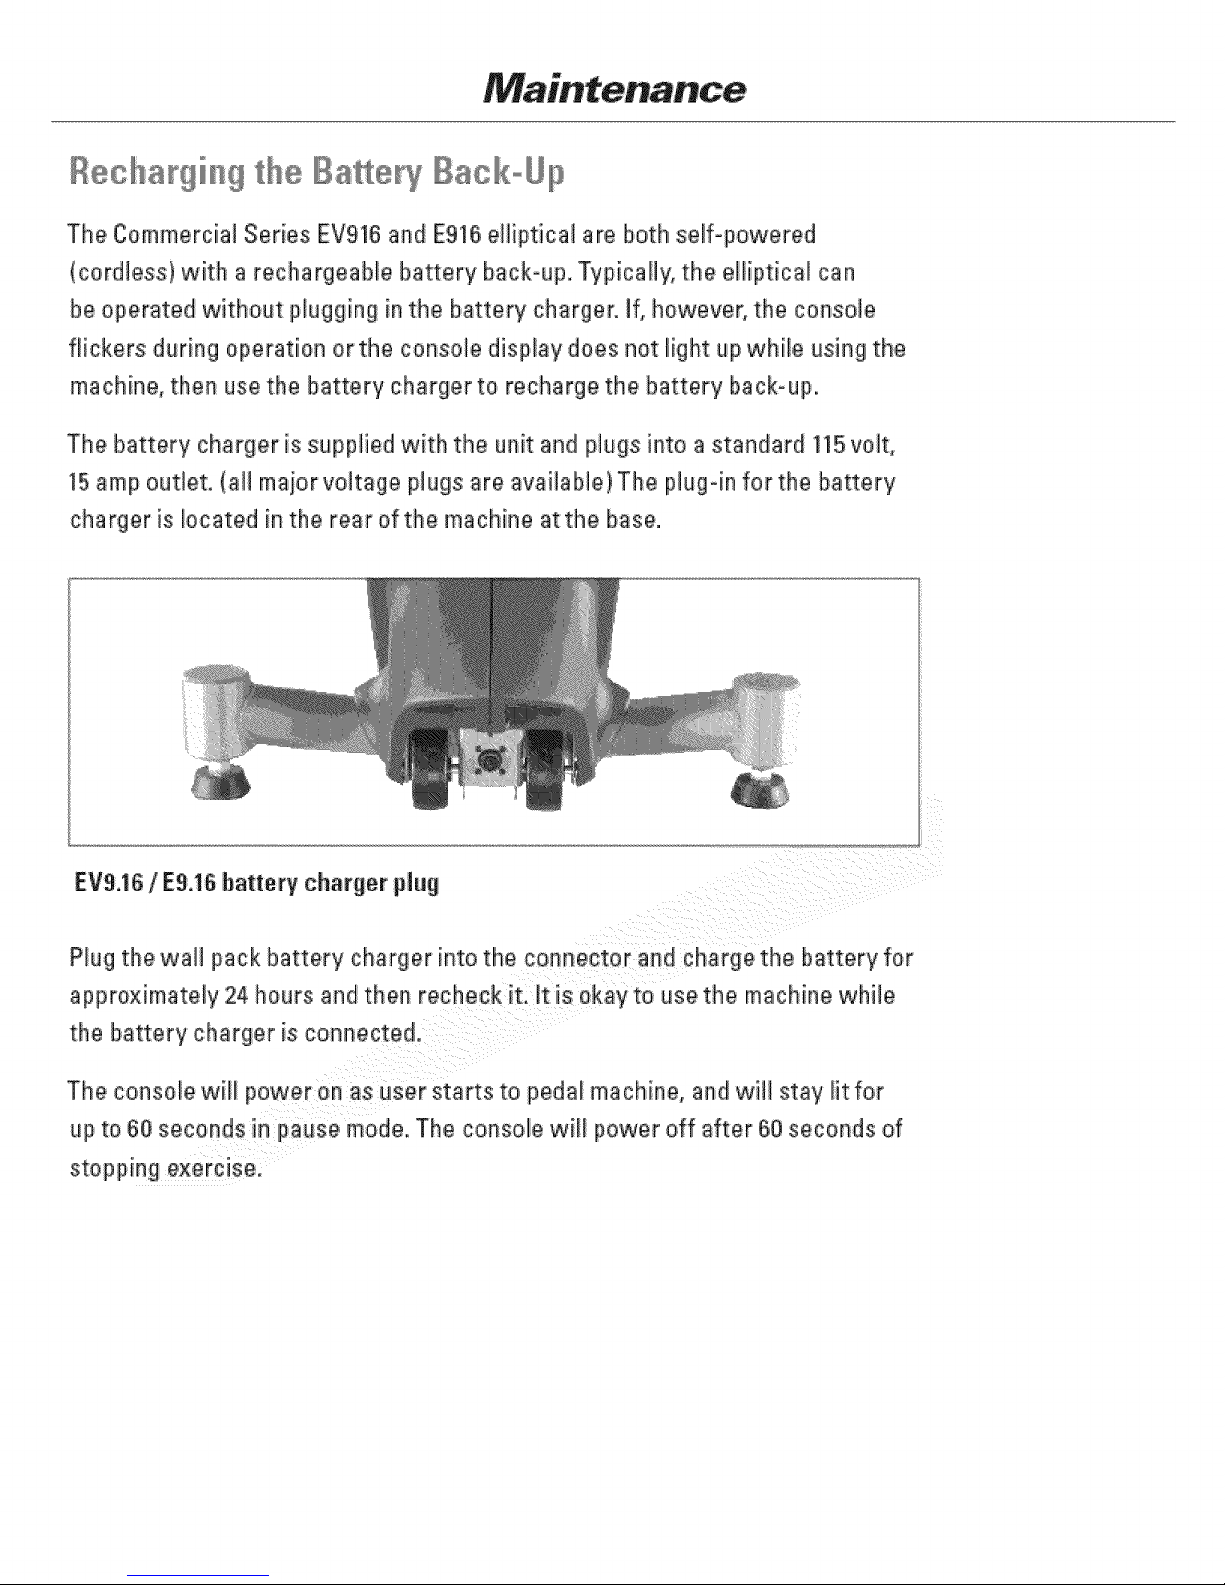
The battery charger is supplied with the unit and plugs into a standard 115volt,
15amp outlet. (all maiorvo]tage p_ugsare available} The plug-in for the battery
charger is located in the rear of the machine atthe base.
EV9.16/ E9.16battery charger plug
Hug the wall pack battery charger into the co_nector at_dcharge the battery for
approximately 24 hours and then recheck it. It is okay to use the machine whi4e
the battery charger is connected.
The consote wilt power on as user starts to pedal machine, and wi41stay _itfor
up to 60 seconds in pa_se mode. The console will powe[ off after 60 seconds of
stop#ing exercise.
Page 9
Nautilus Strength
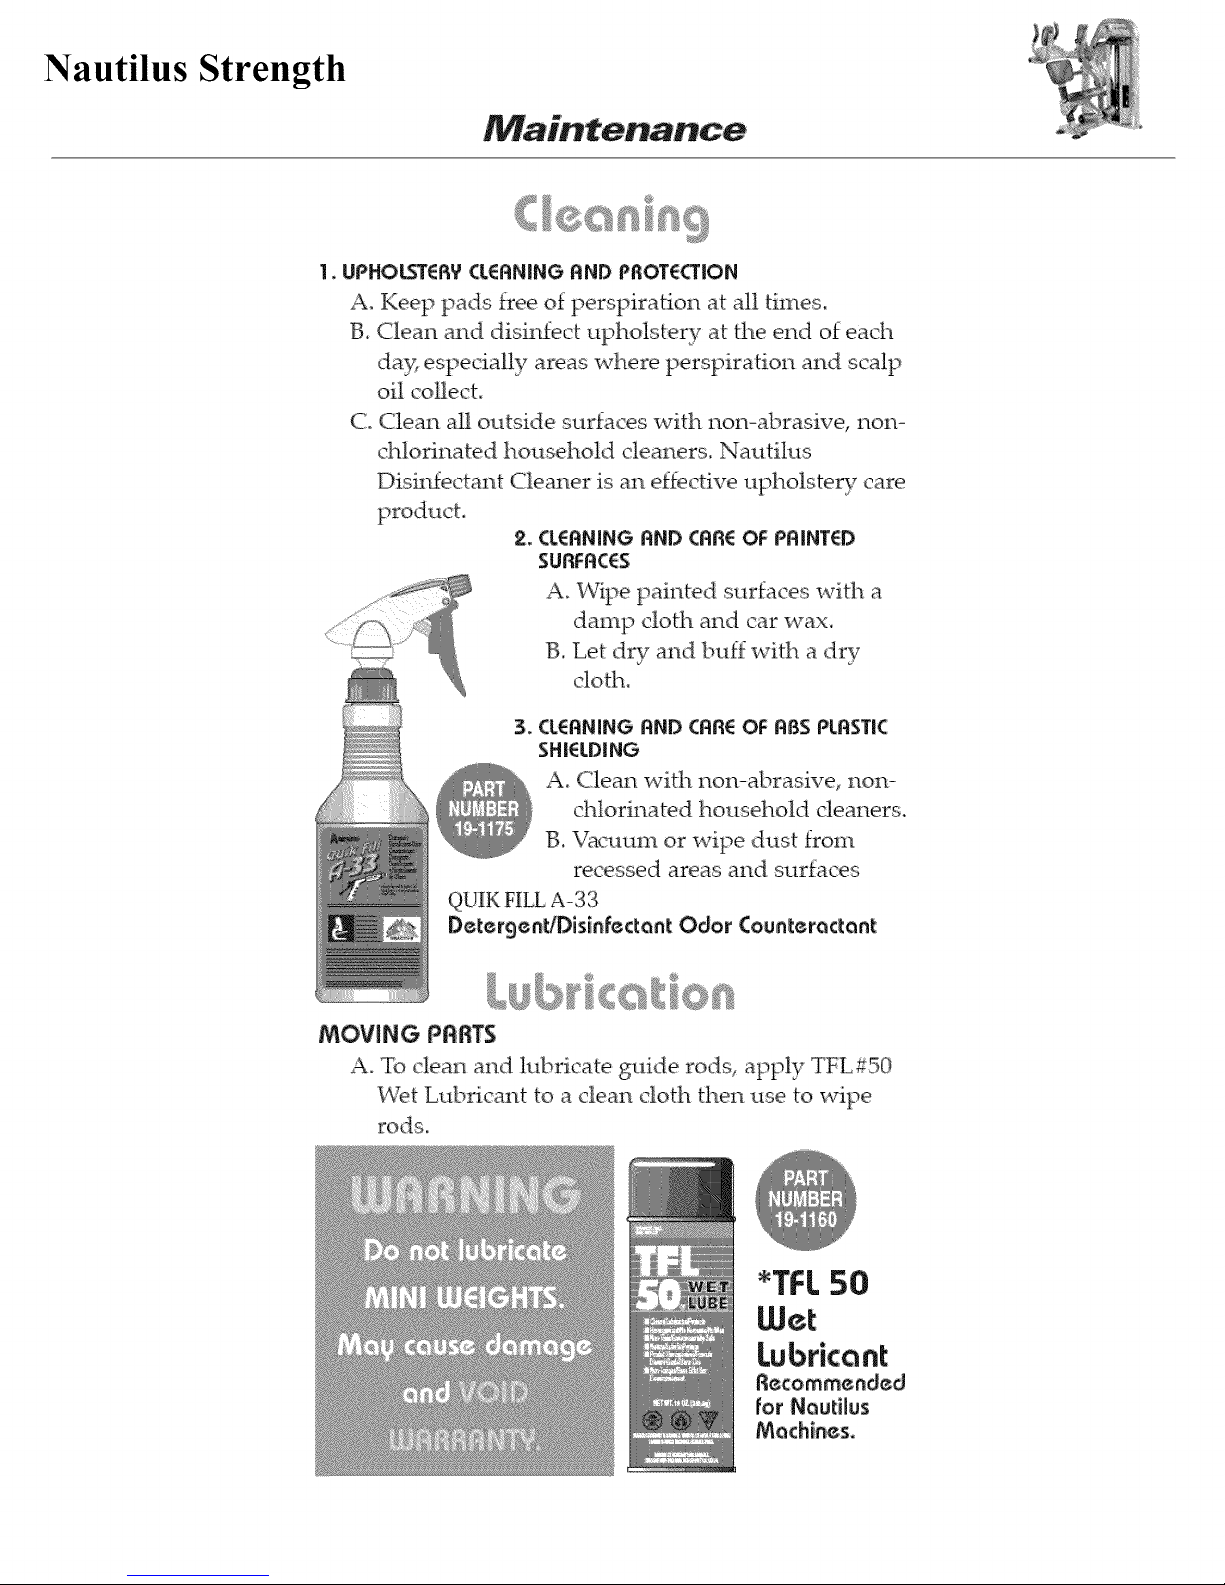
1. UPHOLSTERV CLERI',IINGRHD PROTE_iOH
A. Keep pads free of perspiration at all times.
B. Clean and disinfect upholstery at the end of each
da)_ especially areas where [. e_oplrat_on and scalp
C. Clean all outside surfaces with non-abrasive, non-
chlorinated household cleaners.. Nautilus
Dish-ffectant Cleaner is an effective upholstery care
2. CLENNiNG NND CRREOF PRINTED
$UflFNCES
A. Wipe painted surfaces with a
damp clotl_ and car wax.
B. Let dry and buff with a dry
cloth.
3. CLENHING RND CRF_EOF fiBS PLNSTIC
SHIELDING
A_ Clean with non-abrasive, non-
chlorinated household cleaners.
B. Vacuum or wipe dust from
recessed areas and surfaces
QUIK FILL A-3 3
Detergen_Dis[n[ectant Odor Counteractant
MOVING PRRTS
A. To clean and lubricate guide rods, apply TFL#50
Wet Lubricant to a clean cloth then use to wipe
*TFL 50
Wet:
Lubricant
Recommended
for Nautilus
Machines_
Page 10
Stairmaster ClubTrack 2100 Series Treadmills
£outine Maintenance Schedules
Performing reutine maintenance will help prevent unnecessawwear to the treadmill and!or injuw to the user.The
maintenance schedules aremeant only to seP_eas a guide_Dependingon where and how the treadmill is being
used,more frequent routine maintenance may be required
Daily
• Inspect the powe_cord and walking belt for wear.
• Checkthe position of the walking be_t Verify it is not rubbing against the ffame_The belt shoul{dbe evenly
spaced on the deck within 0,25 inches Adjsst the belt if necessary_
,_ Checkthe optional side handrailsto ensure they ala fastened securely,.
Removepotential hazards flora the treadmill area_
Keepingthe StairMasteP'2100LC/LEtreadmillcleanonaregularbasiswill help to improveoperationandincrease
the lifespanof thecomponents
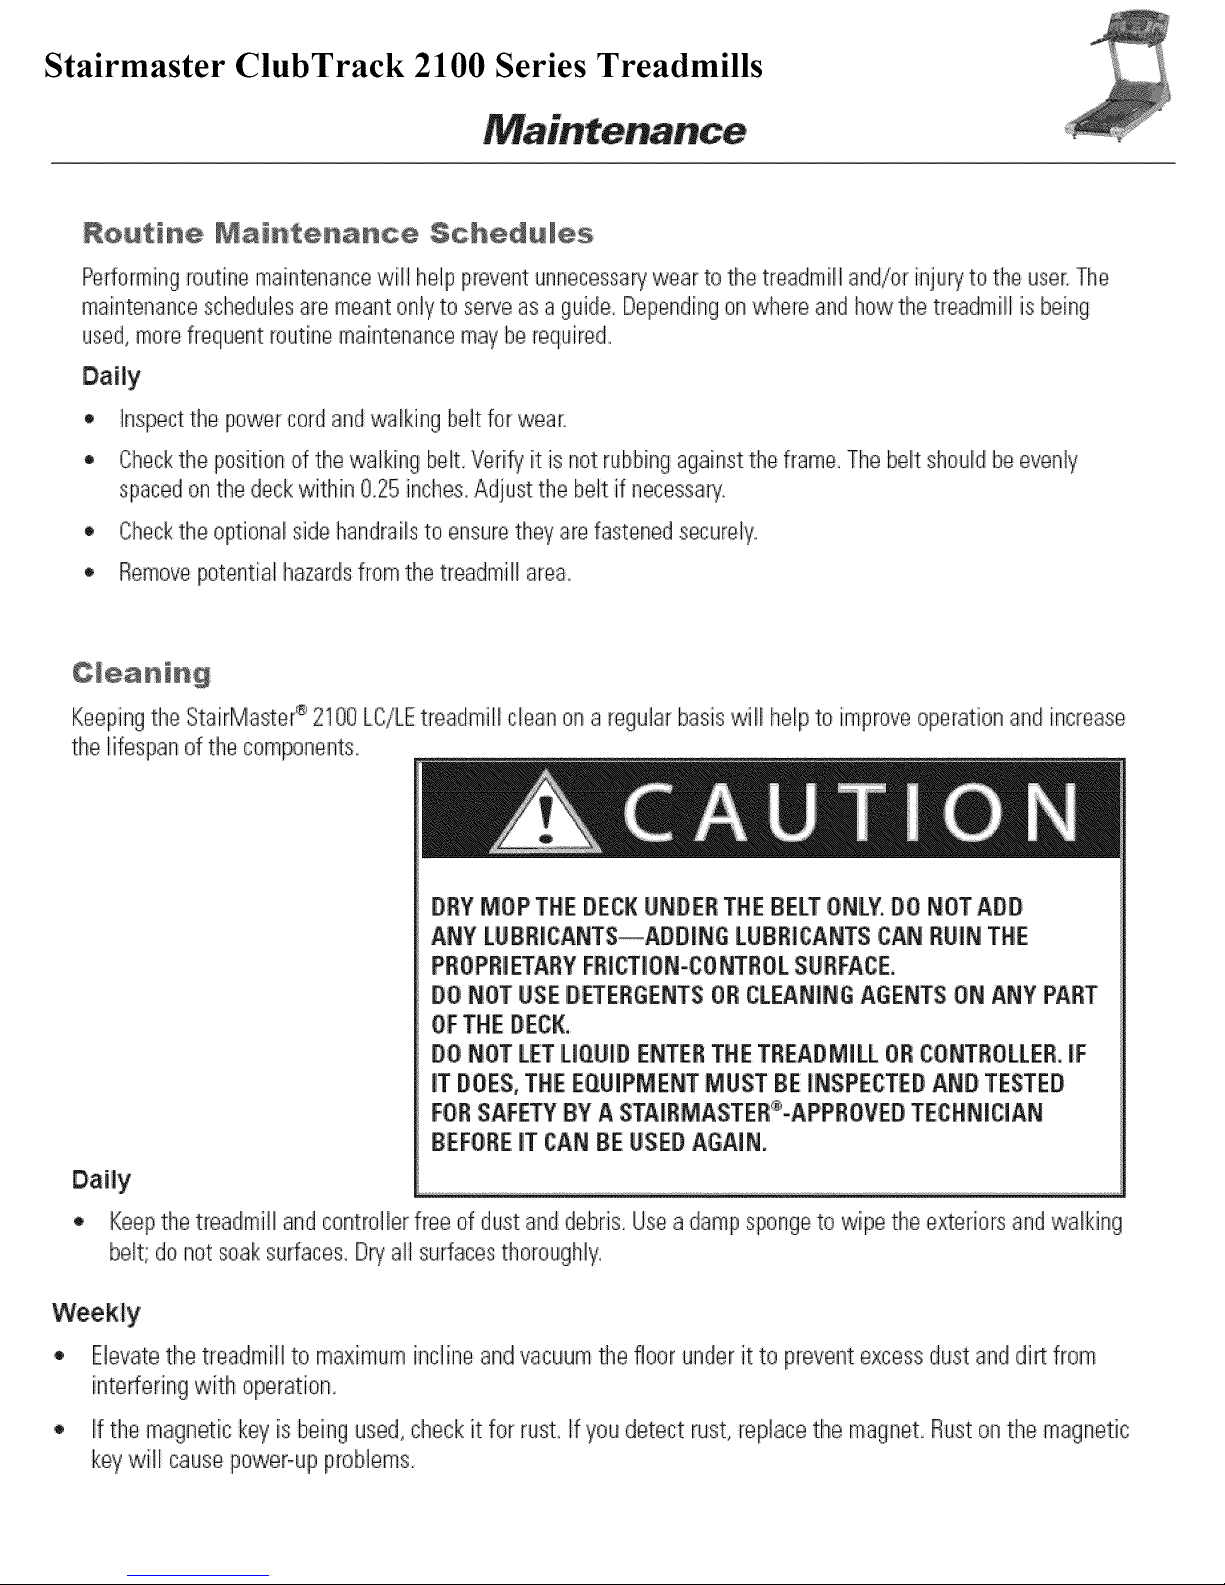
BBYMoPTHE BECK UNBEBTHEBELTONLY.BONOTADD
ANY LUBBICANTS_ABDING LUBRICANTS CAN RUIN THE
PROPRIETARY FR[CTION-CONTROL SUBFACE,
BO NOT USE BETEBGENT$ 0B CLEANING AGENTS ON ANY PART
OFTHE BECK.
DO NOT LET IUOUIB Et'JTERTHE TREADMILL OB CONTROLLEB. IF
iT DOES, THE EQUIPMENT MUST BE INSPECTED AND TESTED
FORSAFETY BY A STAIRMASTEB%APPROVED TECHNICIAN
BEFOREIT CAN BE USEB AGAIN,
Daily ....................................................................................................................................................................................................................................
• Keep the treadmill and controller fi_e d dust and debris. Useadamp sponge to wipe the exteriors and walking
belt: do not soak sue'facesDWall surfaces thoroughly
Weekly
,, Elevatethe t_eadrnitlto maximumincline andvacuumthe floor under it to preventexcessdust anddi_ from
intedering with operation,
• If the magnetickey isbeingused,checkit for rust, Ifyoudetect rust,replacethe magnet Rustonthe magnetic
keywill causepower-upproblems
Page 11
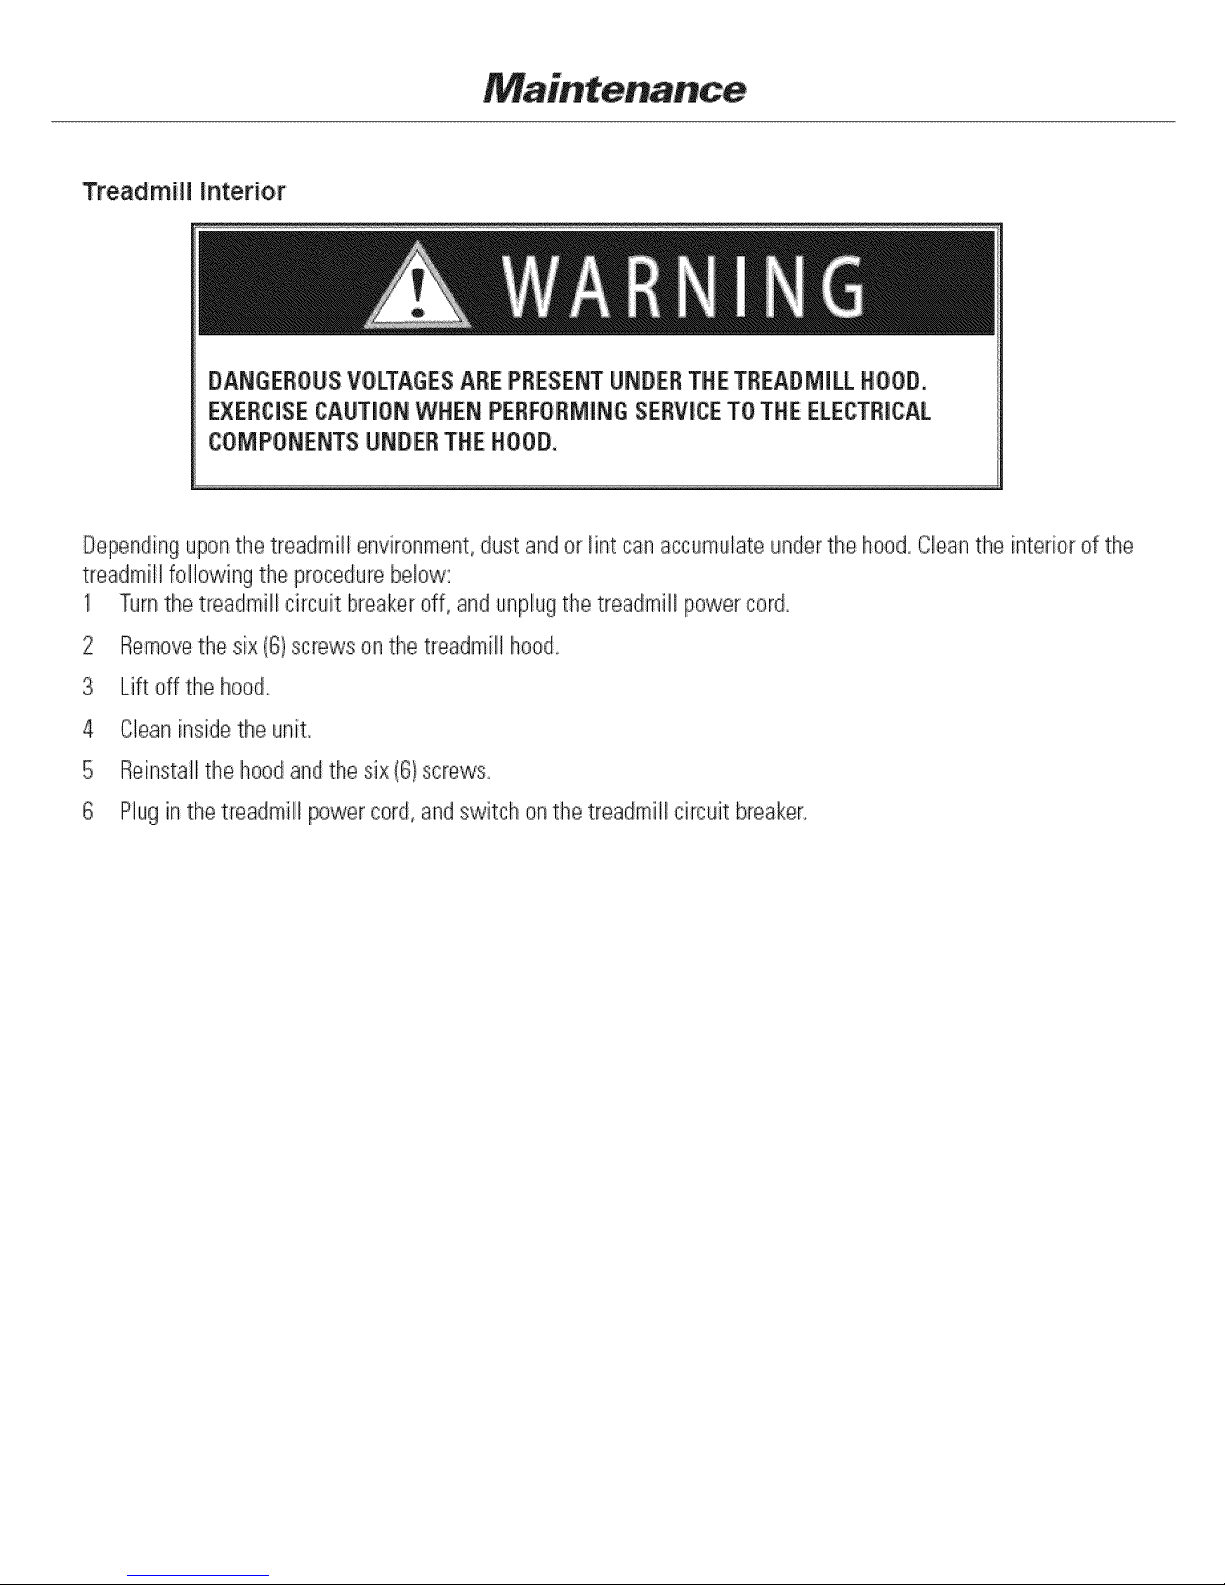
Treadmill Interior
DANGEROUS VOLTAGES ARE PRESENT UNDER THE TREADMILL HOOD.
EXERCUSECAUTION WHEN PERFORMING SERVICETO THE ELECTRICAL
COMPONENTS UNDER THE HOOD.
Depending uponthe treadmill environment, dust andor lint c:snaccumulate under the hood Cleall the interior of the
treadnlill following the procedure below:
1 Turnthe t_eadmill circL_itbreaker off, and unplug the treadmill power cord,.
Removetile six (6) screws on the treadmill hoed.
3 Lifteffthe hood.
4 Clean i_/sidethe unit.
5 Reinstall the hoodand the six(G} screws
6 Plug in the treadmill power cord, and switch on the treadmill circuit breaker.
Page 12
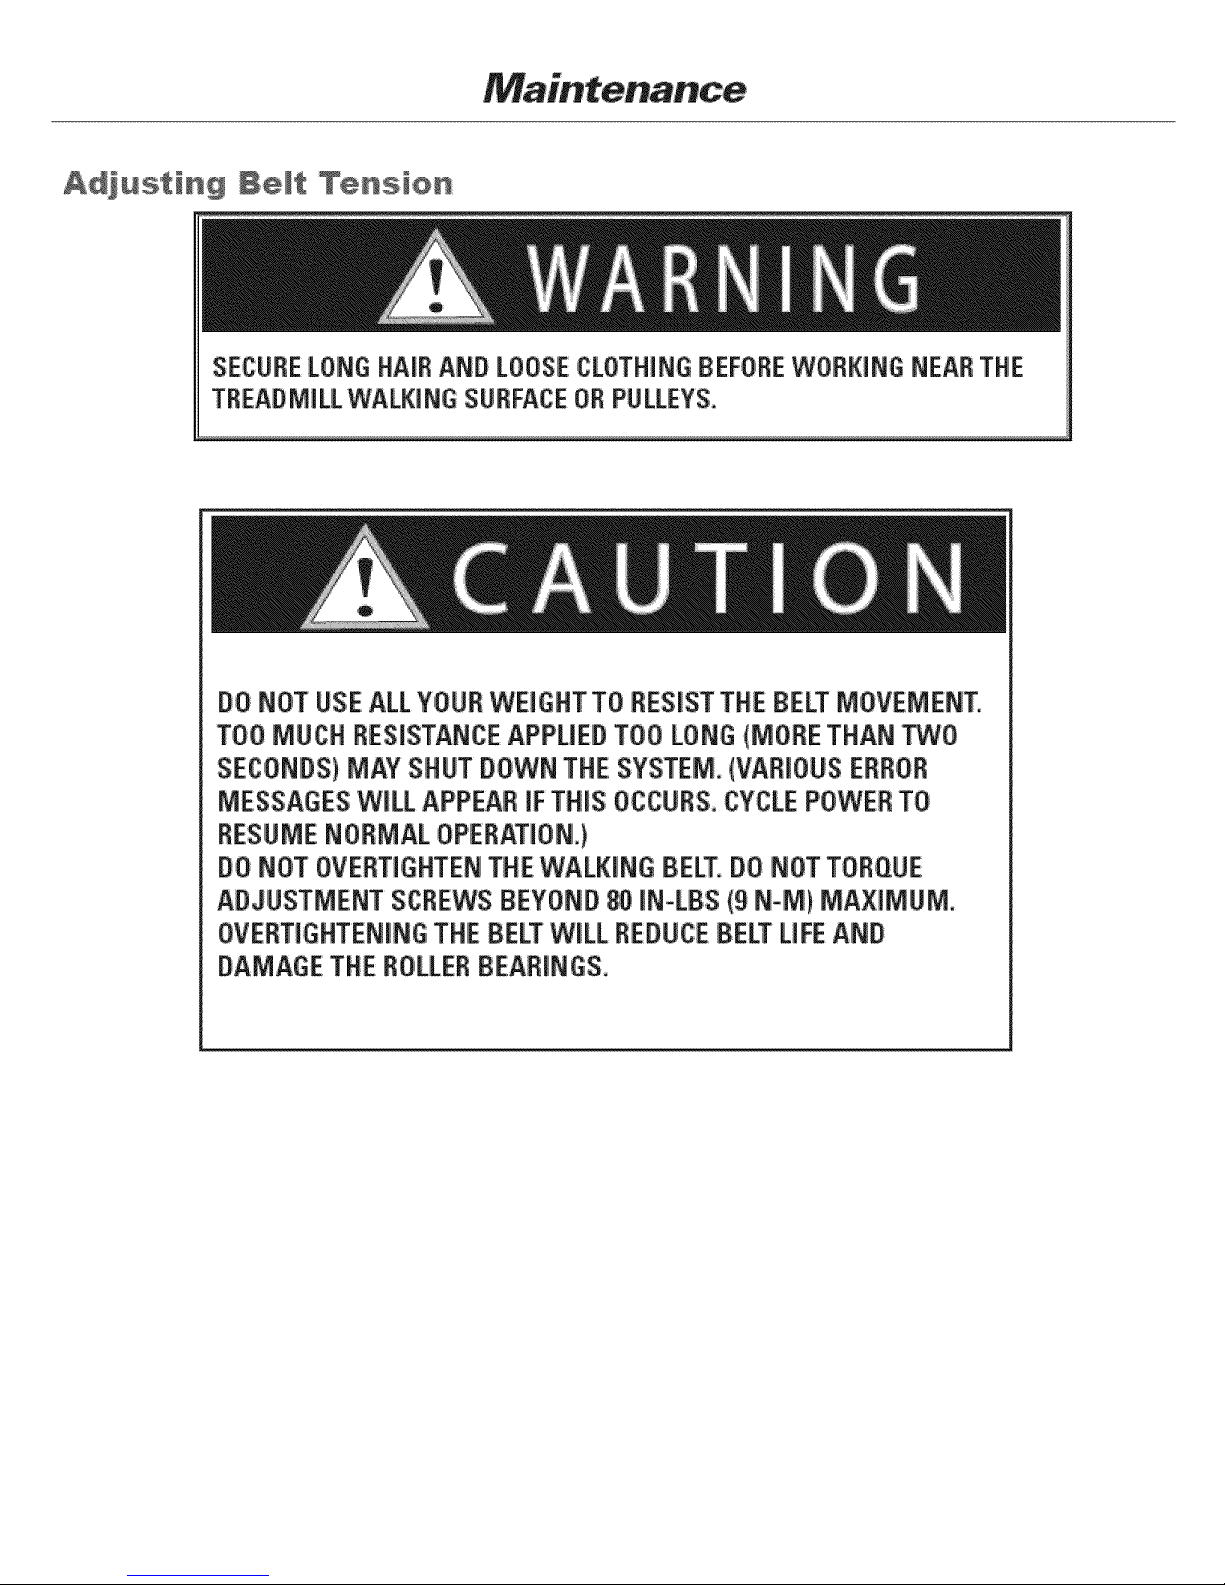
A_ustiH% I÷It T÷nsion
SECIIE LONG HAIRAND LOOSECLOTHINGIEIFOIE WOIRINGHEAl THE
TIEAI MILLWALKINGS!tFACE 01 Pl LLEYS.
DO NOT USE ALLYOUI WEIGHTTU IESIST THEBELT MOVEMEIT.
TII llIl IE$1STAICE APPIIEI TOI LllI (MIIE TIAN IJl
SEIOIIS) MAYSlUT IIWN TIE SYSTEM. (VAIIIUI Ellll
MISSILES Will APPEAl iF TtLS U¢CUIS. CYCLEPOWEt TO
RESUME NOtMAL OPERATION.)
DO NOT UVEITIIHTEI TIE WALKINGIELT. DO IUT TOIIUE
AIJUSTMENT $CIEWS BEYIII I II-LIS 11 I-M)IA×IMUM.
UVEITIGITEIIIG TIIE IELT WILL 111U11 IEl LIFEAll
DAMAGETIE IOLLEI BEAlINIS.
Page 13

Adiust the belt tension whenever the bett slips ormoves unsteadily during operation by following the step,sbelow:
1 Start by loosening the two (2}adjustment bolts,
Adjustment Bolts
With the walking belt loose, place two marks 35 inches (:889ram)apaR oneach side d the belt nearthe edge,
Thebelt must be loose enough for you to move it from side to side on the front ,orrear roller.
3
Turnthe adiustingbolts clockwise byequal amountsuntil the marksarebetween35-3Y16in@esand35-5/16
inchesapart Prope_tensionfor the walking belt is between 5%-6%_ This shouldbeaboutsix fult turnsof
eachadjustmentbolt from the pointwherethe belt beginsto stretch Important Donot exceed35-5,/16inches
4
Testthe belt by runningonthe belt at about fourmph Holdthehandrail lightly andresist the beltmovement
with yew feet
5
Ifyoufeel the belt slip on thefront rolbr, increasethe tensionof eachadjustment boltby 1/2 turn andre4est If
yo_feel the belt stipagain,checkthe tensioner adiustment
Page 14

A usting Be t Trackin@
Performthis:procedurewhenever the belt movesto oneside or the other.Stayoff the belt when adjusting tile
tracking_
I :Sta_the treadmill atminimum speedand grade_
increasespeedto six mph, andmakethe following adiustment:
2t Ifthe belt movesto the right,turn the right a@Jstmellt bolt 1i4-tum clockwise
Ifthe belt movesto,the left, turn the left adjustmentbolt li4-tum clockwise
3 After makingan initial :adiustme_t,runthe treadmill fer five minutes andobservehow the belt tracks, If the belt
continuesto move away from the center,adjustthe appropriafe side ttntil properly centered
Page 15

Stairmaster 7000PT Stepmill
HELPFUL HINTS
Readall maintenan£e[nstructbnstholo%hl_ybeforebeginningwork. [nsome
case< anassistant is requiredWperformthe necessautasks,Thesafetylevel
givenbythe designd this equipmentcanonlybemaintainedwhenttle equip-
mentisregularlyexaminedfor damageandwear.InoperabLecomponen£sshall
bereplacer]immediatelyorthe equipmentshallbeput out d useuntil it is
repaired,All referencestothe right or leRsideandto the front or backaremade
asif youwereonthe machinereadyto exercise.
PREVENTIVEMAINTENANCE
Theproceduresfor performingthe recommen@dpreventivemaintenance
are summarizedin Table3,Thescheduleisbasedonnormalusageina commer-
cial heaRhclubenvironment;adjustthe scheduleto meetactual machineusage.
Referto the "PaRsRemovalandReplacement"_ction of this Manualfor all
disassemblyandassemblyinstructions,
TOAVOIDINJURYDUETOSLIPPERYPEDALSURFACES_DONOTUSE
PETROLEUM-BASEDCLEANERSORARMOR_LL-TYPEPRCtTECTANTS
ANYWHEREONTHISMA£HINEORTHEFLOORMATS,
Cleaning and Inspecting
1, DO NOTUSEGLASSCLEANERSORANY OTHERHOUSEHOLDCLEANER
ON THECONSOLE,Clean the console daily with a water-dampened cloth
and wipe dry after cIeanirlg,
Cleantheexteriorof your StepmilP7000PTexercisesystemdailywith
soapandwater,
Thoroughlycleantheentiremachineat leastonceaweek.
,
Inspect:the paintedsurfacesofthe exposedflamefor anyrest,bubblingor
,chipsduringtheweeklycleaning.Thesalt in perspirationcandamagethe
unpaintedsudaces.Repairttle damagedareawith arust-inhibitorpaint.
ContactourCustomerServiceDepaRmentat 800-331-3578to ordera
touch-uppaintkit,
Page 16

Cleantile stq) hinges carefully. Perspiration tends to accumulate in the
hinges and this can I@d to eventual corrosion,
6. InspectthePoly-Vbeltfor excessivewearduringtheweeklycleaning,
Adju£ thebelt tensionif necessary,
Page 17

TheStairMaster_ StepmiIP7000PTexerciseSYstemhassixcomponentsthat
requireperiodiclubrication:the drivechain°thetwo stepchains°the b_',/obearing
platesandthe step hinges.Thes4epartsareshown inthefigure bebw. Youwill
needto removethe side coversto lubricatethe chainsandthe bearingplates,
Dr_ve
1.
Placeaprotectivematonthefloor wt]i]e youare lubricatingyour
machine.A rubberfloor matk availableflom StairMasterHealth& Fitness
'_; ' c
Products_lnc,
Lubricatethe chainsmonthlywith 30W motoroil. Dripthe oil ontotile
chainplatesandroIlets.Letthe oiIsoakinfor afew minutesandthen
removeanyexcessoil wittl adryrag.
.
Removethe chainseverythree monthsto thoroughlydean andlubricate
them.Usea mild @greaseranda stiff brushto removedirt andcorrosion
fromthe chain,Readthe instructbns onthedegreasercontainerbefore
using.
Page 18

.
Cleaneachbearingplate andlubricateit with multipurposegreaseevery
threemonths.Theplate is lubricatedto reducefriction when the ot4
stlaRbearingsroll overtheplate,
Oncepermo,_lth,use3G_/motoroil or brushlight bearnggreaseintothe
stephJnge:to lubricatethehingesandto preventcorrosion.Wipeoff alI
excesslubricant,
TOREDUCETHEPOSSIBILITYOF:SLIPPING,BESURE
THESTEPAREAiSFREEOFGREASEOROIL,WIPEANY
EXCESSOILOFFTHEMACHINESURFAC:ES,
Page 19

Table 3. Recomme_ed Preventive Maintenance Schedule
E_erior
Poly-VBelt
Step Chain
DriveChain
Clean
Wipe Clean
Inspectand
adjust:if
Lubricate
Cleanand
lubricate
Lubricate
Cleanand
lubricate
D,aiil!y
Daily
Weekly or
after 70 hours
of use
Monthly or
after 300
hours of use
Quarterly or
after 9%
hoursof use
Weekly or
after 70 hours
Of u:se
QuaRerlyor
after 9%
hoursof use
Soap&
N/A
N/A
Mild
N/A
Mild
NiA
NiA
N/A
30W motor
oil
30W motor
oil
30W motor
oil
30W motor
oil
StepHinges
Bearing
Plate
'_Note: Useof lubricants other than tho_,eso specified will result in diminished
performance anda shoRer life spanfor that part.
Lubricate
Cleanand
lubricate
Monthly or
after 300
hoursof use
QuaR:erlyor
after 900
hoursofuse
c'
N/A
Clean_dry
rag
30W'motor
oil
Multipurpose
Page 20

Stairmaster 4600CL / 4600PT / 4200PT
PREVENTIVEMAINTENANCE
Most of these preventive maintenanceprocedure:scan be performed after
removingthe mid-cover:The preventive maintenanceschedule is summarized
in Table3. Thescheduleis basedon normal u_ge in a commercial health club
environment; adjust the scheduleto meet actual machine usage. Referto the
"Pa_s Removaland Replacement"section for all disassembly and assembly
Cleaning
DONOTUSEGLASSCLEANERSORANY OTHERHOUSEHOLD
CLEANERsON THECONSOLE,Clean the console daily with a water-
dampned cloth and wipe dry after cleaning.
Cleanthe exterior of the machinedaily using soapand water or a
diluted householdcleaner such as Fantastic_s_,
Thoroughlyclean the entire machine, includingthe interior, at least
once a week (s_ Table 3).
Inspecting
Inspectthe flame for any rust, bubbling, or paint chips during the
weekly cleaning. The salt in prspiration can damagethe unpainted
Inspct the Poly-V belt and HTD belts for excessive wear during the
quarterly lubrication, Adjust the belt tension if necessary:
Page 21

Lubrication
Thereare nine componentsthat need periodic lubrication: the drive chain, the
step chains, the pedalarm return springs,the step chain connectionpoints,
the pedal arm bushings,the leveling arm bushings,the spring pulley shafts,
the pedal shafts and the leveling arm pins. Thesepars are shown in Figure11,
page 74. Removethe bottom coverto get to the components.If you have a
4600 PT/CLyou will also needto removethe upper covers,
Placea protective mat on the floor whiUeyou lubricateyour machine.
A rubber floor mat is available from StairMaster÷ Health & Fitness
IRe,
Lubricatethe drive chain and tile step chains weekly.Tryto penetrate
the entire length of the chainswith 30W motoroil,
3_
Removethe drive chain and step chains everythree months to
thoroughlyclean and lubricate them. Usea mild degreaseranda
stiff brushto removedin and corrosionfrom the chains.
4w
Unhookthe pedal arm return springsfrom the spring hangerevery
week, Toprotest them from corrosion,wip the entire length of each
pedalarm return springwith a cloth dampenedwith 30W motor oil
beforereconnecting it. Replacethe spring if it is rusty or otherwise
Removethe double pitch master link from the step chain connection
points everythree months_Cleanthe master link and the bushing in
the pedalarm. Lubricatethe master link and bushingwith a thin coat
of:multi-purpose grease before reassembling_
Removethe pedal armsand leveling armsever},three months,Clean
the pedal arm and leveling arm shafts and bushingswith a clean
cloth, Protect the shafts from corrosionby wiping them with a cloth
dampenedwith 30W motor oil,
Page 22

TO REDUCE THE POSSIBILITY OF SLIPPING, BE SURE THE PEDAL
AREA IS FREEOF GREASE OR OIL, WIPE ANY EXCESSOIL OFF
THE MACHINE SURFACES.
Remove the spring pulleys every three months, Clean the spring
pulley shafts with a dry cloth, Protect the shafts from corrosion with a
thin coat of: multi-purpose grease before reassembling.
8_
Removethe tmdals every three months. Cleanthe pedal shaft and
leveling arm pin with a dry cloth, Protectthe pedal shaft and leveling
arm pin from corrosionwith a Uightcoat of muki-purposegrease
before reassembling.
Battery Charge
If you havea 4_/0/4400 CL,removethe bottom cover and checkthe battery
voltage level every three months.
Usingyour mukimeter, touch the red leadto the positive
terminal of the battery and the black leadto the negative terminal
If:the voltage le,/el is less than 6.1VDC,chargethe battery.Plug
the wall pack battery charger into file connector located nearthe
bottom d the leR bottom cover:Chargethe battery for approximately
24 to 48 hoursandthen recheck it. It is okay to usethe machine
while the battery charger is connected,
Page 23

Table 3: Recommended Preventive Maintenance Schedule
CO|!sol÷
;_i_ and
d-_ms
StepC ' o
St@ Cllain
Connection
PoiIT_
Spring
Pulley
Shafts
Lubrimte
Cleanar_
lubricate
Cleanand
lubricate
Cleanar_
lubli_te
FRE@JEN_
Daily
Dai!_y
MOlltJ]ly or
aR_ 30)
Iqo|Jrsof use
QJa_e:lyor
h_urs
E_p/3
malths or
after 9E_
houP5
malths or
after 9['#
C_ANER
W_:_
Dilu't_
b3usa_old
clearer
_A
Mild
_A
_%Wmotor
oil
Mu:lti.
B_rp_e
grease
Mu:_b
pJrpr_e
gr,.a_e
Pe@l
Shafts and
Le,_qing
_m Pins
P_]al Am/
Springs
B_teu
Cleana[_
lubdca[e
Cleanal_
lubdo3te
Che_±VOltage
l:nsp_::t&
Adjust Tension
B_p! 3
mcJlths or
_er 9i_j3
hOUB
E'_£rf3
m_'ltjls or
after 9CO
houB
Derj 3
mOrl_lS or
after %0
hours
E'_ry 3
mal_IS or
after 9_3
houB
Cl_n_dry
rag
N/A
N_
Mu_i-
Ftlrpc_e
grease
Clean,oil-
dampen_
rag
NiA
NiA
*Note: Use of lubricants other than those spec will resultin
dimini pe rice and a shorter life for that paN.
Page 24

Figure 11: Pa_s Needing Periodic Maintenance
DriveC_in
Leveli_ ArmPin
PedalS_
S_p C_in
Ped=lArm
I_velingArmShaft
_elj_ Arm B_hi_
Fed_lArmS_
Page 25

Stairmaster 3800 Bike
PREVENTIVEMAINTENANCE
The procedures for performing recommended preventive maintenance on the
Momentum systems r_/cleergometer are summarized in Table 5,
DO NOT USEG_SS CLEANERORANY OTHERHOUSEHOLD
CLEANERSON THECONSOLE.Clean the console daily with awater-
dampened cloth and wipe dry a_er cleaning,
Clean the exterior covers, the pedals, and the seat on a weekly
basis using either soap and water or adiluted, non-mineral based
househoH cleaner such as Fantastic®.
Weekly Inspection
Frame: Inspect:the paintedsurfacesof the exposedframefor anyrust,
bubbling,orchipsduringthe weekly cleaning,Thesalt in perspiration
will damageunpainted surfaces.Repairthe damagedareawith a
touch-up paintkit:provid_ byStairMaster÷ Health & FitnessProducts,
Inc.(partnumber22181).
Pedals:: Insf_ct the pedalfoot straps at both the insideandoutside
attachment sites,Replacethe foot strapsif they are torn or ripped,
3_
3:800RC:Inspect:the seat assemblymovementto ensurethat the seat
movesfreely onthe seat track, Notethat the centerwheel on eachside
of the seatassemblyis_centdc, Thesewheels areadjustable by
looseningthe nut turning the wheel to adjustthe height,and then
tightnening the nut. if necessary,adjustthesetwo wheels to alJowthe
seatassembJyto move freely onthe seattrack.
Page 26

Monthly Inspection
Pedal crank: Inspectthe crankbearingsfor either excessiveplayor
tightness, Eitherconditionwill reducethe Fifeof the bearings.Ensure
the bearingdampsare tighL Referto the "Part Removaland
RepLacement"section of this manualforthe properadjustment
Belts: inspectthe HTDand PoJy-Vbelt for excessivewear,Adjust the
belt tension if necessary.
HTDBelt:Adjust the HTDbelt tensionto allow 1/2" of belt deflection
with fingertip pressurebetw_n tile idler pulley andthe HTDsprocket.
THEBELTSMUSTBEPROPERLYTENSIONED,A BELTTHATISTOOTIGHTWiLL
CAUSESLOWANDSLUGGISHOPEBATION,A BElTTHATISTOOLOOSEWILL
CAUSEEXCESSIVENOISEAND BELTWEAR,
Page 27

To adjust the tension:
• bosen the idler
assemblyscrew sothat
the idler pulleycanslide
upanddown,
• Slidethe idler pulleyup Main flame
Idlerassy
or downto tighten or
loosenthe belt,
o
Oncein position,tighten the idler assemblyscrew.
o
Verifythe HTDlmlt tension.
Poly-Vbelt: Make sum the belt is centered on the pulleys, Toadjust the
tension:
• Loosenthe top alternator attachment screw and the alternator
adjustment nut. Pivot the alternator up or down as necessary to
allow .25" (0.6cm) of belt deflection with fingeRip pressure at the
center of the 'vertical portion d either side d the belt:,
• Tighten the top alternator attachment screw and the alternator
adjustment nut, Verify .25" (0,6cm) of play in the belt and ,10" gap
between speed sensor and the speed sensor disk.
Alternatorbeltadjustmentnut
Speedsensor Topalternator
_10Max
Speedsensordisk
22517
attachmentscrew
Mainflame
Page 28

Maintenance
Table 5. Preventive Maintenance Schedule
Console Wipe clean Daily
Soap &
Seat
Pedals&
footstraps
Seat post
3400 CE
Wipe clean
Clean & inspect
Clean & inspect
Daily
Eachweek,
or after
e/ery 70
hoursofuse
Eachweek,
or after
e/cry 70
hours of use
Eachweek,
or after
every 70
hours of use
diluted
household
cleaner
Soap &
diluted
household
cleaner
Soap &
diluted
household
cleaner
Clean,dry
rag
Seattrack
3800RC
Crank
bearings
Belts
Clean & inspect
Inspect
Inspect
Eachweek,
or after
e/ery 70
hours of use
Eachmontih,
or3%
hours
Eachmonth
or 300
hours
Clean,dry
rag
N/A
N/A
Page 29

Stairmaster ClubStride 5100NSL Elliptical
....
Upon receivin_ your machine, use a soft, clean towel to wipe off the dust, which
may have accumulated during shipping. Your new machir_e will require minor
assembly. Refer te the"lnstallation [nstructions" section for details.
Cleaning
= DO NOT USE GLASS CLEANERS ORANY OTHERHOUSEHOLD CLEANERS
ONTHE CONSOLE. Clean the conso4e daily with a water-dampened c_oth and
wipe dry after cleaning.
2. Clean the exterior of the machine daity using soap and water or a diluted,
nonomineral based househokt c_eaaer such as Fantastic@.
laspectien
Frame: Inspect the frame for any rust, bubbling, or paint chips during the
weekly cleaning. The salt in perspiration can dama#e the unpainted surfaces.
Repair the damaged area with atouch-up paint kit purchased from Nautilus
(call Customer Service for order information).
Page 30

Schwinn Windrigger
Use a damp cloth to wipe your Windrigger rower and computer free
of sweat, IMPORTANT: To avoid damaging the finish on your
Windrigger rower and computer, never use a petroleum-based
solvent when cleaning, Avoid getting excessive moisture on
the computer.
Page 31

Schwinn IC Spinning Bikes
II Dai|y maintenance
Dry the Schwtnn Evolution Bike a_er each use to
remove sweat and molsSure_ Wlpe your SchwJnn
Evolution Bike regularly with a mlld_ non°abrasive
cWeaner and water so[u_on_ Rinse to remove
detergent residue and then dry
[MPOEANT! To avoid damaging the finish on your
Schwlnn Evolution Bike, never use a _troleum o
ba_d solvent when cleaning,
| Chain adjustme_
The chain on your _hwlnn Evo[udon Bike has been
fa_or¥ set and lubrlcatedo It should not require an_
Immediate a_entUon. Over time however you m_
need to make minor tension adjustmen_
1oWith an adjus_bIe wrench, loosen the two _l_
on either side of the flywheel (Fig, 11}
2__ghten the _o smaller nuts which go through
the frame tube evenly by turning clockwise until
there is approximately 3/16" of slack [n the chain
(Fig. 12L
3, Tighten the _o larger nuts on the sides _ the
fl_hee[ (FIgo 11L
Page 32

Nautilus Stairmaster SM916 Stepmill
Maintenance
Maintenance Records
For ease of maintenance the StepMill ':_SM916 console w[[[ keep track of hours,
number of workouts, 5me between _ast servicing, etc, You can access any of the
custom menus Iby pressing [LEVEE UP], [4], [ENTER]. The censure wi[[ men display
MACH[NE STATUS, Use the [Level: UP] and [Level: DOWN] keys to scroll through
the opt:ions. For details, refer to me Machine Status Console Codes in the previous
Resetting the Maintenance Hour Timer
After each maintenance period reset the counter. Press [LEVEL: UP], [7], [ENTER].
Then use the Level keys to scroll through the options. When MAINT HOURS is
displayed, press [ENTER]. Press the [0] key;, then press [ENTER]. Press [CLEAR] to
return to the opening screen.
Moving your StepM[[[ ¢ SM916
The StepMil[ ¢ SM916 is deffvered with a_ached transport wheells. These same
transport whee_s will be used whenever the machine needs to be relocated.
Note: 2 people are requ#ed to attach/remove the transpo_ wheels and move or
relocate the machine. The transport wheels are intended for indoor use
only and should never be relied on concrete or asphalt su#aces.
initial Se_ice
Upon receiving your machine, use a so_, clean towe_ to wipe offthe dust, which
may have accumulated during shipping. Your new machine will require minor
Refer to the Assembly Manual for details.
Cleaning
Do not use glass cleaners or any other househoW c_eaners on the console.
Clean the console dai_y with a water°dampened cloth and "wipe dH a_er
cleaning.
The safeb/and performance of:this product: can be maintained only if it is
inspected regularly for damage and wear:
Pay pa_icular a_ention to cemponent:a most susceptible to wear such as steps
and lower side covers.
Remove any damaged machine from service and replace damaged compo=
nents
Direct any question regarding mantenance or its function to a qualified
Nautilud _'Technician. For contact information p_ease see the [tape,ant
Contact Numbers page atthe back of this manual
Page 33

Maintenance
2_
Clean the exterior of the machine daily using soap and water or a diluted, non =
mineral based householld cleaner such as Fantas5_ _:'.
Maintenance Sched._e
Oaily Weekly
Ge.eraJ Maintenance
CheckSafety & Warnir_g
Labels
Spot Check Step Chains
AlternatorBelt:Tension
Lubric_ien
Drive Chains
Step Hinges
Bearing Plate
Cleaning
Clean Console X
Clean Side Cove_ X
Monthly
X
X
X
300 hrs.
X
X
Cleanwith a water dampened cloth
and wipe dr,/after cleaning.
Clean exterior with soap andwater or
a diluted household cleaner_
Co|_m ellis
Tension to 40-54 i:nlbs
MuI;ti*Purpose grease
Inspection
1. Inspect the frame for any rust, bubblling, or paint chips during the da[_y cleaning.
The salt in perspiration can damage the unpainted sudaces. Repair the
daraaged area ,Mth a touclh-up paint kit purchased from Nautilus ®{call Customer
Service for order information}.
Parts and Service
Regular and scheduled mah_tenance vv[l[ prolong the life of your Nautilus _
equipment. Only use genuine Nautilus ® replacement pa_s. The Nautillus ® Customer
Service Team inv[t:esyou to call in :your order for replacement parts.
E×ternal Power SuppJy
The StairMaster '_;'CommerciaE Series StepMiJJ®SM916% external power SUplp[yis
supplied 'with the unit and pk_gs into a standard ! 15 voJt, 15 amp outlet, era 220°240
volt 50 Hz, 10 amp outlet. {A]II major voltage plugs are avaiEaMe.) The pJugoin for the
external power supply is located on the underside of the machine.
Page 34

iMPORTANT: If installing the optional LCDMonitor; refer to the NV915installation
manual at this time.
The console will power on and remain powered whenever the external power
supply is connected.
Recycling
Do not dispose of this product as refuse. This product is to be recycled. For
informatio n on the proper method of disposal contact a Nautilus _' Customer
Service Representative.
If you have quesbons, contact the Customer Service Depaltment st 800=NAUT&US
(_0-628-8458), Internationa_ Office (41) (26) 460 77 77 or refer to the mmportant
Contact Numbers section in this manuaJ.
Page 35

Nautilus Stairmaster SC916 Stairclimber
Maintenance
Maintenance Records
For ease ef maintenance the SC918 Stairg[[mber console w'[H keep track of: hours,
number of workouts, time be_een rust servicing, etc. You can quickly access any
of the custom menus by pressing ]LEVEE UP], [4], [ENTER]. The console wi[_ then
display "MACHINE STATUS." Use the [Level: UP] and [Leve_: DOWN] keys to scroll
through the options° For detaills, refer to the Machine Status Console Codes [n the
previous sec_on.
Resetting the Maintenance Hour _mer
A_er each maintenance period reset, the counter. Press [LEVEL: UP1, ]7], [ENTER].
Then use the Lever keys to scroll through the options. When "MAINT HOURS" is
displayed, press [ENTER]. Press the ]0] key, then press [ENTERIo Press ]CLEAR] to
return to the opening screen.
Moving your SC:916 Sta[rC[[mber
Stand in front of the machine and grasp the handmebars.
transport wheels are [n contact with the ground.
Note: Do not push down on the plas_c shroud with your feet when tilting the
machine up to contact the transport wheels with the ground. Use the
stabilizer bars instead, to avoid any damage to the plastic covers.
The machine can now be rolled on the transport wheels°
Note: The transpo_ wheels are intended for indoor use only and should never be
rallied on concrete or asphalt surfaces.
[nit[a_ Service
Upon receiving your machine, use a so% clean towel to wipe offthe dust, which
may have accumulated during shipping. Your new machine w[_[ require minor
assemNy. Refer to the Assembly Manual for details.
The safe_ and performance of this product can be maintained only [f [t is
inspected regularly for damage and wear.
Pay iparticu_ar a_ention to components most sasceptiNe to wear such as
Contact Heart Rate housing, Foot peda_ pads and Lower side covers.
Pull down unSI the
Remove any damaged machine from service and repllace damaged compo-
nents
Direct any question regarding mantenance or its function to a qua_[f[ed
Nautilus Teclhn[cian. For contact information p_ease see the Important Contact
Numbers page atthe back of this manual.
Page 36

Maintenance Schedule
General Maintenance
X
X
X Tension to 3045 inlbs
300 hi's,
Or e_®p/
900 his
X
CleanLo,_r SideCovers
Sp,fiags ............. soaked rag,
x
X Clean, then wipe with lightly oil;
Clean with a water dampened cloth
and wipe dry after cleaning,
a diluted household cleaner,
30W OiI
Multi-Purpose glgase
M Iti-Purpo se g_ ase
soap or
C|eaning
11. Do not use glass cleaners or any other househoW cleaners on the consoJe.
Clean the console daily with a water°dampened c_oth and wipe dry a_er
=
Clean the exterior of the machine daffy using soap and water or a diluted, non °
mine_al based househoW c_eaner such as Fantastic ®.
i pect[on
1.
lnspectthe fl"ame for any rust, bubbling, or paint chips during the daily cleaning.
The salt in perspiration can damage the unpainted surfaces. Repair the
damaged area with a touch-up paint kit purchased from Nautilus ®(ca[[ Customer
Service for order information).
Parts and Service
Regular and scheduled maintenance will prolong the fife of your Nautilus ®
equipment. Only use genuine Nautilud _ replacement parts. The Nautilus ® Customer
Service Team invites you to ca[[ in youm"order for replacement pa_s.
Page 37

Maintenance
Checking the Baffery Charge
1. Using your mu_timeter, touch the red lead to the positive terminaJ
a diluted, non°rain of the battew and the black lead to the negaUve terminal
2. If me vo_tage leve_ is less than 6.1 VDC, charge the ba_ewo
Charging the Battery Back=Up
The StairMasteP _ Commercial Series SC916 StairgJimber is selfpowered (cordless}
with a rechargeaNe baEew bacbup. TypicaH% the StairClimber can be operated
without p_ugging in the externa_ power suppb/, if, however, the console flickers
during operation orthe console display does not light up while using the machine,
then use the externa_ power supply to recharge the bakery back-up.
The external power supply is suppJied with the unit and p_ugs into a standard
115 volt, 15 amp out_et, or a 220 volt, 10 amp oudeL {AH maior voltage plugs are
availlaNe.} The plugoin for the extema_ power supply is _ocated in the front of the
machine atthe base.
IMPORTANT: If #_staHing the opSonal LCD Monitor, refer to the NV915 installation
manual at this 5me.
Plug the wall pack externa_ power supply into the connector and charge the ba_ew
for approximately 24 hours and then recheck it. it is okay to use the machine whi_e
the external power supply is connected.
The console will power on as user starts to move the pedals of:the machine, and
will stay [it for up to 60 seconds in pause mode. The console wi[[ power off after
60 seconds of stopping exercise. The console will power on and remain powered
whenever the external power supply is connected°
Battery Disposal
When ordering new bakeries, you will need to property dispose of: {recycJe)your old
Jeadoacid bakeries. Most federaJ and state regulations require Jeadoacid bakeries
to be recycJedo Do not throw away aid bakeries. Lead is a toxic heavy metal,
hazardous to living organisms.
 Loading...