


NA1550
AV Media Receiver
User Manual
Enjoy the Lifestyle of In-Car Entertainment

CONTENTS
Contents
Thank you for purchasing a Nakamichi products.
Please read all instructions carefully before operation, to ensure your complete understanding and to obtain the best possible performance from the unit.
INTRODUCTIONS |
|
What’s in the box.............................................................................. |
2 |
Installation ..................................................................................... |
3 |
Wiring diagram ................................................................................................... |
4 |
Overview the unit ............................................................................. |
5 |
Basic operations............................................................................... |
|
|
6 |
AV MEDIA |
|
Listening to the radio......................................................................... |
7 |
Playing of USB/SD/DISC..................................................................... |
8 |
Playing of Music................................................................................ |
9 |
Enjoying the movie............................................................................ |
10 |
Viewing the photo............................................................................. |
11 |
AUDIO ADJUSTMENT |
|
Speaker/Subwoofer........................................................................... |
12 |
Equalizer......................................................................................... |
13 |
BLUETOOTH |
|
Using bluetooth................................................................................ |
14 |
MIRROR PHONE |
|
Smart Phone Mirroring - AV System............................................................................... |
15 |
REFERENCE |
|
Specifications.................................................................................. |
16 |
1
INTRODUCTIONS
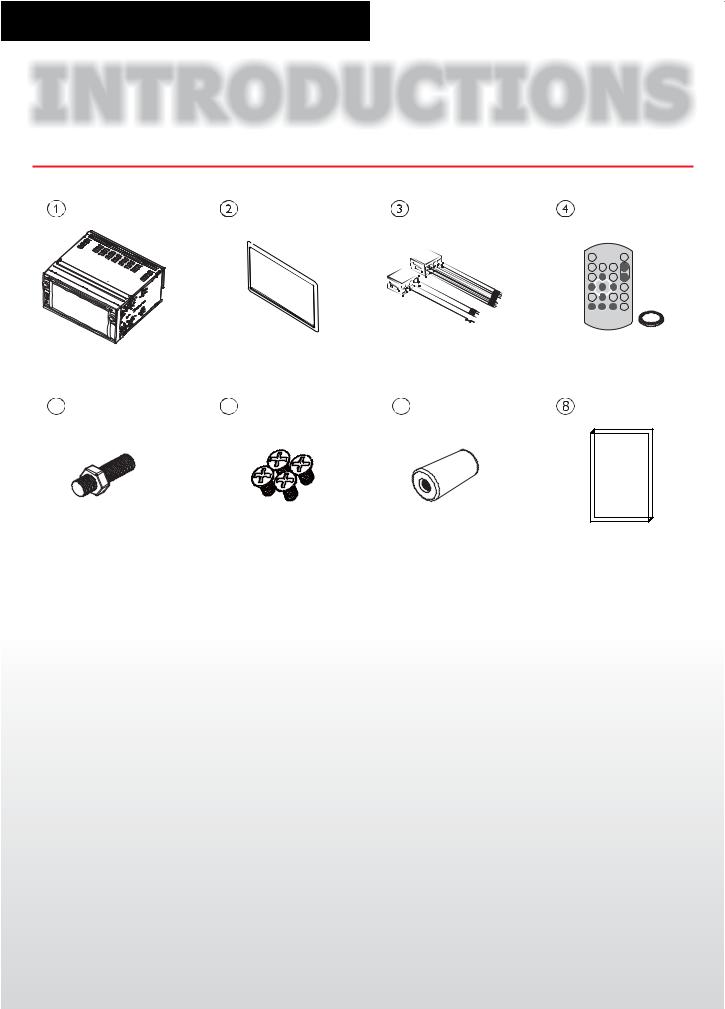
What’s in the box
5 |
6 |
|
|
|
7 |
|
|
|
|
|
|
|||||||||||
|
|
|
|
|
|
|
|
|
|
|
|
|
|
|
|
|
|
|
|
|
|
|
|
|
|
|
|
|
|
|
|
|
|
|
|
|
|
|
|
|
|
|
|
|
|
|
|
|
|
|
|
|
|
|
|
|
|
|
|
|
|
|
|
|
|
|
|
|
|
|
|
|
|
|
|
|
|
|
|
|
|
|
|
|
|
|
|
|
|
|
|
|
|
|
|
|
|
|
|
|
|
|
|
|
|
|
|
|
|
|
|
|
|
|
|
|
|
|
|
|
|
|
|
|
|
|
|
|
|
|
|
|
|
|
|
|
|
Check and identify the contents of the package:
1 |
Main unit |
5 |
Hexagon head screw |
2 |
Trim plate |
6 |
Screw X 4(M5 x8mm) |
3 |
ISO male connector X 2 |
7 |
Rubber cushion |
4 |
Remote control & battery |
8 |
User manual |
2
INTRODUCTIONS
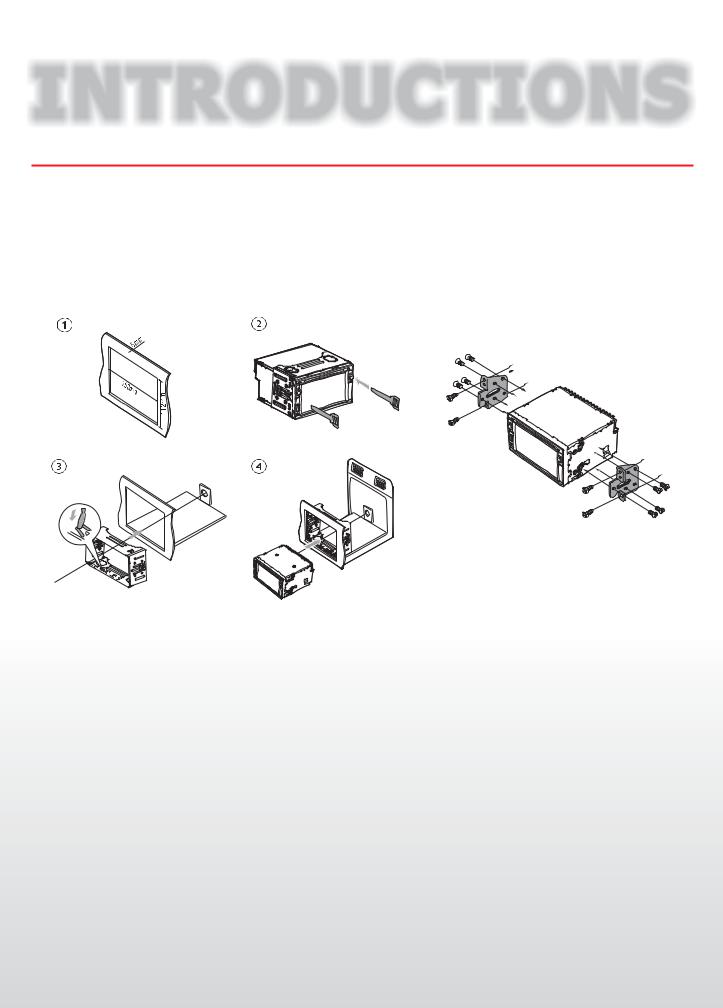
Installation
The following illustration shows a typical installation. If you have any question or require information regarding installation kits, consult your customer car audio dealer or a company suppling kits.
If you are not sure how to install this unit correctly, have it installed by a qualified technician.
Mount in the dashboard:
1 |
2 |
You may be able to install this unit
in some makes of car without the
supplied bracket.
5
1.Make sure that the car dashboard opening is within these measurements.
2.Remove the mounting sleeve with the supplied disassembly tools.
3.Install the sleeve into the dashboard and bend the tabs outward to fix the sleeve.
4.Slide the unit into the sleeve until you hear a “click”.
5.Attach the trim plate.
 All the mounting sleeve & screw are not included in this packing.
3

INTRODUCTIONS
Wiring diagram
(White) |
|
|
|
Front Line Out |
External Bluetooth Microphone |
||
|
(Black) |
|
|
(Red) |
Parking Wire |
BrakeSwitch |
|
Reverse Camera Wire |
|
||
(Pink) |
|
||
(Purple) |
Ground |
||
|
|||
(White) |
Mirrro Phone Black Box |
||
(Black) |
|
||
OE Steering learning Remote |
|
||
|
|
||
(Black-GND) |
|
|
|
(White) |
|
|
|
Steering wheel remote |
|
|
|
Optional |
|
|
|
(Not included) |
|
Mirror Phone Black Box |
|
|
|
(not included) |
|
|
|
|
|
|
|
AV-IN |
REAR OUT |
SUB W OUT |
|
|
|
|
|
|
|
|
R |
R |
|
|
|
B |
1 |
3 |
5 |
7 |
FUSE |
|
|
|
|
|
2 |
4 |
6 |
8 |
L |
L |
CAMERA IN |
Radio Antenna |
|||
|
|
|
|
|
||||||
|
|
|
5 |
7 |
|
|
|
|
|
|
A |
|
4 |
|
8 |
|
|
|
|
|
|
|
|
|
|
|
|
VIDEO IN |
VIDEO OUT 1 |
VIDEO OUT 2 |
|
|
ISO Male |
|
|
|
|
|
|
AV IN |
|
REAR OUT |
SUB W OUT |
Connector |
|
|
|
|
|
|
|
|||
|
|
|
|
|
AUDIO IN RIGHT |
REAR OUT RIGHT |
|
SUBWOOFER OUT |
||
|
|
|
|
|
|
|
||||
|
|
|
|
|
|
AUDIO IN LEFT |
REAR OUT LEFT |
|
CAMERA IN |
|
|
|
|
|
|
|
VIDEO IN |
VIDEO OUT 1 |
|
VIDEO OUT 2 |
|
|
|
|
|
|
|
|
|
|
||
|
|
|
|
|
|
|
VIDEO IN |
|
|
|
PIN WIRE COLOR FUNCTION/LABEL
A4 |
YELLOW |
BATTERY(+) |
|
|
|
|
|
|
|
|
|
|
|
|
|
|
|
|
|
|
|
|
|
|
|
|
|
|
|
|
|
|
|
|
|
|
|
|
|
|
|
|
|||
A5 |
BLUE/WHITE |
REMOTE |
|
|
|
|
|
|
|
|
|
|
|
|
|
|
|
|
|
|
|
|
|
|
|
|
|
|
|
|
|
|
|
|
|
|
|
|
|
|
|
|
|
|
|
A7 |
RED |
IGNITION (ACC) |
|
|
|
|
|
|
|
|
|
|
|
|
|
|
|
|
|
|
|
|
|
|
|
|
|
|
|
|
|
|
|
|
|
|
|
|
|
|
|
|
|||
A8 |
BLACK |
GROUND |
|
|
|
|
|
|
|
|
|
|
|
|
|
|
|
|
|
|
|
|
|
|
|
|
|
|
|
|
|
|
|
|
|
|
|
|
|
|
|
|
|
|
|
B1 |
VIOLET |
RIGHT REAR SPEAKER (+) |
|
|
|
|
|
|
|
|
|
|
|
|
|
|
|
|
|
|
|
|
|
|
|
|
|
|
|
|
|
|
|
|
|
|
|
|
|
|
|
|
|
|
|
B2 |
VIOLET/BLACK |
RIGHT REAR SPEAKER (-) |
|
|
|
|
|
|
|
|
|
|
|
|
|
|
|
|
|
|
|
|
B3 |
GREY |
RIGHT FRONT SPEAKER (+) |
|
|
|
|
|
|
|
|
|
|
|
|
|
|
|
|
|
|
|
|
B4 |
GREY/BLACK |
RIGHT FRONT SPEAKER (-) |
|
|
|
|
|
|
|
|
|
|
|
|
|
|
|
|
|
|
|
|
|
|
|
|
|
|
|
|
|
|
|
|
|
|
|
|
|
|
|
|
|||
|
|
|
|
|
|
|
|
|
|
|
|
|
|
|
|
|
|
|
|
|||
|
|
|
|
|
|
|
|
|
|
|
|
|
|
|
|
|
|
|
|
|
|
|
B5 |
WHITE |
LEFT FRONT SPEAKER (+) |
|
|
|
|
|
|
|
|
|
|
|
|
|
|
|
|
|
|
|
|
|
|
|
|
|
|
|
|
|
|
|
|
|
|
|
|
|
|
|
|
|||
B6 |
WHITE/BLACK |
LEFT FRONT SPEAKER (-) |
|
|
|
|
|
|
|
|
|
|
|
|
|
|
|
|
|
|
|
|
|
|
|
|
|
|
|
|
|
|
|
|
|
|
|
|
|
|
|
|
|
|
|
B7 |
GREEN |
LEFT REAR SPEAKER (+) |
|
|
|
|
|
|
|
|
|
|
|
|
|
|
|
|
|
|
|
|
B8 |
GREEN/BLACK |
LEFT REAR SPEAKER (-) |
|
|
|
|
|
|
|
|
|
|
|
|
|
|
|
|
|
|
|
|
|
Amplifier |
|
Optional |
Optional |
Optional |
(Not included) |
(Not included) |
(Not included) |
4

INTRODUCTIONS
Overview the unit
Eject |
|
|
Mic |
MIC |
Remote sensor |
|
|
HOME |
HOME |
03:38 |
DIM |
|
|
||||
Hold: Power |
|
|
|
|
Press: Mute |
EQ |
|
|
FMSELECT |
Rotate:Volume |
|
|
|
90.30 |
|
MUTE |
|
|
|
|
|
|
|
|
|
FM3 |
102.80 |
|
94.70 |
|
MHz |
102.80 |
||
|
|
|
|
|
|
|
|
|
104.00 |
USB Socket |
|
|
|
108.00 |
|
|
|
|
|
Aux-In Jack |
|
AM |
|
|
|
|
|
|
|
Press: TFT Dimmer Hold:TFT Off
Rotate:Up/down
Press:View the clock
Hold: Will pop up the virtual control buttons.
(This function only avaiable until the external mirror box is connected.)
|
Media SD Card |
SD |
Socket |
|
Reset |
Turn mute or restore volume 

Access into dimmer settings Playback list browser


up/down AccessintotheHOMEmenu
Confirm an option
Tune for radio station
Skip/search for track
Fast backward/forward playback
Radioband
Mediaplayback PauseorResumeplay
Select audio channel 
 Access the DVD main menu

 Power on or off
 Adjust the function o AV source
 Increase/Decrease the volume
 Returntothepreviousitem.

 Enter into the Setting mode.

 Select EQ mode
 iX-BASS booster function On/Off

 Dynamic bass boost sound On/Off
  Bring up the Title Menu
5
 Loading...