


My Nakamichi CD-45z Installation Manual
Introduction: I created this short manual to assist people in installing a new stereo to their Subaru. I have attempted to provide relevant pictures and diagrams to assist. Some of these have been taken from other websites and I have tried to reference them where appropriate.
Background: I have owned my ‘95 Subaru Impreza since I was in high school and have loved every minute of it. When I graduated my parents got me a new stereo for it, an Eclipse 5341R. This is a very nice stereo. One year later, when in school in California, my parents got me a ‘99 Subaru Outback. I had the Eclipse moved over to this vehicle. Later, upon coming back to Kansas, I began to drive my Impreza again. It has the standard Subaru stereo in it which provides truly unacceptable sound. Sometimes I wonder why car manufacturers even waste their time putting in the horrible stereos they do into cars. They must own large amounts of stock in the companies they use… Anyways, after suffering with it for a while I became frustrated enough to purchase a new stereo. I decided to do the install myself despite the entirely lacking amount of information on the web about the wiring on a Subaru. The head unit I decided to install was the Nakamichi CD-45z. I got an incredible deal on one on eBay. So, doing my own install helped to further save me money.
Tools Needed:
Philips Screwdriver (preferably magnetic tipped to aid in not losing screws)
Regular Screwdriver (helps in prying apart some components, remember to be gentle!) Wire Cutters and/or Needle Nose Pliers that can cut wires
Larger Pliers that can be used to exert large amount of force to crimp things 6 Male Bullet Plugs for 14-16 Gauge Wire
6 Female Bullet Plugs for 14-16 Gauge Wire
The Installation: Below is a picture of where the install both starts and should ideally finish. This is, obviously, not my original stereo. I had already gone through installing my new Nakamichi before I wrote this manual.
Disclaimer: I am in no way responsible for anything you do to your car, your stereo, yourself, anyone else, or any other form of property. I suggest that before starting you remove the power from your vehicle. You could and likely will cause serious damage or possibly even loss of life by failing to do so. Basically, I am not responsible for anything you do or any mis-statements made in this manual. Remember, you need to do your own thinking. I am not here to do it for you. If something I say doesn’t make sense, then do not procede. Either I am wrong, or you do not understand what to do properly and so you shouldn’t be doing it in the first place!
One of the first steps to start off with is to pull the parking brake and to stick the car in first. To do this you will need to stick the key in the ignition and rotate it.
REMEMBER, DO
NOT FORGET TO
PULL THE PARKING
BRAKE!!!
The purpose of this is to give you more space to use, which in particularly needed when removing the center dash unit which holds the stereo, lighter, and ashtray.
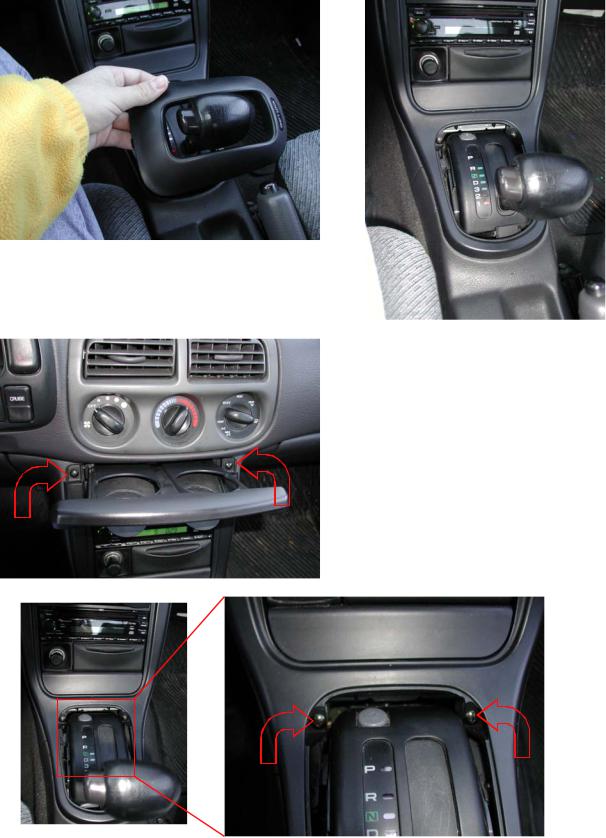
The next step is to remove the shifter cover. To do this note the small notch at the bottom, near the parking brake, insert a regular screwdriver there to pop it up and then rotate it 90 degrees to take it over the shifter. The picture on the left shows this process com-
Now, open the cup holder. We are then going to remove the screws to the left and right of the cup holder. This frees the top portion of the outer trim assembly for the center of the dash.
In the two pictures below, I show the two screws to remove to release the lower portion of the outer trim assembly. Make certain to keep these 4 screws for use when reinstalling the trim piece.

A quick snapshot of the 4 screws removed in the previous steps. Just provided for reference incase it is useful for someone...
The next step is to remove the outer dash trim piece. To do this just start pulling up at the top and work your way down. I have shown the before and after pictures on the left and right respectively.
Now, remove the four screws holding in the center dash rack. This rack holds the entirely CD, ashtray, lighter, etc assembly. Be careful, underneath this unit is the airbag control system. We would not want to inadvertently damage it in the process. On the next page is a large picture showing the four screws to remove. The picture on the let is before removing them. On the right is after.
 Loading...