

Page 1

U P D A T E N O T E S
Flash Remote Handset
ISSUE 2
Page 2

Page 3

Introduction
These update notes provide detailed operating instructions for
the Naim Audio Flash Remote Handset, software version
RCc01-02. If you have received these notes as part of a
software update pack you must first read Appendix 1 –
Software Update Procedure and follow the instructions to
update your handset with the latest software.
Operation
Introduction
The New Flash Remote Handset provides the following features:
•
Preamp, CD, Tuner, AV processor, DVD and Subwoofer
control functions.
•
Menu driven setup facility.
•
User defined softkeys.
•
Central command indicator.
•
Fully backlit.
•
Ambient light level detector.
•
Movement sensor.
•
Powerful multi-directional IR transmitter.
•
Fully future-proof software architecture.
•
Low battery warning.
The following sections provide detailed instructions for using
and setting up your Flash. For a detailed description of
product specific commands and their function please refer to
the appropriate product manuals.
Mode selection
The Flash remote handset has 3 modes of operation, Two
Channel mode (2CH), Audio Video mode (AV) and Setup
1
Page 4

mode (SETUP). To switch between 2CH and AV modes press
the Navi key (<>) for a short time. To enter SETUP mode,
press and hold the Navi Key (<>).
2 Channel mode
2
Page 5
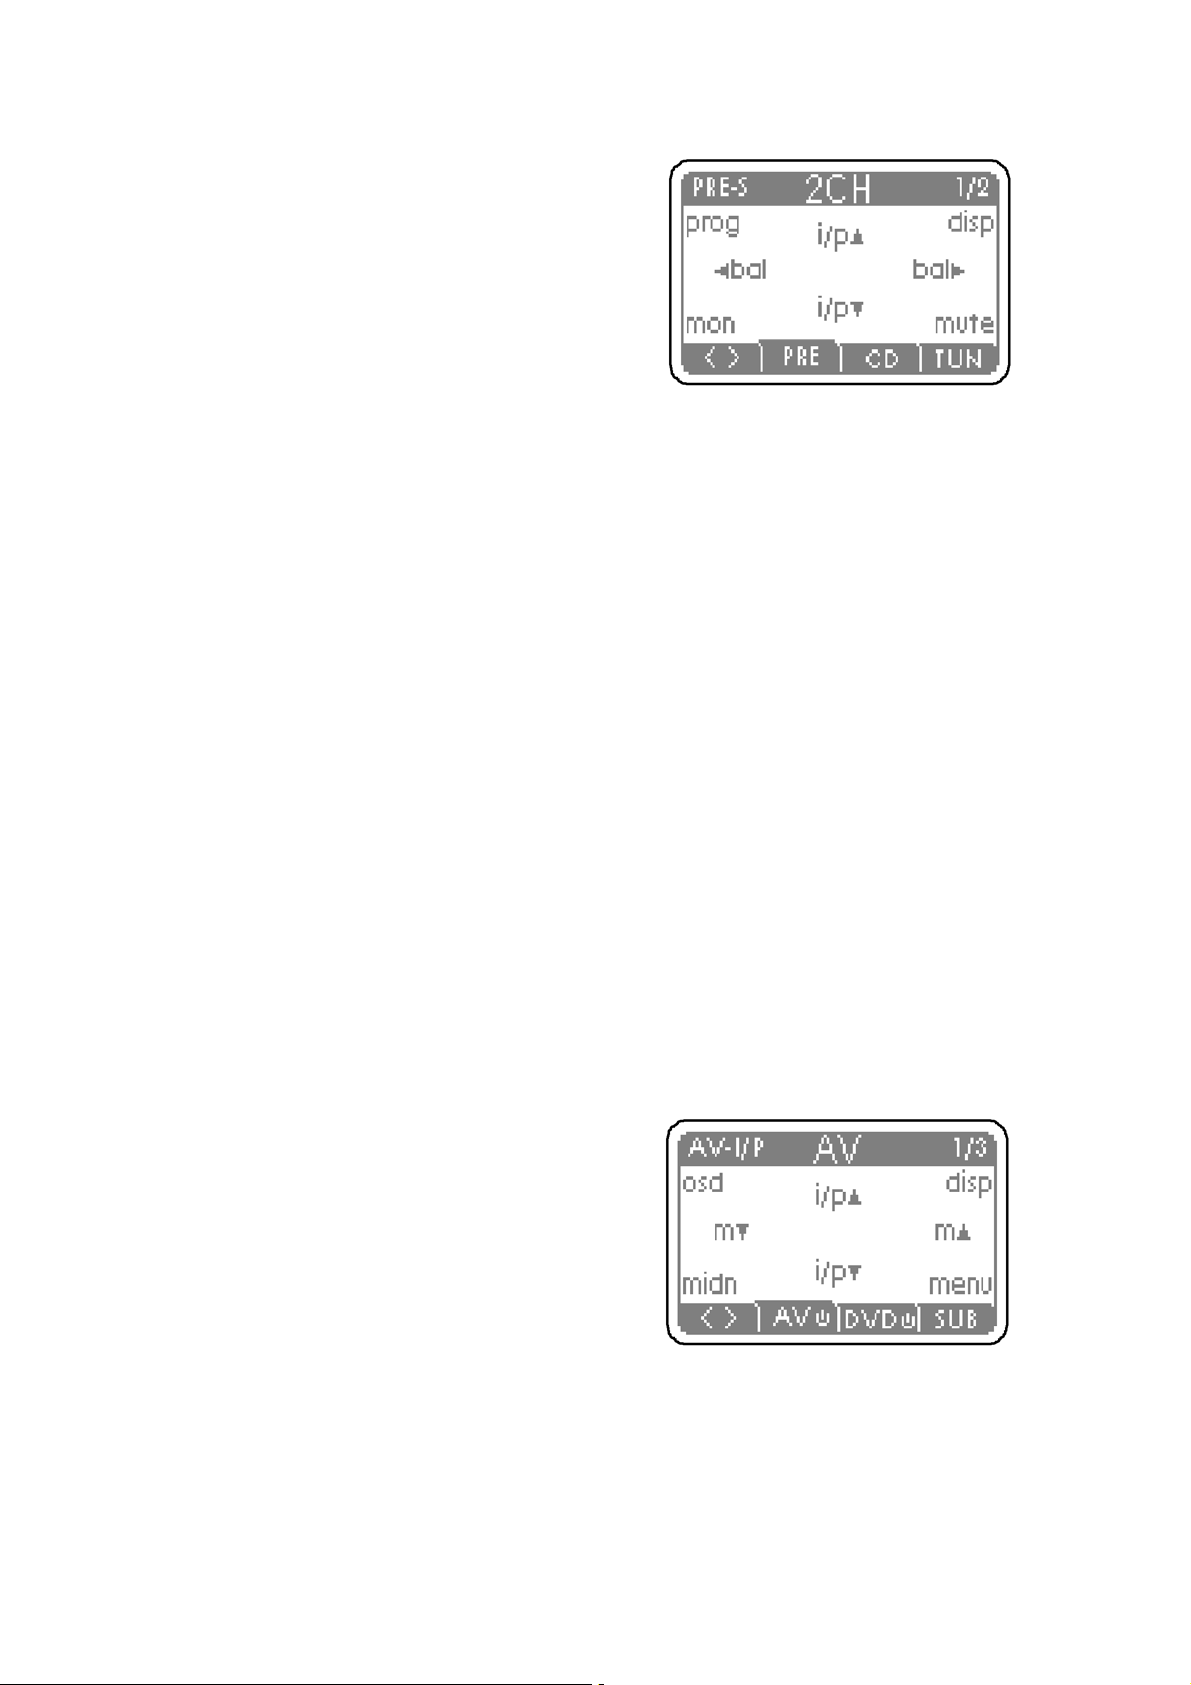
2 channel mode is used to
control 2 channel products such
as preamps, CD players and
tuners. Volume down (6), mute
(mute) and volume up (5)
hotkeys control preamp volume
in this mode.
Preamp key (PRE)
Selects 1 of 2 preamp pages.
PRE-S - Numeric keys control preamp source selection.
PRE-R - Numeric keys control preamp record selection.
CD key (CD)
Selects 1 of 3 CD pages.
Numeric keys control CD track selection.
TUN key (TUN)
Selects Tuner page.
Numeric keys control tuner preset or direct frequency
selection.
AV mode
AV mode is used to control
audio video products such as
AV processors, DVD players and
subwoofers. Volume down (6),
mute (mute) and volume up (5)
hotkeys control AV processor
volume in this mode.
3
Page 6

AV key (AV)
Press and release to selects one of 3 AV pages. Press and
hold to send AV standby command.
AV-I/P - Numeric keys control AV processor input selection.
AV-MODE - Numeric keys control AV processor mode
selection.
AV - Numeric keys are disabled.
DVD key (DVD)
Press and release to selects one of 3 DVD pages. Press and
hold to send DVD standby command.
Numeric keys control DVD track selection.
SUB key (SUB)
Selects one of 2 SUB pages.
Numeric keys 1-6 control sub inputs 1-6. Numeric keys 0, 7, 8
and 9 are disabled.
Setup Mode
Setup mode is used to adjust the
Flash handset setup. Use the
UP (5)/ DOWN (6) keys to
select a setup page and the OK
(OK) key to accept, or EXIT
(EXIT) to exit setup.
To return to normal operation at any point within the setup
menu press and hold the EXIT (EXIT) key.
General
The general setup menu is used to adjust lights, contrast, avrc5 and dvd-rc5 settings. Use the UP (5)/ DOWN (6) keys to
scroll through the setting displayed on the left, and press OK
(OK) to select. Then use the UP (5)/ DOWN (6) keys to
4
Page 7

adjust the current settings displayed on the right, and press
OK (OK).
Lights
The lights setting controls the screen and button backlight. It
has 4 settings:
off – always off.
on – on whenever the handset is awake.
auto – on whenever the handset is awake AND the ambient
light level is low (default).
energy – As auto unless battery low, in which case as off.
Contrast
The contrast setting adjusts the screen contrast.
av-rc5
The AV-rc5 setting selects which AV code set to use from 0-9
(0 default). As the code set is changed a code set change
command is transmitted to the AV processor to synchronize
the handset and the processor. WARNING This setting should
only be adjusted in conjunction with the appropriate AV
processor system code setup procedure outlined separatelty.
dvd-rc5
The dvd-rc5 setting selects which DVD code set to use from 15 (1 default). As the code set is changed a code set change
command is transmitted to the DVD player to synchronize the
handset and the player. WARNING This setting should only
be adjusted in conjunction with the appropriate DVD player
system code setup procedure outlined separatelty.
5
Page 8

Softkeys
The softkey setup menu allows alternate commands to be
assigned to any of the 8 softkeys on each of the 13 pre-
defined product pages.
To assign a softkey, select the required product page using
the OK (OK) key (press EXIT (EXIT) at any time to return to the
instructions page). Then press the required softkey, indicated
by a permanent underline. The UP (5)/ DOWN (6) keys can
then be used to select any one of the available commands
(see appendix 2).
Each command has a product ID to indicate which product the
command controls according to the following key: p-preamp,
r-record, c-cd, t-tuner, a-av, d-dvd, s-sub. If a command for a
product other than the selected page product is chosen, the
product ID will be displayed in the main display.
Appendix 3 contains default product and user preference
tables.
Reset
Resets remote handset to factory defaults settings. WARNING all programmed softkeys will be lost.
6
Page 9

Appendix 1 - Software Update Procedure
Introduction
This update to the Flash Remote
Handset provides the following
enhanced features:
• DVD and n-SUB control functions
• Menu driven setup facility
• User defined softkeys
• New screen design with central
command indication
Fully future-proof software
architecture
Installation
Follow the update instructions
carefully. Incorrect installation of the
PIC (programmable integrated
circuit) can result in damage. The
update procedure requires the
removal and replacement of the
handset PIC followed by a software
initiation procedure. To complete the
update procedure you will need the
update kit comprising a replacement
PIC and PIC removal tool, and the
battery cover allen key (2.5mm)
supplied with Flash.
1.
With the battery cover allen key
undo and remove the rear panel
screw.
2.
Remove the rear panel exposing
the PIC and battery compartment.
Remove the four batteries if fitted.
7
Page 10

3. Note the orientation of the PIC in the PIC Socket. There is a
chamfer with a dot located on one side of the PIC. The
replacement PIC must be inserted with the same orientation.
4.
Attach an anti-static earth strap to your wrist and connect the
crocodile clip to the top negative battery terminal (connected to
the black wire).
5.
You will notice two recesses on opposite corners of the PIC
Socket. Place the small barbed end of the PIC extraction tool
into one of the recesses in the corner of the PIC Socket. Lever
the PIC partially out of its socket. Place the barbed end into the
opposite recess and lever the PIC fully out of the socket.
6.
Place the replacement PIC squarely into the socket. ENSURE
CORRECT ORIENTATION. Apply mild pressure to push the PIC
into the socket so that it is flush to the top of the socket.
7.
Replace the batteries and rear cover. Your Flash display should
now show the enhanced display format.
8.
Your Flash handset has now been updated.
8
Page 11

Appendix 2 – Command Codes
(none)
vol5-p
vol6-p
mute-p
mon-p
bal4-p
3bal-p
disp-p
prog-p
i/p5-p
i/p6-p
1-p
2-p
3-p
4-p
5-p
6-p
7-p
8-p
9-p
0-p
mute-r
mon-r
i/p5-r
i/p6-r
1-r
2-r
3-r
4-r
5-r
6-r
7-r
8-r
9-r
0-r
play-c
stop-c
next-c
prev-c
pause-c
rw-c
ff-c
rep-c
disp-c
prog-c
open-c
1-c
2-c
3-c
4-c
5-c
6-c
7-c
8-c
9-c
0-c
down-t
up-t
mode-t
mono-t
disp-t
prog-t
1-t
2-t
3-t
4-t
5-t
6-t
7-t
8-t
9-t
0-t
s/b-a
vol5-a
vol6-a
mute-a
i/p5-a
i/p6-a
m5-a
m6-a
midn-a
osd-a
disp-a
menu-a
enter-a
clear-a
input-a
spkr-a
5-a
6-a
4-a
3-a
i/p1-a
i/p2-a
i/p3-a
i/p4-a
i/p5-a
i/p6-a
i/p7-a
i/p8-a
i/p9-a
i/p0-a
m1-a
m2-a
m3-a
m4-a
m5-a
m6-a
m7-a
m8-a
m9-a
m0-a
s/b-d
open-d
setup-d
play-d
stop-d
next-d
prev-d
pause-d
ff-d
rw-d
slow-d
rep-d
title-d
menu-d
return-d
clear-d
zoom-d
angle-d
subt-d
audio-d
mem-d
1-d
2-d
3-d
4-d
5-d
6-d
7-d
8-d
9-d
0-d
prog-d
disp-d
5-d
6-d
4-d
3-d
ok-d
disp-s
info-s
1-s
2-s
3-s
4-s
5-s
6-s
mute-s
gain5-s
gain6-s
mode5-s
down-s
save-s
up-s
mode6-s
9
Page 12

Appendix 3 – Product Commands
Use the following images to note changes to softkeys for
future reference.
Preamp
Default User
CD
Default User
10
Page 13

Tuner
Default User
AV
Default User
11
Page 14

DVD
Default User
Subwoofer
Default User
12
Page 15

Page 16

Naim Audio Limited, Southampton Road, Salisbury, England SP1 2LN
Telephone: +44 (0) 1722 332266 Fax: +44 (0) 1722 412034
www.naim-audio.com
Part No. 12-001-0052
Drawing No. NA906002-420/1
 Loading...