

Naim DAC BROCHURE

REFERENCE MANUAL
DAC DIGITAL TO ANALOGUE CONVERTER
ENGLISH, DEUTSCH, FRANÇAIS, ITALIANO
NAIM DAC – English
1 DAC Introduction
The Naim DAC digital to analogue converter is a highly versatile product and we strongly
recommend that you read this manual. You should also read the Statutory And Generic
Information booklet packed with the product as it contains important mains power safety
warnings.
A number of power supply upgrade options are possible for the DAC. Contact your local
retailer or distributor for advice on power supply upgrade options.
All references to Naim preamplifiers in the manual also cover the preamplifier section of
Naim integrated amplifiers.
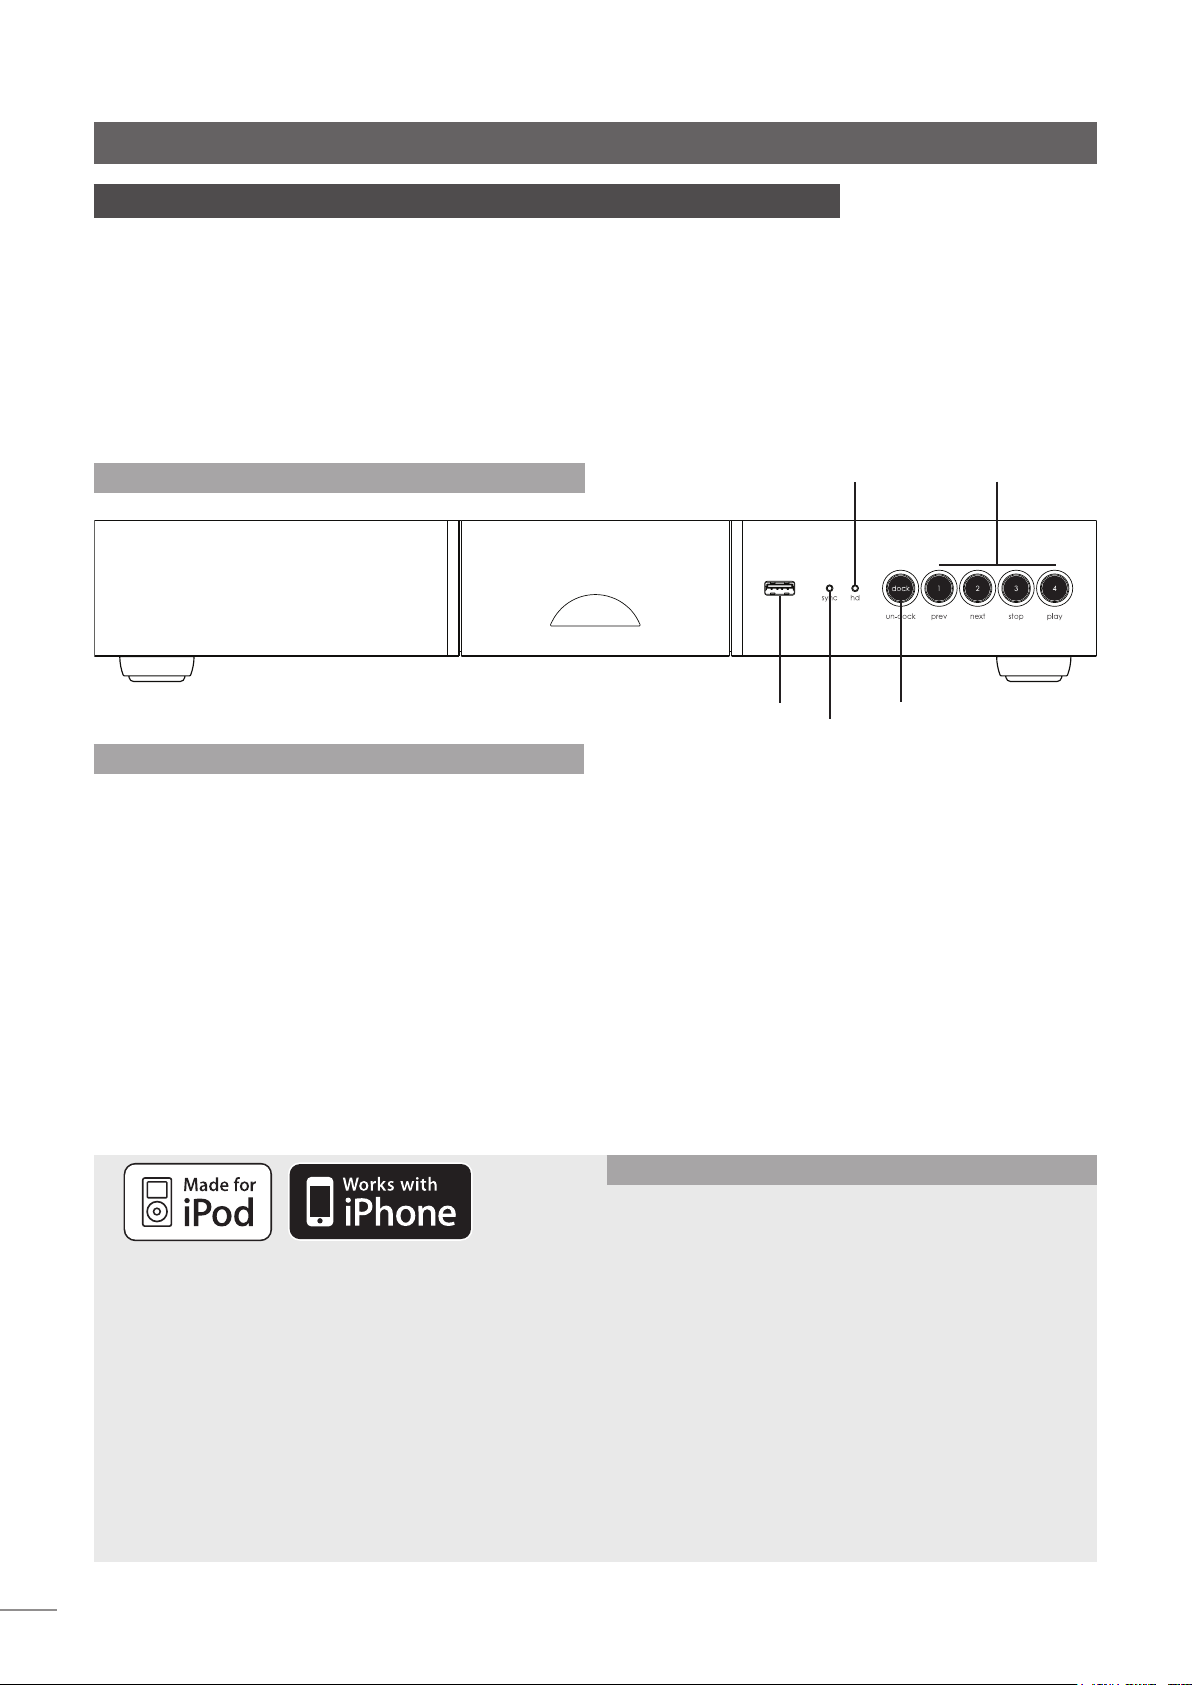
1.1 DAC Front Panel
1.2 DAC Basics
The Naim DAC is a ten input digital to analogue converter
capable of handling stereo audio data of 8 bit to 32 bit
resolution and 32kHz to 768kHz sampling rate. Its stereo
analogue output is available via DIN or RCA phono
sockets.
Eight of the DAC digital inputs are accessed via optical or
coaxial S/PDIF inputs on the rear panel. These input sockets
are selected by pressing one of the front panel input
selection buttons.
Two further digital inputs are accessed via USB sockets;
one on the front panel and one on the rear panel. The
USB sockets can be used to connect USB memory sticks
carrying audio files or Apple iPod or iPhone models. The
high denition
indicator
USB socket
USB sockets are selected automatically when a USB device
is connected.
When a USB device is connected, any appropriate audio
files it holds will be available for playback through the
DAC. The DAC front panel dock button indicator will
illuminate and the input selection buttons will operate as
previous, next, stop and play buttons. The DAC is returned
to S/PDIF input operation by disconnecting the USB device
or pressing the dock button. The last S/PDIF input used will
then be selected.
The DAC can be controlled either from its front panel
buttons or using a Naim remote handset in preamplifier
mode. An Apple Remote handset can also be used to
control playback and volume.
input selection and
transport control
dock/undock
data sync indicator
DAC Specification
Input connections: 4 optical, 4 coax, 2 USB
Outputs: DIN or RCA phono
Made for iPod 5th generation, iPod Touch, iPhone.
“Made for iPod” means that an electronic accessory
has been designed to connect specifically to iPod and
has been certified by the developer to meet Apple
performance standards.
“Works with iPhone” means that an electronic accessory
has been designed to connect specifically to iPhone
and has been certified by the developer to meet Apple
performance standards.
Apple is not responsible for the operation of this device or
its compliance with safety and regulatory standards.
iPod is a trademark of Apple Inc., registered in the U.S. and
other countries. iPhone is a trademark of Apple Inc.
1
Frequency response: 10Hz to 20kHz +0.1dB-0.5dB
Max output voltage: 2.2VRMS
Distortion and noise: <0.002%
Sample rate: USB: 32kHz to 768kHz, 32bit
S/PDIF: 32kHz to 192kHz, 32bit
Apple portable: 48kHz max
Digital formats: S/PDIF, WAV
Upgrade PSU: XPS, CD555PS
Mains supply: 100-120V, 220-240V, 50/60Hz
Dimensions: 70mm x 432mm x 301mm (H X W D)
Power consumption: <30VA
Weight: 5.6kg
Finish: Black anodised
NAIM DAC – English
2 DAC Installation and Connections
The DAC should be installed on a dedicated equipment stand intended for the purpose.
Do not stand it directly on top of another item of equipment. Ensure also that the audio
system volume is turned down before switching on. The DAC power switch is positioned on
its rear panel.
Connect the DAC to mains power using the mains cable supplied or a Naim Power-Line.
Connect audio inputs and outputs using high quality interconnect cables. Naim Hi-Line
cables will provide the best results.
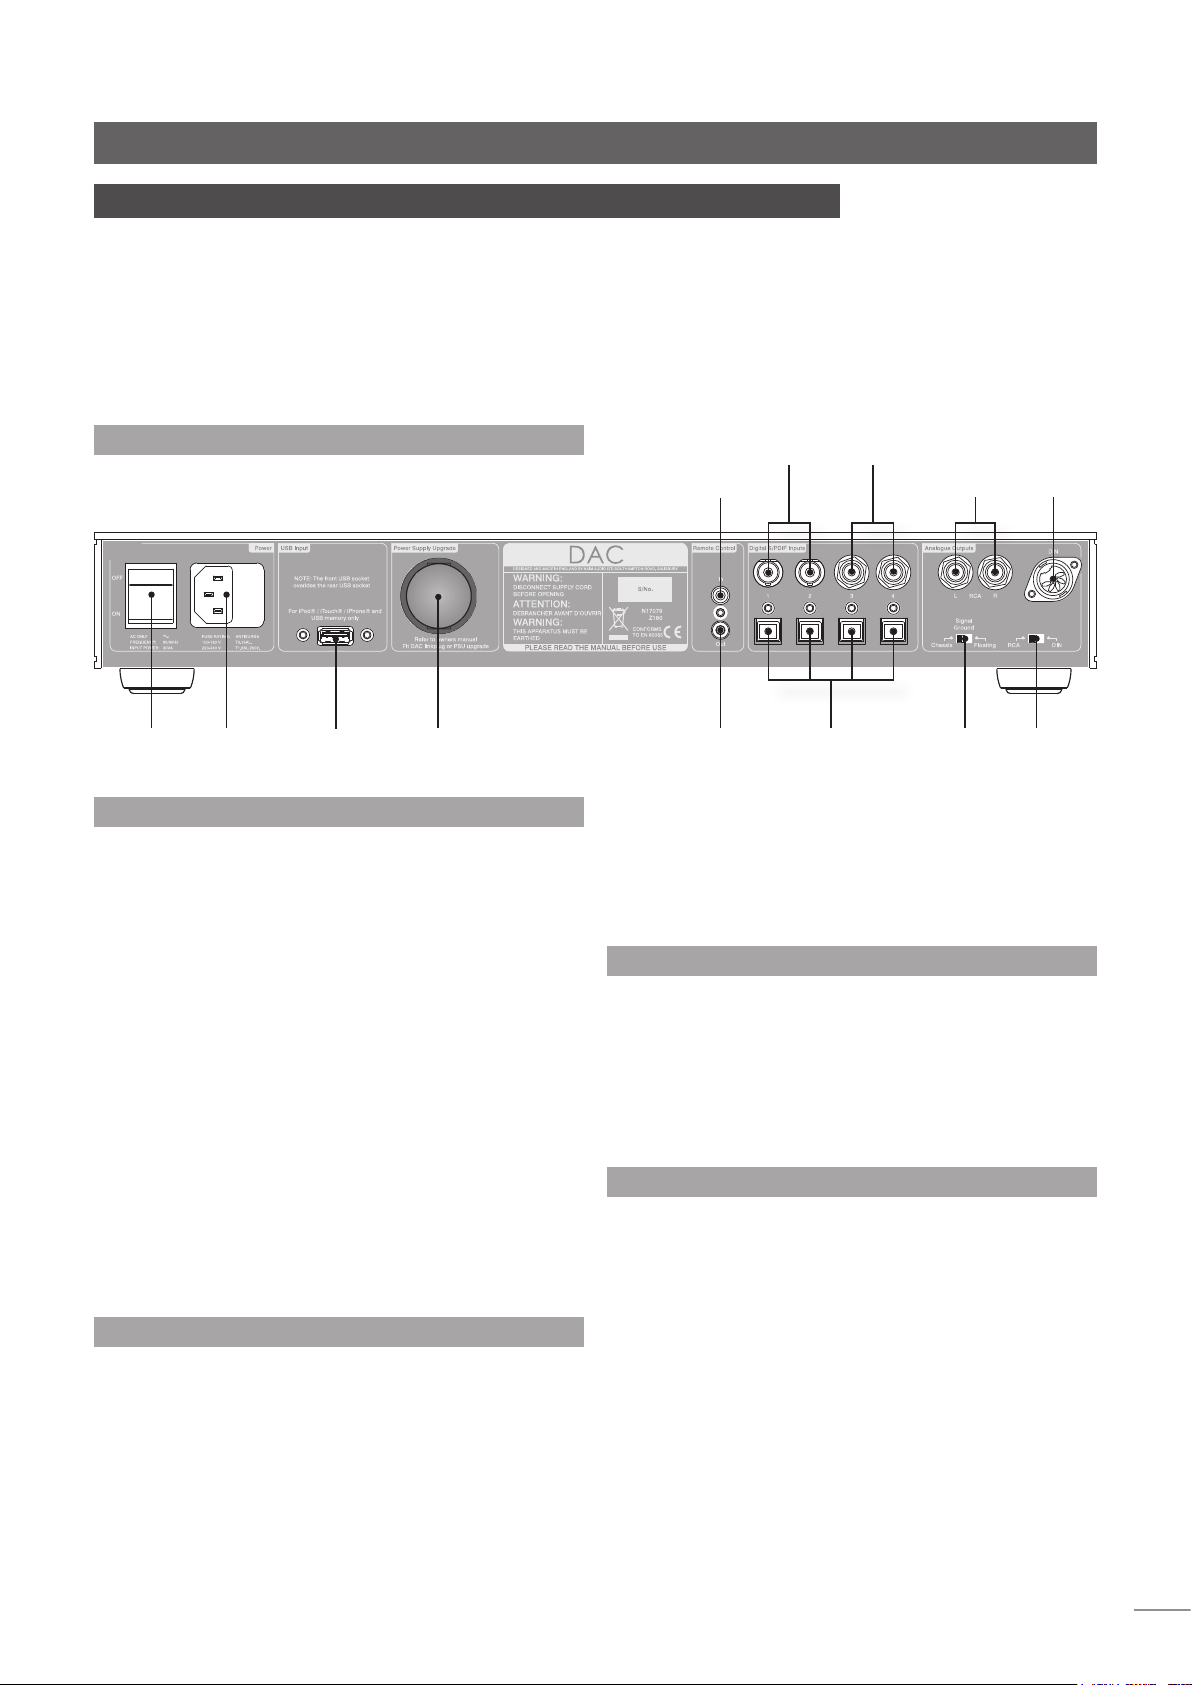
2.1 DAC Rear Panel
(for use with an external IR receiver)
power
mains
input
and fuse
USB socket
power supply upgrade
socket (link plug tted)
2.2 S/PDIF Inputs
The eight rear panel S/PDIF inputs are provided with
connection format and socket options. These are listed in
the following table:
Input Optical Socket Coaxial Socket
S/PDIF 1 TOSLINK BNC (75Ω)
S/PDIF 2 TOSLINK BNC (75Ω)
S/PDIF 3 TOSLINK RCA phono
S/PDIF 4 TOSLINK RCA phono
Only one connection format (optical or coaxial) for
each input may be used at any one time. However,
both may be connected simultaneously and the DAC
will automatically select the socket on which valid data
is present. If a data stream is present on both sockets,
selection can be switched between the two by pressing
the relevant input button.
Note: If valid data is present on both the coaxial and
optical sockets of the selected input, the stream that
appeared first will be preferred.
2.3 USB Inputs
The front and rear panel USB sockets are for the
connection of either USB memory sticks or Apple iPod or
iPhone models. Connect iPod and iPhone models using
the standard Apple USB cable. When USB hardware is
connected the DAC will automatically switch to the
docked USB input.
BNC coaxial S/PDIF
inputs 1 and 2
remote control in socket
remote control
out socket
Note: If both USB inputs are docked, the front panel input
will take priority.
The DAC is able to handle any audio file format that can
be played on the Apple device, however, a lossless format
will provide the best audio quality.
2.4 Analogue Outputs
The DAC is fitted with both DIN and RCA phono analogue
output sockets. The DIN option will provide the best audio
performance. Set the rear panel Socket Selection switch
to the desired option. For best audio performance only
connect one audio output. If the DAC analogue output
is to be connected to a Naim preamplifier, use the Aux 1
input if available. See Section 3.1.
2.5 Remote Control Output and Input
The DAC can send and receive remote control signals to
enable the following functions:
• Automatic preamplifier input switching.
• Use of an external IR sensor.
The DAC Remote Control In and Out sockets require a
mini-jack (3.5mm) plug. Naim preamplifier Remote Control
In sockets require either a mini-jack or RCA phono plug.
Your Naim retailer will be able to provide an appropriate
cable if necessary.
optical S/PDIF
inputs 1 to 4
RCA phono coaxial S/PDIF
inputs 3 and 4
RCA phono
output
signal ground
switch
DIN
output
output
socket
selection
switch
2

NAIM DAC – English
2.6 Signal Ground Switch
The DAC is fitted on its rear panel with a Signal Ground
switch offering two positions: Chassis or Floating. Select
the Chassis position unless the DAC is connected in a hi-fi
system incorporating another earthed source component,
or mains hum is audible through the loudspeakers. Contact
your Naim retailer, Naim distributor or Naim Customer
Service direct for advice if necessary.
Note: All Naim CD and DVD players are earthed so the
Signal Ground switch should be set to floating if one is
connected in the system.
No damage will be done if the wrong Ground Switch
position is chosen but the system sound quality may be
compromised.
2.7 Power Supply Upgrade
The DAC can be upgraded by the addition of an XPS or
CD555 PS external power supply. An external power supply
is installed by removing the link plug from the DAC rear
panel Burndy socket and connecting the power supply
using the appropriate Naim Burndy cable. The DAC’s
internal power supply is still required when an external
supply is in use so it must remain connected to the mains
supply and switched on.
Ensure that all audio system components are switched off
while an external power supply is being connected.
Note: If the DAC power supply link plug or external power
supply is incorrectly installed the hd and sync indicators will
flash.
2.8 iPod and iPhone Charging
The DAC will charge an iPod or iPhone while it is docked.
However, charging an iPod or iPhone while listening
can compromise audio performance. Charging can be
switched off or on, while the iPod or iPhone is docked, by
pressing and holding the dock button for 1 second.
3 Using DAC
Once the DAC’s mains power, inputs, output and remote control link have been
connected, it may be switched on from its rear panel power switch. Its output will remain
muted for a short time while the electronics stabilise.
3.1 Remote Control Link
When the DAC and preamplifier remote control is linked,
selecting a DAC S/PDIF input, or docking USB hardware, will
also automatically select a preamplifier input. Aux 1 is set
as the default but this may be changed by following the
steps described below:
• With the preamplifier switched on and in normal
operational mode, simultaneously press and hold the
DAC front panel 1 and 2 buttons until they illuminate.
• Press either the DAC 1 or 2 button to select each
preamplifier input in turn. The preamplifier button
indicators will illuminate to indicate selection.
• When the desired input is selected, press and hold
the DAC 1 and 2 buttons simultaneously to store the
selection and return the DAC to normal operation.
3.2 DAC Front Panel Indicators
Two indicators on the DAC front panel illuminate to
indicate operational states:
The sync indicator illuminates to indicate that the DAC’s
internal clock is precisely synchronised with the input data
stream. The DAC will continue to operate if synchronisation
is lost but its audio performance may be compromised.
Synchronisation loss is generally caused by an out-ofspecification clock in the source component.
The hd indicator illuminates to indicate that the input data
stream is “high definition”. High definition is defined as any
data stream with a sampling rate above 48kHz.
3.3 Selecting and Using DAC Inputs
With no USB device docked, S/PDIF inputs are selected by
using the front panel input selection buttons. The handset
7, 8, 9 and 0 keys will also select inputs 1, 2, 3 and 4
respectively (handset in preamplifier mode).
Note: The handset 7, 8, 9, and 0 keys are used because the
1, 2, 3 and 4 keys are already employed for preamplifier
input selection.
DAC USB inputs are selected automatically when USB
hardware is connected (docked). The DAC front panel
dock button indicator will illuminate. The front panel USB
input takes priority over the rear panel USB input. To return
the DAC to the last used S/PDIF input, press the front panel
dock button or disconnect the USB hardware.
When USB hardware is connected, the DAC will interrogate
it to identify appropriate files and automatically begin to
play the files sequentially starting with those found in the
highest level directory. The DAC front panel input selection
buttons will operate as previous, next, stop and play
buttons.
3
BEDIENUNGSANLEITUNG
DIGITAL-ANALOG-WANDLER DAC
ENGLISH, DEUTSCH, FRANÇAIS, ITALIANO
NAIM DAC – Deutsch
1 DAC – Einleitung
Aufgrund des großen Funktionsumfangs des Digital-Analog-Wandlers DAC lohnt es sich,
etwas Zeit in die Lektüre dieser Bedienungsanleitung zu investieren. Lesen Sie auch das im
Lieferumfang enthaltene Heft mit wichtigen gesetzlichen und allgemeinen Hinweisen.
Der DAC kann mit verschiedenen externen Netzteilen aufgerüstet werden. Lassen Sie sich
bei Bedarf von Ihrem Händler oder der zuständigen Vertriebsgesellschaft dazu beraten.
Aus Gründen der Einfachheit ist im Folgenden nur von Vorstufen die Rede; das Gesagte
gilt jedoch auch für Vollverstärker.
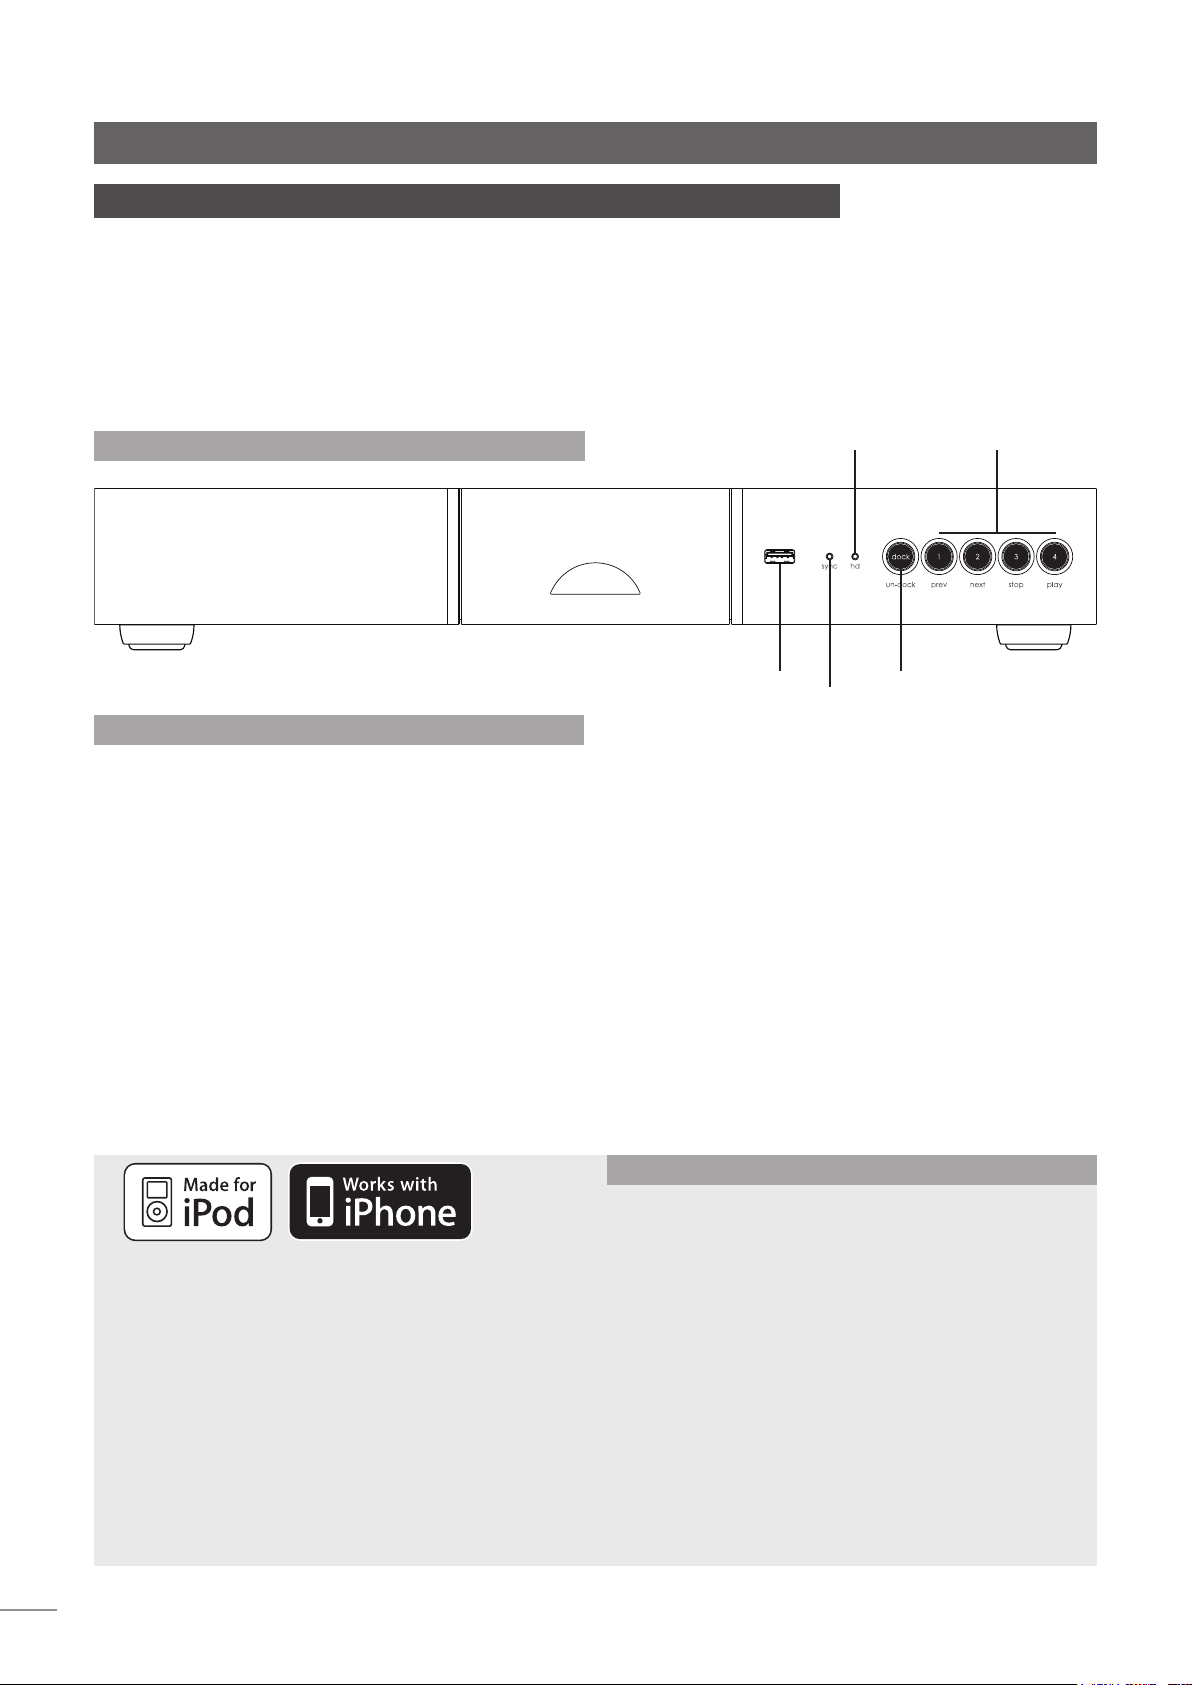
1.1 Gerätefront
High-Denition-
Anzeige
Eingangswahl und
Steuerung der
Wiedergabe
1.2 Kurzübersicht
Der Naim DAC ist ein Digital-Analog-Wandler mit zehn
Eingängen. Der Wandler kann Stereo-Audiodaten mit einer
Auflösung von 8 bis 32 Bit und einer Samplingrate von 32 bis
768 kHz wandeln. Das Stereoanalogsignal des Wandlers wird
über eine DIN-Buchse oder ein Cinchbuchsenpaar ausgegeben.
Acht der Digitaleingänge sind als S/PDIF-Buchsen ausgeführt
(vier als optische und vier als Koaxialbuchsen). Diese Eingänge
werden durch Betätigen der Eingangswahltasten an der
Gerätefront ausgewählt.
Zwei der Digitaleingänge sind als USB-Buchsen ausgeführt, von
denen je eine an der Gerätefront und an der Geräterückseite
zur Verfügung steht. Über die USB-Buchsen lassen sich USBSticks mit Audiodateien oder Apple iPods/iPhones anschließen. Wird ein USB-Gerät an eine dieser Buchsen angeschlossen, schaltet der DAC automatisch auf den entsprechenden
Eingang.
Kompatibel mit iPod (5. Generation), iPod Touch, iPhone.
Das „Made for iPod“-Logo bedeutet, dass dieses Produkt
speziell für die Verwendung mit einem iPod entwickelt und
vom Hersteller gemäß Apple-Leistungsstandards zertifiziert
wurde.
Das „Works with iPhone“-Logo bedeutet, dass dieses Produkt
speziell für die Verwendung mit einem iPhone entwickelt und
vom Hersteller gemäß Apple-Leistungsstandards zertifiziert
wurde.
Apple ist weder für die Funktionstüchtigkeit dieses Geräts
verantwortlich noch dafür, dass es Sicherheitsstandards oder
gesetzliche Vorschriften erfüllt.
iPod ist ein in den USA und anderen Ländern eingetragenes
Warenzeichen von Apple Inc. iPhone ist ein Warenzeichen
von Apple Inc.
USB-Buchse
Sync-Anzeige
Wenn ein USB-Gerät angeschlossen ist, können darauf
gespeicherte Audiodateien (sofern das jeweilige Dateiformat
unterstützt wird) über den DAC abgespielt werden. Die
Fronttaste dock leuchtet dann und die Eingangswahltasten
werden mit den Funktionen „Vorheriger Titel“, „Nächster
Titel“, „Wiedergabe stoppen“ bzw. „Wiedergabe starten“
belegt. Durch Entfernen des USB-Geräts oder durch Betätigen
der Taste dock kann der DAC wieder in den Modus zur
Verwendung der S/PDIF-Eingänge versetzt werden; der DAC
schaltet dabei auf den zuletzt ausgewählten S/PDIF-Eingang
zurück.
Der DAC kann entweder über die Fronttasten oder über die
Fernbedienung (Fernbedienungsmodus pre) gesteuert werden. Zur Steuerung der Wiedergabe und zur Regelung der
Lautstärke kann auch eine Apple-Fernbedienung verwendet
werden.
Verbinden/trennen
DAC – Technische Daten
Eingangsbuchsen: 4 x optisch, 4 x koaxial, 2 x USB
Ausgänge: DIN oder Cinch
Frequenzgang: 10 Hz bis 20 kHz, +0,1 dB/-0,5 dB
Ausgangsspannung: max. 2,2 V RMS
Klirr/Rauschen: <0,002%
Samplingrate: USB: 32 bis 768 kHz, 32 Bit
S/PDIF: 32 bis 192 kHz, 32 Bit
Apple iPod/iPhone: max. 48 kHz
Digitalformate: S/PDIF, WAV
Netzteilupgrades: XPS, CD555PS
Netzversorgung: 100–120 V oder 200–240 V; 50/60 Hz
Abmessungen: 70 x 432 x 301 mm (H x B x T)
Leistungsaufnahme: <30 VA
Gewicht: 5,6 kg
Ausführung: eloxierte Front, lackiertes Gehäuse
5
 Loading...