

Page 1

Multi-Functional
ZOOM Digital Camera
English
User Guide
Page 2

Table of Contents
Identifying the Parts................................................................ 1
LCD Display Icons ................................................................... 2
Control Button Functions .......................................................... 3
Preparation
Charging battery ................................................................ 4
Loading battery .................................................................. 5
Inserting SD/MMC card ......................................................... 5
Attaching the strap ............................................................. 6
Setting the default (Setup Mode) .............................................. 6
Taking Still Pictures (DSC Mode) .................................................. 7
DSC Menu settings .............................................................. 8
Manual settings (Manual Mode) .............................................. 10
Scene selection (SCN Mode) ...................................................12
Taking Videos (DV Mode) ..........................................................14
DV Menu settings ...............................................................15
Recording Voice ................................................................. 16
Playback (Playback Mode)
Playing images on the LCD screen ...........................................17
Playback Menu settings ................................................... 19
Playing MP3 on the LCD screen ............................................... 21
Playback Menu settings (for MP3) .......................................22
Playing images on TV .......................................................... 23
Deleting Files .......................................................................24
Installing Software .................................................................25
Transferring Files
Connecting to PC ............................................................... 26
Removing the Camera .................................................... 27
For MAC Users .................................................................. 28
Removing the Camera from MAC ........................................28
Using as PC Camera ................................................................ 29
Shooting with USB Connection ................................................... 30
Printing Images (DPS) ............................................................. 31
i
Page 3
Identifying the Parts
1.
2.
3.
4.
5.
6. 7. 8.
○○○○○○○○○○○○○○○○○
13.
14.
15.
16.
17.
18.
12.
23.
11.
AE Lock
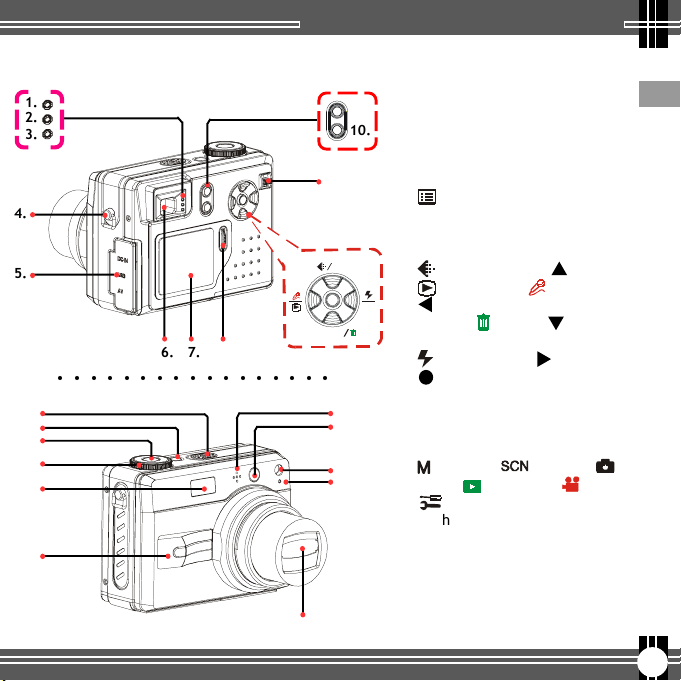
Identifying the Parts
1. Process Indicator
2. Focus Indicator
3. Charge Indicator
4. Strap holder
9.
5. DC-IN/USB/AV port (Earphone)
10.
6. View finder
7. LCD display
8. Jog Dial key
9. Menu button
10. DISP button
11. Zoom lever
12. Control button :
MP3
19.
20.
21.
22.
Vol.
Resolution/MP3/ Up button
1)
2)
Quick Review/ Voice Recorder
Stop/Exit/Left button
AE Lock/ Delete/ Down
3)
button
Flash/Volume/ Right button
4)
OK/Play/Pause button
5)
13. Speaker
14. Power button
15. Shutter button
16. Mode dial :
(Manual)/ (Scene)/
(DSC)/ (Playback)/ (DV)/
(Setup)
17. Flash Light
18. Handle
19. Microphone
20. View Finder
21. Auto Focus Assist Light
22. Self-timer Indicator
23. Zoom Lens
En
1
Page 4
LCD Display Icons
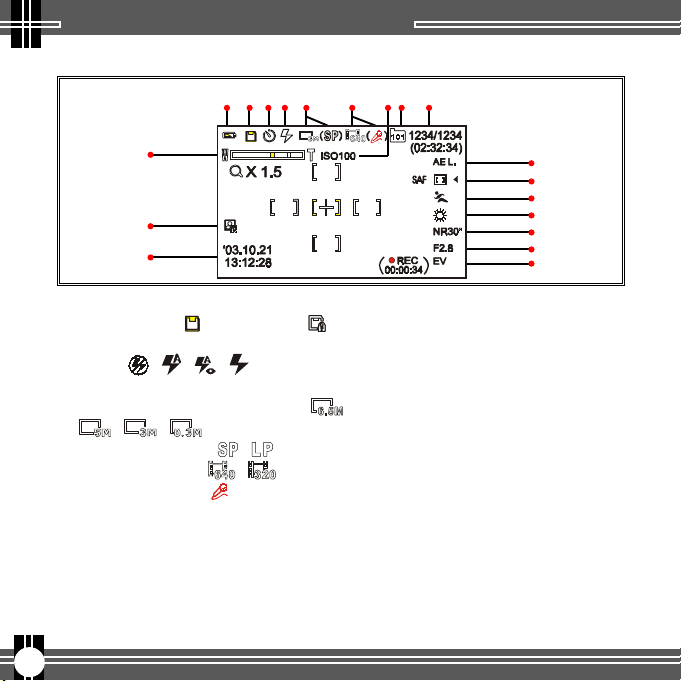
LCD Display Icons
1. 2.3.4. 5. 6. 7.8. 9.
10.
11.
12.
1.
Battery Life
2. Memory Card ( ) / Card Lock ( )
3. Self-timer : DSC/Manual/SCN/DV Mode
4. Flash ( / / / ) : DSC/Manual/
SCN Mode
5.1) DSC/Manual/SCN Resolution ( /
/ / )
2) DVR Resolution ( / )
6.1) DV Resolution ( / )
2) Voice Recorder ( ): DV Mode
7. ISO Sensitivity
8. Folder
9.1) 123(Picture Counter): DSC/Manual/
SCN/Mode
2) 02:32:34 (The total recordable time):
DV Mode
3) 1234/1234 (the selected file number/
2
13.
14.
15.
16.
17.
18.
19.
the total files number): Playback Mode
10. Zoom level
11. Date Mark
12. Date/Time Display
13. AE Lock : DSC/Manual/SCN/DV
Mode
14. Selected frame priority Auto
Focus: Manual/SCN Mode
15. Scene Selections: SCN Mode
16. White Balance: Manual/SCN
Mode
17. Shutter Speed: Manual Mode
18. Aperture Value: Manual Mode
19. 1) EV (Exposure Compensa-
tion): Manual Mode
2) 00:00:34 (The recording
Time): DV Mode
Page 5
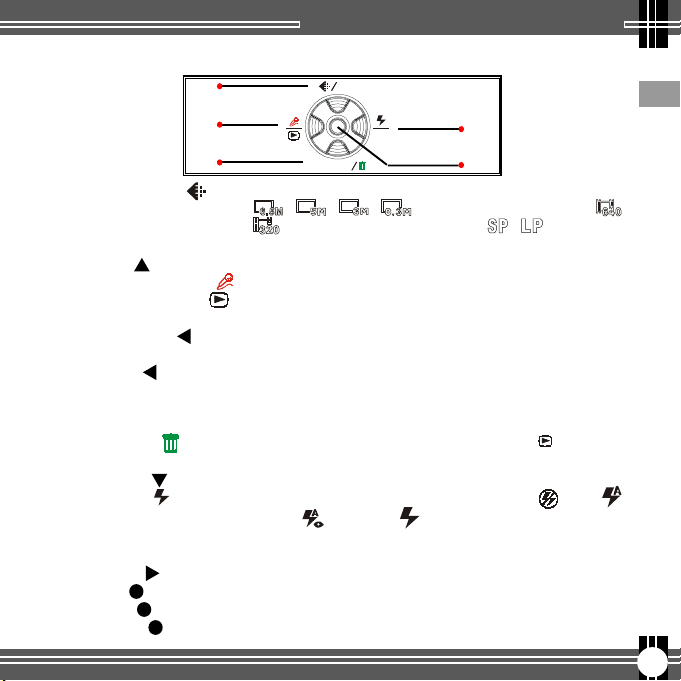
Control Button Functions
1.
2.
3.
1. * Resolution ( )----
* MP3 (
* UP ( ) ------------
MP3
) -------
2. * Voice Recorder ( )-
* Quick Review ( )-
* Stop/Exit ( ) -----
* Left ( ) ----------
3. * AE Lock (
AE Lock
* Delete ( ) -------
* Down ( ) --------
4. * Flash ( ) --------
Volume (
*
*
Right ( ) -----------
Vol.
) ---
5. * OK ( ) ---------------
* Play ( ) --------------
* Pause ( ) ------------
Press this button repeatedly to set the image size,
To enter the MP3 Playback screen. (Playback Mode)
To select the Menu item or its advanced setting.
To record voice. (DV Mode)
To have a quick review of the last picture you shot.
(DSC/Manual/SCN Mode)
To stop implementing, cancel the setting, or exit the
screen you are setting.
To select the advanced setting.
To lock the exposure value on the specific portion of
)-
the subject for capturing available image brightness
while shooting. (DSC/Manual/SCN/DV Mode)
To delete the file (DSC/Manual/SCN Mode- function/
Playback Mode)
To select the Menu item or its advanced setting.
To take pictures in poor lighting conditions, (Off)/
(Auto)/ (Red-Eye)/ (On). (DSC/Manual/SCN Mode)
Press this button to enter the volume adjust screen.
Then turn the Jog Dial to adjust volume.(Playback Mode)
To select the advanced setting.
To implement the setting.
To play back the files (picture/video/voice/music).
To pause playing.
MP3
AE Lock
/ / / (DSC/Manual/SCN Mode), /
(DV Mode) or recording quality, / (DVR function).
Control Button Functions
Vol .
4.
5.
En
3
Page 6
Preparation
Preparation
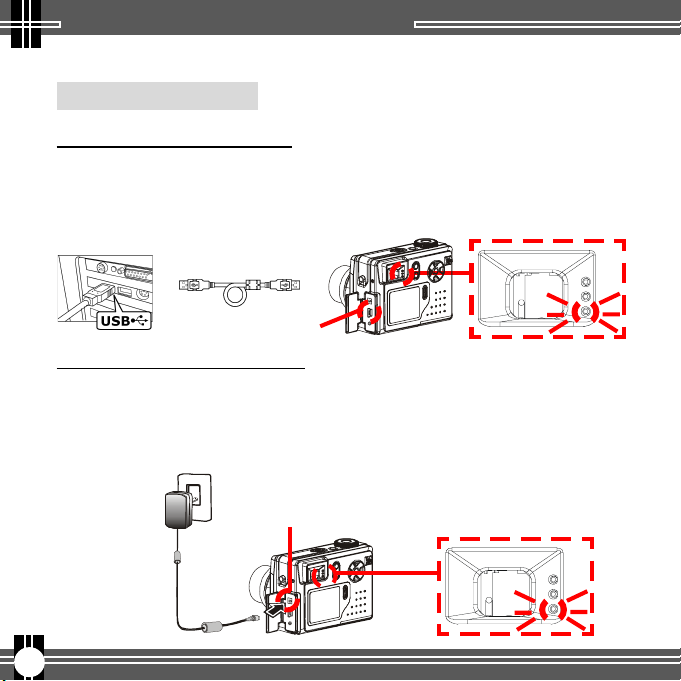
Charging battery
Charging it by USB cable
1. Connect the USB cable between this camera and the computer.
2. While charging, the Charge Indicator will light in orange. If the
battery is fully charged, the Charge Indicator will be off.
USB Cable
USB Port
Charging it by AC Adapter
1. Connect the AC Adapter (5V,1A) to the DC IN jack and a house
hold power outlet.
2. While charging, the Charge Indicator will light in orange. If the
battery is fully charged, the Charge Indicator will be off.
DC-IN Jack
AC-Adapter
4
Page 7
Preparation
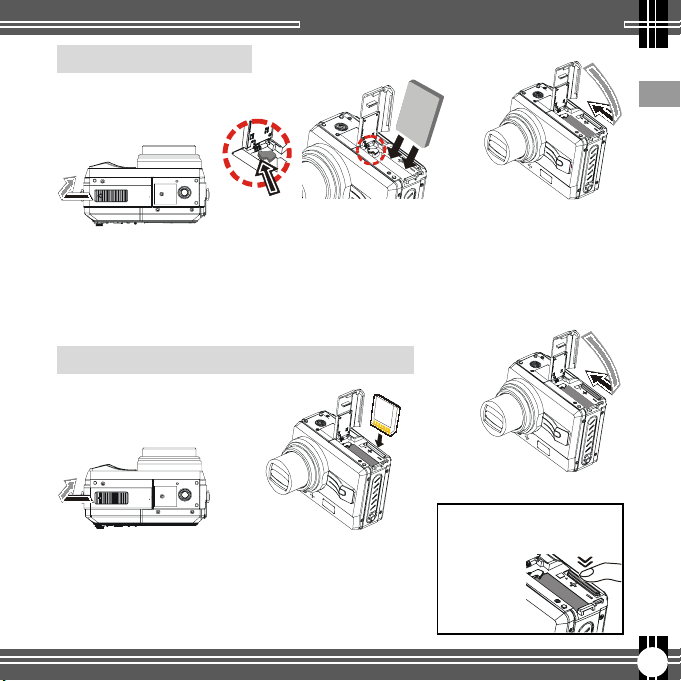
Loading battery
(A)
Pull out of the
battery cover and
uplift it.
Inserting SD/MMC card (not supplied)
(A)
Pull out of the
battery cover and
uplift it.
(B)
Move the battery lock toward
the cover and insert the Li-
ion battery as shown above.
Then push the Li-ion battery
all the way in until it is securely locked.
(B)
Insert the card as
shown above. Push the
card all the way in until it is securely locked.
(C)
En
Press the battery
cover down and
push it inside until
its clutch is connected to the unit.
(C)
Close the cover.
To remove the card:
Open the cover, then
push in
the card
to pop it
out.
5
Page 8
Preparation
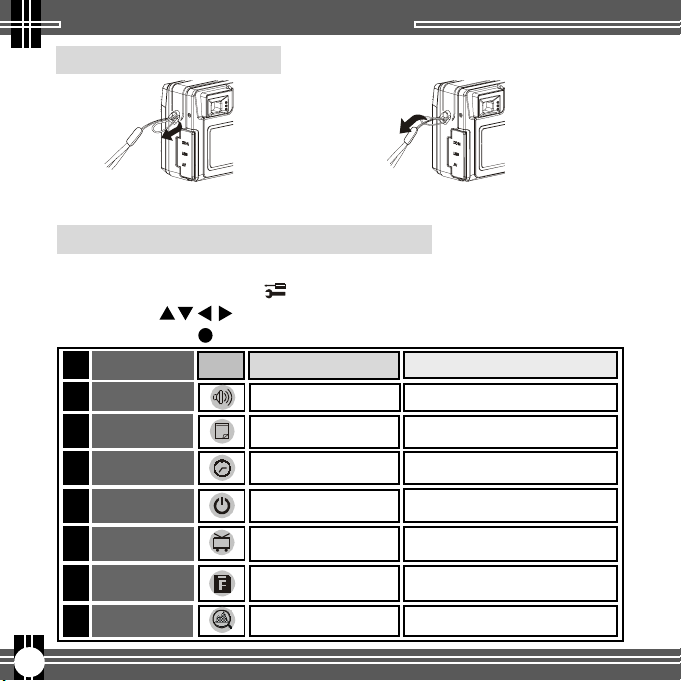
Attaching the strap
(A) (B)
The small loop goes through
the strap holder.
The big loop goes through the small
loop and pull tight.
Setting the default (Setup Mode)
1. Power on the camera.
2. Turn the Mode Dial to (Setup) Mode.
3. Press the button or turn the Jog Dial to select the item,
and press the (OK) button to confirm your setting.
Items Settings
1.
Button Beep
Date Set
2.
3.
Time Set
4.
Auto-Off
5.
Video System
6.
Format
7.
Icon
NO / YES
YY / MM / DD (year /
1
month / day)
HH / MM / SS (hour /
minute / second)
Off / 1.5Min / 3Min /
5Min
NTSC / PAL
NO / YES
NO / YESDigital Zoom
To set Beep sound
To set date for your camera
To set time for your camera
To set time to be auto-off
your camera
To select the available TV
signal format
To format the built-in memory
or your memory card completely
To set “Digital Zoom” function
6
Functions
Page 9
Taking Still Pictures
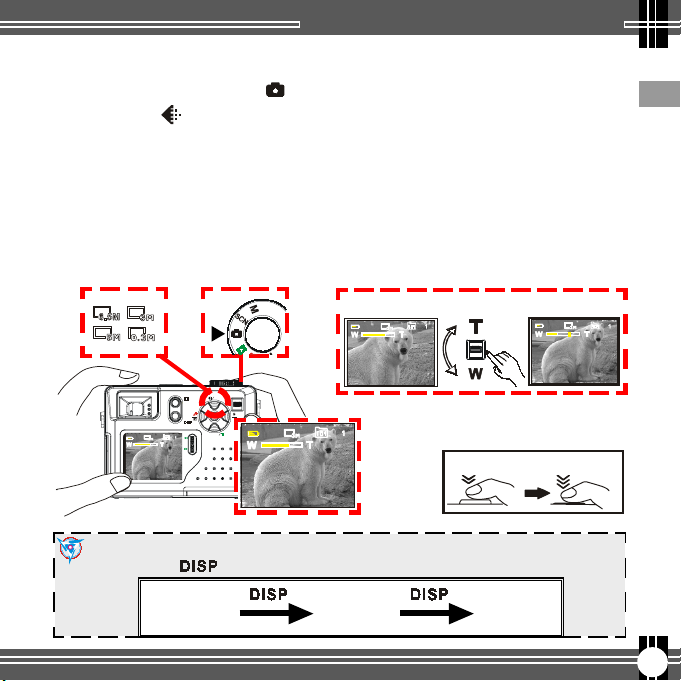
Taking still pictures (DSC Mode)
1. Turn the Mode Dial to (DSC) Mode and press the Power button.
2. Press the (Resolution) button repeatedly to select the image size.
3. Position the subject in the viewfinder or in the LCD display.
4. Turn the zoom-in (T) or zoom-out (W) key to frame the subject.
5. To focus the subject, press the Shutter button halfway down.
6. To shoot, press the Shutter button all the way down.
7. To exit the DSC Mode screen, switch the Mode Dial to another
mode.
En
12
MP3
T
CHG
Note: To save energy, this camera allows you to switch off the LCD panel by
pressing the button repeatedly.
Info. Off
w
Vol.
AE Lock
4
LCD Off
(T) (W)
3
56
LCD On
7
Page 10

Taking Still Pictures
DSC Menu settings
It allows you to set the basic shooting functions.
1. Turn the Mode Dial to (DSC) Mode.
2. Press the (Menu) button to enter the DSC Menu screen as below.
3. To select the menu item or its advanced setting, press the
button or turn the Jog Dial. To confirm your setting, press the
(OK) button.
4. To cancel the setting, press the button.
5. To exit the DSC Menu setting screen, press the (MENU) button.
DSC Menu
1.
2.
3.
4.
5.
6.
1.
2.
ISO
Int. Shut.
Items
Self-timer
Image Quality
NO
YES
Icon
OFF / ON (10 seconds)
Fine / High / Standard
Settings
Int. Shut.
A-B
YES
NO
Functions
To shoot the photograph
of yourself
To select image quality
7.
7.1.
7.2.
8
Page 11
Taking Still Pictures
3.
P Effect
4.
ISO Sensitivity
5.
Auto-Rotate
Date Mark
6.
Int. Shutter
7.
7.1.
7.2.
Items
Recording
Interval
Recording
Number
Icon
Off / Negative Art (like
a negative) / Sepia (like
an old photograph) /
B&W / Solarize (like an
illustration)
100 / 200 / 400
Auto / No
NO / YES
NO / YES
30Sec / 1Min / 5Min /
A-B
10Min / 30Min
x2 / x3 / x5 / x10 / x30 /
x50
Settings
Functions
To add particular
effects to your images
To select the different
sensitivity of the sensor
To autorotate the
picture shot in portrait
orientation and display it
in landscape orientation
To attach Date information
to your image
To set the continuous
shooting function
To set the interval time per
image
To select the
shooting
continuous
number
En
9
Page 12

Taking Still Pictures
Manual settings (Manual Mode)
It allows you to set the advanced DSC functions.
1. Turn the Mode Dial to (Manual) Mode and then the Manual
Mode settings screen will show on the LCD panel automatically.
2. To select the menu item you want to set, turn the Jog Dial. Then
press the (OK) button to enter the selected item.
3. Turn the Jog Dial to select the advanced setting or adjust
the setting value. Then press the (OK) button to confirm your
setting.
4. To exit the screen as below, switch the Mode Dial to another
mode.
Manual Mode settings
1.
2.
3.
4.
5.
10
Page 13

Taking Still Pictures
Selected frame
1.
priority Auto
Focus
White Balance
2.
3.
Shutter Speed
4.
Aperture Value
Exposure
5.
Compensation
Items Settings
Icon
Spot / Center /
Multipoint / Right / Left/
Bottom / Top
AUTO / Daylight / Cloud/
Fluorescence /
Incandescence
NR 30” --- 1/1000
F 2.8 (Sharp subject and
blur background) /
F 8.0 (Sharp subject and
background)
-2.0(Dark) --- +2.0(Bright)
Functions
To focus on and sharpen
the specific portion of
the subject while
shooting
To select color tones
of the image while
shooting under the
different lighting
conditions
To set the exposure time
while shooting :
1) To capture and shoot
the instant moving image
with short time
exposure
2) To brighten the moving
image and bring about
the flowing effect while
shooting with long time
exposure
To select the different
focus depth for deciding
the sharpness of subject
and background while
shooting
To adjust the image
brightness while shooting
En
11
Page 14

Taking Still Pictures
Scene selection (SCN Mode)
It allows you to shoot in the different scene conditions for enhancing
image quality.
1. Turn the Mode Dial to (Scene) Mode and then the Scene
Mode settings screen will show on the LCD panel automatically.
2. To select the menu item you want to set, turn the Jog Dial. Then
press the (OK) button to enter the selected item.
3. Turn the Jog Dial to select the advanced setting. Then press the
(OK) button to confirm your setting.
4. To exit the screen as below, switch the Mode Dial to another
mode.
Scene Mode settings
1.---5.
12
Page 15

Taking Still Pictures
Items Functions
Macro
1.
Twilight Portrait
2.
3.
Landscape
4.
Sport
Portrait
5.
Icon
To shoot from the close distance
To shoot portrait in dark place
To shoot the sharp landscape
To capture and shoot the moving image
To shoot the sharp portrait with soft
background
Note: You may also set “Selected frame priority Auto Focus” and “White
Balance” functions (referring to “Manual settings” Chapter) in this SCN
selection mode.
En
13
Page 16

Taking Videos
Taking Videos (DV Mode)
1. Turn the Mode Dial to (DV) Mode and press the Power button.
2. Press the (Resolution) button repeatedly to select the image size.
3. Position the subject in the viewfinder or in the LCD display.
4. To start recording, press the Shutter button fully down.
5. To stop recording, press the Shutter button fully down again.
6. To exit the DV Mode screen, switch the Mode Dial to another
mode.
2
MP3
T
CHG
w
Vol.
AE Lock
1
4
Note: To save energy, this camera allows you to switch off the LCD panel by
pressing the button repeatedly.
5
14
Info. Off
LCD Off
LCD On
Page 17

Taking Videos
DV Menu settings
It allows you to set the recording video functions.
1. Turn the Mode Dial to (DV) Mode.
2. Press the (Menu) button to enter the DV Menu screen as below.
3. To select the menu item or its setting, press the button
or turn the Jog Dial. To confirm your setting, press the (OK)
button.
4. To cancel the setting, press the button.
5. To exit the DV Menu setting screen, press the (MENU) button.
DV Menu
1.
2.
En
Items
Image Quality
1.
P Effect
2.
Icon
Settings
Fine / High / Standard
Off / Negative Art (like a
negative) / Sepia (like an old
photograph) / B&W / Solarize
(like an illustration)
Functions
To select image quality
To add particular
effects to your images
15
Page 18

Taking Videos
Recording Voice
It allows you to record voice.
1. Turn the Mode Dial to (DV) Mode.
2. Press the (Voice Recorder) button to enter the DVR screen.
3. Press the (Resolution) button repeatedly to select the recording
quality.
4. Position the microphone near voice source.
5. To start recording, press the Shutter button fully down.
6. To stop recording, press the Shutter button fully down again.
7. To exit the DVR screen, press the (Voice Recorder) button.
1
MP3
T
CHG
w
Vol.
AE Lock
16
2,4 5
Page 19

Playback
Playback (Playback Mode)
It allows you to play back images or MP3 files.
Playing images on the LCD screen
A: Playing Pictures
1. Turn the Mode Dial to (Playback) Mode.
2. Turn the Jog Dial to select the picture you want to view.
3. Press the button repeatedly to play a Single View, Multi-
page View, or set Info. Off function.
4. To exit the Playback Mode screen,
switch the Mode Dial to another
mode.
MP3
T
CHG
w
Vol.
AE Lock
Multi-page View
En
Info. Off
Single View
17
Page 20

Playback
B: Playing Videos
1. Turn the Mode Dial to (Playback) Mode.
2. Turn the Jog Dial to select the video you want to view.
3. Press the button repeatedly to play a Single View, Multi-
page View, or set Info. Off function.
4. Press the (OK) button to play the recorded video. To pause,
press the button again.
5. To stop, press the button.
6. To exit the Playback Mode screen, switch the Mode Dial to
another mode.
MP3
T
CHG
w
Vol.
AE Lock
Multi-page View
18
Info. Off
Single View
Page 21

Playback
Playback Menu settings
It allows you to set the playback functions.
1. Turn the Mode Dial to (Playback) Mode.
2. Press the (Menu) button to enter the Menu screen as below.
3. To select the menu item or its advanced setting, press the
button or turn the Jog Dial. To confirm your setting or pause
playing, press the (OK/Pause) button.
4. To stop implementing or cancel the setting, press the button.
5. To exit the Playback Menu setting screen, press the (MENU) button.
Image Playback Menu
En
1.
2.
3.
4.
Items
Quick Search1.
WAV
SettingsIcon
1) After selecting file format, press the
button repeatedly to implement
or pause searching all files.
OR
2) Press the button to stop and
come back the Playback Selection
screen. Then, press the button
to play the selected video file.
Functions
To have a quick
search for all
video files in a
circle.
19
Page 22

Playback
Items
2.
Slide Show
3.
Rotate
Attach Voice
4.
Playing MP3 on the LCD screen
1) Press the button repeatedly to
implement or pause “Slide Show”
function.
2) Press the button to stop.
1) Turn the Jog Dial to select the
image.
2) Press the button to rotate
the image in -90 degree or +90
degree orientation).
3) Press the (OK) button to
confirm your setting.
4) Press the button to exit.
1) Press the Shutter button
-90 / +90
repeatedly to start or stop
recording.
SettingsIcon
Functions
To have a quick
review of all
pictures in a
circle.
To rotate the
selected image
(* Note: The
image will
wring and get
bad quality if
you rotate it
frequently.)
To attach voice
to your images
20
Page 23

Playing MP3 on the LCD screen
Playback
1. Turn the Mode Dial to (Playback) Mode.
2. Press the (MP3) button to enter MP3 Selection screen.
3. Then turn the Jog Dial to select one of the MP3 music.
4. Press the (OK/Pause) button repeatedly to play back or pause
MP3 music.
5. To stop the MP3 music, press the button.
6. To exit the MP3 Selection screen, press the (MP3) button.
1
MP3
T
CHG
w
Vol.
AE Lock
4-5
2,3,6
Note: To save energy, this camera allows you to switch off the LCD panel by
pressing the button repeatedly.
LCD Off
LCD On
En
21
Page 24

Playback
Playback Menu settings (for MP3)
It allows you to set the MP3 playback functions.
1. Turn the Mode Dial to (Playback) Mode.
2. Press the (MP3) button to enter MP3 Selection screen.
3. Press the (Menu) button to enter MP3 Menu settings screen.
4. To select the menu item or its advanced setting, press the
button or turn the Jog Dial. To confirm your setting or pause
playing, press the (OK/Pause) button.
5. To stop implementing or cancel the setting, press the button.
6. To exit the MP3 Menu setting screen, press the (Menu) button.
MP3 Menu settings
1.
2.
22
Items
Quick
1.
Search
Repeat
2.
Icon
(Referring to “ Image
Playback Menu--Quick
Search” content.)
Normal / One / All
Settings
To have a quick search for
all MP3 music in a circle
To select repeating way to
play back MP3 music
Functions
Page 25

Playback
Playing images on TV
1. Turn the Mode Dial to (Setup) Mode.
2. Then select NTSC or PAL in the (Video System) setting as
same as your TV system’s settings.
3. Connect your camera to a TV at VIDEO IN (yellow) and AUDIO IN
(white) port via the video cable.
4. Turn on the TV. * Select “Video” as TV input.
5. If you want to play the video, turn the Mode dial to (Play
back) Mode and then follow the “Playback Chapter” steps.
Note: You may also implement the other functions through TV frame.
En
3
AUDIO IN
(White)
(Red)
VIDEO IN
(Yellow)
A/V Out
1
2
1
NTSC
PAL
23
Page 26

Deleting Files
Deleting Files
DSC Mode
1. Turn the Mode dial to (DSC) mode.
2. Press the (Quick Review) button to have a quick review of the
last picture you shot.
3. Press the (Delete) button to enter the delete screen. And then
press the (OK) button to delete the last picture.
Playback Mode
1. Turn the Mode dial to (Playback) mode.
2. Then turn the Jog Dial to select the file (picture/video/MP3/
audio) you want to delete.
3. Press the (Delete) button repeatedly to select “ DELETE THIS
FILE?”, or “ DELETE ALL FILES? ” screen or come back the
“Playback” screen.
4. To delete one or all files, press the (OK) button. To exit the
selected Delete screen, press the button.
MP3
T
CHG
w
Vol.
AE Lock
24
Page 27

Installing Software
Installing Software
Note: For WinXP users, please refer to
‘Notice to Windows XP Users’ note.
1. Insert installer CD into the CD-ROM
drive (see A).
2. Close the CD-ROM drive.
3. An installer wizard will automatically
launch.
If the installer wizard does not appear,
then;
4. You can click Start in the Windows
Taskbar. Then, select Run to continue
(See B).
5. Click Browse to search the file path,
and select RUN.exe in your CD-ROM
drive (See C).
6. Click Open.
7. Click OK.
8. Follow the on-screen instructions to
complete driver installation and the
bundled software.
(A)
En
(B)
(C)
25
Page 28

Transferring Files
Transferring Files
Connecting to PC
1. Connect your camera to a computer via USB
cable provided as shown below.
2. Power on the camera.
3. A mode selection item will appear on the LCD
screen.
1
3-4
5
4. Select PC item, and press the
(OK) button to enter PC Menu screen.
5. Select MASS STORAGE item in PC
Menu screen, and press the (OK)
button for a while to enter MASS
STORAGE Mode until the icon
moves to the left side of “MASS
STORAGE” item.
6. In the Windows (98SE/Me/2000/XP),
your PC will detect the camera after
connection.
Note: For Windows 98SE users, please
install the Installer CD first.
26
6
Windows XP
Windows Me/2000
Windows 98SE
Page 29

Transferring Files
7. Click My Computer on the
desktop.
8
8. A removable disk drive appears.
9. Double click on the removable
disk.
10. Double click on the DCIM folder.
WARNING: Please do not copy any
files into the DCIM folder of your
camera. Otherwise it may cause the
camera unstable or crash.
11. Then, You can drag-and-drop files
to your PC.
Removing the camera
Windows XP (A)
1. Click Safely Remove Hard-
ware (
) icon in the taskbar.
2. Select Safely remove USB
Mass Storage Device from the
menu.
Windows XP
Windows 98SE/Me/2000
(A)
Windows XP
En
27
Page 30

Transferring Files
Windows 2000/Me (B)
(B)
Windows 2000/Me
1. Click Unplug or Eject Hardware
( )icon in the taskbar.
2. Select Stop USB Mass Storage Device
from the menu (Windows 2000).
Select Stop USB Disk from the menu
(Windows Me).
Windows 98SE (C)
(C)
Windows 98SE
1. In My computer, Right click on the removable
disk corresponding to the camera.
2. Select Eject from the menu.
For MAC users
(MAC OS: 9.x and 10.1 above)
By connecting your camera to a MAC computer (referring to “Con-
necting to PC” Chapter), it will automatically detect Mass Storage
drive. You can easily manipulate your files the way you do in MAC user
interface.
Removing the camera from MAC
1. Select the camera icon (shown as ‘NO_NAME’or ‘untitled’ drive)
on the desktop.
2. Drag and drop the drive to the Trash.
28
Page 31

Using as PC camera
Using as PC Camera
(OS: 98SE/Me/2000/XP)
1. Connect your camera to a computer via USB cable as shown below.
2. Power on the camera.
3. A mode selection item will appear on the LCD screen.
4. Select PC item, and press the (OK) button to enter PC Menu
screen.
5. Press the button or turn the Jog Dial to select PC CAM item in
the PC Menu screen. Then press the (OK) button for a while to
enter PC CAM Mode until the icon moves to the left side of
“PC CAM” item.
6. Start NetMeeting application in Windows.
3-4
5
1
Note: PC Camera Mode does not support
MAC computers.
En
29
Page 32

Shooting with USB Connection
Shooting with USB Connection
It allows you to operate this camera with computer’s power.
1. Connect your camera to a computer via USB cable as shown below.
2. Power on the camera.
3. A mode selection item will appear on the LCD screen.
4. Select PC item, and press the (OK) button to enter PC Menu screen.
5. Press the button or turn the Jog Dial to select BUS-POWERED
item in the PC Menu screen, and press the (OK) button for a
while to enter BUS-POWERED Mode until
the icon moves to the left side of
“BUS-POWERED” item.
6. After entering BUS-POWERED Mode,
the unit will return to the normal
operating status.
3-4
5
30
1
6
Page 33

Printing Images (DPS)
Printing Images (DPS)
If your printer supports DPS (Direct Print Services) function, the
photos stored in this DSC can be printed directly without attaching to
an extra computer.
1. Connect your camera to a printer via USB cable as shown below.
2.
Power on the camera.
3. A mode selection item will appear on the LCD panel.
4. Select DIRECT PRINT item, and a message screen appears to
remind you not to connect to PC. To enter the DPS Menu screen
as shown below, press the button. To exit the message screen,
press the button.
5. To select the menu item or its advanced setting on the DPS Menu
screen, press the button or turn the Jog Dial.
To confirm your setting or select the photos
you want to print, press the (OK) button.
En
3
4
1
4
5
31
Page 34

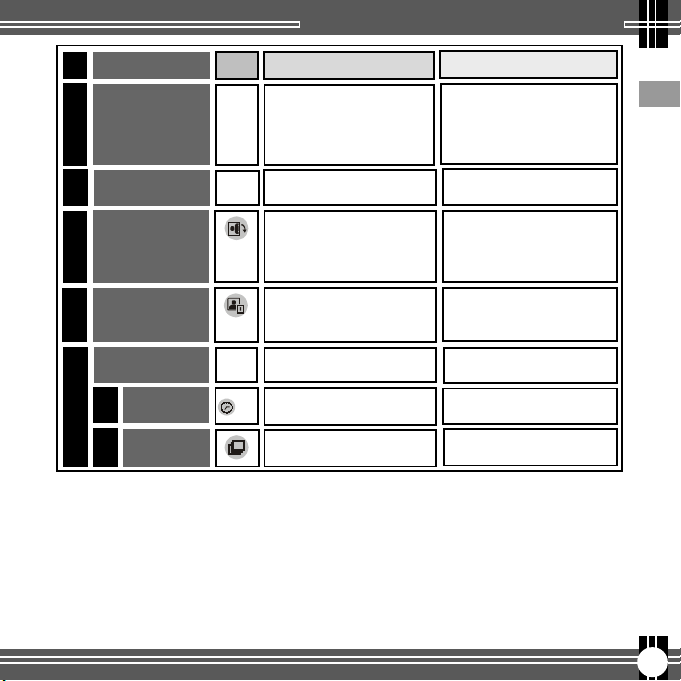
Printing Images (DPS)
1.
2.
3.
4.
5.
Items
Select Pic
Optimal
1 Copies
Paper Set
4.1.
Size
4.2.
Paper
4.3.
Border
Print
Icon
Settings
Select Particular/ All / Cancel
Off / On / Default
Press the button
or turn the Jog Dial to set
copy numbers
The setting information will
show on the right side of the
“Paper Set” item.
4”x6”/5”x7”/8.5”x11”/Default
Photo / Fast Photo / Default
Off / On / Default
1) Press button to print
2) Press button to cancel
Functions
To select particular or all
images for print
To enhance image quality
To set copy numbers
To set paper size
To set paper type
To set borders
To print the selected
image
32
 Loading...