


Plain-paper digital Fax/Copier/Printer/Scanner
Administrator’s Guide
Please read this guide before operating this machine.
After you finish reading this guide, keep it handy for easy reference.

Chapter 1 Using Common Functions
Chapter 2 Management
Chapter 3 Maintenance
Chapter 4 Troubleshooting
1
2
3
4

Contents
How to Read This Manual............................................................................................ |
v |
Symbols....................................................................................................................... |
v |
Key Descriptions........................................................................................................ |
vi |
Screens....................................................................................................................... |
vi |
Chapter 1 Using Common Functions |
|
|
|
Entering Characters................................................................................................... |
1-2 |
Overview of the Character Entry Screen............................................................... |
1-2 |
Entering Characters................................................................................................ |
1-2 |
Entering Symbols / Special Characters.................................................................. |
1-3 |
Deleting / Inserting Characters.............................................................................. |
1-6 |
Editing the Soft Keys................................................................................................. |
1-8 |
Editing the My MFP Shortcuts.............................................................................. |
1-11 |
Using My Jobs............................................................................................................ |
1-14 |
Registering /Editing My jobs................................................................................. |
1-14 |
Deleting My jobs.................................................................................................... |
1-18 |
Printing My Jobs List............................................................................................ |
1-19 |
Executing My jobs.................................................................................................. |
1-20 |
Checking the Machine Information..................................................................... |
1-21 |
List of Entries............................................................................................................ |
1-22 |
Paper Settings............................................................................................................ |
1-25 |
Setting the Bypass Paper...................................................................................... |
1-25 |
List of Paper Settings............................................................................................ |
1-26 |
Specifying Default Settings.................................................................................... |
1-28 |
Setting Example.................................................................................................... |
1-28 |
List of Default Settings......................................................................................... |
1-29 |
Outputting Lists........................................................................................................ |
1-33 |
Printing the Device Settings List......................................................................... |
1-33 |
Printing the User Usage Management List......................................................... |
1-34 |
Printing the Root Certificate List......................................................................... |
1-35 |
List of Lists............................................................................................................ |
1-36 |
Using Personal Settings........................................................................................... |
1-37 |
Specifying Personal Settings................................................................................. |
1-37 |
Using Personal Settings........................................................................................ |
1-40 |
Logging In / Logging Out......................................................................................... |
1-41 |
Logging In.............................................................................................................. |
1-41 |
Logging Out............................................................................................................ |
1-42 |
Chapter 2 Management |
|
|
|
List of Machine Management Settings................................................................... |
2-2 |
Setting Security Codes.............................................................................................. |
2-4 |
Setting the Administrator Password...................................................................... |
2-4 |
ii Contents

Setting the Protect Passcode................................................................................... |
2-7 |
|
Closed Communication.............................................................................................. |
2-9 |
|
Setting Closed Transmission................................................................................... |
2-9 |
|
Setting Closed Reception....................................................................................... |
2-10 |
1 |
Setting Passcode Polling........................................................................................ |
2-11 |
|
Setting the Passcode.............................................................................................. |
2-12 |
|
Communication and Range of Passcodes.............................................................. |
2-14 |
|
Setting ID Check Transmission............................................................................. |
2-16 |
|
Confirming the Destination Before Transmission............................................ |
2-17 |
|
Setting the Destination Confirmation Function.................................................. |
2-17 |
|
Setting the Confirmation Dial Functions............................................................. |
2-18 |
|
Prohibiting Transmission to Multiple Destinations......................................... |
2-20 |
|
Security Reception................................................................................................... |
2-21 |
|
Activating the PIN mask......................................................................................... |
2-23 |
|
Function Protect Settings....................................................................................... |
2-25 |
|
Setting Function Protection.................................................................................. |
2-26 |
|
Using Function Protection.................................................................................... |
2-28 |
|
Setting Mode Protection......................................................................................... |
2-30 |
|
Setting User Authentication................................................................................... |
2-32 |
|
Setting the Authentication Method...................................................................... |
2-32 |
|
Managing User Access/Cost Accounting.............................................................. |
2-35 |
|
Setting the Currency Unit..................................................................................... |
2-35 |
|
Specifying the Charge Settings............................................................................. |
2-37 |
|
Erasing the Accounting Data................................................................................ |
2-39 |
|
Specifying the Network Settings........................................................................... |
2-40 |
|
Specifying the TCP/IP Settings............................................................................. |
2-43 |
|
Registering LDAP Servers.................................................................................... |
2-54 |
|
Specifying the Archive Settings............................................................................ |
2-65 |
|
Setting an E-mail Gateway................................................................................... |
2-69 |
|
Setting the Automatic Logout Time...................................................................... |
2-71 |
|
Mirroring the Machine Settings............................................................................ |
2-73 |
|
Mirroring Methods................................................................................................. |
2-73 |
|
Importing / Exporting Using USB Memory......................................................... |
2-74 |
|
Directly Copying Via the Network........................................................................ |
2-80 |
|
Chapter 3 Maintenance
Cleaning the Outside of the Machine..................................................................... |
3-2 |
Cleaning the Control Panel...................................................................................... |
3-3 |
Cleaning the Scanning Area..................................................................................... |
3-4 |
Cleaning the Automatic Document Feeder (ADF)................................................. |
3-4 |
Cleaning the Scanning Area.................................................................................... |
3-6 |
Contents iii

Chapter 4 Troubleshooting
Error Messages............................................................................................................ |
4-2 |
Communication Errors............................................................................................ |
4-2 |
Error Messages Displayed on the Screen............................................................... |
4-8 |
Troubleshooting........................................................................................................ |
4-11 |
The machine does not operate............................................................................... |
4-11 |
Image Quality Problems........................................................................................ |
4-12 |
Cannot Transmit Faxes......................................................................................... |
4-15 |
Cannot Receive Faxes............................................................................................ |
4-16 |
Cannot Scan........................................................................................................... |
4-16 |
Cannot Print.......................................................................................................... |
4-18 |
Cannot Connect to the Network........................................................................... |
4-19 |
Cannot Install........................................................................................................ |
4-20 |
OfficeBridge Troubleshooting................................................................................ |
4-21 |
Browser Settings.................................................................................................... |
4-23 |
When a Power Failure Occurs................................................................................ |
4-26 |
Main Unit Operation............................................................................................. |
4-26 |
Memory Backups................................................................................................... |
4-26 |
Erased Document Notification.............................................................................. |
4-27 |
iv Contents

How to Read This Manual
Symbols |
1 |
|
|
In this manual, the following symbols are used with the items where important operational and safety information must be observed.
|
|
Symbol |
Meaning |
||
|
|
|
|
|
|
|
|
Warning |
Describes warnings to protect yourself and others from serious or potentially |
||
|
|
fatal injury if you handle the machine incorrectly. For safe operation, please |
|||
|
|
|
|
|
follow instructions carefully. |
|
|
|
|
|
|
|
|
Caution |
Notes a caution to protect yourself and others from personal injury or damage |
||
|
|
to properties if you handle the machine incorrectly. For safe operation, please |
|||
|
|
|
|
|
follow instructions carefully. |
|
|
|
|
|
|
|
|
|
|
|
Describes important conditions or restrictions you should carefully observe to |
|
IMPORTANT |
|
|||
|
|
avoid problems caused by incorrect operations. |
|||
|
|
|
|
||
|
|
|
|
|
|
|
|
|
|
Describes reference information and additional notes for operation. |
|
|
|
Note |
|||
|
|
|
|
|
|
How to Read This Manual v

Key Descriptions
In this manual, the operating keys are described as follows:
The key names on the control panel are shown in < >, and the key names on the touch panel are in [ ].
Keys on the control panel
Enclosed in < >, for example, <Job Confirm. Fax Cancel>.
Touch panel keys
Enclosed in [ ], for example, [Auto].
Screens
This manual uses the screens of the standard model, unless otherwise stated. The screens you see may differ, depending on the options installed.
vi How to Read This Manual

Chapter 1
Using Common Functions
Entering Characters................................................................................................... |
1-2 |
Overview of the Character Entry Screen............................................................... |
1-2 |
Entering Characters................................................................................................ |
1-2 |
Entering Symbols / Special Characters.................................................................. |
1-3 |
Deleting / Inserting Characters.............................................................................. |
1-6 |
Editing the Soft Keys................................................................................................. |
1-8 |
Editing the My MFP Shortcuts.............................................................................. |
1-11 |
Using My Jobs............................................................................................................ |
1-14 |
Registering /Editing My jobs................................................................................. |
1-14 |
Deleting My jobs.................................................................................................... |
1-18 |
Printing My Jobs List............................................................................................ |
1-19 |
Executing My jobs.................................................................................................. |
1-20 |
Checking the Machine Information..................................................................... |
1-21 |
List of Entries............................................................................................................ |
1-22 |
Paper Settings............................................................................................................ |
1-25 |
Setting the Bypass Paper...................................................................................... |
1-25 |
List of Paper Settings............................................................................................ |
1-26 |
Specifying Default Settings.................................................................................... |
1-28 |
Setting Example.................................................................................................... |
1-28 |
List of Default Settings......................................................................................... |
1-29 |
Outputting Lists........................................................................................................ |
1-33 |
Printing the Device Settings List......................................................................... |
1-33 |
Printing the User Usage Management List......................................................... |
1-34 |
Printing the Root Certificate List......................................................................... |
1-35 |
List of Lists............................................................................................................ |
1-36 |
Using Personal Settings........................................................................................... |
1-37 |
Specifying Personal Settings................................................................................. |
1-37 |
Using Personal Settings........................................................................................ |
1-40 |
Logging In / Logging Out......................................................................................... |
1-41 |
Logging In.............................................................................................................. |
1-41 |
Logging Out............................................................................................................ |
1-42 |

Entering Characters
Refer to this section when entering characters for sender names or names for address book destinations, etc.
Overview of the Character Entry Screen
Number of entered characters/Number of characters that can be entered
This displays the number of characters that can be entered and the number of characters entered so far.
Edit window
This displays the entered characters.
Mode selection keys
They change the type of characters that are being entered.
[All Clear] button
Press this to delete all characters.
[Clear] button
Press this to delete characters.
Cursor keys
They move the character entry position.
Return key
Press this to insert a line break while entering text in cover page or e-mail text.
[.com] button
You can register up to 10 domain name extensions for your convenience. (See page 1-4.)
Entering Characters
11 Select the character to enter from the character panel.
••To enter upper case characters, press [Upper].
••To enter lower case characters, press [Lower].
1-2 Entering Characters

Entering Symbols / Special Characters
Entering Symbols / Special Characters
11 Press [Symbol].
22 Select the symbol, and press [Enter].
Depending on the item to set, such as when entering a workgroup or DNS server address, some characters cannot be entered.
Entering Numbers
Numbers can be entered using the numeric keys or from the character entry screen.
1
Using Common Functions
Entering Characters 1-3
Entering Spaces
Press [Space] while entering characters.
Entering “.com”
You can press the [.com] button when entering e-mail addresses, etc. to easily enter domain names. You can also register the parts other than the domain name in advance to easily enter frequently used strings.
 Note
Note
For details on registering domain names, refer to Chapter 7, “Registering Other Settings” in the Scanner and Fax Guide.
11
22
Enter the e-mail address.
Press [.com].
1-4 Entering Characters

33 Select the domain name you want to enter.
The selected domain name is entered.
1
Using Common Functions
The domain name selection screen is not displayed if no domain names are registered.
Entering Characters 1-5

Deleting / Inserting Characters
To delete a character, use the cursor buttons to move the cursor to the character you want to delete, and then press [Clear].
And to insert a character, use the cursor buttons to move the cursor to the insert position and enter the character.
Deleting Characters
11 Use the cursor buttons to move the cursor to the position of the character you want to delete.
22 Press [Clear].
••The last entered character can be deleted by just pressing [Clear].
••To delete all of the characters, press [All Clear].
1-6 Entering Characters

Inserting Characters
11 Use the cursor buttons to move the cursor to the right of the position you want to insert the characters.
22 Enter the characters.
The characters will be inserted before the cursor.
1
Using Common Functions
Entering Characters 1-7
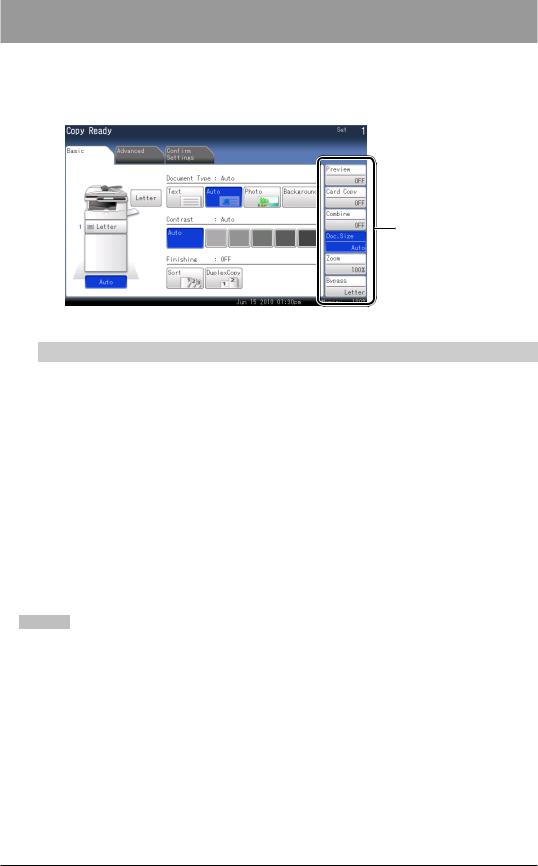
Editing the Soft Keys
Up to six advanced functions of each mode can be displayed on the ready screen. By assigning frequently used functions, you can use them from the ready screen.
Example of the copy ready screen
Soft Key
Ready Screen |
Functions that Can Be Assigned |
|
|
Copy screen |
Preview, Zoom, Card Copy, Document Size, Bypass, Combine, Next |
|
Document Setting, Run ScanTag Program |
|
|
Scanner screen |
Preview, Document Type, Contrast, Resolution, Zoom, Scan Size, Next |
|
Document Setting, Color, Duplex Scan, Broadcast, Batch Scan, |
|
File Format, Speed-Dial, File Name, Mail Address, e-mail Subject, Mail |
|
History, Color Adjustment, Attachment, Category Name, Comments, |
|
TWAIN Box, Scan to Path Notification, Hold Time, Stamp*1 |
Fax screen |
Preview, Resolution, Contrast, Duplex Scan, Redial, Monitor, |
|
Speed-Dial, Auto Distribute, Auto Rx, Security Reception, TTI, |
|
Cover Page, Tx Report, File Format, Scan Size, Next Document Setting, |
|
Polling, F-Code Polling, Polling Doc., F-Code Tx, F-Code Doc., Closed |
|
Transmission, ID Check Transmission, Memory Tx, Broadcast, Mail |
|
Address, Mail History, e-mail Subject, Batch Transmission, Check Mail, |
|
Delayed Transmission, e-mail Gateway, Stamp*1 |
***Only when the “Scan Confirmation Stamp option” is attached.
 Note
Note
Underlined values are the default settings specified at the time of shipment.
1-8 Editing the Soft Keys
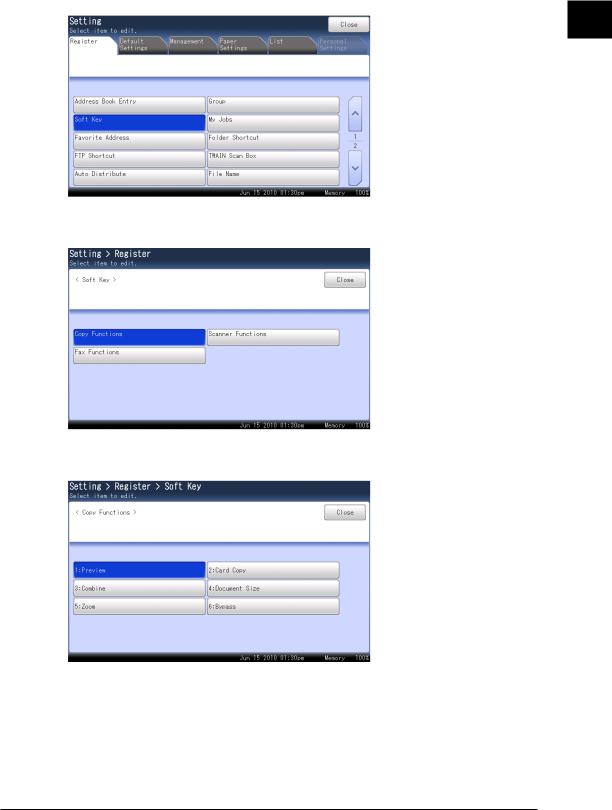
11 Press <Setting>.
22 Press [Soft Key].
1
Using Common Functions
33 Select the ready screen you want to set.
44 Select the soft key you want to edit.
Editing the Soft Keys 1-9

55 Select the function you want to display as a soft key, and press [Enter].
To continue to specify other soft keys, repeat the procedure from step 4.
1-10 Editing the Soft Keys

Editing the My MFP Shortcuts
You can change the shortcut keys on the screen displayed when <My MFP> is pressed.
My MFP shortcuts
The following functions can be assigned:
• Copy |
• Security Print |
• Scan |
• Shared Box |
• Fax |
• User Box |
• PC Folder to Print |
|
• Scan to e-mail |
• USB Memory to Print |
• Scan to PC Folder |
• Register |
• Scan to Box |
• Paper Settings |
• Scan to USB Memory |
• Default Settings |
• Scan to FTP Server |
• Management |
• Scan to Print |
• List |
• Share Rx Box |
• Personal Settings |
• Rx Box |
• Sound Settings |
• Tx Box |
• Language |
• ScanTag |
• LCD Brightness Adjustment |
 Note
Note
Underlined values are the default settings specified at the time of shipment.
1
Using Common Functions
Editing the My MFP Shortcuts 1-11

Editing from the Settings Screen
11 Press <Setting>.
22 Press the [Register] tab.
33 Press [My MFP Shortcut].
44 Select the shortcut button you want to change.
55 Select the screen you want to register in the shortcut button, and press [Enter].
To continue to specify other shortcut buttons, repeat the procedure from step 4.
1-12 Editing the My MFP Shortcuts

Editing From the My MFP Screen
11 Press <My MFP>.
22 Press [Add/Edit].
33 The remaining procedure is the same as steps 4 to 5 in “Editing from the Settings Screen”. (See page 1-12.)
1
Using Common Functions
Editing the My MFP Shortcuts 1-13
Using My Jobs
Register a series of operations in My Jobs to allow all the registered operations to be performed with one press of the button. This is useful for registering frequently used operations.
 Note
Note
••Up to six jobs can be registered.
••The destinations in the personal address book cannot be registered.
••Print jobs cannot be registered.
••The machine emits a beeping sound when registering My Jobs. The mode key corresponding to the mode being registered also flashes, to inform you that the My Jobs is being registered.
Registering /Editing My jobs
Registering / Editing From the My jobs Screen
This section describes the procedure for registering My Jobs. When editing, select the job you want to edit in step 5, and press [Edit]. After the screen in step 7 is displayed, select the item to change.
11
22
33
Press <Setting>.
Press the [Register] tab.
Press [My Jobs].
1-14 Using My Jobs

44 Press [Add].
When editing, select the job you want to edit, and press [Edit]. Proceed to step 7.
55 Select the type of job you want to register.
66 Perform the operation you want to register, and press [Enter] or <Start>.
1
Using Common Functions
Using My Jobs 1-15

•No: Displays the screen indicating the content registered in the job.
•Yes: Displays the screen indicating the content registered in the job, and then automatically starts the job.
111Press [Close].
1-16 Using My Jobs

Registering / Editing From the My jobs Execution Screen
11 Press <My MFP>.
22 |
Press [My Jobs]. |
1 |
|
Using Common Functions |
|||
|
|
||
33 |
Press [Add/Edit]. |
|
44 The remaining procedure is the same as steps 4 to 11 in “Registering / Editing From the My jobs Screen”. (See page 1-14.)
Using My Jobs 1-17

Deleting My jobs
Deleting From My jobs Screen
11 Press <Setting>.
22 Press the [Register] tab.
33 Press [My Jobs].
44 Select the job you want to delete, and press [Delete].
55 Press [Yes] to proceed with the deletion.
Press [No] to return to the screen in step 4.
Deleting From My Jobs Execution Screen
11
22
33
Press <My MFP>.
Press [My Jobs].
Press [Add/Edit].
1-18 Using My Jobs

44 The remaining procedure is the same as steps 4 to 5 in “Deleting From My jobs Screen”. (See page 1-18.)
Printing My Jobs List
Printing From My Jobs Screen
11 Press <Setting>.
22 Press the [Register] tab.
33 Press [My Jobs].
44 Press the [List] tab.
55 Select [ON] to enable duplex printing, or [OFF] to disable it.
66 Select [ON] to enable combined printing, or [OFF] to disable it.
77 Press [Yes].
1
Using Common Functions
Using My Jobs 1-19

Printing From My Jobs Execution Screen
11
22
33
Press <My MFP>.
Press [My Jobs].
Press [Add/Edit].
44 The remaining procedure is the same as steps 4 to 7 in “Printing From My Jobs Screen”. (See page 1-19.)
 Note
Note
My Jobs list can also be printed from [My Jobs List] in [List] after pressing <Setting>.
Executing My jobs
 Note
Note
If the registered function is protected, a message indicating so is displayed when My Jobs is executed. For details, refer to “Setting Mode Protection”. (See page 2-30.)
11
22
33
Press <My MFP>.
Press [My Jobs].
Press the you want to execute.
1-20 Using My Jobs

Checking the Machine Information
In the machine information on the My MFP screen, you can check the IP address and network settings of the machine, the status of optional equipment and consumables, and the number of pages that have been printed with each mode.
11 Press <My MFP>.
22 Press [Machine Info].
33 Check the machine information, and press [Print] if you want to print it.
If you do not want to print the information, press [My MFP Menu].
44 Select [ON] to enable duplex printing, or [OFF] to disable it.
55 Select [ON] to enable combined printing, or [OFF] to disable it.
66 Press [Yes].
1
Using Common Functions
Checking the Machine Information 1-21

List of Entries
You can register useful functions to use with each mode, such as address book destinations, My Jobs, and various shortcuts.
Function |
Description |
Settings |
Reference page |
|
|
|
|
Address Book |
You can register, edit, |
|
Chapter 7, “Registering |
Entry |
and delete address book |
|
Destinations” in the |
|
destinations. |
|
Scanner and Fax Guide. |
|
|
|
|
Group |
You can register, edit, and |
|
Chapter 7, “Registering |
|
delete groups. |
|
Destinations” in the |
|
|
|
Scanner and Fax Guide. |
|
|
|
|
Soft Key |
You can set frequently used |
Copy Functions |
1-8 |
|
functions as soft keys. |
Preview, Card Copy, |
|
|
|
Combine, Document |
|
|
|
Size, Zoom, Bypass |
|
|
|
Scanner Functions |
|
|
|
Preview, Document |
|
|
|
Type, Contrast, |
|
|
|
Resolution, File |
|
|
|
Name, Color |
|
|
|
Fax Functions |
|
|
|
Preview, Resolution, |
|
|
|
Contrast, Redial, |
|
|
|
Monitor, Broadcast |
|
|
|
|
|
My Jobs |
You can register, edit, and |
|
1-14 |
|
delete My Jobs, or print a list |
|
|
|
of My Jobs. |
|
|
|
|
|
|
Favorite Address |
You can register, edit, and |
|
Chapter 7, “Registering |
|
delete destinations to display |
|
Destinations” in the |
|
in the [Faves] tab on the |
|
Scanner and Fax Guide. |
|
scanner screen. |
|
|
|
|
|
|
Folder Shortcut |
You can register, edit, and |
|
Chapter 7, “Registering |
|
delete shortcuts to shared |
|
Destinations” in the |
|
folder paths. |
|
Scanner and Fax Guide. |
|
|
|
|
FTP Shortcut |
You can register, edit, and |
|
Chapter 7, “Registering |
|
delete shortcuts to FTP |
|
Destinations” in the |
|
servers. |
|
Scanner and Fax Guide. |
|
|
|
|
TWAIN Scan Box |
You can register or edit the |
|
Chapter 2, “Scanning |
|
name and I.D. code for a |
|
Documents Using a |
|
TWAIN box. |
|
TWAIN Box” in the |
|
|
|
Scanner and Fax Guide. |
|
|
|
|
1-22 List of Entries

Function |
Description |
Settings |
Reference page |
|
|
|
|
Auto Distribute |
You can register conditions |
Setting |
Chapter 4, “Useful |
|
to determine whether to |
OFF |
Reception Functions” |
|
distribute a received fax. |
ON |
in the Scanner and Fax |
|
You can also edit, delete, and |
|
Guide. |
|
print a list of the conditions. |
Priority |
|
|
|
Low |
|
|
|
Middle |
|
|
|
High |
|
|
|
Conditions |
|
|
|
Matching Method |
|
|
|
Any |
|
|
|
Initial |
|
|
|
Final |
|
|
|
Equal |
|
|
|
Auto Print |
|
|
|
OFF |
|
|
|
ON |
|
|
|
Schedule |
|
|
|
Weekday |
|
|
|
Mon, Tue, Wed, Thu, |
|
|
|
Fri, Sat, Sun |
|
|
|
Start Time/End Time |
|
|
|
12:00 am to 11:59 pm |
|
|
|
|
|
File Name |
You can register the file name |
|
Chapter 7, “Registering |
|
for the scanned image data in |
|
Other Settings” in the |
|
advance. |
|
Scanner and Fax Guide. |
|
|
|
|
Document |
You can register, edit, and |
|
Chapter 7, “Registering |
Category |
delete document categories |
|
Other Settings” in the |
|
to use when saving scanned |
|
Scanner and Fax Guide. |
|
documents in a box. |
|
|
|
|
|
|
Domain Name |
You can register the domain |
|
Chapter 7, “Registering |
|
names to display on the |
|
Other Settings” in the |
|
character entry screen. |
|
Scanner and Fax Guide. |
|
|
|
|
My MFP Shortcut |
You can change the My MFP |
USB Memory to |
1-11 |
|
shortcut keys. |
Print, Scan to USB |
|
|
|
Memory, Scan Tag, |
|
|
|
List, Sound Settings, |
|
|
|
LCD Brightness |
|
|
|
Adjustment |
|
|
|
|
|
1
Using Common Functions
List of Entries 1-23
 Loading...