

Page 1

Freedom™ ReAct™
Interactive Media Player
PRODUCT MANUAL
MTI P/N 063-1011-02 Rev C
Release Date: January 2013
Player Firmware: V3.0.27
1050 NW 229th Avenue, Hillsboro, Oregon 97124
©2013 MTI. All Rights Reserved.
T: 800.426.6844 F: 503.648.7500
www.mti-interactive.com
Page 2

Freedom ReAct
CONTENTS
1.0 Overview ................................................................................................. 3
1.1 System Components & Features ......................................................... 3
1.2 Media Player Details ..........................................................................4
1.3 About the Memory Card .....................................................................5
2.0 Installation & Connections ........................................................................ 6
2.1 General Guidelines ............................................................................6
2.2 Installing or Replacing the Memory Card ..............................................6
2.3 Connecting the Components ...............................................................6
3.0 Operation & Setup ................................................................................... 9
3.1 Playing Media Content ...................................................................... 9
3.2 Error Messages ................................................................................. 9
3.3 Using the Remote Control or USB Keyboard ...................................... 10
3.4 Conguring the Player Using the Setup Menu ................................... 10
3.5 Updating the Firmware.................................................................... 15
4.0 Content Management ............................................................................. 16
4.1 Conguring Media Content & Triggers ............................................... 16
4.2 Updating Media Content & Playlists ................................................. 18
4.3 Downloading Log Files .................................................................... 20
5.0 Troubleshooting ......................................................................................21
6.0 Accessories ........................................................................................... 23
7.0 Limited Warranty ................................................................................... 24
Appendix A .................................................................................................. 25
Playlist Elements & Attributes .........................................................................25
Example mti_cong.xml File ............................................................................29
For more information, please contact MTI at 800-426-6844
or e-mail customer service at cservice@mti-interactive.com.
2
Page 3
Freedom ReAct
1.0 OVERVIEW
Welcome to Freedom™ ReAct™ — MTI’s next-generation interactive media
player. This small, solid-state player provides customers with a powerful shopping
experience by displaying rich media content (e.g., video or computer animation)
on a TV or video monitor.
This player operates by using a removable, ash memory card (SDHC) that holds
media content (individual media les). The card also contains a conguration le
that controls the playback behavior. This conguration le can be easily edited to
develop a variety of custom applications.
The ReAct player is extremely versatile. It can be used as a stand-alone player to
simply play media content on a monitor, or it can be used with triggers to create
an interactive shopping experience. These triggers might be touch points created
for a touch-screen monitor, push-buttons mounted next to the store merchandise,
display posts that are part of an MTI Freedom™ display, or a combination of these.
When used as part of an interactive display, the system is typically congured to
play a video ‘attract loop’ that catches the shopper’s attention when the display
is not in use. When a shopper decides to demo a product (by pressing a button
or lifting a Freedom post), this action triggers the player to switch and play the
specic media content assigned to that product.
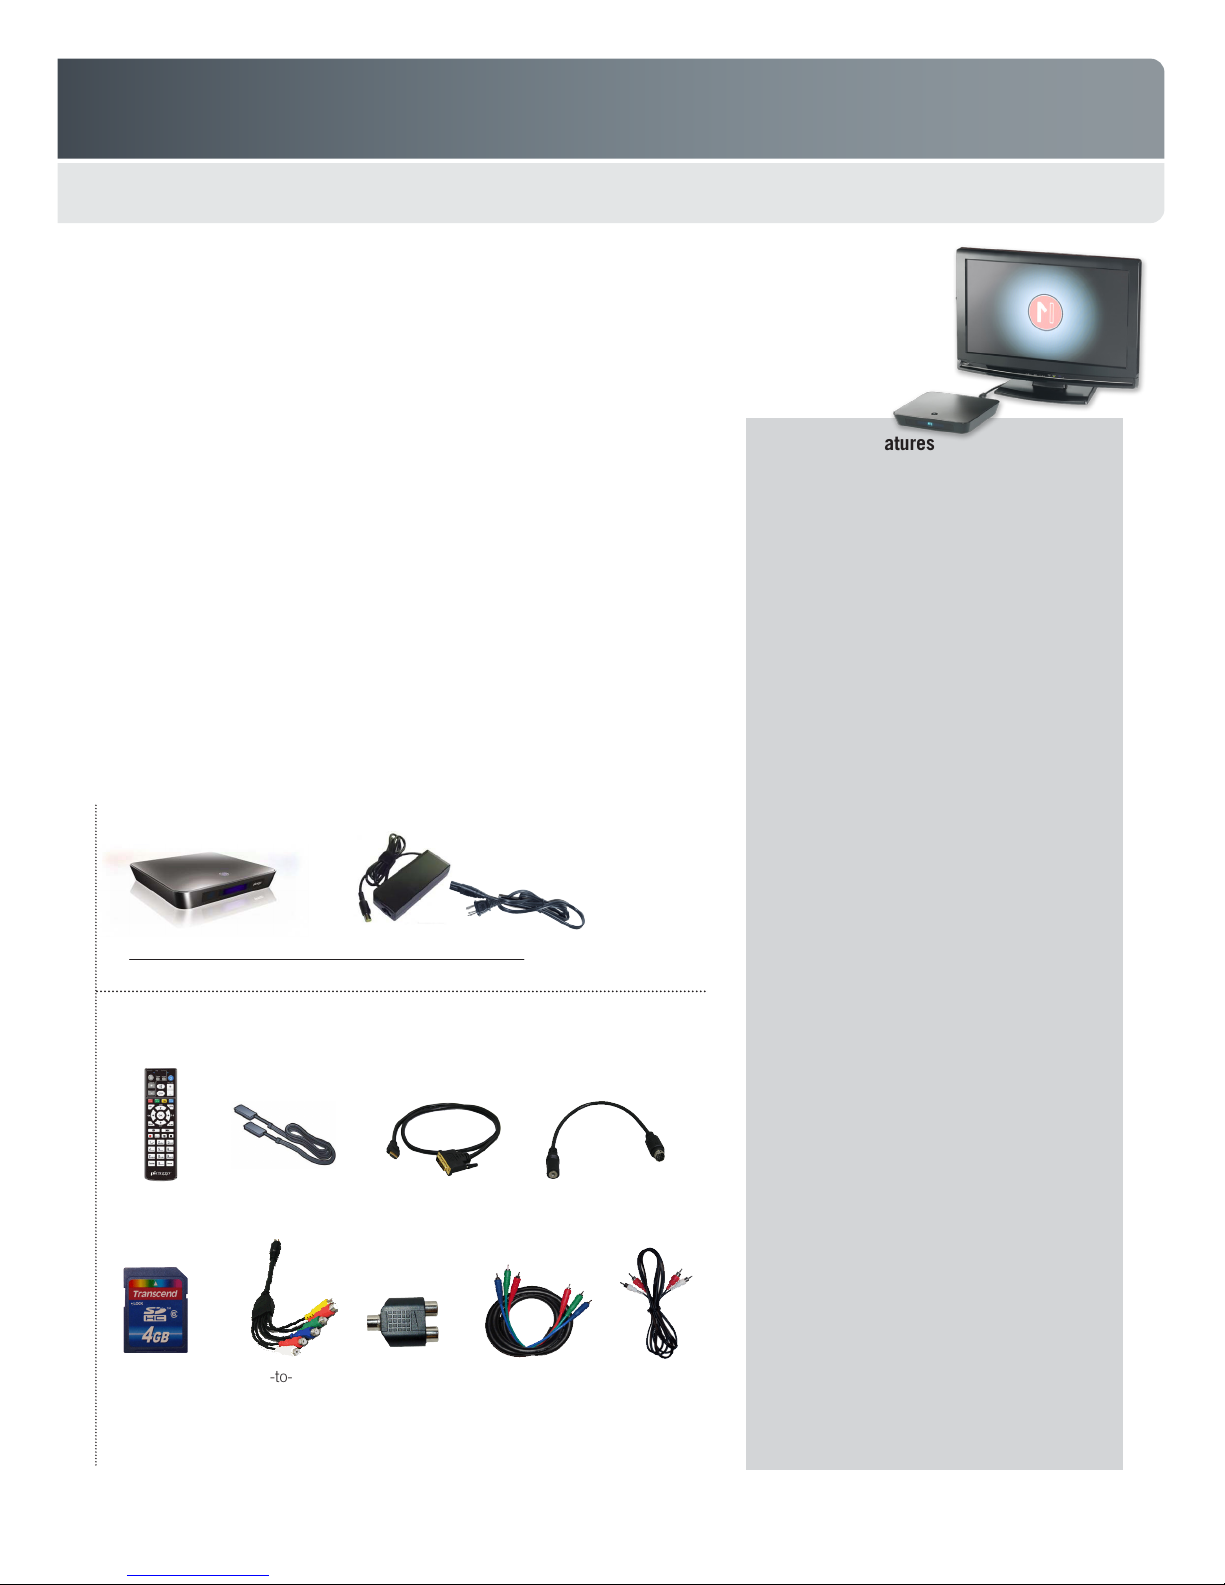
1.1 System Components & Features
Standard Components (supplied with 023-0123-02)
ReAct media player
023-0123-02
Accessories (sold separately)
Remote control
023-0124-00
SDHC
Class 6
memory card
036-0017-00
For a complete list of all accessories, please see the table on page 23.
HDMI cable
422-0200-00
DIN9-to-6RCA
adapter cable
422-0221-00
Power adapter & line cord
HDMI-to-DVI
adapter cable
422-0219-00
3.5mm
audio adapter
406-0594-00
Component
video cable
420-0195-00
DIN9-to-3.5mm
stereo adapter
422-0220-00
Stereo
audio cable
420-0026-00
ReAct Player Features
Full HD
Supports high resolution media les
up to 1920x1080
Multiple playback options
Supports playback of the most popular
video & audio formats (see page 4)
Multiple trigger options
System can be congured to trigger specic
media content in the playlist using a variety of
devices, including
- certied touch-screen monitors
(see page 23 for list of compatible monitors)
- push buttons
- MTI Freedom U2 or LP3 posts
- motion-detection sensors
3D video with auto mode detection
Supports 3D les in Side-by-Side (half) format
with HDMI metadata to enable automatic mode
switching on the 3D-TV
Displays web page content
Supports interactive web page content (html
les) stored locally or via Internet connection
SmartSound™ features
Mute and volume control features designed
specically for retail signage applications
Digital & analog output options
Supports HDMI, component & composite video
Remote management of Internet-
connected ReAct players
Apply new content and playlists, and monitor
player status from a remote location. See the
ReAct Digital Signage Media System Manual
for details.
Enhanced touch-screen functionality
Create touch‐screen interactive experiences
using standard video or image les. Touch points
dened in the ReAct playlist are overlaid onto
any content type, eliminating the need to author
custom interactive content.
Control external devices via RS232
For example, temporarily switch the ReAct
monitor to a live camera output by controlling an
HDMI switching device.
Manage manual content updates to multiple
players from a single USB flash drive
3
Page 4
Freedom ReAct
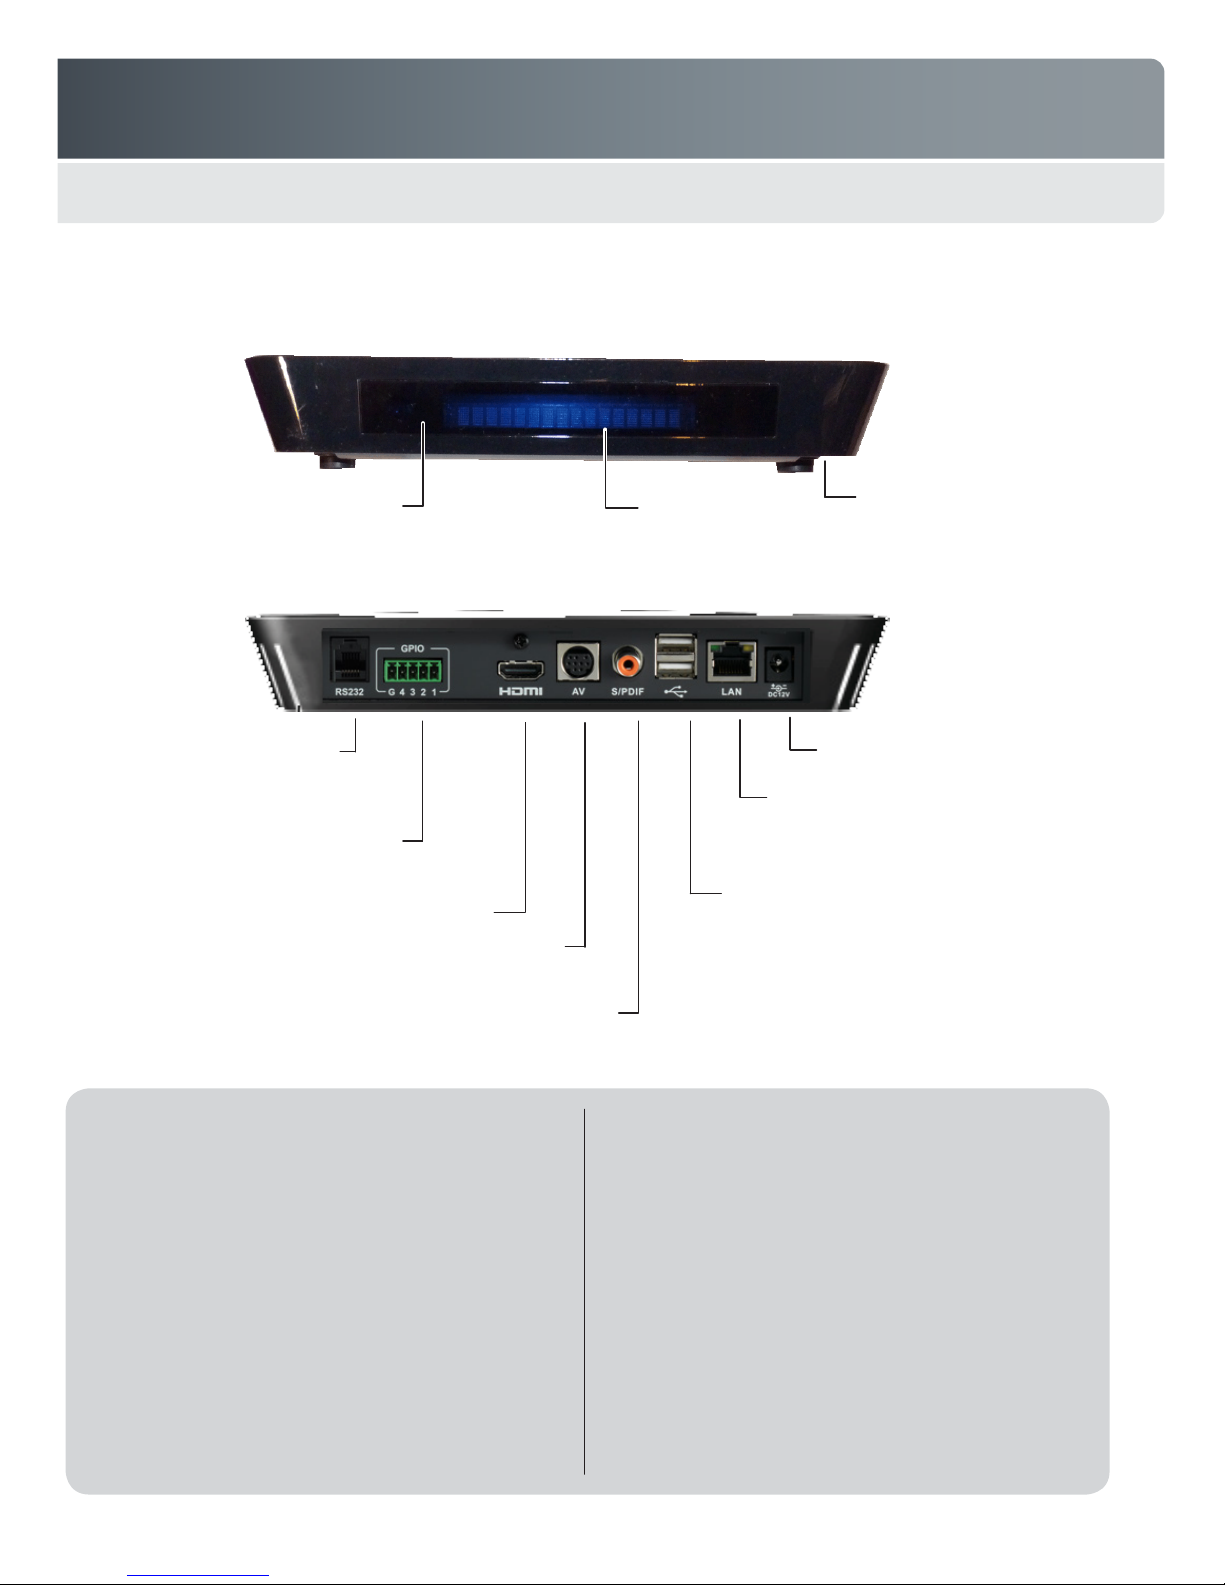
1.2 Media Player Details
Front Panel
IR signal receiver
For use with
optional remote control
RS-232 port
Use to interface with Freedom U2 or
LP3 systems using Universal Interface
Module (UIM) accessory
Use to connect up to four, external
momentary contact closure triggers
GPIO port
Rear Panel
HDMI
Analog audio/video out
S/PDIF audio out
Message LED
Memory card cover (on bottom)
Power input (12VDC)
LAN
10/1000 Base-T for connecting to the Internet, allowing
you to manage content remotely, view web page content,
and synchronize date & time (optional)
USB connectors
Use to connect a wireless network adapter* (optional), USB
keyboard (optional), touch-screen interface (optional), or to
upload new content & rmware or download log les using
a USB ash drive
*See page 23 for information on compatible wireless adapters
Video Outputs
HDMI, Analog Component, Composite
Supports auto-detection of monitor resolution (HDMI port)
Supports 24Hz, 50Hz, 60Hz frame rates
Manual TV resolution settings up through 1080p
Audio Output
Digital 5.1 (HDMI, S/PDIF), Analog L&R
3D Format Supported
Side-by-Side (Half) 720p, 1080i, 1080p
Encoders Supported
MPEG-2 MP@HL, 45Mbps max
MPEG4 Part2 ASP@L5, 8Mbps max
Part 10 (H.264) MP@L4, HP@L4, 45Mbps max
WMV9 (VC-1) AP@L3, 45bps max
Still Image Formats Supported
BMP, JPG, PNG, TIF
Video Container Formats Supported
AVI, MOV, MP4, MPG, TS, VOB, WMV
Control I/O
Contact closure (x4) Normally Open (NO) or
Normally Closed (NC) congurable
RS-232 Interface to Freedom U2 or LP3 via
available UIM accessory
USB 2.0 Content & rmware uploads
Usage data downloads
5V, 0.5A power output
Internal Solid State Storage
SDHC Card Class 6, speed for HD les
Supports up to 32GB capacity
Format as FAT32
4
Page 5
Freedom ReAct
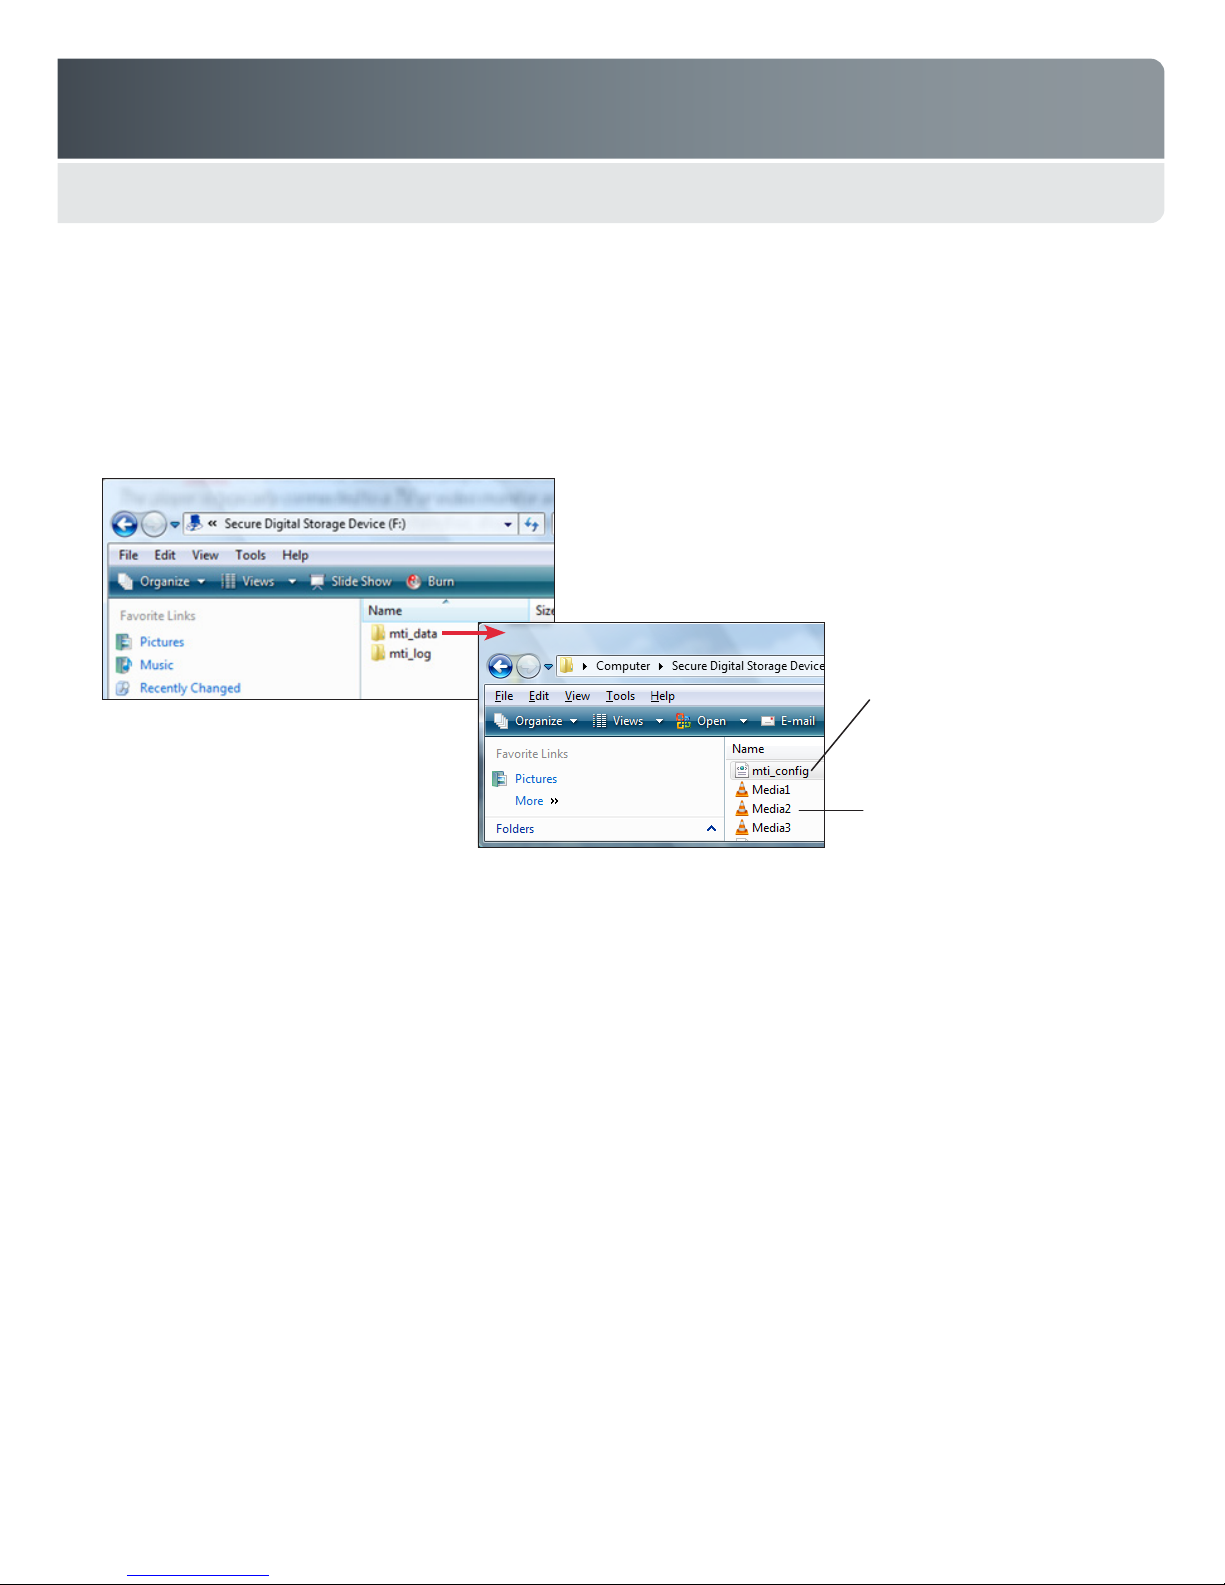
1.3 About the Memory Card
The player uses a Secure Digital High Capacity (SDHC) memory card to hold the media les and playlist information. This card
has two folders: mti_data and mti_log. The mti_data folder holds all the individual media les and an mti_cong.xml le. This
conguration le controls the attract loop, playlists, and all the trigger behaviors (see Appendix A for example le).
Note: To support bit rates required for high denition les, Class 6 or higher SDHC cards should be used with the ReAct player.
Class 6 cards support read/write speeds up to 48 Mbits/sec.
Configuration file
Use to specify attract loop,
playlists, & trigger behaviors
Media files
Media content that plays during the
attract loop and specic trigger events
5
Page 6
Freedom ReAct
2.0 INSTALLATION & CONNECTIONS
2.1 General Guidelines
Place media player in a secure location to avoid tampering.
Do not place player in a tightly enclosed space to prevent excessive temperatures inside player.
Do not mount player upside down. It is designed to dissipate heat through the top metal cover.
Do not mount other heat-generating devices near player.
Do not remove player housing as it could result in electric shock and/or damage to player. In addition, inadvertent static dis-
charges to certain components may corrupt the player rmware leaving it in an inoperable state.
If installing push-buttons as the trigger device, mount buttons in pre-drilled cabinet holes before connecting components.
2.2 Installing or Replacing the Memory Card
Important! Always unplug the power adapter before inserting or removing the memory card.
Remove access cover from bottom of player (requires small Phillips screwdriver).
1
Insert card containing media content into card slot as shown; then re-secure cover.
2
2.3 Connecting the Components
Connect player to monitor (or other AV components) using the connection diagrams below. HDMI provides the highest quality
1
video and audio in a single cable. This connection should be used whenever possible.
Digital monitor with HDMI port
Connect HDMI cable between player &
monitor. Cable provides both audio & video
signals to monitor.
422-0200-00
HDMI cable
Touch-screen monitor with
DVI port & 3.5mm audio
• Connect an HDMI-to-DVI cable
& USB cable between player &
touch-screen monitor.
• Use alternative audio connection
(see examples to right).
* See list of compatible touch-
screen monitors on page 23.
Analog monitor with component or composite video & stereo audio
Plug DIN9 cable into AV port on player; then use the desired video and/or audio
cables to connect to monitor inputs as shown below.
Monitor input DIN9 connector color
Component video Red, Green & Blue
Composite video Yellow
Stereo audio White & Red
422-0221-00
DIN9-to-6RCA cable
Alternative audio connections
• For home theater systems, connect a digital
audio cable to the S/PDIF port on the player.
• For computer speakers, plug a DIN9-to-3.5mm
adapter into the AV port on the player; then plug
the speaker cable into the adapter.
AV port on player
422-0220-00
DIN9-to-3.5mm adapter
023-0123-01
3.5mm speaker jack
6
Page 7

Freedom ReAct
Turn on the monitor and use the monitor’s controls to select the correct video input (e.g., HDMI).
2
Optional Internet connection - Use one of the options below if you want to connect the player to the Internet.
3
LAN Connection - Plug an Ethernet cable from your network into the player’s LAN port.
Wireless Connection - Plug a wireless network adapter into one of the player’s USB ports (see page 23 for compatible adapters).
To connect push-button triggers (or similar devices), connect trigger wires to a 5-position screw terminal connector (common wire to
4
GND). Plug connector into the player’s GPIO port.
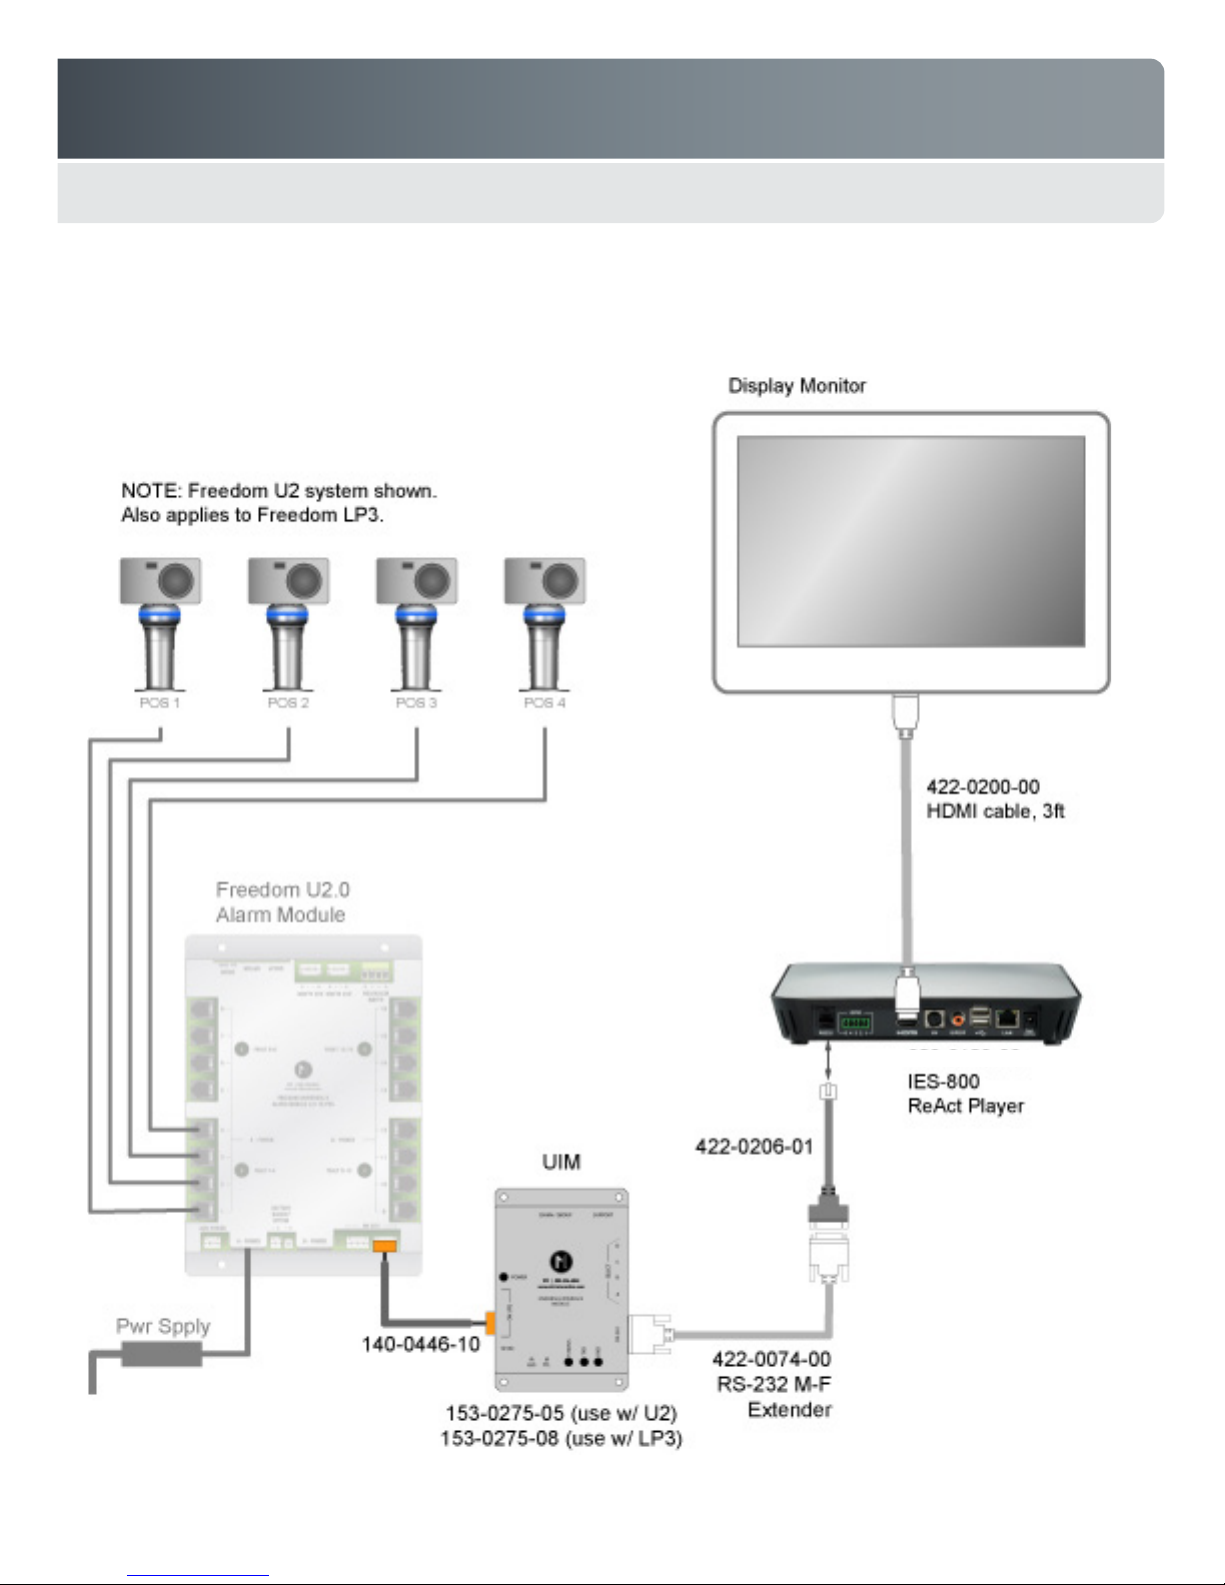
To interface with a Freedom U2 or LP3 system, connect a serial cable to the RS-232 port on the UIM. Connect the other end of this
5
cable to the RS-232 port on the player (see connection diagram on next page).
Triggers can be wired as normally open (NO) or
normally closed (NC). Switching behavior is controlled
by the mti_cong.xml le on the memory card.
Plug provided 12VDC power adapter into the player; then connect the adapter to a suitable AC power source.
6
If you connected the player to a network, you must congure the player’s network settings using the player’s Setup mode
7
(see pages 12-13). The default factory setting is DHCP.
If you are using a touch-screen, you must calibrate the monitor using the player’s Setup Menu (see page 14).
8
2.4 Power-up Sequence
The player does not have a dedicated on/off power button. The player automatically turns on and boots when power is supplied. The boot
sequence includes the following elements:
Approximately 10 seconds after power is applied, the MTI logo appears on the monitor.
Approximately 30 seconds after power is applied, an“MTI” label appears on the front panel of the player.
Approximately 45 seconds after power is applied, the video output from the player turns off briey. This is normal.
Approximately 60 seconds after power is applied, the attract loop begins to play.
Note: This rmware version boots the system in 1280x720p/ 60Hz mode. If using a monitor that does not support this resolution or frame
rate, the MTI logo may not be displayed. After the boot sequence, the player reverts to the current video output setting. When shipped
from the factory, the video output is set to Auto (see page 12 for details). If valid content does not exist on the memory card, the player
automatically displays the Setup Menu (see page 9 for details). If no image is displayed on the monitor, the player may be set for a video
output format that the monitor cannot display. The player’s video output setting may be changed using the front panel display as follows:
Enter 68473887 on the optional remote or attached USB keyboard to access the Setup Menu. The front panel on the player displays
1
“Setup Mode.”
If the down-arrow key, then the OK or Enter keys are the rst keys pressed after entering setup, the front panel indicates the current
2
output format (e.g., “Auto” or “1080p”, etc.).
Use the up or down buttons to select a resolution the monitor can display. If you are unsure what the monitor is capable of, select
3
Auto. If connected via HDMI or DVI, ReAct will automatically set its output to match the native resolution of the monitor. If connected
via YPbPr, ReAct will set its output to 480/576 which should display on the monitor.
Press OK or Enter to change the output resolution. The Setup Menu should now appear on the monitor along with a Conrmation
4
message. Press the left-arrow key to highlight “Save,” then press OK or Enter. If the monitor is not capable of displaying the new
resolution, the player will automatically revert back to the previous output setting. When this happens, the front panel will once again
display “Setup Mode.” Simply pressing OK or Enter (do not press the down-arrow from this state) will once again display the current
output setting on the front panel.
7
Page 8
Freedom ReAct
Connection Diagram for Interfacing the ReAct Player with Freedom U2 or LP3
(3ft)
023-0123-01
(2ft)
(optional)
8
Page 9

Freedom ReAct
3.0 OPERATION & SETUP
3.1 Playing Media Content
The player does not have a dedicated on/off power button. Once power is supplied, the player performs the system boot
process (approximately 60 seconds) and then plays the rst media le in the attract loop playlist. The player continues to
play the attract loop content until a trigger event occurs (e.g., customer pushes a button or lifts a Freedom post). When a
trigger event occurs, the player switches and plays the media les in the playlist assigned to that trigger. These les play only
once; the system then returns to playing les in the attract loop.
3.2 Error Messages
If the player encounters problems with the playlist or media content during bootup, it will begin searching for a connected
USB device with updated content. During this process, a blue window with the word ‘Preparing’ is displayed on screen, along
with an error message that helps pinpoint the problem (see examples below). Problems are typically caused by one of the
following conditions usually after writing to the SD Card directly from a PC:
Memory card is missing or not properly seated.
Memory card does not contain the mti_data folder with content and the mti_cong.xml le.
Media les specied in the mti_cong.xml le are missing.
There are syntax errors in the mti_cong.xml le.
Note: The error message only appears briey on the screen. If you want to view the error message again, simply press the
Setup button on the optional remote, or the Home key if you have an attached USB keyboard.
Example Error Message Probable Cause
Cannot open /tmp/media/sd/mmcblk0p1/mti_data/
mti_cong.xml
Missing lename.mov, Invalid content in attract
loop
Cannot parse xml: tag mismatch ln4 col72 A syntax error has been detected in the mti_cong.xml le. In this case
Attract Loop missing
For all of these errors, check the SD card contents on a PC and correct the error. Or, reload the player content from a known
good USB Flash drive. See pages 16-19 for details.
Memory card is not installed or not properly seated
mti_data folder is missing on the SD card
mti_cong.xml le is missing on the SD card
A le listed in the mti_cong.xml le is missing. In this case it is a le
listed in the Attract Loop section.
it is a tag mismatch. The line and column number indicates where the
xml parser failed. The actual error could be earlier in the le.
Check for proper spelling of the tags and attributes in the
mti_cong.xml le. In this case, the “AttractLoop” tag may be
mis-spelled. Also check the beginning and end tags.
9
Page 10

Freedom ReAct
3.3 Using the Remote Control or USB Keyboard
A remote control is not required for normal operation of the player. It is an optional accessory that can control several basic
player functions (e.g., mute and volume) and can also be used to congure the player and monitor. If you do not have a remote,
you can also congure the player by plugging a USB keyboard into one of the USB slots or by using touch points if connected to
a compatible touch screen. Basic remote control and keyboard functions are detailed below.
Example only - actual remote may vary in
color and layout. Remote buttons not called
out have no function on the ReAct player.
Text button
Use in Setup mode to close
the on-screen keyboard
Mute
Temporarily mutes current media le playing. Mute
can also be controlled via GPI0 push button.
Volume
Temporarily controls playback volume of current media playing.
Volume can also be controlled via GPI0 push buttons.
Setup button
Exits Setup mode. Use Home key if using USB keyboard.
Navigation buttons
Use in Setup mode. Use arrow keys and Enter key if
using a USB keyboard.
Number/letter buttons
3.4 Configuring the Player Using the Setup Menu
Overview
In most cases, the factory default settings are sufcient for basic operation and there is no need to congure the player. You may,
however, need to congure the player using the Setup Menu under the following conditions:
Player is connected to the monitor using the AV port. This is an analog interface that does not exchange resolution informa-
tion between the player and monitor. The player’s video output must be set to a specic resolution.
You want to use a different audio output format (e.g., PCM 5.1).
Player is connected to a wireless network. You must congure the player’s wireless settings.
Player is connected to a touch screen.
10
Page 11

Freedom ReAct
Accessing & Navigating the Setup Menu
You can access the Setup Menu and congure the player using the optional remote control, by attaching a USB keyboard, or by
using a touch screen. Refer to the details below for instructions on how to use each of these devices.
Note: If the player is not on, plug in the power supply and wait approximately 60 seconds until the boot sequence is complete.
Using the remote control
• Enter 68473887 using the remote
(spells “MTISETUP”) to access the
Setup Menu.
• Use the arrow buttons to navigate
between the tabs and the menu
choices.
• Press the Select/OK button to see
choices and make selections.
• An on-screen keyboard appears if
you select a menu item that requires
either a text or numerical entry. Use
the arrow buttons on the remote to
navigate and select keys on the onscreen keyboard.
• Select the backspace key on the
keyboard to delete existing entries.
• Security keys are case sensitive, so
be sure to use the right case when
entering the keys.
• Press the Text button on the remote to
close the on-screen keyboard.
• Once you have nished with all
entries, select the Exit button at the
bottom of the screen or click the
Setup button on the remote to exit the
Setup Menu.
Navigate between tabs to access
the details in each section
Using a USB keyboard
• Enter 68473887 using the keyboard
to access the Setup Menu.
• Use the arrow keys on the keyboard
to navigate between the tabs and the
menu choices.
• When a drop-down box is highlighted,
press the Enter key to see choices
and make selections.
• When a text entry box is highlighted,
press any letter or number key to
begin. The Backspace and Delete
keys are used to delete text. When
nished, press the up or down arrow
to navigate away from the text box.
Note: An on-screen keyboard
appears if you press the Enter key
while on a text entry box. Use the
arrow keys on the USB keyboard to
navigate the on-screen keyboard, and
press Enter on the USB keyboard to
enter the character. Navigate to Enter
on the on-screen keyboard to exit.
• WiFi security keys are case sensitive,
please be sure to use the right case
when entering the keys.
• Once you have nished with all
entries, select the Exit button at the
bottom of the screen or press the
Home key on the USB keyboard to
exit the Setup Menu.
Using a touch screen
Note: The touch screen must be
calibrated when it is initially connected.
This requires entering the Setup Menu
via the remote control or USB keyboard.
• Tap twice in the upper left corner of
the touch screen to access the onscreen keyboard.
• Use the on-screen keyboard to type
“mtisetup” and access the Setup
Menu.
• Use touch points on the screen to
navigate between the menu items.
• An on-screen keyboard appears if
you select a menu item that requires
either a text or numerical entry.
• Press the backspace key on the
on-screen keyboard to delete existing
entries.
• Security keys are case sensitive, so
be sure to use the right case when
entering the keys.
• Touch anywhere outside the keyboard
to exit the on-screen keyboard.
• Once you have nished with all
entries, press the Exit button at the
bottom of the screen to exit the Setup
Menu.
Player model
Firmware version
Current date & time
Machine (MAC) address
11
Page 12

Freedom ReAct
Configuring Audio & Video Settings
Select the AV tab on the Setup Menu to change the video and audio settings as described below:
Video
Output: Choices are Auto, 1080p, 1080i, 720p, 480p, or 480i. These output choices are based on common TV resolutions,
not typical PC resolutions. If you are using a PC monitor, or a TV with an HDMI or DVI cable connection, select Auto as your
desired output. The player will automatically detect and display the correct resolution for your monitor.
Format: Choices are NTSC, PAL or 24p. NTSC selects the US composite video standard, and 60Hz frame rate for YPbPr
and HDMI outputs. PAL selects the European composite video standard, and 50Hz frame rate for YPbPr and HDMI outputs.
The 24p setting may be selected when playing 24Hz video content to avoid 3:2 pull-down artifacts. Note that not all TVs or
monitors support 24Hz.
Aspect Ratio: Choices are 16:9 or 4:3.
Audio
Output: Choices are PCM 2.0 (for stereo-decoded output), PCM 5.1 (for 5.1 surround sound decoded output), or Pass-through
(for non-decoded digital output). Only applies to output through HDMI and SPDIF connections. Select based on the type of
speaker system that you are using (e.g., select 5.1 only if connected to home theater system via HDMI).
If the content le has a multi-channel (5.1) audio track:
• 2.0 decodes and down-mixes the audio to stereo L&R.
• 5.1 decodes the multi-channel audio. The full bandwidth 5.1 channels of audio is carried on the HDMI output. Only the
front left and right audio channels are passed to the analog L&R outputs (no down-mixing).
• Pass-through does not decode the audio. The encoded audio is carried on the SPDIF and HDMI outputs for the connected
audio device to decode.
Settings/Output SPDIF HDMI DIN9 red,white
PCM 2.0 (see note below) 2.0 2.0 2.0
PCM 5.1 N/A 5.1 Front left & right only
Pass-through Pass-through Pass-through N/A
Note: When connecting the player to a non-5.1 channel device, such as a TV, select PCM 2.0 in order to hear audio on the
device. The player will downmix 5.1 content to 2.0 (stereo L&R). Only use Pass-through mode when the connected audio
device, such as a Home Theater receiver, can properly decode the audio format of the content les.
* If the video le has AAC encoded audio, the audio is decoded and downmixed to 2.0 (stereo L&R). Other audio encodings
such as AC-3, DTS, or WMA are not decoded and no audio appears on this port.
Configuring Network Settings
Select the Network tab to congure the settings as described below. This is only required if the player is connected to your network.
Note: It may take a few minutes for an internet connection to establish once the player indicates it has received proper IP
addresses.
LAN
If you connected the player using an Ethernet cable, congure the network settings using the LAN Settings sub-menu.
Address Type: Choices are Dynamic (default) or Static. If Dynamic is selected, player obtains IP automatically if the network router
is DHCP enabled. If Static is selected, you must set the following IP parameters manually using addresses provided by your IT
administrator. The player must be rebooted after the static addresses are entered.
IP Address: (e.g., 192.168.000.002)
Net Mask: (e.g., 255.255.255.0)
DNS: Enter network DNS IP address.
Gateway: Enter IP of router or other directly connected device (e.g., 192.168.000.001).
12
Page 13

Freedom ReAct
WiFi (Wireless Connection)
If you are using a compatible wireless network adapter (see page 23), the player automatically detects the adapter and displays
a Wi sub-menu. Use this sub-menu to congure the following wireless network settings with information provided by your IT
department:
Scan: Press to search for available wireless networks. When complete, the Scan button becomes a drop-down box. Use it to
select the desired network.
SSID: This will automatically populate when the desired network is selected from the drop-down box.
Authentication: This will also populate automatically.
Secret Key: Enter the security key for the selected network.
Address Type: Choices are Dynamic (default) or Static. If Dynamic is selected, player obtains IP automatically. If Static is
selected, you must set up the IP parameters listed below manually. The player must be rebooted after the static addresses are
entered.
IP Address: Enter IP address (e.g., 192.168.000.002).
Net Mask: Enter 255.255.255.000 or other correct mask.
DNS: Enter network DNS IP address.
Gateway: Enter IP of router or other directly connected device (e.g., 192.168.000.001).
Connect: If dynamic addressing is selected, rst clear any existing addresses by briey unplugging the WiFi adapter and waiting
until the Wi menu disappears. When it is plugged back in, the SSID and Secret Key are remembered. Press Connect when
the Wi menu re-appears. It may take a minute or so for the new IP addresses to populate after pressing Connect.
Note: If the WiFi connection does not establish, it may be necessary to reboot the player.
13
Page 14

Freedom ReAct
Performing Action Tasks
The Action tab provides access to the following tasks:
Sync Config/Media/Log: Use to update media content and the conguration le (see page 18).
Touch Screen Calibration: Select this option and perform the following steps to calibrate the touch screen:
1. When the ‘Touch Screen Calibration’ menu item is selected, a screen appears with a marker in the upper left corner.
2. Place nger on marker for 2 seconds, then remove. The marker moves to the bottom left corner of the screen.
3. Place nger on marker for 2 seconds, then remove. The marker moves to the bottom right corner of the screen.
4. Place nger on marker for 2 seconds, then remove. The marker moves to the upper right corner of the screen.
5. Place nger on marker for 2 seconds, then remove. The marker moves to the center of the screen.
6. Place nger on marker for 2 seconds, then remove. The screen is now calibrated. Touch screen anywhere to exit.
Audio Codec Update: Use to update the WMA (Windows Media Audio) codec. This is only needed for serial numbers lower
than M504-110112-xxxxxxxxxxxx. Requires an Internet connection.
Restore Factory Default: Use to restore all settings to the factory defaults. The player automatically reboots when this item is
selected. The following settings are reset when restoring to the factory default:
Marker
AV Settings
Video
Output Auto
Format NTSC
Aspect Ratio 16:9
Audio
Output PCM 2.0
Firmware Upgrade: Use to update the rmware (see next page).
Diagnostic: Do not select as this is for production-line testing use only. If you select this option, you must recycle the power to
exit the diagnostic routine.
Burnin Test: Do not select as this is for production-line testing use only. If you select this option, you must recycle the power to
exit this test.
Network Settings
Lan
Address Type Dynamic
IP Address 0.0.0.0
Net Mask 0.0.0.0
DNS 0.0.0.0
Gateway 0.0.0.0
Other Settings
Language English
Local Mode True
Terminal ID (will be blank)
GMT Zone -0800
Sync Network Date Time Yes
Date = last value if not connect to Internet
Time = last value if not connect to Internet
14
Page 15

Freedom ReAct
Configuring Region Settings
Use the Region tab to congure the following settings:
GMT Zone: This sets the time zone relative to Greenwich Mean Time. Default is -0800 (Pacic Standard Time). Enter your
local time zone in relation to GMT. If Sync Network Date Time is set to Yes, the player time will be set according to the GMT
Zone entered. (Note: Automatic switching to Daylight Savings Time is not supported.)
Sync Network Date Time: If you set to Yes, then the system automatically gets the date and time from the network (if
connected). If set to No, then you must manually enter the date and time.
Date: Use on-screen keyboard to enter date in the format yyyy/mm/dd (e.g., 2011/07/05).
Time: Use on-screen keyboard to enter the current time in the format hh:mm:ss AM or PM (e.g., 10:33:46 AM)
3.5 Updating the Firmware
Warning! Do not remove power while the firmware is updating. Doing so can leave the player in an unusable state, requiring it be
returned to MTI for repair.
If you have a player with older rmware, you can update the player’s rmware using a USB ash drive. Please contact MTI for the
latest rmware le and then update the player using the steps below:
Using a PC, make a copy of the new rmware and name it fw.bin. Copy this le to the root directory of the USB ash drive.
1
Plug the USB ash drive into the player.
2
Access the Setup Menu (see page 11) and select the Action tab.
3
Select Firmware Upgrade.
4
Note: If the dialog box says ‘Firmware Not Found’ select ‘Close’, wait a few seconds, then select Firmware Upgrade
again. It takes a few seconds for the player to confirm a valid fw.bin file.
When the ‘Firmware Found’ dialog box appears, it displays the version currently loaded in the player as well as the version
5
on the USB drive. Make sure you are upgrading to the desired version, then select Flash.
The player automatically updates the rmware.
6
The player automatically reboots when done.
7
Remove USB ash drive when nished.
8
New rmware le
15
Page 16

Freedom ReAct
<GPIO>
4.0 CONTENT MANAGEMENT
4.1 Configuring Media Content & Triggers
Configuration Overview
The player’s behavior is controlled by the mti_cong.xml le on the memory card. This le contains sets of elements and attributes
that species the attract loop, playlists, and trigger behaviors. An example cong.xml le is included in Appendix A. This
appendix also details the specic elements and attributes that are used to create the conguration le. A small excerpt from this
conguration le is shown below:
<?xml version="1.0" encoding="UTF-8" ?>
<M504 date="2011 06 22 22:38:29" version="3">
<DefaultVolume value="45" />
<DefaultDuration value="30" />
<AttractLoop>
<content type="video" linkToTP="1,2,3,4,5,11" rs232Out="#0" volume="55">MTI-Macworld.mov</content>
Tag
Element
<content type="picture" duration="60" linkToTP="1,2,3,4,5,11">3D_Logo.png</content>
</AttractLoop>
<UIM position="68">
<command type="1" value="01">
<content type="video" rs232Out="#A">MTI-Bold_Loop_v5.mov</content>
</command>
<command type="1" value="02">
<content type="video" rs232Out="#B">MTI-Curve_Loop_v5.mov</content>
</command>
<command type="1" value="04">
<content type="video" rs232Out="#D">MTI-Pearl_Loop_v5.mov</content>
</command>
</UIM>
Child Element
Attribute (name = “value” pair)
Notes:
Content file name
A useful freeware program called ConTEXT (www.contexteditor.org) supports syntax color coding of xml les.
Media content can include media les (e.g., image or video les) or web page content (html les stored on the memory card or on a
web server if player is connected to the Internet).
All media content must specify the content type and name.
Media les identied in this conguration le must be in the mti_data folder. If a le is missing, the system displays an error message
and enters Setup Mode.
System requires the <M504> tag at the beginning, a DefaultVolume value, and the </M504> tag at the end.
Volume for individual media les is optional; the system will simply use the default value instead.
You must specify mode3d=”1” for 3D media les; otherwise the system will play the le in the default 2D mode.
16
Page 17

Freedom ReAct
h
x
y
Trigger Overview
ReAct currently supports three types of trigger inputs:
GPIO - momentary contact closure connections (e.g., push buttons or motion-detection sensors). You can attach up to four
GPIO devices to the player’s GPIO port and each device can trigger a specic playlist. Attributes in the cong.xml le determine whether a position is normally open or normally closed, and whether another GPIO trigger may interrupt the current
playback.
Display posts or buttons that are part of a Freedom U2 or LP3 merchandising system. Up to 68 Freedom positions are sup-
ported. Positions 65-68 are special positions that connect to the positions A through D jacks on the UIM. These four special
positions can be used to control illuminating buttons (illumination is controlled through the rs232Out attribute in the cong.
xml le).
Touch points on a compatible touch screen. You can create as many touch points as you want over any media content
displayed on the screen. Each content le has its own unique set of touch point triggers and you can create as many triggers
as you like for each le.
Creating Touch Points
You can add touch points over any media le by adding touch point elements (<TP>) to the cong.xml le. Each touch point
is dened by a set of four values (w,h,x,y) indicating its size and position on the screen as measured in pixels. The position is
measured from the top left corner of the screen and is always dened relative to a 1280x720 canvas.
For example, on a 26” 1280x720 monitor, a touch point 2” wide by 1” high in the center of the screen
would be dened as follows:
w=”113” h=”56” x=”584” y=”332”
Once you have dened the size and location of the touch point in the cong le, there are other attributes that you can add to give the touch point the look that you want. For example, you can specify
the color (r,g,b values) and the transparency level to create basic colored buttons.
You can also assign an image le to your touch point, which is useful for creating special on-screen buttons. If you assign an
image le, the player places and scales the image inside your dened rectangle. You can then also set the transparency of the
image le using the transparency attribute (transparent_level=) and set the transparency of the image background using the
alpha attribute (a=). Refer to the Appendix for additional details regarding these attributes.
w
Using RS-232 Capabilities
The player has the ability to output any character string that you specify out the RS-232 port when content is triggered. This is
accomplished using the RS232 attribute (rs232Out=) in the cong.xml le. This can be useful for triggering or controlling external
devices.
For example, you can use this to control LEDs on buttons connected to positions A through D on the UIM. A typical installation
would be to have the LED light when the button is pressed and the content plays, then turn off when the content nishes and
player goes back to the attract loop.
Likewise, the rs232Out attribute is needed to control the light rings built into the Freedom U2 display posts. In this application,
when a U2 position becomes active, the cong.xml le directs the player to send the appropriate code to the UIM, instructing the
light ring on that position to change to its active color.
Examples:
Freedom U2 positions are represented by single letters. Upper case A thru Z represent positions 1 thru 26, and lower case a thru z repre-
sent positions 27 thru 52.
To change U2 position 1 light ring to the active state, enter rs232Out=”#A” in the <content> element.
To activate multiple U2 light rings, enter rs232Out=”@ABCD”. Enter multiple letters after the @ corresponding to the positions to activate.
Buttons attached to the UIM are represented by the numbers 1 thru 4.
To light the rst button, enter rs232Out=”#1”. To light multiple buttons, enter rs232Out=”@1234”.
To reset all U2 light rings to their idle state and turn all button lights off, enter rs232Out=”#0”. This is usually entered into the rst <con-
tent> element of the attract loop to reset all U2 lights.
17
Page 18

Freedom ReAct
4.2 Updating Media Content & Playlists
There are two methods you can use to update the player’s media content and conguration le. You can do it remotely through an
Internet connection (i.e., remote content management) or locally using a USB ash drive.
Updating via USB Flash Drive
You can update a single player or multiple players using a single USB ash drive. If you are updating multiple players, one or more
‘target’ folders may be created on the USB ash drive to help simplify the process (see next page for example folder structure):
MAC Folders: Create an individual folder for each player using the last six digits of the player’s MAC address as the folder
name. Place the updated content and the cong_xml le specic to each player in its MAC/mti_data folder.
Terminal ID (TID) Folders: If all players are assigned a Terminal ID using the same format (see page 13), you can create fold-
ers named with full or partial TIDs to direct the content to specic players or groups of players. For example, if players are all
named with a unique number (e.g., mti01, mti02, etc.), you can create a single folder path named mti#/mti_data to direct
content in that folder to all players (the ‘#’ at the end of a folder name is wildcard for any character). If you create a folder
mti$1, then it directs content only to players mti01, mti11, mti21, etc. In this case, the ‘$’ is used as a wildcard for any single
character in the TID.
Default Folder: If the player’s MAC address or Terminal ID does not match any of the above folders, the player will look for a
mti_data folder in the root of the USB ash drive as a default.
Common Content Folder: This is an optional folder, containing content that is common to the playlists in multiple MAC, TID,
or default folders. Common content is placed in the common/mti_data folder. This avoids needing to duplicate media les in
multiple folders on the USB ash drive.
Once you have created your desired folders and copied the new content into these folders, use the following steps to update the
player(s):
Create and name a sync.xml le with the following attributes:
1
<M504Sync>
<SYNCData Incremental=”true” FollowCongXml=”true” />
</M504Sync>
Copy this sync le into each of the mti_data folders. Note that each mti_data folder may contain a different sync.xml le.
2
Important! It is best to use a dedicated USB ash drive for the updating media content, not the same ash drive used to
download log les.
If you set to true, it copies all the new media content and does not delete any existing (old) les.
If you set to false, it copies all the new media content and any old media les not listed in the
mti_cong.xml le are deleted.
If you set to true, only media les specied in the new mti_cong.xml le are
copied from the ash drive to the memory card.
If you set to false, all media les in both the target/mti_data folder and the
common/mti_data folder are copied to the player, even if they are not specied in
the mti_cong.xml le.
18
Page 19

Freedom ReAct
Plug the ash drive into one of the player’s USB slots.
3
When the ‘Ready’ dialog box appears on the monitor, the USB -> SD button is highlighted. Select to start the update.
4
The player automatically copies the les to the memory card.
5
Note: Before transferring the new content, make sure that all content les called out in the mti_cong.xml le are present
on the USB ash drive. If any content les are missing it will leave the player with an unusable playlist. When the update is
complete, the Close button on the bottom of the screen should be highlighted. Select (or press Enter) to close the window.
Remove the ash drive when nished.
6
Note: If the new mti_cong.xml le has the
same or older date as the existing le on the
player, a red warning window appears asking to
conrm the content transfer.
Example USB Flash
drive folder structure
070b50
mti_data
ImageA.jpg
mti_cong.xml
sync.xml
VideoA.mov
VideoB.mov
070c63
mti_data
ImageB.jpg
ImageC.jpg
mti_cong.xml
sync.xml
VideoC.mov
common
mti_data
VideoD.mov
VideoE.mov
mti$1
mti_data
mti_cong.xml
sync.xml
VideoF.mov
VideoG.mov
mti_data
ImageD.jpg
mti_cong.xml
sync.xml
VideoH.mov
VideoI.mov
Player with MAC address 070b50 will only look for content in the 070b50/mti_data
and common/mti_data folders as directed by the mti_cong.xml and sync.xml les in
the 070b50/mti_data folder.
Player with MAC address 070c63 will only look for content in the 070c63/mti_data
and common/mti_data folders as directed by the mti_cong.xml and sync.xml les in
the 070c63/mti_data folder.
Players with Terminals IDs that match the mti$1 string will only look for content in the
mti$1/mti_data and common/mti_data folders as directed by the mti_cong.xml and
sync.xml les in the mti$1/mti_data folder.
All other players will only look for content in the mti_data and common/mti_data
folders as directed by the mti_cong.xml and sync.xml les in the mti_data folder.
19
Page 20
Freedom ReAct
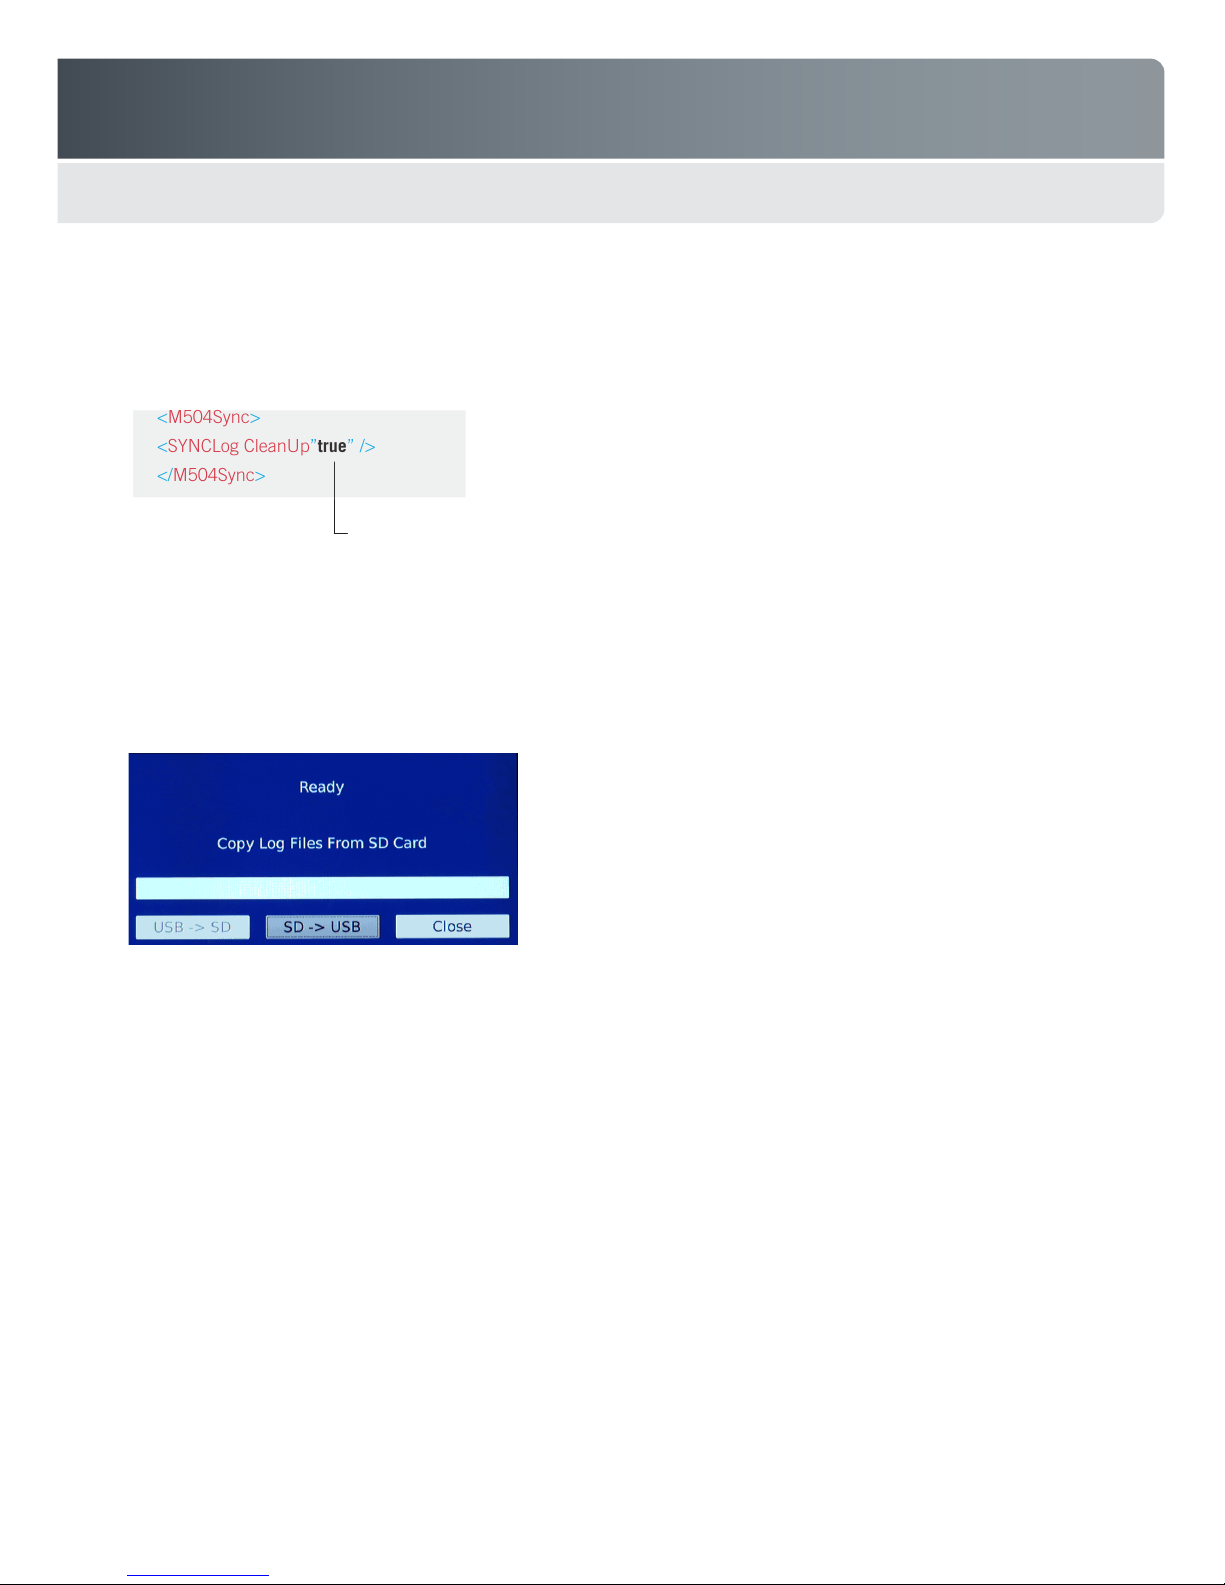
4.3 Downloading Log Files
The player maintains log les of all activity. You can download these log les using a USB ash drive.
Create a folder named mti_log.
1
Create and name a sync.xml le with the following attributes:
2
<M504Sync>
<SYNCLog CleanUp”true” />
</M504Sync>
Copy the sync.xml le into the mti_log folder; then copy this folder to a USB ash drive.
3
Important! It is best to use a dedicated USB ash drive for the log les, not the same ash drive used to update the media content.
Plug the ash drive into one of the player’s USB slots.
4
If you set to true, it copies the les to the ash drive and then deletes the les from the SD card.
If you set to false, it does not delete the les from the SD card after copying them to the ash drive.
When the ‘Ready’ dialog box appears on the monitor, verify that the SD -> USB button is highlighted. Select to copy the les.
5
The player automatically copies the log les to the ash drive.
6
When copying is complete, the Close button will be highlighted. Select to close the window.
7
Remove the ash drive when nished.
8
Notes: The log les are created as plain text les. with one le containing all user activity for each day. The le names contain both
the player serial number and the date:
m504_001BF007011B_20101008.log
When copying log les from the SDHC card to the USB ash drive, be aware that the current day’s le is not copied. This le may
change later if additional user activity occurs. The player does not copy this le in order to avoid duplication of data during future
copy operations.
Note: If this ash drive also contains the mti_data
folder, then the USB -> SD button will be highlighted
by default. You must use a remote, keyboard or
touch screen to select the SD -> USB button before
proceeding.
20
Page 21

Freedom ReAct
5.0 TROUBLESHOOTING
All MTI products are designed and manufactured to provide consistent, trouble-free service. If you encounter a problem, refer
to the troubleshooting table below. If the problem persists, contact MTI Customer Service at 1.800.426.6844 (toll-free) or
503.648.6500 (international), from 8AM - 5PM Pacic Time, Monday through Friday. Please send faxes to 503.648.7500 or e-mail
cservice@mti-interactive.com.
Problem Probable Cause Solution
Error message appears during boot
sequence and system enters Setup
mode
(See page 9 for sample error
messages and their probable causes)
No power Power supply is not connected to player
3D content is displayed in a split
screen format
Memory card is not installed Install memory card
Media le specied in the mti_cong le is
not in the mti_data folder
The mti_data folder is not on the memory
card
Syntax errors in the mti_cong.xml le Fix syntax errors and update the memory card
An update using the USB ash drive was
incomplete because the card was full,
leaving an unusable mti_cong le
and/or AC power source
mti_cong le did not identify that media le
was 3D content
TV is not set to auto-detect 3D input signals Consult your TV manual for instructions on how
TV is not capable of displaying 3D content Replace with 3D-capable TV
Update the memory card content so that all
media les are present in the mti_data folder
Update the memory card content so that it
contains the mti_data folder with all media les
and the mti_cong.xml le
to include the new cong le
Connect a corrected USB ash drive and reboot
the player
Connect power supply to player and AC power
source
Edit the mti_cong le so the media le is tagged as
a 3D le (mode3d=”1”)
to enable this mode
No picture/screen is not stable Audio/video cable is not connected correctly Ensure that all cables are connected correctly
Player video setting is incorrect for that
monitor
Remote does not work and/or cannot
access the player setup menu.
Wrong (or no) media le plays when
trigger event occurs
Player cannot play media le File type is not supported by this system Replace content with correct le type
Player displays “Failed” when trying
to transfer content from a USB Flash
drive
No battery power Replace batteries
Something is blocking the IR receiver on the
player
System resources have over-owed, causing
the player to not recognize the password.
Trigger is not wired correctly Ensure that all trigger cables are properly
The media content and/or trigger information
in the mti_cong.xml le is incorrect
Syntax error in mti_cong.xml le Check for proper spelling of element tags and
One or more content les listed in the playlist
(mti_cong.xml) are missing from the USB
Flash drive
Use the Setup Menu to select the correct video
setting
See page 7 for instructions on how to change
the player settings using the front panel display
Remove obstacle blocking the IR receiver
Rebooting the player resets or clears the
system resources.
connected
Edit the mti_cong.xml le to x the error; then
copy the updated le to the memory card
attributes in the mti_cong.xml le
Correct the mti_cong.xml le, or add the
missing les to the USB Flash drive
21
Page 22

Freedom ReAct
Problem Probable Cause Solution
Cannot open /tmp/media/sd/
mmcblk0p1/mti_data/mti_cong.xml
Memory card is not installed or not properly
seated
mti_data folder is missing on the SD card Copy the mti_data folder to the SD card
mti_cong.xml le is missing on the SD card Copy the mti_cong.xml le to the SD card
Install memory card correctly
Missing lename.mov, Invalid content
in attract loop
Cannot parse xml: tag mismatch ln4
col72
Attract Loop missing
Cannot establish connection to a WiFi
access point
Player has valid network addresses
listed in setup menu, but unable to
display web pages.
Player has valid network addresses
listed in setup menu, but unable to
establish connection to DSMS.
A le listed in the mti_cong.xml le is
missing. In this case it is a le listed in the
Attract Loop section.
A syntax error has been detected in the
mti_cong.xml le. In this case it is a tag
mismatch. The line and column number
indicates where the xml parser failed. The
actual error could be earlier in the le.
Check for proper spelling of the tags and
attributes in the mti_cong.xml le. In this
case, the “AttractLoop” tag may be
mis-spelled. Also check the beginning and
end tags.
Player has stored addresses from a previous
WiFi network
WiFi signal is too weak for adapter to
establish consistent connection.
Player is not communicating properly on all
network ports.
One or more player System settings not
correct.
Player is not communicating properly on all
network ports.
Locate the missing le and copy it to the
SD card
Correct the syntax error(s) in the
mti_cong.xml le
Correct the syntax error(s) in the
mti_cong.xml le
Clear the previous network addresses by
removing the WiFi adapter. Replug the WiFi
adapter to the player and press Connect.
The player must be moved closer to the WiFi
access point. If this is not possible a different
adapter may work.
Reboot the player to reset all port
communications.
Check System settings in player setup menu.
Verify Host Address is correct and UDP Port is
50400. Reboot the player after making changes
to Hoast Address or UDP Port. Verify Terminal
ID is correct.
Reboot the player to reset all port
communications.
22
Page 23

Freedom ReAct
6.0 ACCESSORIES
Part Number Item
023-0124-00 IR remote
036-0017-00 SDHC memory card, Class 6, 4GB
140-0446-10 Power/Logic cable, Freedom Alarm Module to UIM, 3ft
140-0853-22 Push button-to-player cable (non-illuminated), 6ft
153-0275-05 Universal Interface Module (UIM), Freedom U2
153-0275-08 Universal Interface Module (UIM), Freedom LP3
406-0594-00 L&R RCA-to-3.5mm adapter
420-0026-00 Stereo audio cable, 3ft
420-0139-00 Composite video cable, 3ft
420-0195-00 Component video (Y, Pb, Pr) cable, 3ft
420-0332-00 SPDIF digital audio cable, 3ft
422-0074-00 RS-232 M-F extender cable
422-0200-00 HDMI Category 2 cable, 3ft
422-0206-01 DB9 Male-to-RJ11 RS232 adapter cable
422-0219-00 HDMI-to-DVI adapter cable, 3ft
422-0220-00 DIN9-to-3.5mm stereo adapter
422-0221-00 DIN9-to-6RCA adapter cable
428-0052-00 Push button, momentary contact
575-1631-00
Available from various
electronics retailers
Mounting bracket (requires 2 or 3 per player)
Wireless USB Network Adapter - ReAct supports adapters that use the following Ralink chipsets:
Chipset Adapter Examples
RT3070 150Mbps USB Wireless WiFi 802.11n Adapter with Anternna (www.jacobsparts.com)
RT3370 Mini Wireless WiFi USB Dongle Adapter 150Mbps (www.jacobsparts.com)
RT3572 Linksys WUSB600N v2
RT5370 Z0net ZEW2547
Compatible Touch Monitors
ReAct requires a DVI or HDMI video input on the monitor, and touch control interface
via USB. Firmware v2.0.10r1 supports touch monitors from the following companies:
Elo TouchSystems www.elotouch.com
General Touch www.generaltouch.com
23
Page 24

Freedom ReAct
LIMITED WARRANTY
Seller warrants all Products manufactured by Seller to be free from defects in material and workmanship. Seller’s warranty shall
begin on the date of shipment to Customer. The length of the warranty is determined by the Product type as set forth below.
Base units, display puck assemblies (enclosure and ECB, excluding puck battery), alarm modules (enclosure and ECB),
Piezo alarms, secondary sensors, electronic security sensors, quad cables, power/data link cables, IntelliKey Switch Module
assemblies, Keyswitch assemblies, Keypad assemblies, puck adapters and custom design brackets/adapters for the Freedom™
Consumer Electronic Handheld (CEhh) Merchandising System (“Freedom™ System”), and NFC electronics boards in the
Freedom™ System, all OnSite® switching modules and video/audio switching and distribution modules for the Audition Signal
Management System (“Audition System”), multimedia players, format converters, resolution scalers and audio/video cables
for the Audition System are warranted for a period of one (1) year.
CarbonTetherTM assemblies, both powered and mechanical and SmartTetherTM assemblies are warranted for a period of one
(1) year.
AirTetherTM assemblies are warranted for a period of six (6) months.
Seller provides no warranty hereunder for Power Supplies, and Customer must rely solely upon any warranty provided by the
manufacturer of such Power Supplies. Certain manufacturer warranties are on le with Seller and may be made available upon
Customer’s request. Seller warrants all batteries to be free from defects in materials and factory workmanship, and warrants
any battery that fails to perform as specied within six (6) months after date of shipment. This warranty shall not apply if buyer
fails to notify MTI of such defect within ten (10) days after discovery, or if battery has been subjected to misuse, negligence
or accident.
The following components of the Freedom™ System are considered consumable items and Seller provides no warranty for
such items: USB interconnect cables, extension cables, SmartCables, FlexSensors, Membrane Sensors, anti-skid pads, antirotation brackets, VHB adhesive pads, X- and L-brackets, CC- and DC-brackets, cable clamps, zip ties, and installation,
retrieval and removal tools. Unused SmartCables and Secondary Sensors that are demonstrated by Customer to have been
faulty upon delivery to Customer will be replaced at Seller’s expense; provided, however, Customer shall be responsible for any
and all related shipping and handling costs.
All other Seller-manufactured Products, not specied above, are warranted for a period of one (1) year.
Seller’s warranty expressed herein does not apply to the following:
• Cartons, cases, cabinets, displays, or any other unit attached to or otherwise connected to a Seller-manufactured Product.
• The labor and other costs associated with the removal and replacement of the warranted Product or any component
thereof.
• Products used in applications beyond their normal intended use, application, or rated specications.
• Products damaged by accident, abuse, improper voltage, faulty installations, mechanical failure, re, ood, lightning, civil
unrest, or any act of God.
• Warranty services rendered by any party other than Seller unless so authorized by Seller.
• Replacement parts and equipment that have been discontinued or are otherwise unavailable.
• Products from other manufacturers that are integrated by Seller into Customer’s system(s) are not warranted by Seller and
are subject only to that warranty, if any, provided by the manufacturer of such Product(s).
Subject to the limitations stated herein, and at Seller’s sole discretion, Seller will replace or repair defective Products or
components thereof at no charge to Customer so long as Customer’s account with Seller is current and Customer has returned
the Product(s) or component thereof pursuant to a properly issued Return Material Authorization.
Replacement of any Product or any component thereof by Seller under this warranty provision shall not extend, in any way, the
length of the original applicable warranty period otherwise provided for herein.
Seller reserves the right to replace a defective Product or component thereof with a refurbished Product or component.
Seller’s warranty herein is non-transferable and shall extend only to Customer.
24
Page 25

Freedom ReAct
APPENDIX A
Playlist Elements & Attributes
25
Page 26

Freedom ReAct
26
Page 27

Freedom ReAct
27
Page 28

Freedom ReAct
28
Page 29

Freedom ReAct
Example mti_config.xml File
<?xml version="1.0" encoding="UTF-8" ?>
<M504 date="2011 06 22 22:38:29" version="3">
<DefaultVolume value="45" />
<DefaultDuration value="30" />
<AttractLoop>
<content type="video" linkToTP="1,2,3,4,5,11" rs232Out="#0" volume="55">MTI-Macworld.mov</content>
<content type="picture" duration="60" linkToTP="1,2,3,4,5,11">3D_Logo.png</content>
</AttractLoop>
<UIM position="68">
<command type="1" value="01">
<content type="video" rs232Out="#A">MTI-Bold_Loop_v5.mov</content>
</command>
<command type="1" value="02">
<content type="video" rs232Out="#B">MTI-Curve_Loop_v5.mov</content>
</command>
<command type="1" value="04">
<content type="video" rs232Out="#D">MTI-Pearl_Loop_v5.mov</content>
</command>
</UIM>
<GPIO>
<port lockout="true" normal_open="false" value="1">
<content type="video">MTI-CoralReef.wmv</content>
</port>
<port normal_open="false" value="2">
<content type="video" mode3d="1">MTI-FIFA3D.mov</content>
</port>
<port audioctrl="volume_up" normal_open="true" value="3" />
<port audioctrl="volume_down" normal_open="true" value="4" />
</GPIO>
<IRREMOTE />
<TP>
<tpItem value="1" w="476" h="65" x="770" y="600" r="0" g="0" b="0" transparent-level="0.3" a="0"
focusOut="MTItp_SEE_THE_DETAILS.png">
<content type="html" duration="60" linkToTP="12">http://www.mti-interactive.com/Products/Intuition</content>
</tpItem>
<tpItem value="2" w="100" h="100" x="900" y="20" r="255" g="255" b="0" transparent-level="0.0" a
rs232Out="#A" uimOnly="1"/>
<tpItem value="3" w="150" h="50" x="875" y="150" r="0" g="255" b="255" transparent-level="0.0" a="200"
rs232Out="#B" uimOnly="1"/>
<tpItem value="4" w="50" h="75" x="925" y="225" r="255" g="0" b="0" transparent-level="0.0" a="100"
rs232Out="#D" uimOnly="1"/>
<tpItem value="5" w="50" h="50" x="1230" y="0" r="0" g="0" b="0" transparent-level="0.0" a="0">
<content type
</tpItem>
<tpItem value="6" w="200" h="150" x="120" y="505"
repeatPlayList="1">
<content type="video" linkToTP="10">MTI-Cars2a.mp4</content>
</tpItem>
<tpItem value="7" w="156" h="150" x="422" y="505" r="0" g="0" b="0" transparent-level="0.9" a="0"
focusOut="MTItp-GrnLantern.png" repeatPlayList="1">
<content linkToTP="10" type="video">MTI-GreenLantern.mp4</content>
</tpItem>
<tpItem value="8" w="309" h="281" x="615" y="425" r="0" g="0" b="0" transparent-level="0.0" a="0"
focusOut="MTItp-KFP2_BTTN.png" repeatPlayList="1">
<content type="video" linkToTP="10">MTI-KFP2.mp4</content>
</tpItem>
="picture" duration="120" linkToTP="6,7,8,9">MTI-Movie_Trailer_Menu.png</content>
="255"
r="255" g="0" b="0" transparent-level="0.0" a="150"
29
Page 30

Freedom ReAct
</tpItem>
<tpItem value="9" w="200" h="150" x="960" y="505" r="255" g="255" b="255" transparent-level="0.4" a="255">
<content type="video" linkToTP="1,2,3,4,5,11">MTI-Macworld.mov</content>
</tpItem>
<tpItem value="10" w="144" h="65" x="100" y="655" r="0" g="0" b="0" transparent-level="0.3" a="0"
focusOut="MTItp-BACK.png">
<content type="picture" duration="120" linkToTP="6,7,8,9">MTI-Movie_Trailer_Menu.png</content>
</tpItem>
<tpItem value="11" w="200" h="50" x="540" y="0" r="0" g="0" b="0" transparent-level="0.0" a="0"
repeatPlayList="1">
<content type="video" linkToTP="13,14,15,16,17,18">MTI-Macworld.mov</content>
</tpItem>
<tpItem value="12" w="144" h="65" x="1100" y="25" r="0" g="0" b="0" transparent-level="0.3" a="0"
focusOut="MTItp-BACK.png">
<content type="video" linkToTP="1,2,3,4,5,11">MTI-Macworld.mov</content>
</tpItem>
<tpItem value="13" w="312" x="900" y="180" h="362" r="0" g="0" b="0" transparent-level="0.8" a="0"
focusIn="MTItp-CTRL_PNL.png" focusOut="MTItp-CTRL_PNL.png" rs232Out="#0" uimOnly
<tpItem value="14" w="72" h="72" x="970" y="300" r="0" g="0" b="185" transparent-level="0.8" a="63"
focusIn="MTItp-LIT_BTTN.png" focusOut="MTItp-UNLIT_BTTN.png" rs232Out="LSC_01_MTIES" uimOnly="1"/>
<tpItem value="15" w="72" h="72" x="1070" y="300" r="0" g="0" b="185" transparent-level="0.8" a="63"
focusIn="MTItp-LIT_BTTN.png" focusOut="MTItp-UNLIT_BTTN.png" rs232Out="LSC_02_MTIES" uimOnly="1"/>
<tpItem value="16" w="72" h="72" x="970" y="400" r="0" g="0" b="185" transparent-level="0.8" a="63"
focusIn="MTItp-LIT_BTTN.png" focusOut="MTItp-UNLIT_BTTN.png" rs232Out="LSC_03_MTIES" uimOnly="1"/>
<tpItem value="17" w="72" h="72" x="1070" y="400" r="0" g="0" b="185" transparent-level="0.8" a="63"
focusIn="MTItp-LIT_BTTN.png" focusOut="MTItp-UNLIT_BTTN.png" rs232Out="LSC_04_MTIES" uimOnly="1"/>
<tpItem value="18" w="155" h="65" x="100" y="605" r="0" g="0" b="0" a="0"
focusOut="MTItp-HOME.png" transparent-level="0.6">
<content linkToTP="1,2,3,4,5,11" type="video">MTI-Macworld.mov</content>
</tpItem>
<tpItem value="19" w="50" h="50" x="0" y="0
<content type="picture" duration="10">MTItp-UNLIT_BTTN.png</content>
<content type="picture" duration="10">MTItp-KFP2_BTTN.png</content>
<content type="picture" duration="10">MTItp-CTRL_PNL.png</content>
<content type="picture" duration="10">MTItp_SEE_THE_DETAILS.png</content>
<content type="picture" duration="10">MTItp-HOME.png</content>
<content type="picture" duration="10">MTItp-BACK.png</content>
<content type="picture" duration="10">MTItp-GrnLantern.png</content>
<content type="picture" duration="10">MTItp-LIT_BTTN.png</content>
</tpItem>
</TP>
</M504>
" r="255" g="255" b="255" transparent-level="0.5" a="128">
="1"/>
30
 Loading...