

Page 1

™
MTD-ERV 350 / 365
Installation &
Operating Manual
Page 2

II
All rights reserved.
This manual has been produced with the greatest care and attention. Nevertheless, the publisher accepts no liability for damage resulting from missing or incorrect information in this manual.
Page 3

Table of Contents
1 INTRODUCTION ............................................................................................................................. 1
1.1 Foreword .................................................................................................................................. 1
1.2 CE Symbol ............................................................................................................................... 1
1.3 Warranty and Liability ............................................................................................................. 1
1.3.1 General ..................................................................................................................... 1
1.3.2 Warranty Terms ......................................................................................................... 1
1.3.3 Liability ...................................................................................................................... 1
1.4 Safety ........................................................................................................................................ 2
1.4.1 Safety Precautions .................................................................................................... 2
1.4.2 Safety Installations and Safety Measures ................................................................. 2
1.4.3 Symbols Used .......................................................................................................... 2
2 INSTRUCTIONS FOR THE USER .................................................................................................. 3
2.1 Defi nition of Terms ............................................................................................................. 3
2.1.1 Balanced Ventilation ................................................................................................. 3
2.1.2 Heat Recovery .......................................................................................................... 3
2.1.3 Bypass for Free Cooling ........................................................................................... 3
2.1.4 Frost Protection ........................................................................................................ 3
2.1.5 Chimney Sweep Control ........................................................................................... 3
2.1.6 Moisture Recovery (Option) ...................................................................................... 4
2.2 Available Operating Aids ................................................................................................... 4
2.2.1 CC Ease Operating Unit ........................................................................................... 4
2.2.2 3-position Switch (Option) ........................................................................................ 5
2.2.3 Bathroom Switch (Option) ........................................................................................ 6
2.3 Use of the CC Ease Operating Unit .................................................................................. 6
2.3.1 Setting Date and Time .............................................................................................. 6
2.3.2 Reading and Setting Comfort Temperature .............................................................. 6
2.3.2 Reading and Setting Ventilation Level ...................................................................... 7
2.3.4 Switching Extractor Hood On and Off (Option)* ....................................................... 8
2.3.5 Switching Supply and Exhaust Air Fan On and Off .................................................. 8
2.3.6 Setting Ventilation Programme ................................................................................. 9
2.3.7 Setting Additional Functions via the P Menus ........................................................ 10
2.4 Use of the Switch(es) (Option) ........................................................................................ 13
2.4.1 Setting Ventilation Using 3-position Switch(es) ....................................................... 13
2.4.1 Setting Ventilation Using Bathroom Switch(es) ....................................................... 13
2.5 Service by the User .......................................................................................................... 13
2.5.1 Cleaning or Replacing Filters ................................................................................. 14
2.5.2 Cleaning Valves (in the Home) ............................................................................... 15
2.6 Malfunctions ..................................................................................................................... 15
2.6.1 Malfunction indication on the CC Ease Display ...................................................... 15
2.6.2 3-position Switch with Malfunction LED .................................................................. 15
2.6.3 What to Do in the Event of a Malfunction? ............................................................. 16
2.7 End of Service Life ................................................................................................................ 16
Table of Contents III
Page 4

3 FUNCTION OF THE SYSTEM ...................................................................................................... 17
3.1 Components of the Balanced Ventilation System ......................................................... 17
3.2 Controlled Ventilation System......................................................................................... 17
3.3 MTD-ERV 350 .................................................................................................................... 18
3.4 Additional Options ........................................................................................................... 19
3.4.1 Ventilation via Extractor Hood* ............................................................................... 19
3.4.2 Preheater in MTD-ERV 350 ................................................................................... 20
3.4.3 Post-heater* in Duct System ................................................................................... 20
3.4.4 CO2 Sensor* in the Home ...................................................................................... 21
3.4.5 RH Sensor* in the Home ........................................................................................ 21
3.4.6 Underground Geothermal Heat Exchanger* ........................................................... 22
3.4.7 Chimney Sweep Control ......................................................................................... 22
3.5 Technical Specifi cations ................................................................................................. 23
3.6 Dimension Sketch ............................................................................................................ 25
4 INSTRUCTIONS FOR THE INSTALLER ...................................................................................... 26
4.1 Preconditions for Installation ......................................................................................... 26
4.2 Installation of the MTD-ERV 350 ..................................................................................... 26
4.2.1 Transport and Unpacking ........................................................................................ 26
4.2.2 Checking the Scope of Supply ................................................................................ 26
4.3 Wall Mounting ................................................................................................................... 27
4.3.1 Connection of the Air Ducts .................................................................................... 27
4.3.2 Connection of the Condensation Drain ................................................................... 27
4.4 Commissioning the MTD-ERV 350 ................................................................................. 28
4.5 Setting the Air Specifi cations ......................................................................................... 34
4.6 Maintenance by the Installer ........................................................................................... 34
4.6.1 Inspection of Heat Exchanger and Fans ................................................................. 34
4.6.2 Filter Cleaning, if Preheater is Fitted ...................................................................... 36
4.7 Malfunctions ..................................................................................................................... 37
4.7.1 Malfunction Indications on the CC Ease Display .................................................... 37
4.7.2 Malfunction Indications on the CC Ease Display ‡ Remedy ................................. 38
4.7.3 Malfunctions (or Problems) without Indications ...................................................... 43
4.8 Spare Parts ....................................................................................................................... 44
4.9 Wiring Diagram: MTD-ERV 350 – LEFT-HAND Standard Version ................................. 45
4.10 Wiring Diagram: MTD-ERV 350 – LEFT-HAND Luxury Version .................................... 46
4.11 Wiring Diagram: MTD-ERV 350 – RIGHT-HAND Standard Version ............................... 47
4.12 Wiring Diagram: MTD-ERV 350 – RIGHT-HAND Luxury Version .................................. 48
4.13 EC Declaration of Conformity ......................................................................................... 49
IV Table of Contents
Page 5
I
Introduction 1
1 Introduction
This chapter contains general information on the MTD-ERV 350.
1.1 Foreword
Apart from this general chapter, this operating manual consists of:
• A section for the user,
• A section with technical specifi cations, and …
• A section for the installer.
-eb ylluferac launam gnitarepo siht daeR
fore putting the unit into operation.
- User Chapters 1 to 3.
- Installer Chapter 4.
This operating manual contains all the information
required for safe and optimum installation, operation and maintenance of the MTD-ERV 350. In addition, it should serve you as a reference manual
during service work so that this can be carried
out safely and responsibly. The unit is subject to
ongoing improvement and further development.
Your MTD-ERV 350 may therefore differ slightly
from the descriptions in this operating manual.
NOTE:
This manual has been produced with the
greatest care and attention. However, no
rights can be derived from this. Furthermore,
the company reserves the right to change the
contents of this operating manual at any time
without prior notifi cation.
1.2 CE Symbol
The unit is marketed under the name MTD-ERV 350.
The MTD-ERV 350 is a balanced ventilation system
with heat recovery for healthy, balanced and energy-saving ventilation of living premises.
The year of construction of the MTD-ERV 350 is
shown on the identifi cation plate of the ComfoAir
350.
1.3 Warranty and Liability
1.3.1 General
Our “General Terms and Conditions” in their latest
wording apply to the MTD-ERV 350. The warranty
period begins with commissioning, but not later
than one month after delivery. This applies to material replacement and does not include labour. It
applies only on proof of maintenance having been
performed by a specialist company in accordance
with our instructions.
1.3.2 Warranty Terms
The manufacturer's warranty on the MTD-ERV 350
is for a period of 24 months after installation, but up
to a maximum of 30 months after the date of manufacture of the MTD-ERV 350. Warranty claims can be
made only for material fl aws and/or design errors
discovered during the warranty period. In the event
of a warranty claim, the MTD-ERV 350 must not be
dismantled without the prior written authorisation
of the manufacturer. The manufacturer's warranty
covers spare parts only if these have been installed
by an installer approved by the manufacturer.
The warranty will be voided if:
• The warranty period has expired;
• The unit is operated without fi lter;
• Parts not supplied by the manufacturer are installed;
• Unauthorised changes or modifi cations are
made to the unit.
1.3.3 Liability
The MTD-ERV 350 has been developed and manufactured for use in "balanced ventilation systems".
Use in any other way does not constitute an 'intended use' and can result in damage to the MTD-ERV
350 or in personal injury for which the manufacturer
accepts no liability.
The manufacturer accepts no liability for damage or
injury resulting from the following causes:
• Failure to observe the safety, operating and
maintenance instructions contained in this operating manual.
• Installation of spare part not supplied by the
manufacturer.
• The responsibility for the use of such spare
parts lies solely with the installer.
• Normal wear.
Page 6

Caution!
Danger of:
- Damage to the unit, or
- Physical injury to the user, or
- Impairment of the operating of the
unit
if the instructions are not correctly
followed.
I
2 Introduction
1.4 Safety
1.4.1 Safety Precautions
Observe the safety precautions given in this operating manual at all times. Failure to observe the safety
precautions, warnings, comments and instructions
can result in personal injury or damage to the MTDERV 350.
Only an approved installer is authorised to install,
connect, commission and service the MTD-ERV 350
in a way other than that described in this operating
manual.
• The MTD-ERV 350 must be installed in accordance with the general local building, safety and
installation regulations of the responsible public utility and other relevant safety authorities
(such as the GIW - Dutch Institute for Certifi ed
Builders).
• Follow the safety precautions, warnings, comments and instructions given in this operating
manual at all times.
• Store this operating manual in the vicinity of
the MTD-ERV 350 at all times during its whole
service life.
• The instructions on the regular cleaning and/
or changing of the fi lters and air inlet/outlet
valves must be strictly observed
• The specifi cations contained in this document
must not be altered.
• All modifi cations to the MTD-ERV 350 are strictly forbidden.
• The MTD-ERV 350 is not suitable for connection
to an AC power supply.
• In order to ensure that the unit is inspected at
regular intervals, we recommend that the user
concludes a service contract. Your supplier can
provide you with the addresses of authorised
installers in your vicinity.
1.4.2 Safety Installations and Safety Measures
• The MTD-ERV 350 cannot be opened without
the use of tools.
• It must not be possible to touch the fans with
your hand. An air duct must therefore be connected to the MTD-ERV 350. The minimum
duct length is 900 mm.
1.4.3 Symbols Used
The following symbols are used in this operating
manual:
Page 7

Ensure that the comfort temperature
in winter is not set below the temperature you prefer.
2. Instructions for the User
This chapter describes how you should use the MTD-ERV 350.
Instructions for the User 3
2
Congratulations, you are now the owner of
the MTD-ERV 350,
the heat recovery unit from Zehnder Com-
fosystems. We wish you every comfort.
2.1 Defi nition of Terms
The MTD-ERV 350 has the following functions:
• Balanced ventilation.
• Heat recovery.
• Bypass for free cooling.
• Frost protection.
• Chimney sweep control.
• Moisture recovery (option).
These terms/properties are described in more detail
briefl y in the following sections.
2.1.1 Balanced Ventilation
The MTD-ERV 350 is a balanced ventilation system. This is the most economical and balanced
form of ventilation for homes. In a balanced
ventilation system, polluted air from kitchen,
bathroom, toilet and possibly even store room
is drawn off and replaced by an equal volume
of fresh air in the living room and bedroom. Air
gaps under the doors ensure good air circulation in the home. This air circulation is literally
balanced.
derevoc ton era spag eseht taht erusnE
by, for example, rubber door seal strips
or high-pile carpets. This would prevent
the system from operating optimally.
2.1.2 Heat Recovery
Apart from ensuring the right balance between supply and exhaust air, the MTD-ERV 350 also offers the
advantage that the heat from the exhaust air is given
off to the fresh, generally cooler outside air. This is
made possible by the integral heat exchanger. In
this way, roughly 95% of the discharged heat is recovered. The supply air can enter the rooms almost
at room temperature. Draughts are now a thing of
the past.
2.1.3 Bypass for Free Cooling
Apart from transferring heat from the exhaust air
to the fresh, generally cooler outside air, the MTDERV 350 also offers the possibility of discharging
the warmer exhaust air directly into the atmosphere
without passing through the heat exchanger. This is
made possible by the integral bypass. The bypass is
an additional circulating air duct that (temporarily)
interrupts the heat transfer between the exhaust air
and supply air. The cool outside air is then not preheated before it enters the dwelling.
The bypass is used particularly on warm days dur-
ing the summer months. Admitting the cool night
air on warm days allows the room temperature in
the home to be reduced. The bypass functions automatically. You simply have to set your comfort temperature. See section 2.3.2 for further information.
The MTD-ERV 350 then maintains this temperature
as closely as possible.
si retniw ni erutarepmet trofmoc eht fI
below the preferred temperature, it is
possible for the heating to be switched
on with the bypass open. That is a waste
of energy.
2.1.4 Frost Protection
The MTD-ERV 350 also has a frost protection system.
This protects the heat exchanger (or the optional
combined heat and moisture exchanger, see section 2.1.6) from freezing. The risk of freezing exists
in the winter months with moderate to heavy frost.
The MTD-ERV 350 is equipped as standard with an
automatically activated frost protection system that
- when there is a risk of frost - temporarily
reduces the supply of outside air so that condensation in the exchanger cannot freeze. A preheater can
also be installed in the MTD-ERV 350 as an option.
This has the advantage that the balanced ventilation
then remains operational. The inlet of cold outside
air then no longer needs to be reduced. In addition,
this option offers greater comfort as the supply air is
again preheated to more or less room temperature.
If there is no preheater installed in your MTD-ERV
350, ask your installer about the possibilities.
2.1.5 Chimney Sweep Control
The MTD-ERV 350 also has a chimney sweep control
system. This is a system that prevents the MTD-ERV
350 from creating an imbalance in the ventilation
system, i.e. between the supply and exhaust air.
The chimney sweep control system functions automatically. This system blocks or resets other ventilation control systems that could possibly create an
imbalance in the ventilation system and that can be
automatically switched on and off by the software.
One example of this is that the supply and exhaust
air fans cannot be switched off separately when the
chimney sweep control system is active.
The chimney sweep control system is employed in
dwellings with open fi re, as here air can be drawn
back by the draught of the chimney. If problems
occur with the smoke discharge via the draught of
the chimney, this situation must on no account be
caused (or exacerbated) by the MTD-ERV 350. The
chimney sweep control system then interacts with
the existing ventilation control systems in such a
way that the MTD-ERV 350 cannot (or can no longer)
cause an imbalance in the ventilation system.
Page 8
The next section describes briefl y what information
can be read off.
2
4 Instructions for the User
2.1.6 Moisture Recovery (Option)
In addition to the heat transfer from the exhaust air
to the fresh, generally cooler outside air, the MTDERV 350 also offers the possibility of transferring
part of the moisture of the exhaust air to the fresh,
generally dryer outside air. This is made possible
by the (optional) integral moisture exchanger. The
moisture exchanger is supplied as a combined heat
and moisture exchanger and is not installed as an
additional exchanger alongside the heat exchanger
of the MTD-ERV 350. This exchanger then has an additional function, i.e. recovering moisture in addition
to the recovery of heat. In this way, up to 65% of the
moisture is recovered from the exhaust air. The supply air can thus enter the rooms with an increased
moisture content.
sa deppiuqe si 053 MTD-ERV ehT
standard with only a heat exchanger.
The exchanger with combined heat and
moisture recovery can be ordered as an
option.
2.2 Available Operating Aids
The MTD-ERV 350 is equipped with the following
operating aids:
• CC Ease operating unit of the MTD-ERV 350.
• Position switch (option) for setting the ventilation levels.
• Bathroom switch (option) for temporarily setting the highest ventilation level.
These operating aids are described in more detail
briefl y in the following sections.
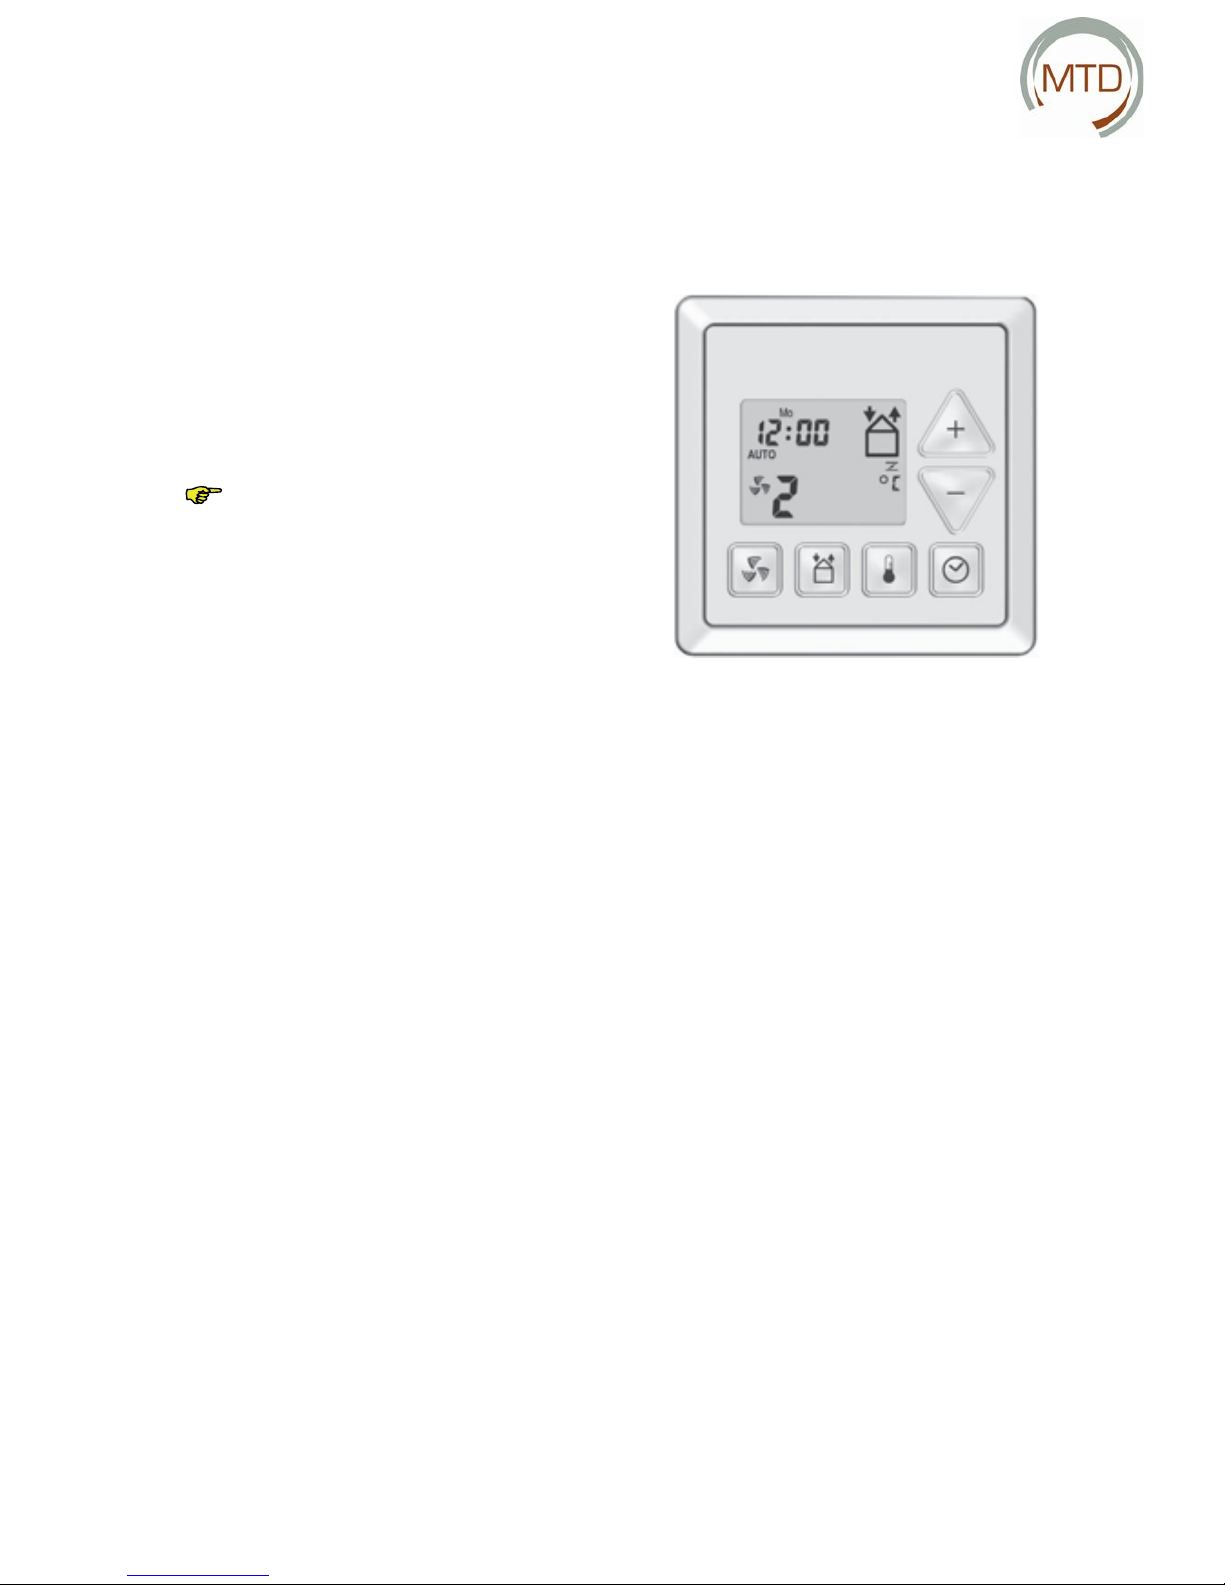
2.2.1 CC Ease Operating Unit
The MTD-ERV 350 is operated using the CC Ease operating unit.
The CC Ease (= Comfort Control Ease) operating unit
is installed on the wall in the living room and communicates from there with the MTD-ERV 350.
Page 9
This key is used to switch the extractor hood on or off.
- Press for less than 1 second! ON.
- Press for longer than 1 second! OFF.
2
This key is used to switch the supply and/or discharge of air on or off.
- Press once! SUPPLY OFF (and EXHAUST ON).
- Press twice! SUPPLY and EXHAUST OFF.
- Press three times! EXHAUST OFF (and SUPPLY ON).
- Press four times! SUPPLY and EXHAUST ON.
This key allows you to read off or set the comfort temperature.
- Press for less than 1 second! READ OFF.
- Press for longer than 1 second ! SET.
This key allows you to switch from AUTO to MANUAL ventilation.
- Press for less than 1 second ! Set ventilation programme.
- Press for longer than 1 second! Set date and time.
Type 1 Type 2
Type 3
Type 1 Type 2
Type 3
Instructions for the User 5
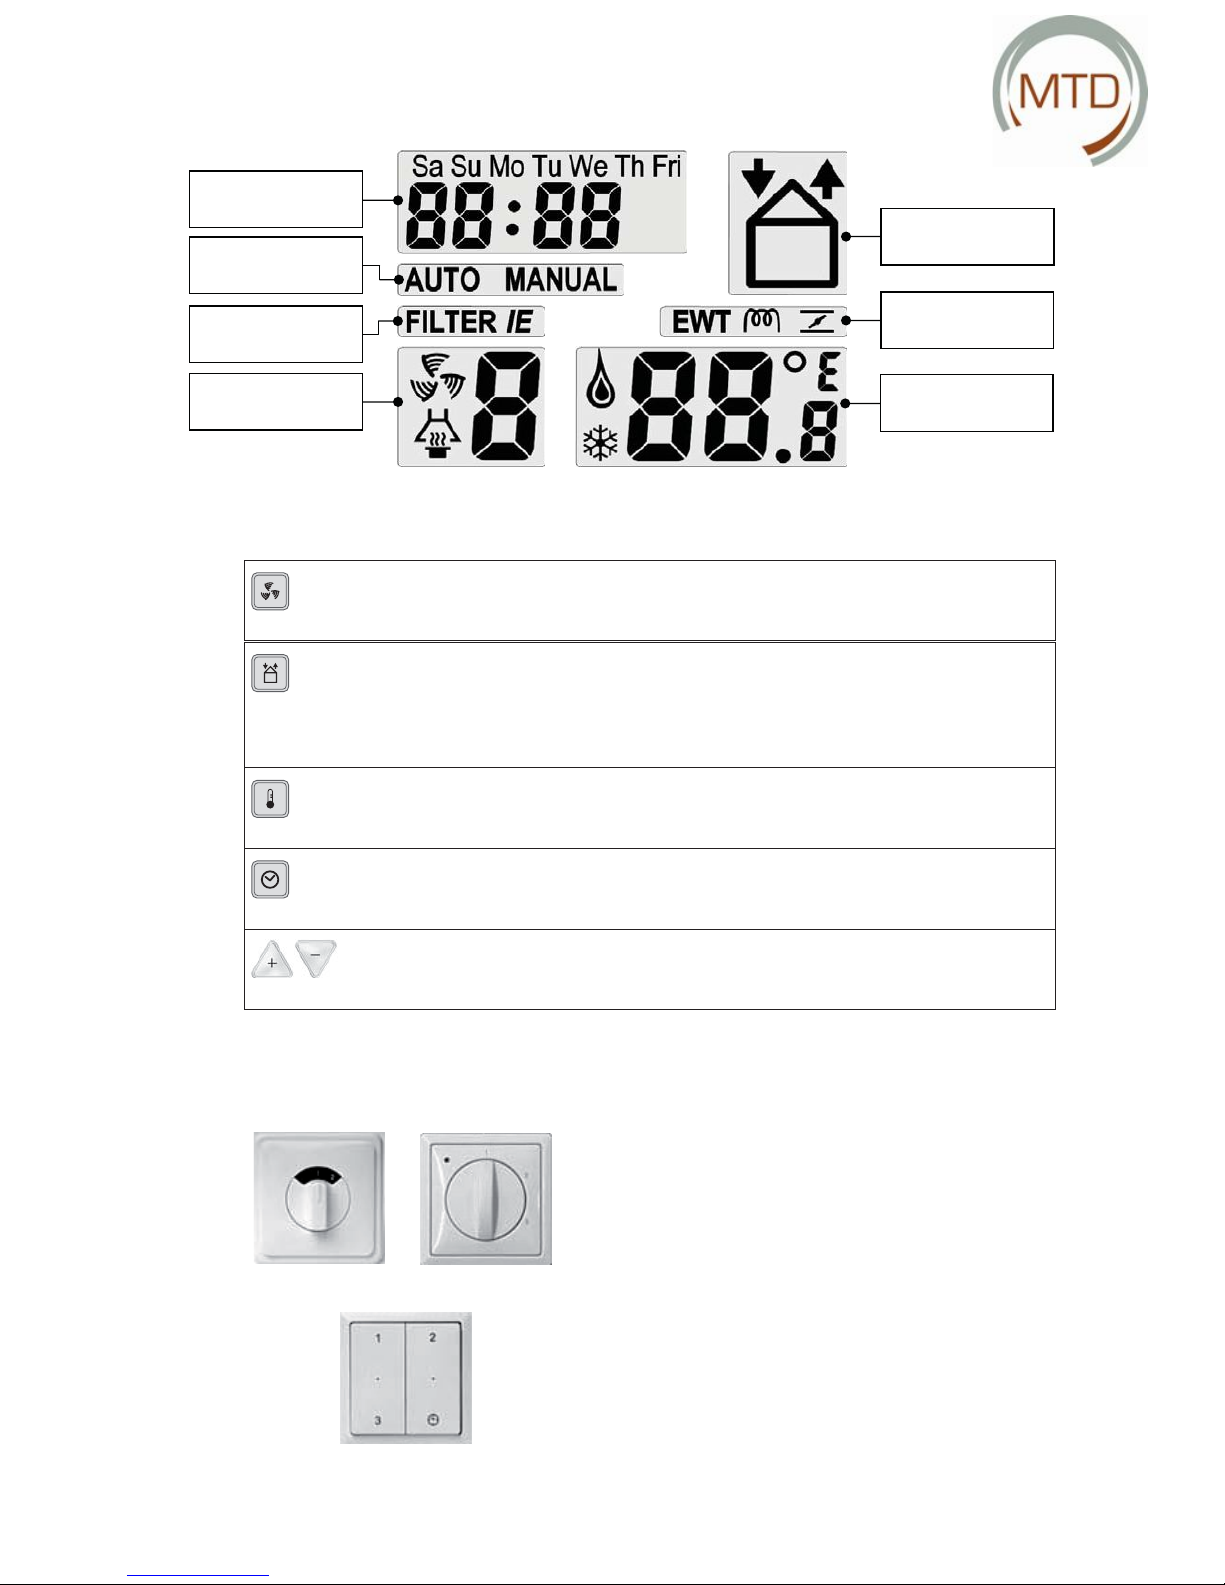
Day and time
Actual ventilation position
(with activated extractor
hood, if applicable)
Automatic or
manual ventilation
Warning to replace internal (I)
or external (E) Filter
Air supply and/or air
exhaust OPEN or CLOSED
Geothermal heat recovery,
post-heater and/or
bypass on
Comfort temperature setting
(also indicates whether
system is heating or cooling)
The CC Ease operating unit has various keys for operating and setting the MTD-ERV 350. These keys are explained
below.
These keys allow two functions to be set:
- In AUTO ventilation Select the ventilation level.
- In MANUAL ventilation Enter the setting values.
2.2.2 3-position Switch (Option)
Ventilation with the MTD-ERV 350 can also be operated by means of a 3-position switch.
A 3-position switch can be used to set the ventilation
levels of the MTD-ERV 350. One or more 3-position
switches can be installed in a home (for example, in
the kitchen). The exact version may differ slightly
from the images above. The following switch types
are available:
• Type 1 Standard 3-position switch.
• Type 2 3-position switch with LED for mal-
function and fi lter indication.
• Type 3 Wireless 3-position switch with:
-idni retl fi dna noitcnuflam rof DEL
cation.
Auxiliary switch: position 3 is activated for a given time (2 possibilities for setting the time).
Page 10
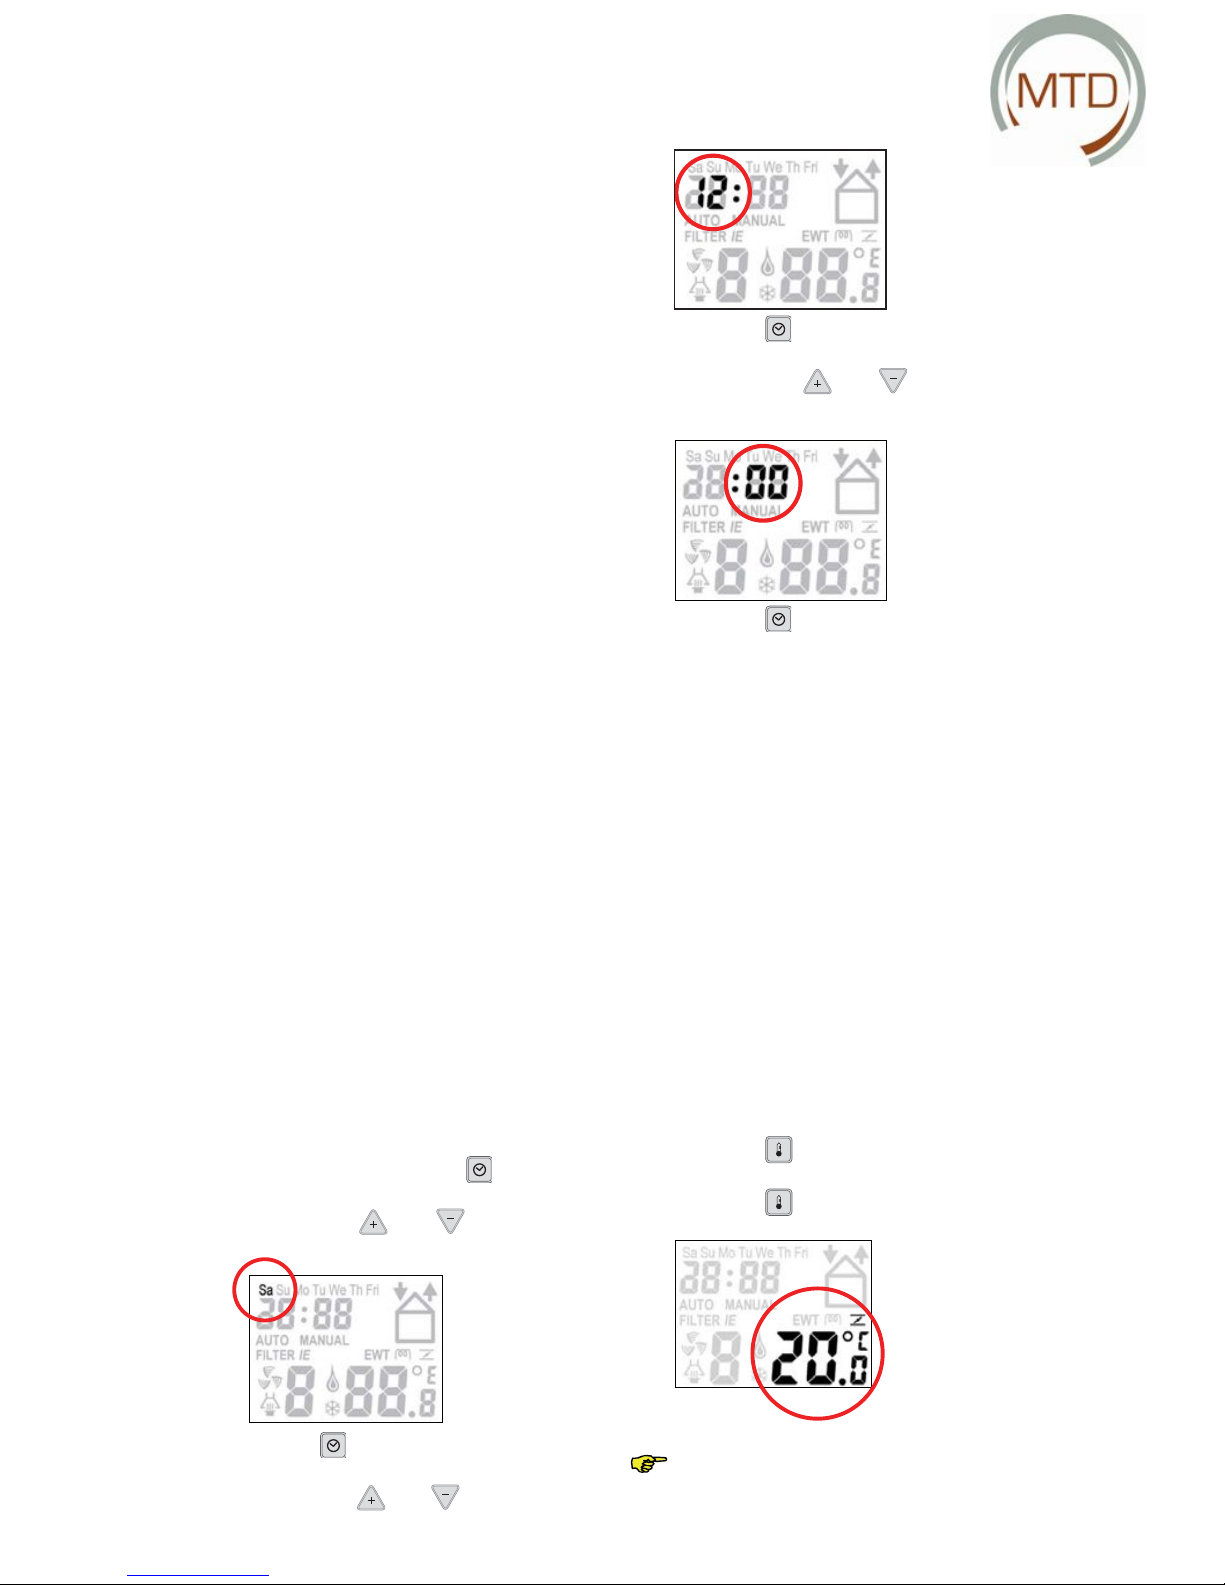
".
2. Wait until the day, e.g. "Sa", starts to fl ash.
3. Select with "
" or " " the correct day.
4. Press " " briefl y.
5. Wait until the hours, e.g. "
12
", start to fl ash.
6. Select with "
" or " " the correct hour.
7. Press " " briefl y again.
8. Wait until the minutes, e.g. "
00
", start to fl ash.
9. Select with "
" or " " the correct min-
utes.
10 Press "
".
2. Wait until the comfort temperature is displayed.
3. Press "
" briefl y now to quit the menu.
Without pressing the key, the menu is
quit automatically after 30 seconds.
2
6 Instructions for the User
2.2.3 Bathroom Switch (Option)
Ventilation with the MTD-ERV 350 can also be operated by means of a bathroom switch.
A bathroom switch can be used to temporarily
set the highest ventilation level of the MTD-ERV
350. This switch can be installed in the bathroom,
for example, for discharging excess moisture as
quickly as possible after showering. As the bathroom switches can have very different designs,
no switch is illustrated here.
If desired, the user can also enter an activation
and deactivation delay for the bathroom switch
via the CC Ease operating unit (see section
2.3.7). This allows the user to specify, for example, that the MTD-ERV 350 switches to the highest ventilation level 5 minutes after the bathroom
switch is activated and then returns to the normal
(or originally set) ventilation level automatically
after 20 minutes.
In many cases, however, no separate bathroom
switch is installed and the bathroom ventilation
control is integrated into the bathroom light switch.
The MTD-ERV 350 then switches automatically to
the highest ventilation level when the bathroom
light is switched on. The MTD-ERV 350 then returns to the normal (or originally set) ventilation
level as soon as the bathroom light is switched
off. Here again, an activation and deactivation delay can be set via the CCE Ease operating unit.
2.3 Use of the CC Ease Operating Unit
The following functions can be set using the CC Ease
operating unit:
• Reading off and setting date and time.
• Reading off and setting the comfort temperature.
• Reading off and setting the ventilation levels.
• Switching the extractor hood on and off (option)*.
• Switching the supply and exhaust air fans on
and off.
• Setting an individual ventilation programme.
• Setting additional ventilation control functions/options in the P menus.
These functions are described in more detail
briefl y in the following sections.
2.3.1 Setting Date and Time
Via the CC Ease operating unit it is possible:
• To set the date and time.
Proceed as follows:
1. Press for two seconds on "
" briefl y again to quit the menu.
2.3.2 ReadingandSettingComfort Temperature
Via the CC Ease operating unit it is possible:
v To read off and set the comfort temperature.
The comfort temperature is the temperature at
which the MTD-ERV 350:
(a) Uses the heat exchanger for heat recovery;
(b) Switches on the bypass (hence bypassing
the heat exchanger) to (temporarily) interrupt the
exchange of heat between the exhaust air and
the supply air.
You can read off the comfort temperature, but
also set the desired temperature. The MTD-ERV
350 will then automatically maintain this temperature as closely as possible after setting. The
comfort temperature generally corresponds to
the temperature that you have set on the room
thermostat (of your central heating).
Reading off the comfort
temperature
Proceed as follows:
1. Press "
Page 11
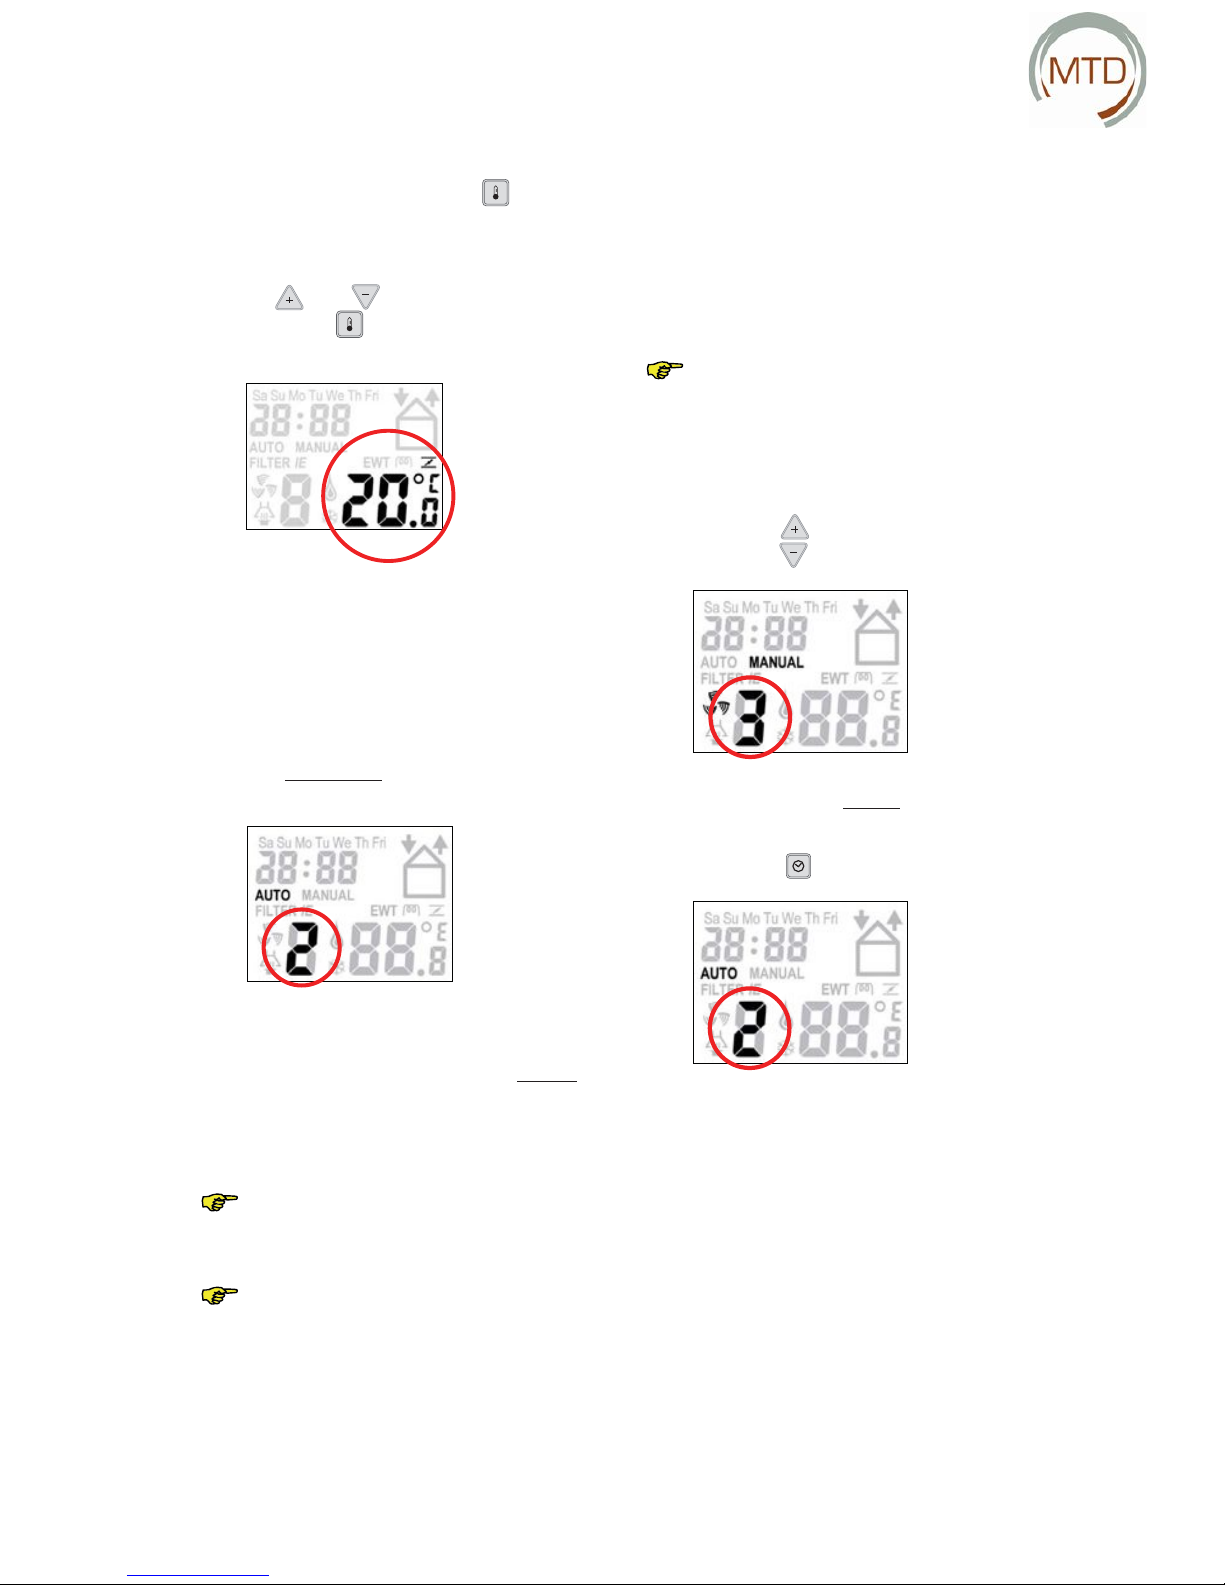
Setting the comfort temperature
Proceed as follows:
1. Press for two seconds on " ".
2. Wait until the comfort temperature, e.g. " 20.0 ",
starts to fl ash.
3. Select the desired comfort temperature with "
" or " ".
4 Press "
" briefl y now to quit the menu.
Setting the ventilation level
You can also set the ventilation level by hand and
thus increase or decrease the level. You have a choice
of 4 ventilation levels. These are:
• Level A ! Absent.
- Use during absence.
In level A, the dwelling is ventilated with
the prescribed minimum air volume.
If level A is set on the CC Ease operating
unit, the 3-position switches cannot be
used.
Position 1 ! Low.
- Use for a low ventilation require
ment.
Position 2 ! Normal.
- Use for a normal ventilation requirement.
Position 3 ! High.
- Use this level during cooking,
showering and when additional
ventilation is desired..
" to increase the ventilation level.
2. Press "
" to decrease the ventilation level.
During ventilation set by hand, the indication "MAN-
UAL" appears on the CC Ease display.
3. Press "
" to quit the menu.
2
Instructions for the User 7
2.3.3 Reading and Setting Ventilation Level
Via the CC Ease operating unit it is possible:
• To read off and set the ventilation level.
Reading off the ventilation level
The currently set ventilation level, e.g. “2”, is shown
as standard on the CC Ease display. The MTD-ERV
350 normally regulates the necessary ventilation
level automatically. During automatic ventilation,
"AUTO" is shown on the CC Ease display.
,denrecnoc si noitalitnev eht sa raf sA
the MTD-ERV 350 adjusts to the highest
ventilation level set in the dwelling, unless otherwise set in the automatic software control.
The ventilation level can be set as follows:
1. Press "
Page 12
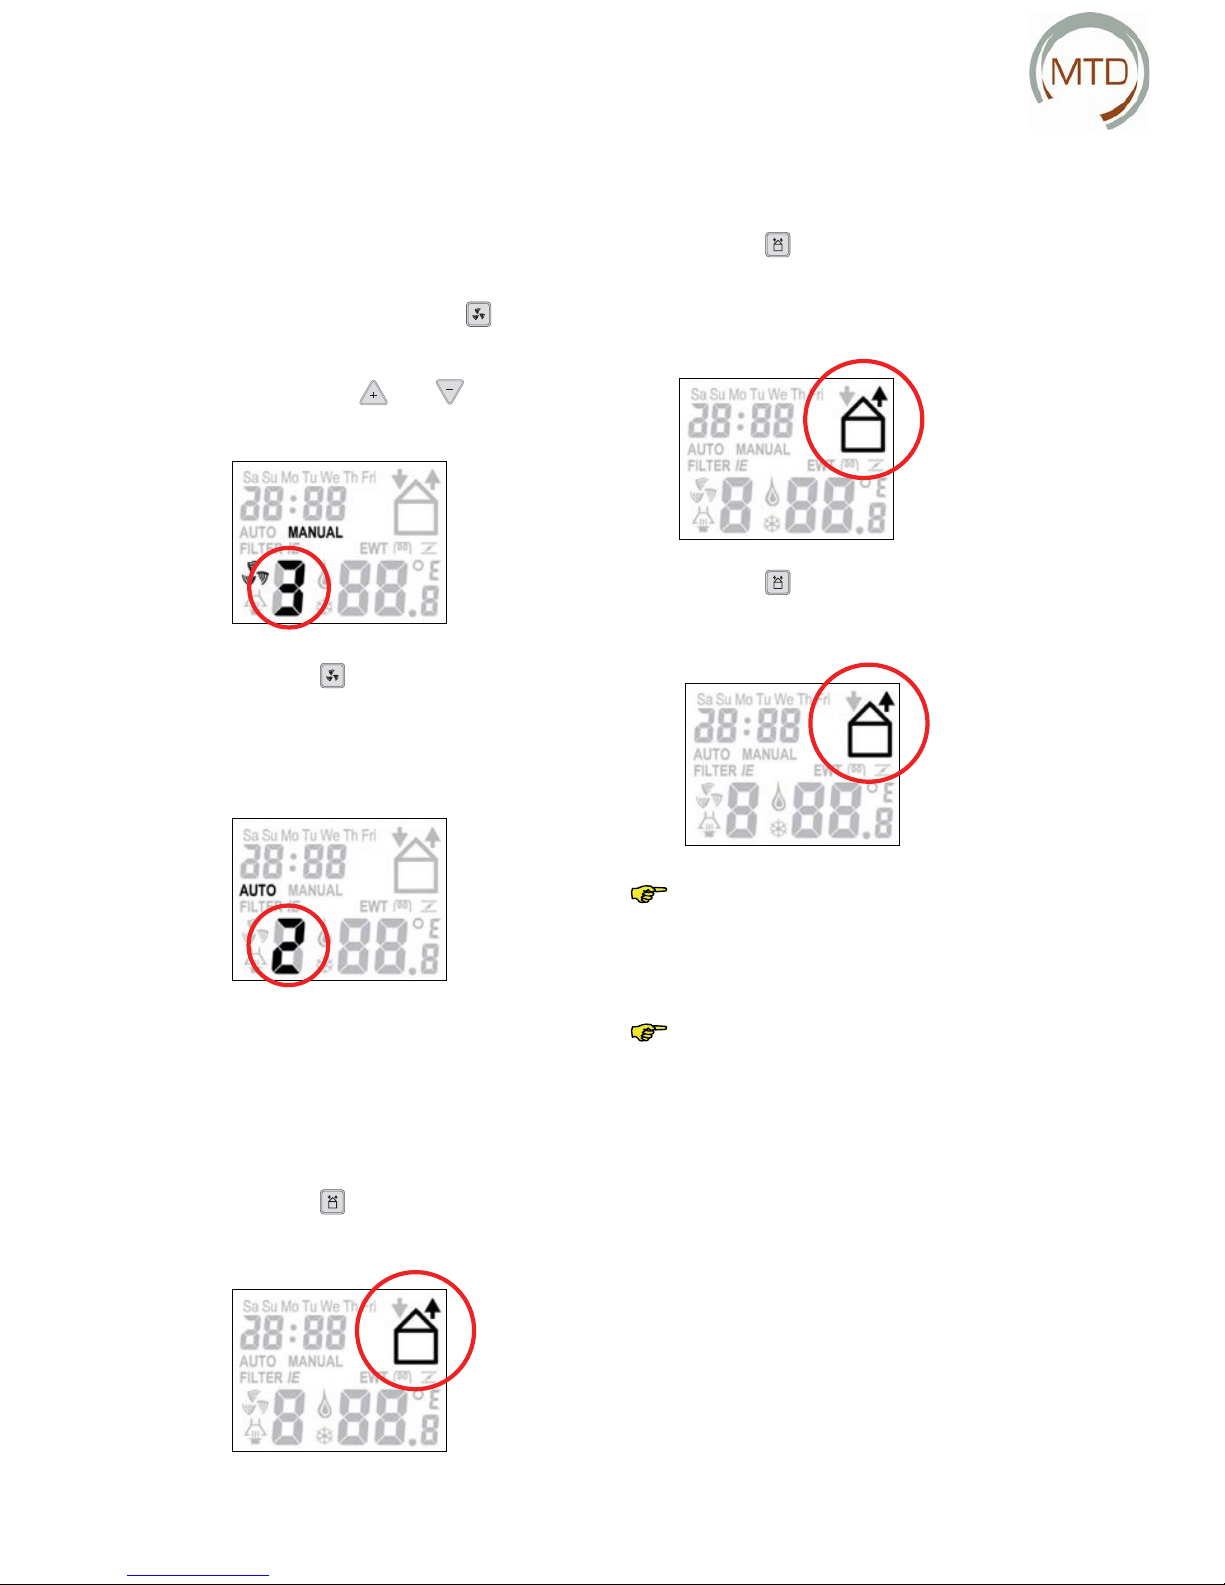
2.3.4 Switching Extractor Hood On and Off
(Option)*
Via the CC Ease operating unit it is possible:
To switch the extractor hood on and off.
Proceed as follows:
4. Press for two seconds on "
".
5. Wait until the symbol for the extractor hood ap-
pears.
6. Select with "
" or " " the ventilation
level, e.g. “ 3”.
7. Press " " briefl y to switch off the extrac-
tor hood.
After switching off the extractor hood, the symbol
for the extractor hood disappears again from the CC
Ease display.
2.3.5 Switching Supply and Exhaust Air Fans On
and Off
Via the CC Ease operating unit it is possible:
To switch the supply air or exhaust air fan on and
off.
Proceed as follows:
1. Press "
" once to
to switch off the supply air fan.
This level can be used in the summer when the
windows are open. The fresh air is then drawn
into the house through the open windows and not
via the supply air valves.
2. Press "
" twice to
switch off the exhaust air fan (and at the
same time switch on the supply air fan
again).
3. Press " " three times to
switch on the supply and exhaust air fans
again.
Note that by switching off the supply or
exhaust air fan, you temporarily have no
balanced ventilation with heat and (if installed) moisture recovery in your home.
Never leave the fans switched off for
longer than 12 hours.
2
8 Instructions for the User
Page 13
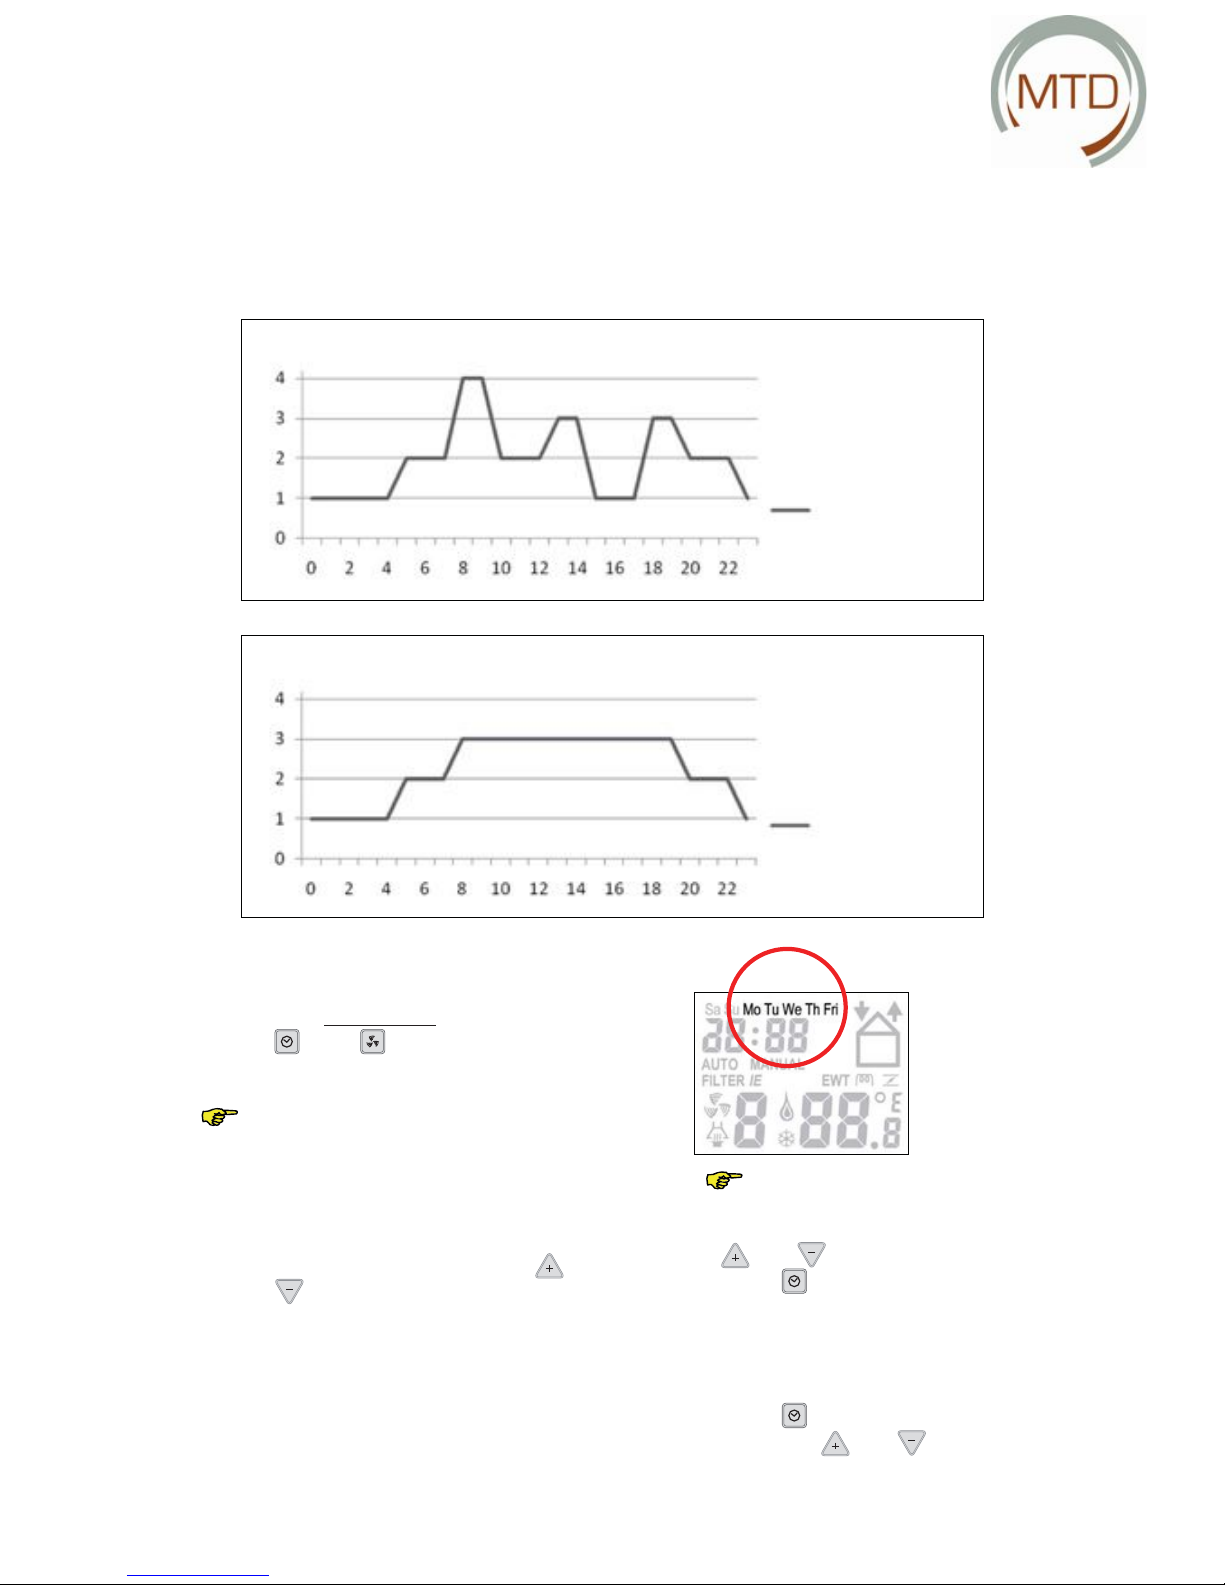
The ventilation programme can be set/changed
as follows:
1. Press simultaneously for two seconds on "
" and " ".
This functions only with ventilation set
to "AUTO".
2. Wait until the day appears.
3. Program the desired days or a sequence of
days.
– Select the desired day/days with "
" or "
".
You have the following choices:
– Sequence of days: “SaSu”.
– Sequence of days: “MoTuWeThFri”.
– Sequence of days: “SaSuMoTuWeThFri”.
– Individual days: “Sa”, “Su”, “Mo”, “Tu”, “We”,
“Th” and “Fri”.
The number of the switching moment
fl ashes in the bottom right-hand corner.
– Select the switching moment by pressing "
" or " ".
– Press "
" to confi rm the switching mo-
ment.
4. Program the starting time for the desired
ventilation level.
– Press "
".
– Select with "
" or " " the desired
time in hours.
2
Instructions for the User 9
Weekday fan
position
Weekend fan
position
2.3.6 Setting Ventilation Programme
Via the CC Ease operating unit it is possible:
To set an individual ventilation programme.
A standard ventilation programme was set on the MTD-ERV 350 during manufacture.
This ventilation programme offers a suitable ventilation pattern for most homes. If you wish, you can adapt this
standard ventilation programme to your own ventilation requirements. For example, for a week and a weekend
programme.
Page 14
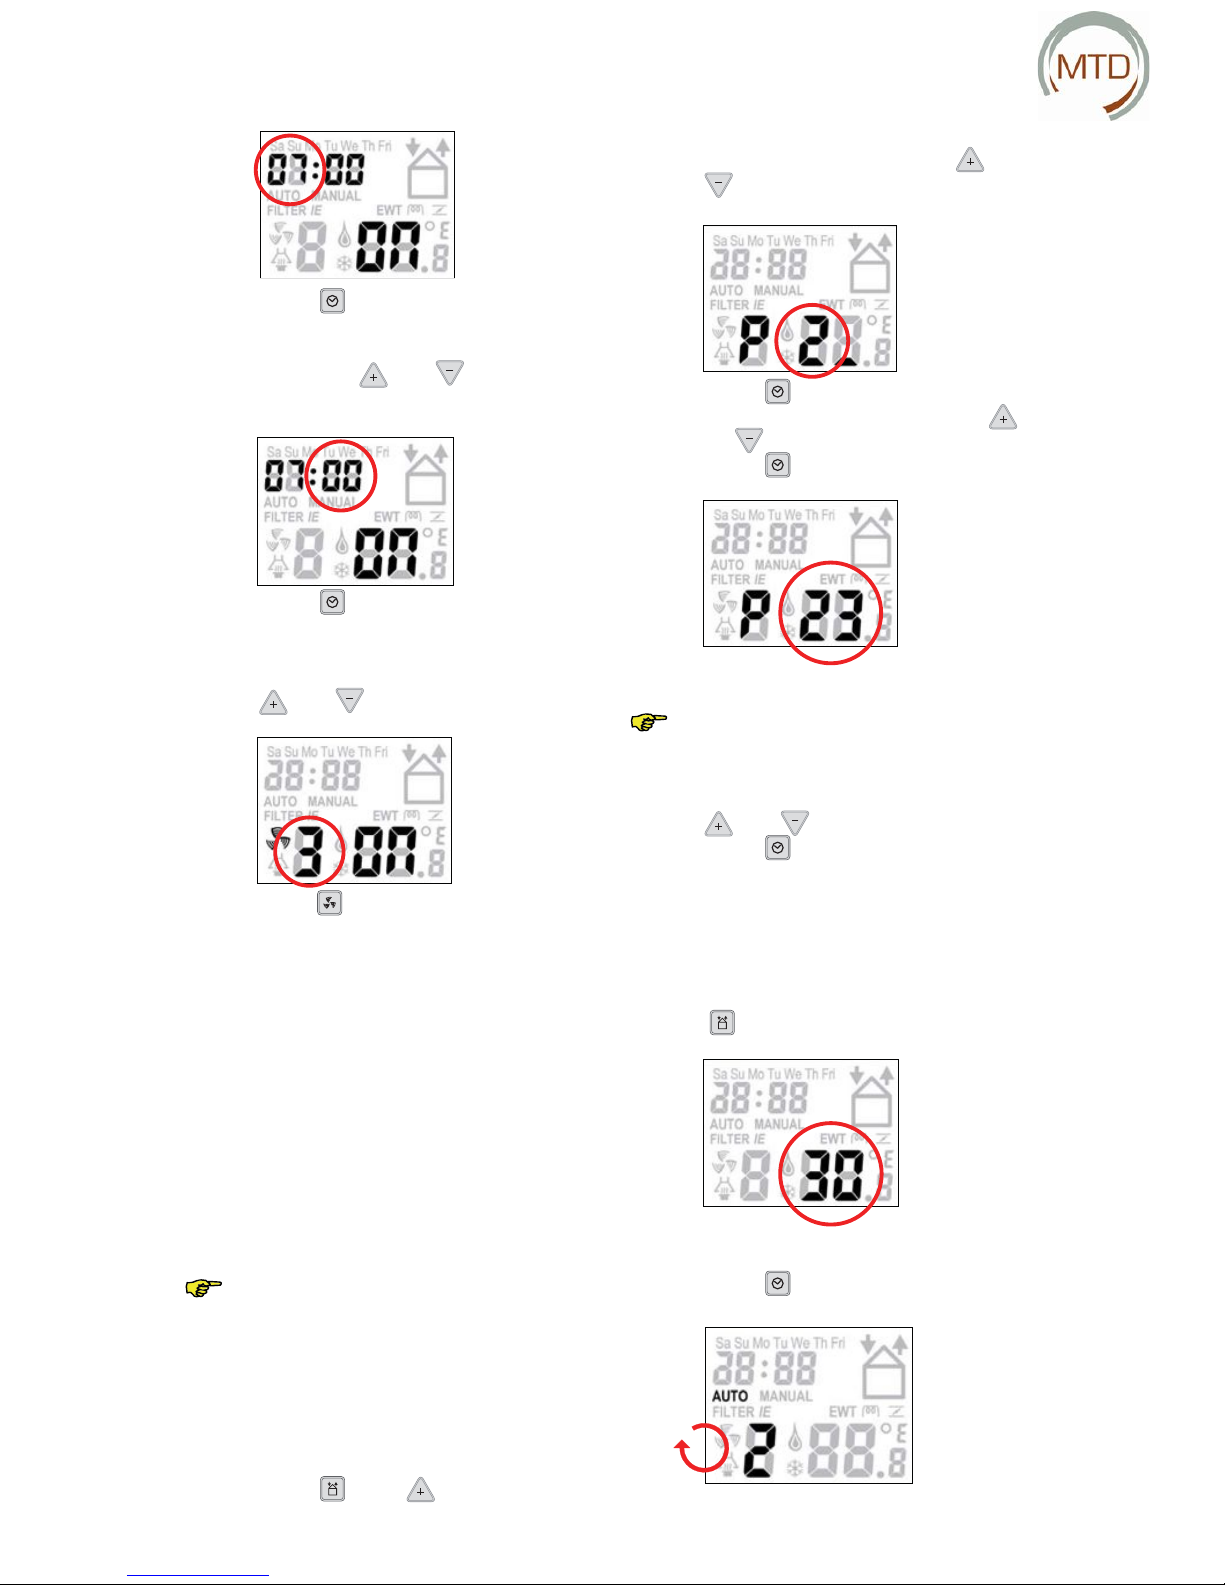
– Press " " again.
– Wait until the minutes, e.g. "
00
" start to
fl ash.
– Select with "
" or " " the desired
time in minutes.
– Press " " again.
– Wait until the ventilation symbol starts to
fl ash.
– Select the desired ventilation level with "
" or " ".
– Press " " to store the switching moment.
5. Program the next ventilation programme, if
required.
– Then perform steps 1 to 5 for the next venti
lation programme.
2.3.7 Setting Additional Functions via the
P Menus
Via several P menus of the CC Ease operating
unit you can:
• Read off the status of various ventilation
functions;
• Activate or deactivate time delays for various
ventilation functions;
• Set time delays for various ventilation func-
tions.
In the P menus the user may:
- only set the additional functions P1,
P2 and P9.
The remaining P menus P3 to P8 are reserved for the installer.
Access to the P menus
Proceed as follows:
1. Press "
" and " " simultaneously.
2. Wait until "P menu" appears on the display.
3. Select the desired P menu with "
" or "
", e.g. " 2 ".
4. Press " " to confi rm the P menu.
5. Select the desired P sub-menu with "
"
or "
", e.g. " 23 ".
6. Press "
" to confi rm the P sub-menu.
Making settings in the P menus
The minimum and maximum values for
the available ventilation functions are
stored in the software.
7. Select a new value for the function with "
" or " ".
8. Press "
" to save the value.
9. Repeat steps 5 to 8 to
set several P sub-menus in turn in the same
P menu.
Or
Return to the P menu; press once on
"
" and possibly start again at step 3.
Or
Return to the main window
Press " " twice.
2
10 Instructions for the User
Page 15
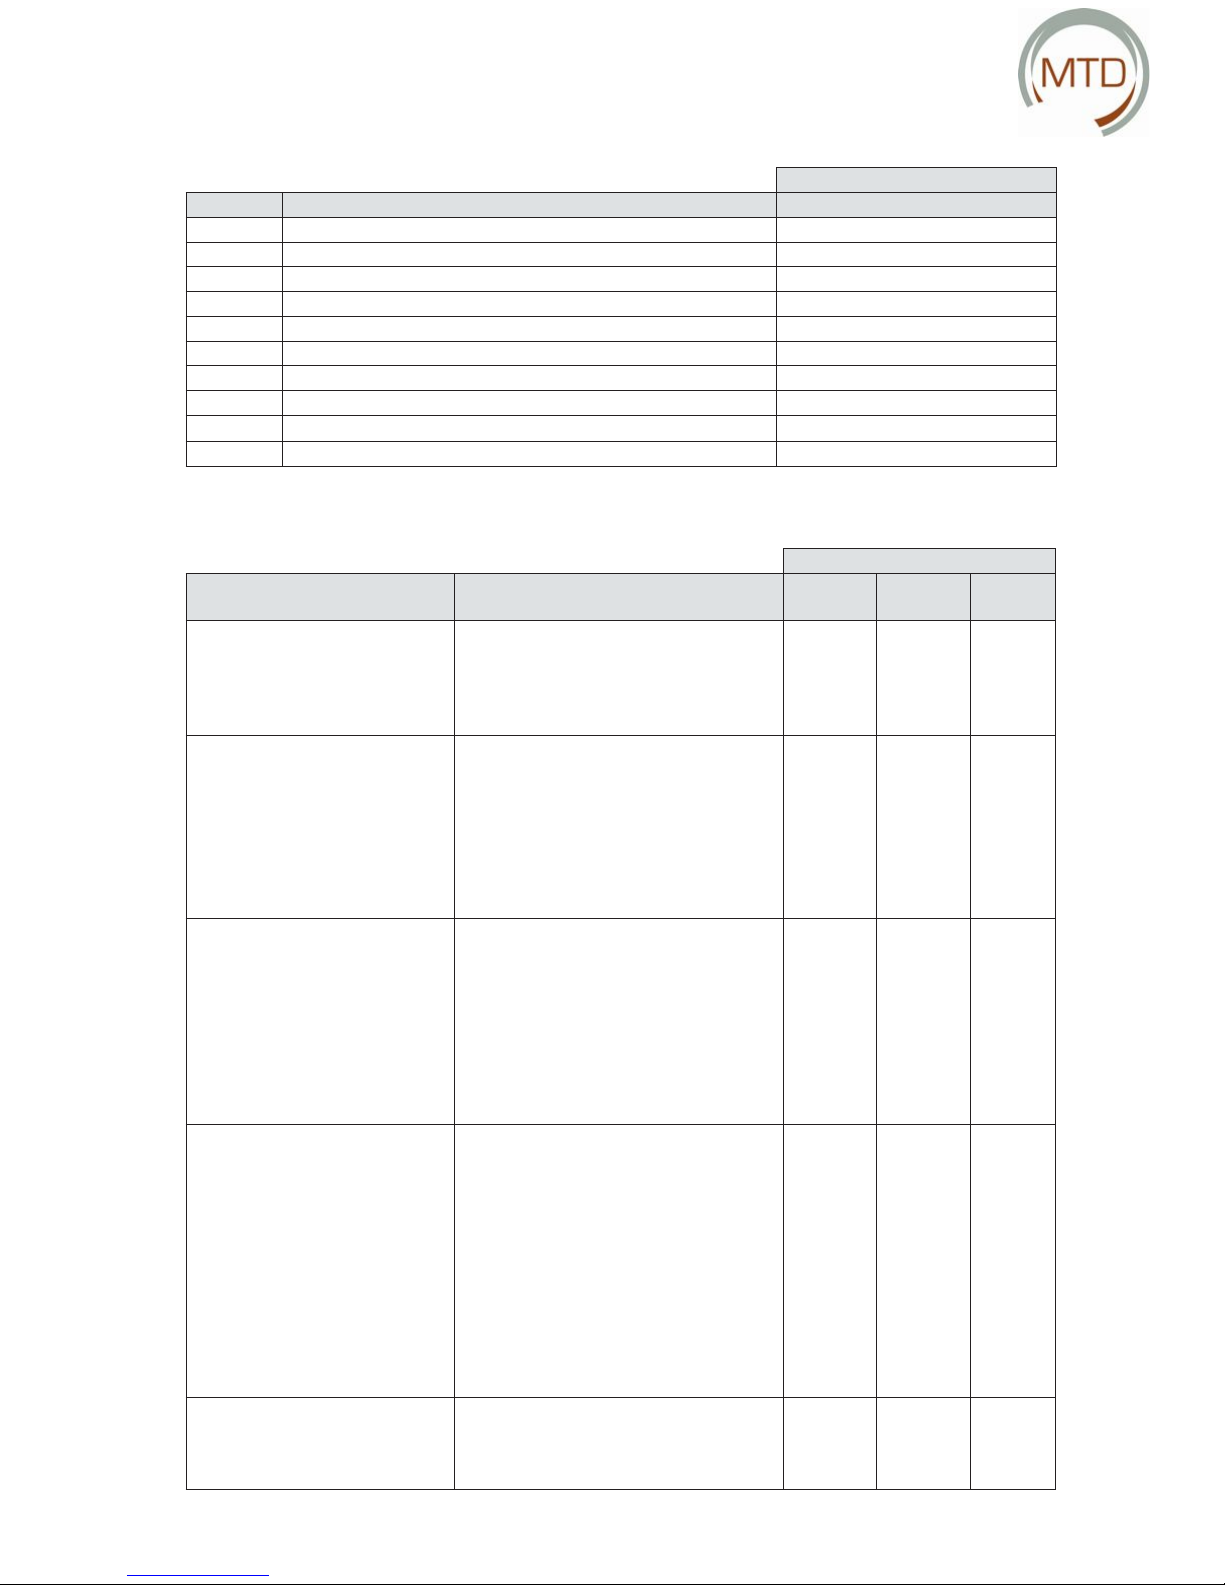
Menu P1 ! Status of the functions
Ventilation functions
Sub-menu Description Activated / not activated
P10 Menu 20 currently active? Yes (1) / No (0)
P11 Menu 21 currently active? Yes (1) / No (0)
P12 Menu 22 currently active? Yes (1) / No (0)
P13 Menu 23 currently active? Yes (1) / No (0)
P14 [Not available] [Not available]
P15 Menu 25 currently active? Yes (1) / No (0)
P16 Menu 26 currently active? Yes (1) / No (0)
P17 Menu 27 currently active? Yes (1) / No (0)
P18 Menu 28 currently active? Yes (1) / No (0)
P19 Menu 29 currently active? Yes (1) / No (0)
2
Instructions for the User 11
Menu P2 ! Set time delays
Time delay values
muminiMnoitpircseDunem-buS Maximum Default
setting
P20
(Option)*
Deactivation delay for extractor hood
function.
• 'x' minutes after pressing the extractor hood switch, the MTD-ERV 350
returns to the previously set level.
0 Min. 180 Min. 30 Min.
P21
(Option)*
Note:
Only for systems with wired
switch and only if your system is
equipped with a second position
switch in the bathroom.
Activation delay for the bathroom
switch (to switch to the HIGHEST LEVEL).
• 'x' minutes after turning on the
bathroom switch, the MTD-ERV 350
switches to the HIGHEST LEVEL.
0 Min. 15 Min. 0 Min.
P22
(Option)*
Note:
Only for systems with wired
switch and only if
your system is equipped with
a second position switch in the
bathroom.
Deactivation delay for the
bathroom switch (to switch to the NORMAL LEVEL).
• 'x' minutes after turning on the bathroom switch, the MTD-ERV 350 returns to the NORMAL LEVEL.
0 Min. 120 Min. 30 Min.
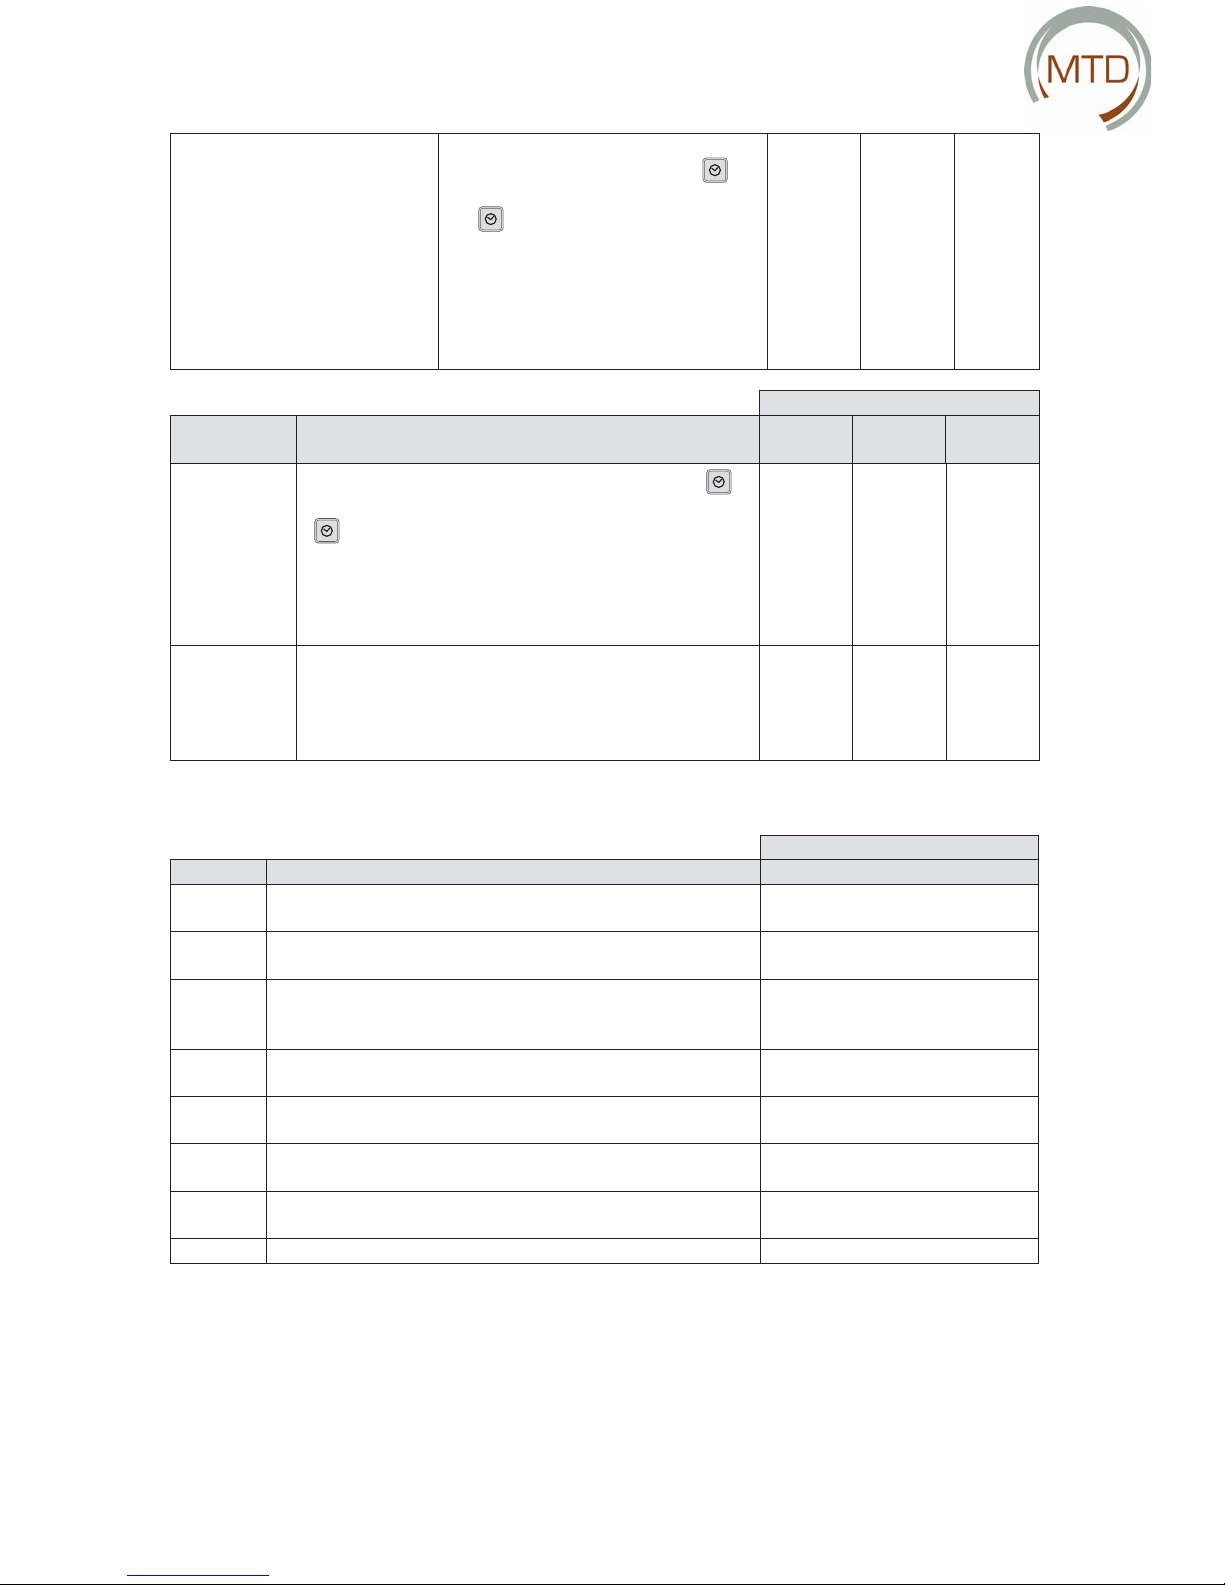
P23
Note:
Only for systems with a wired
position switch.
Deactivation delay
for ventilation position 3.
• When position 3 (HIGHEST LEVEL) is
switched on briefl y (< 3 seconds), the
MTD-ERV 350 remains at this position
for the time set in this menu.
If, within the run-down time, the position switch or the radio remote control
is activated, the MTD-ERV 350 switches
immediately to the set ventilation level.
0 Min. 120 Min. 30 Min.
P24 Filter warning
• Here the user can select when "FILTER
DIRTY" is to appear on the CC Ease
display.
1 week 26 weeks 16 weeks
Page 16
P25
Note:
Only for systems with a remote
control switch.
Deactivation delay
for ventilation position 3 (with "
").
• When
"
Time delay values
Sub-menu Description
Minimum Maximum Default
setting
Menu P9 ! Status of the functions (from menu P5)
Ventilation functions
Sub-menu Description Activated / not activated
P90 Chimney
sweep control active?
Yes (1) / No (0)
P91 Bypass open (=yes)
/ closed (=no)?
Yes (1) / No (0)
P92
(Option)*
Valve of the geothermal heat
exchanger open (=yes)
/ closed (=no)?
Yes (1) / No (0)
P93
(Option)*
Post-heater active? Yes (1) / No (0)
P94
(Option)*
0 – 10 V control active? Yes (1) / No (0)
P95 Frost protection
(standard or preheater) active?
Yes (1) / No (0)
P96
(Option)*
Extractor
hood control active?
Yes (1) / No (0)
P97 Moisture control active? Yes (1) / No (0)
2
12 Instructions for the User
P26
Note:
Only for systems with a
remote control switch.
Deactivation delay for ventilation position 3 (with "
").
When
"
" is pressed BRIEFLY (< 2 sec.),
the MTD-ERV 350 switches to the
HIGHEST LEVEL for ‘x’ minutes and
then switches back automatically to
the set level. ‘x’ can be set between 1
and 20 minutes.
1 Min. 20 Min. 10 Min.
" is held depressed (> 2 sec.), the MTD-ERV 350
switches to the HIGHEST LEVEL for 'x' minutes and then
switches back automatically to the set level. ‘x’ can be set
between 1 and 120 minutes.
1 Min. 120 Min. 30 Min.
P29
(Option)*
Setting the Levels for the Extractor Hood.
When the extractor hood is switched on, the ventilation
levels for the extractor hood can be set a few percent
higher than the corresponding 'normal' ventilation levels.
1% 99% 10%
Page 17

2.4 Use of the Switch(es) (Option)
2
3
1
You can set an activation and deactivation delay for the bathroom ventilation control in P
menus P21 and P22. For further information, see section 2.3.7.
If these measures are not performed (regularly), there is a danger that the ComfoAir 350
will cease to function correctly.
dna gnikooc retfa emit emos rof noitisop tsehgih eht ta 053 MTD-ERV eht evaeL
showering to remove excess moisture and odours as quickly as possible.
stsujda 053 MTD-ERV eht ,tnemtrapa eht ni dellatsni era sehctiws noitisop lareves fI
as far as the ventilation is concerned to the highest ventilation position unless
other values are set in an automatic software control.
2.4.1 Setting Ventilation Using 3-position Switch(es)
A 3-position switch allows 3 ventilation levels to be set.
• Position 1 Low.
- Use for a low ventilation requirement.
• Position 2 Normal.
- Use for a normal ventilation requirement.
• Position 3 High.
- Use this level during cooking, showering and when additional ventilation is required.
2
Instructions for the User 13
eb ot ,level ecnesba eht ,level noitalitnev lanoitidda na swolla tinu gnitarepo esaE CC ehT
set in addition to these 3 ventilation levels. For further information, see section 2.3.3.
2.4.2 Setting Ventilation Using Bathroom Switch(es)
A bathroom switch allows the MTD-ERV 350 to be temporarily set to the highest ventilation level (position 3):
• Actuate the bathroom switch for maximum ventilation.
• Actuate the bathroom switch again to return to the normal (or previously set) ventilation level.
.hctiws thgil moorhtab eht otni detargetni eb osla nac lortnoc noitalitnev moorhtab ehT
2.5 Service by the User
As user you have to service the MTD-ERV 350 as follows:
• Clean or replace the fi lters.
• Clean the valves (in the home).
These measures are described in more detail briefl y in the following sections.
Page 18

2.5.1 Cleaning or Replacing Filters
As soon as the corresponding warning appears
on the display of the CC Ease operating unit, the
fi lters have to be cleaned or replaced.
• “ F
ILTER I ” ! The internal fi lters must be
cleaned or replaced.
• “ F
ILTER E ” ! The external fi lters* must be
cleaned or replaced.
One of the fi lter indications shown above then appears on the CC Ease display.
A
A
• Clean the fi lters (B) using a vacuum cleaner.
B
A
A
• Remove the clamps (C) holding the two fi lter
cloths to the fi lter brackets.
• Push the fi lter cloths (D) off the fi lter brackets
(F).
C
D
Ensure that the cloth is not damaged by
the corners of the fi lter bracket.
fi lanretni ehT lters are supplied as standard with the MTD-ERV 350. The external
fi lters* form part of the duct system of
the ventilation system and do not belong
to the MTD-ERV 350.
The MTD-ERV 350 is equipped as standard with
two internal fi lters. The external fi lters* form part
of the duct system of the ventilation system and
do not belong to the MTD-ERV 350. Should your
ventilation system be equipped with external fi lters, the monitoring of these fi lters must be connected to the PCB panel (extended version) of
the MTD-ERV 350.
• Push the fi lters (A) back into
the MTD-ERV 350.
• Insert the plug of the MTD-ERV 350 into the
plug socket again.
• Press "
" to cancel the fi lter indication.
For replacement ...
As soon as the fi lters have to be replaced, proceed
as follows:
• Remove the mains plug from the plug socket.
• Pull the fi lters (A) out of the MTD-ERV 350.
fi lanretxe eht fo gnirotinoM lters* must
be connected to the PCB panel (extended version) of the MTD-ERV 350 by the
installer.
For cleaning ...
You can clean the fi lters when necessary:
• Remove the mains plug from the plug socket.
• Pull the fi lters (A) out of the MTD-ERV 350.
-po otni 053 MTD-ERV eht gnittup erofeB
eration the fi rst time, you should clean
the fi lters (and the valves) because the
ventilation system may have been soiled
with building dust during the building
phase.
2
14 Instructions for the User
Page 19

• Push the new fi lter cloths (E) over the fi lter
brackets (F).
• Fasten the clamps (C) again.
• Push the fi lters (A) back into the ComfoAir 350.
E
F
" to cancel the fi lter indication.
Replace all fi lters (at least) once a year.
2.5.2 Cleaning Valves (in the Home)
The ventilation system is equipped with the following valves:
Exhaust air valve (STB) Exhaust air valve (STC)
Exhaust air valve (STV) Exhaust air valve (STK)
Supply air valve (STH)
These valves have to be cleaned (at least) twice a
year.
• Remove the valve from the wall or ceiling.
• Clean the valve in a warm soap solution.
• Rinse the valve thoroughly and dry it carefully.
• Install the valve again EXACTLY IN THE SAME
POSITION (and IN THE SAME HOLE).
• Repeat this procedure for the other valves.
On the position of the valves ...
The installer has set all the valves so that the ventilation system operates optimally with respect to the
volumetric air fl ows. Do not therefore change the
setting of the valves.
2.6.2 3-position Switch with Malfunction LED
In the event of a malfunction, 3-position switches
with a malfunction LED start to light up. Depending
on the type of 3-position switch, this takes place in
one of two ways:
• 3-position switch with malfunction LED.
" ! The LED lights up in the event of a mal-
function (and in the event of a fi lter warning).
• Wireless 3-position switch with malfunction
LED.
" ! The LEDs light up as soon as the 3-posi-
tion switch is used. The LED lights up
green once to signal that a communication
has been made. In the event of a malfunction or a 'Filter dirty' warning, both LEDs light
up red three times. Finally both LEDs light
2
Instructions for the User 15
• Insert the plug of the MTD-ERV 350 into the
plug socket again.
• Press "
eht lla llatsni SYAWLA uoy taht erusnE
valves in exactly the same position (and
in the same ventilation slot in the wall
or ceiling) after cleaning, otherwise optimum operation of the ventilation system
cannot be assured.
The ventilation air is admitted and discharged via
valves. Gaps under the doors in the dwelling ensure that the air circulates in the right direction. In
order to ensure that the right volume of ventilation
air is maintained in the right rooms, pay attention
to the following points:
• Do not seal the gaps.
• Do not change the setting of the valves.
• Do not interchange the valves.
2.6 Malfunctions
A malfunction in the MTD-ERV 350 is displayed as
follows:
• A malfunction indication appears on the dis-
play of the CC Ease.
• The malfunction LED on the 3-position switch
lights up.
These measures are described in more detail in the
following sections.
2.6.1 Malfunction indication on the CC Ease
Display
In the event of a malfunction, a malfunction code
appears on the CC Ease display. The display then always shows an 'A' or 'E' code with the corresponding
numbers. By referring to the overview of malfunctions in section 4.7.1, you can fi nd out what the particular malfunction indication means.
Page 20

up green again.
noitisop-3ehtnoDELnoitcnuflamehT
switch lights up not only in the event of
malfunctions, but also in the event of a
'Filter dirty' warning.
2.6.3 What to Do in the Event of a
Malfunction?
In the event of amalfunction, please contact the installer.Note the malfunction code that appears on
the displayofthe CC Ease operating unit.Also note
yourMTD-ERV 350type.It can be foundonthe identification plate on the top of the MTD-ERV 350.
The plug must always remain in the plug socket as
long as the MTD-ERV 350 does not have to be shut
down due to a serious malfunction, for filter cleaning orreplacementorfor someotherurgentreason.
If the plug were to be removedfromtheplugsocket,
thedwellingwould no longer bemechanicallyventilatedand moistureaswellasfungusproblemscould
occur in the longer term. Avoid at all costs leaving
the MTD-ERV 350 switched off for prolonged periods.
2.7 End of Service Life
Discuss with your supplierwhat you should do with
yourMTD-ERV 350at theendofitsservicelife.Ifyou
cannot return the MTD-ERV 350 to your supplier, do
not simply throw itaway;contact your local authorities to find out about possibilities of re-using componentsorthe environmentally saferecycling of the
materials.
• Do not throw the batteries of the wireless
switches into the domestic refuse; dispose of
them at the official waste collection point.
2
16 Instructions for the User
Page 21

B
A
C
E
D
F
D
D
D
E
E
2
Instructions for the User 17
3 Function of the System
This chapter describes the design of the balanced ventilation system and its function in conjunction with the MTDERV 350.
3.1 Components of the Balanced Ventilation System
The complete balanced ventilation system consists of the following components:
· MTD-ERV 350 with CC Ease operating unit
with software prepared for the connection of
the following options:
- Preheater.
- Enthalpy exchanger (heat and moisture
recovery).
- 3-position switch without malfunction and
fi lter display or 3-position switch with malfunction and fi lter display.
- Wireless 3-position switch(es).
- Bathroom switch.
- Sensors with 0 – 10 V control (2x).
· Duct system.
- Supply and exhaust air duct system.
- Supply and exhaust air valves.
· Options that can only be connected to the
MTD-ERV 350 Luxury versions.
- Exhausting via extractor hood.
- Post-heater in duct system.
- Sensors with 0 – 10 V control (2x).
- Moisture sensor in living areas of the
dwelling.
- Geothermal heat exchanger.
-Chimney sweep control with pressure
sensor in the chimney.
- Malfunction indication (with signal) (see
wiring diagram).
- ComfoControl Avignon (touch screen
remote control with additional operating
options compared with the CC Ease operating unit).
These components/functions of the ventilation system are described in the following sections.
3.2 Controlled Ventilation System
A balanced ventilation system generally consists of the following elements:
· MTD-ERV 350 (A).
· Duct system for the intake of outside air (B) and the discharge of indoor air (C).
· Air supply valves in the living rooms and bedrooms (D).
· Exhaust air valves in the kitchen, bathroom, toilet and possibly the store room (E).
· Non-powered extractor hood with 3-position switch (F).
Page 22

18 Function of the System
A
C
D
D
C
C
C
I
L
K
J
G
H2
B
E
E
F
H1
3.3 MTD-ERV 350
The MTD-ERV 350 consists as standard of the following components:
· Outer casing (A) of coated sheet steel.
· Inner lining (B) of high-quality expanded polypropylene (E)PP.
· 4 rotatable air-side connections (C) for the air ducts.
· 2 G3 fi lters (D) for air fi ltration.
· 2 energy-saving DC motors (E) with high-speed impeller.
· (High-effi ciency) heat exchanger (with optional moisture exchanger) (F) with a thermal effi ciency exceeding 95% in which moisture as well as heat is recovered from the exhaust air.
· CC Ease operating unit (G) for reading off data and for settings.
· PCB panel (H2) with connections for the CC Ease operating unit, the enthalpy exchanger and the sensors with 0 - 10 V controller (2x).
· PCB panel (H1) with connections for the fans, bypass, preheater, temperature sensors (T1 to T4), 3-position switch with or without malfunction and fi lter display (option) and the bathroom switch (option).
· Identifi cation plate (I) with the data on the MTD-ERV 350 (not visible).
· Condensation drain (J) for discharging the condensation from the warm exhaust air.
· Sticker (K) with the air connections (not visible).
· 230 V plug (L).
3
Page 23

B
A
C
F
D
E
H
I
G
J
Filter
19Function of the System
3
MTD-ERV 350 Methods of Operation
The MTD-ERV 350 has been designed and produced as a system for controlled ventilation of residential buildings. It
comprises two air fl ows that hygienically exchange their energy.
· Polluted air is drawn off by the exhaust air fan (A) from,
for example, the kitchen, toilet and shower (B).
· The heat exchanger (C) absorbs the heat from the exhaust air.
· The supply air fan (D) draws in fresh air from outside (E).
· The heat exchanger (C) heats up the intaken air using the heat absorbed from the exhaust air.
· If a moisture exchanger is installed (option), moisture is also transferred from the exhaust air to the supply air (for further information, see section 2.1.6).
· The heated fresh air is delivered into the living rooms and bedrooms (F).
· The now cooled polluted air from the kitchen, bathroom and toilet is discharged into the atmosphere (G).
· The bypass (H) allows the exhaust air to be discharged to the atmosphere without passing through the
heat exchanger so that no heat is transferred to the fresh air (for further information, see section 2.1.3).
· The preheater (I) (option) ensures preheating of outside air so that balanced ventilation with heat recovery is assured even with moderate to severe frost (up to 150 m³/h at -15° C) (for further information, see
section 3.4.2).
· The post-heater (J) (option) additionally heats the supply air (after it has already been heated in the heat
exchanger) before it is delivered into the living rooms (for further information, see section 3.4.3).
The balanced ventilation system contributes to energy saving, a healthy room climate and an optimum living climate
and prevents problems with moisture.
3.4. Additional Options
Only for MTD-ERV 350 Luxury versions, with the exception of the preheater that can be installed in any MTDERV 350.
Please refer to the identifi cation plate on the top of the MTD-ERV 350 to determine whether you have
a basic or luxury version of the system.
These are external devices that can be connected to the MTD-ERV 350 Luxury versions (preheater
also to Basic versions).
3.4.1. Preheater in MTD-ERV 350
All MTD-ERV 350 systems with “VV” in the device name (see identifi cation plate on the top of the MTD-ERV
350) are equipped as standard with a preheater. All other MTD-ERV 350 versions can be equipped with a pre-
heater as an option.
The preheater is a heating element that is installed in the outside air duct of the MTD-ERV 350
just upline of the heat exchanger. The preheater
heats the cold outside air before it reaches the
heat exchanger in the event of moderate to severe frost. In this way the heat exchanger is protected against freezing in addition to the standard
frost protection system.
The advantage of the preheater compared with the
standard frost protection system is that balanced
ventilation can be maintained even in the event of
frost. In the event of a frost risk, the intake of out-
Page 24

3
Menu P29:
Setting the rate of increase
v Rate of increase
Minimum 1%
v Rate of increase
Standard 10%
v Rate of increase
Maximum 99%
20 Function of the System
side air no longer has to be temporarily reduced (or
even interrupted for a short time) in order to prevent condensation freezing in the heat exchanger.
Instead the preheater is temporarily switched on.
In addition, this option offers greater comfort as
the supply air is preheated to more or less room
temperature.
The preheater is switched on and off automatically. As soon as the temperature of the outside
air is below 0
o
C for a certain period, the air duct
of the preheater is opened and the preheater is
switched on to heat the intaken outside air to at
least 1 oC. Here a temperature sensor in the supply air duct of the MTD-ERV 350 measures the
temperature. This preheating control ensures balanced ventilation up to a maximum of 150 m³/h at
-15oC. The user cannot infl uence the automatic
preheater control. The installer has to modify the
preheating control, for example during installation of the MTD-ERV 350, in menu P52 via the CC
Ease operating unit (for further information, see
section 4.4).
The preheater and the corresponding
temperature sensor must be connected
to the PCB panel behind the front panel
of the MTD-ERV 350 by the installer. In
the event of retrofi tting, installation instructions are supplied with the installation kit.
3.4.2. Ventilation via Extractor Hood*
An extractor hood can be connected to the MTDERV 350.
This allows moisture (steam) and food odours
to be discharged as quickly as possible via the
ventilation system. For this, the extractor hood
must be connected to the PCB panel (extended
version) of the MTD-ERV 350. The extractor hood
can then be operated via the CC Ease operating
unit of the MTD-ERV 350.
Switching the extractor hood on and off,
see section 2.3.4.
As soon as the extractor hood is switched on
using the CC Ease operating unit, the valve of
the extractor hood opens and the MTD-ERV 350
switches to the 'Extractor hood' function. Ventilation positions 1, 2 or 3 can be set. These ventilation positions for the extractor hood correspond
to the 'normal' ventilation positions. Please note,
however, that these ventilation positions for the
extractor hood are always slightly higher (by x%)
than the 'normal' ventilation positions. The user
can set this x% value himself in menu P29 on the
CC Ease operating unit (see also section 2.3.7).
The following increase values can be selected:
In addition to this ventilation via the extractor
hood, a temperature sensor is also installed in
the extractor hood. This temperature sensor
measures the temperature of the air discharged
via the extractor hood. Should this temperature
become too high, i.e. more than 60 oC, the valve
in the extractor hood will close to protect the
MTD-ERV 350 and in particular the heat/moisture
exchanger.
3.4.3 Post-heater* in Duct System
As an option, the ventilation system can also be
equipped with a post-heater.
The post-heater is a heater element that is installed in the duct system of the ventilation system, in other words downstream of the MTD-ERV
350. The post-heater
ensures that after the
outside air has fi rst
been heated in the
heat/moisture exchanger of the MTDERV 350, the supply air is additionally
heated before it enters the living rooms.
The advantage of the
post-heater is that the supply air can be directly
admitted to the living rooms at the comfort temperature set for the dwelling. That means additional comfort.
The post-heater is not supplied as standard with the MTD-ERV 350. It is actually
part of the duct system of the ventilation
system and does not belong to the scope
of supply of the MTD-ERV 350.
The post-heater is switched on and off automatically. As soon as the temperature of the supply
air drops below the set comfort temperature, the
post-heater is switched on to heat up the supply air
to the comfort temperature. A temperature sensor
in the duct system measures the temperature of
the supply air immediately behind the post-heater. The user cannot infl uence the automatic postheater control system. The post-heater reacts to
Page 25

Living space
Living space
Menu P27:
Setting CO2 concentration
v CO2 concentration
Minimum ppm to be decided
v CO
2
concentration
Standard ppm to be decided
v CO
2
concentration
Maximum ppm to be decided
Living space
Living space
Menu P28:
Setting the humidity level
v Humidity level
Minimum 0%
v Humidity level
Standard 60%
v Humidity level
Maximum 100%
21Function of the System
3
the set comfort temperature. This temperature
can, however, be altered by the user (for further
information, see section 2.3.2). The installer simply has to indicate whether or not a post-heater
has been integrated into the ventilation system
in menu P55 of the CC Ease operating unit during installation of the MTD-ERV 350 (for further
information, see section 4.4).
gnidnopserroc eht dna retaeh-tsop ehT
temperature sensor must be connected
to the PCB panel (extended version) of
the MTD-ERV 350 by the installer.
3.4.4 CO2 Sensor* in the Home
A CO2 sensor can be connected to the MTD-ERV
350.
This CO2 sensor allows the MTD-ERV 350 to
regulate the CO2 concentration in the house. For
this, a CO2 sensor is installed in one of the living
rooms to measure the current CO2 concentration
in the indoor air.
If the CO2 concentration is too high compared
with the set (and hence highest admissible) CO2
concentration, the settings of the supply and exhaust air fans will be gradually increased to reduce the CO2 concentration. In this way the air
in rooms with a high carbon dioxide concentration that can occur, for example, during a party
with a large number of people, can be quickly 'exchanged' by additional ventilation. The user can
set the maximum admissible CO2 content (within
the given limits) himself in menu P27 via the CC
Ease operating unit (see also section 2.3.7). The
following CO2 concentrations can be set:
The starting
point for this
CO2 control is
the assumption
that the outside
air is generally
the fresh(er) air.
The CO2 concentration can
be reduced by
this system in
that (a) fresh air is drawn in faster with the supply
air fan, and (b) the old air is drawn off faster by the
exhaust air fan. As soon as the CO2 concentration in the house has reached acceptable values
again, the settings of the two fans are gradually
reduced again.
ot detcennoc eb tsum rosnes 2OC ehT
the PCB panel in the electronics casing
on the top of the MTD-ERV 350 by the
installer.
3.4.5. RH Sensor* in the Home
A RH sensor can be connected to the MTD-ERV
350.
This RH sensor allows the MTD-ERV 350 to regu-
late the relative humidity in the house. For this, an
RH sensor is installed in one of the living rooms to
measure the current relative humidity of the indoor
air.
If the humidity is too high compared with the set
(and hence highest admissible) humidity, the settings of the supply and exhaust air fans will be
gradually increased to reduce the humidity. Living
rooms with an excessively high humidity, such as
bathrooms during showering, are quickly freed of
the humidity by the additional ventilation. Problems due to high humidity can thus be avoided in
this way. The user can set the maximum admissible humidity (within the given limits) manually in
menu P28 via the CC Ease operating unit (see
also section 2.3.7). The following humidity levels
can be selected:
The starting point
for this humidity
control is the assumption that the
outside air is generally the dry (drier) air. The humidity can be reduced
by this system in
that (a) dry air is
drawn in faster with the supply air fan, and (b) the
humid air is drawn off faster by the exhaust air
fan. As soon as the humidity in the dwelling has
reached acceptable values again, the settings of
the two fans are gradually reduced again.
Page 26

22 Function of the System
3
ot detcennoc eb tsum rosnes HR ehT
the PCB panel in the electronics casing
on the top of the MTD-ERV 350 by the
installer.
3.4.6 Underground Geothermal Heat
Exchanger*
As an option, the ventilation system can also be
equipped with a geothermal heat exchanger.
The geothermal heat exchanger is an additional underground air duct at a depth of at least 1
metre and with a length of 20 to 40 metres that
forms part of the ventilation system. The geothermal heat exchanger allows the outside air to
be admitted to the house under ground instead
of above ground. The heat of the soil is thereby
given off to the outside air as it fl ows through the
geothermal heat exchanger.
The geothermal heat exchanger is thus an outstanding solution both in winter and in summer.
In frosty weather, the outside air can be heated
by the underground geothermal heat exchanger
before it enters the house via the MTD-ERV 350.
During hot weather in the summer, on the other
hand, the outside air can be cooled by the underground geothermal heat exchanger before it
enters the house via the MTD-ERV 350.
The geothermal heat exchanger functions automatically. A temperature sensor installed anywhere on the outside of the house measures
the temperature of the outside air. As soon as
the temperature of the outside air is between 0
and 15 oC in winter months and between 10 and
25oC in summer months, the geothermal heat
exchanger is activated to allow the outside air to
fl ow through the heat exchanger. The user cannot infl uence the automatic geothermal heat exchanger control system. The installer simply has
to indicate whether or not a geothermal heat exchanger has been integrated into the ventilation
system in menu P60 of the CC Ease operating
unit during installation of the MTD-ERV 350 (for
further information, see section 4.4). The installer
can modify the automatic control of the geothermal heat exchanger to a slight extent in menu
P61 at the CC Ease operating unit, if necessary.
ehtdnaregnahcxetaehlamrehtoegehT
corresponding temperature sensor must
be connected to the PCB panel (extended version) of the MTD-ERV 350 by the
installer.
3.4.7 Chimney Sweep Control
Apart from the chimney sweep control set as
standard in the software, an additional unit can
be connected to the PCB panel (extended version) of the MTD-ERV 350 as an option that can
switch off the fans of the MTD-ERV 350 via a floating contact.
By means of a pressure sensor installed in the
room in which the hearth to be monitored is installed, the unit measures the pressure in the
room with the hearth. The pressure in the room
in which the hearth is installed and the adjacent
rooms must not exceed - 4 Pa so that fumes and
smoke cannot enter the house. At a pressure
higher than - 4 Pa, the fans of the MTD-ERV350
are switched off. Malfunction code "E4" appears
on the display. In this case, please contact the
installation company that installed the pressure
sensor and/or the heating. There is probably a
problem with the discharge of the fumes from the
hearth.
-dnopserroc eht dna tinu lanoitidda ehT
ing pressure sensor do not belong to the
standard scope of supply of the MTDERV 350.
-dnopserroc eht dna tinu lanoitidda ehT
ing pressure sensor must be connected
to the PCB panel (extended version) of
the MTD-ERV 350 by the installer.
The installer cannot infl uence the automatic chimney sweep control system. It reacts to settings at
the PCB panel (extended version) stored in the
software. The installer simply has to indicate
whether or not a chimney sweep control system
has been integrated into the ventilation system in
menu P50 of the CC Ease operating unit during
installation of the MTD-ERV 350 (for further information, see section 4.4).
Page 27

23Function of the System
3
3.5. Technical Specifi cations
Power supply
Supply voltage
Power factor (cos phi)
Noise output supply air fan
Position Ventilation rate Value
Absent
Low at
Medium at
High
at
Maximum
at
at
Noise output exhaust air fan
Position Ventilation rate Value
Absent
Low at
Medium at
High
at
Maximum
at
at
MTD-ERV 350 nL (normal Air Volume)
eulaVetar noitalitneVnoitisoP
Absent
tawoL
tamuideM
High
at
Maximum
at
at
Page 28

24 Function of the System
at
at
at
at
at
at
at
at
at
at
HE exchanger material
Inner lining material
Heating capacity
Weight
Polystyrene
3
MTD-ERV 350 nL (normal Air Volume)
etar noitalitneVnoitisoP
Power supply
Noise output supply air fan
Value
Absent
Low
Medium
High
Maximum
eulaVetar noitalitneVnoitisoP
Absent
Low
Medium
High
Maximum
Noise output exhaust air fan
General specifications of the MTD-ERV 350
eulaVetar noitalitneVnoitisoP
Absent
Low
Medium
High
Maximum
Supply voltage
Power factor (cos phi)
at
at
at
at
at
Page 29

25Function of the System
3
3.6 Dimension Sketch
Page 30

26 Function of the System
3
4 Instructions for the Installer
This chapter describes how you have to install the MTD-ERV 350.
4.1 Preconditions for Installation
In order to be able to assess whether the ComfoAir
350 can be installed in a particular room, please pay
attention to the following points:
• The MTD-ERV 350 must be installed in accordance with the local safety regulations and installation instructions of i.a. the public utilities,
and in accordance with the instructions in this
manual.
• The installation location must be selected such
that there is suffi cient space around the MTDERV 350 for air connections and for carrying
out maintenance work.
• The following installations must be present in
the room:
- Air duct connections.
- 230 V power supply with fused wall plug
socket.
- Installations for condensation drainage.
• Roof openings must be air and vapour-tight.
The outside air and exhaust air ducts must be
insulated vapour-tight between the roof/gable
opening and the MTD-ERV 350. This prevents
the formation of condensation on the outside
of the ducts.
• The exhaust air duct must have a doublewalled or insulated roof opening. This prevents
the formation of condensation between the
layers of the roof. The exhaust air duct must be
laid with a gradient towards the MTD-ERV 350.
• The MTD-ERV 350 must be installed in a frostfree room. The condensation must be discharged frost-free, with a downward gradient
and using a siphon. The MTD-ERV 350 must be
fi rmly connected to the siphon.
• The MTD-ERV 350 may only be connected to a
non-powered extractor hood. Any other type
of extractor hood system would interfere with
the basic function of the balanced ventilation
system.
• We recommend that silencers are installed
on both the air intake and air discharge sides
of the MTD-ERV 350. For further information,
please contact your supplier.
In order to ensure a good and draught-free
ventilation of the dwelling, gaps were deliberately left under the inside doors. If these gaps
are sealed, for example with door seals or highpile carpets, the ventilation in the apartment
will stagnate. This would prevent the system
from operating optimally.
4.2 Installation of the MTD-ERV 350
4.2.1 Transport and Unpacking
• Work carefully when transporting and unpacking the MTD-ERV 350.
Ensure that the packaging materials are
disposed of in an environmentally favourable
manner.
4.2.2 Checking the Scope of Supply
Should you discover any damage or missing parts
of the supply product, please contact your supplier
without delay. The scope of supply includes:
• MTD-ERV 350.
• Check the identifi cation plate to see whether it
is the correct type.
• 4 x 45° connection elbows.
• Mounting brackets.
• Operating Manual.
The MTD-ERV 350 is available in the following
types:
Type
MTD-ERV 350 L
MTD-ERV 350 R
MTD-ERV 350 L VV
MTD-ERV 350 R VV
MTD-ERV 350 L Luxe
MTD-ERV 350 R Luxe
Type
MTD-ERV 350 L Luxe VV
MTD-ERV 350 R Luxe VV
MTD-ERV 350 L Luxe CC
MTD-ERV 350 R Luxe CC
MTD-ERV 350 L Luxe CC VV
MTD-ERV 350 R Luxe CC VV
Meaning of the suffi xes:
• L = Left.
• R = Right.
• VV = Preheater.
• Luxe = Refers to the extended version of
the PCB panel.
• CC = ComfoControl Avignon. This is the
touch screen remote control with additional operating options compared
with the CC Ease operating unit.
Page 31

4
27Instructions for the Installer
ComfoAir 350 – LEFT
Stale air
Outside airSupply air
Exhaust air
ComfoAir 350 – RIGHT
Intake air
Exhaust airStale air
Outside air
4.3 Wall Mounting
LEFT
Connectio
n
Install the MTD-ERV 350 on a wall with a load-bearing capacity of at least 200 kg/m².
For other walls we recommend the use of a base for
installation on the fl oor (available as an option, see
section 4.8 with service parts). This helps to avoid
the transmission of structure-borne noise.
• Fasten the supplied mounting bracket to the
wall horizontally.
• Connect the condensation drain (not supplied)
to the underside of the MTD-ERV 350. The value
shown of 235 mm is only an indicative value.
The actual value depends on the type of condensation drain selected, see also section 4.3.2
for the connection of the condensation drain.
• Ensure that at least 1 metre of space is left in
front of the MTD-ERV 350 for later maintenance
work.
No space is required to the sides of the MTD-ERV 350
for its proper operation.
Do not install the MTD-ERV 350 with a side
against a wall to avoid possible contact
noise.
4.3.1 Connection of the Air Ducts
Install a suitable silencer directly at the air intake and
air discharge connections. Information on silencers
is available from your supplier.
The air ducts to be connected, minimum diameter
150 mm, must be installed with as little air resistance
as possible and air tight.
• Insulate the outside air duct and the stale air
duct vapour-tight between the roof/gable
opening and the MTD-ERV 350. This prevents
the formation of condensation on the outside
of the ducts.
• Install the exhaust air duct with a gradient towards the MTD-ERV 350.
4.3.2 Connection of the Condensation Drain
MTD-ERV 350
Page 32

4
28 Instructions for the Installer
RIGHT
Ensure that the water lock of the connection to the house sewage system is always
fi lled with water.
Menu Possibilities
P1 Read off the status (from menu P2)
P2 Set time delays (and indication “F
ILTER
DIRTY” and setting values for extractor
hood and sensors)
P3 Setting the ventilation levels
P4 Read off the temperature, relative hu-
midity and CO2 concentration.
P5 Setting additional control functions
P6 Setting additional control functions
P7 Read off and reset malfunctions (and
system information)
P8 Setting 0-10 V connections
P9 Read off the status (from menu P5)
The P menus P1, P2 and P9 are accessible for the user
and serve mainly for reading off statuses and for setting time delays. For further information, see section
2.3.7. The remaining P menus P3 to P7 are reserved
exclusively for the installer.
In the P menus the user may:
- only set the additional functions P1,
P2 and P9.
The remaining P menus P3 to P7 are reserved for the installer.
Access to the P menus
Proceed as follows:
1 Press simultaneously on " " and
"
".
2 Wait until the "P menu" appears on the display.
The P menus P1, P2 and P9 are now
accessible.
Commissioning can be carried out with the P menus
via the CC Ease operating unit. These P menus allow
various settings (in particular for ventilation control)
to be selected for the MTD-ERV 350. An overview of
the available P menus is given below:
Connection
The warm exhaust air is cooled by the outside air in
the heat exchanger. As a result, the moisture contained in the room air condenses in the heat exchanger. The condensation forming in the heat exchanger is discharged via the condensation tray into
the condensation drain.
The connection for the condensation drain has an
outside diameter of 32 mm. This is located on the
underside of the MTD-ERV 350.
• Connect the condensation drain to the water
lock of the home drainage system using a pipe
or hose.
• Position the upper edge of the water lock at
least 40 mm below the condensation drain of
the MTD-ERV 350.
• Ensure that the end of the pipe or hose ends
under the water level.
ta setanimret dne esoh eht taht erusnE
least 60 mm below the water level. This
will prevent the MTD-ERV 350 from drawing in air.
4.4 Commissioning the MTD-ERV 350
The MTD-ERV 350 can be put into operation after
installation.
MTD-ERV 350
Page 33

4
29Instructions for the Installer
3 Press
"
" and " " simultaneously for 2 seconds.
4 Wait until the "P menu" P3 appears on the dis-
play.
The P menus P3 to P8 are now acces-
sible.
5 Select with " " or " " the desired P
menu, e.g. "
5
".
6 Press "
" to confi rm the P menu.
7 Select with " " or " " the desired P sub-
menu, e.g. " 51 ".
8 Press "
" to confi rm the P sub-menu.
Making settings in the P menus
The minimum and maximum
values for the available
setting parameters are
stored in the software.
9 Select a value for the parameter with " " or
"
".
10 Press "
" to confi rm the value.
11 Repeat steps 7 to 10
to set several parameters in turn in
the same P menu.
Or
Return to the P menu: Press "
" once.
Or
Return to the main window
1 Press " " twice.
Page 34

4
30 Instructions for the Installer
Menu P3 ! Set ventilation controls
Values for ventilation controls
Sub-menu Description Minimum Maximum Standard
P30 Setting the power (in %) of the exhaust air
fan in position "Absent".
0% 97% Normal / High
15% / 15%
P31 Setting the power (in %) of the exhaust air
fan in position "Low".
16% 98% Normal / High
35% / 40%
P32 Setting the power (in %) of the exhaust air
fan in position "Medium".
17% 99% Normal / High
50% / 70%
P33 Setting the power (in %) of the exhaust air
fan in position "High".
18% 100% Normal / High
70% / 90%
P34 Setting the power (in %) of the supply air
fan in position "Absent".
0% 97% Normal / High
15% / 15%
P35 Setting the power (in %) of the supply air
fan in position "Low".
16% 98% Normal / High
35% / 40%
P36 Setting the power (in %) of the supply air
fan in position "Medium".
17% 99% Normal / High
50% / 70%
P37 Setting the power (in %) of the supply air
fan in position "High".
18% 100% Normal / High
70% / 90%
P38 Current power (in %) of the exhaust air
fan.
- - Current %
P39 Current power (in %)
of the supply air fan.
- - Current %
Menu P4 ! Read off the temperatures (% and ppm)
Read off the temperatures (% and ppm)
Sub-menu Description Minimum Maximum Standard
P40 Current value of T
POST-HEATER - - Current
o
C
P41 Comfort temperature 12
o
C 28 oC 20 oC
P42 Current value CO
2
- - Current ppm
P43 Current value relative humidity. - - Current %
P44 Current value of T
EXTRACTOR HOOD - - Current
o
C
P45 Current value of T1
(= temperature of the outside air)
- - Current
o
C
P46 Current value of T2
(= temperature of the supply air)
- - Current
o
C
P47 Current value of T3
(= temperature of the exhaust air)
Current oC
P48 Current value of T4
(= temperature of the stale air)
Current
o
C
P49 Current value of T
GHE
(= temperature of the outside air for geothermal heat exchanger)
Current
o
C
Page 35

4
31Instructions for the Installer
Menu P5 ! Setting additional control functions
Values for additional control functions
dradnatSmumixaMmuminiMnoitpircseDunem-buS
P50 Activation of
the chimney sweep control system.
0 (= No) 1 (= Yes) 0
P51 Indicate whether
preheater is installed.
0 (= No) 1 (= Yes) 0
Note:
change only if a preheater was subsequently installed.
If the MTD-ERV 350 has to be reset to the works settings via P75, a subsequently installed
preheater will be reset as standard to "ABSENT".
• Check the presence of the preheater after a general reset via menu P75.
P52 Setting the
preheater control.
v Level 0
Particularly safe setting.
v Level 1
Safe setting.
v Level 2
Nominal setting.
v Level 3
Economy setting.
0 3 2
Note:
ThePREHEATERIS SWITCHEDON EARLIESTWITH THEparticularly safesetting.Thislevelthus offersthe
greatest safety for maintaining balanced ventilation. On the other hand, the preheater is
switchedon thelatest inthe ECONOMY SETTING.Thislevelthus offersthe leastsafetyformaintaining balanced ventilation.
During commissioning of the MTD-ERV 350 the preheater control can generally be left on
Level 2:NOMINAL SETTING (=workssetting).Only in areaswith coldwinters(withdaytimetemperaturesregularlyapprox.-10°Corbelow)shouldLevel1:SAFESETTINGorevenLevel0:PARTICU-
LARLY SAFE SETTINGS be selected.
Values for additional control functions
dradnatSmumixaMmuminiMnoitpircseDunem-buS
P53 Indicate presence of an extractor hood.
Note:
If an extractor hood is connected to the
ventilation system, the user can set the
ventilation levels for the extractor hood
via P29.
0 (= No) 1 (= Yes) 0
P54 Indicate presence of a bypass.
Note:
The MTD-ERV 350 is equipped with a bypass as standard. The value can therefore
be left at '1'.
0 (= No) 1 (= Yes) 1
P55 Indicate presence of a post-heater. 0 (= No) 1 (= Yes) 0
P56 Setting the necessary air volume for the
dwelling.
• nL: "Normal air volume".
• HL: "High air volume".
nL HL nL
Note:
Setting the air volume in P56 (to "nL" or "HL") forms the basis for setting the air specifi cations
and hence for setting the fans. For further information, see section 4.5 and P30 to P37.
Page 36

4
32 Instructions for the Installer
Values for additional control functions
Sub-menu Description Minimum Maximum Standard
P60 Indicate presence of a
geothermal heat exchanger (GHE).
0 (= No) 1 (= Yes) 0
P61 Setting the percentage that the sup-
ply air fan must run higher when
the valve of the geothermal heat exchanger (EWT) is open.
0% 99% 0%
P62 Tghe, low 0% 15% 7%
P63 Tghe, high 10% 25% 23%
P64 Tnaheater, desired 5% 40% 18%
Menu P7 ! Read off malfunctions (and system information)
Values for additional control functions
dradnatSmumixaMmuminiMnoitpircseDunem-buS
P57 Setting the MTD-ERV 350 Type.
• Li = Left-hand version.
• Re = Right-hand version.
Note:
The MTD-ERV 350 is set correctly at the
factory.
• Refer also to the identifi cation plate for
these data.
Li Re Li
P58
(Not yet available)
Setting the fan type.
• 0 = Standard.
• 1 = Constant volume.
• 2 = Constant pressure.
Note:
The MTD-ERV 350 is set correctly at the
factory.
• Constant volume or constant pressure
fans cannot be installed subsequently.
0 2 0
P59 Enthalpy exchanger installed 0 (= No) 1 (= Yes) with
moisture sensor
2 (= Yes) without moisture
sensor
Menu P6 Setting additional control functions
Values (malfunction) information
dradnatSmumixaMmuminiMnoitpircseDunem-buS
P70 Current software version. Software version number
noitcnuflam dna mrala ot gnidnopserroc edoC.noitcnuflam tsaL17P
display (see section 4.7)
P72 Last malfunction but one Code corresponding to alarm and malfunction
display (see section 4.7)
P73 Last malfunction but two Code corresponding to alarm and malfunction
display (see section 4.7)
P74 Reset a malfunction on the
MTD-ERV 350.
0 1 0
Page 37

4
33Instructions for the Installer
Values (malfunction) information
Sub-menu Description Minimum Maximum Standard
P75
Complete reset.
• Press
"
" for 5 seconds to carry out a com-
plete reset.
A complete reset returns all settings to
the original works settings.
0 0 0
After a complete reset, all settings in menus P2 and P3 and the existing controls P5
and P6 have to be made again.
Sub-menu Description
P80 0= Open-loop control 1 = Closed-loop control (by analogy with input 1)
P81 0= Open-loop control 1 = Closed-loop control (by analogy with input 2)
P82
Min. setting by analogy with input 1
P83
Max. setting by analogy with input 1
P84
Min. setting by analogy with input 2
P85
Max. setting by analogy with input 2
Max
Min
0 V 10
After a complete reset, the MTD-ERV 350 prompts you to enter “nL / HL” (see P56)
and “Li / Re” (see P57) again.
If the MTD-ERV 350 is equipped with a preheater, this must be logged in again in
menu P51, as it is set to "Logged out" as standard after a complete reset.
P76 Self-test of the MTD-ERV 350. 0
1 0
Explanation
The MTD-ERV 350 switchestothehighestlevelimmediately afteractivation of the self-test. In addition,thebypass valveopens and closesimmediatelyafter activation oftheself-test.Ifthis self-test is
completed without malfunctions, the valve of the preheater (if installed) then opens and closes.
Menu P8 Open-loop and closed-loop control
Selection between open-loop and closed-loop control
Page 38

4
34 Instructions for the Installer
Position ABSENT 15%
Position LOW 35%
Position MEDIUM 50%
Position HIGH 70%
The standard settings of the ComfoAir 350, HL, are
as follows:
" and " ".
– Wait until "InR" appears on the CC Ease
display.
4.5 Setting the Air Specifi cations
The MTD-ERV 350 must be set after installation.
This can be performed using the air specifi cations of the MTD-ERV 350 shown above.
v Setting the normal air volume ‘nL’ corre-
sponds to the presetting of the G 90.
v Setting the normal air volume ‘nL’ corre-
sponds to the presetting of the G 91.
The standard settings of the MTD-ERV 350, nL,
are as follows:
fiiceps ria 053 e MTD-ERVht esU cation
diagram for setting the fans.
• If the previously set air volumes still differ
too much:
– Adjust the valves further.
• Check the whole system again after adjustment
of all the valve stages.
• Switch the MTD-ERV 350 (back) to ventilation
position 2.
4.6 Maintenance by the Installer
As installer you have to service the MTD-ERV 350 as
follows:
• Inspect the heat exchangers and fans
• Clean the fi lter if a preheater is installed.
These measures are described in more detail briefl y
in the following sections.
Position ABSENT 15%
Position LOW 40%
Position MEDIUM 70%
Position HIGH 90%
To set the MTD-ERV 350 (after installation), proceed
as follows:
• Switch the MTD-ERV 350 to the setting mode.
– Press simultaneously for two seconds on
"
retaeherp dna ssapyb ,edom gnittes nI
are always deactivated. The MTD-ERV
350 switches the setting mode off again
automatically after 30 minutes.
• Close all windows and outside doors.
• Close all inside doors.
• Check the presence of air circulation systems in
the building (at least 12 cm2 per l/s).
demrofrep ton era serusaem eseht fI
(regularly), there is a danger that the
MTD-ERV 350 will cease to function correctly.
4.6.1 Inspection of Heat Exchanger and
Fans
The fans and the heat exchanger must be inspected
every 4 years.
• Remove the mains plug (A) from the plug sock-
et.
• Pull the fi lters (B) out of the MTD-ERV 350.
• Remove the front plate by removing the screws
(C).
• Push the front plate in the direction of the ar-
row and remove it from the MTD-ERV 350.
• Remove the sealing plate by removing the
screws (D).
-dliub eht ni smetsys noitalucric ria ehT
ing must achieve at least 12 cm2 per l/s.
• Check whether both fans function in the
three speed ranges.
• Switch the MTD-ERV 350 to the high position.
• Install all the valves and set them according to
the instructions or as in the reference dwelling.
If no data are known:
– Install the valves and open them as far
as possible.
– Measure the air volumes, fi rst the supply air
and then the exhaust air.
– differ by more than approx. 10% from the
nominal air volumes and the majority of
the deviations are in the plus range, adjust
the fan so that all the deviations are in the
plus range. If the majority of the deviations
are in the minus range, adapt all the devia-
tions so that they are all in the minus range.
Ensure also that a supply and an exhaust
valve remain fully open.
• Change the fan settings in the P menus P30 to
P37 via the CC Ease operating unit.
– Select the lowest possible setting in or-
der to minimise energy consumption.
– Ensure that the ratio of the air volumes be-
tween high, medium and low remains the
same.
Page 39

4
35Instructions for the Installer
A
C
B
D
B
E
G
F
Left-hand version
Designated as L
E
G
F
Right-hand version
Designated as R
Then:
• Remove the heat exchanger (F) from the drain
plate (G).
Caution!
There may still be water in the heat exchanger!
• Clean the heat exchanger (F), if necessary.
– Immerse the heat exchanger in warm wa-
ter (max. 40° C) to clean.
– Finally rinse the heat exchanger thorough-
ly with warm tap water (max. 40° C).
– Hold the heat exchanger with both hands
at the green side surfaces and shake out
all the water.
Caution!
On no account should aggressive or solvent-based cleaning agents be used.
Do not install the heat exchanger yet
(the fans can be removed, inspected and
cleaned, if necessary, in the following
steps).
If an enthalpy heat exchanger is installed, observe the corresponding instruction.
Do not install the heat exchanger yet if the fans
are also to be inspected. The following section
describes how to remove, inspect and clean the
fans, if necessary, after the heat exchanger:
• Remove the plastic plate (I) in front of the PCB
panel by loosening the two screws.
• Loosen the connectors (J) and the earth cable
(J) at the PCB panel and remove the cables with
the two grommets (K) completely.
• Remove the complete fan casing (L) by pressing
in the tabs (M).
• Remove the inlet neck (N) by pressing in the
tabs around the fan casing.
• Clean the fans (O).
During installation of the sealing
plate, its underside must fi rst be
inserted behind the raised edge so
that a good seal is achieved.
MTD-ERV 350 – L
• Pull the tape (E) to remove the heat exchanger (F) and the drain plate (G).
• Remove the bypass duct (H) on the left-hand
version of the MTD-ERV 350.
MTD-ERV 350 – R
• Remove the bypass duct (H) on the right-hand
version of the MTD-ERV 350.
• Pull the tape (E) to remove the heat exchanger
(F) and the drain plate (G).
Page 40

4
36 Instructions for the Installer
I
J
K
N
O
M
L
Use a soft brush to clean
the fan blades.
Remove dust using a vacuum cleaner.
Caution!
Take care not to damage the fan blades.
Caution!
Take care not to damage the temperature sensor.
• Install all the parts again in the reverse or-
der.
• Carry out the self-test described under P76, see
section 4.4.
Install the drain plate (G) again correctly
under the heat exchanger. The holes in
the drain plate must be on the side of
the condensation drain.
Install the drain plate (G) again correctly
under the heat exchanger. The holes in
the drain plate must be on the side of
the condensation drain.
Tighten the screws to a maximum
torque of 1.5 Nm. This corresponds
to roughly level 2 of a normal screw
drill.
euqrot mumixam a ot swercs eht nethgiT
of 1.5 Nm. This corresponds to roughly
level 2 of a normal screw drill.
4.6.2 Filter Cleaning, if Preheater is Fitted
The fi lter of the preheater (if installed) must be
cleaned every 4 years.
• Remove the mains plug (A) from the plug sock-
et.
• Pull the fi lters (B) out of the MTD-ERV 350.
• Remove the front plate by removing the screws
(C).
• Push the front plate in the direction of the arrow and remove it from the MTD-ERV 350.
• Remove the sealing plate by removing the
screws (D).
• Remove the plastic plate (I) in front of the PCB
panel by loosening the two screws.
• Loosen the connectors (J) and the earth cable
(J) at the PCB panel and remove the cables with
the two grommets (K) completely.
• Remove the cable (P) of the PCB panel.
• Remove the bottom (Q) of the preheater.
– The bottom is secured in the electronic
carriage by 4 tabs. Two tabs are located on
the front side (visible) and two on the rear
side (not visible).
• Clean the fi lter using a brush.
• Remove any caked soiling with a damp cloth.
• Install all the parts again in the reverse order.
• Carry out the self-test described under P76, see
section 4.4.
Page 41

Code Description
A0 NTC sensor TEWT defective.
A1 NTC sensor T1 defective.
(= temperature of the outside air)
A2 NTC sensor T2 defective.
(= temperature of the supply air)
A3 NTC sensor T3 defective.
(= temperature of the return air)
A4 NTC sensor T4 defective.
(= temperature of the exhaust air)
A5 Bypass motor malfunction.
A6 Preheater motor malfunction.
A7 Preheater does not heat up suffi ciently.
A8 Preheater becomes too hot.
A10 NTC sensor Tch defective.
A11 NTC sensor Trh defective.
E1 Exhaust air fan not running (M1).
E2 Supply air fan not running (M2).
E3 Temperature sensor extractor hood too
high.
EA1 Enthalpy sensor measures excessively
high moisture values.
EA2 No communication with the enthalpy
sensor.
Caution!
The electrical connections must not come into contact with moisture.
Pay attention during installation of the heat exchanger and drain plate that the condensation drain is on the same side as the condensation drain fi tting.
Inspect the components of the condensation drain every 2 years.
4
37Instructions for the Installer
4.7 Malfunctions
In the event of a malfunction in the MTD-ERV 350:
• A malfunction indication normally appears on the display of the CC Ease operating unit.
Not all malfunction indications appear on the CC Ease display, however, even when there is a malfunction (or
problem). Both types of malfunction (or problem) are described briefl y in the following sections.
4.7.1 Malfunction Indications on the CC Ease Display
The following table contains an overview of the malfunction indications that are shown on the CC Ease display.
Page 42

4
38 Instructions for the Installer
4.7.2 Malfunction indications on the CC Ease Display à Remedy
This section contains tips on remedying the malfunctions described in section 4.7.1 that can appear on the CC Ease
display.
E1 / E2
Exhaust air/supply air fan
malfunction
Remove the filter,
the plastic front cover
and the metal cover
Do the fan
connection and the PCB
register 230 VAC?
Yes
Then initiate the
self-test (P76 on 1)
Do the fan
and the PCB
register current
(1.5 – 10 VDC)?
Yes
Remove the heat exchanger
and the foam part of the
bypass and replace the fan
No
Replace the PCB
CAUTION: Reset unit
No
Replace the PCB
CAUTION: Reset unit
’FiL‘ ’tEr’
in display
Remove plug
from socket
Clean or
replace filter
Mount filter with the rounded
part of the handle pointing
downwards
Reinsert the
plug in the
socket
Press
until ’FiL‘ ’tEr‘ disappears
CAUTION!
Avoid contact with the PCB
and frost protection
element due to risk
of electrocution
Left-hand or right-hand version of the MTD-ERV 350?
See illustration on plastic cover for location of PCB
ERV 350 Left: Supply fan left
ERV 350 Right: Supply fan right
Page 43

4
39Instructions for the Installer
E3
Extractor hood temperature
sensor too high.
Resistance OK?
Yes No
Replace PCB
Caution:
Reset unit!
Replace
temperature sensor
Caution!
Avoid contact with the
PCB and frost protection
element due to risk of
electrocution
Is something
cooking on the hob?
Yes
No
Turn hob off and
remove item from
heat source
Caution!
Avoid contact with the
PCB and frost protection
element due to risk of
electrocution
E A1
Moisture sensor registers >60%
relative humidity in exhaust air.
Consult the user;
fit standard heat exchanger??
E A2
Cannot read out moisture
sensor
Resistance
OK?
Yes No
Replace PCB
Caution:
Reset unit!
Replace
temperature sensor
Caution!
Avoid contact with the
PCB and frost protection
element due to risk of
electrocution
Connection
between sensor
and PCB OK?
Yes
Check sensor
resistance
No
Repair
connection
E4
MTD-ERV 350 switched off
via external switch
Cause depends on unit
connected to the MTD-ERV 350:
check the connected unit.
Page 44

4
40 Instructions for the Installer
A1 / A2 / A3 / A4
Temperature sensor malfunction
T1 / T2 / T3 / T4
Remove the plug from
the socket
Remove the filter, the plastic
front cover and the metal cover
Remove temperature
sensor from the PCB
Check temperature sensor
resistance; see table
Is resistance OK?
Yes No
Replace the PCB
CAUTION: Reset unit!
Replace the
temperature sensor
CAUTION!
Avoid contact with the
PCB and frost protection
element due to risk of
electrocution
A5 / A6
Motor bypass / frost protection element
malfunction
Remove the filter,
the plastic front cover and
the metal cover
Then initiate the
self-test (P76 on 1)
Is the motor
running?
Yes No
Remove the motor and
the cog (incl. plastic part)
Is the cog defective?
No
Replace motor
Check connection and PCB;
12 VDC if motor is
running (see menu P76)
Does the
PCB register
current?
Yes
Replace motor
Yes
Replace cog
No
Replace the PCB
CAUTION: Reset unit!
Temp Resistance [K!]
o
C MIN MED M AX
10 19.570 19.904 20.242
15 15.485 15.712 15.941
18 13.502 13.681 13.861
19 12.906 13.071 13.237
20 12.339 12.491 12.644
21 11.801 11.941 12.082
22 11.291 11.420 11.550
25 9.900 10.000 10.100
30 7.959 8.057 8.155
[°C]
[KΩ
Page 45

4
41Instructions for the Installer
A8
Malfunction
Frost protection element gets too hot
Remove the filter,
the plastic front cover and
the metal cover
Does the frost protection
element flap work properly?
(Check with P76)
Yes
Check the following factors:
- Fan settings (too low?)
- Supply air valves (opened too wide?)
- The entire duct system (blockage?)
No
See A5 / A6 Malfunction
section “Initiate self-test”
A7
Malfunction
Frost protection element does
not warm up (sufficiently)
Remove the plug
from the socket
Remove the filter,
the plastic front cover and
the metal cover
Remove the plug of frost
protection element from the PCB
Is the resistance
of the plug of the frost
protection element
> 300 ohm?
Yes
Remove the heat exchanger and
the frost protection element
(and also the foam part in case
of right-hand version)
Is the resistance of
the cable of the frost
protection element
infinite?
Yes
If fuse is blown,
replace cable
No
Is resistance
of T1 OK?
No
Yes
Replace T1
temperature sensor
Replace the PCB
No
Check resistance of the cable
and check connections with the
frost protection element
CAUTION!
Avoid contact with the
PCB and frost protection
element due to risk of
electrocution
CAUTION!
Avoid contact with the
PCB and frost protection
element due to risk of
electrocution
Page 46

4
42 Instructions for the Installer
A
0 /A10 /A11
Malfunction
Temperature sensor
T
ghe
/ TCH / T
AH
Check temperature sensor
resistance; see table
Resistance
OK?
Yes No
Replace PCB
Caution:
Reset unit!
Replace
temperature sensor
Temp.
Resistance
[°C]
[KΩ
]
MIN . MED. MAX .
10 19.570 19.904 20.242
15 15.485 15.712 15.941
18 13.502 13.681 13.861
19 12.906 13.071 13.237
20 12.339 12.491 12.644
21 11.801 11.941 12.082
22 11.291 11.420 11.550
CAUTION!
Avoid contact with the
PCB and frost protection
element due to risk of
electrocution
(°C)
Page 47

4
43Instructions for the Installer
4.7.3 Malfunctions (or Problems) without Indications
This section gives an overview of the malfunctions (or problems) that are not displayed on the CC Ease display.
Problem/Malfunction erusaem / kcehCesuaC
All OFF Supply voltage Check the fuse on the PCB panel.
• If the fuse is OK, the circuit board is defective.
.deliaf sah ylppus rewop sniam ehTegatlov ylppus oN
High air delivery temperature in summer
Bypass remains closed Lower
the comfort temperature.
Low air delivery temperature in winter
Bypass remains open Increase
the comfort temperature.
No or insuffi cient air
supply, shower remains wet
Filter clogged Replace
the fi lters.
Valves clogged Clean
the valves.
Heat exchanger clogged by dirt. Clean
the heat exchanger.
Heat exchanger frozen Thaw
the heat exchanger.
Fan dirty Clean
the fan.
Ventilation ducts clogged Clean
the ventilation ducts.
MTD-ERV 350 in frost mode
Too noisy Fan bearings defective Replace
the fan bearings.
Fan settings Change
the ventilation control settings.
Scraping noise
• Siphon is empty
• Siphon does not seal
Install
the siphon again.
Whistling noise
• An air leak somewhere in the system
Seal
the air leak.
Air fl ow noises
• Valves do not seal against duct.
• Valves not suffi ciently open
Install
the valves again.
Set
the valves again.
Leaking condensation Condensation drain clogged Clean
the condensation drain.
Condensation from exhaust duct does not
run into drain plate
Check whether
the connections are correct.
Wired 3-position
switch does not function
Wiring is not OK Check the circuitry of the 3-position switch
using a voltmeter:
• Voltage only on N & L3:
[The fans run at position 1].
• Voltage only on N & L3 & L2:
[The fans run at position 2].
• Voltage only on N & L3 & L1 or N & L3 & L2
& L1:
[The fans run at position 3].
Switch is defective
Wireless 3-position
switch does not function
Battery is discharged Check
the battery.
• Replace the battery, if necessary.
Page 48

4
44 Instructions for the Installer
4.8 Spare Parts
2
1
3
4
5
7
6
9
9
8
11
10
12
The following table contains an overview of the spare parts available for the MTD-ERV 350.
Number Part
1 Fans (left and right)
2 PCB panel in MTD-ERV 350.
3 PCB panel in top-mounted casing, Basic or Luxury version.
4 Temperature sensors T1 / T3 (in top of unit, on electronic carriage).
5 Temperature sensors T2 / T4 (in fan casing of both fans).
6 Servo motor & cable (for bypass and preheater)
7 Heat exchanger (or combined heat/enthalpy exchanger)
8 Filter clamp (2x)
9 Filter cloths (2x)
10 Filter set (with fi lter clamps, fi lter cloths and fi lter holders).
11 Preheater (also available as an optional kit for subsequent installation).
12 Mounting frame for installation on the fl oor (option).
13 Remote control transmitter (option)
14 Display (option).
Page 49

Red
White
Braun
White
Brown
Blue
White
Blue
Brown
Brown
Blue
Blue
Brown
Blue
Brown
Blue
Brown
Preheater
Yellow
Black
Black
White
Brown
White
Brown
White
Blue
Yellow
Red
Preheater valve
Bathroom switch
Enthalpy
Bypass valve
Green/ YellowGreen/ Yellow
Green/ Yellow
Supply air
Exhaust air
4
45Instructions for the Installer
4.9 Wiring Diagram:
MTD-ERV 350 – LEFT-HAND Standard Version
Page 50

M
M
RS232
Black
Red
Brown
M
White
Brown
Blue (-)
Yellow (0-10V)
White ( )
M
Bathroom switch
Preheater
T1
T4
T3
T2
Bypass valve
Preheater valve
Green/ Yellow
Brown
Blue
Blue
Brown
(L1) Grey
(L2) Black
(L3) Brown
(N) Blue
Exhaust air
Supply air
RJ11
VENT.
VENT.
FILT2/T4T1/T3BYP/PIE TRI
VENT. BS
VENT.
1
T2/T4T1/T3BYP/PIE
-
+
White
Red
Black
White
Brown
White
Brown
White ( )
Gelb (0-10V)
Blau (-)
Green/ Yellow
Green/ Yellow
(L3) Brown
(N) Blue
1
2
4
SA 1-3V
L2
L1
(L3) Brown
(N) Blue
123
4
+ -
LED
SAI 1-3V
L2
L1
RS232 - PC
GND
12V
Eb
Ea
GND
12V
12VAbCCb
Aa
CCa
GND
GND
Ext. Comm.
N
L1 PE
Comm. Basis
RS232 - KFB
12V
RX
TX
ERR
GND
OFF
BS
GND
GND
FIE
CH
GND
GND
Tch
Tge
GND
GND
Tah
010
GND
GND
010
AH
Post-heater
Bathroom
switch
External filter
ERR
Malfunction
Comfo-
control
CC EASE
Artic
Enthalpy
sensor
Analogue 2
Analogue 1
Tnav
T.GHE
T extractor
hood
Extractor hood
switch
E/C
L2
N
N
L2 PE PE
PE PE
GND
0-10V OUT
(IN 0-10V)
(IN 0-10V)
Switch off Heat
Exchanger
L
Extractor hood
LN PE
Spare
Spare
Spare
Spare
Spare
Spare
Spare
Spare
12Vhbha
GND
010
GND
010
12V
Analogue 4
(IN 0-10V)
Analogue 3
(IN 0-10V)
4
46 Instructions for the Installer
4.10 Wiring Diagram:
MTD-ERV 350 – LEFT-HAND Luxury Version
Page 51

Red
White
Braun
White
Brown
Blue
White
Blue
Brown
Brown
Blue
Blue
Brown
Blue
Brown
Blue
Brown
Preheater
Yellow
Black
Black
White
Brown
White
Brown
White
Blue
Yellow
Red
Bypass valve
Bathroom switch
Enthalpy
Preheater valve
Green/ YellowGreen/ Yellow
Green/ Yellow
Exhaust air
Supply air
4
47Instructions for the Installer
4.11 Wiring Diagram:
MTD-ERV 350 – RIGHT-HAND Standard Version
Page 52

M
M
RS232
Black
Red
Brown
M
White
Brown
Blue (-)
Yellow (0-10V)
White ( )
M
Bathroom switch
Preheater
T1
T4
T3
T2
Bypass valve
Preheater valve
Green/ Yellow
Brown
Blue
Blue
Brown
(L1) Grey
(L2) Black
(L3) Brown
(N) Blue
Exhaust air
Supply air
RJ11
VENT.
VENT.
FILT2/T4T1/T3BYP/PIE TRI
VENT. BS
VENT.
1
T2/T4T1/T3BYP/PIE
-
+
White
Green/ Yellow
Green/ Yellow
Red
Black
White
Brown
White
Brown
White ( )
Yellow (0-10V)
Blue (-)
(L3) Brown
(N) Blue
1
2
4
SA 1-3V
L2
L1
(L3) Brown
(N) Blue
123
4
+ -
LED
SAI 1-3V
L2
L1
RS232 - PC
GND
12VEbEa
GND
12V
12VAbCCbAaCCa
GND
GND
Ext. Comm.
N
L1 PE
Comm. Basis
RS232 - KFB
12V
RX
TX
ERR
GND
OFF
BS
GND
GND
FIE
CH
GND
GND
Tch
Tge
GND
GND
Tah
010
GND
GND
010
AH
Post-heater
Bathroom
switch
External filter
ERR
Malfunction
Comfo-
control
CC EASE
Artic
Enthalpy
sensor
Analogue 2
Analogue 1
Tnav
T.GHE
T extractor
hood
Extractor hood
switch
E/C
L2
N
N
L2 PE PE
PE PE
GND
0-10V OUT
(IN 0-10V)
(IN 0-10V)
Switch off Heat
Exchanger
L
Extractor hood
LN PE
Spare
Spare
Spare
Spare
Spare
Spare
Spare
Spare
12Vhbha
GND
010
GND
010
12V
Analogue 4
(IN 0-10V)
Analogue 3
(IN 0-10V)
4
48 Instructions for the Installer
4.12 Wiring Diagram:
MTD-ERV 350 – RIGHT-HAND Luxury Version
Page 53

E v Heuveln,
General Managing Director
4
49Instructions for the Installer
4.13 EC Declaration of Conformity
J.E. Stork Ventilatoren B.V. are the manufacturers of the MTD-ERV 350
8028 PM Zwolle-NL
Commercial Register Zwolle 22293
EC Declaration of Conformity
Designation of the appliance: : Heat Recovery Unit: MTD-ERV 350
Conforms to the directives : Machine Safety Directive (98/37/EC)
)CE/73/89( )CEE/32/37( evitceriD egatloV woL
)CEE/86/39 ,CEE/13/29 ,CEE/633/98( evitceriD CME
Zwolle, 16 June 2007
J.E. Stork Ventilatoren B.V.
Page 54

Page 55

Page 56

™
MTD SOLUTIONS LTD
Unit 1, Burgage Business Park, Blessington, Co. Wicklow, Ireland.
Tel: +353 (0)45 900 590 Fax: +353 (0)45 900 623
Email: info@mtd-solutions.com
www.mtd-solutions.com
 Loading...