


OWNER'S OPERATING MANUAL
Garden Shredder Mulcher
MANUEL D'UTILSATION
Broyeur de Jardin
MANUAL DEL USUARIO Picador de Desperdicios de Jardin
Model No. 2001
IMPORTANT:
It is vital that you retain and thoroughly read and understand
these safety and operating instructions. Incorrect use will make this machine in operable.
IMPORTANT:
Il est vital pour vous de lire entièrement et de bien comprendre
ces instructions sur la sécurité d'utilisation, et de les retenir. Un maniement incorrect de cette machine la rendrait inutilisable.
IMPORTANTE:
Es esencial que usted conserve y lea y entienda cabalmente estas instrucciones de seguridad y funcionamiento. El uso incorrecto hará que esta máquina no funcione.
ENGLISH
READ ALL INSTRUCTIONS
WARNING! When using electric gardening tools, basic safety precautions should always be followed to reduce the risk of fire, electric shock, and personal injury, including the following.
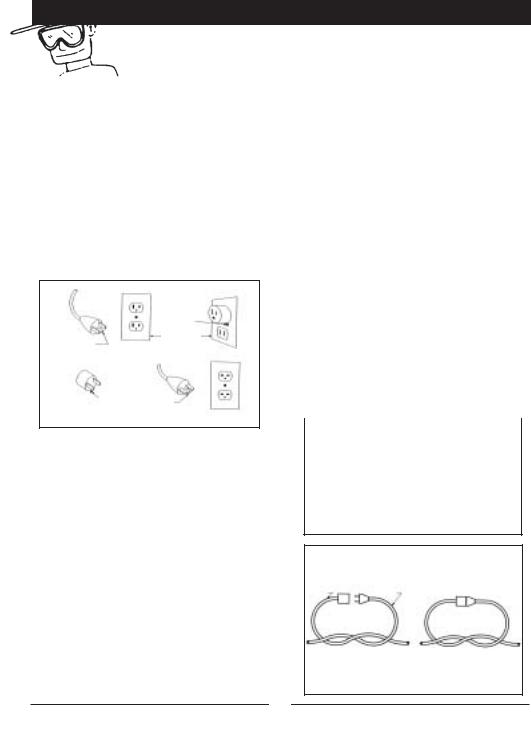
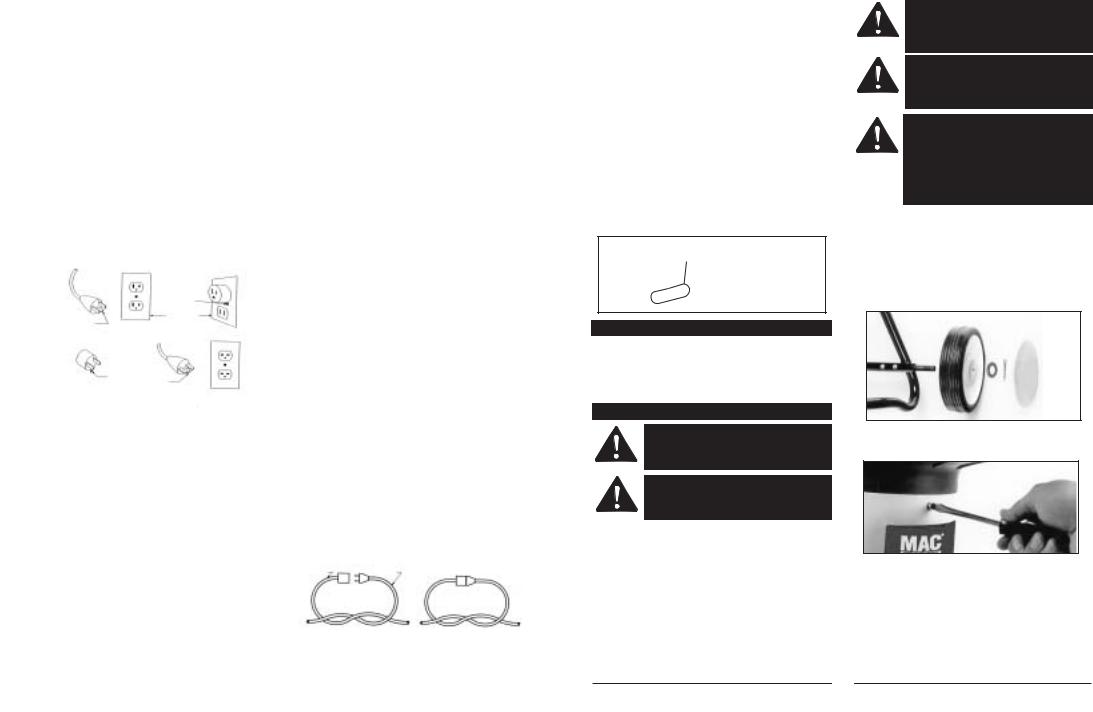
GROUNDING INSTRUCTIONS
This tool should be grounded while in use to reduce the risk of electric shock to the operator. The tool is equipped with a 3-conductor cord and 3-prong grounding plug to fit the proper grounding receptacle. The green or green and yellow wire to live terminal. If your unit is for use on less than 150 volts, it has a plug as illustrated in sketch A in Figure 1 on page 2. If it is for use on 150 to 250 volts, it has a plug as illustrated in sketch D, Fig.1, Page 2.
An adapter, sketches B and C, is available for connecting plugs as illustrated in sketch A to 2-prong receptacles. The green-colored rigid ear, lug, or the like, must be connected to permanent ground, such as a properly grounded outlet box. No adapter is available for the plug illustrated in sketch D.
EXTENSION CORDS
Use only three-wire outdoor extension cords that have three-prong grounding plugs and grounding receptacles that accept the appliance’s plug.
METAL SCREW
COVER OF
GROUNDED
GROUNDING DUTLET BOX
PIN
ADAPTER
GROUNDING GROUNDING
MEANS PIN
FIG. 1
Avoid dangerous environment. Do not use appliance in damp or wet locations.
Don’t use in rain. Water entering a power tools will increase the risk of electric shock.
Do not abuse cord. Never yank it to disconnect from receptacle. Keep cord away from heat, oil, sharp edges or moving parts. Replace damaged cords immediately. Damaged cords increase the risk of electric shock.
Personal Safety
Keep children away. All visitors should be kept at a distance from work area.
Dress properly. Do not wear loose clothing or jewelry. They can be caught in moving parts. Use of rubber gloves and substantial footwear is recommended when working outdoors. Wear protective hair covering to contain long hair.
Use safety glasses. Always use face or dust mask if operation is dusty.
Stay alert, watch what you are doing and use common sense when operating a power tool. Do not use tools while tired or under the influence of drugs, alcohol, or medication. A moment of inattention while operating power tools may result in serious personal injury.
Avoid unintentional starting. Do not move
plugged-in appliance with finger on switch. Be sure switch is off when plugging in.
Do not overreach. Keep proper footing and balance at all times. Proper footing and balance enables better control of the tool in unexpected conditions.
No accessories or attachments are necessary for the operation of this gardening tool. The use of any accessories or attachments for this gardening tool is not recommended. Such use of any attachment or accessory may increase the risk of injury to the user.
Tool Use and care
Use right appliance. Do not use appliance for any job except that for which it is intended.
Ground Fault circuit Interrupter (GFCI) protection should be provided on the circuit(s) or outlet(s) to be used for the gardening appliance. Receptacles are available having built-in GFCI protection and may be used for this measure of safety.
Warning! To reduce the risk of electric shock, use only with an extension cord intended for outdoor use, such as an extension cord of cord type SW-A, SOW-A, STW-A, STOW-A, SJW-A, SJOW-A, SJTW-A, SJTOW-A.
Extension cords of the type specified above are available at local hardware stores.
Extension cord-Make sure your extension cord is in good condition. When using an extension cord, be sure to use one heavy enough to carry the current your product will draw. An undersized extension cord will cause a drop in line voltage resulting in loss of power and overheating. Table 1 shows the correct size to use depending on cord length and nameplate ampere rating. If in doubt, use the next heavier gage. Number, the heavier the cord. To reduce the risk of disconnection of appliance cord from the extension cord during operating:
Make a knot as shown in Figure 2;
|
|
Volts |
|
Total length of cord in feet |
|
||||||||||||
|
|
|
|
|
|
|
|
|
|
|
|
|
|
|
|
|
|
|
|
|
|
|
|
|
|
|
|
|
|
|
|
|
|
|
|
|
|
120V |
|
25 |
|
|
50 |
|
|
100 |
|
|
150 |
|
|
|
|
|
|
|
|
|
|
|
|
|
|
|
|
|
|
|
|
|
|
|
|
|
|
|
|
|
|
|
|
|
|
|
|
|
|
|
|
|
|
Ampere Rating |
|
|
|
|
|
|
|
|
|
|
|
|
|
|
|
|
|
More than Not more than |
|
|
|
|
|
|
|
|
|
|
|
|
|
|
|
|
|
|
|
|
|
|
|
|
|
|
|
|
|
|
|
|
|
|
0-6 |
|
18 |
|
16 |
|
16 |
|
|
16 |
|
|
|
||||
|
6-10 |
|
18 |
|
16 |
|
14 |
|
|
14 |
|
|
|
||||
|
10-12 |
|
16 |
|
16 |
|
14 |
|
|
14 |
|
|
|
||||
|
|
12-16 |
|
14 |
|
12 |
|
|
|
|
|
|
|
|
|
|
|
|
|
|
|
|
Not recommended |
|
|||||||||||
|
|
|
|
|
|
|
|
|
|
|
|
|
|
|
|
|
|
TABLE 1
Method of securing extension cord
CORD |
APPLIANCE |
SET |
CORD |
(A) TIE CORD AS SHOWN |
(B) CONNECT PLUG AND |
|
RECEPTACLE |
FIG. 2
1
Do not force tool. The correct tools will do the job better and safer at the rate for which it is designed.
Disconnect the plug from the power source before making any adjustment, changing accessories, or storing the tool. Such preventive safety measures reduce the risk of starting the tool accidentally.
Store idle tools indoors. When not in use, tools should be stored indoors in dry, and high or locked-up lace, out of reach of children.
Maintain tools with care. Keep cutting tools sharp and clean for best performance and to reduce the risk of injury. Follow instructions for lubricating and changing accessories. Inspect tool cord periodically, and if damaged, have it repaired by an authorized service facility. Keep handling surface dry, clean, and free from oil and grease.
Check damaged parts. Before further use of the tool, a guard or other part that is damaged should be carefully checked to determine that it will operate properly and perform its intended function. check for alignment of moving parts, binding of moving parts, breakage of parts, mounting, and any other condition that may affect its operation. A guard or other part that is damaged should be properly repaired or replaced by an authorized service center unless indicated elsewhere in this manual.
WEAR YOUR
SAFETY GLASSES
AND DUST MASK
SPECIFICATIONS
Motor Input . . . . . . . . . .120V~,60Hz, 14Amp Hopper Size . . . . . . . . . . .394x270x200mm
. . . . . . . . . .(15-1/2”x10-5/8”x7-7/8”) No Load Speed . . . . . . . .2800R.P.M.
Net Weight . . . . . . . . . . .35Kg
PRECAUTIONS FOR USING TRISECTA
WARNING: Extreme caution should be taken to ensure shreddable material does not contain metal. Rocks, bottles. Cans or other foreign objects.
CAUTION! Do not allow hands or any other part of the body, or clothing to enter inside the feeding chambers or discharge chute, while machine is operating.
•Wear gloves while operating the machine.
•Before starting the machine, ensure that all screws and other fasteners are properly secured.
•Machine should be operated on firm level surfaces only.
•Before starting the machine, check that the cutting chamber is empty.
•Motor should be kept clean of debris and other accumulations.
•Keep all guards and deflections in good working condition.
•Stand clear of discharge chute at all times.
•Do not over reach and keep face and body back form the feed opening.
•Never pull the machine by the power cord and keep cord away form water or sharp edges.
•Disconnect the power cord when the machine is not in use.
WARNING! If machine should become clogged, switch off the motor, disconnect the power cord, make sure all moving parts are completely stopped before cleaning clogged debris.
WARNING! Ensure the power cord is always in good condition. A cord with broken insulation is extremely dangerous and can result in fire, electric shock or serious personal injury.
WARNING! The operation of any tools can result in foreign objects being thrown into your eyes, which can result in severe eye damage Before operating power tool, always wear safety goggles or safety glasses with side shields and a full face shield when needed. We recommend wide Vision Safety Mask for use over eyeglasses or standard safety glasses with side shields.
HOW TO ASSEMBLE YOUR TRISECTA
1.Push the large diameter section of the axle into the axle tube and secure the axle into position using the M8 x 40 hex screws and star washer.
(2 per side)
2.Push the wheel and then the 12mm flat washer over the axle.
3.Push the split pin through the hole in the end of the axle and bend the ends over using pliers.
4.Fix on wheel covers.
Fig. 1
HOPPER (FIG.2) Place the hopper on top of the feed tube and align the fixing holes. Secure with the safety set screws.
Fig. 2
MAINTENANCE
Your Trisecta has been designed for a low level of maintenance, involving routine cleaning and inspection. The motor of the Trisecta is maintenance free and requires no attention. For the best results the blades must be kept sharp at all times. The blades have dramatically less cutting power when blunt. The Trisecta will tear rather than cut when the blades are blunt. When this occurs rotate the double sided blades or replace the blades immediately.
2
WARNING! Before attempting any maintenance switch the machine off and disconnect the power cord.
V-CUTTER MAINTENANCE
•Switch the machine off and disconnect the power cord ensuring all moving parts are completely stopped.
•Wear gloves when attempting any maintenance to the cutting blades.
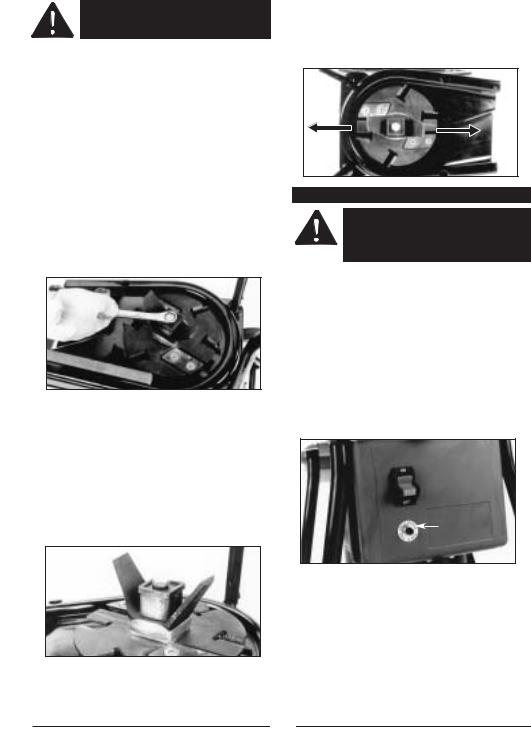
JAMMING if blades become jammed rotate knob under motor. If blades can not be worked loose refer to disassembly instructions (Item1) and then remove obstruction.
DISASSEMBLY
1.Loosen caging knobs and remove the top cover assembly.
2.Rotate the cutter base anti clockwise and place a piece of wood between the cutter base and cutting chamber wall so as to stop the cutting base retating. (Fig 3)
3.Remove the center hold down bolt by turning it anti clockwise using a 17mm spanner.
4.Remove the square washer, square bush, V-cutter to expose cutter base.
Fig. 3
SHREDDING BLADES MAINTENANCE
To inspect or renew the double sided shredding blades there is no need to remove the cutter base. To remove simply undo the counter sunk screws with the 6mm hex wrench supplied with the machine and turn them through 180 These blades are double ground and can be used on both sides. When blunt on both sides renew and ensure they are screwed in tightly.
ASSEMBLY This is carried out in the reverse sequence to that of disassembly but with careful inspection of all components. Ensure that cutter base is assembled with the scraping plates facing down towards the motor and that the spring washer is situated under the head of the centre hold down bolt. (Fig 4)
Fig. 4
Before replacing the top cover assembly ensure that the V-cutter is positioned as shown in (Fig.5) Replace the top cover assembly and secure tightly the caging knobs. If caging Knobs are not tight the motor will not start due to the motor lock out switch not being
activated.
CLEANING After use, always wipe clean the outside of the Trisecta to remove any build up of material with a damp cloth. Clean the inside of the cutting chamber and remove any left over material, Do not hose down with water.
Fig. 5
OPERATION
CAUTION! Read and understand the safety instructions in this owners manual before using your Trisecta. Failure to comply can result in accidents involving fire, electric shock, or serious personal injury.
•Connect the Trisecta to a suitable power outlet.
•To start and stop the Trisecta, depress the switch located at the rear of the Motor (Fig 6)
OVERLOAD PROTECTION AND MOTOR
JAMMING If overfeeding clogs the machine the overload protection switch may cut out the motor. To restart, firstly switch the machine off and disconnect the power cord.
Loosen caging knobs and remove top cover assembly, then remove any clogged debris from the cutting chamber. If the top cover assembly becomes jammed and will not lift off, turn the V-cutter by pushing a piece of wood through the back chute of the top hopper to rotate the V-cutter to enable the top cover assembly to be removed. Reset motor overload protection switch (Fig 6)
Fig. 6
 ON-OFF Switch
Overload protection switch
IMPORTANT: Before replacing top cover assembly ensure that the V-cutter is positioned as shown in (Fig 5).
Replace the top cover assembly together with the top cover screw knob ensuring this is tight. If the top cover screw knob is not tight the motor will not start due to the motor lock out switch not being activated.
ATTACHING MULCH BAG Place a heavy duty trash bag using the mulch bag strap. (Fig 7)
3

Fig. 7
TOP HOPPER-FRONT CHUT The large sloping front chute of the Top Hopper is designed to accept leaves and small garden clippings. Shredding and mulching is achieved by natural suction of the debris through the blade chamber.
Do not overfeed and do not feed wet, soggy material into the Trisecta as this may clog the blade chamber and the discharge chute. (Fig 8)
Fig. 8
TOPHOPPER-BLACK CHUTE The smaller back chute of the top Hopper accepts medium to larger size garden clippings.
Shredding and mulching is achieved through the same action as the front chute. If a finer type mulch is required than is initially achieved, re-feed the mulch through again until the desired result is obtained. (Fig 9).
Do not feed solid branches through the two Top Hopper chutes.
Fig. 9
SIDE CHUTE The elongated chute located at the rear of the machine is specially designed to accept solid garden clippings and branches up to 1-1/2" (38mm) in diameter.
IMPORTANT: When feeding long, large diameter material, control the rate of feed by pulling back on the material so as not to stall or overload the motor. (Fig 10)
WARNING!Do not under any circumstances, place hands inside the geeding chutes while the machine is operation. Force feeding of debris is not necessary due to the natural suction action of the trisecta.
Fig. 10
UNPACKING
1.Carefully remove all parts from the shipping carton.
2.Do not discard material until you have identified all the parts using the parts list.
3.If all parts have been included proceed to assembly.
4.If you are missing a parts, contact the retailer you purchased it form before attempting to assemble your Trisecta.
5.Examine all the parts to make sure no break age has occurred during shipping. Any damaged part should be replaced before attempting to use the Trisecta.
LOOSE PARTS LIST
Assemble the following parts in accordance with the instructions on the following pages.
•Hopper Assembly
•Connecting Tube Assembly
•Hex Wrench
•5 Safety Set Screws M5 X 15
•2 Split Pins
•2 Wheels
•2 Flat Washers 12mm
•2 Hex Screws M8 X 40
•2 Flat Washers 8mm
•2 Spring Washers 8mm
•2 Wheel Covers
4
 Loading...