

Page 1

Page 2
Page 3
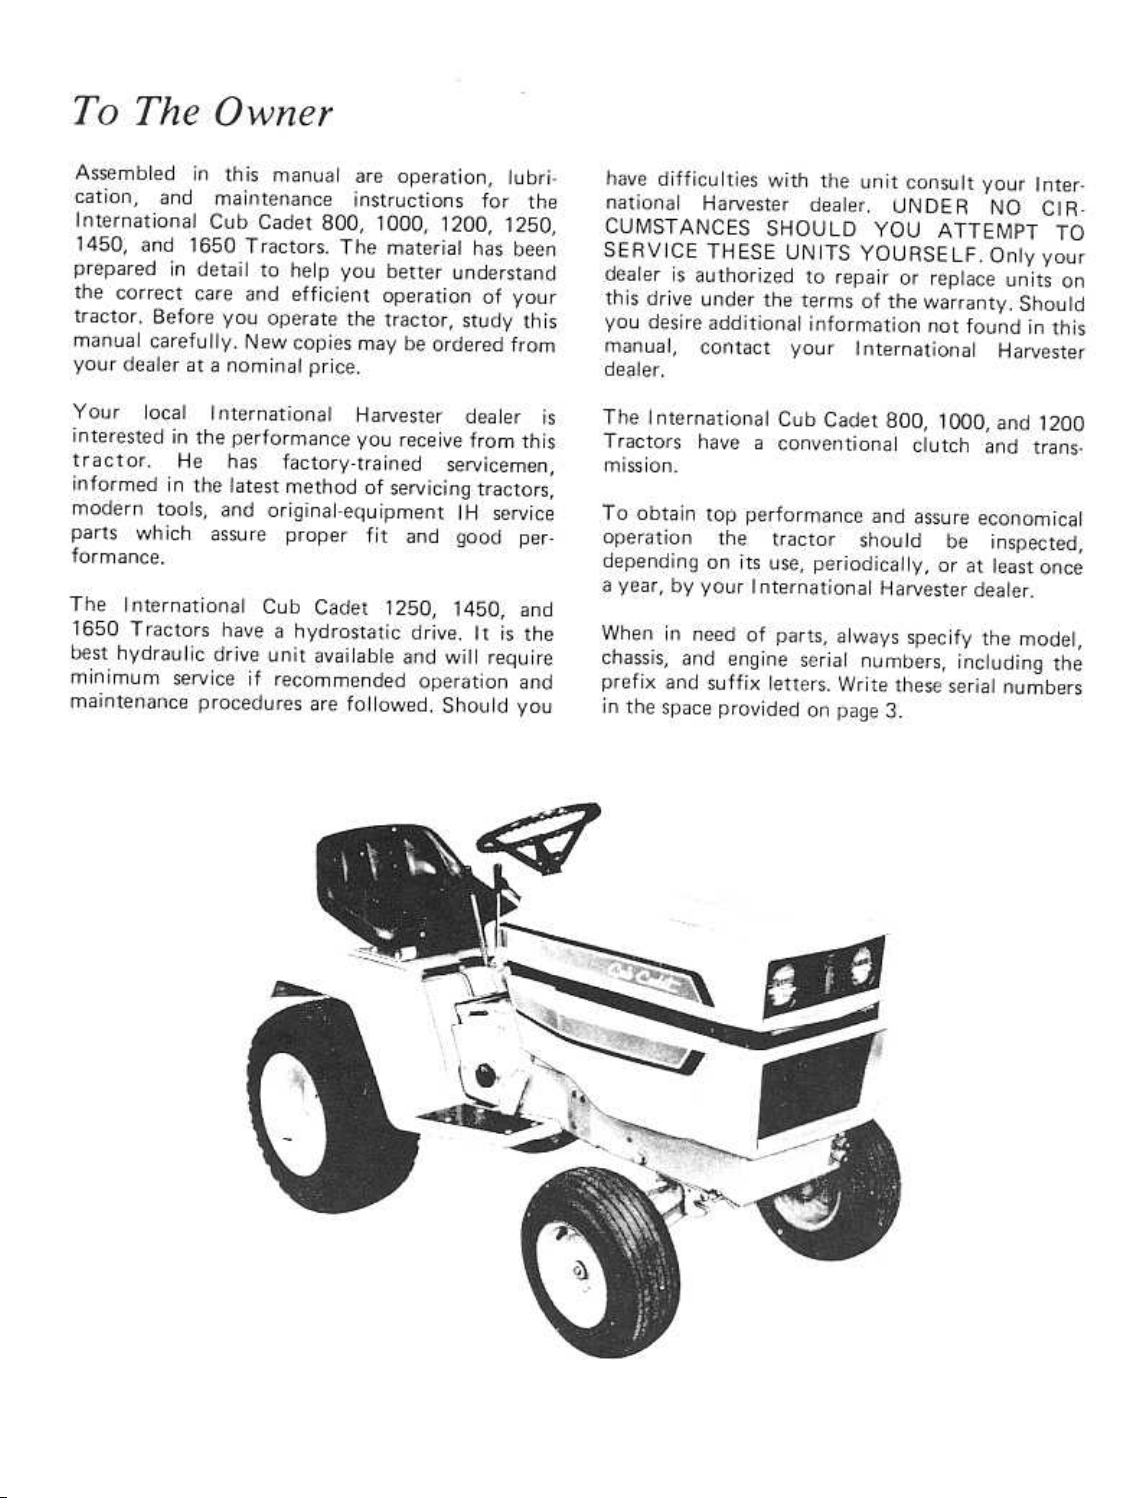
THE OWNER
DELIVERY SERVICE
SERVICE MANUAL INFORMATION
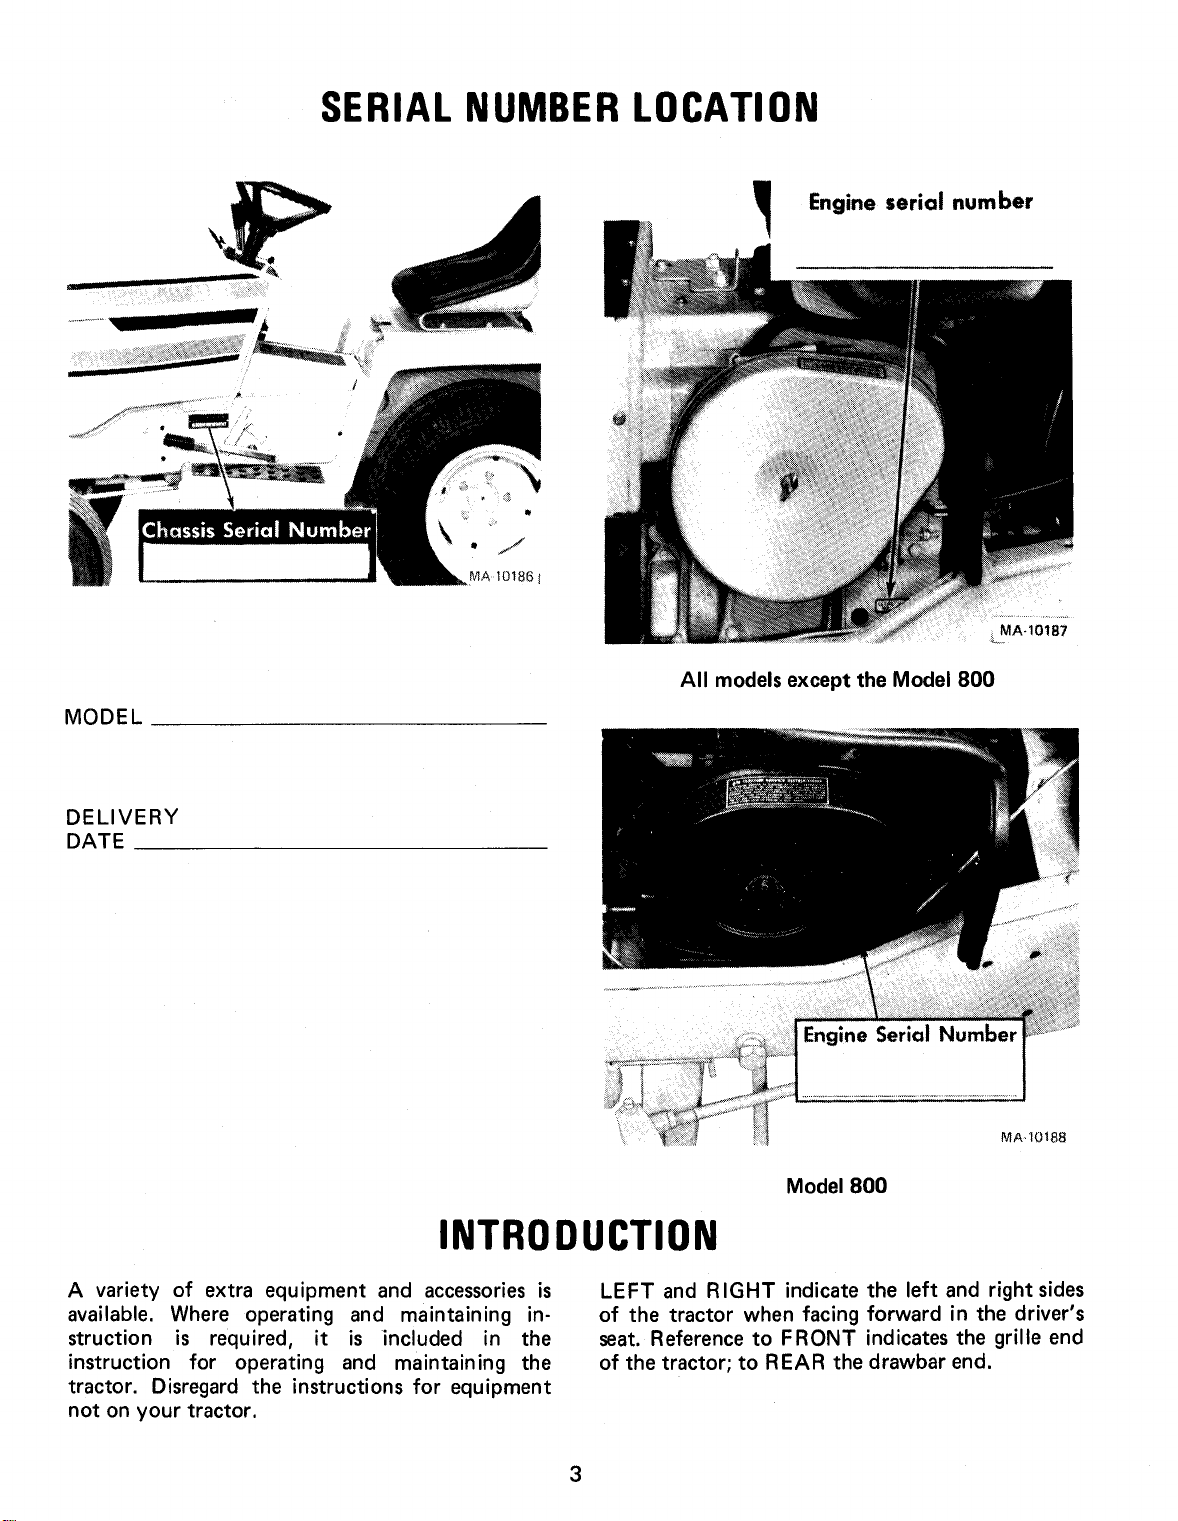
SER1AL NUMBER LOCATION
nside Cover
1,2
3
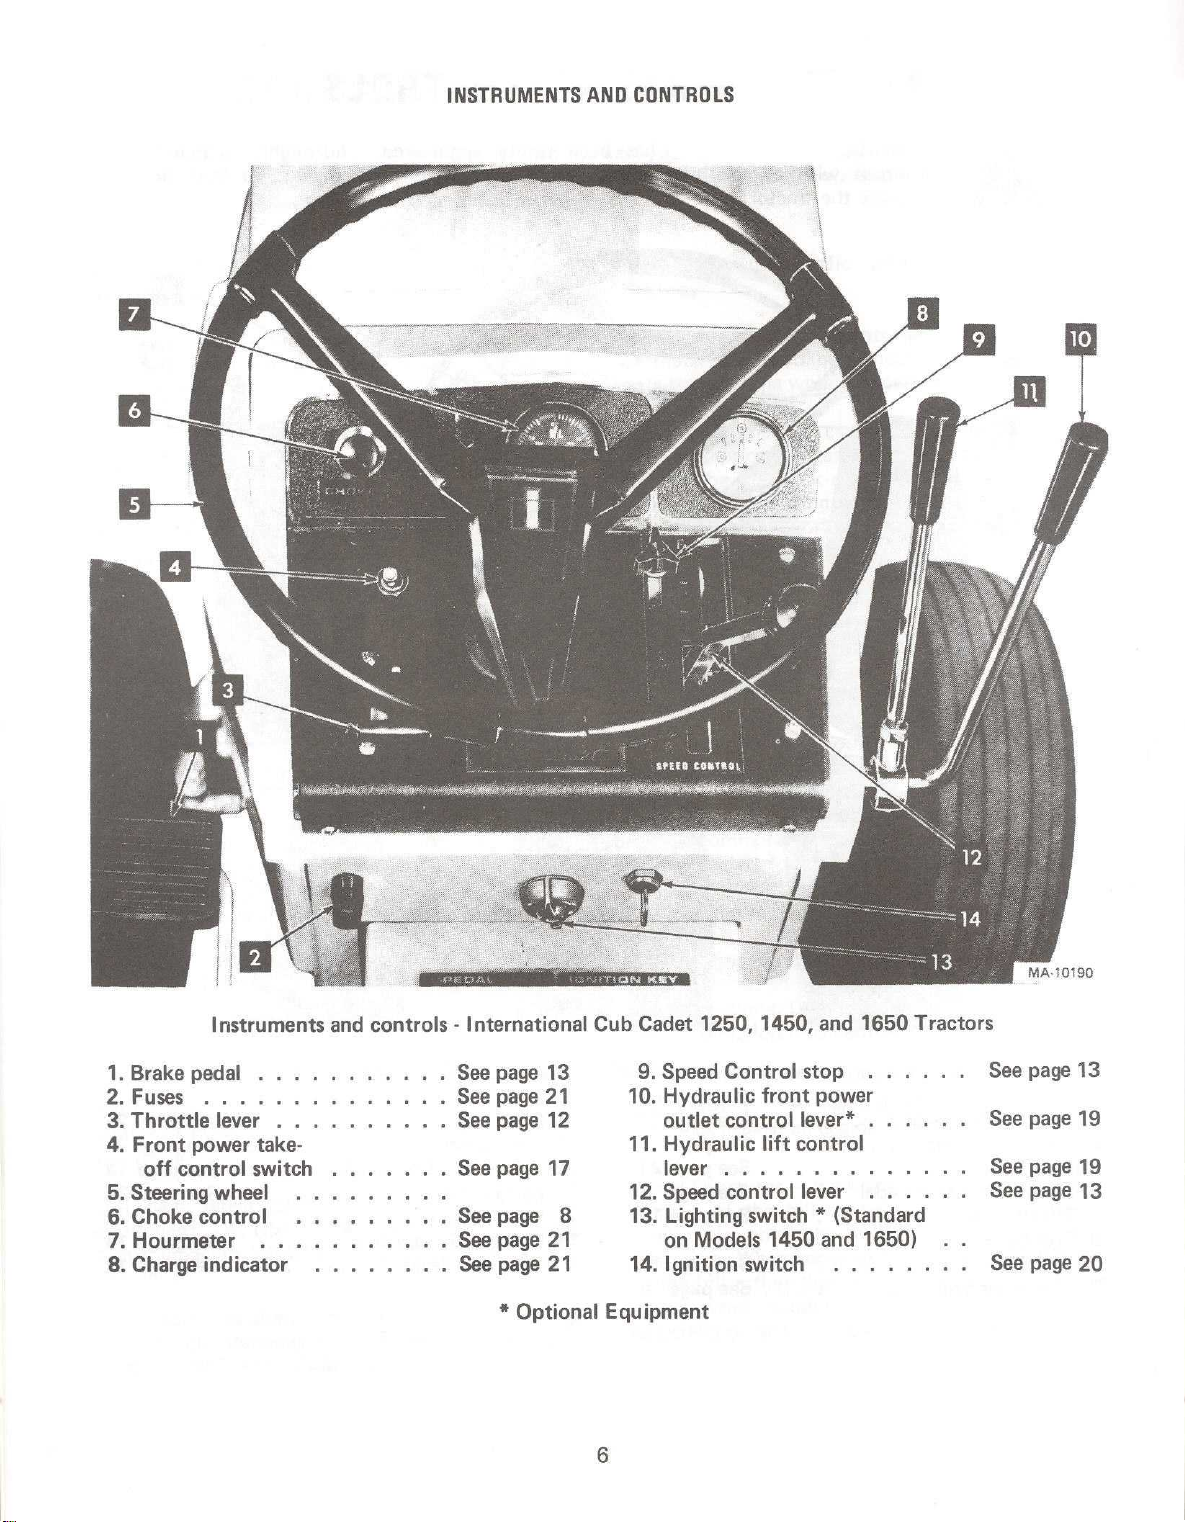
I nternational Cub Cadet 1250, 1450,
and 1650 Tractors
Brake pedal
Speed control lever
Starting the tractor
Release lever
Stopping,the tractor
EGUIPME'NT LIFT HANDLE
14
INTRODUCTION
WO'RK SAFELY-FOllOW THESE
RULES
INSTRUMENTS AND CONTROLS
aEFOREOPERATING YOUR NEW
TRACTQ,R:
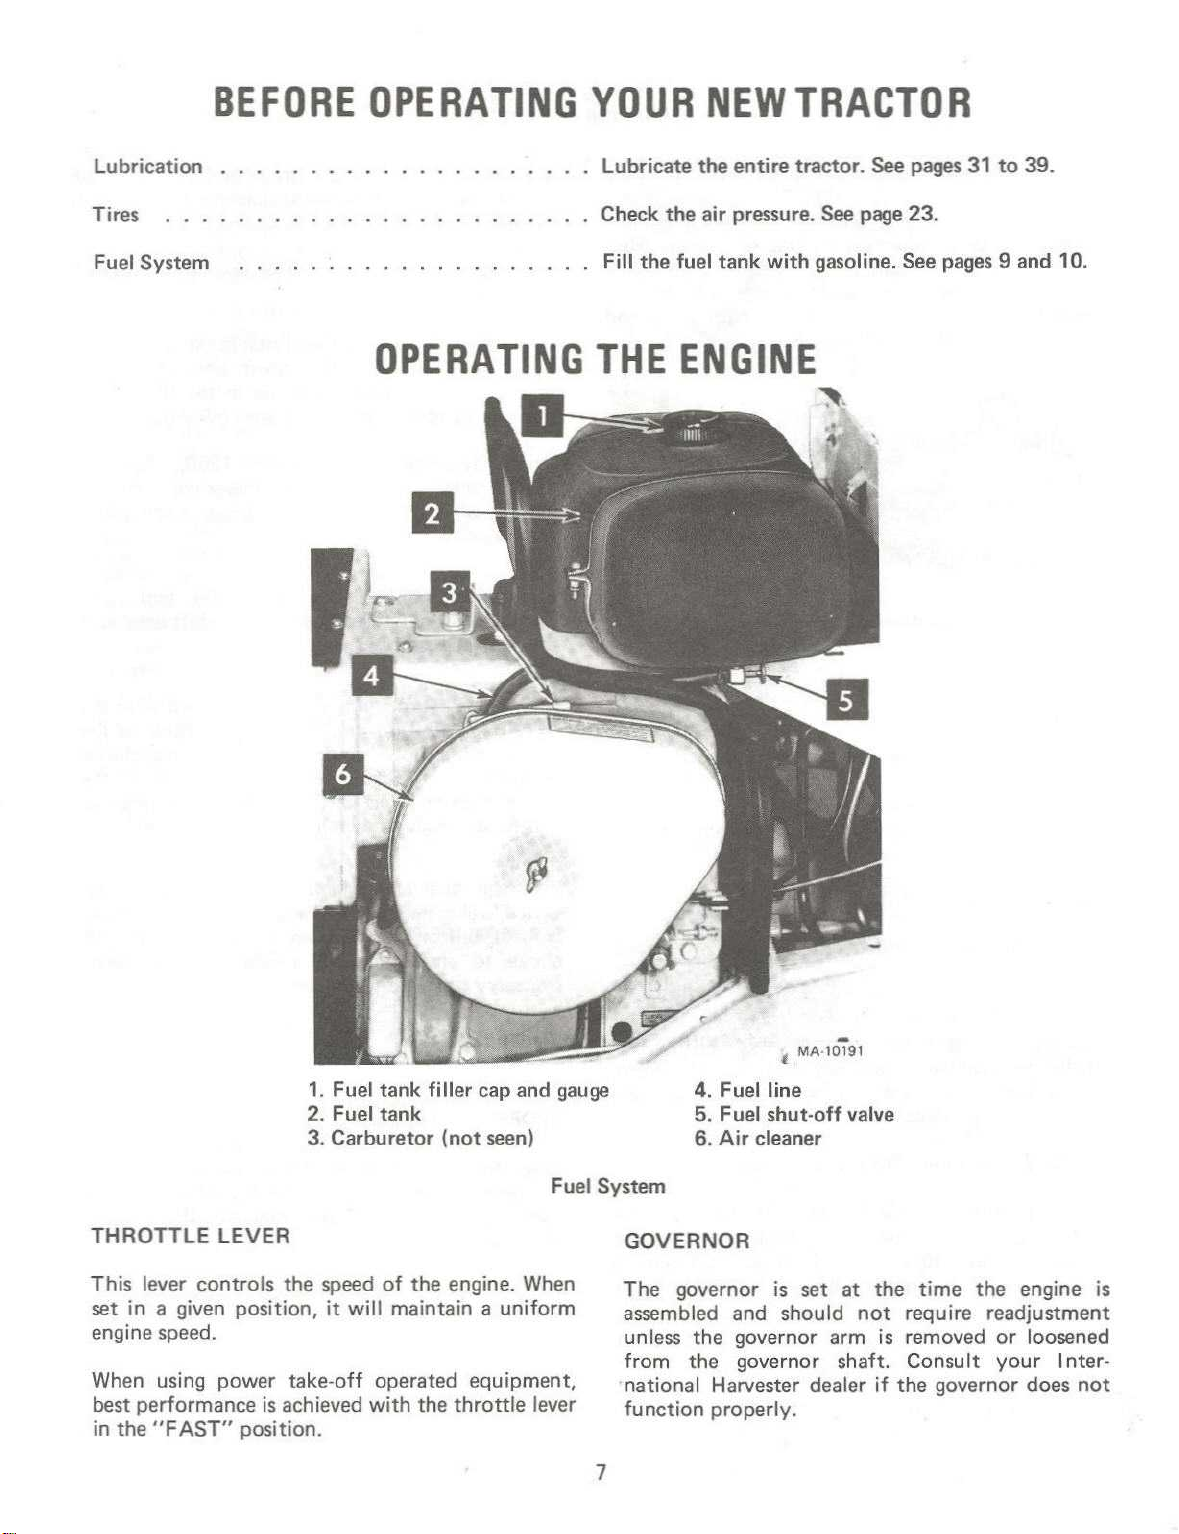
OPERATING THE ENGINE
Throttle lever
Governor
Lifting, the hood
Starting the engine
Stopping the engine
FUEL SYSTEM
Fuel shut-c.ff valve
Carburetor adjustments
4
5,6
7
7,8:
9 10
,
Height adjustment
HITCHING EOU1PMENT TO THE
TRACTO'R
0 raw bar
Three-point hitch
REAR POWER TAKE-OFF
0 peratrng the rear power
take-off wrth the tractor
standing sti II
Operating the rear power
take-off with the tractor
in motion
FRONT POWER TAKE-OFF
Operating the front power
take-off clutch
Adjusting the power take-off
clutch
15
17
THE TRACTOR
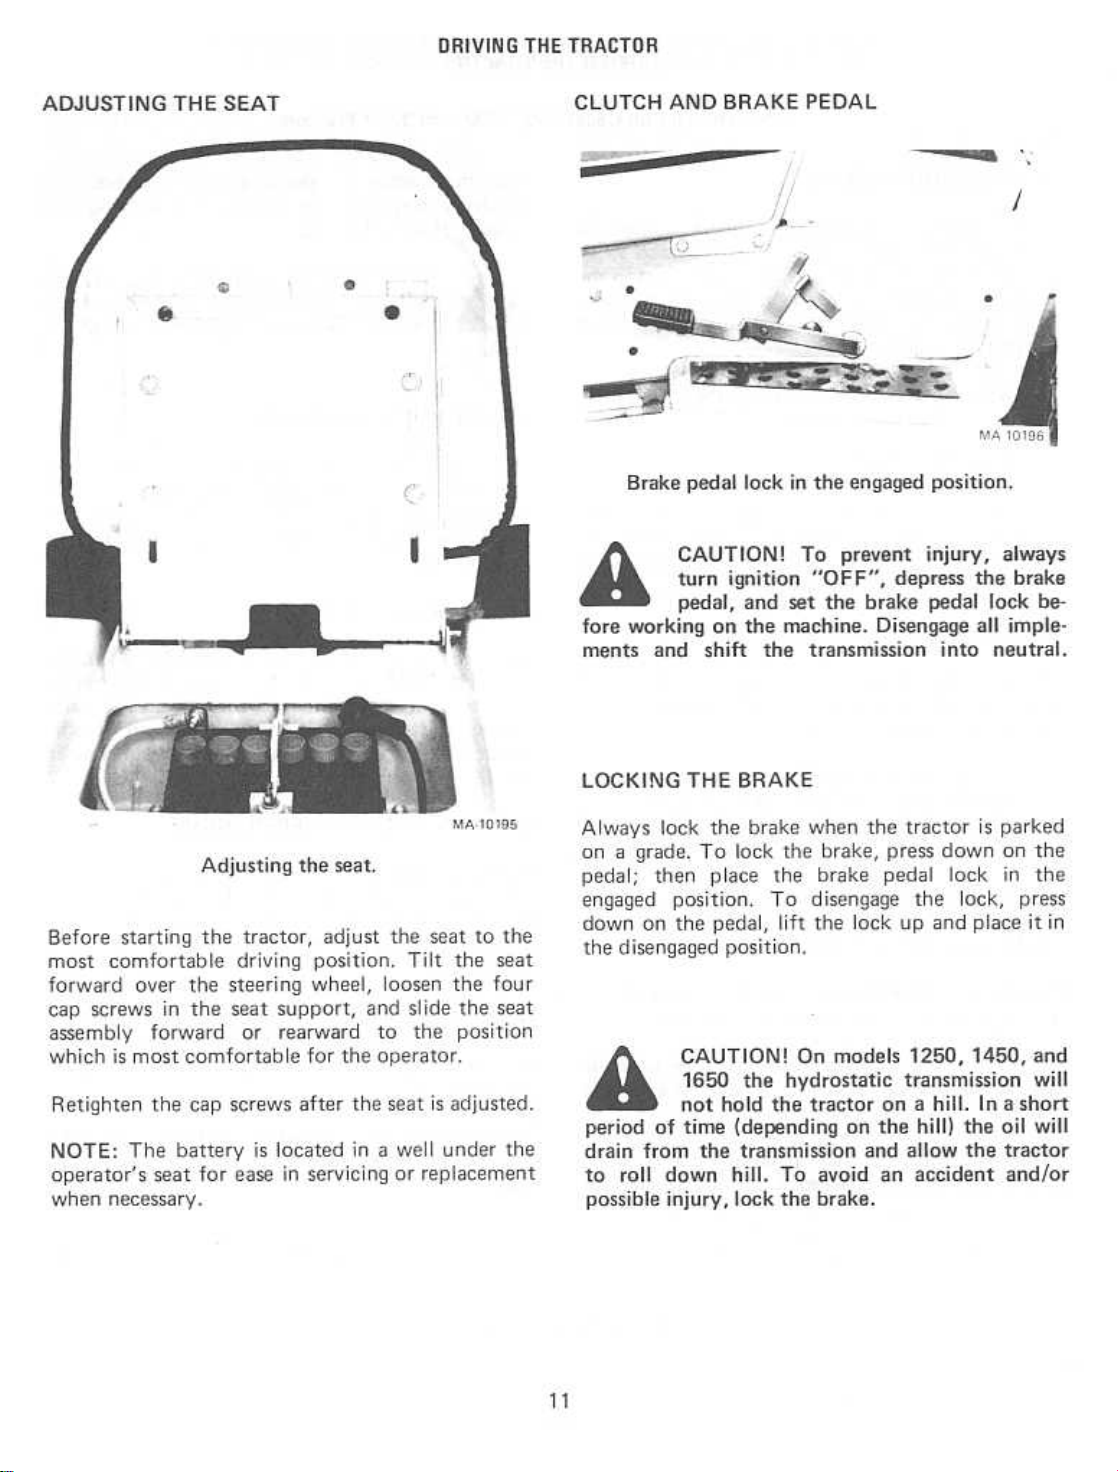
Adjusting the seat
Clutch and brake pedal
Locking the brake
International Cub Cadet ROO, 1000,
and 1200 Tractors
Clutch-brake pedal
Gearshift lever
Starting the tractor
Stopping the tractor
Creeper shift lever
Operating the creeper drive
TO
I
CONTENTS
3
16
DRIVING
10 to 14
ELECTRIC LIFT
HYDRAULIC LIFT
ENGINE COOLING AND AI R
CLEANER
Engine cooling
Dry type air cleaner
17, 18
19
20
Page 4
CONTENTS
ELECTRICAL SYSTEM
Ignition swrtch
Safety starting switch
Charge indicator
Hour meter
Spark plug
Motor generator
Motor generator belt
lights
Fuse
TIRES
Rear tires
Care of tires
Inflation
Operating pressure for tires
Mounting tires on the rim
Rear wheel weights
Tire chains
Overloading
23
STORING THE TRACTOR20 to 22
Removing from storage
EXTRA EOU1PMENT AN D
ACCESSO R 1 ES
TROUBLE SHOOTING
LUBRICATION
LUBRICATION TABLE
LUBRICATION GUIDE
I nternational Cub Cadet 800,
1000 and 1200 Tractors
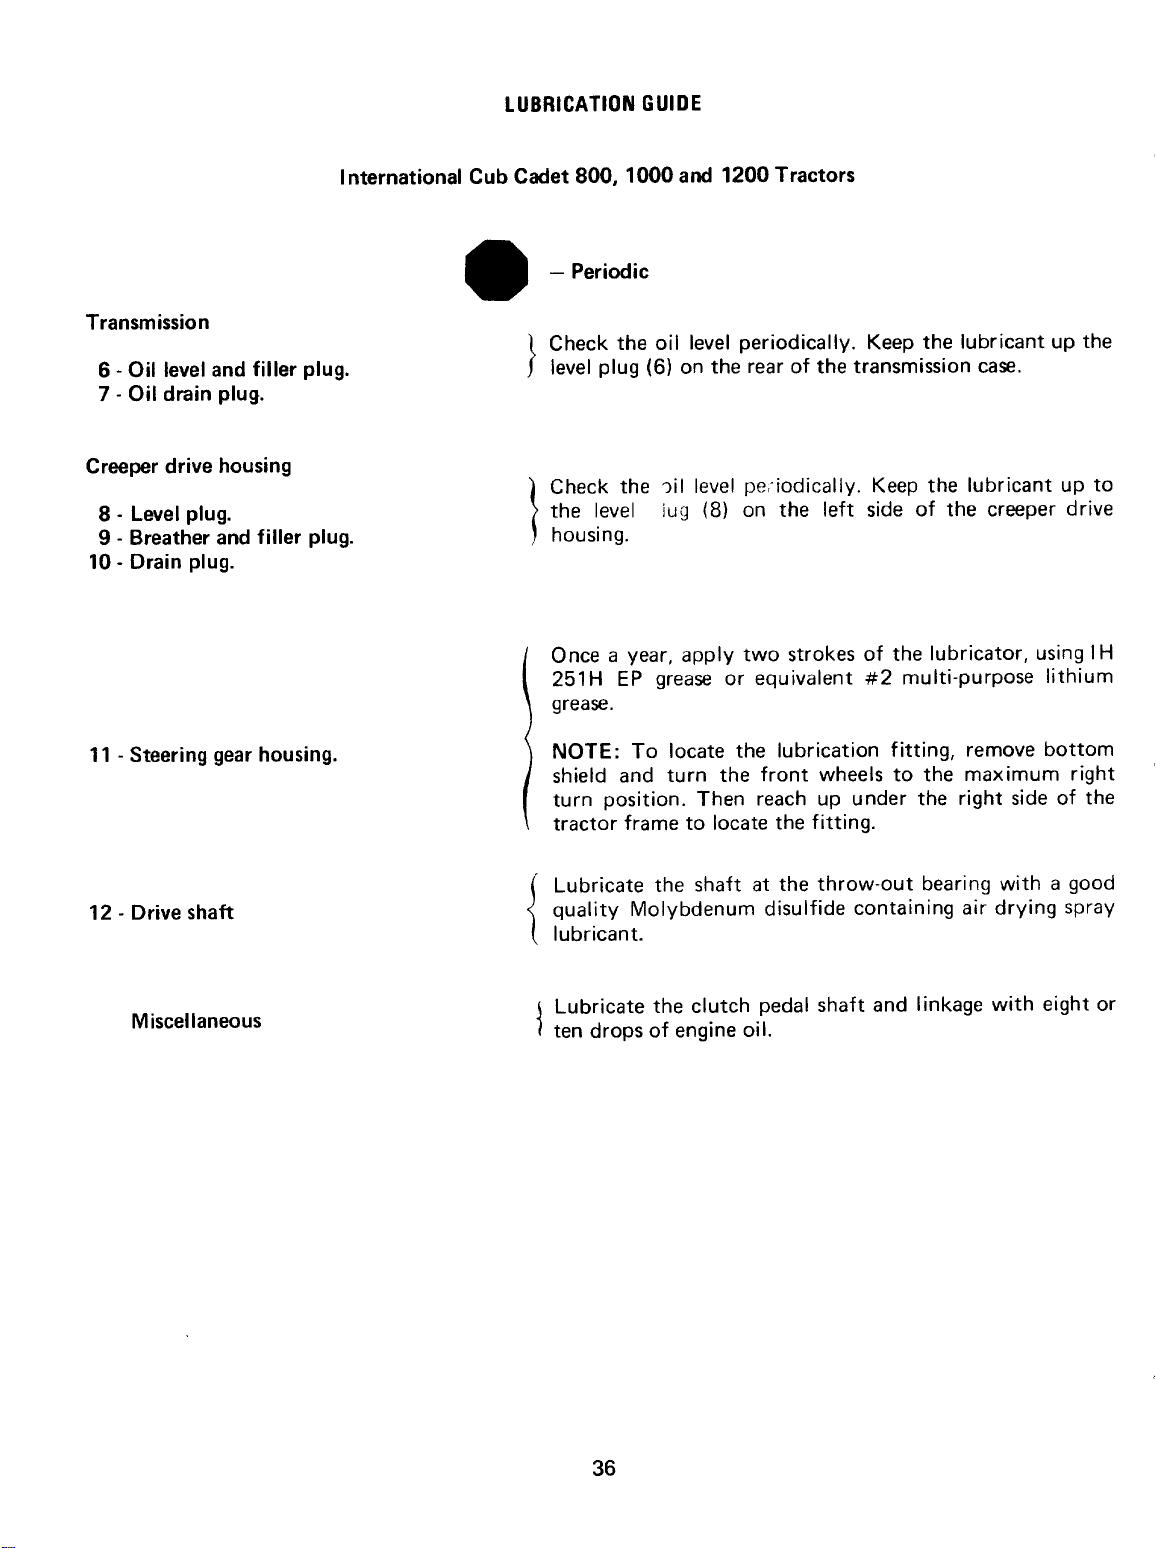
LUBRICATION GUIDE
I nternational Cub Cadet 1250,
1450 and 1650 Tractors
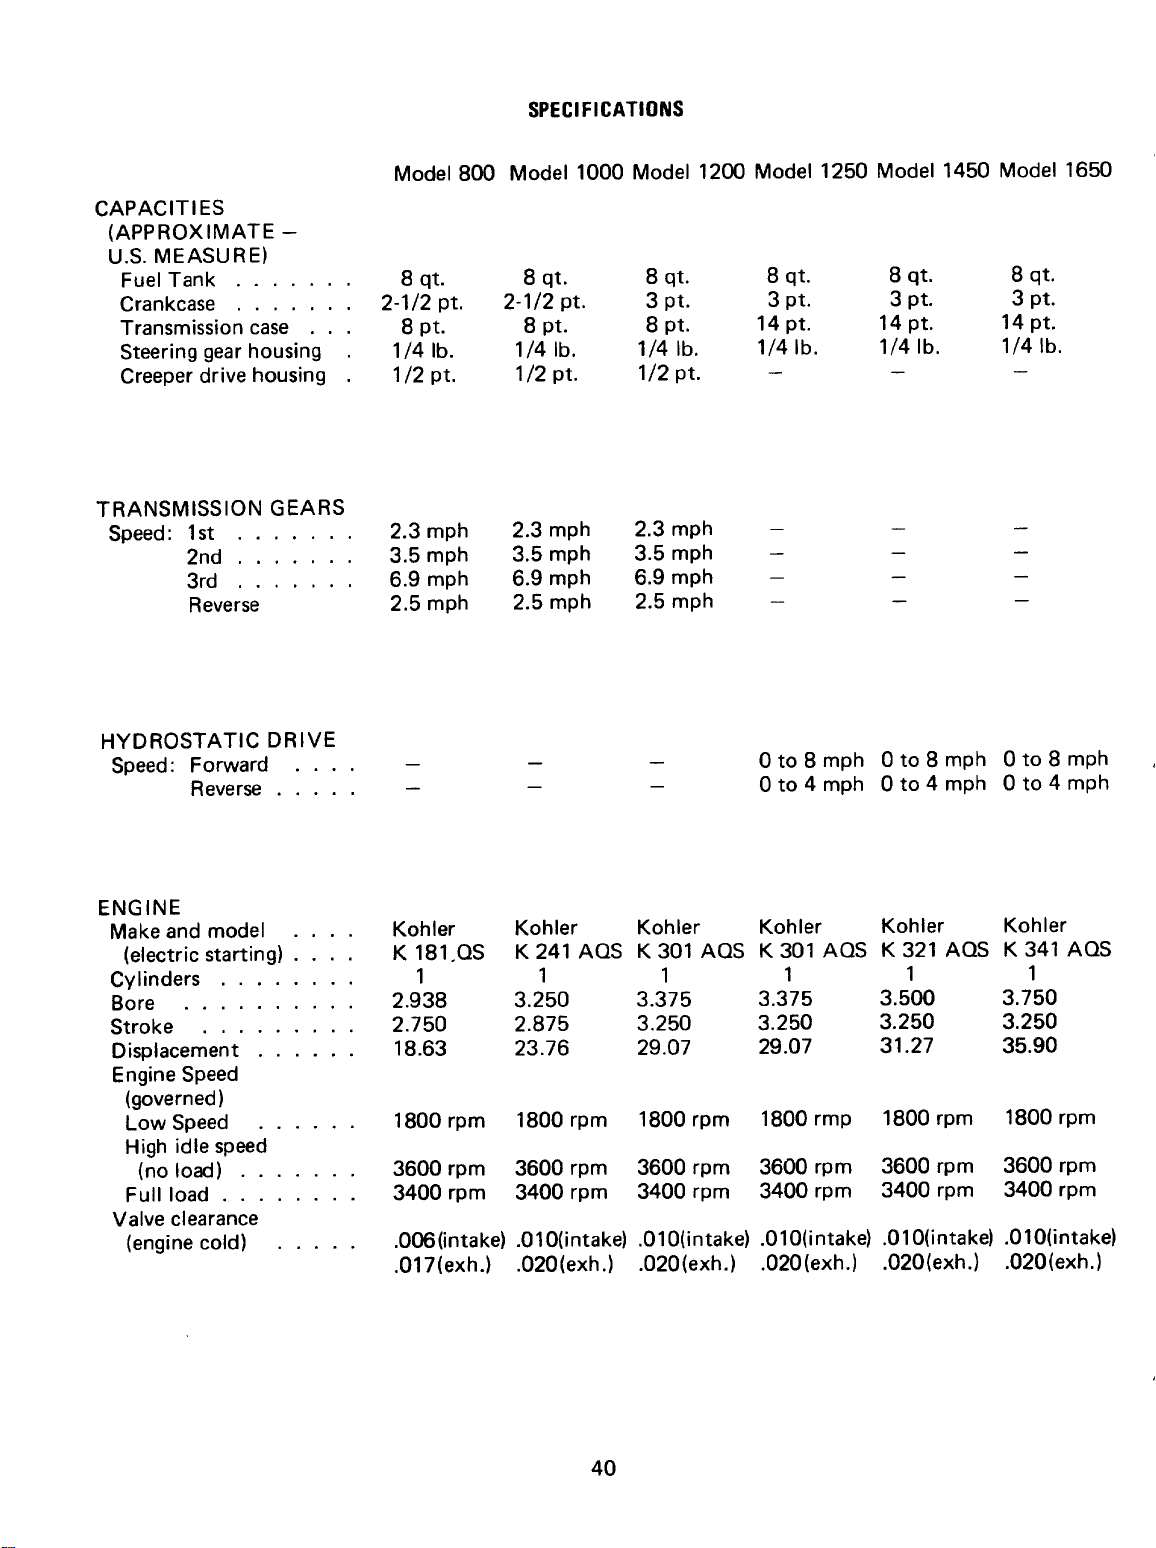
SPECIFICATIONS
28
29
29,30
31,32
33
34 to 36
37 to 39
39 to 42
FRONT WHEELS
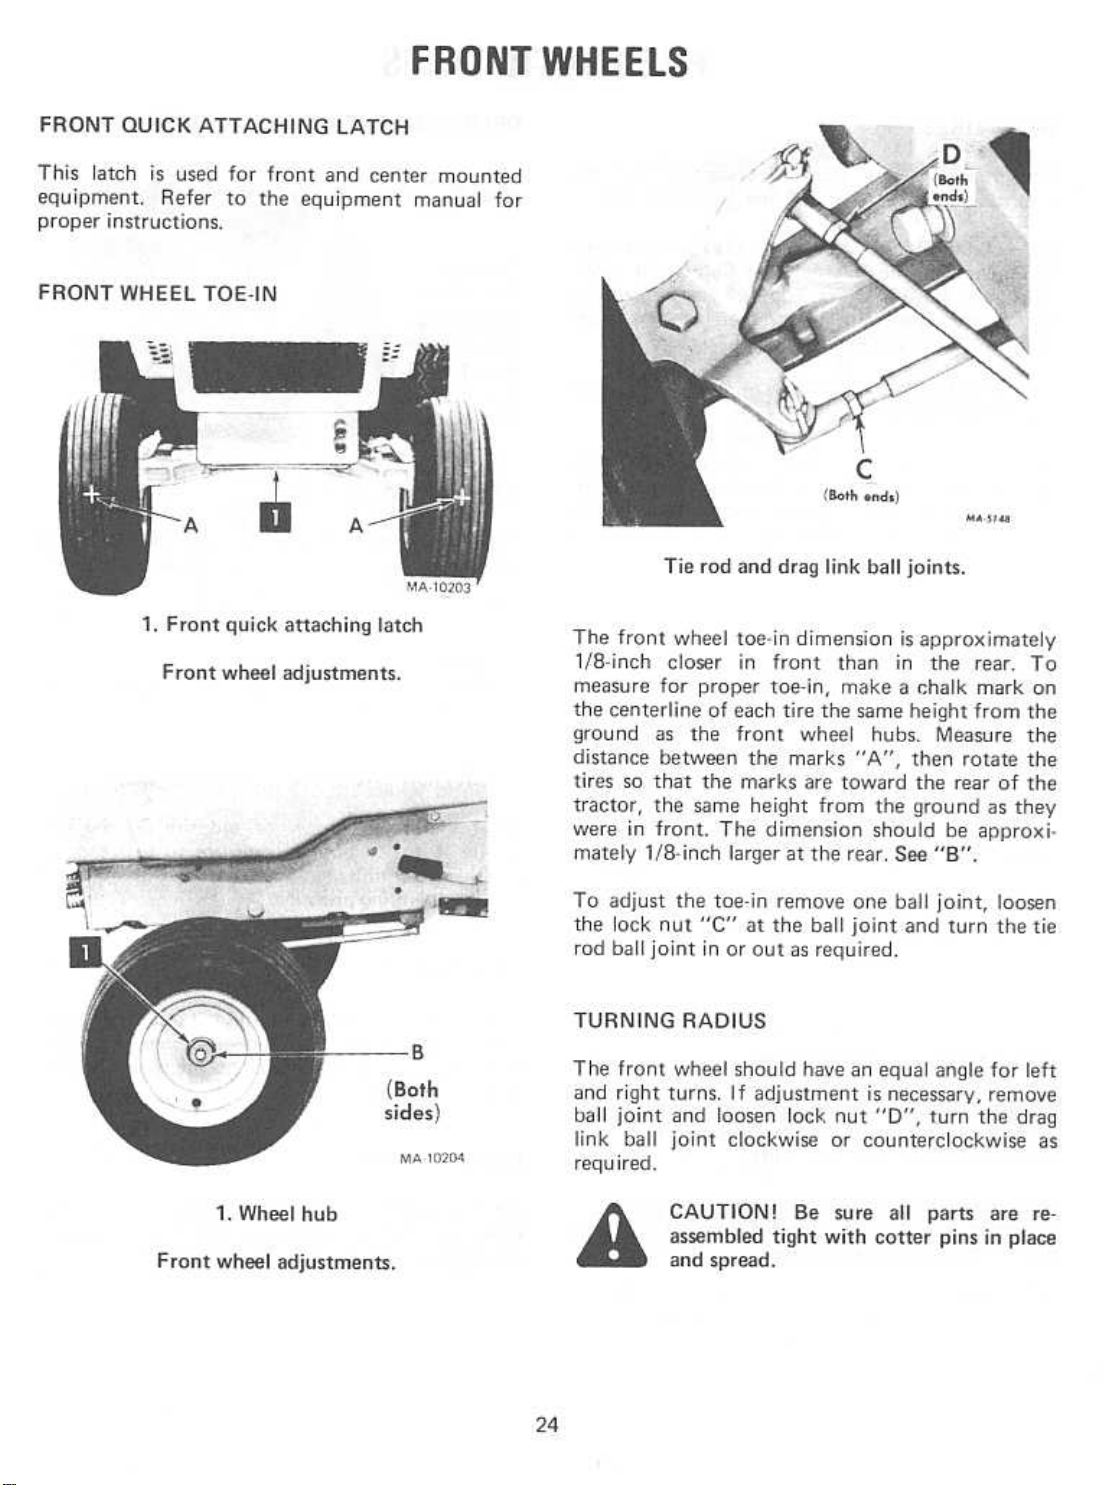
Front quick attaching latch
Front wheel toe-in
Turning radius
CLUTCH-BRAKE
I nternational Cub Cadet 800, 1000,
and 1200 Tractors
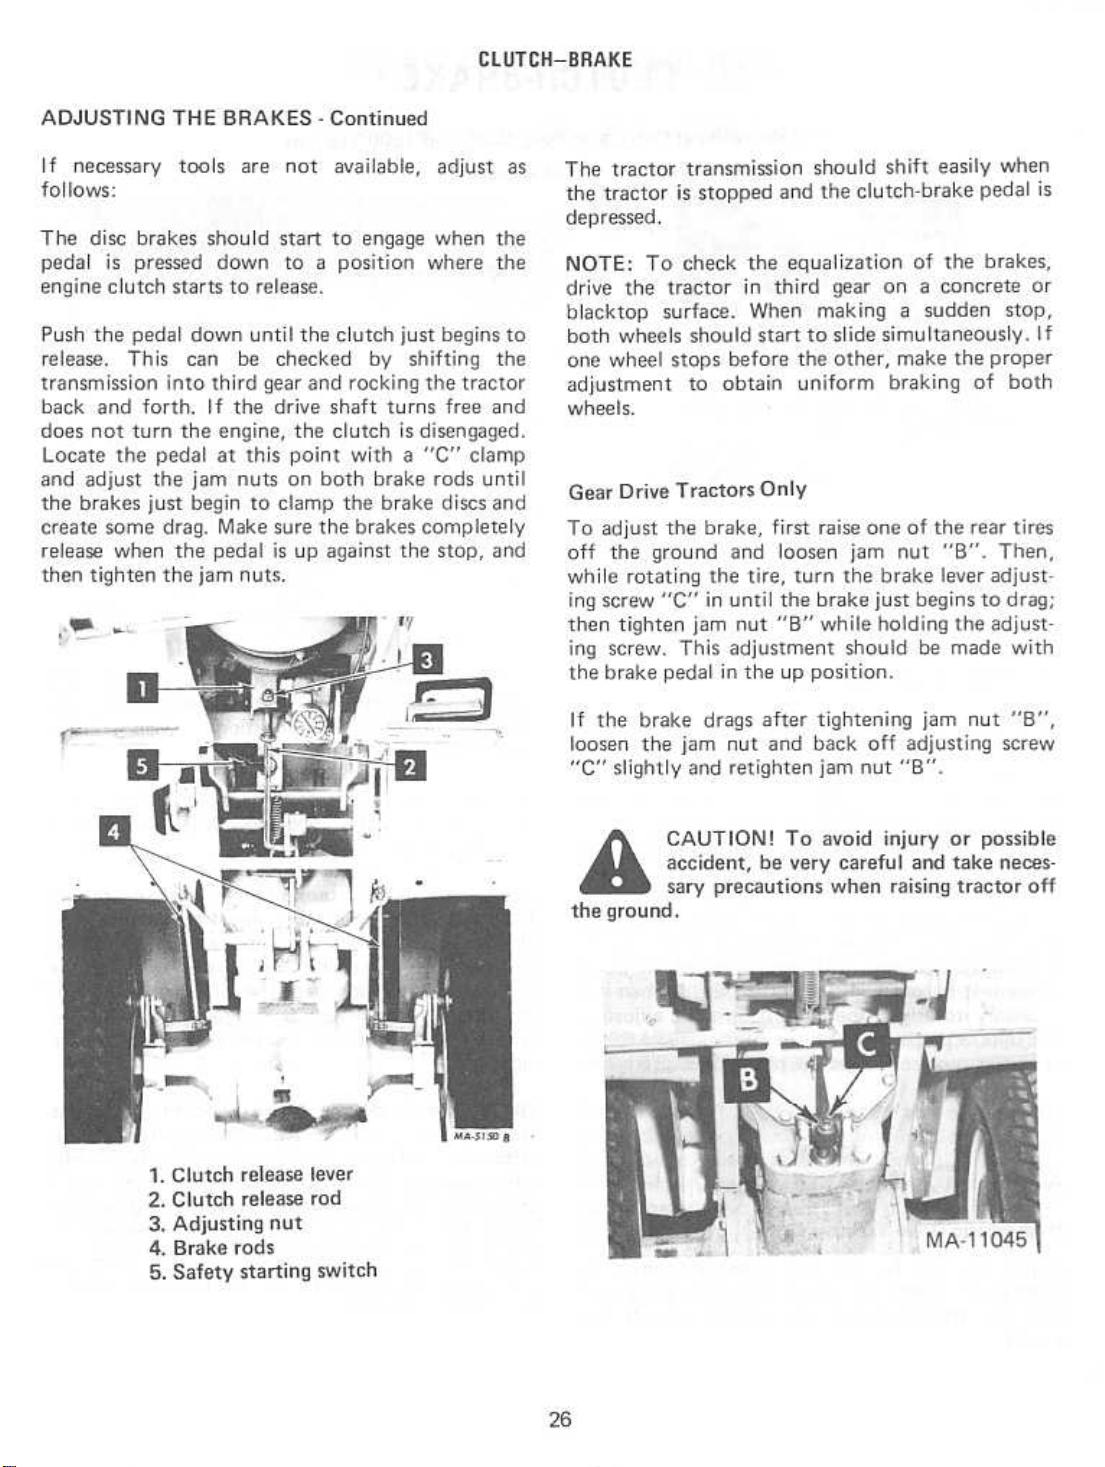
Adjusting the clutch
Adjusting the brakes
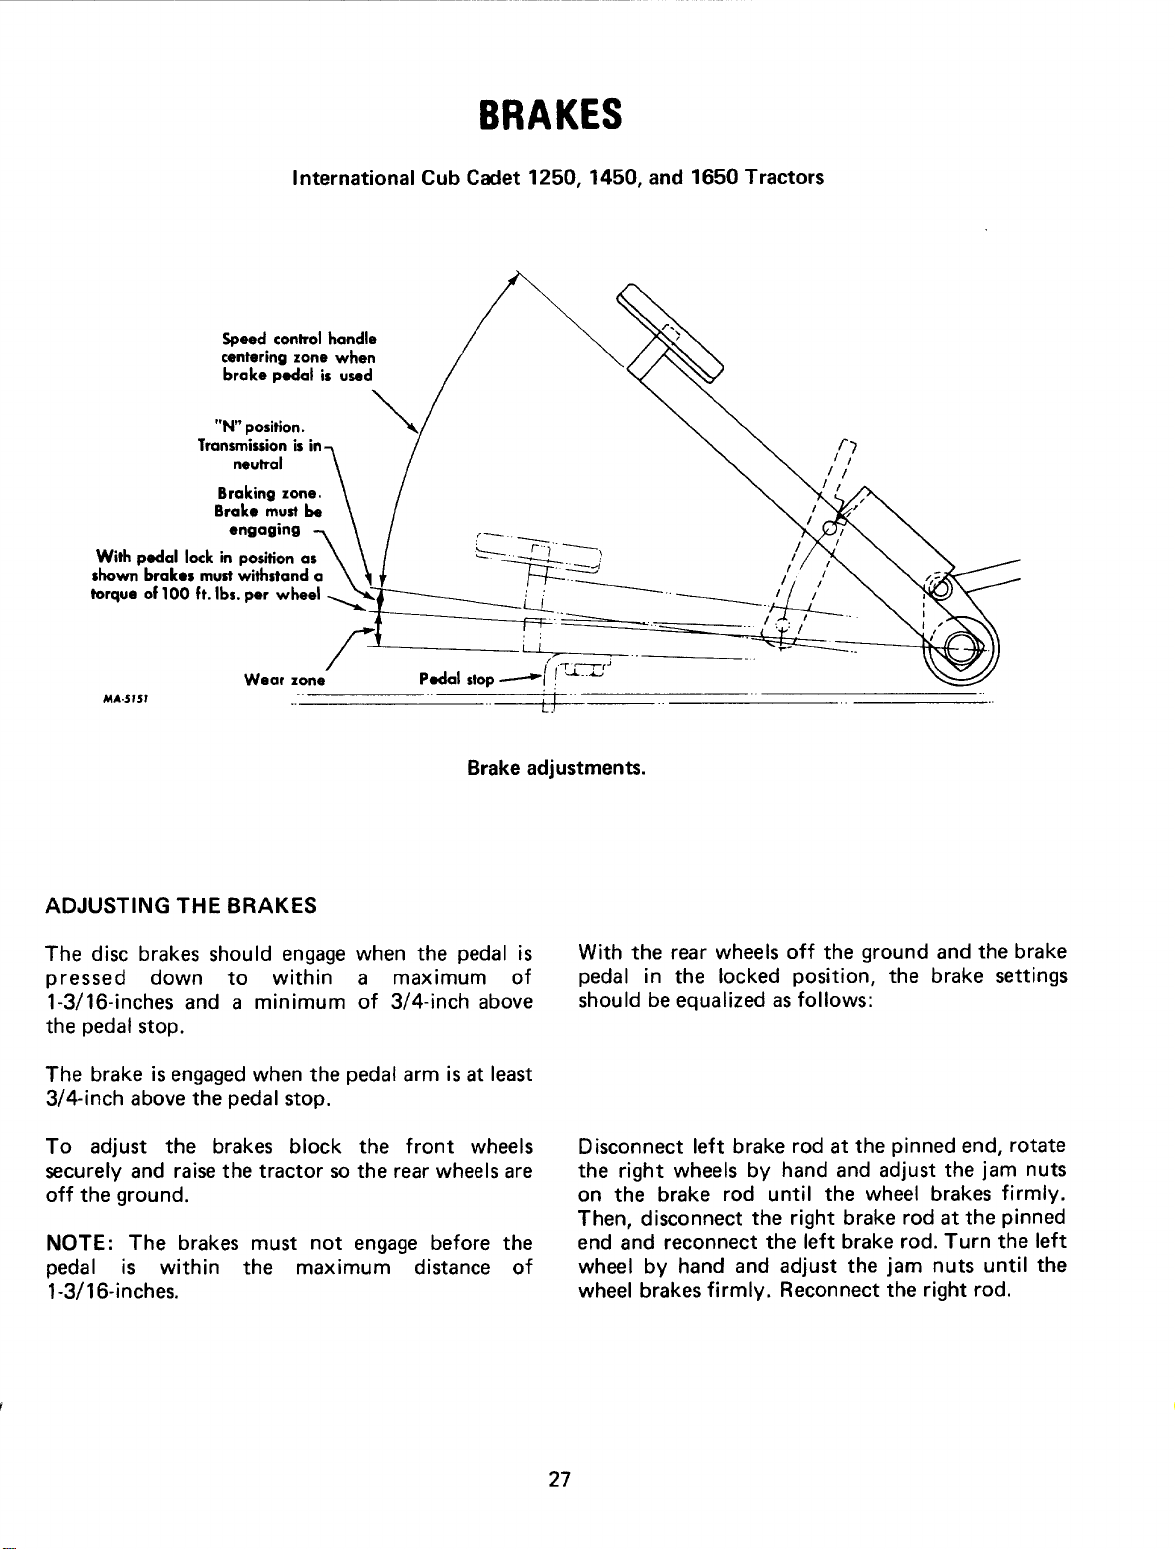
BRAKES
nternational Cub Cadet 1250, 1450
and 1650 Tractors
Adjusting the brakes
24
25,26
27
PNEUMATIC
I
-2-
Page 5
Page 6
This symbol is used to call your attention to instructions
concerning your personal safety. Be sure to observe and
following these instructions.
Disengage all clutches and shift into neutral beforestarting
the engine.
To avoid injury, disengage power to any attachments and stop engine before leaving operator',s
seat or making any repairs or adjustments.
Know the controls and how m stop quickly.
READ THE OPERATOR'S MANUAL.
To avoid an accident or injury, do not allow
children or adults to operate the equipment
without proper instruction.
Clear work area of objects which might be p.icked
up and thrown.
Disengage power to any attachment when transporting or not in use.
To prevent injury, do not carry passengers or give
rides. Keep children, pets, and by-standers a safe
distance away.
To prevent an accident, always disengage the
power take-off, shift transmission into neutral, set
the parking brake, stop the engine, and remove
ignition key when leaving the machine unattended.
Watch out for traffic when crossing or near
roadways.
When using any attachments, never direct discharge
of material toward by-standers nor allow anyone
near the machine while in operation.
Handle gasoline wfth care -it is highly flammable: -
A. Use approved gaso1ine container. B. Never
remove the fuel tank cap or fiJ1 the fuel tank when
the engine is running, is hot, or indoors. Also, do
not smoke when working around inflammable fuel.
Wipe up spilled gasoline. C. Replace gasoline cap
securely.
During operation do not run the engine in confined
area such as storage building any longer than is
necessary for immediate moving of the tractor'outside
into the air.
Keep machine in good operating condition and
keep safety devices in place. Use guards or shields
as instructed in Operator's Manual
1t is recommended that the machine be stopped
and inspected for damage after striking a foreign
object and that any damage be repaired before
restarting and operating the machine.
Reduce speed on slopes and in sharp turns to
prevent tipping or loss of control.
Stay alert for holes in terrain and other hidden
hazards.
Before backing the tractor, always look for obstacles or bystanders in the area where the tractor
will move.
Use care when pulling loads or using heavy
equipment: -A. Use only approved hitch points. B.
Limit loads to those you can safely control. C.
Don't turn too sharp, and use care when backing.
D. Use counterweight or wheel weights when
suggested in Operator's Manual.
Always turn ignition "OFF", depress the brake
pedal, and set the brake pedal lock before working
on the machine. Disengage all implements and shift
the transmission into neutral.
REMEMBER -A careful operator is the best
insurance against an accident.
Avoid Overturns -Back the tractor up the steepest
portion of the hill to be mowed! If the tractor
cannot do this, the hill is too steep for safe
operation. When mowing hills, cut down the face
of the hill rather than across to avoid side tipping.
Also, avoid sudden starts, stops, and turns,
especially on steep slopes to avoid an upset.
4
Page 7

Page 8
Page 9
Page 10

Page 11
Page 12
FUEL SYSTEM
CARBURETOR ADJUSTMENTS -Continued
NOTE: To prevent possible damage to the carburetor needles, be very careful closing the carburetor
needles before basic adjustments are made. Im-
proper adjustment of the carburetor may result in
engine damage.
Adjusting the High-Speed Adjustment Screw
Turn the high speed adjustment screw counterclockwise approximately two turns from the closed
position and start the engine.
Be sure the choke is fully open (knob fully in)
when adjusting.
After the engine has reached normal operating
temperature, place the throttle lever in the fast
position and turn the high speed adjustment screw
clockwise to the leanest mixture that will allow
satisfactory acceleration and steady governor
operation. Then, turn counterclockwise to the
richest mixture that allows satisfactory operation.
The difference between the rich and lean points is
about 1/2 turn. Set the mixture to the rich end of
this range.
If the engine misses and backfires under load, the
high speed mixture is too lean. The high speed
adjustment screw must be turned counterclockwise
1/8 turn at a time until the condition is corrected.
I f the engine shows a sooty exhaust and is sluggish
under load, the high speed mixture is too rich. The
high speed adjustment screw must be turned
clockwise 1/8 turn at a time until the condition is
corrected.
Adjusting the Idle Adjustment Screw
After the high speed adjustment screw is adjusted,
it may be necessary to readjust the idle adjustment
screw as each affects the other.
Close the idle adjustment screw to its seat by
turning it clockwise; then open it one turn. Start
the engine and operate it at fast idling speed
(without any load) until thoroughly warm.
While the engine is running at fast idle speed, it is
advisable to screw in the throttle stop screw a few
turns to keep the engine from stopping when the
throttle lever is moved to the fully retarded
"SLOW" position. The engine will then be idling at
a fairly high speed and the throttle stop screw can
be backed out a little at a time until the desired
idle speed is obtained (1800 RPM).
If the engine misses or rolls while backing out the
throttle stop screw, the idle adjustment screw may
be adjusted in or out until the engine operates
smoothly. Speed up the engine for a few seconds;
then recheck the idle adjustment. A slight adjust-
ment in or out will give the smoothest idle.
PREPARING THE TRACTOR FOR EACH DAY'S WORK
Check the crankcase oil level and add new oil if
necessary. See pages 32 and 33.
Clean the air cleaner element if necessary. See page
21.
I nspect the tires for general condition. See pa~ 25.
10
Page 13
Page 14
DRIVING THE TRACTOR
International Cub Cadet 800, 1000, and 1200 Tractors
CLUTCH-BRAKE PEDAL
The combination clutch-brake pedal is used to
disengage the engine from the transmission when
shifting gears and to actuate the brake to stop the
tractor. The pedal must be pressed all the way
down to activate the safety starting switch when
starting the engine.
To disengage the clutch, and apply the brake, press
the pedal all the way down.
GEARSHIFT LEVER
This lever is used to select various gear ratios
provided in the transmission. There are three
forward speeds and one reverse speed. Refer to
"SPECIFICATION", on page 41.
STARTING THE TRACTOR
Disengage the clutch by pressing the clutch pedal
all the way down, and release the brake lock. Move
the gearshift lever to the desired speed.
Start the tractor in motion by slowly releasing the
clutch pedal and moving the throttle lever to the
position where the engine operates best for the
load to be handled.
NOTE: When using power take-off operated equip-
ment, best performance is achieved with the
throttle lever in the "Fast" position.
NOTE: Do not shift gears while the engine clutch
is engaged or while the tractor is in motion.
NOTE: Do not rest your foot on the pedal while
driving the tractor, as this will result in excessive
clutch lining wear.
Always be sure the rear wheels are free to turn.
Under any adverse conditons, do not attempt to
free the tractor by speeding up the engine and
suddenly engaging the clutch. Try backing out
instead of going foward.
CAUTION! To avoid possible injury, do
not carry passengers or give rides. Keep
children, pets, and bystanders out of the
STOPPING THE TRACTOR
Disengage the clutch by pressing the pedal all the
way down. Move the gearshift lever to the "N"
position. Before dismounting always lock the
pedal, disengage the power take-off, and turn the
ignition "OFF".
CREEPER SHIFT LEVER
The creeper drive (optional) provides a slower
speed in each respective gear, by a four-to-one
reduction in speed from direct drive. When the
creeper shift lever is all the way forward, it is in
direct drive, or all the way rearward, it is in creeper
drive.
OPERATING THE CREEPER DRIVE
To operate the tractor in creeper drive, depress the
pedal and move the creeper shift lever all the way
rearward. Then select the transmission speed
desired and proceed as instructed under "Starting
the Tractor".
NOTE: Do not use a mid-point position on the
creeper drive as neutral. Neutral position must be
selected only with the standard transmission
gearshift lever.
The following table shows the speeds available in
each of the three forward gears and the reverse
gear.
area.
12
Page 15

Page 16

DRIVING THE TRACTOR
1nternational Cub Cadet 1250, 1450, and 1650 Tractors
STARTING THE TRACTOR NOTE: Never operate engine with release lever in
(UP) position. Towing or pushing the tractor for
1. Depress the brake pedal and release the brake
lock. Move the throttle lever to the position where
the engine operates best for the load to be handled.
more than a few feet may result in transmission
damage.
2. Start the tractor in motion by moving the speed
control lever slowly forward or rearward as
described above.
RELEASE lEVER
To push or move the tractor for a short distance,
the release lever, located on the right side of the
frame near the cam stop, must be held in the (up)
position and the speed control lever must be in the
"N" position.
The lift handle is used to lift or lower equipment
used with the tractor. The equipment can be set in
multiple positions by depressing the button on the
top of the handle and releasing it when the desired
position is reached.
HEIGHT ADJUSTMENT
THE TRACTOR
Move the speed control lever to the "N" position
or use the brake. Before dismounting always lock
the brake pedal and turn the ignition "OFF". Also,
disengage the power take-off clutch lever.
CAUTION! To prevent injury or an
accident, do not carry passengers or give
rides. Keep children, pets, and by-
standers out of the area.
Lock cam into this position by turning knobclockwise.
If free handle travel between cam stop and fully
raised position is desired (Float Position), depress
the release button on top of the handle, press in
the lock button located at the front of the handle
and release the top button.
If a single implement height is normally used, the
handle may be adjusted to locate the desired
position by use of the cam stop.
With lift handle in desired implement height
position, release cam by turning locking knobcounterclockwise.
Turn cam until it contacts tang.
STOPPING
NOTE: To disengage the lift handle from the float
position, pull lift handle back slightly and depress
top button.
NOTE: Refer to the equipment manual for proper
hitching instructions.
14
Page 17

Page 18

Page 19

OPERATING THE FRONT POWER TAKE-OFF
CLUTCH
The front power take-off clutch is an electric
clutch operated by a toggle switch on the left side
of the instrument panel.
The clutch is factory adjusted and should not
require further adjustment under normal operating
conditions. However, if the clutch fails to operate
properly check as follows:
Check fuse on pedestal.
1. Move the throttle lever back to the medium or
"slow" position.
2. Flip the toggle switch on to the "ON" position.
Advance throttle to operating speed (full speed).
ADJUSTING THE POWER TAKE-OFF CLUTCH
Using a feeler gauge check the clearance. If the
clearance is not .015/.010 inches tighten the four
(4) self-locking nuts to obtain the proper clearance.
If the above procedure does not work, see your
I nternational Harvester dealer.
CAUTION! To avoid an accident or
possible injury, always disengage all
clutches and shift into neutral before
starting the engine.
CAUTION! To avoid possible injury,
always disengage all clutches, shift the
transmission into neutral, depress the
brake, set the brake pedal lock and turn the ignition "OFF" before working on the machine.
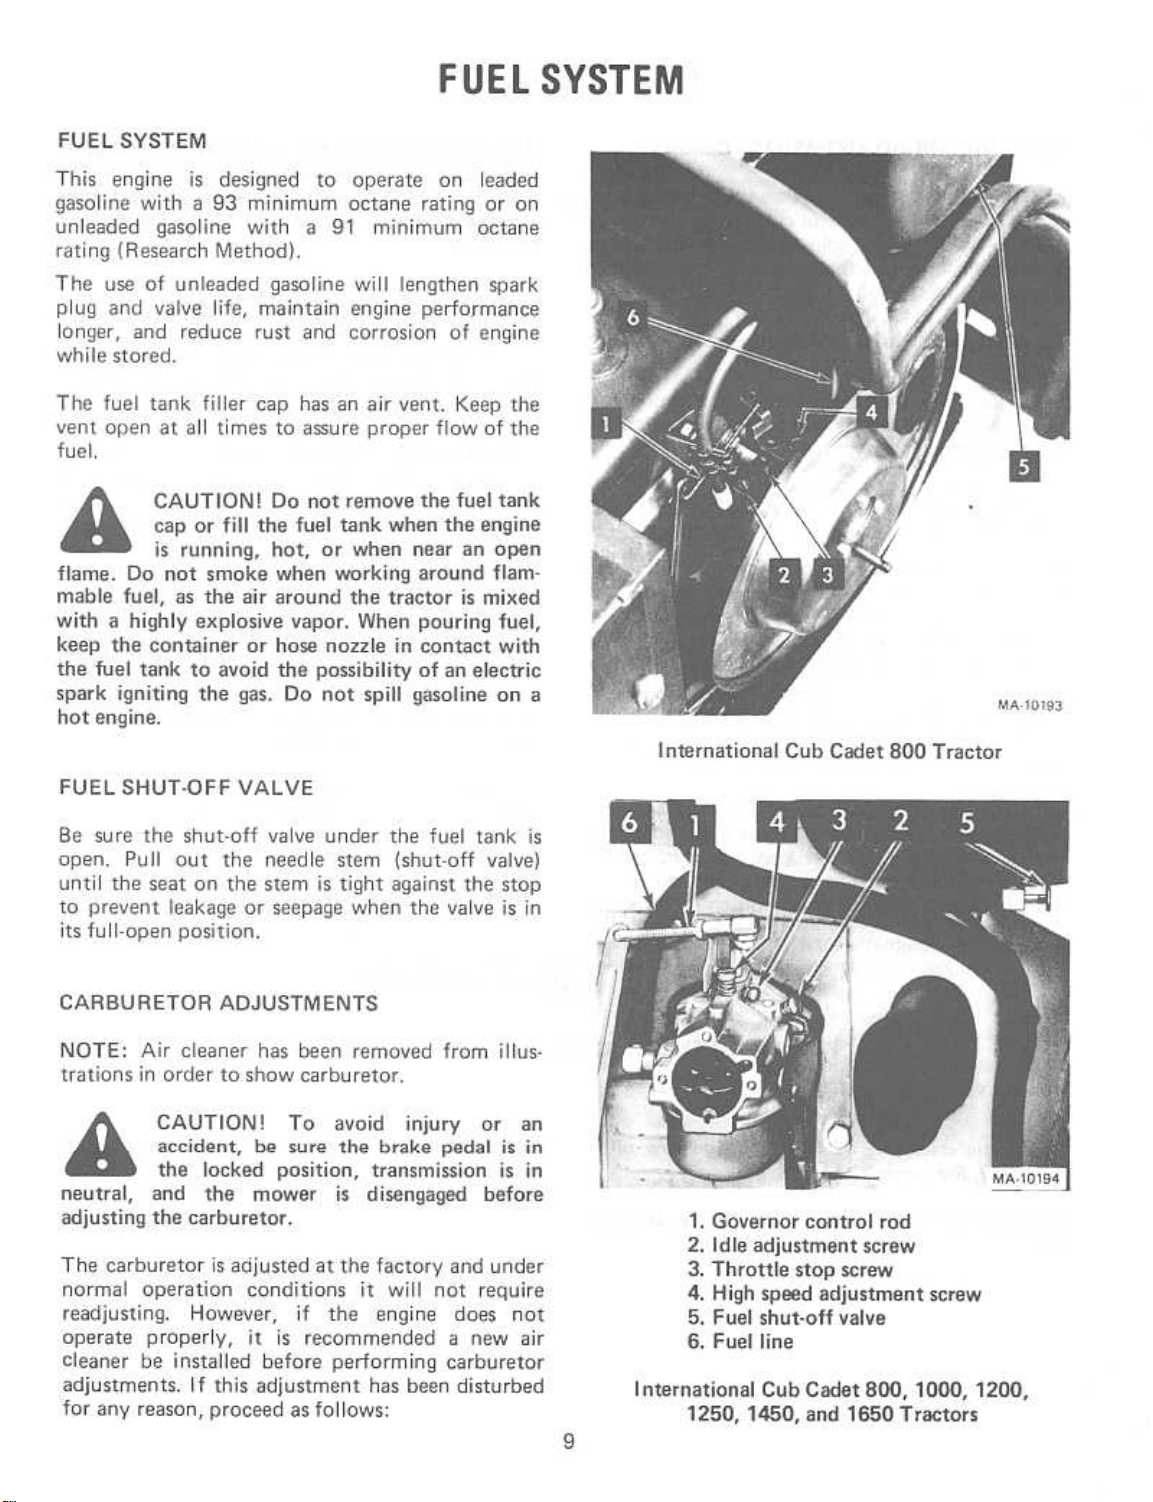
1. Self-locking nuts (4)
2. Feeler gauge openings (4)
The electric lift is a self-contained unit designed to
provide power with fingertip control for raising the
lowering mounted equipment.
3.
The ~Iectric lift is available on all Cub Cadet
Tractors except the Models 1450 and 1650 which
is equipped with a hydraulic lift as standard.
17
Page 20

Page 21

Page 22

Page 23

ELECTRICAL SYSTEM
CHARGE INDICATOR
This instrument indicates whether the alternator is
charging or the battery is discharging. If it shows
discharge continuously, investigate the cause to
avoid completely discharging the battery and
possible damage to the charging circuit.
HOUR METER
The I nternational Cub Cadet Tractors are equipped
with an hour meter which is located on the
instrument panel. It indicates the actual hours of
engine operation, enabling the operator to deter-
mine without guesswork, when lubrication, change
of oil or periodic inspections are necessary. It also
provides a means of computing cost of specific
!obs. The hour meter operates whenever the engine
is running or the ignition key is in the "ON"
position.
SPARK PLUG
Remove the spark plug, always using a spark plugwrench,
after every 100 hours of operation to
check the gap.
CAUTION! To avoid possible injury, be
sure engine is off and cool before making
any adjustments or repairs.
Be sure the gasket is in good condition. Tighten the
plug 1/2 to 3/4 turns past finger tight.
Replace a defective plug with a new plug. See your
I nternational Harvester dealer for the correct
replacement plug.
LIGHTS
Checking the spark plug gap.
Set gap at .O25-inch.
NOTE: Remove all dirt from around the spark plug
before removing.
Lights are optional on all models except the
Models 1450 and 1650.
The headlights are sealed-beam units. Refer to
"SPECIFICATIONS" when replacement is
necessary.
To replace the taillight lamp, remove the lens from
the taillight and replace. Refer to
"SPECIFICATIONS".
FUSES (Electric lighting and Electric Power
Take-Off Clutch)
Always use the same capacity fuse for replacement.
Refer to "Specifications". If the lights fail or the
clutch does not engage, check the appropriate fuse.
21
Page 24

ELECTRICAL SYSTEM
FUSE -Continued
NOTE: There are two fuses adjacent to the lighting
switch on the tractor pedestal (left side), The lower
fuse is for the lights; the upper fuse is for the
electric clutch.
To install a new fuse, press in on the fuse housing
cap and turn counterclockwise to remove it from
the fuse housing. Remove the old fuse and replace
it with a new one. Then reassemble the cap to the
housing.
Before working on any part of the electrical
system, disconnect the battery ground cable at the
battery negative (-) terminal. Do not reconnect this
cable until all work has been completed. This will
prevent shorting and damage to any of the elec-
trical units. Examine the electrcial cables occa-
sionally to be sure they are not being frayed by
contact with adjacent parts.
When replacing a battery, make certain the ground
cable is connected to the negative (-) terminal on
the battery. Be su re the rubber boot is properly
positioned over the positive (+) terminal on the
battery. NOTE: Both cables must be assembled
with the nuts to the inside of the terminals to
prevent shorting against fender well.
Cleaning and Servicing the Battery
The electrolyte (acid and water) in each cell should
be at ring level at all times to prevent batteryfailure.
When the electrolyte is below this level,
add pure, distilled water.
Acid or electrolyte should never be added except
by a skilled battery man. Under no circumstances
add any special battery "dopes", solutions or
powders.
CAUTION! If the tractor is to be tipped
up or on its side remove the batteries to
avoid spilling the electroyte. Battery
electrolyte is poisonous and can be injurious to
eyes, skin, and clothing. If electrolyte is spilled,
flush immediately with water, followed by a
solution of one part baking soda to four parts
water.
Connecting Booster Batteries
When required, a booster 12-volt battery may be
connected in parallel with the 12-volt system on
I nternational Cub Cadet Tractors.
CAUTION! Gas discharged by batteries
is explosive. Avoid sparks near the
batteries.
Occasionally remove the battery cables and
brighten the terminal contact surfaces with wire
wool, and reassemble them. Apply a light coat of
vaseline or chassis lubricant. Be sure the terminals
are clamped tightely and that the battery is
fastened securely in the battery box. Replace
unserviceable cable. Keep the vent holes in the
battery filler caps open.
Keeping the battery fully charged not only adds to
its life but makes it available for instant use when
needed.
Liquid Level
Check the battery at least once a month for water
level.
NOTE: All circuits must be turned "off/. Electrical system is NEGATIVE (-) grounded only.
Reversed polarity will result in permanent damageto
components of the electrical system.
The first jumper cable must connect the positive
(+) terminal of the booster battery and the positive
terminal of the battery on the tractor.
The second jumper cable must first be connected
to the negative (-) terminal of the booster battery;
and then to a point on the frame of the tractor,
away from the battery, having a good ground, so
no spark occurs near the battery.
For dependable battery service, see your I nternational Harvester dealer.
22
Page 25

OPERATING PRESSURE FOR TIRESREAR TIRES
6-12 rear tires are standard equ ipment on the
I nternational Cub Cadet 800 and 1000 Tractors.
23 x 8.50-12 high floatation tires are standard
equipment on the I nternational Cub Cadet 1200,
1250, and 1450 Tractors. They are also available as
optional equipment when ordered for the I nter-
national Cub Cadet 800 and 1000 Tractors.
23 x 10.5-12 tires are standard on the International
Cub Cadet 1650 Tractor.
The high floatation tires provide maximum
mobility in sand, snow, and soft soil conditions.
The reduced ground pressure and low inflation
provides maximum protection for turf, soil and
crops.
CARE OF TIRES
Avoid stumps, stones, deep ruts, curbs, and other
hazards. Cuts in tires should be repaired imme-
diately as neglect decreases the tire lift.
I nflate the front and rear tires for normal or heavy
load operations as shown in the following table.
Tire Size
Front Tires
4.80/4.00-8
16 x 6.50-8
Rear Tires 6-12
23 x 8.50-12
23 x 10.50-12
REAR WHEEL WEIGHTS
Pounds per square inch
12
12
12
12
12
Rear wheel weights increase traction and reduce
wheel slippage. The weights weight approximately
26 pounds each. They are attached to each rear
wheel with two bolts, lock washers, and hex nuts.
I f additional weight is desired, a second set of
weights can be attached to each first weight by
using two longer bolts.
MOUNTING TIRES ON THE RIM
Keep tires free from oil and grease as both destroy
rubber.
After using the tractor for spraying use water to
remove any chemicals that may be on the tires.
INFLATION
Keep the pneumatic tires properly inflated. Overinflation will cause operator discomfort. Underinflation will cause short tire life.
Always see that the tire valve caps are in place and
tightened securely to prevent loss of air and
protect the valve core and stem.
After mounting a new or old tire on the rim,
inflate it to 20 pounds pressure to seat the tire
bead on the rim flange. Then deflate the tire to the
correct operating pressure.
TIRE CHAINS
Tire chains will provide additional traction for wet
ground conditions, when plowing snow, or pulling
heavy loads. Rear wheel weights are recommended
when using chains.
OVERLOADING
Do not overload the tractor tires by mounting
equipment on the tractor which exceed the load
capacity of the size of the tires on the tractor.
23
Page 26
Page 27

Page 28
Page 29
Page 30
When your tractor is not to be used for some time,
6. Clean the exterior of the engine.
it should be stored in a dry and protected place.
Leaving your tractor out-doors, exposed to the
elements materially shortens its life.
7. Remove the battery and place it in a cool, dry
place above (+32°F.). Check battery at least once
a month for water level and amount of charge. See
Follow the procedure outlines below when storing
page 23.
a tractor for an extended period of time.
8. On all gear driven I nternational Cub Cadet
1. Wash or clean and completely lubricate the
tractor. See the "lubrication Guide".
Tractors press clutch and brake pedal all the way
down and engage the brake pedal lock. This will
prevent clutch lining from sticking to pressure
2. Store the tractor so the tires are protected from
plate.
light. Before storing the tractor, clean the tiresthoroughly.
Jack up the tractor so the load is off
the tires when it is to be out of service for a long
period. If not jacked up, inflate the tires at regular
REMOVING FROM STORAGE
intervals.
1. Fill the fuel tank and be sure the grade of oil in
If tractor is jacked up or
placed on blocks, be sure it is done so it
the crankcase is according to the temperature range
in the "lubrication Table".
cannot be tipped over or fall on
someone.
3. Run the engine long enough to thoroughly warm
the oil in the crankcase and then drain the oil.
Refill the crankcase with fresh oil as specified in
the "lubrication Table" and run the engine for
about five minutes.
2. I nstall a fully charged battery and properly
connect.
3. Start the engine and let it run slowly. Do not
accelerate it rapidly or operate at high speed
immediately after starting.
Drain the fuel tank and run the engine until the
fuel is exhausted from the fuel system.
NOTE: Gum will eventually form in the fuel tank,
line, and carburetor if the unit is not drained.
After the engine has cooled, remove the spark
plug and pour two tablespoonsful of a rust
inhibited oil such as Hy-Tran@ or IH No. 1@
engine oil into the cylinder. Crank engine slowly to
distribute the oil over the cylinder walls. Then
replace spark plug.
CAUTION!
4.
5.
4.
CAUTION! Keep doors wide open or
release brake pedal lock and move the
machine outside the storage room before
engine is started to avoid the danger from exhaust
gas.
Check air pressure in tires.
28
Page 31

Page 32
Page 33

ENGINE OIL
The engine crankcase is filled with ship-away oil.This
oil may be used for the first 30 hours of
engine operation at temperatures between +90
degrees F. and 0 degrees F. If temperatu res are not
within this range, drain the oil from the crankcase
and replace with new oil as specified in the
"lubrication Table". The engine oil must be
drained and replaced with new oil every 30 hours
of engine operation.
We recommend I.H. No. 1@ Engine Oil. If other
than I.H. No. 1@ Engine Oil is used, it must be
designated as meeting either SO or SE re-
quirements.
To aid starting, the selection of crankcase lubri-
cating oils should be based on the lowest anticipated temperature until the next drain period. See
page 33.
lubricate the entire tractor, using only high
quality lubricating oils and grease as specified in
the "lubrication Table", For your own protection,
select only oils and greases of recognized manu-
facture.
Regularly check the oil levels of the engine
crankcase and transmission to see that they are
filled to the correct levels. NOTE: Check the oil
level only while the engine is stopped.
Always keep the oil level between the "FULL" and
the "LOW" marks on the gauge. When checking
the oil level the gauge must be withdrawn and
wiped clean, then inserted all the way and withdrawn for a true reading.
NOTE: Never overfill the engine crankcase. Engine
damage may result if the crankcase is below the
"LOW" mar!< or over the "FULL" mark.
31
Page 34

ENGINE OIL -Continued
1. Oil filler cap and oil level gauge Cub Cadet 800 Tractor
LUBRICATION
Keep your supply of lubricating oil absolutely
clean and free from dust. Always use clean
containers. Keep the lubricator clean and wipe dirtfrom
the lubrication fittings before applying thelubricator.
TRANSMISSION OIL FILTER
(International Cub Cadet 1250, 1450, and 1650
Tractors)
Remove the throw-away can-type filter and replacewith
a new filter after the first 10 hours and after
50 hours of operation, and every 100 hou rs of
operation thereafter.
Oil filler cap and oil level gauge -All
models except the Cub Cadet 800 Tractor
NOTE: Right hand side panel removed to show
location.
Clean the outside area before removing thefilter
to keep dirt from getting into the trans-
mission case. I f a mower is mounted on the tractor,the
mower must be lowered to facilitate removal ofthe
filter.
remove the filter, turn the filter counter-clockwise
using an automotive type filter wrenchor
an open end wrench.
Before installing the new filter, apply a coating of
oil on the filter gasket. Thread the filter on by
hand until tight enough to seat the gasket. Loosen
the filter. Then turn it until the gasket contacts the
base. Tighten the filter an additional one half turn.
Check for leaks and check oil level of transmission
case.
NOTE:
To
1.
32
Page 35

Page 36

Page 37

Page 38
Page 39

Page 40

Page 41

Page 42
Page 43

Page 44

Page 45
Page 46

 Loading...