

MSI PC60G, PC60G MS-6834B, MS-6834B Quick Installation Manual

MSI PC60G (MS-6834B)
Wireless 11g PCI Card
Quick Installation Guide
P/N:G52-68341X1
ii
Hiermit erklärt Micro Star International CO., LTD dass sich dieses Produkt in
Übereinstimmung mit den grundlegenden Anforderungen und den anderen
relevanten Vorschriften der Richtlinie 1999/5/EG befindet. Die
Konformitätserklärung kann auf folgender website eingesehen werden:
http://www.msi-computer.de/support/dl_man.php
Hereby, Micro Star International CO., LTD declares that this device is in
compliance with the essential requirements and other relevant provisions of
Directive 1999/5/EC. The respective Declaration of conformity can be found
online:
http://www.msi-computer.de/support/dl_man.php
IEEE 802.11b/g and Bluetoothâ 2.4 GHz operation
Europe: Frequencies: 2.400 – 2.4835 GHz
France: Frequencies: 2.4465– 2.4835 GHz,
Outdoor use is limited to 10mW e.i.r.p. within the band 2454-2483.5 MHz
IEEE 802.11b/g und Bluetoothâ 2.4 GHz Betrieb
Europa: Frequenzen: 2.400 – 2.4835 GHz
Frankreich: Frequenzen: 2.4465– 2.4835 GHz,
Außerhalb von geschlossenen Gebäuden ist die genehmigte Sendeleistung im
Frequenzband 2454-2483.5 MHz auf maximal 10mW beschränkt.
Italy:
If used outside of own premises, general authorisation is required.
Luxembourg:
General authorisation required for public service.
Notified Countries:
Germany, UK, Netherlands, Belgium, Sweden, Denmark, Finland, France, Italy,
Spain, Austria, Ireland, Portugal, Greece, Luxembourg, Estonia, Letvia, Lithuania,
Czech Republic, Slovakia , Slovenia, Hungary, Poland und Malta.
Bestimmungsgemäße Verwendung:
Dieses Produkt integriert als Teil der Produktausstattung eine WLANKomponente und/oder eine Bluetoothâ-Komponente. Die entsprechende
Komponente verbindet Computer über eine Funkverbindung. Es kann auch eine
Funkverbindung zu anderen geeigneten WLAN- oder Bluetoothâ Geräten
hergestellt werden.

iii
Prescribed use:
This product integrates a WLAN- and/or Bluetoothâ device.
The device sets up a radio link between to computer. In addition it is possible to
link the WLAN- or Bluetoothâ device to any other WLAN- or Bluetoothâ device
which stick to the IEEE 802.11b/g or Bluetoothâ requirements.
Hinweise zur Reichweite:
Der Abstand zwischen Sender und Empfänger (von einem WLAN- oder
Bluetoothâ -Gerät zu einem entsprechenden anderen Gerät) hängt stark von der
Einsatzumgebung ab. W ände, Betonboden (Eisen), beschichtete
Fensterscheiben, Fahrzeug-Karosserie, etc..
Weitere Beeinflussungen:
- Hochfrequenzaussendungen jeder Art
- Gebäude, Bäume, etc.
- Heizkörper, Stahlbeton, etc.
- offen betriebene Computer, etc.
- Mikrowellenherde, etc,
Die Kommunikation zwischen unterschiedlichen WLAN- oder Bluetoothâ Geräten ist von der jeweiligen Software und dem entsprechenden Versionsstand
abhängig
Operating range:
The transmission range between different WLAN- or Bluetoothâ devices varies
depending the specific environment. Walls, concrete floor (iron), laminated
windows, vehicle-body, etc..
More electromagnetic interferences:
- high frequency emission of any kind,
- Buildings, trees, etc.
- Heaters, ferroconcrete, etc.
- open computer systems, etc.
- Microwave oven, etc,
Communication (exchange data) is dependent on the software of the WLAN or
Bluetoothâ devices.
MSI Technology GmbH
Hanauer Landstraße 306
60314 Frankfurt
Telefon: +49 (0)69 40893-0
Telefax:+49 (0)69 40893-202

iv
1. The device complies with Part 15 of the FCC rules. Operation is subject to
the following two conditions:
(1) This device may not cause harmful interference, and
(2) This device must accept any interference received, including
interference that may cause undesired operation.
2. FCC RF Radiation Exposure Statement: The equipment complies with FCC
RF radiation exposure limits set forth for an uncontrolled environment.
This equipment should be installed and operated with a minimum
distance of 20 centimeters between the radiator and your body.
3. This Transmitter must not be co-located or operating in conjunction with
any other antenna or transmitter.
4. Changes or modifications to this unit not expressly approved by the
party responsible for compliance could void the user authority to operate
the equipment.
Copyright Notice
The material in this document is the intellectual property of MICRO-STAR
INTERNATIONAL. We take every care in the preparation of this document, but
no guarantee is given as to the correctness of its contents. Our products are
under continual improvement and we reserve the right to make changes without
notice.
Trademarks
Microsoft Windows and Internet Explorer are registered trademarks or
trademarks of Microsoft Corporation.
All brand names, icons, and trademarks used in this manual are the sole
property of their respective owners.
Technical Support:
If a problem arises with your system and no solution can be obtained from this
quick installation guide, please contact your place of purchase or local
distributor. Alternatively, please try the following help resources for further
guidance.
Visit the MSI website for technical guide, driver and software updates, and other
information: http://www.msi.com.tw & http://support.msi.com.tw
Revision History
Revision Date History
V 1.0 Sep. 2006 First Release

v
Important Safety Precautions
Always read and follow these basic safety precautions carefully when handling
any piece of electronic component.
1. Keep this User Manual for future reference.
2. Keep this equipment away from humidity.
3. Lay this equipment on a reliable flat surface before setting it up.
4. The openings on the enclosure are for air convection hence protects the
equipment from overheating.
5. All cautions and warnings on the equipment should be noted.
6. Never pour any liquid into the opening that could damage or cause
electrical shock.
7. If any of the following situations arises, get the equipment checked by a
service personnel:
•Liquid has penetrated into the equipment
•The equipment has been exposed to moisture
•The equipment has not work well or you can not get it work according to
User Manual
•The equipment has dropped and damaged
•If the equipment has obvious sign of breakage
8. DO NOT LEAVE THIS EQUIPMENT IN AN ENVIRONMENT
UNCONDITIONED, STORAGE TEMPERATURE ABOVE 80°C OR
BELOW -20°C, IT MAY DAMAGE THE EQUIPMENT.
vi
WEEE Statement
vii
viii

ix
Table of Content
1. ENGLISH....................................................................1-1
2. DEUTSCH...................................................................2-1
3. FRANÇAIS..................................................................3-1
4. ESPAÑOL...................................................................4-1
5. ITALIANO...................................................................5-1
6. NEDERLANDS............................................................6-1
7. ČESKY........................................................................7-1
8. PORTUGUÊS..............................................................8-1
9. POLSKI.......................................................................9-1
10. PУCCKИЙ...................................................................10-1
11. TÜRKÇE ....................................................................11-1
12. ﻲﺑﺮـﻋ ............................................................................ 12-1
13. ..............................................................................13-1
14. ไทย............................................................................14-1
15. 日本語.........................................................................15-1
16.
한국어
.........................................................................16-1
17. 简体中文......................................................................17-1
18. 繁體中文......................................................................18-1
19. ΕΛΛΗΝΙΚΑ..................................................................19-1
20. Dansk.........................................................................20-1
21. SVENSKA...................................................................21-1
22. SUOMI........................................................................22-1
23. NORSK.......................................................................23-1
24. MAGYAR....................................................................24-1
25. ROMÂNĂ....................................................................25-1
26. SRPSKI.......................................................................26-1
27. SLOVENSKY..............................................................27-1
28. HRVATSKI..................................................................28-1
29. SLOVENŠČINA...........................................................29-1
30. EESTI.........................................................................30-1

x

ENGLISH
Chapter 1

1-2
MSI PC60G Wireless 11g Turbo G PCI Card
This Quick Installation Guide could be used for the MSI PC60G Wireless
11g PCI Card, providing you with easy installation steps to help you build
your network easily and quickly. For further information, please refer to
the User Manual in the accompanied CD; for questions regarding this
product, please either refer to FAQ section in User Manual or visit MSI
website at: http://www.msi.com.tw. For more information about MSI
Turbo G mode, please refer to the User Manual in the CD-ROM.
Note:
Experiencing the high throughput of the MSI Turbo G mode, MSI Turbo G series
wireless products are highly recommanded as your best choices.
MSI Turbo G mode is suggested to function with MSI Turbo G series wireless products
to optimize performance.
The compatibility of other brands of wireless products with MSI Turbo G mode is not
guaranteed.
Actual throughput value might vary due to environmental, operational and other factors.
Before You Begin

1-3
ENGLISH
If you have a Wireless PCI Card (PC60G)
First, confirm that the system is turned off. Remove the computer’s case to
locate the available PCI slot on the motherboard. Insert the Wireless PCI
Card into the slot firmly; then, secure it with the bracket screw. Replace the
cover and connect the external antenna.
If you are not skilled at installing the Wireless PCI Card, please ask the
vendor or an experienced technician for help.
After installing the Wireless PCI Card to your computer and then turning on
the computer, the operating system will detect a new device and start the
configuration automatically. Please CANCEL the pop-up window of the
system’s Found New Hardware Wizard to install the required driver and
utility from InstallShield Wizard of your Software CD.
Insert the Software CD into your CD-ROM drive, and the Setup program
should launch automatically.
If the Auto-run program does not launch automatically, click Start at the
taskbar and select Run.... Type E:\setup.exe (where E is your CDROM
drive) in the Open box and click OK to launch the Setup program manually.
The main screen of Setup program will appear as below. Click the Install
Software button.
The welcome screen of InstallShield Wizard appears. Read and Accept the
License Agreement; then, click Yes.
The program will copy the necessary files to the system. The progress
indicator shall show the installing status.
Click Finish when the installation is completed.
The MSI Wireless LAN icon will appear in the
status area.
Hardware Installation
u
Software Setup
v
w
x
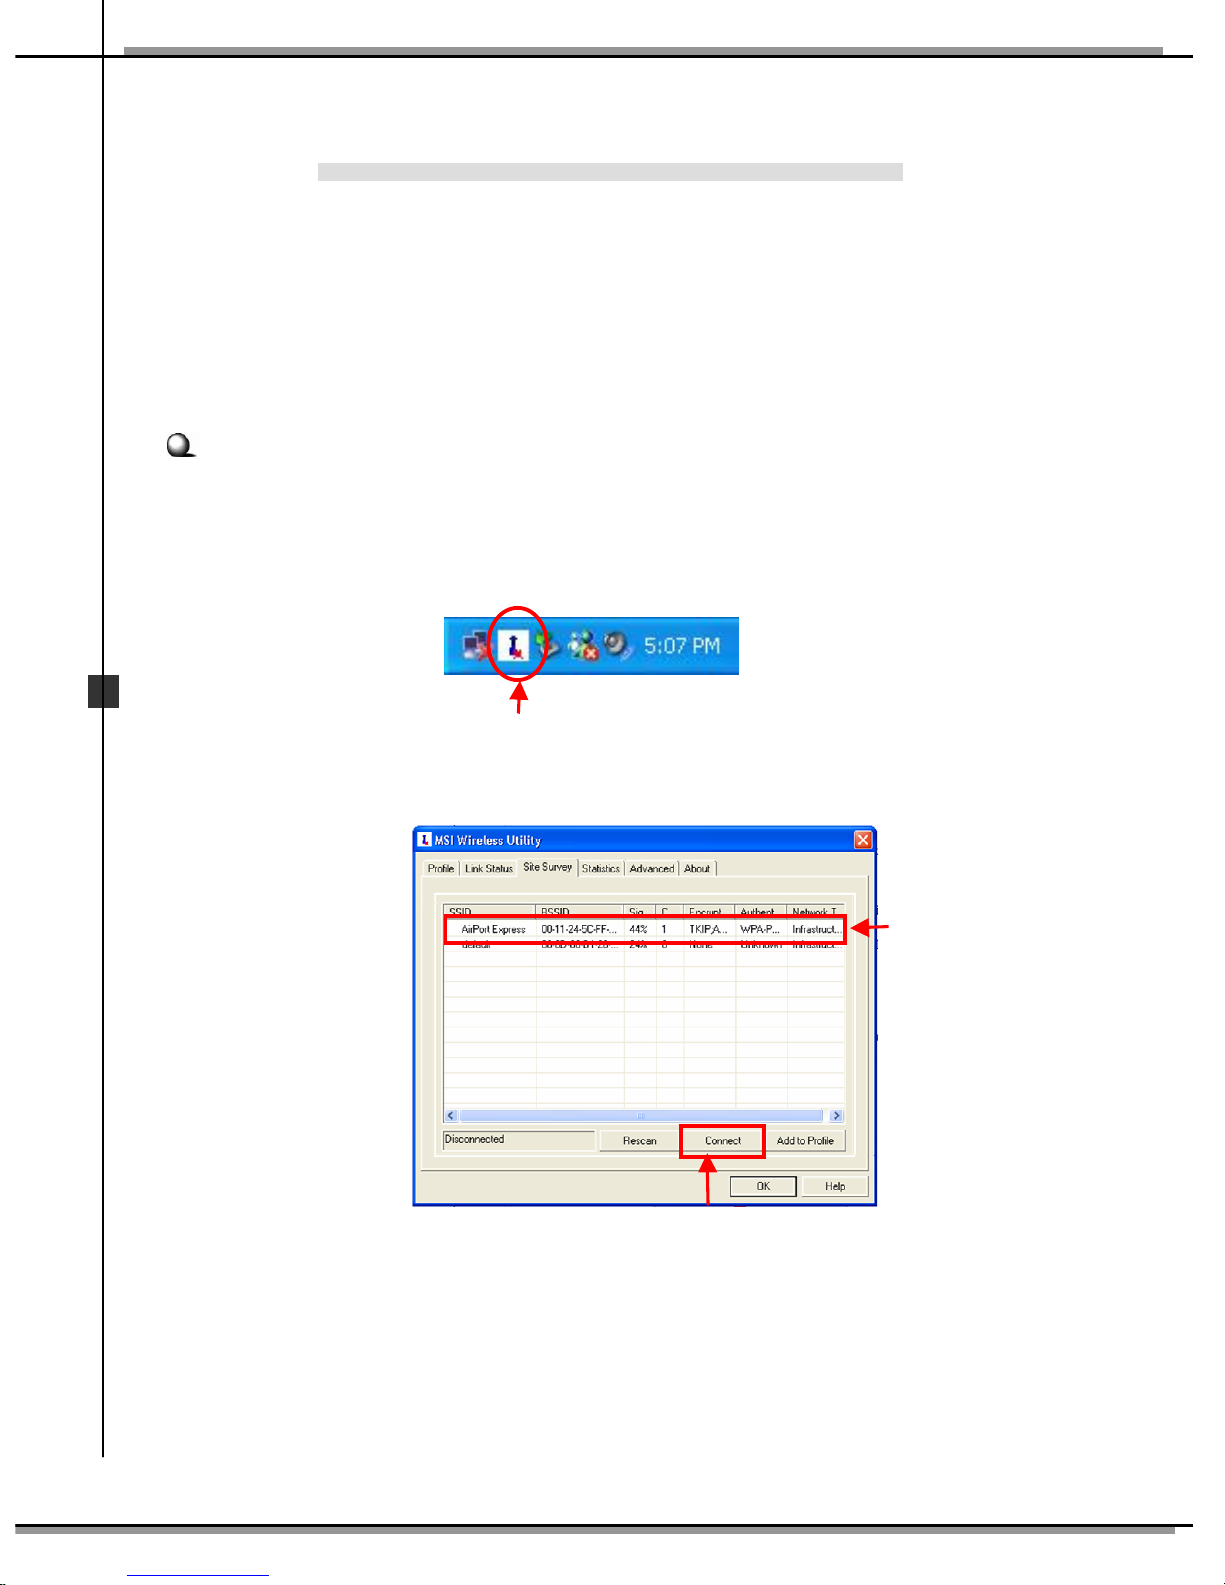
MSI Wireless LAN icon
1-4
MSI PC60G Wireless 11g Turbo G PCI Card
After installing the software, the MSI Wireless PCI Card offers you with a
convenient and powerful utility that allows you to set up, configure, and
know your networking status easily and clearly.
Your MSI Wireless PCI Card can be used by two networking modes:
Infrastructure mode and Ad-hoc mode.
Infrastructure Mode allows your computer to communicate with the other
computers in the network through an Access Point.
To connect the Access Point:
1. Click the MSI Wireless LAN icon to bring up the MSI Wireless
Utility window.
2. In the tab of Site Survey, select the network you want, and then click
Connect.
Connecting Network
Click
Click
Select

1-5
ENGLISH
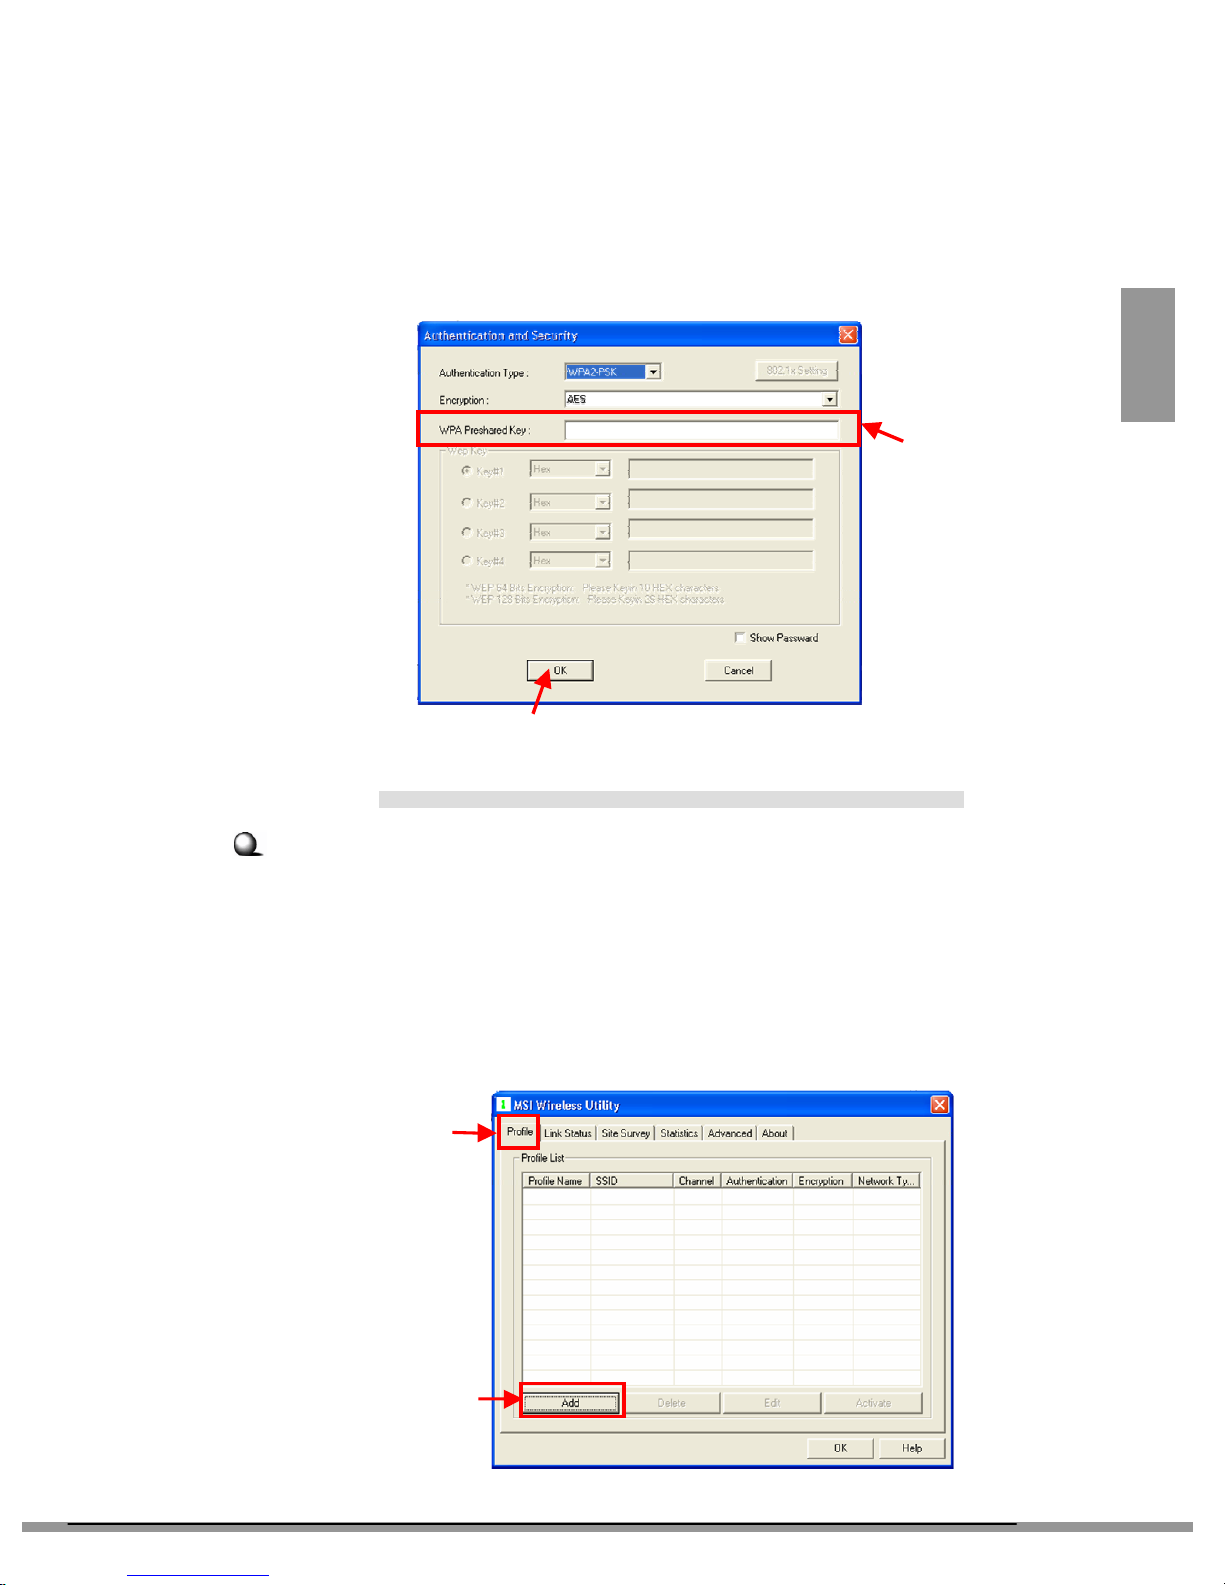
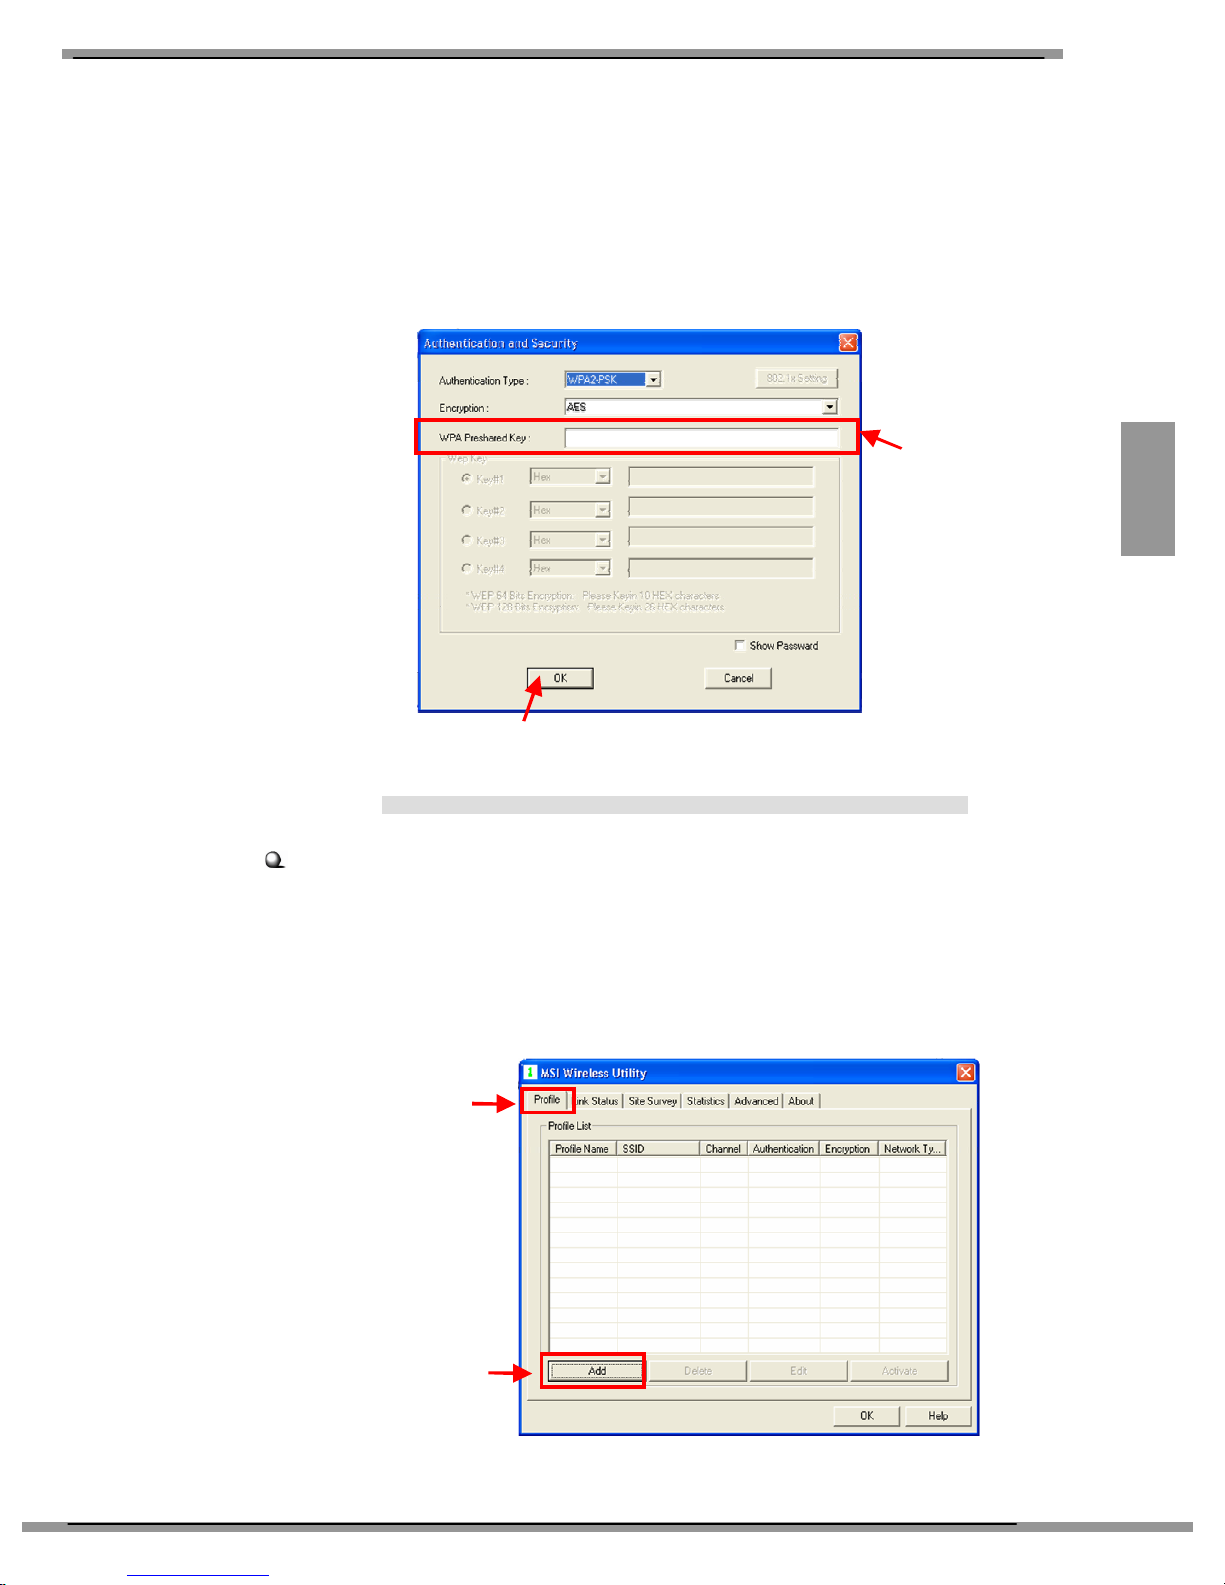
3. If the Access Point selected to connect has been connected and had set
up the Authentication and Security, you need to have the WPA
Preshared Key or WEP Key beforehand from the Access Point
administrator to enter in the blank. Then click OK to complete the
configuration.
Ad-hoc Mode allows your computer to communicate directly with any
computer installed with compatible wireless adapter.
To build the Ad-hoc network:
1. Click the MSI Wireless LAN icon to bring up the MSI Wireless
Utility window. Then, click Profile tab.
2. Click Add.
Connecting Network (2)
Enter WPA
Preshared Key
Click
Click
Click

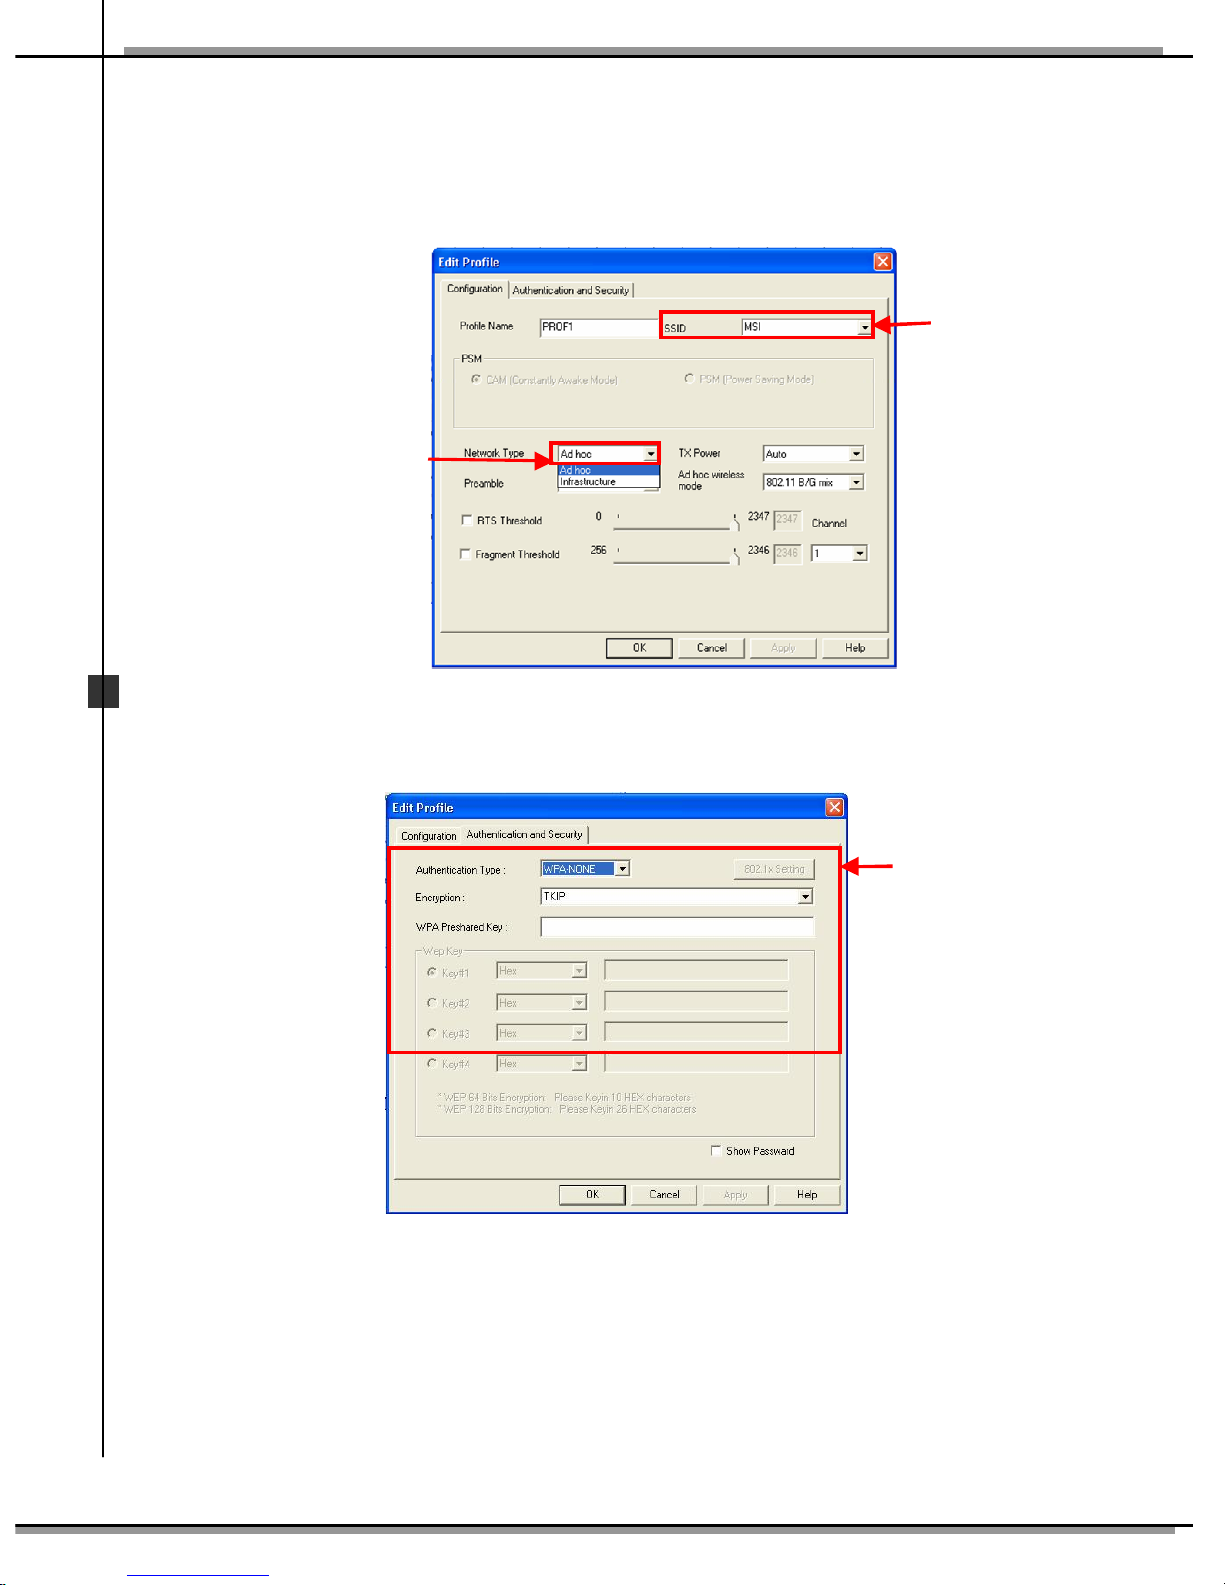
1-6
MSI PC60G Wireless 11g Turbo G PCI Card
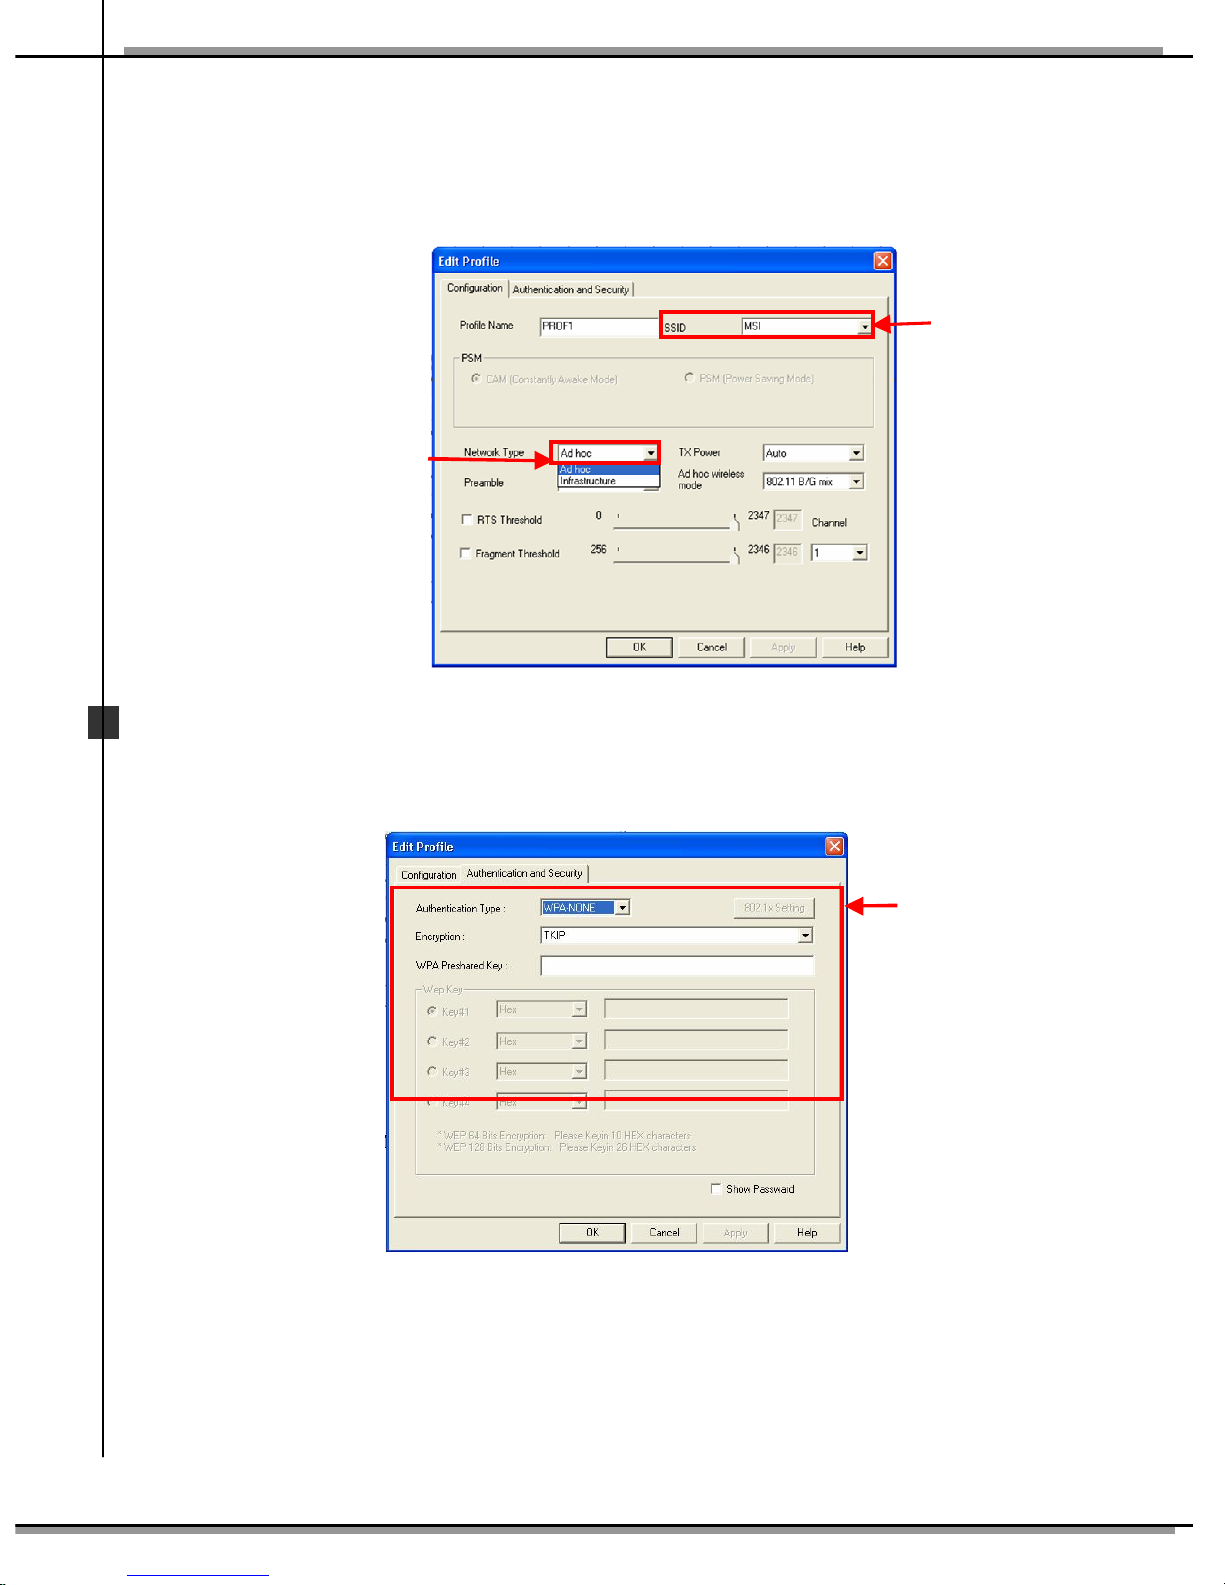
3. Set up the Network Name (SSID)
4. Check “Network Type” option and select “Ad-hoc” to enable the
Ad-hoc mode.
5. Click “Authentication and Security” to setup Authentication type,
Encryption and WPA Pre-shared Key.
Set
the
SSID
Select
Set the
configuration
for your needs.

DEUTSCH
Kapitel 2

2-2
MS
I
PC60G
Wireless
11g Turbo G
PCI C ard
Diese Kurzinstallationsanleitung zur PCI-Drahtloskarte PC60G von MSI
zeigt Ihnen, wie Sie Ihr Netzwerk mit einfachen Installationsschritten leicht
und schnell aufbauen können. Weitere Informationen finden Sie in der
Bedienungsanleitung auf der mitgelieferten CD. Wenn Sie Fragen zu diesem
Produkt haben, lesen Sie bitte den Bereich Häufig gestellte Fragen (FAQ) in
der Bedienungsanleitung oder besuchen die MSI-Internetseite:
http://www.msi.com.tw. Weitere Informationen über den MSI Turbo
G-Modus sind in der Bedienungsanleitung auf der CD-ROM angegeben.
Hinweis:
Dank der hohen Durchsatzrate des MSI Turbo G-Modus werden Ihnen
Drahtlosprodukte der MSI Turbo G-Serie als beste Wahl empfohlen.
Der MSI Turbo G-Modus funktioniert problemlos zur Leistungsoptimierung mit
Drahtlosprodukten der MSI Turbo G-Serie.
Kompatibilität anderer Drahtlosproduktmarken mit dem MSI Turbo G-Modus wird
nicht zugesichert.
Der tatsächliche Durchsatzwert kann jedoch unterschiedlich sein, je nach Umgebung,
Betriebsweise und anderen Faktoren.
Bevor Sie loslegen

2-3
DEUTSCH
Wenn Sie eine PCI-Drahtloskarte haben (PC60G)
Zunächst überzeugen Sie sich davon, dass Ihr System ausgeschaltet ist.
Öffnen Sie das Computergehäuse und suchen Sie einen freien
PCI-Steckplatz am Motherboard. Setzen Sie die PC-Drahtloskarte komplett
in den Steckplatz ein und fixieren Sie sie mit einer Schraube am Gehäuse.
Schließen Sie das Computergehäuse wieder und verbinden Sie die externe
Antenne.
Wenn Sie keine ausreichende Erfahrung in der Installation von PCI-Karten
haben, bitten Sie bitte Ihren Händler oder einen erfahrenen Techniker um
Hilfe.
Nachdem Sie die PC-Drahtloskarte in Ihren Computer eingebaut und den
Computer eingeschaltet haben, erkennt das Betriebssystem ein neues Gerät
und beginnt automatisch mit der Konfiguration. Bitte brechen Sie den
Assistenten „Neue Hardware gefunden“ ab und installieren Sie den nötigen
Treiber und das Dienstprogramm über die mitgelieferte Software-CD.
Legen Sie die Software-CD Ihr CD-ROM-Laufwerk ein - das
Installationsprogramm sollte automatisch starten.
Falls die Installation nicht automatisch starten sollte, klicken Sie unten links
auf das Startmenü und wählen Ausführen... Geben Sie E:\setup.exe ein
(das E steht dabei für den Laufwerkbuchstaben Ihres CD-ROM-Laufwerks)
in das Öffnen-Eingabefeld ein und klicken Sie auf OK, um das
Einrichtungsprogramm manuell zu starten.
Der Hauptbildschirm des Installationsprogramms erscheint, wie nachstehend
gezeigt. Klicken Sie auf die Schaltfläche Software installieren.
Der Begrüßungsbildschirm des InstallShield Wizard wird angezeigt.
Lesen und akzeptieren Sie die Lizenzvereinbarung, klicken Sie danach auf Ja.
Das Programm kopiert die notwendigen Dateien in das System. Ein
Fortschrittsbalken informiert Sie über den Installationsstatus.
Zum Abschluss der Installation klicken Sie auf
Fertigstellen.
Im Statusbereich der Taskleiste wird nun das
Symbol MSI Drahtlos-LAN angezeigt.
Hardware
-
Installation
u
Software
-
Einrichtung
v
w x
MSI- Drahtlos-LAN-Symbol

2-4
MS
I
PC60G
Wireless
11g Turbo G
PCI C ard
Nach der Installation der Software bietet Ihnen die PCI-Drahtloskarte von
MSI ein komfortables und leistungsstarkes Dienstprogramm, mit dem Sie Ihr
Netzwerk bequem einrichten, konfigurieren und überwachen können.
Sie können Ihre PC-Drahtloskarte von MSI nun in zwei Netzwerkmodi
einsetzen: Infrastruktur- und Ad Hoc-Modus.
Im Infrastrukturmodus kann Ihr Computer über einen Zugriffspunkt
(Access Point) mit anderen Computern im Netzwerk kommunizieren.
So verbinden sie sich mit einem Access Point:
1. Blenden Sie das MSI-Drahtlos-Programm ein, indem Sie auf das
Symbol MSI-Drahtlos-LAN klicken.
2. Im Register Standortprüfung wählen Sie das gewünschte Netzwerk
aus und klicken dann auf Verbinden.
Netzwer
kverbindung
Klicken
Auswählen
Anklicken
2-5
DEUTSCH
3. Wenn eine Verbindung mit dem gewünschten Access Point hergestellt
wurde und bei diesem Authentisierungs- und Sicherheitseinstellungen
vorgenommen wurden, müssen Sie den gemeinsamen WPA-Schlüssel
oder WEP-Schlüssel in das entsprechende Feld eingeben. Die Schlüssel
erhalten Sie vom Administrator. Zum Abschluss der Konfiguration
klicken Sie auf OK.
Im Ad Hoc-Modus kann Ihr Computer direkt mit anderen Computern
kommunizieren, die ebenfalls über eine drahtlose Netzwerkverbindung
verfügen.
So bauen Sie ein Ad Hoc-Netzwerk auf:
1. Blenden Sie das MSI-Drahtlos-Programm ein, indem Sie auf das
Symbol MSI-Drahtlos-LAN klicken. Klicken Sie dann auf das
Register Profil.
2. Klicken Sie auf Hinzufügen.
Netzwerkverbindung (2)
Gemeinsamen
WPA-Schlüssel
eingeben
Klicken
Klicken
Klicken
2-6
MS
I
PC60G
Wireless
11g Turbo G
PCI C ard
3. Geben Sie den Netzwerknamen (SSID) ein.
4. Markieren Sie die Option Netzwerktyp und wählen Sie Ad Hoc, um
den Ad Hoc-Modus zu aktivieren.
5. Klicken Sie auf Authentisierung und Sicherheit, um
Authentisierungstyp, Verschlüsselung und gemeinsamen
WPA-Schlüssel zu definieren.
SSID
festlegen
Auswählen
Konfiguration
nach Wunsch
anpassen

FRANÇAIS
Chapitre 3

3-2
MS
I
PC60G
Wireless
11g Turbo G
PCI C ard
Ce guide rapide d'installation est pour la PCI carte sans fil PC60G, offrant
des étapes d'installation très performants. Pour plus d’informations, veuillez
vous référer au Manuel d'Utilisation sur le CD accompagné ; pour des
questions sur ce produit, veuillez vous référer à la section de FAQ dans le
manuel d’utilisation ou visiter le site internet de MSI :
http://www.msi.com.tw. Pour plus d’informations sur le mode MSI
TURBO G, merci de vous référer au manuel d’utilisation inclus dans les
CD-ROM.
Note :
Expérimentez le débit du mode MSI Turbo G. Les produits MSI de la série Turbo G sans
fil sont fortement recommandés comme étant le meilleur des choix !
Le mode MSI Turbo G est suggéré comme fonction avec les produits sans fil Turbo G
pour optimiser les performances.
La compatibilité d’autres marques de produits sans fil avec le mode MSI Turbo G n’est
pas garantie.
La valeur réelle du débit peut varier selon l’environnement, selon l’opération effectuée
ou selon d’autres facteurs.
A
vant d
’
installer

3-3
FRANÇAIS
Si vous avez une PCI Carte sans fil (PC60G)
D'abord, confirmez que le système est éteint. Enlevez la caisse de l’ordinateur pour
mettre la fente disponible de PCI sur la carte mère. Insérez fermement la PCI carte
sans fil dans la fente; puis, fixez-la avec des vis en parenthèse. Remplacez la
couverture et reliez l'antenne externe.
Si vous n'êtes pas un expert à installer la PCI carte sans fil, veuillez demander au
fournisseur ou à un technicien.
Après avoir installé la PCI carte sans fil sur votre ordinateur, vous devez
allumer votre ordinateur, le système détectera un nouveau lecteur et
commencera automatiquement la configuration. Veuillez ANNULER la
fenêtre “Trouvé un nouveau matériel magicien (Found New Hardware
Wizard) “saute du système, puis installez le pilote et l'utilité qui se trouvent
au InstallShield Wizard sur votre logiciel de CD.
Insérez le logiciel de CD dans votre pilote de CD-ROM, ensuite le
programme d'installation est automatiquement pris en marche.
Si l’Auto-run ne marche pas automatiquement, cliquez Début(Start) à la
barre de taches et choisissez Marche(Run).... Type : E:\setup.exe (où E
est le pilote de CDROM) dans la boîte Ouverte et cliquez OK pour marcher
le programme d'installation manuel.
L'écran de bienvenu de l’InstallShield Wizard apparaît.
Lisez et Acceptez l'Accord de Licence ; puis, cliquez Oui.
Le programme copiera les dossiers nécessaires au système. L'indicateur
de progrès montrera le statut d'installation.
Cliquez Fini quand l'installation est accomplie.
L'icône Réseau Sans Fil de MSI apparaîtra
dans la zone d’ état.
Installation
du mat
é
riel
u
Installation du logiciel
v
w x
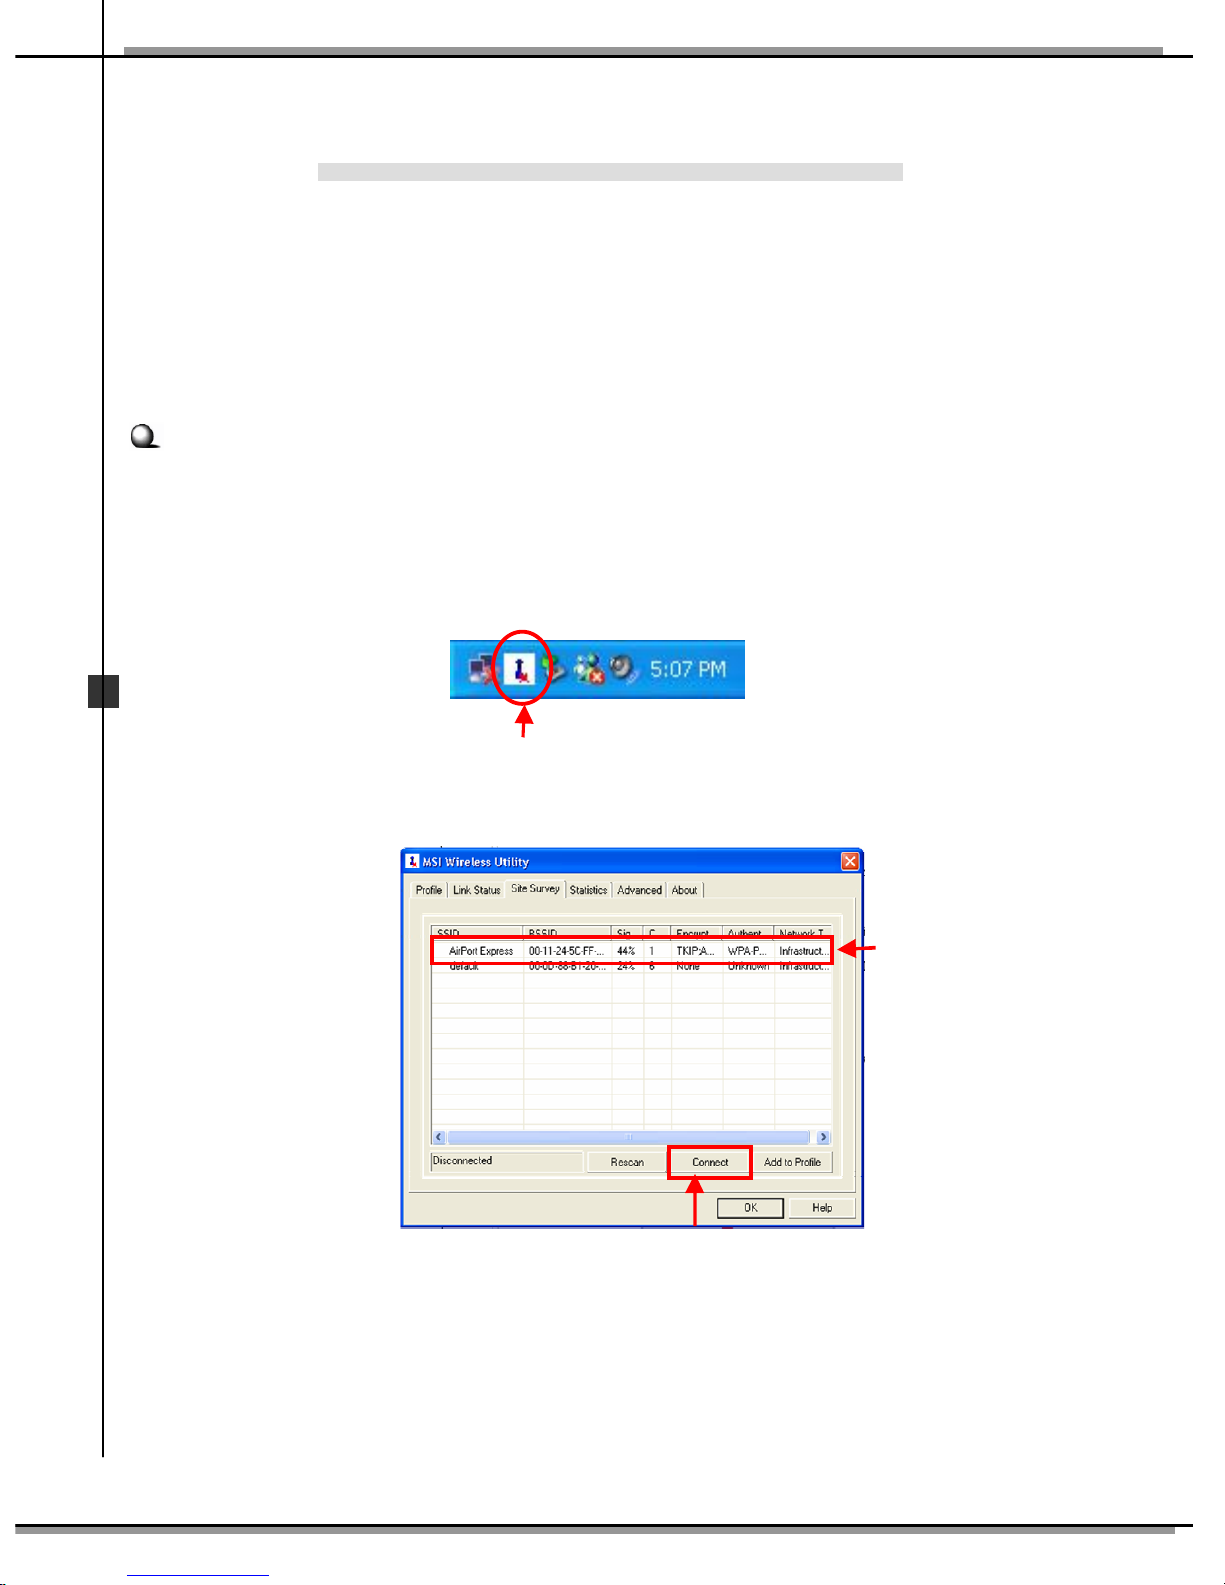
Icône Réseau Sans Fil de MSI
3-4
MS
I
PC60G
Wireless
11g Turbo G
PCI C ard
Après l’installation du logiciel, la PCI carte sans fil de MSI offre une utilité
commode et puissante qui vous permet d'installer, configurer, et bien savoir
l’état de réseau.
Votre PCI carte sans fil de MSI peut être employée par deux modes de réseau :
Mode d'Infrastructure et Mode Ad-hoc.
Mode d’Infrastructure: Permet à votre ordinateur de communiquer avec les
autres ordinateurs dans le réseau via un Point d'Accès.
Pour relier le Point d'Accès :
1. Cliquez l'icône Réseau Sans Fil de MSI pour apporter la fenêtre de
l’Utilité Sans Fil de MSI.
2. Dans l’Enquête du Site, choisissez le réseau que vous voulez, et
cliquez alors Connectez.
C
onnect
ez Le
Ré
seau
Cliquez
Choisissez
Cliquez
3-5
FRANÇAIS
3. Si le Point d'Accès choisi à se relier a été connecté et avait installé
l'Authentification et la Sécurité, vous devez obtenir la Clef
Pré-partagée de WPA ou la clef préalable de WEP par
l’administrateur de Point d'Accès pour entrer dans le blanc. Puis
cliquez OK pour accomplir la configuration.
Mode Ad-hoc permet à votre ordinateur de communiquer directement à
un autre ordinateur installé avec le même adapteur sans fil.
Pour établir le réseau Ad-hoc :
1. Cliquez l'icône Réseau Sans Fil de MSI pour apporter la fenêtre de
l’Utilité Sans Fil de MSI. Puis, cliquez Profil.
2. Cliquez Ajoutez.
C
onnect
ez Le
Ré
seau(2)
Cliquez
Importe
z la Clef
Pré-partagée de
WPA
Cliquez
Cliquez
3-6
MS
I
PC60G
Wireless
11g Turbo G
PCI C ard
3. Établissez le Nom de Réseau (SSID)
4. Vérifiez l'option“Type de Réseau”et choisissez “Ad-hoc” de permettre
le mode Ad-hoc.
5. Cliquez “Authentification et Sécurité”pour installer le type d'
Authentification, le Chiffrage et la Clef Pré-partagée de WPA.
Établissez
le SSID
Choisissez
Établissez la
configuration
selon vos
bsoins

ESPAÑOL
Capítulo 4

4-2
MS
I
PC60G
Wireless
11g Turbo G
PCI C ard
La guía rápida de instalación de la Tarjeta PCI Wireless PC60G de MSI le
muestra los pasos a dar para instalar la tarjeta de manera rápida y sencilla.
Para más información, consulte el manual del usuario del CD; si tiene alguna
pregunta sobre el producto, consulte la sección FAQ del manual del usuario o
visite la página web de MSI: http://www.msi.com.tw. Para más información
sobre el modo MSI Turbo G consulte el manual del usuario del CD.
Nota:
La serie MSI Turbo G es un producto muy recomendado si quiere un productowireless
de alta calidad.
Se aconseja utilizar el modo MSI Turbo G con los productos inalámbricos de la
serie MSI Turbo G para optimizar su funcionamiento.
No se garantiza la compatibilidad del modo MSI Turbo G con productos inalámbricos
de otras marcas.
Su eficacia puede variar dependiendo del entorno, del lugar en el que se utiliza y otros
factore
Antes de empezar
 Loading...