

Page 1
Atomic EFI Return System
PN 2922
ONLINE PRODUCT REGISTRATION: Register your MSD product online. Registering your product
will help if there is ever a warranty issue with your product and helps the MSD R&D team create
new products that you ask for! Go to www.msdperformance.com/registration.
Thank you for selecting the Atomic Fuel Line Return kit. This kit is recommended for use with the
Atomic Throttle Body EFI and Atomic LS EFI systems.
Parts Included:
1 - Adjustable Regulator
1 - -6AN Port Plug
3 - -6AN Straight Port Fittings
2 - -6AN 90° Push-Lock Fittings
2 - -6AN Straight Push-Lock Fittings
15 Feet - High Pressure Fuel Hose
CAPABILITIES
The Atomic Adjustable Regulator is configured for a single -6AN inlet, and dual -6AN outlets (for
regulator-to-tank line routing flexibility). The recommended operating range is 0-90 psig (pounds
per square inch gauge). The maximum recommended flow rate is 500 liters/hour (2.2 GPM). The
vacuum/boost compensation ratio is 1:1.
1 - Regulator Parts Bag includes:
1 - Regulator Mounting Bracket
1 - Brass Hose Barb Fitting
1 - Stainless Steel Pipe Plug
2 - 10-32 x 0.375 Button Head Cap Screws
1 - High Pressure Fuel Hose Clamp
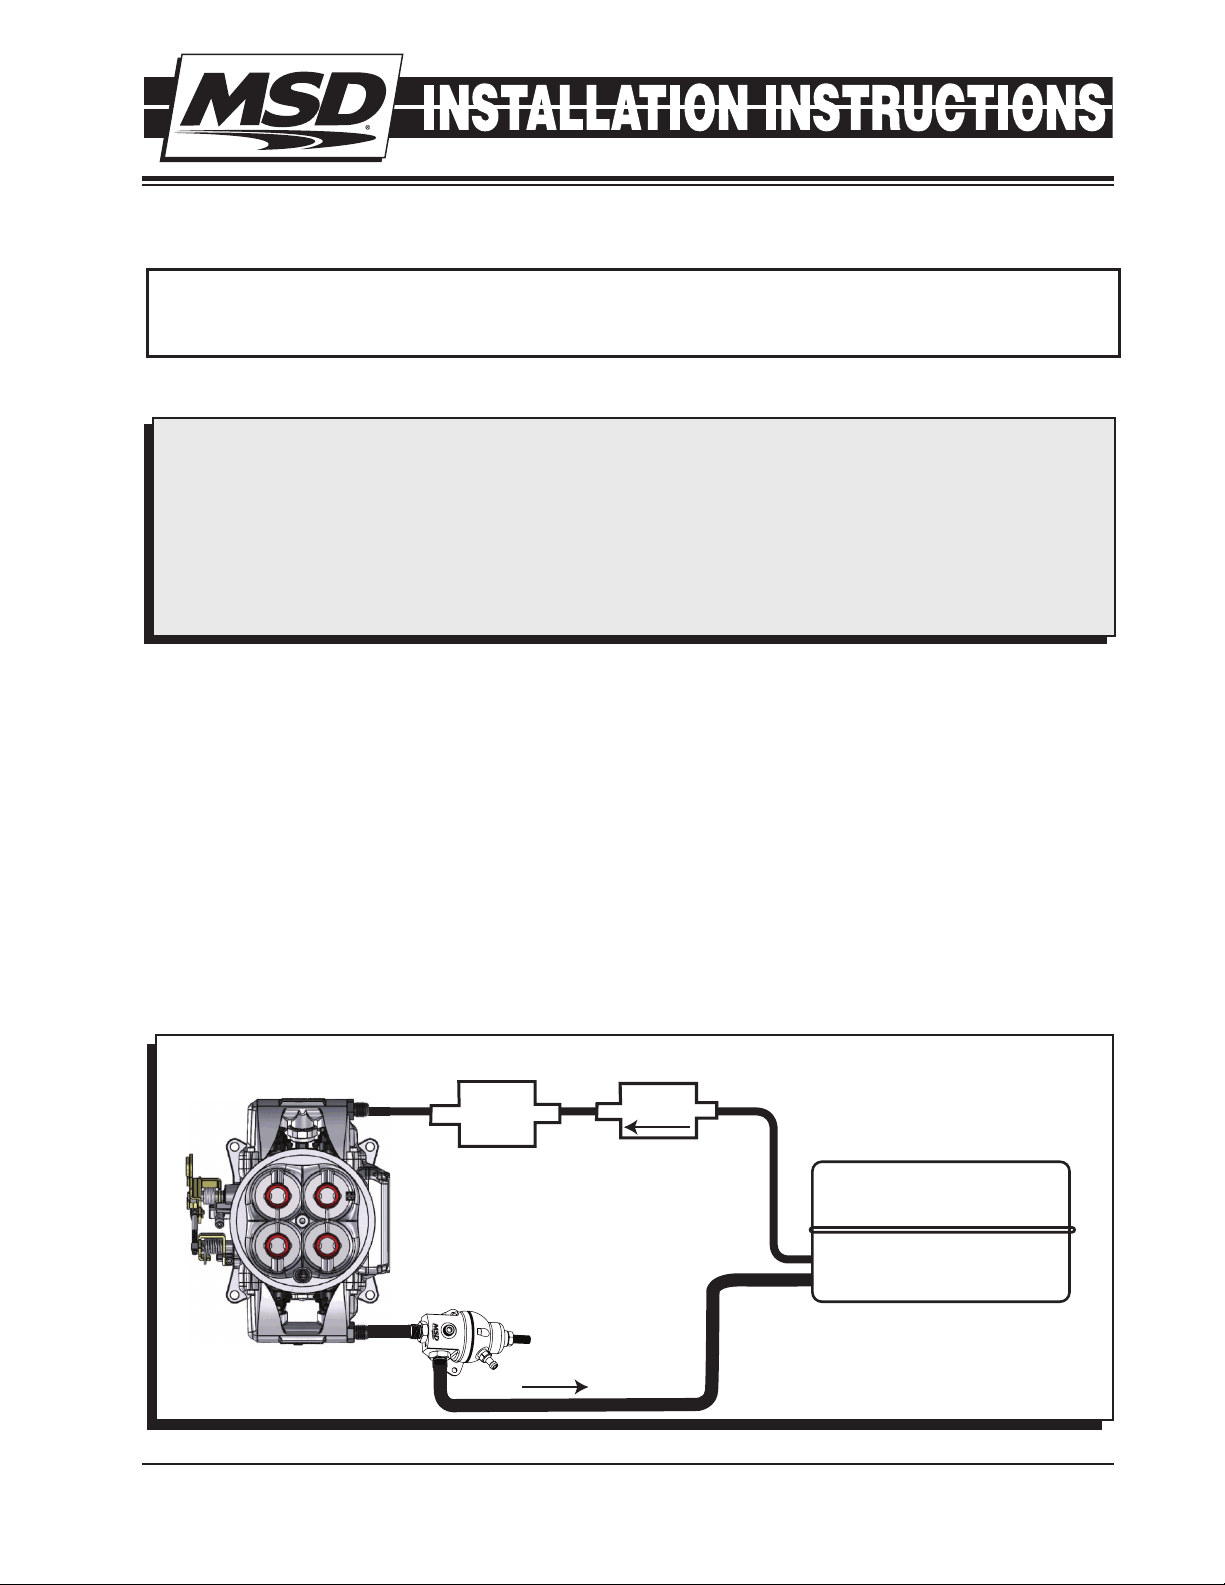
RECOMMENDED PLUMBING SCHEMATICS
Use the schematic below as a guide when installing the kit in conjunction with an Atomic throttle body
EFI system. There are two possible connection points on the throttle body unit, one of which will be
the fuel supply in an operational system. DO NOT “tee” into the supply line and leave the -6AN port
plug installed in the remaining throttle body port. Remove the -6AN port plug from the throttle body
and route fuel from that port to the regulator inlet port (using the supplied hose and fittings). The
hose length between the throttle body and regulator is not critical, but generally speaking, should be
kept to a minimum. Route and secure the hose as necessary to prevent chafing, stretching due to
engine movement, and heat-related damage.
CORRECT FOR RETURN STYLE FUEL SYSTEM.
FUEL
FILTER
MSD ADJUSTABLE
REGULATOR
FUEL
PUMP
FUEL TANK
Figure 1 Atomic TBI Return Fuel System.
MSD • WWW.ATOMICEFI.COM • (915) 857-5200 • FAX (915) 857-3344
Page 2
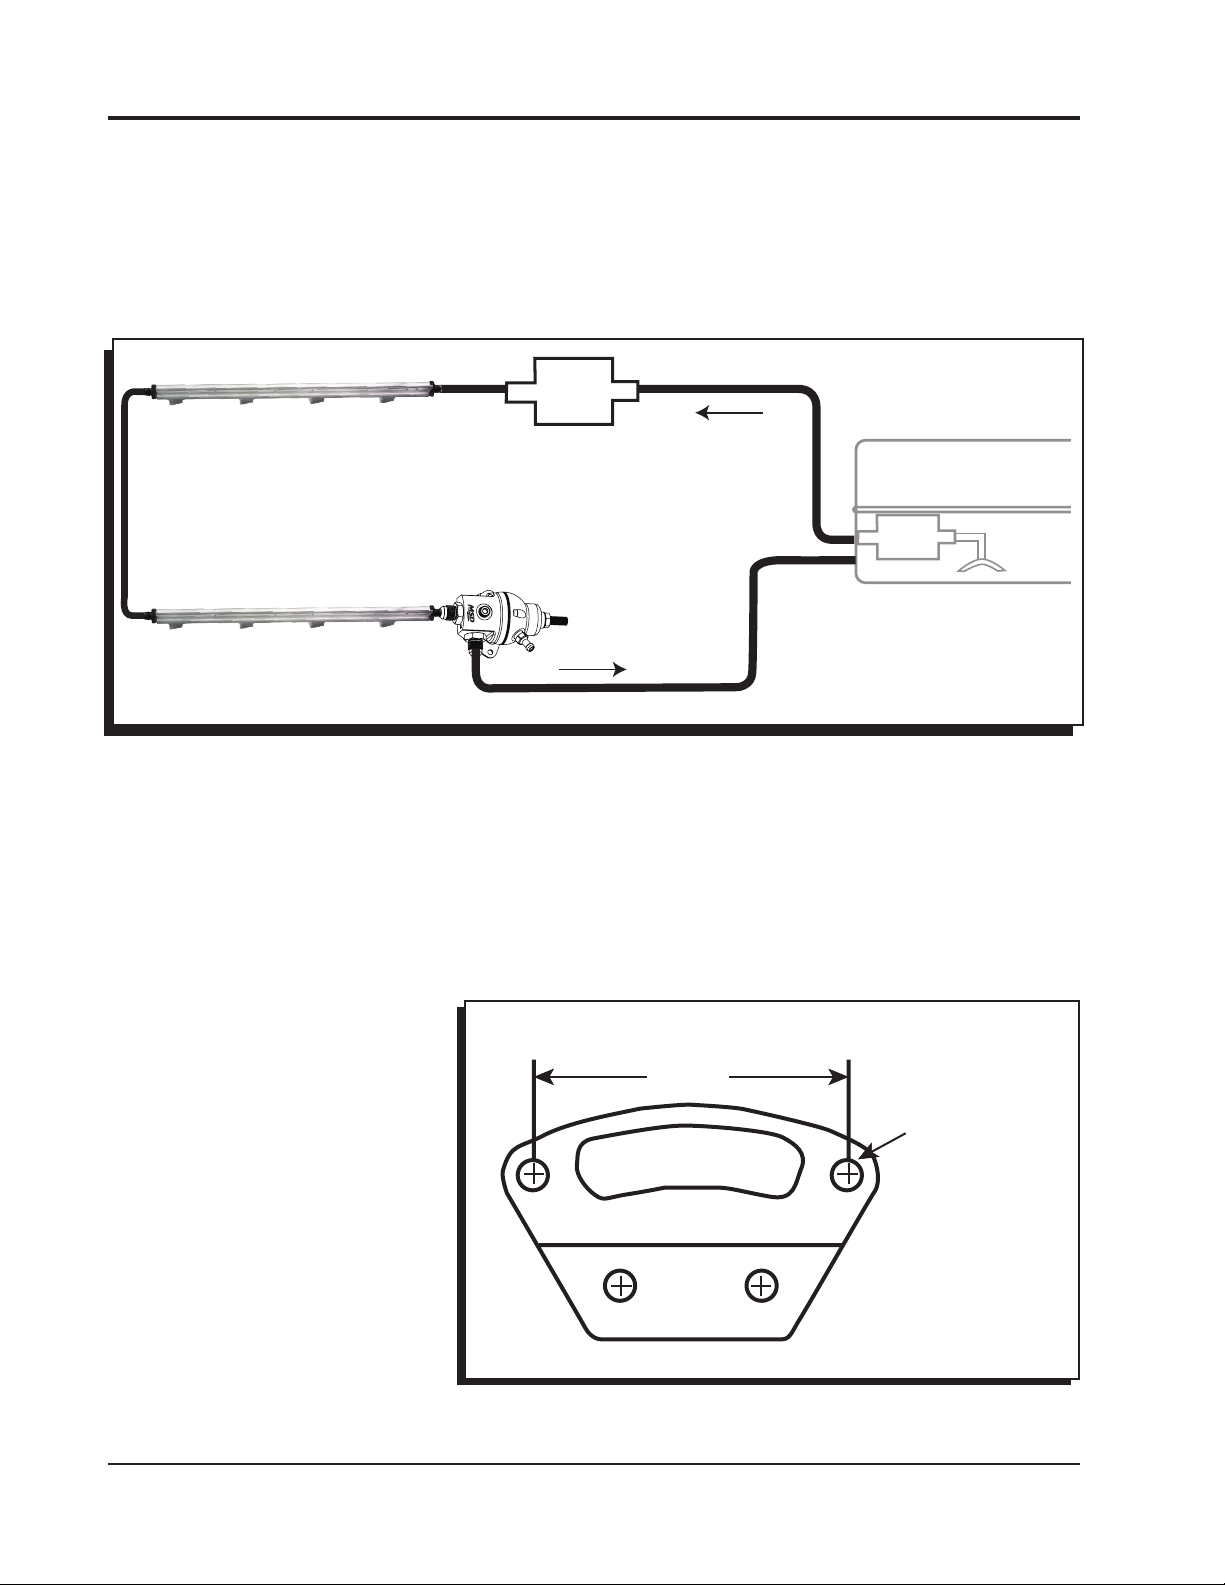
2 INSTALLATION INSTRUCTIONS
, MOUNT
ACCOMMODATES
Use the schematic below as a guide when installing the kit in conjunction with an Atomic LS EFI system.
There are two possible connection points (one at the rear of each fuel rail assembly). One rail will be
connected to the fuel supply in an operational system. DO NOT “tee” into the supply line and leave
the opposing fuel rail plugged or capped. Fuel from the opposing rail should be routed to the regulator
inlet port (using the supplied hose and fittings). The hose length between the rail and regulator is not
critical, but generally speaking, should be kept to a minimum. Route and secure the hose as necessary
to prevent chafing, stretching due to engine movement, and heat-related damage.
FUEL RAIL
(UNDER COVER)
FUEL RAIL
FUEL RAIL
(UNDER COVER)
(UNDER COVER)
MSD ADJUSTABLE
REGULATOR
FUEL
FILTER
FUEL TANK
FUEL
PUMP
IT IS RECOMMENDED TO MOUNT
THE FUEL PUMP IN THE TANK
WHENEVER POSSIBLE. IF IT MUST
BE MOUNTED EXTERNALLY
THE PUMP WITHIN 2-FEET OF THE
FUEL TANK SENDING UNIT.
Figure 2 Atomic LS Return Fuel System.
The regulator-to-tank connection should be made using the supplied hose and fittings. Install the
supplied -6AN port plug in whichever regulator return port is not used. Depending on the configuration
of your fuel tank / fuel cell, the supplied high pressure fuel hose clamp may be used at the tank fitting
connection.
Use care when routing the hose from the regulator to the tank. Route and secure the hose as necessary
to prevent chafing, stretching due to engine movement, and heat-related damage.
REGULATOR MOUNTING
Using the two (2) supplied 10-32
x 0.375 Button Head Cap Screws
and a 1/8-inch hex key (Allen
wrench), attach the regulator
bracket to the regulator body. The
regulator may then be mounted
to the firewall, or other convenient
surface. Regulator orientation
is not critical, but be mindful of
adjustment screw access and hose
routing. Refer to Figure 3 for a
mounting bracket template.
2.200”
#10 SCREW
Figure 3 Regulator Mounting Bracket Template
MSD • WWW.MSDPERFORMANCE.COM • (915) 857-5200 • FAX (915) 857-3344
Page 3
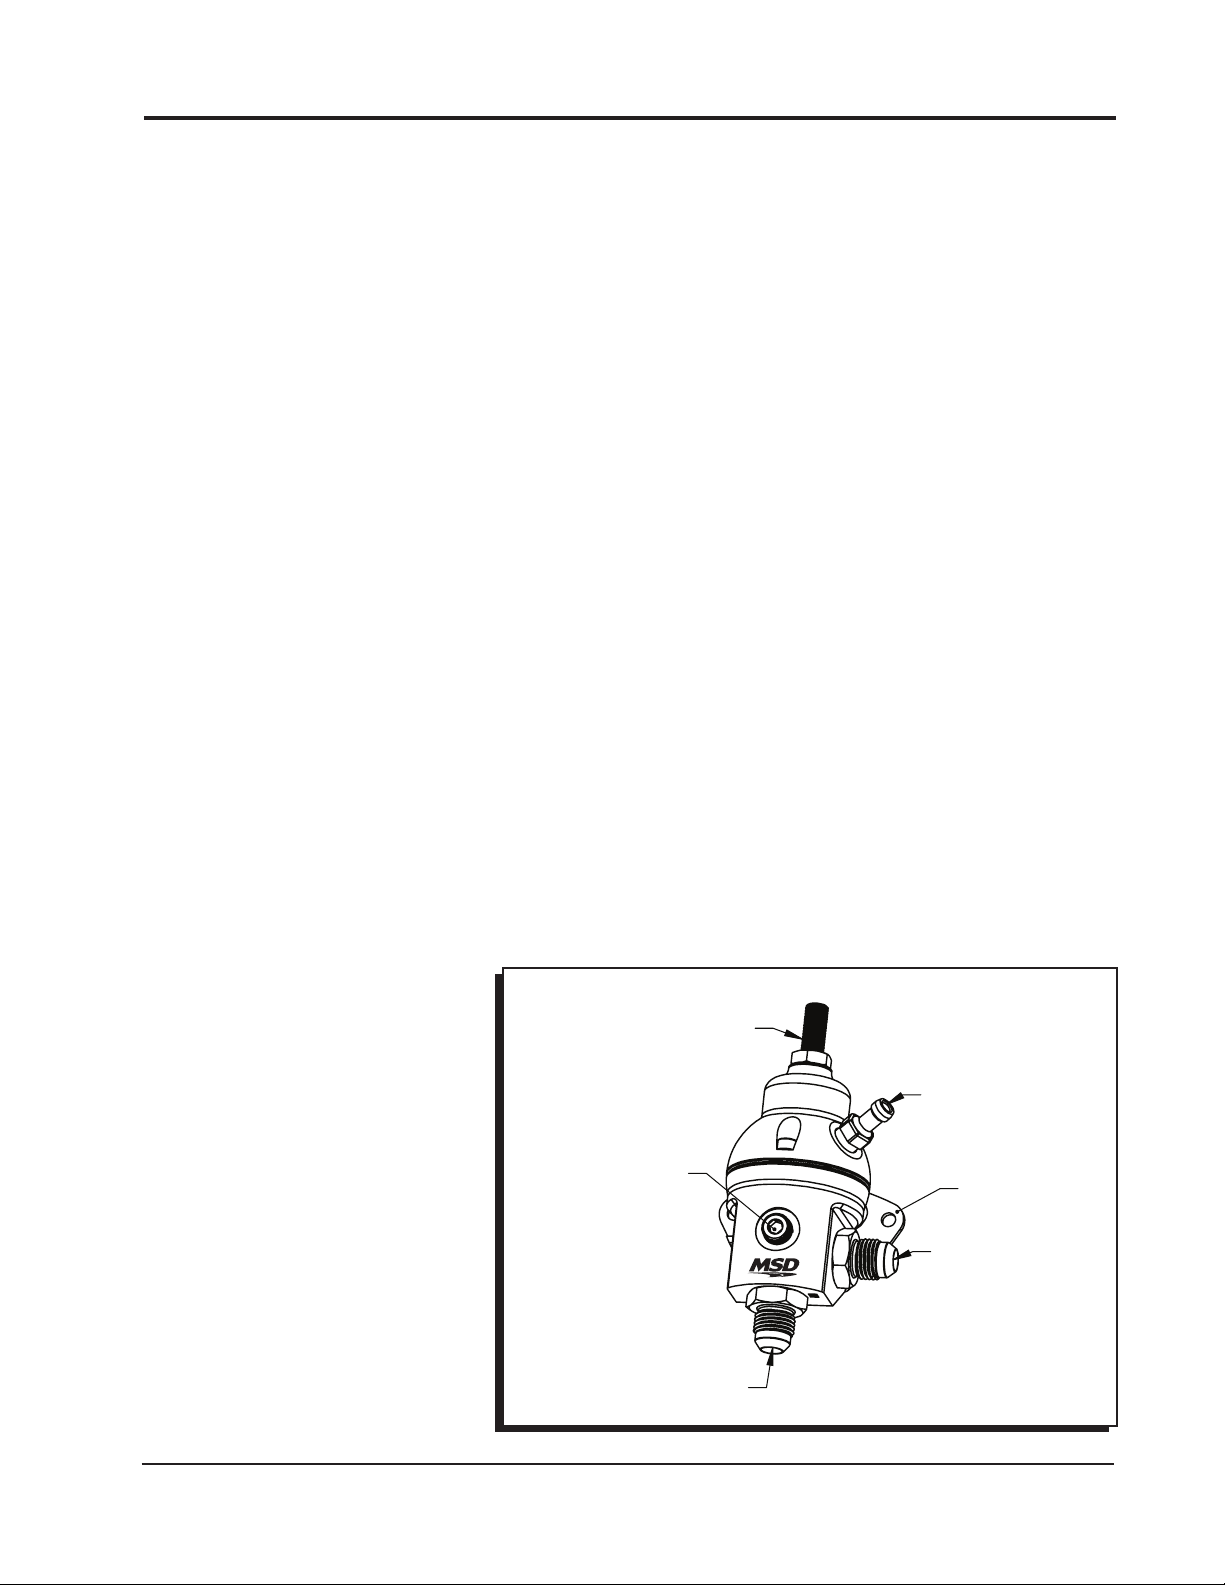
INSTALLATION INSTRUCTIONS 3
VACUUM / BOOST
ADJUSTMENT SCREW
INLET PORT
GAUGE PORT
REGULATOR CONNECTIONS AND ADJUSTMENT
The regulator inlet port is located on the bottom surface, and clearly marked with an identifier machined
in the housing (see Figure 4 below). Two (2) outlet ports are available, but typically only one (1) will
be used. Install the supplied -6AN port plug in the unused outlet port using a 5/16-inch hex key (Allen
wrench). The -6AN straight port fittings should be snugged with an 11/16-inch wrench or deep socket.
Install the supplied 1/8-27 NPT brass hose barb fitting in the upper regulator housing (see Figure 4
below) using a 7/16-inch wrench or deep socket. Thread sealer is not required on this fitting, but
can be used if desired. Connect an intake manifold vacuum / boost source to this fitting, or leave
it open to the atmosphere if manifold pressure compensation is not required. DO NOT plug this
opening. Ensure that contaminants (such as water and road spray) cannot enter the open fitting.
In the event that vacuum / boost reference is not required, a more cosmetically pleasing option is to
install a sintered metal exhaust muffler in this port (such as McMaster-Carr PN 4450K1-Bronze or PN
4402K51-Stainless Steel)
The 1/8-27 NPT port in the lower housing allows the installation of a fuel pressure gauge (direct or
remote-reading). If use of this port is not required, install the supplied stainless steel pipe plug using
a 3/16-inch hex key (Allen wrench). Use of a fuel compatible paste-type thread sealer is REQUIRED
on this plug. Thread sealing tape is also an option, but not recommended due to the potential for
particulate and debris generation.
Use a 5/32-inch hex key (Allen wrench) to adjust the regulator set point. Clockwise rotation (screw
advancing inward) increases the set point, and counter-clockwise rotation (screw advancing outward)
decreases the set point. When the desired set point has been reached, snug the jam nut using a
½-inch wrench.
Refer to the user installation instructions, supplied with the Atomic EFI kit, for regulator set point
recommendations.
Note: An overly lengthy and restrictive return line routing scheme may result in a non-negligible
pressure rise across the regulator-to-tank portion of the system. For this reason, the final
regulator adjustment should be made while monitoring the system fuel pressure (on the Atomic
hand-held Dash) with the engine at idle.
AND LOCK NUT
REFERENCE PORT
(1/8-27 NPT)
(1/8-27 NPT)
MOUNTING
BRACKET
OUTLET PORT
(1 OF 2)
MSD • WWW.ATOMICEFI.COM • (915) 857-5200 • FAX (915) 857-3344
Figure 4 - Regulator Feature Identification Guide
Page 4

4 INSTALLATION INSTRUCTIONS
STOP HERE
REVIEW YOUR INSTALLATION
Take a few extra minutes to check all aspects of your return fuel system installation at this point. Cycle
the key on and off several times to ensure a complete fuel system prime, and verify that all connections
and fittings are leak-tight. Don’t forget to make the final regulator adjustment with the engine idling.
REGULATOR SERVICE
The regulator diaphragm assembly is available as a service kit from MSD and considered a userserviceable item. Detailed instructions are available in the service kit, but for completeness, the
following guidelines must be observed if it is necessary to separate the regulator housings.
• Usea9/64-inchhexkey(Allenwrench)toremovethethree(3)8-32x0.375SocketHeadCap
Screws
• Usecarenottoloseanyinternalparts(particularlythe¼-inchballbeneaththeadjustmentscrew)
• Uponre-assembly,ensurethatnodebrisorparticulatesaretrappedbetweenthehousingmating
surfaces (these may cut or damage the diaphragm)
• Alignthediaphragmslotswiththethree(3)screwholesandstackthespringassemblypriorto
installing the upper housing
• Installthethree(3)8-32x0.375SHCStoastagednaltorqueof25-28*in-lb.
o Stage 1 Torque: 10 in-lb
o Stage 2 Torque: 20 in-lb
o Stage3(nal)Torque:25-28*in-lb.
*VerifytheStage3torqueafteratleastonehourhaselapsed(toallowfordiaphragmcompressionset)
Completing the installation of your MSD Atomic fuel return kit will require that several connections
be made using the supplied high-pressure hose and push-lock fittings. Use compressed air (or
equivalent) to ensure that all complete hose / fitting assemblies are clean prior to final installation.
To ensure that your connections are safe, durable, and cosmetically pleasing, we recommend that
you adhere to the guidelines in the following section:
MSD • WWW.MSDPERFORMANCE.COM • (915) 857-5200 • FAX (915) 857-3344
Page 5

INSTALLATION INSTRUCTIONS 5
PROPER INSTALLATION OF PUSH-LOCK AN FITTINGS
IN AEROQUIP AQP HOSE
Proper installation of push-lock fittings BEGINS with the first cut of the hose. The hose end must be
cut squarely and cleanly. If these two requirements are not met, the connection is compromised from
the start. See Figure 5 and 6 for additional information on achieving a proper cut.
Apply a light coating of fresh motor
oil to the fitting barbs. More is
NOT better – too much oil results
in a slippery mess which makes it
impossible to get a tight grip on the
hose.
To the extent possible, make sure
the push-lok fitting is well anchored
– whether it is in a vise, connected to
another stationary fitting, or against
a hard surface. You WILL NOT get
good results by trying to hold the
fitting in one hand, and the hose in
the other. Likewise, you WILL NOT
get good results if you cannot apply
sufficient force to fully engage the
fitting barbs in one smooth motion.
Having to stop and twist, and then
resume pushing, typically results
in an inferior connection - requiring
that you cut the hose off the fitting
and start again. This means that
you should not try to push the hose
on the fitting when leaning over the
engine while standing on an old
milk crate.
NOTE: THERE IS MINIMAL DISTURBANCE
OF THE OUTER JACKET, BRAIDS,
AND INNER LINER. THIS TYPE
OF CUT IS ACHIEVED WITH A
HOSE CUTTER, NEW RAZOR
BLADE, OR EXTREMELY SHARP
(NON-SERRATED) KNIFE. THE
HOSE SHOULD BE SEVERED
COMPLETELY – REQUIRING NO
TEARING OF BRAIDS AND / OR
RUBBER MATERIAL WHEN THE
CUT IS COMPLETE. THE CUT
PLANE IS PERPENDICULAR TO THE
LONGITUDINAL HOSE AXIS.
Figure 5 Correct Clean, Square Cut
NOTE: THERE IS VISIBLE DAMAGE TO THE
OUTER JACKET, BRAIDS, INNER
LINER, OR ANY COMBINATION
THEREOF. THIS TYPE OF CUT
RESULTS FROM THE USE OF A
DULL KNIFE, SERRATED KNIFE,
“SAWING ACTION” WHILE
CUTTING, THE USE OF SIDECUTTING PLIERS THAT CRUSH
THE HOSE WHILE CUTTING, OR
ANY TYPE OF CUTTER THAT
UTILIZES SHEARING ACTION.
THE CUT PLANE IS GENERALLY
NOT PERPENDICULAR TO
LONGITUDINAL HOSE AXIS.
Figure 6 Incorrect Jagged, Rough Cut
MSD • WWW.ATOMICEFI.COM • (915) 857-5200 • FAX (915) 857-3344
Page 6

6 INSTALLATION INSTRUCTIONS
The depth to which the fitting is inserted into the hose is EXTREMELY IMPORTANT. Stopping too soon,
with the end of the hose positioned directly above the inboard hose barb, will result in excessive hoop
stresses in the braids and outer jacket. Pushing too far, such that the hose starts to ride up on the beauty
ring lead-in chamfer, will have the same result. In either case, the residual hoop stresses (in the braids
and outer jacket) will lead to the formation of splits in the outer jacket once the hose has been exposed
to under-hood temperatures. See Figure 7 for an example of an improperly installed fitting. See
Figure 8 for an example of an improperly installed fitting – which resulted in splits in the outer hose
jacket following heat exposure.
Use the thin edge of the beauty ring as a depth gauge for the end of the hose. STOP pushing when
the end of the hose is flush with the thin edge of the beauty ring. At this point, the end of the hose
should have “rolled over” the inboard barb and conformed snugly to the fitting neck. See Figure 9
for an example of a properly installed fitting.
NOTE: EXCESSIVE GAP BETWEEN END OF HOSE AND THIN EDGE OF BEAUTY
RING - RESULTING IN RESIDUAL HOOP STRESSES IN BRAIDS AND OUTER
JACKET. CONNECTION INTEGRITY HAS BEEN COMPROMISED, AND OUTER
JACKET WILL SPLIT WHEN EXPOSED TO HEAT.
Figure 7 Improperly Installing Push-Lock Fitting
MSD • WWW.MSDPERFORMANCE.COM • (915) 857-5200 • FAX (915) 857-3344
Page 7

INSTALLATION INSTRUCTIONS 7
SPLITS IN OUTER HOSE JACKET (BEAUTY RING REMOVED FOR CLARITY)
Figure 8 Improperly Installed Push-Lock Fitting
END OF HOSE IS FLUSH WITH THE THIN EDGE OF THE BEAUTY RING.
Figure 9 Properly Installed Push-Lock Fitting
MSD • WWW.ATOMICEFI.COM • (915) 857-5200 • FAX (915) 857-3344
Page 8

8 INSTALLATION INSTRUCTIONS
TECH NOTES
_________________________________________________________________________________________________________________________
_________________________________________________________________________________________________________________________
_________________________________________________________________________________________________________________________
_________________________________________________________________________________________________________________________
_________________________________________________________________________________________________________________________
_________________________________________________________________________________________________________________________
_________________________________________________________________________________________________________________________
_________________________________________________________________________________________________________________________
_________________________________________________________________________________________________________________________
_________________________________________________________________________________________________________________________
_________________________________________________________________________________________________________________________
_________________________________________________________________________________________________________________________
_________________________________________________________________________________________________________________________
_________________________________________________________________________________________________________________________
_________________________________________________________________________________________________________________________
_________________________________________________________________________________________________________________________
_________________________________________________________________________________________________________________________
_________________________________________________________________________________________________________________________
Service
In case of malfunction, this MSD component will be repaired free of charge according to the terms of the warranty.
When returning MSD components for warranty service, Proof of Purchase must be supplied for verification. After
the warranty period has expired, repair service is based on a minimum and maximum fee.
All returns must have a Return Material Authorization (RMA) number issued to them before
being returned. To obtain an RMA number please contact MSD Customer Service at 1 (888) MSD-7859 or visit
our website at www.msdperformance.com/rma to automatically obtain a number and shipping information.
When returning the unit for repair, leave all wires at the length in which you have them installed. Be sure to include
a detailed account of any problems experienced, and what components and accessories are installed on the vehicle.
The repaired unit will be returned as soon as possible using Ground shipping methods (ground shipping is covered
by warranty). For more information, call MSD at (915) 855-7123. MSD technicians are available from 7:00 a.m. to
5:00 p.m. Monday - Friday (mountain time).
Limited Warranty
M
SDwarrantsthisproducttobefreefromdefectsinmaterialandworkmanshipunderitsintendednormaluse*,
when properly installed and purchased from an authorized MSD dealer, for a period of one year from the date of
the original purchase. This warranty is void for any products purchased through auction websites. If found to be
defective as mentioned above, it will be repaired or replaced at the option of MSD. Any item that is covered under
this warranty will be returned free of charge using Ground shipping methods.
This shall constitute the sole remedy of the purchaser and the sole liability of MSD. To the extent permitted by
law, the foregoing is exclusive and in lieu of all other warranties or representation whether expressed or implied,
including any implied warranty of merchantability or fitness. In no event shall MSD or its suppliers be liable for special
or consequential damages.
*Intendednormalusemeansthatthisitemisbeingusedaswasoriginallyintendedandfortheoriginalapplication
as sold by MSD. Any modifications to this item or if it is used on an application other than what MSD markets the
product, the warranty will be void. It is the sole responsibility of the customer to determine that this item will work for
the application they are intending. MSD will accept no liability for custom applications.
MSD • WWW.MSDPERFORMANCE.COM • (915) 857-5200 • FAX (915) 857-3344
© 2013 Autotr onic Controls Corp oration
FRM31527 Revised 4/13 Printed in U.S.A.
 Loading...