


4135H - 4155H - 4155 H 4WD
INSTRUCTIONS FOR USE
INSTRUCTIONS FOR USE EN.....7
MODE D’EMPLOI FR... 20
GEBRUIKSAANWIJZING NL .. 34
8211-0069-80
1
2 |
3 |
|
S |
4 |
5 |
2
6 |
|
I |
|
|
F K |
I |
H |
|
G |
S |
|
8 |
|
L |
|
L |
|
|
K |
J |
K |
10 |
|
7 |
|
|
C |
|
|
D, E |
|
|
9 |
|
|
Q |
R |
S |
11
3
12
D E F
B C
A
14
I
J
K 
16 HST
N
13
G
15 |
L |
|
M |
17 |
4WD |
P O
4

18 |
|
Q |
|
|
|
|
|
Max |
20 |
|
|
R |
S |
T |
22
Y
19
21 |
0 |
1 |
U |
V |
23 |
5

24
26
28
25
27 |
29 |
6

ENGLISH |
EN |
|
|
1 GENERAL
This symbol indicates WARNING. Serious personal injury and/or damage to property may result if the instructions are not followed carefully.
You must read these instructions for use and the accompanying pamphlet “SAFETY INSTRUCTIONS” carefully, before starting up the machine.
1.1SYMBOLS
The following symbols appear on the machine. They are there to remind you of the care and attention required during use and maintenance.
This is what the symbols mean:
Warning!
Read the instruction manual and the safety manual before using the machine.
Warning!
Watch out for discarded objects. Keep onlookers away.
Warning!
Always wear hearing protectors.
Warning!
This machine is not designed to be driven on public roads.
Warning!
The machine, equipped with original accessories, must not be driven in any direction on slopes with a gradient greater than 10º.
Warning!
Risk of crushing injuries. Keep hands and feet well away from the articulated steering joint.
Warning!
Risk of burn injuries. Do not touch the silencer/catalytic converter.
1.2 Designations
Three versions of Park Compact are available and are designated in the table below:
Machine |
Designa- |
|
tion |
||
|
||
|
|
|
4135 H with hydrostatic trans- |
HST |
|
mission. |
||
|
||
4155 H with hydrostatic trans- |
HST |
|
mission. |
||
|
||
4155 H with hydrostatic trans- |
4WD |
|
mission and four wheel drive. |
||
|
1.3 References
1.3.1 Figures
The figures in these instructions for use are numbered 1, 2, 3, etc.
Components shown in the figures are marked A, B, C, etc.
A reference to component C in figure 2 is written “2:C”.
1.3.2 Headings
The headings in these instructions for use are numbered in accordance with the following example:
“1.3.1 General safety check” is a subheading to “1.3 Safety checks” and is included under this heading.
When referring to headings, only the number of the heading is normally specified. E.g. “See 1.3.1”.
2 SAFETY INSTRUCTIONS
2.1 GENERAL
•Please read through these instructions carefully. Learn all the controls and the correct use of the machine.
•Before use, all drivers must apply for and receive practical training in the operation of the machine. Particular emphasis should be placed on the fact that:
a.The use of ride-on lawnmowers requires care and concentration.
b.On slopes, it is not possible to control a sliding ride-on lawnmower by braking. The main reasons for losing control are insufficient traction, excessively high speed, insufficient braking, the machine not being suited to the task, lack of attention to the surface or incorrect use as a towing vehicle.
•Never let children or anyone who is not familiar with these instructions to use the machine. Local regulations may impose restrictions as regards the age of the driver.
•Never use the machine if others, particularly children or animals, are in the vicinity.
•Remember that the driver is responsible for accidents that happen to other people or their property.
•Do not let children or other passengers to ride with you on the machine. They might fall off and be seriously injured, or they might prevent the machine being driven safely.
•Do not use the machine if you are under the influence of alcohol, drugs or medication. Neither should you use it when you are tired or feeling unwell.
7

EN |
ENGLISH |
|
|
2.2 PREPARATIONS
•Wear strong shoes and long trousers when using the machine. Do not operate it barefoot or wearing sandals.
•Wear appropriate clothing when using the machine. Do not wear loose, hanging clothes, jewellery, scarves, ties, etc., which can get caught in rotating parts. Tie up long hair.
•Carefully check the area that is to be cut/cleared of snow. Remove all loose stones, sticks, steel wire and other foreign objects which the machine could throw out.
•Warning – Petrol is highly inflammable.
a.Always store petrol in containers that are made especially for this purpose.
b.Only fill or top up with petrol outdoors, and never smoke when filling or topping up.
c.Fill with petrol before starting the motor. Never remove the filler cap or fill with petrol while the engine is running or still warm.
d.If petrol is spilt, do not try to start the engine but instead move the machine away from the place where the spillage occurred and avoid any possible causes of sparks until the petrol fumes have evaporated.
e.Do not forget to screw the cap on the petrol tank and the storage container after filling.
•Replace faulty silencers.
•Before use, always check that blades and mounting devices are not worn or damaged. Replace worn or damage parts as a set so that the correct balance is maintained.
•The battery (on electrically started machines) gives off explosive gases. Keep sparks, flames and cigarettes away. Ensure there is sufficient ventilation during charging.
•The battery contains toxic material. Do not damage the battery casing. If the casing is damaged, avoid contact with the content of the battery.
•Do not throw out old, defective batteries with the rubbish. Contact the local authorities for correct waste Management.
•Do not short circuit the battery. Sparks occur which can result in fire.
2.3 DRIVING
•Start the engine according to the instructions in the user guide. Keep your feet away from the blades.
•Do not run the engine in confined areas where hazardous carbon monoxide gases can collect.
•Only use the machine in daylight or where there is good lighting.
•Always use hearing protectors.
•Take care when approaching obstacles which obscure your vision.
•Always keep children away from the machine’s working area. Get another adult to keep the children under supervision.
•Take care when reversing. Look behind you both before and during reversing to check for any obstacles. Look out for small children.
•Disengage the blade(s) and the connection before starting the engine.
•Never have your hands or feet near or under rotating parts. Watch out for the blades. Do not stand right in front of the discharge opening.
•Avoid using the machine on wet lawns.
•Be careful when driving on slopes. No sudden starting or stopping when moving up or down a slope.
•Release the clutch pedal slowly. Always drive with the gear engaged, and do not disengage when driving down slopes.
•Never cut across a slope. Move from the top down, and from the bottom to the top.
•Use low acceleration when engaging the drive, especially in long grass. Reduce the speed on slopes and when making sharp turns to prevent the machine from tipping over or you losing control of the machine.
•Watch out for holes in the ground and other hidden dangers.
•Do not drive too near ditches or high edges. The machine can turn over if a wheel drives over the edge or the edge breaks.
•Take care when towing and when using heavy equipment.
a.Only use an approved towing device.
b.Limit the load so that it can be controlled safely.
c.Do not make any sudden turns. Take care when reversing.
d.Use wheel weights or front weight when recommended in the user instructions.
•Look out for traffic at crossings or when driving near roads.
•Stop the blade(s) when crossing a surface other than grass during mowing.
•When using any of the accessories, never direct the discharge at somebody standing beside it, and do not allow anyone to stand near the machine when it is running.
•Never operate the machine with insufficient protection or without the safety devices in place.
8

ENGLISH |
EN |
|
|
•Existing safety devices may not be disconnected or disengaged. Check that the safety devices work each time before using the machine.
•Do not alter the engine’s regulator setting and do not race the engine. The danger of personal injury increases when the engine is run at high revs.
•Do not touch engine components which become warm during use. Risk of burn injuries.
•Do not leave the driving seat without:
a.Disengaging the power take-off and lowering the accessories.
b.Putting the gear in neutral and activating the parking brake.
c.Stopping the engine and removing the key.
•Only use accessories that are approved by the machine’s Manufacturer.
•The machine may not be used without accessories/tools being installed in the machine’s tool mounts. Driving without accessories can have a negative effect on the stability of the machine.
•Take care when using grass collectors and other accessories. These can alter the machine’s stability. Particularly on slopes.
•Disengage the drive to the accessories, shut off the engine and disconnect the spark plug cable or remove the starter key:
a.To remove sticks and rubbish or when the discharge has become clogged.
b.To check, clean or service the machine.
c.To check whether damage has occurred and to carry out any repairs before starting and using the machine again after a collision with a foreign object.
d.To check the machine if it begins to vibrate excessively. (Check immediately).
•Disengage the drive to accessories during transport or when the machine is not in use.
•Shut off the engine and disconnect the drive to the accessories:
a.Before filling with petrol.
b.Before removing the grass collector.
c.Before adjusting the height setting, assuming this cannot be done from the driver’s position.
•Reduce the acceleration when the engine is to be stopped, and if the engine is equipped with a fuel shut-off valve, this should be switched off when the work is finished.
•Take care with multiple blade decks as one rotating blade can cause other blades to rotate.
•The machine, equipped with original accessories, must not be driven in any direction on slopes with a gradient greater than 10º.
•The cutting deck’s original blade(s) may not be replaced with non-original devices intended for e.g. moss scarification. If such devices are used, the guarantee will cease to be valid. There is also a risk of serious injury or damage to people or property.
•Take care when unloading and loading the machine onto a trailer or lorry.
2.4 MAINTENANCE AND STORAGE
•Tighten all nuts and screws so that the machine is in safe working condition.
•At regular intervals check that the cutting deck’s blade screw(s) are properly tightened.
•Regularly check the operation of the brakes. It is important to maintain and repair the brakes if necessary.
•Never store the machine with petrol in the tank in buildings where the fumes can come into contact with open flames or sparks.
•Allow the engine to cool before placing the machine in a store.
•To reduce the risk of fire, keep the engine, silencer, battery and petrol tank free from grass, leaves and surplus oil.
•Check frequently whether there is any wear or damage to the grass collector.
•For the sake of safety, replace worn or damaged parts.
•Always use genuine spare parts. Non-genuine spare parts can entail a risk of injury, even if they fit the machine.
•Replace damaged warning and instruction stickers.
•If there is no mechanical lock for the transport position, the cutting deck must be lowered when parked, stored or when the machine is left unsupervised.
•If the petrol tank is to be emptied, this must take place outdoors.
•Store the machine so that children cannot get to it.
3 STORAGE
Empty the petrol tank. Start the engine and let it run until it stops.
Replace the oil while the engine is still warm.
Unscrew the spark plug and pour a tablespoonful of oil into the cylinder. Rotate the engine a few turns to that the oil is distributed in the cylinder. Install the spark plug.
9

EN |
ENGLISH |
|
|
Clean the entire machine. It is particularly important to clean under the cutting deck. Touch up paint damage to prevent rust.
Store the machine indoors in a dry place.
Machines with an electric starter:
Remove the battery. Store it well charged in a cool place (between 0°C and +15°C).
At the correct storage temperature, the battery should be maintenance-charged every four months.
The battery acid is extremely corrosive and can cause injuries and damage to skin and clothing. Always use rubber gloves and glasses (goggles) to protect your eyes. Avoid inhaling any acid vapour.
Do not incline the battery too much so that the battery acid can run out onto hands or clothing. If this should happen, rinse with plenty of water.
4 ASSEMBLY
To avoid injury and damage to people and property, do not use the machine until all the measures in this instruction have been carried out..
4.2 Engine casing
To fill with fuel and to inspect and maintain the engine and battery, open the engine casing.
The engine must not be running when the casing is opened.
4.2.1Opening
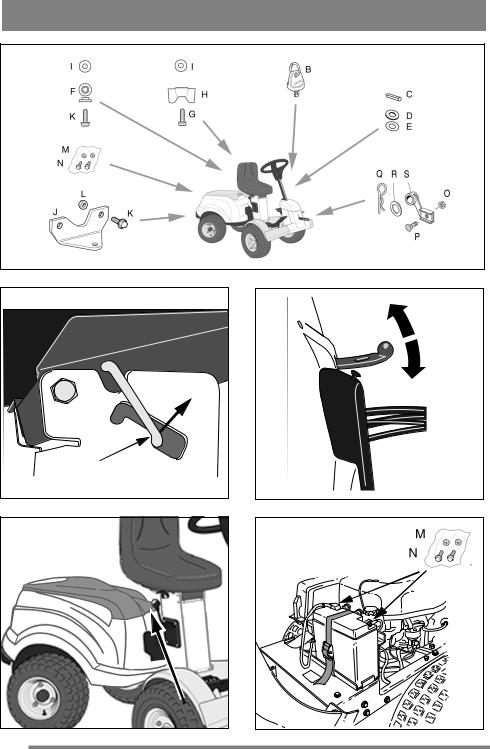
1.Raise the seat lock (fig. 2) and fold the seat forwards.
2.Pull up the rubber strap at the front edge of the casing (fig. 3).
3.Grasp the front edge of the engine casing and fold up the casing (fig. 4).
4.2.2 Closing
1.Grasp the front edge of the engine casing and fold down the casing (fig. 4).
2.Secure the front edge of the casing with the rubber strap (fig. 3).
The machine may not be operated unless the engine casing is closed and locked. Risk of burns and crushing injuries.
4.3 Battery
See “8.8 Battery”.
4.1 Accessories bag
The machine is supplied with a plastic bag containing components which shall be used during the assembly. The bag contains (fig. 1):
Pos. No. |
Designation |
Dimension |
|
B |
|
Spare key |
|
C |
1 |
Tension pin |
6 x 36 |
D |
1 |
Shim washer |
16 x 38 x 0.5 |
E |
1 |
Shim washer |
16 x 38 x 1.0 |
F |
2 |
Shoulder washer |
|
G |
2 |
Screw |
8 x 20 |
H |
2 |
Screw knob |
|
I |
4 |
Washer |
8.4 x 24 x 1.5 |
J |
1 |
Drawing plate |
|
K |
4 |
Screw |
8 x 20 |
L |
2 |
Nut |
|
M2 Screw for battery
N2 Nut for battery
O |
2 |
Screw |
M10 x 35 |
P |
2 |
Nut |
M10 |
Supplied installed on the front axles:
Pos No. Designation
Q2 Lock pin
R2 Washer
Secure to the implement lifter:
Pos |
No. |
Designation |
S |
2 |
Deck mount |
4.4 Seat, fig. 6
Release the catch (S) and fold up the seat bracket.
Install the mounting in the rear (upper) holes as follows:
1.Install the shoulder washers (F) on the screws
(K).
2.Insert the screws through the slots in the bracket. Place a washer (I) between the seat and the bracket.
3.Tighten the screws in the seat. Tightening torque: 9±1.7 Nm.
If the screws are tightened more than 9±1.7 Nm, the seat will be damaged.
4.Check that the seat moves easily in the slots in the bracket.
Install the mounting in the front (lower) holes as follows:
1.Install the screw knobs (H) on the screws (G).
2.Install a washer (I) on each screw.
3.Insert the screws through the slots in the bracket and tighten by hand in the seat.
4.Fold the seat down and place it in the desired position.
5.Tighten the screw knobs (H) by hand.
The screw knobs (H) and the seat will be damaged if tools are used.
10
ENGLISH |
EN |
|
|
The seat can be folded. If the machine is parked outside when it is raining, fold the seat forward to protect the seat cushion from getting wet.
The seat is locked. To fold the seat up or down, release the catch (S).
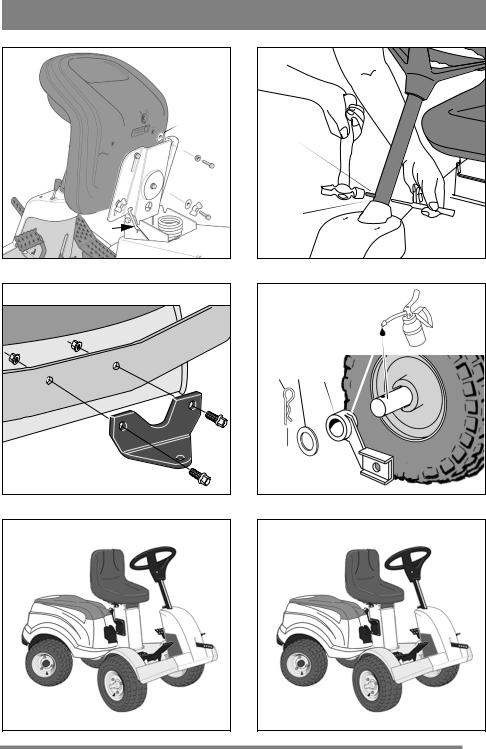
4.5 Steering wheel
See fig. 7. In order to minimise the axial play in the steering column, the shim washers (D) and/or (E) must be installed on the steering column between the steering column jacket and the bracket as follows.
1.Install the steering column jacket on the steering column and secure by knocking in the tension pin (C) approximately 1/3 of its length.
2.Pull the steering column jacket and the steering column up.
3.From the outside, check whether no washers, the 0.5 mm washer, the 1.0 mm washer or both washers can be inserted into the gap. The washer/washers must not be forced in, as there must be a little axial play.
4.Pull out the cotter pin and dismantle the steering wheel jacket.
5.Install the washer/washers in accordance with point 3 above.
6.Install the steering column jacket on the steering column and secure by knocking in the tension pin fully. Use a counterhold.
4.6 Towing hitch
See fig. 8. Screw the towing hitch (J) into the two holes on the underside of the rear axle using screws (L+K). Tighten the screws properly.
Tightening torque: 22 Nm.
4.7 Deck mounts
This only describes installation on the right-hand axle. Same procedure must be carried out on the left-hand axle.
1.Lubricate the axle ends and the deck mount’s bearing surface with oil before installation.
2.Install the deck mounts to the machine according to fig. 9.
3.Install the locking pin (9:Q) in the hole in the axle.
5DESCRIPTION
5.1Transmission
5.1.1 HST
The machine is rear wheel drive.
The rear axle is equipped with a hydrostatic transmission with infinitely variable forward and reverse gear ratios.
The rear axle is also equipped with a differential to facilitate turning.
Front mounted tools are driven by drive belts.
5.1.2 4WD
The machine has 4-wheel drive. The power from the engine to the drive wheels is transferred hydraulically. The engine drives an oil pump, which pumps oil through the rear and front axle drives.
The front axle and rear axle are connected in series, which means that the front wheels and rear wheels are forced to rotate at the same speed.
To make turning easier, both axles are equipped with differential.
Front-mounted implements are powered via drive belts.
5.2Steering
The machine is articulated. This means that the chassis is divided into a front and a rear section, which can be turned in relation to each other.
The articulated steering means that the machine can turn around trees and other obstacles with an extremely small turning radius.
5.3Safety system
The machine is equipped with an electrical safety system. The safety system interrupts certain activities that can entail a danger of incorrect manoeuvres. For example, the engine cannot be started if the clutch-parking brake pedal is depressed.
The operation of the safety system must always be checked every time before use.
4.8 Tyre pressure
Check the air pressure in the tyres. Correct air pressure:
Front: 0.6 bar (9 psi) Rear: 0.4 bar (6 psi)
4.9 Accessories
For the installation of accessories, see separate installation guide supplied with each accessory.
Note: The cutting deck is regarded as an accessory here.
5.4 Controls
5.4.1 Implement lifter, mechanical (12:A)
To switch between working position and transport position:
1.Depress the pedal fully.
2.Release the pedal slowly.
11

EN |
ENGLISH |
|
|
5.4.2 Clutch-parking brake (12:B)
Never press the pedal while driving. There is a risk of overheating in the power transmission.
The pedal has the following three positions:
•Released. The clutch is not activated. The parking brake is not activated.
•Depressed halfway. Forward drive disengaged. The parking brake is not activated.
•Fully depressed. Forward drive disengaged. The parking brake is fully activated but not locked. This position is also used as emergency brake.
5.4.3 Inhibitor, parking brake (12:C)
The inhibitor locks the “clutch-brake” pedal in the depressed position. This function is used to lock the machine on slopes, during transport, etc., when the engine is not running.
Locking:
1.Depress the pedal (14:B) fully.
2.Move the inhibitor (14:C) to the right.
3.Release the pedal (14:B).
4.Release the inhibitor (14:C).
Unlocking:
Press and release the pedal (14:B).
5.4.4 Driving-service brake (12:F)
If the machine does not brake as expected when the pedal is released, the left pedal (12:B) should be used as an emergency brake.
The pedal determines the gearing ratio between the engine and the drive wheels (= the speed). When the pedal is released, the service brake is activated.
1.Press the pedal forward – the machine moves forward.
2.No load on the pedal – the machine is stationary.
3.Press the pedal backward – the machine reverses.
4.Reduce the pressure on the pedal – the machine brakes.
5.4.5 Throttle and choke control (12:D)
A control for setting the engine speed and to choke the engine when starting from cold.
If the engine runs unevenly there is a risk that the control is too far forward so that the choke is activated. This damages the engine, increases fuel consumption and is harmful to the environment.
1. Choke – for starting a cold engine. The choke position is located at the front of the groove.
Do not operate in this position when the engine is warm.
2. Full throttle – when the machine is in operation, full throttle should always be used.
The full throttle position is approximately 2 cm behind the choke position.
3. Idling.
5.4.6 Ignition lock (12:E)
Do not leave the machine with the key in position 2 or 3. There is a fire risk, fuel can run into the engine through the carburettor, and there is a risk of the battery being discharged and damaged.
Ignition lock used for starting/stopping the engine. Four positions:
1. Stop position – the engine is shortcircuited. The key can be removed.
2/3. Operating position.
4. Start position – the electric start motor is activated when the key is turned to the spring-loaded start position. Once the engine has started, let the key return to operating position 2/3.
5.4.7 Power take-off (13:G)
The power take-off must never be engaged when the front-mounted implement is in transport position. This will destroy the belt transmission.
A lever for engaging and disengaging the power take-off for operating front-mounted accessories. Two positions:
1.Lever in forward position – power takeoff disengaged.
2.Lever in backward position - power take-off engaged.
12

ENGLISH |
EN |
|
|
5.4.8 Clutch release lever
A lever for disengaging the variable transmission.
6 AREAS OF USE
HST is equipped with a lever, connected to the rear axle. See (16:N).
4WD is equipped with two levers, connected to the rear axle (17:O) and the front axle (17:P).
The disengagement lever must never be between the outer and inner positions. This overheats and damages the transmission.
The levers enable the machine to be moved by hand without the help of the engine. Two positions:
1.Lever in the inner position – transmission engaged for normal operation.
2.Lever in the outer position – transmission disengaged. The machine can be moved by hand.
The machine may not be towed over long distances or at high speeds. The transmission could be damaged.
The machine must not be operated with the forward most lever in the outer position. Risk of damage and oil leakage in the front axle.
5.4.9 Seat (14:I)
The machine may only be used for the following tasks using the genuine GGP accessories stated.
Operation |
Accessories, GGP original |
Mowing |
With cutting deck 95 C (all). |
|
With cutting deck 105 C (only |
|
4155 H). |
Snow clearance |
With snow blade. Snow chains |
|
and frame weights recommend- |
|
ed. |
Grass clipping and |
With towed collector 30" or 42". |
leaf collection |
|
Grass and leaf |
With dump cart Pro or Combi. |
transport |
|
The maximum vertical load on the towing hitch must not exceed 100 N.
The maximum over-run load on the towing hitch from towed accessories must not exceed 500 N.
NOTE! Before using a trailer – contact your insurance company.
NOTE! This machine is not intended to be driven on public roads.
7 STARTING AND OPERATION
The seat can be folded and is adjustable front-rear. The seat is locked in the folded up position using the catch (14:K) and adjusted front-rear using the knobs (14:J).
The seat is equipped with a safety switch that is connected to the machine’s safety system. This means that certain dangerous activities are not possible when there is nobody in the seat.
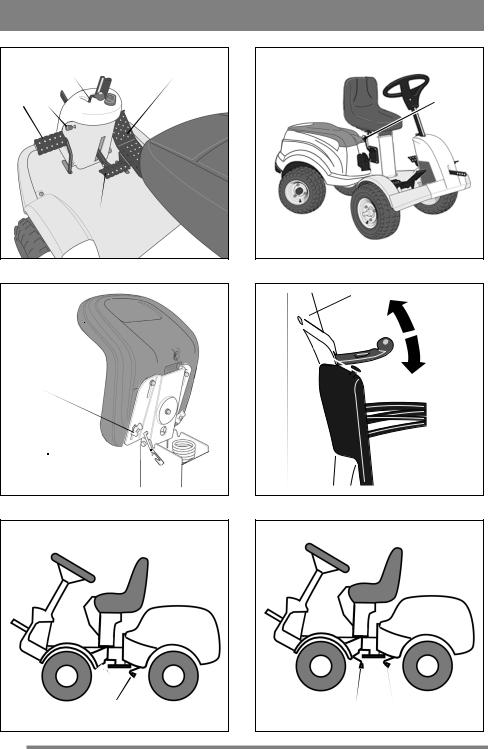
5.4.10 Engine casing (15:L)
To access the fuel cock, battery and engine the engine is equipped with engine casing that can be opened. The engine casing is locked by a rubber strap.
The engine casing is opened as follows:
1.Detach the rubber strap (15:M) at the front edge of the engine casing.
2.Carefully lift the engine casing back.
Close in reverse order.
The machine may not be operated unless the engine casing is folded down and locked. Risk of burns and crushing injuries.
The machine may not be operated unless the engine casing is closed and locked. Risk of burns and crushing injuries.
7.1Filling with petrol (18:Q)
Always use lead-free petrol. You must never use 2- stroke petrol mixed with oil.
The tank holds 6 litres. The level can easily be read through the transparent tank.
NOTE! Ordinary lead-free petrol is a perishable and must not be stored for more than 30 days.
Environmental petrol can be used, i.e. alkylate petrol. This type of petrol has a composition that is less harmful for people and nature.
Petrol is highly inflammable. Always store fuel in containers that are made especially for this purpose.
Only fill or top up with petrol outdoors, and never smoke when filling or topping up. Fill up with fuel before starting the engine. Never remove the filler cap or fill with petrol while the engine is running or still warm.
13

EN |
ENGLISH |
|
|
Never completely fill the petrol tank. Leave an empty space (= at least the entire filler tube plus 1 - 2 cm at the top of the tank) to allow the petrol to expand when it warms up without overflowing. See fig. 18.
7.2 Checking the engine oil level
On delivery, the crankcase is filled with SAE 10W30 oil.
Check the oil level every time before using to ensure it is correct. The machine should be standing on level ground.
Wipe clean around the oil dipstick. Unscrew and pull it up. Wipe off the dipstick. Slide it down completely and tighten it.
Then unscrew it and pull it up again. Read off the oil level. Top up with oil to the “FULL” mark, if the level comes below it. See fig. 19.
The oil level must never exceed the “FULL” mark. This results in the engine overheating. If the oil level exceeds the “FULL” mark, the oil must be drained until the correct level is achieved.
7.3 Checking transmission oil level
Check the oil level every time before using to ensure it is correct. The machine should be standing on level ground.
Read off the oil level in the reservoir (20:R). It should be between the MAX and MIN marks. If necessary, top up with more oil.
Type of oil:
|
Oil type |
4WD |
Synthetic oil 5W-50 |
HST |
SAE 10W-30 (20W-50) |
7.4.1 General safety check
Object |
Result |
Fuel lines and con- |
No leaks. |
nections. |
|
Electrical cables. |
All insulation intact. |
|
No mechanical damage. |
Exhaust system. |
No leaks at connections. |
|
All screws tightened. |
Oil lines |
No leaks. No damage. |
Drive the machine |
The machine will stop. |
forwards/back- |
|
wards and release |
|
the driving-service |
|
brake pedal. |
|
Test driving |
No abnormal vibrations. |
|
No abnormal sound. |
7.4.2 Electrical safety check
The operation of the safety system should always be checked every time before use.
Status |
Action |
Result |
The clutch-brake |
Attempt to start. |
The engine |
pedal not |
|
must not |
depressed. |
|
start. |
Power take-off not |
|
|
activated. |
|
|
Engine running. |
The operator |
The power |
Power take-off |
leaves the seat. |
take-off |
activated. |
|
must disen- |
|
|
gage. |
Engine running. |
Remove the fuse. |
The engine |
|
See 20:S. |
must stop. |
7.4Safety checks
Check that the results of the safety checks below are achieved when testing the machine in question.
The safety checks must always be carried out every time before use.
If any of the results below is not achieved, the machine must not be used! Take the machine to a service workshop for repair.
7.5Start
1.Open the fuel cock. See (21:U).
2.Check that the spark plug cable(s) is/are installed on the spark plug(s).
3.Check to make sure that the power take-off is disengaged.
4.Do not keep your foot on the drive pedal.
5.Starting cold engine – put the throttle control in the choke position.
Starting warm engine – put the throttle control at full throttle (approx. 2 cm behind the choke position).
6.Depress the clutch-brake pedal fully.
7.Turn the ignition key and start the engine.
8Once the engine has started, move the throttle control gradually to full throttle (approx. 2 cm behind the choke position) if the choke has been used.
14

ENGLISH |
EN |
|
|
9.When starting from cold, do not make the machine work under load immediately, but let the engine run for a few minutes first. This will allow the oil to warm up.
When the machine is in operation, full throttle should always be used.
7.6Operating tips
Always check that there is the correct volume of oil in the engine. This is particularly important when operating on slopes. See 7.2 Checking the engine oil level.
Be careful when driving on slopes. No sudden starting or stopping when driving up or down a slope. Never drive across a slope. Move from the top down or from the bottom to the top.
The machine may not be driven on slopes greater than 10º in any direction.
Reduce the speed on slopes and when making sharp turns in order to retain control and reduce the risk of tipping over.
Do not turn the steering wheel to full lock when driving in top gear and at full throttle. The machine can easily topple over.
Keep hands and fingers well away from articulated steering joint and seat bracket. Risk of crushing injuries. Never drive with the engine casing open.
7.7Stop
Disengage the power take-off. Apply the parking brake.
Allow the engine to idle 1-2 mins. Stop the engine by turning off the ignition key.
Shut off the petrol cock. This is particularly important if the machine is to be transported on a trailer for example.
If the machine is left unattended, remove the spark plug cable(s) and remove the ignition key.
The engine may be very warm immediately after it is shut off. Do not touch the silencer, cylinder or cooling fins. This can cause burn injuries.
7.8Cleaning
To reduce the risk of fire, keep the engine, silencer, battery and fuel tank free from grass, leaves and oil.
To reduce the risk of fire, regularly check the machine for oil and/or fuel leakage.
Clean the machine after each use. The following instructions apply for cleaning:
•When washing the machine with water under high pressure, do not point the jet directly at axle seals, electrical components or hydraulic valves.
•Do not spray water directly at the engine.
•Clean the engine with a brush and/or compressed air.
•Clean the engine’s cooling air intake (20:T).
8MAINTENANCE
8.1Service programme
In order to keep the machine in good condition as regards reliability and operational safety as well as from an environmental perspective, GGP’s Service programme should be followed.
Servicing carried out at an authorised workshop guarantees professional work using genuine spare parts.
8.2Preparation
All service and all maintenance must be carried out on a stationary machine with the engine switched off.
Prevent the machine from rolling by always applying the parking brake.
Stop the engine.
Prevent unintentional starting of the engine by disconnecting the spark plug cable(s) from the spark plug(s) and removing the ignition key.
8.3Tyre pressure
Adjust the air pressure in the tyres as follows: Front: 0.6 bar (9 psi).
Rear: 0.4 bar (6 psi).
8.4Changing engine oil
Change engine oil for the first time after 5 hours of operation, and subsequently after every 50 hours of operation or once a season.
Change the oil more often (after 25 hours of operation or at least once a season) if the engine has to operate under demanding conditions or if the ambient temperature is high.
Use oil according to the table below.
Oil |
SAE 10W-30 |
Service class |
SJ or higher |
Use oil without any additives.
15
 Loading...