

Page 1

FCC Statements
Moultrie Products
MCG-13336
A300
Note: Changes and modifications not expressly approved by the party responsible could void the user’s authority to operate this device.
This device complies with Part 15 of the FCC Rules. Operation is subject to the following two conditions: (1) This device may not cause harmful
interference, and (2) this device must accept any interference received, including interference that may cause undesired operation.
NOTE: THE MANUFACTURER IS NOT RESPONSIBLE FOR ANY RADIO OR TV INTERFERENCE CAUSED BY UNAUTHORIZED MODIFICATIONS TO THIS
EQUIPMENT. SUCH MODIFICATIONS COULD VOID THE USER’S AUTHORITY TO OPERATE THE EQUIPMENT.
NOTE: This device com plies with the limits for a Class B digital dev ice, pursuant to Part 15 of the FCC Rules. These limits are designed to provide
reasonable protection against harmful interference in a residential installation. This device generates, uses, and can radiate radio frequency
energy and, if not installed and used in accordance with the instructions, may cause harmful interference to radio communications. However,
there is no guarantee that interference will not occur in a particular installation.
If this device does cause harmful interference to radio or television reception, which can be determined by turning the equipment of f and on, the
user is encouraged to try to correct the interference by one or more of the following measures:
• Reorient or relocate the receiving antenna.
• lncrease the separation between the equipment and receiver.
• Connect the equipment into an outlet on a circuit different from that to which the receiver is connected.
• Consult the dealer or an experienced radio/TV technician for help.
A300i
Moultrie Products
MCG-13337
A700
Moultrie Products
MCG-13334
A700i
Moultrie Products
MCG-13335
MOULTRIE® A-SERIES DIGITAL GAME CAMERA INSTRUCTION MANUAL
THANK YOU for your purchase of an A-Series Digital Game Camera. Please read this booklet before using
the unit. If you have any questions about this product or any other Moultrie product, please contact us
using the information provided on page 7 of this booklet.
Navigation Buttons
Table of Contents
Easy Setup ............... 2
Important Notes .......2
Mounting Camera .....3
Setup Mode .............4
Time & Date ............. 5
Detection Delay ........5
Capture .................... 5
Camera ID ................ 6
Erasing Images ........6
LCD Display
Mode Selector
Slider
SD Card
Slot
Battery Compartment
PRADCO Outdoor Brands • 3280 Highway 31, Ste. B • Calera, AL 35040
www.moultriefeeders.com
01042019 / MCG-13336 • MCG-13337 • MCG-13334 • MCG-13335
A-Series_2019_Manual_ENGLISH_1-4-19.indd 1 1/4/19 8:35 AM
Please register your camera at www.moultriefeeders.com/warranty to activate your warranty.
Micro USB
Port
External
Power Port
Page 2
EASY SETUP INSTRUCTIONS
Open the camera cover and install eight (8) AA batteries in the battery compartment. Follow
+
the + and - polarities as indicated.
_
Important Battery lnformation
- Only use Alkaline or Lithium batteries. We recommend the use of Energizer™ or Moultrie batteries.
- Do not mix old and new batteries. Do not mix alkaline, lithium, or rechargeable batteries. Always replace ALL the batteries
at the same time.
- When the camera is not in use, please remove the batteries.
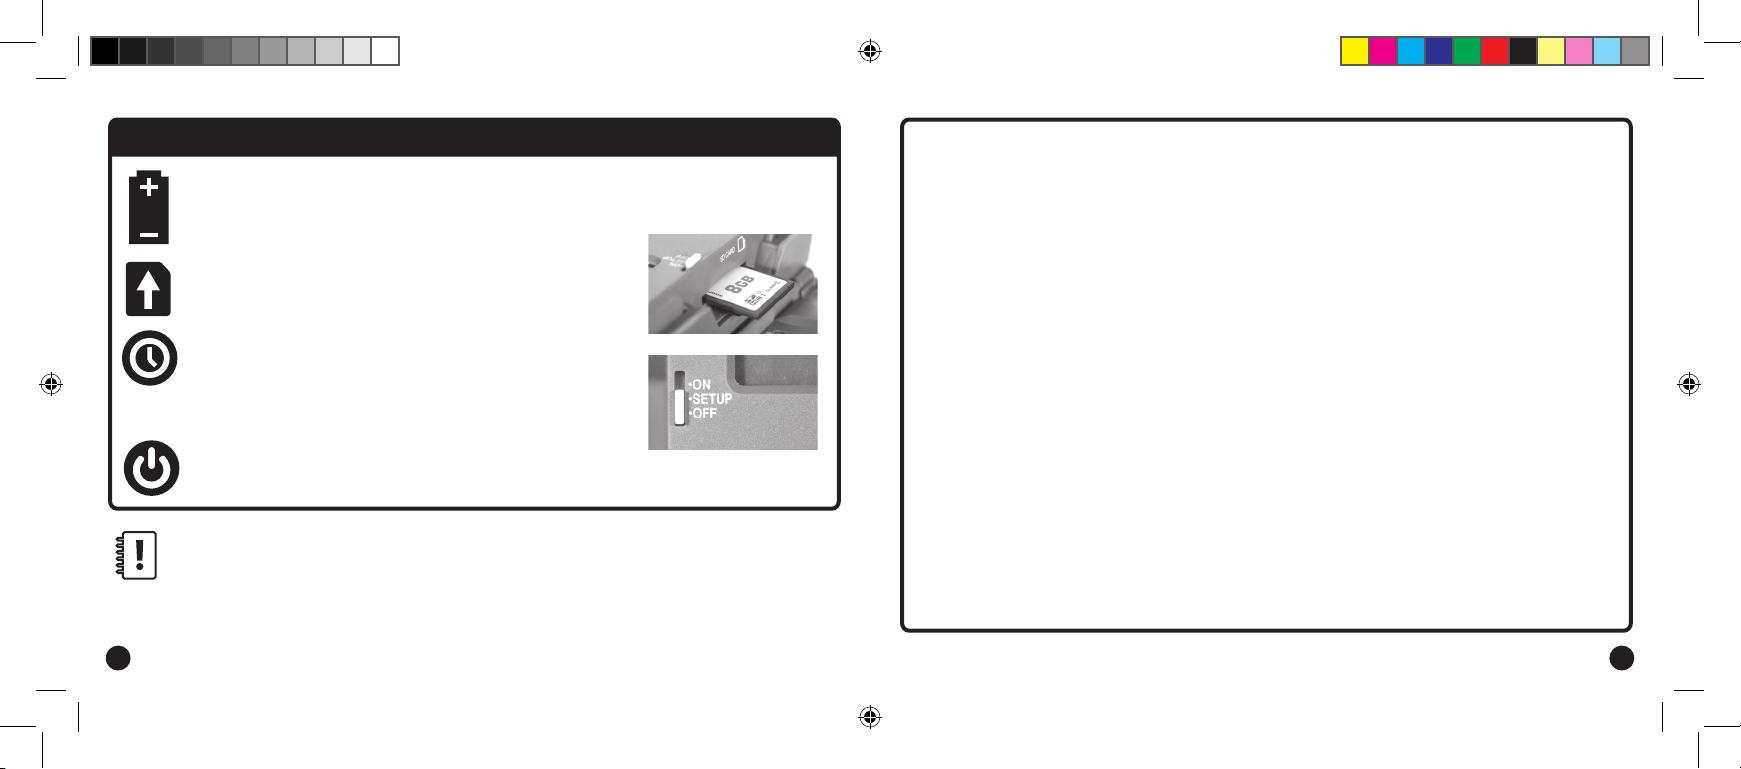
Insert the SD Card into the SD Card slot as shown. You
will hear an audible click when the card is fully inserted.
Slide the Mode switch to the SETUP position, press the OK button
to begin editing the time. Use the (UP) / V (DOWN) buttons to
V
adjust the hour digits. Press OK to select. Repeat to set minutes,
press OK to set correct time. Select AM/PM, press OK to continue.
Moultrie Limited Warranty
This product has been thoroughly tested and inspected before shipment. It is guaranteed from defects in material and
workmanship from the date of purchase for 2 years. Under this limited guarantee we agree to replace or repair free of charge
any part or parts which have been found to be defective in original material or workmanship. Should you require in-warranty
service, contact us at www.moultriefeeders.com/contact-us.
You must register your camera at www.moultriefeeders.com/warranty to activate your 2-year warranty.
Troubleshooting
Please visit www.moultriefeeders.com/contact-us for troubleshooting and helpful tips.
Slide the Mode switch to the ON position. The battery level will
appear on the LCD screen and the camera is ready for use.
Important Notes:
• We recommend the use of SDHC Class 10 SD cards up to 32 GB; camera will not operate without an SD card installed.
• If you have a 12V power source plugged into bottom of unit, leave batteries installed. They will act as a backup if power is lost.
• If the camera detects the battery level is 15% or below, the Low Battery screen (bL:L0) will show on display and the unit
will turn off.
• Do not mix old and new batteries. See important battery info on page 7.
2 7
A-Series_2019_Manual_ENGLISH_1-4-19.indd 2 1/4/19 8:35 AM
Returns and Repairs
Please visit http://www.moultriefeeders.com/return-policy and complete the form or our Service Department will gladly
answer any questions you have.
Moultrie Mobile® Compatibility
Your camera is compatible with our Moultrie Mobile® cellular service when combined with the Moultrie® Field Modem.
Please visit www.moultriemobile.com for more information.
Page 3

3. CAMERA OPTIONS SETUP (cont.)
Mounting with a Strap
1. Close camera cover and mount camera to a tree or pole
approximately 3 ft high.
Hi
Eyelet
Mounting with a Strap
1. Close camera cover and mount camera to a tree or pole
approximately 3 ft high.
2. Thread mounting strap through slots on back of camera
case and secure tightly.
Mounting Tips
Hi
Hi
Eyelet
MOUNTING CAMERA
CAMERA ID
Use the (UP)/ V (DOWN) buttons to choose between
1-9 to set a camera ID number. Images captured via your
camera will display the camera ID number. Press OK to lock
in your selection.
Erasing Images/Resetting Picture Count
Use the (UP)/ V (DOWN) buttons to change the display
to “dELY” (Delete Yes). When the display shows “dELY”
pressing OK will reformat and delete all images stored on
the SD card.
V
V
Mounting with Strap
• Thread mounting strap through slots on back of camera case.
• Mount camera to a tree or pole approximately three (3) feet from
ground. May need to adjust for uneven terrain.
Tips:
• Face the camera North or South to avoid overexposure from the sun.
• Clear brush away from the front of the camera to avoid
false-movement triggers.
• When covering a game trail, face camera looking down the trail instead
of directly at it (see graphics below).
INCORRECT CORRECT
3 ft.
6
A-Series_2019_Manual_ENGLISH_1-4-19.indd 3 1/4/19 8:35 AM
3
Page 4

AM
Setting Time and Date
When the time is showing, press the OK button to begin
editting the time. Use the UP / DOWN buttons to change
1. CAMERA OPTIONS SETUP 2. CAMERA OPTIONS SETUP (cont.)
AM
Hi
POWER ON
• Slide the Mode Switch to the ON position. The battery
level (bL) will appear on the LCD screen for two seconds
then the camera will display a countdown. When the
countdown reaches 00:00 the display will turn off and
the camera will be in Capture Mode.
Hi
99
SETUP MODE
• Slide the Mode Switch to the SETUP position.
NOTE: While in SETUP mode, the camera will turn on the STATUS LED for one second when motion
is detected. You can use this feature to ensure the camera is properly aimed to detect movement in
the desired target area.
Setup Mode Menu Guide
SET TIME 00: Hour :00 Minute AM/PM Time Set
SET DATE 00: Month :00 Day 0000 Year Date Set
OPTIONS Detection Delay Capture Mode Camera ID Erase Images
4
A-Series_2019_Manual_ENGLISH_1-4-19.indd 4 1/4/19 8:35 AM
OK OK OK OK
OK OK OK OK
OK OK OK OK
TIME AND DATE
• Once time is displayed, press the OK button to begin
editing time. Use the (UP) / V (DOWN) buttons to
adjust the hour digits. Press OK to select. Repeat
to set minutes, press OK to set time entered. Select
AM/PM, press OK to continue. Repeat to set the month,
day and year.
V
DETECTION DELAY
• Next, set the amount of time between pictures when motion is detected. Use the
V
(UP)/ V (DOWN) buttons to choose between 0, 15, or 30 seconds and 1 or 5 minutes.
Press OK to lock selection and continue setup.
CAPTURE MODE
• Use the (UP) / V (DOWN) buttons to change the
camera capture mode. Press OK to lock selection and
continue to Camera ID setup.
V
AM
Hi
AM
Hi
Capture Mode Options
5
 Loading...