

Page 1
www.moulinex.com
E
GB
Page 2

MAX
13
15
17
19
11
8
10
12
14
16
18
6
7
9
1d
1e
2a
2b
4
21
20
1a
1b
1c
1f
3a
3b
5
Page 3

fi
g.2
fi
g.5
fig.9
fig.
16
fig.6
fig.15
fi
g.10
fig.11
fi
g.7
fig.13
fi
g.1
4
fig.12
fig.8
fig.1
7
fig.21
fig.18
fi
g.22
fi
g.23
fig.1
9
fig.24
fig.20
f
ig.4
fig.3
fig.1
Recetas
MA
X
MAX
1
2
MAX
1
2
MAX
MA
X
MAX
CLIC
1
2
Page 4

SAFETY RECOMMENDATIONS
Take the time to read all the instructions.
For your safety, this appliance conforms with
applicable standards and regulations
(Directives on low voltage, electromagnetic
compatibility, materials in contact with
foodstuffs, environment …)
•
This appliance is not intended for use by
persons (including children) with reduced
physical, sensory or mental capabilities, or
lack of experience and knowledge, unless
they have been given supervision or
instruction concerning use of the appliance
by a person responsible for their safety.
• Children should be supervised to ensure
that they do not play with the appliance.
• As with any cooking appliance, supervise
cooking closely if using the Pressure
Cooker with children nearby or certain
handicapped persons.
• Do not put your Pressure Cooker into a hot
oven.
• When the Pressure Cooker is under
pressure, take great care when moving it.
Do not touch the hot surfaces. Use the
handles and knobs, and wear gloves if
necessary. Never use the lid knob to carry
your pressure cooker.
• Do not use your Pressure Cooker for any
use other than that for which it is designed.
• Your Pressure Cooker cooks under pressure.
Burns could result from boiling over if not
used properly. Make sure that the Pressure
Cooker is properly closed before bringing it
up to pressure. (see Using).
• Never force the Pressure Cooker open.
Make sure that the inside pressure has
returned to normal. See the instructions for
use.
• Never use your Pressure Cooker without
liquid: this could cause serious damage.
• Do not fill your Pressure Cooker more than
2/3 full. For food that expands considerably
during cooking, such as rice, dehydrated
vegetables or compotes, … do not fill the
Pressure Cooker more than half full.
• After cooking meat which has an outer
layer of skin (such as ox tongue), which
could swell due to the effects of pressure,
do not pierce the skin after cooking if it
appears swollen: you could get burnt.
Pierce it before cooking.
• When cooking food with a thick texture
(chick peas, rhubarb, compotes, etc.) the
Pressure Cooker should be shaken slightly
before opening to ensure that the food
does not spurt out.
• Always check that valves are clear before
use. (see Cleaning and Maintenance).
• Do not use the Pressure Cooker to fry
under pressure using oil.
• Leave the safety systems alone, except for
cleaning and maintenance in accordance
with instructions.
• Use only the appropriate MOULINEX spare
parts for your model. Particularly, only the
MOULINEX pan, lid and sealing gasket.
• SAVE THESE INSTRUCTIONS.
ENVIRONMENT
• In accordance with current regulations,
before disposing of an appliance no
longer needed, the appliance must be
rendered inoperative (by unplugging it
and cutting off the supply cord).
Environment protection first!
Your appliance contains valuable materials
which can be recovered or recycled.
Leave it at a local civic waste collection
point.
WARRANTY
•
This product has been designed for domestic
use only. Any professional use, innapropriate
use or failure to comply with the instructions,
the manufacturer accepts no responsibility
and the guarantee will not apply.
• Read the instructions for use carefully
before using your appliance for the first
time: any use which does not conform to
these instructions will absolve Moulinex
from any liability.
10
Page 5

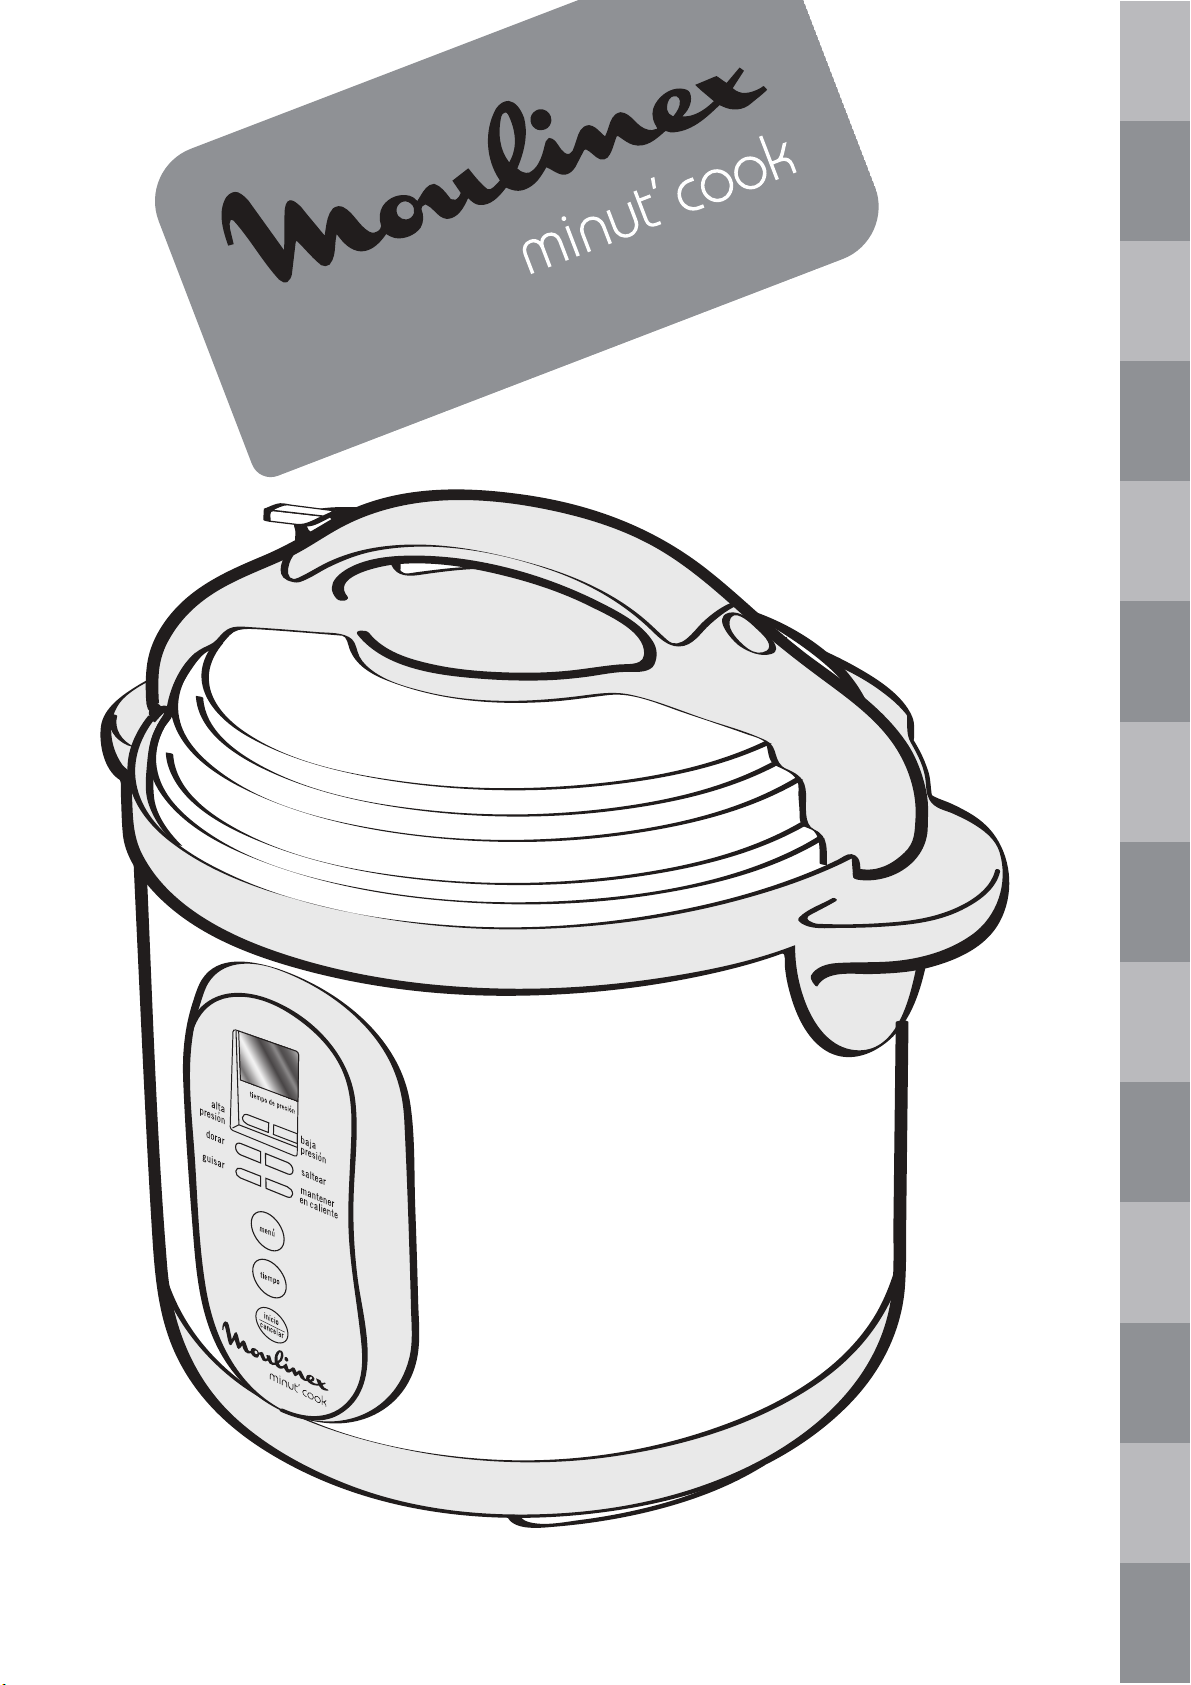
DESCRIPTION
pressure limit valve
float valve
push rod (safety opening system)
lid handle
lid
pressure limit valve protecting cover
sealing gasket (ref. XA500033)
gasket supporting cover
cooking pot of 6L
integrated basket supports
upper ring
carrying handles
stainless steel housing
heating plate with temperature sensor
base
removable power cord
Control panel
digital timer : remaining cooking time
1a
1b
1c
1d
1e
1f
2a
2b
3a
3b
4
5
6
7
8
9
10
high pressure light
low pressure light
browning light
sauté light
simmer light
keep warm light
menu : press to select a cooking menu
timer selection :
1 minute increments up to 40 min
5 minute increments from 40 to 99 min
start / cancel
Accessories
dew collector
steam basket
11
12
13
14
15
16
17
18
19
20
21
BEFORE USING FOR THE FIRST TIME
1. REMOVE PACKAGING
•
Take your appliance out of its packaging.
Keep your warranty card and carefully
read the operating instructions before using
your appliance for the first time
- fig. 1.
• Install your appliance on a stable surface.
Remove all plastic bags, accessories
(steam basket & dew collector) & plug
from the appliance
- fig. 1.
2. REMOVE THE LID
• Take hold of the lid handle and turn
clockwise to the position limit, and then
carry the lid upward
- fig. 2 + 3.
3. CLEANING
• Clean the cooking pot, the lid, the dew
collector, the steam basket, the sealing
gasket and gasket supporting cover in the
dishwaher
- fig. 4.
4. USING YOUR APPLIANCE FOR THE FIRST
TIME
•
Unroll the power cord, connect it to the
appliance
(1) then to an earthed socket (2)
- fig. 5.
11
E
GB
Page 6

USING
1. REMOVE THE LID
• Take hold of the lid handle and turn
clockwise to the position limit, and then
carry the lid upward
- fig. 2 + 3.
2. TAKE THE COOKING POT OUT AND ADD
THE INGREDIENTS
• Take the cooking pot out - fig. 6.
• For steam cooking, pour water into the
cooking pot and place the steam basket
onto the integrated basket supports
(1) or
into the bottom of the appliance
(2) -
fig. 20
.
• You can simultaneously cook food at the
bottom of the cooker and in the steam
basket placed on the basket supports. The
foodstuffs placed in the steam basket
must not touch the lid.
• Put the ingredients in the cooking pot
-
fig. 7.
When pressure cooking, note the total
volume of food and liquid must not
exceed the marking level: MAX .
Inflatable food must not exceed 60%
capacity of the cooking pot .
The minimum of the volume of food and
water should not be less than 20%
capacity of the cooking pot .
3. P
LACE THE COOKING POT INTO THE
APPLIANCE
• Wipe up & clean the foreign objects on
both cooking pot and heating plate if
there is any
- fig 7. Then place the
cooking pot into the appliance
- fig 8.
4. CLOSE AND LOCK THE LID
• Check whether the sealing gasket is well
installed on the gasket supporting cover.
• Slightly rotate the sealing gasket in both
directions in order to ensure that it is
installed in a balance position.
• Take hold of the lid handle and put it on
the side of position limit level, then turn it
counter-clockwise to the lock position.
A sound ‘CLIC’ indicates the lid is locked
-
fig. 9 + 10.
5. PLACE THE PRESSURE LIMIT VALVE
•
Place the pressure limit valve properly
(lower position) and ensure that it is on the
. Then check wether the float is down
(the float should be down for sealing before
pressure cooking)
- fig. 11.
6. PLUG IN THE POWER CORD
• Plug in the power cord - fig. 5 the LED
display will show . Make sure the plug
is well connected to both appliance
and the earthed socket.
7. PRESSURE COOKER SETTINGS
Please, refer to the notice board next page.
12
Page 7

COOKING GUIDANCE
1. TIMING COOKING
• Timer is only used for high & low pressure
cooking menus.
• In the original state, press button, to
select menu
- fig. 12.
Then press button -
fig. 13
, to set up
when the cooking cycle should complete.
•
Then press button to start cooking
- fig. 14.
The menu light stops flashing.
• The led displays shows the countdown. For
example : means the cooking will finish
in 10 min.
• The timing range is from 1 to 99 min:
- Time increases by 1 min. increments up to
40 min.
- From 40 min to 99 min, time increases by
5 min. increments.
2. DIRECT COOKING
• Browning, Simmer, Sauté with lid removed.
• In the original state, the led display shows
. Press the button, to select desired
menu
- fig. 12. In the meanwhile, the
corresponding menu light will flash. Then
press button to start cooking
- fig. 14.
The menu light stops flashing. The
appliance is under cooking cycle and led
display shows , with right dot flashing.
The led will stop flashing when temperature
or pressure is reached.
A slight odour may be given off when
used for the first time.
3. CANCEL BUTTON
• Users can reset the function or cancel the
timing setup anytime by pressing the
button during cooking or operation - fig. 14.
4. COOKING UNDER PRESSURE
• When cooking under pressure, float valve
rise. The lid is double locked and cannot be
opened. Never attempt to open the lid
while pressure cooking.
• Steam cooking is only possible with high
& low pressure cooking menus.
5. KEEP WARM
• After the cooking cycle, the appliance will
automatically switch to the keep warm function.
• Maximum keep warm timing is 12h.
• In the keep warm mode , it is normal if
there is a little dew in the upper ring.
• After 12h, keep warm function stops and
led display shows
.
Cooking
menu
Features Recipes Comments
40kpa
It allows a better preservation
of vitamins while cooking fish
and vegetables in water or in
the steam basket.
Morteau sausage with
lentils, Creamy rice
pudding with coconut
milk, mango & fruit passion,
Cream caramel…
Work only with lid
closed.
70kpa
The high pressure mode
allows a faster cooking of
meats, poultry and frozen
food.
Pork roast with paprika &
green peas, Salmon with
an herbal broth, Mashed
potato with olive oil…
Work only with lid
closed.
browning
Used to fry quickly & to
brown meats, vegetables in a
small amount of fat.
Lamb with chestnut,
almonds & spices, Red
onion soup with comte,
Goulasch…
Work with open lid.
Before cooking under
pressure.
Temperature
of 180°C.
sauté
Used to quickly soften
vegetables in a small amount
of fat or liquid without
browning.
Risotto, Mashed,
Compote…
Work with open lid.
Before cooking under
pressure. Temperature of
140°C.
simmer
To cook liquids or dishes at a
lower temperature. Primarily
used to finish cooking or to
add ingredients at the end of
cooking cycle.
Fish, Miso soup, Farfalle
pasta with tuna…
Work with open lid.
keep warm
Automatic at the end of
cooking, up to 12H. Keep
warm light will turn on and
unit will beep to indicate you,
cooking is complete.
All recipes.
Recommended not to
use the keep warm
function too long when
cooking fragile food
because texture may
change.
13
E
GB
Page 8

IMPORTANT
• Please follow this instruction book correctly.
Do not place the appliance near
inflammable object nor moist environment.
• The volume of the food and water should
strictly accords to the operation « 2. TAKE
THE COOKING POT OUT AND ADD THE
INGREDIENTS ».
• Do not damage the sealing gasket, nor use
other rubber gaskets instead.
• Always keep the protecting float valve
cover clean, and keep the pressure limit
valve and the float valve clear.
• Do not open the lid until the float is down.
• Do not leave any foreign objects on the
top of the pressure limit valve, nor replace
the valve.
• Do not leave cloth in the closing section
between the lid and the outer pot.
• Keep the bottom of the inner pot and the
heating plate clean. Do not heat up the
inner pot in other thermal energy nor
replace it with other pot.
• Use wooden or plastic spoon in order not
to damage the coating of the inner pot.
• During cooking & steam release, the
appliance gives out heat and steam. Keep
your face and hands away. Do not touch
the lid during cooking
- fig. 24.
• It is an abnormal atmosphere if a great
deal of air escapes from the rim of the lid.
Unplug the power cord at once, and send
the appliance to our service center to
repair.
• Please suspend using the appliance if the
alarm is on for 1 minute. Move the
appliance with its handles on the body
instead of the lid handles.
CLEANING AND MAINTENANCE
• Once cooking is finished, unplug the
power cord before cleaning
- fig. 16.
Clean the appliance after each use.
• Clean the housing with cloth. Do not
immerse the housing in water nor pour
water into it.
• Remove the dew collector and clean it
under water then puts it in its original
position
- fig. 17 + 18.
• Clean the upper ring with a damp cloth.
• Rinse the underside of lid including the
sealing gasket, pressure limit valve,
protecting float valve cover, air escape
and float valve, then dry them off.
• Clean the cooking pot, the accessories &
the whole lid in the dishwasher
- fig. 4. Do
not use a metallic brush not to damage
the inner coating.
• To clean the gasket supporting cover: take
hold the lid handle and separate the
gasket supporting cover from the lid . Pull
the sealing gasket upward. After the
cleaning, put the sealing gasket & the
gasket supporting cover back
- fig. 19 +
23.
• For the protecting float valve cover
cleaning, pull the cover outward, clean it,
and then place it back
- fig. 21 + 22.
• For the float valve cleaning, move the float
gently, and rinse the food off from the float
valve and the sealing gasket of the float
valve.
• For the pressure limit valve cleaning, take it
out and rinse it with water, then place it
back in its place.
• In order to avoid any risk of food poisoning
linked to a bacteriological proliferation, do
not use the "Keep warm" function with
food that can not be stored at ambient air
(meat, fish, dairy products, eggs…).
6. REMOVING THE LID
• Place the pressure limit valve on to
exhaust the air
- fig. 15.
Do not leave your
hands above the pressure limit valve
while steam releasing.
• Unplug the power cord
- fig. 16.
• Take hold of the lid handle and turn the lid
clockwise to the position limit, then carry
the lid upward
- fig. 2 + 3.
14
Page 9

TROUBLES & TREATMENTS
Trouble Possible Reasons
Treatment
Cannot lock the lid
• The sealing gasket is not
installed properly
• The float is seized by the
push rod
• Reinstall the sealing gasket
• Push the push rod with
hands
Cannot open the lid after
air exhaust
• The float is still up
• Press the float down with
chopsticks
Air escape from the rim of
the lid
• No sealing gasket
• Food stick on sealing
gasket
• sealing gasket wear out
• Lid not locked properly
• Install the sealing gasket
(ref: XA500033)
•
Clean up the sealing gasket
•
Replace the sealing gasket
• Lock the lid again
Air escape from the float
valve
• Food stick on the sealing
gasket of the float valve
• The sealing gasket on the
float wear out
• Clean up the sealing
gasket
• Replace the sealing
gasket
• Change the sealing
gasket every two years
The float cannot rise up
• The pressure limit valve is
not placed properly
• Not enough food and
water
• Air escape from the rim of
the lid and the pressure
limit valve
• Place the device to .
• Put enough food and
water in the inner pot
• Sent the product to our
service center for repair
• Must not take the appliance apart or
replace any components.
• Do not replace the power cord with other
cords.
• Keep out of the reach of children.
• Do not use the cooking pot on other
stovetops nor in other appliances.
• If pressure is releasing continuously during
more than 1 minute while pressure
cooking, send the appliance to our service
center to repair it.
15
E
GB
 Loading...