

Page 1
FR
EN
NL
DE
IT
ES
PT
EL
Page 2
A1
A
B1 B2 B3 B4 B5
B
B6
B7 B8 B9 B10
C2
C
C1
C3
Page 3
G1
D1
G2
D1a
D
D2
G3
D2a
G
D3
G4
E
G5
F
F1
H
Page 4
1
2
1
2
“click”
2
1
7 8
9
10
11 12
1 2
4
3
5 6
Page 5
2
1
7 8
9
10
11 12
Page 6
13 14
15
16
17 18
Page 7
“click”
19 20
21
22
Page 8

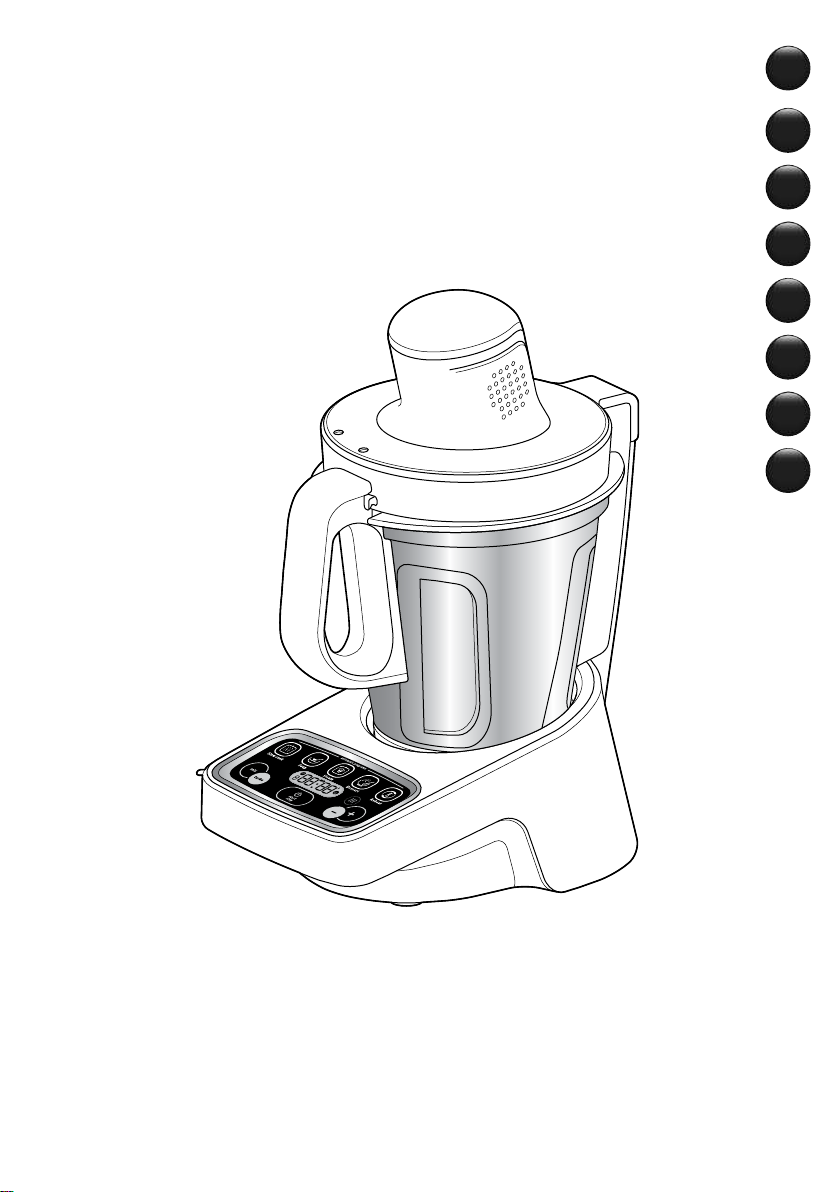
DESCRIPTION
FR
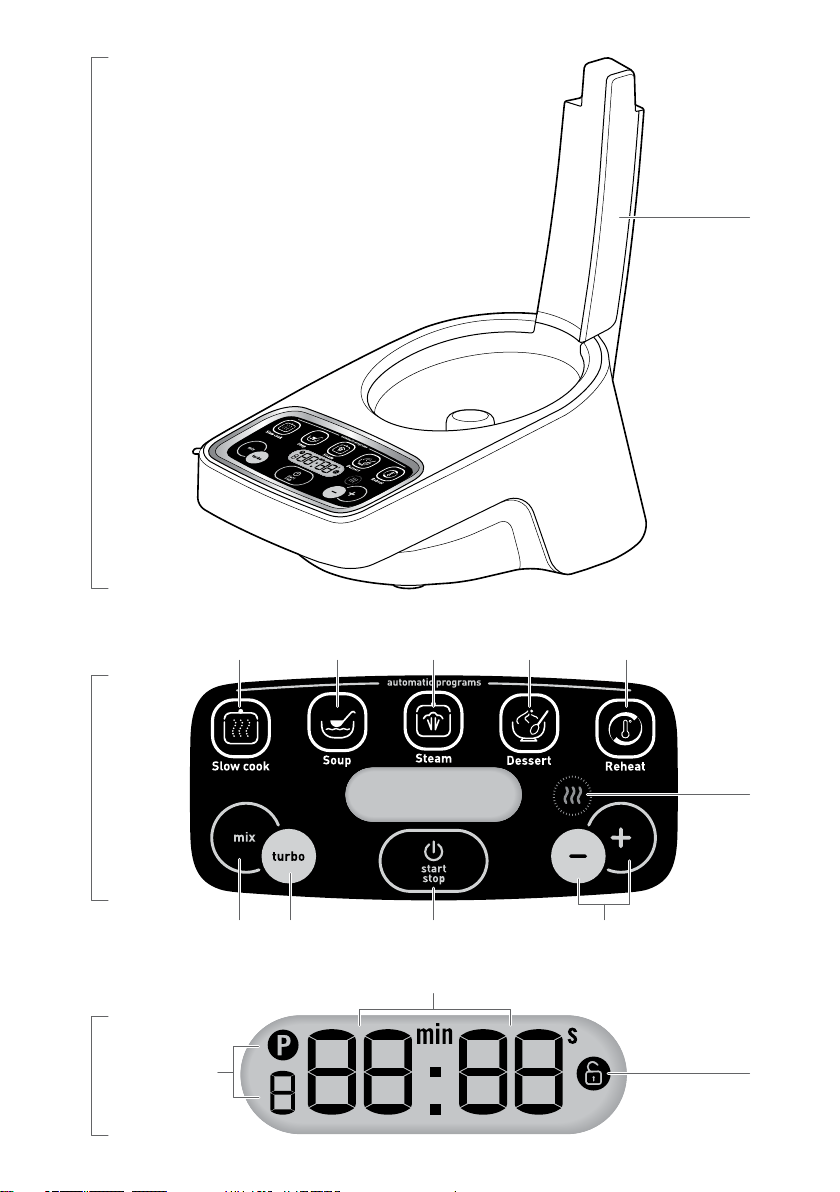
A Base
A1 Colonne arrière
B Tableau de commandes :
B1 Sélecteur du programme mijotés
B2 Sélecteur du programme soupes
B3 Sélecteur du programme vapeur
B4 Sélecteur du programme desserts
B5 Sélecteur du programme de réchauffage
B6 Indicateur de réchauffage
B7 Sélecteur programme mix
B8 Sélecteur turbo
B9 Bouton start/stop/reset
B10 Sélecteur +/-
C Ecran LCD :
C1 Affichage des programmes
C2 Affichage de la durée du programme
C3 Affichage de l’indicateur de mise en
sécurité
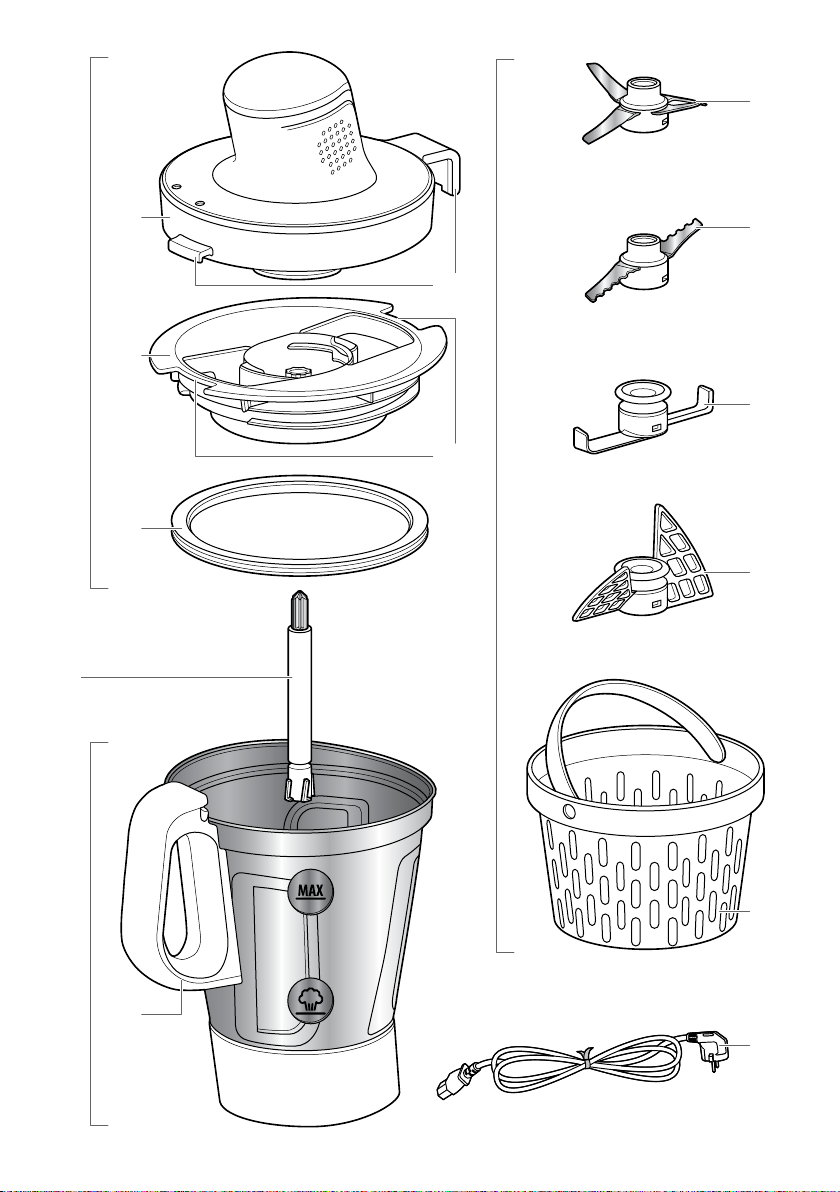
D Ensemble couvercle bloc moteur
D1 Couvercle bloc moteur
D1a Patte de verrouillage
D2 Coupelle porte joint
D2a Encoche
D3 Joint d’étanchéité
E Entraineur
F Bol
F1 Poignée de préhension du bol
G Accessoires :
G1 Couteau hachoir
G2 Couteau pétrin/concasseur
G3 Mélangeur
G4 Batteur
G5 Panier vapeur
H Cordon d’alimentation amovible
DONNÉES TECHNIQUES DE L’APPAREIL
Puissance : 1000W (600W : résistance chauffante / 400W : moteur)
Plage du durée de fonctionnement : de 10s à 2h30min
Nombre de vitesses : 3 vitesses – 1 vitesse intermittente
1
Page 9

CONSIGNES DE SÉCURITÉ
Vis-à-vis de la sécurité de la personne
• Lisez attentivement le mode d’emploi
avant la première utilisation de
votre appareil et conservez-le : une
utilisation non conforme au mode
d’emploi dégagerait le fabricant de
toute responsabilité.
• Toujours déconnecter l’appareil de
l’alimentation si on le laisse sans
surveillance et avant montage,
démontage ou nettoyage. Ne pas
laisser les enfants utiliser l’appareil
sans surveillance.
• Cet appareil ne doit pas être utilisé
par les enfants. Conserver l’appareil et
son câble hors de portée des enfants.
• Cet appareil n’est pas prévu pour être
utilisé par des personnes (y compris les
enfants) dont les capacités physiques,
sensorielles ou mentales sont réduites
ou des personnes dénuées d’expérience
ou de connaissance, sauf si elles ont
pu bénéficier, par l’intermédiaire d’une
personne responsable de leur sécurité,
d’une surveillance ou d’instructions
préalables concernant l’utilisation de
l’appareil. Il convient de surveiller les
enfants pour s’assurer qu’ils ne jouent
pas avec l’appareil.
FR
• Maintenez votre appareil hors de
portée des enfants.
• Lors de l’utilisation
de l’appareil, certaines
pièces atteignent des
températures élevées
(paroi inox du bol, pièces métalliques
sous le bol, coupelle porte joint).
Elles peuvent occasionner des
brûlures. Manipulez l’appareil par les
pièces plastiques froides (poignées,
couvercle bloc moteur). Le témoin
lumineux de chauffe rouge indique
qu’il y a un risque de brûlure.
• La température des surfaces
accessibles peut être élevée lorsque
l’appareil est en fonctionnement.
• L’ appareil n’est pas destiné à être
mis en fonctionnement au moyen
d’une minuterie extérieure ou par un
système de commande à distance
séparé.
• N’utilisez pas votre appareil s’il ne
fonctionne pas correctement, s’il
a été endommagé ou si le câble
d’alimentation ou la prise sont
endommagés.
• Si le câble d’alimentation est
endommagé, il doit être remplacé
par un câble ou un ensemble spécial
disponible auprès du fabricant ou de
son service après vente. (voir liste
dans le livret service).
2
Page 10

• L’appareil ne doit pas être immergé. Ne
FR
passez pas le couvercle bloc moteur
(D1) sous l’eau courante.
• Cet appareil est exclusivement destiné
à un usage domestique à l’intérieur de
la maison et à une altitude inférieure
à 2000 m. Le fabricant décline toute
responsabilité et se réserve le droit de
résilier la garantie en cas d’utilisation
commerciale ou inadaptée, ou de non
respect des consignes.
• Cet appareil n’a pas été conçu pour
être utilisé dans les cas suivants qui
ne sont pas couverts par la garantie :
– zone de travail de cuisine dans
les magasins, bureaux et autres
environnements de type travail.
– des coins cuisine réservés au
personnel dans des magasins,
bureaux et autres environnements
professionnels.
– des fermes.
– l’utilisation par les clients des hôtels,
motels et autres environnements à
caractère résidentiel.
– des environnements du type
chambres d’hôtes.
• Votre appareil émet de la vapeur
qui peut occasionner des brûlures.
Manipulez avec précaution la
coupelle porte joint (utilisez si
nécessaire un gant, une manique,
etc).
• Ne faites pas fonctionner l’appareil
si le joint n’est pas positionné sur
la coupelle.
AVERTISSEMENT : Attention aux
risques de blessure en cas de
mauvaise utilisation de l’appareil.
Prenez des précautions avec les
lames du couteau hachoir (G1) et
du couteau pour pétrir/concasser
(G2) lorsque vous les nettoyez et
lorsque vous videz le bol, elles sont
extrêmement coupantes.
Soyez vigilant si un liquide chaud est
versé dans le préparateur culinaire
dans la mesure où il peut être éjecté
de l’appareil en raison d’une ébullition
soudaine.
Rangez le couteau hachoir (G1) dans
le bol après chaque utilisation.
AVERTISSEMENT : Soyez prudent lors
de la manipulation de votre appareil
(nettoyage, remplissage et versage) :
éviter tout débordement de liquide
sur les connecteurs.
AVERTISSEMENT : Votre appareil émet
de la vapeur qui peut occasionner des
brûlures.
AVERTISSEMENT : La surface de
l’élément chauffant présente une
chaleur résiduelle après utilisation.
3
Page 11

Assurez vous de ne toucher que la
poignée (F1) de votre produit pendant
la chauffe et jusqu’au refroidissement
complet.
Reportez-vous au mode d’emploi
pour l’assemblage et le montage des
accessoires sur l’appareil.
Reportez-vous au mode d’emploi pour
le nettoyage et l’entretien de votre
appareil.
Toujours suivre les instructions de
nettoyage pour nettoyer votre appareil :
• Débrancher l’appareil.
• Ne pas nettoyer l’appareil chaud.
• Nettoyer avec un chiffon ou une
éponge humide.
• Ne jamais mettre l’appareil dans l’eau
ou sous l’eau courante
MARCHES EUROPEENS SEULEMENT :
• Conserver l’appareil et son câble hors
de portée des enfants âgés de moins
de 8 ans.
Les enfants ne doivent pas utiliser
l’appareil comme un jouet.
• Cet appareil peut être utilisé par
des personnes dont les capacités
physiques, sensorielles ou mentales
sont réduites ou dont l’expérience
ou les connaissances ne sont pas
suffisantes, à condition qu’ils
bénéficient d’une surveillance ou
qu’ils aient reçu des instructions quant
à l’utilisation de l’appareil en toute
sécurité et en comprennent bien les
dangers potentiels.
• Cet appareil peut être utilisé par
des enfants âgés d’au moins 8 ans,
à condition qu’ils bénéficient d’une
surveillance ou qu’ils aient reçu des
instructions quant à l’utilisation
de l’appareil en toute sécurité et
qu’ils comprennent bien les dangers
encourus. Le nettoyage et l’entretien
par l’utilisateur ne doivent pas
être effectués par des enfants sans
surveillance, à moins qu’ils ne soient
âgés de plus de 8 ans et qu’ils soient
sous la surveillance d’un adulte.
Vis-à-vis du raccordement électrique
• L’appareil doit être branché sur une
prise de courant électrique reliée à la
terre.
• L’appareil est conçu pour fonctionner
uniquement en courant alternatif.
Vérifiez que la tension d’alimentation
indiquée sur la plaque signalétique de
l’appareil corresponde bien à celle de
votre installation électrique.
• Toute erreur de branchement annule la
garantie.
• Ne tirez jamais sur le câble
d’alimentation pour débrancher
l’appareil.
• Ne mettez pas l’appareil, le câble
d’alimentation à proximité ou en
contact avec les parties chaudes de
l’appareil, près d’une source de chaleur
ou sur un angle vif.
FR
4
Page 12

Vis-à-vis d’une mauvaise utilisation
FR
• Ne touchez pas au couvercle avant
l’arrêt complet de l’appareil (touche
stop), attendez que les aliments
mixés ne tournent plus.
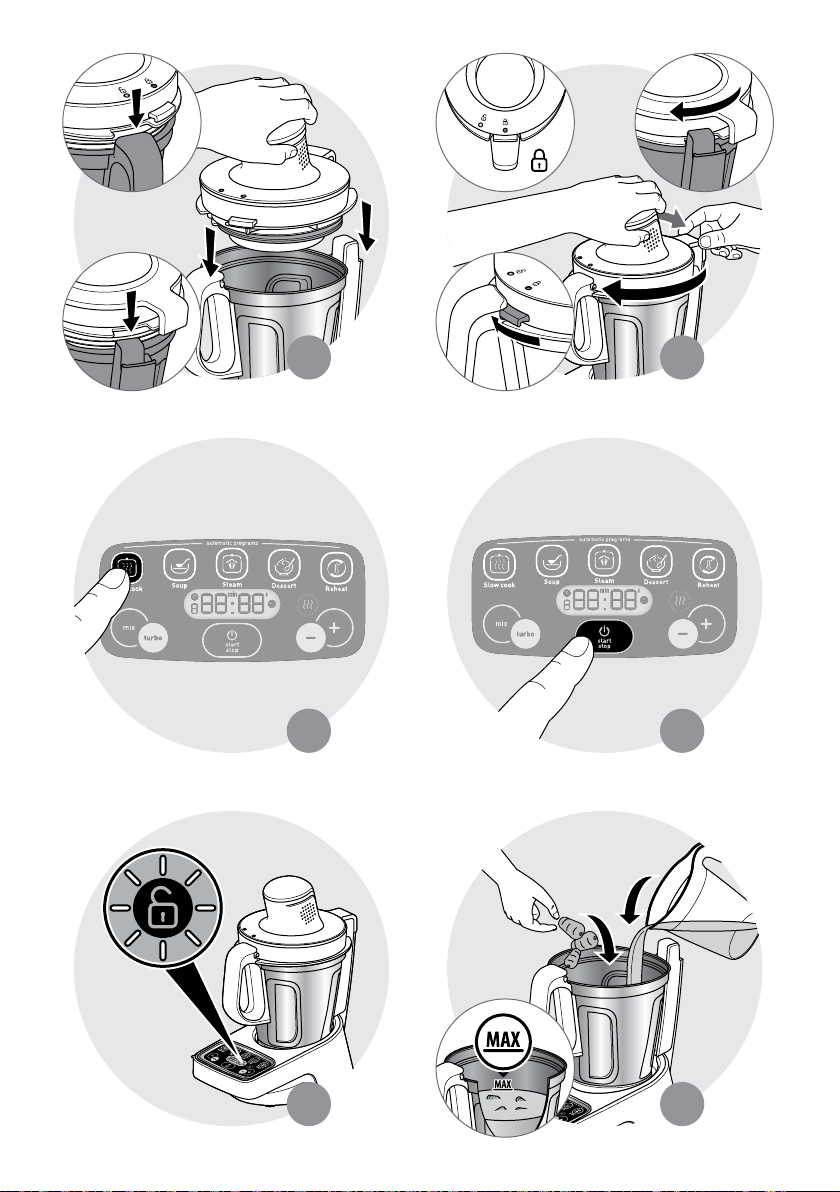
• Versez toujours les ingrédients solides
en premier dans le bol avant d’ajouter
des ingrédients liquides (Fig. 12),
sans dépasser le repère MAX gravé à
l’intérieur du bol (Fig. 13). Si le bol
est trop rempli, de l’eau bouillante
peut-être éjectée.
• Attention dans le cadre du programme
cuisson vapeur, respectez le niveau
d’eau indiqué dans le bol (Fig. 14).
• Ne placez jamais vos doigts ou
tout objet dans le bol pendant le
fonctionnement de l’appareil.
• N’utilisez pas le bol comme
récipient (conservation, congélation,
stérilisation).
• Placez l’appareil sur un plan de travail
stable, résistant à la chaleur, propre et
sec.
• Ne placez pas l’appareil près d’un mur
ou d’un placard, la vapeur produite
pouvant endommager les éléments.
• Ne placez pas votre appareil près d’une
source de chaleur en fonctionnement
(plaque de cuisson, appareil électroménager, etc…).
• Ne couvrez pas votre couvercle avec
un torchon ou autre.
• Ne passez jamais les accessoires dans
un four à micro ondes.
• N’utilisez pas l’appareil en plein air.
• Ne dépassez jamais la quantité
maximum indiquée dans la notice.
• Rangez l’appareil lorsqu’il est refroidi.
SAV
• Pour votre sécurité, n’utilisez pas
d’accessoires ou de pièces de rechange,
autres que ceux fournis par les centres
de service après-vente agréés.
• Toute intervention autre que le
nettoyage et l’entretien usuel par le
client doit être effectuée par un centre
service agréé.
• Consultez le tableau “ Si votre appareil
ne fonctionne pas, que faire ? ” à la
fin du mode d’emploi.
5
Page 13
MISE EN SERVICE DE L’APPAREIL
Avant la première utilisation :
• Lisez attentivement ce mode d’emploi. En le
parcourant, vous découvrirez des conseils
d’utilisation qui vous feront entrevoir le
potentiel de votre appareil : préparation de
mijotés, de soupes, de cuissons vapeur, et
de desserts mais également la possibilité de
réchauffer vos préparations.
• Conservez-le afin de vous y reporter
ultérieurement : une utilisation non conforme
au risque d’emploi dégagerait le fabricant de
toute responsabilité.
• Veillez à retirer tous les emballages de votre
produit.
• Nettoyez les différents éléments : bol,
accessoires, entraineur, coupelle et joint (D2,
D3, E, F, G) à l’aide d’eau savonneuse. (Cf. §
NETTOYAGE de ce mode d’emploi).
• Attention le couvercle qui contient le bloc
moteur (D1) ainsi que la base (A) ne doivent
ne doit pas être placés sous l’eau (Fig. 16).
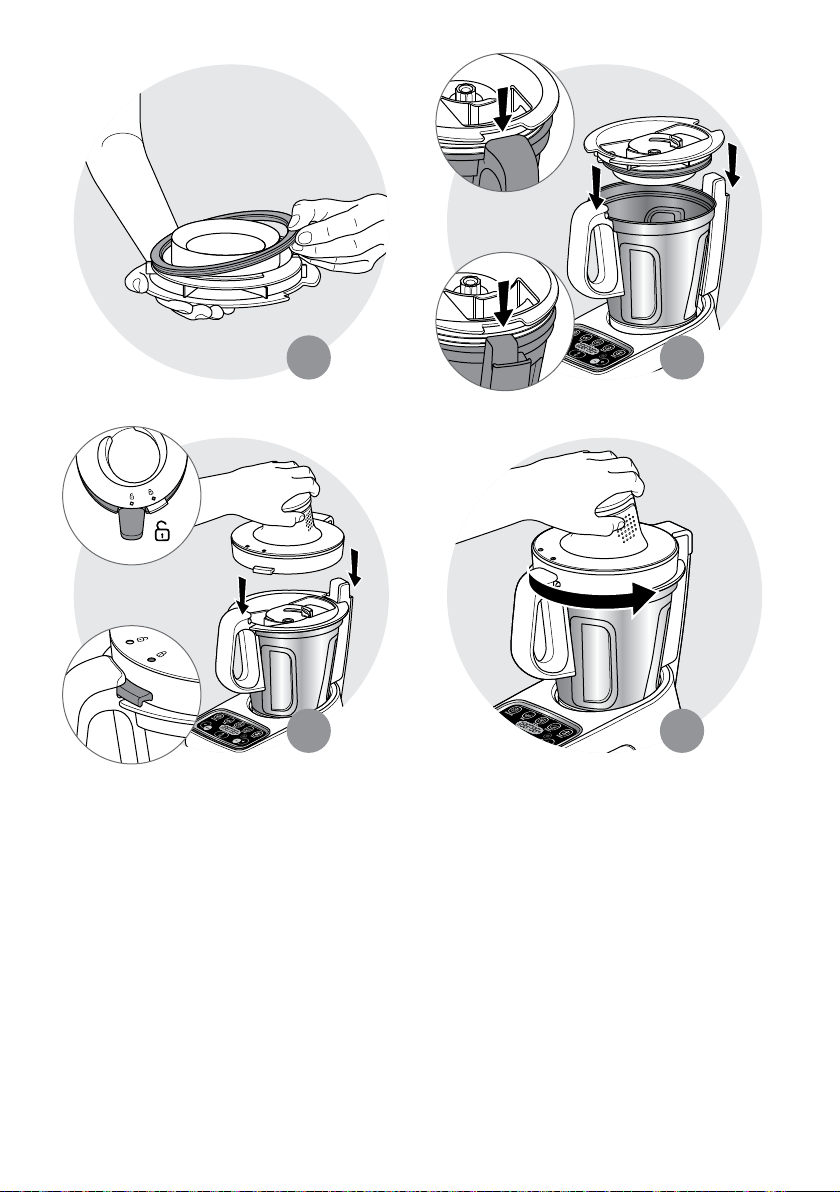
• Mise en place de l’ensemble couvercle :
Le couvercle du produit est composé de trois éléments : le couvercle bloc moteur (D1), la
coupelle (D2) et le joint d’étanchéité (D3).
Ces 3 éléments sont livrés assemblés.
Dans vos utilisations futures, vous pouvez procéder de 2 façons pour assembler votre ensemble
couvercle :
Mise en service de l’appareil : mise en place
du bol, des accessoires et du couvercle
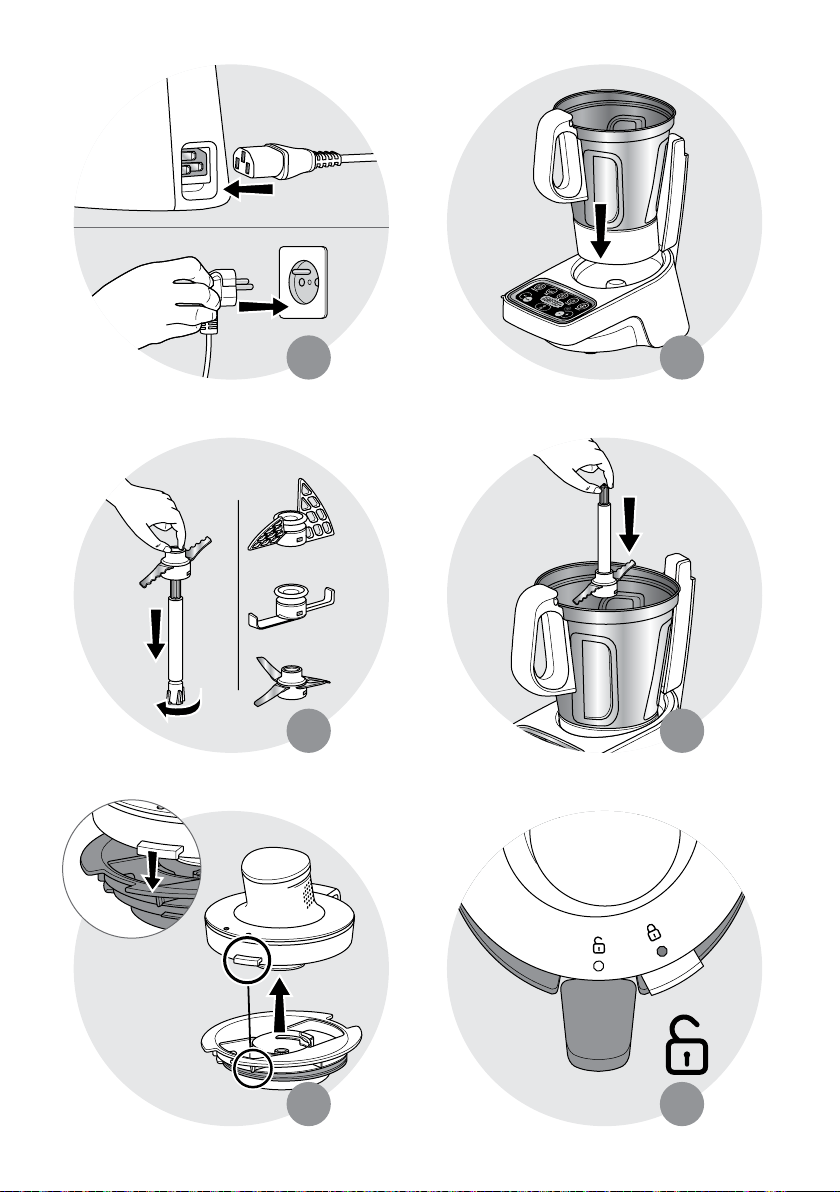
Votre appareil est équipé d’un cordon
d’alimentation amovible (H). Branchez ce
cordon à la base, puis branchez votre appareil à
la prise secteur (Fig. 1).
• Mise en place du bol et des accessoires
1. Placez le bol (F) sur la base de l’appareil
(A) en le manipulant par la poignée de
préhension (F1) (Fig. 2).
2. Positionnez l’accessoire choisi (G1
sur l’entraineur (E) (Fig. 3), puis placez
l’ensemble dans le bol (F) (Fig. 4).
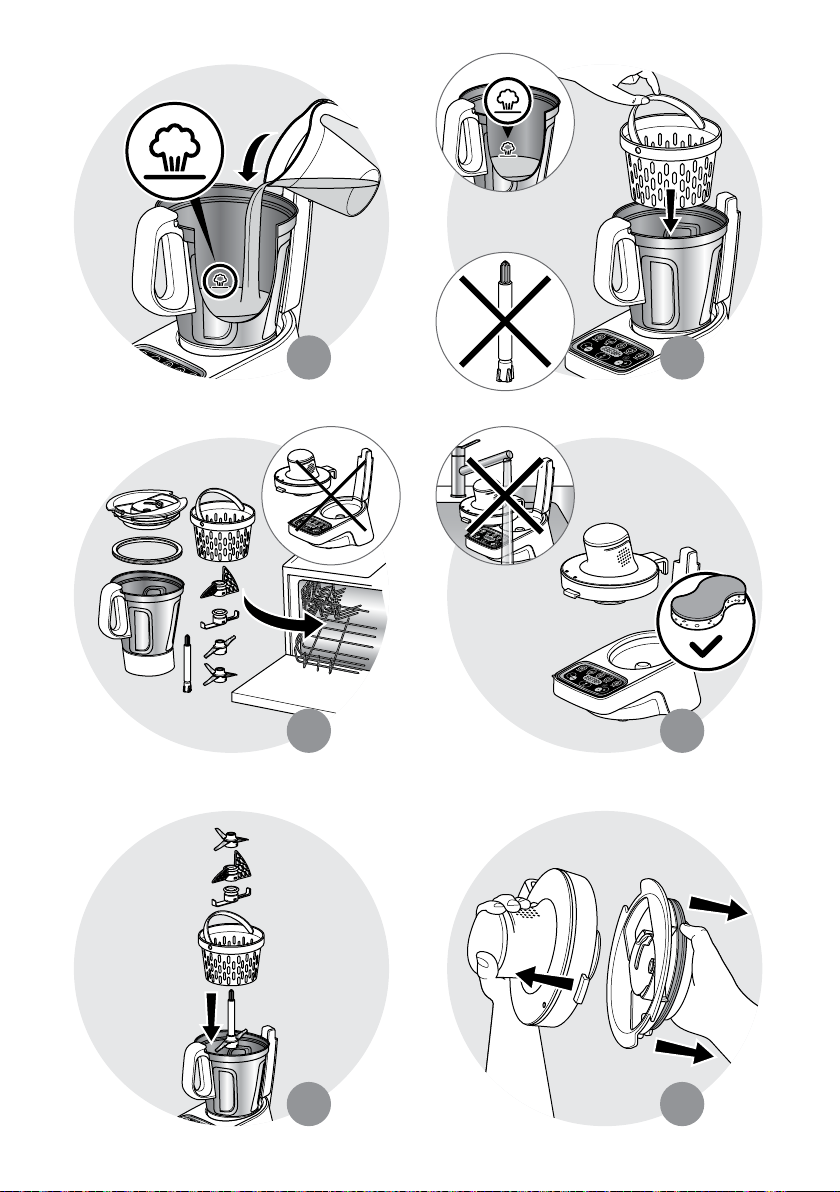
Pour l’utilisation du panier vapeur (G5),
veillez au préalable à remplir la cuve jusqu’au
repère
eau, sauce…) (Fig. 13) avant de le placer à
l’intérieur du bol (F) (Fig. 14),
3. Incorporez les ingrédients à l’intérieur du bol
(F) ou du panier vapeur (G5).
(correspondant à 0.4L de liquide :
G5)
FR
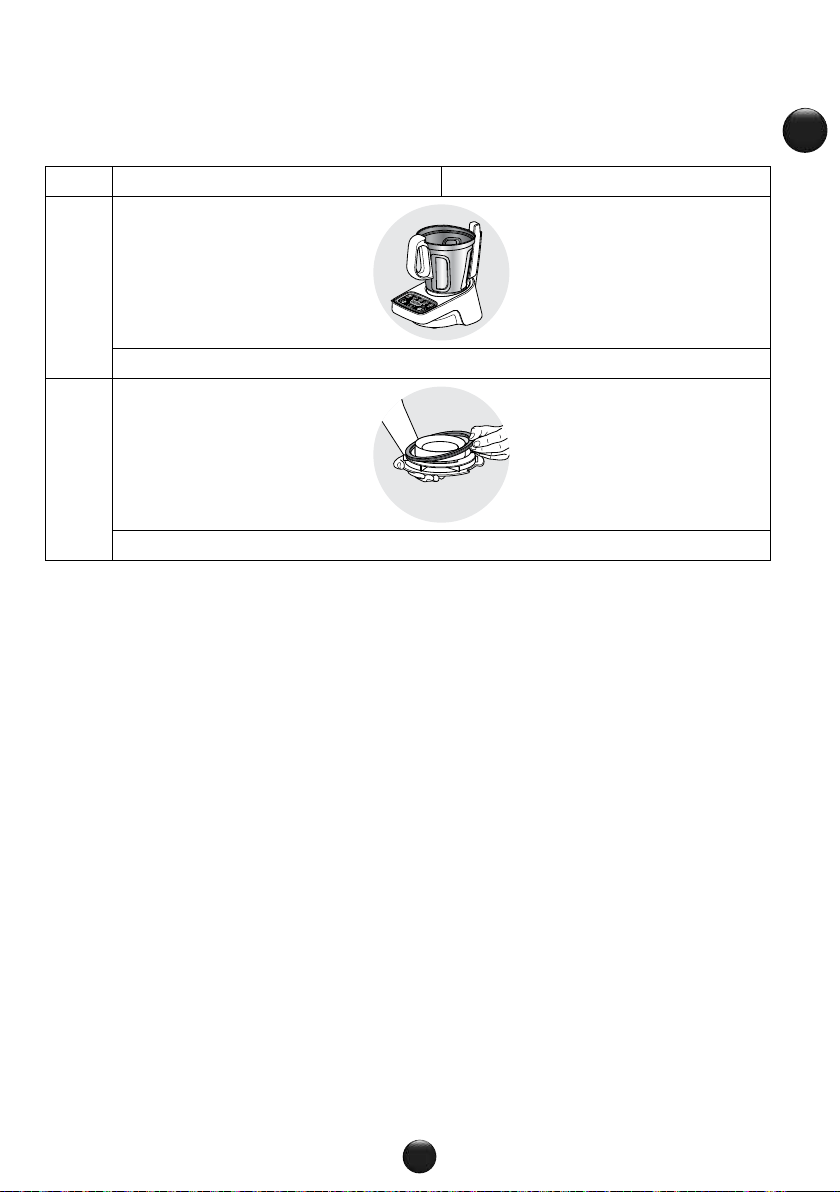
Étape Scénario 1 Scénario 2
1
Placez le bol (F) sur la base de l’appareil (A) en le manipulant par la poignée de
préhension (F1) (Fig. 2).
2
Placez le joint d’étanchéité (D3) sur le porte joint de la coupelle (D2) (Fig. 19).
6
Page 14
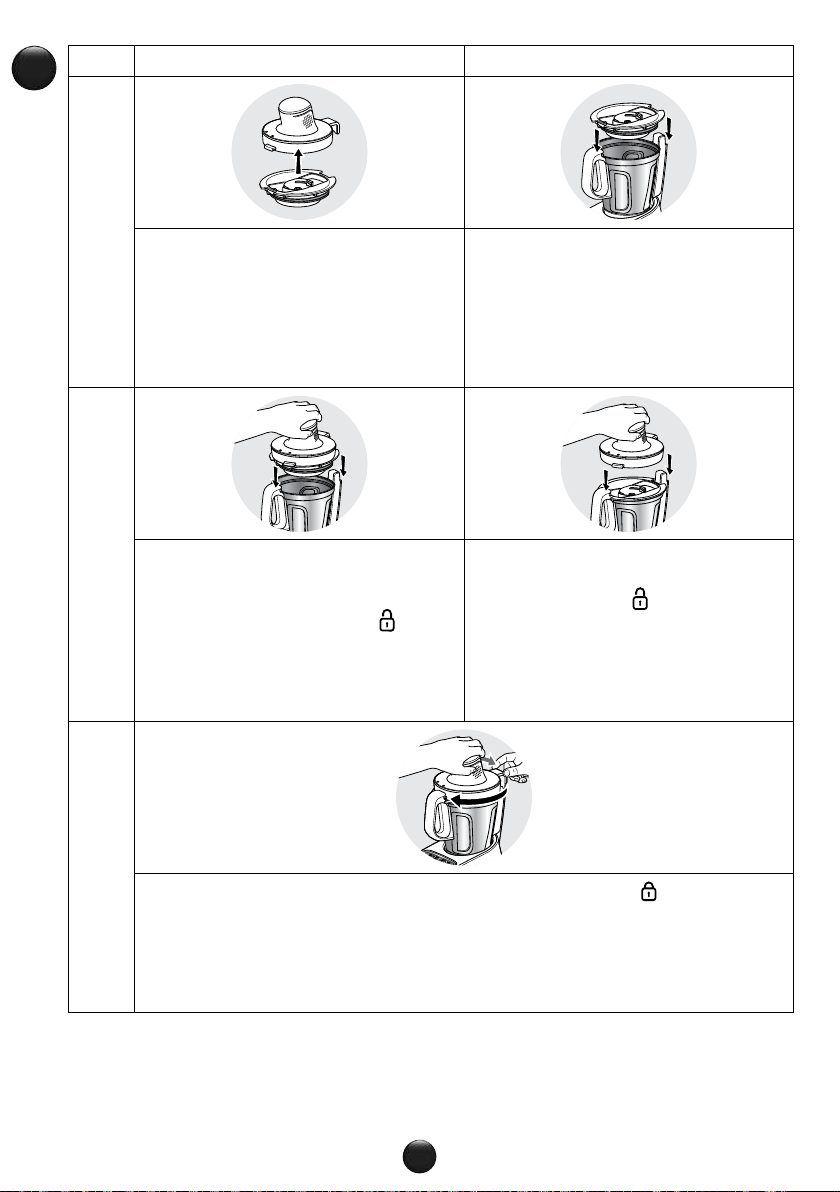
Étape Scénario 1 Scénario 2
“click”
FR
3
Clipsez la coupelle (D2) sur le couvercle
bloc moteur (D1), en veillant à
positionner la patte de verrouillage (D1a)
du bloc moteur au bord de l’encoche
(D2a) de la coupelle (D2), et appuyez
jusqu’à entendre un « clic » (Fig. 5). La
coupelle est alors en place.
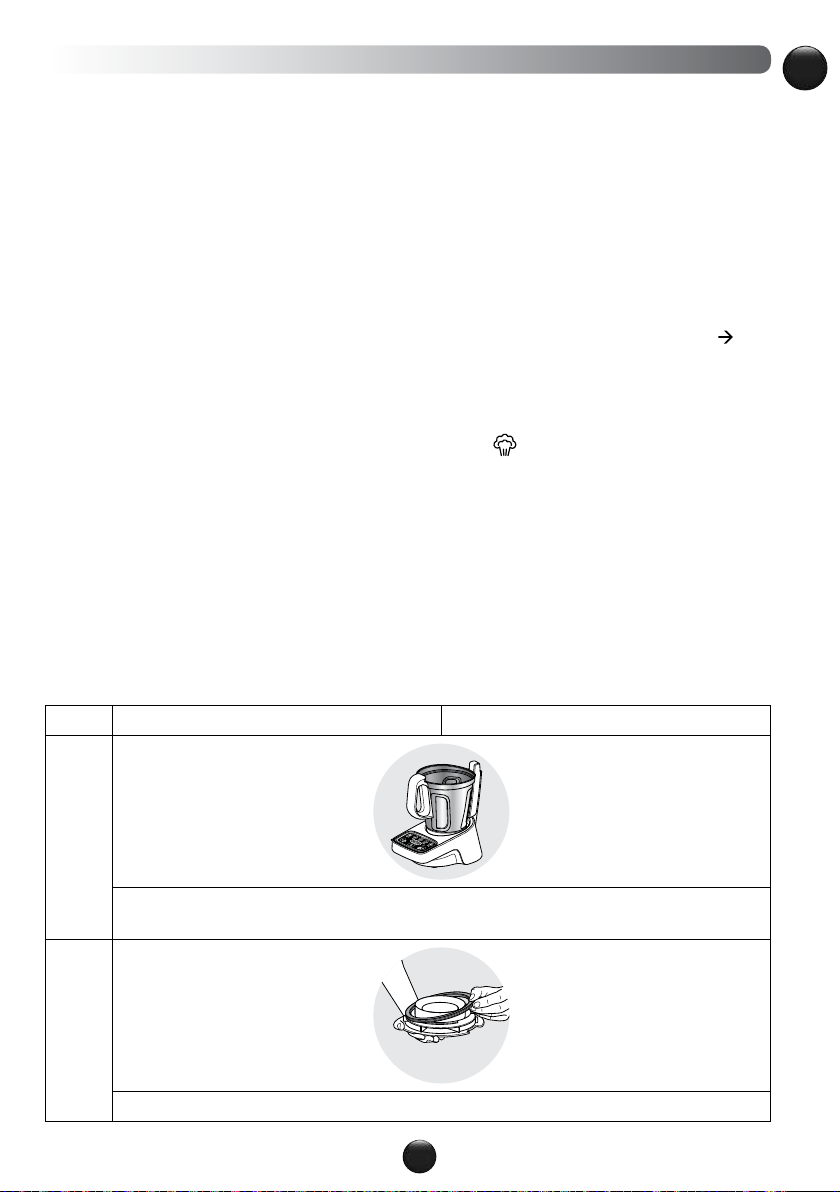
Placez la coupelle (D2) sur le bol en
veillant à placer les encoches (D2a) de la
coupelle (D2) autour de la poignée (F1)
et de la colonne arrière (A1) (Fig. 20)
4
Placez l’ensemble couvercle bloc moteur
(D1, D2+D3) sur le bol (F), en veillant à
positionner :
- le symbole « cadenas ouvert »
de la poignée (Fig. 6)
- les encoches de la coupelle (D2a) autour
de la poignée (F1) et de la colonne
arrière (A1) (Fig. 7)
5
Verrouillez le couvercle, de façon à amener le « cadenas verrouillé » en face de la
poignée (F1) : Pour cela, d’une main, tournez l’ensemble couvercle dans le sens des
aiguilles d’une montre de façon à faire coulisser la patte de verrouillage (D1a) du
bloc moteur dans la poignée (F1), et de l’autre main, accompagnez la partie arrière
du couvercle de façon à faire coulisser la seconde patte de verrouillage (D1a) dans la
colonne arrière (A1) de la base (A). (Fig. 8).
en face
Posez le couvercle bloc moteur(D1) sur
la coupelle (D2) en veillant à positionner
le « cadenas ouvert » en face de la
poignée (F1) et appuyez jusqu’à entendre
un « clic » (Fig. 21).
7
Page 15

! La mise en place du couvercle ne doit être effectuée que si le joint est placé sur le porte
joint de la coupelle (Fig. 19) et si la coupelle est fixée au couvercle bloc moteur.
• Mise en marche
1. Sélectionnez le programme automatique
souhaité en appuyant sur la touche
correspond au programme Choisi (B1, B2,
B3, B4, B5, B7) (Fig. 9). Pour sélectionner
les différents sous-programmes, appuyez à
nouveau sur la touche du programme pour
faire défiler les sous-programmes (ex : soup
P1 = 1 appui ; soup P2 = 2 appuis etc…).
2. Appuyez sur le bouton start/stop/reset (B9)
pour lancer le programme (Fig. 10).
L’appareil démarre uniquement si le bol
est correctement positionné sur la base
et si l’ensemble couvercle bloc moteur est
correctement positionné sur le bol.
En cas de mauvais positionnement du bol
ou de mauvais verrouillage du couvercle, le
tableau de commandes se met à clignoter
lorsqu’on lance un programme (Fig. 11).
Démontage de l’ensemble couvercle :
1. Déverrouillez l’ensemble couvercle, en
tournant le couvercle dans le sens contraire
des aiguilles d’une montre, de façon à amener
le cadenas ouvert en face de la poignée (Fig.
22).
2. Soulevez le couvercle d’une main et de l’autre
tirez la coupelle pour la séparer du bloc
moteur (Fig. 18).
3. Retirez le joint (Fig. 19).
FR
8
Page 16
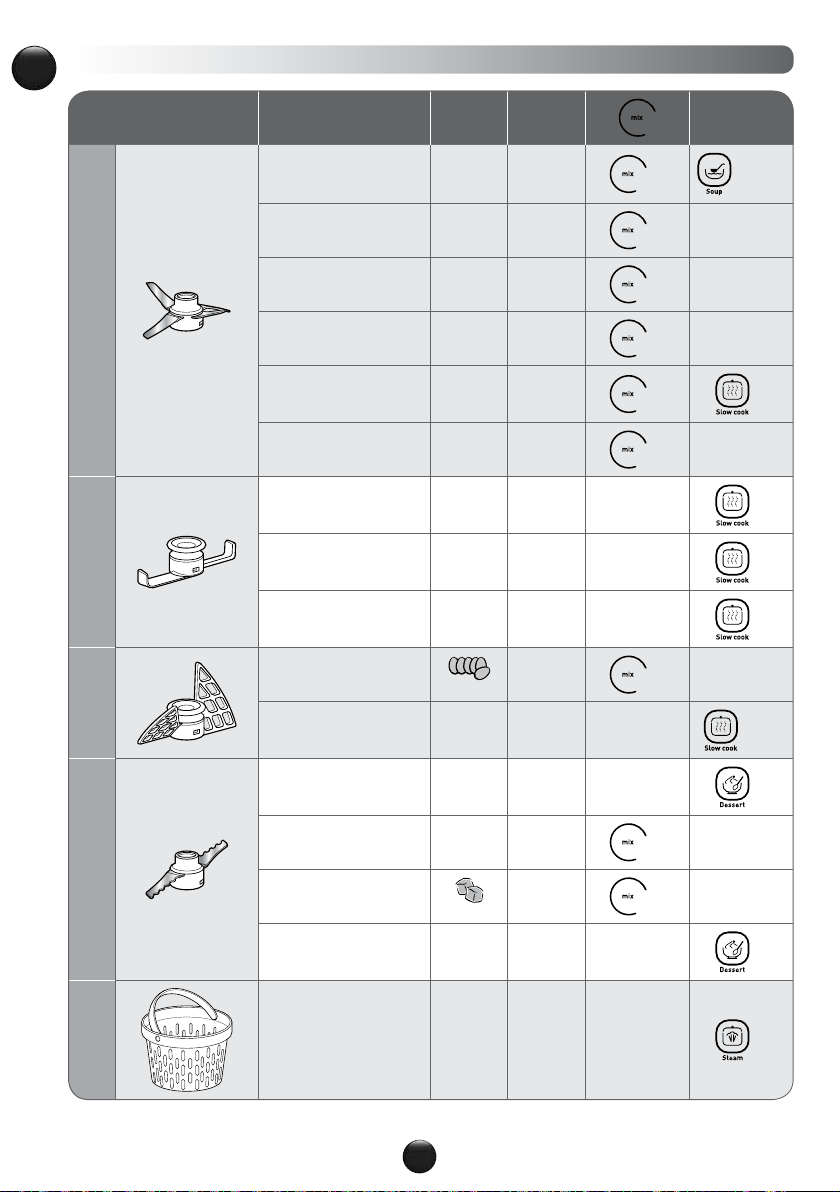
ACCESSOIRES, PROGRAMMES ET QUANTITES
FR
COUTEAU HACHOIR
MELANGEUR
QUANTITES
MAX
Mixer des soupes 1.5L
Mixer des compotes 1kg 1min
Mixer des smoothies 1.5L 2min
Hacher des légumes 500g 15sec
Hacher de la viande 300g 30sec
Hacher du poisson 500g 15sec
Rissolés 200g 5min -
Mijotés 1.2L 45min -
Risottos 1.2L 30min -
Blanc en neige
5max
DUREE
MAX
1min
30sec
2min30s
P3
P3
P3
P3
P3
P3
P2
PROGRAMMES
AUTOMATIQUES
P1 ou P2
-
-
-
P5
-
P1
P4
P3
-
BATTEUR
COUTEAU PETRIN CONCASSEUR
PANIER
VAPEUR
Sauce (ex : béchamel) 0.6L 12min -
Mélanger des pâtes légères 600g 30sec -
Hacher des noisettes 500g 1min
Piler de la glace
Pâte à crêpes, gaufres 1.2L 30sec -
Cuisson vapeur de légumes,
de poissons ou de viandes
6 à 10
600g 30min -
30sec
9
P3
P4
P2 -P3
P1
-
-
P1
P1
Page 17
PROGRAMMES AUTOMATIQUES ET SOUS-PROGRAMMES
Les programmes automatiques :
Vitesse, température de cuisson et durée sont préprogrammées pour réaliser des soupes, des mijotés,
des cuissons vapeur, et des desserts en automatique ou pour réchauffer vos préparations. La durée
de cuisson est un paramètre ajustable. Vous pourrez augmenter ou diminuer le temps de cuisson
(B10) selon votre convenance.
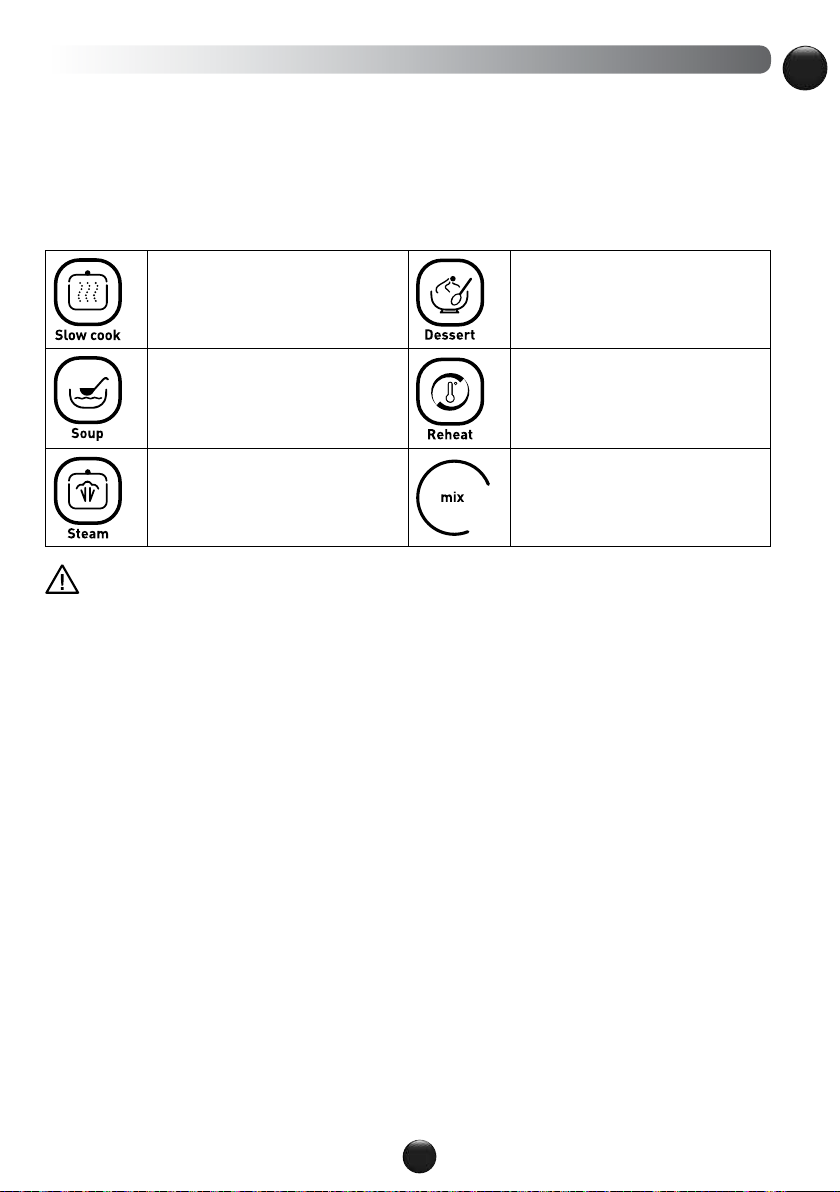
Que vais-je réaliser avec les programmes automatiques du tableau de commandes (B)
Réalisation de plats mijotés, en
sauce.
(Sous programmes P1, P2, P3,
P4, P5)
Réalisation de soupes
(Sous programmes P1, P2)
Réalisation de cuissons vapeur
N’utilisez pas l’accessoire batteur (G4) avec une préparation trop liquide, dont la
quantité serait supérieure à 1 litre. Dans ce cas, il y aurait un risque d’éclaboussures
à l’extérieur du bol.
Réalisation de desserts
(Sous programmes P1, P2, P3,
P4)
Réchauffage des préparations
Réalisation d’oeufs en neige,
viande hachée, glace pilée
(Sous programmes P1, P2, P3,
P4)
FR
10
Page 18
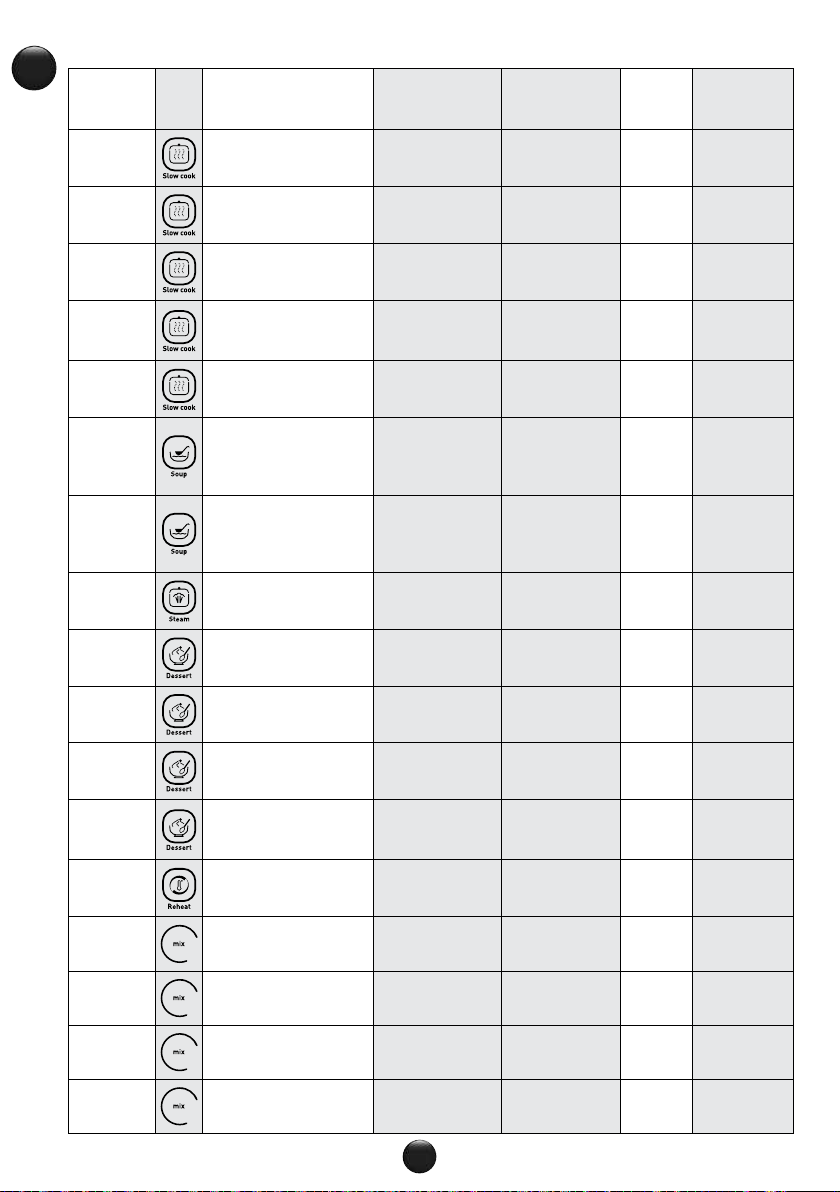
Détail des programmes automatiques et de leurs sous-programmes
FR
Slow cook
P1
Vitesse
(non ajustable)
Lente
Temps par défaut
(ajustable)
5min
(1min à 10min)
Température par
défaut
(non ajustable)
120°C NON
Maintien
au chaud
Exemple de
recettes
Oignons
rissolés
Slow cook
P2
Slow cook
P3
Slow cook
P4
Slow cook
P5
Soup P1
Soup P2
Steam P1
Dessert P1
Dessert P2
Dessert P3
Dessert P4
Reheat
Lente avec intermittence
puis continue
Lente avec intermittence
Aucune
Rapide 15sec et lente avec
intermittence ensuite
Pas de vitesse pendant la
cuisson puis 10 Pulses puis
vitesse rapide pendant
2min après la cuisson
Pas de vitesse pendant
la cuisson et vitesse
moyenne pendant 15
secondes après la cuisson
Aucune
Rapide avec intermittence
puis continue
Lente avec intermittence
Lente avec intermittence
puis continue
Aucune puis lente avec
intermittence en cours de
cuisson
Lente avec intermittence
20min
(5min à 2h30min)
30min
(5min à 2h30min)
45min
(5min à 2h30min)
60min
(5min à 2h30min)
35min
(5min à 1h)
38min
(5min à 1h)
30min
(5min à 1h)
30sec
(10s à 1min)
10min
(1min à 30min)
20min
(10min à 1h)
15min
(5min à 1h)
15min
(3min à 30min)
80°C 45 min Sauce tomate
90°C 45 min Risotto
95°C 45 min
95°C 45 min Paté marmite
100°C 45 min
100°C 45 min
100°C 45 min Brocoli vapeur
Aucune NON Quatre quarts
55°C NON Chocolat fondu
90°C NON Riz au lait
100°C NON
80°C NON
Mijoté de
poisson au
safran
Velouté de
courgettes
Mouliné
carotte /
pomme de
terre
Compote de
pommes
Réchauffer une
soupe
Mix P1
Mix P2
Mix P3
Mix P4
Lente
Moyenne
Rapide
Rapide avec intermittence
2min
(30s à 5min)
5min
(1min à 10min)
1min
(10s à 1min 30sec)
30s
(10s à 1min)
11
Aucune NON
Aucune NON
Aucune NON Bœuf haché
Aucune NON
Crème de thon
et d’oeufs
Blancs en
neige
Piler des
glaçons
Page 19

UTILISATION MANUELLE DU TABLEAU DE COMMANDES (B) :
Ce mode permet de personnaliser le paramètre de durée de cuisson pour une utilisation selon votre
convenance.
• Utilisation des programmes manuels du tableau de commandes (B)
Ce bouton a 4 fonctions :
- Start/stop
- “Validation” du choix de votre programme automatique
- “Pause” au cours d’une utilisation, une fois que l’appareil est lancé.
- “Réinitialisation” des paramètres sélectionnés par une pression de 2 secondes
(reset).
Réglage de la durée de fonctionnement : Sélectionnez le programme souhaité et
ajustez en ajoutant ou réduisant le temps de cuisson.
Ce mode permet de mixer manuellement votre préparation.
• Utilisation du panier vapeur
Pour réaliser une cuisson vapeur à l’aide du
panier cuisson, il est nécessaire de verser 0.4L
d’eau dans le fond du bol (jusqu’au repère gravé
dans le bol (Fig. 13).
Les temps de cuisson sont donnés à titre
indicatif, ils permettent dans la plupart des cas
une cuisson satisfaisante.
Tableau des quantités et temps de cuisson vapeur
Néanmoins, certaines conditions vont influer sur
le temps de cuisson :
–la taille des légumes (coupés ou non-coupés)
–la quantité des ingrédients dans le panier
–la variété des légumes, leur maturité
–la quantité d’eau dans le bol, qui doit
correspondre à la graduation
Si la cuisson est insuffisante, vous pouvez
ajouter un temps de cuisson supplémentaire.
(0.4L).
FR
Temps de cuisson vapeur
Ingrédients Quantités (max) Temps de cuisson estimé
Pommes de terre
Carottes 600g 40 min
Courgettes 600g 25 min
Panais 600g 30 min
Blancs de poireaux 500g 25 min
Haricots verts 400g 35 min
Brocolis 300g 20 min
Poisson (frais ou décongelés) 500g 15 min
Viande blanche 400g 25 min
Certaines recettes peuvent provoquer des débordements intempestifs, en raison de l’apparition
de bulles, en particulier lors de l’utilisation de légumes congelés. Dans ce cas, il vous appartient
de réduire les volumes en conséquence.
600g (rincée à l’eau au
préalable)
12
30 min
Page 20

MISE EN SECURITE DE L’APPAREIL
FR
Votre appareil est équipé, de série, de protections
électroniques du moteur afin d’en garantir sa
longévité. Cette sécurité électronique vous
garantit contre toute utilisation anormale ; ainsi
votre moteur est parfaitement protégé.
Dans certaines conditions d’utilisation très
sévères, ou de recettes personnelles (Internet et
autres...), ne respectant pas les recommandations
de la notice (Cf. § “ACCESSOIRES, PROGRAMMES
ET QUANTITÉS” : quantités éventuellement trop
importantes et/ ou une utilisation anormalement
longue et / ou un enchainement de recettes
trop rapprochées), la protection électronique se
déclenche pour préserver le moteur. Dans ce cas,
l’appareil s’arrête et un affichage “SECU” apparait
dans l’écran LCD du tableau de commande pour
indiquer que l’appareil n’est momentanément
plus opérationnel.
NETTOYAGE DE L’APPAREIL
Si “SECU” s’affiche sur votre tableau de
commandes et que votre appareil s’arrête,
procédez comme suit :
• Laissez votre appareil branché.
• Référez-vous aux recommandations de ce mode
d’emploi pour réadapter votre préparation
quantités d’ingrédients / temps de la recette
/ type d’accessoires (Cf. § « Accessoires,
programmes et quantités »).
• Attendez une demi-heure pour que le moteur
refroidisse.
• Réinitialisez l’appareil en appuyant 2 secondes
sur le bouton “Start / Stop / Reset” (B9).
Votre appareil est de nouveau totalement apte
à l’emploi.
Le service consommateur reste à votre disposition
pour toute question (voir coordonnées dans
livret de garantie).
• L’appareil ne doit pas être immergé. Ne
placez pas la base (A) et le couvercle
bloc moteur (D1) sous l’eau courante
(Fig. 16).
Une fois l’utilisation terminée, débranchez
l’appareil du secteur.
• Déverrouillez l’ensemble couvercle bloc moteur
(D1+D2) du bol (F) en le tournant dans le
sens inverse des aiguilles d’une montre afin
d’amener le « cadenas ouvert » en face de la
poignée.
• Retirez la coupelle (D2) du bloc moteur en la
tirant (Fig. 18).
• Retirez le joint (D3) de la coupelle (Fig. 19).
• Nettoyer votre bol rapidement après utilisation
• Soulevez le bol (F) de la base (A) en le prenant
par la poignée de préhension (F1).
• Placez le bol sur une surface plane.
• Lorsque les pièces sont refroidies :
–Prenez des précautions avec les lames du
couteau hachoir (G1) et du couteau pétrin/
concasseur (G2), lorsque vous les nettoyez
et lorsque vous videz le bol, car elles sont
extrêmement coupantes.
–Nettoyez le bol (F), l’entraîneur (E),
l’accessoire mis en place (G1, G2, G3, G4,
G5), la coupelle (D2) et le joint (D3), à l’aide
d’une éponge et d’eau chaude savonneuse.
• Rincez ces différents éléments sous l’eau
courante.
• Pour vous faciliter le nettoyage le bol, la
coupelle, le joint, l’entraineur et les accessoires
peuvent-être lavés au lave-vaisselle (Fig. 15).
• En cas d’entartrage du bol ou de tâches vous
pouvez utiliser le côté grattoir d’une éponge
imbibée si nécessaire de vinaigre blanc,
ou de produits d’entretien adaptés à l’acier
inoxydable.
• En cas d’encrassement prononcé, laissez
tremper pendant plusieurs heures avec de l’eau
additionnée de liquide vaisselle et grattez si
besoin avec une spatule ou bien avec le coté
grattoir d’une éponge.
• Pour nettoyer le bloc moteur (D1) et la base
(A), utilisez un chiffon humide. Séchez-les
soigneusement.
13
Page 21

• Les accessoires, l’entraineur et les éléments
du couvercle, peuvent se colorer légèrement
avec certains ingrédients comme le curry, le
• Avant de réutiliser le bol (F), assurez-vous
que les contacts électriques sous le bol sont
toujours propres et secs.
jus de carottes, etc… ; cela ne représente
aucun danger pour votre santé, ni pour le
fonctionnement de votre appareil. Pour éviter
cela, nettoyez les éléments rapidement après
l’usage.
RANGEMENT DE L’APPAREIL
Pour faciliter le rangement de votre appareil, les accessoires et l’entraineur se rangent dans le bol en
respectant l’ordre de la figure 17 puis positionnez l’ensemble couvercle (coupelle, couvercle).
QUE FAIRE SI VOTRE APPAREIL NE FONCTIONNE PAS ?
PROBLÈMES CAUSES SOLUTIONS
Les temps de cuisson sont donnés
à titre indicatif, ils permettent
dans la plupart des cas une cuisson
satisfaisante.
Néanmoins, certaines conditions vont
Cuisson insuffisante
Cuisson vapeur insatisfaisante
Difficultés pour réussir certaines
recettes
L’appareil ne fonctionne pas. Le cordon n’est pas branché.
Le couvercle ne se verrouille pas ou se
verrouille difficilement.
influer sur le temps de cuisson :
- la taille des aliments (coupés ou non
coupés)
- la quantité des ingrédients
- la variété des légumes, leur maturité
- si les ingrédients sont surgelés ou
non ....
Quantité inadaptée d’eau dans le bol.
Morceaux trop gros.
Recettes inadaptées.
Le couvercle bloc moteur n’est pas
complet.
Ajouter un temps de cuisson
supplémentaire en utilisant le sélecteur
(B10).
Réduisez la taille des morceaux.
La quantité d’eau dans le bol doit
correspondre à la graduation (0.4L).
Réduisez la taille des morceaux.
Vos recettes, personnelles ou prises sur
Internet peuvent ne pas être adaptées
à votre appareil et à ses accessoires
(quantités, temps de cuisson, durée,
accessoires inadaptés) : avant de
commencer votre recette, assurez
vous que vous respectez les consignes
d’utilisation indiquées dans ce mode
d’emploi.
Vérifier la connexion entre le cordon
et la base, à l’arrière de l’appareil.
Branchez l’appareil sur une prise.
Vérifiez que le joint est correctement
assemblé sur la coupelle porte joint et
que celle-ci est correctement assemblé
sur le couvercle bloc moteur (Fig. 5
à 8).
FR
14
Page 22

FR
Vibration ou bruit excessifs.
Fuite par le couvercle bloc moteur.
Odeur moteur.
Affichage “
Affichage “
rouge clignote.
Affichage “
rouge clignote.
Affichage “Err1”.
Affichage “Err2”. Défaut électronique. Contactez un centre agréé.
Affichage de l’indicateur de mise en
sécurité (C3)
PROBLÈMES CAUSES SOLUTIONS
L’appareil n’est pas posé sur une
SECU”
1
SECU” + témoin lumineux
2
SECU” + témoin lumineux
3
à l’écran LCD.
surface plane, l’appareil n’est pas
stable.
Volume d’ingrédients trop important.
Erreur d’accessoires.
Volume d’ingrédients trop important.
Le joint d’étanchéité n’est pas présent.
Le joint d’étanchéité est coupé,
détérioré.
Erreur d’accessoires.
A la première utilisation de l’appareil,
ou bien en cas de surcharge
moteur provoquée par une quantité
d’ingrédients trop importante ou des
morceaux trop durs ou trop gros.
Surcharge moteur provoquée par une
quantité d’ingrédients trop importante
ou des morceaux trop durs ou trop
gros ou une succession de recettes
sans suffisamment de temps de
refroidissement.
Surchauffe capteur de température, due
à la chauffe du bol alors qu’il était vide
ou avec trop peu d’ingrédients.
La résistance chauffante ne fonctionne
pas.
Le capteur de température ne
fonctionne plus.
Mauvais verrouillage du bol ou du
couvercle bloc moteur.
Surcharge du moteur.
Placez l’appareil sur une surface plane.
Réduisez la quantité d’ingrédients
traités.
Vérifiez que vous utilisez l’accessoire
préconisé.
Réduisez la quantité d’ingrédients
traités.
Positionnez le joint d’étanchéité sur
la coupelle porte-joint et clipsez
l’ensemble sur le couvercle bloc moteur.
Changez le joint, contactez un centre
service agréé.
Vérifiez que vous utilisez l’accessoire
préconisé.
Laissez refroidir le moteur (environ
30 minutes) et réduisez la quantité
d’ingrédients dans le bol.
Laissez refroidir le moteur (environ
30 minutes) et réduisez la quantité
d’ingrédients dans le bol, vérifiez que
vous utilisez le bon programme, ainsi
que l’accessoire recommandé et que
vous n’outrepassez pas les capacités de
l’appareil.
Ajoutez des ingrédients dans le bol.
Vérifiez que les broches d’alimentations
sous le bol ne sont pas encrassées. Si
c’est le cas, nettoyez-les et réessayez.
Si cela ne fonctionne toujours pas,
contactez un centre agréé.
Contactez un centre agréé.
Vérifiez si le bol est correctement
positionné sur la base et si le couvercle
bloc moteur est correctement verrouillé
(le cadenas n’apparaîtra plus à l’écran.
Laissez refroidir le moteur (environ
30 minutes), réduisez la quantité
d’ingrédients dans le bol, vérifiez que
vous utilisez le bon programme, ainsi
que l’accessoire recommandé.»
Vous êtes certain que tout est
correctement assemblé mais le
problème persiste (affichage du
cadenas), dans ce cas, contactez un
centre agréé.
15
Page 23

RECETTE
Pâté marmite
Personnes 2/4 – Préparation 10 min – Cuisson 2h
Accessoires et programmes utilisés :
- Couteau hachoir
- Programme turbo / Programme mijoté P5
300g de poitrine de porc (découennée et désossée) • 1 oignon • 1 gousse d’ail • 2cl d’huile • 5cl de
vin blanc • 5cl d’Armagnac • 1 c.à.c d’épices Rabelais® (ou mélange 5 épices) • 5g de sel • 1g de sel.
1. Epluchez l’ail et l’oignon, puis coupez-les en quatre. Coupez la poitrine de porc en gros cubes.
2. Dans le bol muni du couteau hachoir, mettez l’oignon et l’ail.
Mixer en Turbo pendant 15s.
3. Mettez l’huile, la poitrine de porc et tous les autres ingrédients dans le bol. Lancez le programme
Mijoté P5 pour 2h.
4. En fin de cuisson, placez la viande cuite dans une terrine, puis retirez une partie du gras en
surface.
Astuce :
Laissez suffisamment de gras pour que la terrine se tienne.
RECYCLAGE
• Elimination des matériaux d’emballage et de l’appareil
L’emballage comprend exclusivement des matériaux sans danger pour l’environnement,
pouvant être jetés conformément aux dispositions de recyclage en vigueur.
Pour la mise au rebut de l’appareil, se renseigner auprès du service approprié de votre
commune.
• Produits électroniques ou produits électriques en fin de vie :
Participons à la protection de l’environnement !
Votre appareil contient de nombreux matériaux valorisables ou recyclables.
Confiez celui-ci dans un point de collecte pour que son traitement soit effectué.
FR
16
Page 24

DESCRIPTION
A Base
EN
B Control panel:
C LCD display:
A1 Rear column
B1 Slow cook programme button
B2 Soup programme button
B3 Steam programme button
B4 Dessert programme button
B5 Re-heat programme button
B6 Re-heat indicator light
B7 Mix programme button
B8 Turbo button
B9 Start/stop/reset button
B10 +/- button
C1 Programme display
C2 Programme duration display
C3 Safety-lock indicator
D Motor-unit lid assembly
D1 Motor-unit lid
D1a Locking tab
D2 Seal-mounting cup
D2a Notch
D3 Sealing ring
E Drive shaft
F Jug
F1 Jug grip-handle
G Accessories
G1 Chopping blade
G2 Kneading/crushing blade
G3 Mixer
G4 Whisk
G5 Steamer basket
H Detachable power cord
TECHNICAL SPECIFICATIONS
Power: 1000W (600W: heating resistor / 400W: motor)
Operating duration range: From 10 sec to 2 hrs 30 min
Number of speeds: 3 speeds - 1 intermittent speed
17
Page 25

SAFETY INSTRUCTIONS
Personal safety
• Read the instructions for use
carefully before using your appliance
for the first time and keep them in
a safe place. The manufacturer shall
not accept any liability in the event
of any use that does not comply
with the instructions.
• Always disconnect the appliance
from the power supply if you are
to leave it unattended and before
assembly, dismantling or cleaning.
Do not allow children to use the
appliance without supervision.
• This appliance should not be used
by children. Keep the appliance and
its cord out of reach of children.
• This appliance is not intended for
use by persons (including children)
with reduced physical, sensory
or mental capabilities, or lack of
experience and knowledge, unless
they have been given supervision
or instruction concerning use of the
appliance by a person responsible
for their safety. Children should be
supervised to ensure that they do
not play with the appliance.
• Keep your appliance out of reach of
children.
• When using the
appliance, certain parts
reach high temperatures
(stainless steel wall of the jug, metal
parts under the jug, seal-mounting
cup). They can cause burns. Handle
the appliance by holding the cold
plastic parts (handles, motor-unit
lid). The red heating indicator light
indicates that there is a risk of
burning.
• The temperature of the accessible
surfaces may be high when the
appliance is in operation.
• The appliance is not intended to be
operated using an external timer
or by a separate remote control
system.
• Do not use your appliance if it
is not working properly, if it is
damaged or if the power cord or
plug is damaged.
• If the power cable is damaged, it
must be replaced by a special type
of cable or unit available from
the manufacturer or its after-sales
service. (see the list in the service
booklet).
• The appliance must not be immersed
in water. Do not put the motor-unit
lid (D1) under running water.
• This appliance is designed for
indoor household use only and
at an altitude below 2000 m. The
manufacturer shall not accept any
liability and reserves the right to
EN
18
Page 26

cancel the guarantee in the event
of commercial or inappropriate use
EN
or failure to follow the instructions.
• This appliance is intended for
indoor, domestic household use
only. It is not intended to be used
in the following applications and
the guarantee will not apply for:
– staff kitchen areas in shops, offices
and other working environments;
– farm houses;
– On farms
– by clients in hotels, motels
and other residential type
environments;
– bed and breakfast type
environments
• Your appliance emits steam which
can cause burns.
Handle using the seal-mounting
cup (if necessary, use a glove,
oven mitts etc.).
• Do not operate the appliance if
the sealing ring is not positioned
on the seal-mounting cup.
WARNING: Be aware of the risk of
injury in the event of incorrect use
of the appliance.
Take precautions with the chopping
blades (G1) and the kneading/
crushing blade (G2) when you
clean them and when you empty
the jug. They are extremely sharp.
Be careful if a hot liquid is poured
into the food processor because it
could be ejected from the appliance
due to it suddenly boiling.
Store the chopping blade (G1) in
the jug after each use.
WARNING: Be careful to avoid any
spillage on the connector during
cleaning, filling or pouring.
WARNING : Your appliance releases
steam which can cause burns.
WARNING: The heating element
surface is subjected to residual
heat after use.
Make sure you only touch the
product's handle (F1) when it is
heating up and until it has cooled
completely.
Refer to the instructions for assembly
and fitting accessories to the
appliance.
Refer to the instructions for cleaning
and maintenance of your appliance.
Always follow the cleaning
instructions on how to clean your
appliance :
• Unplug the appliance.
• Do not clean the appliance while
hot.
• Clean with a damp cloth or sponge.
• Never immerse the appliance in
water or put it under running water.
19
Page 27

EUROPEAN MARKETS ONLY:
• Keep the appliance and its cord out
of reach of children under 8 years
of age.
Children should not use the
appliance as a toy.
• This appliance may be used by
persons with reduced physical,
sensory or mental capabilities or
whose experience or knowledge
is insufficient, as long as they
have the benefit of supervision
or they have received instructions
regarding safe use of the appliance
and they understand its potential
dangers.
• This appliance may be used by
children of at least 8 years of age,
as long as they are supervised and
have been given instructions about
using the appliance safely and are
fully aware of the dangers involved.
Cleaning and maintenance by the
user should not be carried out by
children without supervision unless
they are at least 8 years of age and
are supervised by an adult.
Connection to the power supply
• The appliance should be plugged in
to an earthed electrical socket.
• The appliance is designed to work
with alternating current only.
Check that the supply voltage
indicated on the rating plate of the
appliance corresponds to that of
your electrical installation.
• Any connection error will negate
the guarantee.
• Never pull on the power cord to
unplug the appliance.
• The power cord must never be left
near or in contact with the hot parts
of your appliance, near a source of
heat or on a sharp edge.
Incorrect use
• Do not touch the lid before the
appliance comes to a complete
stop (stop button); wait until
the food being mixed is no longer
rotating.
• Always add solid ingredients to
the jug first before adding liquid
ingredients (Fig. 12), without
exceeding the MAX mark engraved
on the inside of the jug (Fig. 13).
If the jug has been over-filled,
boiling water can be ejected.
• Pay attention when using the steam
programme, observe the water level
indicated in the jug (Fig. 14).
• Never put your fingers or any
other object in the bowl while the
appliance is in operation.
EN
20
Page 28

• Do not use the jug as container
(storage, freezing, sterilisation).
• Place the appliance on stable
EN
flat, heat resistant, clean and dry
surface.
• Do not place the appliance near
a wall or a cupboard: the steam
produced may damage them.
• Do not place your appliance near
a heat source in operation (hob,
household appliance, etc.).
• Do not cover the lid with a cloth or
any other objects.
• Never put the accessories, jug and
lid in a microwave.
• Do not use the appliance outdoors.
USING THE APPLIANCE FOR THE FIRST TIME
Before using for the first time:
• Read this instruction manual carefully. As you
go through it, you will discover advice and
tips to help you to use the appliance to its
full potential: preparing stews, soups, steamed
dishes, and desserts but also the possibility of
re-heating dishes.
• Keep for future reference: using the appliance
in a way that does not comply with the safety
instructions will release the manufacturer from
any liability.
• Ensure that you remove all of the packaging
from your product.
• Clean the different parts: the jug, accessories,
drive shaft, seal-mounting cup and sealing
ring(D2, D3, E, F, G) using soapy water. (see §
CLEANING in this instruction manual).
• Caution: the cover that contains the motor
unit (D1) as well as the base (A) must not be
placed under the water (Fig. 16).
• Never exceed the maximum quantity
indicated in the instructions.
• Store the appliance when it has
cooled down.
After-sales Service
• For your own safety, do not use
accessories or spare parts other
than those provided by the
approved after-sales centres.
• Any intervention other than
cleaning and usual maintenance by
the customer must be carried out
by an approved service centre.
• Consult the table “What to do if
your appliance does not work” at
the end of the instruction manual.
Using the appliance for the first time: fitting
the jug, accessories and lid
Your appliance is equipped with a detachable
power cord (H). Connect the power cord to the
base, then plug your appliance into the mains
socket (Fig. 1).
• Fitting the jug and accessories
1. Place the jug (F) on the base of the appliance
(A), holding the handle (F1) (Fig. 2).
2. Position the chosen accessory (G1
the drive shaft (E) (Fig. 3), and then place
the assembled parts on the jug (F) (Fig. 4).
To use the steamer basket (G5), first make
sure you fill the jug up to the mark
(corresponding to 400ml/0.4L of liquid
:water, etc.) (Fig. 13) before placing inside
the jug (F) (Fig. 14),
3. Stir the ingredients inside of the jug (F) or
steamer basket (G5).
G5) on
21
Page 29
• Fitting the lid assembly
The appliance's lid is made up of three parts: the motor-unit lid (D1), the seal-mounting cup
(D2) and the sealing ring (D3).
These 3 items come assembled.
For your future uses, there are two ways to assemble the lid:
Steps Scenario 1 Scenario 2
1
Place the jug (F) on the base of the appliance (A), holding the handle (F1) (Fig. 2).
2
Place the sealing ring (D3) on the seal-mounting cup (D2) (Fig. 19).
EN
22
Page 30

Steps Scenario 1 Scenario 2
“click”
EN
3
Clip the cup (D2) to the motor-unit lid
(D1), making sure you position the lug
(D1a) of the motor unit at the edge of
the notch (D2a) on the cup (D2), and
press until you hear a "click" (Fig. 5). The
cup is now in place.
Place the cup (D2) on the jug making
sure you place the notches (D2a) of the
cup (D2) around the handle (F1) and rear
column (A1) (Fig. 20)
4
Place the assembled motor-unit lid (D1,
D2+D3) on the jug (F), making sure you
position:
- the "open padlock " symbol
of the handle (Fig. 6)
- the notches (D2a) of the cup around the
handle (F1) and rear column (A1) (Fig. 7)
5
To lock the lid in place to position the “locked padlock” opposite the handle (F1):
To do this, with one hand, turn the lid assembly in a clockwise direction in order to
slide the locking tab (D1a) of the motor unit into the handle (F1), and with the other
hand, support the rear part of the lid so as to slide the second locking tab (D1a) into
the rear column (A1) on the base (A). (Fig. 8).
in front
Fit the motor-unit lid (D1) on the cup
(D2), making sure you position the "open
padlock" in front of the handle (F1) and
press until you hear a "click" (Fig. 21).
23
Page 31

! The lid should only be fitted if the sealing ring is placed on the seal-mounting cup (Fig.
19) and if the self-mounting cup is fixed to the motor-unit lid.
• Switching on
1. Select the desired automatic programme
(B1, B2, B3, B4, B5, B7) by
pressing on the corresponding button
(Fig. 9). To select the different subprogrammes, press the programme button again
to scroll through the sub-programmes (e.g:
soup P1 = 1 press; soup P2 = 2 presses etc.).
2. Press the start/stop/reset button (B9) to
launch the programme (Fig. 10).
The appliance only starts if the jug is correctly
positioned on the base and if the motor-unit lid
assembly is correctly positioned on the jug.
In the event of incorrect positioning of the
jug or poor locking of the lid, the control
panel will flash when you try to launch a
programme (Fig. 11).
Disassembling the lid:
1. Unlock the lid assembly, by turning the lid in
an anti-clockwise direction so as to bring the
open padlock opposite the handle (Fig. 22).
2. Lift the lid with one hand and with the other
pull the cup to separate it from the motor
unit (Fig. 18).
3. Remove the sealing ring (Fig. 19).
EN
24
Page 32

ACCESSORIES, PROGRAMMES AND QUANTITIES
EN
CHOPPING BLADE
MIXER
WHISK
MAXIMUM
QUANTITIES
Mixing soup 1.5L
Mixing compotes
(stewed fruit)
Mixing smoothies 1.5L 2min
Chopping vegetables 500g 15sec
Chopping meat 300g 30sec
Chopping fish 500g 15sec
Rissoles 200g 5min -
Stews 1.2L 45min -
Risotto 1.2L 30min -
Whisked egg whites
Sauce (e.g. béchamel) 0.6L 12min -
Mixing light batters and
dough
5max
600g 30sec -
MAXIMUM
DURATION
1min
30sec
1kg 1min
2min30s
P3
P3
P3
P3
P3
P3
P2
AUTOMATIC
PROGRAMMES
P1 or P2
-
-
-
P5
-
P1
P4
P3
-
P2-P3
P1
KNEADING/CRUSHING BLADE
STEAMER BASKET
Chopping nuts 500g 1min
Crushing ice
Pancake batter, waffles 1.2L 30sec -
Steaming vegetables, fish
or chicken
6 to 10
600g 30min -
30sec
25
P3
P4
-
-
P1
P1
Page 33

AUTOMATIC PROGRAMMES AND SUB-PROGRAMMES
Automatic programmes:
Speed, cooking temperature and duration are pre-programmed to make soups, stews, steamed dishes,
and desserts automatically or to re-heat dishes. The cooking duration is an adjustable setting. You
can increase or decrease the cooking time (B10) for your convenience.
What shall I make with the automatic programmes on the control panel (B)?
EN
Making stews
(Sub-programmes P1, P2, P3,
P4, P5)
Making soups
(Sub-programmes P1, P2)
Steamed dishes
Do not use the whisk accessory (G4) with a mixture that is too liquid and that measures
more than 1 litre. If you do so, there is a risk of splashing outside the jug.
Automatic programmes and sub-programme details
Slow cook
P1
Slow cook
P2
Slow cook
P3
Slow cook
P4
Slow cook
P5
Speed
(non-adjustable)
Slow
Slow and intermittently,
then continuously
Slow and intermittently
None
Fast 15sec, slow and
intermittently
Default time
(adjustable)
5min
(1min to 10min)
20min
(5min to
2h30min)
30min
(5min to
2h30min)
45min
(5min to
2h30min)
60min
(5min to
2h30min)
Making desserts
(Sub-programmes P1, P2, P3, P4)
Re-heating dishes
Making whisked egg whites,
chopping meat, crushed ice
(Sub-programmes P1, P2, P3, P4)
Default
temperature
(non-adjustable)
120°C NO Onion rings
80°C 45 min Tomato sauce
90°C 45 min Risotto
95°C 45 min
95°C 45 min Pâté casserole
Keeping
warm
Recipe
examples
Stewed fish
with saffron
26
Page 34

EN
Soup P1
Soup P2
Steam P1
Dessert P1
Dessert P2
Dessert P3
Dessert P4
Reheat
Mix P1
Speed
(non-adjustable)
No speed during cooking,
then 10 pulses, followed
by fast speed for 2min
after cooking
No speed during cooking,
then a medium speed for
15 seconds after cooking
None
Fast and intermittently,
then continuously
Slow and intermittently
Slow, intermittently and
then continuously
None, then slow and
intermittently during
cooking
Slow and intermittently
Slow
Default time
(adjustable)
35min
(5min to 1h)
38min
(5min to 1h)
30min
(5min to 1h)
30sec
(10s to 1min)
10min
(1min to 30min)
20min
(10min to 1h)
15min
(5min to 1h)
15min
(3min to 30min)
2min
(30s to 5min)
Default
temperature
(non-adjustable)
100°C 45 min
100°C 45 min
100°C 45 min
None NO Sponge cake
55°C NO
90°C NO Rice pudding
100°C NO Apple compote
80°C NO
None NO
Keeping
warm
Mashed carrot/
Recipe
examples
Creamed
Courgette
Soup
potato
Steamed
broccoli
Chocolate
fondu
Reheating a
soup
Tuna mayo
with eggs
Mix P2
Mix P3
Mix P4
Medium
Fast
Fast and intermittently
5min
(1min to 10min)
1min
(10s to 1min
30sec)
1min
(10s to 1min)
27
None NO
None NO Chopping beef
None NO Crushing ice
Whisked egg
whites
Page 35

MANUAL USE OF THE CONTROL PANEL (B):
This mode allows you to customise the cooking-duration setting to use at your convenience.
• Using the manual programmes on the control panel (B):
This button has 4 functions:
- Start/stop
- "Confirmation" of your automatic programme choice
- "Pause" during use, once the appliance has started.
- "Reset" the chosen settings by pressing for 2 seconds (reset).
Adjusting the operating duration: Select the desired programme and adjust by
increasing or decreasing the cooking time.
This mode allows you to manually mix your ingredients.
EN
• Using the steamer basket
To cook with steam using the basket, you need to
add 400 ml/0.4L cold water to the bottom of the
jug (up to mark engraved on the just (Fig. 13).
The cooking times are for guidance only, and in
most cases allow for satisfactory cooking.
Nevertheless, certain conditions will influence
Table of quantities and steaming times
Steaming times
Ingredients Quantities (max)
Potato
(small whole new)
Carrots 600g 40 min
Courgettes 600g 25 min
Parsnips 600g 30 min
Leeks (white part only) 500g 25 min
Green beans 400g 35 min
Broccoli (florets) 300g 20 min
Fish fillets or steaks
(fresh or frozen)
White meat
(skinless and boneless chicken
breast fillets)
600g (rinsed with water
the cooking time:
–the size of the vegetables (cut or not cut)
–the quantity of ingredients in the basket
–the variety of vegetables, and their maturity
–the amount of water in the jug, which must
correspond to the mark
If the cooking results are not sufficient, you can
add additional cooking time.
Approximate steaming time
(for fresh ingredients)
beforehand)
500g 15 min
400g 25 min
(400 ml/0.4L).
30 min
Some recipes may cause the water to overflow due to the bubbles, particularly when using
frozen vegetables. In this case, you need to reduce the quantity of food accordingly.
28
Page 36

MAKING YOUR APPLIANCE (“SECU”)
Your appliance comes equipped with electronic
protection of the motor to guarantee its
EN
longevity. This electronic security protects
against any abnormal use; meaning that the
motor is properly protected.
In cases of extreme use, which disregard the
recommendations in the instruction manual
(see section “ACCESSORIES, PROGRAMMES AND
QUANTITIES), the electronic protection will be
triggered to preserve the motor.
This can occur when you use your own recipes
(from the internet or other sources) and the
quantities may be too high and/or the processing
time is abnormally long and/or processing a
succession of recipes too close together without
sufficient cooling time in between. In this event,
the appliance stops and the message "SECU" will
appear on the control panel's LCD display to
indicate that the appliance is momentarily nonoperational.
CLEANING THE APPLIANCE
• The appliance must not be immersed
in water. Do not put the base or motorunit lid (D1) under running water.
Once you have finished using the appliance,
unplug it from the power socket.
• Remove the motor-unit lid assembly (D1+D2)
from the jug (F) by turning it in an anticlockwise direction to move the "open padlock
" opposite the handle.
• Remove the sealing-mount cup (D2) from the
motor unit by pulling it (Fig. 18).
• Remove the sealing ring (D3) from the seal-
mounting cup (Fig. 19).
• Clean the jug immediately after use to avoid
staining.
• Remove the jug (F) from the base of the
appliance (A), holding the grip handle (F1)
(Fig. 2).
• Place the jug on a flat surface.
• When the parts have cooled:
–Take care with the chopping blades (G1)
and the kneading/crushing blade (G2)
when you clean them and when you empty
the jug because they are extremely sharp.
If "SECU" appears on your control panel and
your device stops, proceed as follows:
• Leave your appliance plugged in.
• Refer to the recommendations in this
instruction manual to re-adapt your dishes
quantities of ingredients / processing times
/ type of accessories (see. § "ACCESSORIES,
PROGRAMMES AND QUANTITIES").
• Wait half an hour for the motor to cool down.
• Reset the device by pressing the "Start / Stop
/ Reset" button for 2 seconds (B9).
Your appliance is ready to be used again.
The customer service team remains at your
disposal for any questions (see contact details
in the separate booklet).
–Clean the jug (F), drive shaft (E), accessory
used (G1, G2, G3, G4, G5), seal-mounting
cup (D2) and sealing ring (D3), using a
sponge, hot water and washing up liquid.
• The jug, sealing-mount cup, sealing ring, drive
shaft and accessories, can be washed in the
dishwasher (Fig. 15).
• If there is a build-up of limescale in the jug,
you can use the scourer side of a sponge
dampened if necessary with white vinegar, or
with cleaning products suitable for stainless
steel.
• In the case of stuck-on grime, leave it to
soak for several hours with water and a little
washing-up liquid and scrape if needed with a
spatula or the scourer side of a sponge.
• To clean the motor unit (D1) and the base
(A), use a damp cloth. Dry it carefully.
29
Page 37

• The accessories, drive shaft and lid parts can
discolour slightly with some ingredients such
as curry, carrot juice etc. this presents no
• Before reusing the jug (F), make sure that the
electrical contacts under the jug are always
clean and dry.
danger to your health or to the operation of
your appliance. To avoid this, clean the items
immediately after use.
STORING THE APPLIANCE
To help with storing your appliance, the accessories and drive shaft can be kept in the jug in the
order shown in figure 17 followed by the lid assembly (cup, lid).
WHAT TO DO IF YOU APPLIANCE DOESN'T WORK
PROBLEMS CAUSES SOLUTIONS
The cooking times are for guidance
only and in most cases allow for
satisfactory cooking.
Nevertheless, certain conditions will
influence the cooking time:
Insufficient cooking
Unsatisfactory steaming
Difficulties succeeding with some
recipes
The appliance doesn't work The power cord is not plugged in.
The lid does not lock or locks with
difficulty.
Excessive vibration or noise.
- the size of the vegetables (cut or
not cut)
- the quantity of ingredients
- the variety of vegetables, and their
maturity
- If the ingredients are frozen or not
....
Inappropriate quantity of water in
the jug.
Pieces too large.
Unsuitable recipes.
The motor-unit lid is not fully
assembled.
The appliance is not on a flat surface,
the appliance is not stable.
Too many ingredients have been added.
A problem with the accessories.
Add further cooking time using the
button (B10).
Reduce the size of the pieces.
The amount of water in the jug must
correspond to the mark (400 ml/0.4L).
Reduce the size of the pieces.
Your recipes, whether your own or
found on the internet, may not be
suited to your appliance and its
accessories (quantities, cooking
time, processing time, inappropriate
accessories). Before you begin your
recipe, make sure that you read the
instructions for use shown in this
instruction manual.
Check the connection between the
cord and the base, at the rear of the
appliance. Insert the plug into a power
socket.
Check that the sealing ring is correctly
assembled on the seal-mounting cup
and that it is correctly assembled on
the motor-unit lid (Fig. 5 to 8).
Place the appliance on a stable surface.
Reduce the quantity of ingredients
added.
Check that you are using the
recommended accessory.
EN
30
Page 38

PROBLEMS CAUSES SOLUTIONS
Too many ingredients have been added.
EN
Leak through the motor-unit lid.
Smell from the motor.
SECU" appears on the display.
"
1
SECU" appears on the display and a
"
2
red indicator light flashes.
SECU" is displayed and a red indicator
"
3
light flashes.
"Err1" is displayed.
"Err2" is displayed. Electronic fault. Contact an authorised service centre.
The safety lock indicator appears (C3)
on the LDC display.
The sealing ring is not present.
The sealing ring has been cut or is
damaged.
A problem with the accessories.
When first using the appliance, or in
the event of motor overload caused by
adding too many ingredients, or pieces
that are too large.
A motor overload caused by adding
too many ingredients or pieces that
are too hard or large, or a processing
succession of recipes without sufficient
cooling time.
The temperature sensor is overheating
due to the jug being too hot because it
is empty or has too few ingredients.
The heating resistor does not work.
The temperature sensor no longer
works.
The jug or motor-unit lid has not
locked into place properly.
Motor overload.
Reduce the quantity of ingredients
added.
Position the sealing ring on the
seal-mounting cup and clip to the
motor-unit lid.
Replace the sealing ring - contact an
authorised service centre.
Check that you are using the
recommended accessory.
Leave the motor too cool (for about 30
minutes) and reduce the quantity of
ingredients in the jug.
Allow the motor to cool down
(approximately 30 minutes) and
reduce the quantity of ingredients
in the jug, check that you are using
the right programme, as well as the
recommended accessory and that you
are not exceeding the capacity of the
appliance.
Add ingredients to the jug.
Check that the pins in the connector
under the jug are not dirty. If this is
the case, clean them and try again.
If this still does not work, contact an
authorised service centre.
Contact an authorised service centre.
Check that the jug is correctly
positioned on the base and that the
motor-unit lid is correctly locked in
place (the padlock will no longer
appear on the screen).
Allow the motor to cool down
(approximately 30 minutes) and
reduce the quantity of ingredients
in the jug, check that you are using
the right programme, as well as the
recommended accessory.
You are sure that everything is
assembled correctly but the problem
persists (the padlock can be seen on
the display), in this case, contact an
approved service centre.
31
Page 39

RECIPE
Stockpot pâté
For 2 to 4 people – Preparation time 10 mins – Cooking time 2 hrs
Accessories and programmes used:
- Chopping blade
- Turbo programme / slow-cook programme P5
300g pork belly (without the rind and deboned) • 1 onion • 1 clove garlic • 2cl oil • 5cl white wine
• 5cl Armagnac • 1 tbsp Epices Rabelais® (or five-spice mix) • 5g salt • 1g salt.
1. Peel the garlic and onion and chop them into quarters. Cut the pork belly into large cubes.
2. Put the onion and garlic in the bowl fitted with the chopping blade.
Blend for 15 seconds at turbo speed.
3. Put the oil, the pork belly and all the other ingredients in the bowl. Run the slow-cook programme
P5 for 2 hours.
4. At the end of the cooking time, put the cooked meat in a terrine and remove some of the fat
from the surface.
Tip:
Leave enough fat for the terrine to set.
RECYCLING
• Elimination of packaging and appliance materials.
The packaging exclusively contains materials that are not dangerous to the environment,
which can be disposed of in accordance with the recycling regulations in force.
To dispose of your appliance, ask the appropriate department of your local authority.
• End-of-life electronic or electrical appliances:
Environmental protection first!
Your appliance contains numerous materials that can be recovered or recycled.
Take it to a collection point for processing.
EN
32
Page 40

BESCHRIJVING
A Voet
A1 Zuil aan achterkant
B Bedieningspaneel:
B1 Programmatoets Slow Cook
NL
B2 Programmatoets Soep
B3 Programmatoets Stomen
B4 Programmatoets Desserts
B5 Programmatoets Opwarmen
B6 Opwarmcontrolelampje
B7 Programmatoets Mix
B8 Turbotoets
B9 Start/stop/reset toets
B10 +/- toets
C LCD-scherm:
C1 Weergave van programma’s
C2 Weergave van programmaduur
C3 Weergave van vergrendelingsindicator
D Deksel met motorblok
D1 Deksel met motorblok
D1a Vergrendelingslipje
D2 Dichtingshouder
D2a Inkepingen
D3 Afdichting
E Aandrijving
F Kom
F1 Handgreep van kom
G Toebehoren:
G1 Hakmes
G2 Kneedmes/Crusher
G3 Menger
G4 Mixer
G5 Stoommand
H Afneembaar snoer
TECHNISCHE GEGEVENS VAN HET APPARAAT
Vermogen: 1000W (600W: verwarmingselement/ 400W: motor)
Werkingsduur: Tussen 10 sec en 2u30min
Aantal snelheidsstanden: 3 snelheidsstanden + 1 pulsstand
33
Page 41

VEILIGHEIDSVOORSCHRIFTEN
Voor uw persoonlijke veiligheid
• Lees de gebruiksaanwijzing
aandachtig voor het eerste gebruik
en bewaar ze zorgvuldig: Nietnaleving ontheft de fabrikant van
alle aansprakelijkheid.
• Trek de stekker van het apparaat
uit het stopcontact wanneer u
het apparaat zonder toezicht
laat en voordat u het monteert,
demonteert, of schoonmaakt. Laat
• De bereikbare oppervlakken van het
kinderen dit apparaat niet zonder
toezicht gebruiken.
• Bewaar dit apparaat en het snoer
• Het apparaat is niet ontworpen
buiten het bereik van kinderen.
• Dit apparaat mag niet worden
gebruikt door personen (of
kinderen) met verminderde, fysieke,
• Gebruik uw apparaat niet als
zintuiglijke of mentale capaciteiten,
of personen die te weinig ervaring
of kennis hebben tenzij ze onder de
supervisie staan van een persoon
• Als het snoer is beschadigd, laat
die voor hen verantwoordelijk is of
als ze genoeg richtlijnen gekregen
hebben om het apparaat correct
te hanteren. Er moet toezicht op
kinderen zijn, zodat zij niet met het
• Dompel het apparaat niet onder.
apparaat kunnen spelen.
• Houd uw apparaat buiten het bereik
van kinderen..
• Dit apparaat is uitsluitend geschikt
• Tijdens de werking
van het apparaat kunnen
er bepaalde onderdelen
zeer warm worden (RVS-wand van de
kom, metalen delen onder de kom,
dichtingshouder). Deze kunnen
brandwonden veroorzaken. Houd
NL
het apparaat alleen bij de koude,
kunststof delen vast (handvatten,
deksel met motorblok). Het rode
controlelampje brandt om aan te
geven dat er risico op brandwonden
is.
apparaat kunnen zeer warm worden
tijdens het gebruik.
om met een externe timer of
afstandsbediening te worden
bestuurd.
het niet correct werkt of als het
apparaat, het netsnoer of de stekker
is beschadigd.
het vervangen door de fabrikant of
zijn servicecentrum om elk gevaar
te vermijden. (zie de lijst in het
serviceboekje)
Reinig het deksel met motorblok
(D1) nooit onder stromend water.
voor huishoudelijk gebruik
binnenshuis en op een hoogte van
minder dan 2000 m. De fabrikant is
34
Page 42

niet verantwoordelijk en behoudt
zich het recht voor de garantie te
annuleren in geval van commercieel
of oneigenlijk gebruik of niet-
NL
naleving van de instructies.
• Dit apparaat is niet bedoeld
voor gebruik in huishoudelijke of
analoge toepassingen (gebruik dat
niet onder de garantie valt) zoals
– in keukens van winkels, kantoren
en andere werkomgevingen.
– in personeelskeukens van
winkels, kantoren en andere
werkomgevingen.
– door de gasten van hotels, motels
of andere verblijfsvormen.
• Uw apparaat geeft stoom af, dat
brandwonden kan veroorzaken.
Wees voorzichtig wanneer u de
dichtingshouder aanraakt (indien
nodig, gebruik een ovenwant,
pannenlap, etc.).
• Gebruik het apparaat niet
wanneer de afdichting niet juist
op de houder is aangebracht.
WAARSCHUWING : let op voor
verwondingen door verkeerd
gebruik van het apparaat.
Wees zeer voorzichtig wanneer u
het hakmes (G1) en het kneedmes/
crusher (G2) reinigt of de kom
leegt, deze zijn zeer scherp.
Wees voorzichtig wanneer u
een warme vloeistof in de
keukenmachine giet. De vloeistof
kan uit het apparaat spuiten
wanneer haar kookpunt wordt
bereikt.
Berg het hakmes (G1) in de kom op
na elk gebruik.
WAARSCHUWING: Ga voorzichtig te
werk als u het apparaat hanteert
(reinigen, vullen en uitgieten):
zorg ervoor dat er geen vloeistof op
de contacten terechtkomt.
WAARSCHUWING: Uw apparaat
geeft stoom af die brandwonden
kan veroorzaken.
WAARSCHUWING: Het oppervlak
van het verwarmingselement blijft
na gebruik nog even warm.
Raak alleen de handgreep (F1)
van uw product aan tijdens het
opwarmen en afkoelen van uw
apparaat.
Raadpleeg de gebruiksaanwijzing
voor het monteren en demonteren
van de accessoires op het apparaat.
Raadpleeg de gebruiksaanwijzing
voor het reinigen en onderhouden
van uw apparaat.
Volg voor de reiniging van uw apparaat
steeds de reinigingsinstructies:
• Het apparaat uitschakelen.
• Niet reinigen als het apparaat nog
warm is.
• Reinigen met een vochtige doek of
spons.
35
Page 43

• Het apparaat nooit in water
onderdompelen of onder stromend
water houden.
UITSLUITEND VOOR DE EUROPESE
MARKT:
• Bewaar het apparaat en het snoer
buiten het bereik van kinderen
jonger dan 8 jaar.
Kinderen mogen niet met het
apparaat spelen.
• Dit apparaat mag worden gebruikt
door personen met verminderde
fysieke, mentale of zintuiglijke
capaciteiten of personen die te
weinig ervaring of kennis hebben
als ze onder toezicht staan of als ze
richtlijnen hebben gekregen om het
apparaat veilig te kunnen hanteren
en zich bewust zijn van de risico’s.
• Dit apparaat mag worden gebruikt
door kinderen vanaf 8 jaar als ze
onder toezicht staan of als ze
richtlijnen hebben gekregen om
het apparaat veilig te kunnen
hanteren en zich bewust zijn
van de risico’s. De reinigings- en
onderhoudswerkzaamheden mogen
niet door kinderen zonder toezicht
worden uitgevoerd tenzij ze ouder
zijn dan 8 jaar en onder toezicht
staan van een volwassene.
Ten aanzien van de elektrische
aansluiting
• U moet de stekker van het apparaat
in een geaard stopcontact steken.
• Het apparaat is uitsluitend geschikt
NL
om op wisselstroom te werken.
Controleer of de voedingsspanning
op de gegevensplaat van het apparaat
overeenkomt met de spanning van
uw elektrische installatie.
• Als u het apparaat niet correct
aansluit, vervalt de garantie.
• Trek nooit aan het snoer om de
stekker van het apparaat uit het
stopcontact te trekken.
• Laat het netsnoer niet in aanraking
komen met of in de buurt hangen
van de warme onderdelen van het
apparaat of van een warmtebron.
Laat het snoer ook niet over scherpe
randen hangen.
Ten aanzien van verkeerd gebruik
• Raak het deksel niet aan voordat
het apparaat volledig tot stilstand
is gekomen (‘stop’-knop), wacht
tot de gemixte ingrediënten tot
stilstand zijn gekomen.
• Doe eerst de vaste ingrediënten
in de kom voordat u vloeibare
ingrediënten toevoegt (Fig. 12)
en zorg dat de MAX markering die
binnenin de kom wordt aangegeven
niet wordt overschreden (Fig. 13).
Het kokend water kan uit de kom
spatten als het te veel is gevuld.
36
Page 44

• Opgelet, voor het programma
Stomen, houd rekening met het
waterniveau dat in de kom wordt
aangegeven (Fig. 14).
• Steek nooit uw vingers of andere
NL
voorwerpen in de kom wanneer het
apparaat in werking is.
• Gebruik de kom niet om ingrediënten
te bewaren, in te vriezen, te
steriliseren…
• Zet het apparaat op een stabiel,
hittebestendig, schoon en droog
werkvlak.
• Zet het apparaat niet naast een muur
of kast: de geproduceerde stoom
kan de elementen beschadigen.
• Plaats uw apparaat niet in de buurt
van een ingeschakelde warmtebron
(kookplaat, huishoudapparaat ...).
• Dek uw deksel niet af met een
theedoek of gelijksoortig voorwerp.
• Plaats de accessoires nooit in de
magnetron.
• Het apparaat niet in de open lucht
gebruiken.
• Overschrijd nooit de maximale
hoeveelheid die wordt aangegeven
in de gebruiksaanwijzing.
• Berg het apparaat op wanneer het
is afgekoeld.
Service Center
• Voor uw eigen veiligheid dient
u geen andere accessoires of
onderdelen te gebruiken dan die
door de erkende service centers
worden geleverd.
• Elke handeling anders dan
gewone onderhouds- of
schoonmaakwerkzaamheden dient
door een erkend service center te
worden uitgevoerd.
• Raadpleeg de tabel “Uw apparaat
werkt niet. Wat nu? ” aan het einde
van de gebruiksaanwijzing.
37
Page 45

HET APPARAAT GEBRUIKEN
Vóór ingebruikname:
• Lees deze gebruikershandleiding aandachtig
door. Tijdens het lezen van deze handleiding
zult u gebruikstips ontdekken om u volledig
op de hoogte te stellen van de juiste werking
van uw apparaat: bereiden van stoofgerechten,
soepen, stoomgerechten en desserts, maar
tevens de mogelijkheid om uw gerechten op te
warmen.
• Bewaar deze handleiding voor later gebruik.
De fabrikant is niet verantwoordelijk voor
schade of letsel door het negeren van de
gebruiksaanwijzing.
• Verwijder alle verpakkingsmateriaal van uw
product.
• Reinig de verschillende onderdelen: kom,
accessoires, aandrijving, houder en afdichting
(D2, D3, E, F, G) in een warm sopje. (Zie de
sectie REINIGING in deze gebruiksaanwijzing).
• Dompel het deksel met het motorblok (D1) en
de voet (A) niet in water (Fig. 16).
• Het deksel aanbrengen:
Het deksel van dit apparaat bestaat uit drie onderdelen: het deksel met motorblok (D1), de
houder (D2) en de afdichting (D3).
Deze 3 onderdelen worden in elkaar gezet geleverd.
Voor later gebruik kunt u het deksel op 2 verschillende manieren in elkaar zetten:
Het apparaat in gebruik nemen: de kom,
accessoires en het deksel bevestigen
Uw apparaat is uitgerust met een afneembaar
snoer (H). Sluit het snoer aan op de voet en
steek de stekker vervolgens in een stopcontact
(Fig. 1).
• De kom en het toebehoren bevestigen
1. Plaats de kom (F) op de voet van het
apparaat (A) met behulp van de handgreep
(F1) (Fig. 2).
2. Bevestig het gewenste accessoire (G1
op de aandrijving (E) (Fig. 3) en breng het
geheel vervolgens in de kom (F) aan (Fig. 4).
Als u de stoommand (G5) wilt gebruiken, vul
deze eerst tot aan de markering
overeen met 0,4L vloeistof: water, saus…)
(Fig. 13) voordat u in de kom (F) aanbrengt
(Fig. 14),
3. Doe de ingrediënten in de kom (F) of de
stoommand (G5).
G5)
(stemt
NL
Stap Manier 1 Manier 2
1
Plaats de kom (F) op de voet van het apparaat (A) met behulp van de handgreep (F1)
(Fig. 2).
2
Breng de afdichting (D3) aan op de dichtingshouder (D2) (Fig. 19).
38
Page 46

NL
“click”
Stap Manier 1 Manier 2
3
Klem de houder (D2) vast op het deksel
met motorblok (D1) door het uitsteeksel
van het deksel op (D1a) één lijn te
brengen met de inkeping (D2a) van de
houder (D2) en vervolgens in te drukken
totdat u een ‘klik’ hoort (Fig. 5). De
houder is aldus op het deksel vastgemaakt.
Plaats de houder (D2) op de kom door
de inkepingen (D2a) op de houder (D2)
rond de handgreep (F1) en de zuil aan de
achterkant aan te brengen.
4
Plaats het in elkaar gezette deksel met
motorblok (D1, D2+D3) op de kom (F) en
zorg ervoor dat:
- het “open hangslot” symbool
tegenover de handgreep bevindt (Fig. 6)
- de inkepingen (D2a) op de houder zich
rond de handgreep (F1) en de zuil aan
de achterkant (A1) bevinden (Fig. 7).
5
Zet het deksel vast door het “gesloten hangslot” tegenover de handgreep (F1) te
brengen: Om dit te doen, draai het volledig deksel met een hand met de klok mee
zodat het vergrendelingslipje (D1a) van het motorblok in de handgreep (F1) schuift.
Houd het achterste deel van het deksel met uw andere hand vast en schuif het tweede
vergrendelingslipje (D1a) in de zuil aan de achterkant (A1) van de voet (A). (Fig. 8).
zich
39
Plaats het deksel (D2) met motorblok
(D1) op de houder (D2) en zorg ervoor
dat het “open hangslot” zich tegenover
de handgreep (F1) bevindt en duw totdat
u een “klik” hoort. (Fig. 21).
Page 47

! Installeer het deksel alleen wanneer de afdichting juist op de dichtingshouder is
aangebracht (Fig. 19) en de houder stevig op het deksel met motorblok is vastgemaakt.
• Inschakelen
1. Selecteer het gewenste automatische
programma (B1, B2, B3, B4, B5, B7) door
op de overeenkomstige programmatoets
te drukken (Fig. 9). Om de verschillende
subprogramma’s te selecteren, druk opnieuw
op de programmatoets om de subprogramma’s
te doorlopen (bijv.: soep P1 = 1x drukken;
soep P2 = 2 x drukken, etc…).
2. Druk op de start/stop/reset toets (B9) om
het programma te starten (Fig. 10).
Het apparaat wordt enkel ingeschakeld wanneer
de kom juist op de voet is vastgemaakt en
het deksel met motorblok juist op de kom is
vastgemaakt.
In geval van een verkeerde installatie van
de kom of een verkeerde vergrendeling van
het deksel, knippert het bedieningspaneel
wanneer men een programma wil starten
(Fig. 11).
Het deksel uit elkaar halen:
1. Ontgrendel het deksel door het tegen de klok in
te draaien zodat het open hangslot tegenover
de handgreep komt te staan (Fig. 22).
2. Til het deksel met één hand op en trek met
uw andere hand de houder van het motorblok
af (Fig. 18).
3. Verwijder de pakking (Fig. 19).
NL
40
Page 48

ACCESSOIRES, PROGRAMMA’S EN HOEVEELHEDEN
NL
HAKMES
MENGER
MIXER
HOEVEELHEDEN
(max)
Soep mixen 1,5L
Vruchtenmoes mixen 1kg 1min
Smoothies mixen 1,5L 2min
Groenten hakken 500g 15sec
Vlees hakken 300g 30sec
Vis hakken 500g 15sec
Rissole 200g 5min -
Stoofgerechten 1,2L 45min -
Risotto 1,2L 30min -
Eiwit
Saus 0,6L 12min -
5max
DUUR
(max)
1min
30sec
2min30s
P3
P3
P3
P3
P3
P3
P2
AUTOMATISCHE
PROGRAMMA’S
P1 of P2
-
-
-
P5
-
P1
P4
P3
-
P2-P3
KNEEDMES/CRUSHER
STOOMMAND
Licht beslag mengen 600g 30sec -
Noten hakken 500g 1min
IJs crushen
Pannenkoeken- of
wafelbeslag
Groenten, vis of vlees
stomen
6 tot 10
1,2L 30sec -
600g 30min -
30sec
41
P3
P4
P1
-
-
P1
P1
Page 49

AUTOMATISCHE PROGRAMMA’S EN SUBPROGRAMMA’S
Automatische programma’s:
De snelheid, kooktemperatuur en -tijd zijn reeds geprogrammeerd voor het automatisch bereiden van
soep, stoofgerechten, desserts en stomen, of voor het opwarmen van uw gerechten. De kooktijd kan
worden aangepast. U kunt de kooktijd (B10) naar wens verhogen of verlagen.
Wat kan ik bereiden met de automatische programma’s van het bedieningspaneel (B)
NL
Stoofgerechtenmet saus,
bereiden
(Onder programma’s P1, P2, P3,
P4, P5)
Soep bereiden
(Onder programma’s P1, P2)
Desserts bereiden
(Onder programma’s P1, P2, P3,
P4)
Gerechten opwarmen
Eiwit, gehakt of ijsgruis maken
Gerechten stomen
(Onder programma’s P1, P2, P3,
P4)
Gebruik de klopper (G4) niet voor een zeer vloeibare bereiding, waarvan de hoeveelheid
meer dan 1 liter is, om het uitspatten van de inhoud uit de kom te vermijden.
Informatie over de automatische programma’s en hun subprogramma’s
Standaard
temperatuur
(niet
aanpasbaar)
120°C NEE Gebakken ui
80°C 45 min Tomatensaus
90°C 45 min Risotto
95°C 45 min
95°C 45 min Vleespastei
Slow cook
P1
Slow cook
P2
Slow cook
P3
Slow cook
P4
Slow cook
P5
Snelheid
(niet aanpasbaar)
Langzaam
Langzaam met
tussenpozen, vervolgens
continu
Langzaam met
tussenpozen
Geen
Snel 15sec en vervolgens
langzaam met tussenpozen
Standaard tijd
(aanpasbaar)
5min
(1min tot 10min)
20min
(5min tot
2u30min)
30min
(5min tot
2u30min)
45min
(5min tot
2u30min)
60min
(5min tot
2u30min)
Warm
houden
Voorbeelden
van recepten
Vispannetje
met saffraan
42
Page 50

NL
Soep P1
Soep P1
Stomen P1
Dessert P1
Dessert P2
Dessert P3
Dessert P4
Opwarmen
Snelheid
(niet aanpasbaar)
Geen snelheid tijdens
het koken, vervolgens 10
pulsen, vervolgens snel
gedurende 2min na het
koken
Geen snelheid tijdens het
koken en medium snelheid
gedurende 15 seconden na
het koken
Geen
Langzaam met
tussenpozen, vervolgens
continu
Langzaam met
tussenpozen
Langzaam met
tussenpozen, vervolgens
continu
Geen, vervolgens langzaam
met tussenpozen tijdens
het koken
Langzaam met
tussenpozen
Standaard tijd
(aanpasbaar)
35min
(5min tot 1u)
38min
(5min tot 1u)
30min
(5min tot 1u)
30sec
(10s tot 1min)
10min
(1min tot 30min)
20min
(10min tot 1u)
15min
(5min tot 1u)
15min
(3min tot 30min)
Standaard
temperatuur
(niet
aanpasbaar)
100°C 45 min Courgettesoep
100°C 45 min
100°C 45 min
Geen NEE
55°C NEE
90°C NEE Rijstebrij
100°C NEE Appelmoes
80°C NEE
Warm
houden
Voorbeelden
van recepten
Wortel-/
aardappelpuree
Broccoli
stomen
Quatre-quarts
Gesmolten
chocolade
opwarmen
cake
Soep
Mix P1
Mix P2
Mix P3
Mix P4
Langzaam
Medium
Snel
Snel met tussenpozen
2min
(30s tot 5min)
5min
(1min tot 10min)
1min
(30s tot 1min
30sec)
30sec
(10s tot 1min)
43
Geen NEE
Geen NEE Eiwit
Geen NEE Rundergehakt
Geen NEE Ijs crushen
Tonijnsalade
met eieren
Page 51

HANDMATIG GEBRUIK VAN HET BEDIENINGSPANEEL (B):
Deze modus stelt u in staat om de kooktijd naar wens aan te passen.
• Gebruik van de handmatige programma’s op het bedieningspaneel (B):
Deze toets heeft 4 functies:
- Start/stop
- “Bevestigen” van de keuze van uw automatische programma.
- “Pauze” tijdens gebruik, zodra het apparaat in werking is.
- “Reset” van de gekozen instellingen door 2 seconden op de toets te drukken
(reset).
De werkingstijd instellen: Selecteer het gewenste programma en verhoog of verlaag
de kooktijd.
Deze modus stelt u in staat om uw bereiding handmatig te mixen.
• De stoommand gebruiken
Om met gebruik van de stoommand te stomen,
giet 0,4L water in de kom (tot aan de markering
die in de kom is aangegeven) (Fig. 13).
De vermelde kooktijden zijn indicatief, deze
zorgen over het algemeen voor het juiste
kookresultaat.
Bepaalde omstandigheden kunnen de kooktijd
Tabel met hoeveelheden en stoomkooktijden
Stoomkooktijd
Ingrediënt Hoeveelheid (max) Geschatte kooktijd
Aardappelen
Wortelen 600g 40 min
Courgettes 600g 25 min
Pastinaak 600g 30 min
Preiwit 500g 25 min
Groene bonen 400g 35 min
Broccoli 300g 20 min
Vis (vers of ontdooid) 500g 15 min
Wit vlees 400g 25 min
600g (van tevoren in water
echter beïnvloeden:
–de grootte van de groente (al dan niet in
stukken)
–de hoeveelheid ingrediënten in de mand
–de verscheidenheid en rijpheid van de groente
–de hoeveelheid water in de kom, die moet
overeenstemmen met de markering
Als het kookresultaat onvoldoende is, verhoog
de kooktijd.
gespoeld)
NL
(0,4L).
30 min
Bepaalde recepten kunnen omwille van bellenvorming tot overstroming van de ingrediënten
leiden, in het bijzonder wanneer bevroren groente wordt gebruikt. Als dit zich voordoet, doe
minder ingrediënten in de kom.
44
Page 52

VEILIG GEBRUIK VAN HET APPARAAT
Uw apparaat is voorzien van een elektronische
beveiliging van de motor om een lange
levensduur te waarborgen. Deze elektronische
beveiliging treedt in werking bij elk verkeerd
NL
gebruik voor een perfecte bescherming van uw
motor.
In bepaalde zwaar belaste
gebruiksomstandigheden, het negeren van
de aanbevelingen in de handleiding (Zie
de sectie “ACCESSOIRES, PROGRAMMA’S EN
HOEVEELHEDEN”: te grote hoeveelheden en/
of een te lange werking en/of een te snel en
te vaak gebruik van het apparaat), treedt de
elektronische beveiliging in werking om de
motor te beschermen. In dit geval stopt het
apparaat en wordt “SECU” op het LCD-scherm
van het bedieningspaneel weergegeven om aan
te geven dat het apparaat tijdelijk niet gebruikt
kan worden.
HET APPARAAT REINIGEN
• Dompel het apparaat nooit onder.
Reinig de voet (A) en het deksel
met motorblok (D1) nooit onder
stromend water (Fig. 16).
Als u het apparaat niet langer gebruikt, haal de
stekker uit het stopcontact.
• Maak het deksel (D1+D2) van de kom (F) los
door het tegen de klok in te draaien zodat het
“open hangslot” tegenover de handgreep staat.
• Trek de houder (D2) van het motorblok af
(Fig. 18).
• Verwijder de afdichting (D3) van de houder
(Fig. 19) .
• Reinig uw kom onmiddellijk na gebruik.
• Verwijder de kom (F) van de voet (A) met
behulp van de handgreep (F1) (Fig. 2).
• Plaats de kom op een vlak oppervlak.
• Als de onderdelen zijn afgekoeld:
–Wees zeer voorzichtig wanneer u het hakmes
(G1) en het kneedmes/crusher (G2) reinigt
of de kom leegt, deze zijn zeer scherp.
Als “SECU” op uw bedieningspaneel verschijnt
en uw apparaat stopt, doe het volgende:
• Houd het apparaat op de stroom aangesloten.
• Raadpleeg de aanbevelingen in deze
gebruiksaanwijzing om de instellingen van
uw bereiding aan te passen hoeveelheden
/ kooktijden / accessoires) (Zie de sectie
“Accessoires, programma’s en hoeveelheden).
• Wacht een half uur totdat de motor is afgekoeld.
• Reset het apparaat door 2 seconden op de
“Start / Stop / Reset” toets (B9) te drukken.
Uw apparaat is nu opnieuw klaar voor gebruik.
In geval van vragen kunt u op elk moment
contact opnemen met onze klantenservice
(raadpleeg het garantieboekje voor de juiste
gegevens).
–Reinig de kom (F), de aandrijving (E), het
gebruikte accessoire (G1, G2, G3, G4, G5),
de houder (D2) en de afdichting (D3) met
een spons in een warm sopje.
• Spoel de verschillende onderdelen vervolgens
onder stromend water.
• U kunt de kom, houder, afdichting, aandrijving
en accessoires tevens in de vaatwasser plaatsen
(Fig. 15).
• Als kalk of vlekken op de kom waarneembaar
zijn, gebruik, indien gewenst, een
schuursponsje geweekt in witte azijn of een
reinigingsmiddel speciaal voor RVS.
• Bij hardnekkig vuil, laat het gedurende enkele
uren in een warm sopje weken en gebruik
indien nodig een spatel of een schuursponsje
om het vuil te verwijderen.
• Veeg het motorblok (D1) en het voetstuk (A)
af met een vochtige doek. Veeg vervolgens
grondig droog.
45
Page 53

• De accessoires, aandrijving en het deksel
kunnen bij bepaalde ingrediënten, zoals kerrie,
wortelsap, etc. lichtjes verkleuren; dit is
• Voordat u de kom (F) opnieuw gebruikt, zorg
dat de elektrische contacten aan de onderkant
van de kom schoon en droog zijn.
onschadelijk voor uw gezondheid en heeft geen
enkele invloed op de werking van uw apparaat.
Om dit te vermijden, reinig de onderdelen snel
na gebruik.
HET APPARAAT OPBERGEN
Voor een eenvoudige opslag van uw apparaat, plaats de accessoires en aandrijving in de kom, in de
volgorde zoals aangegeven in figuur 17, en breng vervolgens het deksel met houder aan.
WAT TE DOEN ALS UW APPARAAT NIET WERKT?
PROBLEMEN OORZAKEN OPLOSSINGEN
De vermelde kooktijden zijn indicatief,
deze zorgen over het algemeen voor
het juiste kookresultaat.
Bepaalde omstandigheden kunnen de
Kookresultaat is onvoldoende
Stoomresultaat is onvoldoende
Bepaalde recepten geven een
onbevredigend resultaat
Het apparaat werkt niet.
Het deksel kan niet of moeilijk worden
vergrendeld.
Overmatige trilling of lawaai
kooktijd echter beïnvloeden:
- de grootte van de groente (al dan
niet in stukken)
- hoeveelheid ingrediënten
- de verscheidenheid en rijpheid van
de groente
- al dan niet bevroren ingrediënten....
Ongepaste hoeveelheid water in de
kom.
Te grote stukken.
Ongeschikte recepten.
De stekker steekt niet in het
stopcontact.
Het deksel met motorblok is niet
compleet.
Het apparaat staat niet op een vlak
oppervlak, het apparaat is niet stabiel.
Te veel ingrediënten in de kom.
Verkeerd accessoire.
Verhoog de kooktijd met behulp van de
toets (B10).
Verklein de grootte van de stukken.
De hoeveelheid water in de kom moet
overeenstemmen met de markering
(0,4L).
Verklein de grootte van de stukken.
Uw recepten, eigen of van het
internet, kunnen niet geschikt zijn
voor uw apparaat of de accessoires
(hoeveelheden, kooktijden,
tijd, ongepaste accessoires).
Voordat u uw recept bereidt, zorg
dat deze overeenstemt met de
gebruiksinstructies die in deze
handleiding zijn vermeld.
Controleer de aansluiting tussen het
snoer en de voet aan de achterkant van
het apparaat. Steek de stekker in een
stopcontact.
Controleer of de afdichting juist op de
dichtingshouder is aangebracht en dat de
houder juist op het deksel met motorblok
is vastgemaakt (Fig. 5 tot 8).
Plaats het apparaat op een vlak
oppervlak.
Verminder de hoeveel te bereiden
ingrediënten.
Controleer of u het aanbevolen
accessoire gebruikt.
NL
46
Page 54

PROBLEMEN OORZAKEN OPLOSSINGEN
Te veel ingrediënten in de kom.
De afdichting is niet aanwezig.
Overstroming via het deksel.
NL
De motor geeft een geur af.
Weergave van “
Weergave van “
controlelampje knippert.
Weergave van “
controlelampje knippert.
Weergave van “Err1”. De temperatuursensor is defect.
Weergave van “Err2”. Elektronisch defect.
Weergave van vergrendelingsindicator
(C3)
SECU”
1
SECU” + rood
2
SECU” + rood
3
op het LCD-scherm
De afdichting is beschadigd of
versleten.
Verkeerd accessoire.
Bij ingebruikname van het apparaat
of bij een overbelasting van de motor
veroorzaakt door het bereiden van te
veel ingrediënten, te harde of te grote
ingrediënten.
Overbelasting van de motor veroorzaakt
door het bereiden van te veel
ingrediënten, te harde of te grote
ingrediënten of het bereiden van
meerdere recepten te kort na elkaar,
zonder het apparaat eerst te laten
afkoelen.
Temperatuursensor is geactiveerd
door een oververhitting van de kom
omdat deze leeg of met te weinig
ingrediënten werd gebruikt.
Het verwarmingselement werkt niet.
Verkeerde vergrendeling van de kom of
het deksel met motorblok.
Overbelasting van de motor.
Verminder de hoeveel te bereiden
ingrediënten.
Breng de afdichting op de houder aan
en klem het geheel op het deksel vast.
Vervang de pakking, neem contact op
met een erkend servicecentrum.
Controleer of u het aanbevolen
accessoire gebruikt.
Laat de motor afkoelen (circa 30
minuten) en verwijder een hoeveelheid
ingrediënten uit de kom.
Laat de motor afkoelen (circa 30
minuten) en verwijder een hoeveelheid
ingrediënten uit de kom. Controleer of
het juiste programma is ingesteld, het
aanbevolen accessoire wordt gebruikt
en de capaciteit van het apparaat niet
wordt overschreden.
Doe (meer) ingrediënten in de kom.
Controleer of de stroomcontacten aan
de onderkant van de kom niet vuil
zijn. Als dit het geval is, reinig ze en
probeer opnieuw. Als het nog altijd
niet werkt, neem contact op met een
erkend servicecentrum.
Neem contact op met een erkend
servicecentrum.
Neem contact op met een erkend
servicecentrum.
Controleer of de kom juist op de voet
is vastgemaakt en het deksel met
motorblok juist is vastgezet (het
hangslot verschijnt niet langer op het
scherm).
Laat de motor afkoelen (circa 30
minuten) en verwijder een hoeveelheid
ingrediënten uit de kom. Controleer
of het juiste programma is ingesteld
en het aanbevolen accessoire wordt
gebruikt.
In geval alles juist is vastgemaakt,
maar het probleem nog steeds
aanwezig is (weergave van het
hangslot) (C3), neem contact op met
een erkend servicecentrum.
47
Page 55

RECEPT
Boerenpaté
Voor 2/4 personen – Voorbereidingstijd 10 min – Bereidingstijd 2h
Gebruikte accessoires en programma´s:
- Hakmes
-Turbo-programma / programma Stoven P5
300 g buikspek (ontzwoerd en ontbeend) • 1 ui • 1 teentje knoflook • 2cl olie • 5cl witte wijn • 5cl
Armagnac • 1 theelepel Rabelais®-kruiden (of kruidenmengesl met 5 kruiden) • 5 g zout • 1 g zout.
1. Pel de knoflook en ui en snijd ze vervolgens in stukjes. Snijd het varkensvlees in grote stukken.
2. Doe de ui en knoflook in de kom met het hakmes.
Mix voor 15 s op turbo.
3. Voeg de olie, het varkensvlees en alle andere ingrediënten aan de kom toe. Start het programma
Stoven P5 voor 2h.
4. Plaats aan het einde van de bereiding het gekookte vlees in een terrine. En haal vervolgens een
deel van het vet van het oppervlak.
Tip:
Laat voldoende vet over zodat de terrine goed bewaard kan worden.
AFVALVERWERKING
• Vernietiging van de verpakking en het apparaat
De verpakking bestaat voor 100% uit milieuvriendelijk materiaal dat in overeenstemming
met de bepalingen omtrent afvalverwerking kan worden vernietigd.
Breng het apparaat naar een gemeentelijk afvalinzamelpunt.
• Elektrisch of elektronisch product aan het eind van de levenscyclus:
Bescherm het milieu!
Uw apparaat bevat verschillende materialen die geschikt zijn voor terugwinning of
recycling.
Breng het apparaat naar een afvalinzamelpunt voor een correcte verwerking.
NL
48
Page 56

BESCHREIBUNG
A Basis
B Bedienfeld:
DE
C LCD-Anzeige:
A1 Hintere Stütze
B1 Schmortopf-Programmtaste
B2 Suppen-Programmtaste
B3 Dampfgaren-Programmtaste
B4 Dessert-Programmtaste
B5 Aufwärmen-Programmtaste
B6 Aufwärmen-Kontrollleuchte
B7 Mixer-Programmtaste
B8 Turbo-Taste
B9 Start/Stopp/Reset-Taste
B10 +/- Taste
C1 Programmanzeige
C2 Anzeige der Programmdauer
C3 Sicherheitskontrollleuchte
D Deckel- und Motoreinheit
D1 Deckel mit Motor
D1a Stift
D2 Dichtungsträger
D2a Aussparung
D3 Dichtung
E Mitnehmer
F Behälter
F1 Behältergriff
G Zubehör:
G1 Hackmesser
G2 Knet-und Mahlmesser
G3 Mischer
G4 Flachrührer
G5 Dampfeinsatz
H Abnehmbares Netzkabel
TECHNISCHE DATEN DES GERÄTES
Leistung: 1.000 W (600 W: Heizelement/400 W: Motor)
Betriebsdauer: von 10 s bis 2 h 30 min
Anzahl der Geschwindigkeitsstufen: 3 Stufen – 1 Pulsbetrieb
49
Page 57

SICHERHEITSHINWEISE
Hinsichtlich der Personensicherheit
• Lesen Sie diese Bedienungsanleitung
vor der ersten Verwendung des
Geräts aufmerksam durch und
bewahren Sie diese gut auf:
Die unsachgemäße Verwendung
entbindet den Hersteller von
jeglicher Haftung.
• Für Montage-, Demontage- und
Reinigungszwecke bzw., wenn Sie
das Gerät unbeaufsichtigt lassen,
sollten Sie dieses immer von der
Stromversorgung trennen. Kinder
dürfen das Gerät nur unter Aufsicht
durch Erwachsene verwenden.
• Dieses Gerät darf nicht von Kindern
verwendet werden. Bewahren Sie
das Gerät und dessen Stromkabel
außerhalb der Reichweite von
Kindern auf.
• Dieses Gerät ist nicht zur Verwendung
durch Personen (einschließlich
Kindern) mit eingeschränkten
körperlichen, sensorischen oder
mentalen Fähigkeiten oder durch
Personen ohne entsprechende
Erfahrung oder Kenntnisse
vorgesehen, es sei denn, diese
werden von einer Person, die für
ihre Sicherheit verantwortlich ist,
beaufsichtigt oder haben von dieser
zuvor Anweisungen zum Gebrauch
des Geräts erhalten. Es empfiehlt
sich, die Kinder zu beaufsichtigen,
um sicherzustellen, dass sie nicht
mit dem Gerät spielen.
• Stellen Sie das Gerät außerhalb der
Reichweite von Kindern auf.
• Während des Betriebs
werden einige Elemente
des Gerätes sehr heiß
(Edelstahlwände des
Behälters, Metallteile unter
dem Behälter, dichtungsträger).
Sie können Verbrennungen
verursachen. Fassen Sie das Gerät
an den kühlen Kunststoffteilen an
(Griffe, Deckel mit Motoreinheit).
Die rote Temperaturanzeigeleuchte
signalisiert Verbrennungsgefahr.
• Die zugänglichen Teile des Geräts
können sehr heiß werden, wenn
dieses in Betrieb ist.
• Dieses Gerät darf nicht über
eine externe Schaltuhr oder eine
separate Fernsteuerung betrieben
werden.
• Benutzen Sie das Gerät nicht, wenn
es nicht richtig funktioniert, wenn
es beschädigt wurde oder wenn
das Stromkabel oder der Stecker
beschädigt sind.
• Falls das Netzkabel beschädigt ist,
muss es durch ein Spezialkabel oder
eine Spezialeinheit ersetzt werden,
die bei dem Händler oder seinem
DE
50
Page 58

Kundendienst erhältlich ist (siehe
Liste im Service-Heft).
• Das Gerät darf nicht in Wasser
getaucht werden. Halten Sie die
Deckel-Motor-Einheit (D1) nicht
unter laufendes Wasser.
DE
• Dieses Gerät dient ausschließlich
der Zubereitung von Speisen
in geschlossenen Räumen und
in Höhenlagen unter 2000 m.
Der Hersteller übernimmt weder
Garantie noch Haftung für
den Fall einer gewerblichen,
unsachgemäßen oder nicht den
Angaben der Bedienungsanleitung
entsprechenden Nutzung des
Gerätes.
• Dieses Gerät ist nicht für folgende
Anwendungen vorgesehen (wird
nicht von der Garantie abgedeckt),
wie zum Beispiel:
– In Kochnischen in Geschäften,
Büros oder anderen
Arbeitsumgebungen.
– In Teeküchen für das Personal in
Geschäften, Büros oder anderen
Arbeitsumgebungen.
– In landwirtschaftlichen Betrieben.
– Für Hotel- und Motelkunden,
bzw. in sonstigen derartigen
Unterbringungen,
– In Gästezimmern o. Ä.
• Ihr Gerät erzeugt Dampf, der
Verbrennungen verursachen kann.
Seien Sie vorsichtig, wenn Sie
den Dichtungsträger anfassen.
(Benutzen Sie gegebenenfalls einen
Handschuh, Topflappen usw.)
• Schalten Sie das Gerät nur ein,
wenn die Dichtung auf ihrem
Träger befestigt ist.
Achtung: Bei unsachgemäßer
Verwendung des Geräts besteht
Verletzungsgefahr.
Lassen Sie Vorsicht walten, wenn Sie
die Klingen des Hackmessers (G1)
und des Knet- und Mahlmessers
(G2) reinigen und wenn Sie den
Behälter ausleeren. Die Klingen
sind sehr scharf.
Seien Sie vorsichtig, wenn Sie
heiße Flüssigkeiten in das
Küchengerät geben; diese können
bei Siedetemperaturen aus dem
Gerät spritzen.
Bewahren Sie das Hackmesser (G1)
nach jedem Gebrauch im Behälter
auf.
WARNHINWEIS: Seien Sie bei der
Bedienung Ihres Gerätes stets
vorsichtig (bei Reinigung, Befüllen
und Ausgießen): Vermeiden
Sie jegliches Überlaufen von
Flüssigkeiten auf den Stecker.
WARNHINWEIS: Ihr Gerät erzeugt
Dampf, der Verbrühungen
verursachen kann.
WARNHINWEIS: Die Oberfläche des
Heizelements gibt auch nach dem
Gebrauch Restwärme ab.
51
Page 59

Achten Sie darauf, dass Sie, während
das Gerät sich aufheizt und solange
es sich abkühlt, nur den Griff (F1)
Ihres Produktes berühren.
Lesen Sie die Gebrauchsanweisung,
um Informationen über den Aufbau
und das Anbringen des Zubehörs am
Gerät zu erhalten.
• Lesen Sie die Gebrauchsanweisung,
um Informationen über die
Reinigung und Wartung des Gerätes
zu erhalten.
• Befolgen Sie bei der Reinigung des
Gerätes die Reinigungsanweisungen:
• Ziehen Sie den Stecker aus der
Steckdose.
• Reinigen Sie das Gerät nicht, wenn
es noch heiß ist.
• Reinigen Sie es mit einem feuchten
Tuch oder Schwamm.
• Tauchen Sie das Gerät niemals in
Wasser und halten Sie es nicht
unter fließendes Wasser.
NUR FÜR DEN EUROPÄISCHEN
MARKT:
• Bewahren Sie das Gerät und dessen
Kabel außerhalb der Reichweite von
Kindern unter 8 Jahren auf.
Es ist untersagt, Kinder mit dem
Gerät spielen zu lassen.
• Dieses Gerät kann von Personen
mit eingeschränkten physischen,
sensorischen oder mentalen
Fähigkeiten oder mit mangelnden
Erfahrungen bzw. Kenntnissen
verwendet werden, sofern diese
beaufsichtigt werden oder zuvor
eine adäquate Unterweisung
bezüglich der sicheren Verwendung
des Gerätes erhalten haben und
sich der möglichen Risiken bewusst
sind.
• Dieses Gerät kann von Kindern ab
8 Jahren verwendet werden, sofern
diese beaufsichtigt werden oder
zuvor eine adäquate Unterweisung
bezüglich der sicheren Verwendung
des Gerätes erhalten haben und sich
der möglichen Risiken bewusst sind.
Reinigung und Pflege dürfen nur
von Kindern durchgeführt werden,
wenn diese älter als 8 Jahre sind
und dabei von einem Erwachsenen
beaufsichtigt werden.
Hinsichtlich des elektrischen
Anschlusses
• Das Gerät muss an eine geerdete
Steckdose angeschlossen werden.
• Das Gerät ist ausschließlich für
den Betrieb mit Wechselstrom
ausgelegt. Bitte stellen Sie
sicher, dass die Netzspannung
mit der auf dem Typenschild des
Gerätes angegebenen Spannung
übereinstimmt.
• Jeglicher Anschlussfehler führt zum
Verlust des Garantieanspruchs.
• Trennen Sie das Gerät nie von der
Stromversorgung, indem Sie am
Kabel ziehen.
DE
52
Page 60

• Tauchen Sie das Gerät, das
Stromkabel oder den Stecker
nicht ins Wasser oder sonstige
Flüssigkeiten.
Hinsichtlich eines falschen
Gebrauches
DE
• Berühren Sie den Deckel nicht,
bevor sich das Gerät vollständig im
Stillstand befindet (Stopptaste);
warten Sie, bis sich die gemixten
Zutaten nicht mehr in Bewegung
befinden.
• Geben Sie immer zuerst die festen
Zutaten in den Behälter und
erst dann die flüssigen Zutaten
(Abb. 12), ohne jedoch die
Höchstmarkierung zu überschreiten,
die auf der Innenseite des Behälters
eingraviert ist (Abb. 13). Wenn der
Behälter zu voll ist, kann kochendes
Wasser herausspritzen.
• Beachten Sie bei der Benutzung
des Dampfgaren-Programms das im
Behälter markierte Wasservolumen
(Abb. 14).
• Halten Sie niemals Ihre Finger oder
sonstige Gegenstände in den Behälter,
wenn das Gerät in Betrieb ist.
• Benutzen Sie den Behälter nicht
zum Tiefgefrieren oder Sterilisieren.
• Verwenden Sie Ihr Gerät nur auf einer
stabilen, hitzebeständigen, sauberen
und trockenen Arbeitsfläche.
• Stellen Sie das Gerät nicht in
der Nähe von empfindlichen
Gegenständen, einer Wand oder in
einem Schrank auf: Der austretende
Dampf könnte Schäden verursachen.
• Stellen Sie Ihr Gerät nicht in
die Nähe einer eingeschalteten
Wärmequelle (Kochplatte,
elektrisches Haushaltsgerät, usw.).
• Bedecken Sie den Deckel nicht
mit einem Geschirrhandtuch oder
Ähnlichem.
• Die Zubehörteile dürfen nicht in den
Mikrowellenherd gegeben werden.
• Verwenden Sie das Gerät nicht im
Freien.
• Die in der Bedienungsanleitung
angegebene Höchstmenge darf
keinesfalls überschritten werden.
• Reinigen oder verstauen Sie das
Gerät erst in abgekühltem Zustand.
Kundendienst
• Reinigen oder verwenden Sie
zu Ihrer eigenen Sicherheit nur
für Ihr Gerät geeignete und bei
einem autorisierten Kundendienst
erworbene Zubehör- und Ersatzteile.
• Außer den üblichen Reinigungs- und
Instandhaltungsarbeiten, welche
der Kunde selbst durchführen kann,
muss jeder weitere Eingriff von einem
autorisierten Kundendienstzentrum
durchgeführt werden.
• Siehe Tabelle „Was tun, wenn Ihr
Gerät nicht funktioniert?“ am Ende
der Bedienungsanleitung.
53
Page 61

EINSCHALTEN DES GERÄTES
Vor der ersten Inbetriebnahme:
• Lesen Sie aufmerksam diese
Bedienungsanleitung durch. Beim Durchlesen
erhalten Sie Tipps zur Benutzung, die Ihnen
das Potenzial Ihres Gerätes verdeutlichen:
Zubereitung von Schmortöpfen, Suppen,
Desserts und Garen mit Dampf sowie die
Möglichkeit, Ihre Speisen aufzuwärmen.
• Bewahren Sie die Bedienungsanleitung zum
Nachlesen auf: Die unsachgemäße Verwendung
entbindet den Hersteller von jeglicher Haftung.
• Entfernen Sie bitte sämtliches
Verpackungsmaterial von Ihrem Produkt.
• Waschen Sie die verschiedenen Elemente mit
Seifenwasser ab: Behälter, Zubehör, Mitnehmer,
Träger und Dichtung (D2, D3, E, F, G) (s. §
REINIGUNG in dieser Bedienungsanleitung).
• Achtung! Der Deckel mit der Motoreinheit (D1)
sowie die Basis (A) dürfen nicht in Wasser
gelegt werden (Abb. 16).
• Aufsetzen der Deckeleinheit:
Der Deckel des Produktes besteht aus drei Elementen: Deckel mit Motor (D1), Dichtungsträger
(D2) und Dichtung (D3).
Diese drei Elemente werden bereits zusammengesetzt geliefert.
Wenn Sie das Gerät zukünftig benutzen, haben Sie zwei Möglichkeiten Ihre Deckeleinheit
zusammenzusetzen:
Einschalten des Gerätes: Befestigen Sie
Behälter, Zubehör und Deckel an ihrem Platz.
Ihr Gerät ist mit einem abnehmbaren Netzkabel
(H) versehen. Verbinden Sie dieses Kabel mit
der Basis, schließen Sie dann Ihr Gerät an der
Steckdose an (Abb. 1).
• Befestigen des Behälters und des Zubehörs
1. Stellen Sie den Behälter (F) auf die Basis des
Gerätes (A), indem Sie ihn am Handgriff (F1)
anfassen (Abb. 2).
2. Setzen Sie das gewünschte Zubehörteil (G1
G5) auf den Mitnehmer (E) (Abb. 3),
platzieren Sie dann die gesamte Einheit auf
dem Behälter (F) (Abb. 4).
Wenn Sie den Dampfeinsatz (G5) verwenden,
müssen Sie vorher den Behälter (F) bis zur
Markierung (entspricht 0,4 l Flüssigkeit
(Wasser, Soße ...) (Abb. 13) füllen, bevor Sie
den Dampfeinsatz hineinstellen (Abb. 14).
3. Geben Sie die Zutaten in den Behälter (F)
oder in den Dampfkorb (G5).
DE
Schritt Möglichkeit 1 Möglichkeit 2
1
Stellen Sie den Behälter (F) auf die Basis des Gerätes (A), indem Sie ihn am Handgriff
(F1) anfassen (Abb. 2).
2
Befestigen Sie die Dichtung (D3) am Dichtungsträger (D2) (Abb. 19).
54
Page 62

Schritt Möglichkeit 1 Möglichkeit 2
“click”
3
DE
Lassen Sie den Dichtungsträger (D2) auf
dem Deckel mit Motor (D1) einrasten.
Positionieren Sie hierzu den Stift
der (D1a) Motoreinheit am Rand der
Aussparung (D2a) des Dichtungsträgers
(D2) und drücken Sie, bis Sie ein
Klickgeräusch hören (Abb. 5). Der
Dichtungsträger ist nun befestigt.
Setzen Sie den Dichtungsträger (D2)
auf den Behälter. Achten Sie darauf,
dass sich der Griff (F1) und die hintere
Stütze (A1) in der Aussparung (D2a) des
Dichtungsträgers (D2) befinden (Abb.
20).
Setzen Sie die Deckeleinheit (D1, D2+D3)
4
mit Motor auf den Behälter (F). Achten
Sie dabei auf Folgendes:
- Das Symbol des „offenen
Vorhängeschlosses“
gegenüber des Griffs befinden (Abb. 6).
- Der Griff (F1) und die hintere Stütze
(A1) müssen sich in der Aussparung
(D2a) des Dichtungsträgers befinden
(Abb. 7).
5
Verriegeln Sie den Deckel, indem Sie das geschlossene Vorhängeschloss gegenüber
des Griffs (F1) folgendermaßen verstellen: Drehen Sie hierzu mit einer Hand die
Deckeleinheit im Uhrzeigersinn, sodass Sie die Verriegelungslasche (D1a) der
Motoreinheit in den Griff (F1) schieben, und führen Sie mit der anderen Hand den
hinteren Teil des Deckels, sodass die zweite Verriegelungslasche (D1a) in die hintere
Stütze (A1) der Basis (A) geschoben wird. (Abb. 8).
muss sich
55
Setzen Sie den Deckel mit Motor
(D1) auf den Dichtungsträger (D2).
Achten Sie darauf, dass sich das offene
Vorhängeschloss gegenüber des Griffs
(F1) befindet, und drücken Sie auf den
Deckel, bis Sie ein Klickgeräusch gehören
(Abb. 21).
Page 63

! Der Deckel darf nur verschlossen werden, wenn die Dichtung am Dichtungsträger befestigt
ist (Abb. 19) und der Dichtungsträger an der Deckel-Motor-Einheit angebracht ist.
• Einschalten
1. Wählen Sie das gewünschte automatische
Programm (B1, B2, B3, B4, B5, B7),
indem Sie die entsprechende Programmtaste
(Abb. 9) drücken. Drücken Sie zur Auswahl
der verschiedenen Unterprogramme erneut
auf die Programmtaste, um durch die
Unterprogramme zu scrollen (z. B. Suppe P1 =
1x drücken; Suppe P2 = 2x drücken usw. ...).
2. Drücken Sie die Start/Stopp/Reset-Taste
(B9), um das Programm zu starten (Abb.
10).
Das Programm startet nur, wenn der Behälter
korrekt auf der Basis und die Deckeleinheit mit
Motor korrekt auf dem Behälter positioniert sind.
Falls der Behälter nicht korrekt positioniert
oder der Deckel nicht korrekt verschlossen
ist, beginnt das Bedienfeld zu blinken,
wenn man ein Programm startet (Abb. 11).
Demontage der Deckeleinheit:
1. Lösen Sie die Deckeleinheit, indem Sie
den Deckel im Uhrzeigersinn drehen,
sodass das offene Vorhängeschloss auf die
gegenüberliegende Seite des Griffs gestellt
wird (Abb. 22).
2. Entfernen Sie den Deckel mit der einen Hand
und ziehen Sie mit der anderen Hand am
Dichtungsträger, um ihn von der Motoreinheit
zu trennen (Abb. 18).
3. Entfernen Sie die Dichtung (Abb. 19).
DE
56
Page 64

ZUBEHÖR, PROGRAMME UND MENGEN
DE
HACKMESSER
MISCHER
MENGEN
(max.)
Pürieren von Suppen 1,5 l 1 min 30 s
Pürieren von Kompotten 1 kg 1 min
Pürieren von Smoothies 1,5 l 2 min
Zerkleinern von Gemüse 500 g 15 s
Zerkleinern von Fleisch 300 g 30 s
Zerkleinern von Fisch 500 g 15 s
Bräunen 200 g 5 min -
Schmoren 1,2 l 45 min -
Risotto 1,2 30 min -
DAUER
(max.)
P3
P3
P3
P3
P3
P3
AUTOMATISCHE
PROGRAMME
P1 oder
P2
-
-
-
P5
-
P1
P4
P3
RÜHRER
KNET-/MAHLMESSER
DAMPFEINSATZ
Eischnee
Soße (z.B.: Béchamel) 0,6 l 12 min -
Rühren lockerer Teigmassen 600 g 30 s -
Zerkleinern von Nüssen 500 g 1 min
Zerstoßen von Eis
Crêpe-, Waffelteig 1,2 l 30 s -
Dampfgaren von Gemüse,
Fisch oder Fleisch
5 max.
6 bis 10
600 g 30 min -
2 min 30 s
30 s
57
P2
P3
P4
-
P2-P3
P1
-
-
P1
P1
Page 65

AUTOMATISCHE PROGRAMME UND UNTERPROGRAMME
Die automatischen Programme:
Geschwindigkeit, Gartemperatur und -zeit sind voreingestellt, um Suppen, Schmortöpfe und Desserts
zuzubereiten, mit Dampf zu garen oder Ihre Speisen aufzuwärmen. Die Garzeit ist einstellbar. Sie
können die Garzeit (B10) nach Wunsch verlängern oder verkürzen.
Was kann ich mit den automatischen Programmen des Bedienfeldes (B) zubereiten
Zubereitung von Schmortöpfen,
Gerichten mit Soße
(Unterprogramme P1, P2, P3,
Zubereitung von Desserts
(Unterprogramme P1, P2, P3, P4)
P4, P5)
Zubereitung von Suppen
(Unterprogramme P1, P2)
Aufwärmen von Speisen
Steif geschlagene Eier,
Garen mit Dampf
zerkleinertes Fleisch, zerstoßenes
Eis
(Unterprogramme P1, P2, P3, P4)
Benutzen Sie das Flachrührer-Zubehör (G4) nicht für sehr flüssige Rezepte, deren
Menge 1 Liter überschreitet. Die Zutaten könnten sonst aus dem Behälter spritzen.
Ausführliche Informationen zu den Programmen und ihren Unterprogrammen
Slow cook
P1
Slow cook
P2
Slow cook
P3
Slow cook
P4
Slow cook
P5
Geschwindigkeitsstufe
(nicht einstellbar)
Langsam
Langsam mit Intervallen
(Unterbrechung/
Fortsetzung)
Langsam mit
Unterbrechungen
Nicht zutreffend
Schnell 15 s und
anschließend langsam
mit Unterbrechung
Standardzeit
(einstellbar)
5 min
(1 min bis
10 min)
20 min
(5 min bis
2 h 30 min)
30 min
(5 min bis
2 h 30 min)
45 min
(5 min bis
2 h 30 min)
60 min
(5 min bis
2 h 30 min)
Standardtemperatur
(nicht einstellbar)
120 °C NEIN Röstzwiebeln
80 °C 45 min Tomatensoße
90 °C 45 min Risotto
95 °C 45 min
95 °C 45 min Marmite-Paste
Warmhalten Rezeptbeispiele
DE
Geschmorter Fisch
mit Safran
58
Page 66

DE
Soup P1
Soup P2
Steam P1
Dessert
P1
Dessert
P2
Dessert
P3
Dessert
P4
Reheat
Mix P1
Mix P2
Mix P3
Mix P4
Geschwindigkeitsstufe
(nicht einstellbar)
Keine
Geschwindigkeitsstufe
während des Garens,
nach dem Garen 10
Pulse, dann 2 min hohe
Geschwindigkeitsstufe
Keine
Geschwindigkeitsstufe
während des Garens nach
dem Garen 15 Sekunden bei
mittlerer Geschwindigkeit
Nicht zutreffend
Schnell mit
Unterbrechung, dann
Fortsetzung
Langsam mit
Unterbrechungen
Langsam mit
Unterbrechung, dann
Fortsetzung
Keine, dann langsam
mit Unterbrechungen
während des Garens
Langsam mit
Unterbrechungen
Langsam
Medium
Schnell
Schnell mit
Unterbrechung
Standardzeit
(einstellbar)
35 min
(5 min bis
1 h)
38 min
(5 min bis
1 h)
30 min
(5 min bis
1 h)
30 s
(10 s bis
1 min)
10 min
(1 min bis
30 min)
20 min
(10 min
bis 1 h)
15min
(5 min bis
1 h)
15 min
(3min bis
30 min)
2 min
(30 s bis
5 min)
5 min
(1 min bis 10
min)
1 min
(10 s bis
1 min 30 s)
30 s
(10 s bis
1 min)
Standardtemperatur
(nicht einstellbar)
100 °C 45 min Zucchinicremesuppe
100 °C 45 min
100 °C 45 min
Nicht zutreffend NEIN Eischwerkuchen
55 °C NEIN
90 °C NEIN Milchreis
100 °C NEIN Apfelkompott
80 °C NEIN
Nicht zutreffend NEIN
Keine NEIN Eischnee
Nicht zutreffend NEIN Rinderhack
Nicht zutreffend NEIN
Warmhalten Rezeptbeispiele
Passierte
Karotten/
Kartoffeln
Gedämpfter
Brokkoli
Geschmolzene
Schokolade
Aufwärmen einer
Suppe
Thunfisch- und
Eier-Paté
Zerstoßen von
Eiswürfeln
59
Page 67

MANUELLE BENUTZUNG DES BEDIENFELDES (B):
Dieser Modus ermöglicht Ihnen, die Garzeit nach Belieben einzustellen.
• Benutzung der manuellen Programme des Bedienfeldes (B):
Diese Taste hat vier Funktionen:
- Start/Stopp
- „Bestätigung“ der Auswahl des automatischen Programms
- „Pause“ bei laufendem Betrieb, nachdem das Gerät gestartet wurde
- „Zurücksetzen“ der ausgewählten Einstellungen, indem die Taste 2 Sekunden lang
gedrückt wird.
Einstellen der Betriebsdauer: Wählen Sie das gewünschte Programm und stellen Sie
es ein, indem Sie die Garzeit verlängern oder verkürzen.
In diesem Modus können Sie Ihre Speisen manuell mixen.
DE
• Benutzung des Dampfeinsatzes
Um mithilfe des Dampfeinsatzes mit Dampf zu
garen, müssen Sie 0,4 l Wasser in den Behälter
geben (bis zu der eingravierten Markierung im
Behälter (Abb. 13).
Die Garzeiten dienen als Orientierungshilfe. Sie
ermöglichen in den meisten Fällen, die Speisen
zufriedenstellend zu garen.
Tabelle mit Mengen und Garzeiten zum Dampfgaren
Dampfgarzeit
Zutaten Mengen (max.) Geschätzte Garzeit
Kartoffeln
Karotten 600 g 40 min
Zucchini 600 g 25 min
Pastinaken 600 g 30 min
Lauch 500 g 25 min
Grüne Bohnen 400 g 35 min
Brokkoli 300 g 20 min
Fisch (frisch oder aufgetaut) 500 g 15 min
Weißes Fleisch 400 g 25 min
600 g (vorher mit Wasser
Nichtsdestotrotz können gewisse Umstände die
Garzeit beeinflussen:
–die Größe des Gemüses (klein geschnitten oder
nicht)
–die Menge der Zutaten im Dampfeinsatz
–die Gemüsesorte, der Reifegrad
–die Wassermenge im Behälter, die der
Markierung
Wenn die Speisen nicht ausreichend gegart sind,
können Sie die Garzeit etwas verlängern.
abspülen)
(0,4 l) entsprechen muss.
30 min
Bei manchen Rezepten kann es durch Blasenbildung zum Überlaufen kommen, insbesondere
bei der Verwendung von tiefgefrorenem Gemüse. In diesem Fall müssen Sie das Volumen
entsprechend reduzieren.
60
Page 68

SICHERHEIT DES GERÄTES
Um eine lange Lebensdauer Ihres Gerätes zu
gewährleisten, ist es mit einer elektronischen
Sicherheitsvorrichtung versehen. Diese
elektronische Sicherheitsvorrichtung schützt Sie
vor allen unsachgemäßen Verwendungen; Ihr
Motor ist somit perfekt geschützt.
Unter bestimmten sehr schweren
DE
Benutzungsbedingungen oder bei eigenen
Rezepten (Internet und andere Quellen ...),
bei Nichtbeachtung der Empfehlungen in der
Bedienungsanleitung (siehe § „ZUBEHÖR,
PROGRAMME UND MENGEN“: eventuell zu große
Mengen und/oder eine ungewöhnlich lange
Benutzung und/oder Zubereitung einer Reihe
von Rezepten zu kurz nacheinander) aktiviert
sich der elektronische Überlastungsschutz, um
den Motor zu schützen. In diesem Fall schaltet
das Gerät sich aus und auf der LCD-Anzeige
des Bedienfeldes erscheint „SECU“, um zu
signalisieren, dass das Gerät momentan nicht
betriebsfähig ist.
REINIGUNG DES GERÄTES
• Das Gerät darf nicht in Wasser
getaucht werden. Halten Sie weder
die Basis (A) noch den Deckel mit
Motor (D1) unter laufendes Wasser
(Abb. 16).
Wenn die Benutzung abgeschlossen ist, ziehen
Sie den Netzstecker des Gerätes aus der
Steckdose.
• Lösen Sie die Deckel-Motor-Einheit (D1+D2)
von dem Behälter (F), indem Sie diese gegen
den Uhrzeigersinn drehen, um das geöffnete
Vorhängeschloss auf die gegenüberliegende
Seite des Griffs zu stellen.
• Ziehen Sie den Dichtungsträger (D2) von der
Motoreinheit (Abb. 18).
• Entfernen Sie die Dichtung (D3) vom
Dichtungsträger (Abb. 19).
• Reinigen Sie den Behälter sofort nach dem
Gebrauch.
• Nehmen Sie den Behälter (F) von der Basis (A),
indem Sie ihn am Handgriff (F1) anfassen.
• Stellen Sie den Behälter auf eine ebene Fläche.
Wenn „SECU“ auf Ihrem Bedienfeld angezeigt
wird und Ihr Gerät stoppt, gehen Sie wie folgt
vor:
• Lassen Sie Ihr Gerät mit der Steckdose
verbunden.
• Lesen Sie die Empfehlungen in dieser
Bedienungsanleitung, um Ihre Zubereitung
anzupassen Menge der Zutaten/
Zubereitungszeit/Art des Zubehörs (siehe §
„Zubehör, Programme und Mengen“).
• Warten Sie eine halbe Stunde, damit der Motor
sich abkühlen kann.
• Setzen Sie das Gerät zurück, indem Sie 2
Sekunden lang die „Start/Stopp/Reset“-Taste
(B9) gedrückt halten.
Ihr Gerät ist wieder komplett betriebsbereit.
Der Kundendienst steht Ihnen bei allen Fragen
zu Diensten (siehe Angaben im Garantie-Heft).
• Wenn die Einzelelemente abgekühlt sind:
–Seien Sie vorsichtig mit den Klingen des
Hackmessers (G1) und des Knet-/Mahlmessers
(G2), wenn Sie diese Teile reinigen und wenn
Sie den Behälter ausleeren, denn sie sind
extrem scharf.
–Reinigen Sie den Behälter (F), den Mitnehmer
(E), das jeweilige Zubehörteil (G1, G2, G3,
G4, G5), den Dichtungsträger (D2) und die
Dichtung (D3) mit einem Schwamm und
heißem Seifenwasser.
• Spülen Sie die Einzelteile unter laufendem
Wasser ab.
• Um Ihnen die Reinigung zu erleichtern,
können der Behälter, der Dichtungsträger, die
Dichtung, der Mitnehmer und das Zubehör in
der Geschirrspülmaschine abgewaschen werden
(Abb. 15).
• Bei Kalkablagerungen am Behälter oder Flecken
können Sie die scheuernde Seite eines in Wasser
getauchten Schwamms benutzen und falls
notwendig, weißen Essig oder Pflegeprodukte
für Edelstahl.
61
Page 69

• Bei starker Verschmutzung lassen Sie den
Behälter mehrere Stunden in Wasser mit
etwas Spülmittel einweichen und kratzen
Sie, sofern notwendig, mit einem Spatel oder
der kratzenden Seite eines Schwammes die
Verschmutzung ab.
• Benutzen Sie zur Reinigung der Motoreinheit
(D1) und der Basis (A) ein feuchtes Tuch.
Trocknen Sie alles sorgfältig ab.
usw. leicht verfärben. Dies stellt keine Gefahr
für Ihre Gesundheit dar, noch beeinträchtigt
es die Funktionsfähigkeit Ihres Gerätes. Um
Verfärbungen zu vermeiden, reinigen Sie die
Geräteteile sofort nach jedem Gebrauch.
• Vergewissern Sie sich vor der erneuten
Benutzung des Behälters (F) immer, dass die
elektrischen Kontakte unter dem Behälter
sauber und trocken sind.
• Das Zubehör, der Mitnehmer und die Elemente
des Deckels können sich durch bestimmte
Zutaten wie zum Beispiel Curry, Karottensaft
AUFBEWAHRUNG DES GERÄTES
Um die Aufbewahrung Ihres Gerätes zu erleichtern, können das Zubehör und der Mitnehmer unter
Beachtung der Reihenfolge in Abbildung 17 im Behälter verstaut werden. Setzen Sie dann die
Deckeleinheit (Dichtungsträger, Deckel) auf.
WAS TUN, WENN IHR GERÄT NICHT FUNKTIONIERT?
PROBLEME URSACHEN LÖSUNGEN
Die Garzeiten dienen als
Orientierungshilfe. Sie ermöglichen
in den meisten Fällen, die Speisen
zufriedenstellend zu garen.
Nichtsdestotrotz können gewisse
Nicht richtig gar
Nicht zufriedenstellende Garergebnisse
beim Dampfgaren
Bestimmte Rezepte gelingen nicht Ungeeignete Rezepte.
Das Gerät funktioniert nicht.
Der Deckel lässt sich nicht verschließen
oder schwer verschließen.
Umstände die Garzeit beeinflussen:
- die Größe der Speisen (klein
geschnitten oder nicht)
- die Menge der Zutaten
- die Gemüsesorte, der Reifegrad
- ob die Zutaten gefroren sind oder
nicht ...
Unzureichende Wassermenge im
Behälter
Stücke sind zu groß
Das Netzkabel ist nicht mit der
Steckdose verbunden.
Die Deckel-Motor-Einheit ist nicht
vollständig.
Verlängern Sie die Garzeit mit der
+/-Taste (B10).
Schneiden Sie die Zutaten in kleinere
Stücke.
Die Wassermenge im Behälter muss der
Markierung (0,4 l) entsprechen.
Schneiden Sie die Zutaten in kleinere
Stücke.
Ihre Rezepte, persönliche Rezepte oder
aus dem Internet, sind vielleicht nicht
für Ihr Gerät und sein Zubehör geeignet
(Menge, Garzeit, Zubereitsungsdauer,
ungeeignetes Zubehör): Bevor Sie
mit der Zubereitung Ihres Rezeptes
beginnen, lesen und beachten Sie
die Hinweise zum Gebrauch in dieser
Bedienungsanleitung.
Überprüfen Sie die Verbindung
zwischen dem Kabel und der Basis an
der Rückseite des Gerätes. Schließen
Sie das Gerät an eine Netzsteckdose an.
Prüfen Sie, ob die Dichtung korrekt auf
dem Dichtungsträger montiert ist und
ob dieser korrekt auf dem Deckel mit
Motor befestigt ist (Abb. 5 bis 8).
DE
62
Page 70

PROBLEME URSACHEN LÖSUNGEN
Übermäßige Vibrationen oder Lärm
DE
Der Deckel mit Motor leckt.
Motorgeruch
SECU“ wird angezeigt
„
1
SECU“ + rote Kontrollleuchte blinkt
„
2
SECU“ + rote Kontrollleuchte blinkt Das Heizelement funktioniert nicht.
„
3
„Err1“ wird angezeigt.
„Err2“ wird angezeigt. Elektronischer Defekt
Das Gerät steht nicht auf einer ebenen
Fläche. Das Gerät ist nicht standfest.
Zu große Zutatenmenge Verringern Sie die Menge der Zutaten.
Zubehör-Defekt
Zu große Zutatenmenge
Die Dichtung fehlt.
Die Dichtung ist durchgetrennt oder
beschädigt.
Zubehör-Defekt
Bei der ersten Verwendung des Geräts
oder bei Überlastung des Motors
aufgrund einer zu großen Menge an
Zutaten oder zu harter oder zu großer
Stücke
Überlastung des Motors aufgrund
einer zu großen Menge an Zutaten
oder zu harter oder zu großer Stücke
oder Zubereitung mehrerer Rezepte
nacheinander ohne ausreichende Zeit
zum Abkühlen für das Gerät
Überhitzung der Temperaturfühler
aufgrund Erhitzung des Behälters,
während er leer ist oder zu wenig
Zutaten enthält.
Der Temperaturfühler funktioniert nicht
mehr.
Stellen Sie das Gerät auf eine ebene
Fläche.
Prüfen Sie, ob Sie das empfohlene
Zubehör benutzen.
Verringern Sie die Menge der
verarbeiteten Zutaten
Setzen Sie den Dichtungsring auf
den Dichtungsträger und lassen Sie
die gesamte Einheit auf dem Deckel
einrasten.
Wechseln Sie die Dichtung oder
kontaktieren Sie einen zugelassenen
Kundendienst.
Prüfen Sie, ob Sie das empfohlene
Zubehör benutzen.
Lassen Sie den Motor abkühlen und
verringern Sie die Menge der Zutaten
im Behälter.
Lassen Sie den Motor abkühlen
(ungefähr 30 Minuten) und verringern
Sie die Menge der Zutaten im Behälter.
Stellen Sie sicher, dass Sie das richtige
Programm sowie empfohlene Zubehör
benutzen und nicht die Kapazitäten des
Gerätes überschreiten.
Geben Sie Zutaten in den Behälter.
Überprüfen Sie, ob die Anschlussstifte
für die Stromversorgung unter dem
Behälter nicht verschmutzt sind. Wenn
dies der Fall ist, reinigen Sie diese und
versuchen Sie es erneut. Wenn das
Problem trotzdem weiterhin besteht,
kontaktieren Sie bitte ein zugelassenes
Kundendienstzentrum.
Kontaktieren Sie ein zugelassenes
Kundendienstzentrum.
Kontaktieren Sie ein zugelassenes
Kundendienstzentrum.
63
Page 71

PROBLEME URSACHEN LÖSUNGEN
Stellen Sie sicher, dass der Behälter
korrekt auf der Basis positioniert ist
und die Deckel-Motor-Einheit korrekt
arretiert ist (das Vorhängeschloss wird
nicht mehr auf der Anzeige angezeigt).
Lassen Sie den Motor abkühlen
(ungefähr 30 Minuten) und verringern
Sie die Menge der Zutaten im Behälter.
Stellen Sie sicher, dass Sie das richtige
Programm sowie empfohlene Zubehör
benutzen.
Sie sind sich sicher, dass Sie alles
korrekt zusammengesetzt haben, doch
das Problem besteht weiter (Anzeige
des Vorhängeschlosses). Wenden
Sie sich in diesem Fall an einen
zugelassenen Kundendienst.
Sicherheitskontrollleuchte (C3)
LCD-Anzeige.
Behälter oder Deckel-Motor-Einheit
sind nicht gut verriegelt.
der
Überlastung des Motors
REZEPT
Fleischpastete (Pâté Marmite)
2/4 Personen – Vorbereitung 10 min – Garzeit 2 h
Zu verwendendes Zubehör und Programme:
- Zerkleinerungsmesser
- Turbo-Programm/Schmorprogramm P5
300 g Schweinebauch (entbeint und ohne Schwarte) • 1 Zwiebel • 1 Knoblauchzehe • 2 cl Öl • 5 cl
Weißwein • 5 cl Armagnac • 1 Teelöffel Rabelais®-Gewürz (oder Fünf-Gewürze-Pulver) • 5 g Salz •
1 g Salz.
1. Knoblauchzehe und Zwiebel schälen und in vier Teile schneiden. Das Schweinefleisch grob würfeln.
2. Knoblauch und Zwiebel in die Schüssel mit dem Zerkleinerungsmesser geben.
Mit dem Turbo-Programm 15 sec lang mixen.
3. Das Öl, das Schweinefleisch und die anderen Zutaten in die Schüssel geben. Das Schmorprogramm
P5 für 2 h starten.
4. Nach dem Garen das gebratene Fleisch in eine Terrine geben und einen Teil des oben abgelagerten
Fettes entfernen.
Tipp:
Genug Fett übrig lassen, damit die Pastete fest bleibt.
DE
RECYCLING
• Entsorgung des Gerätes und der Verpackungsmaterialien
Die Verpackung besteht ausschließlich aus umweltfreundlichen Materialien, die nach
den geltenden Recycling-Bestimmungen entsorgt werden können.
Für die Entsorgung des Gerätes informieren Sie sich bitte bei den zuständigen Stellen
Ihrer Gemeinde.
• Entsorgung elektrischer und elektronischer Geräte:
Denken Sie an den Schutz der Umwelt!
Ihr Gerät enthält zahlreiche wiederverwertbare oder recyclebare Materialien.
Bringen Sie das Gerät zur Entsorgung zu einer Sammelstelle ihrer Stadt oder Gemeinde.
64
Page 72

DESCRIZIONE
A Base
A1 Colonna posteriore
B Pannello di controllo
B1 Selettore programma cottura lenta
B2 Selettore programma zuppe
B3 Selettore programma cottura a vapore
B4 Selettore programma dolci
B5 Selettore programma riscaldamento
B6 Indicatore di riscaldamento
IT
B7 Selettore programma mix
B8 Selettore turbo
B9 Pulsante start/stop/reset
B10 Selettore +/-
C Display LCD
C1 Indicatore del programma
C2 Durata del programma
C3 Indicatore della messa in sicurezza
D Gruppo coperchio blocco motore
D1 Coperchio blocco motore
D1a Linguetta di bloccaggio
D2 Porta-guarnizione
D2a Tacche
D3 Guarnizione
E Perno di trasmissione
F Recipiente
F1 Impugnatura del recipiente
G Accessori
G1 Lama tritatutto
G2 Lama impastatrice/frantumatrice
G3 Frullatore
G4 Sbattitore
G5 Cestello vapore
H Cavo di alimentazione removibile
SPECIFICHE TECNICHE DELL'APPARECCHIO
Potenza 1000 W (600 W: resistenza riscaldante / 400 W: motore)
Durata di funzionamento Da 10 secondi a 2,5 ore
Numero di velocità 3 velocità – 1 velocità intermittente
65
Page 73

NORME DI SICUREZZA
Per la sicurezza della persona
• Leggere attentamente le istruzioni
per l’uso prima di utilizzare
l’apparecchio per la prima volta
e conservarle: un utilizzo non
conforme alle istruzioni per l’uso
solleva il produttore da qualsiasi
responsabilità.
• Scollegare sempre l’apparecchio
dall’alimentazione se viene lasciato
incustodito e prima del montaggio,
dello smontaggio o della pulizia.
Non consentire ai bambini di
utilizzare l’apparecchio senza
sorveglianza.
• L’uso di questo apparecchio
è vietato ai bambini. Tenere
l’apparecchio e il cavo fuori della
portata dei bambini.
• Si sconsiglia l’utilizzo del presente
apparecchio da parte di persone
(bambini compresi) con capacità
fisiche, sensoriali o mentali ridotte,
o da persone prive di esperienza o
di conoscenza, se non in presenza
di figure responsabili della loro
sicurezza, che possano monitorarle
ed istruirle preventivamente all’uso.
Sorvegliare i bambini per evitare
che giochino con l’apparecchio.
• Tenere l’apparecchio fuori della
portata dei bambini.
• Quando l'apparecchio
è in funzione, alcune
superfici raggiungono
temperature elevate
(pareti del recipiente, parti
metalliche sotto il recipiente, portaguarnizione) e possono causare
IT
ustioni. Toccare l'apparecchio
tramite le parti in plastica fredde
(impugnature, coperchio blocco
motore). La spia di riscaldamento
rossa indica che sussiste il rischio
di ustioni.
• La temperatura delle superfici
accessibili può essere elevata
quando l’apparecchio è in funzione.
• Questo apparecchio non è
predisposto per essere messo in
funzione mediante un timer esterno
o un sistema di comando a distanza
separato.
• Non utilizzare l’apparecchio nel caso
in cui non funzioni correttamente,
sia stato danneggiato o qualora il
cavo di alimentazione o la presa
risultino danneggiati.
• Se il cavo di alimentazione è
danneggiato, deve essere sostituito
con un cavo o un gruppo speciale
disponibile presso il costruttore o
il centro di assistenza (consultare
l'elenco riportato nel libretto di
assistenza).
66
Page 74

• Non immergere l'apparecchio. Non
risciacquare il coperchio blocco
motore (D1) sotto l'acqua corrente.
• L’apparecchio è destinato al
solo uso domestico, all’interno
dell’abitazione e ad altitudini
inferiori ai 2000 m. Il fabbricante
declina ogni responsabilità e
IT
si riserva il diritto di annullare
la garanzia in caso di un uso
commerciale o improprio del
dispositivo, o del mancato rispetto
delle istruzioni.
• Questo apparecchio non è destinato
ad essere utilizzato in applicazioni
domestiche e simili come:
– in angoli cottura riservati al
personale nei negozi, negli uffici
e in altri ambienti professionali,
– in angoli cucina riservati al
personale di punti vendita, uffici
e altri ambienti professionali;
– nelle fattorie/agriturismi;
– da parte dei clienti di alberghi,
motel e altre strutture a carattere
residenziale;
– in ambienti di tipo B&B.
• L'apparecchio emette del vapore
che potrebbe causare ustioni.
Toccare il porta-guarnizione
con attenzione (se necessario,
utilizzare un guanto, una presina,
ecc.).
• Non mettere in funzione
l'apparecchio se la guarnizione
non è posizionata sul portaguarnizione.
AVVERTENZA Prestare attenzione
ai rischi di infortunio in caso di
cattivo utilizzo dell’apparecchio.
Adottare adeguate precauzioni
per evitare di ferirsi con la
lama tritatutto (G1) e la lama
impastatrice/frantumatrice (G2)
durante la pulizia e lo svuotamento
del recipiente, perché sono
estremamente taglienti.
Prestare particolare attenzione nel
caso vengano versati nel robot da
cucina liquidi caldi: potrebbero
fuoriuscire dall’apparecchio
in seguito ad un’ebollizione
improvvisa.
Riporre la lama tritatutto (G1) nel
recipiente dopo ogni utilizzo.
AVVERTENZA Procedere con cautela
nel manipolare l’apparecchio (pulizia,
riempimento e versamento): evitare
qualunque traboccamento del liquido
sui connettori.
AVVERTENZA L’apparecchio emette
vapore che può provocare bruciature.
AVVERTENZA La superficie della
resistenza rimane ancora calda
dopo l’uso.
67
Page 75

Assicurasi di toccare esclusivamente
• Questo apparecchio può essere
l'impugnatura (F1) del prodotto
durante il riscaldamento e fino al
completo raffreddamento.
Fare riferimento alle istruzioni d’uso
per l’assemblaggio e il montaggio
degli accessori sull’apparecchio.
Fare riferimento alle istruzioni d’uso
per la pulizia e la manutenzione
dell’apparecchio.
Seguire sempre le istruzioni per la
pulizia dell’apparecchio:
• Scollegare l’apparecchio.
• Non pulire l’apparecchio quando è
ancora caldo.
• Pulire con un panno o una spugna
Collegamento elettrico
• Collegare sempre l’apparecchio
umida.
• Non immergere né mettere sotto
l’acqua corrente l’apparecchio
• L’apparecchio è progettato per
SOLO MERCATI EUROPEI:
• Tenere l’apparecchio e il cavo fuori
dalla portata dei bambini di età
inferiore agli 8 anni.
I bambini non devono utilizzare
l’apparecchio come un giocattolo.
• Questo apparecchio può essere
• Eventuali errori di collegamento
utilizzato da persone le cui capacità
fisiche, sensoriali o mentali siano
• Non tirare mai il cavo d’alimentazione
ridotte o la cui esperienza o
conoscenza non siano sufficienti,
a condizione che ricevano una
• Il cavo di alimentazione non deve
supervisione o che abbiano ricevuto
istruzioni in merito ad un uso sicuro
dell’apparecchio e ne comprendano
correttamente i potenziali pericoli.
utilizzato da bambini di almeno
8 anni d’età, a condizione che
ricevano una supervisione o che
abbiano ricevuto istruzioni in merito
ad un uso sicuro dell’apparecchio e
ne comprendano correttamente i
potenziali pericoli. La pulizia e il
mantenimento spettanti all’utente
IT
non devono essere eseguiti da
bambini senza supervisione, a
meno che non abbiano più di 8 anni
e siano sotto la supervisione di un
adulto.
a una presa di corrente dotata di
messa a terra.
funzionare esclusivamente a
corrente alternata. Verificare che la
tensione di alimentazione indicata
sulla targhetta dell’apparecchio
corrisponda a quella dell’impianto
elettrico di casa.
annullano la garanzia.
per scollegare l’apparecchio dalla
presa di corrente.
mai trovarsi vicino o a contatto
con le parti calde dell’apparecchio,
vicino a fonti di calore o ad angoli
vivi.
68
Page 76

Cattivo utilizzo
• Non toccare il coperchio prima del
completo arresto dell’apparecchio
(tasto stop): attendere che gli
alimenti in lavorazione abbiano
smesso di girare.
• Versare sempre gli ingredienti solidi
nel recipiente prima di aggiungere
IT
gli ingredienti liquidi (Fig. 12),
senza oltrepassare la tacca MAX
incisa all'interno del recipiente
(Fig. 13). Se il recipiente è
troppo pieno, potrebbe fuoriuscire
dell'acqua bollente.
• Durante la cottura a vapore,
rispettare il livello d'acqua indicato
nel recipiente (Fig. 14).
• Non appoggiare mai le dita
o qualsiasi altro oggetto nel
recipiente durante il funzionamento
dell’apparecchio.
• Non utilizzare il recipiente come
contenitore (per conservare,
congelare, sterilizzare).
• Posizionare l’apparecchio su un
piano di lavoro stabile, resistente
al calore, pulito e asciutto.
• Non posizionare l’apparecchio
vicino a pareti o armadi: il vapore
prodotto potrebbe danneggarli.
• Non posizionare l’apparecchio vicino
a fonti di calore in funzione (piastre
di cottura, elettrodomestici, ecc.).
• Non coprire il coperchio con un
panno o oggetti similari.
• Non mettere gli accessori nel forno
a microonde.
• Non utilizzare l’apparecchio
all’aperto.
• Non superare mai le quantità
massime indicate nelle istruzioni.
• Riporre l’apparecchio solo una volta
che si è raffreddato completamente.
Servizio post-vendita
• Per la propria sicurezza, non
utilizzare accessori o parti di
ricambio diverse da quelle fornite
dai centri di servizio post-vendita
autorizzati.
• Eventuali interventi diversi dalla
pulizia e dalle normali operazioni di
manutenzione spettanti all’utente
devono essere svolti da un centro
assistenza autorizzato.
• Consultare la tabella “Cosa fare
se l’apparecchio non funziona?”
riportata al termine delle istruzioni
per l’uso.
69
Page 77

PREPARAZIONE DELL'APPARECCHIO
Prima del primo utilizzo
• Leggere attentamente questo manuale di
istruzioni. Il manuale contiene suggerimenti
per l'uso che illustrano il potenziale
dell'apparecchio: cotture lente e al vapore,
preparazione di zuppe e dolci, e la possibilità
di riscaldare le pietanze.
• Conservarlo per poterlo consultare in seguito;
un utilizzo non conforme al manuale libera il
costruttore da ogni responsabilità.
• Rimuovere tutti i materiali di imballaggio dal
prodotto.
• Pulire i diversi elementi: recipiente, accessori,
perno di trasmissione, porta-guarnizione e
guarnizione (D2, D3, E, F, G) con acqua e
detergente (consultare la sezione PULIZIA di
questo manuale).
• Attenzione! Il coperchio che contiene il blocco
motore (D1) e la base (A) non devono essere
lavati sotto l'acqua corrente (Fig. 16).
• Posizionamento del gruppo coperchio
Il coperchio del prodotto è composto da tre elementi: il coperchio blocco motore (D1), il portaguarnizione (D2) e la guarnizione (D3).
Questi 3 elementi sono pre-assemblati.
Per gli utilizzi futuri, è possibile assemblare il gruppo coperchio seguendo 2 procedure, come
descritto di seguito.
Preparazione dell'apparecchio: installazione
del recipiente, degli accessori e del coperchio
L'apparecchio è dotato di un cavo di
alimentazione removibile (H). Collegare il cavo
di alimentazione alla base, quindi collegare
l'apparecchio alla presa di corrente (Fig. 1).
• Installazione del recipiente e degli accessori
1. Posizionare il recipiente (F) sulla
base dell'apparecchio (A) utilizzando
l'impugnatura (F1) (Fig. 2).
2. Posizionare l'accessorio selezionato (G1
G5) sul perno di trasmissione (E) (Fig. 3),
quindi posizionare il tutto nel recipiente (F)
(Fig. 4).
Per utilizzare il cestello vapore (G5),
riempire il recipiente fino alla tacca
(corrispondente a 0,4 L di liquido: acqua,
zuppa, ecc.) (Fig. 13) prima di posizionarlo
all'interno del recipiente (F) (Fig. 14).
3. Incorporare gli ingredienti all'interno del
recipiente (F) o del cestello vapore (G5).
IT
Passaggio Procedura 1 Procedura 2
1
Posizionare il recipiente (F) sulla base dell'apparecchio (A) utilizzando
l'impugnatura (F1) (Fig. 2).
2
Posizionare la guarnizione (D3) sul porta-guarnizione (D2) (Fig. 19).
70
Page 78

Passaggio Procedura 1 Procedura 2
“click”
3
IT
Fissare il porta-guarnizione (D2) sul
coperchio blocco motore (D1), facendo
attenzione a posizionare la sporgenza
del blocco motore sul bordo della tacca
(D2a) del porta-guarnizione (D2), fino
a udire un "clic" (Fig. 5). Il portaguarnizione è quindi in posizione.
Posizionare il porta-guarnizione (D2)
sul recipiente, facendo attenzione a
posizionare le tacche (D2a) del portaguarnizione (D2) intorno all'impugnatura
(F1) e alla colona posteriore (A1) (Fig.
20).
4
Posizionare il gruppo coperchio blocco
(D1, D2+D3) motore sul recipiente (F),
facendo attenzione a posizionare:
- il simbolo "lucchetto aperto"
fronte all'impugnatura (Fig. 6);
- le tacche (D2a) del porta-guarnizione
intorno all'impugnatura (F1) e della
colonna posteriore (A1) (Fig. 7).
5
Bloccare il coperchio in modo da portare il simbolo del lucchetto chiuso di fronte
all’impugnatura (F1); per fare ciò, ruotare con una mano il gruppo coperchio in
senso orario, in modo da far scivolare la linguetta di bloccaggio (D1a) del blocco
motore nell’impugnatura (F1), e con l’altra mano accompagnare la parte posteriore
del coperchio in modo da far scivolare la seconda linguetta di bloccaggio (D1a)
nella colonna posteriore (A1) della base (A) (Fig. 8).
di
71
Posizionare il coperchio blocco motore
(D1) sul porta-guarnizione (D2),
facendo attenzione a posizionare il
simbolo del lucchetto aperto di fronte
all'impugnatura (F1), fino a udire un
"clic" (Fig. 21).
Page 79

! Posizionare il coperchio solo dopo aver posizionato la guarnizione sul porta-guarnizione
(Fig. 19) e solo se il porta-guarnizione è fissato al coperchio blocco motore.
• Avviamento
1. Selezionare il programma automatico
desiderato (B1, B2, B3, B4, B5, B7)
premendo il pulsante corrispondente al
programma (Fig. 9). Per selezionare i diversi
sotto-programmi, premere nuovamente il
pulsante del programma per scorrere i sottoprogrammi (ad es., zuppa P1 = 1 pressione;
zuppa P2 = 2 pressioni, ecc.).
2. Premere il pulsante start/stop/reset (B9) per
avviare il programma (Fig. 10).
L'apparecchio si avvia esclusivamente se il
recipiente è posizionato correttamente sulla
base e se il gruppo coperchio blocco motore è
posizionato sul recipiente.
In caso di posizionamento scorretto
del recipiente o di bloccaggio scorretto
del coperchio, il pannello di controllo
lampeggerà quando viene avviato un
programma (Fig. 11).
Disassemblaggio del gruppo coperchio
1. Sbloccare il gruppo coperchio ruotando il
coperchio in senso antiorario, in modo da
portare il simbolo del lucchetto aperto di
fronte all'impugnatura (Fig. 22).
2. Sollevare il coperchio con una mano, e con
l'altra tirare il porta-guarnizione per separarlo
dal blocco motore (Fig. 18).
3. Rimuovere la guarnizione (Fig. 19).
IT
72
Page 80

ACCESSORI, PROGRAMMI E QUANTITÀ
IT
LAMA TRITATUTTO
FRULLATORE
QUANTITÀ
(max.)
Miscelare zuppe 1,5 L
Miscelare composte 1 kg 1 minuto
Miscelare frullati 1,5 L 2 minuti
Tritare verdura 500g 15 secondi
Tritare carne 300g 30 secondi
Tritare pesce 500g 15 secondi
Rosolare 200g 5 minuti -
Cuocere a fuoco lento 1,2 L 45 minuti -
Risotti 1,2 L 30 minuti -
Albumi montati a neve
5 max.
DURATA
(max.)
1 minuto
30 secondi
2,5 minuti
P3
P3
P3
P3
P3
P3
P2
PROGRAMMI
AUTOMATICI
P1 o P2
-
-
-
P5
-
P1
P4
P3
-
LAMA IMPASTATRICE
CESTELLO
SBATTITORE
FRANTUMATRICE
VAPORE
Salse (ad es. besciamella) 0,6 L 12 minuti -
Mescolare impasti leggeri 600g 30 secondi -
Tritare nocciole 500g 1 minuto
Tritare ghiaccio
Pastella per crepe, gaufre 1,2 L 30 secondi -
Cuocere a vapore verdura,
pesce o carne
Da 6 a 10
600g 30 minuti -
30 secondi
73
P3
P4
P2-P3
P1
-
-
P1
P1
Page 81

PROGRAMMI AUTOMATICI E SOTTO-PROGRAMMI
I programmi automatici
Velocità, temperatura e tempo di cottura sono preimpostati per preparare automaticamente zuppe,
rosolature, pietanze al vapore, dolci o per riscaldare preparazioni. Il tempo di cottura è un parametro
regolabile. È possibile aumentare o diminuire il tempo di cottura (B10) in base alle proprie preferenze.
Che cosa è possibile fare con i programmi automatici del pannello di controllo (B)
Preparare piatti rosolati, in salsa.
(Sotto-programmi P1, P2, P3,
P4, P5)
Preparare zuppe
(Sotto-programmi P1, P2)
Preparare dolci
(Sotto-programmi P1, P2, P3, P4)
Riscaldare pietanze
Montare albumi a neve, tritare
Cuocere pietanze al vapore
carne, tritare ghiaccio
(Sotto-programmi P1, P2, P3, P4)
Non utilizzare l’accessorio sbattitore (G4) con preparazioni molto liquide la cui quantità
sia superiore a 1 litro, poiché ciò potrebbe causare schizzi all’esterno del recipiente.
Dettagli dei programmi automatici e dei rispettivi sotto-programmi
Temperatura
predefinita
(non regolabile)
120°C NO
80°C 45 minuti
90°C 45 minuti Risotto
95°C 45 minuti
95°C 45 minuti
Slow cook
P1
Slow cook
P2
Slow cook
P3
Slow cook
P4
Slow cook
P5
Velocità
(non regolabile)
Lenta
Lenta a intermittenza,
quindi continua
Lenta a intermittenza
Nessuna
Rapida per 15 secondi,
quindi lenta a
intermittenza
Durata predefinita
(regolabile)
5 minuti
(da 1 minuto a
10 minuti)
20 minuti
(da 5 minuti a
2,5 ore)
30 minuti
(da 5 minuti a
2,5 ore)
45 minuti
(da 5 minuti a
2,5 ore)
60 minuti
(da 5 minuti a
2,5 ore)
Mantenimento
al caldo
IT
Esempio di
ricetta
Cipolle
rosolate
Sugo al
pomodoro
Cottura lenta
di pesce allo
zafferano
Crema
spalmabile
74
Page 82

IT
Soup P1
Soup P2
Steam P1
Dessert P1
Dessert P2
Dessert P3
Dessert P4
Reheat
Mix P1
Mix P2
Mix P3
Mix P4
Velocità
(non regolabile)
Nessuna velocità durante
la cottura, quindi 10
impulsi, quindi velocità
rapida per 2 minuti dopo
la cottura
Nessuna velocità durante
la cottura, quindi
velocità media per 15
secondi dopo la cottura
Nessuna
Rapida a intermittenza,
quindi continua
Lenta a intermittenza
Lenta a intermittenza,
quindi continua
Nessuna, quindi lenta a
intermittenza durante la
cottura
Lenta a intermittenza
Lenta
Media
Rapida
Rapida a intermittenza
Durata predefinita
(regolabile)
35 minuti
(da 5 minuti a
1 ora)
38 minuti
(da 5 minuti a
1 ora)
30 minuti
(da 5 minuti a
1 ora)
30 secondi
(da 10 secondi a
1 minuto)
10 minuti
(da 1 minuto a
30 minuti)
20 minuti
(da 10 minuti a
1 ora)
15 minuti
(da 5 minuti a
1 ora)
15 minuti
(da 3 minuti a
30 minuti)
2 minuti
(da 30 secondi a
5 minuti)
5 minuti
(da 1 minuto a
10 minuti)
1 minuto
(da 10 secondi
a 1 minuto 30
secondi)
30 secondi
(da 10 secondi a
1 minuto)
Temperatura
predefinita
(non regolabile)
100°C 45 minuti
100°C 45 minuti
100°C 45 minuti
Nessuna NO Plum cake
55°C NO
90°C NO Riso al latte
100°C NO
80°C NO
Nessuna NO
Nessuna NO
Nessuna NO Manzo tritato
Nessuna NO
Mantenimento
al caldo
Esempio di
Vellutata di
zucchine
Passata di
carote/patate
Broccoli al
Cioccolato
Composta di
Riscaldare
una zuppa
Crema di
tonno e uova
montati a
ricetta
vapore
fuso
mele
Albumi
neve
Ghiaccio
tritato
75
Page 83

UTILIZZO MANUALE DEL PANNELLO DI CONTROLLO (B)
Questa modalità permette di personalizzare il tempo di cottura per un utilizzo più comodo.
• Utilizzo dei programmi manuali del pannello di controllo (B)
Questo pulsante ha 4 funzioni:
- start/stop
- "confermare" la selezione del programma automatico;
- "sospendere" il funzionamento dopo aver avviato l'apparecchio;
- "annullare" i parametri selezionati tenendolo premuto per 2 secondi (reset).
Per regolare la durata di funzionamento, selezionare il programma desiderato e
regolarlo aumentando o riducendo il tempo di cottura.
Questa modalità permette di miscelare manualmente la preparazione.
• Utilizzo del cestello vapore
Per cuocere a vapore con il cestello vapore, è
necessario versare 0,4 L d'acqua nel recipiente
(fino alla tacca incisa all'interno del recipiente)
(Fig. 13).
I tempi di cottura sono dati a titolo indicativo;
garantiscono una cottura soddisfacente nella
maggior parte dei casi.
Tabella delle quantità e dei tempi di cottura al vapore
Tempo di cottura al vapore
Ingredienti Quantità (max.) Tempo di cottura stimato
Patate
Carote 600g 40 minuti
Zucchine 600g 25 minuti
Pastinaca 600g 30 minuti
Parte bianca del porro 500g 25 minuti
Fagiolini 400g 35 minuti
Broccoli 300g 20 minuti
Pesce (fresco o scongelato) 500g 15 minuti
Carne bianca 400g 25 minuti
600 g (precedentemente
risciacquate con acqua)
Tuttavia, alcune condizioni possono influire sul
tempo di cottura:
–le dimensioni della verdura (tagliata o intera);
–la quantità di ingredienti nel cestello;
–la varietà della verdura e il grado di
maturazione;
–la quantità d'acqua nel recipiente, che deve
corrispondere alla tacca
Se la cottura è insufficiente, è possibile
allungarla.
30 minuti
IT
(0,4 L).
Alcune ricette possono provocare fuoriuscite impreviste a causa della formazione di bolle, in
particolare durante la cottura di verdura surgelata. In tal caso, ridurre il volume.
76
Page 84

MESSA IN SICUREZZA DELL'APPARECCHIO
Il motore dell'apparecchio è protetto da un
dispositivo elettronico di sicurezza che ne
garantisce la longevità. Questo dispositivo
protegge contro eventuali malfunzionamenti;
così il motore è perfettamente protetto.
In alcune condizioni d'uso molto intense, o
in caso di ricette personalizzate (ad esempio
scaricate da Internet) che non rispettano le
raccomandazioni del manuale (consultare la
sezione ACCESSORI, PROGRAMMI E QUANTITÀ:
IT
quantità eccessive e/o utilizzo eccessivamente
lungo e/o concatenazione ravvicinata di ricette),
la protezione elettronica si attiva per preservare
il motore. In tal caso, l'apparecchio si arresta e
sul display del pannello di controllo appare il
messaggio “SECU”, a indicare che l'apparecchio
non è momentaneamente funzionante.
PULIZIA DELL'APPARECCHIO
• Non immergere l'apparecchio.
Non risciacquare la base (A) e
il coperchio blocco motore (D1)
sotto l'acqua corrente (Fig. 16).
Al termine dell'uso, scollegare l'apparecchio
dalla presa di corrente.
• Rimuovere il gruppo coperchio blocco motore
(D1+D2) dal recipiente (F) ruotandolo in
senso antiorario, in modo da portare il simbolo
del lucchetto aperto di fronte all'impugnatura.
• Rimuovere il porta-guarnizione (D2) dal blocco
motore estraendolo (Fig. 18).
• Rimuovere la guarnizione (D3) dal portaguarnizione (Fig. 19).
• Pulire il recipiente immediatamente dopo l'uso.
• Sollevare il recipiente (F) dalla base
dell'apparecchio (A) utilizzando l'impugnatura
(F1).
• Posizionare il recipiente su una superficie
piana.
• Quando le parti si sono raffreddate:
–adottare adeguate precauzioni per evitare di
ferirsi con la lama tritatutto (G1) e la lama
impastatrice/frantumatrice (G2) durante
la pulizia e lo svuotamento del recipiente
perché sono estremamente taglienti;
Se sul pannello di controllo appare il messaggio
“SECU” e l'apparecchio si arresta, procedere
come descritto di seguito.
• Lasciare l'apparecchio collegato alla presa di
corrente.
• Consultare le raccomandazioni riportate
in questo manuale per adattare le proprie
preparazioni quantità di ingredienti / tempo
di cottura / tipo di accessorio (consultare la
sezione "Accessori, programmi e quantità").
• Attendere mezz'ora affinché il motore si
raffreddi.
• Riavviare l'apparecchio tenendo premuto il
pulsante start/stop/reset (B9) per 2 secondi.
L'apparecchio è nuovamente pronto all'uso.
Il servizio clienti rimane a vostra disposizione
per qualsiasi domanda (consultare i recapiti
riportati nel libretto di garanzia).
–pulire il recipiente (F), il perno di
trasmissione, l'accessorio installato (G1, G2,
G3, G4, G5), il porta-guarnizione (D2) e la
guarnizione (D3) con acqua calda, detergente
e una spugna.
• Risciacquare tutte le parti sotto acqua corrente.
• Per facilitare la pulizia, il recipiente, il portaguarnizione, la guarnizione e gli accessori sono
lavabili in lavastoviglie (Fig. 15).
• Se il recipiente presenta tracce di calcare o
macchie residue, utilizzare il lato abrasivo di
una spugna imbevuta di aceto di vino bianco
o di un prodotto adatto alla pulizia dell'acciaio
inox.
• In caso di macchie resistenti, lasciarlo a mollo
per diverse ore con acqua e detersivo per
piatti, e strofinarle con una spatola o il lato
abrasivo di una spugna.
• Per pulire il blocco motore (D1) e la base
(A9), utilizzare un panno umido. Asciugarli
con attenzione.
77
Page 85

• Gli accessori, il perno di trasmissione e gli
elementi del coperchio possono macchiarsi
leggermente a contatto con alimenti come
• Prima di usare nuovamente il recipiente (F),
assicurarsi che i contatti elettrici sotto il
recipiente siano sempre puliti e asciutti.
curry, succo di carote, ecc.; ciò non comporta
pericoli per la salute né malfunzionamenti
dell'apparecchio. Per evitare la formazione di
macchie, pulire gli elementi immediatamente
dopo l'uso.
CONSERVAZIONE DELL'APPARECCHIO
Per facilitare la conservazione dell'apparecchio, gli accessori e il perno di trasmissione possono
essere riposti all'interno del recipiente rispettando l'ordine illustrato in Fig. 17, quindi posizionare il
gruppo coperchio (porta-guarnizione, coperchio).
RISOLUZIONE DEI PROBLEMI
PROBLEMI CAUSE SOLUZIONI
I tempi di cottura sono dati a titolo
indicativo; garantiscono una cottura
soddisfacente nella maggior parte dei
casi.
Tuttavia, alcune condizioni possono
Cottura insufficiente
Cottura al vapore insoddisfacente
Difficoltà nella riuscita di alcune
ricette
L'apparecchio non funziona Il cavo non è collegato.
Il coperchio non si blocca o si blocca
con difficoltà.
influire sul tempo di cottura:
- le dimensioni della verdura (tagliata
o intera);
- la quantità degli ingredienti;
- la varietà della verdura e il grado di
maturazione;
- se gli ingredienti sono surgelati.
Quantità d'acqua nel recipiente
insufficiente.
Pezzi troppo grandi.
Ricette non adatte
Il coperchio blocco motore non è
completo.
Aumentare il tempo di cottura
utilizzando il selettore (B10).
Ridurre le dimensioni dei pezzi.
La quantità d'acqua nel recipiente deve
corrispondere alla tacca (0,4 L).
Ridurre le dimensioni dei pezzi.
Alcune ricette, personali o scaricate da
Internet, possono non essere adatte
all'apparecchio e ai suoi accessori
(quantità, tempi di cottura, durata,
accessori non adatti); prima di iniziare
la preparazione, assicurarsi di rispettare
le istruzioni per l'uso riportate in
questo manuale.
Verificare il collegamento tra il cavo
e la base, sul retro dell'apparecchio.
Collegare l'apparecchio a una presa di
corrente.
Verificare che la guarnizione sia
installata correttamente sul portaguarnizione, e che quest'ultimo sia
installato correttamente sul coperchio
blocco motore (Fig. da 5 a 8).
IT
78
Page 86

PROBLEMI CAUSE SOLUZIONI
L'apparecchio non è posizionato su una
superficie piana, l'apparecchio non è
Vibrazioni o rumore eccessivi
Perdite dal coperchio blocco motore
IT
Odore dal motore
Messaggio "
Messaggio "
lampeggiante
Messaggio "
lampeggiante
Messaggio "Err1" Il sensore termico non funziona. Contattare un centro di assistenza.
Messaggio "Err2" Difetto elettronico. Contattare un centro di assistenza.
Indicatore della messa in sicurezza
(C3)
SECU"
1
SECU" + spia rossa
2
SECU" + spia rossa
3
acceso sul display
stabile.
Volume degli ingredienti eccessivo. Ridurre la quantità degli ingredienti.
Accessorio non adatto.
Volume degli ingredienti eccessivo. Ridurre la quantità degli ingredienti.
La guarnizione non è presente.
La guarnizione è rotta o deteriorata.
Accessorio non adatto.
Al primo utilizzo dell'apparecchio, o
in caso di sovraccarico del motore
causato da una quantità eccessiva di
ingredienti o da pezzi troppo duri o
troppo grandi.
Sovraccarico del motore causato da una
quantità eccessiva di ingredienti o da
pezzi troppo duri o troppo grandi, o da
una concatenazione di ricette senza un
tempo di raffreddamento sufficiente.
Surriscaldamento del sensore termico: il
recipiente è vuoto o con una quantità
di ingredienti insufficiente.
La resistenza riscaldante non funziona.
Blocco non corretto del recipiente o del
coperchio blocco motore.
Sovraccarico del motore.
Posizionare l'apparecchio su una
superficie piana.
Verificare che l'accessorio installato
sia adatto.
Posizionare la guarnizione sul portaguarnizione e fissare l'insieme sul
coperchio blocco motore.
Sostituire la guarnizione; contattare un
centro di assistenza autorizzato.
Verificare che l'accessorio installato
sia adatto.
Lasciare che il motore si raffreddi (circa
30 minuti) e ridurre la quantità di
ingredienti nel recipiente.
Lasciare che il motore si raffreddi
(circa 30 minuti) e ridurre la quantità
di ingredienti nel recipiente;
controllare che il programma in uso sia
corretto, che l'accessorio sia adatto;
ricordarsi non superare la capacità
dell'apparecchio.
Aggiungere degli ingredienti nel
recipiente.
Verificare che i contatti di
alimentazione sotto il recipiente non
siano sporchi. In tal caso, pulirli e
riprovare. Se il malfunzionamento
persiste, contattare un centro di
assistenza.
Verificare che il recipiente sia
posizionato correttamente sulla base e
che il gruppo coperchio blocco motore
sia posizionato sul recipiente (il
simbolo del lucchetto scomparirà).
Lasciare che il motore si raffreddi (circa
30 minuti) e ridurre la quantità di
ingredienti nel recipiente; controllare
che il programma in uso sia corretto e
che l'accessorio sia adatto.
Se il problema persiste (indicatore del
lucchetto acceso) e si è certi che tutto
è assemblato correttamente, contattare
un centro di assistenza.
79
Page 87

RICETTA
Patè marmite
Per 2/4 persone – Preparazione 10 min - Cottura 2 ore
Accessori e programmi utilizzati :
- Coltello tritatutto
- Programma turbo / Programma stufati P5
300g di petto di maiale (scotennato e disossato) • 1 cipolla • 1 spicchio d’aglio • 2cl d’olio • 5cl
di vino bianco • 5cl di Armagnac • 1 cucchiaino di spezie Rabelais® (o di miscela di 5 spezie) • 5g
di sale • 1g di sale.
1. Sbucciare l’aglio e la cipolla e tagliarli in quattro. Tagliare il petto di maiale a cubetti grossi.
2. Mettere l’aglio e la cipolla nel recipiente munito di coltello tritatutto.
Frullare a velocità turbo per 15 sec.
3. Mettere l’olio, il petto di maiale e tutti gli altri ingredienti nel recipiente. Lanciare il programma
P5 per 2 ore.
4. A cottura terminata, porre la carne in una terrina ed eliminare una parte del grasso dalla superficie.
Suggerimento :
Lasciare una quantità di grasso sufficiente a tenere salda la terrina.
RICICLAGGIO
• Eliminazione dei materiali di imballaggio e dell’apparecchio
L’imballaggio si compone esclusivamente di materiali non dannosi per l’ambiente
che possono essere smaltiti conformemente alle disposizioni in vigore in materia di
riciclaggio.
Per lo smaltimento dell’apparecchio rivolgersi presso il centro servizi apposito della
propria zona.
• Prodotti elettrici o elettronici da smaltire
Contribuiamo alla salvaguardia dell’ambiente!
Questo apparecchio è composto da diversi materiali che possono essere smaltiti o
riciclati.
Per lo maltimento rivolgersi ad un centro per la raccolta differenziata.
IT
80
Page 88

DESCRIPCIÓN
A Base
A1 Columna trasera
B Panel de control:
B1 Selector de programa de guisos
B2 Selector de programa de sopas
B3 Selector de programa de cocción al
B4 Selector de programa de postres
B5 Selector de programa de recalentar
B6 Indicador de recalentamiento
B7 Selector de programa mixto
ES
B8 Selector de turbo
B9 Botón iniciar/parar/restablecer
B10 Selector +/-
C Pantalla LCD:
C1 Indicador de programas
C2 Indicador de duración del programa
C3 Indicador de bloqueo de seguridad
vapor
D Conjunto de la tapa-motor
D1 Tapa-motor
D1a Pata del pestillo
D2 Copela portajunta
D2a Muescas
D3 Junta de estanqueidad
E Eje de transmisión
F Jarra
F1 Asa de la jarra
G Accesorios:
G1 Cuchilla picadora
G2 Cuchilla amasadora/trituradora
G3 Mezclador
G4 Batidor
G5 Cesta para cocción al vapor
H Cable de alimentación desmontable
DATOS TÉCNICOS DEL APARATO
Potencia: 1000 W (resistencia eléctrica: 600 W / motor: 400 W)
Margen de tiempo en funcionamiento: De 10 s a 2 h 30 min
Número de velocidades: 3 velocidades – 1 velocidad intermitente
81
Page 89

CONSEJOS DE SEGURIDAD
Con respecto a la seguridad de la
persona
• Lea atentamente las instrucciones
de uso antes de utilizar por primera
vez el aparato y guárdelas: un uso
no conforme con las instrucciones
de uso eximiría al fabricante de
cualquier responsabilidad.
• Desconecte siempre el aparato de
la corriente eléctrica si se deja sin
supervisión o antes de montarlo/
desmontarlo o limpiarlo. No permita
que los niños utilicen el aparato sin
la supervisión de un adulto.
• La temperatura de las superficies
• Los niños no deben utilizar el
aparato. Mantenga el aparato y el
cable de alimentación fuera del
• El aparato no debe ponerse en
alcance de los niños.
• Este aparato no está diseñado
para ser utilizado por personas
(incluidos los niños) cuyas
• No utilice el aparato si este no
capacidades físicas, sensoriales
o mentales sean reducidas, o por
personas con falta de experiencia
o de conocimientos, salvo si estas
• Si el cable de alimentación se
están vigiladas por una persona
responsable de su seguridad o si
han recibido instrucciones relativas
al uso del aparato. Se recomienda
vigilar a los niños para asegurarse
de que no juegan con el aparato.
• El aparato no debe sumergirse. No
• Mantenga el aparato fuera del
alcance de los niños.
• Algunas partes (p.
ej., superficie inoxidable
de la jarra, partes
metálicas debajo de
la jarra, copela portajunta) se
calientan cuando el aparato está en
funcionamiento y pueden ocasionar
quemaduras. Manipule el aparato
por las partes de plástico que no
están calientes (asas, tapa-motor).
La luz indicadora roja le indica que
el aparato está caliente y puede
sufrir quemaduras.
accesibles puede aumentar cuando
el aparato esté en funcionamiento.
marcha mediante un temporizador
exterior ni por un sistema de mando
a distancia externo.
funciona correctamente, si está
dañado o si el cable de alimentación
o el enchufe están dañados.
daña, deberá ser reemplazado por
otro cable o componente especial
disponible a través del fabricante o
de su servicio de postventa (ver la
lista en la libreta de servicios).
pase la tapa-motor (D1) por el
agua del grifo.
ES
82
Page 90

• Este aparato se destina únicamente
a un uso doméstico en el hogar y
a una altitud inferior a 2000 m.
El fabricante declina cualquier
responsabilidad y se reserva el
derecho a rescindir la garantía
en caso de un uso comercial o
inadaptado, o de no respetar las
consignas.
• Este aparato no está diseñado
ES
para ser utilizado en aplicaciones
domésticas y similares (uso no
cubierto por la garantía) tales como
– zona de trabajo de cocina en
almacenes, oficinas y otros
entornos profesionales,
– zonas de cocina reservadas para
el personal de almacenes, oficinas
y otros entornos profesionales,
– granjas,
– uso por parte de clientes de
hoteles, moteles y otros entornos
con carácter residencial.
– lugares como habitaciones de
huéspedes.
• El vapor desprendido por
su aparato puede ocasionar
quemaduras.
Manipule la copela portajunta
con cuidado (si es necesario,
utilice guantes, manoplas, etc.).
• No haga funcionar el aparato si la
junta no está puesta en la copela.
Atención: corre el riesgo de sufrir
heridas si utiliza incorrectamente
el aparato.
Tenga cuidado con la cuchillas
picadora (G1) y la cuchilla
amasadora/trituradora (G2) cuando
las limpie y cuando vacíe la jarra,
dado que están muy afiladas.
Debe vigilar si vierte un líquido
caliente en el robot de cocina, ya
que puede salir del aparato debido
a una ebullición repentina.
Guarde la cuchilla picadora (G1) en
la jarra después de cada uso.
ADVERTENCIA: Tenga cuidado al
manipular el aparato (limpieza,
llenado y vertido): evite salpicar el
líquido en los conectores.
ADVERTENCIA: El aparato desprende
vapor que puede provocar
quemaduras.
ADVERTENCIA: La superficie del
elemento calefactor presenta un
calor residual después del uso.
Procure hacer contacto solamente
con el asa (F1) del producto durante
el calentamiento o hasta que éste
se haya enfriado por completo.
Consulte el manual de instrucciones
para saber cómo ensamblar y montar
los accesorios en el aparato
Consulte el manual de instrucciones
para saber cómo limpiar y mantener
el aparato.
83
Page 91

Siga siempre las instrucciones de
limpieza para limpiar el aparato:
• Desenchufe el aparato.
• No limpie el aparato en caliente.
• Limpie el aparato con un paño o
una esponja húmeda.
• Nunca sumerja el aparato en agua
ni bajo el agua corriente
SOLO MERCADOS EUROPEOS
• Mantenga el aparato y su cable
fuera del alcance de los niños de
menos de 8 años.
Los niños no deben utilizar el
aparato como un juguete.
• Este aparato puede ser utilizado por
personas con capacidades físicas,
sensoriales o mentales reducidas o
cuya experiencia o conocimientos
no sean suficientes, siempre que
sean vigiladas o que hayan recibido
instrucciones relativas al uso seguro
del aparato y que comprendan bien
los posibles peligros.
• Este aparato puede ser utilizado
por niños de al menos 8 años
siempre que sean vigilados o
que hayan recibido instrucciones
relativas al uso seguro del aparato
y que comprendan bien los peligros
implicados. La limpieza y el
mantenimiento no los han de llevar
a cabo niños sin vigilancia, salvo
que tengan 8 años como mínimo y
estén supervisados por un adulto.
Con respecto a la conexión eléctrica
• El aparato debe enchufarse a una
toma conectada a tierra.
• Este aparato está diseñado para
funcionar únicamente con corriente
alterna. Asegúrese de que la
tensión de alimentación señalada
en la placa indicadora del aparato
se corresponde efectivamente con
la de la instalación eléctrica.
• Cualquier error en la conexión
ES
anulará la garantía.
• No tire nunca del cable de
alimentación para desconectarlo.
• No deje nunca el cable de
alimentación cerca o en contacto
con las partes calientes de su
aparato, cerca de una fuente de
calor o de un ángulo cortante.
Con respecto a un uso incorrecto
• No toque la tapa antes de que
el aparato se haya detenido
completamente (botón “stop”),
espere a que los alimentos
mezclados dejen de girar.
• Añada siempre los ingredientes
sólidos en la jarra antes de verter
los ingredientes líquidos (Img. 12),
procurando no rebasar la línea de
nivel máximo (MAX) grabada en el
interior de la jarra (Img. 13). Si la
jarra está demasiado llena, el agua
hirviendo podría ser expulsada.
84
Page 92

• Preste atención en el programa
de cocción al vapor y respete los
niveles de agua indicados en la
jarra (Img. 14).
• No introduzca nunca los dedos
ni ningún otro objeto en el bol
mientras el aparato se encuentre en
funcionamiento.
• No utilice el bol como recipiente
(conservación, congelación,
ES
esterilización).
• Coloque el aparato en un lugar
estable, resistente al calor, limpio
y seco.
• No coloque el aparato cerca
de un muro o de un mueble: el
vapor generado puede dañar los
elementos.
• No coloque el aparato cerca de una
fuente de calor en funcionamiento
(placa de cocción, aparato
electrodoméstico, etc.).
• No cubra la tapa con un paño u otra
cosa.
• No introduzca nunca los accesorios
en un microondas.
• No utilice el aparato al aire libre.
• No sobrepase nunca la cantidad
máxima indicada en las
instrucciones.
• Guarde el aparato cuando se haya
enfriado.
Servicio posventa
• Para su seguridad, no utilice
accesorios ni piezas de recambio
distintos a los suministrados por
los centros de servicio posventa
autorizados.
• Cualquier intervención por parte
del cliente diferente de la limpieza
y el mantenimiento deberá llevarse
a cabo en un centro de servicio
autorizado.
• Consulte el cuadro “¿Qué hacer si
su aparato no funciona?” al final de
las instrucciones de uso.
85
Page 93
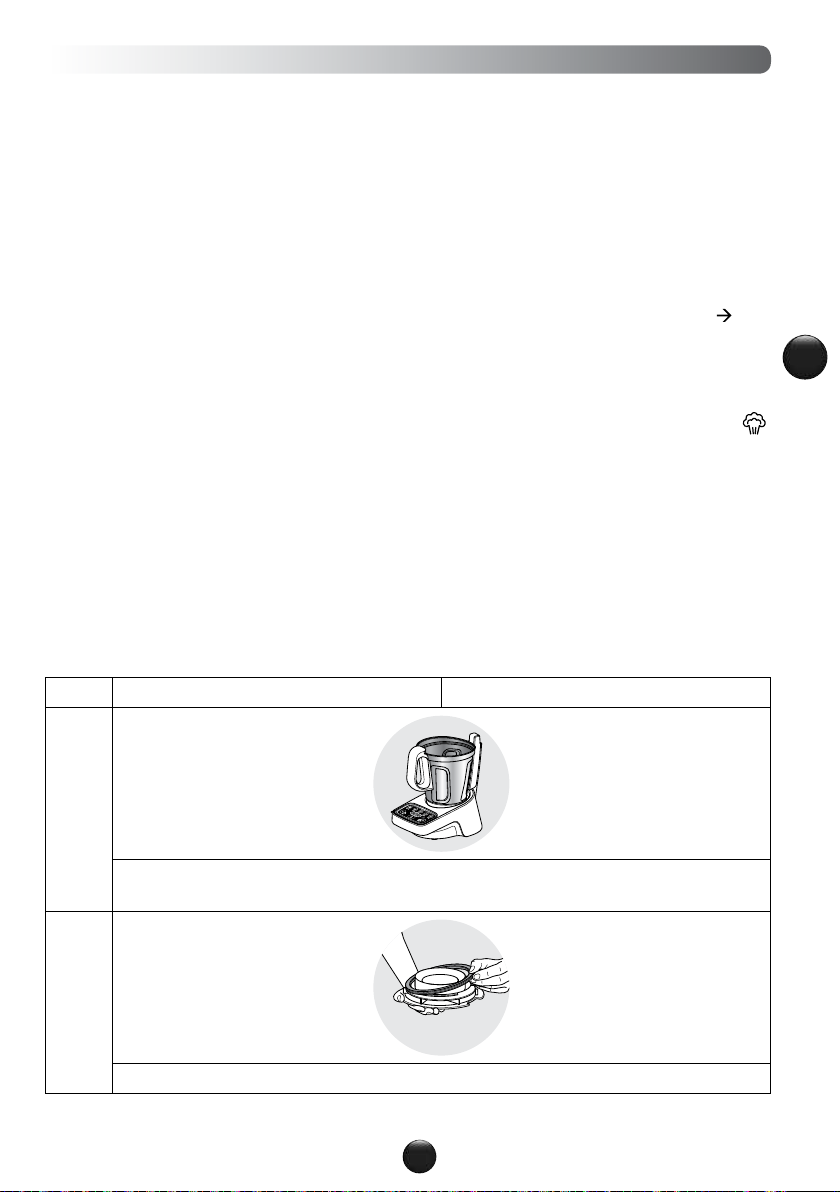
PRIMER USO DEL APARATO
Antes de usar por primera vez:
• Lea atentamente este manual de instrucciones.
Al ojearlo, podrá entrever en los consejos de
utilización el potencial de su aparato: guisos,
cocciones al vapor, postres, así como la
posibilidad de recalentar sus comidas.
• Consérvelo para consultas posteriores: una
utilización que no acate los riesgos de
operación eximirá al fabricante de cualquier
responsabilidad.
• Asegúrese de retirar todos los materiales de
embalaje del producto.
• Lave las diferentes partes con agua jabonosa:
jarra, accesorios, eje de transmisión, copela y
junta (D2, D3, E, F, G) (véase § LIMPIEZA en
el manual de instrucciones).
• Procure no poner bajo el agua la tapa (D1) con
el motor ni la base (A) (Img. 16).
• Instalación del conjunto de la tapa:
La tapa del producto está constituida por tres elementos: la tapa-motor (D1), la copela (D2)
y la junta de estanqueidad (D3).
El conjunto de estos tres elementos se entrega ya ensamblado.
Para usos posteriores, puede montar la tapa de dos maneras:
Primer uso del aparato: instalación de la
jarra, los accesorios y la tapa
Su aparato incorpora un cable de alimentación
desmontable (H). Conéctelo primero a la base y
enchúfelo a continuación a la toma de corriente
(Img. 1).
• Instalación de la jarra y los accesorios
1. Coloque la jarra (F) sobre la base del aparato
(A) agarrándola desde el asa (F1) (Img. 2).
2. Coloque el accesorio elegido (G1
en el eje de transmisión (E) (Img. 3) e
introdúzcalo a continuación en la jarra (F)
(Img. 4).
Para utilizar la cesta de cocción al vapor
(G5), llene la jarra (F) hasta el nivel
que equivale a 0,4 L de líquido (agua, salsa,
etc.) (Img. 13), antes de colocar la cesta en
su interior (Img. 14).
3. Añada los ingredientes en la jarra (F) o en la
cesta de cocción al vapor (G5).
G5)
ES
,
Paso Escenario 1 Escenario 2
1
Coloque la jarra (F) sobre la base del aparato (A) agarrándola desde el asa (F1) (Img.
2).
2
Coloque la junta de estanqueidad (D3) en el portajunta de la copela (D2) (Img. 19).
86
Page 94

ES
“click”
Paso Escenario 1 Escenario 2
3
Acople la copela (D2) a la tapa-motor
(D1), procurando que la pestaña (D1a) de
la tapa-motor se encuentre en la muesca
(D2a) de la copela (D2), y presione hasta
que escuche un “clic” (Img. 5). La copela
está ahora instalada en su lugar.
Coloque la copela (D2) en la jarra
procurando que las muescas (D2a) de
la copela (D2) bordeen el asa (F1) y la
columna trasera (A1) (Img. 20).
4
Coloque el conjunto de la tapa-motor (D1,
D2+D3) sobre la jarra (F) procurando que:
- El símbolo de “candado abierto”
apunte hacia al asa (Img. 6).
- Las muescas (D2a) de la copela bordeen
el asa (F1) y la columna trasera (A1)
(Img. 7).
5
Cierre la tapa de tal manera que el símbolo de “candado cerrado” apunte hacia el
asa (F1): Para ello, gire con una mano el conjunto de la tapa hacia la derecha para
desplazar la pata del pestillo (D1a) de la tapa-motor hasta el asa (F1) y, con la otra
mano, acompañe la parte trasera de la tapa para desplazar la segunda pata del pestillo
(D1a) hasta la columna trasera (A1) de la base (A) (Img. 8).
Ponga la tapa-motor (D1) sobre la copela
(D2), procurando que el símbolo de
“candado abierto” apunte hacia el asa
(F1), y presione hasta que se escuche un
“clic” (Img. 21).
87
Page 95

! La instalación de la tapa sólo debe efectuarse si la junta está instalada en el portajunta
de la copela (Img. 19) y la copela está asegurada a la tapa-motor.
• Puesta en marcha
1. Seleccione el programa automático deseado
(B1, B2, B3, B4, B5, B7) pulsando el
botón correspondiente (Img. 9). Para
seleccionar diferentes subprogramas, pulse
reiteradamente el botón del programa para
navegar por los subprogramas (p. ej., sopa P1
= 1 pulsación; sopa P2 = 2 pulsaciones, etc.).
2. Pulse el botón iniciar/parar/restablecer (B9)
para iniciar el programa (Img. 10).
El aparato sólo se pondrá en marcha si la jarra
está correctamente instalada en la base y el
conjunto de la tapa-motor está bien posicionado
en la jarra.
Cuando no se instale correctamente la
jarra o se cierre bien la tapa, el panel de
control comenzará a parpadear al tratar de
iniciar un programa (Img. 11).
Desmontaje del conjunto de la tapa:
1. Desbloquee el conjunto de la tapa girándolo
hacia la izquierda de manera que el símbolo
del candado abierto apunte hacia el asa
(Img. 22).
2. Levante la tapa con una mano y tire con la
otra de la copela para separar la tapa-motor
(Img. 18).
3. Retire la junta (Img. 19).
ES
88
Page 96

ACCESORIOS, PROGRAMAS Y CANTIDADES
ES
CUCHILLA PICADORA
MEZCLADOR
CANTIDADES
(máx.)
Batir sopas 1,5 L 1 min 30 s
Batir compotas 1 kg 1 min
Batir batidos 1,5 L 2 min
Picar verdura 500 g 15 s
Picar carne 300 g 30 s
Picar pescado 500 g 15 s
Dorar 200 g 5 min -
Guisos 1,2 L 45 min -
Risottos 1,2 L 30 min -
Clara a punto de nieve
5 max
DURACIÓN
(máx.)
2 min 30 s
P3
P3
P3
P3
P3
P3
P2
PROGRAMAS
AUTOMÁTICOS
P1 o P2
-
-
-
P5
-
P1
P4
P3
-
BATIDOR
CUCHILLA AMASADORA/TRITURADORA
AL VAPOR
CESTA DE COCCIÓN
Salsa (p. ej., besamel) 0,6 L 12 min -
Mezclar masas ligeras 600 g 30 s -
Picar avellanas 500 g 1 min
Triturar hielo
Masa para crepes, gofres 1,2 L 30 s -
Cocción al vapor de
verduras, pescados o carnes
6 a 10
600 g 30 min -
30 s
89
P3
P4
P2-P3
P1
-
-
P1
P1
Page 97

PROGRAMAS AUTOMÁTICOS Y SUBPROGRAMAS
Programas automáticos:
La velocidad, la temperatura de cocción y la duración están preprogramados para preparar sopas,
guisos, cocciones al vapor y postres automáticamente, o para recalentar sus comidas. El tiempo de
cocción (B10) es un parámetro ajustable y puede ser aumentado o reducido a su gusto.
Qué se puede preparar con los programas automáticos del panel de control (B)
Preparación de guisos y salsas.
(En los programas P1, P2, P3,
P4, P5)
Preparación de sopas
(En los programas P1, P2)
Cocciones al vapor
No utilice el accesorio batidor (G4) con preparaciones demasiado líquidas cuya
cantidad sea superior a 1 litro, dado que se pueden producir salpicaduras en el exterior
de la jarra.
Información de los programas automáticos y sus subprogramas
Slow cook
P1
Slow cook
P2
Slow cook
P3
Slow cook
P4
Slow cook
P5
Velocidad
(no ajustable)
Lenta
Lenta discontinua y
después continua
Lenta discontinua
Ninguna
Rápida 15 s y después
lenta discontinua
Tiempo por
defecto
(ajustable)
5 min
(1 a 10 min)
20 min
(5 min a 2 h
30 min)
30 min
(5 min a 2 h
30 min)
45 min
(5 min a 2 h
30 min)
60 min
(5 min a 2 h
30 min)
Temperatura por
defecto
(no ajustable)
120 °C NO
80 °C 45 min
90 °C 45 min Risotto
95 °C 45 min
95 °C 45 min Paté marmita
Preparación de postres
(En los programas P1, P2, P3,
P4)
Recalentar comidas
Claras al punto de nieve, carne
picada, hielo triturado
(En los programas P1, P2, P3,
P4)
Mantenimiento
del calor
Ejemplo de
recetas
Cebollas
doradas
Salsa de
tomate
Guiso de
pescado al
azafrán
ES
90
Page 98

ES
Soup P1
Soup P2
Steam P1
Dessert P1
Dessert P2
Dessert P3
Dessert P4
Recalentar
Mix P1
Mix P2
Mix P3
Mix P4
Velocidad
(no ajustable)
Sin velocidad durante
la cocción, seguido de
10 pulsos, y por último
velocidad elevada durante
2 minutos tras la cocción
Sin velocidad durante
la cocción y velocidad
moderada durante 15
segundos tras la cocción
Ninguna
Rápida y discontinua, y
después continua
Lenta discontinua
Lenta discontinua y
después continua
Ninguna, después lenta
y discontinua durante la
cocción
Lenta discontinua
Lenta
Moderada
Rápida
Rápida discontinua
Tiempo por
defecto
(ajustable)
35 min
(5 min a 1 h)
38 min
(5 min a 1 h)
30 min
(5 min a 1 h)
30 s
(10 s a 1 min)
10 min
(1 a 30 min)
20 min
(10 min a
1 h)
15 min
(5 min a 1 h)
15 min
(3 a 30 min)
2 min
(30 s a 5 min)
5 min
(1 a 10 min)
1 min
(10 s a 1 min
30 s)
30 s
(10 s a 1 min)
Temperatura por
defecto
(no ajustable)
100 °C 45 min
100 °C 45 min
100 °C 45 min
Ninguna NO
55 °C NO
90 °C NO
100 °C NO
80 °C NO
Ninguna NO
Ninguna NO
Ninguna NO
Ninguna NO
Mantenimiento
del calor
Ejemplo de
recetas
Crema de
calabacín
Crema de
zanahorias/
patatas
Brócoli al
vapor
Cuatro
cuartos
Fondue de
chocolate
Arroz con
leche
Compota de
manzana
Recalentar
una sopa
Huevos
rellenos de
atún
Clara en
punto de
nieve
Ternera
picada
Hielo
triturado
91
Page 99

UTILIZACIÓN MANUAL DEL PANEL DE CONTROL (B):
Este modo permite ajustar el tiempo de cocción para personalizarlo a su gusto.
• Utilización de los programas manuales del panel de control (B)
Este botón dispone de 4 funciones:
- Iniciar/parar
- “Validación” al elegir el programa automático.
- “Pausa” durante la utilización del aparato una vez iniciado el programa.
- “Reinicio” de los parámetros seleccionados presionando durante 2 segundos
(restablecer).
Ajuste del tiempo de funcionamiento: Seleccione el programa deseado y ajuste la
duración aumentando o reduciendo el tiempo de cocción.
Este modo permite mezclar manualmente la preparación.
ES
• Utilización de la cesta de cocción al vapor
Para cocinar al vapor con la cesta es necesario
verter 0,4 L de agua en la jarra (hasta la marca
de referencia de la jarra ) (Img. 13).
Los tiempos de cocción se proporcionan a título
indicativo para tratar de obtener una cocción
satisfactoria en la mayoría de los casos.
No obstante, algunas condiciones pueden influir
Cuadro de cantidades y tiempo de cocción al vapor
Tiempo de cocción al vapor
Ingredientes Cantidades (máx.)
Patatas
Zanahorias 600 g 40 min
Calabacines 600 g 25 min
Chirivía 600 g 30 min
Tallos blancos de puerros 500 g 25 min
Judías verdes 400 g 35 min
Brócoli 300 g 20 min
Pescados (frescos o
descongelados)
Carne blanca 400 g 25 min
600 g (lavadas previamente
en los tiempos de cocción:
–El tamaño de las verduras (troceadas o sin
trocear).
–La cantidad de ingredientes en la cesta.
–La variedad de verduras y su madurez.
–La cantidad de agua en la jarra debe
corresponder con la graduación
Si no se cuece lo suficiente, puede prolongar el
tiempo de cocción.
Tiempos de cocción
con agua)
500 g 15 min
(0,4 L).
estimados
30 min
Algunas recetas podrían causar derrames inesperados debido a la aparición de burbujas, sobre
todo cuando se cocina con verduras congeladas. En tales casos, es necesario reducir el volumen.
92
Page 100

BLOQUEO DE SEGURIDAD DEL APARATO
Su aparato está equipado de serie con
protecciones electrónicas del motor a fin de
garantizar su longevidad. Este dispositivo de
seguridad electrónico garantiza que el motor
esté totalmente protegido contra cualquier uso
poco habitual.
En condiciones de uso intensivas, o al hacer
recetas personales (Internet u otras fuentes),
en las que no se respeten las recomendaciones
del manual (véase § “ACCESORIOS, PROGRAMAS
Y CANTIDADES”: cantidades demasiado
grandes, un funcionamiento demasiado
prolongado, y/o demasiadas recetas preparadas
ES
consecutivamente), la protección electrónica se
puede activar con el fin de preservar el motor.
En dichos casos, el aparato se detendrá y “SECU”
se mostrará en la pantalla LCD del panel de
control para indicar que el aparato ha dejado de
funcionar momentáneamente.
LIMPIEZA DEL APARATO
• El aparato no deberá sumergirse en
el agua. No ponga la base (A) ni la
tapa-motor (D1) bajo el agua del
grifo (Img. 16).
Desenchufe el aparato una vez que termine de
utilizarlo.
• Desbloquee el conjunto de la tapa-motor
(D1+D2) de la jarra (F) girándolo hacia la
izquierda hasta que el símbolo del “candado
abierto” apunte hacia el asa.
• Tire de la copela (D2) para separarla del motor
(Img. 18).
• Retire la junta (D3) de la copela (Img. 19).
• Lave la jarra después de usarla.
• Separe la jarra (F) de la base (A) agarrándola
del asa (F1).
• Coloque la jarra sobre una superficie plana.
• Una vez enfriadas las piezas:
–Tenga cuidado con las hojas de la cuchilla
picadora (G1) y la cuchilla amasadora/
trituradora (G2) cuando limpie o vacíe la
jarra, dado que están muy afiladas.
Si “SECU” aparece en el panel e control y su
aparato está apagado, proceda de la siguiente
manera:
• Deje el aparato enchufado.
• Consulte los consejos de uso del manual
de instrucciones para adaptar las recetas
cantidades de ingredientes, tiempos de cocción
y tipos de accesorios; (véase § “Accesorios,
programas y cantidades”).
• Espere media hora a que el motor se enfríe.
• Vuelva a encender el aparato manteniendo
pulsado el botón “Start / Stop / Reset” (B9)
durante 2 segundos.
Su aparato está nuevamente listo para su uso.
El servicio al consumidor queda a su disposición
para cualquier consulta (ver la información de
contacto en la cartilla de garantía).
–Limpie la jarra (F), el eje de transmisión
(E), el accesorio instalado (G1, G2, G3, G4,
G5), la copela (D2) y la junta (D3) con una
esponja y agua caliente jabonosa.
• Enjuague los diferentes elementos bajo el agua
del grifo.
• Para facilitar su limpieza, la jarra, la copela,
la junta, el eje de transmisión y los accesorios
pueden ser lavados en el lavavajillas (Img.
15).
• En caso de restos incrustados o manchas
en la jarra, puede utilizar el lado áspero de
una esponja humedecida, si es necesario,
en vinagre blanco o productos de limpieza
apropiados para el acero inoxidable.
• En caso de estar muy sucios, déjelos remojar
durante varias horas con agua y líquido
lavavajillas, y frote con una espátula o con el
lado áspero de una esponja si es necesario.
• Para limpiar la tapa-motor (D1) y la base (A),
utilice un paño húmedo. Séquelos bien.
93
 Loading...