

Page 1
MTH800
TETRA Handportable Terminal
Feature User Guide
6802972C35-O
11/08/2004
Page 2

Page 3

Contents
Safety Information . . . . . . . . . . . . . . . . . . . . . . . . . . . . 1
General Safety Information . . . . . . . . . . . . . . . . . . . . . . . . . . . . 1
Copyright Information . . . . . . . . . . . . . . . . . . . . . . . . . . . . . . . . 1
Product Specific Information . . . . . . . . . . . . . . . . . . . . . . . . . . . 2
Getting Started . . . . . . . . . . . . . . . . . . . . . . . . . . . . . . . 3
How to Use this Guide . . . . . . . . . . . . . . . . . . . . . . . . . . . . . . . 3
Installing the Battery . . . . . . . . . . . . . . . . . . . . . . . . . . . . . . . . . 4
Replacing the Battery . . . . . . . . . . . . . . . . . . . . . . . . . . . . . . . . 5
Charging the Battery . . . . . . . . . . . . . . . . . . . . . . . . . . . . . . . . . 5
Battery Capacity Information . . . . . . . . . . . . . . . . . . . . . . . 6
Battery Maintenance . . . . . . . . . . . . . . . . . . . . . . . . . . . . . 6
Attaching the Antenna
Controls and Indicators . . . . . . . . . . . . . . . . . . . . . . . . . . . . . . . 9
Powering On/Off (On-Off/End/Home Key) . . . . . . . . . . . . . . . . 11
Powering On (Emergency Button) . . . . . . . . . . . . . . . . . . . . . . 12
Powering On with Transmit Inhibit (TXI) Active . . . . . . . . . . . . . 12
Unlocking the MTH800 . . . . . . . . . . . . . . . . . . . . . . . . . . . . . . . 12
Locking/Unlocking the Keys/Buttons . . . . . . . . . . . . . . . . . . . . . 13
Selecting Your Network . . . . . . . . . . . . . . . . . . . . . . . . . . . . . . . 13
How to Hold Your MTH800 . . . . . . . . . . . . . . . . . . . . . . . . . . . . 13
Use in Low Audio (Phone, PABX, and Full-duplex
Private Calls) . . . . . . . . . . . . . . . . . . . . . . . . . . . . . . . . . . . 14
Use in High Audio (Group and Private Calls) . . . . . . . . . . 14
Lapel/Shoulder Use . . . . . . . . . . . . . . . . . . . . . . . . . . . . . 14
Speakerphone Use . . . . . . . . . . . . . . . . . . . . . . . . . . . . . . 14
Looking after your MTH800 . . . . . . . . . . . . . . . . . . . . . . . . . . . . 14
The Display . . . . . . . . . . . . . . . . . . . . . . . . . . . . . . . . . . . . . . . . 15
Home (Idle) Display . . . . . . . . . . . . . . . . . . . . . . . . . . . . . 15
Status Icons . . . . . . . . . . . . . . . . . . . . . . . . . . . . . . . . . . . 15
The LED Status Indicator . . . . . . . . . . . . . . . . . . . . . . . . . . . . . 17
Key, Knob, and Button Overview . . . . . . . . . . . . . . . . . . . . . . . 17
Soft Keys . . . . . . . . . . . . . . . . . . . . . . . . . . . . . . . . . . . . . . 17
Menu Key . . . . . . . . . . . . . . . . . . . . . . . . . . . . . . . . . . . . . 17
Rotary Knob . . . . . . . . . . . . . . . . . . . . . . . . . . . . . . . . . . . 18
. . . . . . . . . . . . . . . . . . . . . . . . . . . . . . 8
6802972C35-O
Page 4

Emergency Button . . . . . . . . . . . . . . . . . . . . . . . . . . . . . . 19
Function Keys . . . . . . . . . . . . . . . . . . . . . . . . . . . . . . . . . . . . . . 19
Speaker Control Key . . . . . . . . . . . . . . . . . . . . . . . . . . . . . 21
Aliases (Names) . . . . . . . . . . . . . . . . . . . . . . . . . . . . . . . . . . . . 21
Screen Saver . . . . . . . . . . . . . . . . . . . . . . . . . . . . . . . . . . . . . . 22
Home Display Text Message . . . . . . . . . . . . . . . . . . . . . . . . . . 22
Terminal Disable/Enable . . . . . . . . . . . . . . . . . . . . . . . . . . . . . . 23
Selecting TMO or DMO Operation . . . . . . . . . . . . . . . . . . . . . . 23
General . . . . . . . . . . . . . . . . . . . . . . . . . . . . . . . . . . . . . . . 23
Entering TMO or DMO . . . . . . . . . . . . . . . . . . . . . . . . . . . 24
TMO Calls . . . . . . . . . . . . . . . . . . . . . . . . . . . . . . . . . . . . . 24
DMO Calls . . . . . . . . . . . . . . . . . . . . . . . . . . . . . . . . . . . . . 25
Making Calls . . . . . . . . . . . . . . . . . . . . . . . . . . . . . . . . . . . . . . . 25
Modifying the Type of Call . . . . . . . . . . . . . . . . . . . . . . . . . . . . . 25
Receiving Calls . . . . . . . . . . . . . . . . . . . . . . . . . . . . . . . . . . . . . 25
Preemptive Calling . . . . . . . . . . . . . . . . . . . . . . . . . . . . . . . . . . 26
Receiving an Emergency Group Call during a Call . . . . . . 27
Receiving a Private PPC during a Call . . . . . . . . . . . . . . . 27
Broadcast Call . . . . . . . . . . . . . . . . . . . . . . . . . . . . . . . . . . . . . . 28
Ambience Listening (AL) . . . . . . . . . . . . . . . . . . . . . . . . . . . . . . 28
Cancelling a Call . . . . . . . . . . . . . . . . . . . . . . . . . . . . . . . . . . . . 29
Using In-call Features . . . . . . . . . . . . . . . . . . . . . . . . . . . . . . . . 29
Local Area Service . . . . . . . . . . . . . . . . . . . . . . . . . . . . . . . . . . 30
TMO Group Call . . . . . . . . . . . . . . . . . . . . . . . . . . . . . . 32
General . . . . . . . . . . . . . . . . . . . . . . . . . . . . . . . . . . . . . . . . . . . 32
Dual Microphone Feature . . . . . . . . . . . . . . . . . . . . . . . . . . . . . 33
Selecting a Group . . . . . . . . . . . . . . . . . . . . . . . . . . . . . . . . . . . 33
Using the Rotary Knob . . . . . . . . . . . . . . . . . . . . . . . . . . . 34
Using the Navigation Key . . . . . . . . . . . . . . . . . . . . . . . . . 34
Using Alphabetic Search . . . . . . . . . . . . . . . . . . . . . . . . . . 34
Using Folder Search . . . . . . . . . . . . . . . . . . . . . . . . . . . . . 34
Selecting a Folder . . . . . . . . . . . . . . . . . . . . . . . . . . . . . . . . . . . 35
Using the Navigation Key . . . . . . . . . . . . . . . . . . . . . . . . . 35
To Select a Folder . . . . . . . . . . . . . . . . . . . . . . . . . . . . . . . 35
“My Groups” Folder . . . . . . . . . . . . . . . . . . . . . . . . . . . . . . . . . . 35
Selecting My Groups . . . . . . . . . . . . . . . . . . . . . . . . . . . . . 35
Adding/Deleting Groups from My Groups . . . . . . . . . . . . . 35
ii
Page 5

Group Scrolling Configuration . . . . . . . . . . . . . . . . . . . . . . . . . . 35
Activating/deactivating Scanning . . . . . . . . . . . . . . . . . . . . . . . 36
Making a Group Call . . . . . . . . . . . . . . . . . . . . . . . . . . . . . . . . . 36
Receiving a Group Call . . . . . . . . . . . . . . . . . . . . . . . . . . . . . . . 37
General . . . . . . . . . . . . . . . . . . . . . . . . . . . . . . . . . . . . . . . 37
Receiving a Group Call in Idle Screen with Scan Off . . . . 38
Receiving a Group Call in Idle Screen with Scan On . . . . 38
Receiving a Group Call during an On-going Group Call . . 39
Receiving an Emergency Group Call . . . . . . . . . . . . . . . . 39
Receiving a Broadcast Call . . . . . . . . . . . . . . . . . . . . . . . . 39
Transmit Inhibit . . . . . . . . . . . . . . . . . . . . . . . . . . . . . . . . . . . . . 39
Dynamic Group Number Assignment (DGNA) . . . . . . . . . . . . . 40
DGNA Reception with Notification Message . . . . . . . . . . . 40
DGNA Reception without Notification Message . . . . . . . . 41
DMO Group Call . . . . . . . . . . . . . . . . . . . . . . . . . . . . . . 42
General . . . . . . . . . . . . . . . . . . . . . . . . . . . . . . . . . . . . . . . . . . . 42
Dual Microphone Feature . . . . . . . . . . . . . . . . . . . . . . . . . . . . . 42
“My Groups” Folder . . . . . . . . . . . . . . . . . . . . . . . . . . . . . . . . . . 42
Selecting the My Groups Folder . . . . . . . . . . . . . . . . . . . . 43
Adding/Deleting Groups from the My Groups Folder . . . . 43
Selecting a Group . . . . . . . . . . . . . . . . . . . . . . . . . . . . . . . . . . . 43
Selecting a Folder . . . . . . . . . . . . . . . . . . . . . . . . . . . . . . . . . . . 43
Making a DMO Group Call without Gateway . . . . . . . . . . . . . . 43
Making a DMO Group Call via Gateway . . . . . . . . . . . . . . . . . . 43
Receiving a DMO Group Call . . . . . . . . . . . . . . . . . . . . . . . . . . 45
Receiving an Emergency Group Call . . . . . . . . . . . . . . . . . . . . 46
Transmit Inhibit . . . . . . . . . . . . . . . . . . . . . . . . . . . . . . . . . . . . . 46
Exiting DMO . . . . . . . . . . . . . . . . . . . . . . . . . . . . . . . . . . . . . . . 46
Private Call . . . . . . . . . . . . . . . . . . . . . . . . . . . . . . . . . . 47
General . . . . . . . . . . . . . . . . . . . . . . . . . . . . . . . . . . . . . . . . . . . 47
Dual Microphone Feature . . . . . . . . . . . . . . . . . . . . . . . . . . . . . 47
Making a Private Call . . . . . . . . . . . . . . . . . . . . . . . . . . . . . . . . . . . . . 47
Other Ways of Dialing . . . . . . . . . . . . . . . . . . . . . . . . . . . . . . . . 48
Dialing via Contact List . . . . . . . . . . . . . . . . . . . . . . . . . . . 48
Short Number Dial . . . . . . . . . . . . . . . . . . . . . . . . . . . . . . 48
Recent Calls List . . . . . . . . . . . . . . . . . . . . . . . . . . . . . . . . 48
One-touch Dial . . . . . . . . . . . . . . . . . . . . . . . . . . . . . . . . . 49
Contents
iii
Page 6

Calling a Number in a Message . . . . . . . . . . . . . . . . . . . . 49
Receiving a Private Call . . . . . . . . . . . . . . . . . . . . . . . . . . . . . . 49
Making a Private PPC (Preemptive Priority Call) . . . . . . . . . . . 49
Call Queuing . . . . . . . . . . . . . . . . . . . . . . . . . . . . . . . . . . . . . . . 50
Phone and PABX Calls . . . . . . . . . . . . . . . . . . . . . . . . . 51
General . . . . . . . . . . . . . . . . . . . . . . . . . . . . . . . . . . . . . . . . . . . 51
Dual Microphone Feature . . . . . . . . . . . . . . . . . . . . . . . . . . . . . 51
Making a Phone or PABX Call . . . . . . . . . . . . . . . . . . . . . . . . . . . . . 51
Other Ways of Dialing . . . . . . . . . . . . . . . . . . . . . . . . . . . . . . . . 52
Dialing via the Contact List . . . . . . . . . . . . . . . . . . . . . . . . 52
Speed Dial . . . . . . . . . . . . . . . . . . . . . . . . . . . . . . . . . . . . 52
One-touch Dial . . . . . . . . . . . . . . . . . . . . . . . . . . . . . . . . . 52
DTMF Overdial . . . . . . . . . . . . . . . . . . . . . . . . . . . . . . . . . 53
Recent Calls List . . . . . . . . . . . . . . . . . . . . . . . . . . . . . . . . 53
Calling a Number in a Message . . . . . . . . . . . . . . . . . . . . 53
Answering a Phone or PABX Call . . . . . . . . . . . . . . . . . . . . . . . 53
Emergency Operation . . . . . . . . . . . . . . . . . . . . . . . . . 54
General . . . . . . . . . . . . . . . . . . . . . . . . . . . . . . . . . . . . . . . . . . . 54
Dual Microphone Feature . . . . . . . . . . . . . . . . . . . . . . . . . 54
Entering TMO or DMO . . . . . . . . . . . . . . . . . . . . . . . . . . . 54
Important Information . . . . . . . . . . . . . . . . . . . . . . . . . . . . 54
Emergency in TMO . . . . . . . . . . . . . . . . . . . . . . . . . . . . . . . . . . 54
Overview . . . . . . . . . . . . . . . . . . . . . . . . . . . . . . . . . . . . . . 54
Changing Folder or Group . . . . . . . . . . . . . . . . . . . . . . . . 55
Entering or Exiting Emergency Mode . . . . . . . . . . . . . . . . 55
Sending an Emergency Alarm . . . . . . . . . . . . . . . . . . . . . 56
Making an Emergency Group Call . . . . . . . . . . . . . . . . . . . . . 57
Hot Microphone Feature . . . . . . . . . . . . . . . . . . . . . . . . . . 57
Receiving an Emergency Group Call . . . . . . . . . . . . . . . . 58
Making an Emergency Private Call . . . . . . . . . . . . . . . . . . 58
Receiving an Emergency Private Call . . . . . . . . . . . . . . . . 59
Modifying the Type of Call . . . . . . . . . . . . . . . . . . . . . . . . 59
Emergency in DMO . . . . . . . . . . . . . . . . . . . . . . . . . . . . . . . . . . 59
General . . . . . . . . . . . . . . . . . . . . . . . . . . . . . . . . . . . . . . . . . . . 59
Changing Folder or Group . . . . . . . . . . . . . . . . . . . . . . . . 60
Making an Emergency Group Call . . . . . . . . . . . . . . . . . . 60
Receiving an Emergency Group Call . . . . . . . . . . . . . . . . 60
iv
Page 7

GPS Location Services . . . . . . . . . . . . . . . . . . . . . . . . 61
Enhancing GPS Performance . . . . . . . . . . . . . . . . . . . . . . . . . . 62
GPS Icon . . . . . . . . . . . . . . . . . . . . . . . . . . . . . . . . . . . . . . . . . . 63
GPS Enable/Disable . . . . . . . . . . . . . . . . . . . . . . . . . . . . . . . . . 63
Entering GPS Location Service . . . . . . . . . . . . . . . . . . . . . . . . . 64
Viewing Your Position . . . . . . . . . . . . . . . . . . . . . . . . . . . . 64
GPS Testpage . . . . . . . . . . . . . . . . . . . . . . . . . . . . . . . . . 65
Entering the Testpage . . . . . . . . . . . . . . . . . . . . . . . . . . . . 66
The Menu . . . . . . . . . . . . . . . . . . . . . . . . . . . . . . . . . . . . 69
To Enter the Menu Items . . . . . . . . . . . . . . . . . . . . . . . . . . . . . . 69
To Return to the Previous Level . . . . . . . . . . . . . . . . . . . . . . . . 69
To Exit the Menu Items . . . . . . . . . . . . . . . . . . . . . . . . . . . . . . . 70
Menu Icons . . . . . . . . . . . . . . . . . . . . . . . . . . . . . . . . . . . . . . . . 70
List of Menu Items . . . . . . . . . . . . . . . . . . . . . . . . . . . . . . . . . . . 71
Messages . . . . . . . . . . . . . . . . . . . . . . . . . . . . . . . . . . . . . . . . . 74
Contacts . . . . . . . . . . . . . . . . . . . . . . . . . . . . . . . . . . . . . . . . . . 74
General . . . . . . . . . . . . . . . . . . . . . . . . . . . . . . . . . . . . . . . 74
Contact Icons . . . . . . . . . . . . . . . . . . . . . . . . . . . . . . . . . . 74
Creating a Contact . . . . . . . . . . . . . . . . . . . . . . . . . . . . . . 75
Editing a Contact . . . . . . . . . . . . . . . . . . . . . . . . . . . . . . . . 76
Deleting a Number . . . . . . . . . . . . . . . . . . . . . . . . . . . . . . 76
Deleting a Contact . . . . . . . . . . . . . . . . . . . . . . . . . . . . . . 76
Checking Capacity . . . . . . . . . . . . . . . . . . . . . . . . . . . . . . 76
Security . . . . . . . . . . . . . . . . . . . . . . . . . . . . . . . . . . . . . . . . . . . 77
PIN Protect . . . . . . . . . . . . . . . . . . . . . . . . . . . . . . . . . . . . 77
Change Code . . . . . . . . . . . . . . . . . . . . . . . . . . . . . . . . . . 78
Locking/Unlocking the Keypad . . . . . . . . . . . . . . . . . . . . . 79
Air Encryption On/Off . . . . . . . . . . . . . . . . . . . . . . . . . . . . 79
Encryption Key Deletion . . . . . . . . . . . . . . . . . . . . . . . . . . 80
K Validity . . . . . . . . . . . . . . . . . . . . . . . . . . . . . . . . . . . . . . 80
SCK Validity . . . . . . . . . . . . . . . . . . . . . . . . . . . . . . . . . . . 81
Setup . . . . . . . . . . . . . . . . . . . . . . . . . . . . . . . . . . . . . . . . . . . . . 81
Entering the Setup Sub-menu . . . . . . . . . . . . . . . . . . . . . . 81
Setting the Vibrate Feature . . . . . . . . . . . . . . . . . . . . . . . . 81
Setting the Ring Style . . . . . . . . . . . . . . . . . . . . . . . . . . . . 82
Setting the Volume . . . . . . . . . . . . . . . . . . . . . . . . . . . . . . 83
Setting the Display’s Working Language . . . . . . . . . . . . . 83
Contents
v
Page 8

Setting Up the Data Function . . . . . . . . . . . . . . . . . . . . . . 83
Setting Group Audio . . . . . . . . . . . . . . . . . . . . . . . . . . . . . 84
Setting Tones . . . . . . . . . . . . . . . . . . . . . . . . . . . . . . . . . . 85
Display Features . . . . . . . . . . . . . . . . . . . . . . . . . . . . . . . . 86
Setting the Display’s Vertical Flip . . . . . . . . . . . . . . . . . . . 87
Setting the Text Size . . . . . . . . . . . . . . . . . . . . . . . . . . . . . 88
Setting the Screen Saver . . . . . . . . . . . . . . . . . . . . . . . . . 88
Setting the Backlight . . . . . . . . . . . . . . . . . . . . . . . . . . . . . 89
Setting the Wallpaper . . . . . . . . . . . . . . . . . . . . . . . . . . . . 89
Setting the Contrast . . . . . . . . . . . . . . . . . . . . . . . . . . . . . 90
Entering More... . . . . . . . . . . . . . . . . . . . . . . . . . . . . . . . . . . . . . 90
Entering Group Setup . . . . . . . . . . . . . . . . . . . . . . . . . . . . . . . . 90
Entering Scan . . . . . . . . . . . . . . . . . . . . . . . . . . . . . . . . . . . . . . 90
Setting Group Scanning . . . . . . . . . . . . . . . . . . . . . . . . . . 91
Viewing the Active Scan List . . . . . . . . . . . . . . . . . . . . . . . 92
Editing Scan Lists . . . . . . . . . . . . . . . . . . . . . . . . . . . . . . . 93
My Groups (TMO/DMO) . . . . . . . . . . . . . . . . . . . . . . . . . . . . . . 95
Selecting a Group from My Groups . . . . . . . . . . . . . . . . . 95
Adding a Group to My Groups . . . . . . . . . . . . . . . . . . . . . 95
Deleting a Group from My Groups . . . . . . . . . . . . . . . . . . 95
Deleting All Groups from My Groups . . . . . . . . . . . . . . . . 96
Viewing/Modifying Personal Information . . . . . . . . . . . . . . . . . . 96
Recent Calls . . . . . . . . . . . . . . . . . . . . . . . . . . . . . . . . . . . . . . . 96
Viewing Recent Calls . . . . . . . . . . . . . . . . . . . . . . . . . . . . 97
Storing Recent Calls to Contacts . . . . . . . . . . . . . . . . . . . 97
Deleting Recent Calls . . . . . . . . . . . . . . . . . . . . . . . . . . . . 98
Calling from Recent Calls . . . . . . . . . . . . . . . . . . . . . . . . . 98
Shortcuts . . . . . . . . . . . . . . . . . . . . . . . . . . . . . . . . . . . . . . . . . . 99
Help on Creating a Menu Shortcut . . . . . . . . . . . . . . . . . . 99
Creating Menu Shortcut . . . . . . . . . . . . . . . . . . . . . . . . . . 99
Viewing the Menu Shortcut List . . . . . . . . . . . . . . . . . . . . 99
Editing Shortcuts . . . . . . . . . . . . . . . . . . . . . . . . . . . . . . . . 99
Deleting Shortcuts . . . . . . . . . . . . . . . . . . . . . . . . . . . . . . . 100
Shortcut Display Messages . . . . . . . . . . . . . . . . . . . . . . . 100
Menu Shortcut Use . . . . . . . . . . . . . . . . . . . . . . . . . . . . . . 100
Networks . . . . . . . . . . . . . . . . . . . . . . . . . . . . . . . . . . . . . . . . . . 101
Entering the Networks Sub-menu . . . . . . . . . . . . . . . . . . . 101
vi
Page 9

Selecting Your Network . . . . . . . . . . . . . . . . . . . . . . . . . . 101
Selecting Trunked Mode . . . . . . . . . . . . . . . . . . . . . . . . . . 102
Selecting Direct Mode . . . . . . . . . . . . . . . . . . . . . . . . . . . . 102
Setting Transmit Inhibit (TXI) Mode . . . . . . . . . . . . . . . . . 102
GPS Location Services . . . . . . . . . . . . . . . . . . . . . . . . . . . . . . . 103
Messages . . . . . . . . . . . . . . . . . . . . . . . . . . . . . . . . . . . 104
General . . . . . . . . . . . . . . . . . . . . . . . . . . . . . . . . . . . . . . . . . . . 104
Sending a Text Message . . . . . . . . . . . . . . . . . . . . . . . . . 104
Receiving Messages . . . . . . . . . . . . . . . . . . . . . . . . . . . . . 105
Displaying Long Text Messages . . . . . . . . . . . . . . . . . . . . 105
Entering the Messages Sub-menu . . . . . . . . . . . . . . . . . . . . . . 106
New Message . . . . . . . . . . . . . . . . . . . . . . . . . . . . . . . . . . . . . . 106
Creating a Message . . . . . . . . . . . . . . . . . . . . . . . . . . . . . 106
Sending the Message . . . . . . . . . . . . . . . . . . . . . . . . . . . . 106
Using the Inbox . . . . . . . . . . . . . . . . . . . . . . . . . . . . . . . . . . . . . 107
Inbox Icons . . . . . . . . . . . . . . . . . . . . . . . . . . . . . . . . . . . . 107
Entering the Inbox . . . . . . . . . . . . . . . . . . . . . . . . . . . . . . . 107
Reading a Message in the Inbox . . . . . . . . . . . . . . . . . . . 108
New Message Received . . . . . . . . . . . . . . . . . . . . . . . . . . 108
Handling Messages . . . . . . . . . . . . . . . . . . . . . . . . . . . . . 108
Calling a Number in a Message . . . . . . . . . . . . . . . . . . . . . . . . 109
User Defined Templates . . . . . . . . . . . . . . . . . . . . . . . . . . . . . 110
Predefined Templates . . . . . . . . . . . . . . . . . . . . . . . . . . . . . . . . 110
Sending a Status Message to a Group . . . . . . . . . . . . . . . . . . . 112
Targeted Status . . . . . . . . . . . . . . . . . . . . . . . . . . . . . . . . . . . . . 112
Writing Text . . . . . . . . . . . . . . . . . . . . . . . . . . . . . . . . . . 114
Selecting the Text Entry Mode . . . . . . . . . . . . . . . . . . . . . . . . . 114
Adding Secondary to the List of Text Entry Modes . . . . . . . . . . 114
Selecting the Text Entry Method and Language . . . . . . . . . . . . 114
Icons . . . . . . . . . . . . . . . . . . . . . . . . . . . . . . . . . . . . . . . . . . . . . 115
TAP Display . . . . . . . . . . . . . . . . . . . . . . . . . . . . . . . . . . . . . . . 116
iTAP Display . . . . . . . . . . . . . . . . . . . . . . . . . . . . . . . . . . . . . . . 116
Keys Usage . . . . . . . . . . . . . . . . . . . . . . . . . . . . . . . . . . . . . . . . . . . . . 117
Other Keys . . . . . . . . . . . . . . . . . . . . . . . . . . . . . . . . . . . . 120
Writing in iTAP Alphanumeric . . . . . . . . . . . . . . . . . . . . . . . . . . 121
Word Locking . . . . . . . . . . . . . . . . . . . . . . . . . . . . . . . . . . 122
Writing in Numeric Mode . . . . . . . . . . . . . . . . . . . . . . . . . . . . . . 122
Contents
vii
Page 10

Writing in Symbol Mode . . . . . . . . . . . . . . . . . . . . . . . . . . . . . . 122
Writing in TAP Alphanumeric . . . . . . . . . . . . . . . . . . . . . . . . . . 122
Adding Words to the Dictionary . . . . . . . . . . . . . . . . . . . . . . . . . 123
What to do if... . . . . . . . . . . . . . . . . . . . . . . . . . . . . . . . . 124
Tones . . . . . . . . . . . . . . . . . . . . . . . . . . . . . . . . . . . . . . . 128
Appendix A. Accessories . . . . . . . . . . . . . . . . . . . . . . 132
Index . . . . . . . . . . . . . . . . . . . . . . . . . . . . . . . . . . . . . . . 134
Quick Reference Guide. . . . . . . . . . . . . . . . . . . . . . . . . 139
© Motorola Inc., 2004
MOTOROLA and the Stylized M Logo are registered in the U.S.
Patent and Trademark Office. All other product or service names are
the property of their respective owners.
viii
Page 11

Safety Information
General Safety Information
• This terminal meets the applicable safety standards if
used as prescribed. All operating and safety instructions
are to be followed carefully.
CAUTION! Before using this product, read the
operating instructions for safe usage contained in
the Product Safety and RF Exposure booklet,
Motorola Publication part number 6866537D38
(for Europe, Middle East and Africa regions) or
6804110J47/6804113J24 (for Asia and Pacific
regions), enclosed with your radio.
• Motorola recommends the usage of Motorola approved
accessories only.
• Only specialized workshops should be contacted for
installation, maintenance and repair work.
• Keep this User Guide and the Product Safety and RF
Exposure booklet in a safe place and make it available
to other operators, and in case, that the radio is passed
on to other people.
Safety
Copyright Information
The Motorola products described in this manual may include
copyrighted Motorola computer programs stored in semiconductor memories or other mediums. Laws in the United
States and other countries preserve for Motorola certain
exclusive rights for copyrighted computer programs, including the exclusive right to copy or reproduce in any form the
copyrighted computer program. Accordingly, any copyrighted
Motorola computer programs contained in the Motorola prod-
1
Page 12

ucts described in this manual may not be copied or reproduced in any manner without the express written permission
of Motorola. Furthermore, the purchase of Motorola products
shall not be deemed to grant either directly or by implication,
estoppel, or otherwise, any licence under the copyrights, patents, or patent applications of Motorola, except for the normal
non-exclusive royalty-free licence to use that arises by operation of the law in the sale of a product.
Product Specific Information
• Max. Voltage 4.2 V
• Max. Current 0.5 A
• Max. RF Power 1 Watt
• Max. Speaker Load 0.5 Watts at 8 Ohms
• Antenna Impedance 50 Ohms
• Operation Temperature Range -20
° C to +60° C
• Operating Time Continuous / Intermittent
Note: In general, the radio transmit and receive time
(operating cycle ti me ) is d etermined by the communic ation system. On overload, re spectively o n extensiv e use
beyond the systems s pecifications at high ambient temperatures, the radio is protected by its thermal control,
which cuts down the RF output power, thus red ucing
the radio coverage range.
2
Page 13
Getting Started
Congratulations on your purchase of the Motorola MTH800.
Enhanced TETRA features and state-of-the-art technology
help to keep you in constant touch with all of your work and
personal contacts.
You can operate your MTH800 in English, German, French,
Spanish, Dutch, or in a language defined by your Service
Provider. The default setting from factory is English. For more
information, please see “Setting the Display’s Working
Language” on page 83.
How to Use this Guide
This guide describes the MTH800 features as setup and preprogrammed at the factory.
Your Service Provider or your organisation may have
customised your MTH800 to optimise its use for your
individual needs. Check with your Service Provider or
organisation to find out the differences from this guide.
Throughout the text in this publication, you will notice the
following special notations used to highlight certain
information or items:
Getting Started
Example Description
or Select
More...> Networks >
TXI Mode > Activate
Contacts
On
Key presses are shown as a key symbol or in
bold print for soft key functions.
Indicates navigation in menu items.
Highlighted text indicates the selection.
Indicates the active setting.
3
Page 14
Example Description
Status Delivered Information appearing on the MTH80 0 display is
shown in special print.
<User Defined>
Indicates a prompt or message configured by
your Service Provider.
A Note contains additional information which is
relevant to the item feature.
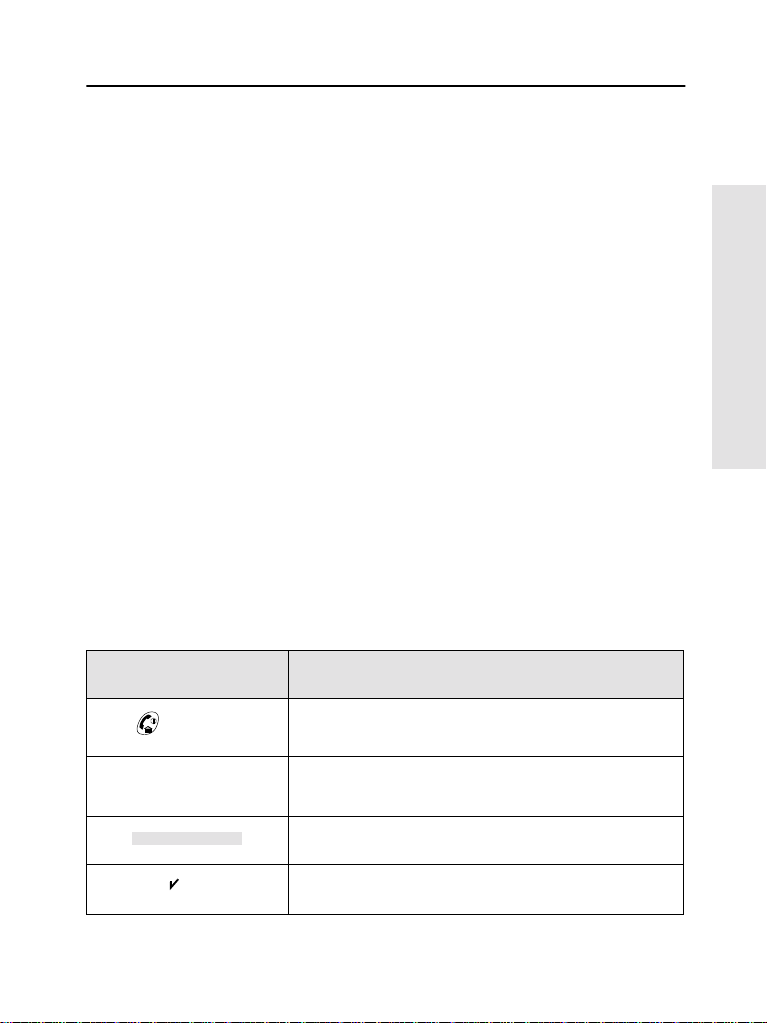
Installing the Battery
1. Remove the battery from its protective clear plastic case.
2. If necessary, remove the battery cover as shown below.
3. Insert the battery top into the compartment as illustrated.
4. Carefully press the battery silver bottom downward until it clicks
into place.
5. Replace battery cover.
4
Page 15
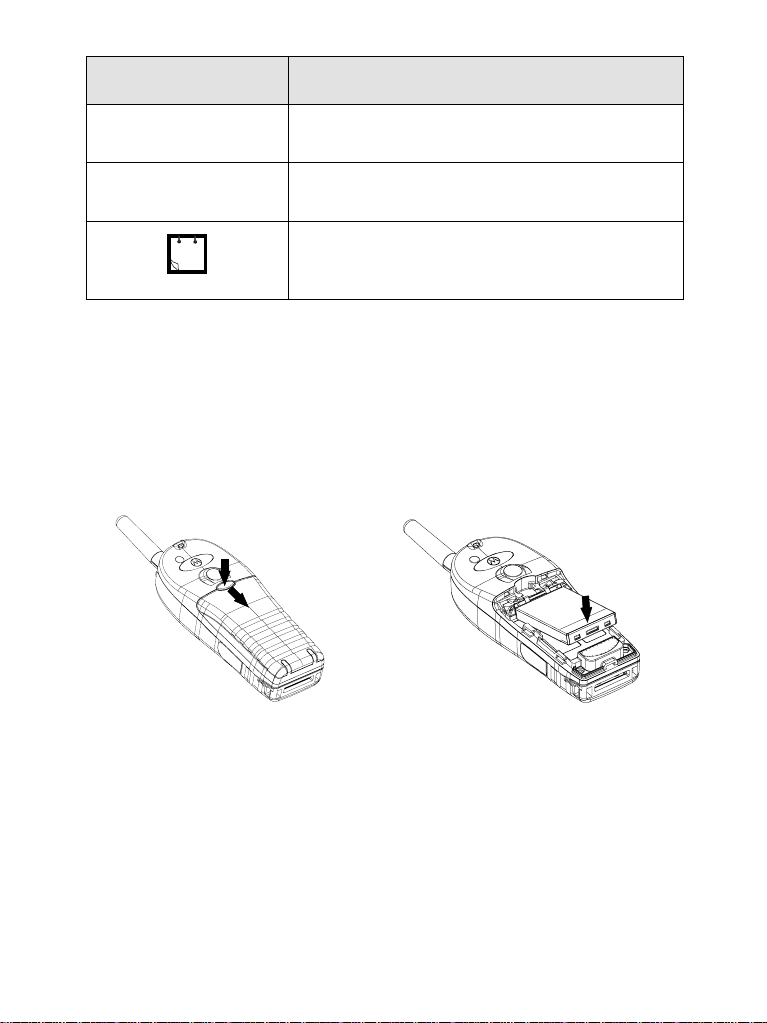
Replacing the Battery
1. To remove the battery cover, push down the cover button. Slide
the cover away.
2. Push retaining clip up and then lift the top of the battery out.
3. Replace the battery.
RETAINING CLIP
Charging the Battery
Motorola approved chargers provide optimum performance.
Other chargers may not fully charge your Motorola LithiumIon battery or may reduce the life of the battery.
The MTH800 can be either
1. Insert the connector on the charger into the socket at the base
of the MTH800. Select the required plug adapter (UK or European type) and connect to the charger. Then plug the charger
into a suitable mains socket.
2. The MTH800 displays the Charger Connected message only
if the MTH800 is On when conne cting the cha r ge r. If the
MTH800 is Off, the display shows an icon of the battery in
charging.
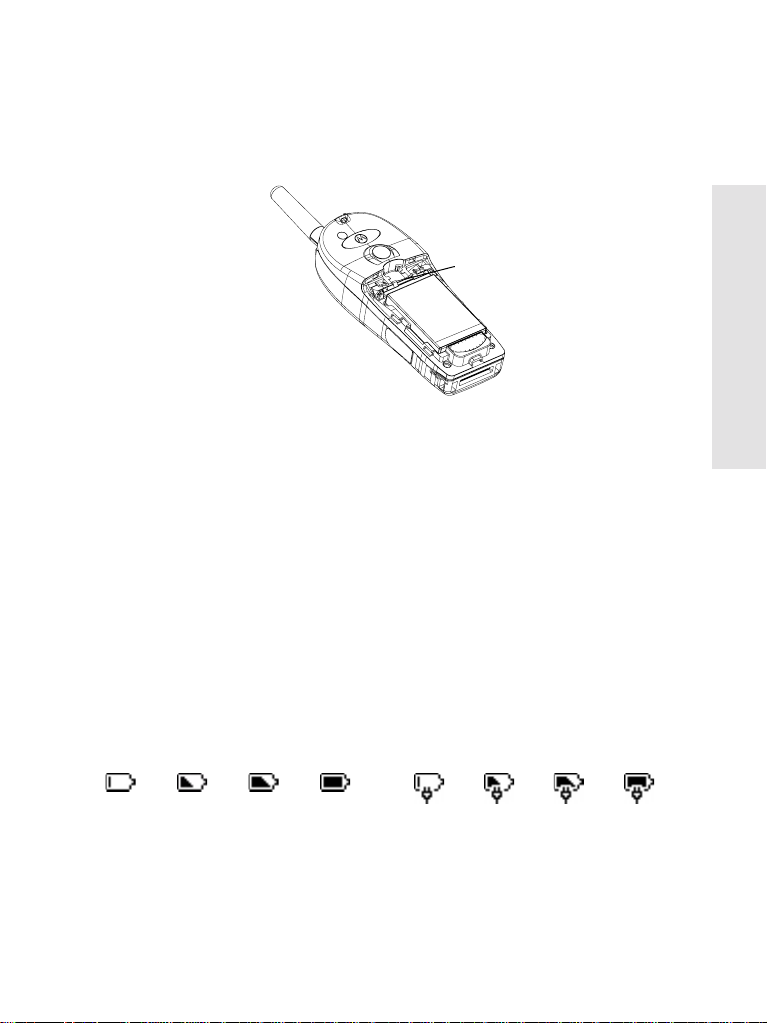
The Battery icon shows the chargi ng status (see below).
On or Off during charging.
Getting Started
Empty Full
Battery Capacity
FullEmpty
Battery Charge Progress
5
Page 16

Battery Capacity Information
Information Description
Green icon Full (70% - 100% capacity)
Yellow icon Middle (40%-70% capacity)
Red icon Low (10% - 40% capacity)
Empty icon Very low (5%-10% capacity)
Low Battery message Less than 5% capacity
Battery Maintenance
The performance of the rechargeable battery delivered with
your terminal depends on the way the battery is treated.
Therefore, to comply with the Motorola warranty for batteries
and to assure high performance and a long life cycle of your
Motorola rechargeable battery, please read and follow the
maintenance rules stated bel ow.
Storage
Do not store your battery where the temperatures will exceed
65 °C or fall below -20 °C.
New Lithium-Ion batteries (i.e.batteries that have never been
charged before) may be stored for up to 2 years (with up to
50% of maximum charge) in well ventila ted, cool and dry
areas with some capacity loss in life cycle.
Batteries, which have already been charged and then stored
for more than 2 months should be recharged overnight (1416 hours) before use.
6
Page 17

Extending Battery Life
A battery is an expendable part and may need replacing
during the life of the terminal.To ensure maximum service life
of your handset, always replace the battery with a genuine
Motorola replacement.
In order to ensure maximum life from your battery, do not
place the handset and/or battery in the charger, unless you
really want to charge the battery.
Battery Charging Temperature
Your charger will only charge your battery when it is at
temperature range of 1 °C to 37°C.
This is due to the fact that the internal battery cell can be
charged in the temperature range of 0 °C to 45 °C.
As the temperature gets colder (close to 0 °C) less capacity
is stored in the battery.
If, during charging, the temperature is out of range, the
battery might not be fully charged since the charging is
temporarily stopped until the temperature becomes suitable.
The range of battery operation is from 0 °C to +45 °C in
charger mode and from -10 °C to +60 °C in discharge
(application) mode.
First Time Battery Charging
Always charge your new battery/(whichever type) overnight
(14-16 hours) before using it.This is referred to as Initialising
and will ensure maximum battery start capacity.
Getting Started
Battery Charging Rules
Generally, to reduce the number of charge cycles as much
as you can wait for Low Battery message to charge as this
will ensure maximum battery life.
Do not use your charger as a terminal stand or leave your
terminal and fully charged battery connected to the charger
whilst not charging. Continuous charging will shorten the
battery life.
7
Page 18
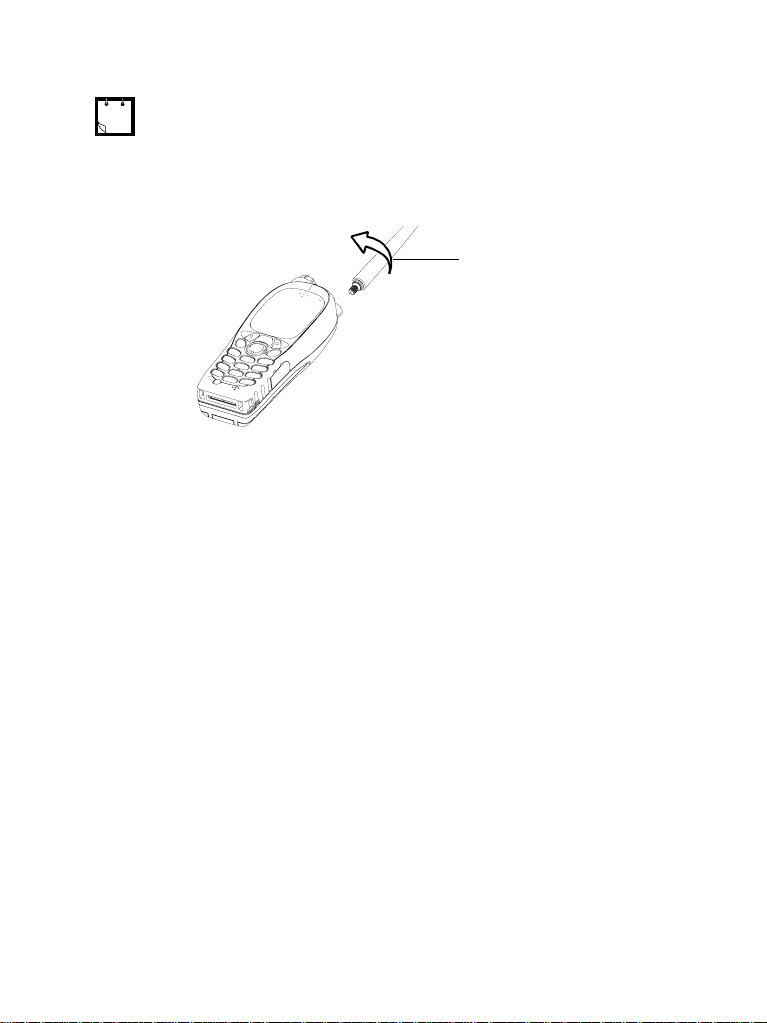
Attaching the Antenna
Turn the MTH800 Off before installing or removing the antenna.
Insert the bottom of the antenna into the screw-in base on the
top of the MTH800. Turn counter clockwise until snug. Do
not force.
Turn counter-clockwise
to attach
8
Page 19
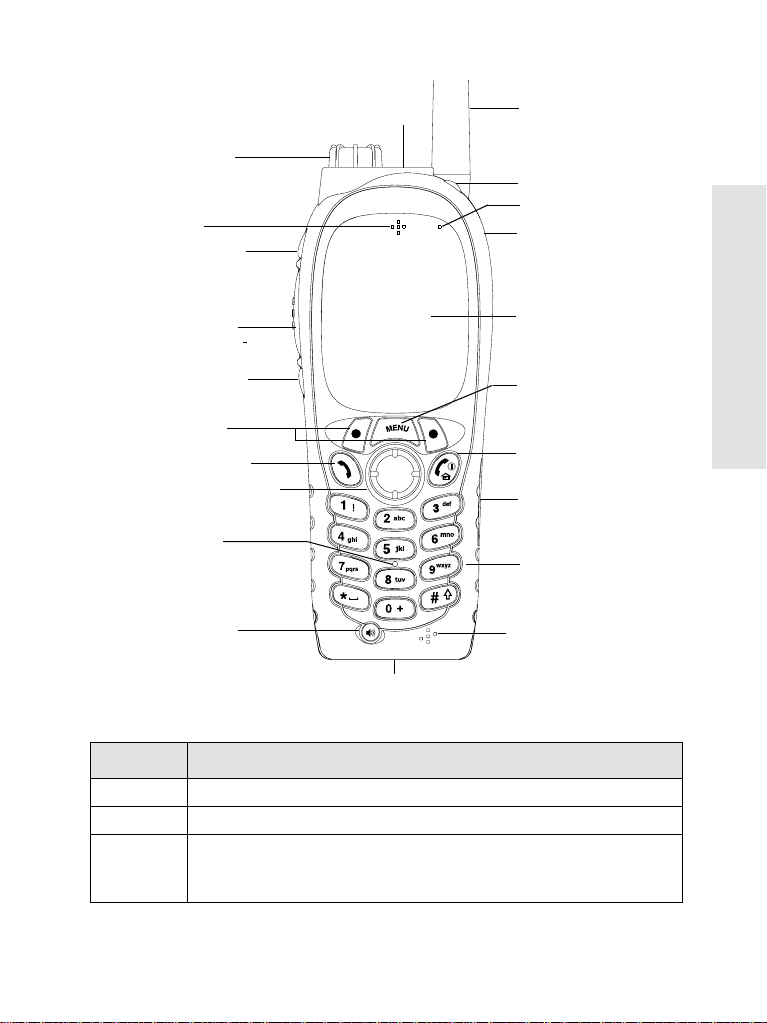
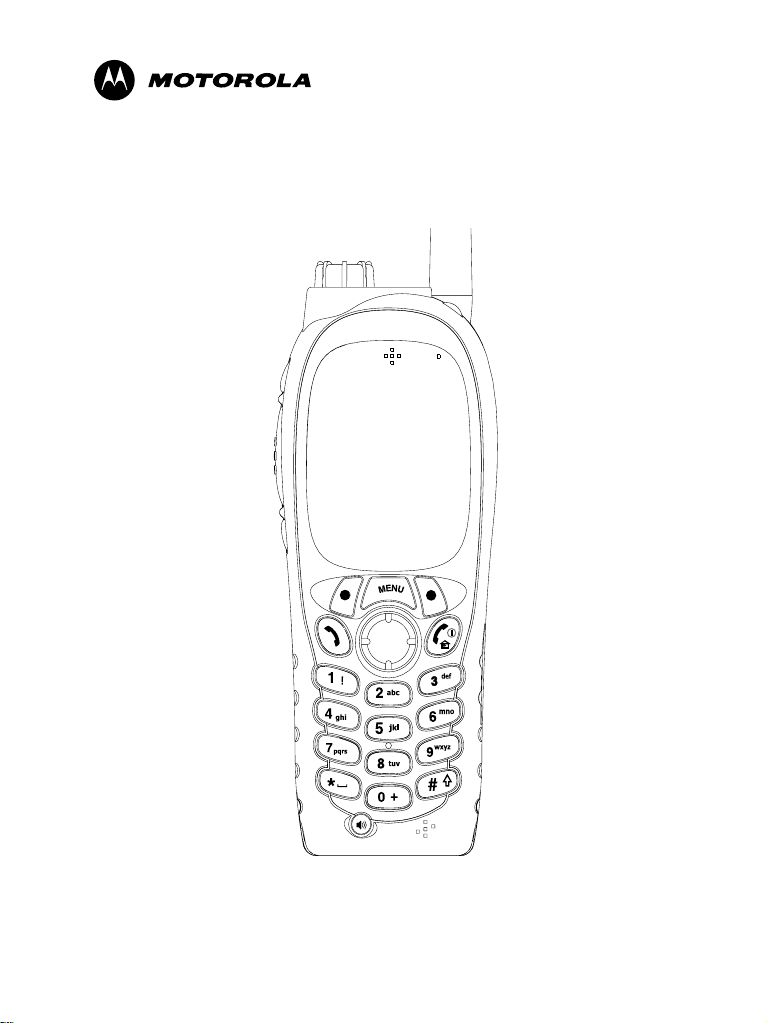
Controls and Indicators
21. Emergency Key
(on top of the MTH800)
20. Rotar y K no b
(on top of the MTH800)
19. Earpiece
17b. Programmable
Side Key
(at the side of the MTH800)
18. PTT Side Key
(at the side of the MTH800)
1. Ante n na
2. LED
3. Top Microphone
4. Exte rnal Antenna
Connector
(back of the MTH800)
5. Alphanumeric
Display
Getting Started
17a. Programmable
Side Key
(at the side of the MTH800)
16.Soft Keys (2)
15. Send Key
14. Four-Way Na vig ation
13. Speaker
Key
(under keypad)
12. Speaker
Control Key
11. Accessory Con nector
(at the base of the MTH800)
Number Description
1 Antenna
2 LED (Indicator)
3 Top Microphone
Activated during half-duplex, high-audio calls such as
Group Calls.
6. Menu Key
7. On-Off/End/Home
key
8. Audio Accessory
Connector
of the MTH800)
(at the side
9. Alphanumeric
Keypad
10. Bottom Micropho ne
9
Page 20

Number Description
4 External Antenna Connector
Used with the digital car kit to connect the RF signal to the
external antenna.
(At the back of the MTH800)
5 Colour Display
6 Menu Key
7 On-Off/End//Home Key
8 Audio Accessory Connector
9 Alphanumeric Keypad
10 Bottom Microphone
11 Accessory Connector
12 Speaker Control Key
13 Speaker (under keypad)
14 Four-Way Navigation Key
15 Send Key
Provides alphanumeric text an d images wit hin 65,536
colours and 130 x 13 0 pixe ls wi th bac kligh ting and scal abl e
fonts.
Used to enter the main menu and the context sensitive
menu.
Press and hold to turn the MTH800 On/Off.
Press to end calls.
Press to return to the Home display (idle screen).
(At the side of the MTH800)
Use the keypad to enter alphanumeric characters for
dialing, contact entries and text messages.
Activated during ha lf-duplex and full -duplex, low-audi o calls
such as Phone Calls.
Provides connection for accessories.
(At the base of the MTH800)
Selects earpiece (low audio) or speaker (high audio)
Press up, down, left or right for list scrolling, while moving
around the menu hierarchy, or for alphanumeric text
editing.
Used to initiate or answer full-duplex calls (such as Phone
Calls), or send status and text messages.
10
Page 21
Number Description
16 Soft Key(s)
Press to select the option that appears in the display
directly above the left or right soft key
17 Programmable Side Keys 1 and 2
Default programming: upper Side ke y activate s/deactiva tes
Backlight; lower Side key activates Screen Saver.
(See also No. 19)
18 Push-To-Talk Button (PTT)
Press and hold this side button to talk in half-duplex calls,
release it to listen.
Press to send status and text messages.
19 Earpiece
20 Programmable Rotary Knob
Default programming: “Dual” - Press the knob to toggle
between “volume” and “list”. Side keys (No. 17) operate as
programmed.
21 Programmable Emergency Button (on top of the MTH800)
Press and hold to enter Emergency mode, and send
Emergenc y Alarms (as programmed). Press and hold to
start an Emergency Private Call (half-duplex or full-duplex).
When the MTH800 is Off, press and hold to power on in
Emergency Operation or in standard mode (as
programmed).
.
Getting Started
Before using your MTH800 for the first time, remove the plastic
lens protector from the display, and charge battery overnight to
ensure battery is initialised to it’s full capacity.
Powering On/Off (On-Off/End/Home Key)
To power On, press and hold . Your MTH800 performs a selfcheck and registration routine. After successful registration, the
MTH800 is in service.
To power Off, press and hold . You will hear a beep and the
Powering Off message is displayed.
11
Page 22

Powering On (Emergency Button)
Press and hold the Emergency button to power On.
The MTH800 will power On in Emergency Operation or in standard
mode (as programmed).
Powering On with Transmit Inhibit (TXI) Active
Transmit Inhibit is a feature allowing you to switch off transmission
before entering a Radio-Frequency (RF) sensitive area. To activate
this feature, press and select More...> Networks > TXI Mode
> Activate.
Pressing the Emergency button, even if Transmit Inhibit is activated, causes
!
!
the MTH800 to transmit immediately. The MTH800 must NOT be within the
W A R N I N G
RF sensitive area when entering Emergency Operation.
The TXI Mode remains active at power On. You will be asked
whether to leave the TXI Mode On or not.
Ensure you have left the RF sensitive area before deactivating Transmit
!
!
Inhibit.
W A R N I N G
Press the Yes key to deactivate the TXI Mode. If the MTH800 was
previously used in Trunked Mode, it will register to the network. If
the MTH800 was previously used in Direct Mode, it will remain in
Direct Mode.
Press No in Trunked Mode and the MTH800 powers down; press
No in DMO and you remain in DMO with TXI selected.
N
E
U
M
Unlocking the MTH800
Your MTH800 may be locked at power up.
To unlock the MTH800 after powering on, enter the code at the
prompt. The MTH800 enters the default Home display.
The unlock code is ori ginally s et to 0000. Your Service Provider may
change this number before you receive your terminal.
12
Page 23

Locking/Unlocking the Keys/Buttons
N
E
U
Press .
When there is an incoming call and the keypad is locked, you can still use
M
PTT, Rotary knob, , and
The Emergency button is not locked. Pressing the Emergency button
unlocks all keys.
.
Selecting Your Network
Before you start operating your MTH800, you can select the
network you want your
MTH800 to be registered to. For
detailed information, see “Networks” on page 101.
How to Hold Your MTH800
The terminal has two microphones: a top microphone for
half-duplex dispatcher calls and a bottom microphone for fullduplex telephone-like calls.
A call can be placed in high or low audio. To activate low or
high audio, see page 21.
In high audio the user transmits via the top microphone and
listens via the internal speaker.
In low audio the user speaks into the bottom microphone and
listens via the earpiece.
Group and Private Calls are half-duplex calls and can be
placed in high or low audio.
Phone, PABX, and full-duplex Private Calls are placed in low
audio. The speakerphone feature allows to hold Phone,
PABX, and full-duplex Private Calls via the MTH800 internal
speaker.
Getting Started
13
Page 24

Use in Low Audio (Phone, PABX, and Full-duplex Private Calls)
When placing or receiving a call and while speaking, hold
your MTH800 as you would a telephone. Speak into the
bottom microphone. Listen via the earpiece.
Keep antenna at least 2.5 centimetres from your head and
body.
Use in High Audio (Group and Private Calls)
Hold MTH800 in a vertical position with its top microphone
5.0 to 10 centimetres away from your mouth. Speak into the
top microphone. Listen via the terminal's internal speaker.
Keep antenna at least 2.5 centimetres from your head and
body.
Lapel/Shoulder Use
For Group and Private Calls turn your head towards your
shoulder/lapel, and speak directly into the top microphone.
Listen via the terminal's internal speaker.
Speakerphone Use
Place the MTH800 30 to 60 centimetres away from you. In a
noisy environment, you may want to move the MTH800 closer
to you for better transmission.
Looking after your MTH800
Never leave your MTH800 or battery in extreme
temperatures (over 60 °C)—for example, behind windscreen
in very hot, direct sunlight. Do not immerse your MTH800 in
water.
To clean your
DO NOT use a dry or electrostatically charged cloth.
14
MTH800, use a moistened or antistatic cloth.
Page 25
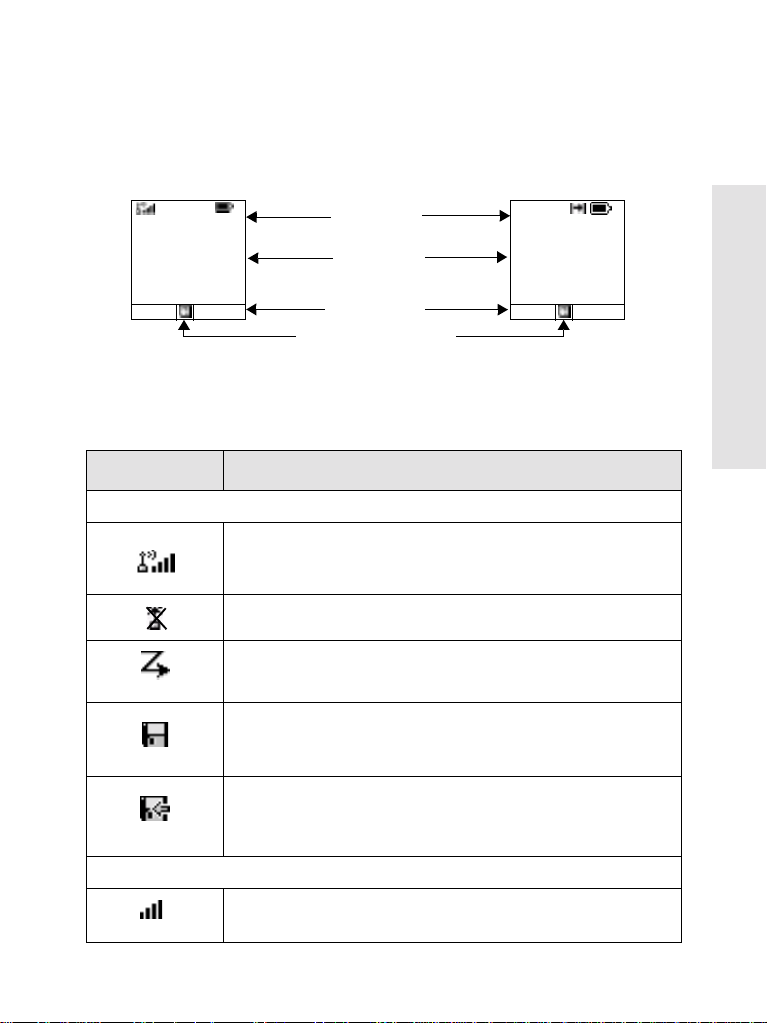
The Display
Home (Idle) Display
A powered-on, idle terminal shows the following typical
Home display:
Trunked Mode Home Display Direct Mode Home Display
status icon area
Network 1
Folder 1
Talkgroup 1
Hello
Optns Contcs
text display area
soft key area
menu/context sensitive icon
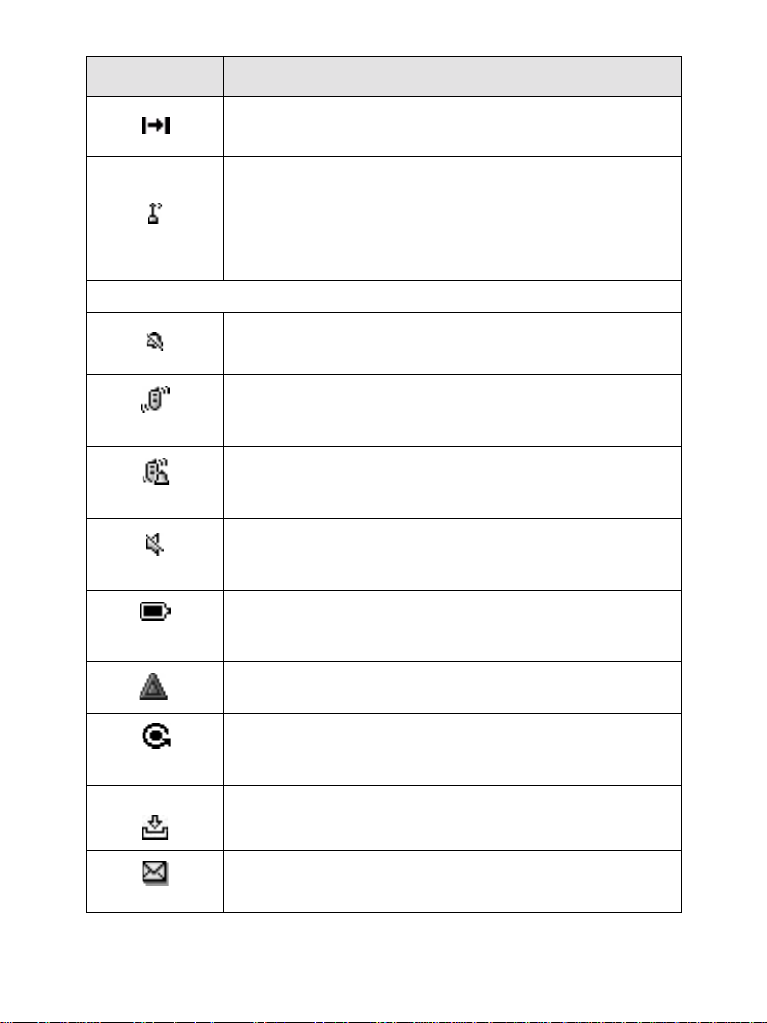
Status Icon s
Status icons appear when your phone is engaged in certain
activities or when you have activated certain features.
Status Icon Description
Trunked Mode Operation
Signal Strength (TMO)
Allows you to check signal strength. More bars indicate a
stronger signal.
No Service
DMO Folder 1
Talkgroup 1
Hello
Optns Contcs
Getting Started
Scan
Indicates scanning is activated in the MTH800.
Data Connected
Displayed when the MTH800 is successfully connected to an
external device and ready for data transfer.
Data Transmit/Receive
Displayed when the MTH800 is transferring data to/receiving
data from the external device (laptop or desktop PC).
Direct Mode Operation
Signal Strength (DMO)
Indicates an incoming Direct Mode Group Call.
15
Page 26
Status Icon Description
Direct Mode
Displayed when the MTH800 is in Direct Mode.
DMO Gateway
Indicates that gateway is selected. The icon has three states:
Solid—while the MTH800 is synchronised with the gateway.
Flashing—while the MTH800 is not synchronised or during
attachment.
No icon—during a radio to radio call, i.e. not using a gateway.
General Icons
All Tones Off
Indicates that all alert tones are off in the MTH800.
Vibrate On
Indicates that the MTH800 will vibrate to alert you of an
incoming call.
Vibrate and Ring
Indicates that the MTH800 will vibrate and ring to alert you of
an incoming call.
Speaker Off (Low Audio)
Indicates that the audio will sound through the earpiece. (See
detailed explanation of Speaker Control Key.)
Battery Strength
Shows the charge in your battery. Full icon is full charge.
16
Emergency
Appears while the MTH800 is in Emergency Operation.
List Scrolling
Displayed to indicate that the Rotary knob use is list scrolling,
as long as this use is selected.
New Message Has Arrived
Indicates a new message just arrived.
New Message(s) in Inbox
Indicates that you have unread messages in your Inbox.
Page 27
The LED Status Indicator
The LED indicator shows the in-service states of your
MTH800. Please refer to the table below.
Indicator Status
Solid green In use
Flashing green In service
Solid red Out of service
Flashing red Connecting to a network/
Solid orange Transmit Inhibit (TXI) in service/
Flashing orange Incoming call
No indication Switched off
Entering DMO
Channel busy in DMO
Key, Knob, and Button Overview
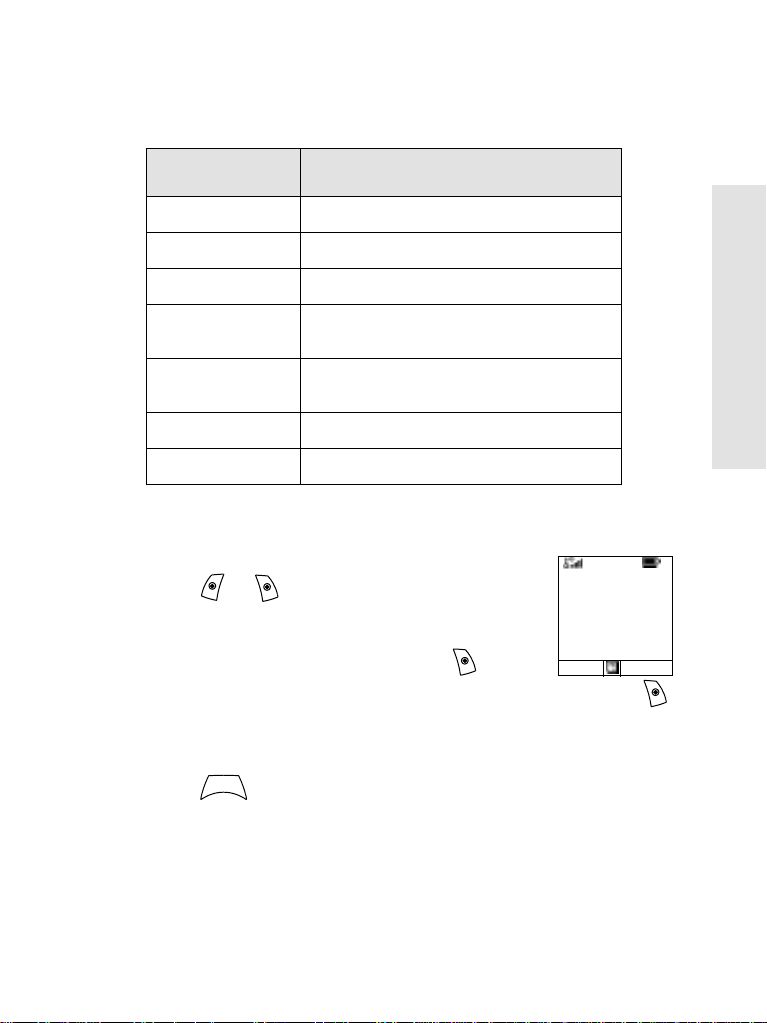
Soft Keys
Press or to select the option that
appears in the screen directly above the left
or right soft key. In this example,
displayed above the key. Pressing
enters the contact list. In the user guide, this
action is described as “press
Menu Key
N
E
U
Press to enter:
M
Contcs is
Contcs”.
Network 1
Folder 1
Talkgroup 1
Hello
Optns Contcs
Getting Started
• The menu (when there is no on-going activity). The
MTH800 menus allow you to control your MTH800 settings. Menus are organised in a hierarchy. See “List of
Menu Items” on page 71. The menu options provide
access to a further list of options called a sub-menu.
17
Page 28
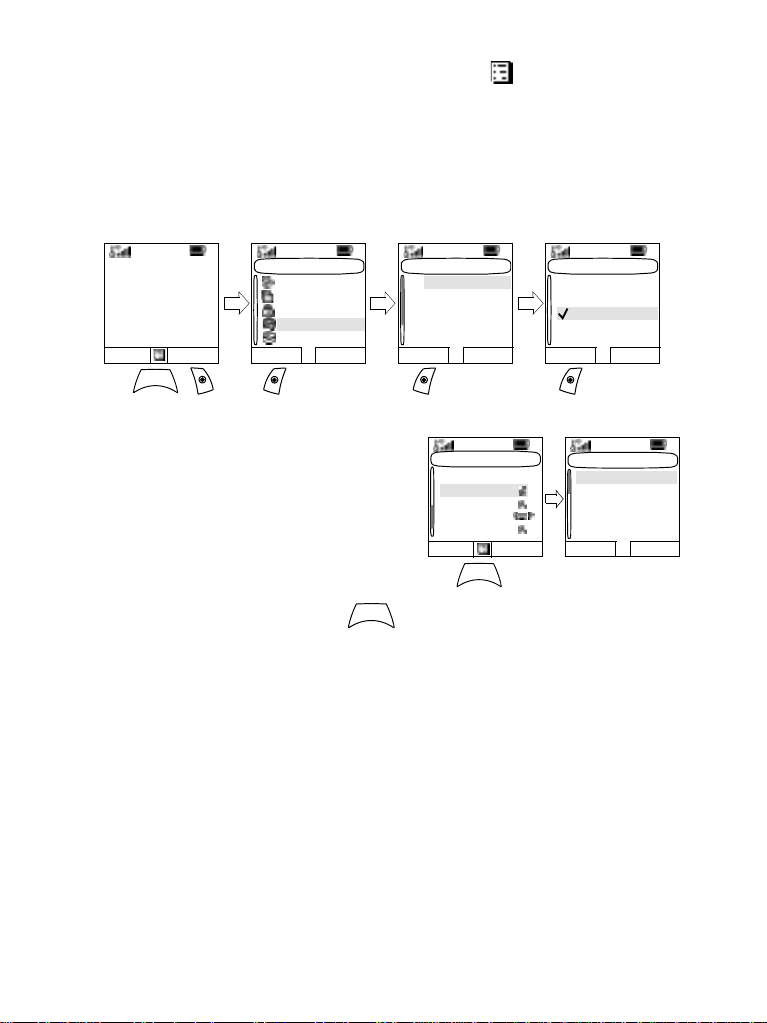
• The context sensitive menu (when i con is on) to view
a list of items for the current menu.
Examples of Menu and Sub-menus:
The example below shows how to setup the Vibrate function
in the terminal.
1st Sub-menu 2nd Sub-menu 3rd Sub-menu
Network 1
Folder 1
Talkgroup 1
Hello
Optns Contcs
N
E
U
M
Main Menu
Messages
Contacts
Security
Setup
More...
Select Back
Setup
Vibrate
Ring Style
Set Volume
Language
Data Setup
Select Back
Select Back
Example of Context
Sensitive Menu
This example shows the
screen when editing a name
listed in the contact list. From
the Home display, press
Contcs. Scroll to the name
N
E
U
you wish to ed i t. P re ss
M
.
Contacts
[New Contact]
David
Ann
Ray
2255
Select Back
N
E
U
M
The context sensitive menu opens up, allowing you to
choose among the entries.
Rotary Knob
The Service Provider can program the Rotary knob to one of the
following uses:
1. Dual Control - the knob is used as both a Volume control and
to scroll through Lists. Press the knob to toggle between Volume and List (default programming).
2. List Control - the knob is used to scroll lists or menu items. In
this case volume control is always via the Side keys.
3. Volume Control - the knob is used only as a volume control;
turn clockwise to increase the audio volume level.
Vibrate
Vibe & Ring
Vibe Only
Ring Only
Details...
Contacts Menu
Edit
Delete number
Delete contact
New contact
Capacity
Select Back
18
Page 29

Press and hold the Rotary knob to lock it, press and hold it again to
unlock. Powering Off also unlocks a locked Rotary knob.
Emergency Button
Press and hold this button to enter Emergency Operation.
When the MTH800 is powered down, press and hold this button to
power On in Emergency Operation (if configured by your Service
Provider).
See “Emergency Operation” on page 54.
Function Keys
For information on the function assigned to each Side or Numeric key,
please refer to your Service Provider.
The required time you need to press the Side or Numeric keys to activate a
one-touch function is set as default to 1 second. This time may be set, however, by your Service Provider.
Side Keys
The Rotary knob and Side key programm ing are paired:
Rotary Knob Programming Side Key Programming
Dual Control Programmed to a one-touch function
Getting Started
List Control
Volume Control P rogram med to a one-touch function
: Volume Up
: Volume Down
When the Rotary knob is programmed to Volume Control or
Dual Control, the Side keys support the one-touch feature
that allows you to select or activate commonly used features
by pressing and holding a single key. By default, the upper
side key is set to “Backlight On/Off” and the lower side key is
set to “Screen Saver On”. Please check with your Service
Provider.
19
Page 30

Programmable Numeric Keys
The MTH800 supports the one-touch feature that allows you
to select/activate commonly used features by pressing and
holding a numeric key. Your Service Provider should
program the numeric keys with the relevant features.
The following table lists the programmable features and their
availability in specific MTH800 states/modes. For detailed
information on the features, see the relevant section in the
user guide .
Feature Description
Talkgroup Swit ch Switch to a specific talkgroup
Talkgroup Sc an Toggles on/off the Talkgroup Scan function
Home Revert Puts the MTH800 back Home display.
DMO/TMO Toggles between DMO and TMO
Status Message Sends a dedicated status message to a
Text Message Template Sends a predefined/user defined template to
Call Dial (Private, Phone,
PABX)
Vertical Flip Display Toggles on/off vertical flip
Transmit Inhibit (TXI) Toggles between activated and deactivated
Screen Saver Activates screen saver.
Backlight Adjustment Toggles on/off backlight.
If dialing via one-touch numeric key is enabled, one-touch dial is disabled (see page 52).
(TMO only)
dedicated address (TMO only)
a dedicated address (TMO only)
Initiates a call to a predefined entry in the
contact list (TMO only)
TXI Mode.
20
Page 31

To use the one-touch feature:
• Press and hold the required numeric key for a few sec-
onds.
• Your
MTH800 will display the number and act according
to the programmed feature.
Speaker Control Key
Press to activate the earpiece (low audio) or speaker
(high audio), depending on the menu settings.
Type of Call Menu Setting Key Use
Getting Started
Half-duplex call
(Group*/Private)
Full-duplex call
(Private/Phone/
PABX
* In an Emergency Group Call, the voice sounds from the speaker regardless of
the speaker setting.
Menu > Setup > Group
Audio > Spkr Cntrl
Menu > Setup > Group
Audio > Always Loud Speaker On/Off for Private
-------- Controls speaker/earpiece of
Speaker On/Off for Group and
Private Calls
Call
the on-going call,
Aliases (Names)
Aliases are optional names that you can assign to stored
phone and private numbers (or IDs). To edit an alias, see
page 76.
Aliases can be up t o 12 char ac ters in len gth an d may consi st
of letters, numbers, and spaces.
Aliases are displayed during contact list scrolling or during an
incoming call. Aliases are also used in alphanumeric search
to retrieve numbers from your memory list.
21
Page 32

The following screens show examples of how the caller’s
private number can be displayed.
Private ID Private ID
without alias with alias
Prvt In Use
180
or
Prvt In Use
Simon
180
Screen Saver
If your Service Provider configured this feature, the screen
saver will automatically cover the MTH800 display after the
MTH800 stays idle for a pre-programmed period of time. If
you press a key or a call arrives, the screen saver is
deactivated and the MTH800 resumes standard operation.
You can also activate this feature manually, by pressing the
relevant pre-programmed button (either a side button or
numeric key). For example, if manually activated during a
group call, the screen saver allows to hide the caller’s identity
for confidentiality . The screen saver consists of a logo and an
alphanumeric text. Check in the menu options whether the
Service Provider has given you the capability of entering your
own screen saver text (see page 88).
Home Display Text Message
Y our MTH800 is provided with a feature that
allows your Service Provider to send special
text messages to your MTH800 display.
The message is displayed when your
MTH800 is idle.
The message will stay on your
MTH800 display until a new
message is received.
If configured by your Service Provider, your
display an internal Home display until another message is
received.
MTH800 will
<Home display
text>
Optns Contcs
22
Page 33

Terminal Disable/Enable
Your MTH800 is provided with a feature that allows your
Service Provider to disable it temporarily in case it is
stolen.When your
MTH800 is disabled, no calls can be
initiated or received.
While your
MTH800 is disabled, it will look and act like it is
turned Off.
If you try to turn your
MTH800 On, when it is disabled, it will
operate as described above.
If your
enable it. After your
MTH800 is found, your Service Provider can re-
MTH800 is re-enabled, you may resume
normal operation.
Selecting TMO or DMO Operation
General
In Trunked Mode Operation (TMO) the MTH800 is used with
the infrastructure services within system coverage.
In Direct Mode Operation (DMO) the MTH800 is used without
infrastructure services required.
While operating in DMO the propagation travels directly from the transmitting terminal antenna to the receiving terminal antenna, with no assistance
from any base station or tower. Therefore, the range is critically dependent
on the position of the user and the antenna. To achieve best results, hold
the terminal in the hand as high as comfortably possible, and be sure not to
obstruct the antenna in any way. Be sure that the antenna is clear from the
body, cables, or other obstructions. As there is no tower-mounted base station to assist, and the two users are usually standing at ground level, the
range is usually shorter than that can be achieved towards a tower or hilltop.
Any obstructions (hills, buildings, etc.) between the users will further
decrease the range. Conversely, raising the terminal higher or moving to a
higher location may improve the range.
Getting Started
23
Page 34

A
MTH800 in DMO can communicate with the trunked
system (and vice-versa) through a gateway device. To use
that feature, please enable the gateway option in your
MTH800 (see “Making a DMO Group Call via Gateway” on
page 43).
In DMO it is only possible to place Group calls and Emergency Group Calls.
Entering TMO or DMO
Enter TMO or DMO in one of the following ways:
• From the Home display press
if the MTH800 is in TMO.
• From the Home display press Optns and select Trunked
Mode
if the MTH800 is in DMO.
N
E
U
• Press and select More...> Networks > Trunked
M
Mode if the MTH800 is in DMO.
N
E
U
• Press and select More...> Networks > Direct Mode
M
if the MTH800 is in TMO.
• Press the TMO/DMO one-touch button (if programmed by
your Service Provider).
Your terminal can alert you of an incoming call. Select the alert settings in
the Vibrate menu and Tones menu items.
Optns and select Direct Mode
TMO Calls
You can make and receive the following types of calls when the
MTH800 operates in Trunked Mode:
• Group Calls
• Private Calls
• Phone Calls
• PABX Calls—local (office) extension calls
• Emergency Calls
24
Page 35

DMO Calls
You can make and receive Group Calls when the MTH800
operates in Direct Mode (DMO). This includes Emergency Group
Calls.
The MTH800 returns to the Home display when there is no activity
for a few seconds.
Making Calls
See the relevant sections in the user guide.
Modifying the Type of Call
The infrastructure can modify the type of call you started.
For example, you might start a a half-duplex Private Call, and
the infrastructure could modify the call to a Group Call.
The terminal will alert you of the modification and will display
the following messages, depending on the type of call:
• Call Modified (to full-duplex)
• Call Modified Use PTT (modified to half-d upl ex)
Continue the modified call depending on the type of call.
• Half-duplex Private Call modified from direct setup to hook setup:
a ringing tone will alert of the change.
• Half-duplex Private Call modified from hook setup to direct setup:
there will be no indication of the change.
Receiving Calls
The MTH800 will automatically receive the incoming call.
Additionally, if Inactivity Revert Mode is enabled, the
MTH800 returns automatically to the Home display, after
that call ends.
Getting Started
Inactivity Revert Mode will occur if configured by your Service Provider.
25
Page 36

Your MTH800 will alert you of an incoming call depending on
the setting you selected in the Vibrate menu option (see
page 81) and the Tones menu option (see page 85).
During message editing, you will be alerted of an incoming
Group/Emergency/Broadcast Group Call if configured by
your Service Pro vider.
Preemptive Calling
Preemptive calling is particularly useful when you need to
speak urgently with a user whose terminal is busy in a nonemergency voice call.
A preemptive priority call (PPC) is either an Emergency
Group Call or a Private PPC (half-duplex or full-duplex call).
The feature allows to disconnect the on-going lower priority
call and to connect to the incoming higher priority call.
To place a PPC, see the Emergency Operation and Private
Call sections in the user guide.
The MTH800 will receive the call via speaker or earpiece,
according to the setting used when the PPC is received.
For call alert, see settings in the Vibrate menu option (page 81) and the
Tones menu option (page 85)
.
Receiving a PPC is explained in the following paragraphs.
In the screens,
<Any> in Use refers to any of the non-
emergency voice calls: Group, Private, Phone, or PABX.
26
Page 37

Receiving an Emergency Group Call during a Call
The MTH800 receives the Emergency Group Call, drops the
on-going non-emergency voice call, and connects to the
Emergency Group Call.
<Any> in Use
Emgcy In Use
ID:David
Talkgroup 1
Optns
Receiving a Private PPC during a Call
If configured by your Service Provider, the MTH800 receives
the PPC, drops the on-going, non-emergency, lower priority
voice call, and connects to the higher priority Private Call.
A PPC with lower or equal priority, will be dropped without
any indication to the called user and will enter the missed call
list.
A PPC Call with Emergency Call priority will be displayed on
the screen as “
Half-duplex Private PPC Received
Call
Preempted
<Any> in Use
Full-duplex Private PPC Received
Call
Preempted
<Any> in Use
Emergency” (instead of “Priority”).
Priority
Private Call
David
2234
<animation>
Prvt Priority
David
2234
Mute Spkr
Press
PTT
Press
any key
Priority
Prvt In Use
David
2234
<animation>
Priority
Prvt In Use
David
Mute Spkr
Getting Started
27
Page 38

Broadcast Call
The Broadcast Group Call (also called Site
Wide Call) is a high-priority group call from
the console operator (or dispatcher) to all
users located at one or more sites. The
terminals are configured to monitor a
Broadcast Call, but the users cannot talk
back.
The call can be received as normal Broadcast
Call or Emergency Broadcast Call.
The Broadcast Call preempts an on-going
Group Call that has the same (or lower) call
priority.
For selecting a talkgroup during a broadcast
call, see “Selecting a Group” on page 33. For changing folder
during a broadcast call, see “Selecting a Folder” on page 35.
Ambience Listening (AL)
This feature, if enabled by your Service Provider, allows a
console operator (or dispatcher) to establish a special call
with a specific terminal to monitor voice activity in the local
vicinity. The call is setup without any indication to the
affected terminal, and any lower priority ongoing voice call or
packet data transfer may be pre-empted.
After accepting the call, the terminal transmits in a halfduplex Private Call without any action from or indication to
the user. The Ambience Listening call shall automatically end
when the user initiates any voice call and uses the terminal
normally.
Group In Use
David
Broadcast
Optns
Emgcy In Use
David
Broadcast
Optns
28
Page 39

Cancelling a Call
Choose one of the following, as relevant:
• Press . If you wish to make a new call, start it at once.
• Wait to answer the call. After a time-out set by your Service Provider, the call number will be forwarded to the
missed call list.
• Press Reject soft key (displayed in an incoming full-duplex
call). The call number will be forwarded to the missed call
list.
Using In-call Features
Handsfree Speakerphone
The speakerphone feature allows you to
hold impromptu meetings in Phone, PABX,
and full-duplex Private Calls.
During speakerphone operation, you may
either speak or listen, but you cannot do
both at the same time.
1. To activate speakerphone, press Spkr. The display shows
Speaker ON.
2. Place the MTH800 30 to 60 cm away from you. In a noisy envi-
ronment, you may want to move the MTH 800 clos er to yo u for
better transmission.
3. To de-activate speakerphone, press Erpce. The display shows
Speaker OFF.
To burst into conversation while the other party is talking,
press and hold PTT. You will hear a tone. Start talking, and
release PTT to listen again to the other party.
<animation>
Phone In Use
David
06754321
Mute Spkr
Getting Started
29
Page 40

Muting/Unmuting the Bottom Microphone
During a Phone, PABX, or full-duplex Private Call, use the
mute feature to:
• hold conversation without being heard by the caller
• silence possible background noise in your area.
1. Press Mute. The display shows Mute is ON. Th e microphon e is
muted. You can hear the incoming audio, but the caller cannot
hear any speech coming from your MTH800.
2. To speak, press Unmut. The display shows Mute is OFF. The
microphone is on.
Local Area Service
This mode, also called Fallback Mode, allows more than one
terminal from the same site to communicate when the link
between the site and network central controller fails. Entering
and exiting Local Area Service (that is, returning to System
Wide Services) is done automatically.
Entering Local Area Service
When the
from the system, the following occurs:
• The
• The display shows the “Local Area Service” message.
• Display icons and soft keys turn brown.
• Any call in progress is dropped upon entering Local Area
Service mode.
If configured by your Service Provider, this message/alert is
periodically repeated to remind you that the MTH800 is still
operating in Local Area Service mode.
The following features are available while the
Local Area Service:
• Registration
• Attachment
• Group Call
• Emergency Call
• Emergency Alarm
MTH800 receives a Local Area Service indication
MTH800 sounds a tone.
MTH800 is in
30
Page 41

Exiting Local Area Service
When the link with the central network controller is reestablished, the
following occurs:
• the
MTH800 sounds a tone
• any call in progress during Local Area Service is dropped.
MTH800 exits Local Area Service and the
Getting Started
31
Page 42

TMO Group Call
General
A Group Call is an instant communication between you and
others in a talkgroup that you select. Participants may join
(late entry) and leave an on-going Group Call. A talkgroup is
a pre-defined set of subscribers enabled to participate in and/
or invoke a Group Call, that is set up by your Service
Provider.
Talkgroups appear on your display as names or numbers (for
example: Sales, Service, Electricians, Talkgrp10).
Talkgroups are divided into folders. Each folder may contain
several talkgroups.
For ease of use, your MTH800 also provides the ability to:
• Perform an alphabetical search of the talkgroup aliases.
Scroll through the entire talkgroup list.
• Organise your favourite groups into one folder called My
Groups (set up by your Service Provider).
Your talkgroups may be organized into scan lists (set up by
your Service Provider, or by yourself through the Menu).
When you activate one of these scan lists, your
continuously monitor the activities of the selected talkgroups.
By assigning priorities to the talkgroups defined in the scan
list, you will be capable of accepting calls that have higher
priority than the on-going call.
You can start talkgroup, folder, or scanning selection when
the terminal is idle or receiving a call.
When receiving a call, choose one of the following:
• Exit selection screen to join the call.
• Join the call from the selection screen by pressing PTT.
• Continue selection.
MTH800 will
32
Page 43

Each talkgroup may have one associated Announcement
Talkgroup (ATG) that it monitors (if set up by your Service
Provider).
An ATG is a special group which is linked to a number of
talkgroups and has the highest priority level, thus enabling
broadcast of the call to all these talkgroups.
When an ATG is selected, the scanning icon is not displayed.
The
MTH800 monitors the ATG scan list instead of the
selected scan list. The ATG scan list contains all the
talkgroups associated with a selected ATG. Your Service
Provider should advise what talkgroups are associated with
which Announcement Talkgroup.
Y our MTH8 00 will always monitor the Group Calls in the ATG
scan list. To place an Announcement Call, you must first
select the specified Announcement Talkgroup as advised by
your Service Provider, otherwise you will only be able to
participate when an Announcement Talkgroup is received.
Activation and deactivation of talkgroup scanning has no
effect on the ATG scan list.
Dual Microphone Feature
See “How to Hold Your MTH800” on page 13.
TMO Group Call
Selecting a Group
You can select a talkgroup in one of the following ways, by
using the:
• Rotary knob
• navigation key
• alphabetical search feature
• folder search
For group scrolling configuration, see page 35.
When you navigate in the “My Groups” folder and select a DMO group, your
terminal will switch between TMO and DMO (and vice-versa).
33
Page 44

Using the Rotary Knob
(If configured by your Service Provider)
From the Home display, press shortly on the Rotary knob
and rotate until the requested group appears.
Group selection occurs:
• After a time-out,
• Or, by pressing Select (if configured by your Service Provider).
Using the Navigation Key
From the Home display, scroll left or right until the requested
group appears. Then press Select to confirm selection.
Pressing the PTT will also choose the group automatically
and start transmission.
Using Alphabetic Search
From the Home display, press Optns. Select a group by
alphabetic search (“TG by abc”). Enter the first character of
the group’s name. Select the group.
Using Folder Search
From the Home display, press Optns. Select a group by
folder search (“TG by Folder”). Select the folder and select
the group.
34
Page 45

Selecting a Folder
You can select a folder by using one of the following:
• the Rotary knob (if configured by your Service Provider)
• the navigation key
Using the Navigation Key
When using the navigation key to select a folder, press Select
to confirm the selection.
To Select a Folder
From the Home display, press Optns. Select Folder, and
select the desired folder. The display shows the last selected
group in that folder.
“My Groups” Folder
You can organise your favourite groups into one folder called
“My Groups”.
Selecting My Groups
From the Home display, press to quickly access the
folder.
Adding/Deleting Groups from My Groups
For more information, see “My Groups (TMO/DMO)” on
page 95.
TMO Group Call
Group Scrolling Configuration
Your Service Provider can configure scrolling via rotary knob
or navigation key as follows:
• Scroll to next folder—when the folder end is reached during group scrolling, further scrolling switches to the group
list in the next folder.
For example: Folder 1 has Group11 and Group12. Folder 2
has Group21 and Group22. Group11, Group12, Group21,
Group22 will appear during scrolling.
OR
35
Page 46

• Stay in folder—when the folder end is reached during
group scrolling, further scrolling restarts the folder group
list. To move to the next Folder, you should select it.
For exampl e: Folder 1 has Group11 and Group12. Folder
2 has Group21 and Group22. Select Folder 1: Group11,
Group12, Group11,Group12 will appear during scrolling.
Change to Folder 2: Group 21, Group 22, Group 21, and
Group 22 will appear during scrolling.
In addition, your Service Provider might configure the rotary
knob as follows:
• End-Stop Rotary Knob Scrolling—the rotary knob will stop
when it reaches the last group in the folder, and a tone will
alert you that you have reached the last group in the
folder. Use the navigation key to continue scrolling through
the list.
Activating/deactivating Scanning
See “Setting Group Scanning” on page 91.
Making a Group Call
1. From the Home display and if this is the
required group, press and hold the PTT.
2. W ait for the talk permit tone (if configured)
and then speak into the microphone. Release the PTT button to listen.
When you start a call, all members of the
selected group who have their units turned
on, will receive the Group Call.
If you are in an on-going Group Call and wish to make a
new call, press to ignore the current call. Start the
new call
.
Network 1
Folder 1
Police
Hello
Optns Contcs
Group In Use
Folder 1
TG4
Optns Folder
36
Page 47

The “No Group” message is displayed when you are out of the normal
coverage area of your selected group. You must then select a new group
that is valid for your working location.
Receiving a Group Call
General
Unless it is engaged in a call, your MTH800 will receive the
Group Call.To answer the call, press and hold PTT.
Your
MTH800 shows the Group name and the caller’s
private number or name if previously stored in your contact
list.
The following screens show examples of how the caller’s
private number (ID 124) is displayed.
Group In Use
ID:124
TG4
Optns Folder
Private ID
without alias
For incoming call alert, see settings in the Vibrate menu option (page 81)
and the Tones menu option (page 85).
Any incoming Group call is ALWAYS received through the main speaker. If
configured by your Service Provider, the Group Audio menu item allows to
setup the audio of the incoming Group Call.
If the setup is Speaker Control, you can direct the audio of an active group
to the earpiece (low audio) or the main speaker (high audio). In low audio
speak into the bottom microphone and listen via the earpiece. In high audio
speak into the top microphone and listen via the speaker.
At the end of a call which has been directed to the earpiece, an audio hang
timer is activated, if it is enabled by your Service Provider. Within the
preprogrammed hang time, any incoming call is still received through the
earpiece. When the timer expires, a low pitch tone is emitted alerting you
that the next incoming Group call will be received through the speaker.
Upon hearing this alert, you are advised to hold the terminal at a
comfortable distance away from the speaker.
OR
Group In Use
Folder 1
TG4
Optns Folder
Private ID
with alias
TMO Group Call
37
Page 48

When receiving a Group call, you will hear a “New Group Call” tone (if
configured by your Service Provider).
Receiving a Group Call in Idle Screen with Scan Off
You can receive a group call from the selected talkgroup or
from the associated ATG only.
Your MTH800 will receive the Group Call.
Group In Use
TG4
Receiving a Group Call in Idle Screen with
ID: David
Optns Folder
Scan On
With Scan On, you can receive a group call
from the scan list you set up, in addition to
receiving a group call from the selected
talkgroup or from the associated ATG.
Receiving the scan call functions as receiving
an associated A TG or selected call in scan off
(see previous page), except for the following:
• The display is different when receiving the call in idle
screen, as shown here.
• The terminal sounds a tone as explained in the note
below.
• When receiving a High Priority Group Call, you will hear a “High Priority
Group Call” tone (if configured by your Service Provider).
• When receiving a Group Call from your scan list, which is not from a high
priority group, you will hear a “New Group Call” tone (if configured by your
Service Provider).
Group In Use
TG4
ID: David
Optns End
• To block reception of a Group Call, select Optns then
Block. Powering off/on the terminal unblocks the reception of this Group Call.
38
Page 49

Receiving a Group Call during an On-going Group Call
Depending on how the Service Provider has configured
incoming calls, the incoming call will either be:
• Forced upon you and will interrupt the on-going call (if the
incoming call has higher priority than the on-going call).
or
• Presented to you (if it has higher priority
than the on-going call).
To accept the call, press
To cancel the call, press End.
Receiving an Emergency Group Call
Join.
Group In Use
TG4
ID: David
Join End
For detailed informat ion, see page 27.
Receiving a Broadcast Call
For detailed informat ion, see page 28.
Tra nsmi t Inhibit
You can activate the Transmit Inhibit (TXI) Mode before
entering RF sensitive areas, e.g. in hospitals or in potentially
explosive areas, where safety can be jeopardized due to
MTH800 transmission radiation.
Radiation of the MTH800 is only suppressed if the TXI Mode is activated or the MTH800 is separated from power supply.
TMO Group Call
In TXI Mode the MTH800 will not transmit under any circumstances, except for the Emergency Call, which can be initiated even if the MTH800 is in TXI Mode.
All MTH800 functions and keys which cause transmission,
e.g. registration to the network, change of talkgroup or folder,
sending messages, pressing PTT, etc. are disabled. In this
case the display shows “Not Allowed In TXI Mode” and the
MTH800 sounds the “Transmit Inhibit” tone.
39
Page 50

When no danger to safety exists anymore (for instance if you
leave the RF sensitive area), the TXI Mode can be deactivated and the MTH800 returns to standard operation.
Setting the TXI Mode is described in “Setting Transmit Inhibit
(TXI) Mode” on page 102.
Activated Transmit Inhibit is indicated by the solid orange
LED and flashing between the two displays:
Folder 1
Police
Hello
Optns Contcs
TXI Mode
Activated
TXI Mode
Folder 1
Police
Hello
Contcs
Dynamic Group Number Assignment (DGNA)
DGNA provides the ability for a network operator or
authorised user to dynamically allocate new, or update
existing talkgroups to selected terminals over the air
interface. Using supplementary services messages (SSDGNA), the network operator can command your terminal to
add talkgroups or to update the existing talkgroups, or to
delete talkgroups from the list. This operation is performed by
transmitting the data into your MTH800.
Your Service Provider can gather some Talkgroups under one Supergroup and transmit it to your MTH800 as a DGNA. In such a case, you
will be able to participate in calls to/from all the groups in the Supergroup.
DGNA Reception with Notification Message
When a DGNA message is received and
DGNA notification was configured by your
Service Provider, you will get a tone
indication and notification message
(“
Talkgroup list updating”), and then a
display of the new assignments.
Talkgroup
list
updating
40
Page 51

You can use the View, Attach, Back soft
N
E
U
keys, , Rotary knob,
Emergency button.
M
, and
Pressing one of them exits the DGNA display.
1. To view the added/deleted talkgroups details press
View. You may scroll through
the list.
2. To return to the previous display press
Back.
3. To select the DGNA group, press
other group and press
• Group attachment is not allowed in TXI Mode.
• Once you exit the DGNA notification screen, select one of the newly
added groups as explained on see page 33.
Attach.
Attach. Or scroll to an-
If the DGNA message is received to delete all
Talkgroups, you r
MTH800 will display the
following:
DGNA Reception without Notification Message
If DGNA notification was not configured by your Service
Provider, you will get a tone indication and notification
message only and only if a selected group was changed by
the DGNA.
Talkgroups:
10 Added
6 Removed
View Back
Talkgroups
TG1
TG2
TG3
TG4
Attach Back
All Talkgroups
Deleted
Back
TMO Group Call
41
Page 52

DMO Group Call
General
In DMO, the MTH800 can be used without your Service
Provider’s infrastructure.
Direct Mode allows communication with other terminals also
operating in Direct Mode, which are on the same frequency
and talkgroup as your MTH800.
In DMO it is only possible to place Group Calls and Emergency Group
Calls.
You can receive a call:
• From the selected talkgroup
• From other users within talkback range (if configured by
your Service Provider). This is called an InterMNI (Mobile
Network identity) call.
• From an open group. (An open group is a super-group to
which all DMO groups belong.)
When you start a call, the members of the selected talkgroup
who have their units turned on, and are within the group
subscriber identi ty (as con f ig ured by the Ser v ic e Prov ide r ),
will receive the transmission.
In DMO the MTH800 can communicate with the trunking
system (and vice-versa) if the Gateway option is enabled in
the MTH800.
Dual Microphone Feature
See “How to Hold Your MTH800” on page 13.
“My Groups” Folder
Y ou can organise your favourite groups into one folder called
“My Groups”.
42
Page 53

Selecting the My Groups Folder
From the Home display, press to quickly access the
folder.
Adding/Deleting Groups from the My Groups Folder
For more information, see “My Groups (TMO/DMO)” on
page 95.
Selecting a Group
See the Group Call section, page 32.
Selecting a Folder
See the Group Call section, page 32.
Making a DMO Group Call without Gateway
1. Enter Direct Mode by pressing Optns and
selecting
Direct Mode.
2. Make sure that you have selected the re-
quired group. Press and hold the PTT button.
3. Wait for the talk permit tone and then speak into the mi-
crophone. Release the PTT button to listen.
DMO Folder 1
Police
Hello
Optns Contcs
DMO Group Call
Making a DMO Group Call via Gateway
While in DMO, pr ocee d as fo llow s to choo se a
gateway to set up a call for the selected
talkgroup:
1. Press
2. The display shows the last gateway type
Optns and select Gateway.
selection. Scroll to your selection and
Select:
press
DMO Options
Folder
TG by Folder
TG by abc
Trunked Mode
Gateway
Select Back
43
Page 54

• None: the MTH800 will not use a gateway
for that talkgroup.
• Automatic: the MTH800 will use the first
available gateway for that talkgroup. The
Gateway icon will flash until the terminal
finds an available gateway.
• Specific: the MTH800 will use a specific gateway for that
talkgroup.
Upon selecting “Specific”, you will see one of the following
displays:
• The selected gateway address (e.g.:
1022), pre-programmed by your Service
Provider or previously entered by yourself
via the keypad. Press
Ok to use the current
address, or enter a new address via the
keypad, and press
Ok. The Gateway icon
will flash until the terminal finds an available gateway.
• “None”, indicating that no specific gateway
was selected for that talkgroup. Enter an
address vi a the k ey pad , an d pr ess
Ok. The
Gateway icon will flash until the terminal
finds an available gateway.
Pressing
Back causes the following message
to be displayed for a few seconds: “No Specific Gateway
Was Selected”. The MTH800 exits the Gateway menu option
and the previous gateway type will be selected.
When the MTH800 is synchronised with the gateway, the
Gateway icon will be solid.
3. To place the call, proceed as explained on page 43.
If you press
PTT while the gateway is not available, you
will start a DMO call without gateway. The Gateway icon
will disappear.
If you press
PTT while the selected
gateway is available, but the call is
rejected by the gateway, your MTH800
will sound a tone and display the
44
GW Options
None
Automatic
Specific
Select Back
Selected
Gateway:
1022
Ok Back
Selected
Gateway:
None
Ok Back
Direct Call
Not Via
Gateway
Page 55

following screen, informing you that the call will be setup
without gateway. The Gateway icon will disappear.
If you press
PTT while the gateway is available, you will
start a DMO call with gateway. The Gateway icon will be
solid.
Receiving a DMO Group Call
You can receive a DMO Group Call only when your MTH800
is in DMO.
Y our MTH800 will display the caller’s private number or alias,
and the talkgroup name.
The following screens show examples of how the caller’s
identity can be displayed.
For call alert, see settings in the Vibrate menu option (page 81) and the
Tones menu option (page 85)
.
Receiving a DMO Group Call (not via Gateway)
Group In Use
DMO Folder 1
DMO TG4
Optns
Without alias and
Private ID
OR
Group In Use
ID: David
Open Group
Optns
Open Group Call
Group In Use
ID:124
DMO TG4
Optns
Private ID
without alias
OR
OR
Optns
Private ID
with alias
Group In Use
ID:...1234
TG4
Optns Network
InterMNI Ca l l
Group In Use
ID: David
DMO TG4
When an InterMNI call is received, you can press Network to
see the Network alias and/or number.
45
DMO Group Call
Page 56

Receiving a Group Call (via Gateway)
Group In Use
Folder 1
TG4
Optns
Without alias and
Private ID
OR
Group In Use
ID:124
TG4
Optns
Private ID
without alias
OR
The display shows the ID of the TMO caller.
Press
Optns to select a new gateway type (see page 44).
Receiving an Emergency Group Call
For detailed informat ion, see page 27.
Tra nsmi t Inhibit
For detailed informat ion, see page 39.
Exiting DMO
To exit DMO, press Optns and select Trunked Mode. For other
ways, see “Selecting TMO or DMO Operation” on page 23.
Group In Use
ID: David
TG4
Optns
Private ID
with alias
46
Page 57

Private Call
General
A Private Call, also called Point-to-Point or individual call, is a
call between two individuals. No other terminal can hear the
conversation. This cal l can be a full -dup lex call (if the syst em
allows) instead of the standard half-duplex call. In a fullduplex call, both participants can speak at the same time,
while in a half-duplex call, only one person can speak at a
time.
For operating the MTH800 in RF sensitive areas, see “Transmit Inhibit” on page 39.
While Transmit Inhibit is activated, an incoming Private Call is indicated, but it is not possible to answer the call.
Dual Microphone Feature
See “How to Hold Your MTH800” on page 13.
Making a Private Call
If you are in an on-going Group Call and wish to make a new call,
press to ignore the current call. Dial the number
.
1. From the Home display dial a number.
2. If Private is not the first type of call presented, press CType to select t he
Private #:
Private Call type.
3. For a half-duplex call, press and release the
PTT button. You will hear a ringing tone. Wait
for the called person to answer your call. (This
is also called a hook setup.) OR,
Press and hold PTT. Wait for the talk permit tone (if configured)
before talking, and release the PTT when listening. (This is a lso
called a direct setup.)
Ctype Delete
Private Call
2234
47
Page 58

For a full-duplex call, press and release . You will hear a ringing tone. Wait for the called person to answer your call.
4. To end the call, press .
If the called person or the infrastructure end the call, the Call
message is displayed.
Ended
While Transmit Inhibit is activated, an incoming Private Call is indicated, but you cannot answer the call.
Other Ways of Dialing
Dialing via Contact List
You can also use the contact list to select a number you previously
stored. Press Contcs and search the stored number by scrolling
( or ) or by entering the first character of the contact name.
If no name is stored under a letter, the
ward, alphabetically, until the next name is found. If more than one name in
the list begins with the same letter, scroll to view other names.
If the contact has more than one number stored, pickers surround
the contact icon
. Use / to select the number.
Short Number Dial
If set up by your Service Provider, Short Dial allows you to
dial part of the full number of the person you wish to call. Your
MTH800 will automatically complete the number and send it
over the air based on your own MTH800's identity. For
example:
1. Dial 456 (instead of 4282456, the full number).
2. To place the call, press the PTT
3. To hang up, press
or .
MTH800 automatically searches for-
or .
Recent Calls List
Select the number from the recent call list. See “Recent
Calls” on page 96.
48
Page 59

One-touch Dial
See “Programmable Numeric Keys” on page 20.
Calling a Number in a Message
See “Calling a Number in a Message” on page 109.
Receiving a Private Call
1. The MTH800 switches to the incoming Private Call. The display
shows the caller’s identity.
2. To answer an incomi ng half-duplex call, press PTT. To answer an
incoming full-duplex call (indicated by Spkr/Earpc keys), press
.
3. To end the call, press .
Your terminal can alert you of an incoming call. Select the alert settings in
the Vibrate menu and Tones menu items
Making a Private PPC (Preemptive Priority Call)
This feature is only available if set up by your Service Provider.
1. Enter the private number and press PTT
or .
2. If the display shows the called user is
busy, press
Yes to interrupt the on-going
call.
3. You will hear a ringing tone. Wait for the
called person to answer your call.
4. Continue the call as in a regular half-duplex or full-duplex
Private Call.
David
Busy
Interrupt?
Yes No
Private Call
49
Page 60

Call Queuing
When there are no available infrastructure resources for a
call while in a setup phase, or while in an active call during
cell re-selection, the call will be queued. The MTH800 will
remain in queue for a pre-programmed period of time. If the
resources become available, the call will proceed. If there are
no resources after a certain period of time, the MTH800 will
end the call.
50
Page 61

Phone and PABX Calls
General
The Phone Call allows you to call a landline telephone
number or a cellular mobile phone number. The Private
Automatic Branch Exchange (PABX) Call allows you to
call local (office) extension numbers. This type of call needs
to be activated by your Service Provider.
In this publication we use “phone number” when referring to
these numbers.
Both calls have the same dialing features.
For operating the MTH800 in RF sensitive areas, see
“Transmit Inhibit” on page 39.
While Transmit Inhibit is activated, an incoming Phone or PABX
Call is indicated, but it is not possible to answer the call.
Dual Microphone Feature
See “How to Hold Your MTH800” on page 13.
Making a Phone or PABX Call
Phone and PABX Calls
If you are in an on-going Group Call wish to make a new call, press to
ignore the current call. Dial the number
1. From the Home display dial a number.
If Phone or PABX are not the first type of
2.
call presented,
select the Phone or PABX Call type.
3. Press and releas e . Yo u will hear a ring ing
tone. Wait for the called person to answer
your call.
4. To end the call, press .
press CType repeatedly to
.
Phone #:
03671234
Ctype Delete
51
Page 62

Other Ways of Dialing
Dialing via the Contact List
You can also use the contact list to select a number you previously
stored. Press Contcs and search the stored number by scrolling
( or ) or by entering the first char acter of th e cont act name. If
the contact has more than one number, use / to select the
number.
If no name is stored under a letter, the MTH800 searches forward, alphabetically, until the next name is found. If more than one name in the list
begins with the same letter, scroll to view other names.
If the contact has more than one number stored, pickers surround
the contact icon
. Use / to select the number.
Speed Dial
Speed dial allows you to dial a shortened number of up to
three digits instead of the full number. The speed dial number
is the location of an entry in the contact list.
1. Enter the pre-programmed speed dial number (for example: 5) and press .
2. To place the call, press .
3. To hang up, press .
One-touch Dial
One-touch dialing allows you to place a call by pressing and
holding one of the numeric keys (0-9) or side keys. The
number is the location of an entry (0-9) in the contact list.
1. Press and hold the required numeric key for a few sec
onds. Your MTH800 will display the number and dial it.
2. To hang up, press .
If dialing via one-touch numeric key is enabled, one-touch dial is
disabled (see page 20).
52
Page 63

DTMF Overdial
If set up by your Service Provider, DTMF
allows you to communicate with an
automated answering device (for example,
the voice mail or answering machine) during
an on-going call.
While in an on-going call, press the DTMF
keys (0-9, *, #). When pressed, the DTMF
key will sound a tone and the entered digit will be displayed
on the screen.
Recent Calls List
Select the number from the recent call list. See “Recent
Calls” on page 96.
Calling a Number in a Message
See “Calling a Number in a Message” on page 109.
Answering a Phone or PABX Call
1. The MTH8 00 switches to the incoming Phone/PABX Call.
2. T o answer the incoming call, press or any other key if
programmed (except Home/End/On-Off key).
Phone and PABX Calls
<animation>
Phone In Use
12345*#67890
3. To end the call,
press .
If the called person or the infrastructure end the call, the
message is displayed.
Ended
For call alert, see settings in the Vibrate menu option (page 81) and the
Tones menu option (page 85)
.
Call
53
Page 64

Emergency Operation
General
Emergency Op er at i on i s a va il a bl e in TM O a n d i n D MO , if t h e
MTH800 is in service.
Dual Microphone Feature
See “How to Hold Your MTH800” on page 13.
Entering TMO or DMO
See “Selecting TMO or DMO Operation” on page 23.
Important Inform ation
• The required time you need to press the Emergency button is set by
default to 0.5 seconds. The time can be configured by your Service Provider.
• Pressing the Emergency button even if Transmit Inhibit is activated
causes immediately the MTH800 to transmit. When entering Emergency
Operation the MTH800 should not be within the RF sensitive area any
longer!
• The MTH800 interrupts the AL call when you press the Emergency button.
• For call alerts, see settings in the Vibrate menu option (page 81) and the
Tones menu option (page 85)
.
Emergency in TMO
Overview
Please check with your Service Provider for the configuration
of your terminal.
Your terminal may be configured with one of the following:
• Emergency Group Call
The terminal will enter Emergency Mode when you press
and hold the Emergency button.
54
Page 65

The Emergency Mode allows you to use the PTT to transmit
with Emergency priority (by either initiating an Emergency
Group Call or requesting emergency transmit priority).
After entering Emergency Mode, you may send an
Emergency Alarm (if configured) and then start the
Emergency Group Call and activate Hot Microphone (if
configured).
The Emergency Alarm is a special Status message sent to
the infrastructure before the Emergency Group Call starts.
The terminal may wait for infrastructure acknowledge for this
Alarm and attempt retries. Each time you press the
Emergency button, the terminal will send an Emergency
Alarm.
Hot Mic (Hot Microphone) allows you to talk without pressing
the PTT. Pressing PTT during Hot Mic ends Hot Mic
transmission. Pressing the End soft key ends Hot Mic
activity. If Hot Mic is disabled, then use PTT to talk.
• Emergency Private Call (half-duplex or full-duplex)
The terminal will start an Emergency Private Call to a pre-
defined ID when you press and hold the Emergency button.
If an Emergency Private Call gets modified to an Emergency
Group Call, the terminal will enter Emergency Mode and will
leave the Emergency Mode when the call ends.
Emergency Operation
Changing Folder or Group
See Group Call section on page 32.
Entering or Exiting Emergency Mode
Upon entry into Emergency Mode any existing call or service
other than packet data service will be aborted or cleared
down.
In Emergency Mode, the terminal will automatically reject
Phone, PABX and Private Calls, and will not monitor the
groups in the user selected scan list. If an ATG is the
selected group, however, the terminal will monitor the sub-
55
Page 66

groups associated with the ATG. The terminal will remain in
Emergency Mode until you exist it.
Press and hold the Emergency button to enter
Emergency Mo de.
When the MTH800 is Off, press this button to
power the MTH800 On in Emergency Mode (if
configured).
The terminal exits Emergency Mode and
switches to the Home display:
• If you press and hold the Exit
gency Group Call
.
soft key during an Emer-
• If the infrastructure ends the Emergency Group Call.
Sending an Emergency Alarm
Your MTH800 will send an Emergency Alarm to the
dispatcher (if configured by your Service Provider):
• Automatically, upon entering Emergency Mode.
• If you press the Emergency button while the MTH800 is in
Emergency Mode.
• If you change group while in Emergency Mode.
The screen will show one of the following delivery reports:
• Alarm Sent
• Alarm Failed
In both cases, the screen returns within a few seconds to the
main screen of the Emergency Mode.
Emergency
Folder 1
Talkgroup 1
Hello
Optns Exit
56
Some systems do not support the Emergency Alarm feature when the user
is in a “Local Area Service” area (see page 30).
Page 67

Making an Emergency Group Call
While in an Emergency Group Call, you can still perform group operations
(such as changing group/folder, searching for a group, or entering the My
Groups folder).
To initia te or answer a call while in Emergenc y Mode :
• Press and hold PTT.
• Wait for the talk permit tone (if configured) and talk.
• Release PTT to listen.
For the delivery reports, see “Sending an Emergency Alarm”
above.
You can also participate in an Emergency Group Call
(initiated by others) in Emergency Mode or in a standard
Group Call.
Hot Microphone Feature
If the Hot Microphone feature was programmed into your
MTH800 by your Service Provider, you can make an
Emergency Group Call without the need to press and hold
the PTT.
The following will happen upon entering Emergency Mode:
1. The MTH800 will automatically send an Emergency
Alarm to the dispatcher (if configured by your Service
Provider).
2. A Talk permit tone will be heard.
3. The following typical display will appear:
The microphone will stay open for a time
period determined and programmed by
your Service Provider.
After the Hot Microphone time period expires,
or if you press PTT during the Hot Microphone
period, or if you press
message will be displayed.The talk session ends. To
resume, press the Emergency button again.
End soft key: the Hot Mic Ended
Hot Mic On
Folder 1
Talkgroup 1
Optns End
Emergency Operation
57
Page 68

If talk permit is granted to another member of
the group, an “Emergency call received” tone
will be heard. If configured by your Service
Provider, your
attempt to get talk permit again and the
For Mic
message will be displayed.
During this pending time the MTH800 microphone is not active until the
Emgcy Mic On message is displayed again.
MTH800 will automatica ll y
Wait
Receiving an Emergency Group Call
A terminal in TMO receives an Emergency Group Call to the
selected group, associated ATG (Announcement Talkgroup),
or scanned group. If the ATG is the currently selected group,
the terminal will receive the Emergency Group Call to the
group associated with this ATG. (For information on the ATG,
see page 32.)
When the
Emgcy In Use and the caller’s identity.
If upon entering Emergency Mode, your MTH800 receives an
Emergency call, and Hot Microphone was enabled by your
Service Provider, the Wait For Mic message will be
displayed. Your MTH800 will attempt to get a talk permit.
The caller’s voice will always sound via the speaker (unless
an external earpiece is connected to the terminal.
If configured by your Service Provider, the screen
background will be red.
MTH800 receives the call, the display will show
Emgcy In Use
ID:David
Wait For Mic
Optns End
Making an Emergency Private Call
• Press and hold the Emergency button.
• The terminal will start the call as a half-duplex or fullduplex call (as programmed). The Emergency ID is predefined and is not displayed.
• Continue the call as you would do in a half-duplex or fullduplex call.
58
Page 69

Receiving an Emergency Private Call
• The tallker’s identity is displayed when the terminal
receives the half-duplex call.
• When the
Emergency Prvt In Use and the caller’s identity.
• If configured by your Service Provider, the screen background will be red.
• Continue the call as you would do in a half-duplex or fullduplex call.
terminal receives the call, the display will show
Modifying the Type of Call
The infrastructure can modify on-going calls as follows:
• Emergency Group Call to Emergency Private Call, and
vice versa.
• Anyone of the above to a Phone Call.
If Hot Mic is interrupted when the modification occurs, the
display will show the Hot Mic Ended message.
Continue the modified call depending on the type of call.
Emergency in DMO
General
You can initiate an Emergency Group Call to a group.
You can receive an Emergency Group Call:
• From the selected talkgroup
• From other users within talkback range (if configured by
your Service Provider). This is called an InterMNI call.
• From an open group. (An open group is a super-group to
which all DMO groups belong.)
Emergency calls can be placed via gateway. For gateway
settings, see the DMO section, page 43.
Emergency Operation
59
Page 70

Changing Folder or Group
Proceed as explained in the Group Call section, page 32.
Making an Emergency Group Call
To initiate or answer a call:
• Enter Emergency Mode by pressing the Emergency button.
• Press and hold PTT.
• Wait for the talk permit tone (if configured) and talk.
• Release PTT to listen.
Receiving an Emergency Group Call
• The display shows “Emrgncy-In Use” and the caller’s identity as a private number or an alias.
• The caller’s voice will always sound via the speaker
(unless an external earpiece is connected to the terminal).
• If configured by your Service Provider, the screen background will be red.
• If the incoming call is an InterMNI call in Emergency Mode,
you can view network info rmation by pressing Optns and
selecting Network.
• If the incoming call is an InterMNI call not in Emergency
Mode, you can view network information by pressing Net-
work.
60
Page 71

GPS Location Services
Your terminal’s GPS Location feature uses information from
Global Positioning System (GPS) satellites orbiting the Earth
to determine the approximate geographical location of your
terminal. The availability and accuracy of this location
information (and the amount of time that it takes to calculate
it) will vary depending on the environment in which you are
using the terminal.
For example, GPS location fixes are often difficult to obtain
indoors, in covered locations, between high buildings, or in
other situations where you have not established a clear
broad view of the sky.
SEE: IMPORTANT: Things to Keep in Mind.
The GPS location Service can assist your Dispatcher or
Colleagues in many ways such as more efficient deployment
of resources or locating your terminal if you trigger your
emergency service.
The terminal can be configured to display location
information on the terminal’s display or to send it over the air
to your dispatcher where it can be displayed in control center
(Please check with your Service Provider on the
configuration of your terminal).
IMPORTANT: Things to Keep in Mind
Where adequate signals from multiple satellites are not
available (usually because your terminal cannot establish a
view of a wide area of open sky), the GPS feature of your
terminal WILL NOT WORK. Such situa t ion s incl ude but are
not limited to:
• In underground locations
• Inside of buildings, trains, or other covered vehicles
• Under any other metal or concrete roof or structure
• Near a powerful radio or television tower
GPS Location Services
61
Page 72

• When your GPS antenna is covered (for example, by your
hand or other object) or facing the ground
• Ιn temperature extremes outside the operating limits of
your terminal
Even where location information can be calculated in such
situations, it may take longer to do so. Therefore, in any
emergency situation, always report your location to your
dispatcher.
Furthermore, please note that even where adequate signals
from multip le satellites are available, your GPS feature will
only provide an approximate location, often within 20 - 100
meters from your actual location.
Enhancing GPS Performance
Sometimes the GPS feature of your terminal may be unable
to complete a location calculation successfully. You will then
see a message indicating that your terminal cannot see
enough visible satellites.
To maximize the ability of your terminal to determine a
location fix please note the following guidelines:
• Stay in the open. The GPS feature works best where there
is nothing between your terminal and a large amount of
open sky. If possible, go outside, away from tall buildings
and foliage. While performance in a building is improved
by moving closer to windows, glass with certain sun
shielding films may block satellite signals.
• Position your terminal to enhance reception. Signals from
GPS satellites are transmitted to your GPS antenna, which
is in your terminal antenna. Hold your terminal away from
your body, giving the antenna clear access to satellite signals. Do not cover the antenna area with your fingers or
anything else.
62
Page 73

• Stand still. If possible, stand still until your terminal is finished determining your location. Moving your terminal at a
walking pace while your terminal is calculating your
approximate location may substantially decrease GPS
performance.
• In a car. When using the GPS feature in a car, position
your terminal so that the GPS antenna has good access to
GPS signals. Typically, the GPS antenna has best access
to GPS signals in a car when placed near a window.
GPS Icon
When your terminal is receiving valid GPS location data, a
GPS icon will be shown in the display:
Please note, that during emergency mode, your terminal will
not display the GPS icon even when receiving GPS location
data. If valid GPS location data is available when you leave
emergency mode the GPS icon will be displayed again.
GPS Enable/Disable
1. From the main menu, press and
select More...> Location > Interface.
The current selection (On/Off) is highlighted.
Select the new choice. The display shows:
• Location Service Off
• Location Service On
Interface
N
E
U
M
On
Off
Select Back
GPS Location Services
63
Page 74

Entering GPS Location Service
N
E
U
To enter the GPS sub-menu, press and
select More...> Location:
• Position provides the actual position infor-
mation.
• Interface allows you to enable/disable the
GPS location service.
• Testpage provides the actual satellite information.
Scroll to your selection and press
display.
This estimate of accuracy of the calculated location is only a
very rough estimate and may vary substantially from the
actual accuracy of the approximate location information
reported.
• The variation will vary in accordance to the GPS Configuration set by
your Service Provider.
• The availability of the GPS Location menus is dependent on your terminal configuration, please contact your Service Provider for further
details.
M
Select to access the next
Location
Position
Interface
Testpage
Select Back
Viewing Your Position
N
E
U
1. From the main menu, press and select More...> Location > Position.
2. Scroll to view the entire screen.
This displays the following information about
the last time your location was calculated (if available):
• The time the location was last calculated
• The latitude expressed in degrees, minutes, and seconds
• The longitude expressed in degrees, minutes, and sec-
onds
• The altitude expressed in meters
• The number of satellites used to calculate the location. In
general, more satellites make for better accuracy. The
maximum is twelve satellites.
To calculate your location again, press Rfrsh.
64
M
Position
<Time>
<Latitude>
<Longitude>
<Altitude>
<Tracked satellites>
Rfrsh Back
Page 75

It may take your terminal several minutes to complete the
process of determining your location. During this time, a
message usually appears on your terminal’s display stating:
• Insufficient Visible Satellites, or
• Insufficient Visible Data
For tips on getting the best location calculation, see
“Enhancing GPS Performance” on page 62.
The Position screen displays the updated information.
To cancel a location calculation before it is completed:
Press Back to return to the previous screen.
Each time approximate location of your terminal is
calculated, the latest location information is stored in your
terminal and remains there even when your terminal is
powered off. You will see this information the next time you
view the Position screen.
If you received a terminal call or alert while attempting to
determine your location, the Position screen will disappear,
but your terminal will continue attempting to determine its
location. If it is successful, the new location information will
be displayed the next time you view the Position screen.
GPS Testpage
Satellite Almanac Data
Government officials maintains an almanac of data about
where GPS satellites are as they orbit the Earth. This
information is available to your terminal. Keeping your
satellite almanac up to date helps your terminal determine
your location more quickly.
The almanac contains information about the location of
satellites, their operational status, and other satellite
information.
GPS Location Services
65
Page 76

In most cases, your terminal will be able to get a fix in strong
satellite signal conditions with outdated almanac data, but it
may take longer.
When you make an Emergency Call, your terminal does not rely upon the
almanac to determine your location.
Entering the Testpage
The Testpage provides GPS information (such as the
number of satellites used, the strength of each one, etc.).
N
E
U
1. From the main menu,
select More...> Location > Testpage.
2. Scroll to your selection and press
to access the next display.
Position
1. From the main menu,
press and select More...> Lo-
cation > Testpage > Position.
2. Scroll to your selection and press Select to access the
next display.
This displays the following information about
the last time your location was calculated:
• The time the location was last calculated
• The latitude expressed in degrees, min-
utes, and seconds
• The longitude expressed in degrees, min-
utes, and seconds
• The altitude expressed in meters
• The number of satellites used
• The bearing (B) - refers to the direction to
a waypoint
• The horizontal speed (HS)
• The level of confidence in percent (LC)
M
press and
Select
N
E
U
M
Testpage
Position
Power
Version
Select Back
Position
<Time>
<Latitude>
<Longitude>
<Altitude>
<Tracked satellites>
Rfrsh More
Position
<Tracked satellites>
<Bearing>
<Horizontal Speed>
<
Level of Confidence>
Rfrsh Back
66
Page 77

Power
N
E
U
1. From the main menu,
M
press and select More...> Lo-
cation > Testpage > Power.
2. Scroll to your selection and press Select to access the
next display.
This displays a list of satellites. Scroll to your selection and
press Select to access the data for each satellite:
• Satellite PRN (Pseudo Random Noise)
number (i.e., the satellite ID number)
• Satellite Status
• Satellite Mode
• Satellite Carrier-to-Noise (C/N) ratio (i.e.: a
power ratio of wanted to unwanted signal,
expressed in decibels).
Satellite Status indicates the Channel status. Channel
assignments only persist until the Phoenix IC computes a
new visible list (which happens periodically in the Phoenix IC
after position fix). Satellites above the horizon will remain on
their assigned channels. Satellites below the horizon will be
removed from their pseudo-channels.
The possible values are:
• 0- Searching
• 1- Detecting
• 2- Acquiring
• 3- Frequency locking
• 4- Bit sync detecting
• 5- Tracking
• 6- Time decoding
• 7- Ephemeris decoding
• 8- Available for fix
• 9-11 - Reserved
Power
PRN: 0
HW: 0
ASIC: 0
RC: 0
Rfrsh Back
GPS Location Services
67
Page 78

Satellite Mode indicates which parameters are valid upon
input. The remaining parameters are ignored. On output, the
Mode indicates which parameters have been measured or
calculated.
The possible parameters are:
• Doppler
• Doppler Uncertainty
• Code Phase
• Code Phase Uncertainty
• Data Phase
• Data Bit
• Azimuth
• Elevation
Version
N
E
U
1. From the main menu,
M
press and se-
lect More...> Location > Testpage >
Version.
2. Scroll to your selection and press Select
to access the next display.
This displays the following information about the software
used to calculate the location:
• Software Version (SW) - the version of the firmware
installed on the Phoenix Integrated Circuit (IC).
• Hardware Version (HW) - the version of the Phoenix IC
• ASIC (Application Specific Integrated Circuit) Version
• Release Code (RC)
68
Version
SW: 0
HW: 0
ASIC: 0
RC: 0
Rfrsh Back
Page 79

The Menu
To Enter the Menu Items
Y ou can enter the menu items during a call. If you are viewing
a menu when a new call starts, the terminal will exit the
menu.
N
E
U
1. Press .
2. Scroll to the required item, press Select or to select.
Or use shortcuts to access frequently-used menu items. (See
“Shortcuts” on page 99.)
If the menu item contains a further set of menu items as in
the example below, repeat step 2.
Navigating Menu Items
Network 1
Folder 1
Police
Hello
Optns Contcs
N
E
U
M
When scrolling up/down menu items, try also right/left
scrolling. (This will select the item or return to previous level.)
M
1st Sub-menu 2nd Sub-menu 3rd Sub-menu
Main Menu
Messages
Contacts
Security
Setup
More...
Select Back
Setup
Vibrate
Ring Style
Set Volume
Language
Data Setup
Select Back
Select Back
Vibrate
Vibe & Ring
Vibe Only
Ring Only
Details...
The Menu
In a list press and hold for automatic scrolling.
To Return to the Previous Level
Press Back or .
69
Page 80

To Exit the Menu Items
Press .
Your MTH800 may exit if no key presses are detected for a time-out period.
Menu Icons
The following icons make it easy to identify the menu items at first
glance.
Menu Icon Description
Main Menu Items/Context Sensitive Menu
N
E
U
Appears above if the main menu items/contex t
sensitive menu are active.
Messages
• Send status messages,
• Send short text messages (free text or according to user
defined or predefined templates),
• Receive messages in Inbox.
Contacts
Add, search, edit, or erase entries in the contact list.
Security
Lets you turn On/Off and verify security features, and change
passwords.
Setup
Allows you to customise your MTH800.
M
70
More...
Contains more customisable menu items.
Scroll Bar
Indicates navigation among items that occupy more than one
screen. If all items appear in one screen, the scroll bar is
empty.
Page 81

List of Menu Items
Messages
New Message
Inbox
Templates
Predefined
Send Status
The Menu
Contacts
Security
Setup
<New Contact>
<Name 1>
<Name 2>
...
PIN Protect
Change Code
Keylock
Air Encrypt
K Validity
SCK Validity
Vibrate
Ring Style
Set Volume
Language
On
Off
Vibe & Ring
Vibe Only
Ring Only
Details ...
<9 styles>
English
Deutsch
Français
Español
Nederlands
<User Defined>
Ring Calls
Vibe & Ring
Vibe Only
Ring Only
Group Call
Vibe On
Vibe Off
Vibrate Messages
Vibe & Ring
Vibe Only
Ring Only
Ringer Vol
Earpiece Vol
Speaker Vol
Keypad Vol
See next page
Data Setup
Voice Only
Data Only
Voice & Data
71
Page 82

List of Menu Items (Cont’d)
Setup
(cont’d)
More...
Group Audio
Tones
Display
Group Setup
Always Loud
Spkr Cntrl
On
Keypad Tone
All Tones
Talk Permit
Clear to send
Flip Display [On/Off]
Text Size [Zoom/Standard]
Screen Saver [Auto/Disabled]
Backlight [Auto/Disabled]
Wallpaper [On/Off]
Contrast
Scan
My Groups
Off
On
Off
No Tone
Short Tone
Normal Tone
Tone On
Tone Off
Scanning
On/Off
Select List
Active List
Scan List(s)
<20 lists>
Select
Edit List
72
My Info
Recent Calls
Shortcuts
Networks
My Private Num
My Phone Num
Dialed
Received
Missed
<New Entry>
<shortcut name>
Networks Sel
Trunked Mode
Direct Mode
TXI Mode
Home Only
Select Net
Activate
Deactivate
Page 83

List of Menu items (Cont’d)
More...
(cont’d)
Testpage
(cont.)
Location
Position
Power
<Time>
N:<Latitude>
E:<Longitude>
H:<Altitude>
Position
Interface
Testpage
<Time>
N:<Latitude>
E:<Longitude>
H:<Altitude>
Sats Used:<Number of satellites used>
B:<Bearing>
HS:<Horizontal Speed>
LC:<Level of Confidence>
<1 Satellite>
<2 Satellite>
<3 Satellite>
<4 Satellite>
... <up to 12>
Sats Used:<Tracked satellites>
On
Off
<Satellite PRN>
<Satellite Status>
<Satellite Mode>
<Satellite C/N>
The Menu
SW: <Software Version>
Version
HW: <Hardware Version>
ASIC: <ASIC Version>
RC: <Release Code>
This is the standard menu layout. Your Service Provider may
enable/disable some menu items or change their names.
73
Page 84

Messages
Refer to “Messages” on page 104 for details.
Contacts
General
Contacts stores Private, Phone, and PABX numbers. Each
Contacts entry can store several numbers. A Contacts entry
contains:
• A name—A name is required if you are storing more than
one number to the entry; otherwise, it is optional. Typically,
this is the name of the person whose contact information is
stored in the entry.
• A Contacts type—Each number stored must be assigned a
Contacts type.
• A number—Each Contacts entry must contain a number.
This may be any type of phone number and Private ID.
• A Speed Dial number — When you store a phone number,
it is assigned a Speed Dial number. You can accept the
default Speed Dial number or change it.
Contact Icons
In the contact list display, the following icons may appear
next to the contact numbers to indicate the type of stored
number.
74
Contact Icon Description
Private ID Number
Mobile Phone Number
Home Phone Number
Work Phone Number
Page 85

Contact Icon Description
PABX Number
Other Phone Number
Pickers
Indicate more than one number is
stored with the contact.
Creating a Contact
1. From the Home display, press Contcs.
Select [New Contact].
Or - from the main menu select
Contacts. Select [New Contact].
Or - while editing the list from the
Contacts Menu, select [New Contact].
2. Enter name. (For details on text editor use, see “Writing
Text” on page 114). Press Ok to confirm.
3. Scroll left or right and select the type of stored number
(such as Private).
4. Enter number (#). Press Ok.
5. Scroll up and down the entries. Continue to enter other
types and numbers, as you may keep several numbers
(Private, Mobile, Home, Work, PABX, Other) for the same
person under the same contact name. T o correct an entry,
press Change.
6. When finished, press Done. Press Back to return to
Home display.
Contacts
[New Contact]
David
Ann
Ray
2255
Select Back
The Menu
75
Page 86

Editing a Contact
1. From the contact list, scroll to the entry you want to edit.
N
E
U
2. Press to enter Contacts. Select Edit. The entry de-
M
tails screen displays.
3. Follow the instructions in “Creating a Contact” on page 75
to edit the various fields.
Deleting a Number
1. From the contact list, scroll to the entry that contains the
number you want to delete.
2. Scroll left or right to display the contact type for the num-
ber you want to delete.
N
E
U
3. Press .
M
4. Select Delete Number.
5. Press Yes to confirm.
If an entry contains only one number, deleting the number deletes the entry.
Deleting a Contact
1. From the contact list, scroll to the entry you want to delete.
N
E
U
2. Press .
M
3. To delete the entire entry, select Delete Contact.
4. Press Yes to confirm.
Checking Capacity
To see how many numbers are stored in Contacts:
N
E
U
1. From the contact list, press .
2. Select Capacity.
3. Select the contacts to check. Select Back to exit.
76
M
Page 87

Security
From the main menu, select > Security.
PIN Protect
Network access protection is configured by
your Service Pro vider:
• No access to network operation
only send or receive Emergency Calls and
adjust the volume level. Unit lock takes effect at the next
power on.
To protect access to network operation:
1. From the main menu, select > Security >
is highlighted.
2. Press
3. At the
Select.
Code? prompt enter the 4-digit code (factory setting
0000). To avoid disclosure of the code, asterisks are displayed instead of the code digits. The display will show
the following message:
Unit Locked—you entered the correct code. The display
returns to the Security sub-menu and shows the active
setting:
On.
To unlock the MTH800 before powering off:
1. From the main menu, select > Security >
is highlighted.
2. Press
Select.
3. At the Code? prompt enter the 4-digit code.The display
will show the following message:
Unit Unlocked—you entered the correct code. The display
returns to the Security sub-menu and shows the active
setting:
Off.
To unlock the MTH800 after powering on, enter the code at
the prompt. The MTH800 enters the Home display.
If you fail to enter the correct code, the following message will
be displayed:
— you can
PIN Protect. On
PIN Protect. Off
Security
PIN Protect
Change Code
Keylock
AirEncrypt
K Validity
Select Back
The Menu
77
Page 88

Incorrect Code Entered—You are prompted to try again. After
failing, your MTH800 will be blocked. Please check with your
Service Provider how many failed attempts are allowed.
How to unblock the MTH800
The display shows
Unit Blocked. Y ou send or receive calls an
Emergency Call.
To unblock the MTH800, enter the PUK (Personal
Unblocking Key). The PUK is an eight-digit master code to be
obtained from your Service Provider.
After entering the PUK successfully, you will be prompted to
replace the forgotten code.
At the
New Code? prompt enter the new 4-digit code, and
repeat the code to confirm. If the code does not match, you
will be prompted to enter it again until the new code message
is accepted.
Change Code
From the main menu, select > Security > Change Code.
The default PIN code is 0000.
At the Old Code? prompt, enter the 4-digit code. If the old
code does not match the entered code at verification, the
display prompts you to re-enter the old code.
If the entered code matches the old code, the display
prompts you to enter a new 4-digit code and to repeat it for
confirmation. If the confirmation code does not match the
new code, the display prompts you to re-enter the new code.
When the new code is accepted, the display returns to the
Security sub-menu.
78
Page 89

Locking/Unlocking the Keypad
To prevent accidental key/button press es:
N
E
U
1.
Press OR,
From the main menu, select > Security >
keypad is locked except .
2. To unlock the keypad,
When there is an incoming call and the keypad is locked, you can still use
M
N
E
U
M
press .
The Menu
Keylock. The
the PTT, rotary knob, , and
The Emergency button is not locked. Entering Emergency Operation,
unlocks all keys.
.
Air Encryption On/Off
From the main menu, select > Security > AirEncrypt.
This sub-menu allows you to view air encryption On/Off state.
Call encryption provides service confidentiality between you
and the system.
If encryption is on and you receive a clear call (unencrypted),
the
MTH800 will display a Call & Data Not Encrypted
message.
You cannot manually disable Air Encryption (if fitted) from the menu. This
sub-menu only indicates if Air Encryption is enabled at that moment.
The Air Encryption feature is ONLY enabled depending on your Service Provider.
79
Page 90

Encryption Key Deletion
Please check with your Service Provider whether the
terminal is provided with air interface encryption keys.
You can delete the air interface encryption keys from the
terminal by entering the following sequence from the keypad:
**00##
CAUTION!
Using this feature will disable the terminal, and your Service Provider will need to re-enable the terminal.
Deletion should be performed in idle TMO/DMO or Emergency Operation.
K Validity
From the main menu, select Security > K Validity.
K (Key) is a secret key the infrastructure uses to authenticate
the MTH800 in the system. It is part of the authentication that
provides service confidentiality between your MTH800 and
the system.
To verify K validity, press
the following messages:
•
K is Valid—the infrastructure can authenticate your
MTH800.
•
K is Invalid—the infrastructure shall not authenticate your
MTH800. Please call your Service Provider to restore K to
your MTH800.
Select. The display will show one of
80
Page 91

SCK Validity
From the main menu, select Security > SCK Validity.
SCK (Static Cipher Key) is a secret key the infrastructure
uses to encrypt call and data in the system. Air interface
encryption provides service confidentiality between your
MTH800 and the system. Your MTH800 should be provided
with a set of SCKs.
T o verify SCK validity, press
Select. The display will show one
of the foll owing messages:
•
SCK is Valid—your MTH800 can work encrypted.
•
SCK is Invalid—your MTH800 cannot work encrypted.
Please call your Service Provider to restore SCKs to your
MTH800.
Setup
Entering the Setup Sub-menu
From the main menu, select > Setup.
This sub-menu allows you to change your
MTH800 configuration: vibrate, ring style,
volume, language, data setup, speaker,
tones, and display.
Setting the Vibrate Feature
This sub-menu allows you to determine if
your MTH800 vibrates, or rings, or both
vibrates and rings when receiving a call.
To change the Vibrate setting:
1. From the main menu, select Setup
Vibrate.
2. Scroll through the settings.
3. Select required setting, and press
The Vibrate settings mentioned above apply for all calls. Your
MTH800 can associate different Vibrate settings for different
calls.
>
Back to exit.
Setup
Vibrate
Ring Style
Set Volume
Language
Data Setup
Select Back
Vibrate
Vibe & Ring
Vibe Only
Ring Only
Details...
Select Back
The Menu
81
Page 92

To make specific Vibrate settings for different calls:
1. From the main menu, select Setup
brate > Details.
2. Choose which type of call that you want
to modify its Vibrate settings, and press
Select.
Ring calls are Phone calls, PABX and Full-Duplex Private calls. Calls are
Group, Emergency and Private (in half-duplex). Vibrate Message (Vibrate
Msgs) are Status Messages and Text Messages.
> Vi-
Details...
Ring Calls
Group Call
Vibrate Messages
Select Back
3. Select the required setting, and press
Select. Press Back to exit
If you chose Ring Calls or Messages, the settings
available are Vibe & Ring, Vibe Only or Ring Only.
If you chose Group Call, the settings available are Vibe
On or Vibe Off only.
Setting the Ring Style
This sub-menu allows you to set the
incoming call ring style. Your MTH800
features nine selectable ring styles.
From the main menu, select Setup >
Volume.
Upon entry into this sub-menu, the display shows the current
ring style used.
Scroll to the desired style and pr ess
ring s tyle immediately for a few seconds. If necessary, adjust
the volume level.
Set. Y ou w ill he ar t he new
Ring Calls
Vibe & Ring
Vibe Only
Ring Only
Select Back
Group Call
Vibe On
Vibe Off
Select Back
Ring Style
British
Style 2
Style 3
French
German
Select Back
82
Page 93

Setting the Volume
Once in the menu, select 3 Set Volume.
This sub-menu allows you to adjust the
ringer, earpiece, speaker, and keypad tone
volume.
To set the volume:
1. From the main menu, select Setup >
Volume.
2. Scroll through the list.
3. Choose the required item, and press
Change.
4. Adjust the volume level. A feedback tone is heard, and a
volume level bar is displayed.
5.
Press Back to exit.
Setting the Display’s Working Language
From the main menu, select Setup >
Language
The display shows the current language
used. You can customize your
operate in English, German, French,
Spanish, Dutch, or in a language defined by
your Service Provider. The default setting
from factory is English.
Scroll to the desired language and press
shows the selected language for a few seconds.
.
MTH800 to
Select. The display
Volume
Ringer Vol: 0_
Earpiece Vol: 1_
Speaker Vol: 1_
Keypad Vol: 0_
Change Done
Language
English
Deutsch
Français
Español
Nederlands
Select Back
The Menu
Setting Up the Data Function
Y ou can connect the MTH800 to an external device (such as
a laptop or desktop PC). The
of transmitting and receiving data from the external device.
To connect the
MTH800 accessory connector to the external
device, use cable FKN4897. The external device must run an
application complying with the TETRA standards.
MTH800 will then be capable
83
Page 94

From the main menu, select Setup > Data
Setup
.
The display shows the current setting:
1.
Voice Only—The MTH800 will receive
and transmit voice calls only.
2.
Data Only—The MTH800 acts as a modem. The
Data Setup
Voice Only
Data Only
Voice & Data
Select Back
MTH800 will reject incoming and outgoing voice calls (except for Emergency Calls), status and text messages.
3.
Voice & Data—The MTH800 acts as a modem but voice
calls will have priority over data calls and will interrupt
them.
Scroll to the desired setting and press
Select.
In Data Only and in Voice & Data, the Data Connected icon is
displayed after you have connected the
MTH800 to the
external device and the MTH800 is ready for data transfer.
The Data Transmit/Receive icon is displayed to indicate data
is being transferred to/receiv ed from the external devi ce .
The MTH800 ends the AL call and the microphone is closed
when the MTH800 is in one of the following states:
• Entering the out-of-service area
• Outgoing packet data call setup
To exit data, return to
Data Setup and select Voice Only. The
MTH800 returns automatically to Voice communication.
Data services are available only in TMO. Data Services are blocked in TXI
Mode.
When set to Voice Only, the built in data modem is disabled to conserve
battery power.
Setting Group Audio
You can control audio routing (speaker/earpiece) for any Private or
Group Cal l via the dedicated Speaker Control key (see page 21.)
You can also define via the menu to have all Group calls in high
audio or controlled by the Speaker Control key.
84
Page 95

1. From the main menu, select Setup > Group Audio.
2. The display shows the current audio setting. When set to
Always Loud, the audio sounds from the speaker (high
audio). When set to Speaker Control, the audio will sound
from the earpiece or the speaker, per Speaker Control
key use.
3. Select the required setting.
Setting Tones
From the main menu, select Setup > Tones.
This sub-menu allows you to activate/
deactivate the MTH800 tones.
For a detailed list of tones, see “Tones” on
page 128.
Setting Keypad Tone
To activate/deactivate keypad tone at every key press:
1. From the main menu, select Setup > Tones > Keypad
Tone.
2. Scroll through the settings (On/Off).
3. Choose required setting, and press
to exit.
Select, or press Back
Tones
Keypad Tone
All Tones
Talk Permit
Clear to send
Select Back
The Menu
Setting All Tones
To activate/deactivate all tones (keypad tone and other
activity tones used in your MTH800):
1. From the main menu, select Setup > Tones > All Tones.
2. Scroll through the settings (On/Off).
3. Choose required setting, and press
Select, or press Back
to exit.
When all tones are disabled, your MTH800 switches into covert mode, and
all audio is routed to the earpiece, instead of the speaker for low audio
operation. Remember to disable this feature, when your covert operation is
complete, to return your MTH800 to high audio operation.
85
Page 96

Setting Talk Permit Tone
There are 3 tone settings:
•
No Tone (no tone heard upon pressing the
PTT).
•
Short Tone (a short tone heard upon
pressing the PTT).
•
Normal Tone (the factory-default tone
heard upon pressing the PTT).
To change your Talk Permit Tone settings:
1. From the main menu, select Setup > Tones > Talk
Permit.
2. Scroll through the settings.
3. Choose required setting, and press
Select. Press Back to
exit.
Setting Clear to Send
The Clear to Send tone indicates to the transmitting terminal
that the receiving terminal is ready to accept the
transmission.
To activate/deactivate the Clear to Send tone:
1. From the main menu, select Setup > Tones > Clear to
send.
2. Choose required setting, and press
Select. Press Back to
exit.
Talk Permit
No Tone
Short Tone
Normal Tone
Select Back
Display Features
The display menu controls how the display
appears.
From the main menu, select Setup >
Display
• Flip Display—fl ip s the di sp lay u pside down.
• Text Size—sets size of text on the display.
• Screen Saver—covers the MTH800 display after the
86
:
MTH800 stays idle for a pre-programmed period of time (if
configured by your Service Provider).
Display
Flip Display: Off
Text Size: Stand..
Screen Saver
Backlight: Auto
Wallpaper: On
Change Done
Page 97

• Backlight—A backlight lights the display and keypad when
you make or receive a call, or press keys or buttons. Backlight can be set to Automatic or Disabled.
• Wallpaper—changes the wallpaper that appears on the
idle screen.
• Contrast—sets the contrast of the display
.
Setting the Display’s Vertical Flip
When this feature is activated, the content of the display is
flipped upside down.The feature is particularly useful for a
user who has to wear the MTH800 on shoulder, belt, or lapel
and at the same time wishes to read the display upside down.
To activate/deactivate:
From the main menu, select Setup > Display > Flip Display
> On. Or press and hold the pre-programmed one-touch
button (if configured by your Service Provider).
Please note the position of the soft keys in the vertical
display
.
Display
Flip Display: Off
Text Size: Stand..
Screen Saver
Backlight: Auto
Wallpaper: On
Change Done
M
Change Done
Wallpaper: On
Backlight: Auto
Screen Saver
Text Size: Stand..
Flip Display: On
Display
N
E
U
N
E
U
M
The Menu
For Rota ry knob use i n the flipped display, see page 18.
See below for navigation key use in the flipped display.
87
Page 98

Scrolling down and up using the navigation key
Change Done
Wallpaper: On
Backlight: Auto
Screen Saver
Text Size: Stand..
Flip Display: On
Display
Change Done
Wallpaper: On
Backlight: Auto
Screen Saver
Text Size: Stand..
Flip Display: On
Display
Change Done
Wallpaper: On
Backlight: Auto
Screen Saver
Text Size: Stand..
Flip Display: On
Display
N
E
U
M
N
E
U
M
M
Scrolling left and right using the navigation key
Ctype Delete
2822|
Private #:
N
E
U
M
M
Ctype Delete
282|2
Private #:
N
E
U
N
E
U
M
To exit display flip:
From the main menu, select Setup > Display > Flip Display
> Off.
Setting the Text Size
1. From the main menu, select Setup > Display > Text
Size.
2. Press Change. Select Normal or Zoomed to see the text
on the display in two sizes.
Setting the Screen Saver
1. From the main menu, select Setup > Dis-
> Screen Saver.
play
2. Press Change. Press Change again and
select the scre en saver sett ing: Automat-
ic or Disabled.
N
E
U
Ctype Delete
2822|
Private #:
Screen
Saver:
5
Hello
Ok Delete
88
Page 99

3. Scroll to Text. Press Change. Type/ edit the screen saver
text using the keypad. (For details on text editor use, see
“Writing Text” on page 114).
4. Press Done
The menu options will display the Screen Saver if your Service Provider
pre-programmed this feature.
to exit.
Setting the Backlight
Your MTH800 has 2 backlight settings:
Auto
Any key press turns the backlight on. The backlight remains
on until the pre-programmed timer runs out.
Disable
The backlight feature is disabled.
To change your backlight settings:
1. From the main menu, select Setup > Display
2. Press Change.
3. Select required setting.
4. Press Done
to exit.
Setting the Wallpaper
1. From the main menu, select Setup > Display >
Wallpaper.
2. Press Change.
3. Select required setting (On/Off).
4. Press Done
to exit.
The Menu
> Backlight.
89
Page 100

Setting the Contrast
1. From the main menu, select Setup > Display > Contrast.
2. Press Change.
3. Use the left and right navigation keys to change the contrast. Press Ok.
4. Press Done
to exit.
Entering More...
From the main menu, select More. This
sub-menu Contains more customisable
menu items.
Entering Group Setup
From the main menu, select More > Group
Setup
. This sub-menu allows you to set the
Scan and My Groups features.
Entering Scan
From the main menu, select More > Group Setup > Scan.
This sub-menu allows you to activate/
deactivate scanning, view the active scan
list, and edit the scan lists.
It is not possible to enable or disable group
scanning in TXI Mode.
Main Menu
Messages
Contacts
Security
Setup
More...
Select Back
Group Setup
Scan
My Groups
Select Back
Scan
Scanning
Active List
Scan Lists
Select Back
90
 Loading...