

Page 1
ampd.ca
Page 2
1 WELCOME
WELCOME
We are pleased that you have chosen the
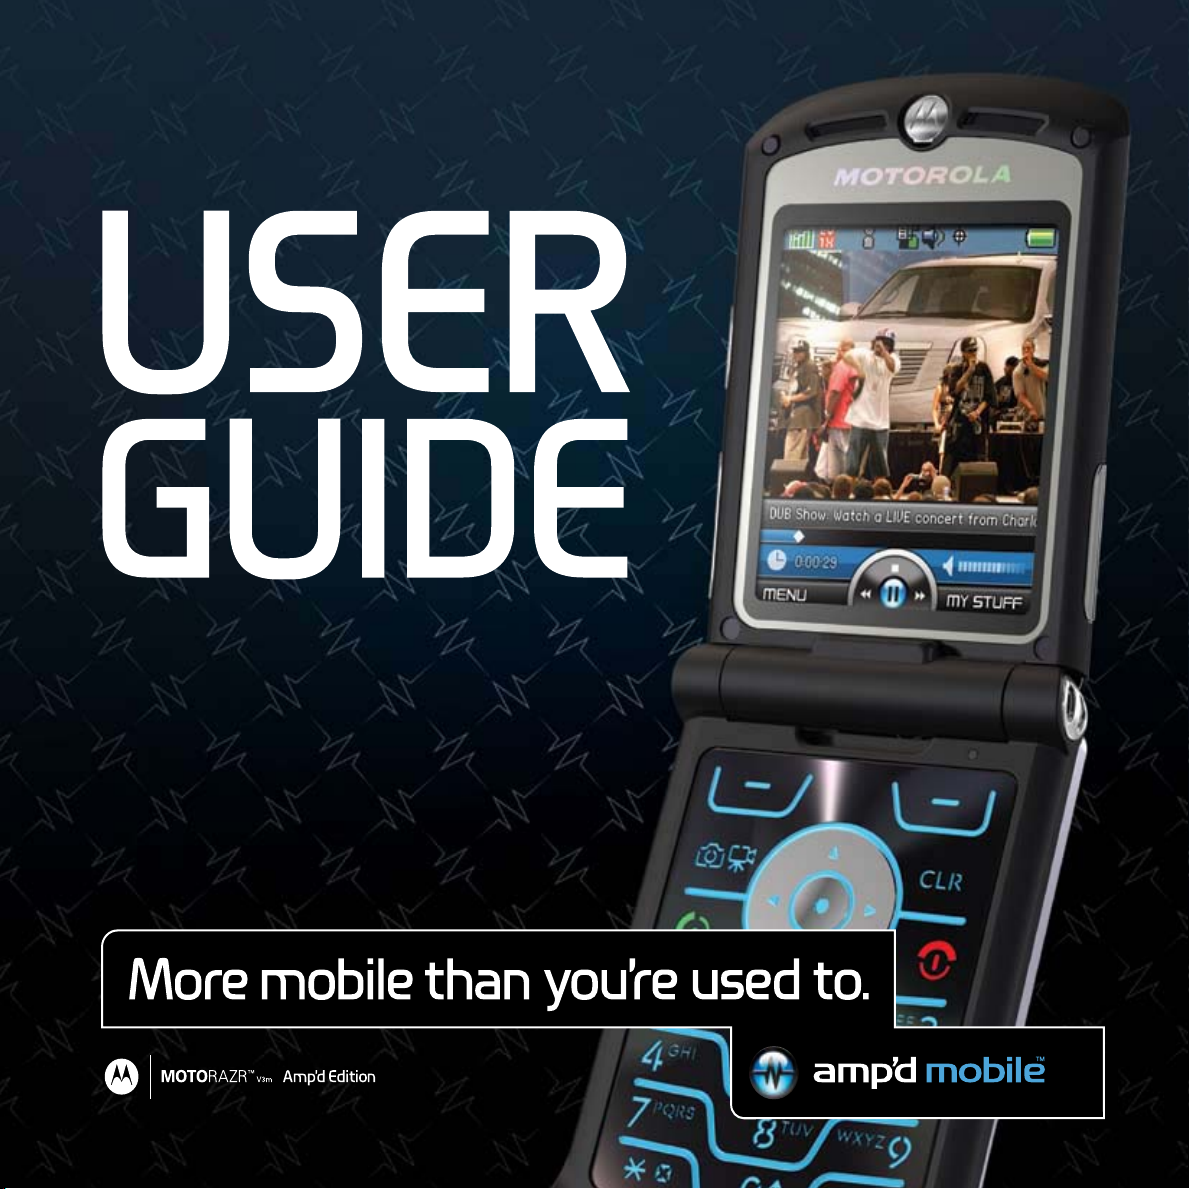
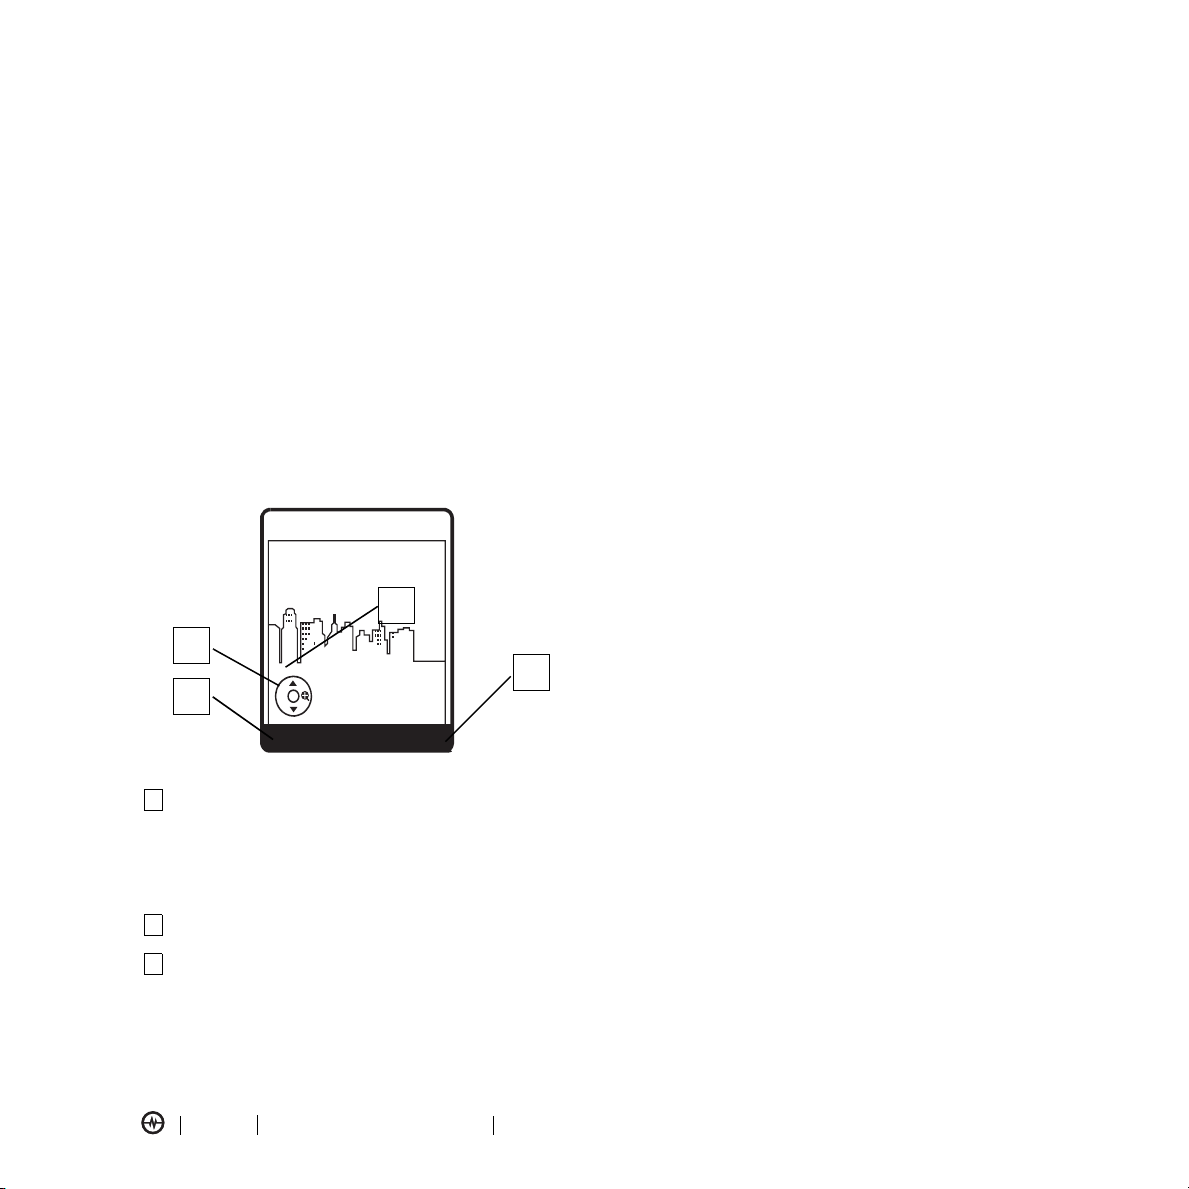
1
Smart Key
Speakerphone when opened. Press and hold to
activate Camera when closed.
2
Volume Keys
3
Left Soft Key
display prompt.
4
Camera Key
5
Send Key
6
5-Way Navigation Key
and lists. Press the
highlighted items.
7
Accessory Port
Voice Recognition Key
8
speaker independent voice recognition. Press and
hold to record voice records.
9
Right Soft Key
display prompt.
10
CLR Key
Press to activate and deactivate
Adjust volume.
Performs functions defined in left
Make and answer calls.
Scroll through menus
Center Select Key
Press once to activate
Performs functions defined in right
MOTO
to select
RAZRTM V3m, Amp’d Mobile CDMA wireless phone.
1
040128o
2
3
4
5
6
7
8
9
10
11
11
Power/End Key
phone calls.
PAGE 1 WELCOME
Turn phone on and off, and end
Page 3

Motorola, Inc.
Consumer Advocacy Office
1307 East Algonquin Road
Schaumburg, IL 60196
www.hellomoto.com
1-800-331-6456 (United States)
1-888-390-6456 (TTY/TDD United States for hearing impaired)
1-800-461-4575 (Canada)
Certain mobile phone features are dependent on the capabilities and settings of your service provider’s network.
Additionally, certain features may not be activated by your service provider, and/or the provider's network settings may
limit the feature’s functionality. Always contact your service provider about feature availability and functionality. All
features, functionality, and other product specifications, as well as the information contained in this user's guide are
based upon the latest available information and are believed to be accurate at the time of printing. Motorola reserves
the right to change or modify any information or specifications without notice or obligation.
MOTOROLA and the Stylized M Logo are registered in the US Patent & Trademark Office. The Bluetooth trademarks
are owned by their proprietor and used by Motorola, Inc. under license. All other product or service names are the
property of their respective owners.
© Motorola, Inc., 2007.
CAUTION: Changes or modifications made in the radio phone, not expressly approved by Motorola, will void the user’s
authority to operate the equipment.
Manual Number: 6809508A24-0
PAGE 2 WELCOME
Page 4

CONTENTS
AMP’D MOBILE V3m CDMA USER GUIDE
1 WELCOME . . . . . . . . . . . . . . . . . . . 1
2 GETTING STARTED . . . . . . . . . . . . . 5
Battery Tips . . . . . . . . . . . . . . . . . . . . . . . . . . . . . 5
Installing the Battery . . . . . . . . . . . . . . . . . . . . . . 5
Charging the Battery . . . . . . . . . . . . . . . . . . . . . . 6
To charge the battery: . . . . . . . . . . . . . . . . . . . . . 6
Turning Your Phone On . . . . . . . . . . . . . . . . . . . 6
Making a Call . . . . . . . . . . . . . . . . . . . . . . . . . . . 6
Answering a Call . . . . . . . . . . . . . . . . . . . . . . . . . 6
Adjusting Volume . . . . . . . . . . . . . . . . . . . . . . . . 7
Change Call Alert . . . . . . . . . . . . . . . . . . . . . . . . 7
Phone Flip Open . . . . . . . . . . . . . . . . . . . . . . . . . 7
Phone Flip Closed . . . . . . . . . . . . . . . . . . . . . . . . 7
Viewing Your Phone Number . . . . . . . . . . . . . . . 7
Installing and Removing the Memory Card . . . . . 7
Installing the Memory Card . . . . . . . . . . . . . . . . . 7
Removing the Memory Card . . . . . . . . . . . . . . . . 8
3 HIGHLIGHT FEATURES . . . . . . . . . . 9
Check It Out! . . . . . . . . . . . . . . . . . . . . . . . . . . . 9
Amp’d LiveTM . . . . . . . . . . . . . . . . . . . . . . . . . . 9
How to Start . . . . . . . . . . . . . . . . . . . . . . . . . . . . 9
What Can You Do? . . . . . . . . . . . . . . . . . . . . . . . 9
How to Find Stuff . . . . . . . . . . . . . . . . . . . . . . . 12
Making Purchases . . . . . . . . . . . . . . . . . . . . . . . 13
Enjoy Your Stuff . . . . . . . . . . . . . . . . . . . . . . . . 13
Taking and Sending a Photo . . . . . . . . . . . . . . . 19
Taking a Self Portrait . . . . . . . . . . . . . . . . . . . . . 19
Pictures Menu Options . . . . . . . . . . . . . . . . . . . 19
Recording and Playing Video Clips . . . . . . . . . . . 20
Recording Video Clips . . . . . . . . . . . . . . . . . . . . 20
Videos Menu Options . . . . . . . . . . . . . . . . . . . . 21
Playing Video Clips . . . . . . . . . . . . . . . . . . . . . . 21
Videos Menu Options . . . . . . . . . . . . . . . . . . . . 21
Multimedia Message . . . . . . . . . . . . . . . . . . . . . 22
Creating and Sending a Multimedia Message . . 22
Receiving a Multimedia Message . . . . . . . . . . . . 23
Bluetooth® Connections . . . . . . . . . . . . . . . . . . 23
Turn Bluetooth® Power On or Off . . . . . . . . . . . 23
Pairing with a Headset, Handsfree Device,
or PC . . . . . . . . . . . . . . . . . . . . . . . . . . . . . . . . 24
4 LEARNING TO USE YOUR PHONE 25
Using the Display . . . . . . . . . . . . . . . . . . . . . . . . 25
Using the 5-Way Navigation Key . . . . . . . . . . . . 26
Using Menus . . . . . . . . . . . . . . . . . . . . . . . . . . . 26
Selecting a Menu Feature . . . . . . . . . . . . . . . . . 27
Selecting a Feature Option . . . . . . . . . . . . . . . . . 27
Entering Text . . . . . . . . . . . . . . . . . . . . . . . . . . . 28
Choosing a Text Entry Method . . . . . . . . . . . . . 29
Using Tap Method . . . . . . . . . . . . . . . . . . . . . . . 30
Using iTAP™ Method . . . . . . . . . . . . . . . . . . . . 31
Using Numeric Method . . . . . . . . . . . . . . . . . . . 32
Using Symbol Method . . . . . . . . . . . . . . . . . . . . 32
Deleting Letters and Words . . . . . . . . . . . . . . . . 33
Using the External Display . . . . . . . . . . . . . . . . . 33
Using a Removable Memory Card . . . . . . . . . . . 33
Memory Card Tips . . . . . . . . . . . . . . . . . . . . . . . 33
Managing a Memory Card . . . . . . . . . . . . . . . . . 33
Formatting the Memory Card . . . . . . . . . . . . . . 33
Storing Multimedia Objects . . . . . . . . . . . . . . . . 34
Viewing Memory Card Contents . . . . . . . . . . . . 34
Using the Handsfree Speaker . . . . . . . . . . . . . . . 34
Turning On Airplane Mode . . . . . . . . . . . . . . . . 34
Changing a Code, PIN, or Password . . . . . . . . . . 34
Locking and Unlocking Your Phone . . . . . . . . . . 35
Locking Your Phone Manually . . . . . . . . . . . . . . 35
Unlocking Your Phone . . . . . . . . . . . . . . . . . . . . 35
Setting Your Phone to Lock Automatically . . . . . 35
If You Forget a Code or Password . . . . . . . . . . . 35
5 SETTING UP YOUR PHONE . . . . . 36
Storing Your Name and Phone Number . . . . . . . 36
Setting an Alert Style . . . . . . . . . . . . . . . . . . . . . 36
Setting Answer Options . . . . . . . . . . . . . . . . . . . 36
Setting a Wallpaper Image . . . . . . . . . . . . . . . . . 36
Setting a Screen Saver Image . . . . . . . . . . . . . . . 37
Setting Display Brightness . . . . . . . . . . . . . . . . . 37
Adjusting the Backlight . . . . . . . . . . . . . . . . . . . 37
Conserving Battery Power . . . . . . . . . . . . . . . . . 37
6 CALLING FEATURES . . . . . . . . . . . 38
Changing the Active Line . . . . . . . . . . . . . . . . . . 38
Redialing a Number . . . . . . . . . . . . . . . . . . . . . . 38
Using Automatic Redial . . . . . . . . . . . . . . . . . . . 38
PAGE 3 CONTENTS AMP’D MOBILE V3m CDMA USER GUIDE
Page 5

CONTENTS
Turning Off a Call Alert . . . . . . . . . . . . . . . . . . . 38
Calling an Emergency Number . . . . . . . . . . . . . 38
Viewing Recent Calls . . . . . . . . . . . . . . . . . . . . . 38
Returning an Unanswered Call . . . . . . . . . . . . . 39
Using the Notepad . . . . . . . . . . . . . . . . . . . . . . 39
Attaching a Number . . . . . . . . . . . . . . . . . . . . . 39
Calling with Speed Dial . . . . . . . . . . . . . . . . . . . 39
Calling with 1-Touch Dial . . . . . . . . . . . . . . . . . 40
Using Voicemail . . . . . . . . . . . . . . . . . . . . . . . . . 40
Listening to Voicemail Messages . . . . . . . . . . . . 40
Receiving a Voicemail Message . . . . . . . . . . . . . 40
Muting a Call . . . . . . . . . . . . . . . . . . . . . . . . . . 40
Using DTMF Tones . . . . . . . . . . . . . . . . . . . . . . 40
Sending DTMF Tones During a Call . . . . . . . . . . 40
7 PHONE FEATURES . . . . . . . . . . . . 41
Menu Map . . . . . . . . . . . . . . . . . . . . . . . . . . . . 41
Calling Features . . . . . . . . . . . . . . . . . . . . . . . . . 42
Messaging . . . . . . . . . . . . . . . . . . . . . . . . . . . . . 42
Contacts . . . . . . . . . . . . . . . . . . . . . . . . . . . . . . 43
Personalizing Features . . . . . . . . . . . . . . . . . . . . 46
Using Speech Commands . . . . . . . . . . . . . . . . . 46
Additional Personalizing Features . . . . . . . . . . . 48
Menu Features . . . . . . . . . . . . . . . . . . . . . . . . . 49
Dialing Features . . . . . . . . . . . . . . . . . . . . . . . . . 50
Call Monitoring . . . . . . . . . . . . . . . . . . . . . . . . . 50
Handsfree Features . . . . . . . . . . . . . . . . . . . . . . 51
Data and Fax Calls . . . . . . . . . . . . . . . . . . . . . . . 51
Bluetooth® Wireless Connections . . . . . . . . . . . 52
Network Features . . . . . . . . . . . . . . . . . . . . . . . 53
Personal Organizer Features . . . . . . . . . . . . . . . 53
Security . . . . . . . . . . . . . . . . . . . . . . . . . . . . . . . 55
News and Entertainment . . . . . . . . . . . . . . . . . . 55
8 SERVICE AND REPAIRS . . . . . . . . 56
9 SPECIFIC ABSORBTION RATE
DATA . . . . . . . . . . . . . . . . . . . . . . . . 57
INDEX . . . . . . . . . . . . . . . . . . . . . . . . . . . . . . . . 58
PAGE 4 CONTENTS AMP’D MOBILE V3m CDMA USER GUIDE
Page 6
GETTING STARTED
2 GETTING STARTED
CAUTION: Before using the phone for the first time,
read the important safety and legal information in the
separate legal information included in the box.
Battery Tips
Battery life depends on the network, signal strength,
temperature, features, and accessories you use.
• Always use Motorola Original batteries and battery
chargers. The warranty does not cover damage
caused by non-Motorola batteries and/or chargers.
• New batteries or batteries stored for a long time may
take more time to charge.
• When charging your battery, keep it near
room temperature.
• When storing your battery, keep it uncharged in a
cool, dark, dry place.
• Never expose batteries to temperatures below -10°C
(14°F) or above 45°C (113°F). Always take your phone
with you when you leave your vehicle.
• It is normal for batteries to gradually wear down and
require longer charging times. If you notice a change
in your battery life, it is probably time to purchase a
new battery.
Contact your local recycling center for proper
battery disposal.
Warning:
they may explode.
Never dispose of batteries in a fire because
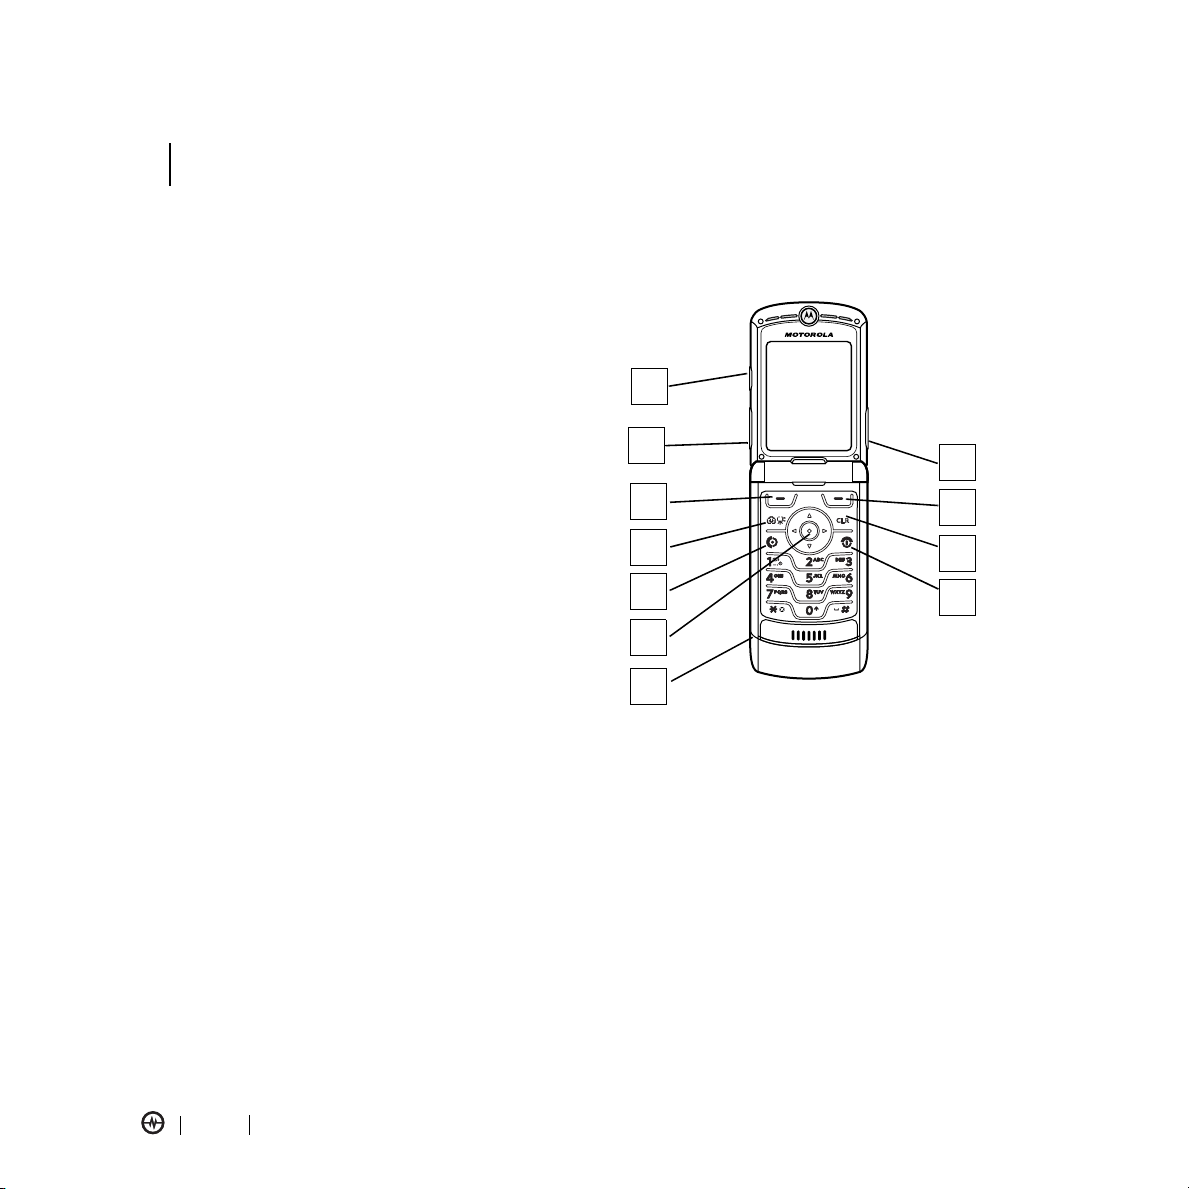
Installing the Battery
Your phone is designed to use only Motorola Original
batteries and accessories.
1. Press in the battery
door, release latch
and remove the
battery door.
2. Follow arrows to
insert battery.
3. Replace the
battery door.
4. Close the battery door.
Before using your phone, please read the battery safety
information in the
section included in the separate legal guide included in
the box.
PAGE 5 BATTERY TIPS GETTING STARTED
Safety and General Information
Page 7
GETTING STARTED
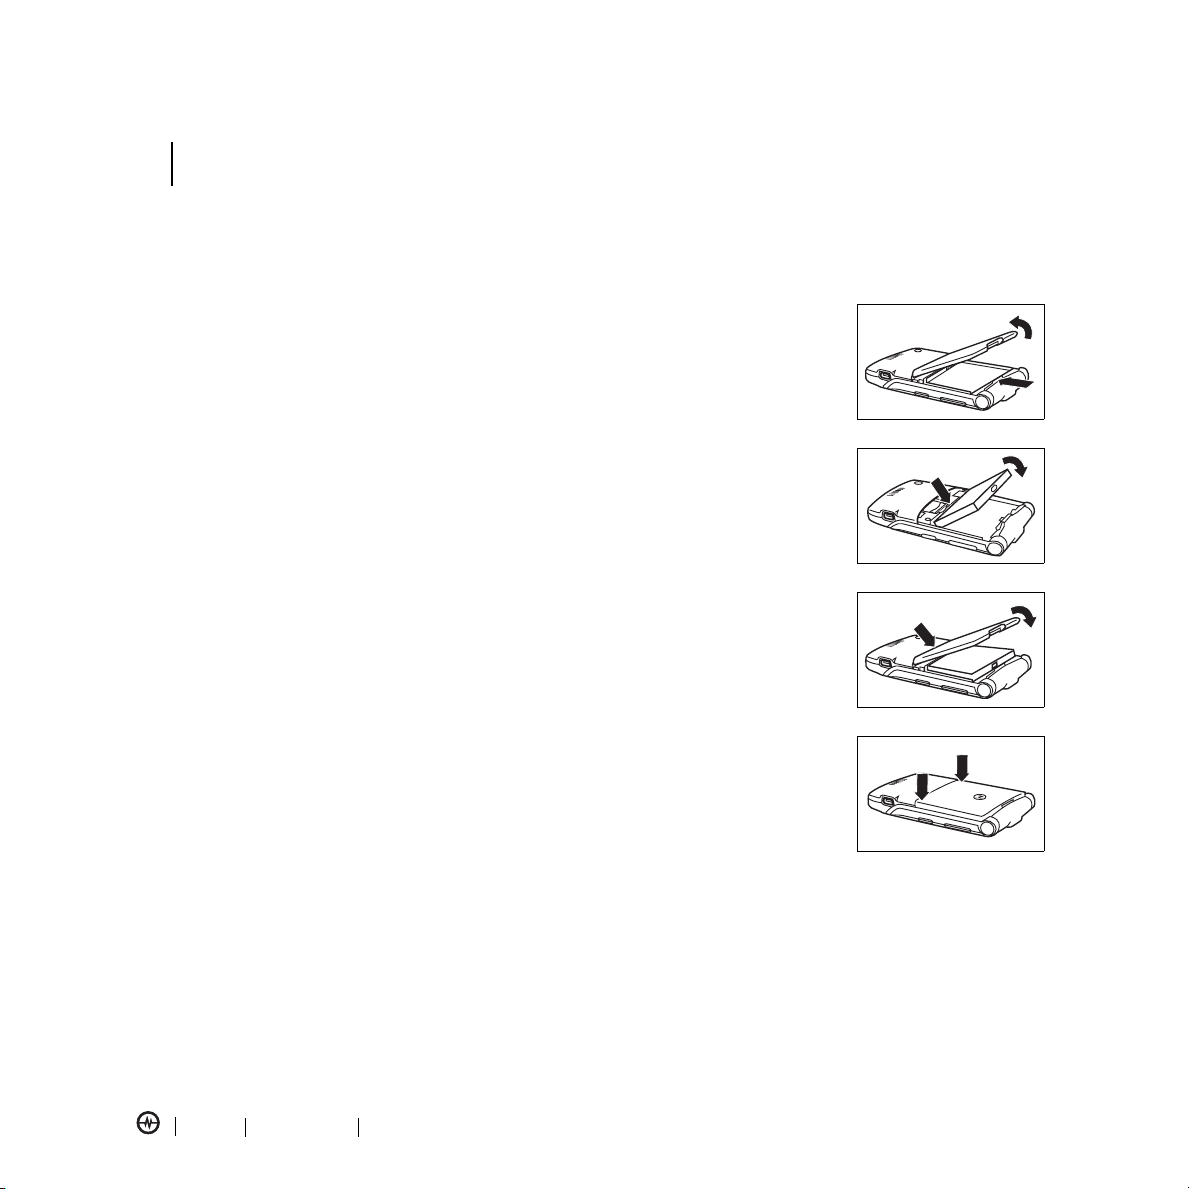
Charging the Battery
New batteries are shipped partially charged. Before you
can use your phone, install and charge the battery as
described below. Some batteries perform best after
several full charge/discharge cycles.
To charge the battery:
1. Insert the charger into
the USB connector on
your phone as shown.
2. Plug the other end of
the charger into the
appropriate electrical
outlet.
3. When your phone
indicates
Complete
the charger.
Tip: You can safely leave the charger connected to your
phone after charging is complete. This will
the battery.
Note: When you charge the battery, the battery level
indicator in the upper right corner of the display shows
how much of the charging process is complete. At least
1 segment of the battery level indicator must be visible
to ensure full phone functionality while charging.
Charge
, remove
not
damage
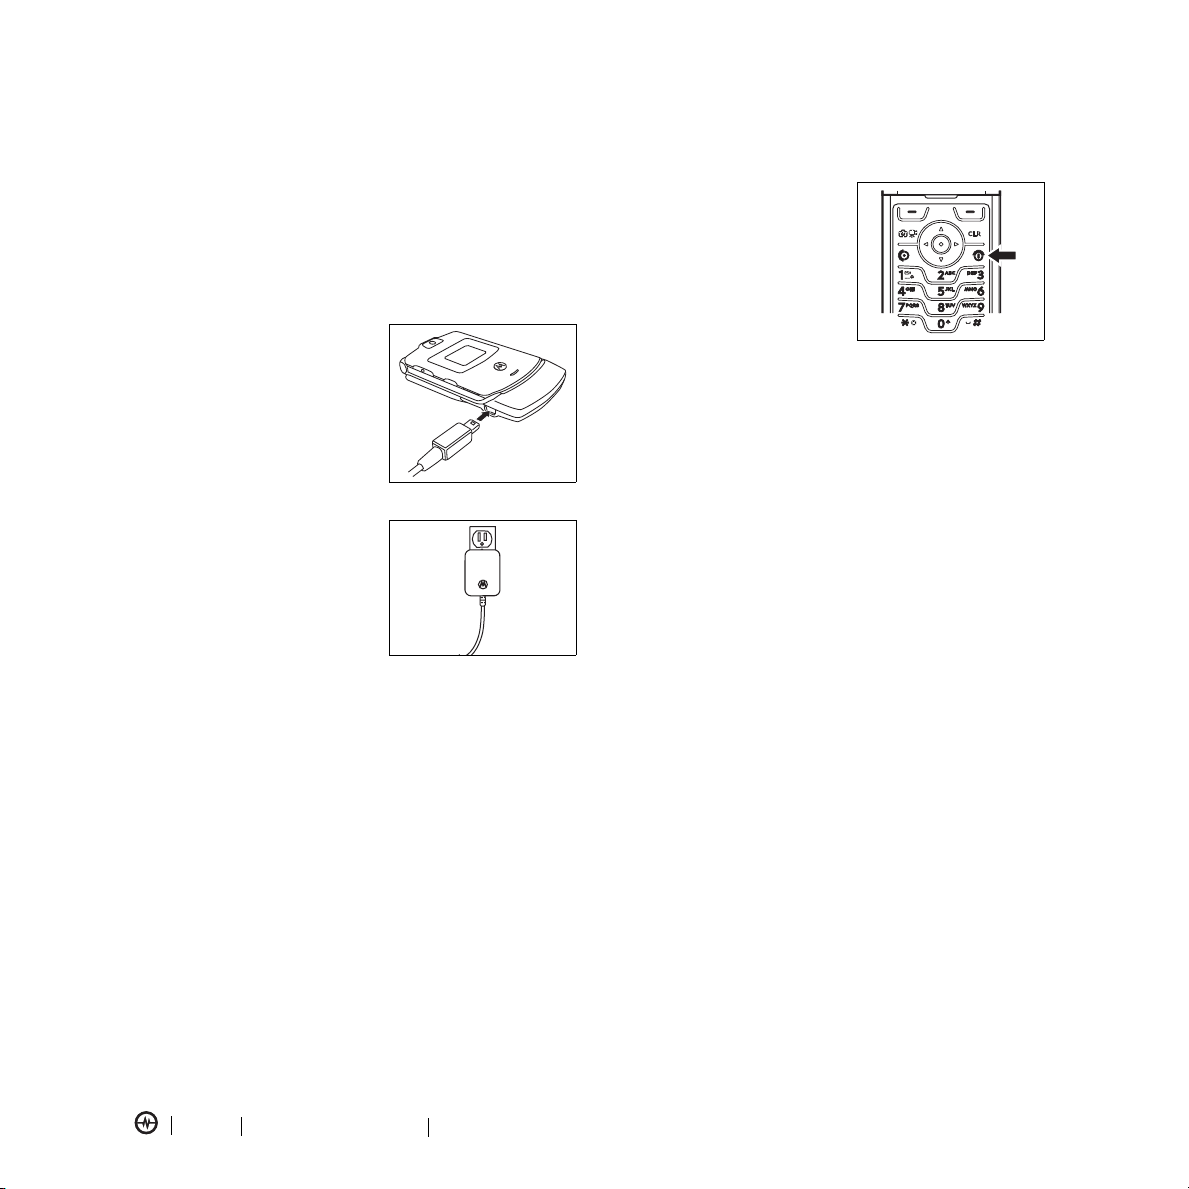
Turning Your Phone On
1. Open your phone.
2. Press and hold the power
key for 3 seconds.
3. If necessary, enter
your 4-digit unlock code
(the last 4 digits of your
phone number) and press
the right soft key to unlock the phone.
Making a Call
1. Press keypad keys to dial the phone number.
2. Press
3. Press
-or
4. Close the flip.
Tip: You can set the phone to answer calls when you
open the flip.
To activate, press
Answer Options
N
to make the call.
P
to end the call and “hang up” the phone
when you are finished.
-
Menu
>
>
Open To Answer
Settings
>
In-Call Setup
Answering a Call
When you receive a call, your phone rings and/or
vibrates and displays an incoming call message.
• Press the answer key to answer a call.
-or-
• Press
-or-
• Open the flip to answer the phone.
N
>
PAGE 6 CHARGING THE BATTERY GETTING STARTED
Page 8
•
Press P to end the call and “hang up” the phone
when you are finished.
-or-
• Close the flip.
Adjusting Volume
Press up or down on volume
keys to:
040135o
• increase or decrease
earpiece volume during an
active call
• temporarily silence an
incoming call alert
• increase or decrease the ringer volume setting when
the home screen is visible (flip must be open)
Tip: At the lowest volume setting, press the down
volume key once to switch to vibrate alert. Press it again
to switch to silent alert. Press the up volume key to cycle
back to vibrate alert, then ring alert.
Change Call Alert
Phone Flip Open
In the home screen, press the
down volume key to switch to
lower call alert volume, then
switch to vibrate and, finally,
silent alert. Press the up
volume key to cycle back from silent alert to vibrate and
then to the lowest alert volume setting.
040135o
Phone Flip Closed
Press the up or down volume
key, then press the smart/
Volume Keys
speakerphone key to scroll
through the alert styles:
Loud
Soft, Vibrate, Vibe then
Ring
, and
Silent
. The alert
,
Smart/
Speakerphone
Key
styles are shown on the external screen.
After scrolling to the desired alert style, press the up or
down volume key to save the setting and return to the
home screen.
Viewing Your Phone Number
To view your phone number from the home screen,
press
Menu
>
Phone Status
While you are on a call, press
>
My Tel. Number
.
>
My Tel. Number
Options
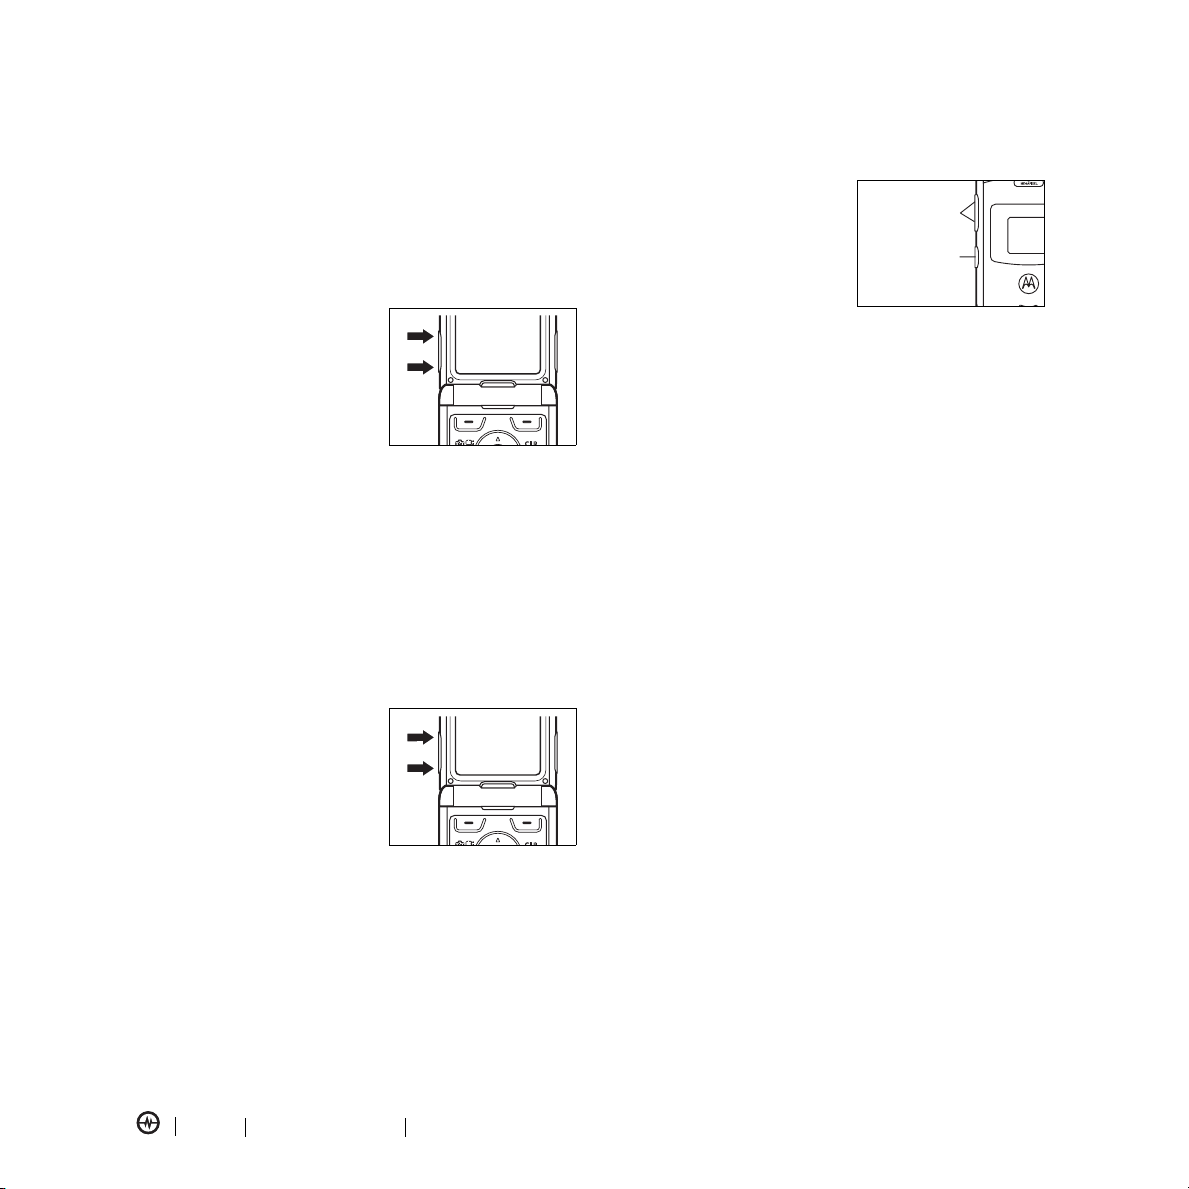
Installing and Removing the Memory Card
You can install a removable memory card in your phone.
This card provides additional storage for pictures,
animations, sounds, and video clips.
CAUTION: Do not bend or scratch your memory card.
Avoid exposing your memory card to static electricity,
water, or dirt.
Installing the Memory Card
CAUTION: When you are not actively inserting or
removing a memory card, keep the cover closed on the
card slot to prevent damage.
PAGE 7 ADJUSTING VOLUME GETTING STARTED
Page 9
With your phone powered off:
1. Press in the battery door,
release latch, and remove
the battery door.
2. Remove the battery.
3. Slide the memory card
out of the card slot as
shown. Be sure the card
is fully inserted.
4. Replace the battery and the battery door.
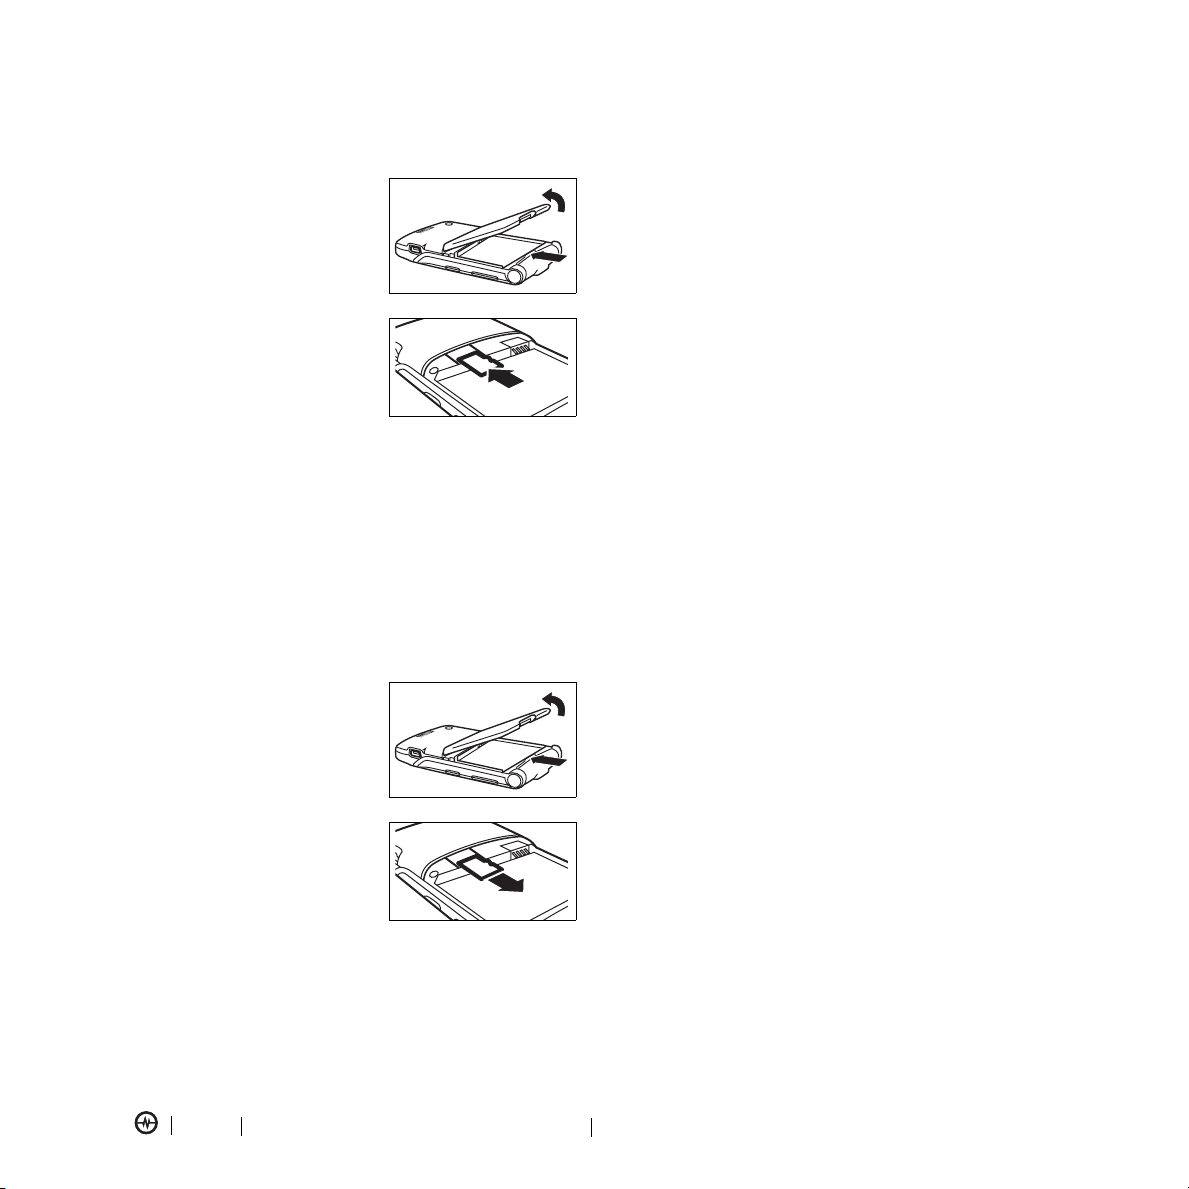
Removing the Memory Card
CAUTION: Do not remove the memory card while
reading or writing files. Otherwise, it could be damaged.
CAUTION: When you are not actively inserting or
removing a memory card, keep the cover closed on the
card slot to prevent damage.
With your phone powered off:
1. Press in the battery door,
release latch, and remove
the battery door.
2. Remove the battery.
3. Slide the memory card
out of the card slot as
shown.
4. Replace the battery and the battery door.
PAGE 8 INSTALLING AND REMOVING THE MEMORY CARD GETTING STARTED
Page 10
HIGHLIGHT FEATURES
3 HIGHLIGHT FEATURES
You can do much more with your phone than make and
receive calls! This section describes some of your
phone’s highlights.
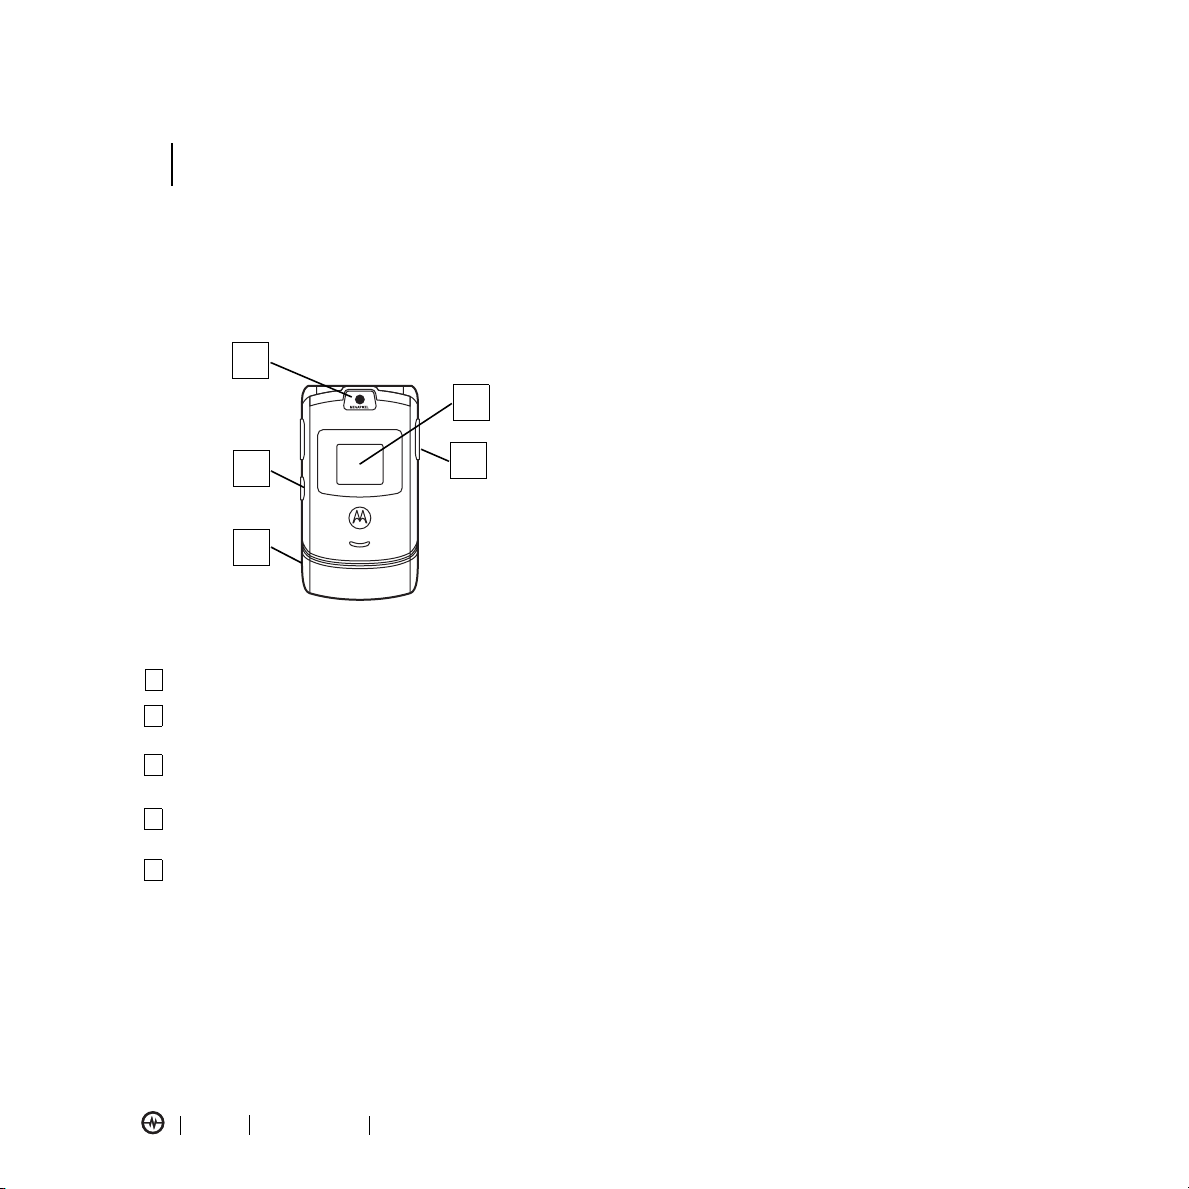
Check It Out!
1
4
2
5
3
1
Camera Lens
2
Smart/Speakerphone Key
photo with camera when flip is closed.
3
Accessory Connector Port
phone accessories.
4
External Display
use as camera viewfinder when flip is closed.
5
Voice Recognition Key
speaker independent voice recognition. Press and
hold to record voice records.
Take photos and videoclips.
Take self-portrait
Insert charger and
View incoming call information,
Press once to activate
Amp’d Live
TM
Amp’d LiveTM is a whole new world of mobile
entertainment. In addition to hot phone features like
messaging and photo and video camera, you can now:
•
watch your favourite videos and TV clips
•
play your favourite 3D multiplayer games
•
download your favourite music, the hottest
ringtones, wallpapers, and more
How to Start
Ready to get started? Just press the
C
on your phone.
Center Select Key
What Can You Do?
The Amp’d LiveTM menu is set up by topic, so finding the
things you like couldn’t be easier.
What’s Hot
Just like the real world, the Amp’d LiveTM world is
dynamic. New music videos, songs, ringtones, and other
cool stuff are released all the time. Think of
as the new-release and hottest-picks corner of Amp’d
TM.
Live
Check it often to stay up-to-date.
In
What’s Hot
•
Daily Video
you’ll find:
—Catch new video releases and other
must-see flicks.
•
Hot Bundles
—Get specially selected combinations
for hot ringtones and wallpapers.
•
Artist Features
—Check here for new releases
from your favourite artists.
•
Cutting-Edge Gear
—Find the hottest accessories
for your phone (coming soon).
What’s Hot
PAGE 9 CHECK IT OUT! HIGHLIGHT FEATURES
Page 11

•
Sizzling Apps
—Stay ahead of the curve with the
most popular games and applications.
TV and Radio
Watch TV right on your phone. With Amp’d live you’ll
find all your favourite channels.
Listen to Radio on your phone. You'll find Deep Indie,
The Joint, Much Radio and more.
Music
With an Amp’d MobileTM phone and Amp’d LiveTM, you
have both the music player
and
a music store right in the
palm of your hand. Browse the store, then buy and play
your favourite downloads anywhere. And, with Amp’d
Live, you can check out music videos, news, live
broadcasts, and even never-before-seen exclusives.
•
Music, Video, Ringtones
—From old-school
classics to today’s Top 10 charts, tons of songs,
videos, and ringtones are ready to be downloaded,
anytime, anywhere.
•
Finding Music
—Search for a song or music video
by artist, title, or genre.
•
Performances
—Watch the hottest performances
from the best in music television.
•
Live Events
—See what your
favourite
band does
backstage or what the hottest artists are up to in
the studio. Check you exclusive behind-the-scenes
sneak peeks and concerts—streamed live to
your phone.
Tones & Graphics
You can do so much more than just change ringtones to
make your phone reflect your own personality.
•
Ringtones
—Choose from tons of choices in our
huge music library.
•
Wallpaper
—Change the background image on
your phone. Choose from massive selection that
includes your
favourite
artists, and more.
Sports
Sports fans rejoice! Checking the final score is a snap
with an Amp’d Mobile
TM
phone. Get your sports news
from the most reliable sources. Keep up on all your
favourite
s, including football, baseball, basketball,
hockey, fighting, and auto racing and don’t forget to
check out the sports high rollers room.
•
FOX Sports
scores, schedules, standings, and betting odds.
Sports Mobile
•
Fights
out Live in the
•
Racing
—Get news from around the leagues,
is your sports lifeline.
—Watch your
favourite
brawlers battle it
Ultimate Fighting Championship
—Keep the adrenaline pumping with
FOX
.
Nascar, Supercross, Speed and more.
•
Action Sports
FUEL TV, and mobile versions of
Surfer, Surfing, Skateboarding
•
Fantasy & Gaming
—View Wave Watch (Surf Cams),
Snowboarding
, and
Biking
,
.
—Fantasy sports go mobile.
Check out player profiles, news, injury reports, LIVE
stats, and more—anytime, anywhere.
•
Danny Sheridan Odds
favourite
games and mock-ups from acclaimed
sports analyst and
—Get the spread on your
USA Today
laminator
Danny Sheridan.
•
NHLPA
—Watch live post game interviews of all
your favorite NHL players.
PAGE 10 CHECK IT OUT! HIGHLIGHT FEATURES
Page 12

Entertainment
Turn your phone into your own portable media center!
On Amp’d Live
TM
, you’ll find videos, the best of network
and cable TV, cool Web sites, your favourite
entertainment rags, comics, and even live broadcasts.
Check out the channels you now have at your fingertips:
•
Viral Videos
—Feed your appetite for humor with
Break.com, College Humor, and more.
•
Movies
—Check out the latest movie trailers and
film reviews straight on your Amp’d live handset.
•TV—Get all your favourite TV shows right on your
Amp’d phone.
•
Internet
—This is your direct connection to the
internet. Access all your favourite Web portals right
on your Amp’d phone.
•
Entertainment News
—stay up to date on the
latest celebrity news, gossip, and satire.
•
Stand Up
Time
For Laughs
•
Animation
—Need a laugh? You’ll find
,
America’s Best Mobile Fix
, and
Just
.
—Enter the whacky worlds of Animated
Comedy
shows and anime. Remember, you’re never too old
to watch cartoons.
•
The Vault
—Find all of your favourite uncensored
adult brands in our password-protected Vault.
Games
Down time is now gaming time. From 3D action and
sports games to arcade classics and mind-boggling
puzzles, you’ll find dozens of ways to entertain yourself.
•
Action
—Get
Prince of Persia, Tom Clancy’s Splinter
Cell
,
Rainbow Six, Brothers in Arms, King Kong
Independence Day
, and many more—all in 3D.
,
•
Sports
—When you’re not playing Amp’d MobileTM
exclusives like
Asphalt: Urban GT 3D
for Speed: Most Wanted
3D
, or
•
Arcade
Pitfall: Glacier and Jungle, Joust 2
•
Strategy
Real Estate Tycoon
Chess, Cribbage, Reverse
•
Puzzles
Search
Snowboarding Travis Rice 3D
, you can download
,
Tony Hawk Underground
3D Madden 2006
, to name just a few.
—Go old-school with classics like
, and
—Strain your brain with
,
3D Pool, Backgammon, Ethel
, and
—Play
TV Guide Crosswords, Trivia, Word
,
Cryptogram, HangMan, Microliters
Donald Trump’s
Mahjong
Snood 2
Defender 2
.
and more.
•
Lifestyle
—Enjoy
3D Pet Care (Tam a got chi)
Busting Bar Trivia, Stack-Sum, Diva Dee Dancing
Mahjong Puzzle, Breakout Bears, Message in a
Garden
, and
Bubble Ducky
•
Casino—Blackjack, Poker, Roulette, Video Poker
Video Slots, Hill, Virtual Resurfacing
Bingo
.
.
, Keno, and
and
3D Need
,
.
,
,
,
,
,
PAGE 11 CHECK IT OUT! HIGHLIGHT FEATURES
Page 13

News & Lifestyle
Use Amp’d LiveTM to keep up to date with daily news,
weather, traffic, and more—everything you need to stay
in the know.
•
News & Info
—Get the latest breaking headlines
from trusted sources.
•
Find It
—Need directions, looking for weather and
traffic report, searching for restaurants and movie
information Amp’d will get you there.
•
Dating
—Get your heart pounding with
•
Health & Fitness
—Keep in shape with exercise
routines and healthy recipes from
Workouts
1. Press the
Amp’d Live
and Food Network.
Center Select Key C
TM
.
to enter
HurryDate.
Wireless
2. Select an item from the menu. Depending on the
item, there may be multiple levels of choices.
•
Culture
—View exclusive videos as well as top
content from leading magazines.
How to Find Stuff
You have two ways to find stuff in Amp’d LiveTM:
•
browse by category
•
search for a specific item
Browsing Amp’d Live
TM
As you explore the Amp’d LiveTM universe, you’ll notice
that it’s pretty easy to get around. Here’s how it works:
1. Press the
Amp’d Live
2. Select an item from the
Center Select Key C
TM
.
Category
to enter
list.
Depending on the item, there may be multiple pages
of choices.
Searching Amp’d Live
If you know exactly what you want to find, use
1. Press the
Amp’d Live
2. Press the
Center Select Key C
TM
Left Soft Key
TM
Search
to enter
.
, then select
Search
.
3. Select one of the three available drop down menus
(Type, Category, or Keyword).
4. Select the
Category
box, and choose the category
that you wish to search for your content.
5. Enter a description of the item.
6. Press
Search
.
If you don’t find what you want the first time, don’t
give up. Try again, using a different item description
or category.
:
PAGE 12 CHECK IT OUT! HIGHLIGHT FEATURES
Page 14
Decode the Ratings
Whether you’re looking for adult content or something
less racy, all Amp’d Live
TM
items have a rating decal to
help you choose correctly.
Rating Description
AA
All Audiences
—Grandma won’t
be offended.
GC
General Content
—May contain mild
language, violence, comic mischief, and/or
suggestive themes.
MC
Mature Content
—May contain strong
language, depictions of violence, sex, and/
or substance abuse.
AO
18+ Adult Only
—May contain uncensored
depictions of violence, nudity, or sex.
Parental
Advisory
—
Explicit
Recordings identified with this warning
contain strong language or depictions of
violence, sex, or substance abuse. Parental
discretion is advised.
Content
Making Purchases
Try Before You Buy
The Amp’d MobileTM
any of our items before you buy. Here is how it works:
1. Press the
Amp’d Live
2. Find an item you want to try.
3. Select
Previewed
a bundle, you can preview each item in the bundle.
4. If you want to purchase the item, select
-or
-
Preview
feature lets you sample
Center Select Key C
TM
.
to check out the item. If you pick
to enter
Buy
.
If you don’t want to purchase the item, or if you
want to check out some other choices before you
decide, press
Back
and continue looking.
Buy Stuff
Amp’d LiveTM offers a variety of ways for you to load up
on entertainment. Mix and match to create your own
blend of permanent and temporary ownership.
•
Own It (Download)
puts a copy of the item on
your phone so you can view or play it whenever
you want, forever. Copy protection laws still apply,
so you may not be able to send the item to
your friends.
•
Buy Access (Subscription)
gives you unlimited
access to the item during your subscription period.
Subscriptions are billed monthly and are great for
sampling a variety of items. Just remember that the
subscription items change all the time (like an e-fine
or a premium TV channel), so you find something
you
must
have, you should buy that item and
download it permanently.
•
On Demand (Streaming)
plays the entire item on
your phone, but only one time. It’s just like
pay-per-view from your cable or satellite TV service.
Note:
If a download is interrupted, you will not be
charged for the item. You can always go back and
purchase the item again.
Enjoy Your Stuff
After you download or subscribe to items, go to
My Stuff
run your applications.
1. Press the
2. Press
to play your music, videos, and games, and to
TM
Live
.
S
My Stuff
Center Select Key C
left to open
My Stuff
.
to enter Amp’d
or go to
Menu
>
PAGE 13 CHECK IT OUT! HIGHLIGHT FEATURES
Page 15

Enjoy Your Music
After you download a song or start a music subscription,
use the Media Player to play your music.
You can select any of the following methods to play
your music:
Pick Songs
1. Go to
2. Select
My Stuff
Music
.
.
3. Select the method you want to use to play your
songs (see the table below).
Option Description
Shuffle Play all songs on your phone in random sequence.
Artist Display an alphabetical list of artists whose songs are on your phone. You
can select the artist you want to hear. After you select the artist, you can play
all songs by that artist, a specific album, or a single song.
Album Display an alphabetical list of the albums on your phone. Just select the
album you want to hear. You can then play all songs on the album or a
specific song.
Song Display an alphabetical list of all songs on your phone. Select the songs you
want to play.
My List
Display all the songs that you chose to Add2MyList from anywhere
in Music.
Playlist Display all playlists on your phone. Select a playlist, then play all songs on
that playlist or only a specific song.
PAGE 14 CHECK IT OUT! HIGHLIGHT FEATURES
Page 16
Using the Media Player
After you select the songs you want to play, use the
Media Player to control playback.
Option Description
Play/Pause Press the
While a song is playing, press
Center Select Key C
C
to play a song.
to pause it. Press Cagain to continue
playing it.
Stop Press Sup to turn off the song. The next time you play the song, it will
start at the beginning.
Next Press Sright to skip ahead to the next song.
Restart Press Sleft to restart a song from the beginning.
Previous Press Sleft
twice
to skip back to the previous song.
Fast Forward Press and hold Sright to fast-forward the song.
Rewind Press and hold Sleft to scroll backwards in the song.
Volume Press your phone’s volume keys (on the left side of the phone) up and down
to adjust volume levels.
PAGE 15 CHECK IT OUT! HIGHLIGHT FEATURES
Page 17

Organize Your Music
My Stuff
can change
includes a built-in playlist called
MyList
by adding, deleting, or moving
MyList
. You
songs on your phone. You can create and manage
additional playlists on your computer and then copy
them to your phone.
To add a song to MyList
1. Go to
2. Select
My Stuff
Music
.
:
.
3. Find the song you want to add.
4. Select
5. Select
To delete or move a song in
1. Go to
2. Select
3. Select
Menu
.
Add2MyList
My Stuff
Music
Playlist
.
.
.
.
MyList
:
3. Select the category where you expect to find the
video you want to play.
4. Select the title you want to play.
5. Press the
Center Select Key C
to play the video.
Use the Media Player to control video playback.
Play Games
When you’re ready to play a downloaded or subscription
game, you’ll find it in
1. Go to
2. Select
My Stuff
Games and Applications
My Stuff
.
.
.
3. Select the title or subscription you want to play.
4. Press the
Center Select Key C
to start the game.
Run Applications
To run an application you have installed, downloaded, or
subscribed to:
1. Go to
My Stuff
.
4. Select
5. Select
MyList
Menu
.
.
6. Select the appropriate command to make
your changes.
Move Up
in
Move Down
in
Delete
moves the current song up one slot
MyList
.
moves the current song down one slot
MyList
.
removes the current song from
MyList
Play Videos
Use the Media Player to play downloaded videos.
1. Go to
2. Select
My Stuff
Video
PAGE 16 CHECK IT OUT! HIGHLIGHT FEATURES
.
.
2. Select
Games and Applications
.
3. Select the title or subscription you want to run.
4. Press the
Center Select Key C
to run
the application.
.
Page 18

Change Tones & Graphics
Tones & Graphics
is where you personalize your phone
by setting its ringtone, wallpaper, and screen saver:
1. Go to
2. Select
My Stuff
.
Tones & Graphics
.
3. Select the type of item you want to change.
4. Select the item you want to use.
5. Press the
Center Select Key C
to preview
the item.
Tip: To stop a preview before it completes,
press
OK
.
-or-
Press the
Assign
Soft Key to use the selected item.
Access Your Subscriptions
To view or play something to which you’ve subscribed:
1. Go to
2. Select
My Stuff
.
Subscription
.
3. Select the subscription you want to view or play.
4. Select the item you want to use.
Cancel a Subscription
You can cancel a subscription directly from your phone
or by going to www.ampd.ca. To cancel from
your phone:
1. Go to
2. Select
My Stuff
.
Subscription
.
3. Select the subscription you want to cancel.
4. Select
5. Select
6. Press the
Menu
.
Unsubscribe
.
Center Select Key C
to confirm
the cancellation.
See Details for an Item.
1. Go to
My Stuff
.
2. Select the item for which you want to see details.
3. Select
4. Select
Menu
.
Properties
.
5. Press the
Center Select Key C
to launch the
selected item.
PAGE 17 CHECK IT OUT! HIGHLIGHT FEATURES
Page 19

My Stuff Menu Commands Quick Reference
Command Action
Add2MyList Add the selected item to
MyList
.
Unsubscribe Cancel the subscription for the selected item.
Delete Delete the selected item from
MyList
or your phone (depending on the
item selected).
Shuffle Play songs on current playlist in random order.
Properties Show details for the selected item such as title, artist, album, genre, rating,
and price.
Home Go to the
My Stuff
main menu.
Help Display helpful hints and explanations for the current screen.
Need Help for Amp’d Live
TM
?
Commonly Asked Questions
How can I quickly return to the Amp’d Live
TM
or
My Stuff main menu?
1. Select
2. Select
Menu
Home
.
.
I selected On Demand/Streaming. Why can’t I
restart or replay the item?
You can view or play On Demand/Streaming items
only once.
It’s like a pay-per-view movie from your cable or satellite
TV service. If you want to use an item more than one,
select the
Download
option instead.
How do I edit playlists?
You can edit only the built-in
MyList
playlist from your
Where can I view details about an item?
1. Go to
My Stuff
.
2. Select the item for which you want to see details.
3. Select
4. Select
Menu
.
Properties
How do I cancel a subscription?
1. Go to
2. Select
My Stuff
.
Subscription
.
3. Select the subscription you want to cancel.
4. Select
5. Select
6. Press the
Menu
.
Unsubscribe
.
Center Select Key C
to confirm the
cancellation.
phone. Edit your other playlists using your computer,
then place an updated copy on your phone.
PAGE 18 CHECK IT OUT! HIGHLIGHT FEATURES
Page 20
Get Help Online
To get help online, go to www.ampd.ca and select
Customer Care
at the bottom of the page.
Customer Care
To reach an Amp’d Mobile
TM
Customer Care
representative, call 1-877-611-2673, or dial *611
from your Amp’d Mobil
TM
phone. Otherwise, go
to www.ampd.ca
Taking and Sending a Photo
From the home screen, press the camera key b to
activate your phone’s camera.
The active viewfinder image appears on your
phone’s display.
N
I
621
4
1.
Press the camera key b to take a photo.
-or-
Press the
2. Press
Center Select Key C
Options
to view storage options:
.
Store Only
Apply as Wallpaper, Apply as Screensaver or
Apply as Phonebook Entry
.
If you choose to store the photo, continue to step 3.
-or-
Press the Bkey to delete the photo and return to
the active viewfinder.
3.
Press
Send
to Send in Message.
Taking a Self Portrait
1. Press b, then close the flip.
-or-
With the flip closed, press and hold the
(below volume keys) on the side of the phone.
2. Hold the camera with the lens aimed at yourself. Use
the external display as a viewfinder.
camera key
,
1
3
S
left or
.
Options
Zoom
1x
480x640
Exit
2
1
Displays when you activate the camera. Press S
left or right to zoom in or out on an image. Press
S
up or down to change settings for lighting
conditions, style, and zoom. Then press
right to change levels.
2
Press
3
Press
Press the
Options
Exit
Center Select Key
to view the Options menu.
to return to previous screen
C to take a photo.
Point the camera lens at the photo subject, then:
PAGE 19 TAKING AND SENDING A PHOTO HIGHLIGHT FEATURES
3. Press the
key
below volume keys on the side of the
phone to capture the photo.
Pictures Menu Options
When the camera is active, press
Pictures Menu
following options:
. The menu can include the
Options
to open the
Page 21

Option Description
Go To Pictures View pictures and photos stored on your phone.
Switch Storage Device Save the photo on optional memory card (
phone memory (
Phone
).
TRANS-T-Flash
), if installed, or on
Auto-Timed Capture Set a timer for the camera to take a photo.
Capture Title Assign a name to a captured photo.
Camera Setup Open the setup menu to adjust picture settings (Resolution,Quality).
View Free Space See how much memory remains for storing photos.
Recording and Playing Video Clips
From the home screen, press and hold the camera key to
activate your phone’s video camera. You can navigate
between picture and video mode when you press and
hold the camera key.
The active viewfinder image appears on your phone’s
display.
N
621
1
2
Lighting Conditions
Options
480x640
Exit
3
3
Return to previous screen.
Point the camera lens at the video subject, then:
Press and hold the Camera key to activate the Video
Camera.
Recording Video Clips
Press the
Point the camera lens at the video subject, then:
1. Press and hold the
2. Press the
Center Select Key C
Video Camera
.
-or-
Press
Menu
>
Camera & Pics
Center Select Key C
-or-
Press
Options
to open the
to start recording.
Camera key
>
Videos Menu
to activate the
Video Camera
to begin recording.
other options as described in the table below.
1
Displays when you press
settings
.
2
Press
Options
to view the
S
to change video
Videos Menu
3. Press the
Center Select Key C
4. Press the
.
to save the captured video clip or press the
Stop
key to stop recording, or press the
while recording to stop.
Options
key or the
Center Select Key C
to add a message attachment.
to select
Send
key
PAGE 20 RECORDING AND PLAYING VIDEO CLIPS HIGHLIGHT FEATURES
Page 22

Videos Menu Options
When the Video Camera is active, press
open the
following options:
Option Description
Go To Videos View video clips stored on the phone.
Videos Menu
. The menu can include the
Options
to
Switch Storage Device Save the video clip on memory card (
phone memory (
Video Camera Setup Adjust settings for:
View Free Space View how much memory remains for storing multimedia objects.
Playing Video Clips
1. Press
2. Pres
3. Press
4. Press
Note: Videos are preset to a default recording length.
This length can be extended in the
You can send and receive video clips in
multimedia messages.
Press
To play a video clip stored on your phone:
1. Press S to scroll to the video clip.
Option Description
Menu
>
Camera & Pics
s S
up or down to pause or stop the video clip.
S l
eft or right to rewind or fast forward
though the video clip.
Options
Menu >Camera & Pics >Videos
to open
>
Videos Menu
Videos
> Video Clip
.
Videos Menu
Phone
).
Auto Repeat, Video Length, Recording Sound
2. Press the
playback.
3. Press
-or-
Press
select other options as described in the table below.
Note: When you view a video clip in a multimedia
message that does not contain text, pressing
.
may display a blank screen or restart the video clip.
Videos Menu Options
When the Video clips are listed, press
the
Videos Menu
options:
TRANS-T-Flash
Center Select Key C
S
to control the video (move up or down).
Options
to view video information and to
. The menu can include the following
), if installed, or on
to start video clip
Options
.
S
right
to open
Send in Message Send the clip in a multimedia message.
Switch Storage Device Save the video clip on optional memory card (
or on phone memory (
New Video Capture a new video clip.
PAGE 21 RECORDING AND PLAYING VIDEO CLIPS HIGHLIGHT FEATURES
Phone
).
TRANS-T-Flash
), if installed,
Page 23

Option Description
Details View information about the highlighted video clip.
Rename Assign a different name to the video clip.
Delete Delete the highlighted video clip.
Move
Copy
Mark Mark 1 or more video clips that you want to move, copy, or delete.
Mark All Mark all video clips to be moved, copied, or deleted.
Categories Create a new category, or view video clips in a selected category.
Assign to Category Assign a video clip to a defined category.
Videos Setup Adjust settings for:
View Free Space View how much memory remains for storing multimedia objects.
Multimedia Message
A
Multimedia Messaging Service
contains one or more slides with text and media objects
(including photos, pictures, animations, sounds, voice
records, and/or video clips). You can send the
multimedia message to other wireless phone users, and
to email addresses.
Creating and Sending a Multimedia Message
1. Press
2. Press keypad keys to enter text.
3. Press
4. Press
5. Press
Menu >Messaging >Create Message
>
New MMS Message
Options
S
items you can insert in the message.
S
to open the
to select
to scroll to a type of object to insert.
Insert
MMS Menu
. This will display a list of
Move highlighted video.
Copy highlighted video.
(MMS) message
.
Auto Repeat, Video Length, Recording Sound
Select
6. Press
7. Press
8. Press
To add another object to the message, continue.
To send the message, go to step 12.
9. Press
new object.
10. Press
items you can insert in the message.
11. Press the
current object
Repeat steps 3 to 10 to enter contents for the new
object.
12. Press the
select a contact from the
key to select the object type.
S
highlight the object you want.
Center Select
Options
S
to Select
Insert
Send To
key to insert the object.
to open the
Insert
key to insert a new object after the
key to send the message. You can
MMS Menu
. This will display a list of
Contact
list or add a new
.
to insert a
PAGE 22 MULTIMEDIA MESSAGE HIGHLIGHT FEATURES
Page 24

number and/or email address.
-or-
Press
Options
to delete the page, preview, set page
timing, save as a template, view message details,
save to drafts, change entry mode, change entry
setup or cancel message.
Receiving a Multimedia Message
When you receive a multimedia message or letter, your
phone displays the
New Message
Press
Read
Multimedia messages that you receive can contain
different media objects:
•
Photos, pictures, and animations are displayed as
you read the message.
•
A sound file, or video clip begins playing when its
slide is displayed. Use the volume keys to adjust the
volume as the sound file or video clip plays.
Note: In a multimedia letter, you may have to
highlight an indicator in the text to play a sound file
or video clip.
•
Attached files are added to the end of the message.
To open the attachment, highlight the file indicator/
filename and press the
Play
key (sound file or video clip), or
(object such as
unknown file type).
Note: File names for stored multimedia objects cannot
exceed 36 characters.
É
(message waiting) indicator and a
notification, and sounds an alert.
key to open the message.
View
key (image file type),
Contacts
or datebook entry, or
Open
key
or connect to another device to exchange and
synchronize files.
Your phone currently supports the following
Bluetooth profiles:
•
headset (optional Motorola Original™ accessory)
•
Handsfree Car Kit (optional
Motorola Original accessory)
For more information about Bluetooth
®
wireless
connections supported by this device, go to FAQs
www.motorola.com/bluetooth
.
Note: All multimedia (video player, audio player, shutter
tones) will play from the speakerphone when your
phone is connected to another Bluetooth device.
Turn Bluetooth® Power On or Off
Press
Menu >
Link
>
Note: To extend battery life, use the above procedure
and set Bluetooth
turn Bluetooth
to accessories until you turn Bluetooth
reconnect to the accessories.
Settings >Connection >Bluetooth
Setup >Power
®
®
power to
power
>
On
Off
when not in use. If you
Off
, your phone will not connect
®
power On and
Bluetooth® Connections
Your phone supports Bluetooth® connections. You can
connect your phone to a Bluetooth
PAGE 23 RECEIVING A MULTIMEDIA MESSAGE HIGHLIGHT FEATURES
®
headset or car kit,
Page 25

Pairing with a Headset, Handsfree Device,
or PC
Before you try to connect to another Bluetooth
device,
make sure your phone’s Bluetooth® power is On
and the device is in
the device). You cannot perform pairing while your
phone is connected to another device.
To pair your phone to a headset accessory, handsfree car
kit, or PC that supports Bluetooth
Press
Menu >
Link
>
Handsfree
pairing mode
(see the user guide for
®
wireless connections:
Settings >Connection >Bluetooth
>
[Look For Devices]
PAGE 24 BLUETOOTH® CONNECTIONS HIGHLIGHT FEATURES
Page 26

LEARNING TO USE YOUR PHONE
4 LEARNING TO USE YOUR PHONE
See page 1 for a basic phone diagram.
Using the Display
The
home screen
using the menu. You must be in the home screen to dial
a phone number.
Date
Left Soft Key Label
Clock
Right Soft Key Label
Note: Because you can customize the soft key settings,
your home screen soft key labels may be different than
the ones shown above.
Labels at the bottom corners of the display show the
current soft key functions. Press the left or right soft key
to perform the function indicated by the left or right soft
key label.
Your phone will display digital clock in the home screen.
displays when you are
6
WED 8/24/05
Menu
Îì
12:45pm
Contacts
not
on a call or
The following status indicators can display:
3O\ r uõ É
WED 8/24/05
12:45pm
Menu
Roam Indicator
Shows when your phone is
Contacts
seeking or using another network outside your
home network.
Signal Strength Indicator
Vertical bars show the
strength of the network connection. You cannot
make or receive calls when the
indicator or
0
(no transmit) indicator displays.
Data Coverage Indicator
1
(no signal)
Shows the type of data
signal your phone is using:
I
= shows when your phone is in a 1x-RTT
coverage area, access to files under 200K
7
= shows when your phone is in a 1x-EVDO
coverage area. Broadband speeds full access to
Amp’d Live
TM
PAGE 25 USING THE DISPLAY LEARNING TO USE YOUR PHONE
Page 27

Message Indicator
Displays when you receive a
new message. Indicators can include:
É
= text message
è
= voicemail and
Ë
= voicemail message
text message
When you enter a text or picture message using the
messaging feature, a number in the message entry area
shows the number of characters remaining on the
current page (text message) or the message size
(multimedia message or letter).
Battery Level Indicator
Vertical bars show the
battery charge level. Recharge the battery when
Low Battery
displays and you hear an audible
battery alert.
Ring Alert Indicator
õ
= loud ring
Î
= vibrate
Í
= silent
Shows alert style setting:
ô
= soft ring
ö
= vibrate and ring
Using the 5-Way Navigation Key
Use the
left, or right through the menu system, highlight menu
items, change feature settings, and play games. Press
the
menu item.
5-Way Navigation Key S
Center Select Key C
to scroll up, down,
to select a highlighted
Using Menus
From the home screen, press
main menu.
Left Soft Key
Perform functions identified by left
display prompt.
Center Select Key
open main menu.
Right Soft Key
right display prompt.
5-Way Navigation Key SScroll through menus
and lists, set feature values. Press the
Key
C
to select highlighted items.
Menu
to enter the
Îì
6
WED 8/24/05
040128o
12:45pm
Menu
Contacts
From home screen, press to
Perform functions identified by
Center Select
PAGE 26 USING THE 5-WAY NAVIGATION KEY LEARNING TO USE YOUR PHONE
Page 28

Press S to scroll to and highlight a menu feature icon
in the main menu. The following icons represent
features that may display in the main menu, depending
on your service provider and service subscription
options.
Icon Feature Icon Feature
C
n
e
w
m
Amp’d Live
Contacts
Messaging*
Settings
Phone Status
TM
D
s
e
É
My Stuff
Recent Calls*
Camera & Pics
Tools
Note: Features marked with * are optional network/
subscription dependent features.
Note: This is the standard main menu layout.
Menu
organization and feature names may vary on your
phone.
Not all features may be available on your phone.
Selecting a Menu Feature
To select a menu feature, starting from the home screen:
Press
Menu >
This example shows that from the home screen, you
must press
the main menu, then scroll to and select
S
to scroll, and the left/right soft keys to select the
functions displayed in the bottom left and right corners
of the display.
Recent Calls >Dialed
Menu
, scroll to and select
Recent Calls
Dialed
. Press
from
Selecting a Feature Option
Some features require you to select an option from a list:
6
Dialed
10) John Smith
9) Lisa Owens
8) Adda Thomas
7) Jack Bradshaw
Options
Press
Options
Highlighted option.
Press the
Press the
Center Select Key C
to open the submenu.
Back
key to return to the previous screen.
highlighted option.
Press
S
to scroll up or down to highlight the option
you want.
In a numbered list, press a number key to highlight
the option.
In an alphabetized list, press a key repeatedly to cycle
through the letters on the key and highlight the closest
matching list option.
When an option has a list of possible values, press
left or right to scroll through and select a value.
When an option has a list of possible numeric values,
press a number key to set the value.
Îì
Back
to view details of
S
PAGE 27 USING MENUS LEARNING TO USE YOUR PHONE
Page 29

Entering Text
Some features require you to enter information.
The message center lets you compose and send
text messages.
Done
displays when you enter or edit information.
Highlighted option.
Cancel
Press
Press
Options
Press
S
to scroll down to other options.
6
Entry Details
Name: John Smith
No.: 2125551212
Type: Mobile
Speed No.: 6
Category: General
Ringer ID: None
Done
Îì
t
Cancel
to exit without making changes.
>
Edit
to enter or edit information.
6
ÂÆ
Options
Msg
Îì
450
Cancel
For indicator descriptions, see following section.
Flashing cursor indicates insertion point.
Press
Options
to open the submenu. Select
Insert
to insert a quick note.
Character counter.
Press
Cancel
to exit without making changes.
PAGE 28 ENTERING TEXT LEARNING TO USE YOUR PHONE
Page 30

Choosing a Text Entry Method
Multiple text entry methods make it easy for you to
enter names, numbers, and messages. The method you
select remains active until you select another mode.
Press
#
in any text entry screen to select one of the
following entry methods:
Primary
Numeric
The primary text entry method (see below
to set).
Enter numbers only (see page 32).
Using Capitalization
Press 0 in any text entry screen to change text case.
The following indicators show capitalization status:
U
= no capital letters
V
= capitalize next
letter only
T
= all capital letters
Text Entry Method Indicators
The following indicators identify the text entry setting:
Symbol
Enter symbols only (see page 32).
Alternatively, you can select a text entry method
(Primary, Secondary, Numeric or Symbol) in any text
entry screen by pressing
Options >Entry Mode
.
Setting Up a Text Entry Method
Press
Options >Entry Setup
screen. Select
Primary or Secondary Setup
from any text entry
, then
choose:
iTAPTM English
Let the phone predict each word (in
English) as you press keys
(see page 31).
iTAP Français
Let the phone predict each word (in
French) as you press keys.
(see page 31)
iTAP Espanol
Let the phone predict each word (in
Spanish) as you press keys.
Tap English
Enter letters and numbers by pressing
a key one or more times.
Tap Extended
Enter letters, numbers and symbols by
pressing a key one or more times.
Indicator Setting
g
h
f
j
k
i
The following indicators identify
Tap, no capital letters
Tap, capitalize next letter only
Tap, all capital letters
iTAP, no capital letters
iTAP, capitalize next letter only
iTAP, all capital letters
Numeric
entry method:
W
= numeric method[= symbol method
or
Symbol
PAGE 29 ENTERING TEXT LEARNING TO USE YOUR PHONE
Page 31

Using Tap Method
This is the standard method for entering text on
your phone.
Tap method cycles through the letters and numbers of
the key you press.
Press To
a keypad key 1 or more times select a letter,
number, or symbol
keypad keys enter remaining
characters
Tip: Press
to accept a word
completion, or
to insert a space.
S
In a text entry screen, you can press
store the text
*
modes. The entry mode is displayed in the upper left
corner as the
*
is pressed.
S
right
#
to switch entry
When you enter text with Tap method, the soft key
functions change.
6
ÁÔ Msg
This is a prog ram
Options
Îì
436
Send To
Character displays at insertion point.
Press the Bkey
to delete character to the left of
the insertion point.
After 2 seconds, character is accepted and the
cursor moves to the next position.
Press
Cancel
to exit without making changes.
PAGE 30 ENTERING TEXT LEARNING TO USE YOUR PHONE
Page 32

Character Chart
Use this chart as a guide for entering characters with
Tap method.
1 . ? ! , @ ' - _ : ; ( ) & " ~ 1 0 ¿ ¡ % £ $ ¥ ¤ £ + x *
/ \ [ ] = > < # §
2 a b c 2
•
If you enter or edit information and do not want to
save the changes, press
P
to exit without saving.
Using iTAP™ Method
iTAP software provides a predictive text entry method
that lets you enter a word using 1 key press per letter.
This can be faster than Tap method, because your phone
combines the key presses into common words.
3 d e f 3
4 g h i 4
5 j k l 5
6 m n o 6
7 p q r s 7
8 t u v 8
9 w x y z 9
0 change text case, for capital letters
* change text entry method (hold for default)
# enter a space (hold to enter a return)
Note: This chart may not reflect the exact character set
available on your phone. In a URL editor,
1
first shows
common characters for that editor.
Tap Method Text Entry Rules
•
Press a keypad key repeatedly to cycle through
its characters.
•
Press S left or right to move the flashing cursor to
the left or right in a text message.
•
The first character of every sentence is capitalized.
If necessary, press
S
down to force the character
to lowercase before the cursor moves to the
next position.
For example, if you press
7 7 6 4
, letter
combinations that match your keypresses display:
6
ÁÛ Msg
This is a prog ram
prog proh proi pro4
Select
Press
Select
to lock highlighted combination.
Press
Delete
to delete the last letter.
S
Press
Press S right to highlight another combination.
Press
up to accept
*
to enter
Prog
If you want a different word (such as
Îì
433
Delete
Program
.
and a space.
Progress
),
continue pressing keypad keys to enter the
remaining characters.
PAGE 31 ENTERING TEXT LEARNING TO USE YOUR PHONE
Page 33

Entering Words
In a text entry screen, you can press * to switch entry
methods. An indicator shows which method is active
(see page 29).
1. Press keypad keys (1 press per letter) to show
possible letter combinations at the bottom of
the display.
2. Press
S
left or right to highlight the combination
you want.
3. Press
Select
key to lock a highlighted combination.
You can press keypad keys to add more letters to the
end of the combination.
-or-
Press # to enter the highlighted combination when
it spells a word.
A space is automatically inserted after the word.
If you enter a word your phone does not recognize, the
phone stores it to use as one of your word options.
When you fill memory space for unrecognized words,
your phone deletes the oldest words to add new words.
2. Press
S
left or right to highlight the combination
you want.
3. Press
Select
key to lock a highlighted combination.
You can press keypad keys to add more symbols to
the end of the combination.
-or-
Press # enter the highlighted combination.
Symbol Chart
Use this chart as a guide for entering characters with
symbol method.
1 . ? ! , @ ' - _ : ; ( ) & " ~ 1 0 ¿ ¡ % £ $ ¥ ¤ £ + x *
/ \ [ ] = > < # §
2 @ _ \
3 / : ;
4 " & '
5 ( ) [ ] { }
6 ¿ ¡ ~
Using Numeric Method
In a text entry screen, press * to switch entry methods
until the
W
(numeric) indicator displays.
Press keypad keys to enter the numbers you want. When
you finish entering numbers, press
*
to switch to
another entry method.
Using Symbol Method
In a text entry screen, press * to switch entry methods
until the
1. Press keypad keys (1 press per symbol) to show
[
(symbol) indicator displays.
possible symbol combinations at the bottom of
the display.
PAGE 32 ENTERING TEXT LEARNING TO USE YOUR PHONE
7 < > =
8 $ £ ¥ ¤
£
9 # % *
0 + - x * / = > < # §
* change text entry method (hold for default)
# enter a space (hold to enter a return)
Note: This chart may not reflect the exact character set
available on your phone. In a URL editor,
1
first shows
common characters for that editor.
Page 34

Deleting Letters and Words
Place the cursor to the right of the text you want to
delete, then:
1. Press the Bkey to delete 1 letter at a time.
2. Hold the
atime.
B
key to delete all the text, 1 word at
•
The memory card is recognized as removable
memory when connected to a personal computer.
•
When you disconnect the phone with the memory
card from a personal computer, remove the USB
storage equipment on your personal computer.
Otherwise, files stored on the memory card could
be damaged.
Using the External Display
When the flip is closed, you can use the external display
for the following:
•
View time, date, and phone status information.
•
Read messages that notify you of incoming calls
and other events.
•
Use the external display as a viewfinder when you
take a self portrait with the phone’s camera.
•
When you use a Bluetooth® headset for speech
recognition, view speech-activated dialing
commands and other status information.
Using a Removable Memory Card
Note: See page 8 for instructions on inserting and
removing a memory card.
Note: You should format a memory card before you
can use it.
You can use an optional removable memory card with
your phone to store additional multimedia objects such
as photos, video clips, and graphics.
Memory Card Tips
•
File names for multimedia objects must be less than
12 characters.
•
Do not remove the memory card while reading or
writing files. Otherwise, the card may be damaged.
Managing a Memory Card
To manage an inserted memory card:
Press
Menu >
1. Press S to scroll to the memory card.
Note: Phone memory is always listed last.
2. Press
card information.
-or-
Press
perform other procedures (see the table below).
The Storage Device menu can include the
following options:
Option Description
Format
Phone Status >Storage Devices
Center Select
Menu
to open the Storage Device menu to
Format the memory card.
key to view memory
Formatting the Memory Card
It is recommended that you format the memory card
before you attempt to store any multimedia objects
on it.
Note: Formatting the memory card will erase any data
already on the card.
1. With the phone powered off, insert the memory
card into the phone (see page 8).
2. Turn on the phone.
PAGE 33 USING THE EXTERNAL DISPLAY LEARNING TO USE YOUR PHONE
Page 35

3. When the phone is completely powered on, press
Menu
.
4. Scroll to
5. Scroll to
6. Scroll to
7. Scroll to
The phone displays Formatting will erase all data.
8. Press the
memory card.
-or-
Press the No key to exit without formatting the card.
Phone Status
Storage Devices
Trans T-Flash
Format
Yes
key to begin formatting the
and press the
and press the
and press the
and press the
Select
Select
key.
Select
Options
key.
key.
key.
Storing Multimedia Objects
When a memory card is inserted into your phone, you
must select the card before you can store objects to or
access objects on it. Use the Switch Storage Device
option in the Pictures Menu, Videos Menu, or
Tones & Graphics Menu.
Using the Handsfree Speaker
When you activate your phone’s built-in handsfree
speaker, you can talk to the other party without holding
the phone to your ear.
Press the upper left smart key to turn the handsfree
speaker on or off during a call. A soft audio alert
confirms activation/deactivation.
When you turn the handsfree speaker on, your phone
displays
handsfree speaker remains on until you press the
speakerphone key again or turn the phone off.
Note: The handsfree speaker is disabled when you
connect your phone to a handsfree car kit or
headset accessory.
Spkrphone On
in the home screen. The
Turning On Airplane Mode
Note: Consult airline staff about the use of Airplane
Mode in flight. Turn off your phone whenever instructed
to do so by airline staff.
Viewing Memory Card Contents
To view the contents of an inserted memory card:
Press
Menu >
-or-
Press
Menu >
1. Scroll to and select the desired multimedia object
(Pictures, Sounds, or Videos).
2. Press
multimedia object.
3. Scroll to and select
4. Scroll to and select
PAGE 34 USING THE HANDSFREE SPEAKER LEARNING TO USE YOUR PHONE
Tools >Sounds
Camera & Pics
Options
to open the menu for the selected
Switch Storage Devices
TRANS-T-Flash
.
.
Airplane Mode allows you to disable your phone’s radio
frequency functions and still use other applications (such
as the calculator or datebook functions). This may
enable you to use these applications while on
an airplane.
Press
Changing a Code, PIN, or Password
Your phone’s 4-digit unlock code is originally set to
1234, and the 6-digit security code is originally set to
000000. Your service provider may reset these codes
before you receive your phone.
If your service provider has not reset these codes, we
recommend that you change them to prevent others
from accessing your personal information. The unlock
Menu >
Tools >Airplane Mode
Page 36

code must contain 4 digits, and the security code must
contain 6 digits.
To change a code or password:
Press
Menu >
Settings >Security >New Passwords
Locking and Unlocking Your Phone
You can lock your phone manually or set the phone to
lock automatically whenever you turn it off.
To use a locked phone, you must enter the unlock code.
A locked phone still rings or vibrates for incoming calls
or messages,
You can make emergency calls on your phone even
when it is locked.
Locking Your Phone Manually
Press
Menu >
>
Lock Now
1. Press keypad keys to enter your unlock code.
2. Press the
Unlocking Your Phone
Your phone’s unlock code is originally set to 1234. Your
service provider may reset the unlock code to the last 4
digits of your phone number.
At the
but you must unlock it to answer.
Settings >Security >Phone Lock
Center Select Key C
Enter Unlock Code
prompt:
to lock the phone.
Setting Your Phone to Lock Automatically
You can set your phone to lock every time you turn
it off:
Press
Menu >
>
Automatic Lock >On
1. Press keypad keys to enter your unlock code.
2. Press the
automatic lock.
Settings >Security >Phone Lock
Center Select Key C
to activate
If You Forget a Code or Password
Your phone’s 4-digit unlock code is originally set to
1234, and the 6-digit security code is originally set to
000000. Your service provider may reset the unlock code
to the last 4 digits of your phone number before you
receive your phone.
If you forget your unlock code, try entering 1234 or the
last 4 digits of your phone number. If that does not
work, contact your service provider.
If you forget your security code or call barring password,
contact your service provider.
1. Press keypad keys to enter your unlock code.
2. Press the
phone.
PAGE 35 LOCKING AND UNLOCKING YOUR PHONE LEARNING TO USE YOUR PHONE
Center Select Key C
to unlock your
Page 37

SETTING UP YOUR PHONE
5 SETTING UP YOUR PHONE
Storing Your Name and Phone Number
To view your phone number, go to
Phone Status
-or-
from the home screen press
>
My Tel. Number
CLR
Menu
then #.
>
Setting an Alert Style
Your phone rings or vibrates to notify you of an
incoming call or other event. This ring or vibration is
called an
You can select 1 of 5 different alert styles:
Vibrate, Vibe then Ring, Silent
indicator in the display shows the current alert style.
To set an alert style:
Press
1. Press S to scroll to
2. Press
3. Press
4. Press
Each alert style contains settings for specific event alerts,
ringer ID, and ringer and keypad volume. To change
these settings, press
>
Note: When your phone is connected to a charger or
other accessory, the call ringer defaults to
uses the current
alert
.
Menu >
Ring Styles>style
Settings >Ring Styles
Change
S
Select
key to access the list of alert styles.
to scroll to the desired alert style.
key to select the alert style.
Loud Detail
. The alert style
Style.
Menu >Settings
Detail
setting.
Loud, Soft
Loud
and
,
Setting Answer Options
You can use additional methods for answering calls:
Press
Menu >Settings >In-Call Setup >Answer Options
Option Description
Multi-key answer by pressing any key
Open to Answer answer by opening the flip
Setting a Wallpaper Image
You can set the same photo, picture, or animation as a
wallpaper (background) image on your phone’s home
screen and external display.
Press
Menu >
1. Press S to scroll to
2. Press
3. Press
animation, or photo.
Scroll to
-orPress
up or down to open the
scroll to and select
memory card), then scroll to a picture, animation, or
photo
4. Press
5. Press
Settings >Personalize >Wallpaper
Picture
.
Change
S
Options >
.
Center Select
S
key to open the picture viewer.
up or down to scroll to a picture,
(None)
to turn off the wallpaper image.
Switch Storage Device
Storage Devices
TRANS-T-Flash
to scroll to
key to select the image.
Layout
(the removable
.
, then S
menu,
6. Press
7. Press
8. Press
PAGE 36 STORING YOUR NAME AND PHONE NUMBER SETTING UP YOUR PHONE
Change
S
to scroll to
Select
key to adjust the image layout.
Center, Tile
key to confirm the layout setting.
, or
Fit-to-screen
.
Page 38

9. Press
Tip: Set the resolution to the
camera when taking pictures to be applied as wallpaper.
Low resolution photos display best when applied as
to-Screen
Back
key to save wallpaper settings.
Low
as wallpaper.
setting on your
Fit-
Setting a Screen Saver Image
Set a photo, picture, or animation as a screen
saver image.
The screen saver image displays when the phone is on
and no activity is detected for a specified time. An
animation repeats for 1 minute, then the first frame of
the animation displays.
Tip: Turn off the screen saver to extend battery life.
Press
Menu >
1. Press S to scroll to
2. Press
3. Press
animation, or photo. Scroll to
screen saver image.
-or
Press
up or down to open the
scroll to and select
memory card), then scroll to a picture, animation, or
photo.
Settings >Personalize >Screen Saver
Picture
.
Change
S
Options>Switch Storage Device
key to open the picture viewer.
up or down to scroll to a picture,
(None)
to turn off the
Storage Devices
TRANS-T-Flash
(the removable
, then S
menu,
8. Press
9. Press
Select
key to confirm the delay setting.
Back
key to save the screen saver settings.
Setting Display Brightness
Press
Menu >
Settings >Initial Setup >Brightness
Adjusting the Backlight
Set the amount of time that the display and keypad
backlights remain on.
Press
Menu >
Settings >Initial Setup >Backlight
Conserving Battery Power
Some networks and phones include a battery save
setting to extend battery life. When this feature is
activated, your phone automatically turns off the keypad
backlight when it detects that enough ambient light
is available.
Press
Menu >
Settings >Initial Setup >Battery Save
4. Press
5. Press
6. Press
7. Press
Select
key to select the image.
S
scroll to
Note: Setting
saver feature.
Change
S
to scroll to the inactivity interval that
triggers the screen saver.
PAGE 37 SETTING A SCREEN SAVER IMAGE SETTING UP YOUR PHONE
Delay
.
Delay
to
Off
disables the screen
key to set the delay interval.
Page 39

CALLING FEATURES
6 CALLING FEATURES
For basic instructions on how to make and answer calls,
see page 7.
Changing the Active Line
Change the active phone line to make and receive calls
from your other phone number.
Press
Menu >
Phone Status
>
Active Line
Redialing a Number
1. Press N to view the Recent Calls list.
2. Press
3. Press
S
to scroll to the entry you want to call.
N
to redial the number.
Using Automatic Redial
When you receive a busy signal, your phone displays
Call Failed, Number Busy
With automatic redial, your phone automatically redials
the number for 4 minutes. When the call goes through,
your phone rings or vibrates 1 time, displays
Successful
You must turn on automatic redial to use the feature. To
turn automatic redial on or off:
Press
When automatic redial is turned off, you can manually
activate the feature to redial a phone number. When you
hear a fast busy signal and see
Press
, and then connects the call.
Menu >
N
Settings >Initial Setup >Auto Redial
or
RETRY
.
Redial
Call Failed
key to activate automatic redial.
:
Press either volume key to turn off the alert for a current
incoming call.
Calling an Emergency Number
Your service provider programs 1 or more emergency
phone numbers, such as 911, that you can call under
any circumstances, even when your phone is locked.
Note: Emergency numbers vary by country. Your phone’s
preprogrammed emergency number(s) may not work in
all locations, and sometimes an emergency call cannot
be placed due to network, environmental, or
interference issues.
1. Press keypad keys to dial the emergency number.
2. Press
N
call the emergency number.
Viewing Recent Calls
Your phone keeps lists of the calls you recently received
and dialed, even if the calls did not connect. Lists are
sorted from newest to oldest entries. Oldest entries are
deleted as new entries are added.
Press
Menu >
Shortcut:
recent calls list.
1. Press S to scroll to
Dialed
2. Press
\
means the call connected.
Recent Calls
Press N from the home screen to view the
calls.
Select
key to select the list.
Received
calls or
Turning Off a Call Alert
You can turn off your phone’s incoming call alert before
answering the call.
PAGE 38 CHANGING THE ACTIVE LINE CALLING FEATURES
Page 40

3. Press N to call the entry’s number.
Press
N
to send the number as DTMF tones during
a call.
-or-
Press
Center Select
-or-
Press
Options
perform various operations on the entry.
The
Last Calls Menu
following options:
Option Description
Store Create a
Delete Delete the entry.
Delete All Delete all entries in the list.
Send Message Open a new text message with
key to view entry details.
to open the
can include the
phone number in the
the number in the
Last Calls Menu
Contacts
to
entry with the
No.
field.
To
field.
Using the Notepad
The most recent set of digits entered on the keypad are
stored in your phone’s notepad memory. This can be a
phone number that you called, or a number that you
entered but did not call. To retrieve the number stored in
the notepad:
Press
Menu >
1. Press N to call the number.
-or-
Press
a number or insert a special character.
-or-
Press
number in the
Recent Calls >Notepad
Options
Store
to open the
key to create a
No.
field.
Dialing Menu
Contacts
entry with the
to attach
Attaching a Number
While dialing (with digits visible in the display):
Press
Options >Attach Number
from the
Contacts
or
Recent Calls
to attach a number
lists.
Add Digits Add digits after the number.
Attach Number Attach a number from
or the
Recent Calls
Contacts
lists.
Returning an Unanswered Call
Your phone keeps a record of your unanswered calls,
and displays:
•
the { (missed call) indicator
•
X Missed Calls
missed calls
1. Press
2. Press
3. Press N to make the call.
Select
S
PAGE 39 RETURNING AN UNANSWERED CALL CALLING FEATURES
, where X is the number of
key to see the received calls list.
to
select a call to return
.
Calling with Speed Dial
Each entry you store in
speed dial number.
You can change an entry’s speed dial number.
To see an entry’s speed dial number, press
>
Contacts
Select
To speed dial a
1. Press keypad keys to enter the speed dial number for
2. Press
3. Press
, scroll to the entry, and press the
key.
Contacts
the entry you want to call.
#
to submit the number.
N
to call the entry.
Contacts
entry:
is assigned a unique
Menu
Center
Page 41

Calling with 1-Touch Dial
To call
Contacts
single-digit speed dial number for 1 second.
entries 1 through 9, press and hold the
Using Voicemail
Voicemail messages that you receive are stored on the
network. To listen to your messages, you must call your
voicemail phone number.
Your service provider may include additional information
about using this feature.
Listening to Voicemail Messages
Press
Menu >
The phone calls your voicemail phone number. If no
voicemail number is stored, your phone prompts you to
store a number.
Messaging >Voicemail
Receiving a Voicemail Message
When you receive a voicemail message, your phone
displays the
New Voicemail
Press
The phone calls your voicemail phone number. If no
voicemail number is stored, your phone prompts you to
store a number.
t
(voicemail message) indicator and a
notification.
Call
key to listen to the message.
Muting a Call
1. Press
Mute
key.
Using DTMF Tones
You can send numbers to the network as dual tone
multi-frequency (DTMF) tones during a call. Use DTMF
tones to communicate with automated systems that
require you to submit a PIN code, password, or credit
card number.
To set DTMF tones to be long, short, or off:
Press
Menu >
1. Press S to scroll to
2. Press
DTMF options.
3. Press
4. Press
Short
sends a short, fixed-duration tone for each key
you press.
the key. Some systems (such as home answering
machines) may require long tones for proper activation.
Sending DTMF Tones During a Call
Using the Keypad
1. Press keypad keys to enter a number to send.
2. Press
3. Press
4. Press
as DTMF tones.
Settings >Initial Setup
DTMF
.
Change
S
Select
Options
S
Select
key to access the list of
to scroll to the desired options.
key to select the DTMF option.
Long
sends each tone for as long as you press
to open the
to scroll to
key to send the number to the network
Call Menu
Send Tones
.
.
PAGE 40 CALLING WITH 1-TOUCH DIAL CALLING FEATURES
Sending a Stored Number
During a call, highlight a number in
Recent Calls
Press
lists, then:
N
to make the call.
Contacts
or the
Page 42

PHONE FEATURES
7 PHONE FEATURES
Menu Map
Contents of the Main Menu Contents of the Settings Menu
Amp’d Live
My Stuff
Music
Video
Games & Applications
Tones & Graphics
Subscriptions
My Account
Contacts
Recent Calls
Received
Dialed
Notepad
Call Times*
Data Times*
Data Volumes*
Messaging*
Create Message
Voicemail
Message Inbox
Drafts
Outbox
Quick Text
TM
Camera & Pics
Camera
Pictures
Videos
Video Camera
Settings
(see Contents of the
Settings Menu)
To ol s
Calculator
Datebook
Voice Records
Alarm Clock
Airplane Mode
Sounds
Phone Status
My Tel. Number
Active Line
Battery Meter
Storage Devices
Other Information
Ring Styles
Style
style
Detail
Personalize
Home Screen
Main Menu
Skin
Greeting
Wallpaper
Screen Saver
Sound Settings
In-Call Setup
In-Call Timer
Answer Options
Msg Alert
Security
Phone Lock
Lock Keypad
Lock Application
Restrict Calls
New Passwords
Initial Setup
SpeakerPhone
Auto PIN Dial
Auto Redial
Display Timeout
Backlight
TTY Setup
Initial Setup (con’t)
Scroll
Language
Battery Save
Brightness
DTMF
Hyphenation
Master Reset
Master Clear
Network
Current Network
Set Mode
Service Tone
Call Drop Tone
Car Settings
Auto Answer
Auto Handsfree
Power-off Delay
Charger Time
Headset
Auto Answer
Voice Dial
Location
Location On
911 Only
Connection
Bluetooth Link
USB Settings
*Optional network/subscription dependent feature.
This is the standard main menu layout. Menu organization and feature names may vary on your phone. Not all features may be
available on your phone.
PAGE 41 MENU MAP PHONE FEATURES
Page 43

Calling Features
Feature Description
Conference Call During a call:
Dial next number, press
again.
Restrict Calls Restrict outgoing or incoming calls:
Menu >Settings >Security >Restrict Calls
N
, press N. When the second call connects, press N
>
unlock code
Messaging
Feature Description
Send Text Message Send a text message:
Menu >Messaging >Create Message >New TXT Message
Send Multimedia Message Send a multimedia message:
Menu >Messaging >Create Message >New MMS Message
Use Media Template Open an MMS template with preloaded media:
Menu >Messaging >Create Message >MMS Templates
Read Message Read a new text or multimedia message that you have received:
Press the
When you view a video clip in a multimedia message that does not contain text,
pressing
Store Message Objects Go to a multimedia message slide, or highlight an object in a letter, then:
Options >Store
File names for stored multimedia objects can not exceed 36 characters.
Quick Text Send or create a prewritten message:
Menu >Messaging >Quick Text
PAGE 42 CALLING FEATURES PHONE FEATURES
Read
key.
S right may display a blank screen or restart the video clip.
Page 44

Feature Description
Sent Messages View sent messages:
Menu >Messaging >Outbox
Received Messages Read received messages:
Menu >Messaging >Message Inbox
Press
Options
to perform various operations on the message.
When you view a video clip in a multimedia message that does not contain text,
pressing
S right may display a blank screen or restart the video clip.
Drafts View messages saved in the drafts folder:
Menu >Messaging >Drafts
Contacts
Feature Description
Create Entry Create a new
Contacts
entry:
Menu >Contacts
Create Group Mailing List
Options
You can store up to 1000
Create
>
New >Phone NumberorEmail Address
Contacts
a group mailing list as a Contacts entry:
Menu >Contacts
Options
Dial Number Call a number stored in
Menu >Contacts
>
New >Mailing List
Contacts
, highlight the entry, press N to call
Voice Dial Entry Voice dial a name or # stored in
With phone flip open, press and release the voice key, and say the entry’s name or
# (within 2 seconds) exactly as it is stored in
PAGE 43 CONTACTS PHONE FEATURES
entries.
:
Contacts
:
Contacts
.
Page 45

Feature Description
Change Speed Dial Number
for Entry
Assign a distinctive ringer alert to a
Menu >Contacts >entry
Contacts
entry:
Options >Edit >Speed No
Set Ringer ID for Entry Assign a distinctive ringer alert to a
Contacts
entry:
Menu >Contacts >entry
Options >Edit >Ringer ID >ringer name
Set Picture ID for Entry Assign a picture to display when you receive calls from an entry:
Menu >Contacts >entry
Options >Edit >Picture >picture
Set Picture ID View View
Contacts
entries as text list, or with picture caller ID photos:
Menu >Contacts
Options
Set Category for Entry Set the category for a
>
Setup >View by
Contacts
>
entry:
List
or
Picture
Menu >Contacts >entry
Options >Edit >Category >category name
Set Category View View
Contacts
entries as text list, or with picture caller ID photos:
Menu >Contacts
Options
Sort Contacts List Set the order in which
>
Categories
>
category type
Contacts
Menu >Contacts
Options
>
Setup >Sort by >sort order
Set Primary Number Set the primary number for a
Menu >Contacts
>
entry
Options >Set Primary >phone number
PAGE 44 CONTACTS PHONE FEATURES
entries are listed:
Contacts
entry with multiple numbers:
Page 46

Feature Description
View Primary or All Numbers Set to view only primary numbers or all numbers when viewing entries:
Menu >Contacts
>
entry
Options >Setup
Edit Entry Edit a
Contacts
Menu >Contacts
Options >Edit
Delete Entry Delete a
Contacts
Menu >Contacts
Options >Delete
Copy Contacts Entry Copy a
Contacts
Menu >Contacts
Options >Copy Entry
Copy Multiple Contacts Entries Copy multiple
Menu >Contacts
Options >Copy Entries >From[start]: >starting location number
>
From[end]:
number
>
View
>
All Contacts
entry:
>
entry
entry:
>
entry
entry to another location in
>
entry
>
location number
Contacts
>
entries to other locations:
>
entry
ending location number
or
Primary Contacts
Contacts
>
To[start]:
:
>
new starting location
PAGE 45 CONTACTS PHONE FEATURES
Page 47

Personalizing Features
Using Speech Commands
You can place calls and perform other tasks by speaking commands to your phone.
1. Press and release the voice button on the right side of the phone.
Your phone displays and speaks
2. Say 1 of the commands listed in the table below.
Your phone performs the corresponding action.
The following are speech commands and the actions they perform:
Speech Command Description
Call <Name or #> call a Contacts entry whose name or # you speak
Say a command
, followed by a list of speech commands.
Send Picture <Name or #> send a multimedia message to the
Send Text <Name or #> send a text message to a
Lookup <Name> look up a
Go To <App> use a speech shortcut to access the phone
Voicemail, Camera, Redial, Received Calls
Check <Item> check the
•
•
•
•
•
Contacts
item
you specify:
Status
—network coverage, signal strength, and battery life
Signal
—network signal strength
Network
Battery
My Phone Number
—network your phone is currently using
—battery charge level
Contacts
entry by speaking the entry’s
—view your phone number
Contacts
entry whose
entry whose
name
name
app
(application) you specify:
name
or # you speak
or # you speak
PAGE 46 PERSONALIZING FEATURES PHONE FEATURES
Page 48

Use the
Call
•Dial a
command to place a call in 2 different ways:
Contacts
entry by speaking the name of the entry.
• Dial any number by speaking the digits in the number.
1. Press and release the voice button on the right side of the phone.
You phone displays
2. Say “Call,” then say the name of the
• For example, to call the mobile number for a
Say a command
, followed by a list of speech commands.
Contacts
entry, or speak the digits of the phone number.
Contacts
entry named Bill Smith, you would say “Call Bill Smith
mobile.” (If the entry included only 1 number for Bill Smith, you would simply state “Call Bill Smith.”)
• Similarly, to call the phone number 312-555-1212, you would say “Call 312-555-1212.”
If the phone recognizes the name or number, it places the call.
• If the phone asks you to repeat a name or number, say it again. If the name or number is not valid or is not
recognized, the phone does not place the call.
• If the phone does not recognize the name or number, it displays a list of up to 3 names or numbers, asks, “Did
you say ...,” and highlights that first item in the list.
• If the name or number is correct, say “Yes” to place the call.
• If the name or number is not correct, say “No” to go to the next item on the list.
• To select the name or number manually, scroll to the name or number on the list and press the
Center Select
key.
• To exit the list, say “Cancel.”
• If you reach the end of the list without confirming a number, the phone says, “Sorry, no match found.” To try
to place the call again, press the
Repeat
key, say “Call,” and clearly speak the name or number.
Tip: Speak numbers at a normal speed and volume, pronouncing each digit distinctly. Avoid pausing between digits.
PAGE 47 PERSONALIZING FEATURES PHONE FEATURES
Page 49

Additional Personalizing Features
Feature Description
Ring Style Change the ring alert for an event:
Menu >Settings >Ring Styles >style
Detail >event name
Ringer IDs Activate distinctive ring alerts assigned to
Menu >Settings >Ring Styles >style
Contacts
entries:
Detail >Ringer IDs
Ring Volume Set ringer volume:
Menu >Settings >Ring Styles >style
Detail >Ring Volume
Keypad Volume Set keypad keypress volume:
Menu >Settings >Ring Styles >style
Skin Appearance To choose a phone
skin
that sets the look and feel of your phone’s display:
Detail >Key Volume
Menu >Settings >Personalize >Skin
Change Soft Keys Change soft key labels and menu feature icons in the home screen:
>
Settings>Personalize >Home Screen >Home Keys
Menu
PAGE 48 PERSONALIZING FEATURES PHONE FEATURES
Page 50

Menu Features
Feature Description
Language Set menu language:
Menu >Settings >Initial Setup >Language
Menu View Display the main menu as graphic icons or as a text-based list:
Menu >Settings >Personalize >Main Menu >View
Main Menu Reorder your phone’s main menu:
Menu >Settings >Personalize >Main Menu >Reorder
Show or Hide Menu Icons Show or hide menu feature icons in the home screen:
Menu >Settings >Personalize >Home Screen >Home Keys >Icons
Master Reset Reset all options except unlock code, security code, and lifetime timer:
Menu >Settings >Initial Setup >Master Reset
To reset all options, you need to enter the
Security Code
(000000).
Master Clear Reset all options except unlock code, security code, and lifetime timer, and
clear all user settings and entries:
This option erases all user-entered information stored in your phone memory,
including
Contacts
entries and downloaded files. Once you erase the
information, it cannot be recovered. It resets all options back to their factory
settings except for the unlock code, security code, and lifetime timer.
Menu >Settings >Initial Setup >Master Clear
To clear all information, you need to enter the Security Code (000000).
PAGE 49 MENU FEATURES PHONE FEATURES
Page 51

Dialing Features
Feature Description
Auto PIN Dial Some networks require an authenticating PIN code to allow outgoing calls.
Use this feature to automatically dial your PIN code.
Menu
>
Settings
>
Initial Setup >Auto PIN Dial
Call Monitoring
Network connection time
the moment you end the call by pressing
The amount of network connection time you track on your resettable timer may not equal the amount of time for
which you are billed by your service provider. For billing information, contact your service provider.
Feature Description
Call Times View call timers:
In-Call Timer Set a timer to beep at selected intervals during a call, and display time
is the elapsed time from the moment you connect to your service provider's network to
P
. This time includes busy signals and ringing.
Menu >Recent Calls >Call Times
information during a call:
Menu >Settings >In-Call Setup >In-Call Timer
PAGE 50 DIALING FEATURES PHONE FEATURES
Page 52

Handsfree Features
Note: The use of wireless devices and their accessories may be prohibited or restricted in certain areas. Always obey
the laws and regulations on the use of these products.
Feature Description
Accessory Volume Settings
(car kit or headset)
Speakerphone Automatic Off
Auto Answer
(car kit or headset)
Voice Dial
(headset)
Auto Handsfree
(car kit)
Power-Off Delay
(car kit)
Charger Time
(car kit)
Data and Fax Calls
Adjust volume of headsets or car kit accessories that are enabled for
®
Bluetooth
connections:
During an active call, press your phone’s up or down volume key.
Set the speakerphone feature to disable itself 20 seconds after end of call:
Menu >Settings >Initial Setup >SpeakerPhone
Automatically answer calls when connected to a car kit or headset:
Menu >Settings >Car Settings
or
Headset >Auto Answer
Enable voice dial with headset send/end key:
Menu >Settings >Headset >Voice Dial
Automatically route calls to a car kit when connected:
Menu >Settings >Car Settings >Auto Handsfree
Set the phone to stay on for a specified time after the ignition is switched off:
Menu >Settings >Car Settings >Power-off Delay
Charge the phone for a specified time after the ignition is switched off:
Menu >Settings >Car Settings >Charger Time
Feature Description
Send Data or Fax Connect your phone to the device, then place the call through the device application.
Receive Data or Fax Connect your phone to the device, then answer the call through the device application.
PAGE 51 HANDSFREE FEATURES PHONE FEATURES
Page 53

Bluetooth® Wireless Connections
Feature Description
Make Phone Visible to Other Device Allow an unknown Bluetooth device to discover your phone:
Menu >Settings >Connection >Bluetooth Link >Setup >Find Me
Tip: After the first connection, you do not need to select
to reconnect.
Connect to Recognized Device Connect to a recognized handsfree device:
Menu >Settings >Connection >Bluetooth Link >Handsfree
>
device_name
where
device_name
is the name of the device with which you want
to connect.
Connect to a Handsfree Device
During a Call
Switch to a headset or car kit during a call:
Menu
>
Use Bluetooth
Note: You cannot switch to a headset or car kit if you are already connected
to a Bluetooth device.
Disconnect From Device Disconnect from a device:
Highlight the device name and press the
DROP
Edit Device Properties Edit the properties of a recognized device:
Menu
>
>
Set Bluetooth Power Permanently On Set
Menu
>
Settings
Edit
Bluetooth Power
>
Settings
On
>
Connection
>
Bluetooth Link
to be on whenever your phone is on:
>
Connection >Bluetooth Link
key.
>
>
Find Me
Device History
Setup
>
Power
Set Bluetooth Options Set your phone’s Bluetooth options:
Menu >Settings >Connection >Bluetooth Link >Setup
PAGE 52 BLUETOOTH® WIRELESS CONNECTIONS PHONE FEATURES
Page 54

Network Features
Feature Description
Current Network View information about network with which phone is currently registered:
Menu >Settings >Network >Current Network
Set Mode Set how your phone searches for a network connection:
Menu >Settings >Network >Set Mode
Set Service Tones Set phone to beep each time the network registration status changes:
Menu >Settings >Network >Service Tone
Set Call Drop Alerts Set phone to emit an alert tone whenever the network drops a call. (Because
digital networks are so quiet, the call drop alert may be your only indication
that a call has been dropped.)
Menu >Settings >Network >Call Drop Tone
Personal Organizer Features
Feature Description
Create Datebook Event Create a new datebook event:
Menu >Tools >Datebook
C
, press
Options >New
You can store up to 1000
View or Edit Datebook Event View or edit event details:
Menu >Tools >Datebook
Event Reminder View event reminder:
OK
key
Close event reminder:
Back
key
PAGE 53 NETWORK FEATURES PHONE FEATURES
Datebook
, highlight the day, press the
events.
, highlight the day, press C, press the OKkey
Center Select Key
Page 55

Feature Description
Copy Datebook Event Copy a datebook event to date and/or time
Menu >Tools >Datebook
>
day >eventC.
Options >Copy
Set Alarm Set an alarm:
Menu >Tools >Alarm Clock
Turn Off Alarm Turn off alarm:
Press the
Disable
key or
Set 8-minute delay:
Press the
Snooze
key.
Create Voice Record Create a voice record:
Press and hold voice key, speak into the phone, release voice key.
Note: Recording of phone calls is subject to varying State and Federal laws
regarding privacy and recording of phone conversations. Always obey the
laws and regulations on the use of this feature.
Play Voice Record Play back a voice record:
Menu >Tools >Voice Records >voice record
Calculator Calculate numbers:
Menu >Tools >Calculator
Currency Converter Convert currency:
Menu >Tools >Calculator
Options
>
Exchange Rate
Enter exchange rate, press theskey, enter amount, and press
Convert Currency
.
Options
.
Options
>
PAGE 54 PERSONAL ORGANIZER FEATURES PHONE FEATURES
Page 56

Security
Feature Description
Lock Application Lock phone applications:
Menu >Settings >Security >Lock Application
News and Entertainment
Feature Description
Manage Pictures Manage pictures, animations, and photos:
Menu >Camera & Pics >Pictures
To access images stored on the removable memory card, press
open the
then scroll to and select
Manage Tones & Graphics Manage ring tones and tones & graphics that you have composed
or downloaded:
Menu >My Stuff
Manage Video Clips Manage video clips:
Menu >Camera & Pics >Videos
To access video clips stored on the removable memory card, press
to open the
then scroll to and select
Pictures Menu
>
Tones & Graphics
Videos Menu
, scroll to and select
TRANS-T-Flash
, scroll to and select
TRANS-T-Flash
.
.
Switch Storage Devices
Switch Storage Devices
Options
Options
to
,
,
PAGE 55 SECURITY PHONE FEATURES
Page 57

SERVICE AND REPAIRS
8 SERVICE AND REPAIRS
If you have questions or need assistance, we’re here to
help. Go to
you can select from a number of customer care options.
You can also contact the Motorola Customer Support
Center at 1-800-331-6456 (United States),
1-888-390-6456 (TTY/TDD United States for hearing
impaired), or 1-800-461-4575 (Canada).
www.motorola.com/consumer/support
, where
PAGE 56 SERVICE AND REPAIRS
Page 58

SPECIFIC ABSORBTION RATE
GETTING STARTED
9 SPECIFIC ABSORBTION RATE DATA
The model wireless phone meets the
government’s requirements for exposure to
radio waves.
Your wireless phone is a radio transmitter and receiver. It
is designed and manufactured not to exceed limits for
exposure to radio frequency (RF) energy set by the
Federal Communications Commission (FCC) of the U.S.
Government and by the Canadian regulatory authorities.
These limits are part of comprehensive guidelines and
establish permitted levels of RF energy for the general
population. The guidelines are based on standards that
were developed by independent scientific organizations
through periodic and thorough evaluation of scientific
studies. The standards include a substantial safety
margin designed to assure the safety of all persons,
regardless of age or health.
The exposure standard for wireless mobile phones
employs a unit of measurement known as the Specific
Absorption Rate, or SAR. The SAR limit set by the FCC
and by the Canadian regulatory authorities is 1.6 W/kg.
Tests for SAR are conducted using standard operating
positions accepted by the FCC and by Industry Canada
with the phone transmitting at its highest certified
power level in all tested frequency bands. Although the
SAR is determined at the highest certified power level,
the actual SAR level of the phone while operating can be
well below the maximum value. This is because the
phone is designed to operate at multiple power levels so
as to use only the power required to reach the network.
In general, the closer you are to a wireless base station,
the lower the power output.
1
Before a phone model is available for sale to the public
in the U.S. and Canada, it must be tested and certified
to the FCC and Industry Canada that it does not exceed
the limit established by each government for safe
exposure. The tests are performed in positions and
locations (e.g., at the ear and worn on the body)
reported to the FCC and available for review by Industry
Canada. See the printed
Information
for SAR values.
guide or http://www.motorola.com/rfhealth
2
Important Safety and Legal
While there may be differences between the SAR levels
of various phones and at various positions, they all meet
the governmental requirements for safe exposure. Please
note that improvements to this product model could
cause differences in the SAR value for later products; in
all cases, products are designed to be within
the guidelines.
Additional information on Specific Absorption Rates
(SAR) can be found on the Cellular Telecommunications
& Internet Association (CTIA) Web site: http://
www.phonefacts.net
or the Canadian Wireless Telecommunications
Association (CWTA) Web site: http://www.cwta.ca
1. In the United States and Canada, the SAR limit for mobile
phones used by the public is 1.6 watts/kg (W/kg) averaged
over one gram of tissue. The standard incorporates a
substantial margin of safety to give additional protection
for the public and to account for any variations in
measurements.
2. The SAR information includes the Motorola testing
protocol, assessment procedure, and measurement
uncertainty range for this product.
PAGE 57 SPECIFIC ABSORBTION RATE
Page 59

INDEX
INDEX
A
accessory connector port 1
alarm clock 54
alert
setting
7, 48
turning off 7, 38
animation
screen saver
viewing 55
wallpaper 36
answering a call 6, 36
application, locking and unlocking 55
automatic redial 38
37
B
backlight 37
barring calls 42
battery
charging
extending battery life 5, 37
installing 5
battery save 37
Bluetooth 52
brightness, setting 37
6
C
calculator 54
call
alert, turning off
answer options 36
answering 6
barring 42
dialed calls list 38
dialing 6, 7
emergency number 38
handsfree speaker 34
7, 38
making 6, 7
mute 40
received calls list 38
receiving 6
ring style 7, 48
timers 50
unanswered call 39
Call Failed, Number Busy message 38
caller ID 44
camera
taking a photo
category
Contacts entry
center key 26
character chart 31
codes
changing
default 34, 35
forgetting 35
conference call 42
Contacts
attaching 2 numbers
category for entry 44
dialing a number 43
group mailing list 43
1-touch dial 40
picture ID 44
primary number, setting 44
ringer ID 44, 48
sorting entries 44
speed dial number 39
storing an entry 43
coverage indicator 25
customizing the menu 49
19
44
34
39
D
data call 51
PAGE 58 INDEX
Page 60

INDEX
datebook 53
dialed calls list 38
dialing a number 6, 7
display
backlight
brightness 37
description 25
home screen 25
language 49
personalizing 49
distinctive ringer alert 48
37
E
earpiece volume 7
emergency number 38
end key 1
Enter Unlock Code message 35
external display 33
F
fax call 51
5-way navigation key 1, 26
message waiting 23
signal strength 25
text entry mode 26
voicemail message 26, 40
J
joystick 1
K
key
center key
end 1
5-way navigation 1, 26
left soft key 1, 25
menu 1
power 1
right soft key 1, 25
send 1
voice 1
volume control 1, 7
keypad
answering calls
volume, setting 48
26
36
H
handsfree speaker 34
headset jack 1
home screen
defined
25
I
incoming call
answering
indicators
coverage
message 26
PAGE 59 INDEX
25
6
L
language, setting 49
left soft key
functions
lock
application
phone 35
1, 25
55
M
making a call 6, 7
master clear 49
Page 61

INDEX
master reset 49
menu
entering text
icons, converting to text 49
icons, showing or hiding 49
language, setting 49
personalizing 49
rearranging features 49
using 26
view, changing 49
menu key 1
message
MMS, defined
multimedia message 42
multimedia template 42
reading 42
text 42
message indicator 26
message waiting indicator 23
MMS.
See
multimedia message
receiving
sending 22, 42
multimedia messaging service.
multimedia template
mute a call 40
my telephone number 7, 36
message
23
28
22
42
N
notepad 39
number
storing your number
viewing your number 7
36
O
1-touch dial
See
message
40
using
open to answer 36
P
passwords.
phone
phone number
photo
picture
picture ID 44
power key 1
See
codes
alert, turning off
answer options 36
clear stored information 49
codes 34
keypad, answering calls 36
language, setting 49
locking 35
open to answer 6
reset all options 49
ring style 7, 48
security code 34
unlock code 34
unlocking 35
attaching 2 numbers
redialing 38
storing in Contacts 43
storing your number 36
viewing your number 7
picture ID
sending 19
taking 19
screen saver
viewing 55
wallpaper 36
setting 44
44
37
7, 38
39
PAGE 60 INDEX
Page 62

INDEX
R
received calls list 38
recent calls 38
redial
automatic redial
busy number 38
right soft key
functions
ring alert
setting
7
turning off 7
ring style, setting 7, 48
ring tone
managing
ringer ID
setting
44
turning on/off 48
ringer volume, setting 7, 48
1, 25
55
38
S
screen saver 37
security code
changing
default 34
send key 1
signal strength indicator 25
silent alert, setting 7, 48
silent ring alert, setting 7
soft keys
functions
illustration 1
Speaker On message 34
speakerphone
automatic answer
speed dial 39
standby time, increasing 37
34
25
51
symbol chart 32
T
telephone number
storing your number
viewing your number 7
text
capitalization, changing
character chart 31
entering 28
symbol chart 32
text entry mode indicator 26
timers 50
tones & graphics
managing
55
36
U
unlock
application
phone 35
unlock code
bypassing
changing 34
default 34, 35
55
35
V
vibrate alert
setting
7, 48
turning off 7, 38
video clip
downloading
managing 55
recording 20
voice dial 51
voice key
42, 43
29
PAGE 61 INDEX
Page 63

INDEX
illustration 1
voicemail 40
voicemail message indicator 26, 40
volume
earpiece
keypad 48
ringer 7, 48
volume keys 1, 7
7
W
wallpaper 36
PAGE 62 INDEX
Page 64

ampd.ca
© 2007 Amp’d Mobile, Inc. All rights reserved. Amp’d Mobile, Amp’d Live, the pulse design and More mobile than you’re used to are trademarks
of Amp’d Mobile, Inc. All other company names, trademarks, logos and copyrights mentioned are the property of their respective owners.
 Loading...