

Page 1

M
Moto Contacts Tool
Quick Start Guide
Version 1
Page 2

Copyright, Distribution Policy, and Trademarks
Copyright
© Motorola, Inc. 2007 - 2009. All rights reserved. No part of this publication may be reproduced, transmitted,
transcribed, stored in a retrieval system or translated into any language in any form by any means without the written
permission of Motorola, Inc.
Consumer Advocacy Office
1307 East Algonquin Road
Schaumburg, IL 60196
1-800-331-6456 (United States)
1-888-390-6456 (TTY/TDD United States for hearing impaired)
1-800-461-4575 (Canada)
www.hellomoto.com
Software License
The Agreement sets forth the license terms and conditions for using the enclosed Software. You may use this Software on a single computer, and you may transfer it to another computer as long as it is used on only one computer at
a time. You may copy the Software for backup purposes only. You may not rent, sell, lease, sublicense, time-share or
lend the Software to a third party or otherwise transfer this License without written consent of Motorola. You shall not
decompile, disassemble, reverse-engineer or modify the Software. This License is effective until terminated. You may
terminate it at anytime by destroying the Software together with all copies. The License also terminates if you fail to
comply with the terms and conditions of this Agreement. United States copyright laws as well as international treaty
provisions protect this Software and accompanying documentation. Any use of the Software in violation of these laws
constitutes termination of the License.
Limited Liability
The Software and accompanying documentation is provided “AS IS” without warranty of any kind. Motorola
specifically disclaims all other warranties, expressed or implied, including but not limited to implied warranties of
merchantability and fitness for a particular purpose. With respect to the use of this product, in no event shall Motorola
be liable for any loss of profit or any other commercial damage, including but not limited to special, inci dental,
consequential or other damages.
Trademarks
MS Excel, Windows, Windows Vista, Windows XP, the Windows Vista start button and the Windows logo are
trademarks or registered trademarks of Microsoft Corporation.
MOTOROLA, the Stylized M Logo, and Moto Contacts Tool are registered in the US Patent & Trademark Office.
All other product names mentioned in this document are trademarks of their respective owner.
2 Moto Contacts Tool Quick Start Guide
Page 3

Contents
About Moto Contacts Tool..............................................................................................4
Using Moto Contacts Tool..............................................................................................5
General System Requirements.......................................................................................................... 5
Installing Moto Contacts Tool.........................................................................................6
Process of Contact Exporting and Results Reporting...............................................10
Import of CSV File to Android Device..........................................................................16
What is a CSV File Format? .............................................................................................................16
How Do I Import Contacts to an Android Device? ...…………………………………………………….16
Troubleshooting ............................................................................................................17
Phone Connection Mode Change.................................................................................19
Supported Phones.........................................................................................................20
3 Moto Contacts Tool Quick Start Guide
Page 4

About Moto Contacts Tool
Moto Contacts Tool is a desktop application that allows you to export mobile phone
contacts from your Motorola devices to the file on your PC. It allows you to save contacts
from the phone memory, SIM card or both. The contacts will be stored in an industrystandard file format, CSV (Comma Separated Values)
into other applications such as Google Contacts.
on your PC and can be imported
4 Moto Contacts Tool Quick Start Guide
Page 5

Using Moto Contacts Tool
The following requirements have to be fulfilled to use Moto Contacts Tool on your PC.
General system requirements
• Windows XP (SP2 or higher) or Windows Vista
• 8 MB available hard drive space
• Motorola handset drivers (usually will be installed automatically)
5 Moto Contacts Tool Quick Start Guide
Page 6
Installing Moto Contacts Tool
An installation wizard will walk you through the quick and uncomplicated installation
process.
To install Moto Contacts Tool, you must have administrator rights for all operating
systems newer than Windows XP.
Moto Contacts Tool can be installed from a downloaded executable file. You can
download Moto Contacts Tool installer from http://www.motorola.com
To install Moto Contacts Tool, proceed as follows:
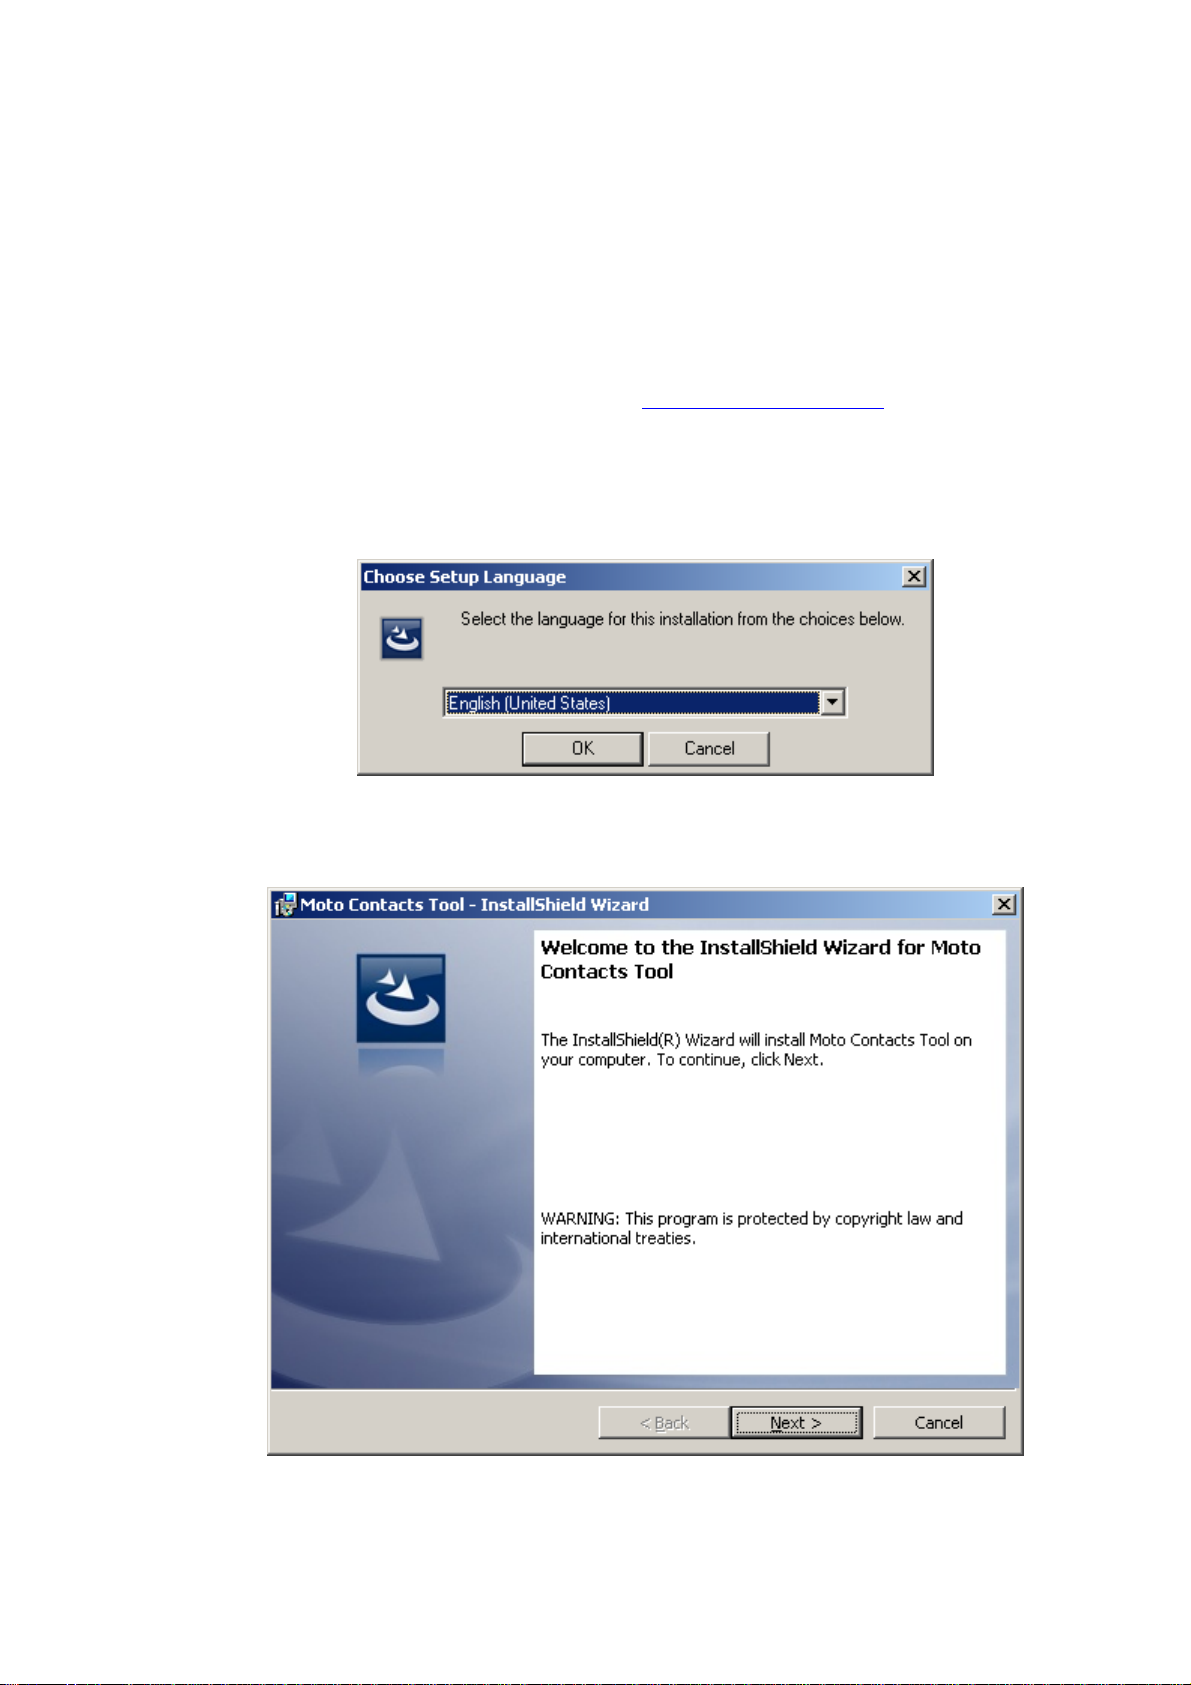
Step 1. Launch setup.exe. Choose the setup language from the displayed drop-down
menu in the displayed dialog.
Step 2. Click the “OK” button. The installation starts and the Moto Contacts Tool InstallShield Wizard window is opened.
Step 3. Click the “Next” button. The License Agreement screen is displayed.
6 Moto Contacts Tool Quick Start Guide
Page 7

Please read the license agreement carefully and select the appropriate check box if you
agree to the terms of the agreement. Installation is not possible without this agreement.
Step 4. Click the “Next” button. The Customer Information screen is displayed.
Enter your name in the input field. Corporate customers should also include their
company's name.
Step 5. Click the “Next” button. The Destination Folder screen is displayed.
7 Moto Contacts Tool Quick Start Guide
Page 8

On this screen, you can select a folder to install Moto Contacts Tool. The default folder is
C:\Program Files\Motorola\Moto Contacts Tool\
Click the “Change” button if you want to install the program to a different folder.
8 Moto Contacts Tool Quick Start Guide
Page 9

Step 6. Click the “Next” button. The Ready to Install the Program screen is displayed.
Step 7. Click the “Install” button. The Installing Moto Contacts Tool screen is displayed.
The program is being installed.
A final window is opened when the InstallShield Wizard has successfully installed Moto
Contacts Tool.
9 Moto Contacts Tool Quick Start Guide
Page 10

Please make sure that the “Launch Moto Contacts Tool” check box is selected if you
want to start using the application immediately.
Please make sure that the “Create shortcut on Desktop” check box is selected if you
want to have a Moto Contacts Tool icon available on the computer's desktop. Doubleclicking it will open the application.
Please make sure that the “Create shortcut on Start->Program menu” check box is
selected if you want to have a Moto Contacts Tool group in the Windows Start menu.
The InstallShield Wizard selects all the check boxes by default.
Step 8. Click the “Finish” button. You have now installed Moto Contacts Tool.
10 Moto Contacts Tool Quick Start Guide
Page 11

Process of Contact Exporting and Results
Reporting
T
his section provides the step-by-step instructions for saving your contacts to your PC.
A
fter launching the Moto Contacts Tool application, you will see the language selection
d
ialog where you can choose the language of the application interface.
A
fter launching the application, the Welcome screen is displayed.
O
n this screen, you can see the brief description of the Moto Contacts Tool application.
P
ress the “Change Language” button if you want to change the interface language of the
a
pplication.
Y
ou can select the “Skip this page in the future” check box to avoid this screen in future.
Device Selection
ressing the “Next” button on the Welcome screen will bring you to the Device list sc
P reen.
his screen is the first Moto Contacts Tool application window if previously you selected to
T
ip the Welcome screen.
sk
11 Moto Contacts Tool Quick Start Guide
Page 12

n this screen, you can select a device from which you are going to export your co
O ntacts.
he table lists all Motorola devices now connected to your PC via USB. The IMEI
T
nternational Mobile Equipment Identity) number for each device is displayed in the right
(I
lumn of the table.
co
Note: The list does not contain non-Motorola devices connected to PC. If your Motorola
phone did not appear in the list, check the Troubleshooting
section to solve this problem.
Note: A list of Motorola phones supported by this version of the tool can be found in the
Supported phones
section.
On the right side of each phone row, there is the
button (the Alias button). Clicking it
will display a dialog where you can specify an alias for the phone with that IMEI.
Press the “OK” button. After that, each time you connect this device to your PC, it will
appear with the name you specified instead of its IMEI number. You will still be able to
find out the IMEI number of your phone by pressing the Alias button.
12 Moto Contacts Tool Quick Start Guide
Page 13

Contacts Source Selection
S oose
elect the device and press the “Next” button on the “Choose phone” screen. The Ch
C
ontacts source screen is displayed.
O
n this screen, you can select a contact storage location from which to export your
co mory
ntacts. You can save the contacts from the phone internal memory or SIM card me
o
r both.
13 Moto Contacts Tool Quick Start Guide
Page 14

T
o choose a source of contacts, just select a check box next to the name of desired
st
orage.
Choosing a File to Save Contacts
ress the “Next” button on the Choose Contacts source screen. The Choose save loc
P ation
reen is displayed.
sc
On this screen, you can enter a CSV file
by clicking the “Browse” button on the right side of “Save in” text box. Pressing the “Next”
button will start the contact export process.
name and choose a file for saving your contacts
Exporting Process
n the Exporting contacts screen, the progress of the exporting process is displayed. Yo
O u
n see the percentage of contact records currently saved.
ca
14 Moto Contacts Tool Quick Start Guide
Page 15

Task Completion
A ort.
fter the contacts are successfully saved to your PC, you will see the screen with a rep
15 Moto Contacts Tool Quick Start Guide
Page 16

O
n this screen, you can see the summary of the contact export process: your device
m
odel, the number of contacts and records exported, the name of the file where your
m
obile phone contacts are saved, and the file encoding
N
ote: The number of records is NOT a number of contacts on your device. One contact
may contain several records, for example, if there are several phone numbers associated
w
ith this contact.
16 Moto Contacts Tool Quick Start Guide
Page 17

Import of CSV File to Android Device
What is a CSV File Format?
CSV (Comma Separated Values) format is a text file format used to store tabular data.
Each line in the CSV file corresponds to a row in the table. Within a line, fields are
separated by commas, where each field belongs to a one table’s column.
CSV files can be opened by a text editor application or by a spreadsheet application (like
MS Excel, for example).
One of the most frequently-used CSV file formats for storing contacts information is the
Google CSV format. The Google CSV format is used for importing your contacts into
various applications or into a Google account.
How Do I Import Contacts to an Android Device?
To transfer your contacts to a Motorola Android phone, open your Gmail account and
import the contacts file.
17 Moto Contacts Tool Quick Start Guide
Page 18

Troubleshooting
Problem: The Moto Contacts Tool does not detect my Motorola phone.
• Switch your phone connection to the Data Connection mode (modem mode)
Be sure that your phone is connected via USB cable with the “Data connection” mode
(modem mode). Please refer to the Connection mode change instruction
• Install necessary device drivers
You should have Motorola handset drivers installed, which allows the Moto Contacts
Tool application to detect your phone. Usually, the drivers are installed automatically
when you first connect your device to your PC. If it didn’t happen, you can go to
http://www.motorola.com
and download and install the latest drivers manually.
.
For other requirements, see the General system requirements
Problem: The phone is connected via USB but the “Next” button is disabled in “Device list”.
• Insert a SIM card into your device
Make sure that you have a SIM card installed into your phone. Moto Contacts Tool
cannot work with some Motorola devices without a SIM card inserted.
Problem: There is a failure while the export is in progress.
• Make sure that the phone has completed its initialization
If you have just turned your phone on, it is possible that the phone has not completed
phonebook initialization yet, which might result in faults when the Moto Contacts Tool
gathers contacts from the phonebook. Just make sure you wait a minute or so after the
phone is turned on.
Problem: The Moto Contacts Tool might provide an option to export SIM contacts whereas
the phone doesn’t have SIM card inserted.
• Ignore the option
Some of the phones may report to the Moto Contacts Tool that there is a SIM card
installed in the phone however it might absent physically there.
section.
18 Moto Contacts Tool Quick Start Guide
Page 19

Phone Connection Mode Change
Steps to switch a phone to the Data Connection mode depend on the phone model.
MOTOROLA W510
MOTORAZR V9
MOTORIZR Z3
MOTORAZR V3xx
• Go to “Main” Menu
• Choose “Settings” and press “Select” button
• Choose “Connection” and press “Select” button
• Choose “USB Settings” and press “Select” button
• Press “Change” button, select “Data Connection” and press “Select” button
• Reconnect the phone to PC
MOTOKRZR K1m
MOTOROKR Z6m
MOTOROLA SLVR L7c
• Go to “Main” Menu
• Choose “Settings” and press “Select” button
• Choose “Connection” and press “Select” button
• Choose “USB Settings” and press “Select” button
• Press “Change” button, select “Modem/COM” and press “Select” button
• Reconnect the phone to PC
MOTOROLA L7
MOTORAZR V3i
• Go to “Main” Menu
• Choose “Settings” and press “Select” button
• Choose “Connection” and press “Select” button
• Choose “USB Settings” and press “Select” button
• Press “Change” button, select “Data/Fax” and press “Select” button
• Reconnect the phone to PC
MOTORAZR V3 (Razr 05 & Razr 06)
MOTOKRZR K1
No change is required. These phones are in the Data Connection mode always.
19 Moto Contacts Tool Quick Start Guide
Page 20

Supported Phones
The Moto Contacts Tool version 1.0 supports the following Motorola phones
MOTOKRZR K1
MOTOKRZR K1m
MOTOROLA L7
MOTOROLA SLVR L7c
MOTORAZR V3 (Razr 05)
MOTORAZR V3 (Razr 06)
MOTORAZR V3xx
MOTORAZR V3i
MOTORAZR V9
MOTOROLA W510
MOTORIZR Z3
MOTOROKR Z6m
20 Moto Contacts Tool Quick Start Guide
 Loading...