

Page 1

Dear customer,
Motorola M800 is an ergonomically designed fixed mobile car phone, uniquely
designed for the vehicle environment. With its voice activation feature, enhanced
display screen and all round hands-free environment, the M800 is the more
convenient way to talk and drive.
Key Product Features
The M800 provides the ability for you to access its functionality by speaking to the
phone in English or French Canadian.
Voice activation features include: name dialing, which enables you to speak a
voice tag that you have saved for a phonebook entry; number dialing, which lets
you speak a phone number for the M800 to dial; and voice activated menu
access, which allows you to browse to frequently used menu options by attaching
voice tags to them.
The M800’s high quality hands-free operation enables you to communicate in
more convenient way while in the vehicle environment. The M800's enhanced
illuminated graphic display is designed for easy reading using 8 mm character
height, with an adjustable backlight and contrast display setting.
A well-spaced keypad with large, illuminated tactile keys makes it easier for you to
dial when mobile.
Enjoy the luxury of installing a single fixed mount unit that includes a display,
keypad and radio, making the installation process easier and faster.
* Various phone features are network dependant.
Page 2

Page 3

Total Customer Satisfaction
Absolute customer satisfaction is Motorola’s top priority. If you have a question,
suggestion or any other issue concerning the Motorola phone, Motorola wants to
hear from you.
Motorola Australia Customer Care 1300138 823 8am – 6pm Australia EST
Motorola New Zealand Customer Care 0508 668-676 10am - 8pm
Motorola Canada Customer Care 1-800-461-4575
Motorola USA Customer Care 866-289-6686
Total Customer Satisfaction - 1
Page 4

MOTOROLA, the Stylized M Logo and all other trademarks indicated as such
herein are trademarks of Motorola,Inc.® Reg.U.S. Pat.&Tm.Off. TrueSync,
Sidekick, Starfish and the Stylized Starfish Logo are registered trademarks of
Starfish Software,Inc., a wholly owned independent subsidiary of Motorola,Inc. All
other product or service names are the property of their respective owners.
©2005 Motorola,Inc. All rights reserved.
Software Copyright Notice
The Motorola products described in this manual, may include copyrighted
Motorola and third party software stored in semiconductor memories or other
media. Laws in the United States and other countries preserve for Motorola and
third party software providers certain exclusive rights for copyrighted software,
such as the exclusive rights to distribute or reproduce the copyrighted software.
Accordingly, any copyrighted software contained in the Motorola products may not
be modified, reverse-engineered, distributed, or reproduced in any manner to the
extent allowed by law. Furthermore, the purchase of the Motorola products shall
not be deemed to grant either directly or by implication, estoppel, or otherwise,
any license under the copyrights, patents, or patent applications of Motorola or
any third party software provider, except for the normal, non-exclusive, royaltyfree license to use that arises by operation of law in the sale of a product.
2 - Total Customer Satisfaction
Page 5

WELCOME
Volume Keys
and
Left S
oft
Key
identified
Right Soft Key
E
nd Key
Voice Activation Key
Send Key
calls
2-Way Navigation Key
menus and
. Press up and hold to
V
oicemail
Press and hold the key for
Personal handset/headset
Welcome to the world of Motorola digital wireless Communications!
We are pleased that you have decided to choose the Motorola CDMA 1X M800
fixed mobile car phone for your vehicle.
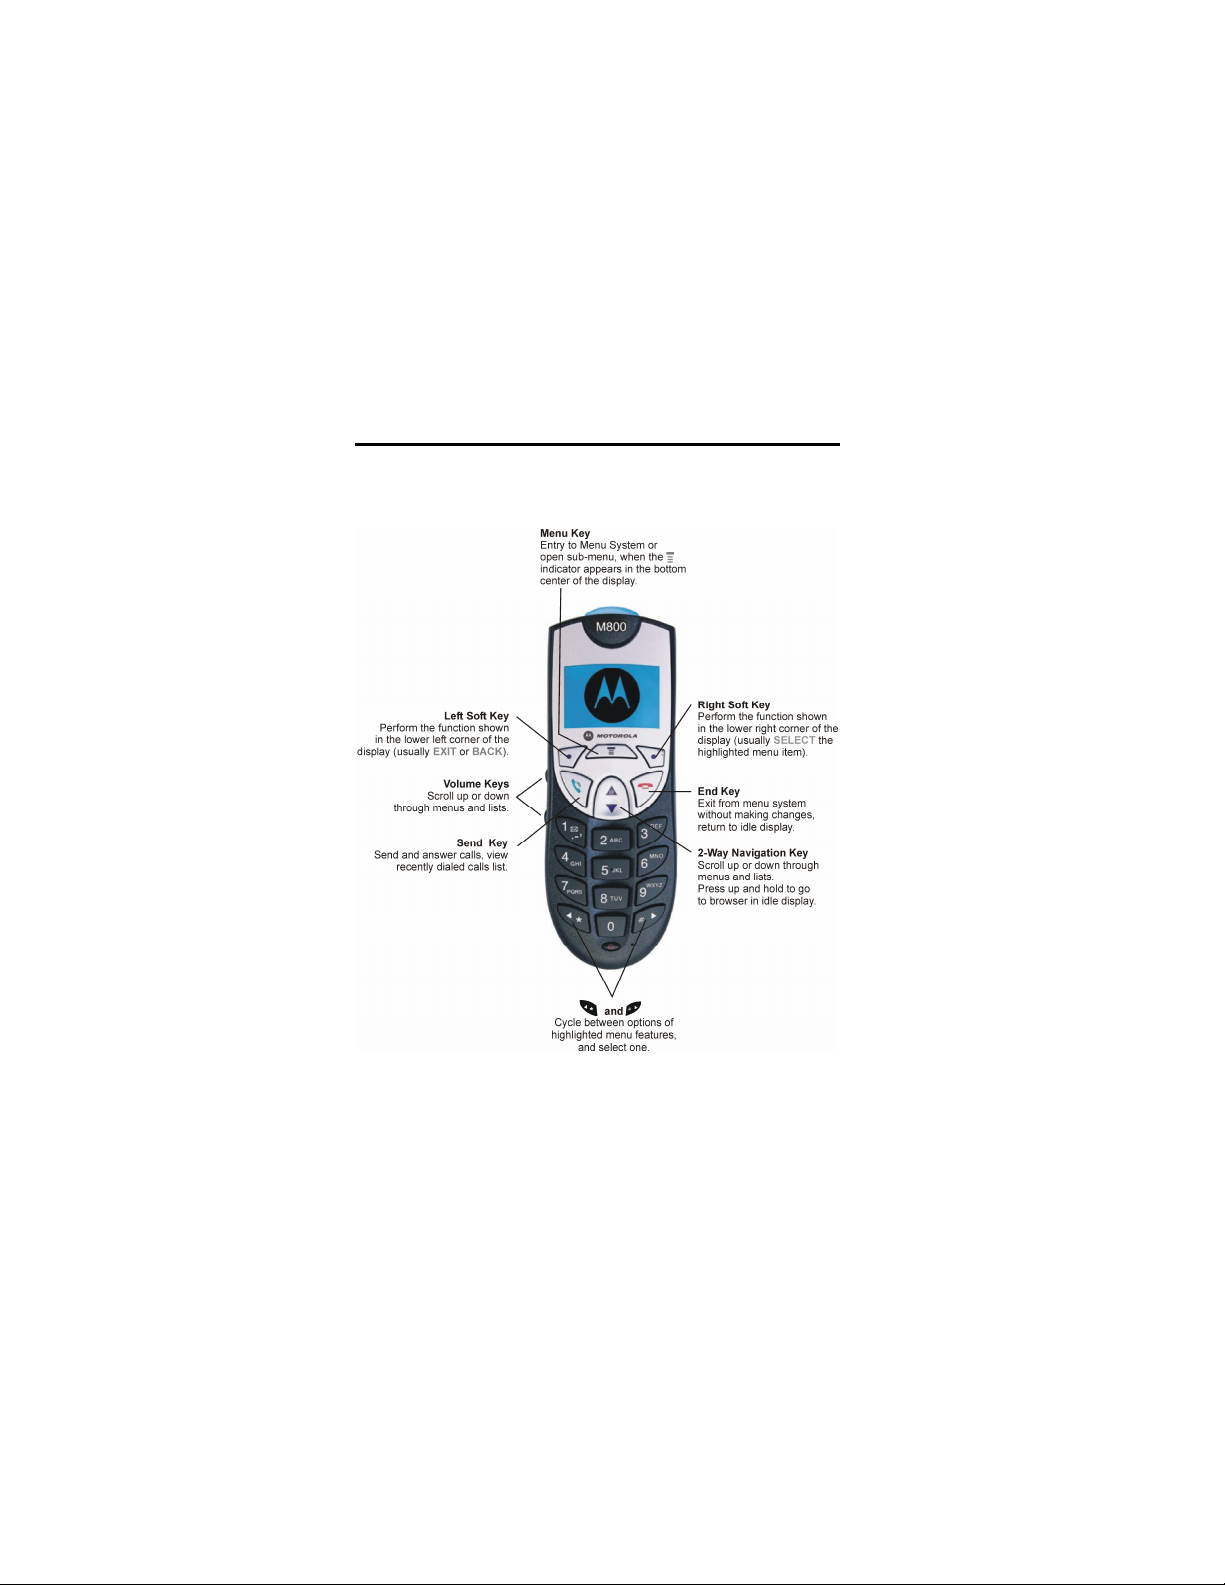
Perform functions
by left display prompt.
Send and answer calls,
view recently dialed
Name dialing, number dialing,
voice browser, VoiceNotesTM,
answering and ending a call
list.
Menu Key
Perform functions identified
by right display prompt.
End phone calls, exit menu
system.
Adjust earpiece
ringer volume.
direct access to voicemail.
connector port
Scroll through
lists
open browser.
Power On/Off Key
WELCOME - 3
Page 6

Table of Contents
About This Guide 7
Navigating To a Menu Feature 7
Menu Map 8
Main Menu 8
Settings 9
Getting Started 12
Turning Your Phone On 12
Making a Call 12
Ending a Call 13
Answering a Call 13
Seeing Your Phone Number 13
Using Your Phone 14
Phone Display 14
Zooming In and Out 16
Adjusting Volume 16
Making and Answering Calls 17
Redialing a Number 17
Using Automatic Redial 17
Using Caller ID 18
Viewing the Received Calls or Dialed Calls List 18
Calling an Emergency Number 19
ALI 20
Turning off a Call Alert 21
Canceling an Incoming Call 21
Calling with Speed Dial 21
Calling With One-Touch Dial 22
Using Features While On a Call 24
Using Call Waiting 24
Making a Three-Way Call 24
Additional On-Call Features 25
Using Menus 26
Navigating to a Feature 26
Entering Text 30
Choosing a Text Mode 30
Using Tap Method: English 30
Using Symbol Mode 33
Using iTAP™ Software Predictive Text Entry Method 34
Menu Feature Descriptions 38
Main Menu 38
Settings Menu 42
PANIC button (emergency services) 48
General description 48
Installation 48
4 - Table of Contents
Page 7

Functionality 48
Display 48
Auxiliary Alert 49
General description 49
Recent Calls 50
Viewing Received Calls or Dialed Calls 50
Last Number Entered 51
Viewing and Resetting Call Timers 52
Phonebook 54
Viewing Entry Details 54
Storing a Phonebook Entry 54
Storing a Split Number 56
Recording a Voice Name For a Phonebook Entry 57
Dialing a Phonebook Entry 58
Editing a Phonebook Entry 59
Sorting the Phonebook List 60
Icon Viewer 61
Datebook 62
Week View 62
Day View 63
Event View 63
Adding a Datebook Event 63
Changing Event Information 64
Copying an Event 65
Deleting an Event 66
Calling with Speed Dial 66
Messages – Voicemail 67
Storing Your Voicemail Number 67
Receiving a Voicemail Message 67
Listening to a Voicemail Message 68
Cancelling the “Voice Message” indicator 68
Messages – Text 69
Setting up the Text Message Inbox 69
Receiving a Text Message 69
Reading, Locking, or Deleting a Text Message 70
Sending a Text Message 71
Sending a Quick Note Text Message 74
Viewing the Status of Sent Text Messages 74
Ring Styles 75
Customizing a Ring Style 75
Activate and Deactivate Ringer IDs 75
Set Ringer or Keypad Volume 76
Creating Alert Tones 76
Setting Reminders 81
Shortcuts 82
Standard Shortcuts 82
Creating a Shortcut 82
Table of Contents - 5
Page 8

Using Shortcuts 83
VoiceNotesTM 85
Recording a VoiceNoteTM 85
Viewing the VoiceNotesTM List 86
Playing a VoiceNoteTM 86
VoiceNoteTM Controls 88
Locking a VoiceNoteTM 89
Deleting a VoiceNoteTM 90
Voice Activation 91
Dialing Names 91
Voice-Activated Speed Dialing 92
Dialing Digits 93
Voice Shortcuts to Features 93
Micro-Browser 94
Starting a Micro-Browser Session 94
Using Web Pages 94
Calculator 95
Calculating Actions 95
Converting Currency 96
Adjusting Your Settings 97
Reordering Menu Items 97
Customizing a Soft Key Function 97
Screen Saver 98
Data and Fax Calls 99
Sending a Data or Fax Call 101
Receiving a Data or Fax Call 101
Security 103
Assigning a New Code or Password 103
If You Forget a Code or Password 104
Locking and Unlocking Your Phone 104
Accessories 106
Troubleshooting 107
Safety and General Information 111
Wireless Phone Safety Tips 114
6 - Table of Contents
Page 9

About This Guide
dependent
contingent upon payment. Possibly not all
about the
This user guide introduces you to the many features in your M800 fixed mobile car
phone.
Navigating To a Menu Feature
Use the menu system to access your phone’s features. This guide shows you how
to select a menu feature as follows:
Find The Feature
> New Message
In this example, you must press , scroll using to Messages
features and select it using (Select), and subsequently scroll to the New
Message option and select it.
Optional Features
This label identifies an optional network or subscriptionfeature that may be
service providers offer these features in all geographical areas.
Contact your service provider for more information
availability of these features.
Optional Accessories
This label identifies a feature that requires an optional Motorola OriginalTM
accessory available for purchase separately. Please contact your
service provider for information about the availability and purchase of
these devices.
> Messages
About This Guide - 7
Page 10

Menu Map
Main Menu
Phonebook
Search
Recent Calls
• Received Calls
• Dialed Calls
• Notepad
• Call times
• Data times
• Data volumes
Messages
• Voicemail
• Create Message
• Inbox
• Outbox
• Quick Notes
• Drafts
• Browser Alerts
Browser
Settings
Icon Viewer
Shortcuts
Calculator
Datebook
VoiceNotes
(see page 9)
TM
8 - Menu Map
Page 11

Settings
Ring Styles
• Loud Detail
• My Tones
Phone status
• My Tel. Number
• Other Information
Browser Setup
Connection
• Incoming Call
In-Call Setup
• In-Call Timer
• Answer Options
Security
• Phone Lock
• Lock Application
• New Passwords
Location
• Location on
Voice Activation
• Language
• Voice Comments
• Training
Menu Map - 9
Page 12

Other Settings
Personalise
• Main Menu
• Keys
• Greeting
• Screen Saver
• Banner
Initial Setup
• Auto PIN Dial
• Automatic Redial
• Backlight
• Zoom
• Scroll
• Animation
• Language
• Contrast
• DTMF
• Master Reset
• Master Clear
Network
• Current Network
Car Settings
• Auto Answer
• Power-off Delay
10 - Menu Map
Page 13

These are the standard shortcut menus in the telephone device.
Shortcuts
Display my telephone number:
Press
pressing the right soft key displays the
number).
(Display the name -
Dialing Voicemail:
Press and hold
Go to the dialed calls list:
Press
Exit the menu system:
Press
Volume:
During a call, press the volume keys on the
side of the device.
Ringer volume:
On the standby display, press the volume
keys on the side of the device.
Menu Map - 11
Page 14

Getting Started
The unlock code is set to the last
delete the last digit, or press
Turning Your Phone On
Do this To
1 Press and hold
seconds
for 3
On/Off Key
2 If required, key in the 4-digit
unlock code and press OK
( )
3 While switching the vehicle
on/off (using the ignition switch),
the device will turn on
Making a Call
Do this To
1 Press the keypad keys
Press
2
Turn on your phone
Note: If you turned on your
device using this key, and
the ignition switch is in the
off position, the power-off
delay timer is set to 60
minutes, you should turn
off the device by pressing
the on/off key again.
Unlock the phone
4 digits of your phone number.
Dial the phone number
Tip: If you made a mistake,
press DELETE ( ) to
and hold DELETE ( ) to
clear all digits.
Make the call
12 - Getting Started
Page 15

Ending a Call
Press To
or the voice activation key
End the call
Answering a Call
When you receive a call, your phone rings and/or lights up and displays an
incoming call message.
Press To
or press ANSWER or
press the voice activation key
Note: if your phone is locked, you must unlock it to answer the call.
Answer the call
Seeing Your Phone Number
Press To
See your phone number
Getting Started - 13
Page 16
Using Your Phone
See page 3 for a basic phone diagram.
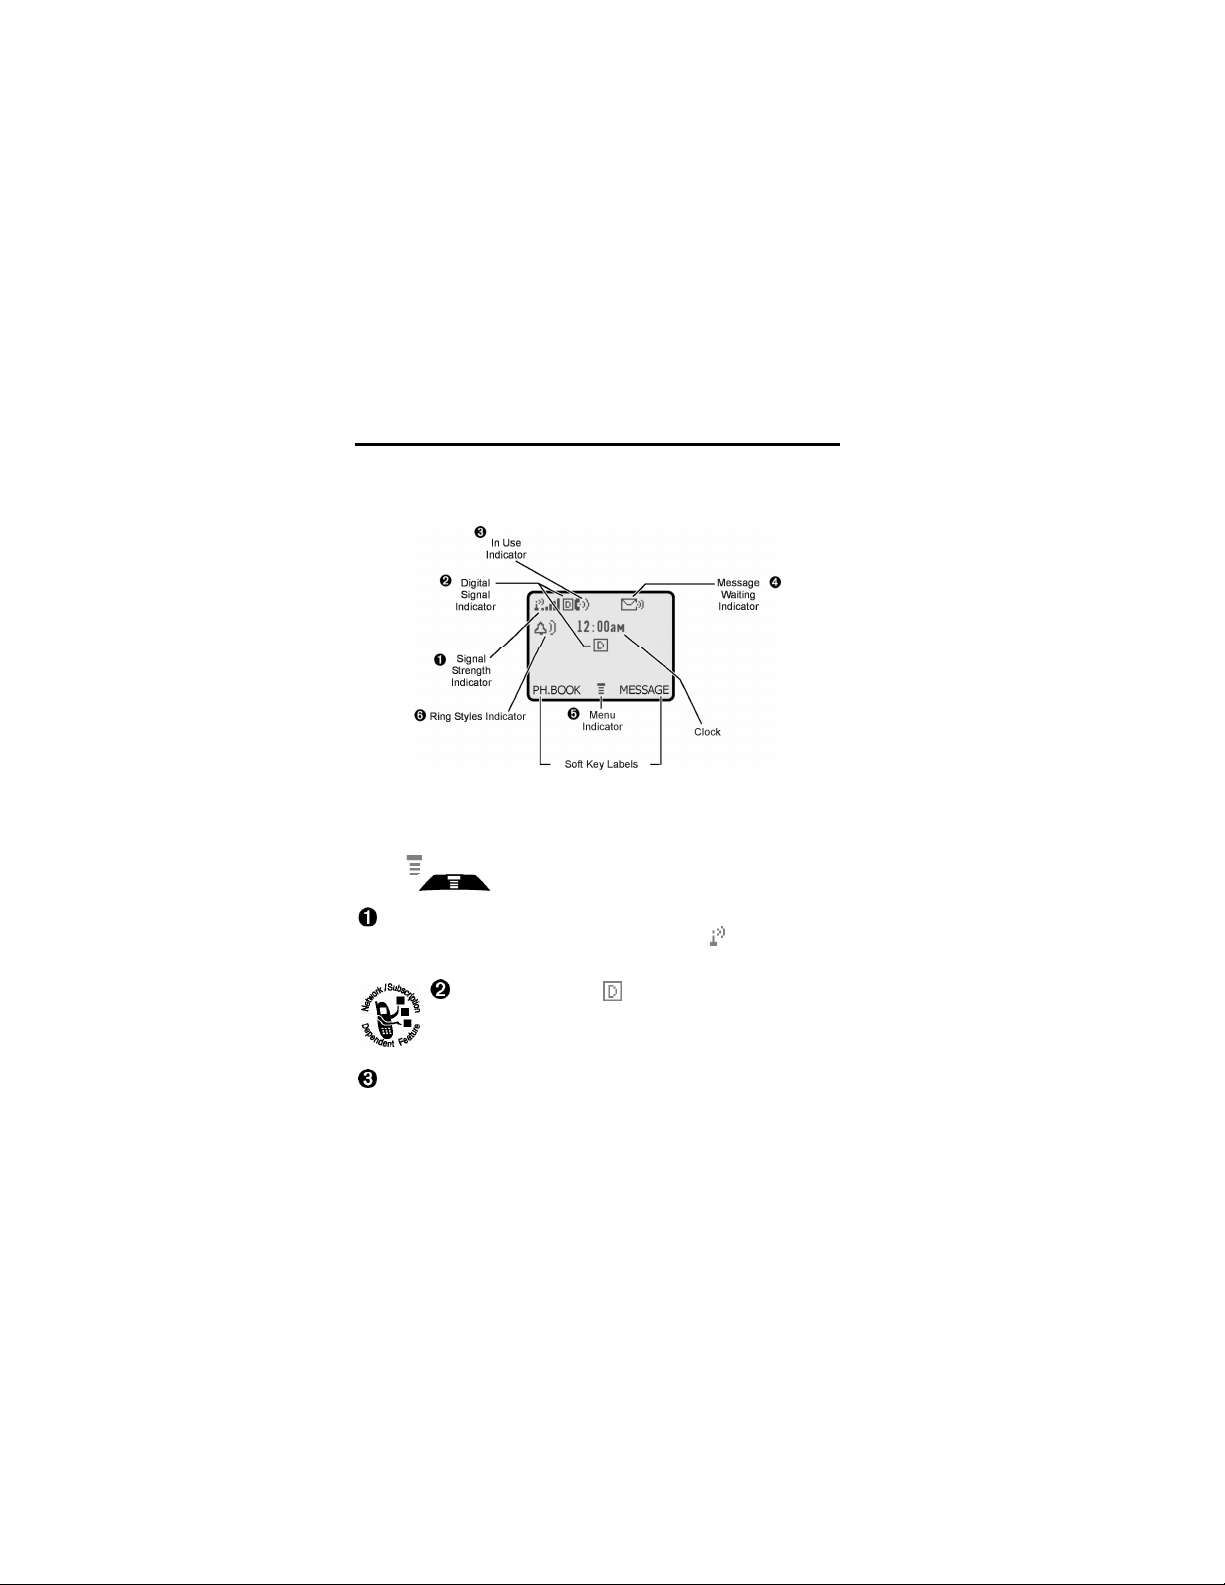
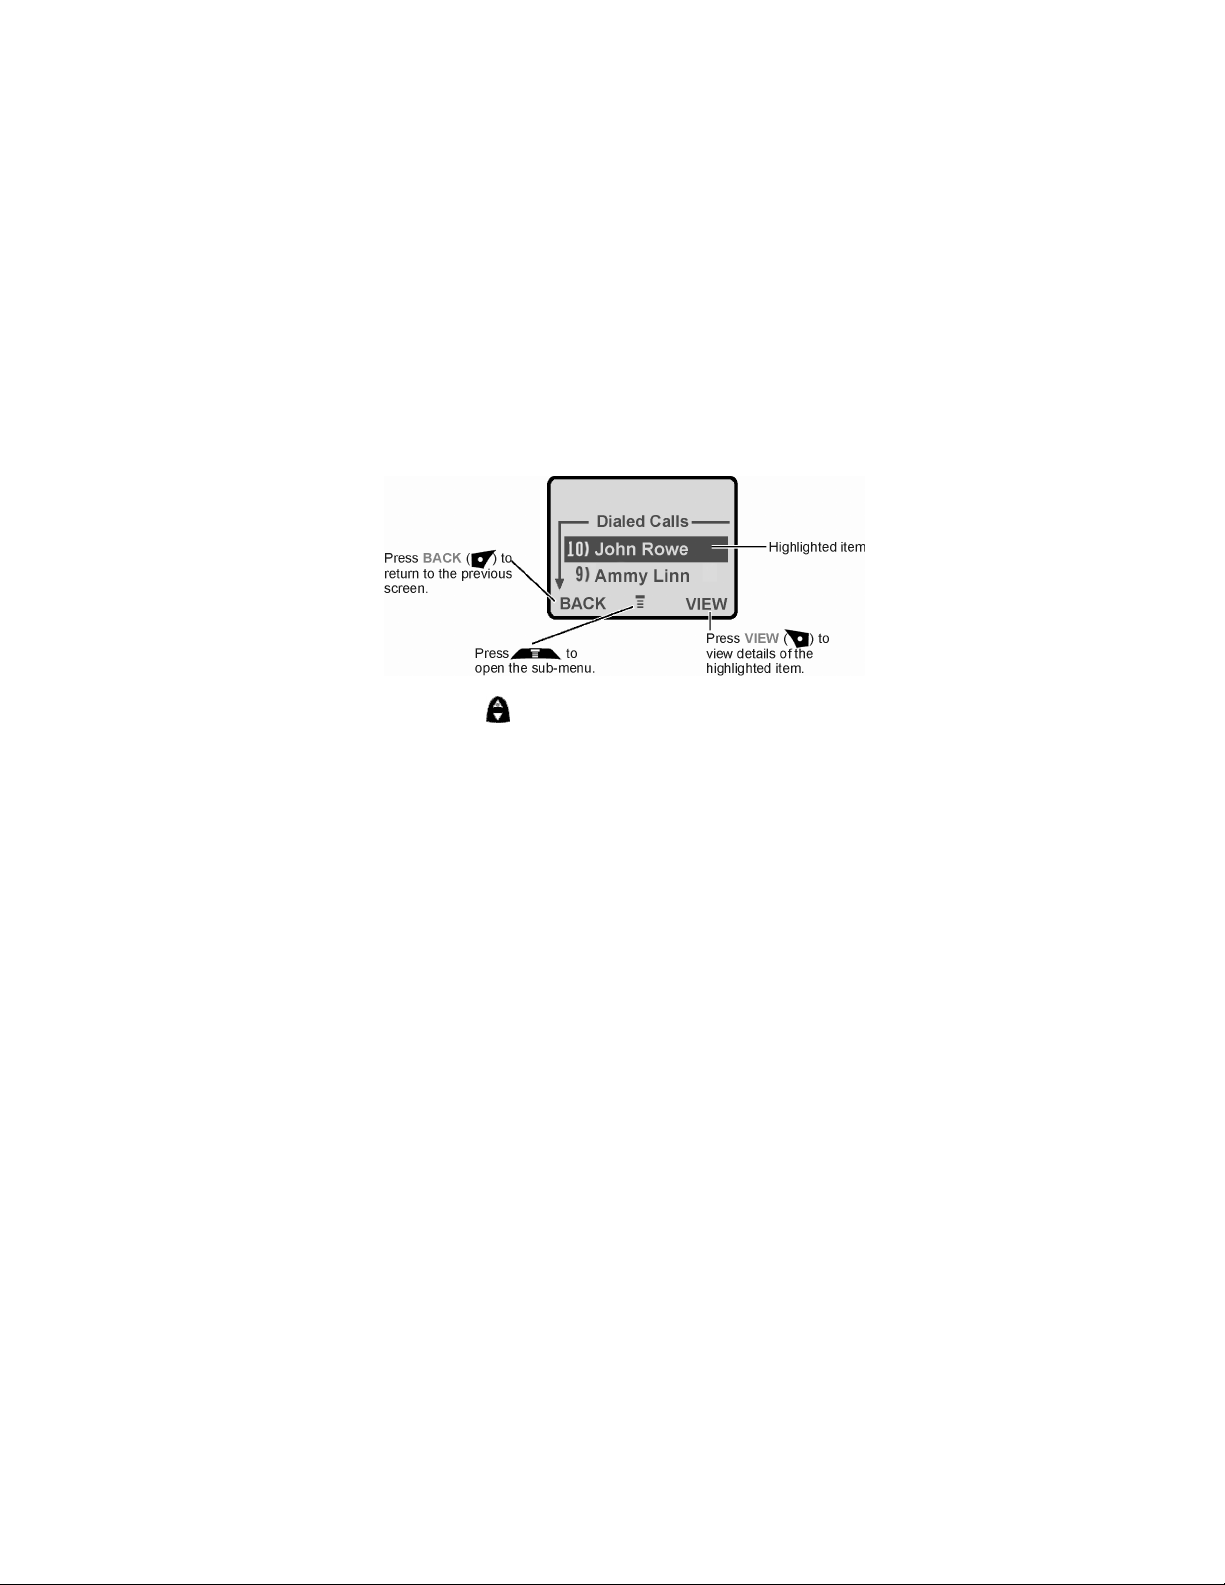
Phone Display
The idle display is the standard display that you see when you are not on a call or
using the menu.
Labels at the bottom corners of the display show the current functions of the soft
keys. A (menu) indicator at the bottom center of the display indicates that you
can press to enter the main menu.
Signal Strength Indicator vertical bars show the strength of the network
connection. You cannot make or receive calls when the (no signal)
indicator is displayed.
Digital Signal Indicator identifies a digital network.
In Use Indicator shows that a call is in progress.
14 - Using Your Phone
Page 17

Message Waiting Indicator appears when you receive
voicemail or a text message.
Menu Indicator indicates that you can press to enter the main
menu or open a feature sub-menu.
Ring Style Indicator
= Loud Detail
My Tones
Using Your Phone - 15
Page 18
Zooming In and Out
You can zoom in and out to display more information on the screen.
Find The Feature
> Settings
> Other Settings
> Initial Setup > Zoom
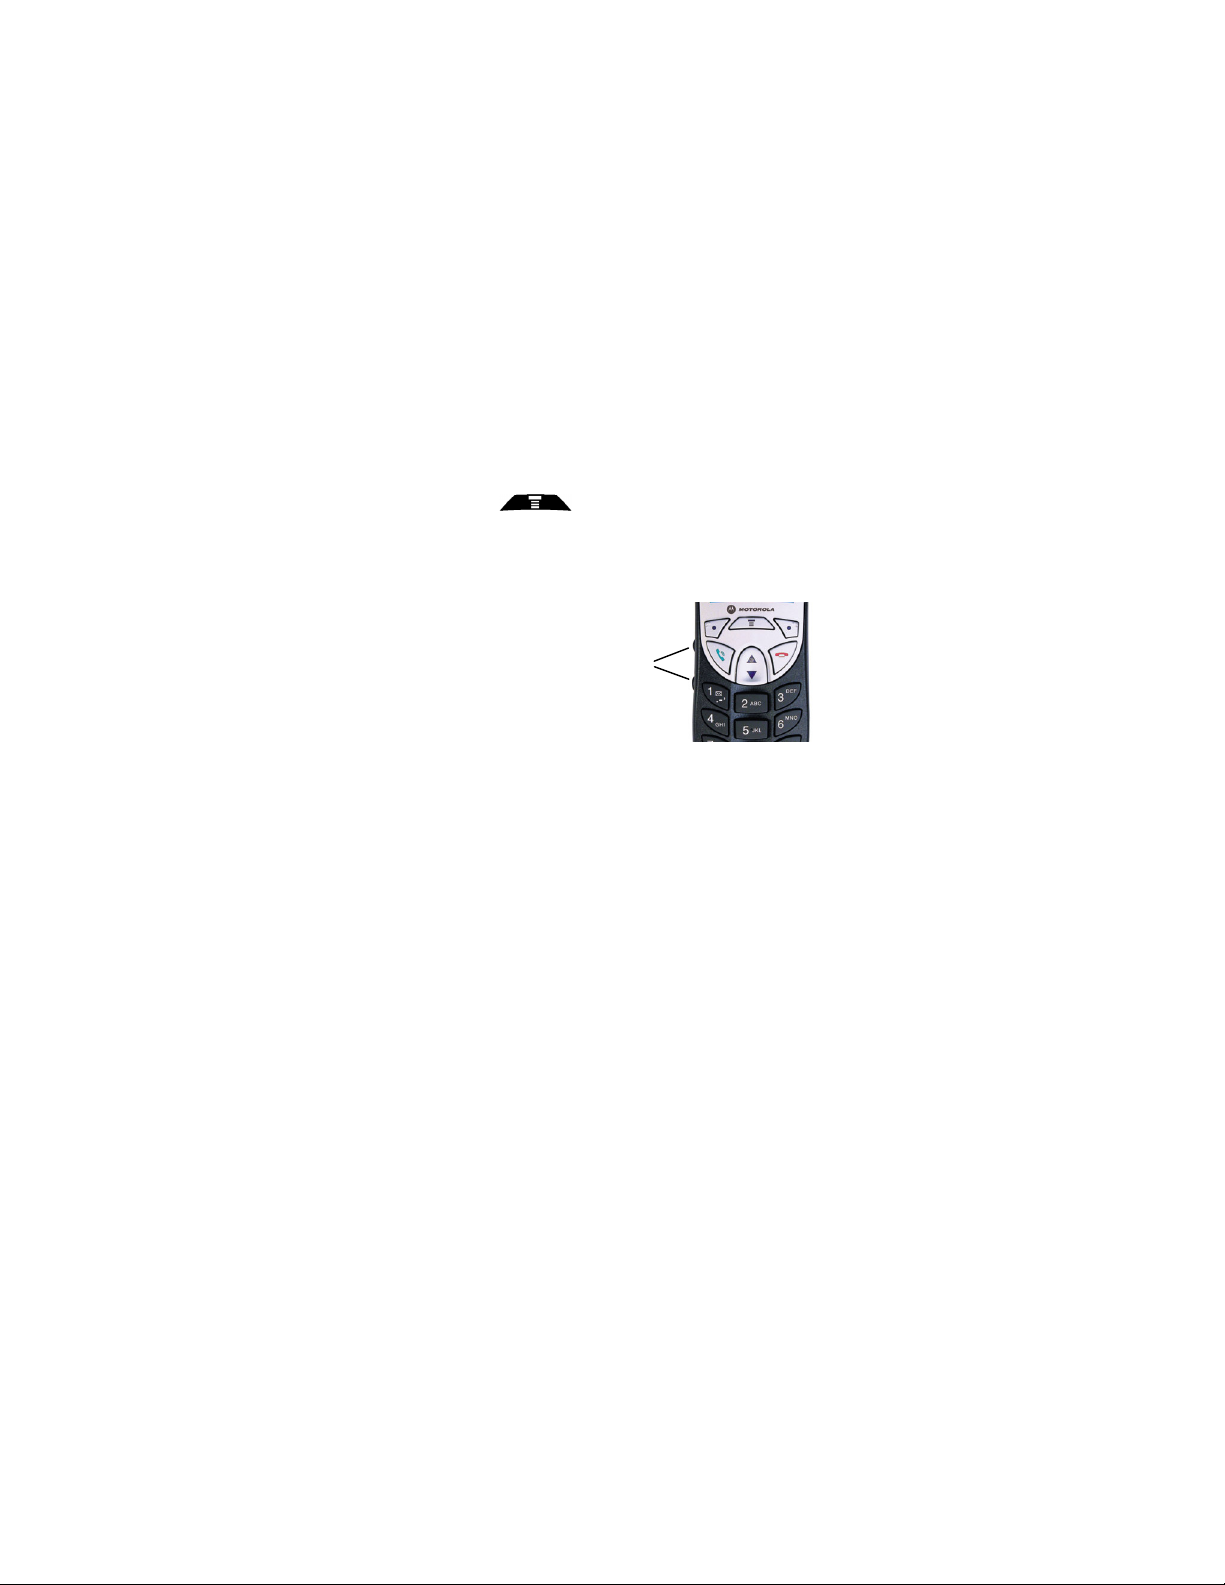
Adjusting Volume
Press the up and down volume keys
to:
• Increase and decrease
earpiece volume during a
call.
• Increase and decrease the
ringer volume when the idle
display is visible.
Volume
Keys
16 - Using Your Phone
Page 19

Making and Answering Calls
For basic instructions on how to make a call, end a call, or answer a call, see
page 13.
Redialing a Number
If you hear an ordinary busy signal:
Press To
1
2
Hang up
Redial the busy number
Using Automatic Redial
If the network is busy, you hear a fast busy signal, and your phone displays Call
Failed.
With automatic redial, your phone automatically redials the number for four
minutes. When the call goes through, your phone rings one time, displays Redial
Successful, and then connects the call.
You must turn on automatic redial to use the feature. See the “Auto Redial” option
on page 45.
When automatic redial is turned off, you can manually activate the feature to redial
a phone number. When you hear a fast busy signal and see Call Failed:
Press To
twice
Activate automatic redial
Making and Answering Calls - 17
Page 20

Using Caller ID
s
Returning an Unanswered Call
Your phone keeps a record of your unanswered calls, and displays the following
items:
Press To
1 DISPLAY ( )
2 Select a call to return
3
Calling line identification (caller ID) displays the phone numbers for
incoming calls to your phone.
The phone displays the caller’s name when the name is stored in
your phonebook, or Unknown Call when caller ID information is not
available.
• indicator (missed call).
• X Missed Calls Y Unknown, where X is the total number of missed
calls and Y is the number of missed calls with no caller ID information.
See the received calls list
Make the call
Viewing the Received Calls or Dialed Calls List
Your phone keeps lists of the calls you recently received and dialed, even if the
calls did not connect. The lists are sorted from newest to oldest, and contain up to
10 entries. The oldest entries are deleted as new ones are added.
Shortcut: From the idle display, press to display the dialed calls list.
Find The Feature
Press To
1 up or down
2 SELECT ( )
3 Scroll to an entry
4
> Recent Calls
Scroll to Received Calls or Dialed
Calls
Select the list
Note: The symbol means the call i
connected.
Call the entry’s number
18 - Making and Answering Calls
Page 21

Press To
seconds
or
Note: Press and hold for 2
to send the number as DTMF tones
during a call.
Calling an Emergency Number
Your service provider programs one or more emergency phone numbers, such as
911, so that you can call under any circumstances, even when your phone is
locked.
Note: Emergency numbers vary by country. Your phone’s preprogrammed
emergency number(s) may not work in all locations, and sometimes an
emergency call cannot be placed due to problems in the network or other
interference issues.
Press To
1 keypad keys
2
Dial the emergency number
Call the emergency number
Making and Answering Calls - 19
Page 22

ALI
If your phone has the automate location information (ALI) feature, it can tell the
Active Line Indicator Shows the current active phone line:
ALI Indicator Shows the status of the automatic location
information feature:
LOCATION
phone network where you are physically located.
Hiding or Showing Location Information
Your phone can use the automatic location information (ALI)
feature to tell the network where you are physically located.
When ALl is set to Location On, your phone displays the (ALI on) indicator.
Services may use your known location to provide useful information (for example,
driving directions, or the location of the nearest bank).lour phone prompts you
when the network or a service asks for your location. You can refuse at this point.
When ALI is set to 911 Only, your phone displays the (ALI off) Indicator, and
the phone does not send location information unless you cal the emergency
phone number (such as 911).
Find The Feature
Press To
1 Scroll to Location On or 911 Only
2 SELECT ( )
20 - Making and Answering Calls
> Location
= ALI on = ALI off
> Recent Calls
> Location
> Settings
Select the setting
Page 23

Turning off a Call Alert
You can turn off your phone’s incoming call alert before answering the call.
Press To
either volume key Turn off the alert
Canceling an Incoming Call
While the phone is ringing or alerting:
Press To
or IGNORE ( )
Depending on your phone settings and/or service subscription, the
call may be forwarded to another number, or the caller may hear a
busy signal.
Cancel the incoming call
Calling with Speed Dial
Each entry you store in your phonebook is assigned a unique speed dial number,
which identifies the stored location of the entry in the phone memory. To speed
dial a phonebook entry:
Press To
1 keypad keys
2
3
Enter the speed dial number for the
entry you want to call
Display the number.
Note: Some networks let you skip this
step for speed dial numbers 1 through
99.
Call the entry
Making and Answering Calls - 21
Page 24
Calling With One-Touch Dial
To call phonebook entries 1 through 9, just press and hold the one-digit speed dial
number for one second.
We recommend that you reserve phonebook entry 1 (speed dial number 1) for
storing and dialing your voicemail number (Voicemail service of the service
provider). In many cases, your service provider has already done this for you. If
necessary, see page 67 to store your voicemail number for one-touch dial access.
Calling a Number in a Text Message
Calling a Number in a Text Message
To call a phone number embedded in a text message that you receive, highlight or
open the message and then:
Press To
1
2
3 SELECT ( )
Additional Calling Features
While dialing (with digits visible in the display), open the Dialing Menu to perform
the following tasks:
Press To
1 > Attach
Number
2 > Insert Pause
3 > Insert Wait
4 > Insert ‘n’
5 > Send
Message
Open the Inbox Menu
Scroll to Call Back
Call the number
Attach a number from the phonebook or
recent call lists
Insert a p (pause) character
For more information, see page 57.
Insert a w (wait) character
For more information, see page 57.
Insert an n (number) character
For more information, see page 57.
Open a new text message with the
number in the To field
22 - Making and Answering Calls
Page 25

You can also call a number using these features:
Do This To Call
1 Press and release the voice
activation key, then say a voice
name.
Voice
Activation Key
A phonebook entry using voice dial.
See page 57.
2 Press
> Recent Calls
> Received Calls or
> Dialed Calls
> Entry to Call
A missed call, or a recent received or
dialed call
Making and Answering Calls - 23
Page 26

Using Features While On a Call
Using Call Waiting
When you are on a call, an alert tone sounds to indicate that you
have received a second call.
Press To
1
2
Answer the new call
Switch back to the first call
Making a Three-Way Call
During a call, you can call and connect a third party for a three-way
call. You cannot do this if you already have a call on hold.
Press To
1 keypad keys
or
left soft key
2
3
4
or
Note: Some networks may use the following procedure to establish a Three-Way
Call.
1. Dial the first person – wait for them to answer.
2. Dial the third person – when they answer, you may talk privately before
rejoining the original call. (If your call to the third person is not successful,
press 1 to return to your original caller.)
3. Join all the calls together, press 3 or to switch between callers, press 2
.
Dial the third party’s number
View the phonebook and select the
desired number
Call the number
Connect the two calls
End the entire call
24 - Using Features While On a Call
Page 27

Additional On-Call Features
Press To
1 MUTE ( ) (if available) or
> Mute
2
3
Dialed Calls
4
5
6
> My Tel. Number
> Received Calls or
> Messages
> Datebook
> Other Information
Mute the call
See your phone number
View recent received or dialed call
numbers
View or send messages
View datebook entries
View phone specifications
Using Features While On a Call - 25
Page 28
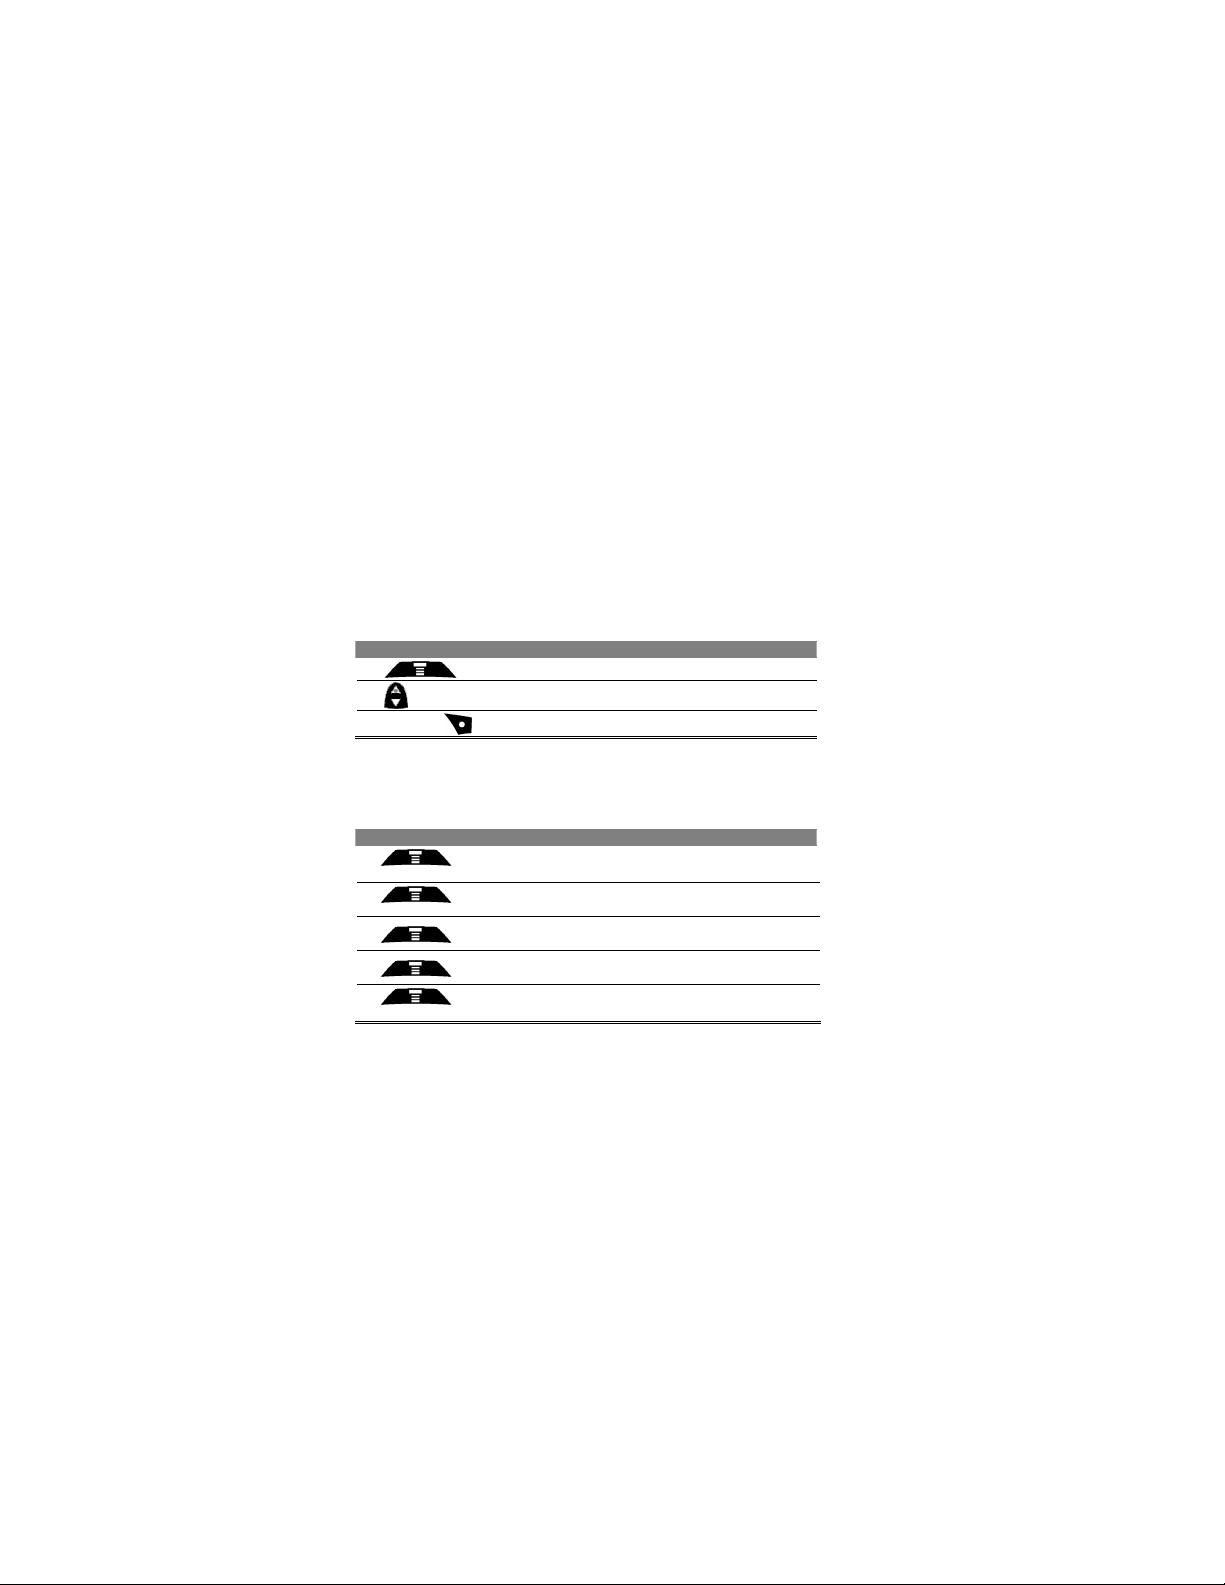
Using Menus
Navigating to a Feature
Use these keys to move through the menu system:
26 - Using Menus
Page 29
Selecting a Menu Item
Some features require you to select an item from a list:
• Press to scroll up or down and highlight the item you want.
• In a numbered list, press a number key (1-9) to highlight the item.
• In an alphabetized list, press a key multiple times to cycle through the
letters on the key and highlight the closest matching list item.
Using Menus - 27
Page 30

Adding Information to an Item
Some features require you to enter information:
• Enter numbers or text with the keypad.
• When an item has a list of possible values, press or to the
left or right to scroll through and select a value.
• When an item has a list of possible numeric values, press a number
key to set the value.
• If you enter or edit information and do not want to save your changes,
press to exit without saving.
28 - Using Menus
Page 31

The Message Center lets you compose and send text messages.
A flashing cursor shows where text will appear:
When you enter text using the standard tap method, the flashing cursor changes
to a block cursor, and the soft key functions change:
Using Menus - 29
Page 32

Entering Text
and symbols
lists to select a name or
symbol shown
Multiple text entry methods make it easy for you to enter names, numbers, and
messages on your phone.
Choosing a Text Mode
Press from any text entry screen to select a text mode.
Press and Entry Method appears, then press to find the
following:
iTAP English/
French Canadian
Tap Method
English:
Numeric
Symbol
Browse
Note: The text mode you select remains active until you change it by selecting
another mode.
Let the phone predict each word as you enter it. See page 34.
Enter letters (English/French Canadian), numbers,
by pressing a key one or more times. See page 32.
Enter numbers only.
Enter symbols only. See page 33.
Browse your phonebook or recent call
number.
Using Tap Method: English/French Canadian
This is the standard mode for entering text on your phone.
Press from any text entry screen and select the Tap Method menu
option.
Do This To
1 Press a number key one or
more times
2 Continue pressing number keys
3 Press OK ( )
Select a letter, number, or
in the “Character Chart” on page 32.
Enter the remaining characters
Store the text when you are finished
30 - Entering Text
Page 33

General Text Entry Rules
Press a number key repeatedly to cycle through its characters. See “Character
Chart” on page 32.
• If you do not press a key for two seconds, the character in the block
cursor is accepted, and the cursor moves to the next position.
• The first character of every sentence is capitalized (while the character
is highlighted by the block cursor, press to force it to lowercase).
Entering Text - 31
Page 34

Character Chart
Use this chart as a guide for entering spaces, letters, numbers, and symbols with
the tap method.
space . 1 ? ! , @ _ & ~ : ; " - ( ) ' ¿ ¡ % £ $ ¥ ¤ €
a b c 2 ä å á à â ã æ α β ç
d e f 3 δ ë é è ê ε φ
g h I 4 Ï Í Ì Î γ η ι
j k l 5 κ λ
m n o 6 ñ ö ø ó ò ô µ υ ω
p q r s 7 π ß σ
t u v 8 θ ü ú ù û τ
w x y z 9 ξ ψ
+ - 0 x * / \ [ ] = > < # §
Note: This chart may not reflect the exact character set available on your phone.
There may be slight variations depending on your software version.
32 - Entering Text
Page 35

Using Symbol Mode
flashing cursor
Your phone provides an alternate way to enter symbol characters in a message.
Press from any text entry screen and select the Symbol menu
option.
Do This To
1 Press a number key one time
2 Press or
or
Press the number key multiple
times
3 Press SELECT )(
Display its symbol options at the
bottom of the display
See “Symbol Chart” on page 34.
Highlight the symbol you want
Enter the symbol at the
location
Entering Text - 33
Page 36

Symbol Chart
Use this chart as a guide for entering characters in symbol mode.
space . ? ! , @ _ & ~ : ; " - ( ) ' ¿ ¡ % £ $ ¥
¤ €
_ @\
/ : ;
" & '
( ) [ ] { }
¿ ¡ ~
< > =
$ £ ¥ ¤ €
# % *
+ - x * / = > < # §
Using iTAP™ Software Predictive Text Entry
Method
iTAP™ software provides a predictive text entry method, that lets you enter a
word using one keypress per letter.
Press from any text entry screen and select the iTAP English/
French Canadian menu option.
Note: You can switch languages within a message in iTAP text mode. Press
to select the text mode and the language you want to use.
34 - Entering Text
Page 37

Enter Words
Do This To
1 Press a number key one time
2 Press number keys (one per
letter)
3 Press or
4 Press SELECT )(
For example, to spell the word “act,” press
shows:
Enter the first letter of the word
The letters associated with the key are
shown at the bottom of the display.
Enter the rest of the word
Alternative words and letter
combinations are shown at the bottom
of the display. The word choices are
updated with each keypress.
Highlight the word you want
Enter the word at the flashing cursor
location.
A space is automatically inserted after
the word.
>
> . The display
Entering Text - 35
Page 38

Entering Novel Words
characters as
You may enter a word that the iTAP software does not recognize. If the word you
want is not displayed:
Do This To
1 Press DELETE ( ) one
or more times
2 Press or
3 Press SELECT ( ) then
press
4 Continue to enter letters and
highlight letter combinations
Delete letters until you see a letter
combination that matches the start of the
word
Highlight the letter or letter combination
Shift the text entry cursor to the left and
“lock” the selected word portion
Spell the word
Punctuation
Press To
or
Enter punctuation or other
shown in the
“Character Chart” on page 32.
36 - Entering Text
Page 39

Entering Numbers
Do This To
1 Enter the first digit and then
highlight it
2 Press number keys
3 Press SELECT )(
Put the iTAP software in number entry
mode
Add digits to the number
Enter the number at the flashing cursor
location
Delete Letters and Words
Place the cursor to the right of the text you want to delete, and then do the
following:
Do This To
1 Press DELETE ( )
2 Hold DELETE ( )
Delete one letter at a time
Delete the entire message
Entering Text - 37
Page 40

Menu Feature Descriptions
calls,
This chapter describes all of your phone’s features in order of the menu map
shown on page 8.
Main Menu
RECENT CALLS
Received Calls
View a list of recently received calls. See page 48.
Dialed Calls
View a list of recently dialed calls. See page 48.
Notepad
Call or store the last number entered on the keypad. See page 51.
Call Times
View call timers that track time spent on your last call, dialed
received calls, all calls since reset, and all calls total. See page 52.
> Recent Calls
> Received Calls
> Recent Calls
> Dialed Calls
> Recent Calls
> Notepad
> Recent Calls
> Call Times
38 - Menu Feature Descriptions
Page 41

call
appointments.
PHONEBOOK
Store names and numbers as entries in your phonebook, then
numbers by selecting them from the phonebook list. See page 54.
ADVANCED SEARCH
To improve your user experience, Motorola is pleased to introduce a fast
and easy-to-use search mechanism for the telephone directory in your
unit.
To search for names:
1. On the main screen, select the Telephone Directory menu (press
Select or use the Main menu screen).
2. Press Select again to access the Search menu. A new screen
opens with the message Name.
3. Enter one or several characters of the name you are trying to find.
4. Press OK (using the softkey on the right) to activate the search
mechanism. If there is no name with the selected character, the
screen displays the name with the next character in the alphabet.
You can search for names in English and French Canadian.
5. To view the details of the contact, press Menu and then the Select
softkey.
Press Description
1
2
3
4
To search for a name in the telephone directory:
Access the telephone directory using the Select softkey
or the Main menu.
Press the softkey on the right to enter the Search menu.
Enter one or more characters of the name and press
OK (softkey on the right)
> Phonebook
> Advanced search
5
To view details of the contact person, press Menu.
To view the details press OK (softkey on the right).
> Datebook
DATEBOOK
Use the datebook calendar to schedule and review your
See page 62.
Menu Feature Descriptions - 39
Page 42

> Messages
MESSAGES
Adjust message settings, view and manage the various
types of messages your phone can receive and/or send:
Voicemail
Create Message
Inbox
Outbox
Quick Notes
Drafts
Browser Alerts
Listen to your recorded voice
messages. See page 68.
Create new text messages.
See page 71.
Read and manage text
messages. See page 70.
View all outgoing text messages.
Select and send pre-written
messages from the quick notes
list. See page 74.
Store and edit text messages
that you have written but not
sent.
Read alert messages received
by your micro-browser.
40 - Menu Feature Descriptions
Page 43

ng
(Wireless Application
from your service provider directly to your
See
SHORTCUTS
Create keypad or voice shortcuts to menu features.
See page 82.
VoiceNotes
Use the voice activation key to record messages and phone calls.
See page 85.
Note: Recording phone calls is subject to varying state laws regardi
privacy and recording of conversations.
TM
> Shortcuts
> VoiceNotes
TM
BROWSER
The micro-browser delivers WAP
Protocol)
phone. See page 94.
> Browser
> Calculator
CALCULATOR
Use your phone as a calculator or currency converter.
See pages 95, 96.
> Icon Viewer
ICON VIEWER
View and manage the icons and animations stored on your phone.
page 61.
Menu Feature Descriptions - 41
Page 44

Settings Menu
(if available from the
RING STYLES
Loud Detail
Change details about the current ring style. See page 75.
My Tones
Create custom alert tones for your phone. See page 76.
PHONE STATUS
My Tel. Number
View, enter, and edit information about your name and phone number.
Other Information
View your phone’s feature specifications
service provider).
> Ring Styles
> Loud detail
> Ring Styles
> My Tones
> Settings
> Phone Status
> My Tel. Number
> Settings
> Phone Status
> Other Information
42 - Menu Feature Descriptions
Page 45

CONNECTION
held device to
Fax In
call timer
set your
60 seconds is the
turn on or off a display timer during calls as
, in addition to
Connect your phone to a computer or handsend and receive data and fax calls on the connected device.
> Settings
Incoming Call
Specify the format for the next incoming call. You can select
Only, Data In Only, or Normal. See page 101.
> Connection
> Incoming Call
IN-CALL SETUP
Set the features that are active during a call, such as the inand call answering options.
In-Call Timer
Adjust call timer Display and Beep (Alert) settings. You can
timer to beep at a selected interval during your calls. (
default.) You can also
follows:
Display: Time
Beep: Off
Display the elapsed time for the current call.
No in-call beep display.
Answer Options
Turn call answering options on or off:
Multi-Key
Answer by pressing any key
the key, and right soft key .
> Settings
> In-Call Setup
> In-Call Timer
> Settings
> In-Call Setup
> Answer Options
Menu Feature Descriptions - 43
Page 46

SECURITY
as phonebook or
users must enter the unlock
your security code
you turn
> Settings
Phone Lock
Lock and unlock your phone. See page 104.
> Security
> Phone Lock
> Settings
Lock Application
Lock and unlock specific phone applications (such
datebook). When an application is locked,
code to use the application.
> Security
> Lock Application
> Settings
New Passwords
Change your unlock code (originally set to 1234) or
(originally set to 000000). See page 103.
Voice Activation
> Security
> New Passwords
> Settings
> Voice Activation
OTHER SETTINGS
> Settings
Personalise
Set several personal phone options:
Main Menu
Keys
Change the order of the main menu. See page 97.
Change the functions of the soft keys in the idle
display. See page 97.
> Other Settings
> Personalise
Greeting
44 - Menu Feature Descriptions
Change the text displayed when
on your phone.
Page 47

Screen Saver
turn off the automatic
that fail due to
and
)
ses your menus to move smoothly, as
Banner
Change the phone’s screen saver image.
See page 98.
Change the text that appears in the idle display.
Initial Setup
Set many basic phone options:
Auto PIN Dial
Some networks require an authenticating PIN
code to allow outgoing calls. Use this
feature to automatically dial your PIN.
> Settings
> Other Settings
> Initial Setup
Auto Redial
Backlight
Zoom Move between three-line text display (Zoom Out
Scroll
Animation Animation cau
Use this option to turn on or
redial feature. When you turn on automatic redial,
your phone automatically redials calls
busy network conditions. See page 17.
Set the light intensity of the display backlight
keyboard accordingly.
and two-line text display (Zoom In).
Force the cursor to stop or wrap around when it
reaches the top or bottom of a list in the display.
you scroll up and down.
Menu Feature Descriptions - 45
Page 48

Language
DTMF
with automated
number such as
this
their original factory
code,
their original factory
code,
settings and
phonebook
Contrast
DTMF
Master Reset
Master Clear
Set the language for phone menus:
English or French Canadian – menus and editing
Adjust the contrast setting for your display.
Your phone can send a number to the network as
dual tone multi-frequency (DTMF) tones.
tones are used to communicate
systems that require you to enter a
a code, password, or credit card number. Use
option to set DTMF tones to be long, short, or off.
Reset all options back to
settings except for the unlock code, security
and lifetime timer.
Reset all options back to
settings except for the unlock code, security
and lifetime timer, and clear all user
entries.
Note: This option erases all user-entered information
stored in your phone’s memory, including
and datebook entries. Once you erase the
information, it cannot be recovered.
> Settings
Network
View and adjust your phone’s network settings.
> Other Settings
> Network
46 - Menu Feature Descriptions
Page 49

You can set the phone to automatically answer calls
You can set the phone to stay on for a period of time
off is “0 minutes”. It is
and
” or
accessories may be
> Settings
Car Settings
You can set two options of Car Settings:
Auto Answer
Power-off Delay
after two rings.
after you switch off the ignition.
The default setting for powerpossible to change this setting. Press change
select “15 minutes”, “30 minutes”, “60 minutes
“continuous”, as you need.
> Other Settings
> Car Settings
Note: The use of wireless devices and their
prohibited or restricted in certain areas. Always obey the laws and
regulations on the use of these products.
Menu Feature Descriptions - 47
Page 50

PANIC button (emergency services)
General description
An optional Motorola Original™ PANIC button enables you to dial an
emergency number for getting connected rapidly to your local
emergency services. This feature is a network dependant and might
not work in all networks.
Installation
Use Motorola Original PANIC button for enabling emergency- services dialing with
your Motorola M800.
Do This
1 Attach the PANIC button cable to the connector at the end of the split
cable that exits the rear of the device. This connector is usually hidden
beneath the car carpet and therefore an authorised installer is
recommended.
2 Place the PANIC button (which is placed at the end of the PANIC cable)
in accessible place inside the vehicle (such as the handbrake), where you
can press the button intuitively and initiate an emergency call when
needed.
Functionality
Once the PANIC button is being pressed, a phone call is initiated to emergency
number (which was preset by the network operator in advance). Usually this
emergency number is set to be a governmental service such as police, fire
department etc.
After pressing the PANIC button, all other phone functionalities are being stopped
and first priority is given to emergency dial. For example if you write a text
message or if you are in a call, pressing the PANIC button will terminate all other
activities and will initiate an emergency call as described above.
Display
When the user presses the PANIC button, the following message will appear on
the display: “calling… Emergency” (the number will not appear)
48 - PANIC button (emergency services)
Page 51

Auxiliary Alert
General description
This feature enables the M800 to signal you about an incoming call when you are
out of the car, but the phone is still on.
Depending on whether the power cable is connected to the lights or to
the horn, the car lights will flash or the horn will sound as the signal.
Find The Feature
Note: The shortcut for this feature is
> In-Call Setup
> Aux Alert
> Settings
> .
Auxiliary Alert - 49
Page 52

Recent Calls
perform other procedures
Viewing Received Calls or Dialed Calls
Your phone keeps a list of the calls you recently received and dialed (up to the
last 10 calls), even if the calls did not connect. The lists are sorted from newest to
oldest entries. The oldest entries are deleted as new ones are added.
Shortcut: Press
Find the Feature
Press To
1
2 SELECT ( )
3
4
or
VIEW ( )
or
to go directly to the dialed calls list from the idle display.
> Recent Calls
Scroll to Received Calls or Dialed Calls
Select the list
Scroll to an entry
Note: The symbol means the call is connected.
Call the entry’s number
View entry details
Open the Last Calls Menu to
as described in the following list
50 - Recent Calls
Page 53

The Last Calls Menu can include the following options:
Option Description
Delete
Delete All
Send Message Open a new text message with the number in the To
Add Digits
Attach Number
Delete the entry.
Delete all entries in the list.
field.
Add digits after the number.
Attach a number from the phonebook or recent call
lists, after the highlighted number.
Last Number Entered
Your phone temporarily stores in memory the last string of digits that you entered
using the keyboard. This number may be a dialed number, or an entered number
that was not dialed. To retrieve the number stored in the notepad.
Find the feature
Press To
or
or
STORE ( )
> Recent Calls
> Notepad
Call the number
Open the Dialing Menu to attach a
number or insert a special character
Create a phonebook entry with the
number in the No. field.
Recent Calls - 51
Page 54
Viewing and Resetting Call Timers
or received
since the last
received calls since the
and received calls
Network connection time is the elapsed time from the moment you connect to your
service provider's network to the moment you end the call by pressing . This
time includes busy signals and ringing.
The amount of network connection time you track on your
resettable timer may not equal the amount of time for which you
are billed by your service provider.
For billing information, please contact your service provider
directly.
Timer Description
Last Call
Dialed Calls
Received Calls
All Calls
Lifetime
To view a call timer:
Press To
1
2 SELECT ( )
You can view the following network connection times:
Approximate time spent on last dialed
call. You cannot reset this timer.
Approximate time spent on dialed calls
time you reset this timer.
Approximate time spent on
last time you reset this timer.
Approximate time spent on dialed
since the last time you reset this timer.
Approximate time spent on all calls on this phone.
You cannot reset this timer.
Find the feature
> Recent Calls
> Call Times
Scroll to the timer you want
View the recorded time
52 - Recent Calls
Page 55

To reset the call timer:
Press To
1 RESET ( )
2 YES ( )
Reset the time (if available)
Confirm the reset
Recent Calls - 53
Page 56

Phonebook
You can store a list of names and phone numbers or email addresses in your
phone’s electronic phonebook. You have 500 memory cells. You can store up to 5
numbers under each name.
To see the names in your phonebook, press > Phonebook from the
idle display. Scroll to a name and press VIEW ( ) to view details of the
phonebook entry as shown below.
Viewing Entry Details
Note: When you set a distinctive ringer alert for an entry, the Ringer ID setting
appears below the speed dial number.
Storing a Phonebook Entry
A phone number or email address is required for a phonebook entry. All other
information is optional.
Shortcut: Enter a phone number in the idle display, then press STORE ( ) to
create a phonebook entry with the number in the No. field. Go directly to step 3 to
continue.
54 - Phonebook
Page 57

Entering data
Select
Ringer ID
if you want to
assign a
Find the Feature
> Phonebook
> New entry
Press To
1
2 SELECT ( )
3 CHANGE ( )
4 keypad keys
5 OK ( )
6 CHANGE ( )
7 keypad keys
8 OK ( )
9 CHANGE ( )
10
11 SELECT ( )
12 RECORD ( )
or
Go to step 13 if you do not want
a voice name record
13
14 CHANGE ( )
15 keypad keys
16 OK ( )
Scroll to Phone Number or
Email Address
Select the entry type
Select Name
Enter a name for the entry
Store the name
Select No. or Email
Enter the phone number or email
address (to a maximum of 32
characters)
Tip: You can store a PIN code with the
phone number (split number).
See page 56.
Store the phone number or email
address
Select Type
Note: This option is not available for
email entries.
Scroll to the number type
Select the number type
A voice name for the entry, if desired
Scroll to Speed No.
The next available speed dial number is
assigned to a new phonebook entry.
Select Speed No. if you want to change
it
Enter a different speed dial number, if
desired
Store the speed dial number
17 CHANGE ( )
Phonebook - 55
Page 58

Press To
18
19 SELECT ( )
20 SELECT ( )
distinctive ringer alert for the phone
number.
Your phone uses the alert to notify you
when you receive a call from this phone
number.
See page 76.
Scroll to the alert you want
Store the ringer ID alert
Select MORE if you want to create
another entry under the same Name
You must use a different Type identifier
for each number.
Complete Phonebook Entry
When you are finished entering information for a phonebook entry:
Press To
DONE ( )
Store the entry
Storing a Split Number
You can store a PIN code with the phone number for calls that require additional
digits (for example, to make a calling card call, or to retrieve voicemail or
answering machine messages). Insert one or more of the following characters in
the dialing sequence to ensure that the number dials and connects properly:
56 - Phonebook
Page 59

Press To
1
2
3
Note: You can store a maximum of 32 digits per number. Each character counts
as one digit.
> Insert Pause
> Insert Wait
> Insert ‘n’
Insert a p (pause) character
Your phone dials the preceding digits,
waits for the call to connect, then sends
the remaining digit(s).
Insert a w (wait) character
Your phone dials the preceding digits,
waits for the call to connect, then
prompts you for confirmation before it
sends the remaining digit(s).
Insert an n (number) character
Your phone prompts you for a number
before dialing the call. The number you
enter is inserted into the dialing
sequence in place of the n character
Recording a Voice Name For a Phonebook Entry
You can record a voice name for a new or existing phonebook entry. A voice
name lets you call the phonebook entry using voice dial. You may store up to 20
voice names. See page 91.
Find the Feature
Do This To
1 Press
2 Press VIEW ( ) View entry details
3 Press EDIT ( )
4 Press
5 Press RECORD ( )
6 Press and release the voice
activation key and say the
entry’s name (in two seconds)
7 Press and release the voice
activation key and repeat the
name
8 Press DONE ( )
> Phonebook
Scroll to the entry
Edit the entry
Scroll to Voice Name
Begin recording
Record the voice name
Confirm the voice name
Store the voice name
Phonebook - 57
Page 60

Dialing a Phonebook Entry
Use one of the following procedures to call a number (or send a text message to
an email address) stored in your phonebook.
Phonebook List
Find the Feature
Press To
1 keypad key letter
2
3
Voice Dial
Do This To
Press and release the voice
activation key and say the entry’s
name (in two seconds)
To speed dial a phonebook entry, see page 21, and to call an entry with one-touch
dial, see page 22.
> Phonebook
Jump to entries that begin with that
letter (optional)
Scroll to the entry
Make the call
Make the call
58 - Phonebook
Page 61

Editing a Phonebook Entry
Find the Feature
Press To
1
2 VIEW ( )
3 EDIT ( )
Edit the entry as described on previous pages.
Deleting a Phonebook Entry
Find the Feature
Press To
1
2
3
4 SELECT )(
5 YES )(
Note: You cannot restore deleted entries.
> Phonebook
Scroll to the entry
View entry details
Edit the entry
> Phonebook
Scroll to the entry
Open the Phonebook Menu
Scroll to Delete
Select Delete
Confirm the deletion
Phonebook - 59
Page 62

Sorting the Phonebook List
You can sort your phonebook list by speed dial number (memory cell), name,
email address, or voice name.
Note: The voice name sort is identical to the name sort, except that entries with
voice nametags appear first.
Find the Feature
Press To
1
2
3 SELECT )(
4
5 CHANGE )(
6
7 SELECT )(
> Phonebook
Open the Phonebook Menu
Scroll to Setup
Select Setup
Scroll to Sort by
Select Sort by
Scroll to Name, Speed No., Voice
Name, or Email
Select the sort order
60 - Phonebook
Page 63

Icon Viewer
Your phone contains icons and animations that you can use as a
screen saver.
Note :Your phone may include predefined icons. These icons are
identified by a (predefined object) indicator. You cannot rename,
delete, or view details about predefined icons.
Find the Feature
> Icon Viewer
Press To
1
2 SELECT )(
3
or
DETAILS )(
or
The Icon Viewer menu can include the following options:
Option Description
Details
Set as Screen Saver
Rename
Delete
To adjust your phone’s screen saver images, see page 98.
View icon information.
Set the icon as your phone’s screen saver image.
Rename the icon.
Delete the icon.
Scroll to the icon
View the icon
View the previous/next icon
View icon information
Open the Icon Viewer menu to perform
other procedures as described in the
following list
Icon Viewer - 61
Page 64

Datebook
The datebook is a calendar that lets you schedule and organize events such as
appointments and meetings. You can set the datebook to send a reminder alarm
for specific events.
Note: You must set the correct time and date on your phone to use the datebook.
To schedule or review datebook events:
Find the Feature
> Datebook
Week View
The datebook displays a calendar for the week by default. Lines or filled boxes
indicate scheduled events.
62 - Datebook
Page 65

Day View
Select a day and press VIEW ( ) to see the day’s events.
Event View
Select an event and press VIEW ( ) to see event details.
Adding a Datebook Event
A title is required for a datebook event. All other information is optional.
Note: You must create an event to use the reminder alarm.
Datebook - 63
Page 66

Find the Feature
> Datebook > day
> New Event
Press To
1 CHANGE ( )
2 keypad keys
3 OK ( )
4
5 DONE ( )
Select Title
Enter a title for the event
Store the event title
Scroll to other fields and enter
information as necessary.
You can set start time, duration, date,
repeat interval, and reminder alarm.
Store the event
Changing Event Information
Find the Feature
Press To
1 or
2 VIEW ( )
3
4 VIEW ( )
5 EDIT ( )
6
7 CHANGE ( )
8 keypad keys
9 DONE ( )
> Datebook
Scroll to the day
Display the day view
Scroll to the event
Display the event view
Edit the event
Scroll to the information you want to
change
Edit the information
Enter new information
Store the information
64 - Datebook
Page 67

Copying an Event
Find the Feature
Press To
1 or
2 VIEW ( )
3
4
5
6 SELECT ( )
7 YES ( )
8 keypad keys
9 ( )
10 DONE ( )
11
12 DONE ( )
> Datebook
Scroll to the day
Display the day view
Scroll to the event
Open the Datebook Menu
Scroll to Copy
Copy the event
Confirm the copy
Your phone assumes you want to change
the date, and displays the Date field.
Enter date information
Move to month, day, and year
Save the copy of the event
Scroll to and edit event information, if
necessary
Store the information
Datebook - 65
Page 68

Deleting an Event
Find the Feature
Press To
1 or
2 VIEW )(
3
4
5
6 SELECT )(
7 YES )(
> Datebook
Scroll to the day
Display the day view
Scroll to the event
Open the Datebook Menu
Scroll to Delete
Select Delete
Confirm the deletion
Calling with Speed Dial
To manually speed dial a phonebook entry, in the idle display:
• Press the digits of the phonebook entry you want to call. Hold the last digit
continuously until the number dials.
For example:
• To dial phonebook entry 99, press
• To dial phonebook entry 7, press .
You must hold down the last digit of the phonebook entry for this feature to work,
even if it is just a single digit.
.
66 - Datebook
Page 69

Messages – Voicemail
code with
You can listen to your voicemail messages by calling your network
voicemail phone number (voicemail service). Voicemail messages
are stored on the network—not on your phone.
Storing Your Voicemail Number
Storing your voicemail number on your phone makes it easy for you to listen to
new voicemail messages. In many cases, your service provider has already done
this for you.
Find the Feature
Press To
Select ( )
> Messages
> Voicemail
> Voicemail setup
Press To
1 keypad keys
2 OK ( )
Your service provider additionally may store your voicemail number as phonebook
entry number 1, so you can use one-touch dial to listen to your voicemail
messages. If necessary, see page 54 to store your voicemail number for onetouch dial access.
Enter your voicemail number.
Tip: You can store your PIN
the voicemail number. See page 103.
Store the number
Receiving a Voicemail Message
When you receive a voicemail message, your phone displays the (voice
message waiting) indicator and a New Voicemail notification
Press To
CALL ( )
If reminders are turned on, your phone sends a reminder at regular intervals until
you close the new message notification, listen to the message, or turn off your
phone.
Listen to your message
Messages – Voicemail - 67
Page 70

Listening to a Voicemail Message
Find the Feature
The phone calls your voicemail number. If no voicemail number is stored, your
phone prompts you to store one.
Shortcut : If your voicemail number is also stored as phonebook entry number 1,
you can press and hold to listen to your voicemail message.
> Messages > Voicemail
Cancelling the “Voice Message” indicator
To delete the (Voice message waiting) indicator:
Find the Feature
> Messages
> Voicemail
> Cleanup Now
68 - Messages – Voicemail
Page 71

Messages – Text
you want to
Text messages are brief messages that you can send and receive.
Quick notes are pre-written text messages that you can incorporate
into a message and send quickly.
The number of messages the inbox can hold depends on the length of the
messages, and the number of other messages and drafts stored on your phone.
Your device is set up for 50 incoming messages and 20 outgoing messages.
Setting up the Text Message Inbox
Note: In many cases, your service provider has already set up the text message
inbox for you.
Find the Feature
Press To
1 CHANGE ( )
2
3 SELECT ( )
4 DONE ( )
> Messages
> Inbox
Setup
>
Change the Cleanup setting
Scroll to the number of days
keep messages in the inbox, or the
number of messages you want to keep
Select the cleanup setting
Save the inbox settings
Receiving a Text Message
When you receive a text message, your phone displays the (message
waiting) indicator and a New Inbox Message notification, and gives an alert.
Press To
1 READ ( )
If reminders are turned on, your phone sends reminders at regular intervals until
you close the new message notification, read the message, or turn off your phone.
When your phone displays Memory is Full!, you must delete some existing
messages to receive new messages.
Open the message
Messages – Text - 69
Page 72

Reading, Locking, or Deleting a Text Message
procedures as described in the following
Messages in the text message inbox are sorted from newest to oldest. The oldest
messages are deleted automatically as specified by the inbox cleanup setting (see
page 69). If you want to save a message, you should lock it to prevent it from
being deleted during cleanup.
Find the Feature
Press To
1
2 SELECT ( )
3 BACK ( )
> Messages > Inbox
Scroll to the message.
The following indicators show message
status:
= Unread
= Unread and urgent
= Read
= Read and locked
Open the message
Close the message
Open the Inbox Menu to perform other
list
70 - Messages – Text
Page 73

The Inbox Menu includes the following options:
Option Description
Call Back
Reply
Forward Open a copy of the text message, with an empty To
Lock/Unlock
Store
Delete
Delete All
Create Message
Setup
Go To
Call the number in the message header or
embedded in the message.
Open a new text message, with the sender’s Reply
To number or email address in the To field.
field.
Lock or unlock the message.
Delete the message.
Delete all inbox messages.
Open a new text message.
Open the text message inbox setup menu.
Launch the micro-browser and go to a web address
(URL) embedded in the message.
Sending a Text Message
You can send a text message to one or more recipients (up to 10 recipients). You
can manually enter each recipient’s phone number or email address, or select
numbers/addresses from the phonebook or recent call lists.
Note: When you manually enter numbers and/or email addresses, you must insert
a space between each entry. Press one time, wait for the space to appear,
and then enter the next number or email address.
Find the Feature
> Messages
> New Message
Messages – Text - 71
Page 74

Press To
1 CHANGE ( )
2 keypad keys
or
BROWSE ( )
A
B SELECT ( )
C
D ADD ( )
E DONE ( )
3 OK ( )
4 CHANGE ( )
5 keypad keys
Select To
Enter one or more phone numbers
and/or email addresses
Tip : Press to insert a space
between each number/address that you
enter manually.
Select numbers/addresses from the
phonebook or recent call lists as follows:
Highlight one of the following options:
Phonebook, Received Calls, or
Dialed Calls
Select the list
Highlight a number/address
Add the number/address to the list of
message recipients
Return to the message editor when you
are finished
Store the numbers/addresses
Select Msg option
Enter the message
Note : Message length is limited to 126
characters. A display counter displays
the number of characters left.
72 - Messages – Text
Page 75

pages in the
Press To
or
INSERT ( )
or
BROWSE ( )
6 OK ( )
7 CHANGE ( )
8 keypad keys
9 OK ( )
10 DONE ( )
11 YES ( )
or
No ( )
Select and insert a quick note message
(see page 74)
Enter the message
Note: Message length is limited. A
display counter cycles between the
number of pages you have written
(number preceded by a *), and the
number of characters left on the current
page. Network charges are based on
the number of pages sent.
Select and insert a quick note message
(see page 74)
Store the message
Select Call
Enter a number for the recipient to call
back
Store the number
Finish the message. Your phone
displays the total number of
message.
Send the message
Cancel the message or save it in the
drafts folder.
Messages – Text - 73
Page 76

Sending a Quick Note Text Message
Quick notes are pre-written text messages that you can incorporate into a
message and send quickly (for example, I'm on my way). You can also create
new quick notes.
Find the Feature
> Messages
> Quick Notes
Press To
1
2 READ ( )
or
The Quick Note Menu can include the following options:
Option Description
New
Edit
Delete
Send Open a new message with the quick note in the Msg
Create a new quick note.
Edit the quick note.
Delete the quick note.
field.
Scroll to the quick note
Read the quick note
Open the Quick Note Menu to perform
other procedures as described in the
following list.
Viewing the Status of Sent Text Messages
Text messages that you send are stored in the Outbox.
Find the Feature
Messages in the Outbox are sorted from newest to oldest.
The following indicators show message status:
= Sending in progress
= Sending failed
> Messages > Outbox
= Sent
74 - Messages – Text
Page 77

Ring Styles
Your phone rings to notify you of an incoming call or other event.
Each ring style contains settings for specific event alerts, ringer type (ringer ID),
and ringer and keypad volume.
Customizing a Ring Style
Change Style Settings
You can change the alerts that notify you of the following events: incoming calls,
text messages, voicemail messages, data calls, fax calls, alarms, and reminders.
Any changes you make are saved to the current ring style. You have 36 different
ring options.
Find the Feature
Press To
1
2 CHANGE )(
3
4 SELECT )(
> Settings
> Ring Styles
> Loud Detail
Scroll to the event
Select the event
Scroll to the alert you want
Select the alert
Activate and Deactivate Ringer IDs
When ringer IDs are turned on, your phone uses distinctive ringer alerts to notify
you of incoming calls or messages from specific entries stored in your phonebook.
Find the Feature
> Settings
> Ring Styles
> Loud Detail
Ring Styles - 75
Page 78

Set Ringer or Keypad Volume
Find the Feature
Press To
1
2 or
> Settings
> Ring Styles
> Loud Detail
Scroll to Ring Volume or Key Volume
Scroll to the desired volume
Creating Alert Tones
You can create and store custom alert tones on your phone. The tones appear in
the list of available alerts.
Create a Tone
Find the Feature
Press To
1
2 SELECT ( )
3 CHANGE ( )
4 keypad keys
5 OK ( )
6 CHANGE ( )
7 keypad keys
8 OK ( )
9 DONE ( )
> Settings
> Ring Styles
> My Tones
Scroll to [New Tone]
Select [New Tone]
Select Notes
Enter notes (see following section)
Store the notes
Select Name
Enter a name for the tone
Store the name
Store the tone
76 - Ring Styles
Page 79

Entering Notes
Use the keypad keys to enter each note. Press a key multiple times to cycle
through its notes or options (pitch, octave, or length). The default setting for a new
tone is a quarter note in octave two.
Key Display Description
1
2
3
A
B
C
D
E
F
G
R
#
b
q
h
w
Set octave one
Set octave two
Set octave three
Note A
Note B
Note C
Note D
Note E
Note F
Note G
Rest
Sharp
Flat
Quarter note or rest
Half note or rest
Whole note or rest
Ring Styles - 77
Page 80

Enter a note as follows:
ps and flats are played as standard notes.
Task Action
Change the octave
Select the note
(required)
Change a note to a
sharp or flat
Change a note’s length
Add a rest
Listen to a new tone as
you compose it
Set the new octave (1, 2 or 3) before selecting the
note. The octave applies to all following notes until
you change it again.
Press a keypad key.
Enter a sharp or flat (# or b) after selecting the note.
Some shar
For example, B# is the same as C. Press to scroll to
valid notes when entering a new note.
Set the new length (q, h, or w) after selecting the
note. The length applies to all following notes until
you change it again.
Enter one or more rests (R characters) as needed in
the tone sequence. Set the length of the rest by
entering a q, h, or w character after the rest, just as
you would for a note.
Press to enter the Compose Menu,
and select Play All to play the notes you have
entered.
78 - Ring Styles
Page 81

Example
Press the following keys to play this sequence of notes and rests in octave three:
C (quarter note), E flat (quarter note), half rest, and G (whole note):
Press To Display
1
2
3
4
5
Set octave three
Enter a quarter note C
Enter a quarter note E flat
Enter a half rest
Enter a whole note G
3
C
Eb
Rh
Gw
Play a Tone
> Settings
Find the Feature
Press To
1
2
3
4 SELECT ( )
5 PLAY ( )
or
CANCEL ( )
> Ring Styles
> My Tones
Scroll to the tone
Open the Tone Menu
Scroll to Play
Select Play
Play the tone again
Return to My Tones list
Ring Styles - 79
Page 82

Edit a Tone
You cannot edit the predefined alert tones included with your phone. To edit a
custom alert tone:
Find the Feature
Press To
1
2 EDIT ( )
3
4 CHANGE ( )
5 keypad keys
6 OK ( )
7 DONE ( )
> Settings
> Ring Styles
> My Tones
Scroll to the tone
Open the tone details
Scroll to the item you want to edit
(Name or Notes)
Select the item
Enter new text or notes
Store the new text or notes
Save your changes
80 - Ring Styles
Page 83

Delete a Tone
You cannot delete the predefined alert tones included with your phone. To delete
a custom alert tone:
Find the Feature
> Settings
> Ring Styles
> My Tones
Press To
1
2
3
4 SELECT )(
5 YES )(
Scroll to the tone
Open the Tone Menu
Scroll to Delete
Select Delete
Confirm the deletion
Setting Reminders
A reminder is an alert that rings or lights up at regular intervals to notify you about
a voicemail or text message that you have received.
Find the Feature
Press To
1
2 SELECT )(
> Settings
> Ring Styles
> Loud Detail
> Reminders
Scroll to set the reminder alert type, or
Off to turn off all reminders
Select the reminder alert
Ring Styles - 81
Page 84

Shortcuts
Your phone includes several standard shortcuts. You can create additional
shortcuts to frequently used menu items.
Standard Shortcuts
The following shortcuts are pre-programmed in your phone. You cannot edit or
delete these shortcuts.
Do This To
1 Press , then press
and hold (within
two seconds)
2 Press
Zoom in/out on your phone display
See your phone number
3 Press Go to the dialed calls list
4 Press
Exit the menu system
Creating a Shortcut
You can create a keypad shortcut (9 in all) plus an optional voice shortcut (5 in all)
to a menu item. When creation of a shortcut through a certain item is invalid, a
message "Shortcut for this item is invalid" will appear. A voice shortcut takes you
directly to the menu item when you say the shortcut name.
Do This To
1 Press
2 Press
3 Press and hold
4 Press YES ( )
Enter the menu system
Scroll to the menu item
Open the shortcut editor
View shortcut options
82 - Shortcuts
Page 85
Do This To
5 Press CHANGE ( )
or
Press DONE ( )
or
Press
6 Press RECORD ( )
7 Press and release the voice
activation key and say the
shortcut’s name (in two
seconds)
8 Press and release the voice
activation key and repeat the
name
9 Press DONE ( )
Change the keypad shortcut number
Select the default keypad shortcut
number
Scroll to Voice to assign a voice
shortcut
Begin recording
Record the shortcut name
Confirm the shortcut name
Store the shortcut name
Using Shortcuts
Use a Keypad Shortcut
Press To
1
2 a number key
Select a Shortcut from the List
Find the Feature
Open the main menu
Go to the menu item with that shortcut
number
> Shortcuts
> shortcut name
Shortcuts - 83
Page 86

Use a Voice Shortcut
Do This To
1 Press
2 Press and release the voice
activation key and say the
shortcut’s name (in two
seconds)
Open the main menu
Go to the menu item with that shortcut
name
84 - Shortcuts
Page 87

VoiceNotes
You can use the VoiceNoteTM feature to record personal messages and phone
calls on your phone. You have 2 minutes in all to record VoiceNotesTM.
Recording a VoiceNote
Use this procedure to record a VoiceNoteTM from the idle display, or to record a
phone call in progress (the voice of the other party). Your phone plays an alert
tone to notify the other party that the call is being recorded.
Note: Recording phone calls is subject to varying laws in different states
regarding privacy and recording of conversations.
TM
TM
Do This Result
1 Press and hold the voice
activation key (at least
2 seconds).
2 Speak your VoiceNoteTM.
3 Press the voice activation key
to stop the recording.
The phone sounds an alert tone and
begins recording.
The phone records the VoiceNoteTM.
The phone displays the VoiceNoteTM
number and total recording time.
VoiceNotesTM - 85
Page 88

Viewing the VoiceNotesTM List
Find the Feature
Note: VoiceNotes are equivalent to Voice Record
> VoiceNotes
TM
Playing a VoiceNote
Find the Feature
Press To
1
2 PLAY ( )
When you connect an optional Motorola Original™ headset to your phone,
playback is routed automatically to the headset.
Tip: You can play a VoiceNoteTM while taking a call. It will not be transmitted to
the other party.
Recording any VoiceNoteTM enables access to the VoiceNotesTM list.
TM
> VoiceNotes
Scroll to the VoiceNote
Play the VoiceNote
TM
TM
TM
86 - VoiceNotesTM
Page 89

Playback Screen
The playback screen is displayed as the VoiceNoteTM plays.
VoiceNotesTM - 87
Page 90

VoiceNoteTM Controls
88 - VoiceNotesTM
Page 91

Locking a VoiceNote
Lock a VoiceNoteTM to prevent it from being deleted.
Find the Feature
Press To
1
2
3
4 SELECT )(
To lock a VoiceNoteTM during playback:
TM
> VoiceNotes
Scroll to the VoiceNote
Open the VoiceNotesTM Menu
Scroll to Lock
Lock the VoiceNote
TM
Press To
1
2
Open the VoiceNotesTM Menu
Scroll to Lock
3 SELECT )( Lock the VoiceNoteTM
Playback stops when you lock a VoiceNoteTM.
Press any number key to resume playback.
TM
TM
VoiceNotesTM - 89
Page 92

Deleting a VoiceNote
TM
Find the Feature
Press To
1
2
3
4 SELECT )(
5 YES )(
or
NO )(
> VoiceNotes
Scroll to the VoiceNote
Open the VoiceNotesTM Menu
Scroll to Delete or Delete All
Select the highlighted option
Confirm the deletion
Cancel deletion
Comments:
• You cannot delete a locked VoiceNoteTM.
• You cannot recover a deleted VoiceNoteTM.
TM
TM
90 - VoiceNotesTM
Page 93

Voice Activation
Enables the playback of voice instructions while using the features of
Enables maximum compatibility between the user’s accent and the
voice operating system for dialing digits. Follow the system instructions.
The character that you must pronounce will appear on the display. Say
uction. Repeat the characters, as required,
Your M800 phone is equipped with advanced features that enable you to activate
the phone audibly by dialing names, digits, and direct access to menus.
> Settings
Find the Feature
Language
Enables the selection of a language to dial digits.
> Voice Activation
> Settings
> Voice Activation
> Language
> Settings
Voice Comments
voice activation, for example: “Say a name”, “Say a number”.
Training
the character after the instr
in accordance with the appearance on the display.
> Voice Activation
> Voice Comments
> Settings
> Voice Activation
> Training
Dialing Names
Your phone supports voice dial through the saying of names previously entered
into the device’s memory. It is possible to store up to 20 names in the voice dial
memory.
To operate the phone using voice dial, the name must be recorded (see page 54)
with the user’s voice only.
Operation of this feature is very simple and was planned to be so in advance.
Voice Activation - 91
Page 94

The name is displayed on the display
Do this Result
1 Press and hold the voice
activation key.
Voice activation
key
The phone emits a voice message
“Say name”
2 Say the name that you wish to
call out aloud.
טי
Note: Incoming calls may be answered by pressing the voice activation key.
Pressing the voice activation key again will stop the process and return the phone
to standby.
and the number is dialed automatically.
Voice-Activated Speed Dialing
Each entry in your phonebook is assigned a unique speed dial number that
identifies where the entry is stored in phone memory or on the SIM card. You can
initiate phone calls by speaking this number to the M800, which will then dial the
call.
Note: Voice-activated speed dialing uses M800 phonebook memory locations 1
through 99.
Do this Result
1 Press the voice activation key
twice
Speak the digits of the
phonebook entry that you want
to call:
The phone plays a voice message:
“Say number”.
For example:
• To dial phonebook entry 99, say
“nine, nine”.
• To dial phonebook entry 7, say
“seven”.
92 - Voice Activation
Page 95

Dialing Digits
Say aloud the telephone number
The phone beeps once and plays a voice
The menu associated with the shortcut
The phone supports dialing telephone numbers (including the * asterisk character)
with user’s voice. This feature does not require recording the numbers in advance
(as dialing names does).
Do this Result
1 Press the voice activation key
rhythmically twice
The phone beeps once and plays a
voice message “Say number”
2
that you wish to dial (each digit
separately)
Note: incoming calls may be answered by pressing the voice activation key.
Pressing the voice activation key again will stop the process and return the phone
to standby.
The number is displayed on the display
panel, and the dial process is performed
automatically
Voice Shortcuts to Features
This feature enables the user to access the menus directly. Up to 5 shortcuts may
be stored in memory. Activation of this feature requires prior training of the system
using a recording of the user’s voice. See page 82.
Do this Result
1 Press once of the “Menu” key
and immediately once on the
voice activation key
2 Say aloud the shortcut that you
wish to use
message “Say shortcut”
appears
Voice Activation - 93
Page 96

Micro-Browser
Dial the telephone number highlighted in
) to delete one
The Micro-Browser lets you access Web pages and Webbased applications on your phone. Contact your service
provider to set up access, if necessary.
Starting a Micro-Browser Session
Find the Feature
Press To
1
2 SELECT ( )
Shortcut: press and hold the upper 2-way navigation key will launch the browser
automatically. In addition, if you open a text message that contains a web address
(URL) you can press > Go To UR L to launch the browser and go
directly to the internet address. You can press and hold to go directly to the
home page.
If you are unable to establish an internet connection with the micro-browser,
contact your service provider.
> Browser
Scroll to a bookmark, service, or an
application
Select the item
Using Web Pages
Press To
1
2 SELECT ( )
3
4 Keypad keys, then press OK
( )
5 BACK ( ) Go back to the previous page
6
Scroll down the text, or highlight a
selectable item
Select the highlighted item
the micro-browser
Enter information.
Tip: Press DELETE (
letter at a time, in the event of a typing
error
Open the Browser Menu
94 - Micro-Browser
Page 97

Calculator
You can use your phone as a calculator and currency converter.
Note: The last result displayed remains in the memory even after you exit the
feature or switch off the device. To reset the result, press C, CE.
Calculating Actions
Find the feature
Press To
1 number keys
2 or
3 SELECT ( )
The calculator can perform the following functions:
Function Description
.
C
=
+
-
X
Insert a decimal point
Clear the calculation
Calculate the result
Add
Subtract
Multiply
> Calculator
Enter a number
Highlight a calculator function
Perform the action
Calculator - 95
Page 98

Function Description
Divide
÷÷÷÷
%
Divide the displayed value by 100
Calculate the exchange rate
$
+- Change the entry’s sign (positive/negative)
MR
MS
MC
Replace the displayed value with the value stored in memory
Store the value in memory (overwrites current stored value)
Clear the value stored in memory
Converting Currency
The currency converter works just like the calculator, but uses the $ (currency)
function.
Note: Enables precision of 6 digits after the decimal point.
Find the Feature
Press To
1 number keys
2 OK ( )
3 number keys
4 or
5 SELECT ( )
> Calculator
> Exchange Rate
Enter the exchange rate
Store the exchange rate
Enter the amount to convert (amount to
multiply by the exchange rate)
Highlight the $ function
Perform the conversion
96 - Calculator
Page 99

Adjusting Your Settings
Reordering Menu Items
You can reorder the items in your phone’s main menu:
Find the Feature
Press To
1 Scroll to a menu item
2 GRAB ( )
3
4 INSERT ( )
Customizing a Soft Key Function
You can change the soft key features ( and ) to access different menu
features from standby.
Find the Feature
Press To
1
2 CHANGE ( )
3
4 CHANGE ( )
> Settings
> Other Settings
> Personalise
> Main Menu
Grab the menu item
Move the item to a new location in the
menu
Insert the menu item
> Settings
> Other Settings
> Personalise
> Keys
Scroll to Left or Right
Select the key
Scroll to the new key feature
Confirm the new feature
Adjusting Your Settings - 97
Page 100

Screen Saver
You can set a icon or an animation as a screen saver image in your phone’s idle
display. The image is displayed when no activity is detected for a specified time.
The screen saver image is shrunk to fill the display, if necessary. An animation
repeats for one minute, and then the first frame of the animation is displayed.
Find the Feature
Press To
1 Scroll to Picture
2 CHANGE ( )
3
4 SELECT ( )
5
6 CHANGE ( )
7
8 SELECT ( )
9 DONE ( )
> Settings
> Other Settings
> Personalise
> Screen saver
Open the Icon Viewer
Scroll up or down to a picture/animation
Scroll to (None) to turn off the screen
saver image.
Select the image
Scroll to Delay
Set the delay interval
Scroll to the inactivity interval that
triggers the screen saver
Confirm the delay setting
Save screen saver settings
98 - Adjusting Your Settings
 Loading...