

Page 1

Motorola
iDEN In-Vehicle Phone with GPS
M710 User's Guide
Page 2

IMPORTANT NOTICE: PLEASE READ
PRIOR TO USING YOUR PHONE
The SIM card provided in this kit is intended for use with the phone
provided in this package.
Loss of certain features will result when using a SIM card from one of
the following models: i30sx, i35s, i50sx, i55sr, i58s, i60c, i80s, i85s, i88s,
i90c, i95cl series, and the i2000 series.
For more information on SIM card compatibility, go to www.
motorola.com/iden/support.
Defects or damage to your Motorola phone that result from the use
of non-Motorola branded or certied Accessories, including but not
limited to replacement housings and or other peripheral accessories,
are excluded from warranty coverage. Please refer to the text of
Motorola’s Limited One Year warranty located in this user’s guide for
complete details.
Page 3

C
Dear customer,
Motorola M710 iDEN In-Vehicle Phone with GPS is
uniquely designed for dedicated access to voice and data
communication from within the vehicle environment.
With its voice activation feature, GPS navigation on a sharp
display screen, well-spaced keypad and all round handsfree environment, the M710 is the more convenient way to
talk and drive.
Key Product Features
• The M710 Voice Activated Dialing feature: Name dialing,
which allows you to speak a voice tag that you have
saved for a phonebook entry.
• High quality hands-free operation enables you to
communicate in more convenient way while in the
vehicle environment.
• Sharp color graphic display designed for easy reading
with large fonts, and automatic backlight behavior for
in-vehicle use.
• A well-spaced keypad with large, illuminated tactile keys
makes it easier for you to dial when mobile.
• Enjoy the luxury of installing a single xed mount unit
that includes a display, keypad and radio, making the
installation process easier and faster.
• Turn-by-turn navigation and Location Based Services via
integrated AGPS.
• "Push-To" features including Push-To-Talk, Push-To-Send
Contacts and Push-To-Send Pictures..
* Various phone features are network dependant.
** Specications subject to change without prior notice.
Page 4

D
Total Customer Satisfaction
Absolute customer satisfaction is Motorola’s top priority.
If you have a question, suggestion or any other issue
concerning the Motorola phone, Motorola wants to hear
from you.
Motorola Australia Customer Care:
1300138 823 8am - 6pm Australia EST
Motorola New Zealand Customer Care:
0508 668-676 10am - 8pm
Motorola Canada Customer Care:
1-800-461-4575
Motorola USA Customer Care:
866-289-6686
Software Copyright Notice
The Motorola products described in this manual, may
include copyrighted Motorola and third party software
stored in semiconductor memories or other media.
Laws in the United States and other countries preserve
for Motorola and third party software providers certain
exclusive rights for copyrighted software, such as the
exclusive rights to distribute or reproduce the copyrighted
software. Accordingly, any copyrighted software contained
in the Motorola products may not be modied, reverseengineered, distributed, or reproduced in any manner
to the extent allowed by law. Furthermore, the purchase
of the Motorola products shall not be deemed to grant
either directly or by implication, estoppel, or otherwise,
any license under the copyrights, patents, or patent
applications of Motorola or any third party software
provider, except for the normal, non-exclusive, royalty-free
license to use that arises by operation of law in the sale of
a product.
MOTOROLA, the Stylized M Logo and all other trademarks
indicated as such herein are trademarks of Motorola,Inc.®
Reg.U.S. Pat.&Tm.O. TrueSync, Sidekick, Starsh and the
Stylized Starsh Logo are registered trademarks of Starsh
Software,Inc., a wholly owned independent subsidiary of
Motorola,Inc. All other product or service names are the
property of their respective owners.
©2006 Motorola,Inc. All rights reserved.
Page 5

E
Safety Information
Important: Read this information before using your
wireless mobile phone.
Exposure to Radio Frequency Signal
our wireless mobile telephone is a low power radio
transmitter and receiver. When it is ON, it receives and also
sends out radio frequency (RF) signals.
Your Motorola wireless mobile telephone complies with the
following RF energy exposure standards and guidelines:
• United States Federal Communications Commission,
Code of Federal Regulations; 47CFR part 2 sub-part J
• American National Standards Institute (ANSI) / Institute of
Electrical and Electronic Engineers (IEEE) C95. 1-1992
• Institute of Electrical and Electronic Engineers (IEEE)
C95.1-1999 Edition
• International Commission on Non-Ionizing Radiation
Protection (ICNIRP) 1998
• Ministry of Health (Canada) Safety Code 6. Limits of Human
Exposure to Radiofrequency Electromagnetic Fields in the
Frequency Range from 3 kHz to 300 GHz, 1999
• Australian Communications Authority
Radiocommunications (Electromagnetic Radiation
- Human Exposure) Standard, 2003
• ANATEL, Brazil Regulatory Authority, Resolution No. 303
of July 2, 2002 “Regulation of the limitation of exposure
to electrical, magnetic, and electromagnetic elds in the
radio frequency range between 9KHz and 300 GHz.” and
“Attachment to resolution # 303 from July 2, 2002”
The design of your phone complies with these standards
when used as described under "Phone Operation."
Antenna Installation Guidelines
Important: To meet the FCC's RF Exposure guidelines
and satisfy the categorical exclusion
requirements for mobile transmitters, the
antenna must be installed so there is at
least 30 cm of separation between the
antenna and both the occupants of the
vehicle and bystanders outside of the
vehicle. In addition, total antenna gain
must not allow the transmitted ERP to
exceed 1.189 Watts.
Page 6

F
Antenna Care
Use only the supplied or an approved replacement
antenna. Unauthorized antennas, modications, or
attachments could damage the phone and may violate
local agency regulations.
Mobile Conguration
Do not operate your mobile telephone when a person is
within 12 inches (30 centimeters) of the antenna. A person
or object within 12 inches (30 centimeters) of the antenna
could impair call quality and may cause the phone to
operate at a higher power level than necessary and expose
that person to RF energy in excess of that established by
the FCC RF Exposure Guidelines.
Driving
Check the laws and regulations on the use of wireless
telephones in the areas where you drive. Always obey
them. Observe the following guidelines when using your
phone while driving.
• Give full attention to driving. Driving safely is your rst
responsibility.
• Use hands-free phone operation, if available.
• Pull o the road and park before making or answering a
call if driving conditions so require.
Electronic Devices
Most modern electronic equipment is shielded from RF
signals. However, certain equipment may not be shielded
against the RF signals from your wireless phone.
Pacemakers
The Health Industry Manufacturers Association
recommends that a minimum separation of 6 inches
(15 centimeters) be maintained between a wireless
phone's antenna and a pacemaker to avoid potential
interference with the pacemaker. These recommendations
are consistent with the independent research by and
recommendations of Wireless Technology Research.
Persons with pacemakers:
• Should ALWAYS keep the phone more than 6 inches (15
centimeters) from their pacemaker when the phone is
turned ON
• Should turn the phone OFF immediately if you have any
reason to suspect that interference is taking place.
Page 7

G
Other Medical Devices
If you use any other personal medical device, consult the
manufacturer of your device to determine if it is adequately
shielded from external RF energy. Your physician may be
able to assist you in obtaining this information.
Turn your phone OFF in health care facilities when any
regulations posted in these areas instruct you to do so.
Hospitals or health care facilities may be using equipment
that could be sensitive to external RF energy.
Vehicles
RF signals may aect improperly installed or inadequately
shielded electronic systems in motor vehicles. Check with
the manufacturer or its representative regarding your
vehicle. You should also consult the manufacturer of any
equipment that has been added to your vehicle.
Posted Facilities
Turn your phone OFF in any facility where posted notices
so require.
Blasting Areas
To avoid interfering with blasting operations, turn your
phone OFF when in a "blasting area" or in areas posted:
"Turn o two-way radio." Obey all signs and instructions.
Potentially Explosive Atmospheres
When you are in any area with a potentially explosive
atmosphere, turn your phone OFF and obey all signs and
instructions. Sparks in such areas could cause an explosion
or re resulting in bodily injury or death.
Areas with a potentially explosive atmosphere are often
but not always clearly marked. They include: fueling areas
such as gasoline stations; below deck on boats; fuel or
chemical transfer or storage facilities; areas where fuel
odors are present (for example, if a gas/propane leak occurs
in a car or home); areas where the air contains chemicals
or particles, such as grain, dust, or metal powders; and any
other area where you normally would be advised to turn
o your vehicle engine.
For Vehicles Equipped with an Air Bag
An air bag inates with great force. Do NOT place objects,
including both installed or portable wireless equipment, in
the area over the air bag or in the air bag deployment area.
If in-vehicle wireless equipment is improperly installed and
the air bag inates, serious injury could result.
Page 8

H
FCC Grant of Equipment Authorization
FCC ID: AZ492FT5854
Canada Grant of Equipment Authorization
IC:109U-92FT5854
Network Freq Band Rated Power
iDEN 800/900MHz 0.354W
MOTOtalk ISM 0.316W
FCC INTERFERENCE
This device complies with Part 15 of the FCC Rules.
Operation is subject to the following two conditions:
(1) This device may not cause harmful interference.
(2) This device must accept any interference received,
including interference that may cause undesired operation.
Page 9

i
Contents
Getting Started ......................................................1
Locating Your SIM Card ........................................................................2
Activating Service ...................................................................................2
Powering On and O ............................................................................ 2
Enabling Over-the-Air Security .......................................................3
Finding Your Phone Number ...........................................................4
Phone Basics ...............................................................................................4
Entering Numbers From the Keypad .......................................... 8
Setting the Ring Volume .....................................................................8
SIM Card Security .....................................................................................8
Accessories ............................................................................................... 12
For More Information .........................................................................12
Making Calls .........................................................13
Phone Calls ............................................................................................... 13
Private Calls ..............................................................................................13
Receiving Calls........................................................................................13
Choosing a Number to Call ............................................................14
Voice Dialing ............................................................................................15
Missed Phone Calls .............................................................................. 16
Using Mute ............................................................................................... 16
Making Emergency Phone Calls .................................................16
MOTOtalk™ ...........................................................18
Switching to MOTOtalk .....................................................................18
Exiting MOTOtalk .................................................................................. 19
Talk Range ................................................................................................. 19
Channels and Codes...........................................................................19
Private MOTOtalk Calls ...................................................................... 21
Making Emergency Calls while in MOTOtalk™ Mode ....22
Setup Options ........................................................................................22
Call Alerts .............................................................24
Sending Call Alerts ..............................................................................24
Page 10

ii
Receiving Call Alerts ...........................................................................24
Using the Call Alert Queue ............................................................. 25
Recent Calls ..........................................................27
Calls and Call Alerts .............................................................................27
My Info From Other Phones ..........................................................27
Contact Information From Other Phones ............................. 28
Viewing the Recent Calls List ........................................................28
Storing Items to Contacts ...............................................................29
Deleting Items ........................................................................................ 29
Making Calls From the Recent Calls List ................................. 30
Contacts ................................................................31
Accessing Contacts ............................................................................. 32
Creating Entries ..................................................................................... 32
Assigning a Ring Tone or Picture ................................................33
Assigning a Speed Dial Number or Voice Name ...............34
Storing Numbers Faster ....................................................................34
Editing Entries .........................................................................................35
Viewing Entries ......................................................................................35
Deleting Entries .....................................................................................37
Checking Capacity ............................................................................... 38
Creating Pauses and Waits .............................................................. 38
International Numbers ...................................................................... 39
Making Calls From Contacts .......................................................... 39
Accessing Contacts with GSM Phones ...................................40
Call Forwarding ...................................................41
Turning O Call Forwarding ..........................................................42
Forwarding Missed Calls ..................................................................42
Viewing Call Forwarding Settings .............................................. 43
Advanced Calling Features .................................44
Call Waiting ...............................................................................................44
Switching Between Calls .................................................................44
Putting a Call on Hold ........................................................................45
Calling 2 People .....................................................................................45
Duo Phones Service ............................................................................ 46
Creating Pauses and Waits While Dialing ..............................46
Making International Calls ..............................................................46
Page 11

iii
Contents
One Touch PTT .......................................................................................47
Quick PTT ................................................................................................... 47
Call Timers ................................................................................................. 48
Using Your Phone as a Modem....................................................49
Group Calls and Selective Dynamic Group
Calls ....................................................................50
Group Calls ...............................................................................................50
Selective Dynamic Group (SDG) Calls......................................52
Memo ....................................................................57
Ring Tones ............................................................58
Assigning Ring Tones to Contacts .............................................58
Viewing Ring Tone Assignments ................................................58
Downloading More Ring Tones ................................................... 58
About DRM Ring Tones ..................................................................... 58
Managing Memory .............................................................................59
Deleting Custom Ring Tones.........................................................59
Entering Text ........................................................60
Using Word Mode ................................................................................ 60
Special Function Keys ........................................................................ 61
Messages ..............................................................62
Message Notications .......................................................................62
Message Center ..................................................................................... 63
Voice Mail Messages ............................................64
Receiving a Message .......................................................................... 64
Accessing Voice Mail .......................................................................... 64
Sending Unanswered Calls to Voice Mail ..............................64
MOSMS Messages ................................................65
Setting Up ................................................................................................. 65
Receiving a Message .......................................................................... 66
Reading from the Message Center ............................................66
Creating and Sending Messages ................................................ 66
Sorting Messages .................................................................................69
Managing Memory .............................................................................69
Page 12

iv
Media Center ........................................................71
Viewing the Media Center .............................................................. 71
Forward Locked Items ....................................................................... 72
DRM Items ................................................................................................73
Pictures........................................................................................................73
Audio Recordings ................................................................................. 74
Renaming Items ....................................................................................75
Locking Items .........................................................................................75
Deleting Items ........................................................................................ 76
Managing Memory .............................................................................76
Digital Rights Management ................................78
Installing Items ....................................................................................... 78
Understanding DRM Status Icons ..............................................78
Sharing Items ..........................................................................................78
Managing DRM Items ........................................................................ 79
Using Send via PTT ..............................................82
Sending a Picture ................................................................................. 82
Receiving a Picture ..............................................................................83
Sending My Info and Contact Information .......................... 84
My Info ..................................................................86
Viewing My Info .....................................................................................86
Editing My Info ....................................................................................... 86
Setting Sending Options .................................................................87
Datebook ..............................................................88
Viewing Datebook ...............................................................................88
Creating Events ......................................................................................89
Editing Events ......................................................................................... 91
Deleting Events......................................................................................92
Receiving Reminders..........................................................................92
Making Calls From Datebook and Datebook Reminders ..
93
Customizing Datebook Setup ...................................................... 94
Java Applications .................................................95
Installing Applications ....................................................................... 95
Running Applications ........................................................................95
Page 13

v
Contents
Suspending Applications ................................................................96
Resuming Applications .....................................................................96
Ending Applications ...........................................................................96
Downloading Applications ............................................................96
Deleting Applications ........................................................................ 97
Managing Memory .............................................................................97
Shortcuts on the Main Menu ........................................................98
Java Applications and GPS Enabled .........................................98
GPS Enabled ...................................................... 101
IMPORTANT: Things to Keep in Mind .................................... 101
Making an Emergency Call .......................................................... 102
Viewing Your Approximate Location.....................................103
Enhancing GPS Performance ..................................................... 104
Updating Satellite Almanac Data ............................................ 105
Setting Privacy Options ................................................................. 105
Voice Records .................................................... 107
Viewing Voice Records ................................................................... 107
Creating Voice Records .................................................................. 108
Playing Voice Records ..................................................................... 108
Labeling Voice Records ..................................................................108
Locking Voice Records ................................................................... 108
Deleting Voice Records ..................................................................109
Managing Memory ..........................................................................109
Customizing Your Phone .................................. 110
Setting the Volume .......................................................................... 110
Changing the Look of Your Phone.......................................... 110
Using Settings...................................................................................... 111
Proles ............................................................... 116
Editing Proles .....................................................................................116
Setting Call Filtering .........................................................................116
Shortcuts ........................................................... 118
Creating a Shortcut .......................................................................... 118
Using a Shortcut ................................................................................118
Editing a Shortcut .............................................................................119
Deleting Shortcuts ............................................................................ 119
Page 14

vi
Optional Features ............................................. 120
Audio Routing ..................................................................................... 120
Muting Entertainment System.................................................. 121
Wireless Phone Safety Tips .............................. 122
Understanding Status Messages ..................... 124
Index .................................................................. 126
Page 15
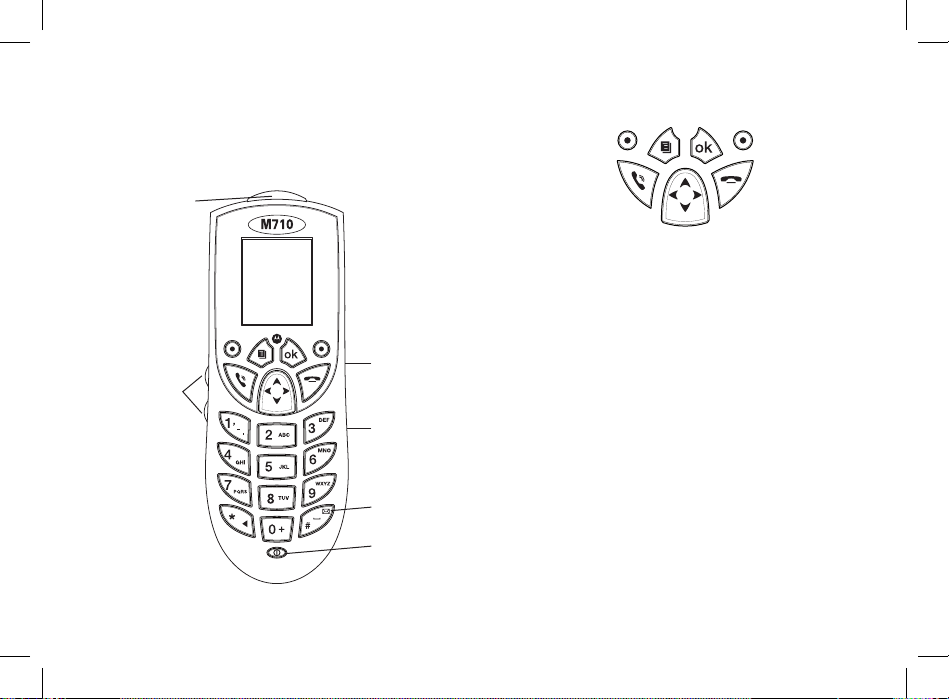
1
Getting Started
Volume
Controls
SIM Card
Housing
Power Button
Mini USB
Connector
Smart Key
N
Navigation key – press the arrows to scroll
through menus and lists.
o
OK key – selects highlighted item; answers
calls.
m
Menu key – accesses context-sensitive
menus.
B
Option key – selects the option appearing
above it on the display.
s
Send key – places phone calls.
e
End key – ends phone calls; returns to idle
screen.
.
Smart Key – activates Voice Dial; end calls;
make PTT calls; starts recording a voice
message or the active call.
Voice Mail
Page 16
2
To start using your M710 phone:
• Make sure your SIM card is in place.
• Activate your service.
• Enable over-the-air security if you are prompted to.
Locating Your SIM Card
Your SIM (Subscriber Identity Module) card is a small piece
of plastic located in the SIM card housing at the right side
of the phone.
If your SIM card is not in the SIM card holder, it may be in
the box your phone came in, attached to a piece of plastic
about the size of a credit card. If this is the case, carefully
detach your SIM card from the surrounding plastic and
insert it as described in “Inserting Your SIM Card” on page
11.
If there is no SIM card in your phone or the box, contact
your service provider.
Activating Service
The rst time you power on your phone, you must be in
your local calling area. This activates your service.
Powering On and O
The rst time you power your phone on, a screen may
appear asking you to update your browser information.
This means you must enable security.
To power your phone on, Press
p
.
To power your phone o, Press and hold
p
.
Page 17

3
Getting Started
When You Power On For the First Time
If the Enter SIM PIN Code screen appears, enter your SIM
PIN. See “Entering the PIN” on page 9.
Press
A
under Ok.
When you receive your phone, the SIM PIN is 0000. Change
your PIN to prevent fraudulent use of the SIM card (see
“Changing the PIN” on page 9).
As your phone connects to the network, you will see a
welcome message and a connecting message. When the
idle screen appears, the phone is ready to use.
Ignition Sensor Powering
Your M710 phone powering is controlled by an ignition
sensor, that will:
• Automatically power on the phone after the car is started.
• When not engaged in an active call, the phone will
automatically power o after the car is turned o.
• When turning the car o while engaged in an active
call, the phone remains active and turns itself o
automatically 6 seconds after ending the call.
For more information, see in the phone's installation guide.
Enabling Over-the-Air Security
If you are set up to receive over-the-air programming from
your service provider, you must enable security the rst
time you power on your phone or within 10 days of rst
activation of your phone:
1 When you power on your phone for the rst time, after
the idle screen appears, you will be prompted to select
Ok to update your browser information.
Note:
If you press A under Later, you will be
prompted to enable security each time you
power on your phone until you press A under
Ok.
Page 18

4
2 Press A under Ok.
3 You are prompted to enable security. Press A under
Yes. A series of screens appears. If you subscribe to your
service provider’s plan, your home page appears.
4 Press e to return to the idle screen.
Phone Programming
Within 24 hours of enabling security, you may receive an
alert notication containing your Private ID and Talkgroup
lists for Private calls.
To accept programming:
1 When you receive an alert notication saying New
Browser Message - Receive Programming Info,
press o or press A under Goto.
2 You are prompted to accept changes to your lists. Press
o
or press A under Ok.
3 If you are prompted again to accept changes to your
lists, press o or press A under Ok.
4 A conrmation screen displays. Press o or press A
under Ok.
5 Press e to return to the idle screen.
Finding Your Phone Number
My Info lets you view your phone number, Private ID, and
other phone information:
1 Press m to access the main menu.
2 Scroll to My Info.
3 Press o.
4 Scroll to see your information.
Line 1 and Line 2 are your phone numbers. Private is
your Private ID, the number that others use to contact you
using Private service. These numbers appear when you
receive your alert notication after enabling security on
your phone. See “My Info” on page 86 for more information
about this feature.
Phone Basics
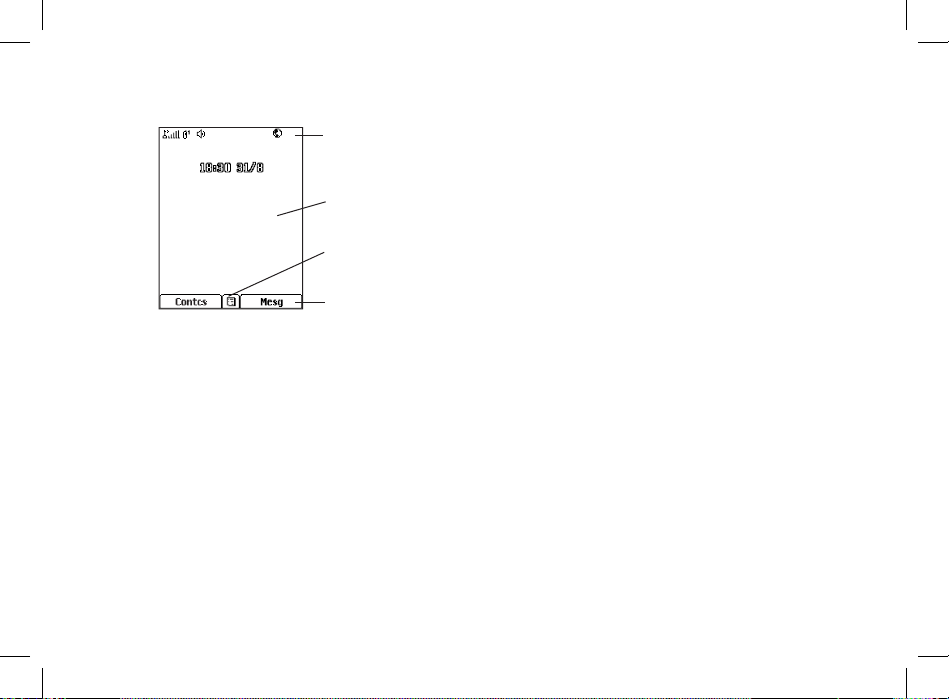
Any time your phone is powered on, the display provides
you with information and options.
The screen shown is the idle screen.
Page 19
5
Getting Started
Display
options
Status icons
Menu icon
Text area
The text that appears on your idle screen depends on your
service provider. The idle screen appears when your phone
is on, but not engaged in any activity.
Text Area
This area displays menus, messages, names, phone
numbers, and other information.
Display Options
Two display options appear at the bottom of most screens.
You select a display option by pressing the option key A
below it.
Menus and Lists
Your phone’s features are arranged in menus, submenus,
and lists.
To access the items in a menu or list, scroll using the
navigation key at the top of your keypad. This key lets you
scroll up, down, left, or right. Holding down the appropriate
part of the navigation key speeds up scrolling.
In this guide, this symbol > tells you to select a menu or list
item. For example, Settings > Security means:
1 Scroll to Settings on the main menu.
2 Press o to see the Settings screen.
3 Scroll to Security.
4 Press o to see the Security screen.
OK Key
Pressing o:
• Selects the highlighted menu item or list item
• Sets options
• Conrms actions
• Places and answer calls
Page 20

6
c
VoiceRecord Record and play audio messages.
See on page 107.
j
My Info View personal phone information,
including phone number and
Private ID. See on page 86.
l
GPS Find your approximate
geographical location. See on
page 101.
d
Contacts Create, view, store, edit Contacts
and SDG lists*. See on page 31.
* Selective Dynamic Group Calling
(SDGC) may not be oered by your service
provider.
e
Messages Access messages. See on page 62.
f
Call Forward Set call forwarding options. See on
page 41.
o
Datebook Schedule appointments. See on
page 88.
g
Memo Store a number to access later. See
on page 57.
Menu Key
Many features provide context-sensitive menus that let you
access related features and actions.
This icon S appears any time a context-sensitive menu is
available. Press m to access the menu.
Main Menu
All your phone’s features can be accessed through the
main menu. You can set the main menu to appear as a list
or as large icons.
a
Browser Browse the Web.
q
Java Apps Java applications on your phone.
See on page 95.
b
Settings Customize your phone. See on
page 110
m
Ring Tones Assign ring tones and turn ringer
o. See on page 58.
*
Media Center Access stored pictures and audio
recordings. See on page 71.
Page 21

7
Getting Started
h
Call Timers Phone usage information. See on
page 48.
i
Recent Calls Lists recent calls. See on page 27.
s
Shortcuts Create shortcuts to screens. See
on page 118.
p
Proles Groups of settings you apply
together. See on page 116.
k
Call Alert Lists call alerts. See on page 24.
Q
Quick PTT Access* any Private IDs and SDG
lists on your phone. See on page
47.
* Quick PTT may not be oered by your
service provider.
Quick Access to Main Menu Items
Each arrow in the navigation key and o can be used to
access a main menu item from the idle screen. Each of
these keys is assigned to a main menu item when you
receive your phone. To assign dierent main menu items,
see “Personalize Features” on page 113.
Status Icons
Status icons appear at the top of the display. Some appear
at all times. Others appear only when your phone is
engaged in certain activities or when you have activated
certain features.
o p q r
s
Signal Strength – More bars next to
the antenna indicate a stronger signal.
A
Phone In Use – Your phone is active on
a phone call.
B
Private In Use – Your phone is active
on a Private call.
C
Talkgroup In Use – Your phone is
active on a group call.
S
SDG Call In Use– Your phone is active
on a SDG call.
2 1
Active Phone Line – 1 indicates phone
line 1 is ready to make calls; 2 indicates
phone line 2 is ready to make calls.
Page 22

8
J G
K I
L H
Call Forward – Your phone is set to
forward calls. See on page 41.
T x w
z y
Messages – You have one or more
messages. See on page 62.
E D
Internet – You are ready to browse the
internet.
c
Voice Message – You recorded one or
more voice messages. See on page 107.
Z Y
Packet Data – You are ready to transfer
packet data or are transferring packet
data. See on page 49.
Entering Numbers From the
Keypad
To enter numbers at the idle screen or any screen that
requires you to enter numbers, press the numbers on the
keypad.
If you make a mistake:
• To clear a digit, press A under Delete.
• To clear all digits, press and hold A under Delete.
• To insert or delete a digit anywhere in the string of
digits you have entered, scroll left or right.
• To cancel, press e.
Setting the Ring Volume
When not in a call, use the volume control buttons, located
at the left side of the phone, to set the phones ringing
volume.
To set the keypad sound level when you press any key:
1 Press m to access the main menu.
2 Select Settings > Volume > Keypad.
SIM Card Security
Your SIM card protects your personal information.
The SIM card stores all your Contacts information.
Since this information is stored on your SIM card, not in
your phone, you can remove the information by removing
your SIM card.
Page 23

9
Getting Started
Note: Except for making emergency calls, your phone
will not function without the SIM card.
To prevent unauthorized use of your phone, your SIM card
may be protected by a PIN that you enter each time the
phone is powered on. You can change the PIN or turn o
the requirement that it be entered.
Entering the PIN
You may be required to enter a SIM PIN when you rst use
your phone.
When you receive your phone, the SIM PIN is 0000. Change
your PIN to prevent fraudulent use of the SIM card.
Important:
If you enter your PIN incorrectly 3 times,
your SIM card is blocked. To unblock your
SIM card, you must contact your service
provider. See “Unblocking the PIN” on
page 10.
1 When the Enter SIM PIN Code screen appears, enter
your SIM PIN. An asterisk appears for each character
entered.
2 Press A under Ok.
Changing the PIN
1 From the main menu, select Settings > Security >
Change Passwords > SIM PIN.
2 At the Enter Old SIM PIN screen, enter the current SIM
PIN.
3 Press A under Ok.
4 At the Enter New SIM PIN screen, enter the new 4- to
8-digit SIM PIN.
5 Press A under Ok.
6 At the Re-enter New SIM PIN screen, re-enter the
new SIM PIN to conrm.
7 Press A under Ok.
Turning the PIN Requirement On and O
When the SIM PIN requirement is on, you are prompted to
enter your PIN each time you turn on your phone.
Note:
If a SIM PIN is required, your phone will not
function until the SIM PIN is entered, except for
making emergency calls.
When the PIN requirement is o, your phone can be used
without entering a PIN.
Page 24

10
To unblock the PIN:
1 Press
*#m1
.
2 At your service provider representative’s request,
provide the information needed to give you a PUK
code.
3 Select Unblock PIN.
4 Enter the PUK code.
5 Enter a new 4- to 8-digit SIM PIN.
6 Re-enter your SIM PIN.
If you entered the codes properly, SIM Unlocked appears
on the display.
Inserting and Removing Your SIM Card
Important: Do not touch the gold-colored areas of
your SIM card.
Switching SIM Cards
Moving your SIM card from one phone to another moves
all your Contacts information, but erases other information.
If you remove your SIM card and use it with another phone,
Important:
When the SIM PIN requirement is o, the
personal data on your SIM card is not
protected. Anyone can use your phone
and access your personal data.
1 From the main menu, select Settings > Security >
SIM PIN.
2 Select On or O.
3 Enter the current SIM PIN.
4 Press A under Ok.
Unblocking the PIN
If you enter your PIN incorrectly 3 times, your SIM card is
blocked. To unblock your SIM card, you must contact your
service provider to get a PIN Unblock Code (PUK).
Important:
If you unsuccessfully enter the PUK code
10 times, your SIM card is permanently
blocked and must be replaced. If this
happens, all data is lost. You will get
a message to contact your service
provider. Except for making emergency
calls, your phone will not function with a
blocked SIM card.
Page 25
11
Getting Started
or use another SIM card with your phone, the following
information is erased:
• The recent calls list
• Call forwarding settings
• Net alerts
• MOSMS drafts, outbox messages, and customized quick
notes
• Information stored in Memo
• Pictures and audio recordings in the media center, except
those that are forward locked
• 3 most recent GPS Enabled locations
• Voice records
• Voice names
• Datebook events
• Options set using the Personalize menu
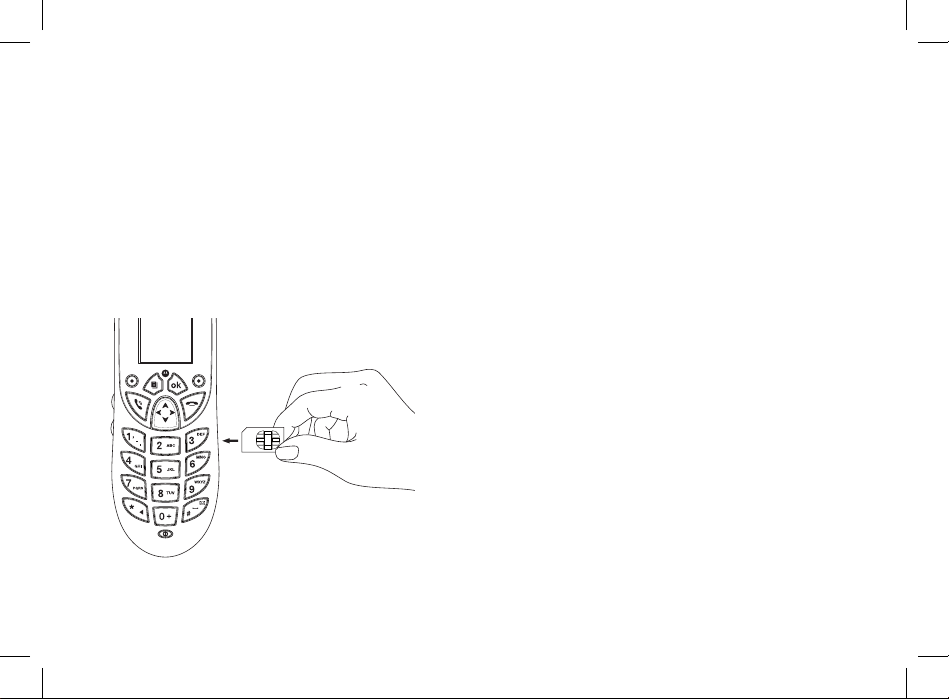
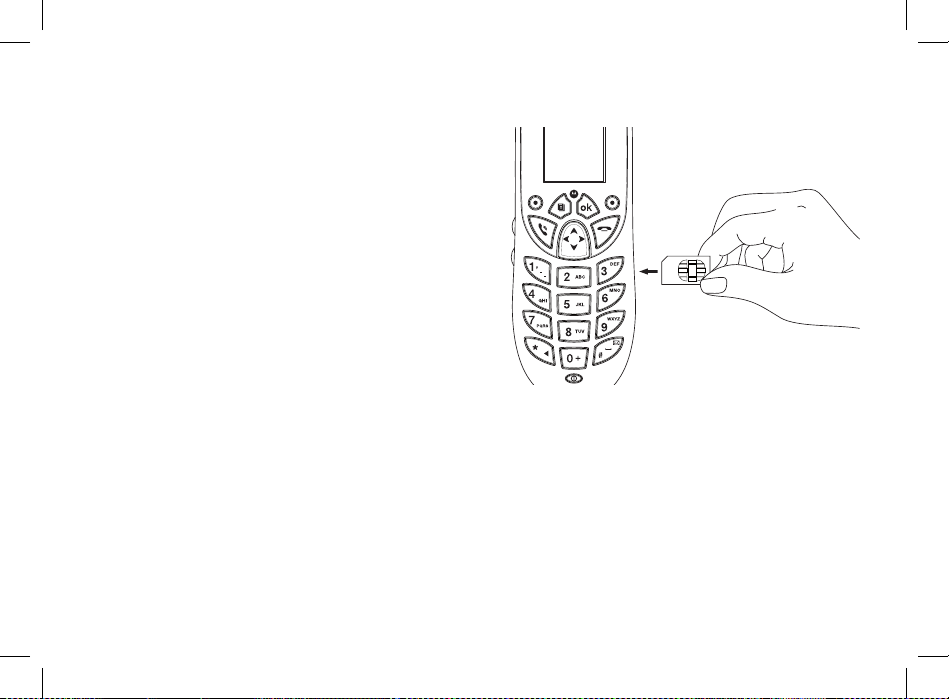
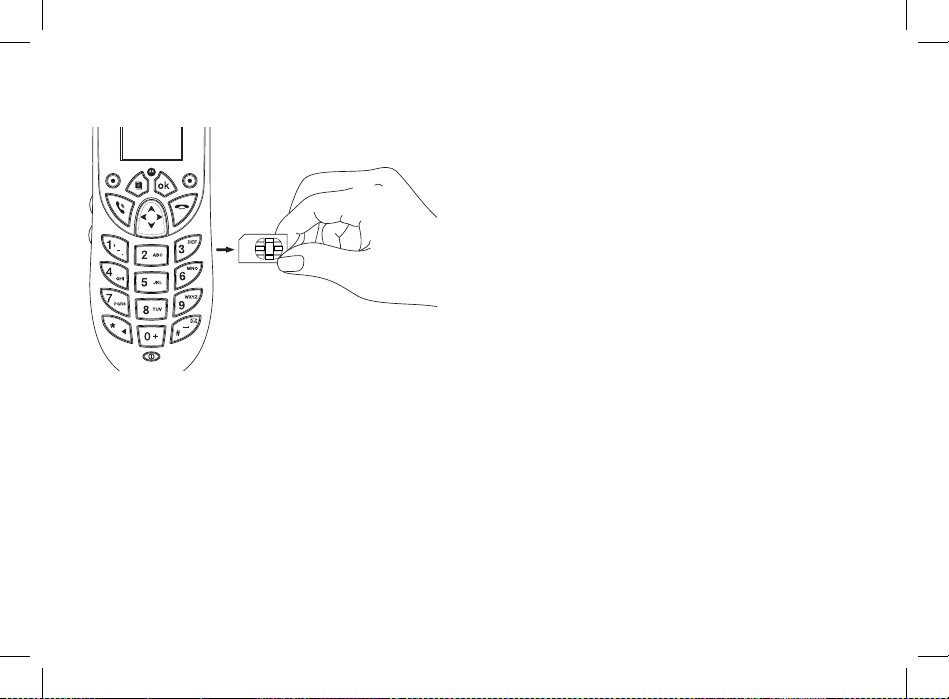
Inserting Your SIM Card
1 With your phone powered o, insert the SIM card into
the SIM card housing at the right side of the phone.
2 Press the SIM card into the housing, to make sure it
locks into place.
Removing Your SIM Card
Important:
To avoid loss or damage, do not remove
your SIM card from your phone unless
absolutely necessary.
1 With your phone powered o, press on the SIM card
until you hear a release “click” sound.
2 Relieve the pressure from the SIM card, allowing it to
pop-out of the housing.
Page 26
12
3 Remove the SIM card.
Note:
Protect your SIM card as you would any
delicate object. Store it carefully.
Accessories
Your M710 phone comes with the following accessories:
Standard Accessories
• Microphone
• Speaker
• Mounting Cradle
• Octopus Cable
• Power Cable
• User Guide
• Installation Guide
• Getting Started Leaet
Optional accessories
• External Privacy Handset
• Handheld Microphone
• PTT Button
To order accessories, log on to our Web site at:
www.motorola.com/store/iden or contact your Motorola
Authorized Retailer.
For More Information
If you have questions about your M710 phone, contact
your sales representative or your service provider.
Page 27

13
Making Calls
Your M710 phone makes two types of calls: digital cellular
phone calls and Private calls. With Private calls, you use your
phone as a long-range, digital walkie-talkie.
Phone Calls
1 Enter the number you want to call.
2 To place the call:
Press
s
. -or-
If you entered the number from the idle screen, press
o
.
3 To end the call, press e.
Private Calls
1 Enter the Private ID you want to call.
2 Press and hold the external PTT install in your car, or
the Smart button . at the top of your phone. Begin
talking after your phone emits a chirping sound.
3 Release the PTT or Smart button to listen.
4 To end the call:
Press
e
. -or-
Press
A
under Exit.
A Private call ends automatically if there is no activity on
the call for a few seconds.
Tip:
To let someone know you want to talk to him
or her on a Private call, send a call alert. See “Call
Alerts” on page 24.
Receiving Calls
Phone Calls
When you receive a phone call, your phone rings, or lights
up its backlight.
Answering
Press
s
. -or-
Press
o
. -or-
Press
A
under Yes. -or-
Press any number key.
-or-
Press the external PTT or the Smart button
.
.
Page 28

14
To answer a call by pressing any number key, you must
have the Any Key Ans feature turned on (see “Phone Calls
Features” on page 112).
Routing Call to Voice Mail
Press
e
. -or-
Press
A
under No.
Ending Call
Press
e
. -or-
Press the external PTT or the Smart button ..
Private Calls
When you receive a Private call, your phone emits a
chirping sound.
Answering
1 Wait for the caller to nish speaking.
2 Press and hold the external PTT install in your car, or
the Smart button . at the top of your phone. Begin
talking after your phone emits a chirping sound.
3 Release the PTT button to listen.
Ending Call
Press
e
. -or-
Press
A
under Exit. -or-
Press the external PTT or the Smart button ..
A Private call ends automatically if there is no activity on
the call for a few seconds.
Choosing a Number to Call
You can choose the number you want to call in many ways:
• Enter the number on the keypad. See “Entering Numbers
From the Keypad” on page 8.
• Say a voice name into your phone. See “Using a Voice
Name” on page 15.
• Use Speed Dial or Turbo Dial® to make a phone call. See
“Using Speed Dial and Turbo Dial” on page 15.
• Redial the last phone number called. See “Redialing the
Last Number” on page 16.
• Select the number from the recent calls list. See “Making
Calls From the Recent Calls List” on page 30.
• Select the number from Contacts. See “Making Calls From
Contacts” on page 39.
Page 29

15
Making Calls
• Select a number stored in Datebook. See “Making Calls
From Datebook and Datebook Reminders” on page 93.
• Use One Touch PTT to make a Private call. See “One Touch
PTT” on page 47.
• Use the number in Memo. See “Memo” on page 57.
• Select the number in a text message you have received.
See “Receiving a Message” on page 66.
Voice Dialing
If you have created a voice name in Contacts for the
number you want to call, and the Voice Activation feature
is enabled as explained in “One Touch PTT” on page 47,
you can dial by saying the name. Repeat the voice name
into your phone to enter the number. See on page 34 for
information on voice names.
Note:
Before using Voice Name to make a call, make
sure the idle screen is displayed.
To enter a number by using the voice name:
1 Press once on the external PTT or the Smart button
.
at the top of your phone.
2 Speaking into the microphone, say the voice name
assigned to the number you want to call.
Your phone plays the name back to you.
3 If you are making a phone call, the call is placed
automatically.
Tip:
To stop a phone call from being completed, press
the Smart button . or press e.
If you are making a Private call or a SDG call, press and
hold the external PTT button to place the call. For
information on how to enter Private ID, Group, or SDG,
See “Creating Entries” on page 32.
Using Speed Dial and Turbo Dial®
Each phone number stored in Contacts is assigned a Speed
Dial number, which you can use to call that number.
Speed Dial
1 From the idle screen, use the keypad to enter the
Speed Dial number assigned to the phone number you
want to call.
2 Press #.
3 Press s.
Page 30

16
Turbo Dial
From the idle screen, press and hold the Speed Dial
number (1 through 9) assigned to the phone number you
want to call.
Redialing the Last Number
Press and hold s to place a call to the last phone number
you called.
Missed Phone Calls
When you miss a call, this icon V and the number of
phone calls you have missed appear briey.
If you want to dismiss the missed call message, press
A
under Back. -or-
If you want to view the missed call on the recent calls
list, press A under View.
Using Mute
Muting calls lets you listen to incoming sound without
transmitting sound. Mute is available whenever you are on
an active call.
To turn mute on:
Press
A
under Mute.
While mute is on, Unmute appears as a display option.
To turn mute o:
Press
A
under Unmute.
Making Emergency Phone Calls
Your phone supports emergency calling. Emergency
phone calls can be made even when your SIM card is
blocked or not in your phone.
Dial 911 to be connected to an emergency response
center. If you are on an active call, you must end it before
calling 911.
When you make an emergency call, your phone’s GPS
Enabled feature can help emergency service personnel
nd you, if you are in a location where your phone’s GPS
antenna has established a clear view of the open sky and
your local emergency response center has the equipment
to process location information. See “GPS Enabled” on page
101, and particularly “IMPORTANT: Things to Keep in Mind”
on page 101 and “Making an Emergency Call” on page 102,
for more information on the limitations of this feature.
Page 31

17
Making Calls
Because of the limitations of this feature, always provide
your best knowledge of your location to the emergency
response center when you make an emergency call.
Important:
Emergency calls cannot be placed while
the keypad is locked.
Important:
If you have not registered on the
network, emergency calls cannot be
placed.
Page 32

18
MOTOtalk™
Note: This feature may not be oered by your service
provider.
With MOTOtalk, you can make and receive 2-way radio calls
without network coverage. If you are travelling outside your
service provider's coverage area, receiving a poor signal,
or otherwise want to temporarily avoid using your service
provider's network, you can switch to MOTOtalk and talk
with anyone on your code and channel who is within range.
Note:
Range will vary based on terrain,
man-made structures, and atmospheric conditions.
MOTOtalk lets you:
• Use code or private mode operation
• Use up to 10 channels
• Communicate with standalone MOTOtalk radios
Note:
You cannot use MOTOtalk with older Family
Radio Services products.
The following features and main menu items are
unavailable while in MOTOtalk:
• On-network phone calls
• On-network Private calls
• Data transmission
• Incoming message notication
• Musical ring tones
• Call forwarding
• Messages
• Call Timers
• Call alerts
• Voice records
Switching to MOTOtalk
To set your phone to MOTOtalk:
1 From the main menu, scroll to MOTOtalk and press
o
.
2 Select Go to MOTOtalk.
Switching to MOTOtalk Please Wait
displays.
After a few seconds, the MOTOtalk idle screen displays.
When MT Ready displays, you can begin using
MOTOtalk.
While in MOTOtalk, this icon ~ displays.
Page 33

19
MOTOtalk™
Exiting MOTOtalk
To switch to network mode:
1 From the MOTOtalk idle screen, press m.
2 Scroll to MT Options and press o.
3 Select Exit MOTOtalk.
Tip:
You can also exit MOTOtalk from the MOTOtalk
idle screen by pressing e for 3 seconds.
Switching to Network Please Wait displays. After a
few seconds, the network idle screen appears.
Talk Range
While in MOTOtalk mode, phones should be a minimum
of 6 feet apart to maximize performance and improve
transmission range.
Channels and Codes
Your phone has 10 channels and 15 codes. Channels are
divided into sets of frequencies. Other parties may be
talking on the same channel. Codes minimize interference
from other parties when you are sharing the same channel.
MOTOtalk opens to the last code and channel used on your
phone. You can view the code and channel your phone is
currently set to on the MOTOtalk idle screen.
For code calls, all parties must be on the same channel
and code. For private MOTOtalk calls, the person you are
calling must be in MOTOtalk and set to the same channel
to receive your call.
Note:
When making a code call, all parties that are
on your code and channel can hear your
conversation.
Setting Channels and Codes
To set a channel:
1 From the MOTOtalk idle screen, press A under Edit.
2 Scroll to Channel.
3 Press A under Edit.
4 Select a channel.
5 When you are nished, press A under Back to return to
the MOTOtalk idle screen.
Page 34

20
To set a code:
1 From the MOTOtalk idle screen, press A under Edit.
2 Scroll to Code.
3 Press A under Edit.
4 Select a code.
5 When you are nished, press A under Back to return to
the MOTOtalk idle screen.
Making Code Calls
To make a code call:
1 From the MOTOtalk idle screen or the channel and
code edit screen, press and hold the external PTT or the
Smart button .. Transmit appears on the rst line
of display. Begin speaking after your phone emits the
MOTOtalk tone.
Note:
The MOTOtalk tone consists of 4 rapid beeps.
2 Release the external PTT or the Smart button . to
listen.
If you receive an error message:
• No one is on your channel or code.
• You are out of range.
Receiving Code Calls
When you receive a code call, Receive will appear on
the display. After hearing the MOTOtalk tone, you have 6
seconds to reply before the call times out.
To reply to the call, press the external PTT or the Smart
button ..
Note:
An incoming MOTOtalk call can be terminated
at any time by pressing e.
Receiving All MOTOtalk Calls
If you set the code to Receive All, your phone can receive
MOTOtalk transmissions from any phone that is set to the
same channel, regardless of the code (1-15). When you
receive transmissions with the code set to Receive All, the
code that the transmission was received on will replace
Receive All on the display.
Note:
You cannot initiate a code call when the code
is set to Receive All.
To set the code to Receive All:
1 From the MOTOtalk idle screen, press A under Edit.
2 Scroll to Code.
3 Press A under Edit.
Page 35

21
MOTOtalk™
4 Select Receive All.
5 When you are nished, press A under Back to return to
the MOTOtalk idle screen.
To reply to a call with the code set to Receive All:
Press the external PTT or the Smart button
.
.
Private MOTOtalk Calls
If you want to have a private conversation without other
parties listening in, you can make a private MOTOtalk call.
The person you are calling must be in MOTOtalk and set to
the same channel to receive your call.
To make a private MOTOtalk call, enter the Personal
Telephone Number (PTN) of the person you are calling.
If the PTN is more than 10 digits, enter the last 10 digits
of the PTN.
If you receive an error message:
• The PTN you entered is invalid.
• The person that you are trying to reach is in network
mode.
• The person that you are trying to reach is set to a
dierent channel.
• The person that you are trying to reach is out of range.
Private Only
To set MOTOtalk to ignore code calls, so that you only make
or receive private MOTOtalk calls, set your code to Pvt Only.
To set the code to Pvt Only:
1 From the MOTOtalk idle screen, press A under Edit.
2 Scroll to Code.
3 Press A under Edit.
4 Select Pvt Only.
Making a Private MOTOtalk Call
1 Enter the PTN of the person you want to call on your
channel. If the PTN is more than 10 digits, enter the last
10 digits of the PTN. -or-
Scroll to a number or name in Contacts.
-or-
Scroll to a number in the recent calls list.
2 Press and hold the external PTT or the Smart button
.
. Begin speaking after your phone emits the
MOTOtalk tone.
3 Release the external PTT or the Smart button . to
listen.
The number or name of the person you are calling will
appear in the display.
Page 36

22
Receiving a Private MOTOtalk Call
The number or name of the person who is calling will
appear in the display.
To reply, press the external PTT or the Smart button
.
.
Ending Code Calls and Private MOTOtalk
Calls
Code calls and private MOTOtalk calls will end
automatically after 6 seconds of inactivity.
The MOTOtalk idle screen will display.
Note:
A private MOTOtalk call can be interrupted
during the 6 second idle time by another code
call or private call.
Making Emergency Calls while in
MOTOtalk™ Mode
If you attempt to make an Emergency 911 call while
in MOTOtalk mode, your phone will automatically exit
MOTOtalk mode and attempt to nd a network signal.
If you are out of network coverage your phone will not be
able to make an emergency 911 cellular call until you go
back into the network coverage area.
You must wait until the phone reconnects to the network
before attempting to make an emergency 911 cellular call.
Setup Options
You can set up MOTOtalk options on the MT Options
screen. You can access this screen in both network and
MOTOtalk modes.
To access setup options:
1 From the main menu, select MOTOtalk. If MOTOtalk
is not one of your options, select MT Options.
2 Select Setup.
You can set the following MOTOtalk options:
• Direct Launch: Launch directly into MOTOtalk when you
select MOTOtalk from the main menu.
• State Tone: Have an alert sound notify you that you have
used MOTOtalk for a specied interval.
Page 37

23
MOTOtalk™
Using Direct Launch
To set your phone to launch MOTOtalk when you select
MOTOtalk from the main menu:
1 From the Setup screen, scroll to Direct Launch and
press o.
2 Select On.
Note:
If Direct Launch is set to On, the MOTOtalk
setup options will be unavailable from the
main menu. However, you can still access setup
options while in MOTOtalk by pressing m and
selecting MT Options.
To turn o Direct Launch:
1 From the Setup screen, scroll to Direct Launch and
press o.
2 Select O.
MT Options will now display when you select
MOTOtalk from the main menu.
Using State Tone
To set your phone to alert you after you have used
MOTOtalk for a specied interval:
1 From the Setup screen, scroll to State Tone and press
o
.
2 Select the interval after which you want the tone to
sound.
For example, if you select 1 hour, you will be notied every
hour that you are in MOTOtalk.
To turn o State Tone:
1 From the Setup screen, scroll to State Tone and press
o
.
2 Select O.
Page 38

24
Call Alerts
Sending a call alert lets the recipient know you want to talk
to him or her on a Private call.
When you send a call alert, the recipient’s phone emits a
series of beeps, and displays your name or Private ID.
The recipient can:
• Answer – begin a Private call with the sender
• Queue – store the call alert to the call alert queue, which
is a list of call alerts
• Clear – dismiss and delete the call alert
Sending Call Alerts
1 Enter the Private ID you want to send to, as you would
when making a Private call.
2 Press A under Alert. Ready to Alert appears on the
display.
3 Press the external PTT button until Alert Successful
appears on the display.
Note:
If the alert is not successful, the person you are
trying to reach is on a call or has the phone
turned o.
Receiving Call Alerts
When you receive a call alert, you must answer, queue, or
clear it. You cannot receive phone calls or Private calls until
you do.
To answer a call alert:
Press the external PTT button to make a Private call to
the sender.
To queue a call alert:
Press
A
under Queue.
To clear a call alert:
Press
o
. -or-
Press
A
under Clear.
Note:
The recent calls list also stores call alerts you
have received. They appear as Private calls. Call
alerts remain in your recent calls list until you
delete them or until they reach the end of the
list.
Page 39

25
Call Alerts
Using the Call Alert Queue
When you queue a call alert, it remains in the call alert
queue until you make a Private call to the sender or delete
it.
Viewing Call Alerts
1 From the main menu, select Call Alert.
2 Scroll through the list.
Viewing Date and Time
To view the date and time a call alert was received:
1 From the main menu, select Call Alert.
2 Select the call alert you want information on.
3 Press o to display the call alert details.
Responding to Call Alerts in the Queue
After you queue a call alert, you can respond to it by
making a Private call to the sender or sending a call alert to
the sender.
Making a Private Call to the Sender
1 From the main menu, select Call Alert.
2 Scroll to the call alert you want to respond to.
3 Press the external PTT button to begin the call.
This removes the call alert from the queue.
Sending a Call Alert to the Sender
1 From the main menu, select Call Alert.
2 Scroll to the call alert you want to respond to.
3 Press A under Alert. Ready to Alert appears on the
display.
4 Press the external PTT button until Alert Successful
appears on the display.
Deleting Call Alerts
To delete a call alert from the queue:
1 From the call alert queue, scroll to the call alert you
want to delete.
2 Press m.
3 Select Delete.
4 Press o or press A under Yes to conrm.
Page 40

26
To delete all call alerts from the queue:
1 From the call alert queue, press m.
2 From the call alert menu, select Delete All.
3 Press o or press A under Yes to conrm.
Sorting Call Alerts
Tip: You must have at least one call alert in the queue
to access this feature.
To sort call alerts by the order they were received:
1 From the main menu, select Call Alert.
2 Press m.
3 Select Sort By.
4 Select First on Top or Last on Top.
Page 41

27
Recent Calls
The recent calls list displays information associated with
calls you have made and received and call alerts you have
received. It also displays My Info and contact information
sent to you from other phones.
The recent calls list displays up to 20 items.
Calls and Call Alerts
The recent calls list contains the numbers of up to 20 of the
most recent calls you have made and received.
If the number of a recent call is stored in Contacts, the
following information appears:
• The name assigned to the number
• The picture assigned to the number, if your phone is set
to show pictures on the recent calls list. See "Choosing
Picture View or List View" on page 36. Pictures appear for
phone calls only.
• The Contacts type icon associated with the number. If
the Contacts entry containing the number has more
than one number or address stored, <> surrounds the
Contacts type icon. For information on Contacts types,
see on page 31.
The Private ID Contacts type icon appears when you
receive a Private call or call alert, even if the number is not
stored in Contacts.
Call alerts you have received appear as Private calls. Like
all items in the recent calls list, they remain listed until you
delete them or until they reach the end of the list.
For phone calls, an additional icon appears giving
information about the call:
X A call you made.
W A call you received.
V A missed call. Missed calls appear on the recent calls
list only if you have Caller ID.
When you select a call to view its details, you see
information such as the name associated with the call, the
number, date, time, and duration of the call.
My Info From Other Phones
Note: This feature may not be oered by your service
provider.
The recent calls list displays My Info from other phones. See
"Sending My Info and Contact Information" on page 84.
Page 42

28
This icon j appears with My Info from other phones on
the recent calls list, along with the Private ID of the person
who sent the information.
When you select My Info from other phones to view its
details, you see all the information sent.
If you receive My Info from the same phone more than
once, only the most recently sent version appears in the
recent calls list.
Contact Information From Other
Phones
Note: This feature may not be oered by your service
provider.
The recent calls list displays contact information sent from
other phones. This information comes from the other
phone’s Contacts list or recent calls list. See "Sending My
Info and Contact Information" on page 84.
This icon d appears with contact information on the
recent calls list.
Contact information in the recent calls list displays:
• The name contained in the contact information
• The Contacts type icon associated with the number or
address contained in the contact information. If the item
contains more than one number or address stored, <>
surrounds the Contacts type icon.
The name or Private ID of the person who sent the contact
information appears as a separate item on the recent calls
list, above the information sent. If one person sends you
more than one item of contact information, all the items
appear below the person’s name or Private ID.
When you select contact information to view its details,
you see the name or Private ID of the person who sent the
information and all the information in the item.
If you receive contact information with the same name
from the same phone more than once, only the most
recently sent version appears in the recent calls list.
Viewing the Recent Calls List
1 From the main menu, select Recent Calls.
2 Scroll through the list.
To view the details of an item on the list:
From the recent calls list, select the item you want
information on.
Page 43

29
Recent Calls
Tip: To view the details of more items, keep scrolling.
Choosing Picture View or List View
You can set your phone to show the picture associated
with each item as you view the recent calls list or show the
list without pictures.
1 From the recent calls list, press m.
2 Select Recent Calls View.
3 Select List View to show the recent calls list without
pictures. -or-
Select
Picture View to show the picture associated
with each entry.
Storing Items to Contacts
1 From the recent calls list, scroll to or select the item you
want to store.
2 Press A under Store. -or-
If Store is not one of your options: Press
m
. Select
Store or Update Contacts.
Tip:
If the item you want to store is a call, Store does
not appear if the number is already stored in
Contacts.
3 To store the item as a new entry, select [New Contact].
-or-
To store the number to an existing entry, select the
entry.
Note:
Storing My Info or contact information from
another phone to a Contacts entry that has a
name assigned to it does not change the name
of the Contacts entry.
4 If the item you want to store is a call, you must assign a
Contacts type to the number:
With the Contacts type eld highlighted, scroll left or
right to display the Contacts type you want to assign
the number.
5 If you want to add more information to the entry, follow
the applicable instructions in "Creating Entries" on page
32.
6 Press A under Save.
Deleting Items
To delete an item from the recent calls list:
1 From the recent calls list, scroll to or select the item you
want to delete.
Page 44

30
2 Press A under Delete. -or-
If Delete is not one of your options: Press
m
. Select
Delete.
3 Press o or press A under Yes to conrm.
To delete all items on the recent calls list:
1 From the recent calls list, press m.
2 Select Delete All.
3 Press o or press A under Yes to conrm.
Making Calls From the Recent Calls
List
1 From the main menu, select Recent Calls.
2 Scroll to the item containing the number you want to
call.
• If you scroll to a call, you can make a call to the
number that made the call. If the number is stored in
Contacts, you can make a call to any of the numbers
stored with it.
• If you scroll to My Info from another phone, you can
make a call to the Private ID of the phone that sent
the information.
• If you scroll to contact information from another
phone, you can make a call to any of the numbers in
the contact information.
3 To place the call now, go to step 4. -or-
Scroll left or right to display the Contacts type for the
number you want to call.
4 To make a phone call, press s. -or-
To make a Private call, press the external PTT button.
You can also make calls while viewing the details of an item
on the recent calls list:
1 From the recent calls list, select the item containing the
number you want to call.
• If you select a call or contact information from
another phone, you can make a call to the number
shown rst on the details screen.
• If you scroll to My Info from another phone, you can
make a call to the Private ID of the phone that sent
the information.
2 To make a phone call, press s. -or-
To make a Private call, press the external PTT button.
Page 45

31
Contacts
Contacts stores up to 600 numbers or addresses. Each
Contacts entry can store several numbers or addresses.
Information stored in Contacts is saved on your SIM card.
A Contacts entry contains:
• A name – A name is required if you are storing more
than one number or address to the entry; otherwise, it is
optional. Typically, this is the name of the person whose
contact information is stored in the entry.
• A ring tone – This is the sound your phone makes when
you receive phone calls or call alerts from any of the
numbers stored in the entry. You can assign the ring
tone from your list of ring tones. If you do not assign a
ring tone, the entry is created with a default ring tone
assigned.
• A picture – This picture appears on the display when
you receive phone calls from any of the phone numbers
stored in the entry. You can assign the picture from the
pictures stored in the media center. If you do not assign a
picture, the entry is created with no picture assigned.
• A Contacts type – Each number or address stored must
be assigned a Contacts type:
A
Mobile phone number
B
Private Private ID
C
Work1 phone number
D
Work2 phone number
E
Home phone number
F
Email email address
G
Fax phone number
H
Pager phone number
I
Talkgroup Talkgroup number
S
SDG SDG list* number
* Selective Dynamic Group Calling
(SDGC) may not be oered by your
service provider.
J
IP IP address
K
Other phone number
Page 46

32
• A number or address – Each Contacts entry must contain
a number or address. This may be any type of phone
number, Private ID, SDG list number, Talkgroup number,
email address, or IP address.
Note:
You can store numbers up to 64 digits long, but
every 20 digits must be separated by a pause
or wait. See “Creating Pauses and Waits” on
page 38.
• A Speed Dial number – When you store a phone number,
it is assigned a Speed Dial number. You can accept the
default Speed Dial number or change it.
• A voice name – If you create a voice name for a number,
you can then dial that number by saying the voice name
into your phone. This icon P appears to the left of the
Contacts type icon if a voice name is assigned.
Accessing Contacts
From the main menu, select Contacts. -or-
If you are on a call: Press m. Select Contacts.
Creating Entries
A number or address and a Contacts type are required for
all Contacts entries. Other information is optional. You may
enter the information in any order by scrolling through the
entry details.
After you have entered the number or address, Contacts
type, and any other information you want, you can press
A
under Save to save the entry to Contacts. To cancel a
Contacts entry at any time, press e to return to the idle
screen.
To create a Contacts entry:
1 To access the entry details screen: Select Contacts >
[New Contact]. -or-
From the Contacts list, press
m
. Select New Contact.
2 If you want to assign a name to the entry: Select Name.
Enter the name. See
“Entering Text” on page 60. When
you are nished, press o.
Tip:
Press A under Browse to select a name already in
Contacts.
3 If you want to assign a ring tone or picture to the entry,
select [Ring Tone/Picture]. See “Assigning a Ring Tone
or Picture”.
Page 47

33
Contacts
4 To assign a Contacts type to the number or address
being stored:
Select the Contacts type eld.
Select the Contacts type you want to assign.
Note:
For information about creating SDG lists, see
“Creating SDG Lists in Contacts” on page 52.
5 To store a number or address:
Select the
# eld (or ID for an email address, or IP for an
IP address).
Enter the number or address. For phone numbers, use
the 10-digit format. For email addresses, see “Entering
Text” on page 60.
Tip:
Press A under Browse to select a number or
address from Contacts, the recent calls list, or
Memo.
When you are nished, press
o
.
6 If you want to change the default Speed Dial number
or a create a voice name for the entry, select [Options].
See “Assigning a Speed Dial Number or Voice Name” on
page 34.
7 If you want to add more numbers or addresses to the
entry:
Scroll past the information you already entered.
Enter the additional information for the entry using
step 3 through step 6. You must assign a name to the
entry, if you have not already.
8 Press A under Save.
Assigning a Ring Tone or Picture
1 If you have not already, select [Ring Tone/Picture].
2 If you want to assign a ring tone from the list of ring
tones:
With
Ringer highlighted, scroll left or right to choose a
ring tone. -or-
Select
Ringer. Select the ring tone you want to assign.
3 If you want to assign a picture from the media center:
Scroll to
Picture. Scroll left or right to choose a picture.
-or-
Select
Picture. Select the picture you want to assign.
Only pictures that can be assigned to Contacts entries are
displayed. Some large pictures cannot be assigned.
Page 48

34
Tip: If an entry has a picture assigned and you want
the entry to have no picture, select [No Picture]
or press A under Unassign.
4 When you are nished, press A under Back.
Assigning a Speed Dial Number or
Voice Name
1 If you have not already, select [Options].
2 The default Speed Dial number assigned to a phone
number is displayed in the Speed # eld. This is always
the next available Speed Dial location.
If you want to assign the phone number to a dierent
Speed Dial location:
With the
Speed # eld highlighted, press o.
Press
A
under Delete to delete the current Speed Dial
number.
Enter the new Speed Dial number using the keypad.
When you are nished, press
o
.
3 If you want to create a voice name for a phone number,
select Voice Name.
As directed by the screen prompts, say and repeat the
name you want to assign to the number. Speak clearly
into the microphone.
4 When you are nished, press A under Back.
Storing Numbers Faster
To store numbers to Contacts from the recent calls list, see
“Storing Items to Contacts” on page 29.
To store numbers to Contacts from Memo, see “Memo” on
page 57.
To store numbers to Contacts from the idle screen:
1 Use the keypad to enter the number you want to store.
2 Press m.
3 Select Store Number.
4 To store the number as a new entry, select [New
Contact]. -or-
To store the number to an existing entry, select the
entry.
5 With the Contacts type eld highlighted, scroll left or
right to display the Contacts type you want to assign
the number.
Page 49

35
Contacts
6 If you want to add more information to the entry, follow
the applicable instructions in “Creating Entries” on page
32.
7 Press A under Done.
Editing Entries
1 From the Contacts list, scroll to or select the entry you
want to edit.
2 Press A under Edit. -or-
If
Edit is not one of your options:
Press
m
. Select Edit.
The entry details screen displays.
3 Follow the applicable instructions in “Creating Entries”
on page 32 to edit the various elds.
Viewing Entries
When you view Contacts entries, you can choose how
much detail you want to see.
Viewing the Contacts List
In this view, each entry shows:
• The name assigned to the entry
• A small version of the picture assigned to the entry, if you
have set Contacts to show pictures in the Contacts list.
See “Choosing Picture View or List View” on page 36.
• The types of numbers and addresses stored in the entry
To view entries from the Contacts list:
1 Access Contacts.
2 Scroll to view entries.
Tip:
To nd Contacts entries faster, use the keypad to
enter the rst letter of the name.
3 If an entry has more than one number or address
stored, <> surrounds the Contacts type icon. Scroll left
or right to view the icon for each number stored in the
entry.
Selecting an Entry
In this view, each entry shows:
• The name assigned to the entry
• A small version of the picture assigned to the entry
Page 50

36
• The name of the ring tone assigned to the entry
• The numbers and addresses stored in the entry
To select an entry:
1 From the Contacts list, select the entry you want to
view.
2 Scroll to view the numbers and addresses stored in the
entry.
Tip:
To select other entries: Scroll left or right. Or, press
#
or *.
To return to the Contacts list, press A under Back.
Viewing More Details
When an entry is selected, you can view more details about
the entry by selecting items within the entry.
Viewing Details of a Number or Address
1 Select the entry.
2 Select the number or address you want to view details
of.
If you select a phone number, you can view its Speed
Dial number and see whether it has a voice name.
To return to the entry, press A under Back or press o.
Viewing a Large Picture
To view a large version of the picture assigned to an entry:
1 Select the entry.
2 Select the rst item shown on the entry screen. This
item shows the name assigned to the entry or No
Name.
Note:
You cannot make calls from this view.
To return to the entry, press A under Back or press o.
Choosing Picture View or List View
You can set Contacts to show the picture assigned to each
entry as you view the Contacts list or show the Contacts list
without pictures.
1 From the Contacts list, press m.
2 Select Contacts View.
3 Select List View to show the Contacts list without
pictures. -or-
Select
Picture View to show the picture assigned to
each entry.
Page 51

37
Contacts
Searching for a Name
To search for a name in Contacts:
1 From the Contacts list, press A under Search. -or-
If
Search is not one of your options: Press m. Select
Search.
2 Enter the name you want to see. See “Entering Text” on
page 70.
3 Press o.
Your phone nds the name you entered or the nearest
match.
Showing Only Private IDs, SDG Lists, and
Talkgroups
To set Contacts to show only entries that contain Private
IDs, SDG lists, and Talkgroup entries:
1 From the Contacts list, press m.
2 Select Filter.
3 Set this option to Show Prvt/Grp.
To set Contacts to show all entries:
1 From the Contacts list, press m.
2 Select Filter.
3 Set this option to Show All.
Deleting Entries
Delete an Entry
1 From the Contacts list, scroll to or select the entry you
want to delete.
2 Press m.
3 To delete the entire entry, select Delete Contact or
Delete SDG List.
4 Press o or press A under Yes to conrm.
Delete a Number or Address
1 From the Contacts list, scroll to the entry that contains
the number or address you want to delete.
2 Scroll left or right to display the Contacts type for the
number you want to delete. -or-
Select the entry. Scroll to or select the number you
want to delete.
3 Press m.
Page 52

38
4 Select Delete Number.
5 Press o or press A under Yes to conrm.
Note:
If an entry contains only one number or
address, deleting the number or address
deletes the entry.
Checking Capacity
To see how many numbers are stored in Contacts:
1 From the Contacts list, press m.
2 Select Capacity.
Creating Pauses and Waits
When storing a number, you can program your phone to
pause or wait between digits while dialing. A pause makes
your phone pause for 3 seconds before dialing further.
A wait makes your phone wait for your response before
dialing further.
This feature is useful when using voice mail or other
automated phone systems that require you to dial a phone
number and then enter an access number.
To program a pause:
Press and hold
*
until the letter P appears. The P
represents a 3-second pause.
If you store 17035551235P1234, when you select this
number and make a call, your phone dials the rst 11 digits,
pauses for 3 seconds, then dials the last 4 digits.
If you want a pause longer than 3 seconds, press and hold
*
more than once. Each P represents a 3-second pause.
To program a wait:
Press and hold
*
until the letter W appears. The W
means your phone waits before dialing further.
If you store 17035551235W1234, when you select this
number and make a call, your phone dials the rst 11 digits
and then waits. A message appears asking if you want to
send the rest of the digits. Press A under Yes to dial the last
4 digits.
Tip:
You can create pauses and waits while dialing a
number from the keypad. See “Creating Pauses
and Waits While Dialing” on page 46.
Page 53

39
Contacts
International Numbers
Note: This feature may not be oered by your service
provider.
When storing a number that you plan to use for
international calls, use Plus Dialing:
1 Press and hold 0 for two seconds. A “0” appears, then
changes to a “+”.
Note:
The network translates the “+” into the
appropriate international access code needed
to place the call.
2 Enter the country code, city code or area code, and
phone number.
For information about making international calls, see
“Making International Calls” on page 46.
Making Calls From Contacts
While Viewing the Contacts List
1 Access Contacts.
2 Scroll to the name or number you want to call.
Tip:
To nd Contacts entries faster, use the keypad to
enter the rst letter of the name.
3 To place the call now, go to step 4. -or-
Scroll left or right to display the Contacts type for the
number you want to call.
4 To make a phone call, press s. -or-
To make a Private call, press the PTT button.
If you are making a Private call, your phone places the call
to the Private ID stored in the Contacts entry, even if the
Private icon is not displayed.
If you are making a phone call:
• Your phone places the call to the phone number
assigned to the Contacts type displayed.
• If the Contacts type displayed is not a phone number,
your phone places the call to the phone number stored
in the Contacts entry.
• If the Contacts type displayed is not a phone number
and you have more than one phone number stored in
the Contacts entry, your phone prompts you to select the
phone number you want to place the call to.
Page 54

40
After Selecting an Entry
1 Access Contacts.
2 Select the Contacts entry that contains the number you
want to call.
3 Scroll to or select number you want to call.
4 To make a phone call, press s. -or-
To make a Private call, press the PTT button.
If you try to make a type of call that does not match the
Contacts type of the number you chose, no call is placed.
Accessing Contacts with GSM
Phones
If you plan to use the information stored in Contacts with
an i2000, i2000plus, or any other GSM phone, download
iDEN Phonebook Manager.
Go to idenphones.motorola.com/iden/support for more
information.
You can use iDEN Phonebook Manager to make the
Contacts information saved to your M710 phone’s SIM card
accessible in this type of phone.
Page 55

41
Call Forwarding
Call forwarding sends calls to the phone numbers you
specify. You can forward all calls to one number or forward
missed calls to dierent numbers depending on the reason
you missed the call.
You can forward phone lines 1 and 2 independently.
Forwarding All Calls
When you set your phone to forward all calls, an icon
appears in the top row of the display:
G
Phone line 1 is active; calls to phone line 1 are
being forwarded.
H
Phone line 1 is active; calls to phone line 2 are
being forwarded.
I
Phone line 1 is active; calls to phone lines 1 and 2
are being forwarded.
J
Phone line 2 is active; calls to phone line 1 are
being forwarded.
L
Phone line 2 is active; calls to phone line 2 are
being forwarded.
K
Phone line 2 is active; calls to phone lines 1 and 2
are being forwarded.
To forward all calls:
1 From the main menu, select Call Forward > Forward
> All Calls.
2 Select To.
If you specied a forwarding number for all calls before,
this number displays.
To forward calls to this number, press
A
under Back.
To delete this number, press
o
, then press and hold A
under Delete.
3 To enter the number you want to forward calls to: Enter
the number using your keypad. -or-
Press
A
under Search. Select Contacts, Recent Calls,
or Memo. Select the number you want to enter.
4 Press o.
All your calls are now forwarded to the number you
specied.
Page 56

42
Turning O Call Forwarding
If you do not want all your calls forwarded, turn the feature
o:
1 From the main menu, select Call Forward > To.
2 Set this option to O.
All your calls are now sent to your phone.
Calls you miss are forwarded according to the options set
for missed calls. By default, missed calls are forwarded to
voice mail.
Note:
To receive voice mail messages, you must rst
set up a voice mail account with your service
provider.
Forwarding Missed Calls
You can specify a forwarding number for each type of
missed call:
• If Busy – Your phone is on a call or transferring data.
• If No Answer – You do not answer on the rst 4 rings.
• If Unreachable – Your phone is out of coverage or
powered o.
Note:
If you want a type of missed call sent to voice
mail, the call forwarding number for that type
of missed call must be your voice mail access
number.
To forward missed calls:
1 From the main menu, select Call Forward > Forward
> Detailed.
2 Select If Busy to specify a forwarding number for calls
received when your phone is busy.
3 If you specied a forwarding number for this type of call
before, this number displays.
To forward calls to this number, press
B
under Back
and go to step 6. -or-
To delete this number, press
o
, then press and hold A
under Delete.
4 To enter the number you want to forward this type of
call to:
Enter the number using your keypad.
-or-
Press
A
under Search. Select Contacts, Recent Calls,
or Memo. Select the number you want to enter.
5 Press o.
Page 57

43
Call Forwarding
6 Repeat step 2 through step 5 for If No Answer and If
Unreachable.
7 When you are nished, press A under Back.
Viewing Call Forwarding Settings
1 From the main menu, select Call Forward > Forward
> All Calls.
2 With To highlighted, press A under Status.
Page 58

44
Advanced Calling Features
Call Waiting
Call Waiting lets you receive a second call while on an
active call. Call Waiting is always available, unless you turn it
o for a specic call.
If you are on a call and receive a second call, your phone
emits a tone and displays a message saying you are
receiving a second call.
To accept the second call and put the active call on hold:
Press
A
under Yes.
To accept the second call and end the active call:
1 Press e.
Your phone rings with the second call.
2 Answer the second call.
To decline the second call:
Press
A
under No. If you subscribe to voice mail, the call
is forwarded to your voice mail box, unless you set Call
Forward for If Busy to a dierent number.
Turn O Call Waiting
To turn o Call Waiting during a call:
1 Press m.
2 Select In Call Setup > Call Waiting.
3 Set this option to O.
Tip:
To turn Call Waiting back on while still on the call,
set this option to On.
To turn o Call Waiting for the next call you make or
receive:
1 From the main menu, select Settings > Phone Calls >
Call Waiting.
2 Set this option to O.
Call Waiting is turned back on when you end the call.
Switching Between Calls
Any time you have one call active and one call on hold,
to make the call on hold active and put the active call on
hold:
Press
A
under Switch. -or-
If
Switch is not one of your options: Press m. Select
Switch.
Page 59

45
Advanced Calling Features
To make the call on hold active and put the active call on
hold:
Press
A
under Switch.
Merging 2 Calls into a 3-Way Call
After you put a call on hold and place a second call, you
can combine these calls into a 3-way call:
1 Press m.
2 Select Join.
All 3 people in the call can speak to and hear each other.
Making a 3-Way Call
1 Place or receive a phone call.
2 While the call is active, press m.
3 Select 3 Way. This puts the call on hold.
4 Enter the second phone number you want to call.
Tip:
For quick ways to enter the number, press m.
5 Press s to place the call.
6 Press A under Join.
All 3 people in the call can speak to and hear each other.
Putting a Call on Hold
1 While on an active call, press m.
2 Select Hold.
If you want to make the call active again, press A under
Resume.
Calling 2 People
Putting a Call on Hold, Making a Second
Call
1 Place or receive a phone call.
2 While the call is active, press m.
3 Select 2nd Call. This puts the call on hold.
4 Enter the second phone number you want to call.
Tip:
For quick ways to enter the number, press m.
5 Press s to place the call.
To end the second call and make the call on hold active
again:
Press
e
.
Page 60

46
Duo Phones Service
Note: This service is subjected to subscription with
your service provider.
The duo phones service is based on the installation of the
M710 In-Vehicle Phone to your mobile cellular phone, both
connected to the same service provider, and using the
same subscription.
When you receive a call, both phones will ring up to 6
times. Answering the call with either of them, will cause the
other phone to stop ringing.
If the call was not answered by both phones, it will be
transferred to the VoiceMail of the mobile phone.
Creating Pauses and Waits While
Dialing
You can enter a pause or wait while dialing a number.
For information on using pauses and waits, see "Creating
Pauses and Waits" on page 38.
To create a pause while dialing a phone number:
1 From the keypad, enter the digits you want to occur
before the pause.
2 Press m.
3 Select Insert Pause.
4 Enter the digits you want to occur after the pause.
To create a wait while dialing a phone number:
1 From the keypad, enter the digits you want to occur
before the wait.
2 Press m.
3 Select Insert Wait.
4 Enter the digits you want to occur after the wait.
Making International Calls
Note: This feature may not be oered by your service
provider.
Plus Dialing lets you place an international call to most
countries without entering the local international access
code.
1 Press and hold 0 for two seconds. A “0” appears, then
changes to a “+”.
Note:
The network translates the “+” into the
appropriate international access code needed
to place the call.
2 Enter the country code, city code or area code, and
phone number.
Page 61

47
Advanced Calling Features
One Touch PTT
One Touch PTT sets your phone to call the most recent
Private ID or SDG list on the recent calls list, or a Private ID
you choose, or activate the Voice Dialing every time you
press the external PTT or the Smart button ..
Setting One Touch PTT
To the Most Recent Private ID or SDG List
1 From the main menu, select Settings > 2-Way Radio
> One Touch PTT.
2 Set this option to Last Call.
To A Private ID
1 From the main menu, select Settings > 2-Way Radio
> One Touch PTT > Assigned Number.
2 To enter the Private ID you want your phone to call
every time you press the external PTT or the Smart
button ..
Enter the number using your keypad.
-or-
Press
A
under Search. Select Contacts, Recent Calls,
or Memo. Select the number you want to enter.
Tip:
If you are entering a Talkgroup number, enter #
before the number.
3 Press o.
Enabling Voice Activation
1 From the main menu, select Settings > 2-Way Radio
> One Touch PTT.
2 Set this option to Voice Activation.
Quick PTT
Note: This feature may not be oered by your service
provider.
Quick PTT lets you quickly access any Private IDs on your
phone so that you can make a Private call, or create a SDG
list and make a SDG call. For more information about SDG
lists, see "Selective Dynamic Group (SDG) Calls" on page 52.
To view a list of Contacts and SDG lists with Private IDs in
Contacts:
1 From the idle screen, press m.
2 Select Quick PTT.
To move between Contacts, the recent calls list, and Memo:
Scroll left or right.
-or-
Press
*
or #.
Page 62

48
To make a Private call or SDG call:
1 Select the entries you want.
2 Press A under Done.
3 Press the external PTT button or the Smart button at
the top of your phone.
To save your selections as a SDG list:
1 Press m.
2 Select Store SDG.
3 If you want to assign a name to the SDG list, enter the
name.
Note:
If you do not assign a name, the SDG list is
named “SDG” followed by the number of
members in the SDG list. For example, “SDG (8)”
for a SDG list with 8 members.
4 Press o.
Call Timers
Call timers measure the duration of your phone calls,
Private or group calls, and circuit data use, as well as the
number of Kilobytes sent and received by your phone:
• Last Call – displays the duration of your most recent
phone call.
• Phone Reset – keeps a running total of your phone call
minutes, until you reset it.
• Phone Lifetime – displays the total minutes of all your
phone calls.
• Prvt/Grp Reset – keeps a running total of all of your
Private and group call minutes, until you reset it.
• Prvt/Grp Lifetime – displays the total minutes of all
your Private and group calls.
• Circuit Reset – keeps a running total of all of your circuit
data use, until you reset it.
• Circuit Lifetime – displays the total minutes of all of
your circuit data use.
• Kbytes Reset – keeps a running total of the number
of Kilobytes sent and received by your phone, until you
reset it.
To view or reset a timer:
1 From the main menu, select Call Timers.
2 Select the feature you want to view or reset.
3 To view a feature without resetting: Press o when you
are nished viewing. -or-
To reset a feature: Press
A
under Reset. Press o or
press A under Yes to conrm.
Page 63

49
Advanced Calling Features
Note: The values displayed by Call Timers should not
be used for billing. Call timers are estimates
only.
Using Your Phone as a Modem
Note: This feature may not be oered by your service
provider.
To use your phone as a modem with a laptop, handheld
device, or desktop computer:
1 Connect the Mini-USB connector of the data cable to
the Mini-USB port at the right side of the phone.
2 Insert the USB data plug into the data port of the other
device.
When used as a modem, your phone has these data
transfer modes:
• Circuit data – used for sending and receiving faxes and
for transferring large les
• Packet data – used for small le transfers such as email
To use these services, you must install the iDEN Wireless
Data Services software (available separately). For more
information on setting up your computer and your M710
phone for packet and circuit data calls, refer to the Wireless
Data Services User’s Guide or contact your service provider.
Page 64

50
Group Calls and Selective
Dynamic Group Calls
Note: Selective Dynamic Group Calling (SDGC) may
not be oered by your service provider.
Your phone gives you 2 ways to call more than one Private
ID at once:
• Group calls – calls to a Talkgroup
• Selective Dynamic Group calls – calls to a SDG list
Note:
In order to store SDG lists to your M710, you
must use a SDG-capable SIM card. For more
information about SDG-capable SIM cards,
contact your service provider. SDG lists created
with your M710 phone are not readable by an
older iDEN SIM-based phone.
Calls Group SDG
Set-up Predened, via your
service provider
administrator using
Group Management
Dynamically, via your
phone
Group
Names
Talkgroups I SDG lists
S
Voice
Activated
Dialing
No Yes
Group Calls
A group call is similar to a Private call, but is made to
all members of a Talkgroup at once. A Talkgroup is a
predetermined group of your service provider’s customers.
Before you can make or receive group calls, a Talkgroup
must be established. After the Talkgroup is established, you
must join the Talkgroup.
Joining a Talkgroup
Your sales representative or your service provider
establishes Talkgroups for you and assigns each Talkgroup a
Talkgroup number. You can choose a name for each of your
Talkgroups when you create entries for them in Contacts.
To receive group calls made to any of these Talkgroups, you
must join the Talkgroup.
1 From the main menu, select Contacts.
Page 65

51
Group Calls and Selective Dynamic Group Calls
Turning O Group Calls
To set your phone to prevent you from hearing group calls
to your Talkgroup:
1 From the main menu, select Settings > 2-Way Radio
> Tkgrp Silent.
2 Set this option On.
To set your phone to let you hear group calls to your
Talkgroup:
Set
Tkgrp Silent to O in step 2.
2 Scroll to the Talkgroup you want to join.
3 Press A under Join.
Note:
You can only monitor one Talkgroup at a time.
Making Group Calls
1 Press #. Then enter the Talkgroup number using the
keypad. -or-
Choose the Talkgroup name from Contacts or recent
calls list.
2 Proceed as if making a Private call.
Receiving Group Calls
To answer a group call:
Proceed as if answering a Private call. Only one person
at a time may speak on a group call. The Private ID or
name of the person who is speaking will appear on the
display below the Talkgroup number.
Page 66

52
Selective Dynamic Group (SDG)
Calls
Note: This feature may not be oered by your service
provider.
A SDG call is similar to a Private call, but is made to all
members of a SDG list at once. A SDG list is a group of
Private IDs that you create using your phone. A SDG list
must contain at least 2 members and can contain up to 20
members.
You can create a SDG list for one call only or store it to
Contacts so you can call it any time.
You can use Send via PTT* to send SDG lists to other
phones that have this capability.
* Send via PTT may not be oered by your service provider.
Creating SDG Lists in Contacts
1 From the main menu, select Contacts.
2 Select [New SDG List].
Note:
You can also create a SDG list by selecting
[New Contact] and assigning the SDG contact
type.
3 If you want to assign a name to the SDG list, enter the
name.
Note:
If you do not assign a name, the SDG list is
named “SDG” followed by the number of
members in the SDG list. For example, “SDG (8)”
for a SDG list with 8 members.
4 Add Private IDs. See “Adding Private Numbers”.
5 If you want to create a voice name for the SDG list,
select [Options] > Voice Name. As directed by the
screen prompts, say and repeat the voice name you
want to assign to the SDG list. Speak clearly into the
microphone.
6 Press A under Save.
Adding Private Numbers
You can add Private IDs to a SDG list by selecting them
from Contacts, the recent calls list, or Memo. You can add
all members in an existing SDG list by selecting the list.
You can select more than one member from Contacts
and the recent calls list. A checkmark appears next to each
selected item.
Tip:
To deselect an item: Scroll to a selected item and
press o.
Page 67

53
Group Calls and Selective Dynamic Group Calls
You can also enter Private IDs from the keypad.
To add members from Contacts, the recent calls list, or
Memo:
1 While creating a SDG list, select [Add Member]. -or-
2 Select [Add Number] and press A under Browse.
Note:
To move between Contacts, the recent calls list,
and Memo, scroll left or right, or press * or
#
.
3 Scroll to the members you want from Contacts, the
recent calls list, or Memo and press o. A check mark
appears next to each selected member.
Note:
To deselect a member, scroll to a selected
member and press o.
4 Press A under Done.
To add members manually from the keypad:
1 While creating a SDG list, select [Add Number].
2 Enter the Private number using the keypad.
3 Press o.
Removing Members or SDG Lists
To remove a member from a SDG list:
1 From Contacts, scroll to the SDG list you want to delete
the member from.
2 Press A under Edit.
3 Scroll to the member you want to remove.
4 Press m.
5 Select Remove Member.
6 Select Save.
To remove all members from a SDG list:
1 From Contacts, scroll to the SDG list you want to delete
the member from.
2 Press A under Edit.
3 Press m.
4 Select Remove All Members.
5 Press A under Yes.
To delete a SDG list from Contacts:
1 Scroll to the SDG list you want to delete.
2 Press m.
Page 68

54
3 Select Delete SDG List.
Storing SDG Lists Faster
From the Recent Calls List
1 From the recent calls list, select the SDG list you want.
2 Press A under Store.
3 If you want, add more information to the entry.
4 Press A under Save.
From an Active SDG Call
1 During an active SDG call, press m.
2 Select Store SDG.
3 If you want, add more information to the entry.
Note:
You cannot record a voice name during an
active call.
4 Press A under Save.
Making SDG Calls
1 From Contacts or the recent calls list, scroll to or select
the SDG list you want. -or-
Press and hold the external PTT or the Smart button
.
until a prompt appears telling you to say the
voice name. Say the voice name assigned to the SDG
list you want. -or-
From the idle screen, press the number on your keypad
for the shortcut you assigned to the SDG list you want.
-or-
Enter or select a Private ID and add more Private IDs.
See “Starting a SDG Call with a Private ID”.
2 Press the PTT button.
Starting a SDG Call with a Private ID
You can start a SDG call with any Private ID you want to call.
1 Choose the rst Private ID that you want in the SDG call:
From the idle screen, enter the Private ID. -or-
From the Contacts list, scroll to an entry containing the
Private ID. -or-
From recent calls list, scroll to an entry containing the
Private ID.
2 Press m.
3 Select Call New SDG.
Page 69

55
Group Calls and Selective Dynamic Group Calls
4 Add more Private IDs. See "Adding Private Numbers" on
page 52.
5 If you want to save the SDG list you have created: Press
m
. Select Store SDG. -or-
If you do not want to save the SDG list, press
A
under
Done.
6 To make the call, press the external PTT or the Smart
button.
Receiving SDG Calls
To answer a SDG call:
Proceed as if answering a Private call. Only one person
at a time may speak on a SDG call.
SDG Call Information
While you are in a SDG call, the following appears on the
screen:
• The name of the SDG list
• The name or the Private ID of the person speaking
• The number of participants in the SDG call
SDG Call Details
During a SDG call, you can view details about the other
SDG list members, such as their name or Private ID, and
their status on the call.
To view SDG call details, press
A
under Details.
In the SDG Call Details view, these icons appear next to
member names or Private IDs:
T
The member of the SDG list who is speaking.
A
A member of the SDG list who is active on the SDG
call, but not speaking.
O
A member of the SDG list who has exited the call.
U
A member of the SDG list who could not be reached
on the SDG call.
u
A member of the SDG list whose status is unknown.
Sending SDG Lists Using Send via PTT
Note: Send via PTT may not be oered by your
service provider.
You can send a SDG list using Send via PTT so that the
person who receives the SDG list can use the list.
Page 70

56
1 From Contacts or the recent calls list, scroll to or select
the SDG list you want. -or-
From the idle screen, press the number on your keypad
for the shortcut you assigned to the SDG list you want.
2 Press m.
3 Select Send SDG via PTT.
4 To include yourself in the list, press A under Yes. -or-
To exclude yourself from the list, press
A
under No.
Note:
If you choose to include yourself and the
list already contains 20 members, you will
be prompted that the list is full. You will be
excluded from the list.
5 Enter the Private ID of the person you want to send the
SDG list to. -or-
Select Browse to select a contact from Contacts, the
recent calls list, or Memo.
6 Press o.
7 To send the SDG list, push the PTT button.
The SDG list will display in the recent calls list on the
phone that you send the SDG list to.
Page 71

57
Memo
Memo lets you store a number, make a call to that number,
and save it to Contacts.
To create a memo:
1 From the main menu, select Memo.
2 Enter the number using your keypad.
3 Press o.
To view the memo later:
From the main menu, select
Memo.
To delete the memo:
1 From the main menu, select Memo.
2 Press and hold A under Delete.
3 Press o.
To edit the memo:
1 From the main menu, select Memo.
2 Enter the new number.
3 Press o.
To make a call to the memo number:
1 From the main menu, select Memo.
2 To make a phone call, press s. -or-
To make a Private call, press the external PTT or Smart
button.
To store the memo number to Contacts:
1 From the main menu, select Memo.
2 Press m.
3 Select Store to Contacts.
4 To store the number as a new entry, select [New
Contact]. -or-
To store the number to an existing entry, select the
entry.
5 With the Contacts type eld highlighted, scroll left or
right to display the Contacts type you want to assign
the number.
6 Press A under Save.
Page 72

58
Ring Tones
To set the ring tone your phone makes when you receive
phone calls, call alerts, message notications, pictures sent
using Send via PTT, or Datebook reminders:
1 From the main menu, select Ring Tones.
2 Scroll through the list of ring tones and select the one
you want to assign. Silent sets your phone to not make
a sound.
Tip:
Highlighting a ring tone lets you hear it.
3 Select the features you want to assign the ring tone to.
4 When you are nished, press A under Done.
Assigning Ring Tones to Contacts
You can set the ring tone your phone makes when you
receive phone calls or call alerts from someone you have
stored in Contacts.
1 From the main menu, select Ring Tones.
2 Scroll through the list of ring tones and select the one
you want to assign.
3 Select A Contact.
4 Select the Contacts entry you want to assign the ring
tone to.
Viewing Ring Tone Assignments
1 From the main menu, select Ring Tones.
2 Highlight any ring tone.
3 Press m.
4 Select Overview.
5 Scroll to view ring tones assigned to features and
Contact entries.
Downloading More Ring Tones
If you want to use other ring tones, you can download
them into your phone for a fee. For more information
about custom ring tones and downloading instructions,
please contact your service provider.
About DRM Ring Tones
Your phone supports gifting and Tell-A-Friend services
for DRM ring tones. However, these services may not
Page 73

59
Ring Tones
be oered by your service provider. Please contact your
service provider for more information about these services.
For more information about DRM items, see "Digital Rights
Management" on page 78.
Managing Memory
To view the amount of memory available for custom ring
tones:
1 From the main menu, select Ring Tones.
2 Highlight any ring tone.
3 Press m.
4 Select Memory Usage.
Deleting custom ring tones frees memory.
Note:
Ring tones are stored in your phone using the
same memory space used to store messages,
voice records, Java application data, pictures,
and wallpaper images. Deleting some of these
other items frees memory for ring tones.
Deleting Custom Ring Tones
Deleting a ring tone from the list of ring tones deletes it
from all parts of your phone, including the media center
and Contacts.
Except for DRM ring tones, if you delete a ring tone that
you purchased from your phone, you will have to purchase
it again. Under certain conditions, some DRM vendors will
not charge you if you download an item multiple times
within a given time frame. Please contact the DRM vendor
to learn more about their download regulations.
To delete a custom ring tone:
1 From the main menu, select Ring Tones.
2 Scroll to the ring tone you want to delete.
3 Press m.
4 Select Delete.
5 Press A under Yes to conrm.
Page 74

60
Entering Text
You can enter text, numbers, and symbols into your phone
using Alpha, Word, Numeric, or Symbol text input modes.
l Alpha – Press a key several times for each character.
j Word – Press a key once for each letter while words
likely to be the one you want are chosen from a
database.
i Symbols – Enter punctuation and other symbols.
k Numeric – Enter numbers.
When you access a screen that requires you to enter text,
you start in the mode last used.
To choose a text input mode:
1 At a screen that requires you to enter text, press m.
2 Select the text input mode you want to use. A
checkmark appears next to the current mode.
Using Word Mode
In Word mode, T9 Text Input analyzes the letters on the
keypad button you press and arranges them to create
words. As you type, T9 Text Input matches your keystrokes
to words in its database and displays the most commonly
used matching word. You can add your own words to this
database.
Entering a Word
1 Select Word as your text input mode.
2 Type a word by pressing one key for each letter. For
example, to type “test” press 8 3 7 8.
The displayed word may change as you type it. Do not
try to correct the word as you go. Type to the end of
the word before editing.
3 If the word that appears is not the desired word, press
0
to change the word on the display to the next
most likely word in the database.
Repeat until the desired word appears.
If the desired word does not appear, you can add it to the
database.
Adding Words to the Database
1 Select Alpha as your text input mode.
2 Type the word using Alpha mode.
3 Select Word as your text input mode.
Page 75

61
Entering Text
uppercase (shift), to make all subsequent letters typed
uppercase (caps lock), or to go back to lowercase letters.
These icons appear in the top row of your display:
m or _
Shift is on
n or ^
Caps lock is on
When neither of these icons appear, letters typed are
lowercase. Scrolling up after typing a letter makes that
letter uppercase.
Note:
When creating a text message, you cannot
capitalize by scrolling up.
Your phone automatically makes the rst letter of a
sentence uppercase.
Punctuation
Press 1 or 0 to insert punctuation. Continue to press
the key to view the list of symbols available through that
key. Pause to select the symbol you want.
Note:
Additional punctuation symbols are available in
Symbols mode.
4 Press #.
The word you typed in Alpha text entry mode is now in the
database.
Note:
You cannot store alphanumeric combinations,
such as Y2K.
Choosing a Language
To change the language of the database:
1 At a screen that requires you to enter text, press m.
2 Select Languages.
3 Select the language you want for your database.
Special Function Keys
Some of the phone’s keys assume dierent functions while
in Alpha or Word mode.
Spaces
Press # for a space.
Capitalization
When you press and hold the # key, it acts as a 3-way
toggle. Press and hold # to make the next letter typed
Page 76

62
Messages
You can receive the following types of messages on your
phone:
• Voice mail messages
• Short Message Service (SMS) text messages
• Depending on your service provider, you may have the
option to receive fax mail and Net alerts.
You have 2 ways to access the messages you receive:
• Respond to the message notication that appears when
the message is received.
• Dismiss the message notication and access the message
later through the message center.
You can listen to or view these messages, delete them, or
continue to store them in the message center.
Message Notications
When you receive a message, your phone noties you with
text on the display and a notication tone. You can access
the message or dismiss the notication.
If you dismiss the notication, the message is not deleted.
It can be accessed through the message center.
If you are not on a phone call when you receive a message,
your phone sounds a notication tone every 30 seconds
until you access the message, you dismiss the notication,
or the alert time-out expires.
Setting Notication Options
To control whether your phone sounds message
notication tones while you are on phone calls:
1 From the main menu, select Settings > Phone Calls >
Notications.
2 Select the option you want:
• Receive All – Tones sound during calls for all types of
messages.
• Message Mail Only – Tones sound during calls for SMS
messages; tones for all other types of messages are held
until you end calls.
• Delay All – Tones for all types of messages are held until
you end calls.
Tip: To set notication options during a call: Press m.
Select In Call Setup > Notications.
Page 77

63
Messages
Message Center
The message center manages your messages.
All your messages are stored in the message center. The
message center shows how many messages you have of
each type.
To access your messages through the message center:
1 From the main menu, select Messages.
2 Scroll to the type of message you want to access.
3 Press o or press A under the display option on the left.
Page 78

64
Voice Mail Messages
Note: To receive voice mail messages, you must rst
set up a voice mail account with your service
provider.
Receiving a Message
When you receive a voice mail message, New Voice Mail
Message appears on the display.
To call your service provider’s voice mail system and listen
to the message:
Press
A
under Call.
To dismiss the message notication:
Press the external PTT or Smart button.
-or-
Press
o
or press A under Back.
If the caller leaves a message, this icon y appears on the
display, reminding you that you have a new message.
Accessing Voice Mail
To access the Voice Mail by using the shortcut key:
Press and hold
#
for a few seconds. The phone
automatically dials the voice mail number.
To access the Voice Mail from the Message Center:
From the main menu, select
Messages > Voice Mail.
Sending Unanswered Calls to
Voice Mail
To send a phone call to voice mail instead of answering it:
Press the external PTT or Smart button.
-or-
Press
e
. -or-
Press
A
under No.
Page 79

65
MOSMS Messages
Note: This feature may not be oered by your service
provider.
If your service provider oers MOSMS, your phone sends
SMS messages using MOSMS and receives SMS messages
from other phones that are using MOSMS.
Setting Up
Before you begin using MOSMS, you may need to set up
your signature, service center number, and expiration
information:
1 From the main menu, select Messages.
2 Scroll to Text Inbox.
3 Press m.
4 Select Text Msg Setup.
5 Select Signature.
Enter your signature. It may be up to 11 characters long.
When you are nished, press o.
6 Select Srvc Cntr No.
Enter the phone number of your service center. If
you do not know this number, contact your service
provider.
When you are nished, press
o
.
7 Select Expire After.
This is the amount of time messages you send are
saved at the service center if they cannot be delivered.
After this period, they are discarded.
Scroll to select the number of days you want your
messages to be saved.
When you are nished, press
o
.
8 Select Auto Clean Up. Set this option to On if you
want your phone to delete sent messages.
If you set
Auto Clean Up to On, select Clean Up After
to set the number of days after which sent messages
are deleted or the number of messages to be kept.
9 Press A under Done to save the information you
entered.
Page 80

66
Tip: Scrolling through one message lets you view the
next message.
4 To save the message, press o. -or-
To reply to the message, press
A
under Reply. -or-
To see all other choices, including forwarding and
deleting the message, calling the sender, or storing the
sender’s number in Contacts, press m.
Creating and Sending Messages
1 From the main menu, select Messages > [Create
Message]. -or-
Select
[Create Message] from Text Inbox, Text Outbox,
or Drafts. -or-
Highlight
Quick Notes and press A under Create.
Tip: This option is available from many context-
sensitive menus in the message center.
2 To address the message:
Use the keypad to enter the phone number of the
person you want to send the message to. -or-
Press
A
under Browse. Select Contacts, Recent Calls,
or Memo. Select the number you want to enter.
Receiving a Message
To view the message:
Press
A
under Read.
To dismiss the message notication:
Press the external PTT or Smart button.
-or-
press
A
under Back.
If your phone is powered o when you receive a text
message, your phone noties you the next time you power
it on. If you are out of your coverage area, your phone alerts
you when you return to your coverage area.
Tip:
While reading a text and numeric message that
contains a phone number, you can press s to
call that number.
Reading from the Message Center
1 From the main menu, select Messages > Text Inbox.
2 Select the message you want to read. -or-
Press the number of the message you want to read.
3 If the message lls more than one screen, scroll to read
it.
Page 81

67
MOSMS Messages
When you are nished, press o.
3 Enter the text of the message. -or-
To use a quick note: Press
A
under Browse. Scroll to the
quick note you want. For more information on quick
notes, see “Using Quick Notes”.
When you are nished, press
o
.
4 If you want to send the message, press A under Send.
-or-
To edit the message, press
o
. -or-
To delete the message without sending it, press
A
under Cancel. -or-
If you want to request conrmation of delivery, save the
message as a draft, or set the sending method, press
m
. Select the option you want.
Beginning Messages From the Recent
Calls List
1 From the recent calls list, scroll to the name you want to
send a message to.
2 If the entry has more than one phone number stored,
view the phone number you want to send the message
to.
3 Press m.
4 Select Compose SMS. The message is automatically
addressed to the phone number you chose.
5 Follow step 3 through step 4 of "Creating and Sending
Messages" on page 66.
Beginning Messages From the Idle Screen
1 Using the keypad, enter the number you want to send
a message to.
2 Press m.
3 Select Compose SMS. The message is automatically
addressed to the phone number you chose.
4 Follow step 3 through step 4 of "Creating and Sending
Messages" on page 66.
Using Quick Notes
Quick notes are short, pre-written text messages that you
can create, edit, and send. You can store up to 20 quick
notes. A quick note may be up to 30 characters long.
Page 82

68
To create a quick note:
1 From the main menu, select Messages > Quick Notes
> [New Note].
2 Press o or press A under Create. Enter text. -or-
To choose from pre-installed notes, select the note you
want.
Tip:
For more options, including sending the quick
note, press m.
Using Drafts
When you save a message as a draft, it is saved in the drafts
folder.
To edit a draft:
1 From the main menu, select Messages > Drafts.
2 Select the draft you want to edit.
3 To edit the elds you want to change, follow step 2
through step 4 in "Creating and Sending Messages" on
page 66.
Resending Messages
To resend a message:
1 From the main menu, select Messages > Text
Outbox.
2 Scroll to the message you want to resend. -or-
Press the number of the message you want to resend.
3 Press s. -or-
Press
m
. Select Resend.
Deleting Sent Messages
To delete a sent message:
1 From the main menu, select Messages > Text
Outbox.
2 Scroll to the message you want to delete.
3 Press A under Delete.
4 Press A under Yes to conrm.
To delete all unlocked sent messages:
1 From the main menu, select Messages > Text
Outbox.
2 Press m.
Page 83

69
MOSMS Messages
3 Select Delete All.
4 Press A under Yes to conrm.
Locking and Unlocking Sent Messages
When you lock a message, it cannot be deleted until you
unlock it.
Locking a Message
1 From the main menu, select Messages > Text
Outbox.
2 Scroll to the message you want to lock or unlock.
3 Press m.
4 Select Lock.
Unlocking a Message
1 From the main menu, select Messages > Text
Outbox.
2 Scroll to the message you want to lock or unlock.
3 Press A under Unlock.
Sorting Messages
You can sort messages in your inbox by sender, time and
date, and status. You can sort messages in your outbox by
recipient, time and date, and status.
1 From the main menu, select Messages > Text Inbox
or Messages > Text Outbox.
2 Highlight any messages.
3 Press m.
4 Select Sort and Order.
5 Select Sort By to specify the sorting method.
6 Select Order By to specify the sorting order.
Managing Memory
Your text inbox, outbox, and drafts folder have a set
amount of memory available for storing messages.
The text inbox holds 20 messages. If the text inbox is
full, you cannot receive messages until you delete some
existing messages.
The outbox and drafts folder share memory space.
Together they can hold 30 messages. If the outbox and
Page 84

70
drafts folder memory is full, you cannot send messages or
save drafts until you delete some existing messages.
To view the amount of memory available in your text inbox:
1 From the main menu, select Messages > Text Inbox.
2 Press A under Memory.
To view the amount of memory available in your outbox
and drafts folder:
1 From the main menu, select Messages > Text Outbox
or Messages > Drafts.
2 Press A under Memory.
Page 85

71
Media Center
The media center lets you access pictures and audio
recordings.
All pictures saved in your phone can be accessed through
the media center.
The following audio recordings can be accessed through
the media center:
• Voice records created when your phone was not in a call
• Musical ring tones in the list of ring tones
• Audio recordings you downloaded to your phone
Pictures and audio recordings in the media center can be
sent in Private calls using Send via PTT. See "Using Send via
PTT" on page 82.
Note:
You can transfer pictures from your phone
to your computer using a data cable and
software you can download. Go to idenphones.
motorola.com/iden/support for more
information.
Viewing the Media Center
To access the media center:
From the main menu, select
Media Center.
Scroll to view the items in the media center.
Choosing Thumbnail View or List View
You can set the media center to show a thumbnail of each
picture as you view the list of items or show the list of items
without thumbnails.
To change views:
1 Access the media center.
2 Press m.
3 Select Set View.
4 Select Plain List View or Thumbnail List View.
Filtering by Media Type
You can set the media center to show all items, only
pictures or only audio recordings. Setting Filtering
1 Access the media center.
2 Press m.
Page 86

72
With an item selected, scroll up or down to access the
items that appeared before and after it in the list.
Sorting by Time or Name
You can set the media center to sort items by the time the
item was created or by the name of the item.
1 Access the media center.
2 Press m.
3 Select Setup.
4 Select Sort.
5 Select By Time or By Name.
When you receive your phone, the media center is set to
sort items by time.
Forward Locked Items
Some items saved to the media center from Private calls or
by downloading may be forward locked. Forward locked
items are usually copyright protected, and you cannot
share them with anyone, such as in Private calls, or by
uploading them from your phone.
You cannot remove forward locking from an item.
3 Select Filter.
4 Select All, Pictures, or Audio.
Tip:
You can also scroll through these options while
viewing the list of items by either scrolling left or
right or pressing * or #.
Keeping the Last Filter Setting
You can set the media center to show all items every time
you access it or to keep the ltering setting you had when
you last viewed it.
1 Access the media center.
2 Press m.
3 Select Setup.
4 Select Remember Filter to keep the ltering setting
you had when you last viewed the media center.
When you receive your phone, the media center is set to
show all items every time you access it.
Accessing Items Listed
To access a picture or audio recording, select it from the list
of items in the media center.
Page 87

73
Media Center
When you view items in the media center, one of these
icons appears next to each forward locked item:
[ Forward locked.
\ Forward lock and locked.
When an item is locked, it cannot be deleted from the
media center. See "Locking Items" on page 75. Locking an
item has no eect on its forward locking.
DRM Items
Except for Java applications, which download to Java Apps,
the default location for any DRM items that you download
is the media center.
Depending on how a given third-party vendor has set
rights for an item, the item may include the following
status icons.
c
The item is a DRM item.
g
The DRM item has expired.
All DRM items are forward locked. As with other items in
media center, you can lock DRM items. See "Locking Items"
on page 75.
For more information about DRM items, see "Digital Rights
Management" on page 78.
Note:
While your phone supports gifting and Tell-AFriend services for DRM items, these services
may not be oered by your service provider.
Please contact your service provider for more
information.
Pictures
The media center lets you view pictures, send them in
Private calls, assign them to Contacts entries, or set them as
your phone’s wallpaper.
Viewing
To view a picture, select it from the list of items in the
media center.
If your phone is set to show thumbnails, a thumbnail of
each picture appears next to the picture in the list of items.
If your phone is not set to show thumbnails, this icon &
appears next to the picture.
To see a larger or smaller view of the picture you are
viewing:
1 Press m.
2 Select Zoom.
3 Select the zoom option you want
Page 88

74
If the picture does not t in the display, scroll left and right
and up and down to view dierent parts of the picture.
Sending in Private Calls
For information on sending stored pictures in Private calls,
see "Starting a Call by Sending a Picture" on page 82.
Assigning to Contacts
1 Scroll to or select the picture you want to assign to a
Contacts entry.
2 Press m.
3 Select Set As Caller ID.
4 To store the number as a new entry, select [New
Contact]. -or-
To store the number to an existing entry, select the
entry.
Only entries that include phone numbers are displayed.
This icon & appears next to entries that have pictures
assigned.
5 If you selected an entry with a picture assigned, press
o
or press A under Yes to overwrite the assigned
picture. -or-
Press
A
under No to return to the list of entries without
overwriting the assigned picture.
Setting as Wallpaper
1 Scroll to or select the picture you want to set as
wallpaper.
2 Press m.
3 Select Set As Wallpaper.
Note:
If you later set your wallpaper to Auto Cycle,
the picture is included and will appear on the
idle screen. See "Wallpaper" on page 110.
Audio Recordings
The media center lets you play audio recordings and assign
them to Contacts entries.
Playing
To play an audio recording, select it from the list of items in
the media center.
This icon # appears next to each audio recording in the
list of items.
Page 89

75
Media Center
Tip: When viewing the list of items in the media
center, you can scroll left or right, or press * or
#
, to change the type of media that is displayed
in the list.
To stop the audio recording before it has nished playing:
Press
o
. -or-
Scroll left.
To restart the audio recording:
Scroll right.
When you play an audio recording, an animated image
appears on the display.
Assigning to Contacts
To assign an audio recording in the media center as the
ring tone for a Contacts entry:
1 Scroll to or select the audio recording you want to
assign.
2 Press m.
3 Select Assign As Ringer.
4 Select the Contacts entry you want to assign the ring
tone to.
Note:
You cannot assign a voice record as the ring
tone for a Contacts entry.
Renaming Items
1 Access the media center.
2 Scroll to or select the item you want to rename.
3 Press m.
4 Select Rename.
5 Delete the item’s name and enter a new name.
6 Press o.
Locking Items
When you lock an item in the media center, it cannot be
deleted until you unlock it.
1 Access the media center.
2 Scroll to or select the item you want to lock or unlock.
3 Press m.
4 Select Lock to lock the item. -or-
Select Unlock to unlock the item.
Page 90

76
When you view items in the media center, one of these
icons appears next to each locked item:
R Locked.
\ Forward lock and locked.
Deleting Items
Deleting items from the media center deletes them from
all parts of your phone, including the list of ring tones, the
list of voice records, and Contacts.
Under certain conditions, some DRM vendors will not
charge you if you download an item multiple times within
a given time frame. Please contact the DRM vendor to learn
more about their download regulations.
Deleting an Item
1 Scroll to or select the item you want to delete.
2 Press m.
3 Select Delete.
4 Press o or A under Yes to conrm.
Deleting All Items
You can delete all unlocked items currently in view,
depending on how media center ltering is set. See
"Filtering by Media Type" on page 71. If ltering is set to
show all types of media center items, all unlocked items
are deleted.
1 Access the media center.
2 Press m.
3 Select Delete All.
4 Press o or A under Yes to conrm.
Managing Memory
To view your used memory, free memory, and memory
capacity:
1 Access the media center. -or-
Scroll to or select any item in the media center.
2 Press m.
3 Select Memory Usage.
To free memory, delete items in the media center.
Page 91

77
Media Center
Note: Items in the media center are stored in your
phone using the same memory space used
to store messages, Java application data, and
voice records created when your phone is in a
call. Deleting some of these other items frees
memory for media.
Page 92

78
Digital Rights Management
When you download multimedia content available online,
such as audio, images, or Java applications, these items
may be subject to DRM restrictions. DRM, or digital rights
management, is a system that denes how copyrighted
multimedia content can be distributed and used.
DRM sets items to time-based or count-based usage
settings. Time-based settings let you use the given item
for a specied interval. Examples of time-based settings
include being able to use an item for a specied number
of days from the date of purchase, a specied number of
days from the date that the item is rst used, or a specied
number of minutes. Count-based settings let you use an
item for a specied number of times after you download it
or for unlimited use.
Installing Items
Except for DRM Java applications, DRM items will
automatically install once they have nished downloading.
To install DRM Java applications, see "Digital Rights
Management" on this page.
To send the DRM installation to the background, press e.
Understanding DRM Status Icons
Depending on how a given third-party vendor has set
rights for an item, the item may include the following
status icons:
c The item is a DRM item.
g The DRM item has expired.
As with other items in media center, you can lock DRM
items. See "Locking Items" on page 75.
Note:
All DRM items are forward locked. See "Forward
Locked Items" on page 72.
Sharing Items
Note: These features may not be oered by your
service provider.
You can gift a DRM item to a friend’s phone. Gifting is
when you purchase a copy of a DRM item and send it to
someone. If you do not want to gift an item, you can send
a message to a friend’s phone that contains the link for
purchasing the item. The friend can then purchase the item
quickly and easily. Sending this type of message is called
Tell-A-Friend.
Page 93

79
Digital Rights Management
Tell-A-Friend
1 Go to the location on your phone that contains the
item you want.
2 Highlight the DRM item you want to tell your friend
about.
3 Press m.
4 Select Tell-A-Friend.
The Create Message screen opens.
5 Complete and send the message. See "Creating and
Sending Messages" on page 66.
Managing DRM Items
Note: Depending on how the third-party vendor has
set rights for the given DRM item, you may be
unable to perform some of the following tasks.
Viewing License Information
You can check a DRM item’s license to view the following
information:
• For time-based items, either the date and time the item is
scheduled to expire, or the number of days left
Gifting
To check if a DRM item is giftable:
1 Go to the location on your phone that contains the
item you want.
2 Highlight the DRM item you want to gift.
3 Press m. If Gift is an option, the item is giftable.
To gift a DRM item:
1 Go to the location on your phone that contains the
item you want.
2 Highlight the DRM item you want to gift.
3 Press m.
4 Select Gift.
5 Select the contact you want to send the item to. -or-
If the person you want to send the item to is not in
Contacts, select [New Number]. Enter the number.
6 Press o.
7 Follow the vendor’s instructions for purchasing an
additional license.
Page 94

80
• For count-based items, the number of credits (uses) left
or an unlimited use notice
• The name of the item’s vendor
To view the license of a DRM item:
1 Go to the location on your phone that contains the
item you want.
2 Highlight the DRM item you want to view license
information for.
3 Press m.
4 Select License Info.
Renewing DRM Licenses
Note: You can only renew DRM licenses if the
license contains a link to the page where you
purchased the item.
1 Go to the location on your phone that contains the
item you want.
2 Highlight the DRM item you want to renew.
3 Press A under Renew or press m. Select Renew.
4 Select the link to the page where you purchased the
item.
5 Follow the vendor’s instructions for purchasing an
additional license.
Deleting Items
If you delete a DRM item that you purchased from your
service provider from your phone, you will have to
purchase it again to download it.
Under certain conditions, third-party vendors will let you
download an item multiple times within a given time
frame, even if you deleted the item. Please contact the
third-party vendor of an item to learn more about the
vendor’s download regulations.
To delete an item:
1 Go to the location on your phone that contains the
item you want.
2 Highlight the DRM item you want to delete.
3 Press m.
4 Select Delete.
5 If prompted, press A under Yes.
Page 95

81
Digital Rights Management
About Expired Items
If you are using an item when it expires, once you nish
your session with the item, you will be unable to use the
item.
When ring tones and wallpapers expire, they are
automatically removed from their respective lists. For
expired items that continue to display in their respective
lists, you can either choose to renew the license for the
item or else manually delete the item.
Note:
You cannot delete locked items.
Page 96

82
Using Send via PTT
Send via PTT lets you exchange pictures, My Info, and
contact information with other phones that have this
capability. You do this through Private calls.
Send via PTT cannot be used during group calls.
Sending a Picture
Note: This feature may not be oered by your service
provider.
When you send a picture using Send via PTT, the picture
you sent appears on the display of the phone you are
engaged in the Private call with and is saved to that
phone’s media center.
Sending a Picture During a Call
You can send a picture at any time during a Private call,
whether you made or received the call*.
* Additional charges may apply.
You cannot talk or listen on a Private call while a picture is
being transmitted. Other activities, such as searching for a
picture, do not prevent you from talking or listening.
Sending a Stored Picture
1 While in a Private call: Press m. Select Browse
Pictures.
A list of pictures that can be included in a Private call
appears.
2 Select the picture you want to send.
3 Press the external PTT button or the Smart button to
send the picture.
4 Wait while the picture is transmitted. The Private call is
temporarily interrupted while a picture is transmitted.
5 When prompted, press the PTT button or the Smart
button to resume the Private call.
Starting a Call by Sending a Picture
You can start a Private call by choosing a stored picture
from the media center.
To do this, you must have the Private ID and IP address of
the person you want to send to stored in your Contacts.
1 From the media center, scroll to or select the picture
you want to send in a Private call.
2 Press m and select Send Picture via PTT.
Page 97

83
Using Send via PTT
2 Wait while the picture is transmitted. The Private call is
temporarily interrupted while a picture is transmitted.
3 When prompted, press the external PTT button or the
Smart button to resume the Private call.
Tip:
If you want to stop the transmission before it is
nished, press A under Cancel.
Declining a Picture
When you see the message asking you if you want to
accept the picture, press A under No. The picture is not
transmitted.
Setting Picture Capability
To turn your phone’s ability to send and receive pictures in
Private calls on or o:
1 From the main menu, select Settings > 2-Way Radio
> PTT Picture.
2 Select On or O.
This setting does not aect your phone’s ability to send and
receive My Info or contact information.
A list of names from Contacts appears. These names
have Private IDs and IP addresses stored.
3 Select the name of the person you want to send the
picture to.
4 Press the external PTT button or the Smart button to
send the picture.
5 Wait while the picture is transmitted. The Private call is
temporarily interrupted while a picture is transmitted.
6 When prompted, press the external PTT button or the
Smart button to resume the Private call.
Receiving a Picture
When someone sends you a picture using Send via PTT,
your phone emits tone and a message appears on the
display asking you if you want to accept the picture.
When you receive a picture, it appears every time you are
in a Private call with the person who sent it unless you
delete the picture from the media center. This occurs for
the last 20 people who sent you pictures.
Accepting a Picture
1 When you see the message asking you if you want to
accept the picture, press A under Yes.
Page 98

84
Sending My Info and Contact
Information
When you send My Info or contact information using Send
via PTT, the information you sent appears on the display of
the phone you are engaged in the Private call with. After
the call, the information appears on the recent call list of
that phone.
Sending My Info
You can control what portion of the information in My Info
is sent and whether it is sent automatically in every Private
call or only when you choose to send it. See "Setting
Sending Options" on page 87.
Tip:
When you send My Info, certain information, such
as your email address or fax number, cannot be
included. To send complete contact information,
create an entry for yourself in Contacts and send
it.
Sending Information During a Call
1 While in a Private call, press m.
2 With Send via PTT highlighted, press o.
3 When Ready to Send appears on the display, press the
external PTT button or the Smart Button to send the
information.
Starting a Call by Sending Information
1 From the main menu, select My Info.
2 Press m.
3 With Send via PTT highlighted, press o.
4 Use the keypad to enter the Private ID you want to
send the information to. -or-
Press
A
under Browse. Select Contacts, Recent Calls,
or Memo. Select the number you want to enter.
5 When Ready to Send appears on the display, press the
external PTT button or the Smart Button to send the
information.
Sending Contact Information
You can send contact information by selecting a Contacts
entry or an item from the recent calls list.
Contacts entries that contain only addresses cannot be
sent. When Contacts entries are received, they do not
include ring tones or pictures.
Page 99

85
Using Send via PTT
These items from the recent calls list can be sent:
• Contact information sent from other phones
• Calls to or from numbers stored in your Contacts list
Sending Information During a Call
1 While in a Private call, press m.
2 Select Contacts or Recent Calls.
3 Scroll to the Contacts entry or item in the recent calls
list you want to send.
4 Press m.
5 Select Send Contact via PTT or Send SDG via PTT.
6 Press the external PTT button or the Smart button to
send the information.
Starting a Call by Sending Information
1 From Contacts or the recent calls list, scroll to or select
the entry you want to send.
2
Press m.
3
Select Send via PTT.
4 Use the keypad to enter the Private ID you want to
send. -or-
Press
A
under Browse. Select Contacts, Recent Calls,
or Memo. Select the number you want to enter.
5 When Ready to Send appears on the display, press the
external PTT button or the Smart button to send the
information.
Receiving My Info or Contact Information
When you receive My Info or contact information from
another phone, an icon appears on the display:
j My Info.
d Contact Information.
To view the information while still in the Private call:
1 Press m.
2 Select View Contact.
You can also view My Info from other phones on the recent
calls list. See "Recent Calls" on page 27.
Page 100

86
My Info
My Info lets you view information about your phone.
Depending on your service provider, you may also be able
to send this information to other phones.
Viewing My Info
1 From the main menu, select My Info.
2 Scroll to see the entire screen.
The My Info screen contains:
• My Name – You can enter your name here.
• Line 1 and Line 2 – your phone numbers for phone
lines 1 and 2. Each number appears when you receive
your rst call on that line.
• Private – Your Private ID is the number that others use
to contact you using Private calls. This number appears
when you receive your rst Private call.
• Group ID – the number of the Talkgroup you have
joined.
• Carrier IP – the IP address assigned to your service
provider. This number appears when you register for
packet data services.
• IP1 Address and IP2 Address – the IP addresses you
use to access the Internet with your phone.
• Circuit Data – the number you use if you want to use
your phone to transfer circuit data. See "Using Your Phone
as a Modem" on page 49. You receive this number from
your service provider.
Note: If you request equipment-related transactions on
your account, your service provider may require
you to provide specic information about
your phone. By pressing m anytime while in
My Info, a submenu will appear that includes
your phone’s service status, unit information,
and phone identication numbers including
IMEI, SIM ID, and Serial Number (SN). Please be
prepared to supply the representative with this
information when requesting these types of
transactions.
Editing My Info
To edit My Info to enter or change the text that appears in
My Name:
1 From the main menu, select My Info.
2 Press A under Edit.
 Loading...