

Page 1
BEFORE YOU BEGIN
Before using this product, read the Important Safety and Legal
Information pamphlet and follow its instructions.
Take a moment to familiarize yourself with your
new H270 Headset.
motorola
H270
Quick Start Guide
1
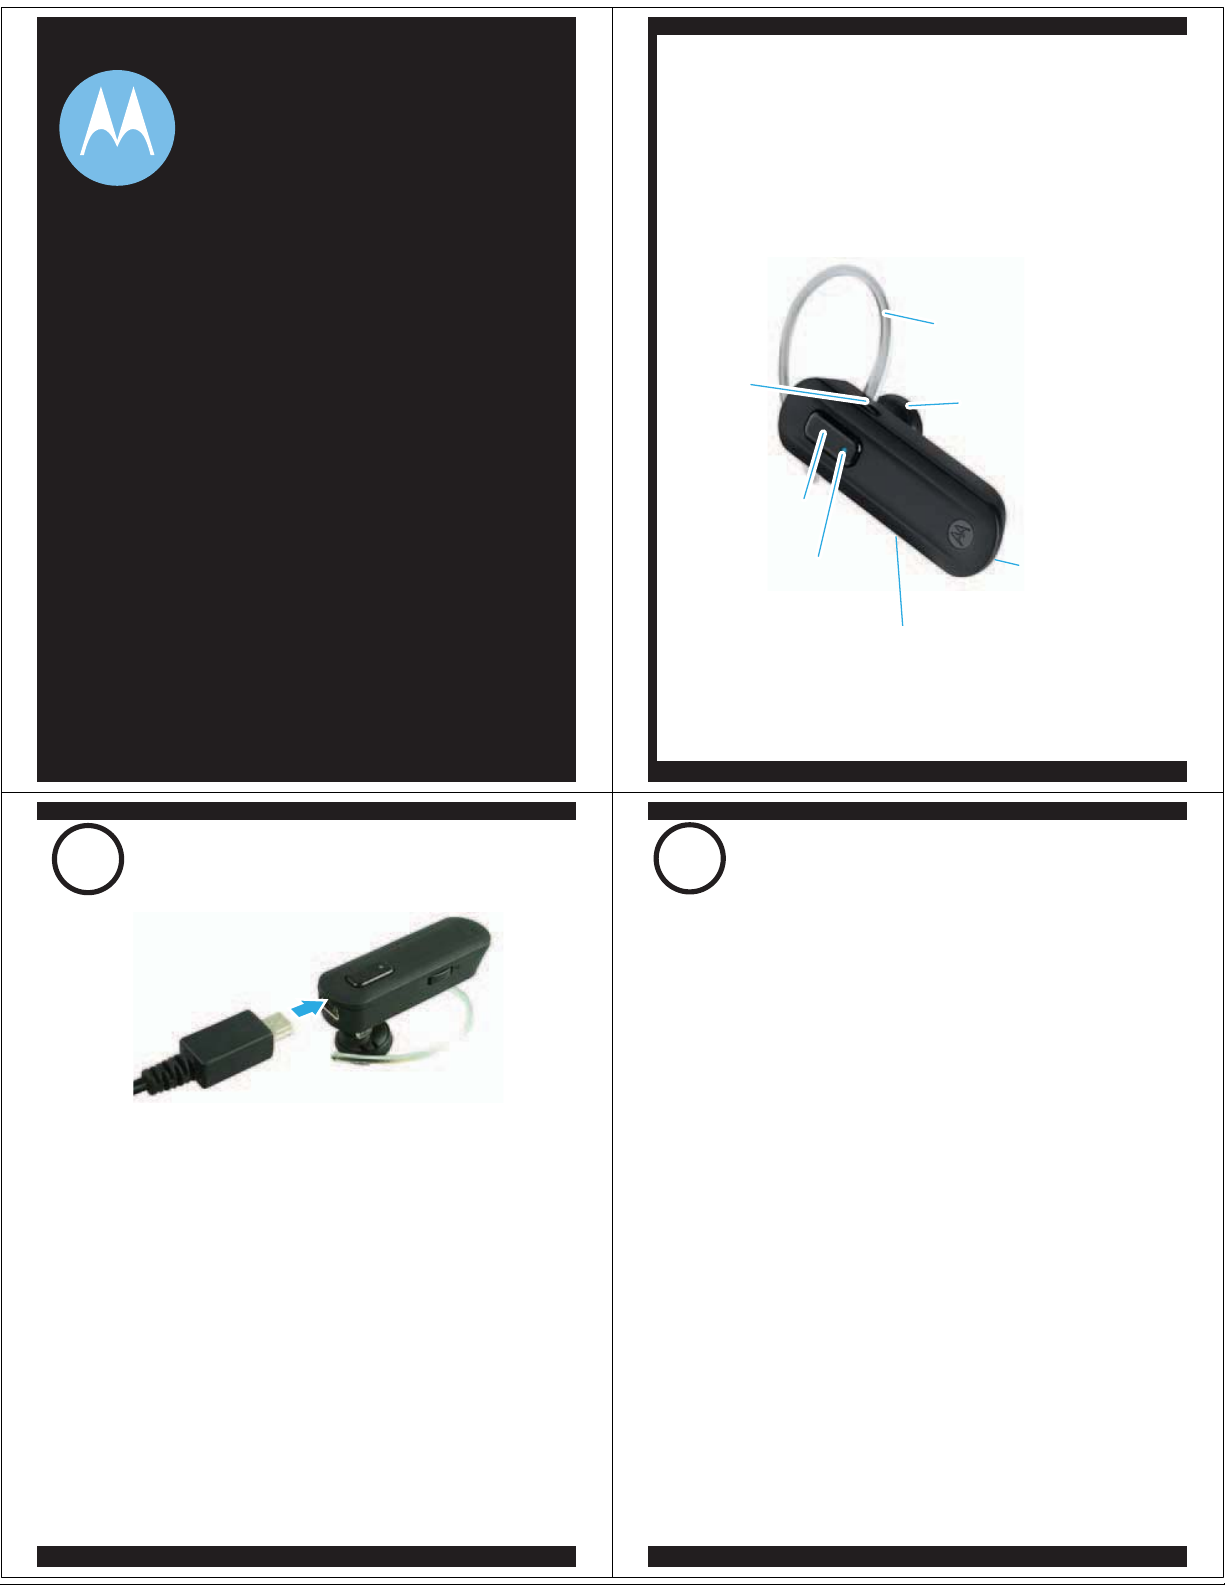
Your Headset's Battery
CHARGE
Volume
Button
Call Button
Indicator Light
Power Switch
Earhook
Speaker
Microphone
GET STARTED! >
2
START BLUETOOTH®
FEATURE
Your Phone
Verify slide switch is in the off position
1
(toward the charging port).
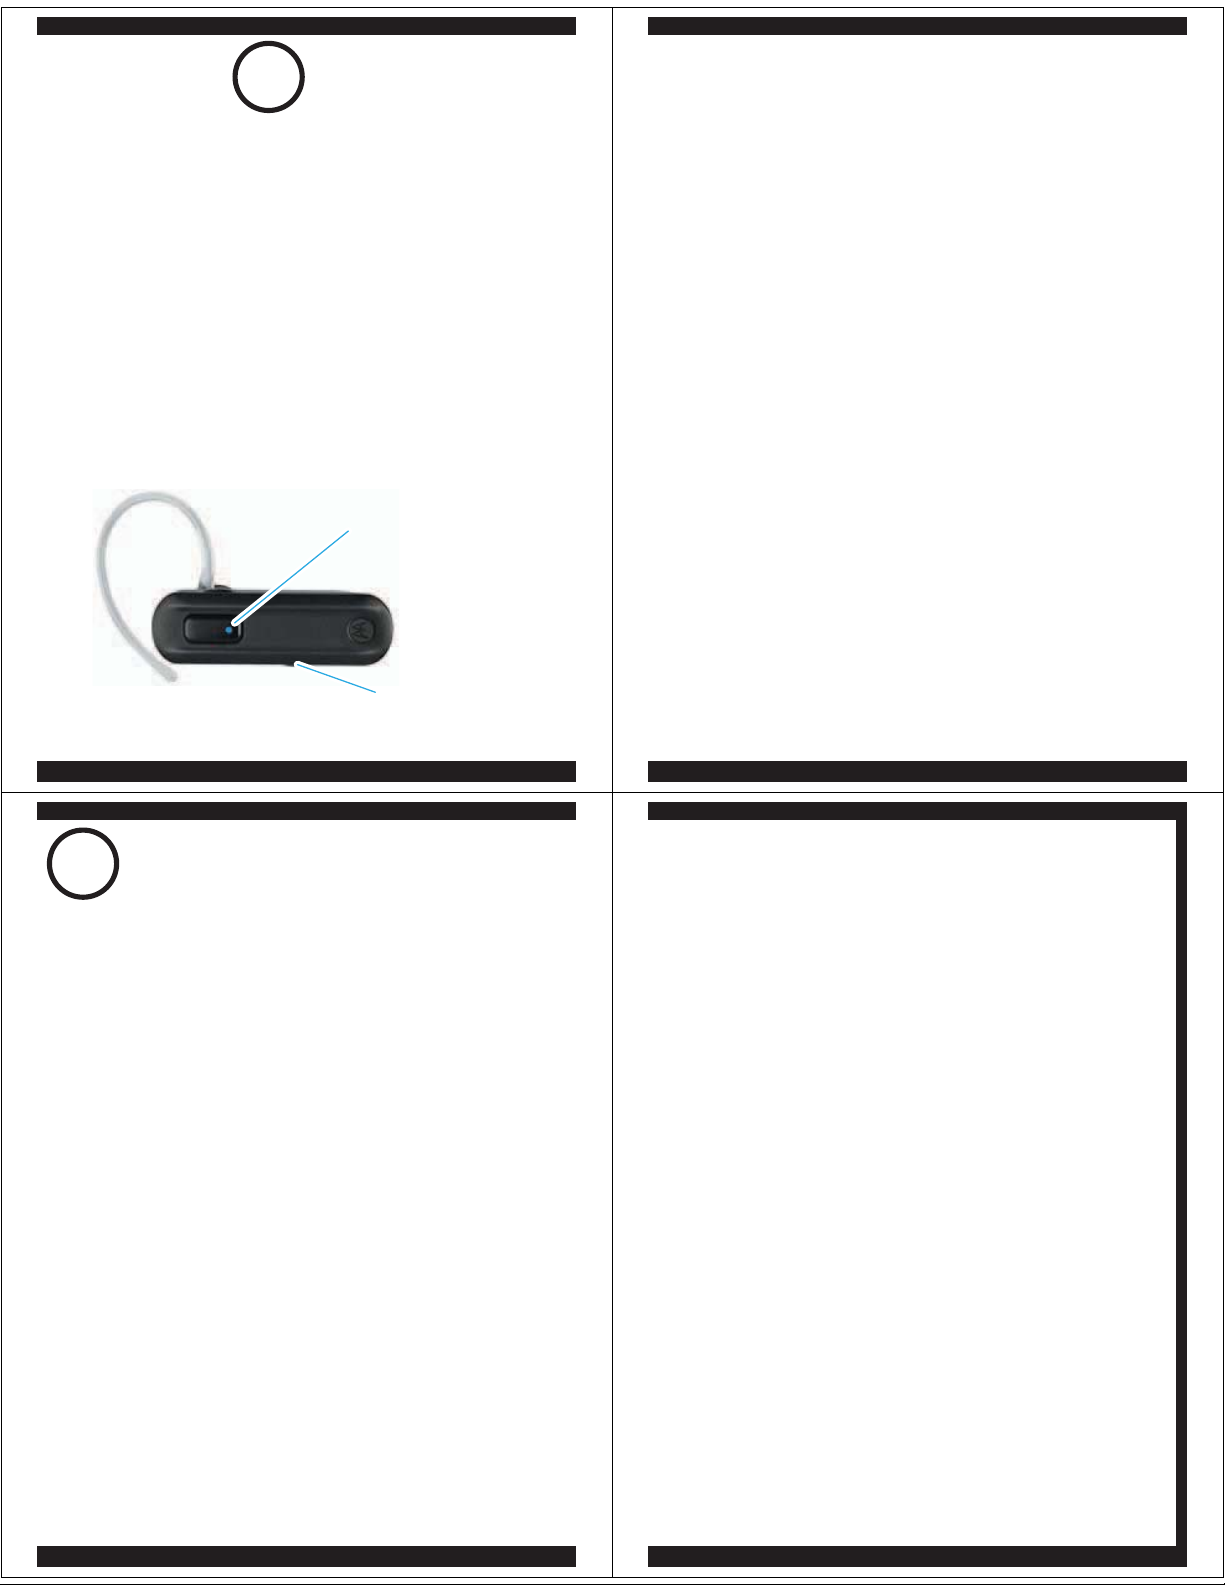
Plug the Motorola charger into the end of the
2
headset.
The indicator light turns red or purple when
the battery is charging. It may take up to 1
minute for the indicator light to turn on.
When the headset's battery is fully charged
(about 2 hours), the indicator light turns blue.
Disconnect the charger.
3
Note: Headset is not functional while charging.
Note: This product uses a lithium ion, rechargeable,
non-replaceable battery. Under normal use, the expected life
of the rechargeable battery is approximately 400 charges.
Your phone's Bluetooth feature is off by default.
To use your headset, you must turn on the
Bluetooth feature in your phone.
For most Motorola phones (at the main menu):
M
Press (
1
Bluetooth Link > Setup.
Scroll to Power.
2
Select Change.
3
Scroll to On.
4
Press Select to turn on the Bluetooth
5
feature. The Bluetooth feature remains on
until you turn the feature off.
Note: These steps are for most Motorola phones.
For other phones, see your phone's user's guide.
Menu) > Settings > Connection >
Page 2
3
h
Your Headset and P
Before you can use your headset, you must pair
(link) it with your phone.
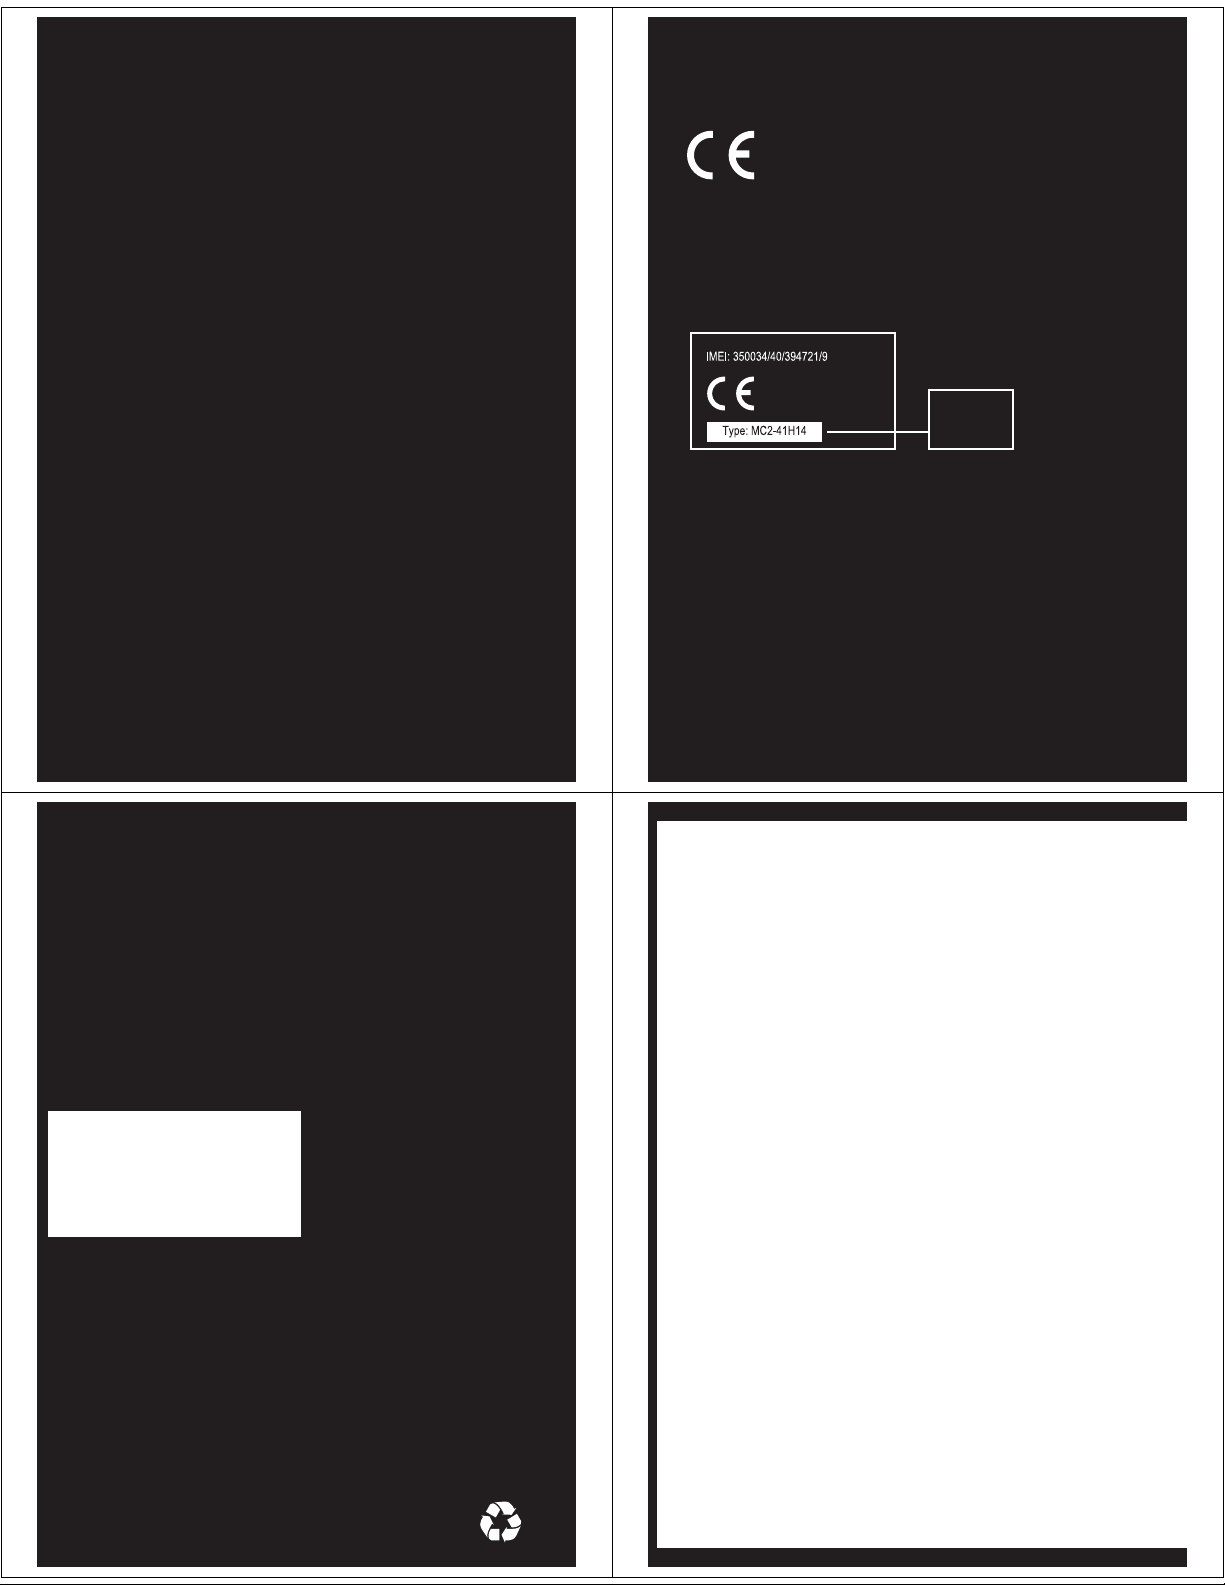
Step A - ENSURE HEADSET IS IN PAIRING
MODE
Power on headset by sliding the Power switch
towards the microphone to initiate easy
pairing. After a few moments, the indicator
light will be steadily lit in blue to indicate
headset is in pairing mode.
Indicator Light
(steadily blue
for pairing)
If the headset does not enter pairing mode,
see TROUBLESHOOTING for help.
PAIR
Power Switch
one
Step B - SET YOUR PHONE TO LOOK FOR
YOUR HEADSET
For most Motorola phones:
On your Motorola phone, press (
1
M
Settings > Connection > Bluetooth Link >
Handsfree > Look for Devices.
The phone lists Bluetooth devices it finds.
Select Motorola H270.
2
Select OK or Ye s to pair your headset with
3
your phone.
4
Enter the passkey: 0000
Select OK.
5
When your headset successfully pairs and
connects with your phone, the indicator
light changes from steadily lit to flashing
blue and purple.
Note: These steps are for most Motorola phones.
For other phones, see your phone's user's guide.
Menu) >
4
Your phone and headset are now paired and
ready to make and receive calls.
To make a call:
Place the headset over your ear.
1
On the phone, dial the number you want to
2
call and press SEND key on your phone.
If your phone and headset are successfully
paired, you will hear ringing on the headset.
After you have successfully paired your
phone and headset, you don't need to
repeat these steps. For daily use, ensure
that your headset is turned ON and that
your phone's Bluetooth feature is ON.
TEST AND USE
NOTES ON SETUP
Note: If desired, your headset can be restored to
original factory settings. This action will erase all pairing
information stored in your headset. Thus, you will need
to pair your phone and headset again (see step 3).
Note: To restore your headset to original factory
settings, press and hold both Volume and Call buttons
at the same time and slide Power switch to ON.
YOU ARE DONE!
Page 3
TROUBLESHOOTING
My headset will not enter pairing mode.
Make sure that any devices previously paired
with the headset are turned off. If the indicator
light is not steadily lit in blue, turn off both the
other device and headset, wait 10 seconds,
then turn headset back on. Wait for the indicator
light to become steadily lit in blue, indicating
the headset is now in pairing mode.
My phone doesn't find my headset.
Make sure the indicator light on your headset is
on (lit in blue) and steady when your phone is
searching for devices (see step 3).
My headset worked before but now it's not
working.
Make sure your phone is on and the Bluetooth
feature is turned on in your phone (see step 2).
If the Bluetooth feature was turned off or was
turned on only temporarily, you may need to
restart the Bluetooth feature (see step 2) and
pair your phone and headset again (see step 3).
European Union Directives
Conformance Statement
Hereby, Motorola declares that
this product is in compliance with:
• The essential requirements and
other relevant provisions of Directive
1999/5/EC.
• All other relevant EU Directives.
Product
Approval
Number
The above gives an example of a typical Product
Approval Number.
You can view your product’s Declaration of Conformity
(DoC) to Directive 1999/5/EC (to R&TTE Directive) at
www.motorola.com/rtte. To find your DoC, enter the
product Approval Number from your product’s label in
the “Search” bar on the web site.
Support.
If you need more help, contact us at
1-877-MOTOBLU or visit us at
www.motorola.com/Bluetoothsupport
Motorola, Inc.
Consumer Advocacy Office
1307 East Algonquin Road
Schaumburg, IL 60196
www.motorola.com
1-877-MOTOBLU
1-888-390-6456 (TTY/TDD United States for
hearing impaired)
Guide Number: 68000202001-A
Features and
Functions
IMPORTANT:
Be sure to first follow the
steps on the top row
of this guide
to complete initial setup
Bluetooth QD ID: B014546
MOTOROLA and the Stylized M Logo are registered in the US
Patent & Trademark Office. The use of wireless devices and their
accessories may be prohibited or restricted in certain areas.
Always obey the laws and regulations on the use of these
products. The Bluetooth trademarks are owned by their
proprietor and used by Motorola, Inc. under license. All other
product or service names are the property of their respective
owners.
© 2008 Motorola, Inc. All rights reserved.
of your H270.
Page 4

TURNING HEADSET
WEARING THE
ON AND OFF
To turn your headset on, slide the switch
toward the microphone. The indicator light
flashes blue three times, then flashes in
blue and purple (if connected with a device)
or is steadily blue (if ready to be paired).
To turn your headset off, slide the switch
toward the charging plug. The indicator light
flashes three times then turns off.
Indicator
Light
Power Switch
HEADSET
To wear your headset, flex the earhook and
loop it over your ear as shown.
Be sure to position the ear cushion into your
ear canal for optimal audio performance and
comfort.
CHANGING FOR USE
ON OTHER EAR
You can wear your H270 headset on your left or
right ear. The headset comes ready for the right
ear. To change the headset for the left ear:
Gently lift and pull the
1
top of the earhook up
and off speaker stem.
Flip the headset over.
2
Attach the earhook to
3
the speaker stem.
MAKING CALLS
Function Action
Receive a call Tap the Call button
Reject a call Press and hold a
Volume button until
the ringer stops
End a call Tap the Call button
Make a voice dial call Tap the Call button
and wait for voice
prompt
Answer second incoming Use phone to answer
call (follow your phone’s
instructions)
Note: Your H270 supports both Handsfree and Headset
Profiles. Accessing call functions depends upon which
profile your phone supports. See your phone's user's guide
for more information.
Note: Some features are phone/network dependent.
Page 5

INDICATOR LIGHT
With the Charger Plugged In
INDICATOR LIGHT
With No Charger Plugged In
Headset Indicator Headset Status
Red Charging (battery
level less than 70%
charge)
Purple Charging (battery
level more than 70%
charge)
Blue Charging complete
Note: Your battery is designed to last the life of the product.
It should only be removed by a recycling facility. ANY
ATTEMPT TO REMOVE OR REPLACE YOUR BATTERY
WILL DAMAGE THE PRODUCT.
Headset Indicator Headset Status
Off Power off
Three blue flashes Powering on/off
Steady blue Pairing/connect mode
Rapid blue/purple flashes Connection successful
Quick blue flash Incoming/outgoing call
Slow blue pulse Connected (on a call)
Slow blue flash Standby (not on a call)
Slow red flash Idle (not connected
to phone)
Steady red Attempting to connect
Quick red flash Low battery
Note: After 30 minutes on a call or of inactivity, the light stops
flashing to conserve power, but the headset remains on.
AUDIO TONES
Audio Tone Headset Status
Ascending tone Powering on
Two descending Powering off
tones
Ring tone Incoming call
Short tone when Volume level (high,
pressing Volume button medium, or low)
High/low tones Low battery
repeated every 60 sec.
No audio indications; Out of range
deteriorating quality
Two ascending tones Connected to phone
TROUBLESHOOTING
My phone does not find my headphones.
Make sure the L indicator light on your
headphones is on and steady when your phone
is searching for devices (see step 3).
My headphones worked with my phone
before but now their not working.
Make sure your phone is on and the Bluetooth
feature is turned on in your phone (see step 2). If
the Bluetooth feature has been turned off or was
turned on only temporarily, you may need to
restart the Bluetooth feature (see step 2). If you
have confirmed the Bluetooth feature is on in
your phone, pair your phone and headphones
again (see step 3).
Support.
If you need more help, contact us at
1-877-MOTOBLU or visit us at
www.hellomoto.com/bluetooth and click
Support.
Page 6

ANTES DE COMENZAR
Antes de usar este producto, lea el folleto Información Legal y de
Seguridad Importante y siga sus instrucciones.
Tome algunos minutos para familiarizarse con el
nuevo Audífono H270.
motorola
H270
Guía de inicio rápido
1
La batería de su audífono
CARGA
Botón de
volumen
Botón de
llamada
Luz indicadora
2
INICIO DE LA FUNCIÓN
Gancho para
la oreja
Altavoz
Interruptor de alimentación
INICIO >
BLUETOOTH
Su teléfono
Micrófono
®
Verifique que el interruptor de deslizamiento esté
1
en la posición apagado (hacia el puerto de carga).
Conecte el cargador Motorola en el extremo del
2
audífono.
La luz indicadora se enciende en rojo o en púrpura
cuando la batería se está cargando. El encendido
de la luz indicadora puede tardar hasta 1 minuto.
Cuando la batería del audífono está completamente
cargada (aproximadamente 2 horas), la luz
indicadora cambia a azul.
Desconecte el cargador.
3
Nota: el audífono no funciona mientras se carga.
Nota: este producto utiliza una batería de iones de litio recargable que
no se puede reemplazar. En circunstancias de uso normal, la vida útil
esperable de la batería recargable es de aproximadamente 400 cargas.
La configuración predeterminada de la función
Bluetooth del teléfono es desactivado. Para usar el
audífono, deberá activar la función Bluetooth en el
teléfono.
En la mayoría de los teléfonos Motorola (en el menú
principal):
M
Oprima
1
Enlace Bluetooth > Configuración
Desplácese a Encendido.
2
Seleccione Cambiar.
3
Desplácese a Activado.
4
Oprima Seleccionar para activar la función
5
Bluetooth. La función Bluetooth permanece
activada hasta que la desactiva.
Nota: estos pasos son comunes para la mayoría de los
teléfonos Motorola. Para otros teléfonos, consulte la guía
del usuario del teléfono.
(Menú) > Programación > Conexión >
.
Page 7

3
N
n
Antes de que pueda usar el audífono, debe asociarlo
(enlazarlo) con el teléfono.
Paso A: ASEGÚRESE DE QUE EL AUDÍFONO ESTÉ
EN MODO DE ASOCIACIÓN
Encienda el audífono deslizando el interruptor de
alimentación hacia el micrófono para iniciar la
asociación fácil. Después de un momento, la luz
indicadora se mantendrá encendida en azul para
indicar que el audífono está en modo de asociación.
Si el audífono no entra al modo de asociación,
consulte SOLUCIÓN DE PROBLEMAS para
obtener ayuda.
ASOCIACIÓ
Audífono y teléfo
Luz indicadora (se mantiene
encendida en azul en el
modo de asociación)
Interruptor de
alimentación
o
Paso B: PROGRAME EL TELÉFONO PARA QUE
BUSQUE EL AUDÍFONO
En la mayoría de los teléfonos Motorola:
1
En el teléfono Motorola, oprima
Programación > Conexión > Enlace Bluetooth > Manos
libres > Busc dispositivos
El teléfono muestra los dispositivos Bluetooth
encontrados.
2
Seleccione Motorola H270.
Seleccione OK o Sí para asociar el audífono con
3
el teléfono.
4
Ingrese la contraseña: 0000
5
Seleccione OK.
Cuando el audífono se asocia y conecta
correctamente con el teléfono, la luz indicadora
cambia de encendida en forma constante a azul y
púrpura destellante.
Nota: estos pasos son comunes para la mayoría de los
teléfonos Motorola. Para otros teléfonos, consulte la guía
del usuario del teléfono.
.
M
(Menú) >
4
El teléfono y el audífono están ahora asociados y
listos para realizar y recibir llamadas.
Para realizar una llamada:
Coloque el audífono en su oreja.
1
2
En el teléfono, marque el número al que desea
llamar y oprima la tecla ENVIAR.
Si el teléfono y el audífono se asociaron
correctamente, escuchará un timbre en el
audífono.
Una vez que haya asociado correctamente el
teléfono con el audífono, no es necesario repetir
estos pasos. Para el uso diario, asegúrese de
que tanto el audífono como la función Bluetooth
del teléfono estén activados.
PRUEBA Y USO
NOTAS SOBRE LA
CONFIGURACIÓN
Nota: si lo desea, el audífono se puede restablecer a la
programación original de fábrica. Esta acción borrará
toda la información de asociación almacenada en el
audífono. Por lo tanto, deberá volver a asociar el
teléfono y el audífono (consulte el paso 3).
Nota: para restablecer el audífono a la programación
original de fábrica mantenga oprimidos ambos
botones de volumen y el botón Llamar al mismo
tiempo y deslice el interruptor de alimentación a la
posición de encendido.
LISTO
Page 8

SOLUCIÓN DE PROBLEMAS
El audífono no entra al modo de asociación.
Asegúrese de que todos los dispositivos
previamente asociados con el audífono estén
desactivados. Si la luz indicadora no se mantiene
encendida en azul, apague el otro dispositivo y el
audífono, espere 10 segundos y vuelva a encender
el audífono. Espere a que la luz indicadora se
mantenga encendida en azul, lo que indica que
el audífono está en modo de asociación.
El teléfono no encuentra el audífono.
Asegúrese de que la luz indicadora del audífono esté
encendida (en azul) y sea constante cuando el teléfono
esté buscando dispositivos (consulte el paso 3).
El audífono funcionó antes, pero ahora
no funciona.
Asegúrese de que el teléfono esté encendido y que
la función Bluetooth esté activada en el teléfono
(consulte el paso 2). Si se ha desactivado la función
Bluetooth o se activó sólo temporalmente, es posible
que deba reiniciarla (consulte el paso 2) y volver a
asociar el teléfono y el audífono (consulte el paso 3).
Soporte.
Si necesita ayuda adicional visítenos en
www.motorola.com/Bluetoothsupport
Declaración de Conformidad con las
directivas de la Unión Europea
Mediante la presente, Motorola declara
que este producto cumple con:
• Los requisitos esenciales y demás provisiones
pertinentes de la Directiva 1999/5/EC.
• Todas las demás directivas pertinentes
de la UE.
Número de
Tipo:
Lo anterior constituye un ejemplo de un Número de
aprobación de producto común.
Puede ver la Declaración de Conformidad (DoC) del
producto con la Directiva 1999/5/EC (Directiva R&TTE)
en www.motorola.com/rtte. Para encontrar la DoC,
ingrese el Número de aprobación que aparece en
la etiqueta del producto en la barra “Buscar” del
sitio Web.
aprobación
de producto
Motorola, Inc.
Consumer Advocacy Office
1307 East Algonquin Road
Schaumburg, IL 60196
www.motorola.com
0800 666 8676 (Argentina)
800-201-442 (Chile)
01-800-700-1504 (Colombia)
01 800 021 0000 (México)
0800-100-4289 (Venezuela)
0-800-52-470 (Perú)
Número de guía: 68000202001-A
ID de Bluetooth QD: B014546
MOTOROLA y el logotipo de la M estilizada están registrados
en la Oficina de patentes y marcas registradas de los
Estados Unidos. Es posible que el uso de dispositivos inalámbricos
y de sus accesorios esté prohibido en algunas áreas. Cumpla
siempre con las leyes y regulaciones sobre el uso de estos
productos. Las marcas comerciales Bluetooth pertenecen a
su propietario y son utilizadas por Motorola, Inc. bajo licencia.
Todos los demás nombres de productos o de servicios
pertenecen a sus respectivos dueños.
© 2008 Motorola, Inc. Todos los derechos reservados.
Características
y funciones
IMPORTANTE:
Primero, asegúrese de seguir
los pasos de la parte superior
de esta guía, para completar la
configuración inicial del H270.
Page 9

ENCENDIDO Y APAGADO
USO DEL
DEL AUDÍFONO
Para activar el audífono, deslice el interruptor
hacia el micrófono. Ésta destella en azul tres
veces, luego destella en azul y en púrpura (si se
conecta con un dispositivo) o permanece
encendida en azul (si está listo para la
asociación).
Para desactivar el audífono, deslice el
interruptor hacia el enchufe de carga. La luz
indicadora destella tres veces y luego se apaga.
Luz
indicadora
Interruptor de
alimentación
AUDÍFONO
Para usar el audífono, doble el gancho para la
oreja y páselo sobre la oreja como se indica.
Asegúrese de colocar la almohadilla para
auriculares en el canal de la oreja para que el
audio sea el óptimo, y su uso, cómodo.
CAMBIO PARA USO
EN LA OTRA OREJA
Puede usar el audífono H270 en la oreja izquierda o
derecha. Este audífono está listo para usarse en la
oreja derecha. Si desea usarlo en la oreja izquierda:
Levante y tire suavemente
1
la parte superior del
gancho para la oreja,
sacándolo de la varilla
del altavoz.
Dé vuelta el audífono.
2
Fije el gancho para la oreja
3
a la varilla del altavoz.
CÓMO REALIZAR
LLAMADAS
Función Acción
Recibir una llamada Oprima el botón
ed llamada
Rechazar una llamada Mantenga oprimido el
botón de volumen hasta
que el timbre deje de sonar.
Finalizar una llamada Oprima el botón
ed llamada
Realizar una llamada Pulse el botón de llamada
de marcado por voz y espere la instrucción
ed voz
Conteste una segunda Uso del teléfono para
llamada entrante contestar (siga las
senoiccurtsni de
us teléfono)
Nota: el H270 es compatible con los perfiles Manos libres y
Audífono. El acceso a las funciones de llamada depende del
perfil compatible con el teléfono. Consulte la guía del
usuario del teléfono para obtener más información.
Nota: algunas funciones dependen del teléfono o de la red.
Page 10

LUZ INDICADORA
Con el cargador conectado
LUZ INDICADORA
Sin el cargador conectado
Indicador del audífono Estado del audífono
Rojo Carga (nivel de batería
inferior al 70%)
Púrpura Carga (nivel de batería
superior al 70%)
agraC luzA completa
Nota: la batería está diseñada para durar lo que dura el
producto. Sólo se debe eliminar en una instalación de
reciclaje. CUALQUIER INTENTO DE RETIRAR O
REEMPLAZAR LA BATERÍA DAÑARÁ EL PRODUCTO.
Indicador del audífono Estado del audífono
Desactivar Unidad apagada
Tres destellos azules Durante encendido
o apagado
Azul fijo Modo de asociación/
nóixenoc
Destellos rápidos Conexión exitosa
en azul o púrpura
Azul destello rápido Llamada entrante o
saliente
Azul pulso lento Conectado (llamada en
curso)
Azul destello lento En reposo (no durante
una llamada)
Roja destello lento En reposo (no está
conectado a un teléfono)
Roja fija Intentando reconectar
Destello en rojo rápido Batería baja
Nota: después de 30 minutos en una llamada o de inactividad, la luz
deja de destellar para ahorrar energía, pero el audífono permanece
encendido.
TONOS DE AUDIO
Tono de audio Estado del audífono
Tono ascendente Durante encendido
Dos tonos descendentes Durante apagado
Tono de timbre Llamada entrante
Tono corto cuando oprime Nivel de volumen
el botón de volumen (alto, medio o bajo)
Tonos altos y bajos que Batería baja
se repiten cada 60 seg.
Sin indicaciones de audio; Fuera de alcance
deterioro de la calidad
Dos tonos ascendentes Conexión al teléfono
TROUBLESHOOTING
My phone does not find my headphones.
Make sure the L indicator light on your
headphones is on and steady when your phone
is searching for devices (see step 3).
My headphones worked with my phone
before but now their not working.
Make sure your phone is on and the Bluetooth
feature is turned on in your phone (see step 2). If
the Bluetooth feature has been turned off or was
turned on only temporarily, you may need to
restart the Bluetooth feature (see step 2). If you
have confirmed the Bluetooth feature is on in
your phone, pair your phone and headphones
again (see step 3).
Support.
If you need more help, contact us at
1-877-MOTOBLU or visit us at
www.hellomoto.com/bluetooth and click
Support.
 Loading...