

Page 1
GP640
GP340
GP640
Page 2
1
7
2
8
3
9
4
5
6
10
11
Page 3

BASIC USER GUIDE
C
CONTENTS
BASIC USER GUIDE
GeneralInformation................. 2
Notes.............................10
Operation and Control Functions. . .... 3
Radio Controls . . . . . . . . . . . . . . . . . . . . . . 3
Audio Signal Tones . . . . . . . . . . . . . . . . . . 4
GettingStarted..................... 6
Radio On-Off/Volume Control . . . . . . . . . . 6
Radio Operation . . . . . . . . . . . . . . . . . . . . . 6
Sending a Call . . . . . . . . . . . . . . . . . . . . . . 6
Receiving a Call . . . . . . . . . . . . . . . . . . . . . 6
Cancelling or Ending a Call . . . . . . . . . . . . 6
BatteryInformation................. 7
Battery Care and Tips . . . . . . . . . . . . . . . . 7
Recycling or Disposal of Batteries . . . . . . . 8
Charging the Battery . . . . . . . . . . . . . . . . . 8
Attaching and Removing Accessories. . 9
Attaching/Removing the Battery. . . . . . . . . 9
Attaching/Removing the Belt Clip. . . . . . . . 9
opyrightInformation
The Motorola products described in this manual may include copyrighted Motorola
computer programs stored in semiconductor memories or other mediums. Laws in
the United States and other countries preserve for Motorola certain exclusive
rights for copyrighted computer programs, including the exclusive right to copy or
reproduce in any form the copyrighted computer program. Accordingly, any
copyrighted Motorola computer programs contained in the Motorola products
described in this manual may not be copied or reproduced in any manner without
the express written permission of Motorola. Furthermore, the purchase of
Motorola products shall not be deemed to grant either directly or by implication,
estoppel, or otherwise, any licence under the copyrights, patents, or patent
applications of Motorola, except for the normal non-exclusive royalty-free licence to
use that arises by operation of the law in the sale of a product.
1
English
Page 4
GENERAL INFORMATION
This user guide covers the basic operation of the
GP640 Portable Radio. Please consult your dealer for
further, more detailed information which is contained in
a full feature user guide 68P64110B24_.
Before using this product, read the operating
instructions for safe usage contained in the
!
Product Safety and RF Exposure booklet
Caution
68P64117B25_ enclosed with your radio.
BASIC USER GUIDE
English
This radio is restricted to occupational use only to satisfy
ATTENTION!
ICNIRP RF energy exposure requirements. Before using
this product, read the RF energy awareness information
and operating instructions in the Product Safety and RF
Exposure booklet (Motorola Publication part number
68P64117B25_) to ensure compliance with RF energy
exposure limits.
2
Page 5

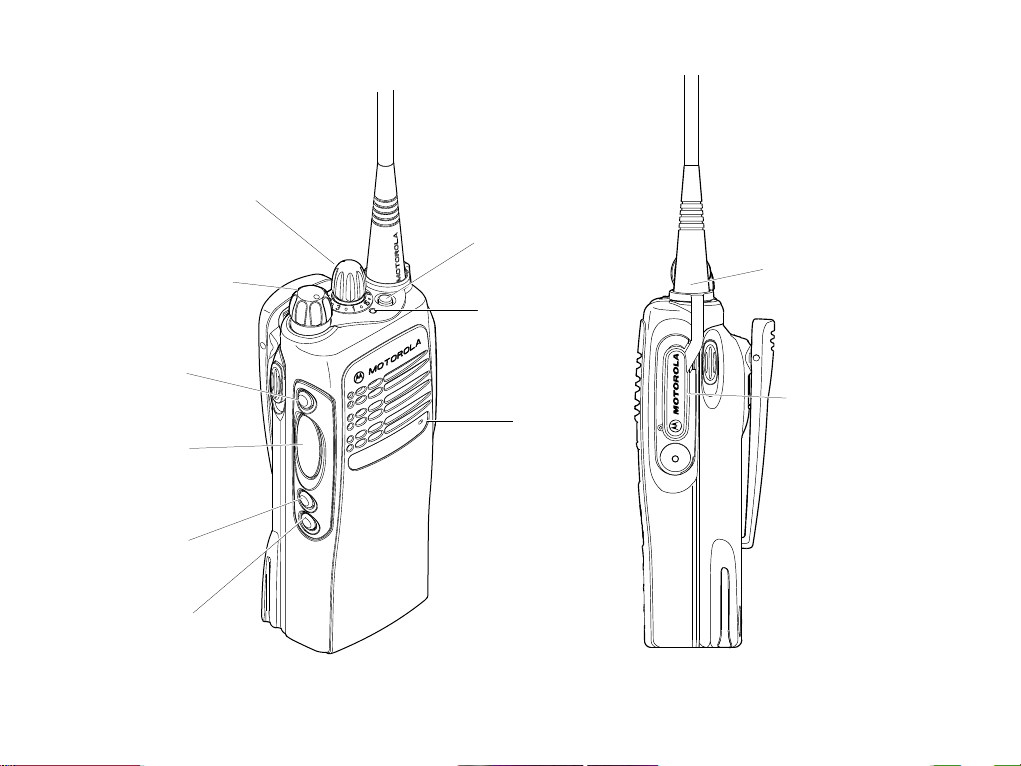
OPERATION AND CONTROL FUNCTIONS
Radio Controls
The numbers below refer to the illustrations on the
inside front cover.
10. Antenna
11. Accessory Connector
Connects headsets, remote speaker/
microphones and other accessories. Replace
attached dust cap when not in use.
BASIC USER GUIDE
1. Rotary Knob (16 position)
Used as a channel selector (Conventional
mode)
2. On-Off / Volume Knob
Used to turn the radio on or off, and to adjust
the radio’s volume.
3. Clear Button (Side Button 1)
Used to cancel a call, clear down at the end of
a call or Carrier Monitor (Conventional mode).
4. Push to Talk Button (PTT)
Press and hold down this button to talk, release
it to listen.
5. Side Button 2
Personality button, otherwise programmable.
6. Side Button 3 (programmable)
7. Top Button (programmable)
Recommended as Emergency button.
8. LED Indicator
Green: Flashes to indicate NO SERVICE.
Red: On when radio is transmitting.
Red Flashing: When transmitting - battery low.
Red Flashing: When receiving - channel busy
(Conventional Mode)
9. Microphone
Note:The programmable buttons can be
programmed by the Customer Programming
Software (CPS) as short-cut buttons for many
of the radio’s features. Check with your dealer
for a complete list of the functions your radio
supports.
3
English
Page 6

Audio Signal Tones (Normal)
High pitched tone Low pitched tone
Tone Signal Description
Self test Power up.
Tone A Call clear indication.
BASIC USER GUIDE
Tone B
Tone C1 System busy.
Tone C2 Unavailable.
Tone C3 Called party busy.
Tone C4 Invalid number.
Tone D
Tone F
Tone G
Tone H Invalid entry.
allocated or PTT/ Mic/
Loudspeaker enabled.
Call set up in progress,
confirmed, called unit
Look at display for
System information.
Traffic channel
wait for further
indications.
Transaction
will call back.
call set up or
Tone Signal Description
Confidence tone when
Key click
Fail tone
Tone I Low battery warning.
Tone K1 Voice Storage recording.
Tone K2 Voice Storage warning.
Tone K3 Voice Storage full.
Tone L1 1st Personality.
Tone L2 2nd Personality.
Tone M1 Talkgroup Confirmation.
Tone M2 Talkgroup unavailable.
Tone N1 Out of range alert.
Ringtones
English/French/
General
any key pressed or
Call ending alert.
Hardware error or
Call timed out
(conventional mode).
Incoming call, press
PTT, then wait for
further indications.
English
4
Page 7

Audio Signal Tones (Alternative)
High to Low pitched tones
Tone Signal Description
Self test Power up.
Tone A Call clear indication.
Traffic channel
Tone B
Tone C1 System busy.
Tone C2
Tone C3 Called party busy.
Tone C4 Invalid number.
Tone D
Tone F
Tone G
allocated or PTT/ Mic/
Loudspeaker enabled.
Unavailable.
Call set up in progress,
wait for further
indications.
Transaction
confirmed, called unit
will call back.
Look at display for
call set up or
System information.
Tone Signal Description
Tone H Invalid entry.
Key click
Fail tone
Tone I Low battery warning.
Tone K1 Voice Storage recording.
Tone K2 Voice Storage warning.
Tone K3 Voice Storage full.
Tone L1 1st Personality.
Tone L2 2nd Personality.
Tone M1 Talkgroup Confirmation.
Tone M2 Talkgroup unavailable.
Tone N1 Out of range alert.
Ring
tones
English/French/
General
Confidence tone when
any key pressed or
Speech limitation alert.
Hardware error or
Call timed out
(conventional mode).
Incoming call, press
PTT, then wait for
further indications.
BASIC USER GUIDE
5
English
Page 8

GETTING STARTED
Receiving a Call
Radio On-Off/Volume Control
To turn the radio on, turn the On-Off/Volume Control
knob clockwise. To turn the radio off, turn the
On-Off/Volume Control knob counterclockwise until
you hear a click.
BASIC USER GUIDE
Radio Operation
When the self test is complete the self test tone will
sound. The radio will then scan for system access with
the LED on the top of the radio flashing GREEN.
When a system is acquired, the green LED will go off.
Making a Call
Before you can make a call the radio must be in the
IDLE STATE, i.e. a personality has been selected and
no call is in progress.
The radio is capable of making a variety of calls,
including calls to individual radios, groups of radios
and calls to private and public telephone systems.
Please contact your dealer for further information.
There are two types of systems on which the radio
may be used, Off Air Call Set Up (OACSU) and Full Off
Air Call Set Up (FOACSU). If you are in doubt about
which system you are operating on, please consult
your dealer.
Receiving a call on an OACSU system -
When the radio is called tone D will sound and the
LED flashes. This will then be followed by tone B.
Receiving a call on an FOACSU system -
When the radio is called, a ringing tone will sound
and the LED flashes.
Press the PTT to accept the call. Tone D will sound
until a speech channel is allocated, then tone B
sounds.
Note:The system may have a limited call time and
the call may be terminated automatically if this
call time is exceeded.
Cancelling or Ending a Call
At any time while setting up a call it may be cancelled
by pressing the clear button. The call timer can also
cancel calls.
A call should always be ended by pressing the clear
button.
English
6
Page 9

BATTERY INFORMATION
Battery Care and Tips
This product is powered by a nickel-cadmium (Ni-Cd),
nickel-metal-hydride (NiMH), or lithium-ion
rechargeable battery.
The following battery tips will help you obtain the
highest performance and longest cycle life from your
Motorola rechargeable battery.
• Charge your new battery overnight (14-16 hrs)
before using it to obtain maximum battery
capacity and performance.
• Charging in non-Motorola equipment may lead
to battery damage and void the battery warranty.
• When charging a battery that is attached to the
radio, turn the radio off to ensure a full charge.
• The battery should be at about 25°C/77°F (room
temperature) whenever possible. Charging a
cold battery (below 10°C/50° F) may result in
leakage of electrolyte and ultimately, in failure of
the battery.
• Charging a hot battery (above 35°C/95°F)
results in reduced discharge capacity, affecting
the performance of the radio. Motorola rapid-rate
battery chargers contain a temperature-sensing
circuit to ensure that the battery is charged
within these temperature limits.
• New batteries can be stored up to two years
without significant cycle loss. Store new/unused
batteries in cool dry area.
• Batteries which have been in storage should be
charged overnight.
• Do not return fully charged batteries to the
charger for an “extra boost”. This action will
significantly reduce battery life.
• Do not leave your radio and battery in the
charger when not charging. Continuous charging
will shorten battery life. (Do not use your charger
as a radio stand.)
• For optimum battery life and operation use only
Motorola brand chargers. They were designed to
operate as an integrated energy system.
BASIC USER GUIDE
7
English
Page 10

Recycling or Disposal of Batteries
At the end of its useful life, the NiCd battery
can be recycled. However, recycling
facilities may not be available in all areas.
Motorola endorses and encourages the recycling of all
re-chargeable batteries. Please contact your dealer for
further information.
BASIC USER GUIDE
Charging the Battery
If a battery is new, or its charge level is very low, you
will need to charge the battery before you can use it in
your radio.
Note: Batteries are shipped uncharged from the
factory. New batteries could prematurely
indicate full charge, charge a new battery for
14-16 hrs before initial use.
Charger LED Status
NiCd
Red Battery is charging
Green Battery is fully charged
Flashing Red * Battery is unchargeable
Flashing Yel lo w Charger is getting ready to charge
Flashing Green Battery is 90% charged
*
Battery is damaged. Please contact your dealer.
1. Place the radio with the battery attached, or the
battery alone, in the charger.
2. The charger’s LED indicates the charging
progress.
Battery chargers will charge only the Motorola
authorized batteries listed below; other batteries will
not charge.
Part No. Description
English
HNN9008
HNN9009
HNN9010
HNN9011
HNN9012
HNN9013
High-Capacity NiMH
Ultra-High-Capacity NiMH
Ultra-High-Capacity Factory Mutual NiMH
High-Capacity Factory Mutual NiCd
High-Capacity NiCd
Lithium-Ion
8
Page 11

ACCESSORY INFORMATION
Attaching the Battery
1. Fit the extensions
at the bottom of the
battery into the
slots at the bottom
of the radio’s body.
2. Press the top part
of the battery
towards the radio
until you hear a
click.
2
Slots
Attaching the Belt Clip
BASIC USER GUIDE
1. Align the grooves of
the belt clip with those
of the battery.
2. Press the belt clip
downwards until a
click is heard.
1
Battery
Latches
1
Removing the Battery
Ensure radio is switched off.
1. Slide the battery
latches, on both sides of
the battery, downwards.
2. Pull the top part of the
battery away from the
radio’s body, and remove
the battery.
2
Belt Clip Tab
1
2
Removing the Belt Clip
1. Use a key to press
the belt clip tab away
from the
battery.
2. Slide the belt clip
upwards to remove it.
9
English
Page 12

NOTES
NOTES
English
10
Page 13

Page 14

and Motorola are registered trademarks of Motorola Inc.
Professional Radio and GP are trademarks of Motorola Inc.
© 2003 Motorola, Inc. All rights reserved.
Printed in the European Union.
6864110B14 - B
EN
DE
FR
ES
IT
PR
DA
SV
NL
RU
CZ
HU
PL
RO
TU
 Loading...