

Page 1
DCX3501-M
HD Dual Tuner DVR
Quick Start Guide
Page 2
Before You Begin
The DCX3501-M HD DVR has a 500GB hard drive allowing forapproximately
72-hours of HD record time (this may vary based on programming and other
recordings). A full User Guide is not available at this time.
Not currently available online.
Introduction
Congratulations on receiving a Motorola DCX3501-M HD Dual Tuner DVR. This document will help you set up your DCX3501-M set-top to quickly
get it up and running.
READ THIS FIRST
1. Determine if you are connecting to a:
High-Definition TV (HDTV)
or monitor
Standard-Definition TV Use the RF Out connector on the DCX set-top, if the TV does not support S-Video or composite video
2. Determine if you are connecting the audio to a home theater receiver or directly to the TV:
• For an HDMI or IEEE-1394 video connection, no additional audio connections to the TV are required.
• For a DVI video connection, additional audio connections to the TV are required.
• If the receiver or TV has a digital audio (S/PDIF) input, use the Digital Audio (S/PDIF) output. Otherwise, use the left and right (RCA phono)
audio outputs.
3. Locate the cabling diagram(s) that best match the configuration.
4. Connect the audio and video cables in a manner matching that diagram.
5. Connect the Cable In terminal to the coaxial cable wall outlet.
6. Connect the power cord to the set-top and the electrical wall outlet.
7. Perform the operational check for the remote control.
8. Optimize the high-definition settings.
Use the HDMI, component video (YPbPr), or IEEE-1394 outputs. No other video connection supports HDTV.
If the TV has no HDMI input but does have a DVI input, connect a DVI-to-HDMI adapter or cable to the HDMI
out connector on the DCX set-top and the DVI input connector on the TV.
connections. The RF connection carries video and audio.
Additional information for adjusting user settings
The DCX set-top User Settings menu allows you to adjust the video, audio, and closed captioning configuration of the set-top.
The User Settings menu can be accessed from the DCX set-top remote by pressing Power and then Menu within 2 seconds.
For more detailed instructions on changing the set-top configuration through the User Settings menu, please refer to the DCX3501-M User
Guide available online at http://motorola.com/homevideo/support.
DCX3501-M Quick Start Guide 1
Page 3
Before You Begin
...Not active at this time.
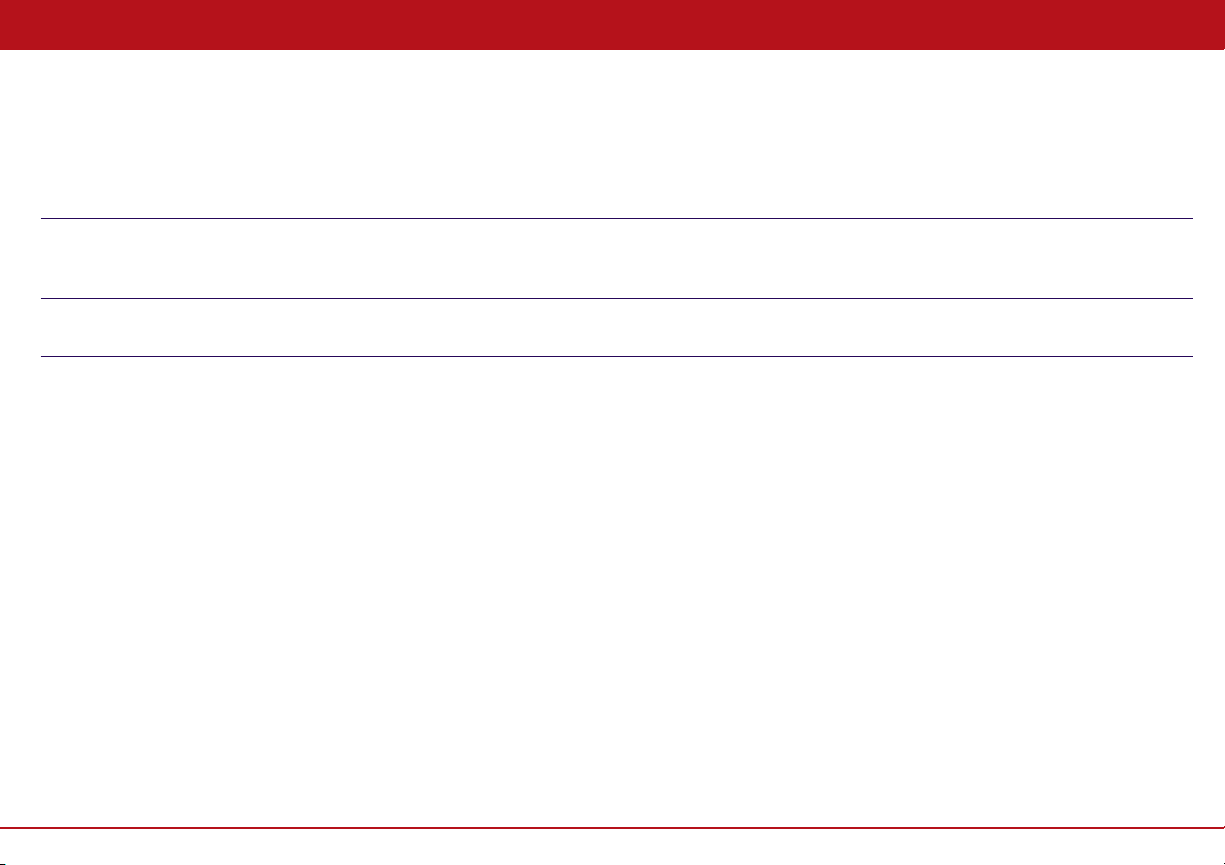
Front Panel
The front panel provides Power, Message, Data, and Home LAN indicators, Output
video format indicator, 4-character 7-segment display, two Recording indicators, IR
remote control sensor, and buttons.
Cursor — Menu navigation
1
Select — Selects menu options
2 Power — Turns the set-top on and off (standby)
3 Menu — Displays the menu
4 Guide — Displays the program guide
5 Info — Displays current channel and program information
6 Format* — Changes the video output format
7 Channel — Changes channel up or down
*Availability of certain features is dependent upon application support
Rear Panel
The rear panel contains a power input; connectors for video, audio, and RF cabling; data output; and data interface connectors. Some
connectors are not enabled and require the support of application software.
1 Cable In — Connects to the signal from your service provider
2 RF Out — Ch 3/4 modulated audio/video (SDTV) to TV or VCR
3 S-Video — Connects to S-Video (SDTV) input of TV or VCR
4 Digital Audio (S/PDIF)* — Provides Dolby® Digital 5.1 audio or PCM output
5 YPbPr — Component video output (HDTV)
6 Video — Composite video (SDTV) output
7 Audio — Audio L/R outputs
8 eSATA* — External Serial ATA disk interface
9 HDMI — HDTV audio and video connector
10 USB* 2.0 — High-Speed peripheral device connection
11 Ethernet* — Network connection
12 IR Remote Input — Connects to a remote control set-top accessory cable
13 IEEE-1394 — Audio and HDTV video device connection (US models only)
14 Power cord connector — DC input
*Feature is dependent upon application support
2DCX3501-M Quick Start Guide
Page 4
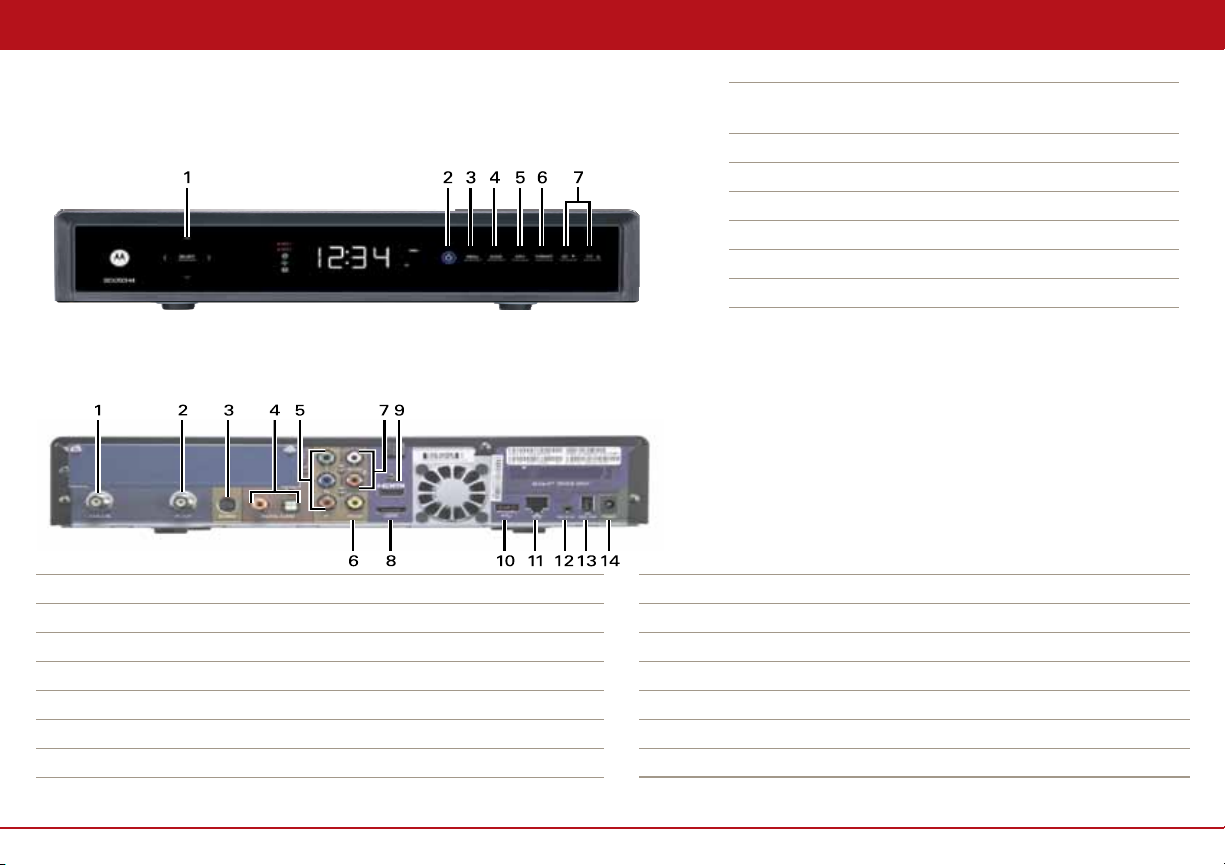
Connecting Your Device
Cabling to an HDTV for Video
For the best possible HDTV video quality:
1. If the TV has an HDMI input, connect it to the DCX
set-top HDMI output. If the TV has a DVI input,
connect it to the DCX set-top HDMI output using an
HDMI-to-DVI converter cable or adapter.
2. If the TV has neither an HDMI nor a DVI input but has
an IEEE-1394 input, connect it to the DCX set-top
IEEE-1394 output.
If you use IEEE-1394, on-screen graphics do not
display. Other wise, use the component video (Y, Pb,
and Pr) connectors.
Note: Be sure to match up each signal to the same
connection on the TV. Otherwise, the colors will not
appear correctly on your TV.
L/R Audio connection or digital audio S/PDIF
connection is required for sound with component
video.
DCX3501-M Quick Start Guide
Note: Because HDMI provides both video and audio output, no
additional audio connections to the TV are required.
3
Page 5
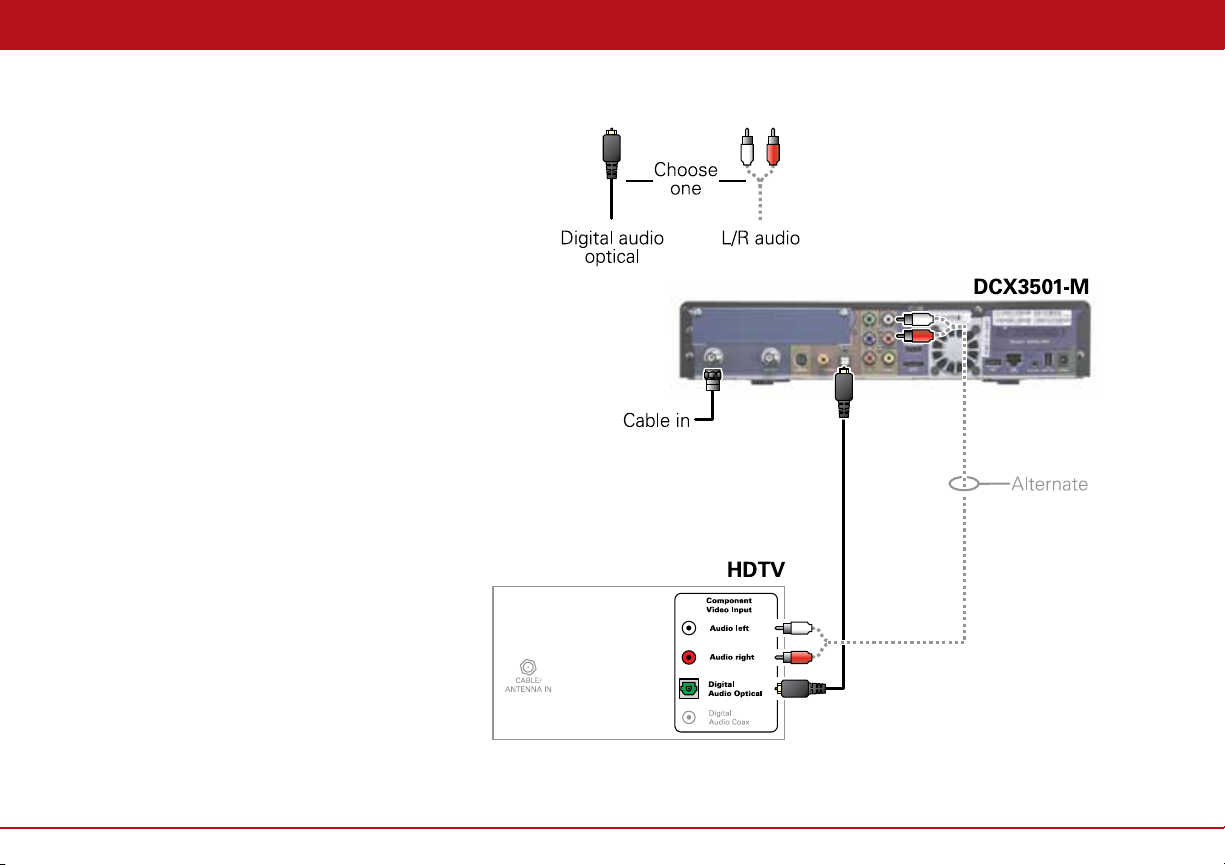
Connecting Your Device
Cabling to an HDTV for Audio
DCX3501-M Quick Start Guide
4
Page 6
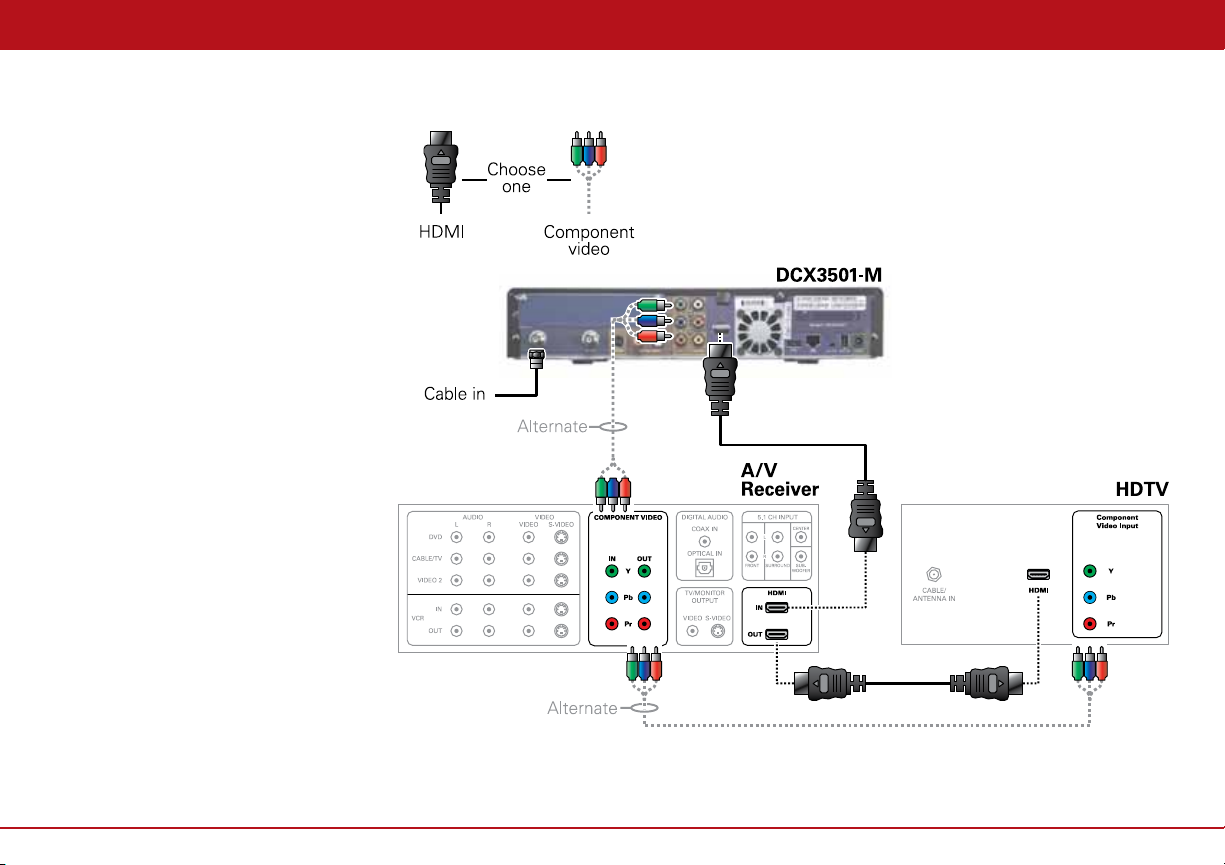
Connecting Your Device
Cabling to an HDTV and an A/V Receiver for Video
Note: If the A/V receiver
includes an HDMI input and
output, the DCX set-top HDMI
output can be connected directly
to the A/V receiver’s input and
the A/V receiver’s HDMI output
directly to the TV. Because HDMI
provides both video and audio
output, no additional audio
connections to the A/V Receiver
and TV are required.
DCX3501-M Quick Start Guide
5
Page 7

Connecting Your Device
Cabling to an HDTV and an A/V Receiver for Audio
Note: If the A/V receiver
includes an HDMI input and
output, the DCX set-top HDMI
output can be connected directly
to the A/V receiver’s input and
the A/V receiver’s HDMI output
directly to the TV. Because HDMI
provides both video and audio
output, no additional audio
connections to the A/V Receiver
and TV are required.
DCX3501-M Quick Start Guide
6
Page 8

Connecting Your Device
Cabling to a Standard-Definition TV
Note: This connection method
does not support HDTV. For
information, see Cabling to an
HDTV for Video.
DCX3501-M Quick Start Guide
7
Page 9

Connecting Your Device
Cabling to a Standard-Definition TV, A/V Receiver, and VCR
Note: This connection method
does not support HDTV. For
information, see Cabling to an
HDTV for Video.
If degraded picture quality is
observed while viewing copyprotected limited view programs.
do not connect through a VCR.
Instead, connect the set-top
directly to the TV (see illustration
on page 7).
DCX3501-M Quick Start Guide 8
Page 10

Connecting Your Device
Cabling to DVR Storage
1. Contact your cable
service provider to
verify the set-top
software necessary to
support External DVR
Storage is available in
your area.
2. Connect the AC power
cord to the external
drive and plug the
external drive’s AC
power adapter into an
electrical outlet.
3. Allow approximately 15
to 30 seconds for the
external drive to reach
operating speed.
4. Connect one end of
the eSATA cable to the
set-top.
5. Connect the other end
of the eSATA cable to
the external drive.
6. Follow the on-screen
instructions.
9DCX3501-M Quick Start Guide
Page 11

Troubleshooting
Troubleshooting guidelines follow. If problems still occur after performing the diagnostics, call your service provider for assistance.
Problem — If this occurs: Solution — Then do one of the following:
The set-top will not
power on
The remote control
does not work
There is no audio
when viewing cable
channels
• The DCX set-top may have received a software update and may not power on while the new software is
being installed. Try again in a few minutes.
• Verify that the power supply is connected to the set-top and an electrical outlet. Unplug the set-top from the
electrical outlet, plug it back in, and then press the POWER button.
• If the set-top is connected to a switched outlet on another unit, verify that the unit is powered on. Unplug
the power supply from the rear of the set-top, plug it back it in, and then press the POWER button. Use an
unswitched outlet, if possible.
• Press the POWER button on the set-top’s front panel instead of the remote control. The batteries in the
remote control may be depleted.
• Verify that the remote control is in STB mode.
• Verify that there are no obstructions between the remote control and the set-top. Aim the remote control
directly at the set-top front panel, not the TV or VCR.
• The angle between the remote control and the set-top may be too large. Stand in front of the set-top and not
too far to either side.
• Press and release operation keys one at a time, firmly and deliberately.
• Try changing channels using the buttons on the set-top front panel.
• Check the batteries in the remote control. Install new batteries if needed.
• Verify that the mute button on the remote control has not been pressed. Press MUTE on the remote control
to restore sound.
• If the set-top audio output is connected to the TV, verify that the mute button on the TV has not been pressed.
• If the set-top audio output is connected to a home theater receiver, verify that the receiver is set to the
appropriate input source and the mute button on the receiver has not been pressed.
• Verify that you have the correct cables for the audio connections.
• Verify that the audio cables are firmly connected between the set-top and the audio playback device (TV,
receiver, DVD player, etc.).
DCX3501-M Quick Start Guide 10
Page 12
Troubleshooting
Problem — If this occurs: Solution — Then do one of the following:
There is no audio
from the center and/or
surround speakers of a
home theater receiver
connected to the
set-top
There is no video on the
TV screen
No graphics or
program guides appear
on the TV screen
• Not all Dolby Digital programs feature full 5.1 surround sound. In some cases, the programs may only contain
left and right stereo audio.
• Verify that the S/PDIF cable (coaxial or optical) is firmly connected to the set-top and the home theater
receiver.
• Verify that the home theater receiver is set to a surround sound audio mode (Dolby Digital, Dolby Pro Logic II,
Dolby Pro Logic).
• Verify that the receiver is properly configured to work with all connected speakers.
• Verify that the TV is powered on and set to the appropriate input source for the set-top.
• Verify that the set-top is powered on and tuned to an authorized cable channel.
• Verify that all video cables between the set-top and the TV are firmly connected.
• Verify that the coaxial cable feed is firmly connected to the set-top and the wall jack.
• If the set-top video output is connected to a home theater unit, verify that the home theater unit is powered
on and set to the appropriate input source.
• If the set-top video output is connected to a TV through an HDMI connection, power off the TV and then
power off the set-top. Wait one second and then power on the devices.
• Not all HDTVs can display every output format (1080i, 1080p, 720p, 480p, or 480i) available on the set-top. To
select a different format:
1. Ensure that your set-top is plugged into a power outlet and is turned off.
2. Ensure the TV is turned on and tuned to the appropriate channel for the set-top.
3. Press the MENU key on the front panel. Your settings are displayed on the set-top front panel display.
4. Use the ▲ and ▼ keys on the front panel to display the HDMI/YPbPr OUTPUT setting.
5. Press the ► key to cycle through the available output formats until a picture displays on the TV.
If you use the IEEE-1394 connection, on-screen graphics, including closed captions and program guides, are
not displayed by the set-top. On-screen graphics and captions may still be overlaid by your TV, if enabled.
Alternatively, use HDMI or component video instead.
11DCX3501-M Quick Start Guide
Page 13

Troubleshooting
Problem — If this occurs: Solution — Then do one of the following:
No closed captions
display
There are black bars to
the right and left of the
picture
There are black bars above
and below the picture
• Verify on the User Settings menu that closed captions are enabled on the set-top.
• Verify that closed captions are enabled on the TV.
Note: Closed captioning may not be available on the current program.
The User Settings menu can be accessed from the DCX set-top remote by pressing Power and then Menu
within 2 seconds.
• Widescreen TVs display 4:3 programs in this format unless set to Stretch. Turn on the 4:3 OVERRIDE
feature in the User Settings menu. This enables most widescreen TVs to stretch the video to fill the screen
(see your TV manual for information about stretching 4:3 video).
• If the set-top is connected to a widescreen TV, verify that the TV TYPE is set to 16:9 in the User Settings
menu.
• Many HD programs are broadcast in pillar-box format with black bars to the left and right of the picture.
These programs are broadcast in 16:9 HD formats, even though the video is not 16:9.
All 4:3 HDTVs display HD programs in letterbox format (black bars above and below the picture) because of
the shape of the display screen.
• Turn on the 4:3 OVERRIDE feature in the User Settings menu. This enables most standard screen TVs to
display a full screen picture when the set-top is tuned to a 4:3 program.
• Set the TV TYPE to 4:3 Pan-Scan. This enables the set-top to remove the black bars above and below the
picture when possible.
Some SD programs are broadcast in the letterbox format with black bars above and below the
picture. Some widescreen TVs offer a zoom feature that may be able to remove the black bars (see
your TV manual for information about zooming 4:3 video).
DCX3501-M Quick Start Guide 12
Page 14

Troubleshooting
Problem — If this occurs: Solution — Then do one of the following:
There are black bars
on all four sides of the
picture
Colors do not appear
correctly
The set-top is making a
humming noise
Stopping playback of an
external recording causes
a black screen with no
audio or video
Connecting the external
drive to the set-top, does
nothing.
This may occur on a 4:3 TV if the 4:3 OVERRIDE setting is OFF. To set 4:3 SD programming to fill the screen,
depending on the capabilities of the TV, set 4:3 OVERRIDE to 480i or 480p.
This may occur on a 16:9 TV if the active video for an SD broadcast is in letterbox format. To confirm, wait
for a commercial or look for a graphic, such as a network logo. If the commercial fills the screen from top to
bottom, or the graphic appears below the active video, the program is being
letterboxed by the broadcaster. You can minimize this by activating the zoom feature on the TV.
A broadcaster may include black bars on either side of a widescreen broadcast. This is called a “hybrid”
aspect ratio and results in a black border surrounding the video on a 4:3 TV. Because this is part of the
broadcast, the set-top cannot correct the video. You may be able to minimize the
border using the zoom feature on the TV.
Be sure to match up each signal to the same YPbPr connection on the TV.
Otherwise, colors will not appear correctly on your TV.
The DCX set-top includes a fan for cooling and the option for an external hard drive. During normal operation,
the DCX set-top emits a low humming noise, similar to a personal computer. The noise varies in volume
occasionally when the speed of the internal fan adjusts to changes in the temperature around the set-top.
Please note the external hard drive may stay on even when the DCX set-top is turned off (standby).
Push the channel up or channel down button on your remote control to reacquire service.
Contact your cable service provider to verify the set-top software necessary to support External DVR Storage
is available in your area.
Verify the eSATA cable is connected securely at both ends to the set-top and external drive.
Verify the external drive is plugged in and on.
13DCX3501-M Quick Start Guide
Page 15

Recording Your Connections
Use this diagram to record
connections between
your home entertainment
components. You can use
this diagram to reconnect
your system if you move
the equipment or add new
equipment.
Disconnect the power
from the DCX set-top
before connecting
or changing cable
connections. Do not place
another component or
object on top of the DCX
set-top.
DCX3501-M Quick Start Guide 14
Page 16

© Motorola, Inc. 2010. All rights reser ved.
www.motorola.com
MOTOROLA and the Stylized M Logo are registered in the U.S. Patent and Trademark Office. HDMI is a trademark of HDMI Licensing LLC. Dolby and the double-D symbol are
registered trademarks of Dolby Laboratories. This product incorporates copyright protection technology that is protected by U.S. patents and other intellectual property rights.
Use of this copyright protection technology must be authorized by Macrovision, and is intended for home and other limited viewing uses only unless otherwise authorized by
Macrovision. Reverse engineering or disassembly is prohibited. All other product or service names are the property of their registered owners. No part of the contents of this
document may be reproduced or transmitted in any form or by any means without the written permission of the publisher.
578847-001-a 06/10
 Loading...