

Page 1

The DCT6412 Front Panel
The DCT6412 front panel has 12 keys and an LED display. Use the keys to perform basic functions such as access the
interactive program guide,navigate menus,and purchase
Key Description
1 LED Displays the channel number or time of day.
There are four indicator lights on the LED screen:
• MSGS - the DCT6208 has received
• A/B - the RF bypass is active
• ON - the DCT6208 is powered on
• REMOTE - the remote control is in use
On Demand (OND) and Pay-Per-View events.
Messages for you to read
2
3 MENU Displays the
4 POWER Turns the device on or off.
5 INFO Displays the current channel and program information.
6 A/B Use to manually enable the RF bypass function.You must have a cable-ready TV
7 SELECT Selects menu options,
8 GUIDE Displays the program guide.
9 CHANNEL + Changes the channels by moving up or down.
10 SMART CARD SLOT Not currently enabled – intended for future use.
There are also inputs for a Universal Serial Bus (USB),audio/video jacks and a Smart Card slot. These inputs are for future
applications under development and are not enabled on this unit.
5634 CURSOR Moves the cursor around the program guide and menu screens.
Main Menu.
for this function to operate.(Optional Feature)
On Demand programming, Pay-Per-View events or
programs from the program guide.
CHANNEL -
The DCT6412 Back Panel
ear panel of the DCT6412 c
he r
T
describes each connection and its use.
onsists of thr
ypes of interfaces - audio, video and data. The table following this drawing
ee t
DIGITAL CABLE BOX / DCT6412
7
Page 2

Important Safety Instructions
lease refer to the Motorola DCT6412 User Guide for complete safety and operating instructions. The Motorola DCT6412
P
has been designed to operate reliably in a well-ventilated household environment. Slots and openings in the unit cabinet
are provided for ventilation.These openings should never be blocked. As such,do not place the product on a bed,sofa, rug,
or similar surface.
• Position the DCT6412 with at least 2 inches of space above and on all sides.
• Do not block the slots and openings in the DCT6412.
• Do not place anything on top of the DCT6412.
• Do not position the DCT6412 in an enclosed space that would restrict airflow around the unit.
• Do not position the DCT6412 near any external heat source that could raise the temperature around the unit.
DIGITAL CABLE BOX / DCT6412
9
Page 3
Basic i-Guide Navigation Tips
Yellow is always the highlight color.As you navigate listings using your remote, the highlight appears on screen to
*
indicate your current selection.
* Press the
* Press OK to make your selection.
* Press the EXIT button on your remote to return to watching TV.
5634 buttons on your remote to move the highlight.
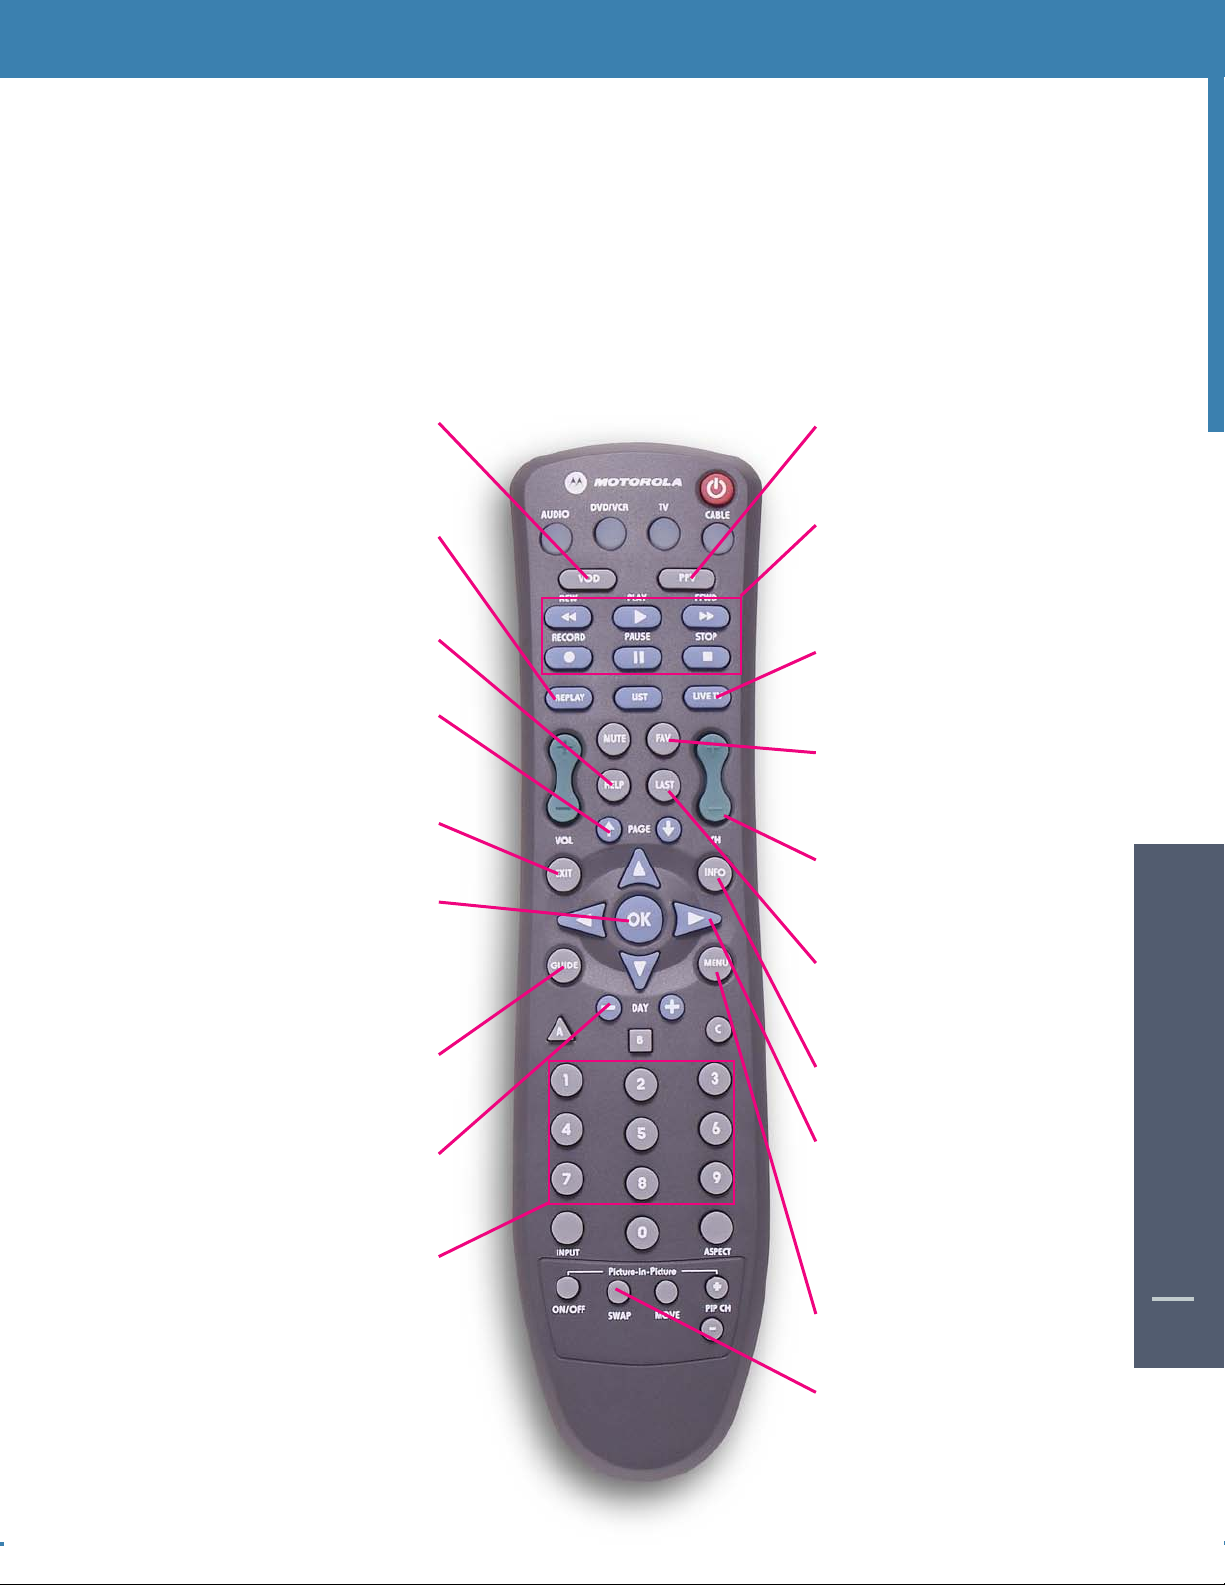
Remote Control Features
VOD
Direct Access to Video On
Demand(VOD), where available
PPV
Direct Access to Pay-Per-View
(PPV), where available
BASIC i-GUIDE NAVIGATION TIPS
Replay
Replays last 15 seconds
of program
Help
Learn more about a feature
PAG E
Scroll to the next or previous page
of listings
Exit
Return to watching television
OK
Select a highlighted item; or while
watching a program, press to
display or remove the Flip Bar or
Mini Guide
Guide
See program listings for the
current time
VCR Controls
Controls VCR, ON DEMAND
and Digital Video Recording
(if available)
LiveTV
Displays live television
programing
FAV
Tune to your Favorite channels,
once you set them up
CHAN
Change channels and access the
Flip Bar
LAST
eturn to the previous screen or
R
channel
Info
See program information
16
16
Day*
See listings for the next
or previous day
Numbers
Press channel numbers,then
OK/SEL to tune to a channel
Note: Remote pictured may not reflect your
actual remote. Basic functions should be the same.
*Amount of programming data varies by system.
Arrows
Use to highlight guide features,or
while watching television, press to
begin browsing.Note: Arrows
ol playback of recorded
tr
on
c
programs with
DVR
MENU
En
t
er and e
xit the
M
ain M
enu
SWAP
ap between television tuners
w
S
REMOTE CONTROL FEATURES
BASIC i-GUIDE NAVAGATION TIPS /
11
Page 4
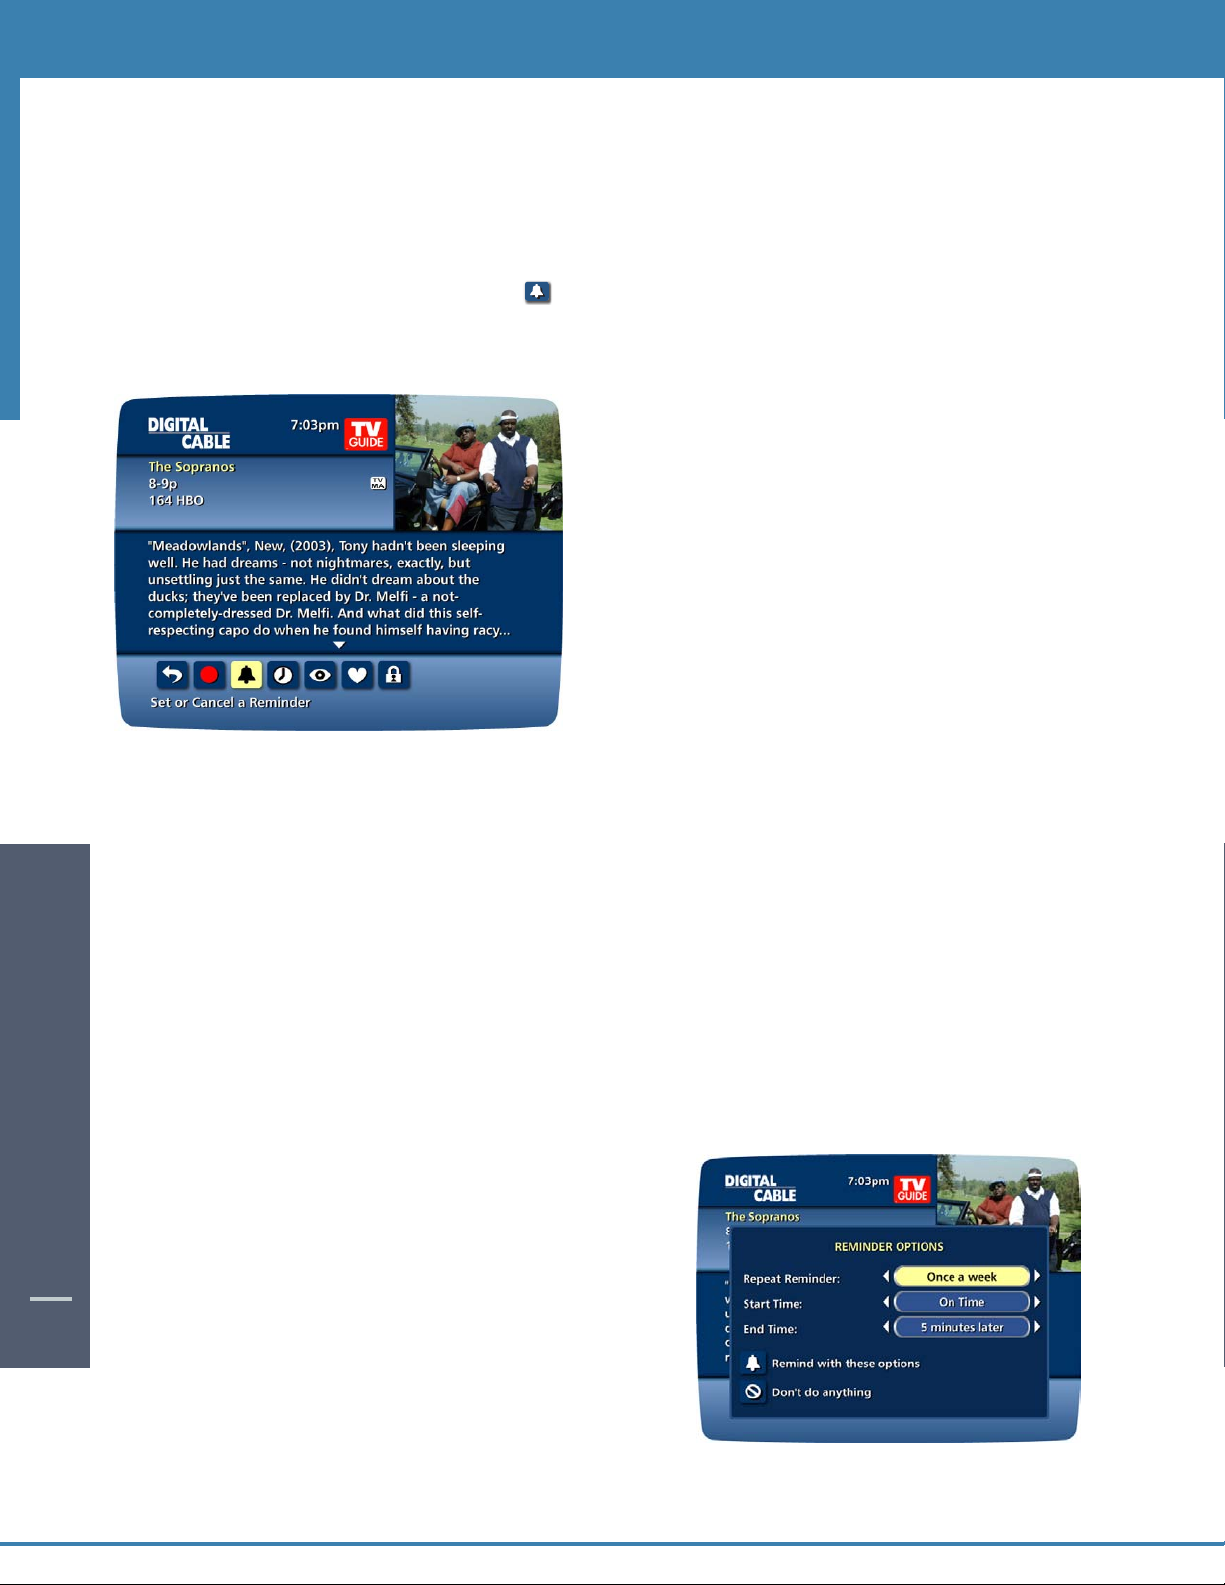
Reminders
With i-Guide, you can set Reminders so you don’t miss shows you want to watch.
Setting Reminders
From a Program Information screen, highlight the __ Icon from Quick Menu and press OK. Follow the on-screen
prompts to confirm the Reminder or set Reminder Options.
Reminder Options
Reminder Options let you customize the frequency and timing for Reminders.
REMINDERS
This option appears only if you have already set a lock for that program.
*
18
• Use the34 buttons to set repeating Reminders that will
appear Once, Once a Day,Once a Week, Mon-Fri or Sat-Sun.
• Determine the Start Time for the Reminder to appear on screen,
up to 15 minutes prior to the program start.
• Reminder End Time enables you to extend the reminder period
beyond the end of the program up to 2 hours after the program is over.
When you set a
•
ypassing lo
b
can then tune directly to the program from the
Reminder without having to enter your Locks PIN,
v
ou ha
if y
more information).
Reminder,
ou plac
cks* y
e set one up (See
you have the option of
tal Locks
en
ogram.You
sec
ed on the pr
ar
P
tion f
or
REMINDERS
23
23
Page 5

Building Your Library - Recording Programs
You can set and schedule recordings three ways with i-Guide: one touch
record,interactively by program and by manually scheduling your recording.
One Touch Record
Press RECORD on your remote any time while watching TV or while
navigating through the guide.Recording begins immediately at the point you
pressed
recordings for programs starting at a later time or date by pressing RECORD
while in the listings. Recording will start at the program’s scheduled start time.
*Some remotes are equipped with Instant Replay and LIVE buttons.
RECORD for programs airing now.You can automatically schedule
Record From Program Information
From the listings,highlight and select a program, scheduled for a later time.
Press the INFO button and you will see an information screen. Highlight the
Icon and press OK to start a recording for the time the program is
scheduled to start.
Note: For more information on Action Icons, see the Action Icons section in this
manual.
Record Two Programs at Once
The Dual Tuner DVR allows you to set recordings for two different programs that air at the same time. While
recording two programs,you can watch and control either program up to the point of live TV by using the SWAP
button on your remote.There are several ways to record two programs at once.Here are two basic examples:
DIGITAL VIDEO RECORDING
42
42
While Watching a Show:
• Press Record to record the program you are watching.
• Press SWAP to switch to the other tuner and find the second program you want to record.
• Press Record when you locate the second program you want to record.
From the Guide:
• Highlight a program you want to record from any listings screen.
ding
ess
r
• P
• Highlight the second program.
• Press
d
or
Rec
Record to set up the second recording.
o set up the first r
t
ec
or
Manually Schedule a Recording
You can set a Manual Recording to automatically record a specific time and channel.
ep 1:
t
S
Step 2: Select the start and end times and the day you wish to record
Step 3: A channel list will then appear, allowing you to select the
Step 4: A “Create a New Recording”Screen will appear,select Create
t
elec
S
and confirm your settings.
channel to record. Select the channel you want.
or
a Rec
Options
om the Main M
DVRfr
ding
t
onfir
o c
or additional R
on f
Ic
enu
m your settings or select the
then selec
,
ding options
or
ec
t
et a Rec
S
Rec
.
or
or
ding
ding
.
DIGITAL VIDEO RECORDING
37
Page 6

Record a Series
Your Dual Tuner DVR lets you record multiple episodes of a program
ording to your preferences. You can set the DVRto record only
acc
new (first run) episodes, first run episodes and repeats or all
des.
episo
When you set a recording from a Series Program Information screen,
you’ll have an additional icon on the preceding Recordings Overlay.
Choose this
recording options.
• Select the episode type to record, such as first run only,first run
• Specify how many recording to save.
• Specify how long to save the recording – until you erase it or
• To access advanced series setup features like add minutes to the
Create a Series Recording Icon to specify your series
and repeats or all episodes.
until space is needed.
start and end times and specify which channels to record, select
the Setup Icon to review all options.
Your series recordings’ will appear in your
the show title as its label. Multiple recordings of the same show will
have the same label and will be listed beginning with the most
recent recordings first as default.To change your view,use the (arrow
left/right) buttons on your remote to View by Date, View by Channel
or View by Title.
DIGITAL VIDEO RECORDING
My Recordings list with
Managing Scheduling Conflicts
If you schedule more than two recordings for the same time,you
will see a Scheduling Conflict screen that allows you to choose
between a previously set recording and the new recording that
is conflicting. Individual recordings always take priority over
series recordings when there are scheduling conflicts.
In case of a scheduling conflict between two series programs,
additional icons will appear at the bottom of the
Conflict
screen to help you determine which program to record.
- Return to the previous screen.
ecord highlighted series as shown above.
- R
- Show conflicts when the new series is a high priority.
- Show conflicts when the new series is a low priority.
- Don’t record this series.
Scheduling
38
• To give your new recording the highest scheduling priority and
e the most number of episodes for your new recording,
aptur
o c
t
t High.
selec
new series will be recorded and which episodes of the old series
will not b
o mo
T
•
ior
pr
revised results.
• S
You may also modify the priority assigned to a series using the
e recorded because of the conflict.
e the new series back to the bottom of the scheduling
v
y list
it
t the R
elec
een will sho
he scr
T
w and the screen will refresh and give you
o
t L
selec
,
ecord Icon to confirm your new settings.
Series Priority List. (See next section)
w y
w many episodes of the
ou ho
DIGITAL VIDEO RECORDING
43
43
Page 7

Modify the Series Priority List
To help you manage which series get recorded when there are
scheduling conflicts, your DVR automatically creates a Series Priority List.
The first series you set to record has the highest priority and is the
program recorded in case of a conflict. If there are no conflicts, each
additional ser
can easily change the recording priority of the programs so that the
programs of your choice are recorded in case of a conflict.
• Select DVR from the Main Menu or Quick Menu.
• Choose Series Priority.
• Highlight a program and use the Page +/- buttons on your remote
to modify its priorities.
Note: If you want to record two series recordings instead of an individual recording that airs at the same time,you must
e the individual recording from the Scheduled Recordings List (See Cancel a Scheduled Recording section).
delet
ies you set to record is added to the bottom of the list. You
View Your List of Scheduled Recordings
Step 1: From the Main Menu or Quick Menu, select DVR*
* Menu label may vary
Step 2: Select Future Recordings.
Step 3: See a list of all the programs you have scheduled to record,
select a title to cancel the scheduled recording or modify recording
DIGITAL VIDEO RECORDING
options.
Modifying Recording Options
i-G
can change your
C
From the Main Menu
S
44
44
scheduled r
uide
hange Options f
elect DVR,
ou fle
es y
giv
then select F
or
ec
dings
o manage y
y t
xibilit
Recording Options at any time,as often as you like.
or Scheduled Rec
uture Recordingsto see a list of your
Highlight a program title and press
.
our personal video library.You
dings
or
OK or INFO.
DIGITAL VIDEO RECORDING
39
Page 8

Select the Icon from the program information screen. Select to change the Recording Options, or select
Guide Tip
Guide Tip
o delete this program from your list of Future Recordings
t
Use the 5634 buttons on your remote to change
Recording Options:
• Change the frequency of the recording,such as every
day or once a week.
• Specify how many recordings to save.
• Set a Save Until parameter, either until you delete or
automatically when space is needed.
• Change the start and end times in order to catch every
minute of a program, even if it runs over.
From Listings
Select your Scheduled Recording in the listings indicated by the red
dot in the instant info.
.
DIGITAL VIDEO RECORDING
F
mo
40
OK or INFO and select the Icon.
Press
rom here,select Icon to cancel the recording,or select Icon to
dify the
ding Options
or
Rec
DVRis not a long-t
your storage space,review the contents of your library
regularly and discard the recordings you no longer
o save.See “Managing Your Personal Video
wish t
Library” in this manual.
.
orage device.To maximize
m st
er
DIGITAL VIDEO RECORDING
45
45
Page 9

Managing Your Personal Video Library
A recorded program remains in your personal video library until you decide to delete it,unless you have it set to
e when space is needed.Your DVR
delet
and up to 40 hours of
these guidelines:
To Delete Recordings
From the program information screen,select the Icon to delete the recording,or select the Icon to modify
Delete Priority. For example, you can tell the guide to delete the recording when space is needed.
the
High Definition programming*.To make the most efficient use of DVR storage space, follow
ecord and store up to 40 hours of standard definition programming
will r
Copy Recordings to A VCR Tape
After you watch a recording, decide to either erase it or
keep it permanently by transferring it to a VCR tape.
When you copy recordings to a VCR tape, make sure
that the recording is displayed on the TV screen for the
entire time the recording is being copied.If you
change channels or display guide screens during the
copying process,your tape copy will contain these
images and you will not have a complete copy of the
recording.
1. Connect the
2. Put a tape in your VCR.
3. Access your list of
FREQUENTLY ASKED QUESTIONS
4. Use the 5634 buttons on your remote to highlight a program from your list of Recorded Programs. Press OK to
select a program.
5. From the Information Screen, select to resume play from where you left off or select to restart from
the beginning.
6. Start recording on the VCR when playback begins.
7. As the recording plays, it is taped to your VCR.
Note: Refer to your VCR User Manual for specific instructions on using your VCR.
Cable Out or OUT 1 (TV) connection on the back of the DVR to the Cable IN of your VCR.
42
Recorded Programs.
To help you manage your personal video library,
i-Guide will advise you with an on-screen notice when
the available memory gets low or full.
If recording space becomes full during a recording,the
recording will stop.Make sure you have enough
recording space to record the entire program before
you begin to avoid missing part of the program.
* Recording HD programing requires a DVR connection to a
vision.
ele
HD t
DIGITAL VIDEO RECORDING
47
47
Page 10

On Demand (Optional Feature)
Q. Do my Parental Locks & Purchase PIN settings stay the same for On Demand purchases as with regular
ograms?
pr
A.
Yes. PINs and settings apply to On Demand ratings and purchases.
Q.What if I only watched 15 minutes of my On Demand program and didn’t get to watch the rest before it
expired?
A. You will have to order it again. Refer to the On Demand section in this manual for remaining rental and viewing
time for more information on rental and viewing times.
Q. If I get to the end of a On Demand program and want to watch it again, can I restart at the beginning?
Yes, as long as your viewing period has not expired, you may watch it again.
A.
Q. How do I return to watching an On Demand program after I’ve tuned to another channel?
Select My Rentals from the On Demand Menu and choose the program you want to resume watching.You can
A.
either begin watching where you left off by selecting Resume, or start over with the Restart.
Q. Some of the programs appear in the listings with a checkmark or a dollar sign next to the title. What does
this mean?
Depending on the services your cable provider offers, you may see a checkmark or a dollar sign to indicate a
A.
program you have ordered is available for viewing.
Q. How many On Demand programs can I order at one time?
A. Typically, there is no limit on purchases. Check with your cable operator for system-specific ordering information.
Q. I tried to order an On Demand program and received an error screen that said,“Unable to Process
Request.”What does this mean?
A. The “Unable to Process Request” message occurs when the set-top box is unable to communicate with the On
Demand equipment at your cable company.Try turning your set-top box off,and then turn it on again. If the
message appears again, note the time it appeared and the action you took and call your cable operator.
Q.When I select a category from the On Demand menu, I receive a message that says,“No program listings
available”.
If there are no listings for a particular category,this message will appear.
FREQUENTLY ASKED QUESTIONS
A.
DVR (Optional Feature) and Digital Services
Q. How many hours of programming can I store on my DVR? What is the hard drive capacity?
A.The recording capacity depends on the video format that is being recorded. Your DVR can record up to 90
minutes standard definition programming or up to 20 hours of high-definition programming. The hard drive
capacity is 120GB. See “Managing your Personal Video Library” section in this manual for more information.
Q. How many tuners does my DVR have?
VR has two tuners to that you can, 1) record two channels at the same time, 2) record one and watch the
our D
Y
A.
other or 3) record two channels and watch a 3rd program from your DVR recordings library.
How do I return to live TV when I'm watching recorded programming?
Simply press the LIVE button on your remote.
Q. Can I record or watch two programs at the same time?
YES
A.
Q. How do I record a Pay Per View (PPV) broadcast?
A. PPV broadcasts must be recorded manually; you cannot schedule automatic recording in advance. Follow your
cable operator's instructions for viewing PPV content,then press Record on your DVR DCT6412 Cable Box.
44
How many other home entertainment components can be connected to my DVR DCT6412 Cable Box?
Three: your television, cable box, and one other component (VCR, DVD player,or audio).
Q. Do I have to connect my Cable Box DVR DCT6412 to a telephone or other data source?
A. The DVR DCT6412 gets all the information it needs from your cable signal, so that's the only connection required.
FREQUENTLY ASKED QUESTIONS
49
49
Page 11

Q. I currently record programs on my VCR. How is a DVR different?
A. Your Cable Box DVR DCT6412 takes recording technology to a new level, capturing picture and sound digitally
(for a superior result to tape-based recording) and allowing greater viewing flexibility.With the DVR DCT6412 you
can PAUSE a broadcast while you're watching it,and restart it up to 2 hours later.And you can say goodbye to those
ying "what just happened?" moments when you're watching a movie — simply press INSTANT REPLAY to
anno
review the last 15 seconds, or REWIND to see a longer scene again.Yet you won't miss a moment of the action,
because the DVR DCT6412 keeps recording forward while you pause, rewind or replay scenes. No VCR can do that!
Q. Can I adjust the quality of the video recording to conserve hard disk space?
A. No, the DVR DCT6412 records at a pre-set level to ensure consistently good results.
Q. How does the Parental Control (Locks) feature work?
A. Parental Control / Locks allows you to block programs, or types of programs,from being recorded.You can set
blocks based on the program's Title or Rating,or you can block entire Channels. See Parental Locks on page 22 of
this manual.
Q. How can I find programs I want to record?
A. Using i-Guide, you can search many ways: through the search menu, by programming genre, and category, by
reviewing a listings screen, program information screen for other times or through an alphabetical search by Title.
When you find something that sounds interesting,simply press RECORD. The DVR DCT6412 will automatically record
that program for you.
Q. Can my cable operator or another company track what I record with my DVR DCT6412?
A. No. What you choose to record with the DVR DCT6412 is private.
Q. Can the DVR DCT6412 playback a high definition recording while another HD program is being recorded?
A. YES, in fact you can record two programs at once while watching a previously recorded program from the hard
drive.
Q. Are there two record buttons; one for each tuner? How do you make the DVR DCT6412 record two
programs at once?
A. You can set it for two recordings using i-Guide by selecting two different programs listed with overlapping
times and pressing the record button or by manually scheduling programs which times overlap.
FREQUENTLY ASKED QUESTIONS
50
50
Q.What kind of programs can I record?
A. You can record both standard and high definition programs which are automatically interpreted by the DVR
DCT6412. Note: Recording HD programs will take more storage space on your DVR.
Q. How much high definition programming can I save versus standard definition programming?
A. You can record up to 90 hours of standard digital TV or up to 15 hours of HDTV (depending on the transmission
bit rate). Recording times may vary.
Q. Does the DVR DCT6412 support digital video interfaces?
A. Yes, it features both DVI and 1394-DTV digital interfaces.
Q. Does the DVR DCT6412 support external storage devices?
A.
Q.
A. A
D
Q.What is the picture quality of recorded programs?
A. The DVR records programs in the same quality in which they are broadcast. For example, programs broadcast in
HDTV format are recorded in HDTV quality (if your DVR is connected to a High Definition television). Broadcast
quality may vary.
es, it includes an IEEE1394 port that will be functional in the future.
Y
I have a home theater system.Can I record a program in Dolby Digital
eing broadcast in digital audio,the
am is b
gr
s long as the pr
igital indic
a
o
or will app
t
ear on the
lip B
F
ar
or pr
f
gr
o
ams tha
DVRwill r
e broadcast in Dolby Audio.
t ar
TM
5.1 on m
d the digital audio p
or
ec
y DVR?
tion. A Dolby
or
FREQUENTLY ASKED QUESTIONS
45
Q. Can I record Digital Music channels?
A. Yes, you can record and playback Digital Music. However, the playback controls (Pause, FF and REW) are not
functional for recorded digital music.
Q. Can I record On Demand and Pay-Per-View programs?
A. On Demand
cannot be recorded with the DVR.You may record Pay-Per-View programs like any other program.
Page 12

Q. Does the DVR automatically delete programs when the record space is full?
A. Only if you set it up that way. The DVR will automatically delete programs if you tell it to do so by setting the
programs to be deleted when space is needed. When the record space is full, the oldest recordings that you have set
to be deleted, will be deleted first. If you do not want the DVR to automatically delete certain recordings, you can set
them so that they are only deleted by you.
Troubleshooting
Q. Why doesn’t the set-top box respond when I press the keys on my remote?
A. Make sure your remote is in the Cable mode. Press the CABLE button on the remote.
Q. If the power goes out, do I need to reset my Parental Locks and Purchase PINs, Favorite
Channels, Locks and Reminders?
A. No. These items will not be lost if the terminal loses its power.
Q. Nothing happens when the MENU button is pushed, but I can change the channel up and down.
A. If the terminal was just installed, it takes approximately 15-30 minutes for the guide to be downloaded to
the set-top. If after 15-30 minutes nothing happens, unplug the terminal, plug it back in and wait another 15-30
minutes. If i-Guide still does not appear, contact your cable company.
Q. I can’t see the edges of the i-Guide screens.
A. Select the Adjust Screen Position option from the Setup screen. Press the ßßßßbuttons until the
arrows on the screen are centered.
Q. The guide has locked up. Neither the buttons on the remote, nor the buttons on the terminal itself work.
A. Try unplugging the terminal and then plugging it back in. This will reset the terminal and allow for data to
be downloaded. It will take some time for the information to appear. If there is still a problem after the
information has appeared, call your cable company.
Q. I have no video, a snowy picture, or I cannot tune to any of the digital channels.
A. Make sure that all of the cable connections are secure and that the TV is tuned to the correct channel
(3 or 4). Also, make sure you are actually controlling the cable terminal (press the CABLE button on the
remote).
Q. Why won’t my remote control respond when I press a button?
A. Go through this quick checklist to determine the problem:
1. Press the CABLE button on the remote to make sure it is in Cable mode. Try using the
remote again. Move to Step 2 if necessary.
2. If the remote is still not functioning correctly, press the CHAN ßßbutton on the front of the terminal. If
the channel changes, there is a problem with the remote control. The batteries or the remote control itself
may need to be replaced.
Q. There are no listings in i-Guide, or the words “To Be Announced” appear in the listings
creens. s
A. This can happen if there has been a power failure or if the terminal was unpl ugged. Make sure
everything is plugged in and running. Wait 15-30 minutes as the channels and program data start to fill
in.
Page 13

Q. I have a message on my screen that says ‘This feature is currently being restored.’What does this mean?
A. This screen appears if you try to access a feature that is not available because the set-top box has not received all
the nec
Q. I have a message on the screen that says “This channel should be available shortly.”What does this mean?
A. T
after 15-30 minutes, call your cable company.
Q.What do I do if I am stuck in a screen or menu I do not understand and want to get out?
A. You can always press the EXIT button to immediately return to watching TV.You can also press the LAST button
to back up one screen at a time.
Q.The displayed listing information or pricing information is incorrect.
A. Although i-Guide checks all data thoroughly before it is sent to your home, programmers do sometimes change
their schedules at the last minute without letting us know.Please report erroneous data to your cable company.
Q.What happens to my DVR recordings if my digital cable box temporarily loses power?
A. All recordings that were saved prior to the power loss are preserved, as well as future recording schedules.You
miss only the recordings scheduled to be recorded while the power was out.
N
your local cable company.
essary data. This most commonly happens following a power loss.
his screen will appear when you tune to a channel that is currently not available. If the channel is not available
ote: If you experience continued problems with your cable box, remote control or program listings, please contact
FREQUENTLY ASKED QUESTIONS
53
53
 Loading...