

Page 1
A
Introduction
Getting Started
Installing/Replacing the Battery............... 3
Control Buttons........................................ 4
Turning Your Pager On............................. 5
Turning Your Pager Off............................. 6
Sending a Test Page to Yourself.............. 7
Backlight.................................................. 7
Setting up Your Pager.............................. 7
Time and Date
Setting the Time and Date....................... 8
Private Time
T o Turn Private Time On........................ 11
USER GUIDE
T o Turn Private Time Off........................ 14
Alerts
Selecting the Incoming
Message Alert................................. 15
Alert Audio and Alert Mixed................... 17
Alert Volume.......................................... 18
Table of Contents
Messages
Reading Stored Messages.................... 21
Saving Messages.................................. 22
Deleting Messages
Deleting a Single Message.................... 23
Deleting All Messages........................... 24
Message Folder
Moving a Message
into the Folder................................. 25
Reading Messages in the Folder........... 27
Deleting Messages
from the Folder ............................... 29
Alarm
Setting the Alarm................................... 30
Turning Off a Daily
or Weekly Alarm.............................. 34
QuickNotes.............................................. 35
Belt Clip .................................................... 38
Use and Care............................................ 39
Congratulations on purchasing a BR850 pager. Your new pager provides
exciting capabilities in messaging and can become a vital part of your
business and personal life. This compact pager combines messaging and
time keeping functions in a package that is conv enient to carry.
Your BR850 uses FLEX
™
technology. The Motorola’ s FLEX protocol-
based pagers offer extended battery life and impro v ed paging reliability.
To fully understand the features this pager offers, please take a f e w
minutes to read this user’s guide .
This user’s guide also inc ludes a detachable quic k reference card on
the back cover.
INTRODUCTION
1
Effective Use of Your Pager
Your pager can help you keep in contact with everyone important
to you. By giving y our pager number to y our business associates ,
family, and friends, you can be contacted whenever needed.
If you have a cellular phone , giv e your pager n umber instead of y our
cellular number. Then you can decide who to call back on your cellular
phone without paying for incoming calls .
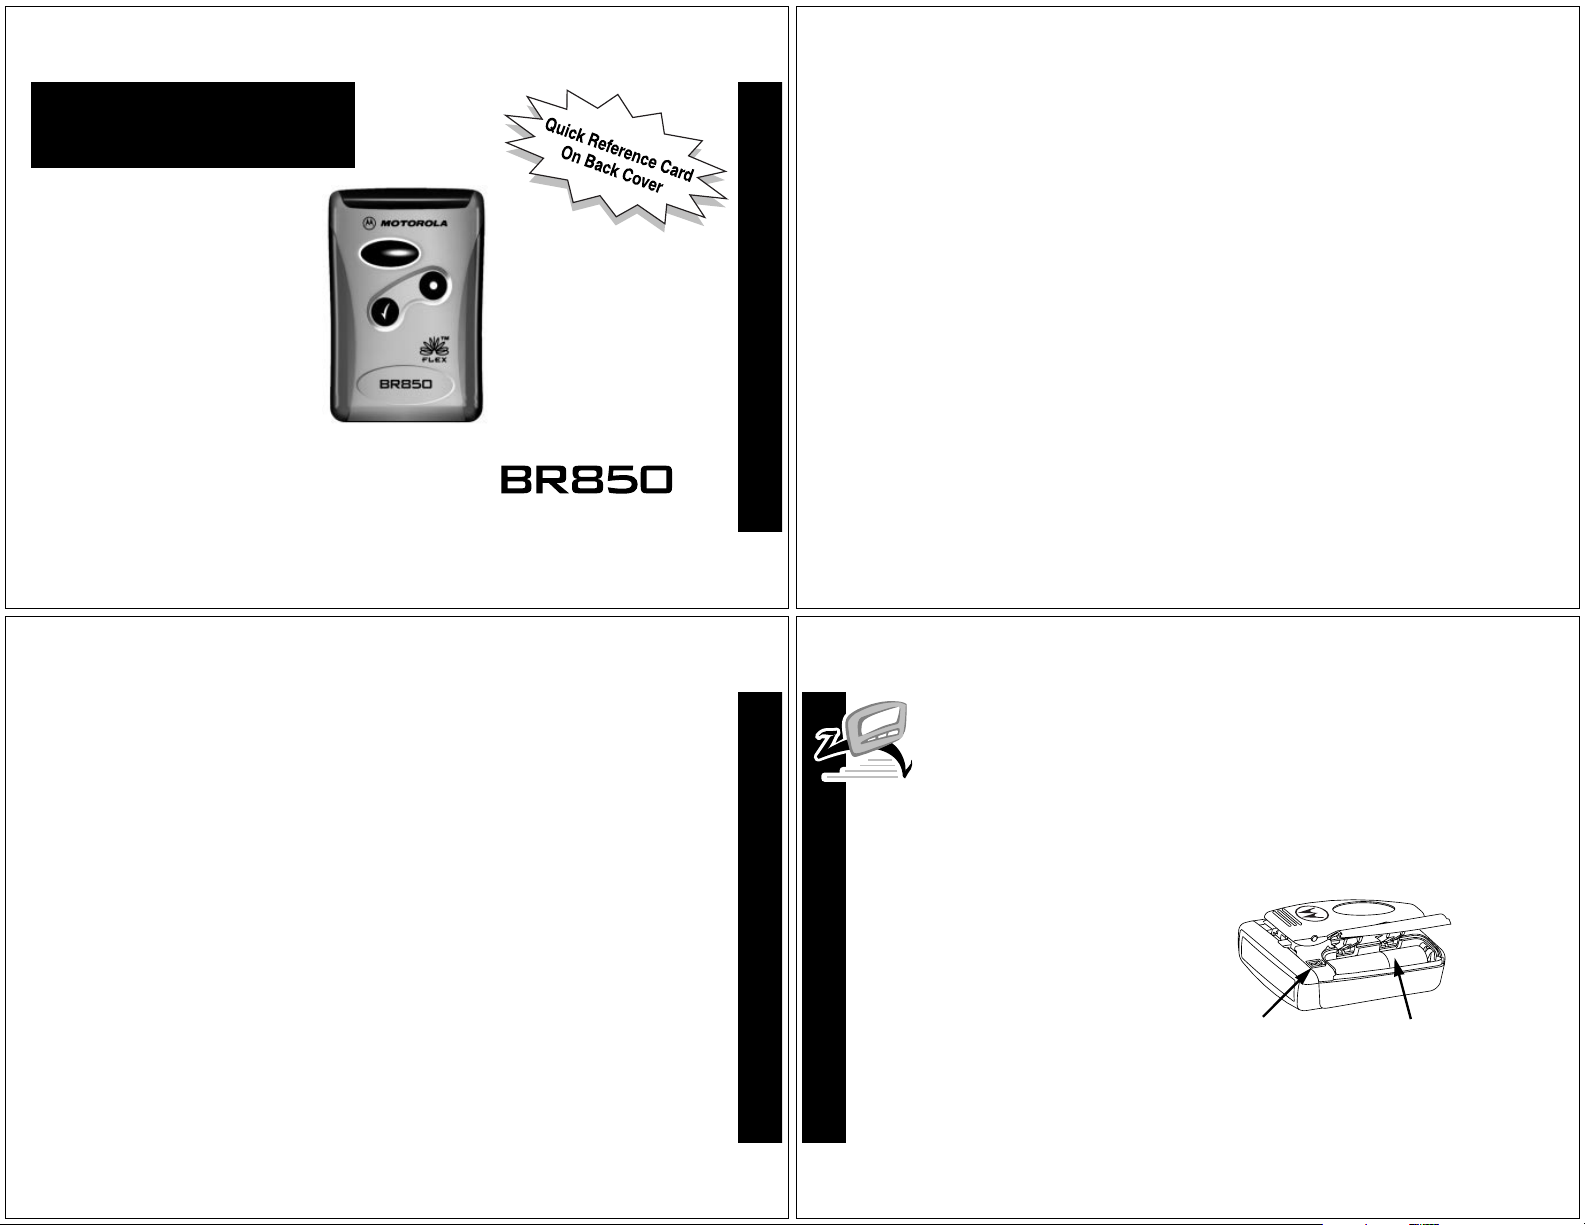
Battery Information
Your pager operates with one AAAsize alkaline battery (carbon zinc
batteries are not recommended).
Polarity
Marking
Compartment
GETTING STARTED
2
Battery
Page 2
Installing/Replacing the Battery
Turn the pager off. Refer to “T urning Y our Pager Off” on page 6.
➊
➋ Locate the battery door on the back of the pager.
➌ Slide the battery door in the direction of the arrow to unlatch the
battery door.
➍ Lift the battery door up to open.
➎ Remove the old battery, noting the polarity.
➏ Position the new battery so the + and - markings on the battery match
the polarity diagram next to the battery compartment.
➐ Close the battery door.
➑ Slide the door until it is fully closed.
Note:
Check your pager’s clock time after replacing the battery.
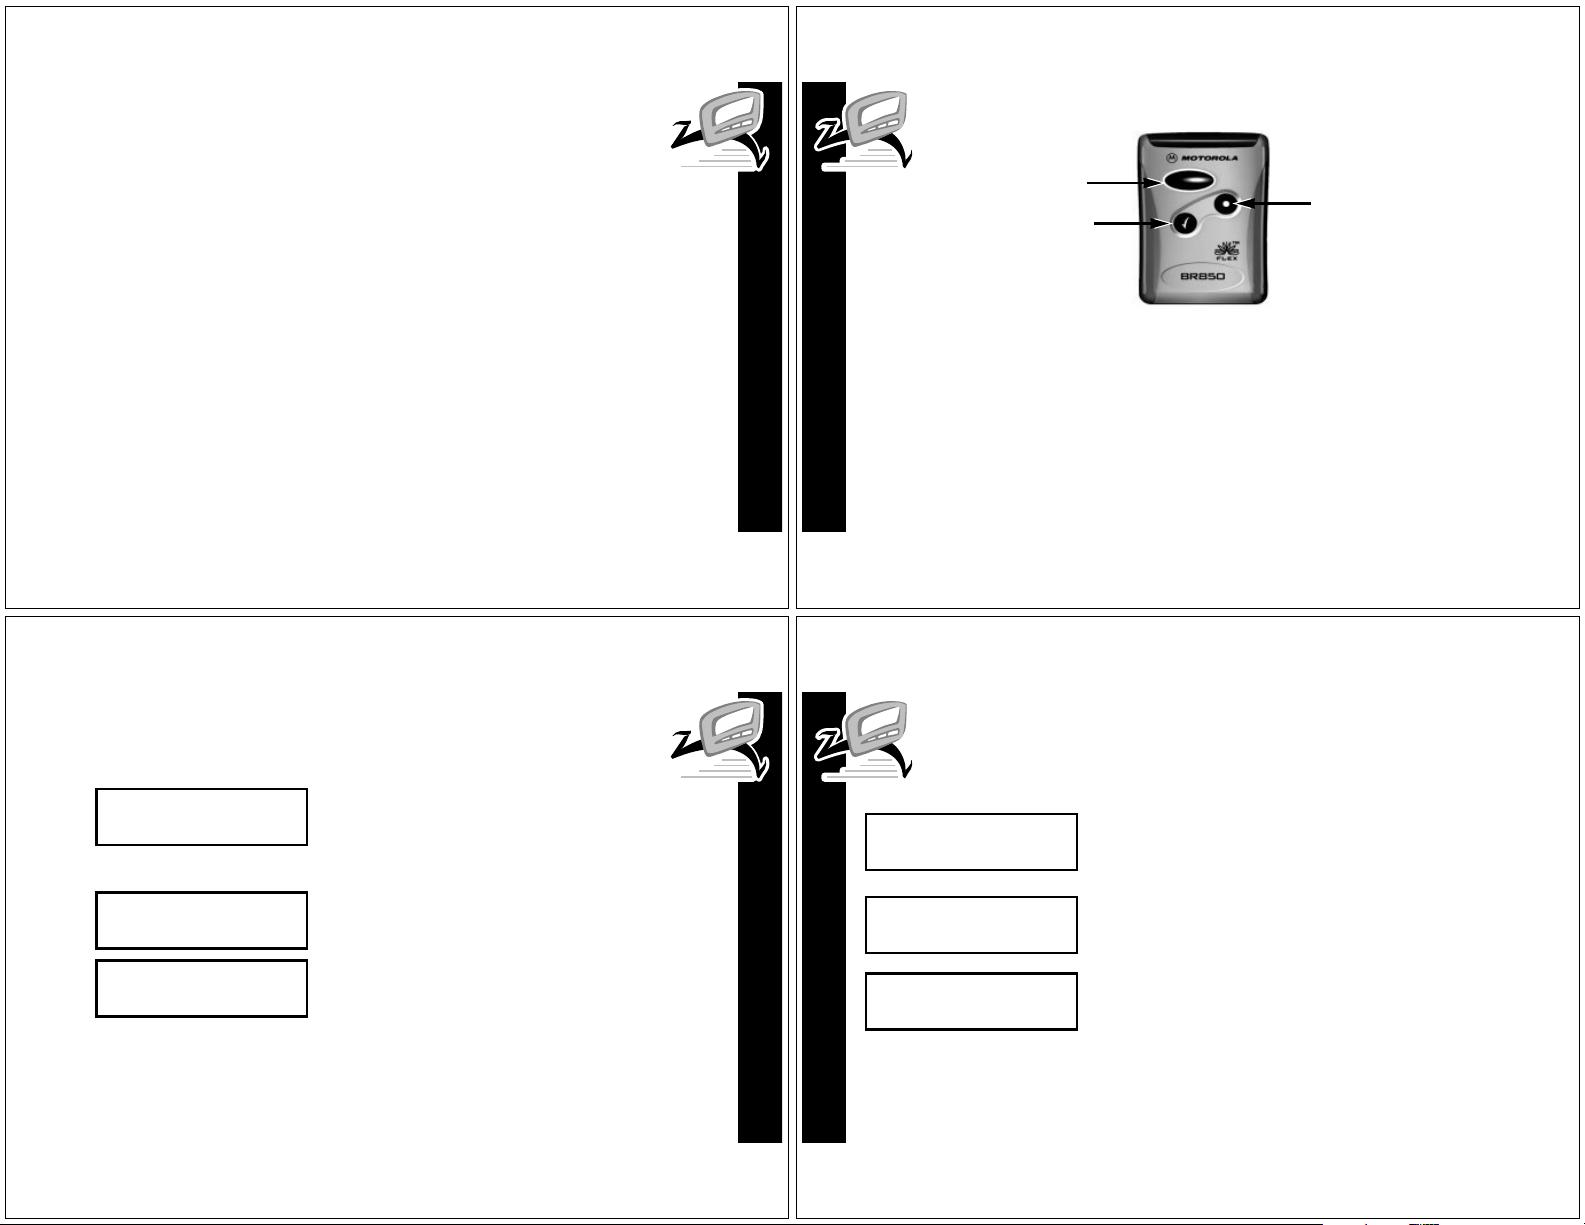
Control Buttons
Read
Button
Select
Button
t
Menu Used to enter pager setting menus and to turn on the
backlight.
r
Read Used to turn the pager on, read messages, and
navigate through menus.
s
Select Used to select pager settings and features. Also used
to read additional screens of messages.
GETTING STARTED
3
GETTING STARTED
4
Menu
Button
Turning Your Pager On
m 88 f hjl b e
➊ Press r. The start-up screens are
MOTOROLA
➋ Press any button to stop the alert.
m 88 f hjl b e
NEW! 1
m 88 f hjl b e
3!30P 07/05
displayed and your pager activ ates the
power on chime (when in audible mode).
The unread message screen is
displayed.
When your pager is on and no activity
is taking place, the Standby screen is
displayed. The Standby screen
displays the time and date and may
display other status indicators.
Turning Your Pager Off
m 85 f hjl b e
PAGER OFF
m 85 f ojl b e
OFF
m 88 f ojl b e
3!30P 07/05
GETTING STARTED
5
GETTING STARTED
6
➊ From the Standby screen, press t twice.
➋ Press and release r until PAGER OFF is
displayed, then press
OFF is displayed momentarily before
the pager shuts off, and
from the display.
The off screen displays the time and
date, and if an alarm is set, the alarm
indicator.
s.
m is removed
Page 3
Sending a Test Page to Yourself
After you have read this guide and y our pager has been activ ated
by your service provider , send yourself a test page . Refer to
“Functionality and Use of Your Pager” on page 40.
Backlight
In low-light conditions, press and hold t for 2 seconds to turn on the
pager’s backlight. The backlight turns off automatically after the pager
returns to the Standby screen.
Setting up Your Pager
This section gives instructions for setting the time and date, Private Time,
and alert volume. Access to these f eatures is obtained through the Setup
Pager menu.
Setting the Time and Date
m 86 f hjl b e
SET UP PAGER
m 81 f hjl b e
TIME/DATE
m 85 f hjl b e
FORMAT! AM/PM
➊ From the Standby screen, press t twice.
➋ Press and release r until SET UP
is displayed.
PAGER
➌ Press
s
.
TIME/DATE is displayed.
➍ Press s.
FORMAT!AM/PM or FORMAT!24HR is
displayed.
TIME AND DATE
GETTING STARTED
7
8
m 85 f hjl b e
TIME! 12!00A
m 85 f hjl b e
TIME! 03!00A
m 85 f hjl b e
TIME! 03!30P
➎ Press and release r until your choice
of
FORMAT!AM/PM (for AM/PM time), or
FORMAT!24HR (for 24-hour time) is
displayed, then press
The screen used to set the time is
displayed with the hour digit flashing.
s.
➏ Press r until the correct hour is
displayed, then press
s.
➐ Repeat Step 6 to set the minutes and AM/
PM fields (if AM/PM time was selected
above).
m 85 f hjl b e
DATE! 07/01
m 85 f hjl b e
DATE! 07/05
m 85 f hjl b e
TIME AND DATE
TIME AND DATE
9
10
SET
After the time has been set, the screen
used to set the date is displayed.
➑ Press and release r until the correct
month is displayed, then press
s.
➒ Press and release r until the correct
day is display ed, the press
SET is displayed momentarily.
s.
Page 4
To Turn Private Time On
You can set a time period during which your pager still receives
messages but it will not alert. Your pager goes into the Private Time
mode daily until it is turned off.
m 86 f hjl b e
SET UP PAGER
m 82 f hjl b e
PRIVATE TIME
m 82 f hjl b e
PRIVATE OFF
➊ From the Standby screen, press t twice.
➋ Press and release r until SET UP
is displayed.
PAGER
➌ Press s, then press r.
PRIVATE TIME is displayed.
➍ Press s.
PRIVATE OFF or PRIVATE ON is displayed
depending on the current setting.
m 82 f ujl b e
START! 03!00A
m 82 f ujl b e
START! 03!30P
The screen used to set the start time is
displayed.
➏ Press and release r until the desired
start hour is displayed, then press
s.
➐ Repeat Step 6 to set the minutes and
AM/PM fields (if your pager’s cloc k is set
to AM/PM time).
m 82 f ujl b e
PRIVATE ON
m 82 f ujl b e
END! 05!00P
m 82 f ujl b e
SET
➎ Press and release r until PRIVATE ON
is displayed, then press
The screen used to set the stop (END)
time is displayed.
s.
➑ To set the stop time, follow the same
procedure used to set the start time.
When finished,
momentarily.
Note:
When your pager has entered
the private time mode,
alert mode indicator.
SET is displayed
q replaces the
11
PRIVATE TIME
PRIVATE TIME
12
To Turn Private Time Off
m 82 f hjl b e
PRIVATE OFF
➊ Follow steps 1 through 4 in “To Turn
Private Time On” on page 11.
➋ Press and release r until PRIVATE! OFF
is displayed, then press
START screen is displayed
The
momentarily.
s.
13
PRIVATE TIME
PRIVATE TIME
14
Page 5

Selecting the Incoming Message Alert
You can set your pager’s incoming message alert to a vibration, a
chirp (short beep), no alert (no beep or vibration), a mixed audio
alert (vibration then musical alert) or you can select one of the
musical alerts.
m 82 f ojl b e
SELECT ALERT
m 82 f ojl b e
➊ From the Standby screen, press t twice.
➋ Press and release r until SELECT ALERT
is displayed, then press
The current alert setting is displayed.
s.
ALERT VIBE
ALERTS
m 82 f hjl b e
ALERT AUDIO
m 82 f ojl b e
ALERTS
SELECTED
➌ Press r until your choice of ALERT
AUDIO, ALERT VIBE, ALERT CHIRP, ALERT NONE,
or
ALERT MIXED is displayed.
Note:
If ALERT AUDIO or ALERT MIXED is
selected, the pager automatically goes
into the set-audio alert mode, refer to
“Alert Audio and Alert Mixed” on
page 17.
➍ When the desired alert is displayed,
press
s. The pager gives a sample of
your selection.
SELECTED is displayed momentarily.
Alert Audio and Alert Mixed
The Alert Audio feature allows you to select one of the musical
alerts. The Alert Mixed features allows y ou to select a combination
alert that produces a short vibration then a musical alert.
m 82 f hjl b e
AUDIO 1
m 82 f hjl b e
AUDIO 2
When Alert Audio or Alert Mixed is
selected in the Select Alert feature the
previously selected alert is displayed
and sampled.
➊ Press and release r until your choice
of musical alert is displayed. The pager
gives a sample of each alert as you scroll
through the choices.
➋ Press s to select the alert.
m 82 f hjl b e
SELECTED
SELECTED is displayed and the pager
gives a sample of the alert.
➌ Press s to stop the alert.
15
ALERTS
16
Alert V olume
You can set the alert volume to low, medium, or high.
m 86 f hjl b e
SET UP PAGER
m 83 f hjl b e
VOLUME
m 83 f hjl b e
VOLUME HIGH
ALERTS
➊ From the Standby screen, press t twice.
➋ Press and release r until SET UP
is displayed, then press s.
PAGER
➌ Press and release r until VOLUME is
displayed, then press
The current volume setting is
displayed.
s.
➍ Press and release r until your choice
VOLUME HIGH, VOLUME MED, or VOLUME
of
LOW
is displayed, then press s.
17
18
Page 6

m 86 f hjl b e
SET is displayed momentarily.
SET
Messages
Your pager can receive up to 60 messages. When a message is receiv ed,
your pager alerts according to the current alert and
Reading New Messages
m 81 f hjl b e
➊ Press r to stop the alert and display
the number of new messages.
m flashes.
NEW! 1
m 81 f hjl b e
555-1212
➋ Press r again to display the first
unread message. When
indicates that the message continues on
an additional screen.
e is present, it
m 81 f hjl b e
3!30P 07/05
m 81 f hjl b e
MESSAGES
MESSAGES
END
➌ Press s to displa y the next screen of y our
message.
The next screen of your message,
typically the time stamp, is displayed.
➍ Repeat Steps 2 and 3 to read the next
message.
END is displayed after the very last
message is displayed.
Note:
To exit from any screen while
reading your messages, press
GO)HOME is displayed, then press s. The
number of unread (new) messages is
displayed before the pager returns to
the Standby mode.
t,
Reading Stored Messages
m 81 f hjl b e
555-1212
m 81 f hjl b e
3!30P 07/05
m 82 f hjl b e
555-1234
➊ From the Standby screen, press r
twice. The first screen of the first stored
message is displayed.
Note:
If no messages are stored, NO
MESSAGES
is displayed.
➋ Press s to display the second screen of
your message. If you want to vie w the first
screen again, press
s again.
➌ Press r to display the ne xt stored
message. If you w ant to displa y just the
first screen of your messages, continue
to press and release
r.
19
20
m 82 f hjl b e
Saving Messages
You can save important messages by moving them to the Message Folder .
MESSAGES
MESSAGES
For information about moving, reading, and deleting messages in the
folder , ref er to “Message F older” on page 25.
END
After you have viewed all stored
messages,
Note:
reading your messages, press
GO)HOME is displayed, then press s. The
number of unread messages is
displayed before the pager returns to
the Standby mode.
END is displayed.
To exit from any screen while
t,
21
22
Page 7

Deleting Messages
Messages that you no longer want can be deleted one at a time or
all at once (delete all). Unread messages and messages that ha v e
been moved to the message f older are not deleted.
Deleting a Single Message
m 81 f hjl b e
➊ Display the message you want to delete .
555-1212
m 81 f hjl b e
GO)HOME
m 83 f hjl b e
➋ Press t.
GO)HOME is displayed.
➌ Press r until DELETE MSG is displayed.
DELETE MSG
m 83 f hjl b e
DELETED
➍ Press s.
DELETED is displayed.
m 83 f hjl b e
DEL ALL MSGS
m 83 f hjl b e
DEL ALL YES
m 83 f hjl b e
DELETING
DELETING
Deleting All Messages
This feature allows you to delete all pre viously read messages at
one time. Messages stored in the Message F older are not deleted
with this feature.
➊ From the Standby screen, press t twice.
➋ Press and release r until DEL ALL
MSGS
is displayed, then press s.
DEL ALL YES is displayed.
➌ Press s.
DELETED
DELETED is displayed. All messages
except unread messages and those in
the message folder are deleted.
Message Folder
You can prevent important messages from being deleted, or from
being overwritten by new messages , b y moving them into the
folder . Messages moved into the folder retain their original time
stamp. Up to 30 messages can be mov ed into the folder .
displayed if you try to mov e a message into the f older when there is not
enough storage space left.
MEM FULL is
Moving a Message into the Folder
Note:
Messages can only be moved one at a time into the folder.
m 81 f hjl b e
➊ With the message displayed, press t.
555-1212
m 82 f hjl b e
➋ Press and release r until MOVE)FOLDER
is displayed.
MOVE)FOLDER
23
24
m 82 f hjl b e
FOLDER
FOLDER
MOVED
➌ Press s.
MOVED is displayed indicating the
message has been moved to the f older
and the pager returns to the readmessage mode.
Note:
After messages are moved to
the folder , the y can not be mo ved back
into the personal message area. They
can only be read and deleted.
25
26
Page 8

Reading Messages in the Folder
m 81 f hjl b e
GO)FOLDER
m 81 f hjl b e
555-1212
➊ From the Standby screen, press t twice.
GO)FOLDER is displayed.
➋ Press s to display the first screen of y our
message.
Note:
folder ,
➌ Press s to display the second screen of
your message. If you want to vie w the first
screen again, press
If no messages are stored in the
NO MESSAGES is displayed.
sagain.
m 82 f hjl b e
555-1234
m 82 f hjl b e
FOLDER
FOLDER
END
➍ Press r to display the ne xt stored
message. If you w ant to displa y just the
first screen of your messages, continue
to press and release
After you have viewed all messages
stored in the folder,
Note:
To exit from any screen while
reading your messages, press
GO)HOME is displayed, then press s. The
number of unread (new) messages is
displayed before the pager returns to
the Standby mode.
r.
END is displayed.
t,
Deleting Messages from the Folder
Note:
Messages can only be deleted one at a time.
m 81 f hjl b e
➊ With the message displayed, press t.
555-1212
m 82 f hjl b e
➋ Press and release r until DELETE MSG is
displayed.
DELETE MSG
m 82 f hjl b e
DELETED
➌ Press s.
DELETED is displayed.
27
28
Setting the Alarm
m 84 f hjl b e
m 81 f hjl b e
ALARM 1
FOLDER
ALARM
m 81 f hjl b e
ALARM 2
Alarm
Your pager has three alarms. Each alarm can be set for one time on
a specific date, a specific time daily, or a specific time weekly. At the
selected alarm time, your pager alerts with the same alert as the
incoming message alert.
➊ From the Standby screen, press t twice.
SET ALARM
➋ Press and release r until SET ALARM is
displayed.
➌ Press s.
ALARM 1 is displayed.
➍ Press and release r until your choice
of
ALARM 1, ALARM 2, or ALARM 3 is
displayed, then press
s.
29
30
Page 9

m 81 f hjl b e
ON
m 81 f hjl b e
TIME! 12!00A
ON or OFF is displayed.
➎ Press and release r until ON is
displayed, then press
The screen used to set the alarm time
is displayed.
s.
➏ Set the alarm time by following the steps
in “Setting the Time and Date” on
page 8.
ALARM
ALARM
m 81 f hjl b e
DATE! 01/01
m 81 f hjl b e
DAILY
m 81 f hjl b e
SET
When you have finished setting the
alarm time, the screen used to set the
alarm date is displayed.
➐ Enter the alarm date by following the
steps in “Setting the Time and Date” on
page 8.
➑ When you have finished setting the alarm
date, press and release
choice of
displayed.
1 TIME, DAILY, or WEEKLY is
r until your
➒ Press s.
SET is displayed momentarily.
At the alarm time, your pager alerts,
the alarm number (for example,
ALARM 2) is displayed, and the l
indicator flashes. Press any button to
remove the alarm indication.
Note:
If the alarm is set for Weekly or
Daily, the
screen.
l indicator stays on the
31
ALARM
32
Turning Off a Daily or Weekly Alarm
m 84 f hjl b e
SET ALARM
m 84 f hj l b e
ALARM 1
m 84 f hjl b e
ALARM
OFF
➊ From the Standby screen, press t twice.
➋ Press and release r until SET ALARM is
displayed, then press
s.
➌ Press and release r until the alarm
you want to turn off is displayed, then
s.
press
➍ Press and release r until OFF is
displayed, then press
TIME screen is displayed
The
momentarily.
s.
33
34
Page 10

Optional Features
QuickNotes
QuickNotes are short messages that can be displayed when you are
paged. There can be up to 5 QuickNotes stored in your pager. The person
paging you activates these messages by entering a code f ollow ed by the
rest of the message.
To receive a QuickNote, the person paging you enters ** on the ke ypad,
then the code, then the rest of the message. F or e xample , if someone
paged you and entered **087, you would receiv e a message lik e this
RUNNING LATE.
Note:
QuickNotes are subject to change. Contact your service provider
to verify the list and to make desired changes.
Code Message
Displayed
087 Running Late 108 Next mtg at 107 Mtg now at
106 Mtg at 119 Delayed til
Code Message
Displayed
Code Message
Displayed
Connect Function
The menu selection CONNECT is intended for use by service personnel only.
When selected, an alternating pattern of
screen, press any button twice and the pager restarts.
Message and Pager Indicators
Your pager has several indicators to inform you of the status of y our
messages and your pager.
Duplicate Message
When a new message is received that is identical to one already stored,
the older message is overwritten by the new one .
before the new message and new time stamp.
Errored Data
When a message is received that might contain errors, the characters
QUICKNOTES
INDICATORS
likely to be in error flash when the message is read.
cC Cc is display ed. To exit this
DUPLICATE is displayed
Alarm
The alarm icon l is displayed when an alarm is set and flashes during the
alarm alert.
Memory Full
When the pager memory is full, for example, all message locations are
occupied,
pressed. When this occurs, delete your old unwanted messages to make
room for newer messages .
message into the message folder when there is not enough storage space
left.
Note:
MEM FULL is displayed in the Standby screen until a b utton is
MEM FULL is also displayed if you try to move a
If you don’t delete any old messages, the pager automatically
deletes the oldest read message to make room for the new
message.
35
36
Low Battery
When the voltage of the pager’ s battery drops below a certain level, b is
displayed on all screens, e v en when the pager is off . The low-battery
condition is displayed until the battery is replaced.
Note:
Check your pager’s clock time after replacing the battery.
Belt Clip
Your pager has a removable belt clip. To remove and replace the belt clip,
follow the instructions below.
Removing the Belt Clip
➊ Insert the pointed end of a non-metallic
tool (such as a pen cap) into the top
end of the belt clip as shown in the
BELT CLIP
INDICATORS
illustration.
➋ Push upward on the tab and slide the
belt clip forward to separate it from the
pager.
Lift tab to
release
belt clip
37
38
Page 11

Replacing the Belt Clip
➊ Place the belt clip with the belt clip holder.
➋ Slide the belt clip into the holder until it snaps into place.
Cleaning Y our Pager
To clean smudges and grime from the exterior of your pager, use a soft,
non-abrasive cloth moistened in a mild soap and water solution. Use a
second cloth moistened in clean water to wipe the surface clean. Do not
immerse in water. Do not use alcohol or other cleaning solutions.
Care And Maintenance
The BR850 pager is durable, reliable , and can provide y ears of
dependable service; howe v er, it is a precision electronic product. W ater
moisture, excessiv e heat, and e xtreme shock ma y damage the pager. Do
not expose your pager to these conditions. If repair is required, the
Motorola Service Organization, staffed with specially trained technicians,
offers repair and maintenance facilities throughout the w orld.
You can protect your pager purchase with an optional extended warranty
covering parts and labor. F or more information about warranties, please
contact either your paging service provider, retailer, or Motorola, Inc. at
1-800-548-9954. F or repairs , call Motorola, Inc. at 1-800-548-9954 in the
U.S. or 1-800-323-9685 in Canada. In the U.S ., to contact Motorola, Inc.
on your TTY, call 1-800-793-7834.
Functionality and Use of Your Pager
For questions pertaining to the functions and use of your Motorola pager
please visit our web site at www .motorola.com/pagers or in the U .S . call
USE AND CARE
USE AND CARE
1-800-548-9954 or 1-800-793-7834 (TTY). F or questions pertaining to
your paging service, contact your paging service provider.
Patent Information
This pager is manufactured under one or more Motorola U .S . Patents. A
partial listing of these patents is provided on the inside surface of the
battery door. Other patents cov ering this product are pending.
4860003 5051993
5117500 5128665
5168493 5311516
5325088 5371737
5414419 5450071
39
40
Regulatory Agency Compliance
This device complies with part 15 of the FCC Rules. Operation is subject to the following
two conditions: (1) This de vice ma y not cause harmful interference, and (2) this de vice
must accept any interference received, including interference that ma y cause undesired
operation.
This equipment has been tested and found to comply with the limits for a Class B digital
device, pursuant to part 15 of the FCC Rules. These limits are designed to provide
reasonable protection against harmful interference in a residential installation. This
equipment generates, uses and can radiate radio frequency energy and, if not installed
and used in accordance with the instructions, may cause harmful interference to radio
communications. Ho we v er, there is no guarantee that interference will not occur in a
particular installation.
If this equipment does cause harmful interference to radio or television reception, which
can be determined by turning the equipment off and on, the user is encouraged to try to
correct the interference by one or more of the following measures:
• Reorient or relocate the receiving antenna.
• Increase the separation between the equipment and receiver.
• Connect the equipment into an outlet on a circuit different from that to which the
receiver is connected.
• Consult the dealer or an experienced radio/TV technician for help.
FCC COMPLIANCE
41
PATENT INFORMATION
42
Page 12

ONE (1) YEAR STANDARD LIMITED WARRANTY AND PROVISIONS (U.S.A. ONLY)
Motorola warrants the pager against defects in material and workmanship under normal use and
service for the period of time specified below. This express warranty is extended by Motorola, 1500
Gateway Blvd., Boynton Beach, Florida 33426 to the original end user purchaser only and is not
assignable or transferable to any other party.
This warranty sets forth the full extent of MOTOROLA's responsibilities regarding the pager. Repair,
replacement, or refund of the purchase price, at MOTOROLA's option, is the exclusive remedy. THIS
WARRANTY IS GIVEN IN LIEU OF ALL OTHER WARRANTIES, EXPRESS OR IMPLIED,
INCLUDING WITHOUT LIMITATION, IMPLIED WARRANTIES OF MERCHANTABILITY AND
FITNESS FOR A PARTICULAR PURPOSE. THIS WARRANTY IS LIMITED TO THE DURATION
CHOSEN. IN NO EVENT SHALL MOTOROLA BE LIABLE FOR DAMAGES IN EXCESS OF THE
PURCHASE PRICE OF THE MOTOROLA PAGER, FOR ANY LOSS OF USE, LOSS OF TIME,
INCONVENIENCE, COMMERCIAL LOSS, LOST PROFITS OR SAVINGS OR OTHER INCIDENTAL,
SPECIAL OR CONSEQUENTIAL DAMAGES ARISING OUT OF THE USE OR INABILITY TO USE
SUCH PRODUCT, TO THE FULL EXTENT SUCH MAY BE DISCLAIMED BY LAW.
Motorola pagers are shipped from the factory with a standard limited warranty of one (1) year on parts
and labor from date of purchase by the original end user purchaser, based on proof of purchase. In the
event of a defect, malfunction, or failure to conform to specifications during the warranty period,
Motorola, at its option, will either repair, replace or refund the purchase price of the pager. Repair, at
Motorola's option, may include the replacement of parts or boards with functionally equivalent
reconditioned or new parts or boards. Replaced parts and boards are warranted for the balance of the
original warranty period.
(continued)
LIMITED WARRANTY AND PROVISIONS (U.S.A. ONLY) continued
All parts and boards removed in the replacement process shall become the property of Motorola. This
warranty does not cover defects, malfunctions, performance failures or damages to the unit resulting
from use in other than its normal and customary manner, misuse, accident or neglect, the use of nonconforming parts, or improper alterations or repairs. This warranty does not cover wear and tear on
covers or housings, nor the coverage or range over which the pager will receive signals.
For information on how to receive service on Motorola pagers or covered accessories, call
1-800-548-9954 or 1-800-793-7834 (TTY).
Pager warranty will be VOID if any of the following conditions occur:
• Pagers that are incomplete such as those in which boards or components are missing and/or
incompatible.
• Pagers whose serial numbers do not match on the boards, or pagers in which the board serial
numbers don’t match the housing.
• Pagers that have been opened by, or had work performed by, anyone other than a Motorola
authorized pager service center.
• Pagers received with non-conforming or non-Motorola housings or parts.
Flat rate repair fees apply to pagers and accessories not covered under warranty.
STATE LAW RIGHTS
SOME STATES DO NOT ALLOW THE EXCLUSION OR LIMITATION OF INCIDENTAL OR
CONSEQUENTIAL DAMAGES, OR LIMITATION ON HOW LONG AN IMPLIED WARRANTY LASTS,
THEREFORE THE ABOVE LIMITATIONS OR EXCLUSIONS MAY NOT APPLY. This warranty gives
you specific legal rights and you may also have other rights which vary from state to state.
Personal Numbers
Use the spaces provided below to write down your pager and personal
identification number (PIN), and the number of your service provider .
Additional spaces have been provided to write down the pager and PIN of
your family and friends.
Service Provider Pager Number and PIN
Family and Friends Pager Number and PIN
BR850 Quick Reference Card
Control Buttons
rRead
s Select
t Menu
Indicators and Icons
m Pager is on. When flashing,
indicates an unread message.
e Message Continuation Indicator
h Audio Alert Mode Indicator
o Vibrate Mode Indicator
p Alert Mixed Indicator
u Priv ate Time Set, Audio Alert Mode
i Private Time Set, Vibrate Mode
g Priv ate Time Set, Alert Mixed Mode
q Private Time is Activ e
PERSONAL NUMBERS
l Alarm is Set, flashes during alarm
alert
j Out of Range Indicator
b Low Battery Indicator
f Message Folder
Turning Your Pager On
Press
r.
Turning Your Pager Off
➊ From the Standby screen,
press
t twice.
➋ Press and release r until PAGER
is displayed, then press s.
OFF
Setting the Time and Date
➊ From the Standby screen, press t
twice.
➋ Press and release r until SET UP
is displayed.
PAGER
➌ Press stwice.
➍ Press and release r for AM/PM or
24-hour format, then press
s.
Page 13

➎ Press r until the correct hour digit
is displayed, then press
s.
➏ Repeat step 5 to set the minutes and
AM/PM fields (if applicable).
➐ Press and release r until the
correct month is display ed, then
press
s. Repeat this step to set the
date.
Moving Messages to the Folder
➊ With the message displayed,
press
t.
➋ Press and release r until
MOVE)FOLDER is displayed,
then press
s.
Reading Messages in the Folder
➊ From the Standby screen,
press
t twice.
➋ Press s to display the first message.
➌ Press r to display the next
message. Repeat this step to displa y
all messages in the folder.
Setting the Alarm
➊ From the Standby screen,
press
t twice.
➋ Press and release r until SET
is displayed, then press s.
ALARM
➌ Press and release r to select the
alarm.
➍ Press and release r until ON is
displayed, then press
s.
➎ Press r until the correct hour digit
is displayed, then press
s.
➏ Repeat Step 5 to set the minutes, the
AM/PM fields, the date, and to select
a one time, daily, or weekly alarm.
are trademarks or registered trademarks of Motorola Inc.
t, Motorola, FLEX, f, and BR850
Reg. U.S. Pat. & Tm. Off.
© 1998 by Motorola, Inc.
All Rights Reserved.
Paging Products Group
1500 Gateway Blvd.,
Boynton Beach, FL 33426-8298
Printed in U.S.A. 10/98
6881031B25-O
@6881031B25@
 Loading...