

Page 1

xPlay Product Overview Training
Nov 28th, 2014
B2X EMEA
© B2X Care Solutions I Company confidential
1
Page 2

Product Overview
• Internal Name: XPlay
• Marketing Name: Nexus 6
• External number: XT110X (32 and 64GB) depends on market models
(SBOM references XCVR#s on SJUG####)
• APC: 0R33
• TAC CODE EMEA: 35545706
• TAC CODE (Google Play): 35547006
• Colours: Dark Blue and Light Grey
2
© B2X Care Solutions I Company confidential
Page 3
Product Overview
Specifications
Processor
Weight 184.00g
Dimensions 82.98mmx159.26mmx10.06mm
2.7GHz Quad-Core
Adreno 420 GPU
APQ 8084AB
Display
Battery 3220 mAh
Bands
Corning Gorilla Glass3,
5.96” AMOLED QHD (1440x2560) 493ppi
XT1100 using MDM9225
4G LTE: 1/3/5/7/8/9/19/20/28/41;
CA DL: B3-B5, B3-B8
WCDMA 850/900/1900/2100: 1/2/4/5/6/8/9/19
CDMA: not supported
GSM: 850/900/1800/1900
© B2X Care Solutions I Company confidential
3
Page 4
Key Features
Software Platform Android 5.0 Lollipop
Audio
Video
Camera
Connectivity
Memory 2GB (RAM), Storage (ROM)
Messaging/Web/Apps
Sensors Accelerometer, Gyroscope, Proximity, Magnetometer, Barometer, Temperature
SIM Configuration NanoSIM
AAC, AAC+, AAC+ Enhanced, AMR NB, AMR WB, FEVRC, LAC, MIDI, MP3, OGG/Vorbis,
PCM, QCELP, WAV, WMA (v2, v7, v8, v9, v10)
Capture/Playback/Streaming, 1080p HD Video and 2160p Ultra HD Video, Video Streaming,
H.263, H.264, MPEG4, WMV v9
13 MP large format sensor, 2 MP front, Digital Zoom, Auto HDR, Ring flash with dual LEDs,
4K UHD video capture, 1080p HD video (30 fps), 4X digital zoom
3.5mm Headset Jack, 802.11a/ac/b/g/n, BT 4.0 LE, Hotspot for up to 8 devices, MicroUSB,
NFC, USB 2.0 HS
MMS, SMS, Email (Corporate Sync, Google Mail, POP3/IMAP embedded, Push Email, Yahoo
Mail), IM (GTalk), Chrome
4
© B2X Care Solutions I Company confidential
Page 5
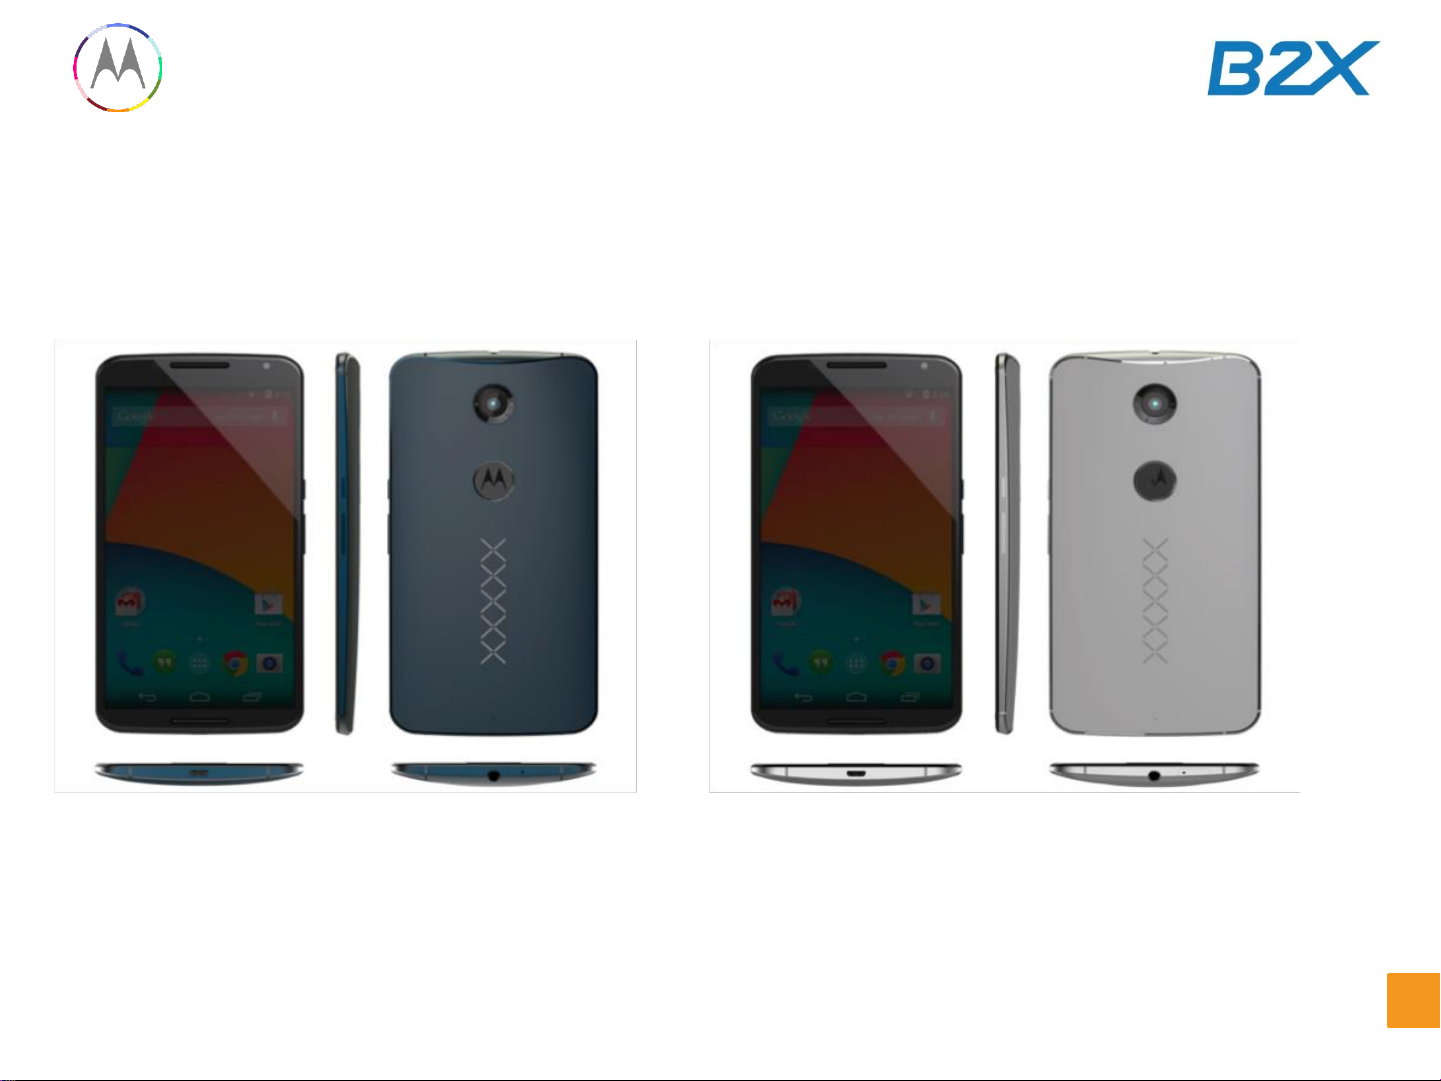
xPlay - Overview
Dark CMF: Black Lens / Ink Metal Frame / Ink FAD M1 Inlay
Light CMF: Black Lens / Silver Metal Frame /Fog Whte FAD M1 Inlay
© B2X Care Solutions I Company confidential
5
Page 6
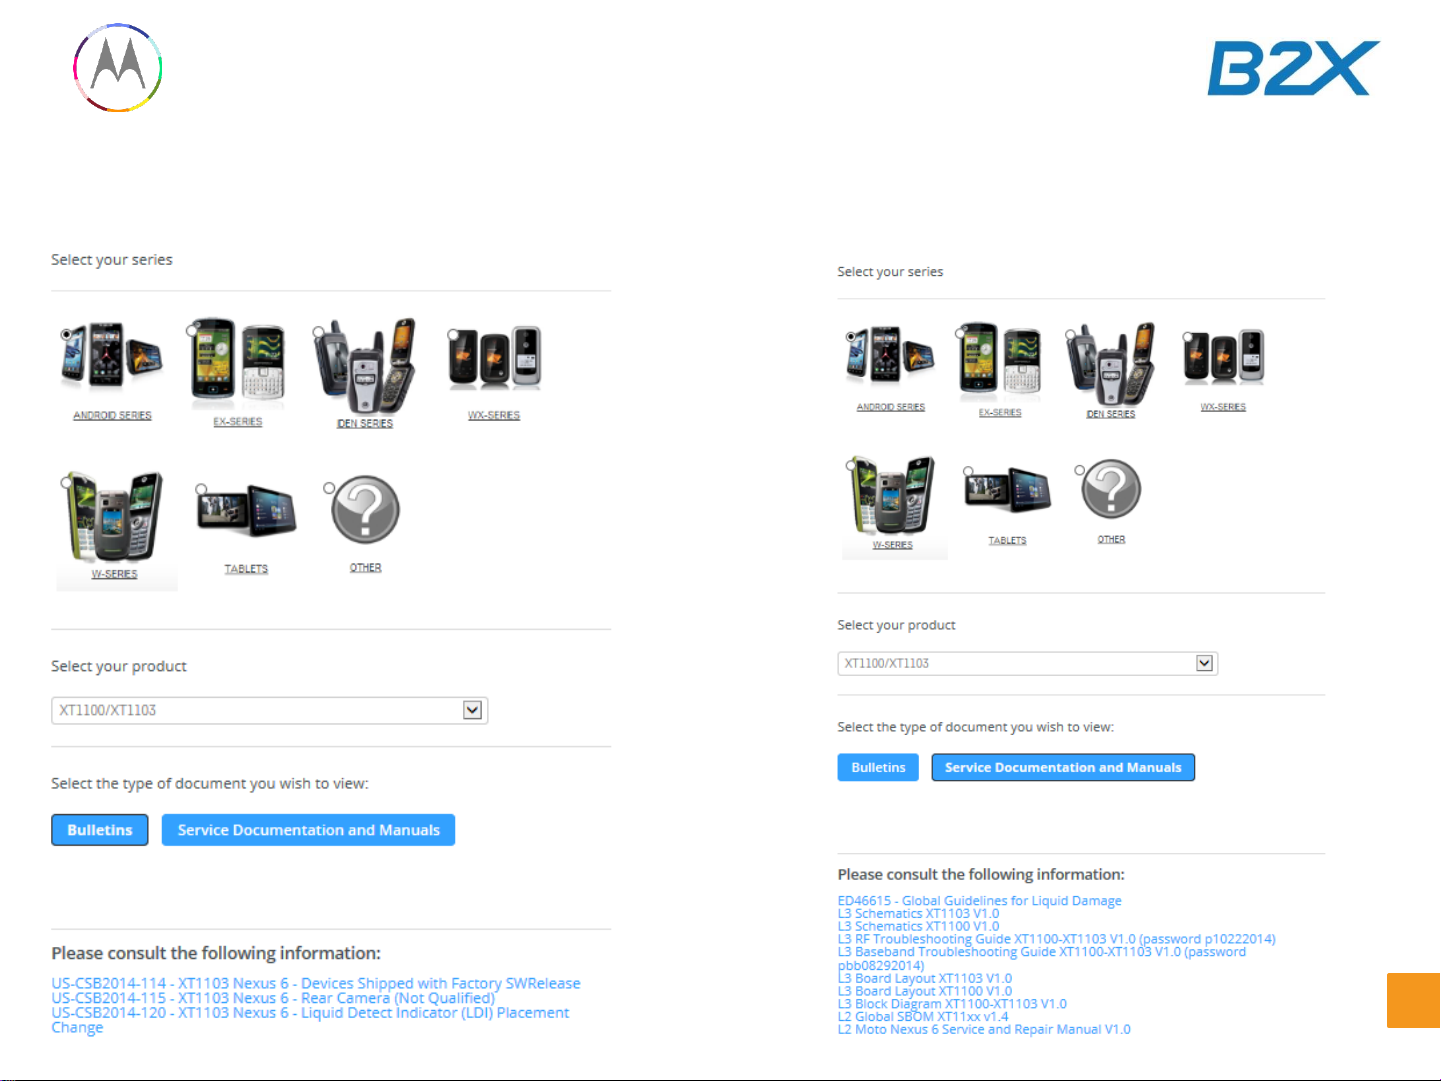
Motorola Service Portal - Example
Following Bulletins, Service Documentation and Manuals are available 12/08/14 !
6
© B2X Care Solutions I Company confidential
Page 7
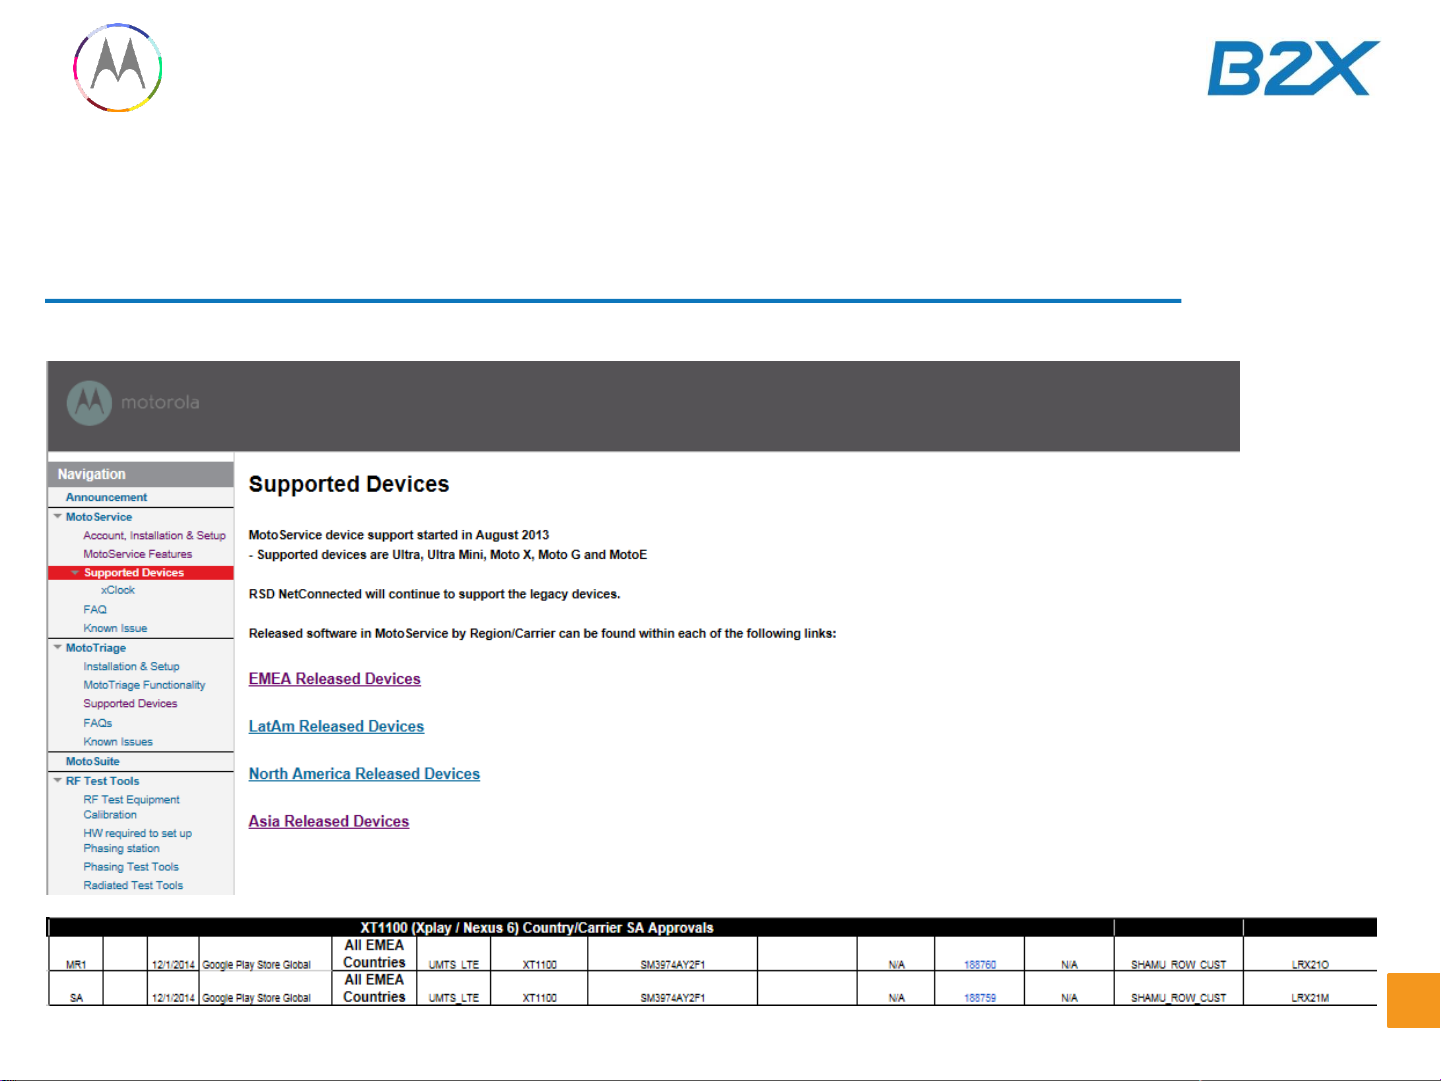
Motorola Service tools
EMEA Released Devices/Software Access on motoservice-external:
https://sites.google.com/a/motorola.com/motoservice-external/
7
© B2X Care Solutions I Company confidential
Page 8
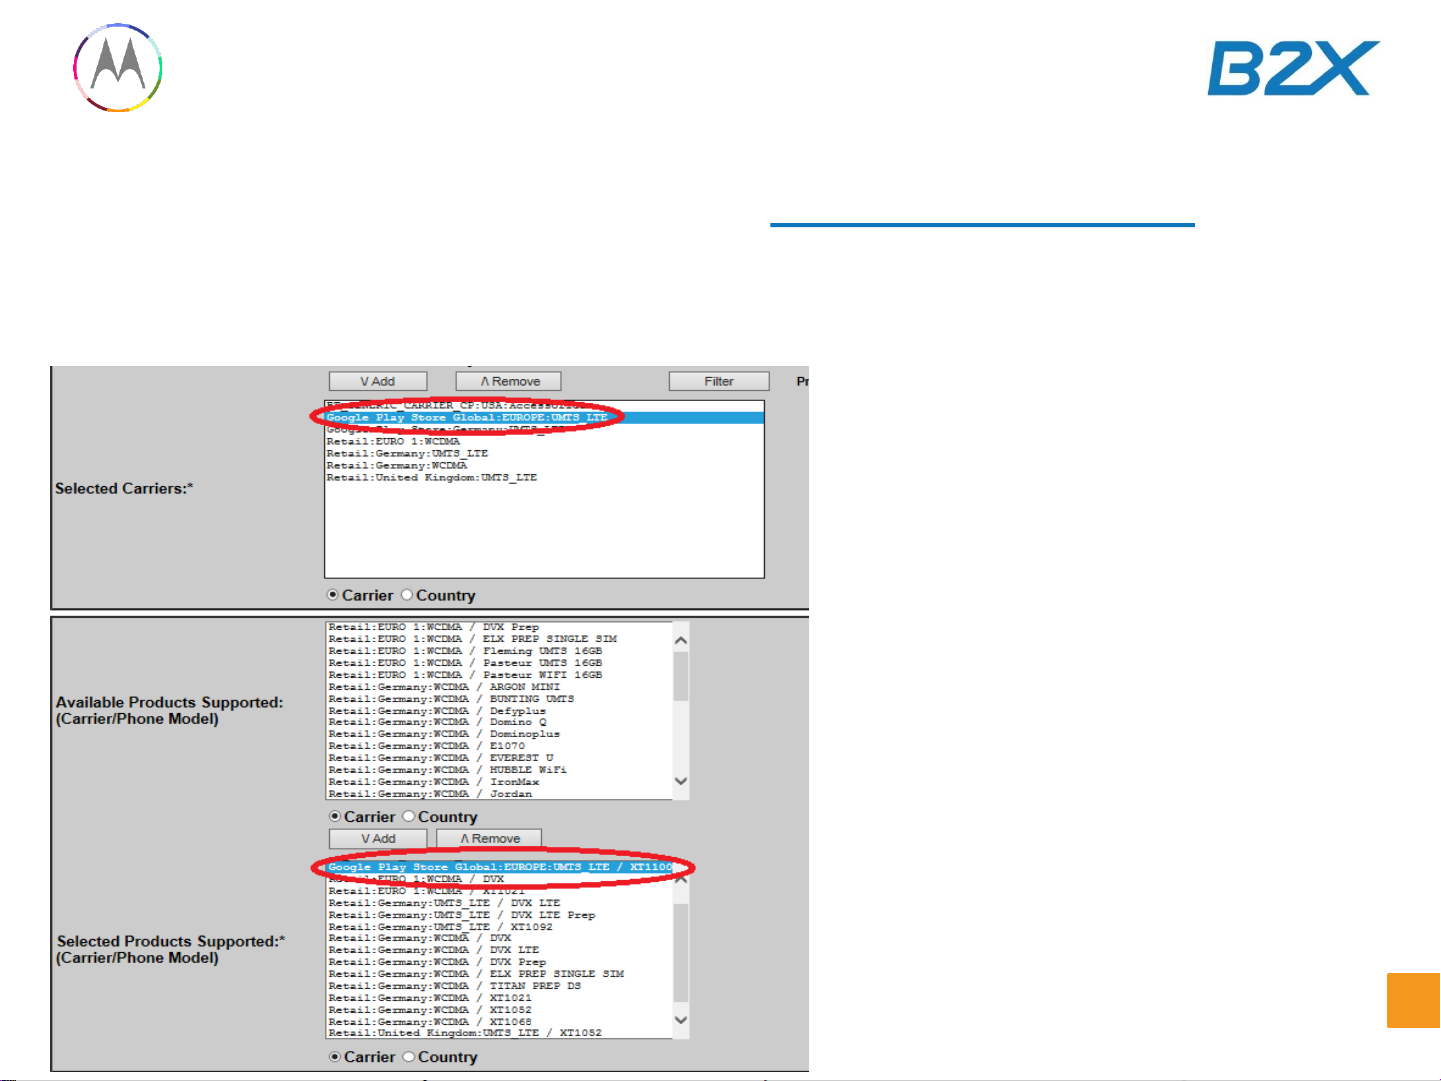
User Profile Update Supporting xPlay of MotoService on RSD NC Site
• RSD (Remote Software Download) Site : https://rsd.motorola.com
• Need to update “Supported Carrier & Supported Product”
-Selected Carriers: Google Play Store Global:EUROPE:UMTS_LTE
-Selected products: Google Play Store Global:EUROPE:UMTS_LTE/XT1100
8
© B2X Care Solutions I Company confidential
Page 9
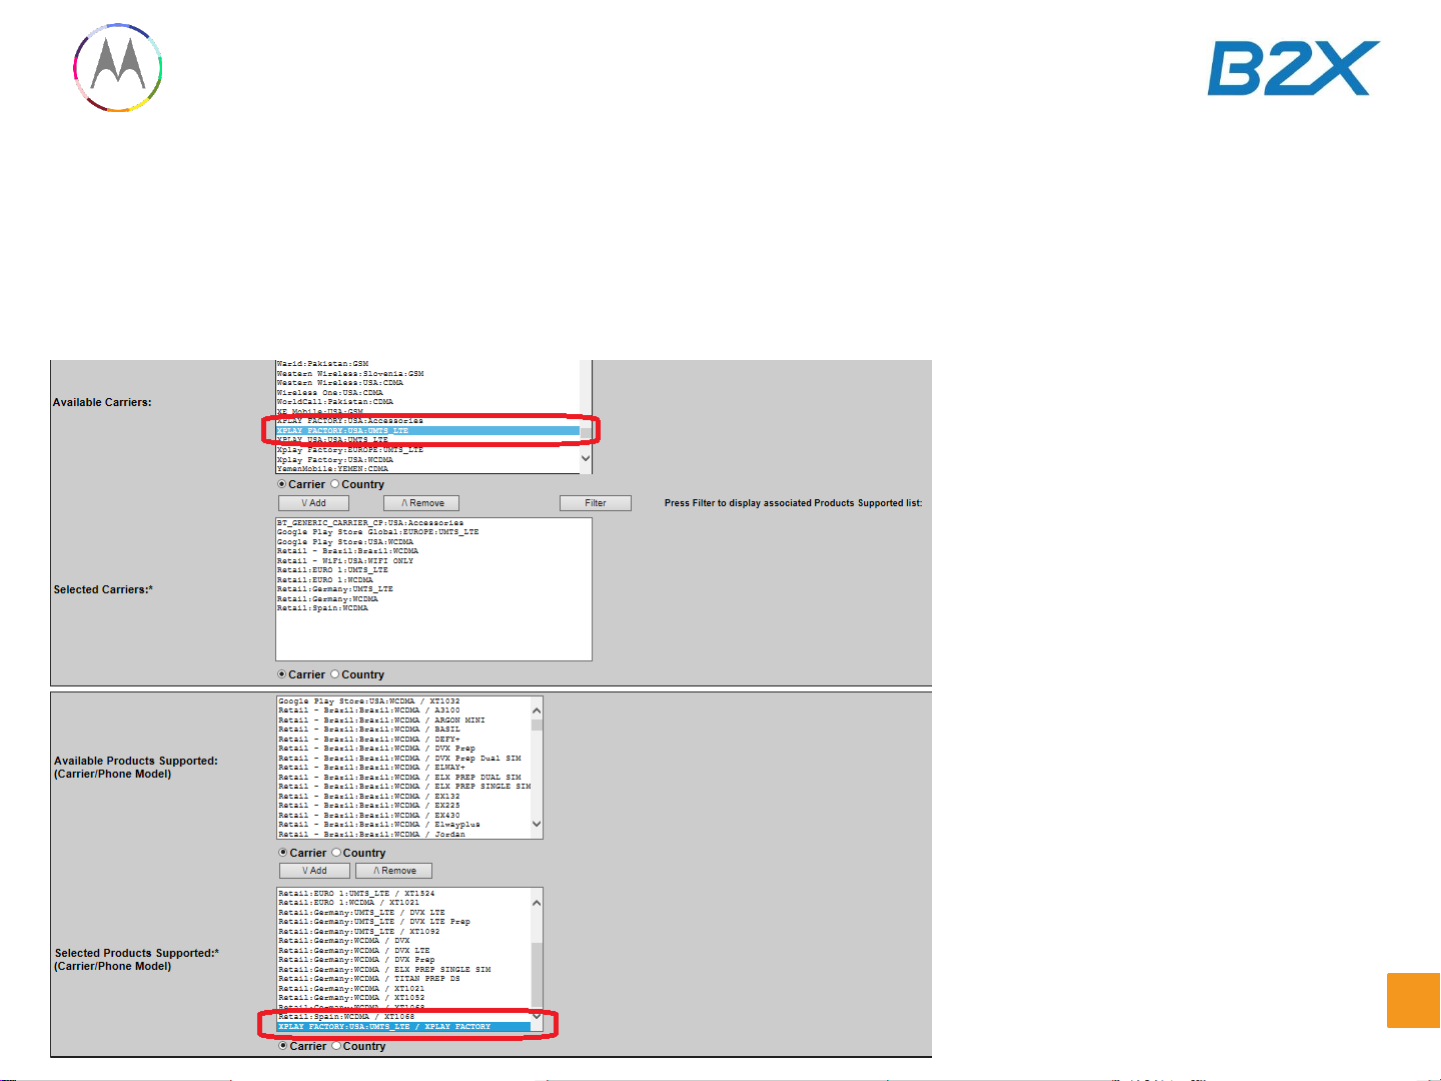
User Profile Update Supporting xPlay of MotoService on RSD NC Site
• Need to update “Supported Carrier & Supported Product” to support Factory sw.
-Selected Carriers: XPLAY FACTORY:USA:UMTS_LTE
-Selected products: XPLAY FACTORY:USA:UMTS_LTE/XPLAY FACTORY
9
© B2X Care Solutions I Company confidential
Page 10

User Profile Update Supporting xPlay of MotoService on RSD NC Site
• RSD (Remote Software Download) Site : https://rsd.motorola.com
• Need to update Motoservice CIT test requirements for xPlay
with back to factory option
10
© B2X Care Solutions I Company confidential
Page 11

Sales Model Matrix
Item Part
Number
Model 1 Model 2 Model 3 Model 4 Model 5 Model 6 Model 7 Model 8
Model Number SM3979AY2E1 SM3979AW4 E1 SM3981AY2E1 SM3981AW4E1 SM3972AY2F1 SM3972 AW4F1 SM3974AY2F1 SM3974AW4 F1
Model Desc ription
MOTOROLA,
XT1100, FR,
RETAIL, DK BLU,
32 GB
MOTOROLA,
XT1100, FR,
RETAIL, LT GRY,
32GB
MOTOROLA,
XT1100, FR,
RETAIL, DK BLU,
64 GB
MOTOROLA,
XT1100, FR,
RETAIL, LT GRY,
64GB
MOTOROLA, XT1100,
RETAIL, DK BLU, EURO1
32 GB
MOTOROLA, XT1100,
RETAIL, LT GRY,
EURO1, 32 GB
MOTOROLA, XT1100,
RETAIL, DK BLU,
EURO1, 64GB
MOTOROLA, XT1100,
RETAIL, LT GRY,
EURO1, 64GB
Colour (model set up) DARK BLUE Light Grey DARK BLUE Light Grey DARK BLUE Light Grey DARK BLUE Light Grey
Country
Franc e Franc e France Franc e
EURO1
Austria ,Belgium,
Germany,Netherlands ,
Portugal ,Spain,
Switzerla nd,Italy
EURO1
Austria ,Belgium,
Germany,Netherland
s, Portuga l,Spai n,
Switzerla nd,Italy
EURO1
Austria ,Belgium,
Germany,Netherland
s, Portuga l,Spai n,
Switzerla nd,Italy
EURO1
Austria ,Belgium,
Germany,Netherlands
, Portugal ,Spain,
Switzerla nd,Italy
Operator / Retai l
Retail Retail Retai l Retai l
Retail Retail Retail
Retail
Sim / Sub Lock Ena ble - Y or N NO NO NO NO NO NO NO NO
Color for Commercial Invoic e and Label
French
(Noir,Bl anc)
French
(Noir,Bl anc)
French
(Noir,Bl anc)
French
(Noir,Bl anc)
Engli sh (default) Engli sh (default) Engl ish (d efault) Engli sh (default)
XCVR 32GB - EMEA/APAC Dark SJUG6962AA
X X
XCVR 32GB - EMEA/APAC Light SJUG6961AA X X
XCVR 64GB - EMEA/APAC Dark SJUG6959AA X
X
XCVR 64GB - EMEA/APAC Light SJUG6960AA
X X
Charger - Agate Turbo Li te EURO SPN5866A
X X X X X X X X
Charger - Agate Turbo Li te UK SPN5868A
Data Ca ble - Shamu Bla ck SKN6466A
X X X X X X X X
Headset - Lumineers Bl ack (Da rk XCVR) SJYN1305A
X X
Headset - Lumineers W hite (Light XCVR) SJYN1298A
X X
REAR INLAY,INK,NO CARRIER,CO-BRAND (For Dark) 01018057001
X X X X
REAR INLAY,FOG,NO CARRIER,CO-BRAND (For Light) 01018057002
X X X X
DECO SPKR DARK,XPLAY (Both Light & Dark) QTY 2.0 13014257001
X X X X X X X X
IMEI Label 54014394001
X X X X X X X X
XPLAY SIM TRAY REMOVAL TOOL 55014044001
X X X X X X X X
XPLAY SIM TRAY REMOVAL TOOL INSERT 68017820001
X X X X X X X X
Model description for EMEA
© B2X Care Solutions I Company confidential
11
Page 12

Product External View
12
© B2X Care Solutions I Company confidential
Page 13

Main Exploded View
13
© B2X Care Solutions I Company confidential
Page 14

Main Exploded View
14
© B2X Care Solutions I Company confidential
Page 15

Snapshots of Main PCB – Top and Bottom
Top Side Bottom Side
15
© B2X Care Solutions I Company confidential
Page 16

Tools Required for Disassembly
16
© B2X Care Solutions I Company confidential
Page 17

Fixtures for xPlay - disassembly repair
4-00-U2-10000 Rear Inlay Removal Tool
1. Push the SIM Tray Removal Tool into the SIM Tray hole until the SIM Tray
ejects from the phone as shown at figure 1.
2. Insert the Inlay Ejection Pin into the guide hole on the Inlay Pin Guide
(figure 2).
Refer page 19 L2 Moto Nexus Service and Repair Manual.
Removal tool figure 1 figure 2
© B2X Care Solutions I Company confidential
17
Page 18

Tools Required for Parts Refresh
18
© B2X Care Solutions I Company confidential
Page 19

Fixtures for xPlay – Parts Refresh
4-00-V3-10000 PCB Processes Fixture (PCB Preparation)
1. Set the PCB Processes Fixture nest with the “shields down” side
facing up (figure1).
2. Place the Audio Gasket (figure 2) in the fixture nest.
3. Place the Bottom Thermal Spreader over the alignment pins (figure 3).
Refer page 54/55/56 L2 Moto Nexus Service and Repair Manual.
figure 1 figure 2 figure 3
NOTE: The Bottom Thermal Spreader liner must be removed to perform the remaining steps.
© B2X Care Solutions I Company confidential
19
Page 20

Fixtures for xPlay – Parts Refresh
4-00-V3-10000 PCB Processes Fixture (PCB Preparation)
1. Set the PCB Processes Fixture nest with the “shields up” side
facing up (figure1).
2. Insert the Audio Gasket press tool in the press head (figure 2).
3. Place the Copper Tape over the alignment pins (figure 3).
4. Place the Top Thermal Spreader over the alignment pins (figure 4).
Refer page 57 up to 60 L2 Moto Nexus Service and Repair Manual.
figure 1 figure 2 figure 3 figure 4
© B2X Care Solutions I Company confidential
20
Page 21

Tools Required for Assembly
21
© B2X Care Solutions I Company confidential
Page 22

Fixtures for xPlay – assembly repair
4-00-V3-10000 PCB Processes Fixture (Loudspeaker Assembly)
Set the PCB Processes Fixture nest with the “shields up” side facing up.
1. Place the locating tool over the alignment pins and the PCB (figure 1).
2. Place the Loudspeaker in the tool and press down (figure 2).
3. Insert the Loudspeaker tool in the press and press the loudspeaker for 10
sec. (figure 3).
Refer page 72 L2 Moto Nexus Service and Repair Manual.
figure 1 figure 2 fixture 3
© B2X Care Solutions I Company confidential
22
Page 23

Fixtures for xPlay – assembly repair
4-00-R8-10000 Front Facing Gasket Alignment (Front camera)
Place the Fixture lid over the gasket carrier. Match the angled corner of the
fixture lid to the angled corner of the recessed pocket in the fixture (figure 1).
Place the Front-Facing Imager face-down in the fixture through the fixture lid
(figure 2).
Refer page 86 L2 Moto Nexus 6 Service and Repair Manual.
figure 1 figure 2
© B2X Care Solutions I Company confidential
23
Page 24

Fixtures for xPlay – assembly repair
4-00-V4-10000 Rear Housing Prep Fixture (Battery Assembly)
1. Place the Rear Housing in the fixture and insert the battery in the Rear
Housing as shown in figure 1.
2. Place the Rear Housing Prep Fixture in the Press and press the Battery and
Battery Insulator Tapes for 10 sec. (figure 2).
3. Position the NFC Flex alignment and press down (figure 3 a/b).
Refer page 90 L2 Moto Nexus 6 Service and Repair Manual.
figure 1 figure 2 figure 3a figure 3b
CAUTION: Do not damage the Battery Flex, Battery, Battery Adhesive tap or NFC Flex.
© B2X Care Solutions I Company confidential
24
Page 25

Fixtures for xPlay – assembly repair
4-00-V4-10000 Rear Housing Prep Fixture (Earpiece Assembly)
1. Place the Rear Housing in the fixture and place the earpiece in the pocket of
Rearhousing (figure 1).
2. Position the earpiece press tool over the earpiece and Rear Housing
(figure 2).
3. Press the earpiece for 5 sec. to secure it in the Rear housing (figure 3).
Refer page 97 L2 Moto Nexus 6 Service and Repair Manual.
figure 1 figure 2 figure 3
25
© B2X Care Solutions I Company confidential
Page 26

xPlay – Rear Housing assembly repair
Torque Driver (Adjustable)
Use the Torque Driver and 3IP Torx bit to tighten the 22 screws to 1.0 in-lbs (11.3
nm) in the order as shown below.
Refer page 103 xPlay L2 Nexus 6 Service and Repair Manual.
26
© B2X Care Solutions I Company confidential
Page 27

Fixtures for xPlay – assembly repair
4-00-V4-10000 Rear Housing Prep Fixture (Rear Inlay Assembly)
1. Place the assembly in the Rear Housing Prep fixture nest (figure 1).
2. Place the fixtures in the press and verify audio deco alignment tools are
positioned correctly (figure 2).
3. Press the assembly for 10 sec. (figure 3).
Refer page 106 L2 Moto Nexus 6 Service and Repair Manual.
figure 1 figure 2 figure 3
CAUTION: Do not allow 3M AP111 Surface Promoter to contact the Rear-Facing Imager Lens, microphone
openings, or microphone gasket.
© B2X Care Solutions I Company confidential
27
Page 28

Fixtures for xPlay – assembly repair
4-00-T9-10000 Top and Lower Deco Press (Audio Deco Assembly)
Insert the Audio Deco Alignment Press into the recess in the Front Housing
and place the Audio Deco into the Audio Deco Alignment Press (figure 1).
Press carefully the Audio Deco into the Front Housing with the Audio Deco
Press (figure 2).
Refer page 110 L2 Moto Nexus 6 Service and Repair Manual.
figure 1 figure 2
NOTE: The same fixture and procedures apply for the Top and Bottom Audio Decos.
© B2X Care Solutions I Company confidential
28
Page 29

Motoservice CIT test requirements for xPlay
Enable Full CIT test under Motoservice
To run full CIT test under Motoservice devices have to be flashed with back to
factory software. This is required to cover all CIT teststeps under MotoService.
Tests covered in the factory sw that are not in the customer sw:
• Audio2ndMicLoudSpeakerUnblockedCqaApk
• Audio3rdMicLoudSpeakerUnblockedCqaApk
• INVM Master clear
• LPDDDR3 memory
• NFCAntenna
• eMMC
• CPI Clear
NOTE: For FULL CIT test under MotoService an eToken is required !
© B2X Care Solutions I Company confidential
29
Page 30

Motoservice CIT test requirements for xPlay
Enable Full CIT test under Motoservice
1. Nexus6 must be flashed with backflash to factory software.
- XT1100 currently has customer software
- Connect to MotoService and select the Back to Factory feature option
- Select the Carrier “Google Play Store Global” and Model “XT1100”
- Select the Recipe “BackToFactory”
- Browse field is left blank under Firmware File
- Start the flashing process by clicking on “Back to Factory” on the port the device is assigned
30
© B2X Care Solutions I Company confidential
Page 31

Motoservice CIT test requirements for xPlay
Enable Full CIT test under Motoservice
2. After flashing is complete and device is shown at passed, run CIT Tests
- Disconnect the device and re-connect before starting CIT test
- Device will be recognized as XT1103
(XT1100 and XT1103 share the same factory software build)
31
© B2X Care Solutions I Company confidential
Page 32

Motoservice CIT test requirements for xPlay
Enable Full CIT test under Motoservice
3. Flash the customer software using board swap process
- Factory software will be detected when it is connected to MotoService
- Run Board Swap thru the normal process, selecting the same carrier/model in the drop down
lists
- Enter the serial number of the device to allow the correct serial # swap process
32
© B2X Care Solutions I Company confidential
 Loading...