

Page 1

IMPORTANT SAFETY INSTRUCTIONS
WARNING – When using electric products, basic
precautions should always be followed, including the
following:
1) Read all the instructions before using the product.
5) The product should be connected to a power supply
only of the type described in the operating instructions
or as marked on the product.
6) The power-supply cord of the product should be
unplugged from the outlet when left unused for a long
period of time.
2) Do not use this product near water – for example,
near a bathtub, washbowl, kitchen sink, in a wet
basement, or near a swimming pool or the like.
3) This product, in combination with an amplifier and
headphones or speakers, may be capable of
producing sound levels that could cause permanent
hearing loss. Do not operate for a long period of time at
a high volume level or at a level that is uncomfortable.
If you experience any hearing loss or ringing in your
ears, you should consult an audiologist.
4) The product should be located away from heat
sources such as radiators, heat registers, or other
products that produce heat.
7) Care should be taken so that objects do not fall and
liquids are not spilled into the enclosure through
openings.
8) The product should be serviced by qualified
personnel when:
a) The power-supply cord or the plug has been
damaged; or
b) Objects have fallen, or liquid has been
spilled onto the product; or
c) The product has been exposed to rain; or
d) The product does not appear to operate
normally or exhibits a marked change in
performance; or
e) The product has been dropped or the
enclosure damaged.
1
Page 2

9) Do not attempt to service the product beyond that
described in the user-maintenance instructions. All other
servicing should be referred to qualified service
personnel.
DANGER: INSTRUCTIONS PERTAINING TO
RISK OF FIRE, ELECTRIC SHOCK, OR INJURY
TO PERSONS: Do not open the chassis. There are no
user serviceable parts inside. Refer all servicing to
qualified personnel only.
GROUNDING INSTRUCTIONS:
This product must be grounded. If it should malfunction
or breakdown, grounding provides a path of least
resistance for electrical current to reduce the risk of
electric shock. The plug must be plugged into an
appropriate outlet that is properly installed and
grounded in accordance with all local codes and
ordinances.
DANGER – Improper connection of the equipmentgrounding connector can result in a risk of electric
shock. Check with a qualified electrician or serviceman
if you are in doubt as to whether the product is properly
grounded. Do not modify the plug provided with this
product – if it will not fit in the outlet, have a proper
outlet installed by a qualified electrician.
SAVE THESE INSTRUCTIONS
2
Page 3

Table of contents
1) Introduction ……………………………… 4
2) Getting started ………………………...… 7
A) PianoBar Components……………….. 7
B) Piano Considerations …………......... 9
C) Installing and Calibrating the PianoBar
…..…. 12
D) Using the PianoBar for the First Time
……… 15
3) The PianoBar’s Controls, Connections and
Menus.. ……… 17
A) Front Panel Controls/ ……………….. 17
B) Rear Panel Connections…….……… 18
C) Navigating the menus……………… 19
D) Main Setup Page…………………… 20
E) Edit Menu…………………………….. 23
F) Library………………………………… 24
G) Channel Setup……………………… 26
H) Controllers…………………………… 28
I) Effects…………………………………. 29
J) Channel Route……………………….. 29
K) Options……………………………….. 30
4) About MIDI………………………………. 31
5) Creating your own Setups……………… 34
Appendix A –
MIDI Implementation Chart ……………. 39
Appendix B –
User and Factory Setup Chart ……………. 41
Appendix C –
Sound Cart ……………………………… 51
Appendix D –
MIDI CC Chart ……………………... 58
Appendix E –
Service and techsupport info ………….. 60
3
Page 4

1. INTRODUCTION
Congratulations! By purchasing the Moog PianoBar
you have recognized you CAN teach an old dog
new tricks…
Of course we mean no disrespect referring to
the modern acoustic piano as an old dog; it has a
long and distinguished history. Adapted from the
Harpsichord and other early keyboard instruments,
the forte-piano, produced around 1708 by
Bartolomeo Cristofori of Padova, Italy, was the first
keyboard instrument to feature a wide dynamic
response to a player’s touch. Composers began to
flock to the instrument as it became more widely
available to take advantage of its capability for
musical expression. A number of technological
innovations led to the modern piano – an
instrument capable of whispery soft playing or
thunderous passages. The piano has an impressive
repertoire – from the highest statements of
classical artistic purity to the greasiest boogie-
woogie to elegant and complex jazz voicings. The
piano is a sound that will forever be etched in our
consciousness – and one always worth exploring.
Today, music is a varied and complex
endeavor, often utilizing the latest in technology.
Piano players and composers have often found a
frustrating gap between the true touch, feel and
voice of the piano and the technology of modern
music making. In fact many have resorted to
compromised means – digital instruments with
plastic keys that lack the touch and sound of the
piano. This is where the PianoBar comes to the
rescue.
What does the PianoBar Do?
The PianoBar is a portable device designed to
scan the keys of the piano and the pedals and
transmit the playing of the piano as MIDI
information. If you are unfamiliar with MIDI, there is
detailed information in chapter 4. Simply put, MIDI
is a method of capturing a musical performance;
4
Page 5

it can be used to simultaneously play sounds other
than the sound of the instrument being played, or
record that performance information for later
playback.
The PianoBar extracts the information about your
piano playing by means of a Scanner Bar which
rests above the keys of the piano and out of the
way of the player’s fingers. Yet it requires no
technician to install it, it’s portable, and IT SETS UP IN
JUST A FEW MINUTES…. When you are done you
can leave it installed or remove it.
With the Piano Bar, you can:
- Play sounds when you depress a key on the
piano – combine and layer sounds with the
acoustic piano sound for rich new timbres. This is a
great way to explore sounds and add new spice to
your piano performances.
- Capture your piano playing in a computer, in a
MIDI sequencer or notation software. This is a great
way to increase productivity while composing
music at the piano.
- Play MIDI music files into the PianoBar for
education or entertainment. LEDs above the keys
can be enabled to light up showing the notes
being played.
- Whatever else your imagination can dream up!
How does it do it?
How does the PianoBar extract MIDI data from
the keyboard and pedals? If you study the
mechanics of a piano key and its action, you will
find that the loudness of a tone produced by
playing a key is closely related to the VELOCITY of
the key being pressed. Therefore, by looking
simply at the motion of the keys, you can get a
highly accurate representation of the notes and
loudness of the notes that are played. The Scanner
Bar uses patented Infrared Scanning technology to
measure the movement of the keys and transmit
that information to the Control Module, where it is
converted to MIDI.
5
Page 6

The Pedal Sensor contains a pair of proximity
sensors, which respond to the depression of the
Soft and Sustain Pedals.
Why Moog and why the PianoBar?
Moog is concerned with the production of
soulful and innovative music utilizing the best
electronic design. The Piano is an instrument that
can possess a depth of expression that is unrivalled
by many instruments. The PianoBar is the fruit of
collaboration between Don Buchla and Moog
Music. Buchla is an important name in electronic
music history – as he was working on synthesizers
on the West Coast around the same time Bob
Moog was working on the East Coast. His
developments over the years include pioneering
synthesizer designs and a number of innovative
MIDI controllers – including the PianoBar. By
creating an accessory that taps into the
expressiveness of the piano, we hope that many
piano players, casual or serious, may find new joy
in a timeless instrument.
The following will explain fully the installation,
function and possible uses for the Moog PianoBar.
If you don’t like reading manuals, “Getting Started”
on p. 7 covers the installation and basic operation.
It is highly recommended that you read the
manual in order to obtain the maximum results
from this product. We at Moog Music extend to
you our sincerest hopes that your muse is
awakened by this remarkable device.
We know you are itching to get started so here
it is…
6
Page 7
2. GETTING STARTED
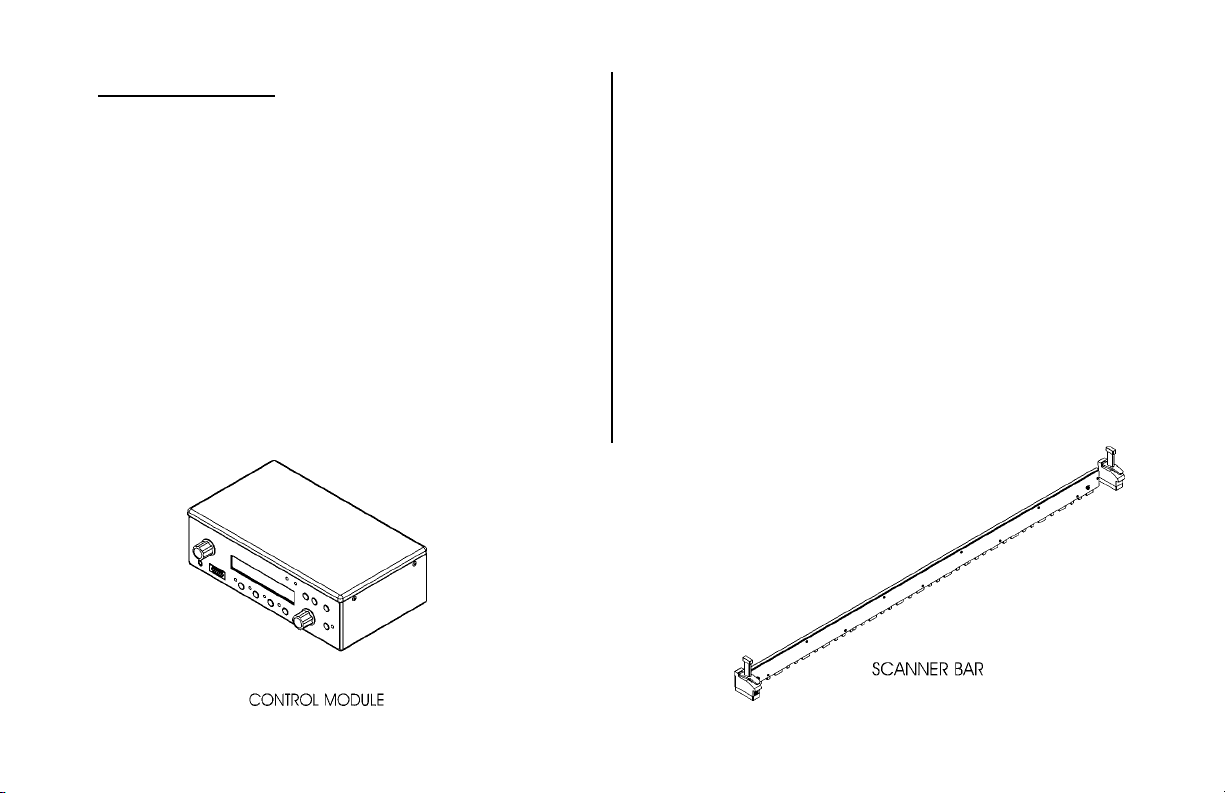
PIANOBAR COMPONENTS
The PianoBar is shipped inside its own carrying
case. Upon opening your new PianoBar, inspect
the contents to ensure that all the components are
present.
The PianoBar package contains the following
components:
• Power Supply: Wall transformer connects
the PianoBar to a source of AC.
• Control Module: The Control Module houses
the user interface, the sounds and the
brains of the PianoBar. Both the Scanner
Bar and Pedal Sensor connect to the
Control Module. The Control Module
contains the brains and sounds of the
PianoBar.
•
Scanner Bar: The Scanner Bar is what senses
the piano keys’ movements and translates
this into MIDI information. When it is
installed, it rests on the cheek blocks (The
wooden pieces next to the lowest and
highest keys) and rests against the fallboard
(the piece behind the keys).
7
Page 8

•
Pedal Sensor: The Pedal Sensor sits under
the piano’s pedals and detects the use of
the sustain and soft pedal.
• Library Card: The Library Card serves a dual
purpose. It functions as a memory storage
device, which holds 20 Setups. It also
serves as a height gauge for setting the
distance between the Scanner Bar and the
keys.
• Two cables: Used for connecting the
Scanner Bar and Pedal Sensor to the
Control Module.
And of course,
• This Manual.
To use the PianoBar you will need:
• A source of power: 85-250 Volts AC, 50-60
Hz.
• Your piano
• If you are using the PianoBar’s built in
sounds you will need a pair of amplified
monitors or headphones
• If you are using external MIDI devices, you
will also need MIDI cables to connect them
to the Control Module.
8
Page 9

PIANOBAR CONSIDERATIONS - What you should
know about the piano on which you are
installing the PianoBar
Please note that we have stated that the
PianoBar works on virtually every 88-key acoustic
piano.
There are some exceptions, and features that may
affect the performance of the PianoBar.
• Key span (the width of keys) – a lot of
research went into determining the
extremes of key span. The Scanner Bar can
be adjusted to accommodate a large
variety of key spans.
• Uneven key height – when installed and
calibrated, the Scanner Bar’s sensors
compensate for any unevenness of the key
height.
• The piano must have 88 keys.
• Cheek-blocks that have unusual shaping,
or are too skinny.
• Black Keys that end more than ¼” from the
fallboard
• Non-Vertical fallboards – these pianos are
not excluded from being used with the
PianoBar, but their performance may be
compromised if the Scanner Bar is allowed
to flex.
What you don’t have to worry about:
Other considerations:
• Tuning and condition of piano – The Moog
PianoBar is used in conjunction with the
sound and feel of the acoustic piano. For
layering sounds from the Control Module
with the acoustic piano, we assume that
the piano in question is in reasonable
condition and tuning. The PianoBar does
not provide a method of muting the
acoustic piano’s sound, so if the piano is
out drastically of tune, it will not be in tune
with the sounds in the Control Module. Also,
9
Page 10

if a piano is poorly regulated, the velocity of
the keys may not be closely related to the
loudness of the tone produced. In this
circumstance, it is possible that the
PianoBar will have keys that produce MIDI
velocity information that is not the same as
the loudness of the piano tone. In any case
we highly recommend regular tuning and
maintenance from a qualified Piano
Technician. Your piano will love you for it.
• Pedal sensor height – Every piano sits at a
different height in relation to the floor. Some
pianos may be situated on a dolly, which
raises the pedal height substantially. The
Pedal Sensor must be at a distance of ½”
to 1” from the pedals when they are
depressed. For raising the Pedal sensor, we
recommend the Pedal Height adjustment
accessory (available from Moog Music pn
PB-PS-HA). In a pinch you can use a book. If
the Piano is too close to the pedal sensor
due to placement on a carpet, we
recommend a set of caster cups, available
from your piano dealer. These will raise your
piano.
• External MIDI devices – The PianoBar has a
wealth of applications as a MIDI controller.
If you plan on using the PianoBar with an
external MIDI device – please consult the
sections on the Channel Setup and
Channel Route functions to learn how to
configure the PianoBar with External MIDI
devices.
• USB Cables – The PianoBar comes supplied
with two USB-type cables. There is a 6’
cable, to make the connection between
the Scanner Bar and the Control Module.
Do not substitute longer USB cables or USB
cables that have smaller diameter wires.
There is a 16’ cable that is used to connect
he Pedal Sensor to the Control Module. The
cables are not interchangeable, always
use the shorter cable to connect the
10
Page 11

Scanner Bar to the Control Module. The
PianoBar is not a standard USB device.
• Care of the PianoBar – The PianoBar is
designed as all Moog equipment is –
robust. However, Care should be taken with
the Scanner Bar’s lower edge, which
contains the infrared sensors that detect
the motion of the keys. In general don’t rest
it in a manner that could cause wear to
these components, and don’t lean the
Scanner where it can fall and possibly be
damaged.
11
Page 12
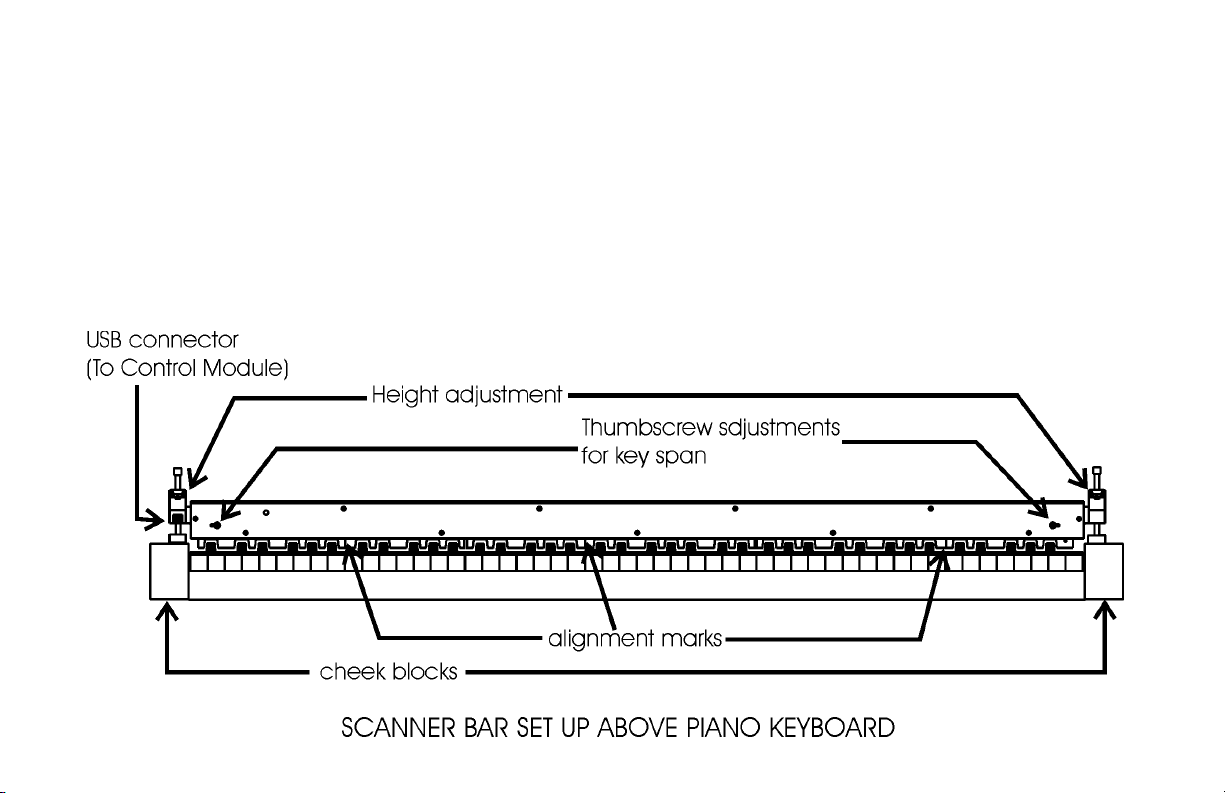
INSTALLING AND CALIBRATING THE PIANOBAR
1) Place the Scanner Bar so the end pieces are resting on the cheek blocks. Squeeze the clamps and
position the Height adjustment so the Scanner Bar is well above the keys. Whenever the height of the Scanner
is adjusted, be sure to squeeze the quick release clamps rather than forcing the height adjusters up and
down. Make sure the back of the Scanner Bar rests against the fallboard, and that the center mark aligns with
the gap between middle C and the B below it.
12
Page 13
2) For the outside sections of the Scanner Bar,
locate the thumbscrews on the front. Loosen them.
Adjust the outside sections so the alignment marks
line up with the gaps between their respective Bs
and Cs. Once the alignment marks are set, tighten
the thumbscrews.
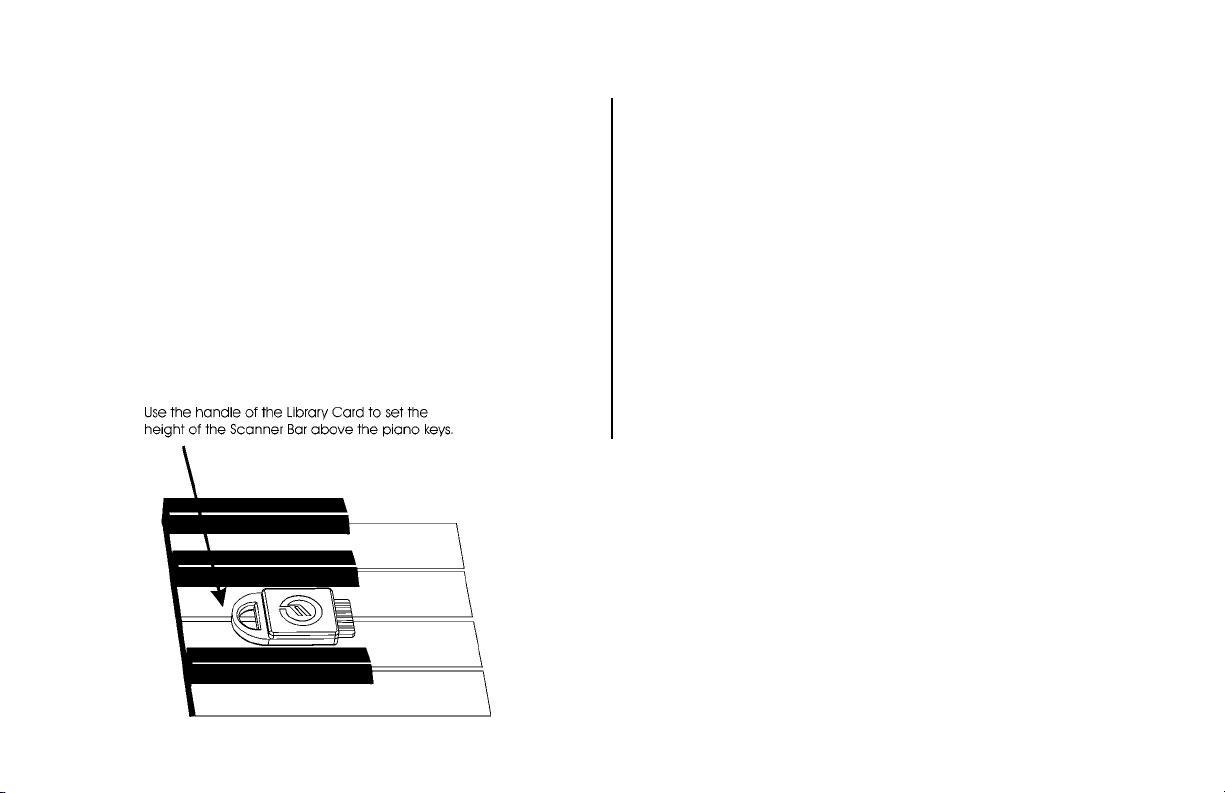
3) Place the Library card face up on the lowest B
and C so the handle points towards the back of
the piano. Use the left leveling system to adjust the
height of the scanner so it barely touches the top
of the library card.
4) Place the library card in a similar position on the
highest B and C. Use the right leveling system to
adjust the height of the right side of the scanner.
5) Plug the longer of the two provided cables into
the Pedal Sensor. Place the Pedal sensor under the
piano’s pedals so the cable comes out the back.
When either the Soft Pedal or the Sustain Pedal are
depressed, they should be approximately ½” to 1”
above the pedal sensor, adjust height if necessary.
13
Page 14
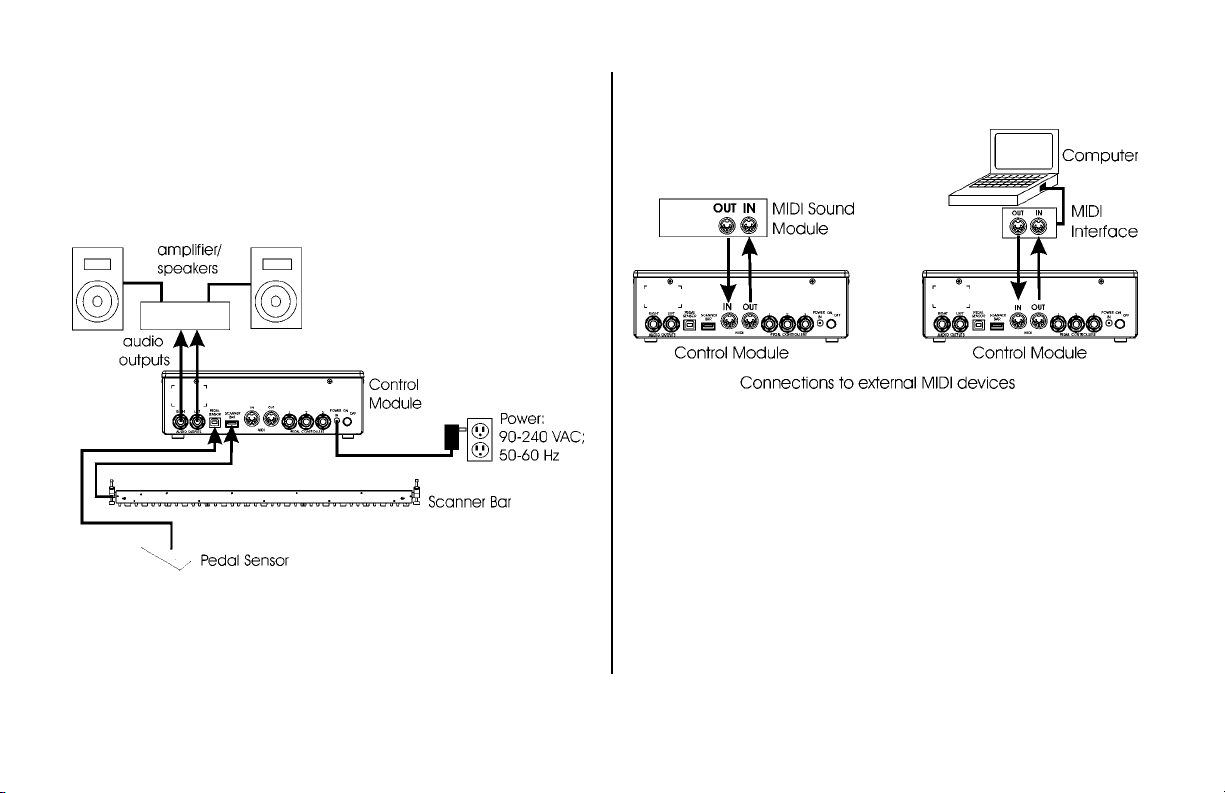
6) Connect the Pedal Sensor and Scanner to the
Control Module using the cables provided, using
the shorter of the two cables to connect the
Scanner to the Control Module. Place the Control
Module so you can conveniently view the screen
and reach the buttons.
7) Connect the Control Module to the Power
source and sound system (or headphones).
Connections to external MIDI devices can be
made if so desired, or the MIDI interface of a
nearby computer.
8) Turn on the power (on the back of the Control
Module). The opening screen displays the version
number of the software. After a few seconds a
second screen is displayed. If the Scanner is at the
correct height, the screen will say “Press Enter to
Calibrate”. This screen appears for about 6
seconds, so press Enter before it disappears, if
calibration is necessary. Calibration will be
necessary the first time the Scanner is installed on
14
Page 15
a piano – to skip calibration, simply wait for the
screen to change to the Main Setup Page. If the
Scanner is set too high or low, the screen will
display prompts in the left and right upper corners
of the screen to raise or lower the left or right
levelers, respectively, until the Scanner is at the
correct height. When done, press Enter and you
will see the “Press Enter to Calibrate” screen – do
so. The display now prompts the user to play all
the keys on the piano. Calibration merely requires
the playing of all the keys on the piano. Take care
to depress the keys fully, and make sure the keys
don’t bounce. Once you have pressed all the keys
down, press escape, and installation is complete!
Please note that if you press Enter and enter the
calibration page, you must play all the keys, or the
Scanner will be “confused” and send incorrect
data.
USING THE PIANOBAR FOR THE FIRST TIME
Now that the PianoBar is installed and calibrated,
it is ready to use. The Control Module display will
look something like this:
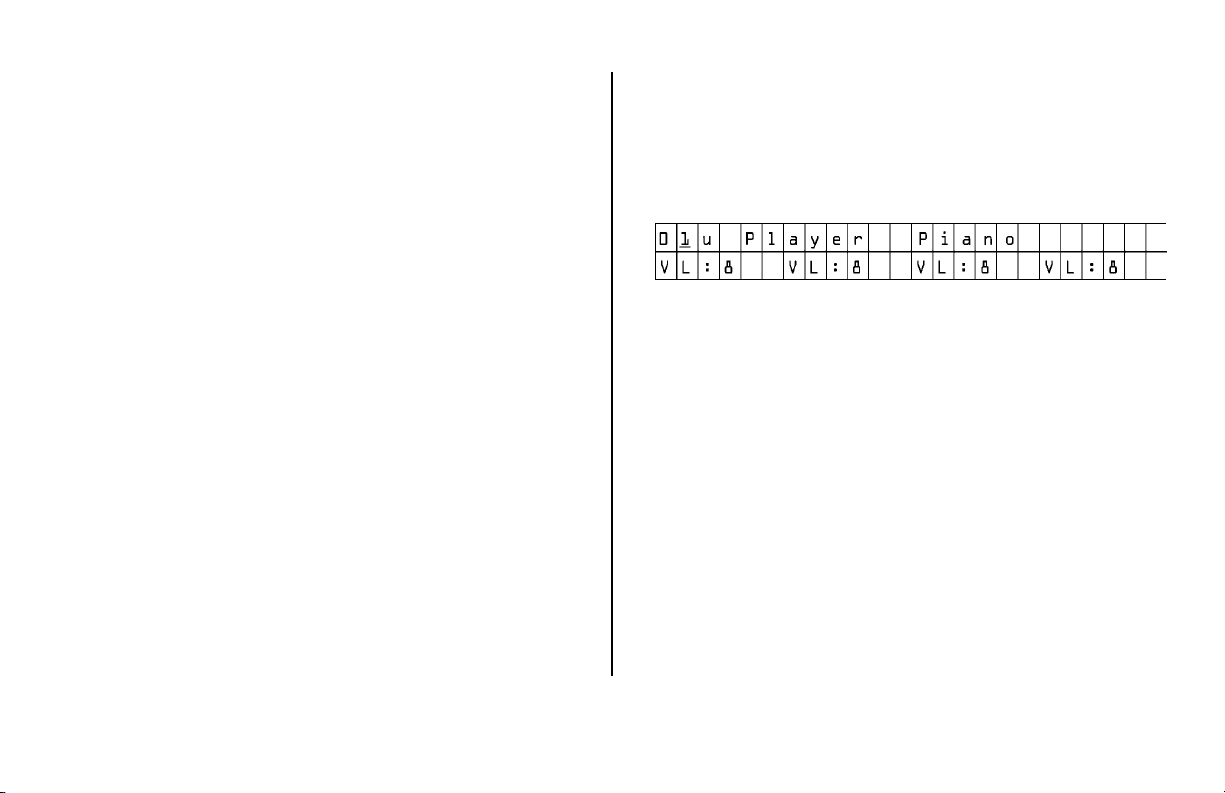
This is called the Main Setup Page. The items
displayed include the current Setup number and
name, as well as the activity and volume settings
of Channels 1-4 of the setup. The volume of the
active channels can be set by pressing the
appropriate channel button located under the
display and adjusting the number displayed with
the Value Control. Note when you play a key on
the piano, a bar next to the active channels shows
the relative velocity of the note played. The
internal sound assigned to a MIDI channel is set in
a function called “Channel Setup”.
Note that there is a green LED lit on the Scanner
Bar. This LED has a photosensor switch that can be
15
Page 16

used to change Setups. Simply cover the LED with
your finger. You will notice that an LED will light up
above a key on the piano that corresponds to the
number of the current Setup. (#1 is the lowest A on
the Keyboard). Simply press another key, and the
current Setup will be changed to the number that
matches that key (for instance – middle C is 40).
This allows quick access to any Setup from 1 to 88.
Another way to change Setups is with the Value
rotary control on the front of the Control Module.
There are 100 Setup memory locations: 60 user
Setups, 20 library card Setups, and 20 factory
Setups. The user Setups are shipped with Setups
from the factory. These can be edited to suit the
needs of the user. The library card Setups are
empty until a library card with Setups is installed in
the slot on the front panel of the control module.
The factory Setups are permanently installed.
By taking a tour of the Setups, you can quickly
see the variety of sounds and effects that you can
add to the sound of a piano. Keep in mind that a
Setup can contain the complete configuration of
16 MIDI channels – both in and out. There is a
wealth of possibilities contained in the PianoBar –
to discover them let’s continue.
16
Page 17
3. THE PIANOBAR’S CONTROLS, CONNECTIONS
AND MENUS
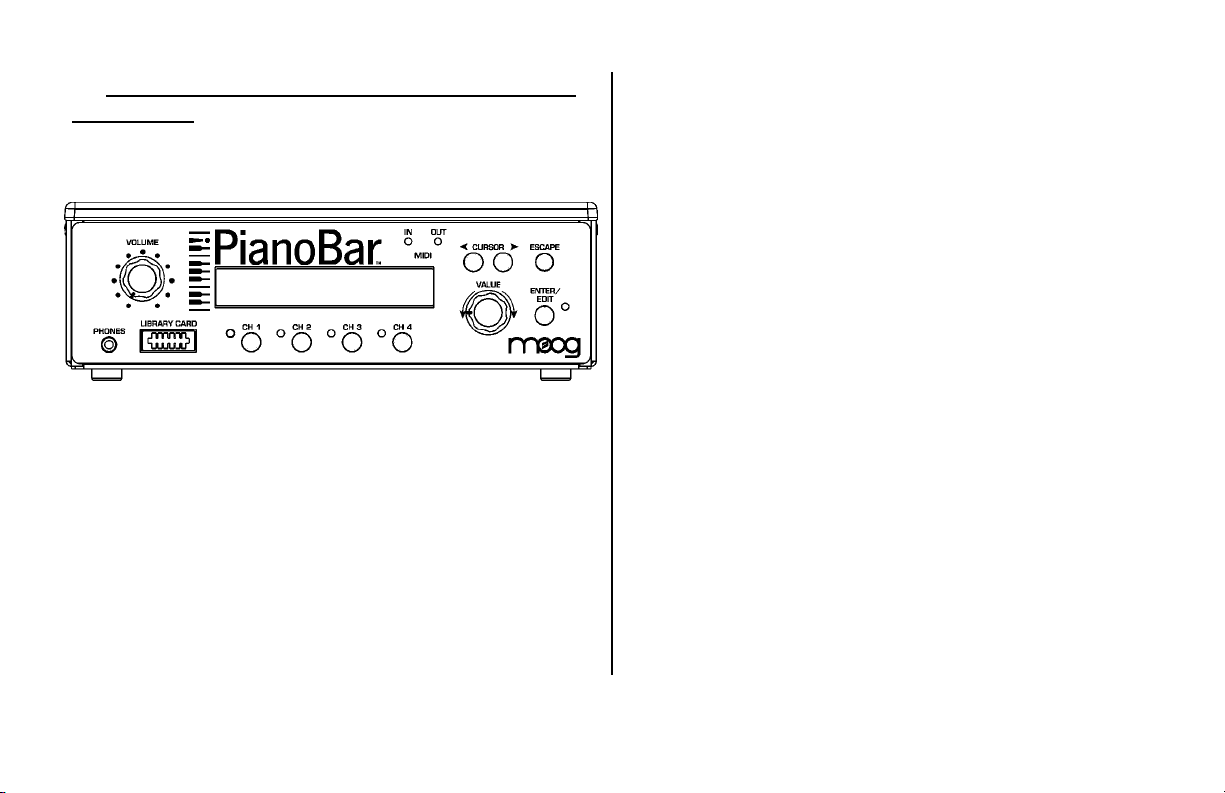
THE CONTROL MODULE’S FRONT PANEL
The Front Panel of the Control Module has all the
controls necessary for using and editing Setups.
• Volume – sets the overall volume of the internal
sounds
• Phones – 1/8” jack used to connect
headphones.
• Library Card – used to load sounds into Setups
# 61-80 from Library Cards
• Display- Shows information about Setups
• Channel buttons – Allow Quick changes in
Volume settings of channels 1-4 in the Main
Setup Page.
• MIDI indicators – Display status of MIDI in and
Out. Lights up when MIDI data is sent or
received.
• Cursor – Moves Cursor.
• Value – Used for changing Setups or data entry
when Editing Setups.
• Escape – Takes the User “Up one level” when
editing Setups. It also sends an All Notes Off
message in Main Setup Page
• Enter/Edit – Chooses and executes functions /
Takes the User to the Edit menu for editing
Setups.
17
Page 18
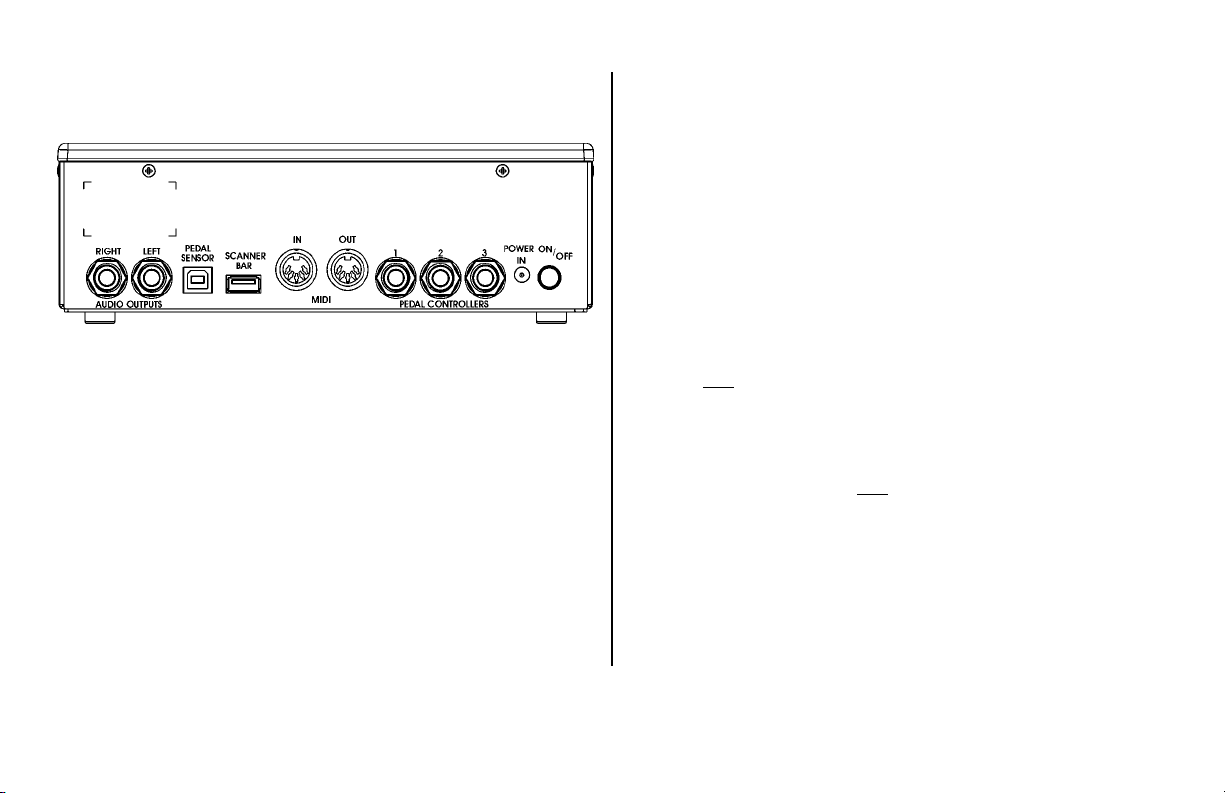
THE REAR PANEL CONNECTIONS
The Rear Panel contains all the connections to
hook the PianoBar up to the outside world.
• Power: The PianoBar requires a +12VDC center
positive power supply which can deliver 830
mA or greater. A power supply is provided with
the PianoBar.
• Pedal Controllers 1-3: These three ¼” TRS
(Tip/Ring/Sleeve) jacks accept an expression
pedal input. Works with moogerfooger EP-1 or
equivalent. All three pedal inputs can be
configured to send MIDI CCs in a Setup.
• MIDI In/Out: MIDI out connects to external MIDI
devices to send MIDI from the PianoBar to the
external device. MIDI In is connected to the
MIDI out of an external MIDI device to receive
MIDI data. The current Setup determines how
MIDI channels 1-16 are routed, externally and
internally. These are set in Channel Setup and
Channel Route.
• Scanner Bar In: Connects to the Scanner Bar to
receive the Piano’s Performance data. Note:
Although this is a standard USB connector, this
is not a USB device.
• Pedal Sensor In: Connects to the Pedal Sensor
to receive signals from the sustain and soft
pedals. Note: Although this is a standard USB
connector, this is not a USB device.
• Audio Outputs: Two ¼” jacks deliver the audio
output of the PianoBar’s internal sounds to your
amplification.
18
Page 19
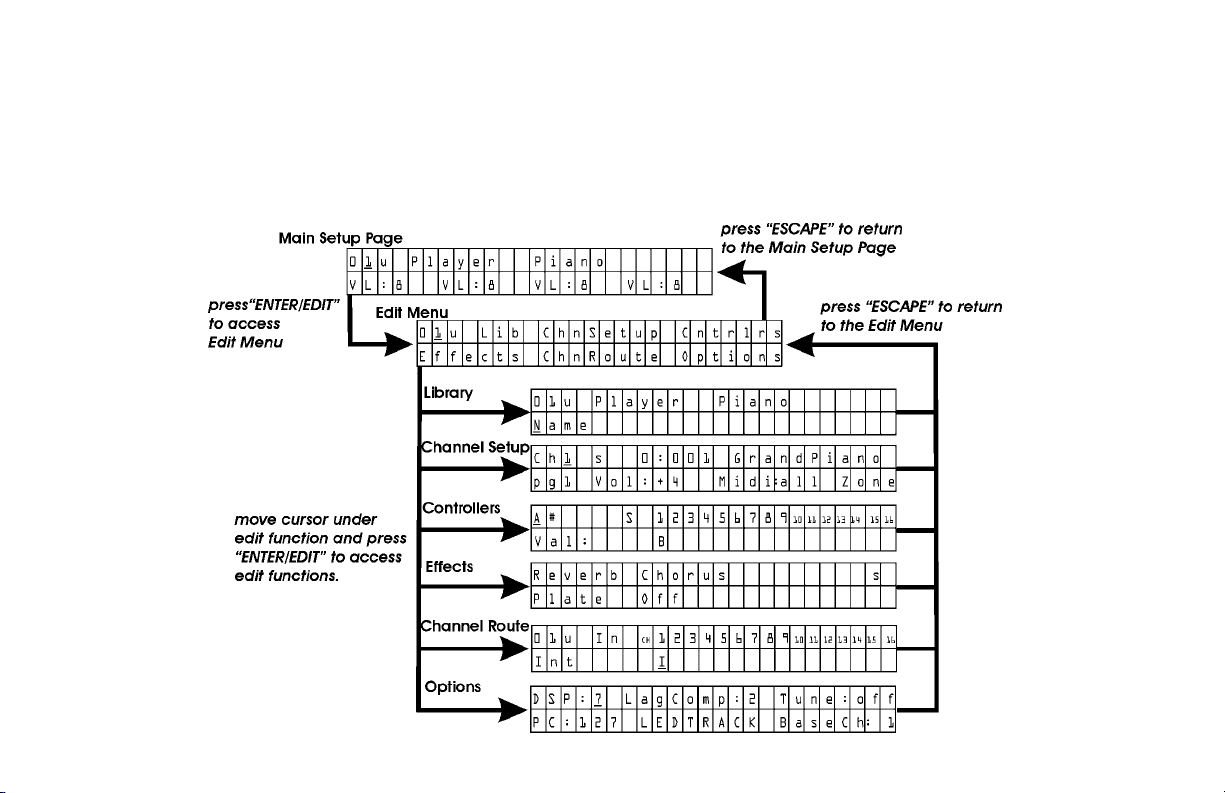
NAVIGATING THROUGH THE MENUS
The PianoBar’s Menu system is really quite simple – there are 3 basic levels: the Main Setup Page, the Edit
Menu, and the Edit functions you can select in the Edit menu. Navigation is simple: Press Enter/Edit to go
deeper into editing, and press escape to “come back to the surface”.
19
Page 20

There are a few instances where the Enter/Edit
button serves a different purpose, such as
changing between two pages (such as Channel
Route), or initiating a process (such as formatting a
library card). The actual parameters and functions
are frequently abbreviated. The following is a
comprehensive guide to the Menus and Functions
of the Control Module.
MAIN SETUP PAGE
The Main Setup Page is the screen used for
performance applications. There are three
functions that can be performed: changing
Setups, and altering the volume of Channels 1-4,
and sending an “All Notes Off” message. In
addition, the Main Setup Page displays a bar
graph of the MIDI velocity on Channels 1-4 if they
have an internal sound or external MIDI Output
assigned.
The Main Setup page is described in brief in the
“Getting Started” Chapter. Let’s review and
elaborate:
The Main Setup Page looks something like this:
Changing Setups:
A Setup can be changed from the Scanner Bar
and piano keys, the front panel value control, or by
MIDI program change. To change Setups using
the Scanner Bar and Piano Keys, locate the Green
LED above the lowest E flat. Cover this LED with
your finger, and notice that it disappears and an
LED appears above one of the piano’s keys. By
counting up from the low A, this corresponds to the
current Setup number. Play another key to change
to a different Setup. This allows easy access to
20
Page 21

Setups 1-88. Changing Setups with the Value
control is simply a matter of placing the cursor
under the current Setup number and rotating the
knob – clockwise to increase, counterclockwise to
decrease. The PianoBar can also respond to MIDI
Program Change commands – setting the base
channel on which it responds is set in “Options” (p.
30); default is MIDI channel 16.
Changing Volume on Channels 1-4:
The Volume of channels 1-4 can be set by
pressing the corresponding channel button below
the display and using the Value knob to change
the value. The Values are 1 to 10. This is useful for
quick adjustment of a Setup’s sounds during a
performance. When in the Main Setup page,
pressing a channel button “solos” that channel
(turns off all other channels) as well as provides
access to the volume adjustment for that channel.
Be aware that if you are holding a note and press
a channel button, that note will not turn off,
because the MIDI channel it is on is deactivated
and can’t receive the information that the note
has been released. Simply put, don’t use the
Channel buttons while playing, or you are likely to
get hung notes. If this does happen, pressing
Escape will turn the hung notes off.
All Notes Off:
In case of stuck notes, in the Main Setup Page, the
Escape button doubles as an “All Notes Off”
button. All Notes Off is a MIDI command that does
just that – turn off any notes that are on, on any
active channels.
What is a Setup?
A Setup determines what happens to the PianoBar
when a key on the Piano is played. A Setup can be
configured to play the PianoBar’s internal sounds,
or send MIDI through the MIDI output. There is
much more to what can be in a Setup. A Setup
contains the following global parameters that are
independent of the 16 MIDI channels:
21
Page 22

• Setup Number
• Setup Name (accessed in the Library
function)
• Effects: Reverb type, Chorus type (defined
with the Effects function)
• Assignment of Controllers A through F:
Continuous Controller Numbers, and their
values. (defined with the Controllers
function)
• Assignment of Pedals 1 to 3: CC Numbers
(defined with the Controllers function)
A Setup also contains a number of parameters for
each MIDI Channel. There are 16 MIDI channels
supported, and each can be Setup differently
resulting in complex Setups. These parameters are
defined in the Channel Setup pages or the
Channel Route function:
• Bank Select
• Program Number
• Volume
• Zone
• Velocity Curve
• Pan
• Transpose
• Reverb amount
• Chorus Amount
• MIDI sent to internal sounds, MIDI out, or
both
• MIDI In off, routed to internal sounds,
Scanner LEDs, or both.
There are three types of Setup: User, Card, and
Factory. The current Setup on the Main Setup page
has a super script character: u, c, or f, identifying
these types of Setups.
User Setups are stored in locations 1-60.
Changes made to these Setups are instantly
remembered; no saving process is required. There
is no “Factory Reset” feature for these Setups.
Should you wish to return the PianoBar to the
original settings, you will have to back these Setups
to Library Cards (60 Setups require 3 Library Cards).
Backing up the Setups is performed with the Library
Function “Setups _ to _ Copy to _ to _” described
on page 25 of the manual. Before copying Setups
22
Page 23

to a Library Card, it must be formatted, done with
the Library Function “Format Card”. A 3-pack of
Library Cards (part no. PB-LC-3PK) is available for
$34.95.
Card Setups are in locations 61-80. These
Setups are blank unless a PianoBar Card with
Setups stored on it is inserted in the card slot on the
front of the Control Module. To store Setups on a
card, simply copy a Setup to a location from 6180 with a formatted Library Card inserted in the
Card slot.
Factory Setups are in locations 81-100. They are
stored in permanent memory.
EDIT MENU
The Edit Menu is asked by pressing the Enter/Edit
button when on the Main Setup Page. Getting
back to the Main Setup page is done by pressing
the Escape button. The Edit Menu looks like this:
Each item in the Edit menu is a different set of
functions for the Piano Bar. There are a total of six
edit functions:
• Library – abbreviated as “Lib”
• Channel Setup – abbreviated as
“ChnSetup”
• Controllers – abbreviated as “Cntrlrs”
• Effects
• Channel Route – abbreviated as
“ChnRoute”
• Options
The overall architecture is shown on page 19. To
access any of the Edit functions, simply move the
cursor using the Cursor buttons underneath the
Function to be accessed and press Enter.
Returning to the Edit Menu from any of the
Functions is accomplished by pressing the Escape
button.
23
Page 24

LIBRARY
The Library Edit function is used to name and
manage the location of Setups and Create Library
Cards
There are a total of 10 Library functions. Placing the
cursor under the function and rotating the Value
control selects the different functions. The following
are the functions and how they work:
Name:
This allows you to copy the current Setup to
another one of the 80 user accessible memory
locations. Copying to a setup between 61-80
copies the setup to a library card – if there is a
library card plugged into the slot. First, select the
desired destination location where the current
Setup will be copied. With the cursor under the
function, press Enter/Edit. The display will prompt to
press Enter to complete the process or press
Escape to cancel.
The Setup Name and Number are displayed,
along with the current Library function, Name. With
the cursor placed underneath the function, Press
Enter/Edit to Begin naming the preset. Use the
cursor buttons to move the cursor to the desired
position and the Value control to change
characters. Press escape when finished.
Copy to Setup:
Swap with Setup:
This allows you to swap the current Setup with
another. This is useful for organizing your Setups.
First, select the Setup to swap locations. With the
cursor placed underneath the function, Press Enter.
24
Page 25

You will be prompted to press Enter to complete,
or press Escape to cancel.
Clear this Setup:
This clears the memory of the current Setup and
returns it to its default settings. With the cursor
placed under the function, press Enter. The display
prompts to press Enter to complete, or press
Escape to cancel.
Setups _ to _ Copy to _ to _:
between 61-80 will write those setups to the library
card that is plugged into the library card slot. First,
select the starting and ending Setups that you
want to copy. Then select the destination range
where the Setups will be copied. Move the cursor
under the function and press Enter. The display will
prompt for you to press Enter to complete, or
Escape to cancel.
Setups A to B – Clear these Setups:
This allows the clearing of a range of Setups. Move
the cursor under the function and press Enter. The
display will prompt for you to press Enter to
complete, or Escape to cancel.
This allows the copying of a range of Setups to
another location range. Copying to a range
Format Card:
25
Page 26

Format Card is used to create a blank Library Card
for storing your Setups. Any Setups present on the
Card will be erased when this is performed, so be
sure the card being formatted does not contain
any valuable data before proceeding. With the
cursor placed under the function, press Enter. The
display prompts to press Enter to complete, or
press Escape to cancel.
sends MIDI information, and what the internal
sounds are. The Channel Setup Function contains
two pages. Use the Enter button to toggle between
them unless the cursor is under the Zone
parameter (in this case pressing Enter enables the
selecting of the Zone for the current MIDI channel).
The two pages look something like this:
Make Remote Card, Make Scanner Card,
Copy
Card to Fixed:
These functions are used at the factory for
diagnosis purposes only and are not used in
operation of the PianoBar.
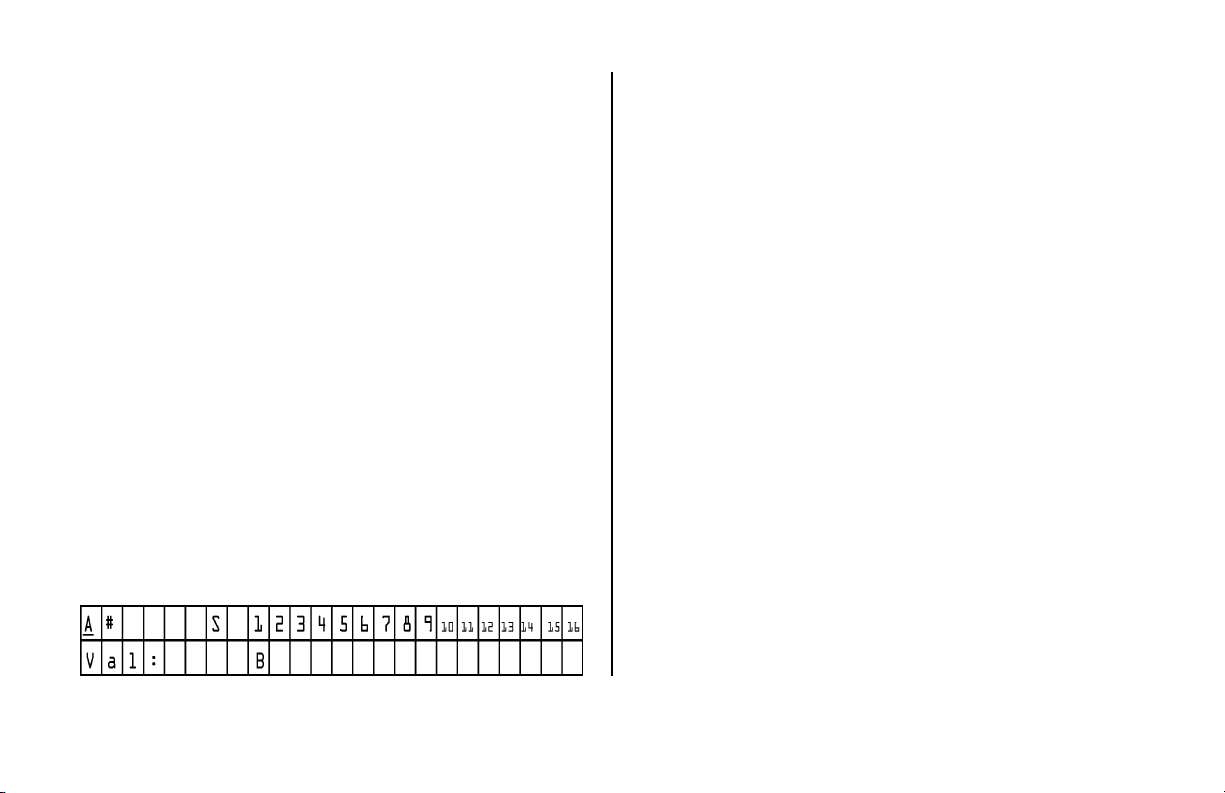
CHANNEL SETUP
The Channel Setup Function is where the bulk of
editing is done to configure how the PianoBar
The first item, CH, stands for MIDI Channel. With the
cursor under this parameter, the Value control can
be used to select the channel to configure. There
are 16 MIDI channels. Each can have its own
independent settings in the Channel Setup
function. This parameter is on both page 1 and 2.
26
Page 27

S stands for solo. When this character is
capitalized, the current channel is soloed – which
means it is the only channel that can be
monitored. This parameter is on both pages 1 and
2.
Midi: This sets the routing of the MIDI signals
generated by the Scanner Bar and Pedal Sensor
for the current channel. Choose the internal sound
engine, the external MIDI output, or both.
0:1 Grand Piano refers to the bank, program
number, and the program name of the sound
selected for this channel. The General MIDI sound
set is organized into 128 banks. Each bank has 128
Program numbers, but not all program numbers
have a sound associated with them. The easiest
way to select the sound assigned to a channel is
to move the cursor under the name of the sound.
Rotating the value knob changes the current
sound, which are grouped according to type of
sound, i.e. keyboards, guitars, winds, strings, etc.
This way you can quickly select a type of sound
you like and try variations without having to refer to
a chart of banks and program numbers.
Vol: This sets the volume of the current channel
sound.
Zone: Each channel can be assigned a zone on
the keyboard. This means that a sound can be
assigned to a particular range of keys. With the
cursor under this parameter, press Enter. The LEDs
above the keys show the current zone boundaries,
and the display now prompts you to play the keys
that correspond to the desired zone boundaries.
The keys must be played simultaneously to set the
zone boundaries. Press escape when complete.
Vel: stands for velocity curve. This refers to the MIDI
velocity value that is generated by the PianoBar
when a note is played. The curves determine how
the velocity of playing affects the loudness of the
current channel sound. For instance some sounds,
like organs, do not have a dynamic response to
touch – this can be set by choosing a velocity
27
Page 28
curve that is not affected by the velocity of your
actual playing. There are 10 curves, their responses
are displayed graphically.
Pan: This is the left/right balance of the sound
assigned to the current channel.
Trn: This refers to the transposition of the sound
assigned to the current channel. Transposition can
be applied in semitones – up to 99 semitones up
or down from the key being played.
Reverb: This is the amount of Reverb applied to
the current channel sound.
Chorus: This is the amount of chorus applied to the
current channel sound.
CONTROLLERS
The Controllers function is used to assign up to 6
(displayed as A through F) MIDI CC numbers and
values on up to 16 MIDI channels. The Controllers
function is also for assigning the function of the 3
Pedal Controller inputs. The CC values are sent to
either the PianoBar’s internal synth, the external
MIDI output, or both when a Setup is selected. MIDI
CCs are typically used for setting the
characteristics of a sound, such as the attack time,
or the portamento speed. A MIDI CC message
consists of a Number - which corresponds to a
parameter that is to be changed, and a Value –
which refers to how much that parameter is
changed. The upper left hand corner displays the
current Controller (A through F) or Pedal Controller
(Pedal 1-3). For Controllers A through F, the MIDI
CC Number is set (after the # symbol) and a Value
is selected. Move the cursor under the Channels to
enable this message to be sent to the internal
synth, the external MIDI output, or both. For the
Pedal Controllers, a MIDI CC Number is selected,
and the position of the Expression pedal
28
Page 29

connected to that Pedal Controller input
determines the value sent. The Pedal Controllers
can be used as real time controllers. A very useful
application for this is to control the Volume of the
PianoBar’s sound with an Expression pedal.
EFFECTS
Effects function assigns the global effects for each
Setup. Choose Reverb type or Chorus type.
Reverb effects available are:
• Room 1
• Room 2
• Room 3
• Hall 1
• Hall 2
• Plate
• Delay
• Pan Delay
Chorus effects available are:
• Chorus 1
• Chorus 2
• Chorus 3
• Chorus 4
• Feedback
• Flanger
• Short Delay
• FB (Feedback) Delay
CHANNEL ROUTE
Channel Route is for configuring the PianoBar’s
MIDI input and viewing the Routing of the MIDI
output.
Press Enter to switch between MIDI in and MIDI out.
To Configure the PianoBar’s MIDI input, move the
cursor underneath the channel that you wish to
configure. The Value control is used to select
29
Page 30

whether the MIDI input is sent to the Internal
sounds, the scanner bar LEDs, Both, or neither.
When viewing the MIDI out Routing for a Setup, the
settings can be viewed in this screen, but not
changed. The routing of MIDI out is done on page
1 of the Channel Setup function.
OPTIONS
Options are global functions, independent of the
Setups. The following are the descriptions of the
Options:
• DSP: Display viewing angle
• LagComp: adds a delay to the MIDI signal to
align the start of a MIDI event with the
hammers striking the keys.
• Tune: Globally tunes the sound engine +/- 100
cents.
• PC: switches between 0 to 127 and 1 to 128
Program Change numbering schemes.
• LED TRACK: The word TRACK indicates that the
Scanner Bar’s LEDs light up when the key under
it is played. With the cursor underneath this, use
the value knob to turn the LED tracking off. The
word track changes to lowercase.
• Base CH: Base Channel for PianoBar to receive
Program Change commands.
30
Page 31

4. ABOUT MIDI
For those who know MIDI, you may want to skip
this section and go to the next. However, if you are
new to MIDI or a bit rusty, this section is for you. A
complete tutorial on MIDI is beyond the scope of
this program. We recommend The MIDI Manual, by
David Huber, published by Butterworth-Heinemann.
MIDI is an acronym for Musical Instrument Digital
Interface. It is a communication standard by which
aspects of a musical performance can be
recorded or transmitted between electronic
musical devices, such as synthesizers, in order to
trigger sounds, alter sounds, begin sequences of
events, and so on.
play a key on a piano you start a musical event –
a note. MIDI defines the beginning of a new note
a “NOTE ON” message. Similarly, when you release
a key, that musical event ends. MIDI defines the
end of a note as “NOTE OFF”. This allows for two
very important functions:
• A NOTE ON produced on a MIDI keyboard
can be sent to a different MIDI device to
play a sound.
• A NOTE ON message can be recorded and
played back in MIDI compatible software,
without recording the sound of the
performance. Thus the ACTIONS of the
performance are recorded and can be
played back or edited.
Musical performances consist of the SOUND of the
Music being performed, as well as the ACTIONS of
the musician on his instrument that produce the
sound. MIDI translates the ACTIONS that a musician
takes when he/she performs a piece of music into
data that represent them. For instance – When you
There are many more aspects to MIDI than just a
NOTE ON Message, for instance, every NOTE ON
has a VELOCITY value. Velocity corresponds to how
fast a key is pressed down which usually, as in a
Piano, corresponds to the loudness of the note that
sounds.
31
Page 32

MIDI also allows for more than one instrument to
sound at the same time, as in an ensemble or an
orchestra. A single MIDI cable can send messages
on up to 16 channels at a time, allowing for up to
16 different “instruments” to sound at once. A
General MIDI synthesizer (like the sounds in the
Control Module) contains a standard set of sounds
that are arranged in a standard list, called a bank.
Each bank has 128 sounds, called Programs. A
MIDI message called a “Program change”
message allows the selection of one of these
sounds. A Program change message consists of a
Channel number, and a program number.
Furthermore, most synthesizers have more than
128 sounds, so MIDI allows for multiple banks – up
to 128.
A sound played by MIDI can be varied after it is
started, just like on many acoustic instruments.
Performance effects such as vibrato can be
applied using a type of message called
“Continuous Controller”, or CC for short. A MIDI CC
message consists of a CC Number, from 0-127,
which identifies the type of change that is to be
made to the sound, then a value from 0 to 127
that determines the amount of the change to the
sound. Types of changes include changes to the
Volume (CC#7) and Pan or Left Right position
(CC#10). Some MIDI CC numbers are specified to
do particular musical functions, others are not. A
list of the MIDI CCs that the PianoBar’s sound
engine responds to is included in Appendix B.
MIDI messages can be recorded by a computer
program called a Sequencer, which records MIDI
data. The MIDI data can be played back into a
MIDI device and will sound like the original
performance. Because MIDI data is a
representation of a musical performance, it is easy
to edit MIDI events in a sequencer, or to display
them as notes on a staff – like sheet music.
Programs such as Sibelius® combine MIDI
recording as well as sophisticated notation
capability in order to aid with composition.
MIDI’s capabilities are vast – and the power of
adding MIDI capability quickly to an acoustic
32
Page 33

piano with the PianoBar will open many creative
doors to pianists and composers who explore the
possibilities.
33
Page 34

CREATING YOUR OWN SETUP
The following will walk you through the steps to
creating your own Setups with two examples. The
first example is a simple 1-layer Setup with
Expression Pedal control of the Volume. The
second example walks you through some of the
more advanced features of the PianoBar.
Example 1 – String Ensemble
A common accompaniment to an acoustic piano
sound in music is the sound of a string ensemble.
The characteristics of this sound are that it starts
somewhat slowly, sustains as long as a note is
played (as opposed to a piano tone which fades
out) and fades out somewhat slowly.
Step 1 – Clear Setup
- First, we will create a default Setup. Choose a
Setup that you don’t plan on using.
- Press the Enter/Edit button. Move the cursor under
“Lib” and press Enter.
- Move the Cursor under “Name”. Use the Value
control to advance through the functions until you
reach “Clear this Setup”.
- Move the cursor under and press Enter. The
display will prompt you to press Enter for Yes, or
Escape for No – press Enter.
- The Setup will now contain all the default settings.
Step 2 – Name Setup
- Now let’s go ahead and name this Setup. With
the Cursor moved under the “Clear this Setup”, use
the Value control to
go back to the “Name” function.
- Move the cursor under the Setup Name, which
should be blank. Use the Value control to select
the first Character – “S” – then move the cursor to
the next character and select a “t”. Repeat this
until you have spelled “String Ensemble”.
- Press Escape to return to the Edit Menu.
34
Page 35

Step 3 – Channel Setup
- Now it’s time to get the sound we’re after. Move
the cursor under Channel Setup and press Enter.
- Move the cursor underneath the name of the
sound, which should be “Grand Piano”.
- Use the Value control to scroll through the sounds
until you reach “String Ens 1”
Step 4 – Effects
- Let’s add some Reverb to our String Ensemble
sound. Press Enter. You will now see page 2 of the
Channel Setup function. Move your cursor under
the Reverb amount, and increase this to 5
- Press Escape, Move the cursor to “Effects” and
press Enter.
- Move the cursor under Reverb. Use the Value to
select “Hall1”
Panning, Transposing, Velocity Curves, and
Controllers.
Example 2 – Bass and Vibe Space
Step 1 – Clear Setup
- First, we will create a default Setup. Choose a
Setup that you don’t plan on using.
- Press the Enter/Edit button. Move the cursor under
“Lib” and press Enter.
- Move the Cursor under “Name”. Use the Value
control to advance through the functions until you
reach “Clear this Setup”.
- Move the cursor under and press Enter. The
display will prompt you to press Enter for Yes, or
Escape for No – press Enter.
- The Setup will now contain all the default settings.
You have now created a simple 1-layer Setup.
Let’s make another Setup, this time let’s use some
of the PianoBar’s powerful MIDI possibilities to make
a 3-layer Setup that illustrates the use of Zones,
Step 2 – Name Setup
- Now let’s go ahead and name this Setup. With
the Cursor moved under the “Clear this Setup”, use
the Value control to go back to the “Name”
function.
35
Page 36

- Move the cursor under the Setup Name, which
should be blank. Use the Value control to select
the first Character – “B” – then move the cursor to
the next character and select a “a”. Repeat this
until you have spelled “Bass and Vibe Space”.
- Press Escape to return to the Edit Menu.
Step 3 – Building the Layers
- First we’ll configure Channel 1. Move the cursor
under Chn Setup and press Enter.
- Move the cursor underneath the name of the
sound. Use the Value control to scroll through the
names, until you reach “Vibraphone”.
- Move the cursor underneath “Zone” and press
Enter. The display now prompts you to “Play Zone
boundaries”, which means the highest and lowest
note of the Zone. The boundary notes must be
played at the same time. Let’s set this Zone to
extend from the D flat below middle C to the
highest note on the piano. Play these two notes
simultaneously and then press Escape.
- Move the cursor back to “Midi: int” and press
Enter – page 2 of Channel Setup will now be
displayed.
- Move the cursor under the “Pan” setting, and use
the Value control to increase the pan to R6.
- Move the cursor under Reverb amount and set it
to 7. Press Enter to return to Page 1.
- Move the cursor under the Channel. Use the
Value control to increase the Channel number to
Channel 2.
- Now we’ll set up Channel 2. Move the cursor
underneath the name of the sound. Use the Value
control to scroll through the sounds until you reach
“Acoustic Bass”.
- Move the cursor underneath “Zone” and press
Enter. Play the C 1 octave below middle C and the
lowest A simultaneously to set the Zone
boundaries. Press Escape.
- Move the cursor back to “Midi: int” and press
Enter – page 2 of Channel Setup will now be
displayed.
36
Page 37

- Move the cursor under the “Pan” setting, and use
the Value control to decrease the pan to L6.
- Move the cursor under the Channel. Use the
Value control to increase the Channel number to
Channel 3.
- On to Channel 3! So far we have a Bass sound
panned to the Left from the Low A to the C an
octave below middle C, and a Vibraphone sound
panned to the right above that. Let’s add a
synthesizer sound that fades in a perfect fifth
above the note played as the Vibraphone fades
out, and features portamento, or glide, in between
the notes. Further more this layer will only come in
when the piano is played with more velocity.
- Move the cursor underneath the name of the
sound. Use the Value control to scroll through the
sounds until you reach “Warm Pad”.
- Move the cursor underneath “Zone” and press
Enter. Play the D flat below middle C and the
highest note on the piano simultaneously and then
press Escape.
- Move the cursor back to “Midi: int” and press
Enter – page 2 of Channel Setup will now be
displayed.
- Move the cursor under the Velocity curve. Use the
th
Value Control to advance to the 6
Velocity curve
( _/ ) which means this sound will begin to be
heard at medium velocities.
- Move the cursor to the Transpose setting. Use the
Value control to increase the number displayed to
+7. This makes the sound pitched 7 semitones, or
a perfect fifth, higher than the note played.
- Press Escape to return to the Edit menu
- Finally, we will add portamento to Channel 3’s
“Warm Pad” with the Controllers function – this will
require programming two MIDI CC messages.
Move the cursor underneath the Controller function
and press Enter.
- Move the cursor next to A#. Use the Value control
to increase the number displayed to 65. This is the
MIDI CC number for turning portamento in or off.
- Advance the cursor to the Value. Use the Value
control to increase the MIDI CC value to 64. This is
the Value that turns portamento on.
37
Page 38

-Advance the cursor to the Channel 1 location it
should say “B”. Use the Value control to turn this off.
Move the cursor to the Channel 3 location set this
to “I” for internal.
- Now, move the cursor back to the “A#”. Use the
Value control to change this to “B#”.
- Move the cursor to the right of “B#” and increase
the MIDI CC number to 5. This corresponds to the
MIDI CC number for portamento rate.
- Move the cursor to the MIDI CC Value. Use the
Value control to change this to 64.
-Advance the cursor to the Channel 1 location it
should say “B”. Use the Value control to turn this off.
Move the cursor to the Channel 3 location set this
to “I” for internal.
Now we’re done! Now you have learned how to
make a complex Setup.
38
Page 39

Appendix A
MIDI IMPLEMENTATION CHART
Moog Music Inc. 9/30/03
Moog PianoBar MIDI Implementation Chart
Function… Transmitted Recognized Remarks
Basic Default
Channel Changed
Mode
Note
Number
True Voice
Velocity
After
Touch
Default
Messages
Altered
Note On
Note Off
21-108
O
X X
Pitch Bend X
1-16
1-16
1-4*
O
X
0-127*
O*
1-16
1-16
1-4*
O**
X
0-127
0-127
O
X
O
Memorized
Memorized
*user selectable
**All Notes Off
*value is 64
39
Page 40

*0-127
Control
Change
O* O**
** 0-2,5-7,10,11,
64-67,7178,80,81,91,93,
100,101 (RPN)
120,121,123,126,
127
Program
Change
True #
O
0 –127
O
0 –127
O O
System Exclusive
System
X X
Common
System
Real Time
Aux
Messages
X X
X X
Notes
Mode 1: Omni On, Poly Mode 2: Omni On, Mono O: Yes
Mode 3: Omni Off, Poly Mode 4: Omni Off, Mono X: No
40
Page 41

Appendix B – User and Factory Setup Chart
The Setups provided in the PianoBar include useful basic sounds and interesting layered sounds. The
following is a chart of the sounds used in the Setups and a brief description for reference. The first 60 Setups
are user definable, feel free to use these setups as a springboard for your own creations.
Setup# Name Channel Channel Channel Channel Description
Bank:Pgm# Bank:Pgm# Bank:Pgm# Bank:Pgm#
Name Name Name Name
1u Virtual Player Piano ch1 0:1
Grand
Piano1
2u String Bean ch1 0:49
String Ens1
3u Organic ch1 127:12
Elec Orgn4
4u Good Vibes ch1 0:12
Vibraphone
5u Electric Piano ch1 0:6
El. Piano 2
6u Brass Knuckles ch1 127:25
Syn Brass 1
ch2 0:1
Grand
Piano1
ch2 0:50
String Ens2
ch2 127:15
Pipe Orgn 3
ch2 0:11
Music Box
ch2 127:7
Elec Piano4
ch2 0:62
Brass Section
ch3 0:17
Drawbar
Orgn
ch3 0:79
Whistle
ch3 0:61
French Horn
Set up to use with
Sibelius® for creating
piano scores. ch 1
and ch 2 split at f
below middle c
Basic string section
sound – nice with slow
sustained chords
Electric organ sound
Vibes sound with extra
sparkle and sustain
Subtle combination
with acoustic piano,
but adds depth to the
sound
Bright brassy sound
41
Page 42

7u Warm Pad ch1 0:90
Warm Pad
8u Flutey ch1 0:73
Piccolo 1
9u Vocal Ease ch1 0:53
Choir Aahs
10u Bells ch1 127:47
Bell Singer
11u Caribbean ch1 0:115
Steel Drums
12u Ravi ch1 0:105
Sitar
13u Electric Harpsichord ch1 0:7
Harpsichord
14u Mallet Head ch1 0:13
Marimba
15u Synth Strings ch1 0:51
SynStrings1
16u Cosmic Whistling ch1 127:110
Whistle 2
ch2 8:51
SynStrings3
ch2 0:76
Pan Flute
ch2 0:54
Voice Oohs
ch2 0:9
Celesta
ch2 0:109
Kalimba
ch2 0:105
Sitar
ch2 0:7
Harpsichord
ch2 127:105
Marimba
ch2 8:51
SynStrings3
ch2 127:109
Whistle 1
ch3 0:76
Pan Flute
ch3 127:35
Choral
ch3 0:15
TubularBells
ch3 0:79
Whistle
ch3 0:27
Jazz Guitar
ch3 0:7
Harpsichord
ch3 0:14
Xylophone
ch3 0:52
SynStrings2
ch4 0:14
Xylophone
Warm sound with a
slow attack, good with
slow, sustained chords
Nice flute sounds with
echo
Smooth choir sound
Sparkly bell sound
Steel drums with extra
sustained sound
Sitar sounds – for
morning or evening
raga
Harpsichord sounds –
doubled and
transposed for extra
thickness
Multi-layered mallet
percussion sound
Synthetic String sound
– great with sustained
chords
Whistle sound with
portamento and lots of
echo
42
Page 43

17u Sweet Harp ch1 0:47
Orc Harp
ch2 127:59
Harp 2
Nice harp sound –
play arpeggiated
chords with this one
18u Accordionly ch1 0:24
Tango
Accord
19u Organism ch1 127:11
Elec Orgn3
20u Voices in the Mist ch1 0:89
New Age
21u Bass and Strings ch1 0:49
String Ens 1
22u Bass and Vibes ch1 127:98
Vibe 1
23u Bass and Voices ch1 0:54
Voice Oohs
24u Bass and Organ ch1 0:19
Rock Organ
25u Bass and Smooth Pad ch1 0:90
Warm Pad
ch2 127:16
Accordion
ch2 0:19
Rock Organ
ch2 0:101
Brightness
ch2 0:50
String Ens 2
ch2 127:99
Vibe 2
ch2 0:53
Choir Aahs
ch2 127:9
Elec Orgn1
ch2 127:36
Glasses
ch3 8:22
Italian
Accordion
ch3 8:17
DetunedOrg
ch3 0:93
Bowed Pad
ch3 0:33
Acoustic
Bass
ch3 0:33
Acoustic
Bass
ch3 0:35
Picked Bass
ch3 0:18
Perc Orgn
ch3 0:36
FretlessBass
ch4 0:18
Perc Orgn
ch4 0:33
Acoustic
Bass
ch4 0:33
Acoustic
Bass
Big accordion sound
Big organ sound with
vibrato, echo
Pretty breathy sound
Bass up to an octave
below middle C,
Strings above that
Bass up to an octave
below middle C, Vibes
above that
Bass up to an octave
below middle C, Choir
above that
Bass up to an octave
below middle C,
Organ above that
Bass up to an octave
below middle C,
Smooth pad above
that
43
Page 44

26u Bass and Brass ch1 8:63
SynBrass2
27u Bass and Strings 2 ch1 0:46
PizzStrings
28u Bass&Vibes&MutedHorn ch1 0:12
Vibraphone
29u Bass and Bells ch1 127:100
Syn Mallet
30u Bass and Echo Flute ch1 0:73
Piccolo 1
31u Bass and Synth Sweep ch1 2:103
Echo Pan
ch2 127:96
Brass Sect 1
ch2 0:50
String Ens 2
ch2 0:13
Marimba
ch2 9:15
Carillion
ch2 127:109
Whistle 1
ch2 0:96
Sweep
ch3 0:33
Acoustic
Bass
ch3 0:33
Acoustic
Bass
ch3 0:60
Mute
Trumpet
ch3 127:33
Fantasy
ch3 127:109
Whistle 1
ch3 0:95
Halo Pad
ch4 0:38
Slap Bass2
ch4 0:43
Cello
ch4 0:33
Acoustic
Bass
ch4 0:33
Acoustic
Bass
ch4 0:36
Fretless Bass
ch4 0:33
Acoustic
Bass
Bass up to an octave
below middle C, Brass
above that
Bass and deep Cello
up to an octave below
middle C, Pizzicato
and sustained strings
above that
Bass up to an octave
below middle C, Vibes
above that to 3
octaves above middle
C, then muted
trumpet
Bass up to an octave
below middle C, Bells
above that – can
make the piano sound
very “honky-tonk”
Bass up to an octave
below middle C, Flute
with echo above that
Bass up to an octave
below middle C, Synth
sound with slow attack
and sweeping filter
above that
44
Page 45

32u Synth Bass and Lead ch1 127:45
Doctor Solo
33u Bass and Elec Guitar ch1 0:31
Distorted
Guitar
34u Bass and Reeds ch1 0:70
English Horn
35u Bass and Toy Piano ch1 8:32
Gtr
Feedback
36u Bass and Pan Flute ch1 127:111
Bottleblow
37u Bass and E Piano ch1 127:5
Elec Piano 2
38u Bass and Accordion ch1 127:16
Accordion
ch2 1:81
Square
ch2 8:31
Feedback
Gtr
ch2 0:72
Clarinet
ch2 8:32
Gtr
Feedback
ch2 0:76
Pan Flute
ch2 127:4
Elec Piano 1
ch2 0:22
Fr Accordion
ch3 1:82
Saw
ch3 8:29
Funk Guitar
ch3 127:85
Oboe
ch3 0:10
Glockenspiel
ch3 127:44
Echo Pan
ch3 127:4
Elec Piano 1
ch3 8:22
It Accordion
ch4 127:29
Syn Bass 1
ch4 0:35
Picked Bass
ch4 0:36
Fretless Bass
ch4 127:68
Elec Bass 2
ch4 127:65
AcoustBass1
ch4 127:71
Fretless 1
ch4 127:68
Elec Bass2
Bass up to an octave
below middle C, Synth
lead sound above that
Bass up to an octave
below middle C, clean
guitar attack with
feedback swell above
that
Bass up to an octave
below middle C,
blended woodwind
sounds above that
Bass up to an octave
below middle C,
sparkly toy piano
above that
Bass up to an octave
below middle C, Pan
Flute above that
Bass up to an octave
below middle C,
heavily chorused
electric piano above
that
Bass up to an octave
below middle C,
accordion above that
45
Page 46

39u Bass and Pipe Organ ch1 0:21
Reed Organ
40u Bass and Bell Strings ch1 0:50
String Ens 2
41u Zen Garden ch1 8:108
Taisho Koto
42u Kalimba Pad ch1 0:109
Kalimba
43u Steel&Wood&Warmth ch1 0:26
Steel Guitar
44u Cool Copland ch1 0:50
String Ens 2
45u Guitar Fantasy ch1 0:29
Muted El Gtr
46u Full Orchestra ch1 0:48
Timpani
ch2 127:13
Pipe Orgn 1
ch2 127:36
Glasses
ch2 0:108
Koto
ch2 127:100
Syn Mallet
ch2 8:27
Hawaiian Gtr
ch2 0:51
SynStrings 1
ch2 8:29
Funk Guitar
ch2 0:49
String Ens 1
ch3 0:20
Church
Organ
ch3 127:33
Fantasy
ch3 0:107
Shamisen
ch3 0:101
Brightness
ch3 0:96
Sweep
ch3 127:36
Glasses
ch3 0:32
Guitar
Harmonics
ch3 0:62
BrassSection
ch4 0:36
FretlessBass
ch4 0:33
Acoustic
Bass
ch4 127:107
Sho
ch4 0:55
Synth Voices
ch4 0:14
Xylophone
ch4 127:35
Choral
ch4 8:32
Gtr
Feedback
ch4 8:49
Orchestra
Bass up to an octave
below middle C, pipe
Organ above that
Bass up to an octave
below middle C,
Strings layered with
Bells above that
Japanese instruments
layered together for a
bright plucked sound
Kalimba (thumb piano)
layered with vocal
sounding pad
Layered sound with
acoustic guitar,
xlophone and
sustained synth
Sustained string/choral
sound with layers
transposed in 5ths
Clean guitar attack
with feedback and
harmonics fading in
Timpani in the left
hand, strings and brass
in the right, full
orchestra all across for
a big orchestra sound
46
Page 47

47u Toy Piano ch1 0:9
Celesta
48u Bright and Funky ch1 0:82
Saw Lead
49u Electric Groove ch1 0:33
Acoustic
Bass
50u Fusion Combo ch1 0:29
Muted El Gtr
ch2 0:10
Glockenspiel
ch2 127:20
Clavi 1
ch2 0:5
El. Piano 1
ch2 0:12
Vibraphone
ch3 127:100
Syn Mallet
ch3 127:22
Clavi 3
ch3 0:50
String Ens 2
ch3 0:35
Picked Bass
ch4 0:113
Tinkle Bell
ch4 127:21
Clavi 2
ch10 0:26
TR-808 Set
ch10 0:33
Jazz Set
Bell-like and sparkly
like a toy piano
Clavinet mixed with
synth lead
Funky drum machine
in the left hand with
bass, and electric
piano in the right – top
2 octaves of the piano
have a string
ensemble sound
Drum Set in the left
hand with bass guitar,
guitar sounds and
Vibes in the right hand
51u Slow Harpsichord ch1 0:7
Harpsichord
52u Slow Growth 1 ch1 127:109
Whistle 1
ch2 127:17
Harpsi 1
ch2 127:110
Whistle 2
ch3 127:18
Harpsi 2
ch3 0:84
Chiff
ch4 0:7
Harpsichord
ch4 0:76
Pan Flute
Harpsichord sounds,
but with very slow
attack times, so they
fade in. Really pretty
with sustained chords
Slowly fading in with
flutelike timbres, great
with sustained chords
47
Page 48

53u Floating Atmosphere ch1 127:38
Atmosphere
1
54u Floating Bells ch1 127:47
Bell Singer
55u Long Time Growth ch1 8:81
Sine
56u Smooth Background ch1 127:108
Shakuhachi
57u Very Electric ch1 127:21
Clavi 2
58u On the Mountain ch1 0:124
Bird Tweet
59u Reedy ch1 0:65
Soprano Sax
60u Did We Break It! ch1 9:126
Burst Noise
81f String Bean ch1 0:49
String Ens1
82f Organic ch1 127:12
Elec Orgn4
ch2 0:100
Atmosphere
2
ch2 0:93
Bowed Pad
ch2 8:81
Sine
ch2 0:52
SynStrings 2
ch2 127:40
Funny Vox
ch2 127:108
Shakuhachi
ch2 0:66
Alto Sax
ch2 8:126
Starship
ch2 0:50
String Ens2
ch2 127:15
Pipe Orgn 3
ch3 0:32
Gtr
Harmonics
ch3 127:36
Glasses
ch3 8:81
Sine
ch3 0:51
SynStrings 1
ch3 127:69
Slap Bass 1
ch3 8:81
Sine
ch3 0:71
Bassoon
ch3 2:128
Laser Gun
ch3 0:17
Drawbar
Orgn
ch4 0:32
Gtr
Harmonics
ch4 0:10
Glockenspiel
ch4 8:81
Sine
ch4 0:96
Sweep
ch4 127:31
Syn Bass 3
ch4 0:51
SynStrings 1
ch4 0:70
English Horn
ch4 5:125
Wind Chime
Guitar-like atack with
nice “floating”
harmonics fading in
Pretty sustaining belllike timbre
4 pure tones layered
with different
transpositions (root, 4
5th ) inner voices fade
in slowly
Nice pad sound for
playing sustained
chords
Bright and bold lead
sound
Pretty pastoral pad
with almost subliminal
bird song
Nice blended
woodwind sound
Wild sound effect!
Basic string section
sound – nice with slow
sustained chords
Electric organ sound
th,
48
Page 49

83f Good Vibes ch1 0:12
Vibraphone
84f Electric Piano ch1 0:6
El. Piano 2
85f Brass Knuckles ch1 127:25
Syn Brass 1
86f Warm Pad ch1 0:90
Warm Pad
87f Flutey ch1 0:73
Piccolo 1
88f Vocal Ease ch1 0:53
Choir Aahs
89f Bells ch1 127:47
Bell Singer
90f Caribbean ch1 0:115
Steel Drums
91f Ravi ch1 0:105
Sitar
92f Electric Harpsichord ch1 0:7
Harpsichord
93f Mallet Head ch1 0:13
Marimba
ch2 0:11
Music Box
ch2 127:7
Elec Piano4
ch2 0:62
Brass Section
ch2 8:51
SynStrings3
ch2 0:76
Pan Flute
ch2 0:54
Voice Oohs
ch2 0:9
Celesta
ch2 0:109
Kalimba
ch2 0:105
Sitar
ch2 0:7
Harpsichord
ch2 127:105
Marimba
ch3 0:79
Whistle
ch3 0:61
French Horn
ch3 0:76
Pan Flute
ch3 127:35
Choral
ch3 0:15
TubularBells
ch3 0:79
Whistle
ch3 0:27
Jazz Guitar
ch3 0:7
Harpsichord
ch3 0:14
Xylophone
ch4 0:14
Xylophone
Vibes sound with extra
sparkle and sustain
Subtle combination
with acoustic piano,
but adds depth to the
sound
Bright brassy sound
Warm sound with a
slow attack, good with
slow, sustained chords
Nice flute sounds with
echo
Smooth choir sound
Sparkly bell sound
Steel drums with extra
sustained sound
Sitar sounds – for
morning or evening
raga
Harpsichord sounds –
doubled and
transposed for extra
thickness
Multi-layered mallet
percussion sound
49
Page 50

94f Synth Strings ch1 0:51
SynStrings1
95f Cosmic Whistling ch1 127:110
Whistle 2
96f Sweet Harp ch1 0:47
Orc Harp
97f Accordionly ch1 0:24
Tango
Accord
98f Organism ch1 127:11
Elec Orgn3
99f Voices in the Mist ch1 0:89
New Age
100f Bass and Strings ch1 0:49
String Ens 1
ch2 8:51
SynStrings3
ch2 127:109
Whistle 1
ch2 127:59
Harp 2
ch2 127:16
Accordion
ch2 0:19
Rock Organ
ch2 0:101
Brightness
ch2 0:50
String Ens 2
ch3 0:52
SynStrings2
ch3 8:22
Italian
Accordion
ch3 8:17
DetunedOrg
ch3 0:93
Bowed Pad
ch3 0:33
Acoustic
Bass
ch4 0:18
Perc Orgn
Synthetic String sound
– great with sustained
chords
Whistle sound with
portamento and lots of
echo
Nice harp sound –
play arpeggiated
chords with this one
Big accordion sound
Big organ sound with
vibrato, echo
Pretty breathy sound
Bass up to an octave
below middle C,
Strings above that
50
Page 51

Appendix C –Sound Chart (Banks and Program Numbers)
PC Bank 0 Bank 1 Bank 2 Bank3Bank 4 Bank 5 Ban
1Grand
Piano1
2 Bright Piano1 Acoustic
3El. Grand
Piano1
4 Honky-tonk
Piano
5El. Piano 1 Detuned EP
6El. Piano 2 Detuned EP
7 Harpsichord Coupled
8 Clavinet Honky Tonk
9 Celesta Elec Org 1
10 Glockenspiel Elec Org 2
11 Music Box Elec Org 3
12 Vibraphone Elec Org 4
13 Marimba Pipe Org 1
14 Xylophone Pipe Org 2
15 Tubular Bells Church Bell Car-
16 Dulcimer Accordion
17 Drawbar
Organ
Bank7Bank 8 Bank9Bank16Bank 127
k 6
1
2
Harpsichord
illion
Detuned
Organ 1
Acoustic
Piano 1
Piano 2
Acoustic
Piano 3
Elec Piano
1
Elec Piano
2
Elec Piano
3
Elec Piano
4
Pipe Org 3
Harpsi 1
51
Page 52

18 Perc. Organ Detuned
19 Rock Organ Harpsi 3
20 Church
Organ
21 Reed Organ Clavi 2
22 French
Accordion
23 Harmonica Celesta 1
24 Tango
Accordion
25 Acoustic
Guitar(Nylon)
26 Acoustic
Guitar (Steel)
27 Jazz Guitar Hawaiian
28 Clean Elec
Guitar
29 Muted Elec
Guitar
30 Overdriven
Guitar
31 Distortion
Guitar
32 Guitar
Harmonics
33 Acoustic
Bass
34 Finger Bass Harmo Pan
35 Picked Bass Chorale
Organ 2
Church
Organ 2
Italian
Accordion
Ukulele Syn Brass 1
12-str guitar Man-
dolin
Gtr
Chorus Gtr Syn Brass 4
Funk Gtr Syn Bass 1
Feedback
Gtr
Gtr
Feedback
Harpsi 2
Clavi 1
Clavi 3
Celesta 2
Syn Brass 2
Syn Brass 3
Syn Bass 2
Syn Bass 3
Syn Bass 4
Fantasy
52
Page 53

36 Fretless Bass Glasses
37 Slap Bass1 Sound Track
38 Slap Bass 2 Atmosphere
39 Synth Bass 1 Synth Bass 3 Warm Bell
40 Synth Bass 2 Synth Bass 4 Funny Vox
41 Violin Echo Bell
42 Viola Ice Rain
43 Cello Oboe 2001
44 Contrabass Echo Pan
45 Tremolo
Strings
46 Pizzicato
Strings
47 Orchestral
Harp
48 Timpani Square
49 String
Ensemble 1
50 String
Ensemble 2
51 Synth Strings
1
52 Synth Strings
2
53 Choir Aahs Violin 1
54 Choir Oohs Violin 2
55 Synth Voice Cello 1
56 Orchestra Hit Cello 2
57 Trumpet Contra-
Orchestra Str Sect 1
Syn Strings 3 Str Sect 3
Doctor Solo
School
Daze
Bell Singer
Wave
Str Sect 2
Pizzicato
bass
53
Page 54

58 Trombone Harp 1
59 Tuba Harp 2
60 Muted
Trumpet
61 French Horn Guitar 2
62 Brass Section Brass 2 Elec Gtr 1
63 Synth Brass 1 Syn Brass 3 Elec Gtr 2
64 Synth Brass 2 Syn Brass 4 Sitar
65 Soprano Sax Acou Bass 1
66 Alto Sax Acou Bass 2
67 Tenor Sax Elec Bass 1
68 Baritone Sax Elec Bass 2
69 Oboe Slap Bass 1
70 English Horn Slap Bass 2
71 Bassoon Fretless 1
72 Clarinet Fretless 2
73 Piccolo Flute 1
74 Flute Flute 2
75 Recorder Piccolo 1
76 Pan Flute Piccolo 2
77 Blown Bottle Recorder
78 Shakuhachi Pan Pipes
79 Whistle Sax 1
80 Ocarina Sax 2
81 Lead 1
(Square)
82 Lead 2
(Sawtooth)
83 Lead 3
(Calliope)
Square Sine Sax 3
Saw Sax 4
Guitar 1
Clarinet 1
54
Page 55

84 Lead 4
(Chiff)
85 Lead 5
(Charang)
86 Lead 6
(Voice)
87 Lead 7 (fifths) Bassoon
88 Lead 8
(Bass+Lead)
89 Pad 1
(New Age)
90 Pad 2
(Warm)
91 Pad 3
(Polysynth)
92 Pad 4 (Choir) Trombone 2
93 Pad 5
(Bowed)
94 Pad 6
(Metallic)
95 Pad 7 (Halo) Tuba
96 Pad 8
(Sweep)
97 FX 1 (Rain) Brs Sect 2
98 FX 2
(Soundtrack)
99 FX 3 (Crystal) Vibe 2
100 FX 4
Atmosphere
101 FX 5
(Brightness)
Clarinet 2
Oboe
English Horn
Harmonica
Trumpet 1
Trumpet 2
Trombone 1
Fr Horn 1
Fr Horn 2
Brs Sect1
Vibe 1
Syn Mallet
Wind Bell
55
Page 56

102 FX 6
(Goblins)
103 FX 7
(Echoes)
104 FX (Sci-fi) Xylophone
105 Sitar Marimba
106 Banjo Koto
107 Shamisen Sho
108 Koto Taisho Koto Shaku-hachi
109 Kalimba Whistle1
110 Bagpipe Whistle 2
111 Fiddle Bottle Blow
112 Shanai Breathpipe
113 Tinkle Bell Timpani
114 Agogo Melodic
115 Steel Drums Deep Snare
116 Woodblock Castanets Elec Perc 1
117 Taiko Drum Concert BD Elec Perc 2
118 Melodic Tom Melo Tom Taiko
119 Synth Drum 808 Tom Elec
120 Reverse
Cymbal
121 Guit. Fret
Noise
122 Breath Noise Fl. Key
123 Seashore Rain Thun-
Gt Cut
Noise
Click
Echo
Pan
Perc
1
String
Slap
Wind Stream Bubble Orchestra
der
Glock
Tube Bell
Drum
Taiko Rim
Cymbal
Castanets
Triangle
Hit
56
Page 57

124 Bird Tweet Dog Horse
125 Telephone
Ring
126 Helicopter Car
127 Applause Laugh-
128 Gunshot Mach-
Telephone
Ring 2
Engine
Start
ing
ine
Gun
Gallop
Door
Creak
Car
Break
Screaming
Laser
Gun
Bird2 Telephone
Door
Closing
Car
Pass
PunchHeart-
Explosion
Scratch Wind
Car
Crash
beat
Chime
Police
Siren
Footstep
Train Jet
Take
off
Starship Burst
Noise
Bird Tweet
One Note
Jam
Water Bell
Jungle Tune
57
Page 58

Appendix D – MIDI CC Numbers
MIDI CC (Continuous Controller) Chart
MIDI
Description
CC#
0 Bank Select MSB
1 Mod Wheel – default is vibrato
2 Breath Controller – default is 17 (not used)
5 Portamento time
6 Data Entry: provides data to RPN and NRPN
7Volume
10 Pan (64 is center)
11 Expression
64 Sustain Pedal
65 Portamento On/Off
66 Sostenuto Pedal
67 Soft Pedal
71 Filter Resonance
72 Envelope Release time
73 Envelope Attack Time
74 Filter Cutoff Frequency
75 Envelope Decay Time
58
Page 59

76 Vibrato Rate
77 Vibrato Depth
78 Vibrato Delay
80 Reverb type
81 Chorus Type
91 Reverb level
93 Chorus level
100 RPN High Byte (value=0 for RPN, followed by CC 101 value 0-2, CC 6 value 0-127)
101 RPN Low Byte (Value 0=Pitch Bend Amount, 1= Fine Tuning, 2= Coarse tuning) followed
by CC6 for RPN value
120 All Sound Off
121 Reset all Controllers
123 All Notes Off
126 Mono On
127 PolyOn
59
Page 60

Appendix E - Service and techsupport info
The PianoBar should serve you well for a long time
without trouble. If the unit develops a fault, you
can contact techsupport@moogmusic.com, or
phone 800-948-1990 for assistance. We ask that
you have a detailed explanation of your problem,
and that you have sought assistance from this
manual or our online support. If the unit is
determined to be defective, for units sold in the US,
an RMA (return materials authorization) number will
be issued and the product can then be returned
to the factory for service. Warranty service will be
provided only in the case that the unit suffers a
defect in materials or workmanship. Moog Music
reserves the right to refuse Warranty service if, after
inspection, the unit appears to have been
damaged by misuse, such as dropping the unit.
All PianoBar materials ©2003 Moog Music Inc.
Specifications subject to change without notice
Moog Music Inc.
554C Riverside Dr.
Asheville NC USA 28801
800-948-1990
www.moogmusic.com
60
Page 61

61
 Loading...