

Page 1
User’s Guide
Thanks for purchasing The Moog Guitar – Paul Vo Collector Edition. Paul’s efforts are the result of years of
research and technical breakthroughs, some of which would not have been possible even a few short years
ago. This may be your rst Moog instrument and we hope you will nd that it meets the denition of a Bob Moog
product; superior quality, an investment that will give back to you more, much more than you put into it, and an
inspiration to the creative process.
Thanks for placing your trust in Moog Music.
Mike Adams
President
Moog Music Inc.
Introduction
We started out by crafting a great guitar. The “Moog” name could not go on just any guitar. The guitar had to be
a professional instrument of the highest quality. Of course, simply placing our name on a great instrument was
just the beginning. Next, and in the tradition of Bob as a musician’s toolmaker, we created an instrument that
brings ve new tools to the ngertips of the guitarist:
1. Innite, powerful, and controllable sustain on every string at every fret position.
2. Rich, sweet and clean harmonics shifting and evolving under your control.
3. Controlled sustain - sustains the notes you want to sustain and mutes the strings
you want muted. No special playing technique is needed. Plays smooth and easy.
4. Powerful muting of the strings opens up a whole new world of punchy staccato
- the Moog Guitar is suddenly a completely new instrument!
5. Overlaid with each of the above, the player controls the famous Moog ladder lter
- switch it in or leave it out; dial in resonance and control the cut-off frequency with
the control pedal.
It’s easy to get started, the learning curve is minimal. An experienced guitarist can
begin crafting new and previously unimaginable soundscapes in just the rst few
minutes. However, there is much to discover over time because the Moog Guitar
makes many new things possible.
We encourage you to initially turn off your amplier and just listen to the strings and
feel their vibration. It is enlightening. We’ve found this is the best rst step to really
connecting with this instrument.
A strong aspect of our design philosophy was that the Moog electronics should
work together with the basic nature of the guitar rather than overwhelming it. Your
instrument is real, not virtual. That means each guitar has its own unique heart and
character that can never be completely dened. It awaits your creativity.
Page 2
User's Guide
_______________________________________________________
Connection
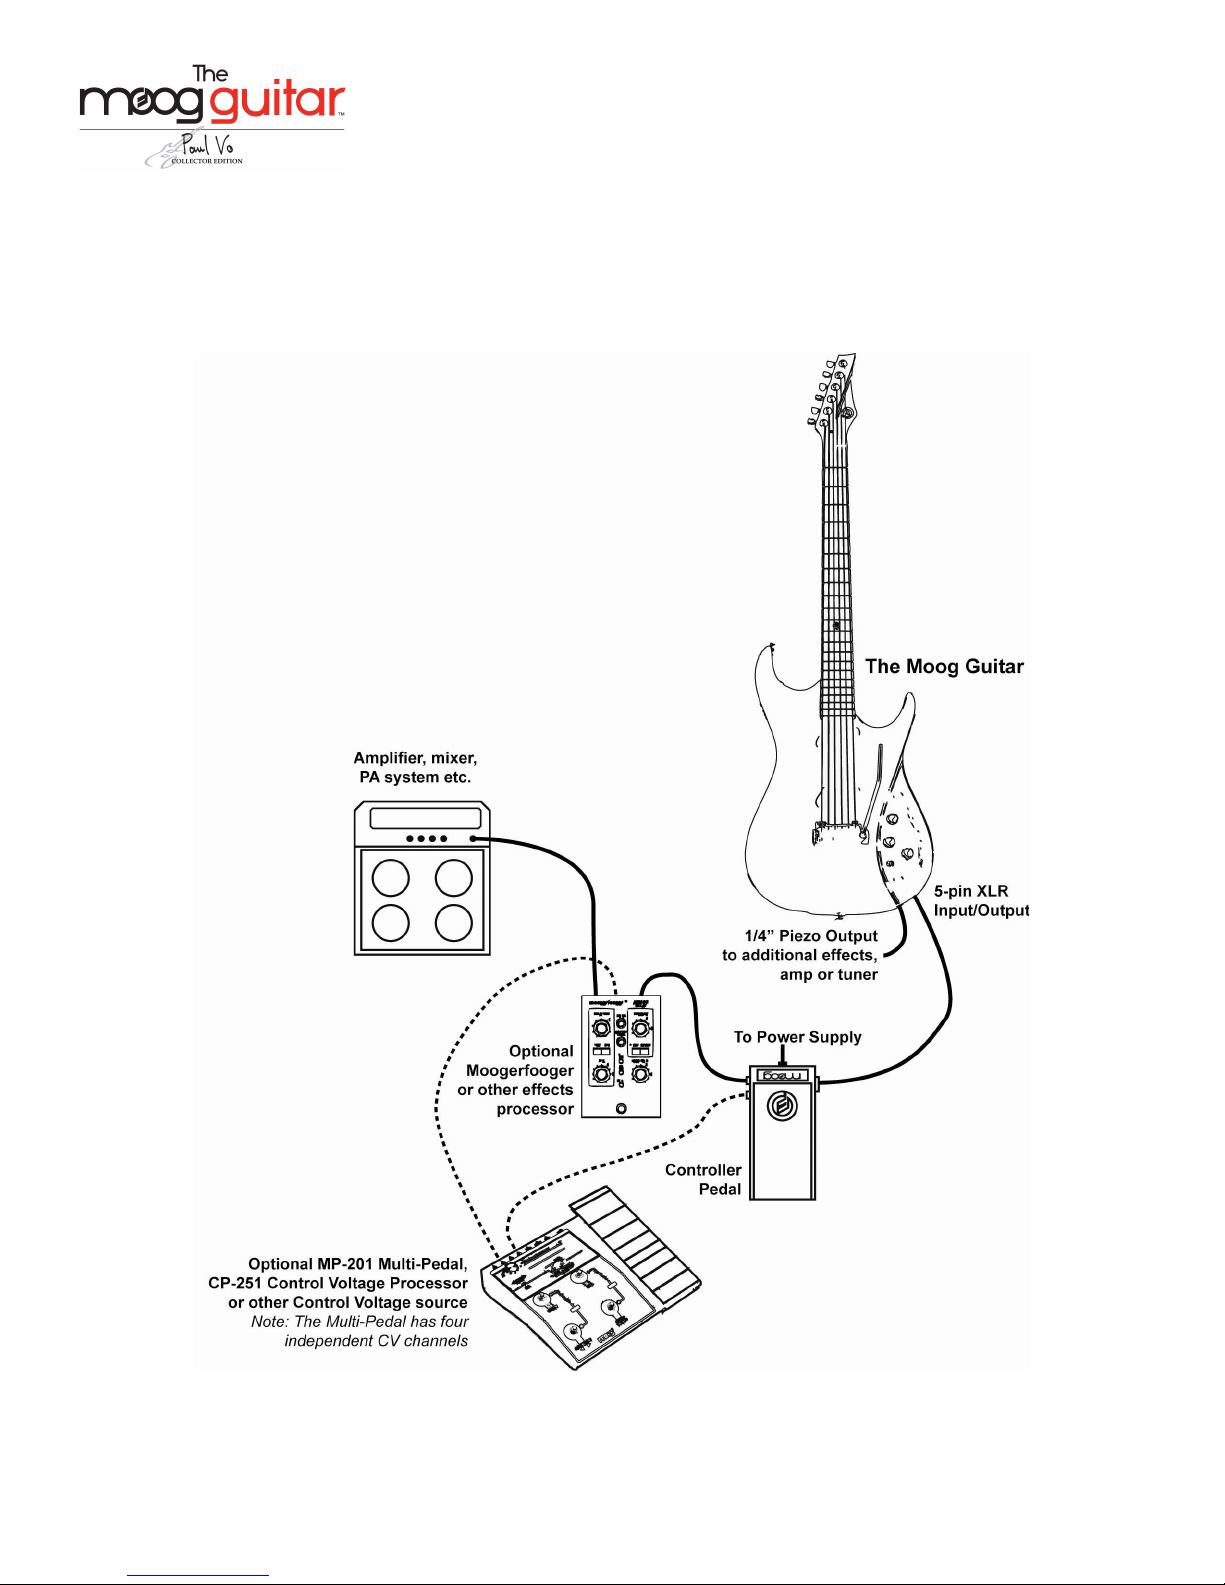
The following diagram shows a typical connection setup for The Moog Guitar. The effects processor and control voltage
source are optional. As with any Moog product, experimentation is richly rewarded.
.
Note: Once the Moog Guitar is powered, it takes approximately 30 seconds for the Moog electronics to activate
© 2008 Moog Music Inc Specifications subject to change without notice www.moogmusic.com
Page 3

User's Guide
_______________________________________________________
Knobs and Switches Overview
Knobs
Full Clockwise Full Counter Clockwise Comments
MASTER VOLUME Full volume No volume Controls overall volume of
Moog pick-ups and piezo
output
VO POWER Full Vo Power No Vo Power Turn fully CCW when playing
as a normal guitar
HARMONIC BALANCE Neck pick-up only Bridge pick-up only In center detent position, Vo
Power is equal on neck and
bridge pick-up.
When the Filter Toggle switch
is in the TONE position,
HARMONIC BALANCE is set
by foot pedal and knob has no
effect.
PIEZO BLEND The output signal is 100% from the
piezo pick-ups, but still passes through
the Moog filter.
TONE With the FILTER TOGGLE in the
TONE POSITION: Emphasizes treble
frequencies.
With the FILTER TOGGLE in the
FILTER & ARTICULATED FILTER
POSITION: Full resonance.
The output signal is 100% from the
neck and/or bridge pick-up, via the
pickup selector switch.
With the FILTER TOGGLE in the
TONE POSITION: Emphasizes bass
frequencies.
With the FILTER TOGGLE in the
FILTER & ARTICULATED FILTER
POSITION: Minimum resonance
Sets a blend of the piezo and
magnetic pickups.
Controls either the basic guitar
tone or Moog filter resonance,
depending on the FILTER
TOGGLE position.
Position 1 Position 2 Position 3 Position 4 Position 5
PICK-UP SELECTOR Piezo Bridge Out of Phase In Phase Neck
FILTER TOGGLE Tone Articulated Moog Filter Moog Filter n/a n/a
MODE SELECTOR Mute Controlled Sustain Full Sustain n/a n/a
© 2008 Moog Music Inc Specifications subject to change without notice www.moogmusic.com
Switches
Page 4

User's Guide
_______________________________________________________
Exploring the Moog Guitar
This section provides suggestions for exploring the many innovations of The Moog Guitar. They are just starting points
and many other expressive variations are possible. You may find that while maximum Vo Power is useful for illustrating
many of the innovations, setting it to a lesser amount provides a result more suited to your playing situation. Use these
examples as a starting point and explore!
Full Sustain Mode – Place the Mode Selector Switch in Full Sustain position. Adjust the Vo Power Knob for maximum
power. Place the Filter Toggle Switch into the tone position. Strum a full six-stringed chord. All notes sustain clearly and
powerfully. You can also hold a chord with your left hand and tap new notes on the fretboard with your right.
Mute Mode – Place the Mode Selector Switch in Mute position. Adjust the Vo Power Knob for maximum power. Place
the Filter Toggle Switch into the tone position. Set the control pedal midway between heel and toe. Play individual notes,
intervals or chords (high on the neck sounds particularly nice). Notes are physically muted, resulting in more staccato
timbres. The instrument actually feels different! Great for traditional blues, world music and beyond.
Controlled Sustain Mode - Place the Mode Selector switch in Controlled Sustain position. Adjust the Vo Power Knob for
maximum power. Play single note lines or several strings at once.
In Controlled Sustain Mode several tests are applied to bias a string either towards being muted or being driven.
Deliberately played strings cross an amplitude threshold that varies according to a proprietary algorithm. The strings are
not either "on" or "off"; it does not work like that. Everything is gradual. A tendency towards sounding louder is "rewarded"
with more energy; a tendency towards being muted is encouraged with active muting, resulting in a more natural feeling
playing experience.
The muting is not absolute; The Moog Guitar will still allow sympathetic vibrations when they are strongly related to the
basic pitch of the played string or strings; resulting in a very natural feel. With Controlled Sustain, it’s about as easy to
govern the strings in the presence of strong sustain as it is to play an ordinary guitar that doesn't have sustain.
Harmonic Blends – Set Mode Selector switch to Full Sustain. Place Filter Toggle Switch into the tone position. Strum
and hold a chord, then slowly move the foot pedal from heel to toe position and back.
During Harmonic Blends, one pick-up supplies sustaining energy while the other attempts to mute the strings. The pedal
pans the sustaining and muting energy between the neck and bridge pick-ups. This results in natural, shifting harmonic
overtones that are actually occurring on the strings.
Moog Filter – Set the Filter Toggle Switch to Moog Filter. Set the Mode Selector Switch to Full Sustain. Place the
Control Pedal into heel position. Strum and hold a chord. Move the Pedal towards the toe position. The Control Pedal
controls the cutoff frequency of the Moog Filter, much like a sophisticated wah-wah pedal. In this mode, the Tone/Filter
knob controls the filter resonance.
Change the Filter Toggle Switch to Articulated Moog Filter. The articulated filter now modulates the cutoff frequency of the
filter for each string based on the energy present at that string; much like a hex envelope follower. The pedal sets the
start frequency of the articulation. In this mode, the Tone/Filter Knob controls the filter resonance. Play in any mode. The
articulated filter can also be used to provide a unique vocal-like quality to melodic phrasing.
The Moog Filter cutoff frequency can also be controlled by an external Control Voltage signal (0-5V). This signal can
come from an MP-201 Multi Pedal, a CP-251 Control Voltage Processor or any other equipment capable of generating
suitable control voltages.
A great application is to synchronize the Multi Pedal’s on board LFO (through MIDI Clock Sync) to a laptop or drum
machine rhythm track and then to use that LFO to modulate the filter cutoff frequency.
© 2008 Moog Music Inc Specifications subject to change without notice www.moogmusic.com
Page 5

User's Guide
_______________________________________________________
Accessories
Moog Music provides many accessories for the Moog Guitar; from genuine Moog Guitar strings for optimum sound and
playability, to controllers and effects processors to propel your sonic explorations even further. Visit your Moog Guitar
dealer or www.moogguitar.com for more information or to order.
Strings
The Moog Guitar works best with Moog Guitar Strings. These strings are made of materials that favor the unique
electromagnetic interaction of Moog pickups. Using ordinary strings will work - you can “get through the night” with an
ordinary string, but string control, (sustain and muting) will be weaker and less stable.
Players have their favorite strings, presumably because they sound the best on their existing instrument. The Moog
Guitar will sound the best with Moog Guitar Strings.
String Sets
Gauging First-E Second-B Third-G Fourth-D Fifth-A Sixth-E
Light 9-46 009 011 016 026 036 046
Medium 10-52 010 013 017 030 042 052
Heavy 11-52 011 014 018 030 044 052
Note: When replacing your guitar strings, it is important to carefully snip off any curled ends of the strings prior
to pulling them through.
CV Controllers, Processors and Moogerfooger Effects Pedals
The CV (Control Voltage) Input on the Moog Guitar Control Pedal opens the door to an unlimited sonic landscape and
Moog Music’s CV Controllers and Processors harness that potential. Moogerfoogers are analog effects pedals, equally at
home on the floor, the desktop or in a rack mount. Their warm, all-analog sound and extensive CV implementation makes
them the perfect complement to the Moog Guitar. To top it off, they’re made to be over-driven!
MP-201 Multi-Pedal Programmable 4 channel Foot Pedal Controller - On-board LFO - MIDI Sync & Tap
Tempo - 4 Analog CV Outputs - MIDI In, Out & USB (MIDI over USB) - Animates the
Moog Guitar’s Filter - Sync LFO Filter Modulation to Master MIDI Clock
CP-251 CV Processor Collection of Classic Modular Synthesizer Circuits - Designed by Bob Moog -
Generate, Modify, Combine & Distribute Control Voltages - Create Simple or Complex
CV patches - Control the Moog Guitar Filter - Uncontaminated by the digital world!
MF-101 Low-Pass Filter The Classic Moog Ladder Filter – Rich and Resonant – Add a Moog Filter to Piezo Out
MF-102 Ring Mod Subtle Tremolos to Clangorous, Metallic Overtones – Built-In LFO
MF-103 Phaser Selectable 6 or 12 Stage – Auxiliary Out for Stereo Phasing – Extremely Wide Range
MF-104Z Analog Delay 1,000ms of Warm, Controllable Analog Delay – External Loop for Additional
Processing
MF-105 MuRF Multiple Resonance Filter Array – Sequenced Filtering – MF-105B Bass Version Too!
MF-107 FreqBox Audio Modulated Oscillator – Brings Analog Synthesis Hard Sync to the Guitar
© 2008 Moog Music Inc Specifications subject to change without notice www.moogmusic.com
Page 6

User's Guide
_______________________________________________________
Setting up and Adjusting your Moog Guitar
Your Moog Guitar has been set up at our facility by an experienced luthier who understands how the new capabilities of
your instrument are affected by the guitar’s set up. We strongly suggest that you play your Moog Guitar for a while with
no alterations - even though you may be used to a different set-up on your other guitars. You may find that as you
experience your instrument the differences become more acceptable or even preferred.
Adjusting the pickups: The high end is closer to the strings to compensate for the smaller mass of string. The pickups
may be raised or lowered using the three screws under each pickup at the back of the guitar. The tripod of screws allows
adjustment of both height and orientation. Caution: These screws are nylon. Turning them against strong
resistance may damage the screw heads and the screw threads. The available range of pickup adjustment is about
¼” at the maximum. We strongly recommend you refrain from adjusting your pickups.
Intonation and String Height
Moog recommends that these adjustments are performed by an experienced person and with the proper precision tools.
The string saddles must be adjusted with caution - note especially that the center screw that locks the saddle to the
bridge MUST be loosened before an individual saddle height is adjusted or you may break the saddle.
Changing Strings
Moog strings are required for the proper operation of the Moog Guitar. You should always use Moog Strings, however in
an emergency, GHS “Infinity Steel” (best), GHS “Super Steels”, or D’Addario “ProSteels” strings would work, but not quite
as well as Moog Strings. You can use an ordinary string in an emergency if you have nothing else, but you will not be able
to play at full Vo power.
When changing strings, please be careful not to drop anything, (especially anything electrically conductive), into
the string access opening in the rear cavity cover. Such debris may damage your Moog electronics!
Controller Pedal Adjustment
The overall audio output signal level can be set to your preference by a control located just under the middle of the right
side of the control pedal.
CAUTION:
Safe wiring practices and national electrical codes mandate that every piece of equipment be connected to a proper
earth ground to prevent potentially lethal electrical shocks. If you experience hum with the Moog Guitar, Moog
advises you to check your entire rig to make sure all equipment is properly connected to earth ground. If not, have your
AC wiring updated to code by a qualified technician. The Moog Guitar is designed to be hum-free when used with
properly grounded equipment.
© 2008 Moog Music Inc Specifications subject to change without notice www.moogmusic.com
 Loading...