

Page 1
VMX-440/SW
Best.-Nr. 20.2530
VOICE/MUSIC MIXER
BEDIENUNGSANLEITUNG
INSTRUCTION MANUAL
MODE D’EMPLOI
ISTRUZIONI PER L’USO
GEBRUIKSAANWIJZING
MANUAL DE INSTRUCCIONES
INSTRUKCJA OBSŁUGI
SIKKERHEDSOPLYSNINGER
SÄKERHETSFÖRESKRIFTER
TURVALLISUUDESTA
Page 2

2
Bevor Sie einschalten …
Wir wünschen Ihnen viel Spaß mit Ihrem neuen Gerät
von MONACOR. Bitte lesen Sie diese Bedienungsanleitung vor dem Betrieb gründlich durch. Nur so lernen Sie
alle Funk tionsmöglichkeiten kennen, ver meiden Fehlbedienungen und schützen sich und Ihr Gerät vor eventuellen Schäden durch unsachge mäßen Ge brauch. Heben
Sie die Anleitung für ein späteres Nachlesen auf.
Der deutsche Text beginnt auf der Seite 4.
Before switching on …
We wish you much pleasure with your new MONACOR
unit. Please read these operating instructions carefully
prior to operating the unit. Thus, you will get to know all
functions of the unit, operating errors will be prevented,
and yourself and the unit will be protected against any
damage caused by improper use. Please keep the oper ating instructions for later use.
The English text starts on page 4.
D
A
CH
GB
Avant toute installation …
Nous vous souhaitons beaucoup de plaisir à utiliser cet
appareil MONACOR. Lisez ce mode dʼemploi entièrement avant toute utilisation. Uniquement ainsi, vous pour rez apprendre lʼensemble des possibilités de fonctionnement de lʼappareil, éviter toute manipulation erronée et
vous protéger, ainsi que lʼappareil, de dommages éven tuels engendrés par une utilisation inadaptée. Conservez
la notice pour pouvoir vous y reporter ultérieurement.
La version française se trouve page 6.
Prima di accendere …
Vi auguriamo buon divertimento con il vostro nuovo
apparecchio di MONACOR. Leggete attentamente le
istruzioni prima di mettere in funzione l'apparecchio. Solo
così potete conoscere tutte le funzionalità, evitare
comandi sbagliati e proteggere voi stessi e l'apparecchio
da eventuali danni in seguito ad un uso improprio. Conservate le istruzioni per poterle consultare anche in
futuro.
Il testo italiano inizia a pagina 6.
F
B
CH
I
Voor u inschakelt …
Wij wensen u veel plezier met uw nieuwe apparaat van
MONACOR. Lees deze gebruikershandleiding grondig
door, alvorens het apparaat in gebruik te nemen. Alleen
zo leert u alle functies kennen, vermijdt u foutieve be dien ing en behoedt u zichzelf en het apparaat voor eventuele schade door ondeskundig gebruik. Bewaar de
hand leiding voor latere raadpleging.
De Nederlandstalige tekst vindt u op pagina 8.
NL E
Antes de la utilización …
Le deseamos una buena utilización para su nuevo aparato MONACOR. Por favor, lea estas instrucciones de
uso atentamente antes de hacer funcionar el aparato.
De esta manera conocerá todas las funciones de la
unidad, se prevendrán errores de operación, usted y el
aparato estarán protegidos en contra de todo daño causado por un uso inadecuado. Por favor, guarde las
instrucciones para una futura utilización.
El texto en español empieza en la página 8.
Før du tænder …
God fornøjelse med dit nye MONACOR produkt. Læs
venligst sikkerhedsanvisningen nøje, før du tager produktet i brug. Dette hjælper dig med at beskytte produktet
mod ukorrekt ibrugtagning. Gem venligst denne betjeningsvejledning til senere brug.
Du finder sikkerhedsanvisningen på side 12.
DK
FIN
Innan du slår på enheten …
Vi önskar dig mycket glädje med din nya MONACOR
produkt. Läs igenom säkerhetsföreskrifterna noga innan
enheten tas i bruk. Detta kan förhindra att problem eller
fara för dig eller enheten uppstår vid användning. Spara
instruktionerna för framtida användning.
Säkerhetsföreskrifterna återfinns på sidan 12.
Ennen kytkemistä …
Toivomme Sinulle paljon miellyttäviä hetkiä uuden
MONACOR laitteen kanssa. Ennen laitteen käyttöä
pyydämme Sinua huolellisesti tutustumaan turval lisuusohjeisiin. Näin vältyt vahingoilta, joita virheellinen
laitteen käyttö saattaa aiheuttaa. Ole hyvä ja säilytä käyttöohjeet myöhempää tarvetta varten.
Turvallisuusohjeet löytyvät sivulta 12.
S
Przed uruchomieniem …
Życzymy zadowolenia z nowego produktu MONACOR.
Dzięki tej instrukcji obsługi będą państwo w stanie
poznać wszystkie funkcje tego urządzenia. Stosując się
do instrukcji unikną państwo błędów i ewentualnego
uszkodzenia urządzenia na skutek nieprawidłowego
użytkowania. Prosimy zachować instruk cję.
Tekst polski zaczyna się na stronie 10.
PL
B
Page 3
3
34 5 6 7 8 9
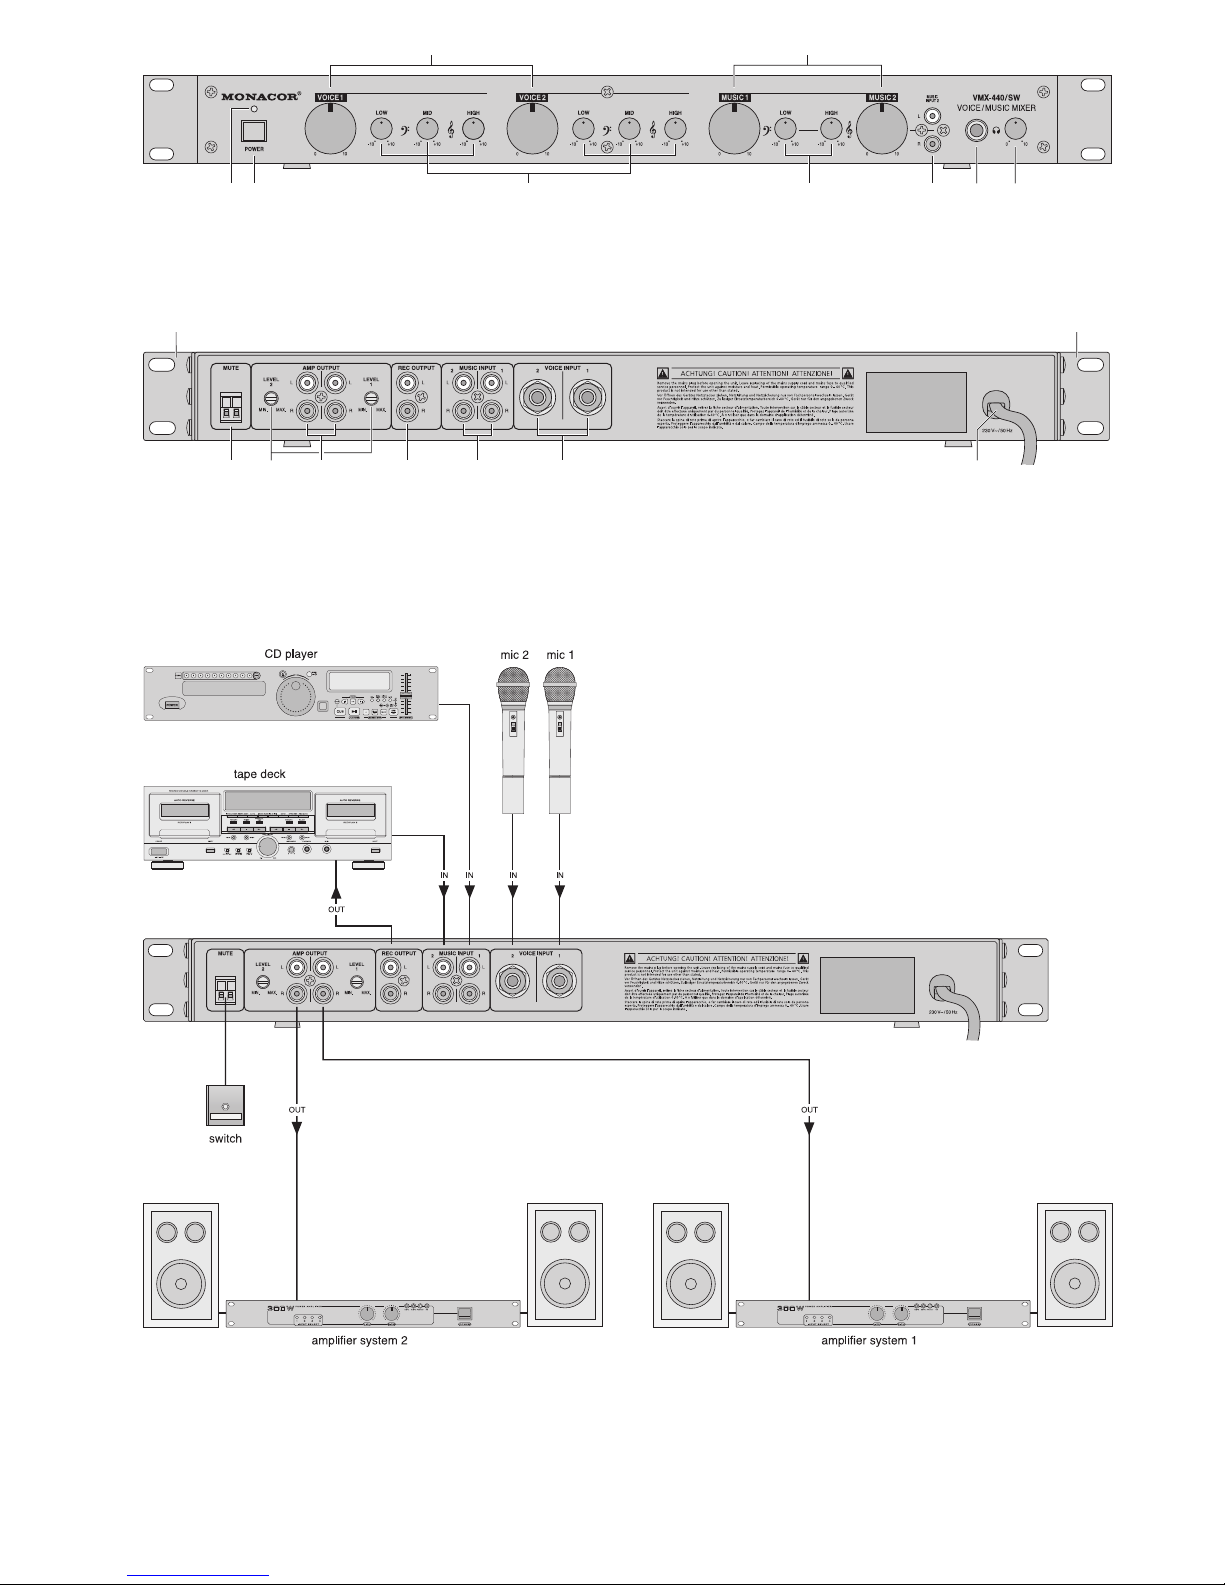
D Anschlussbeispiel
GB Example for connection
F Exemple de connexion
I Esempio di collegamento
NL Voorbeeld van aansluiting
E Ejemplo para conexión
PL Przykład połączeń
11 12 13 14 15 16 17
10 10
12
Page 4
Auf der ausklappbaren Seite 3 finden Sie alle be schriebenen Bedienelemente und Anschlüsse.
1 Übersicht der Bedienelemente und
Anschlüsse
1 Lautstärkeregler, jeweils für den Mikrofonkanal
VOICE 1 und den Mikrofonkanal VOICE2
2 Lautstärkeregler, jeweils für den Stereo-Kanal
MUSIC 1 und den Stereo-Kanal MUSIC 2
3 Betriebsanzeige
4 Ein-/Ausschalter POWER
5 3fach-Klangregelung, jeweils für den Mi krofon -
kanal VOICE 1 und den Mikrofonkanal VOICE 2:
LOW = Bässe, MID = Mitten, HIGH = Höhen
6 2fach-Klangregelung, gemeinsam für beide Ste-
reo-Eingangskanäle MUSIC 1 und MUSIC 2:
LOW = Bässe, HIGH = Höhen
7 Stereo-Line-Eingang MUSIC INPUT2, alternativ
zum Eingang MUSIC INPUT 2 auf der Rückseite
verwendbar (→ siehe Position 15)
8 Buchse für den Anschluss eines Stereo-Kopf -
hörers zum Abhören des von den Pegelreglern
LEVEL (12) unbeeinflussten Ausgangssignals
9 Lautstärkeregler für den Kopfhörer
10 Montagewinkel zum Einbau des Mixers in ein
Rack (482 mm /19″)
11 Schraubklemmen MUTE (vom Gerät abziehbar)
für den An schluss eines Schalters/ Tasters zum
Stummschalten der beiden Summenausgänge
AMP OUTPUT (13)
12 Pegelregler LEVEL1 bzw. LEVEL 2 (mit einem
Schraubendreher einstellbar) für den je weils da neben liegenden Ausgang AMP OUT PUT (13)
13 Summenausgänge AMP OUTPUT für den An -
schluss der Endverstärker bzw. anderer Geräte
mit Line-Eingangspegel, z. B. zweites Mischpult
14 Aufnahmeausgang REC OUTPUT für den An -
schluss an den Eingang eines Aufnahmegeräts;
der Aufnahmepegel ist unabhängig von den Reglern LEVEL (12)
15 Stereo-Eingänge MUSIC INPUT 1 und 2 für den
Anschluss von Audio-Geräten mit Line-Ausgangspegel z. B. CD- oder DVD-Player, Tapedeck, Tuner
16 Mono-Eingänge VOICE INPUT1 und 2 zum An -
schluss von Mikrofonen
17 Netzkabel zum Anschluss an eine Steckdose
(230 V~ /50 Hz)
2 Hinweise für den sicheren Gebrauch
Das Gerät entspricht allen erforder lichen Richt linien
der EU und ist deshalb mit gekennzeichnet.
Beachten Sie auch unbedingt die folgenden Punkte:
G
Verwenden Sie das Gerät nur im Innenbereich.
Schützen Sie es vor Tropf- und Spritzwasser,
hoher Luftfeuchtigkeit und Hitze (zulässiger Einsatztemperaturbereich 0 – 40°C).
G
Stellen Sie keine mit Flüssigkeit gefüllten Gefäße,
z. B. Trinkgläser, auf das Gerät.
G
Nehmen Sie das Gerät nicht in Betrieb und ziehen
Sie sofort den Netzstecker aus der Steckdose:
1. wenn sichtbare Schäden am Gerät oder an der
Netzanschlussleitung vorhanden sind,
2. wenn nach einem Sturz oder Ähnlichem der
Verdacht auf einen Defekt besteht,
3. wenn Funktionsstörungen auftreten.
Geben Sie das Gerät in jedem Fall zur Reparatur
in eine Fachwerkstatt.
G
Eine beschädigte Netzanschlussleitung darf nur
durch eine Fachwerkstatt ersetzt werden.
G
Ziehen Sie den Netzstecker nie am Kabel aus der
Steckdose, fassen Sie immer am Stecker an!
G
Verwenden Sie für die Reinigung nur ein trockenes weiches Tuch, niemals Chemikalien oder
Wasser.
G
Wird das Gerät zweckentfremdet, nicht richtig
angeschlossen, falsch bedient oder nicht fachgerecht re pa riert, kann keine Garantie für das Gerät
und keine Haftung für daraus resultierende Sachoder Personenschäden übernommen werden.
3 Einsatzmöglichkeiten
Dieser 4-Kanal-Mixer ist universell einsetzbar. Er
bietet die Möglichkeit, bis zu zwei Audio-Gerä te mit
Line-Ausgangspegel (z. B. CD- oder DVD-Player,
Tapedeck) und bis zu zwei Mikrofone anz uschlie ßen
und ihre Signale auf zwei Summenausgänge zu
mischen. Die Summenausgänge lassen sich über
einen optionalen Fernschalter stumm schalten. Der
Mixer verfügt außerdem über einen zusätz lichen
Auf nahmeausgang und einen regel baren Kopf hörerausgang.
Mit den zwei beiliegenden Montagewinkeln [(10)
in Abb. 2] lässt sich der Mixer in ein Rack für Geräte
mit einer Breite von 482 mm (19″) einbauen: Die
Winkel vorn an der rechten und linken Seite mit
jeweils drei Schrauben befestigen. Im Rack wird
eine Höhe von 1 HE (Höheneinheit) = 44,45 mm be nötigt. Der Mixer kann aber auch ohne Winkel als
Tischgerät verwendet werden.
WARNUNG Das Gerät wird mit lebensgefähr -
licher Netzspannung (230 V~) versorgt. Nehmen Sie deshalb nie selbst
Eingriffe am Gerät vor. Durch un sach ge mäßes Vorgehen besteht die
Gefahr eines elektrischen Schlages.
Soll das Gerät endgültig aus dem Betrieb
genommen werden, übergeben Sie es zur
umweltgerechten Entsorgung einem örtlichen Recycling betrieb.
All operating elements and connections described can be found on the fold-out page 3.
1 Operating Elements and Connections
1 Volume controls, each for the microphone chan nel
VOICE 1 and the microphone channel VOICE 2
2 Volume controls, each for the stereo channel
MUSIC 1 and the stereo channel MUSIC 2
3 POWER LED
4 POWER switch
5 3-way equalizer, each for the microphone channel
VOICE 1 and the microphone channel VOICE 2:
LOW, MID, HIGH
6 2-way equalizer, in common for both stereo input
channels MUSIC 1 and MUSIC 2: LOW, HIGH
7 Stereo line input MUSIC INPUT2, can be used
as an alternative to the input MUSIC INPUT 2 on
the rear side (→ see item 15)
8 Jack for the connection of stereo headphones to
monitor the output signal not affected by the controls LEVEL (12)
9 Volume control for the headphones
10 Mounting brackets for installing the mixer into a
rack (482 mm/ 19″)
11 Screw terminals MUTE (can be removed from
the unit) for the connection of a switch/ momen tary pushbutton for muting the two master outputs
AMP OUTPUT (13)
12 Control LEVEL1 or LEVEL 2 (to be adjusted with
a screwdriver) for the output AMP OUTPUT (13)
located next to it in each case
13 Master outputs AMP OUTPUT for the connection
of the power amplifiers or other units with line
input level, e. g. second mixer
14 Recording output REC OUTPUT for the connec-
tion to the input of a recorder; the recording level
is independent of the controls LEVEL (12)
15 Stereo inputs MUSIC INPUT1 and 2 for the con-
nection of audio units with line output level, e. g.
CD or DVD player, tape deck, tuner
16 Mono inputs VOICE INPUT 1 and 2 for connec-
tion of microphones
17 Mains cable for connection to a socket (230V~/
50 Hz)
2 Safety Notes
The unit corresponds to all required directives of the
EU and is therefore marked with .
It is essential to observe the following items:
G
The unit is suitable for indoor use only. Protect it
against dripping water and splash water, high air
humidity, and heat (admissible ambient temperature range 0 – 40°C).
G
Do not place any vessels filled with liquid, e. g.
drinking glasses, on the unit.
G
Do not set the unit into operation, or immediately
dis connect the mains plug from the mains socket if
1. there is visible damage to the unit or to the
mains cable,
2. a defect might have occurred after a drop or
similar accident,
3. malfunctions occur.
The unit must in any case be repaired by skilled
personnel.
G
A damaged mains cable must only be replaced by
skilled personnel.
G
Never pull the mains cable to disconnect the mains
plug from the mains socket, always seize the plug.
G
For cleaning only use a dry, soft cloth, by no
means chemicals or water.
G
No guarantee claims for the unit and no liability for
any resulting personal damage or material dam age will be accepted if the unit is used for other
pur poses than originally intended, if it is not correctly con nected, operated, or not repaired in an
expert way.
G
Important for U. K. Customers!
The wires in this mains lead are coloured in accord ance with the following code:
blue = neutral
brown = live
As the colours of the wires in the mains lead of this
appliance may not correspond with the coloured
markings identifying the terminals in your plug,
proceed as follows:
1. The wire which is coloured blue must be con nected to the terminal in the plug which is
marked with the letter N or coloured black.
2. The wire which is coloured brown must be con nected to the terminal which is marked with the
letter L or coloured red.
3 Applications
This 4-channel mixer is suitable for universal applications. It allows to connect up to two audio units
with line output level (e. g. CD or DVD player, tape
deck) and up to two microphones and to mix their
signals to two master outputs. The master outputs
can be muted via an optional remote switch. The
mixer is also equipped with an additional re cording
output and an adjustable headphone output.
With the two supplied mounting brackets [(10) in
fig. 2] the mixer can be installed into a rack for units
with a width of 482 mm (19″): Fix the brackets at the
If the unit is to be put out of operation de finitively, take it to a local recycling plant for
a disposal which is not harmful to the environment.
WARNING The unit is supplied with hazardous
mains voltage (230 V~). Leave servic ing to skilled personnel only. In expert
handling or modification of the unit
may cause an electric shock hazard.
4
GB
D
A
CH
Page 5

4 Anschlüsse herstellen
Vor dem Anschließen von Geräten oder Ändern be stehender Anschlüsse sollten der Mixer und die verwendeten Geräte ausgeschaltet sein.
1) Die Tonquellen an die Eingangskanäle anschlie ßen:
Mikrofone (symmetrisch oder asymmetrisch aus-
gelegt) an die 6,3-mm-Klinkenbuchsen VOICE
IN PUT 1 und 2 (16),
Stereo-Geräte mit Line-Ausgangspegel (z. B.
CD- oder DVD-Player, Tapedeck, DAT-Recorder, Tuner) an die Cinch-Buchsen MUSIC
INPUT 1 und 2 (15).
Anstelle des rückseitigen Eingangs MUSIC
INPUT 2 kann auch der frontseitige Ein gang
MUSIC INPUT 2 (7) verwendet werden
2) Die Endverstärker bzw. andere nachfolgende
Geräte mit Line-Eingangspegel (z. B. zweites
Mischpult, Effektgerät) an die Cinch-Buchsen
AMP OUTPUT (13) anschließen.
Über einen an den Schraubklemmen MUTE
(11) angeschlossenen Schalter oder Taster können die Ausgänge AMP OUTPUT stumm ge schaltet werden, z. B. wenn der Ton nicht mehr
über die Lautsprecheranlage, sondern nur noch
über einen Kopfhörer wiedergegeben werden
soll. Zur besseren Hand habung können die
Klem men vom Gerät ab ge zogen und nach dem
Verschrauben der beiden Schalterleitungen ein fach wieder auf gesteckt werden.
3) Ein Aufnahmegerät kann an die Cinch-Buchsen
REC OUTPUT (14) angeschlossen werden. Einstellungen der Regler LEVEL (12) haben keinen
Einfluss auf das Aufnahmesignal.
4) Ein Stereo-Kopfhörer (Impedanz min. 32 Ω) zum
Abhören des Ausgangssignals kann an die
6,3-mm-Klinkenbuchse (8) ange schlos sen
werden (→ siehe auch Kap. 5, Bedienschritt 6).
5) Zuletzt den Netzstecker des Anschlusskabels
(17) in eine Steckdose (230 V~ /50 Hz) stecken.
5 Bedienung
1) Als Grundeinstellung die Pegelregler LEVEL (12)
für die Aus gän ge AMP OUTPUT (13) bis zum
Anschlag nach links drehen. Dazu einen kleinen
Schraubendreher verwenden.
2) Den Mixer mit dem Ein-/Ausschalter POWER (4)
einschalten, die Betriebsanzeige (3) leuchtet. Die
an geschlossenen Ge räte einschalten.
3) Mit den Lautstärkereglern der Eingangskanäle
[(1) für die Mikrofonkanäle VOICE 1 und VOICE 2,
(2) für die Stereo-Kanäle MUSIC 1 und MUSIC 2]
die Eingangssignale mischen oder nach Be darf
ein- und ausblenden. Die Regler nicht be nutzter
Kanäle stets ganz nach links auf „0“ drehen.
4) Die Kanäle VOICE 1 und VOICE 2 sind jeweils
mit einer 3fach-Klangregelung (5) ausgestattet,
die Kanäle MUSIC 1 und MUSIC 2 verfügen über
eine gemeinsame 2fach-Klang regelung (6).
Die Frequenzbereiche (LOW = Bäs se, MID =
Mitten, HIGH = Höhen) können mit den jeweiligen Reglern um max. ±12 dB angehoben bzw.
abgesenkt werden.
5) Sollte der Pegel eines Ausgangs AMP OUT PUT
(13) zu niedrig für das nachfolgende Ge rät sein,
kann er mit dem jeweils daneben lie genden Regler LEVEL (12) angehoben werden: Den Regler
entsprechend aufdrehen.
6) Den Lautstärkeregler (9) für den Kopfhörerausgang (8) wie gewünscht aufdrehen. Über den
Kopfhörer ist das von den Reglern LEVEL (12)
un beeinflusste Ausgangssignal zu hören.
6 Technische Daten
2 Mikrofoneingänge (VOICE)
Empfindlichkeit/ Impedanz: 1 mV/600 Ω
Anschluss: . . . . . . . . . . . . . 6,3-mm-Klinke, sym.
2 Line-Eingänge (MUSIC)
Empfindlichkeit/ Impedanz: 100 mV/10 kΩ
Anschluss: . . . . . . . . . . . . . Cinch, L/ R*
2 Summenausgänge (AMP):
Nennpegel/ Impedanz: . . . 1–3V/100Ω
Anschluss: . . . . . . . . . . . . . Cinch, L/ R*
1 Aufnahmeausgang (REC):
Nennpegel/ Impedanz: . . . 1 V/100 Ω
Anschluss: . . . . . . . . . . . . . Cinch, L/ R*
1 Kopfhörerausgang ( )
Impedanz/ Leistung: . . . . . ≥ 32 Ω/2 × 15 mW
Anschluss: . . . . . . . . . . . . . 6,3-mm-Klinke, stereo
Frequenzbereich: . . . . . . . . 20 – 20 000Hz
Klirrfaktor: . . . . . . . . . . . . . . 0,05 %
Störabstand: . . . . . . . . . . . . > 60 dB
Klangregler
Tiefen: . . . . . . . . . . . . . . . . ±12dB/30 Hz
Mitten (nur VOICE): . . . . . ±12 dB/1 kHz
Höhen: . . . . . . . . . . . . . . . ±12 dB/12 kHz
Stromversorgung: . . . . . . . . 230 V~/ 50 Hz/10 VA
Einsatztemperatur: . . . . . . . 0 –40 °C
Maße (inkl. Montagewinkel): 482 × 45 × 274mm
(B × H × T), 1 HE
Gewicht: . . . . . . . . . . . . . . . 2,9 kg
* L = linker Kanal, R = rechter Kanal
Änderungen vorbehalten.
VORSICHT Stellen Sie die Lautstärke der Audio -
an lage und des Kopfhörers nie sehr
hoch ein. Hohe Laut stärken können
auf Dau er das Gehör schädigen! Das
Ohr gewöhnt sich an hohe Lautstärken und empfindet sie nach ei niger
Zeit als nicht mehr so hoch. Da rum
erhöhen Sie eine hohe Laut stärke
nach der Ge wöhnung nicht wei ter.
right side and left side at the front with three screws
respectively. In the rack a height of 1 rack space =
44.45 mm is required. However, the mixer can also
be used without brackets as a table top unit.
4 Making the Connections
Prior to connecting units or changing existing con nections the mixer and the units used should be
switched off.
1) Connect the audio sources to the input channels:
microphones (balanced or unbalanced) to the
6.3 mm jacks VOICE INPUT 1 and 2 (16),
stereo units with line output level (e. g. CD or
DVD player, tape deck, DAT recorder, tuner) to
the phono jacks MUSIC INPUT 1 and 2 (15).
Instead of the rear input MUSIC INPUT 2, also
the front input MUSIC INPUT 2 (7) can be used.
2) Connect the power amplifiers or other following
units with line input level (e. g. second mixer,
effect unit) to the phono jacks AMP OUTPUT (13).
Via a switch or momentary pushbutton con nected to the screw terminals MUTE (11) the outputs AMP OUTPUT can be muted, e.g. when
the sound is no longer to be reproduced via the
PA system but only via headphones. For better
handling the terminals can be removed from the
unit and be replaced again after screwing the two
switch lines.
3) A recorder can be connected to the phono jacks
REC OUTPUT (14). Adjustments of the controls
LEVEL (12) do not affect the recording signal.
4) Stereo headphones (minimum impedance 32 Ω)
for monitoring the output signal may be con nect ed
to the 6.3 mm jack (8) [→ also see chapter 5,
operating step 6].
5) Finally connect the mains plug of the connection
cable (17) to a socket (230 V~ /50 Hz).
5 Operation
1) As a basic adjustment turn the controls LEVEL
(12) for the outputs AMP OUTPUT (13) to the left
stop. For this purpose use a small screw driver.
2) Switch on the mixer with the on/ off switch
POWER (4), the POWER LED (3) lights up.
Switch on the connected units.
3) Mix the input signals with the volume controls of
the input channels [(1) for the microphone channels VOICE 1 and VOICE 2, (2) for the stereo
channels MUSIC 1 and MUSIC 2] or fade them in
and out as required. Always turn the controls of
the channels not used to the left stop to “0”.
4) The channels VOICE 1 and VOICE 2 are each
equipped with a 3-way equalizer (5), the channels MUSIC 1 and MUSIC 2 have a common
2-way equalizer (6).
The frequency ranges (LOW, MID, HIGH) can
be boosted or attenuated by ±12 dB as a maximum with the corresponding controls.
5) If the level of an output AMP OUT (13) should be
too low for the following unit, it can be boosted
with the control LEVEL (12) located next to it in
each case: Turn up the control correspondingly.
6) Turn up the volume control (9) for the headphone
output (8) as desired. Via the headphones the
output signal can be heard which is not affected
by the controls LEVEL (12).
6 Technical Specifications
2 microphone inputs (VOICE)
sensitivity/impedance: . . . . 1 mV/600 Ω
connection: . . . . . . . . . . . . 6.3mm jack, bal.
2 line inputs (MUSIC)
sensitivity/impedance: . . . . 100 mV/10 kΩ
connection: . . . . . . . . . . . . phono, L/R*
2 master outputs (AMP)
rated level/ impedance: . . . 1–3V/100Ω
connection: . . . . . . . . . . . . phono, L/R*
1 recording output (REC):
rated level/ impedance: . . . 1 V/ 100 Ω
connection: . . . . . . . . . . . . phono, L/R*
1 headphone output ( )
impedance/ power: . . . . . . ≥ 32Ω/2 × 15mW
connection: . . . . . . . . . . . . 6.3mm jack, stereo
Frequency range: . . . . . . . . 20 –20 000 Hz
THD: . . . . . . . . . . . . . . . . . . 0.05 %
S/ N ratio: . . . . . . . . . . . . . . > 60 dB
Equalizer controls
bass range: . . . . . . . . . . . . ±12 dB/30 Hz
midrange (VOICE only): . . ±12 dB/1 kHz
high range: . . . . . . . . . . . . ±12 dB/ 12 kHz
Power supply: . . . . . . . . . . . 230 V~/ 50 Hz/10 VA
Ambient temperature: . . . . . 0 – 40 °C
Dimensions
(incl. mounting brackets): . . 482 × 45 × 274 mm
(W × H × D),
1 rack space
Weight: . . . . . . . . . . . . . . . . 2.9 kg
* L = left channel, R = right channel
Subject to technical modification.
CAUTION Never adjust a very high volume of the
audio system and the headphones.
Permanent high volumes may dam age your hearing! The human ear will
get accustomed to high volumes
which do not seem to be that high any
more after some time. Therefore, do
not further increase a high volume
after getting used to it.
5
GB
D
A
CH
Diese Bedienungsanleitung ist urheberrechtlich für
MONACOR®INTERNATIONAL GmbH & Co. KG ge schützt. Eine Reproduktion für eigene kommerzielle
Zwecke – auch auszugsweise – ist untersagt.
All rights reserved by MONACOR®INTERNATIONAL
GmbH & Co. KG. No part of this instruction manual may
be reproduced in any form or by any means for any
commercial use.
Page 6

Vous trouverez sur la page 3, dépliable, la description des éléments et branchements.
1 Eléments et branchements
1 Potentiomètres de réglage de volume, respec -
tivement pour le canal micro VOICE 1 et le canal
micro VOICE 2
2 Potentiomètres de réglage de volume, respec -
tivement pour le canal stéréo MUSIC 1 et le
canal stéréo MUSIC 2
3 Témoin de fonctionnement
4 Interrupteur POWER Marche/Arrêt
5 Egaliseur 3 voies, respectivement pour le canal
micro VOICE 1 et le canal micro VOICE 2 :
LOW = graves, MID = médiums, HIGH = aigus
6 Egaliseur 2 voies, commun pour les deux ca -
naux dʼentrée stéréo MUSIC 1 et MUSIC 2:
LOW = graves, HIGH = aigus
7 Entrée ligne stéréo MUSIC INPUT2, alternative
à lʼentrée MUSIC INPUT 2 sur la face arrière
(→ position 15)
8 Prise pour brancher un casque stéréo pour faire
une préécoute du signal de sortie non influencé
par les réglages de niveau LEVEL (12)
9 Potentiomètre de réglage de volume pour le
casque
10 Etriers de montage pour placer la table de
mixage dans un rack 482 mm /19″
11 Bornes à vis MUTE (pouvant être retirées de la
table) pour brancher un interrupteur/ bouton
poussoir momentané pour couper les deux sorties master AMP OUTPUT (13)
12 Potentiomètres de réglage de niveau LEVEL1
ou LEVEL 2 (réglable avec un tournevis) pour la
sortie AMP OUTPUT (13) respectivement positionnée à côté
13 Sorties master AMP OUTPUT pour brancher les
amplificateurs de puissance ou dʼautres ap pareils à niveau dʼentrée ligne, par exemple, une
seconde table de mixage
14 Sortie dʼenregistrement REC OUTPUT pour
brancher à lʼentrée dʼun enregistreur : le niveau
dʼenregistrement est indépendant des réglages
LEVEL (12)
15 Entrées stéréo MUSIC INPUT 1 et 2 pour bran-
cher des appareils audio à niveau de sortie ligne,
par exemple lecteur CD ou DVD, tapedeck, tuner
16 Entrées mono VOICE INPUT 1 et 2 pour bran-
cher des microphones
17 Cordon secteur à relier à une prise secteur
230 V~ /50 Hz
2 Conseils de sécurité et dʼutilisation
Lʼappareil répond à toutes les directives nécessaires
de lʼUnion Européenne et porte donc le symbole .
Respectez scrupuleusement les points suivants :
G
Lʼappareil nʼest conçu que pour une utilisation en
intérieur. Protégez-le des éclaboussures, de tout
type de projections dʼeau, dʼune humidité élevée
et de la chaleur (température ambiante admissible
0 – 40°C).
G
En aucun cas, vous ne devez pas poser dʼobjet
contenant du liquide ou un verre sur lʼappareil.
G
Ne faites pas fonctionner lʼappareil et débranchez
le cordon secteur immédiatement dans les cas
suivants :
1. lʼappareil ou le cordon secteur présentent des
dommages visibles.
2. après une chute ou accident similaire, vous
avez un doute sur lʼétat de lʼappareil.
3. des dysfonctionnements apparaissent.
Dans tous les cas, les dommages doivent être
réparés par un technicien spécialisé.
G
Tout cordon secteur endommagé ne doit être remplacé que par un technicien habilité.
G
Ne débranchez jamais lʼappareil en tirant sur le
cordon secteur ; retirez toujours le cordon secteur
en tirant la fiche.
G
Pour le nettoyage, utilisez un chiffon sec et doux,
en aucun cas de produits chimiques ou dʼeau.
G
Nous déclinons toute responsabilité en cas de
dommages corporels ou matériels résultants si
lʼappareil est utilisé dans un but autre que celui
pour lequel il a été conçu, sʼil nʼest pas correctement branché, utilisé ou réparé par une personne
habilitée ; en outre, la garantie deviendrait ca duque.
3 Possibilités dʼutilisation
Cette table de mixage 4 canaux convient pour des
applications universelles. Elle offre la possibilité de
connecter jusquʼà deux appareils audio avec niveau
de sortie ligne (par exemple lecteur CD ou DVD,
tapedeck) et jusquʼà deux microphones, et de mixer
leurs signaux sur deux sorties master. Les sorties
master peuvent être coupées via un interrupteur en
option. La table de mixage dispose en outre dʼune
sortie enregistrement supplémentaire et dʼune sortie
casque réglable.
Via les deux étriers de montages livrées [(10) sur
le schéma 2], la table de mixage peut être intégrée
dans un rack prévu pour appareils avec une largeur
de 482 mm (19″) : fixez les étriers à lʼavant sur les
côtés droit et gauche avec respectivement trois vis.
Dans le rack, une hauteur dʼune unité (1 U =
44,45 mm) est nécessaire. La table de mixage peut
également être utilisée sans les étriers, directement
posée sur une table.
Lorsque lʼappareil est définitivement retiré
du service, vous devez le déposer dans
une usine de recyclage de proximité pour
contribuer à son élimination non polluante.
AVERTISSEMENT Lʼappareil est alimenté par une
tension dangereuse en 230 V~.
Ne touchez jamais lʼintérieur de
lʼappareil car, en cas de mauvai se manipulation, vous pouvez
subir une décharge électrique.
A pagina 3, se aperta completamente, vedrete
sempre gli elementi di comando e i collegamenti
descritti.
1 Elementi di comando e collegamenti
1 Regolatori volume, per cadauno dei canali
microfono VOICE 1 e VOICE 2
2 Regolatori volume, per cadauno dei canali
stereo MUSIC 1 e MUSIC 2
3 Spia di funzionamento
4 Interruttore on/off POWER
5 Regolatori toni a 3 frequenze, per cadauno dei
canali microfono VOICE 1 e VOICE 2:
LOW = bassi, MID = medi, HIGH = acuti
6 Regolazione toni comune, a 2 frequenze, per i
canali stereo dʼingresso MUSIC 1 e MUSIC 2:
LOW = bassi, HIGH = acuti
7 Ingresso stereo di linea MUSIC INPUT2, utiliz -
zabile in alternativa allʼingresso MUSIC INPUT 2
sul retro (→ vedi posizione 15)
8 Presa per il collegamento di una cuffia stereo per
ascoltare il segnale dʼuscita non influenzato dai
regolatori LEVEL (12)
9 Regolatore volume per la cuffia
10 Angoli di montaggio del mixer in un rack
(482 mm /19″)
11 Morsetti a vite MUTE (staccabili dallʼapparec-
chio) per il collegamento di un interruttore/
pulsante per rendere mute le due uscite delle
somme AMP OUTPUT (13)
12 Regolatori livello LEVEL 1 e LEVEL 2 (per im po-
stare usare un cacciavite) ognuno per lʼuscita
vicina AMP OUTPUT (13)
13 Uscite delle somme AMP OUTPUT per il colle-
gamento dei finali o di altri apparecchi con livello
di linea , p. es. un secondo mixer
14 Uscita di registrazione REC OUTPUT per il col-
legamento con lʼingresso di un registratore; il
livello di registrazione è indipendente dai regolatori LEVEL (12)
15 Ingressi stereo MUSIC INPUT 1 e 2 per il colle-
gamento di apparecchi audio con livello di linea,
p. es. lettori CD o DVD, tapedeck, tuner
16 Ingressi mono VOICE INPUT 1 e 2 per il collega-
mento di microfoni
17 Cavo per il collegamento con una presa di rete
(230 V~ /50 Hz)
2 Avvertenze di sicurezza
Lʼapparecchio è conforme a tutte le direttive richieste dellʼUE e pertanto porta la sigla .
Si devono osservare assolutamente anche i
seguenti punti:
G
Usare lʼapparecchio solo allʼinterno di locali. Proteggerlo dallʼacqua gocciolante e dagli spruzzi
dʼacqua, da alta umidità dellʼaria e dal calore (temperatura dʼimpiego ammessa fra 0 e 40 °C).
G
Non depositare sullʼapparecchio dei contenitori
riempiti di liquidi, p. es. bicchieri.
G
Non mettere in funzione lʼapparecchio e staccare
subito la spina rete se:
1. lʼapparecchio o il cavo rete presentano dei
danni visibili;
2. dopo una caduta o dopo eventi simili sussiste il
sospetto di un difetto;
3. lʼapparecchio non funziona correttamente.
Per la riparazione rivolgersi sempre ad unʼofficina
competente.
G
Il cavo rete, se danneggiato, deve essere sostituito solo da un laboratorio specializzato.
G
Staccare il cavo rete afferrando la spina, senza ti rare il cavo.
G
Per la pulizia usare solo un panno morbido,
asciut to; non impiegare in nessun caso prodotti
chimici o acqua.
G
Nel caso dʼuso improprio, di collegamenti sba gliati, dʼimpiego scorretto o di riparazione non a
regola dʼarte dellʼapparecchio, non si assume
nessuna responsabilità per eventuali danni consequenziali a persone o a cose e non si assume
nessuna garanzia per lʼapparecchio.
3 Possibilità dʼimpiego
Questo mixer a 4 canali è previsto per impieghi universali. Offre la possibilità di collegare fino a due
apparecchi audio con livello dʼuscita di linea (p. es.
lettore CD o DVD, tapedeck) e fino a 2 microfoni, e
di miscelare i loro segnali su due uscite delle
somme. Con un telecomando opzionale, le uscite
delle somme possono essere messe mute. Il mixer
dispone inoltre di unʼuscita supplementare per la
registrazione e unʼuscita regolabile per la cuffia.
Con i due angoli di montaggio in dotazione
[(10) in fig. 2], il mixer può essere montato in un rack
per apparecchi larghi 482 mm (19″): Fissare gli
angoli davanti, a destra e a sinistra ognuno con
3 viti. Nel rack e richiesta lʼaltezza di 1 RS (unità
dʼaltezza) = 44,45 mm. Tuttavia è possibile fare fun-
Se si desidera eliminare lʼapparecchio definitivamente, consegnarlo per lo smaltimento ad unʼistituzione locale per il
riciclaggio.
AVVERTIMENTO Lʼapparecchio funziona con
pericolosa tensione di rete
(230 V~). Non intervenire mai
personalmente al suo interno!
La manipolazione scorretta
può provocare una scarica
elettrica pericolosa.
6
I
F
B
CH
Page 7

4 Branchements
Avant dʼeffectuer les branchements ou de modifier
les branchements existants, la table de mixage et
les appareils utilisés devraient impérativement être
débranchés.
1) Reliez les sources audio aux canaux dʼentrée :
microphones (configurés en symétrique ou asy-
métrique) aux prises jack 6,35 VOICE INPUT 1
et 2 (16).
appareils stéréo avec niveau de sortie ligne (par
exemple lecteur CD ou DVD, tapedeck, enre gistreur DAT, tuner) aux prises RCA MUSIC
INPUT 1 et 2 (15).
A la place de lʼentrée MUSIC INPUT 2 sur la
face arrière, on peut également utiliser lʼentrée
MUSIC INPUT 2 (7) en façade.
2) Reliez les amplificateurs ou appareils suivants à
niveau dʼentrée ligne (par exemple seconde table
de mixage, appareil à effets) aux prises RCA
AMP OUTPUT (13).
Via un interrupteur ou un bouton poussoir
momentané relié aux bornes à vis MUTE (11), les
sorties AMP OUTPUT peuvent être coupées par
exemple lorsque le son ne doit plus être restitué
via lʼinstallation haut-parleur mais uniquement
via un casque. Pour une meilleure manipulation,
les pinces peuvent être retirées de lʼappareil et
replacées une fois les deux lignes vissées.
3) Un enregistreur peut être relié aux prises RCA
REC OUTPUT (14). Les réglages des potentiomètres LEVEL (12) nʼinfluent pas sur le signal
dʼenregistrement.
4) Un casque stéréo (impédance minimale 32 Ω)
peut être relié à la prise jack 6,35 (8) pour faire
une préécoute du signal de sortie (→ également
chapitre 5, point 6).
5) Reliez enfin la fiche du cordon secteur (17) à une
prise secteur 230 V~/50 Hz.
5 Utilisation
1) Comme réglage de base, tournez les potentiomètres LEVEL (12) pour les sorties AMP OUTPUT (13) vers la gauche jusquʼà la butée. Utilisez
un petit tournevis.
2) Allumez la table de mixage avec lʼinterrupteur
Marche/Arrêt POWER (4), le témoin de fonctionnement (3) brille. Allumez les appareils reliés.
3) Avec les réglages de volume des canaux dʼentrée
[(1) pour les canaux micro VOICE 1 et VOICE 2,
(2) pour les canaux stéréo MUSIC 1 et MUSIC 2],
mixez les signaux dʼentrée ou si besoin faites les
entrer et sortir. Tournez les réglages des canaux
non utilisés entièrement à gauche sur “0”.
4) Les canaux VOICE 1 et VOICE 2 sont respec tivement dotés dʼun égaliseur 3 voies (5), les ca naux MUSIC 1 et MUSIC 2 disposent dʼun égaliseur 2 voies commun (6). Les plages de fré quen ces (LOW = graves, MID = médiums, HIGH =
aigus) peuvent être diminuées ou augmentés avec
les réglages correspondants de ±12 dB maximum.
5) Si le niveau dʼune sortie AMP OUTPUT (13) était
trop faible pour lʼappareil suivant, il peut être augmenté avec le réglage LEVEL (12) situé respec tivement à côté : tournez le réglage en conséquence.
6) Tournez le réglage de volume (9) pour la sortie
casque (8) comme souhaité. Le signal de sortie non influencé par les réglages LEVEL (12)
peut être écouté via le casque.
6 Caractéristiques techniques
2 entrées micro (VOICE)
Sensibilité/ impédance : . . 1 mV/600 Ω
Branchement : . . . . . . . . . . jack 6,35, sym.
2 entrées Ligne (MUSIC)
Sensibilité/ impédance : . . 100 mV/10 kΩ
Branchement : . . . . . . . . . . RCA, L/ R*
2 sorties master (AMP)
Niveau nominal/
impédance : . . . . . . . . . . . 1–3V/100Ω
Branchement : . . . . . . . . . . RCA, L/ R*
1 sortie enregistrement (REC)
Niveau nominal/
impédance: . . . . . . . . . . . 1 V/100 Ω
Branchement : . . . . . . . . . . RCA, L/ R*
1 sortie casque ( )
Impédance/ puissance : . . ≥ 32 Ω/ 2 × 15 mW
Branchement : . . . . . . . . . . jack 6,35, stéréo
Bande passante : . . . . . . . . 20 – 20 000Hz
Taux de distorsion : . . . . . . . 0,05 %
Rapport signal/ bruit : . . . . . > 60 dB
Egaliseur
Graves : . . . . . . . . . . . . . . ±12 dB/30 Hz
Médiums
(uniquement VOICE) : . . . . ±12 dB/1 kHz
Aigus : . . . . . . . . . . . . . . . . ±12dB/12 kHz
Alimentation : . . . . . . . . . . . 230 V~/50 Hz/10 VA
Température fonc. : . . . . . . . 0 –40 °C
Dimensions
(avec étriers de montage) : . 482 × 45 × 274 mm
(L × H × P), 1 U
Poids : . . . . . . . . . . . . . . . . . 2,9 kg
L = canal gauche, R : canal droit
Tout droit de modification réservé.
PRECAUTION Ne réglez pas le volume du
système audio ou du casque trop
fort. Un volume trop élevé peut, à
long terme, générer des troubles
de lʼaudition. Lʼoreille humaine
sʼhabitue à des volumes élevés et
ne les perçoit plus comme tels au
bout dʼun certain temps. Nous
vous conseillons donc de régler le
volume et de ne plus le modifier.
zionare il mixer anche senza gli angoli, posizionandolo su un tavolo.
4 Eseguire i collegamenti
Prima di collegare degli apparecchi o di modificare
dei collegamenti esistenti occorre spegnere il mixer
e gli apparecchi impiegati.
1) Collegare le sorgenti con i canali dʼingresso:
Microfoni (simmetrici o asimmetrici) con le prese
jack 6,3 mm VOICE INPUT 1 e 2 (16),
Apparecchi stereo con livello dʼuscita di linea
(p. es. lettore CD o DVD, tapedeck, DAT-re corder, tuner) con le prese RCA MUSIC
INPUT 1 e 2 (15).
Al posto dellʼingresso sul retro MUSIC INPUT 2
si può usare anche lʼingresso frontale MUSIC
INPUT 2 (7).
2) Collegare i finali o altri apparecchi a valle con
livello dʼingresso di linea (p. es. un secondo
mixer, unità per effetti) con le prese RCA AMP
OUTPUT (13).
Tramite un interruttore o pulsante collegato
con i morsetti a vite MUTE (11) è possibile mettere su muto le uscite AMP OUTPUT, p. es.
quando lʼaudio deve essere riprodotto non più
attraverso lʼimpianto di altoparlanti bensì solo
attraverso una cuffia. Per facilitare il collegamento, i morsetti possono essere staccati dal lʼapparecchio e dopo aver avvitato i due conduttori si possono rimettere al loro posto.
3) Alle prese RCA REC OUTPUT (14) è possibile
collegare un registratore. La posizione dei regolatori LEVEL (12) non ha effetto sul segnale di
registrazione.
4) Alla presa jack 6,3 mm (8) si può collegare una
cuffia stereo (impedenza min. 32 Ω) [→ vedi
anche cap. 5, numero 6].
5) Alla fine inserire la spina del cavo (17) in una
presa di rete (230 V~ /50 Hz).
5 Funzionamento
1) Come impostazione base, girare i regolatori
LEVEL (12) per le uscite AMP OUTPUT (13) tutto
a sinistra, fino allʼarresto, usando un piccolo cacciavite.
2) Accendere il mixer con lʼinterruttore on/ off
POWER (4), si accende la spia di funzionamento
(3). Accendere gli apparecchi collegati.
3) Con i regolatori volume dei canali dʼingresso
[(1) per i canali micro VOICE 1 e VOICE2, (2) per
i canali stereo MUSIC 1 e MUSIC 2] miscelare i
segnali dʼingresso o fare delle dissolvenze in/ out
secondo desiderio. I regolatori dei canali non
usati devono sempre essere girati tutto a sinistra
sullo “0”.
4) I canali VOICE 1 e VOICE 2 dispongono ognuno
di una regolazione toni a 3 frequenze (5), i canali
MUSIC 1 e MUSIC 2 dispongono di una regolazione toni comune a 2 frequenze (6).
Con i relativi regolatori, le frequenze (LOW =
bassi, MID = medi, HIGH = acuti) possono
essere alzate o abbassate di max. ±12 dB.
5) Se il livello di unʼuscita AMP OUTPUT (13)
dovesse essere troppo basso per lʼapparecchio a
valle, è possibile aumentarlo con il suo regolatore
vicino LEVEL (12): aprire il regolatore in corri spondenza.
6) Aprire il regolatore di volume (9) per lʼuscita cuffia (8) secondo desiderio. Nella cuffia si può
ascoltare il segnale dʼuscita non influenzato dai
regolatori LEVEL (12).
6 Dati tecnici
2 ingressi microfoni (VOICE)
Sensibilità/ Impedenza: . . . 1 mV/600 Ω
Collegamento: . . . . . . . . . . jack 6,3 mm, simm.
2 ingressi di linea (MUSIC)
Sensibilità/ Impedenza: . . . 100 mV/10 kΩ
Collegamento: . . . . . . . . . . RCA, L/R*
2 uscite delle somme (AMP)
Livello nominale/
Impedenza: . . . . . . . . . . . . 1–3V/100Ω
Collegamento: . . . . . . . . . . RCA, L/R*
1 uscita di registrazione (REC)
Livello nominale/
Impedenza: . . . . . . . . . . . . 1 V/100 Ω
Collegamento: . . . . . . . . . . RCA, L/R*
1 uscita cuffia ( )
Impedenza/ Potenza: . . . . ≥ 32 Ω/ 2 × 15 mW
Collegamento: . . . . . . . . . . jack 6,3 mm, stereo
Banda passante: . . . . . . . . . 20 – 20000 Hz
Fattore di distorsione: . . . . . 0,05 %
Rapporto S/ R: . . . . . . . . . . . > 60 dB
Regolatori toni
Bassi: . . . . . . . . . . . . . . . . ±12 dB/30 Hz
Medi (solo VOICE): . . . . . . ±12dB/1 kHz
Acuti: . . . . . . . . . . . . . . . . . ±12dB/12 kHz
Alimentazione: . . . . . . . . . . 230 V~/50 Hz/10 VA
Temperatura dʼesercizio: . . . 0 – 40°C
Dimensioni
(con angoli di montaggio): . . 482 × 45 × 274 mm
(l × h × p), 1 RS
Peso: . . . . . . . . . . . . . . . . . . 2,9 kg
* L = canale sinistro, R = canale destro
Con riserva di modifiche tecniche.
ATTENZIONE Mai tenere molto alto il volume
dellʼimpianto audio e della cuffia. A
lungo andare, il volume eccessivo
può procurare danni allʼudito!
Lʼorecchio si abitua agli alti volumi e
dopo un certo tempo non se ne
rende più conto. Perciò non aumentare il volume successivamente.
7
I
F
B
CH
Notice dʼutilisation protégée par le copyright de
MONACOR®INTERNATIONAL GmbH & Co. KG. Toute
reproduction même partielle à des fins commerciales
est interdite.
La MONACOR®INTERNATIONAL GmbH & Co. KG si
ri serva ogni diritto di elaborazione in qualsiasi forma del le presenti istruzioni per lʼuso. La riproduzione – an che
parziale – per propri scopi commerciali è vietata.
Page 8

Op de uitklapbare pagina 3 vindt u een overzicht
van de bedieningselementen en de aansluitingen.
1 Overzicht van de bedieningselementen
en aansluitingen
1 Volumeregelaar, telkens voor het microfoon -
kanaal VOICE 1 en het microfoonkanaal VOICE2
2 Volumeregelaar, telkens voor het stereokanaal
MUSIC 1 en het stereokanaal MUSIC 2
3 POWER-LED
4 POWER-schakelaar
5 3-bands equalizer, telkens voor het microfoonka-
naal VOICE 1 en het microfoonkanaal VOICE 2:
LOW = lage tonen, MID = middentonen, HIGH =
hoge tonen
6 2bandse equalizer, samen voor beide stereo-
ingangskanalen MUSIC 1 en MUSIC 2:
LOW = lage tonen, HIGH = hoge tonen
7 Stereolijningang MUSIC INPUT2, ook bruikbaar
voor de ingang MUSIC INPUT 2 aan de achter zijde (→ zie pos. 15)
8 Bus voor de aansluiting van een stereohoofdtele-
foon voor het beluisteren van het onbewerkte uitgangssignaal van de niveauregelaars LEVEL (12)
9 Volumeregelaar voor de hoofdtelefoon
10 Montagebeugel om het mengpaneel in te bou-
wen in een 19″-rack (482 mm)
11 Schroefklemmen MUTE (van het apparaat
afneembaar) voor het aansluiten van een schakelaar/ toets om de beide masteruitgangen AMP
OUTPUT (13) te dempen
12 Niveauregelaar LEVEL1 resp. LEVEL 2 (met
een schroevendraaier regelbaar) voor de uitgang OUTPUT (13) die er telkens naast ligt
13 Masteruitgangen AMP OUTPUT voor de aan slui-
ting van de eindversterkers resp. andere apparaten met lijningangsniveau, b.v. tweede mengpaneel
14 Opname-uitgang REC OUTPUT voor de aan -
sluiting op de ingang van een opnameapparaat;
het opnameniveau is onafhankelijk van de regelaars LEVEL (12)
15 Stereo-Ingangen MUSIC INPUT 1 en 2 voor de
aansluiting van audioapparaten met lijnuitgangsniveau b.v. cd- of dvd-speler, cassettedeck, tuner
16 Mono-ingangen VOICE INPUT 1 en 2 voor het
aansluiten van microfoons
17 Netsnoer voor aansluiting op een stopcontact
(230 V~ /50 Hz)
2 Veiligheidsvoorschriften
Dit apparaat is in overeenstemming met alle vereiste
EU-Richtlijnen en is daarom met gekenmerkt.
Let eveneens op het volgende:
G
Het apparaat is uitsluitend geschikt voor gebruik
binnenshuis. Vermijd druip- en spatwater, uitzonderlijk warme plaatsen en plaatsen met een hoge
vochtigheid (toegestaan omgevingstemperatuurbereik: 0 – 40°C).
G
Plaats geen bekers met vloeistof zoals drink glazen etc. op het apparaat.
G
Schakel het apparaat niet in resp. trek onmiddellijk de stekker uit het stopcontact:
1. wanneer het apparaat of het netsnoer zichtbaar
beschadigd is,
2. wanneer er een defect zou kunnen optreden
nadat het apparaat bijvoorbeeld is gevallen,
3. wanneer het apparaat slecht functioneert.
Het apparaat moet in elk geval worden hersteld
door een gekwalificeerd vakman.
G
Een beschadigd netsnoer mag alleen in een
erkende werkplaats worden vervangen.
G
Trek de stekker nooit met het snoer uit het stopcontact, maar met de stekker zelf!
G
Verwijder het stof met een droge, zachte doek.
Gebruik zeker geen chemicaliën of water.
G
In geval van ongeoorloofd of verkeerd gebruik,
verkeerde aansluiting, foutieve bediening of van
herstelling door een niet-gekwalificeerd persoon
vervalt de garantie en de verantwoordelijkheid
voor hieruit resulterende materiële of lichamelijke
schade.
3 Toepassingen
Het 4-kanaals mengpaneel is universeel inzetbaar.
Het biedt de mogelijkheid om max. twee audioapparaten met lijnuitgangsniveau (b.v. cd- of dvd-speler,
cassettedeck) en max. twee microfoons aan te sluiten en uw signalen op twee masteruitgangen te
mengen. De masteruitgangen kunnen via een optionele afstandsschakelaar worden gedempt. Het
mengpaneel beschikt bovendien over een bijkomende opname-uitgang en een regelbare hoofdtelefoonuitgang.
Met de twee bijgeleverde montagebeugels [(10)
in fig. 2] kunt u het mengpaneel in een rack voor
apparaten met een breedte van 482 mm (19″) monteren: Bevestig de beugels vooraan aan de rechteren linkerkant met telkens drie schroeven. In het rack
is 1 HE (rack-eenheid) = 44,45 mm nodig. Het
mengpaneel kan echter ook zonder beugels als
tafelmodel worden gebruikt.
Wanneer het apparaat definitief uit bedrijf
wordt genomen, bezorg het dan voor
milieuvriendelijke verwerking aan een
plaatselijk recyclagebedrijf.
WAARSCHUWING De netspanning (230V~) van
het apparaat is levensgevaarlijk. Open het apparaat niet,
want door onzorgvuldige in grepen loopt u het risico van
elektrische schokken.
Todos los elementos de funcionamiento y las
conexiones que se describen pueden encontrarse en la página 3 desplegable.
1 Elementos operativos y conexiones
1 Controles de volumen, uno para el canal de
micrófono VOICE 1 y uno para el canal de micrófono VOICE 2
2 Controles de volumen, uno para el canal estéreo
MUSIC 1 y uno para el canal estéreo MUSIC 2
3 POWER LED
4 Interruptor POWER
5 Ecualizador 3 vías, uno para el canal de micró-
fono VOICE 1 y uno para el canal de micrófono
VOICE 2:
LOW = gama de graves, MID = gama de medios,
HIGH = gama de agudos
6 Ecualizador 2 vías, en común para los canales de
entrada estéreo MUSIC 1 y MUSIC 2:
LOW = gama de graves, HIGH = gama de agudos
7 Entrada de línea estéreo MUSIC INPUT2, se
pue de usar como una alternativa a la entrada
MUSIC INPUT 2 en la parte trasera (→ ver punto
15)
8 Jack para la conexión de auriculares estéreo
para monitorizar la señal de salida no afectada
por los controles de nivel LEVEL (12)
9 Control de volumen para los auriculares
10 Soportes de montaje para instalar el mezclador
en un rack (482 mm /19″)
11 Terminales de tornillo MUTE (se pueden sacar
de la unidad) para la conexión de un inter ruptor/ pulsador para silenciar las dos salidas
master AMP OUTPUT (13)
12 Control de nivel LEVEL 1 o LEVEL 2 (para ajus-
tar con un destornillador pequeño) para la salida
AMP OUTPUT (13) situada junto a él en cada
caso
13 Salidas master AMP OUTPUT para la conexión
de los amplificadores de potencia u otras unidades con nivel de entrada de línea, p. ej. un se gundo mezclador
14 Salida de grabación REC OUTPUT para la cone-
xión a la entrada de un grabador, el nivel de gra bación es independiente de los controles LEVEL (12)
15 Entradas estéreo MUSIC INPUT 1 y 2 para la
conexión de unidades audio con nivel de salida
de línea, p. ej. reproductor CD o DVD, lector cassette, sintonizador
16 Entradas mono VOICE INPUT 1 y 2 para cone-
xión de micrófonos
17 Cable de red para la conexión a una toma
(230 V~ /50 Hz)
2 Notas de seguridad
La unidad corresponde a todas las Directivas requeridas por la UE y por ello está marcada con .
Es esencial que tenga en cuenta los puntos si guientes:
G
La unidad sólo está indicada para un uso en interior. Protéjala de goteos y salpicaduras de agua,
humedad elevada del aire, y calor (rango de temperatura ambiente admisible: 0 – 40°C).
G
No coloque ningún recipiente que contenga
líquido sobre la unidad, p. ej. vasos de bebida.
G
No ponga en marcha la unidad, o desconecte
inmediatamente la toma de red del enchufe:
1. en caso de daño visible en la unidad o el cable
de red,
2. si ha ocurrido un defecto tras una caída o un
accidente similar,
3. si ocurren disfunciones.
La unidad debe ser reparada por personal especializado en cualquier caso.
G
Un cable de red dañado sólo debe ser reparado
por personal especializado.
G
No tire nunca del cable de red para desconectar la
toma de red del enchufe, tire siempre del enchufe.
G
Para limpiar use sólo un paño seco y suave, no
utilice productos químicos o agua.
G
No se asumirá ninguna garantía para la unidad ni
se aceptará ninguna responsabilidad en caso de
daños personales o patrimoniales resultantes si
se usa para otros fines distintos a los originalmente concebidos, si no se conecta y utiliza co rrectamente o si no se repara de manera experta.
3 Aplicaciones
Este mezclador de 4 canales está indicado para
aplicaciones universales. Permite conectar hasta
dos unidades audio con nivel de salida de línea
(p. ej. reproductor CD o DVD, lector cassette) y
hasta dos micrófonos y para mezclar sus señales a
dos salidas master. Las salidas Master se pueden
silenciar mediante un interruptor remoto opcional. El
mezclador también está equipado con una salida de
grabación adicional y una salida auricular ajustable.
Con los dos soportes de montaje entregados [(10)
en fig. 2] el mezclador se puede instalar en un rack
para unidades con una anchura de 482 mm (19″):
Fije los soportes en el lado derecho e izquierdo en el
frontal con tres tornillos respectivamente. En el rack
Si la unidad debe retirarse del funciona miento definitivamente, llévela a un centro
de reciclaje local para su disposición no
contaminante para el medio ambiente.
ADVERTENCIA La unidad se alimenta con un
voltaje de red peligroso (230 V~).
Deje el mantenimiento sólo en
manos de personal especializado. La manipulación inexperta o la modificación de la
unidad pueden causar un peligro
de descarga eléctrica.
8
E
B
NL
Page 9

4 Het toestel aansluiten
Schakel het mengpaneel en de gebruikte apparatuur uit, alvorens apparaten aan te sluiten en
bestaande aansluitingen te wijzigen.
1) Sluit de geluidsbronnen aan op de betreffende
ingangskanalen:
Microfoons (gebalanceerd of ongebalanceerd
uitgevoerd) op de 6,3 mm-stekkerbussen
VOICE INPUT 1 en 2 (16),
stereoapparatuur met lijnuitgangsniveau (b.v.
cd- of dvd-speler, cassettedeck, DAT-recorder,
tuner) op de cinch-jacks MUSIC INPUT 1 en 2
(15).
In plaats van de ingang MUSIC INPUT 2 aan
de achterzijde kunt u ook de ingang MUSIC
INPUT 2 (7) aan de voorzijde gebruiken.
2) Sluit de eindversterkers resp. andere nageschakelde apparaten met lijningangsniveau (b.v.
tweede mengpaneel, effectenapparaat) aan op
de cinch-jacks AMP OUTPUT (13).
Via een schakelaar of toets die op de schroefklemmen MUTE (11) is aangesloten, kunt u de
uitgangen AMP OUTPUT dempen, b.v. als het
geluid niet meer via de luidsprekerinstallatie,
maar enkel nog via een hoofdtelefoon moet worden weergegeven. Om makkelijker te werken,
kunt u de klemmen van het apparaat afnemen en
na het vastschroeven van de beide schakelaarleidingen gewoon opnieuw opsteken.
3) Op de cinch-jacks REC OUTPUT (14) kunt u een
opnameapparaat aansluiten. Instellingen van de
regelaars LEVEL (12) hebben geen invloed op
het opnamesigaal.
4) Een stereohoofdtelefoon (impedantie min. 32 Ω)
voor het beluisteren van het uitgangssignaal kan
op de 6,3 mm-stekkerbus (8) worden aange sloten (→ zie ook hoofdstuk 5, bedieningsstap 6).
5) Plug ten slotte de netstekker van het aansluit snoer (17) in een stopcontact (230 V~ /50 Hz).
5 Bediening
1) Als basisinstelling draait u de niveauregelaars
LEVEL (12) voor de uitgangen AMP OUTPUT
(13) tot tegen de aanslag naar links. Gebruik
hiervoor een kleine schroevendraaier.
2) Schakel het mengpaneel in met de POWERschakelaar (4); de POWER-LED (3) licht op.
Schakel de aangesloten apparatuur in.
3) Met de volumeregelaars van de ingangskanalen
[(1) voor de microfoonkanalen VOICE 1 en
VOICE 2, (2) voor de stereokanalen MUSIC 1 en
MUSIC 2] mengt u de ingangssignalen of mengt
u ze naargelang nodig in of uit. Draai de regelaars van de niet-gebruikte kanalen steeds helemaal naar links in de stand “0”.
4) De kanalen VOICE 1 en VOICE2 zijn telkens met
een 3-bandse equalizer (5) uitgerust, de kanalen
MUSIC 1 en MUSIC 2 beschikken over een
gemeenschappelijke 2-bandse equalizer (6).
De frequentiebereiken (LOW = lage tonen,
MID = middentonen, HIGH = hoge tonen) kunnen
met de betreffende regelaars met max. ±12 dB
worden versterkt resp. gedempt.
5) Mocht het niveau van een uitgang AMP OUTPUT
(13) te laag zijn voor het nageschakelde apparaat, kunt u het versterken met de regelaar
LEVEL (12) die er telkens naast ligt: draai de
regelaar overeenkomstig open.
6) Draai de volumeregelaar (9) voor de hoofdtele foonuitgang (8) desgewenst open. Via de
hoofdtelefoon kunt u onbewerkte uitgangssignaal
van de regelaars LEVEL (12) beluisteren.
6 Technische gegevens
2 microfooningangen (VOICE)
Gevoeligheid/ impedantie: . . . . . 1 mV/600
Ω
Aansluiting: . . . . . . . . . . . . . . . . . 6,3 mm-jack, gebal.
2 lijningangen (MUSIC)
Gevoeligheid/ impedantie: . . . . . 100 mV/10 k
Ω
Aansluiting: . . . . . . . . . . . . . . . . . Cinch, L/R*
2 masteruitgangen (AMP):
Nominaal niveau/ impedantie: . . 1–3V/100
Ω
Aansluiting: . . . . . . . . . . . . . . . . . Cinch, L/ R*
1 opname-uitgang (REC):
Nominaal niveau/ impedantie: . . 1 V/ 100
Ω
Aansluiting: . . . . . . . . . . . . . . . . . Cinch, L/ R*
1 hoofdtelefoonuitgang ( )
Impedantie/ vermogen: . . . . . . . . ≥ 32
Ω
/2 × 15 mW
Aansluiting: . . . . . . . . . . . . . . . . . 6,3 mm-jack, stereo
Frequentiebereik: . . . . . . . . . . . . . 20 – 20 000Hz
THD: . . . . . . . . . . . . . . . . . . . . . . . 0,05 %
Signaal/ Ruis-verhouding: . . . . . . . > 60 dB
Equalizer
Lage tonen: . . . . . . . . . . . . . . . . . ±12 dB/ 30 Hz
Middentonen (alleen VOICE): . . . ±12 dB /1 kHz
Hoge tonen: . . . . . . . . . . . . . . . . ±12 dB/ 12kHz
Voedingsspanning: . . . . . . . . . . . . 230 V~/ 50Hz/ 10VA
Omgevingstemperatuurbereik: . . . 0 – 40 °C
Afmetingen (incl. montagebeugel): 482 × 45 × 274 mm
(B × H × T), 1 HE
Gewicht: . . . . . . . . . . . . . . . . . . . . 2,9 kg
* L = linker kanaal, R = rechter kanaal
Wijzigingen voorbehouden.
WAARSCHUWING Stel het volume van de ge luid-
sinstallatie en dat van de
hoofdtelefoon nooit zeer hoog
in. Langdurige blootstelling
aan hoge volumes kan het
gehoor beschadigen! Het ge
hoor raakt aangepast aan hoge volumes die na
een tijdje niet meer zo hoog lijken. Verhoog daar om het volume niet nog meer, nadat u er gewoon
aan bent geraakt.
se necesita una altura de 1 espacio rack = 44,45 mm.
Sin embargo, el mezclador también se puede usar
sin soportes como una unidad de sobremesa.
4 Realizar las conexiones
Antes de conectar las unidades o cambiar las conexiones existentes, deberían apagarse el mezclador
y las unidades.
1) Conecte las fuentes audio a los canales de en trada:
micrófonos (simétricos o asimétricos) a los jacks
6,3 mm VOICE INPUT 1 y 2 (16),
unidades estéreo con nivel de salida de línea
(p. ej. reproductor CD o DVD, lector cassette,
grabador DAT, sintonizador) a los jacks phono
MUSIC INPUT 1 y 2 (15).
En vez de la entrada trasera MUSIC INPUT 2,
también se puede usar la entrada frontal
MUSIC INPUT 2 (7).
2) Conecte los amplificadores de potencia u otras
unidades siguientes con el nivel de entrada de
línea (p. ej. un segundo mezclador, unidad de
efecto) a los jacks phono AMP OUTPUT (13).
Mediante un interruptor o pulsador conectado
a los terminales de tornillo MUTE (11) se pueden
silenciar las salidas AMP OUTPUT, p. ej. cuando
el sonido ya no debe reproducirse mediante el
sistema de megafonía sino sólo mediante auriculares. Para manejar mejor los terminales se pueden sacar de la unidad y volverlos a poner de
nuevo tras atornillar las dos líneas de interruptor.
3) Se puede conectar un grabador a los jacks phono
REC OUTPUT (14). Los ajustes de los controles
LEVEL (12) no afectan a la señal de grabación.
4) Auriculares estéreo (impedancia mínima 32Ω)
para monitorizar la señal de salida se puede
conectar al jack 6,3 mm (8) [→ ver también el
capítulo 5, paso operativo 6].
5) Finalmente conecte la toma de red del cable de
conexión (17) a un enchufe (230 V~ /50 Hz).
5 Funcionamiento
1) Como ajuste básico gire los controles de nivel
LEVEL (12) para las salidas AMP OUTPUT (13)
hacia el tope izquierdo. Con este fin use un destornillador pequeño.
2) Encienda el mezclador con el interruptor de en cen dido/apagado POWER (4), el LED POWER
(3) se enciende. Encienda las unidades conectadas.
3) Mezcle las señales de entrada con los controles
de volumen de los canales de entrada [(1) para
los canales de micrófono VOICE 1 y VOICE 2,
(2) para los canales estéreo MUSIC 1 y MUSIC2]
o auméntelos y redúzcalos como necesite. Gire
siempre los controles de los canales que no use
hacia el tope izquierdo a “0”.
4) Los canales VOICE 1 y VOICE 2 están equipados cada uno con un ecualizador de 3 vías (5),
los canales MUSIC 1 y MUSIC 2 tienen un ecualizador de 2 vías común (6). Las gamas de frecuencia (LOW = gama de graves, MID = gama
de medios, HIGH = gama de agudos) se pueden
aumentar o atenuar por ±12 dB como máximo
con los controles corres pondientes.
5) Si el nivel de una salida AMP OUTPUT (13) fuera
demasiado bajo para la unidad siguiente, se
puede aumentar con el control LEVEL (12)
situado junto a éste en cada caso: Suba el control como corresponda.
6) Suba el control de volumen (9) para la salida
auricular (8) como desee. Mediante los auricu-
lares se puede oír la señal de salida que no está
afectada por los controles LEVEL (12).
6 Características técnicas
2 entradas de micrófono (VOICE)
sensibilidad/ impedancia: . . . . . . 1 mV/600
Ω
conexión: . . . . . . . . . . . . . . . . . . jack 6,3 mm, sim.
2 entradas línea (MUSIC)
sensibilidad/ impedancia: . . . . . . 100 mV/10 k
Ω
conexión: . . . . . . . . . . . . . . . . . . phono, L /R*
2 salidas master (AMP):
nivel nominal/ impedancia: . . . . . 1–3V/100
Ω
conexión: . . . . . . . . . . . . . . . . . . phono, L /R*
1 salida de grabación (REC):
nivel nominal/ impedancia: . . . . . 1 V/100
Ω
conexión: . . . . . . . . . . . . . . . . . . phono, L /R*
1 salida auricular ( )
impedancia/ potencia: . . . . . . . . . ≥ 32
Ω
/2 ×15mW
conexión: . . . . . . . . . . . . . . . . . . jack 6,3 mm, estéreo
Gama de frecuencia: . . . . . . . . . . . 20 – 20 000Hz
Tasa de distorsión lineal: . . . . . . . 0,05 %
Relación señal/ ruido: . . . . . . . . . . > 60 dB
Controles de ecualizador
gama de graves: . . . . . . . . . . . . . ±12 dB/30 Hz
gama de medios (sólo VOICE): . ±12 dB/1 kHz
gama de agudos: . . . . . . . . . . . . ±12 dB/12 kHz
Alimentación: . . . . . . . . . . . . . . . . 230 V~ /50 Hz/ 10VA
Temperatura ambiente: . . . . . . . . . 0 – 40 °C
Dimensiones
(incl. soportes de montaje): . . . . . . 482 × 45 × 274 mm
(B × H × P),
1 espacio rack
Peso: . . . . . . . . . . . . . . . . . . . . . . . 2,9 kg
* L = canal izquierdo, R = canal derecho
Sujeto a modificaciones técnicas.
PRECAUCIÓN No ajuste nunca un volumen
muy alto del sistema audio y de
los auriculares. ¡Los volúmenes
permanentemente altos pueden
dañar su oído! El oído humano
se acostumbrará a los volúmenes
altos que no parecerán tan altos al cabo de un
tiempo. Por lo tanto, no aumente un volumen alto
tras haberse acostumbrado a él.
9
E
NL
B
Deze gebruiksaanwijzing is auteursrechterlijk be schermd
voor MONACOR®INTERNATIONAL GmbH & Co. KG.
Reproductie voor eigen commerciële doeleinden – ook
bij wijze van uitzondering – is niet toegestaan.
Manual de instrucciones protegido por el copyright de
MONACOR
®
INTERNATIONAL GmbH & Co KG. Toda
reproducción, incluida parcial con fines comerciales
está prohibida.
Page 10

Na stronie 3 znajdują się schematy elementów
sterujących i gniazd połączeniowych.
1 Elementy sterujące
i gniazda połą czeniowe
1 Regulatory głośności dla kanałów mikrofono-
wych: VOICE 1 oraz VOICE 2
2 Regulatory głośności dla kanałów stereofonicz-
nych: MUSIC 1 oraz MUSIC 2
3 Wskaźnik zasilania POWER
4 Włącznik zasilania POWER
5 Trzypunktowe korektory dla kanałów mikro fono-
wych: VOICE 1 oraz VOICE 2:
LOW = tony niskie, MID = tony średnie,
HIGH = tony wysokie
6 Dwupunktowy korektor dla kanałów stereofo-
nicznych: MUSIC 1 oraz MUSIC 2:
LOW = tony niskie, HIGH = tony wysokie
7 Wejście liniowe stereo MUSIC INPUT 2, oprócz
wejścia MUSIC INPUT 2 na panelu tylnym
(→ zob. punkt 15)
8 Gniazdo na słuchawki stereofoniczne do odsłu-
chu wyjścia, niezależne od ustawienia regulatorów LEVEL (12)
9 Regulator głośności dla słuchawek
10 Uchwyty do montażu miksera w stojaku rack
(482 mm/19″)
11 Terminale śrubowe MUTE (można je wyjąć):
podłączenie włącznika/przełącznika monostabilnego do wyciszania dwóch wyjść master AMP
OUTPUT (13)
12 Regulator LEVEL 1 oraz LEVEL 2 (regulacja za
pomocą śrubokrętu) dla wyjścia AMP OUTPUT
(13), znajdującego się obok
13 Wyjścia master AMP OUTPUT: podłączenie
wzmacniacza lub innych urządzeń z wejściem
liniowym, np. drugiego miksera
14 Wyjście REC OUTPUT: podłączenie wejścia
rejestratora; poziom zapisu jest niezależny od
ustawienia potencjometrów LEVEL (12)
15 Wejścia stereo MUSIC INPUT 1 oraz 2 podłą -
czenie urządzeń z wyjściem liniowym (np.
odtwa rzacza CD lub DVD, magnetofonu, tunera)
16 Wejścia mono VOICE INPUT 1 i 2: podłączenie
mikrofonów
17 Kabel sieciowy: podłączenie do gniazda
(230 V~/50 Hz)
2 Bezpieczeństwo użytkowania
Urządzenie spełnia wymogi dyrektyw obowią zujących w Unii Europejskiej, posiada więc oznaczenie .
Należy przestrzegać następujących zaleceń:
G
Urządzenie przeznaczone jest do użytku jedynie
wewnątrz pomieszczeń. Należy chronić je przed
bezpośrednim kontaktem z wodą, działaniem wilgoci oraz wysokiej temperatury (zakres dopuszczalnej temperatury otoczenia pracy: (0 – 40°C).
G
Na obudowie urządzenia nie wolno stawiać
pojemników z płynem (np. szklanek).
G
Należy przerwać obsługę urządzenia lub niezwłocznie wyjąć z wtyczkę z gniazda jeśli:
1. istnieje widoczne uszkodzenie urządzenia lub
kabla zasilania,
2. mogło nastąpić uszkodzenie urządzenia w
wyniku jego upuszczenia itp.,
3. urządzenie działa nieprawidłowo.
Urządzenie należy przekazać do autoryzowanego
punktu serwisowego.
G
Wymianę uszkodzonego kabla zasilającego
należy zlecić punktowi serwisowemu lub producentowi.
G
Nie wolno odłączać urządzenia z gniazda sieciowego ciągnąc za kabel zasilania, należy zawsze
chwytać za wtyczkę.
G
Do czyszczenia urządzenia należy używać
suchej, miękkiej tkaniny. Nie wolno stosować
wody ani chemicznych środków czyszczących.
G
Producent ani dostawca nie ponoszą odpowiedzialności za wynikłe szkody (uszkodzenie
sprzętu lub obrażenia użytkownika), jeśli urządzenie używano niezgodnie z przeznaczeniem, nieprawidłowo podłączono, obsługiwano bądź poddano nieautoryzowanej naprawie.
3 Zastosowanie
Czterokanałowy mikser ma uniwersalne zastosowanie. Można do niego podłączyć maksymalnie dwa
urządzenia audio z wyjściem liniowym (np. odtwarzacz CD lub DVD, magnetofon) oraz maksymalnie
dwa mikrofony, następnie miksować ich sygnały do
dwóch wyjść master. Wyjścia master można wyciszyć po podłączeniu przełącznika. Mikser posiada
również dodatkowe wyjście na rejestrator oraz regulowane wyjście słuchawkowe.
Przy użyciu dwóch uchwytów (w zestawie) [(10)
na schemacie nr 2] mikser można zamontować w
stojaku rack o szerokości 482 mm (19″). W tym celu
należy przykręcić uchwyt do lewego oraz prawego
boku panelu przedniego (po trzy śruby do każdego
boku). W stojaku mikser zajmuje przestrzeń 1 U =
44,45 mm wysokości. Mikser może również pracować jako urządzenie typu table-top.
Po całkowitym zakończeniu eksploatacji
urządzenia należy przekazać je do punktu
utylizacji odpadów, aby uniknąć zanieczyszczenia środowiska.
UWAGA Urządzenie jest zasilane niebez-
piecznym dla życia napięciem zmiennym 230 V~. Aby uniknąć ryzyka
porażenia prądem, obsługę techniczna urządzenia należy zlecić osobom do tego upoważnionym.
4 Podłączanie miksera
Przed rozpoczęciem podłączania oraz zmianą połączeń należy wyłączyć zasilanie miksera oraz pozostałych urządzeń nagłośnieniowych.
1) Należy podłączyć źródła sygnału do kanałów
wejściowych:
mikrofony (symetryczne lub niesymetryczne) do
gniazd 6,3 mm VOICE INPUT 1 i 2 (16),
urządzenia stereofoniczne z wyjściem liniowym
(np. odtwarzacz CD lub DVD, magnetofon,
rejestrator DAT, tuner) do gniazd chinch
MUSIC INPUT 1 i 2 (15).
Zamiast wejścia na panelu tylnym MUSIC
INPUT 2 można użyć wejścia MUSIC INPUT 2
(7) na panelu przednim.
2) Należy podłączyć wzmacniacze lub inne urządzenia audio z wejściem liniowym (np. drugi mikser, urządzenie efektowe) do gniazd chinch AMP
OUTPUT (13).
Za pomocą włącznika lub przełącznika monostabilnego, podłączonego do terminali śrubowych MUTE (11), można wyciszyć wyjścia AMP
OUTPUT, np. gdy sygnał ma być słyszalny tylko
na słuchawkach. Można wyjąć terminale
i ponownie je włożyć po podłączeniu przełą czników.
3) Rejestrator należy podłączyć do gniazd chinch
REC OUTPUT (14). Ustawienie regulatorów
LEVEL (12) nie ma wpływu na sygnał zapisu.
4) Słuchawki stereofoniczne (min. impedancja:
32 Ω), do odsłuchu kanału wyjściowego, należy
podłączyć do gniazda 6,3 mm (8) [→ zob. rozdział 5, punkt 6].
5) Po zakończeniu połączeń należy podłączyć wtyk
kabla sieciowego (17) do gniazda (230 V~/
50 Hz).
5 Obsługa
1) Należy obrócić maksymalnie w lewo regulatory
LEVEL (12) dla wyjść AMP OUTPUT (13); w tym
celu należy użyć śrubokrętu.
2) Należy włączyć mikser za pomocą włącznika
zasilania POWER (4), zaświeci się wskaźnik
POWER (3). Następnie należy włączyć po zostałe urządzenia.
3) Należy zmiksować sygnały wejściowe przy użyciu regulatorów głośności dla kanałów wejściowych [(1) dla kanałów mikrofonowych VOICE 1
i VOICE 2, (2) dla kanałów stereofonicznych
MUSIC 1 i MUSIC 2] lub przechodzić między
kanałami. Regulatory nieużywanych kanałów
należy obrócić maksymalnie w lewo (pozycja “0”).
4) Kanały VOICE 1 i VOICE2 posiadają oddzielne
trzypunktowe korektory (5), kanały MUSIC 1 i
MUSIC 2 mają wspólny korektor dwupunktowy
(6).
Pasmo przenoszenia (LOW = tony niskie,
MID = tony średnie, HIGH = tony wysokie) można
zwiększyć lub zmniejszyć o maks. ±12 dB za
pomocą regulatorów.
5) Jeśli poziom wyjścia AMP OUT (13) będzie za
niski dla podłączonego urządzenia, można go
zwiększyć za pomocą regulatora LEVEL (12),
znajdującego się obok wyjścia: należy odpowiednio zwiększyć położenie regulatora.
6) Należy odpowiednio zwiększyć położenie regulatora głośności (9) dla wyjścia słuchawkowego
(8). Na słuchawkach można odsłuchać kanał wyjściowy, niezależny od ustawienia regulatorów
LEVEL (12).
UWAGA Nigdy nie należy ustawiać bardzo
wysokiego poziomu głośności syste mu audio ani słuchawek. Długotrwałe
narażenie ucha ludzkiego na dźwięki
o wysokim poziomie głośności może
spowodować uszkodzenie słuchu!
Ucho ludzkie przyzwyczaja się do
wysokiego poziomu głośności, który
po pewnym czasie przestaje być
odbierany jako wysoki. Dlatego nie
należy przekraczać maksymalnego
poziomu głośności, do którego ucho
zostało przyzwyczajone.
10
PL
Page 11

6 Dane techniczne
2 wejścia mikrofonowe (VOICE)
czułość/impedancja: . . . . . 1 mV/600 Ω
złącze: . . . . . . . . . . . . . . . . duży jack 6,3 mm,
sym.
2 wejścia liniowe (MUSIC)
czułość/impedancja: . . . . . 100 mV/10 kΩ
złącze: . . . . . . . . . . . . . . . . chinch, L/R*
2 wyjścia master (AMP):
poziom znamionowy/
impedancja: . . . . . . . . . . . . 1–3V/100Ω
złącze: . . . . . . . . . . . . . . . . chinch, L/R*
1 wyjście na rejestrator (REC):
poziom znamionowy/
impedancja: . . . . . . . . . . . . 1 V/100 Ω
złącze: . . . . . . . . . . . . . . . . chinch, L/R*
1 wyjście słuchawkowe ( )
impedancja/moc: . . . . . . . . ≥ 32 Ω/2 × 15 mW
złącze: . . . . . . . . . . . . . . . . duży jack 6,3 mm,
stereo
Pasmo przenoszenia: . . . . . 20 – 20 000Hz
THD: . . . . . . . . . . . . . . . . . . 0,05 %
Wskaźnik S/N: . . . . . . . . . . > 60 dB
Korektor
tony niskie: . . . . . . . . . . . . ±12 dB/30 Hz
tony średnie
(tylko dla VOICE): . . . . . . . ±12 dB/1 kHz
tony wysokie: . . . . . . . . . . ±12 dB/12 kHz
Zasilanie: . . . . . . . . . . . . . . . 230 V~/50 Hz/10 VA
Temperatura otoczenia
pracy: . . . . . . . . . . . . . . . . . 0 – 40 °C
Wymiary (z uchwytami
montażowymi): . . . . . . . . . . 482 × 45 × 274 mm
(szer. × wys. × głęb.),
1U
Waga: . . . . . . . . . . . . . . . . . 2,9 kg
* L = kanał lewy, R = kanał prawy
Z zastrzeżeniem możliwości zmiany.
11
PL
Instrukcje obsługi są chronione prawem copyright for MONACOR®INTERNATIONAL GmbH & Co. KG.
Przetwarzanie całości lub części instrukcji dla osobistych korzyści finansowych jest zabronione.
Page 12

12
S
FIN
Ole hyvä ja huomioi joka tapauksessa seuraavat
turvallisuuteen liittyvät seikat ennen laitteen käyttöä.
Laitteen toiminnasta saa lisätietoa tarvittaessa
tämän laitteen muunkielisistä käyttöohjeista.
Turvallisuudesta
Tämä laite täyttää kaikki siihen kohdistuvat EUdirek tiivit ja sille on myönnetty hyväksyntä.
Huomioi seuraavat seikat:
G
Tämä laite soveltuu vain sisätilakäyttöön. Suojele
lai tetta kosteudelta, vedeltä ja kuumuudelta (sallittu ympä röivä lämpötila 0 –40 °C).
G
Älä sijoita laitteen päälle mitään nestettä sisältävää, kuten vesilasia tms.
VAROITUS Tämä laite toimii vaarallisella 230 V~
jännitteellä. Laiteen huolto tulee
tehdä siihen valtuutetun huollon toimesta. Asiaa tuntematon käsittely voi
aiheuttaa sähköiskun vaaran.
G
Irrota virtajohto pistorasiasta, äläkä käynnistä laitetta, jos:
1. laitteessa tai virtajohdossa on havaittava vaurio
2. putoaminen tai muu vastaava vahinko on saat tanut aiheuttaa vaurion
3. laitteessa esiintyy toimintahäiriöitä
Kaikissa näissä tapauksissa laite tulee huollattaa
valtuutetussa huollossa.
G
Vioittuneen verkkojohdon saa vaihtaa vain siihen
oikeutettu sahkoasentaja.
G
Älä koskaan irrota virtajohtoa pistorasiasta johdosta vetämällä.
G
Käytä puhdistamiseen pelkästään kuivaa, pehmeää kangasta. Älä käytä kemikaaleja tai vettä.
G
Laitteen takuu raukeaa, eikä valmistaja, maahantuoja tai myyjä ota vastuuta mahdollisista välit tö mis tä tai välillisistä vahingoista, jos laitetta on
käytetty muuhun kuin alkuperäiseen käyttötarkoitukseen, laitet ta on taitamattomasti käytetty tai
kytketty tai jos laitetta on huollettu muussa kuin
valtuutetussa huollossa.
Huolehdi laitteen kierrättämisestä, kun laite
lopullisesti poistetaan käytöstä.
Læs nedenstående sikkerhedsoplys ninger op mærk somt igennem før ibrugtagning af enheden. Bortset
fra sikkerhedsoplys nin gerne henvises til den en gels ke tekst.
Vigtige sikkerhedsoplysninger
Denne enhed overholder alle nødvendige EU-direktiver og er som følge deraf mærket .
Vær altid opmærksom på følgende:
G
Enheden er kun beregnet til indendørs brug. Be skyt
den mod vanddråber og -stænk, høj luft fugtig hed
og varme (tilladt omgivelses tem pera tur 0 – 40°C).
G
Undgå at placere væskefyldte genstande, som
f. eks. glas, ovenpå enheden.
ADVARSEL
Dette produkt benytter 230 V~. Overlad al servicering til autoriserede personer. Ukyndig håndtering kan føre til
elektrisk stød.
G
Tag ikke enheden i brug eller tag straks stikket ud
af stikkontakten i følgende tilfælde:
1. hvis der er synlig skade på enheden eller net kablet.
2. hvis der kan være opstået skade, efter at enhed en er tabt eller lignende.
3. hvis der forekommer fejlfunktion.
Enheden skal altid repareres af autoriseret per sonel.
G
Et beskadiget netkabel må kun repareres af autoriseret personel.
G
Tag aldrig stikket ud af stikkontakten ved at
trække i kablet, tag fat i selve stikket.
G
Til rengøring må kun benyttes en tør, blød klud;
der må under ingen omstændigheder benyttes
kemikalier eller vand.
G
Hvis enheden benyttes til andre formål, end den
oprindeligt er beregnet til, hvis den ikke er korrekt
tilsluttet, hvis den betjenes forkert, eller hvis den
ikke repareres af autoriseret personel, omfattes
eventuelle skader ikke af garantien.
Hvis enheden skal tages ud af drift for
bestandigt, skal den bringes til en lokal
genbrugsstation for bortskaffelse.
Ge akt på säkerhetsinformationen innan enheten
tas i bruk. Skulle ytterliggare information behövas
kan den återfinnas i Manualen för andra språk.
Säkerhetsföreskrifter
Enheten uppfyller samtliga Eu-direktiv och har därför försetts med symbolen .
Ge ovillkorligen även akt på följande:
G
Enheten är endast avsedd för inomhusbruk. Skyd da enheten mot vätskor, hög luftfuktighet och hög
värme (tillåten omgivningstemperatur 0 – 40°C).
G
Placera inte föremål innehållande vätskor, t.ex.
drick sglas, på enheten.
VARNING Enheten använder högspänning in -
ternt (230 V~). Överlåt all service till
auktoriserad personal. Egna ingrepp
kan ge elektriska överslag med risk för
skada på person och/ eller materiel.
G
Använd inte enheten eller ta omedelbart kontakten ur eluttaget om något av följande fel uppstår:
1. Enheten eller elsladden har synliga skador.
2. Enheten är skadad av fall e. d.
3. Enheten har andra felfunktioner.
Enheten skall alltid lagas på verkstad av utbildad
personal.
G
En skadad elsladd skall bytas på verkstad.
G
Drag aldrig ut kontakten genom att dra i sladden
utan ta tag i kontaktkroppen.
G
Rengör endast med en mjuk och torr trasa, an vänd aldrig kemikalier eller vatten vid ren göring.
G
Om enheten används på annat sätt än som avses,
om den inte kopplas in ordentligt, om den används
på fel sätt eller inte repareras av auktoriserad per sonal upphör alla garantier att gäll. I dessa fall tas
inget ansvar för uppkommen skada på person
eller materiel.
Om enheten skall kasseras bör den lämnas till återvinning.
DK
Page 13

®
MONACOR INTERNATIONAL GmbH & Co. KG •Zum Falsch 36 •28307 Bremen •Germany
Copyright
©
by MONACOR INTERNATIONAL. All rights reserved. A-1078.99.02.06.2011
 Loading...