

Monacor VIEWEX-640, VIEWEX-670WDR, VIEWEX-850, VIEWEX-870WDR, VIEWEX-650 Instructions Manual
Page 1
Überwachungskamera
Diese Anleitung richtet sich an den Installateur der
Kamera. Bitte lesen Sie die Anleitung vor der
Installation gründlich durch und heben Sie sie für
ein späteres Nachlesen auf.
1 Verwendungsmöglichkeiten
Diese Farbkamera ist speziell für den Einsatz in VideoÜberwachungs anlagen (CCTV) konzipiert. Sie ist mit
einem Objektiv variabler Brennweite ausgestattet und
verfügt über eine automatische Tag/ Nacht-Umschaltung.
Durch ihr wetterfestes Gehäuse (IP 66) ist sie auch für
den Außeneinsatz geeignet. Bei Dunkel heit leuchten die
Infrarot-LEDs den Überwachungsbereich aus.
2 Wichtige Hinweise für den Gebrauch
Die Kamera entspricht allen relevanten Richtlinien der EU
und ist deshalb mit gekennzeichnet.
G
Das Kameragehäuse ist wetterfest, jedoch nicht absolut wasserdicht. Tauchen Sie darum die Kamera
nicht in Wasser ein.
G
Schützen Sie die Kamera vor extremen Temperaturen
(zulässige Einsatztemperatur −10 °C bis +50°C).
G
Berühren Sie die Objektivlinse nicht mit den Fingern
und verwenden Sie zum Säubern der Linse nur Mittel
speziell für optische Linsen.
G
Verwenden Sie zum Reinigen des Gehäuses keine
aggressiven Reinigungsmittel oder Chemikalien.
G
Wird die Kamera zweckentfremdet, nicht richtig installiert oder nicht fachgerecht repariert, kann keine Haftung für daraus resultierende Sach- oder Personenschäden und keine Garantie für die Kamera übernommen werden.
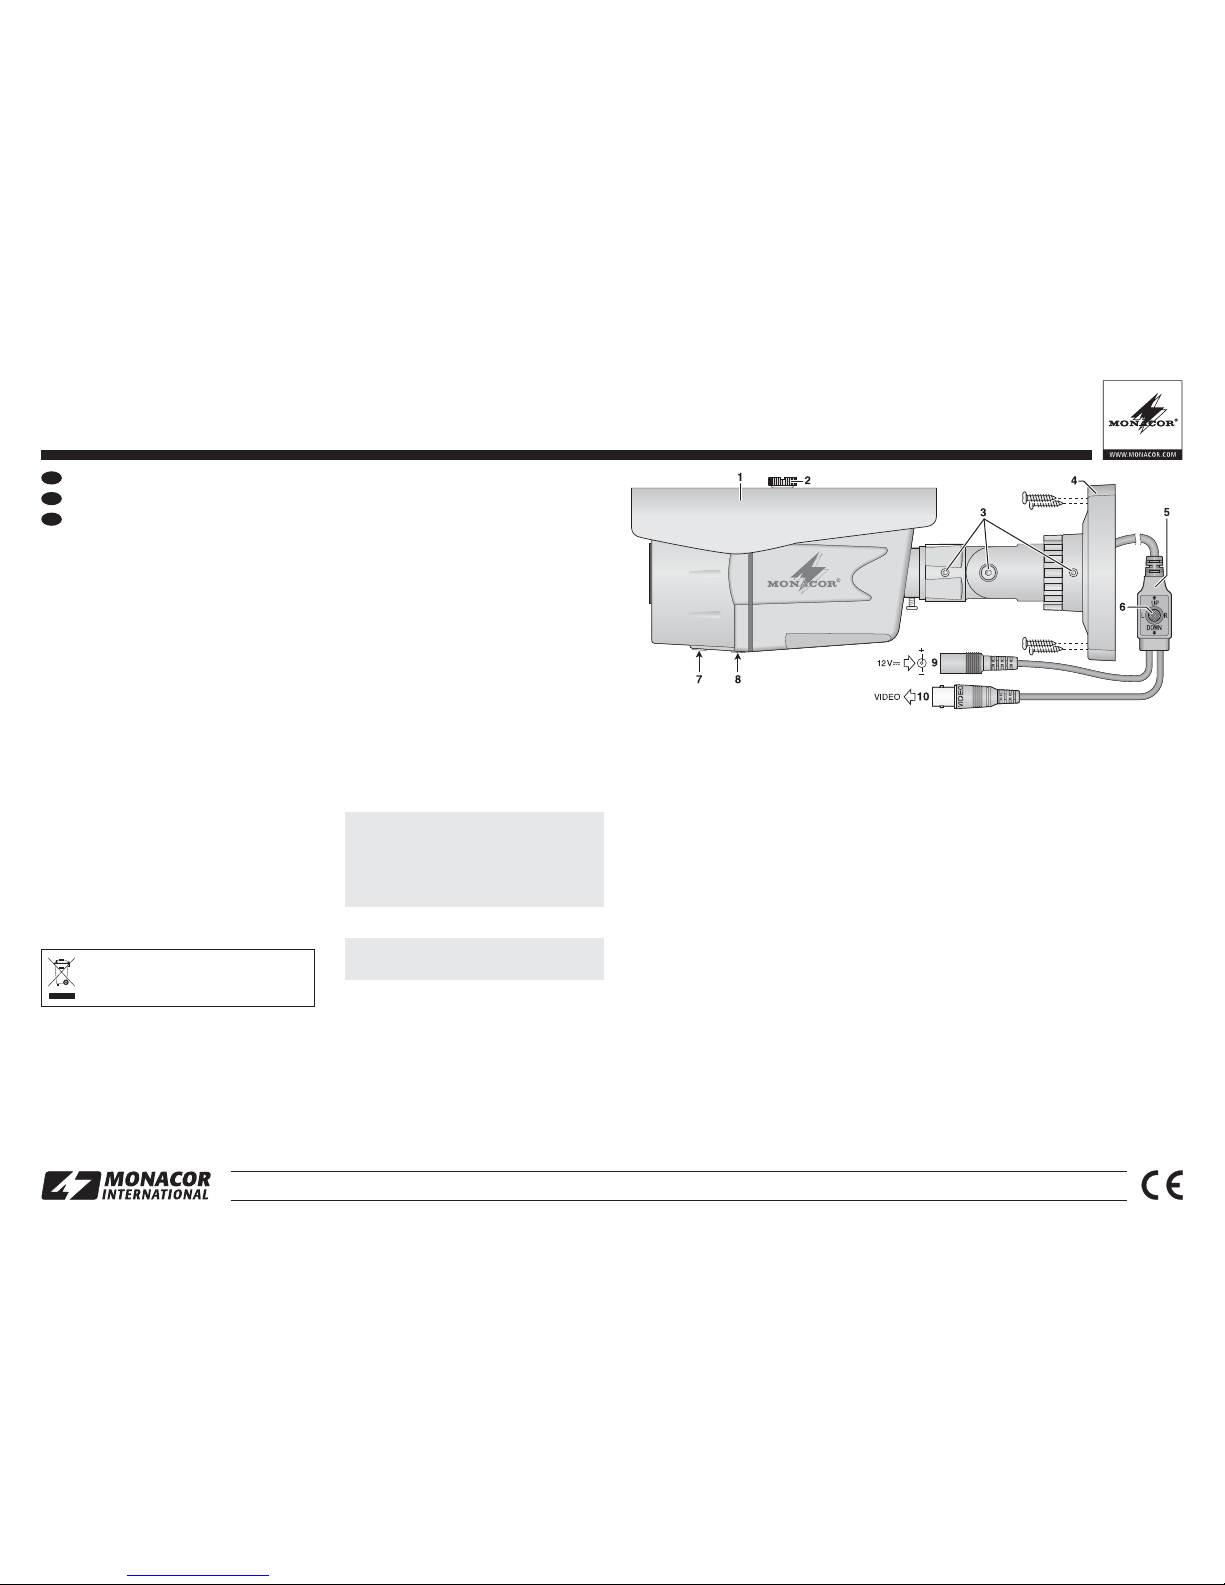
3 Installation
1) Um die optimale Montageposition zu ermitteln, sollte
vor der Montage ein Probebetrieb erfolgen.
2) An der Montagestelle vier Löcher für die Befestigung
des Sockels (4) bohren und ggf. ein Loch für das
Anschluss kabel (das Kabel kann auch durch die Aussparung seitlich am Sockel herausgeführt werden).
Den Sockel dort festschrauben. Lösen Sie ggf. mit dem
beiliegenden Inbusschlüssel die Feststellschrauben (3)
des Sockels und der Kamera halterung.
3) Die BNC-Kupplung (10) über ein 75-Ω-Koaxialkabel mit
dem Videoeingang eines Monitors verbinden. Dabei auf
den korrekten 75-Ω-Abschluss am Monitor bzw. bei
einer Serienschaltung am letzten Monitor achten. Bei
einer Kabellänge von mehr als 100 m sollte zum Ausgleich von Pegelverlusten durch das Kabel ein
Videoverstärker zwischen die Kamera und das lange
Kabel geschaltet werden.
4) An die Kupplung (9) ein stabilisiertes 12-V-Netz gerät
mit einer ausreichenden Dauerbelastbarkeit anschließen (
Kap. 5). Es wird ein Kleinspannungsstecker
5,5/2,1 mm (Außen-/ Innendurchmesser) be nötigt. Un be dingt auf die richtige Polung achten (Mittelkontakt =+).
5) Bei einer Außeninstallation beachten:
6) Den angeschlossenen Monitor einschalten und die
Kamera anhand des Monitorbilds ausrichten: Die
Feststellschrauben (3) mit dem beiliegenden Inbusschlüssel lösen und die Kamera wie gewünscht positionieren. Die Schrauben anschließend wieder festdrehen. Das Objektiv muss vor direkter Sonneneinstrahlung geschützt sein, da sonst der Bildabtaster
beschädigt werden kann. Zum Verschieben des Sonnendachs (1) die Feststellschraube (2) lösen.
Zur Einstellung der Brennweite mit der ZoomSchraube (7) den Bildausschnitt einstellen und mit der
Fokus-Schraube (8) das Bild auf dem Monitor scharf
stellen.
Die Anschlüsse (9– 10) und der Kabelverteiler (5)
sind nicht wetterfest. Sie müssen entsprechend ge schützt werden.
VORSICHT Bei Dunkelheit schalten sich die IRLEDs ein. Blicken Sie beim Einrichten der Kamera
nicht aus der Nähe direkt in die eingeschalteten IRLEDs. Das Infrarotlicht kann zu einer Reizung der
Augen führen. Die IR-Strahlung liegt allerdings weit
unterhalb des Emissionsgrenzwertes und ist risikofrei eingestuft nach EN 62471.
Soll die Kamera endgültig aus dem Betrieb
genommen werden, übergeben Sie sie zur
umweltgerechten Entsorgung einem örtlichen
Recyclingbetrieb.
®
MONACOR INTERNATIONAL GmbH & Co. KG • Zum Falsch 36 • 28307 Bremen • Germany Copyright©by MONACOR INTERNATIONAL. All rights reserved. A-1633.00.01.01.2015
4 Einstellungen über das Bildschirmmenü
Kameramodelle, die über ein Bildschirmmenü verfügen,
haben einen Steuerhebel (6) am Kabelverteiler. Zum Einblenden des Bildschirmmenüs den Hebel hineindrücken.
Das Hauptmenü oder erscheint:
Durch vertikales Kippen ? des Hebels einen Menüpunkt
wählen, durch horizontales Kippen ? den Wert ändern
oder eine Option wählen. Steht hinter einem Menüpunkt
oder einer Option das Symbol
↵
, kann durch Hineindrücken des Hebels ein Untermenü aufgerufen oder eine
Funktion ausgelöst werden.
Alle Einstellmöglichkeiten sind in der Menütabelle oder
aufgeführt. Zum Speichern aller durchgeführten Änderungen im Menü den Punkt
SAVE ALL wählen und den
Hebel drücken; im Menü geschieht die Sicherung beim
Verlassen des Menüs automatisch.
Zum Verlassen des Menüs den Punkt
EXIT aufrufen.
5 Technische Daten
Bildabtaster: . . . . . . . . . . . CCD-Chip, 8,5 mm (1⁄3″)
Anzahl der Bildpunkte / Auflösung
VIEWEX-640: . . . . . . . 500 × 582 / 420 Linien
SETUP
LENS
EXPOSURE
↵
WHITE BAL.
BACKLIGHT
DAY&NIGHT
DPC
↵
SPECIAL
↵
RESET
↵
EXIT
SETUP MENU
LENS
SHUTTER/AGC
WHITE BAL
BACKLIGHT
PICT ADJUST
↵
D-WDR
DAY/NIGHT
LANGUAGE
NEXT
↵
EXIT↵SAVE ALL
VIEWEX-650/850: . . . . 752 × 582 / 540 Linien
VIEWEX-670/870WDR: 752 × 582 / 700 Linien
Objektiv
VIEWEX-640/650,
VIEWEX-670WDR: . . . 4 – 9 mm/ 1: 1,2
VIEWEX-850/870WDR: 6 – 15 mm/ 1 : 1,2
Mindestbeleuchtung (Farbe)
VIEWEX-640: . . . . . . . 0,1 lx
VIEWEX-650/670WDR,
VIEWEX-850/870WDR: 0,5 lx
Videoausgang: . . . . . . . . . PAL, 1Vss /75 Ω
Signal/Rausch-Abstand: . > 48 dB (AGC aus)
IR-LEDs, Reichweite
VIEWEX-640/650,
VIEWEX-670WDR: . . . 42 LEDs, 40m
VIEWEX-850/870WDR: 36 LEDs, 50m
Stromversorgung
VIEWEX-640: . . . . . . . 12 V
, 430 mA
VIEWEX-650/670WDR: 12 V
, 450 mA
VIEWEX-850/870WDR: 12 V
, 540 mA
Einsatztemperatur: . . . . . −10 °C bis +50°C
Schutzart: . . . . . . . . . . . . IP 66
Abmessungen, Gewicht
VIEWEX-640/650,
VIEWEX-670WDR: . . . 90 × 88 × 160 mm, 500g
VIEWEX-850/870WDR: 110 × 100 × 187mm, 700 g
Änderungen vorbehalten.
VIEWEX-640 Bestellnummer 18.7610
VIEWEX-650 Bestellnummer 18.7620
VIEWEX-670WDR Bestellnummer 18.7630
VIEWEX-850 Bestellnummer 18.7650
VIEWEX-870WDR Bestellnummer 18.7660
ELECTRONICS FOR SPECIALISTS ELECTRONICS FOR SPECIALISTS ELECTRONICS FOR SPECIALISTS ELECTRONICS FOR SPECIALISTS ELECTRONICS FOR SPECIALISTS ELECTRONICS FOR SPECIALISTS ELECTRONICS FOR SPECIALISTS ELECTRONICS FOR SPECIALISTS ELECTRONICS FOR SPECIALISTS ELECTRONICS FOR SPECIALISTS ELECTRONICS FOR SPECIALISTS
D
A
CH
Page 2

®
MONACOR INTERNATIONAL GmbH & Co. KG • Zum Falsch 36 • 28307 Bremen • Germany Copyright©by MONACOR INTERNATIONAL. All rights reserved. A-1633.00.01.01.2015
To select a menu item, tilt the lever vertically ?; to change
the value or to select an option, tilt the lever horizontally
? . When the symbol ↵appears behind a menu item or
option, the lever can be pressed to call up a submenu or
to activate a function.
All adjustment options can be found in the menu table
or . To save any changes you may have made: in menu
, select the item
SAVE ALL and press the lever; in menu
, the changes are automatically saved when the menu
is exited.
To exit the menu, select the item EXIT.
5 Specifications
Image sensor: . . . . . . . . . CCD chip, 8.5 mm (1⁄3″)
Number of pixels / Resolution
VIEWEX-640: . . . . . . . 500 × 582 / 420 lines
VIEWEX-650/850: . . . . 752 × 582 / 540 lines
VIEWEX-670/870WDR: 752 × 582 / 700 lines
SETUP
LENS
EXPOSURE
↵
WHITE BAL.
BACKLIGHT
DAY&NIGHT
DPC
↵
SPECIAL
↵
RESET
↵
EXIT
SETUP MENU
LENS
SHUTTER/AGC
WHITE BAL
BACKLIGHT
PICT ADJUST
↵
D-WDR
DAY/NIGHT
LANGUAGE
NEXT
↵
EXIT↵SAVE ALL
Lens
VIEWEX-640/650,
VIEWEX-670WDR: . . . 4 – 9 mm/ 1: 1.2
VIEWEX-850/870WDR: 6 – 15 mm/ 1 : 1.2
Minimum illumination (colour)
VIEWEX-640: . . . . . . . 0.1 lx
VIEWEX-650/670WDR,
VIEWEX-850/870WDR: 0.5 lx
Video output: . . . . . . . . . . PAL, 1 Vpp/75 Ω
S / N ratio: . . . . . . . . . . . . . > 48 dB (AGC off)
IR LEDs, range
VIEWEX-640/650,
VIEWEX-670WDR: . . . 42 LEDs, 40m
VIEWEX-850/870WDR: 36 LEDs, 50m
Power supply
VIEWEX-640: . . . . . . . 12 V
, 430 mA
VIEWEX-650/670WDR: 12 V
, 450 mA
VIEWEX-850/870WDR: 12 V
, 540 mA
Admissible temperature: . −10 to +50 °C
IP rating: . . . . . . . . . . . . . IP66
Dimensions, weight
VIEWEX-640/650,
VIEWEX-670WDR: . . . 90 × 88 × 160 mm, 500g
VIEWEX-850/870WDR: 110 × 100 × 187mm, 700 g
Subject to technical modification.
VIEWEX-850 Order number 18.7650
VIEWEX-870WDR Order number 18.7660
Surveillance Camera
These operating instructions are intended for the
installer of the camera. Please read the operating
instructions carefully prior to installation and keep
them for later reference.
1 Applications
This colour camera is especially designed for video surveillance systems (CCTV). It is equipped with a lens with
variable focal length and features automatic day/ night
switching. Due to its weatherproof housing (IP 66), the
camera is also suited for outdoor applications. During
darkness, the infrared LEDs illuminate the surveillance
area.
2 Safety Notes
The camera corresponds to all relevant directives of the
EU and is therefore marked with .
G
The camera housing is weatherproof, but not absolutely watertight. Therefore, do not immerge the camera into water.
G
Protect the camera against extreme temperatures (admissible ambient temperature range: -10 °C to +50°C).
G
Never touch the lens with your fingers. For cleaning the
lens, only use optical lens cleaners.
G
For cleaning the housing, never use aggressive detergents or chemicals.
G
No guarantee claims for the camera and no liability for
any resulting personal damage or material damage will
be accepted if the camera is used for other purposes
than originally intended, if it is not correctly installed or
if it is not repaired in an expert way.
3 Installation
1) To find the optimum place of mounting, make a test run.
2) At the location of mounting, drill four holes for fixing the
base (4) and, if necessary, drill a hole for the connection cable (the cable can also be guided through the
cable inlet at the side of the base). Fasten the base at
the place of mounting with screws. If necessary,
loosen the setscrews (3) of the base and the camera
support, using the hex key supplied.
3) Connect the BNC inline jack (10) via a 75 Ω coaxial
cable to the video input of a monitor. Observe the correct 75 Ω termination on the monitor or, in case of
series connection, on the last monitor. For a cable
length of more than 100 m, a video amplifier should be
inserted between camera and cable to compensate
level loss.
4) Connect a regulated 12 V power supply with a sufficient permanent current rating (
chapter 5) to the
inline jack (9). A low-voltage plug 5.5 / 2.1 mm (exterior/
interior diameter) is re quired. Make absolutely sure to
observe the correct polarity (centre contact =+).
5) Please observe the following for outdoor installations:
6) Switch on the monitor connected and align the camera
by means of the monitor image: Loosen the setscrews
(3), using the hex key supplied, and position the camera as desired. Then tighten the screws again. Protect
the lens against direct sunlight; otherwise the CCD
chip may be damaged. To move the sunshield (1),
loosen the setscrew (2).
Use the zoom screw (7) to adjust the angle of view
and the focus screw (8) to focus the image on the
monitor.
4 Adjustments via the On-screen Menu
Camera models featuring an on-screen menu are
equipped with a control lever (6) at the cable splitter. To
display the on-screen menu, press the control lever. The
main menu or will appear:
The connections (9 – 10) and the cable splitter (5) are
not weatherproof and must be protected accordingly.
CAUTION The infrared LEDs switch on in case of
darkness. When setting up the camera, never look
directly into the lit infrared LEDs from a close range.
The infrared light may cause eye irritation. However,
the infrared radiation is far below the emission limit
and rated risk-free according to EN 62471.
If the camera is to be put out of operation definitively, take it to a local recycling plant for a disposal which is not harmful to the environment.
GB
ELECTRONICS FOR SPECIALISTS ELECTRONICS FOR SPECIALISTS ELECTRONICS FOR SPECIALISTS ELECTRONICS FOR SPECIALISTS ELECTRONICS FOR SPECIALISTS ELECTRONICS FOR SPECIALISTS ELECTRONICS FOR SPECIALISTS ELECTRONICS FOR SPECIALISTS ELECTRONICS FOR SPECIALISTS ELECTRONICS FOR SPECIALISTS ELECTRONICS FOR SPECIALISTS
VIEWEX-640 Order number 18.7610
VIEWEX-650 Order number 18.7620
VIEWEX-670WDR Order number 18.7630
Page 3

®
MONACOR INTERNATIONAL GmbH & Co. KG • Zum Falsch 36 • 28307 Bremen • Germany Copyright©by MONACOR INTERNATIONAL. All rights reserved. A-1633.00.01.01.2015
Menüzeile
Menu line
Auswahl/ Untermenü
Selection / Submenu
Einstellung; Funktion
Setting; function
LENS – Objektiv MANUAL, DC
2
, VIDEO
2
EXPOSURE↵– Belichtung
SHUTTER – Verschluss
AUTO, 1/50, FLK, 1/250, 1/500, 1/1000, 1/2000, 1/4000, 1/5000, 1/10000, 1/100000
BRIGHTNESS – Helligkeit 0 … 50 … 255
AGC (Automatic Gain Control) – Verstärkungsregelung OFF, LOW, MIDDLE, HIGH
DWDR – Brightening of dark zones
Aufhellung dunkler
Bereiche
OFF
ON↵
LEVEL 0 … 63
RETURN
1
RET↵, END↵
WHITE BAL.
White balance
Weißabgleich
ATW1
ATW2
AWCSET
MANUAL↵
COLOR TEMP MANUAL, INDOOR, OUTDOOR
BLUE 0 … 45 … 255
RED 0 … 64 … 255
BACKLIGHT
Backlight compensation
Gegenlichtkompensation
OFF
BLC↵
AREA SEL. AREA1, AREA2
AREA STATE ON, OFF
GAIN 0 … 42 … 255
HEIGHT 0 … 4 … 15
WIDTH 0 … 3… 15
LEFT/RIGHT 0 … 6 … 15
TOP/BOTTOM 0 … 5 … 15
HLC↵
LEVEL 0 … 200 … 255
MODE ALL DAY, NIGHT ONLY
DAY&NIGHT
Day/ night
switching
Tag/ NachtUmschaltung
AUTO↵
DN LEVEL
0 … 128 … 255
DN DELAY
1, 3, 5, 10, 15, 20, 25, 30 SEC
ND LEVEL
0 … 118 … 255
ND DELAY
1, 3, 5, 10, 15, 20, 25, 30 SEC
COLOR
B/W↵
BURST OFF, ON
IR SMART
OFF
ON↵
IR GAIN = 0 … 122 … 255
HEIGHT = 0 … 6 … 15
WIDTH = 0 … 10 … 15
LEFT/RIGHT = 0 … 2 … 15
TOP/BOTTOM = 0 … 7 … 15
IR LEVEL LOW, HIGH
EXT
2
DPC ↵ Defective pixel correction • Korrektur defekter Pixel
“COVER THE LENS THEN PRESS ENTER KEY” ⇒ “PROCESSING NOW...”
SPECIAL ↵
CAM TITLE
OFF
ON↵
Show camera name • Kameranamen einblenden
MOTION
Motion detection
Bewegungs -
erkennung
OFF
ON↵
AREA SEL. AREA1, AREA2, AREA3, AREA4
AREA STATE ON, OFF
HEIGHT 0 … 15
WIDTH 0 … 15
LEFT/RIGHT 0 … 15
TOP/BOTTOM 0 … 15
DEGREE 0 … 38 … 255
VIEW ON, OFF
Menüzeile
Menu line
Auswahl/ Untermenü
Selection / Submenu
Einstellung; Funktion
Setting; function
… SPECIAL
PRIVACY
Masking of
image zones
Maskierung von
Bildbereichen
OFF
ON↵
AREA SEL. AREA1 … AREA8
AREA STATE ON, OFF
HEIGHT 0 … 149
WIDTH 0 … 200
LEFT/RIGHT 0 … 200
TOP/BOTTOM 0 … 149
COLOR 0 … 15
PARK. LINE
Insertion of auxil-
iary parking lines
Einblenden von
Parkhilfslinien
OFF
ON↵
LT 0 … 194
LB 0 … 194
RT 0 … 194
RB 0 … 194
F 0 … 80
N 0 … 80
T 2 … 15
IMAGE ADJ. ↵
Bildeinstellungen
LENS SHAD.
OFF
ON↵ LEVEL 0 … 29 … 255
2DNR ON, OFF
MIRROR OFF, ON
FONT COLOR↵
FONT 0 … 3… 15
ID&TITLE 0 … 3 … 15
CONTRAST 0 … 160 … 255
SHARPNESS 0 … 31
DISPLAY
CRT↵
PED LEVEL 0 … 34 … 63
COLOR GAIN 0 … 230 … 255
LCD↵
GAMMA 0.05 … 0.45 … 1.00
PED LEVEL 0 … 28 … 63
COLOR GAIN 0 … 176 … 255
USER↵
GAMMA 0.05 … 0.45 … 1.00
PED LEVEL 0 … 28 … 63
COLOR GAIN 0 … 176 … 255
NEG. IMAGE OFF, ON
COMM ADJ. ↵
2
CAM ID 0, 1 … 255
BAUD RATE 2400, 4800, 9600, 19200, 38400, 57600
PROTOCOL PELCO-D, PELCO-P, NEXTCHIP
DISPLAY ID OFF, ON
ID POS ↵
LANGUAGE – Menu language • Menüsprache
ENGLISH,
中文
VERSION – Firmware version • Firmwareversion 12 01 06
RESET ↵ –Reset all settings to their factory settings • Alle Einstellungen auf Werkseinstellungen zurücksetzen
FACTORY RESET↵
EXIT – Exit menu and save changes • Menü verlassen und Änderungen speichern
Menü • Menu
1
Die Zeile RETURN ist in allen Untermenüs vorhanden. Sie führt zur höheren Menüebene (RET↵) oder zum Verlassen des Menüs mit Speicherung (END↵).
The line RETURN is available in all submenus. Use it to go to the next higher menu level (RET↵) or to exit the menu (END↵), saving any changes you may
have made.
2
bei diesem Modell ohne Funktion oder nicht sinnvoll • not functional or reasonable for this model
Optionen im Fettdruck = Werkseinstellung • Options printed in bold type = factory setting
Page 4

®
MONACOR INTERNATIONAL GmbH & Co. KG • Zum Falsch 36 • 28307 Bremen • Germany Copyright©by MONACOR INTERNATIONAL. All rights reserved. A-1633.00.01.01.2015
1
Die Zeile RETURN ist in allen Untermenüs vorhanden. Sie führt zur höheren Menüebene.
The line RETURN is available in all submenus. Use it to go to the next higher menu level.
2
bei diesem Modell ohne Funktion oder nicht sinnvoll • not functional or reasonable for this model
Optionen im Fettdruck = Werkseinstellung • Options printed in bold type = factory setting
Menüzeile
Menu line
Auswahl/ Untermenü
Selection / Submenu
Einstellung; Funktion
Setting; function
Seite 1 • Page 1
LENS
Objektiv
MANUAL
AUTO ↵
2
TYPE DC, VIDEO
MODE AUTO, OPEN, CLOSE
SPEED 0 … 80 … 255
RETURN↵
1
SHUTTER/AGC
(Automatic Gain
Control)
Verschluss/
Verstärkungs regelung
AUTO ↵
HIGH LUMINANCE
MODE SHUT+AUTO IRIS, AUTO IRIS
BRIGHTNESS 0 … 40 … 255
LOW LUMINANCE
MODE AGC, OFF
BRIGHTNESS x0.25, x0.50, x0.75, x1.00
MANUAL↵
MODE SHUT+AGC
SHUTTER 1/50, 1/100, 1/250, 1/500, 1/1000, 1/2000, 1/4000, 1/10000
AGC 6.00, 12.00, 18.00, 24.00, 30.00, 36.00, 42.00, 44.80
WHITE BAL
White balance
Weißabgleich
ATW↵
SPEED 0 … 239 … 255
DELAY CNT 0 … 16 … 255
ATW FRAME x0.50, x1.00, x1.50, x2.00
ENVIRONMENT INDOOR, OUTDOOR
PUSH
USER1↵
B-GAIN 0 … 255
R-GAIN 0 … 33… 255
USER2↵
B-GAIN 0 … 255
R-GAIN 0… 255
ANTI CR
MANUAL↵ LEVEL 26 … 64 … 72
PUSH LOCK
BACKLIGHT – Backlight compensation •Gegenlichtkompensation OFF, BLC, HLC
PICT ADJUST ↵ – Bildeinstellungen
MIRROR – Spiegelbild OFF, ON
BRIGHTNESS – Helligkeit 0 … 255
CONTRAST – Kontrast 0 … 128 … 255
SHARPNESS – Bildschärfe 0 … 128 … 255
HUE – Farbton 0 … 128 … 255
GAIN – Farbintensität 0 … 128 … 255
D-WDR – Brightening of dark zones
Aufhellung dunkler
Bereiche
OFF
ON↵
LUMINANCE LOW, MID, HIGH
CONTRAST LOW, MIDLOW, MID, MIDHIGH, HIGH
DAY/ NIGHT
Day/ night
switching
Tag/ NachtUmschaltung
AUTO↵
BURST OFF, ON
DELAY CNT 0 … 255
DAYNIGHT
0 … 5 … 255
NIGHTDAY
0 … 5 … 255
COLOR
B/ W↵ BURST OFF, ON
LANGUAGE – Menu language • Menüsprache
ENGLISH,
日本語
, DEUTSCH, FRANCAIS,
РУССКИЙ
, PORTUGUÊS, ESPAÑOL,
中文
NEXT↵ Page 2 • Seite 2
EXIT↵ – Exit menu • Menü verlassen
SAVE ALL – Save changes • Änderungen speichern
Menüzeile
Menu line
Auswahl/ Untermenü
Selection / Submenu
Einstellung; Funktion
Setting; function
Seite 2 • Page 2
PRIVACY
Masking of
image zones
Maskierung von
Bildbereichen
OFF
ON↵
AREA SEL 1/8 … 8/8
TOP 0 … 288
BOTTOM 0 … 288
LEFT 0 … 468
RIGHT 0 … 468
COLOR 1… 8
TRANSP 0.00, 0.50, 0.75, 1.00
MOSAIC OFF, ON
MOTION DET
Motion detection
Bewegungs -
erkennung
OFF
ON↵
DETECT SENSE 0 … 111… 127
BLOCK DISP
OFF
ON
ENABLE↵
MONITOR AREA OFF, ON
AREA SEL 1/4 … 4/4
TOP 0 … 288
BOTTOM 0 … 288
LEFT 0 … 468
RIGHT 0 … 468
2DNR ↵ – Digital noise reduction• Digitale Rauschunterdrückung
NR MODE Y/C, OFF, Y, C
Y LEVEL 0 … 4 … 15
C LEVEL 0 … 4 … 15
CAMERA ID
OFF
ON↵ ABC …, CLR, POS↵
Show camera name • Kameranamen einblenden
SYNC INT
CAMERA RESET –Reset all settings to their factory settings • Alle Einstellungen auf Werkseinstellungen zurücksetzen
BACK↵ Page 1 • Seite 1
EXIT↵ – Exit menu • Menü verlassen
SAVE ALL – Save changes • Änderungen speichern
Menü • Menu
 Loading...