

Page 1

TXM-48
Best.-Nr. 17.2380
MEGAFON MIT FUNKMIKROFON
MEGAPHONE WITH WIRELESS MICROPHONE
BEDIENUNGSANLEITUNG
INSTRUCTION MANUAL
MODE D’EMPLOI
ISTRUZIONI PER L’USO
Page 2

2
Bevor Sie einschalten ...
Wir wünschen Ihnen viel Spaß mit Ihrem neuen Gerät
von MONACOR. Bitte lesen Sie diese Bedienungsan lei tung vor dem Betrieb gründlich durch. Nur so lernen Sie
alle Funktionsmöglichkeiten kennen, vermeiden Fehl be dienungen und schützen sich und Ihr Gerät vor eventuellen Schäden durch unsachgemäßen Gebrauch. Heben
Sie die Anleitung für ein späteres Nachlesen auf.
Der deutsche Text beginnt auf der Seite 4.
Before you switch on ...
We wish you much pleasure with your new MONACOR
unit. Please read these operating instructions carefully
prior to operating the unit. Thus, you will get to know all
functions of the unit, operating errors will be prevented,
and yourself and the unit will be protected against any
damage caused by improper use. Please keep the op erating instructions for later use.
The English text starts on page 4.
D
A
CH
GB
Avant toute mise en service ...
Nous vous souhaitons beaucoup de plaisir à utiliser cet
ap pareil MONACOR. Lisez ce mode dʼemploi enti è re ment
avant toute utilisation. Uniquement ainsi, vous pourrez
apprendre lʼensemble des possibilités de fonc tion nement
de lʼappareil, éviter toute manipulation erro née et vous
protéger, ainsi que lʼappareil, de dommages éven tuels
engendrés par une utilisation inadaptée. Conservez la
notice pour pouvoir vous y reporter ultérieurement.
La version française se trouve page 7.
Prima di accendere ...
Vi auguriamo buon divertimento con il vostro nuovo apparecchio di MONACOR. Leggete attentamente le istruzioni
prima di mettere in funzione lʼapparecchio. Solo così
potete conoscere tutte le funzionalità, evitare comandi
sbagliati e proteggere voi stessi e lʼapparecchio da eventuali danni in seguito ad un uso improprio. Conservate le
istruzioni per poterle consultare anche in futuro.
Il testo italiano inizia a pagina 7.
F
B
CH
I
Page 3
3
AUXMIC.
DC-12V
BATTERY
LOW RED HI GREEN
OFF SIREN
ALARM
TUNER /AUX
OFF
ON
1
2
3
45
6
7
8
9
10
00
F
E
D
C
B
A
9
8
7
6
5
4
3
2
1
CH SEL
6
7
5
10
11
8
12
13
9
TXM-48
00
F
E
D
C
B
A
9
8
7
6
5
4
3
2
1
WIRE
LESS
MICROPHONE
BATT.
ON OFF
1
2
3
4
14
15
18 19
16
17
Page 4

Auf der ausklappbaren Seite 3 finden Sie alle
beschriebenen Bedien elemente und Anschlüsse.
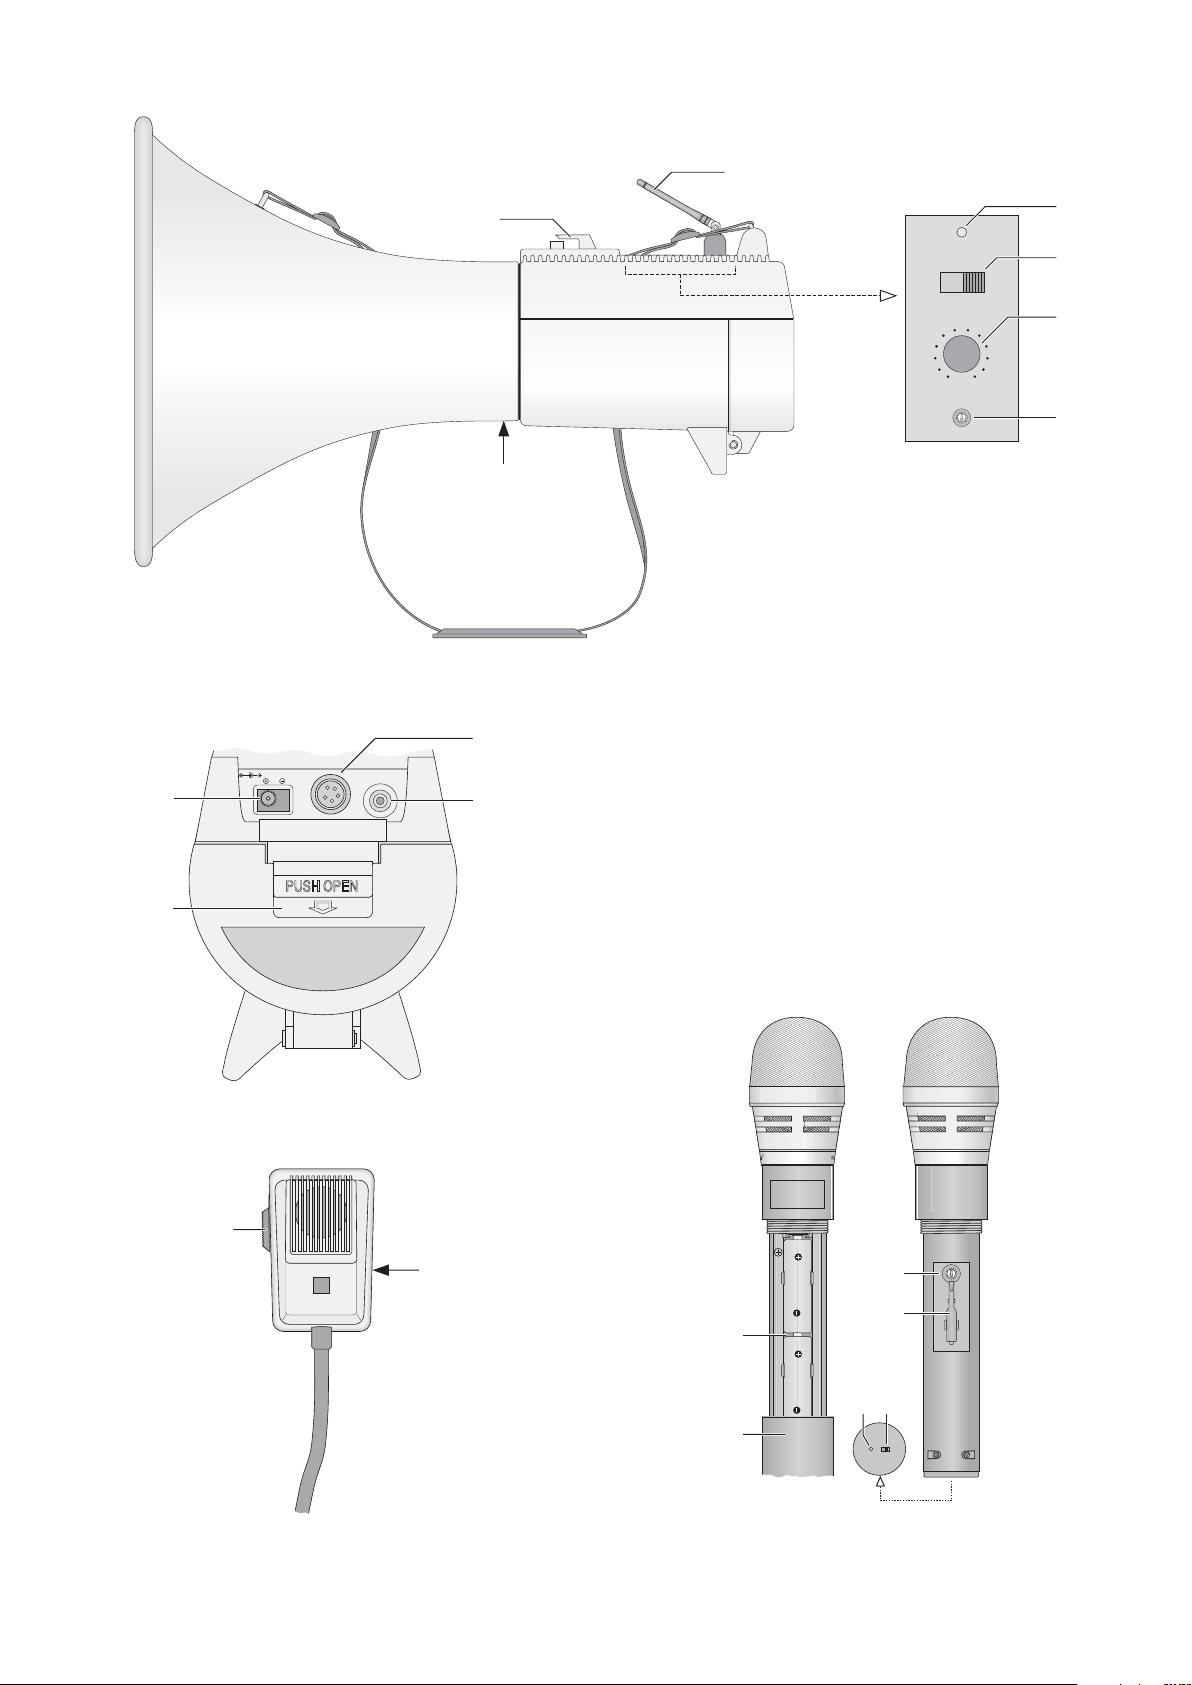
1 Übersicht der Bedienelemente und
Anschlüsse
1.1 Megafon (Abb. 1 und 2)
1 M8-Gewindebuchse für die Montage auf ein
Stativ
2 Halter für das kabelgebundene Mikrofon
3 Antenne
4 Anzeige für die Stromversorgung des Megafons
grün: Stromversorgung ausreichend
rot: Stromversorgung zu gering (z. B. bei fast
verbrauchten Batterien)
5 Schalter zum Ein-/Ausschalten der Sirene
6 Drehknopf TUNER/AUX zum Ein-/Ausschalten
des Megafons und Einstellen der Lautstärke bei
dem Betrieb des Megafons mit dem Funkmikrofon (→ Kap. 6.3) oder mit einem am Eingang AUX
(11) angeschlossenen Audiogerät (→ Kap. 6.4)
7 Drehschalter zur Wahl des Empfangskanals für
die Funkübertragung; zum Drehen des Schalters
den Einstellschlüssel (17) des Funkmikrofons
verwenden
8 Kleinspannungsbuchse (∅ 5,5 mm, Mittelkontakt
∅ 2,1 mm; Mittelkontakt = Pluspol) für den
Anschluss an ei ne externe 12-V-Stromversorgung, z. B. Netzgerät, Autobatterie
9 Schnappverschluss des Batteriefachs
10 Anschlussbuchse MIC für das kabelgebundene
Mikrofon
11 Eingang AUX (3,5-mm-Klinke) für den An schluss
an den Line- oder Kopfhörerausgang eines
Audiogerätes wie z. B. Kassettenrecorder, Radio
1.2 Kabelgebundenes Mikrofon (Abb. 3)
12 Sprechtaste: beim Sprechen ge drückt halten
Die Taste lässt sich durch Schieben in Pfeil rich tung einrasten: das Mikrofon bleibt dann eingeschaltet.
13 Lautstärkeregler
1.3 Funkmikrofon (Abb. 4)
14 Fach für zwei Batterien der Größe Mignon /AA
15 Schraubkappe für das Batteriefach (14)
16 Kanalwahlschalter; zum Drehen des Schalters
den Einstellschlüssel (17) verwenden
17 Einstellschlüssel für den Kanalwahlschalter (16)
18 Anzeige für den Ladezustand der Batterien:
beim Ein-/Ausschalten leuchtet sie kurz rot auf;
leuchtet sie im Betrieb, sind die Batterien fast
erschöpft
19 Ein- /Ausschalter
2 Hinweise für den sicheren Gebrauch
Die Geräte (Funkmikrofon und Megafon) entsprechen allen erforderlichen Richtlinien der EU und
sind deshalb mit gekennzeichnet.
G
Legen Sie die Geräte nicht in feuchter Umgebung
ab und schützen Sie sie vor großer Hitze (zulässiger Einsatztemperaturbereich 0– 40 °C).
G
Vermeiden Sie es, die Geräte im Regen zu verwenden. Achten Sie darauf, dass keine Flüssigkeit in die Geräte gelangt.
G
Verwenden Sie für die Reinigung nur ein trockenes oder leicht angefeuchtetes, weiches Tuch, auf
keinen Fall Chemikalien oder aggressive Reinigungsmittel.
G
Werden die Geräte zweckentfremdet, falsch be dient oder nicht fach ge recht re pa riert, kann keine
Haftung für daraus resultierende Sach- oder Personenschäden und keine Garantie für die Geräte
übernommen werden.
G
Bei längerem Nichtgebrauch der Geräte sollten
die Batterien herausgenommen werden. So bleiben die Geräte bei einem eventuellen Auslaufen
der Batterien un be schädigt.
3 Ausstattung
Das TXM-48 ist ein lei stungs star kes 45-W-Megafon
mit einschaltbarer Sirene. Es kann mit Batterien
oder über eine externe 12-V-Stromversorgung be trieben werden.
Das Megafon wird mit einem kabelgebundenen
Handmikrofon und einem Funkmikrofon geliefert.
Die Funkübertragung findet im Frequenzbereich
863,05 – 864,95MHz statt. Der regelbare AUX-Eingang bietet zusätzlich die Möglichkeit, ein Audiogerät, wie z. B. Kassettenrecorder, Ra diorecorder,
tragbarer CD-Spieler usw., anzu schlie ßen.
Das Megafon kann frei aufgestellt oder über die
M8-Ge windebuchse [(1) in Abb. 1] auf ein Stativ
montiert werden.
Sollen die Geräte endgültig aus dem Be trieb ge nommen werden, übergeben Sie
sie zur umweltgerechten Entsorgung ei nem örtlichen Re cycling betrieb.
Werfen Sie verbrauchte Batterien bzw. defekte
Akkus nicht in den Hausmüll, sondern geben Sie
sie nur in den Sondermüll (z. B. Sammelbehälter
bei Ihrem Einzelhändler).
VORSICHT Betreiben Sie das Megafon niemals
in Ohrnähe einer anderen Person!
Durch die verstärkte Stimme oder
durch ein Rückkopplungspfeifen können Gehörschäden verursacht werden.
All operating elements and connections de scribed can be found on the fold-out page 3.
1 Operating Elements and Connections
1.1 Megaphone (figures 1 and 2)
1 M8 threaded jack for mounting the megaphone
onto a stand
2 Support for the cable microphone
3 Antenna
4 Indicating LED for power supply of the mega-
phone
green: power supply is sufficient
red: power supply is insufficient (e. g. if the
batteries are almost exhausted)
5 Switch for activating /deactivating the siren
6 Rotary knob TUNER/AUX for switching the
megaphone on/ off and for adjusting the volume
while operating the megaphone with the wireless
microphone (→ chapter 6.3) or with an audio unit
connected to the AUX input (11) [→ chapter 6.4]
7 Rotary switch for selecting the receiving channel
for the wireless transmission; for turning the
switch, use the adjusting key (17) of the wireless
microphone
8 Low voltage jack (∅ 5.5 mm, centre contact
∅ 2.1 mm; centre contact = positive pole) for
connection to an external 12 V power supply,
e. g. power supply unit, car battery
9 Snap lock of the battery compartment
10 Connection jack MIC for the cable microphone
11 AUX input (3.5 mm jack) for connection to the
line output or headphone output of an audio unit,
e. g. cassette recorder, radio
1.2 Cable microphone (fig. 3)
12 Talk button: keep pressed while talking
To lock the button, push it in arrow direction: the
microphone will remain switched on.
13 Volume control
1.3 Wireless microphone (fig. 4)
14 Compartment for two batteries of size AA
15 Screw cap for the battery compartment (14)
16 Channel selector switch; for turning the switch,
use the adjusting key (17)
17 Adjusting key for the channel selector switch (16)
18 Battery status LED:
it will shortly show red when the microphone is
switched on or off; if it lights up during operation,
the batteries are almost exhausted
19 On /off switch
2 Safety Notes
The units (wireless microphone and megaphone)
correspond to all required directives of the EU and
are therefore marked with .
G
Never put down the units in humid environments
and protect them against excessive heat (admissible ambient temperature range 0 – 40°C).
G
Never use the units in the rain. Make sure that no
liquid will penetrate the units.
G
For cleaning only use a soft cloth, dry or slightly
damp; never use chemicals or aggressive detergents.
G
No guarantee claims for the units and no liability for
any resulting personal damage or material damage
will be accepted if the units are used for other purposes than originally intended, if they are not correctly operated, or not repaired in an expert way.
G
If the units are not used for a longer period,
remove the batteries to prevent damage to the
units due to battery leakage.
3 Features
The TXM-48 is a powerful 45 W megaphone with
siren feature. It can be operated with batteries or via
an external 12 V power supply.
The megaphone is supplied with a hand-held
cable microphone and a wireless microphone. The
wireless transmission is made in the frequency
range of 863.05 – 864.95MHz. The adjustable AUX
input also allows connection of an audio unit, e. g.
cassette recorder, radio recorder, portable CD
player, etc.
The megaphone can be placed as desired or
mounted onto a stand via the M8 threaded jack [(1)
in fig. 1].
3.1 Conformity and approval of the wireless
transmission system
Herewith, MONACOR INTERNATIONAL declare
that the wireless transmission system TXM-48 is in
accordance with the basic requirements and the
If the units are to be put out of operation
definitively, take them to a local recycling
plant for a disposal which is not harmful to
the environment.
Dead batteries or defective rechargeable batteries
do not belong in the household rubbish; always
take them to a special waste disposal (e. g. collection container at your retailer).
CAUTION
Never operate the megaphone close
to anyoneʼs ears; the amplified voice
or howling may cause hearing dam age!
4
GB
D
A
CH
Page 5

3.1 Konformität und Zulassung für das
Funkübertragungssystem
Hiermit erklärt MONACOR INTERNATIONAL, dass
sich das Funksystem TXM-48 in Übereinstimmung
mit den grundlegenden Anforderungen und den übrigen einschlägigen Bestimmungen der Richtlinie
1999/ 5/EG befindet. Das System ist für den Betrieb
in den EU- und EFTA-Staaten allgemein zugelassen
und an melde- und ge büh renfrei.
4 Stromversorgung des Megafons
Das Gerät kann wahlweise über Batterien oder eine
externe 12-V-Stromversorgung versorgt werden. Bei
Anschluss einer externen Stromversorgung werden
die eingesetzten Batterien abgeschaltet.
Während des Betriebs wird die Stromversorgung
über die Anzeige BATTERY (4) angezeigt:
Anzeige leuchtet grün:
Stromversorgung ist ausreichend
Anzeige leuchtet rot:
Stromversorgung ist zu gering (z. B. bei fast verbrauchten Batterien)
4.1 Einsetzen von Batterien
1) Den Schnappverschluss (9) des Batteriefach s
kräftig nach unten drücken: Der Batteriefachdeckel klappt auf.
2) Den Kunststoffbehälter aus dem Batteriefach neh -
men und in diesen zehn Batterien (oder Akkus)
der Größe Mono/ D ein setzen. Da bei auf die richti ge P o larität achten (→ Aufdruck des Behälters).
3) Den Behälter mit den Batterien wieder in das
Batte rie fach setzen und den Batteriefachdeckel
kräf tig zu drücken, sodass der Schnappverschluss
einrastet.
4.2 Externe Stromversorgung
Zum Anschluss einer externen 12-V-Stromversorgung, z. B. 12-V-Netzgerät, 12-V-Batterie, die Schutz kappe über der Buchse DC-12V (8) ab nehmen und
die Stromversorgung über einen Klein span nungs stec ker 5,5 mm/2,1 mm (Außen-/In nen durch mes ser)
an schlie ßen. Am Mittelkontakt des Steckers muss
der Pluspol liegen. Die Anschlussleitung muss mit
einer 5-A-Sicherung abgesichert werden.
Als externe Stromversorgung kann auch eine
12-V-Autobatterie, deren Minuspol an Masse liegt,
verwendet werden. Hierzu das beiliegende Adapterkabel an die Buchse DC-12V an schlie ßen und mit
der Zigarettenanzünder-Buch se im Auto verbinden.
(Für einen optimalen elektrischen Kontakt sollte
diese nicht durch Zigarettenasche verschmutzt sein.
Ggf. mit einem weichen, trockenen Tuch säubern.)
Eine 5-A-Sicherung ist im vorderen Teil des
Steckers bereits integriert. Zum Auswechseln der
Sicherung die Rändelmutter herausdrehen.
5 Stromversorgung des Funkmikrofons
1) Die Schraubkappe (15) abschrauben.
2) Zwei Batterien (oder Akkus) der Größe Mig-
non/AA unter Beachtung der Polarität in das Bat-
teriefach (14) einsetzen.
3) Ist die Kanaleinstellung (→ Kap. 6.2.2) durchge-
führt, die Kappe wieder aufschrauben.
6 Inbetriebnahme
6.1 Betrieb mit kabelgebundenem Mikrofon
1) Das beiliegende kabelgebundene Mikrofon an
das Megafon anschlie ßen: Den Stecker des
Mikrofonkabels in die Buchse MIC (10) stec ken
und mit der Rändelmutter des Steckers die Ver-
bindung arretieren.
2) In das Mikrofon sprechen und dabei die Sprech taste (12) auf der linken Seite des Mikrofons
gedrückt hal ten. Das Mikrofon sollte beim Sprechen so nah wie möglich vor den Mund gehalten
werden.
Die Sprechtaste kann durch Schieben in Pfeilrichtung eingerastet werden: das Mikrofon bleibt
dann eingeschaltet.
3) Mit dem Regler (13) auf der rechten Seite des
Mikrofons die gewünschte Lautstärke ein stellen.
Tritt ein Rückkopplungspfeifen auf, den Regler
entsprechend zurückdrehen.
4) Nach dem Betrieb das Mikrofon auf die Mikrofonhalterung (2) stecken.
Bei eingerasteter Sprechtaste nicht vergessen, diese nach dem Betrieb wieder zu lösen, um
un nötigen Stromverbrauch zu vermeiden.
6.2 Funkverbindung einrichten
Es sind 9 Übertragungskanäle im Frequenzbereich
863,05 – 864,95 MHz verfügbar.
Werden bei Betrieb dieses Funksystems gleich zeitig
an de re drahtlose Übertragungssysteme be trie ben,
sollten die Funkfrequenzen der einzelnen Sys teme
other relevant regulations of the directive
1999/ 5 /EC. The system is licence free and generally approved for operation in EU and EFTA countries.
4 Power Supply of the Megaphone
The unit can either be supplied with power via bat teries or via an external 12 V power supply. If an
external power supply is connected, the inserted
batteries will be switched off.
During operation, the power supply will be indi -
cated via the LED BATTERY (4):
LED shows green:
power supply is sufficient
LED shows red:
power supply is insufficient (e. g. if the batteries
are almost exhausted)
4.1 Inserting batteries
1) Push hard to disengage the snap lock (9) of the
battery compartment: The battery compartment
cover will open.
2) Remove the plastic container from the battery
compartment and insert ten (rechargeable) bat teries of size D. Observe the correct polarity
(→ imprint on the container).
3) Replace the container into the battery compartment and push hard to close the battery compartment cover so that the snap lock will engage.
4.2 External power supply
To connect an external 12 V power supply, e. g.
12 power supply unit, 12 V battery, remove the protection cap from the jack DC-12V (8) and connect
the power supply via a low voltage plug 5.5 mm /
2.1 mm (outside /inside diameter). The positive pole
must be at the centre contact of the plug. The
connection cable must be protected by a 5 A fuse.
For external power supply, a 12V car battery,
with its negative pole connected to ground, can also
be used. For this purpose, connect the adapter
cable supplied to the jack DC-12V and to the cigarette lighter socket in the car. (To ensure optimum
electrical contact, the socket should not be soiled by
cigarette ash; clean it with a soft dry cloth, if necessary.) A 5 A fuse has already been integrated into the
front part of the plug. To replace the fuse, unscrew
the knurled nut.
5 Power Supply of the Wireless Micro-
phone
1) Unscrew the screw cap (15).
2) Insert two (rechargeable) batteries of size AA into
the battery compartment (14). Observe the po -
larity.
3) After adjusting the channel (→ chapter 6.2.2),
screw on the cap again.
6 Operation
6.1 Operation with cable microphone
1) Connect the cable microphone supplied to the
megaphone: Connect the plug of the microphone
cable to the jack MIC (10) and secure the
connection with the knurled nut of the plug.
2) Talk into the microphone while keeping the talk
button (12) on the left side of the microphone
pressed. While talking, hold the microphone as
close to your mouth as possible.
To lock the talk button, push it in arrow direc-
tion; the microphone will remain switched on.
3) Adjust the desired volume with the control (13) on
the right side of the microphone. In case of howl -
ing, turn back the control accordingly.
4) After operation, place the microphone onto the
microphone support (2).
If the talk button is locked, remember to
unlock it after operation to prevent unnecessary
power consumption.
6.2 Adjusting the channel for wireless transmission
9 transmission channels in the frequency range of
863.05 – 864.95MHz are available.
If this wireless transmission system is operated
together with other wireless transmission systems at
the same time, the radio frequencies of the indi vidual systems should be carefully matched to prevent interference.
6.2.1 Adjusting the channel on the megaphone
Turn the channel selector switch CH SEL (7) on the
megaphone in such a way that its arrow will point to
the desired channel. For turning, use the adjusting
key (17) of the wireless microphone.
5
GB
D
A
CH
4
6
Kanal
0
3
5
7
8
2
1
864,05 MHz
864,55 MHz
Frequenz
863,25 MHz
863,05 MHz
863,75 MHz
864,25 MHz
864,75 MHz
864,95 MHz
863,55 MHz
4
6
Channel
0
3
5
7
8
2
1
864.05 MHz
864.55 MHz
Frequency
863.25 MHz
863.05 MHz
863.75 MHz
864.25 MHz
864.75 MHz
864.95 MHz
863.55 MHz
Page 6

sorgfältig aufeinander abgestimmt werden, um Stö rungen zu vermeiden.
6.2.1 Kanal am Megafon einstellen
Am Megafon den Kanalwahlschalter CH SE L (7) so
drehen, dass sein Pfeil auf den gewünschten Kanal
zeigt. Zum Drehen kann der Einstellschlüssel (17)
des Funkmikrofons verwendet werden.
6.2.2 Kanal am Funkmikrofon einstellen
Am Funkmikrofon mit dem Einstellschlüssel (17)
den Kanalwahlschalter (16) auf den gleichen Kanal
drehen, der am Megafon eingestellt ist.
Hinweis: Bei dem Funkmikrofon hat eine Änderung
der Kanaleinstellung während des Be triebs keine Auswirkung. Deshalb nach
jedem Kanalwechsel das Mikrofon kurz
ausschalten und dann wieder einschalten.
6.3 Betrieb mit Funkmikrofon
1) Die Antenne (3) senkrecht stellen.
2) Das Megafon auf Empfang des Funkmikrofons
schalten: den Drehknopf TUNER/AUX (6) von
OFF (Aus) auf ON (Ein) drehen.
3) Das Funkmikrofon einschalten: den Schal ter (19)
in die Position ON schieben. Die An zeige BATT.
(18) leuchtet kurz rot auf. Wenn die An zeige
während des Betriebs permanent leuchtet, sind
die eingesetzten Batterien fast erschöpft.
4) Den Drehknopf TUNER/AUX je nach ge wünsch ter Lautstärke aufdrehen und so nah wie möglich
in das Mikrofon sprechen. Tritt ein Rückkopplungspfeifen auf, den Drehknopf entsprechend
zu rückdrehen.
Wird am Megafon kein Mikrofonsignal emp-
fangen, überprüfen, ob die Ge räte auf den glei-
chen Kanal eingestellt sind (→ Kap. 6.2). Bei
schlechtem oder gestörtem Empang überprüfen,
ob:
a) auf einem anderen Übertragungskanal der
Empfang besser ist
b) der Abstand zwischen Funkmikrofon und
Megafon zu groß ist oder sich Hindernisse in
der Übertragungstrecke befinden, die das
Funksignal abschirmen können
c) sich der Empfang durch Schwenken der
Antenne verbessern lässt
5) Nach dem Betrieb nicht vergessen, den Drehknopf wieder auf OFF zu stellen und das Mikrofon mit dem Schalter (19) auszuschalten, um un nötigen Stromverbrauch zu vermeiden.
6.4 Betrieb mit einem Audiogerät
1) Den Line-Ausgang oder den Kopfhörerausgang des Au diogerätes (z. B. Ra diorecorder,
tragbarer CD-Spieler) mit der 3,5-mm-Klinkenbuchse AUX (11) verbinden.
Hinweis: Bei Anschluss eines Stereo-Ausgangs
einen Stereo-Mono-Adapterstecker ver wenden, an derenfalls wird nur der linke
Stereo-Kanal wiedergegeben.
2) Zum Einschalten des Megafons den Drehknopf
TUNER/AUX (6) von OFF (Aus) auf ON (Ein)
drehen.
3) Das Audiogerät einschalten. Den Drehknopf
TUNER/AUX je nach ge wünsch ter Lautstärke
aufdrehen.
4) Nach dem Betrieb nicht vergessen, den Drehknopf wieder auf OFF zu stellen, um unnötigen
Stromverbrauch zu vermeiden.
6.5 Sirenenfunktion
Zum Einschalten der Sirene den Sirenenschalter
ALARM (5) auf Position SIREN stellen. In der Po sition OFF ist die Sirene abgeschal tet.
7 Technische Daten
Ausstattung: . . . . . . . . . . . . 1 kabelgebundenes
Mikrofon
1 Funkmikrofon
Verstärkerleistung: . . . . . . . 45 W max.
Mittl. Schalldruck (1 W/ 1 m): 124 dB
Aux-Eingang: . . . . . . . . . . . 300 mV/30 kΩ
Trägerfrequenz: . . . . . . . . . 863,05 –864,95 MHz
Abmessungen: . . . . . . . . . . ∅ 350 mm × 505mm
Gewicht (ohne Batterien): . . 3,4 kg
Stromversorgung: . . . . . . . . 10 × 1,5-V-Monozelle
(Größe D) oder extern
12 V /4 A
Funkmikrofon
Reichweite: . . . . . . . . . . . ca. 30 m
Sendeleistung: . . . . . . . . < 10 mW (EIRP)
Stromversorgung: . . . . . . 2 × 1,5-V-Mignonzelle
(Größe AA)
Abmessungen: . . . . . . . . . ∅ 48 × 235mm
Gewicht (ohne Batterien): 165 g
Änderungen vorbehalten.
6.2.2 Adjusting the channel on the wireless
microphone
Use the adjusting key (17) to set the channel selector switch (16) on the wireless microphone to the
same channel adjusted on the megaphone.
Note: A change of the channel adjustment during
operation will not affect the wireless microphone. Therefore, shortly switch off the
microphone each time a different channel
has been adjusted, then switch it on again.
6.3 Operation with wireless microphone
1) Place the antenna (3) in a vertical position.
2) Switch the megaphone to reception of the wire-
less microphone: Set the rotary knob TUNER/
AUX (6) from OFF to ON.
3) Switch on the wireless microphone: Set the
switch (19) to ON. The LED BATT. (18) will
shortly show red. If the LED lights continuously
during operation, the inserted batteries are
almost exhausted.
4) Advance the rotary knob TUNER/AUX according
to the desired volume, hold the microphone as
close to your mouth as possible and talk into it. In
case of howling, turn back the rotary knob ac cordingly.
If the megaphone does not receive any micro-
phone signal, check if the units are adjusted to
the same channel (→ chapter 6.2). If the reception is poor or disturbed, check
a) if the reception is better on a different trans-
mission channel
b) if the distance between the wireless micro-
phone and the megaphone is too long or if
there are any obstacles in the transmission
path which may screen the radio signal
c) if the reception can be improved by turning the
antenna
5) After operation, remember to set the rotary knob
to OFF and to switch off the microphone with the
switch (19) to prevent unnecessary power consumption.
6.4 Operation with an audio unit
1) Connect the line output or the headphone output
of the audio unit (e. g. radio recorder, portable CD
player) to the 3.5 mm jack AUX (11).
Note: When connecting a stereo output, use a
stereo mono adapter plug, otherwise only
the left stereo channel will be reproduced.
2) To switch on the megaphone, set the rotary knob
TUNER/AUX (6) from OFF to ON.
3) Switch on the audio unit. Advance the rotary knob
TUNER/AUX according to the desired volume.
4) After operation, remember to set the rotary knob
to OFF to prevent unnecessary power consumption.
6.5 Siren feature
To activate the siren, set the siren switch ALARM (5)
to the position SIREN. In the position OFF, the siren
will be deactivated.
7 Specifications
Features: . . . . . . . . . . . . . . 1 cable microphone
1 wireless microphone
Amplifier power: . . . . . . . . . 45 W max.
SPL (1W/1 m): . . . . . . . . . 124 dB
Aux input: . . . . . . . . . . . . . . 300 mV/30 kΩ
Carrier frequency: . . . . . . . 863.05 – 864.95 MHz
Dimensions: . . . . . . . . . . . . ∅ 350 mm × 505 mm
Weight (without batteries): . 3.4 kg
Power supply: . . . . . . . . . . 10 × 1.5 V battery,
size D or external
12 V / 4 A
Wireless microphone
Range: . . . . . . . . . . . . . . approx. 30 m
Transmitting power: . . . . < 10 mW (EIRP)
Power supply: . . . . . . . . 2 × 1.5 V battery,
size AA
Dimensions: . . . . . . . . . . ∅ 48 × 235 mm
Weight
(without batteries): . . . . . 165 g
Subject to technical modification.
6
GB
D
A
CH
Diese Bedienungsanleitung ist urheberrechtlich für MONACOR®INTERNATIONAL GmbH & Co. KG
geschützt. Eine Reproduktion für eigene kommerzielle Zwecke – auch auszugsweise – ist untersagt.
All rights reserved by MONACOR
®
INTERNATIONAL GmbH & Co. KG. No part of this instruction manual
may be reproduced in any form or by any means for any commercial use.
Page 7

Vous trouverez sur la page 3, dépliable, les éléments et branchements décrits.
1 Eléments et branchements
1.1 Mégaphone (schémas 1 et 2)
1 Prise filetée M8 pour le montage sur un pied
2 Support pour le microphone filaire
3 Antenne
4 LED pour lʼalimentation du mégaphone
vert : alimentation suffisante
rouge : alimentation trop faible (par exemple si
les batteries sont presque épuisées)
5 Interrupteur Marche /Arrêt de la sirène
6 Potentiomètre rotatif TUNER /AUX pour mettre
en marche/ arrêter le mégaphone et régler le
volume lorsque le mégaphone fonctionne avec
le microphone sans fil (voir chapitre 6.3) ou avec
un appareil audio branché à lʼentrée AUX (11)
(voir chapitre 6.4)
7 Sélecteur rotatif pour choisir le canal de récep-
tion pour la transmission sans fil ; utilisez la clé
de réglage (17) du micro sans fil pour tourner le
sélecteur.
8 Prise basse tension (∅ 5,5 mm, contact médian
∅ 2,1 mm ; contact médian = pôle plus) pour
brancher une alimentation externe 12 V, par
exemple bloc secteur, batterie voiture.
9 Fermeture à déclic du compartiment batterie
10 Prise de branchement MIC pour le microphone
filaire
11 Entrée AUX (jack 3,5) pour brancher à la sortie
casque ou ligne dʼun appareil audio, par exemple magnétophone, radio
1.2 Microphone filaire (schéma 3)
12 Touche Parole : maintenez-la enfoncée pour
parler
La touche peut être enclenchée si on la pousse
dans le sens de le flèche : le microphone reste
alors allumé.
13 Potentiomètre de réglage de volume
1.3 Microphone sans fil (schéma 4)
14 Compartiment pour deux batteries de type R6
15 Couvercle à vis du compartiment batterie (14)
16 Sélecteur de canal : utilisez la clé de réglage (17)
pour tourner le sélecteur
17 Clé de réglage pour le sélecteur de canal (16)
18 Affichage pour lʼétat de charge des batteries :
lors de lʼallumage/ arrêt, elle brille brièvement en
rouge ; si elle brille pendant le fonctionnement,
les batteries sont presque épuisées
19 Interrupteur Marche /Arrêt
2 Conseils dʼutilisation et de sécurité
Les appareils (mégaphone et micro sans fil) répondent à toutes les directives nécessaires de lʼUnion
européenne et portent donc le symbole .
G
Ne déposez pas les appareils dans un environnement humide et protégez-les dʼune chaleur élevée
(plage de température de fonctionnement autorisée : 0 – 40°C).
G
Evitez dʼutiliser lʼappareil sous la pluie. Veillez à
ce quʼaucun liquide ne pénètre dans les appareils.
G
Pour les nettoyer, utilisez uniquement un chiffon
doux, sec ou légèrement humide, en aucun cas,
de produits chimiques ou produits de nettoyage
agressifs.
G
Nous déclinons toute responsabilité en cas de
dommages matériels ou corporels consécutifs si
les appareils sont utilisés dans un but autre que
celui pour lequel ils ont été conçus, sʼils ne sont
pas correctement utilisés ou réparés par une personne habilitée ; de même, la garantie deviendrait
caduque.
G
En cas de non utilisation prolongée des appareils,
retirez les batteries des appareils, elles pourraient
couler et endommager les appareils.
3 Equipement
Le TXM-48 est un mégaphone puissant 45W avec
une sirène commutable. Il peut fonctionner avec des
batteries ou une alimentation externe de 12V.
Le mégaphone est livré avec un micro main
filaire et un micro sans fil. La transmission radio sʼeffectue dans la plage 863,05-864,95 MHz. Lʼentrée
AUX réglable permet en plus de relier un appareil
audio, par exemple magnétophone, radiocassette,
lecteur CD portable...
Le mégaphone peut être posé librement ou
monté sur un pied via la prise filetée M8 [(1) sur le
schéma 1].
Lorsque les appareils sont définitivement
retirés du service, vous devez les déposer
dans une usine de recyclage adaptée pour
contribuer à leur élimination non polluante.
Ne déposez pas les batteries usagées dans la
poubelle domestique, déposez-les dans un container spécifique ou ramenez-les à votre détaillant.
ATTENTION Ne faites jamais fonctionner le mé -
gaphone à proximité des oreilles
dʼune autre personne ! Des dommages à lʼaudition peuvent être causés
par une voix amplifiée ou un sifflement dû au feedback acoustique.
A pagina 3, se aperta completamente, vedrete
sempre gli elementi di comando e i collegamenti
descritti.
1 Elementi di comando e collegamenti
1.1 Megafono (figg. 1 e 2)
1 Presa filettata M8 per il montaggio su un trep-
piede
2 Supporto per il microfono collegato mediante
cavo
3 Antenna
4 Spia di alimentazione del megafono
verde: alimentazione sufficiente
rosso: alimentazione scadente (p. es. con bat-
terie quasi scariche)
5 Interruttore on/off della sirena
6 Manipola TUNER /AUX per accendere/spegnere
il megafono e per impostare il volume quando
il megafono funziona con il radiomicrofono
(→ cap. 6.3) o con un apparecchio audio collegato allʼingresso AUX (11) (→ cap. 6.4).
7 Selettore per la ricezione del canale di ricezione
per la trasmissione wireless; per girare il selettore usare la chiave di regolazione (17) del radiomicrofono
8 Presa per alimentazione DC (∅ 5,5 mm, contatto
centrale ∅ 2,1 mm; contatto centrale = positivo)
per il collegamento con unʼalimentazione
esterna a 12 V, p. es. alimentatore, batteria dellʼauto
9 Chiusura a scatto del vano batteria
10 Presa di collegamento MIC per il microfono via
cavo
11 Ingresso AUX (jack 3,5 mm) per il collegamento
con lʼuscita di linea o cuffia di un apparecchio
audio, p. es. registratore a cassette, radio
1.2 Microfono collegato mediante cavo (fig. 3)
12 Tasto voce: tenerlo premuto mentre si parla.
Spingendo il tasto in direzione della freccia si
blocca ad incastro: il microfono rimane acceso.
13 Regolatore volume
1.3 Radiomicrofono (fig. 4)
14 Vano per due batteria tipo stilo/AA
15 Cappuccio a vite per il vano batterie (14)
16 Selettore canali; per girare il selettore usare la
chiave di regolazione (17)
17 Chiave di regolazione per il selettore canali (16)
18 Spia per lo stato delle batterie:
si accende brevemente di rosso durante lʼaccensione e lo spegnimento; se si accende durante il
funzionamento significa che le batterie sono
quasi scariche
19 Interruttore on /off
2 Avvertenze di sicurezza
Gli apparecchi (radiomicrofono e megafono) sono
conformi a tutte le direttive richieste dellʼUE e pertanto porta la sigla .
G
Non depositare gli apparecchi in un ambiente
umido e proteggerli dal forte calore (temperatura
dʼimpiego ammessa fra 0 e 40 °C).
G
Cercate di non usare gli apparecchi sotto la pioggia. Fare in modo che non entri del liquido allʼinterno degli apparecchi.
G
Per la pulizia usare solo un panno morbido asciut to oppure leggermente inumidito; non impiegare
in nessun caso prodotti chimici o detersivi aggressivi.
G
Nel caso di uso improprio, di impiego scorretto o
di riparazione non a regola dʼarte degli apparecchi, non si assume nessuna responsabilità per
eventuali danni consequenziali a persone o a
cose e non si assume nessuna garanzia per gli
apparecchi.
G
Nel caso di non utilizzo prolungato conviene
togliere le batterie per evitare che perdano danneggiando gli apparecchi.
3 Equipaggiamento
Il TXM-48 è un megafono potente a 45 W con possibilità di inserire la sirena. Può funzionare sia con
batterie che con unʼalimentazione esterna a 12 V.
Il megafono è equipaggiato con un microfono a
mano collegato con un cavo e con un radiomicrofono. La trasmissione radio è effettuata nel range di
frequenze 863,05 – 864,95MHz. Lʼuscita AUX regolabile permette il collegamento di un apparecchio
audio, p. es. di un registratore a cassette, un radio
registratore, un lettore CD portatile ecc.
Il megafono può essere sistemato liberamente
oppure può essere montato su un treppiede me diante la presa filettata M8 [(1) di fig. 1].
3.1 Conformità e omologazione
La MONACOR INTERNATIONAL dichiara che i
sistema radio TXM-48 è conforme a tutti i requisiti di
base e alle rimanenti disposizioni in materia della
Se si desidera eliminare lʼapparecchio definitivamente, consegnarlo per lo smaltimento ad unʼistituzione locale per il
riciclaggio.
Non gettare le batterie scariche nelle immondizie
di casa bensì negli appositi contenitori.
ATTENZIONE Non usare mai il megafono vicino
allʼorecchio di unʼaltra persona! Il
forte volume della voce o il fischio
dovuto al feedback acustico possono provocare danni allʼudito.
7
I
F
B
CH
Page 8

3.1 Conformité et autorisation du système de
transmission sans fil
Par la présente, MONACOR INTERNATIONAL dé clare que le système sans fil TXM-48 se trouve en
conformité avec les exigences fondamentales et les
réglementations inhérentes à la directive 1999/ 5/CE.
Le système est autorisé pour un fonctionnement
dans les pays de lʼUnion européenne et de lʼA.E.L.E
et ne nécessite pas de déclaration.
4 Alimentation du mégaphone
Lʼappareil peut être alimenté via des batteries ou
une alimentation externe 12 V. Si vous branchez
une alimentation externe, les batteries insérées sont
déconnectées.
Pendant le fonctionnement, lʼalimentation est si -
gnalé par la LED BATTERY (4) :
la LED brille en vert :
alimentation suffisante
la LED brille en rouge :
alimentation trop faible (par exemple si les batteries sont presque épuisées)
4.1 Insertion des batteries
1) Pressez fortement la fermeture à déclic (9) du
compartiment batterie vers le bas : le couvercle
du compartiment batterie sʼouvre.
2) Retirez le support plastique du compartiment bat-
terie et insérez dix batteries ou accumulateurs de
type R20. Veillez à respecter la polarité (reportez-vous au repère du support).
3) Remettez le support avec les batteries dans le
compartiment batterie, et fermez le compartiment
batterie en poussant fortement sur le couvercle
de sorte que la fermeture à déclic sʼenclenche.
4.2 Alimentation externe
Pour brancher une alimentation externe 12 V, p.ex.
bloc secteur 12 V, batterie 12V, retirez la protection
sur la prise DC-12V (8), et branchez lʼalimentation
via une fiche à basse tension 5,5 mm /2,1 mm
(Ø ext./ int.). Le pôle plus doit être au contact
médian de la fiche. Le câble de branchement doit
être protégé par un fusible 5 A.
Comme alimentation externe une batterie voiture
12 V dont le pôle moins est à la masse peut aussi
être utilisée. Branchez le câble adaptateur livré à la
prise DC-12V et à la prise allume-cigare dans la voiture. (Pour assurer un contact électrique optimal,
cette prise ne devrait pas être salie par de la cendre
de cigarettes. Si nécessaire, nettoyez-la avec un
chiffon sec et doux.) Un fusible 5 A est déjà intégré
dans la partie avant de la fiche. Tournez lʼécrou
moleté pour changer le fusible.
5 Alimentation du microphone sans fil
1) Dévissez le couvercle (15).
2) Insérez deux batteries (ou accumulateurs) de
type R6 dans le compartiment batterie (14) en
respectant la polarité.
3) Si le réglage du canal est déjà effectué (voir cha-
pitre 6.2.2), revissez le couvercle.
6 Fonctionnement
6.1 Fonctionnement avec le microphone filaire
1) Reliez le microphone filaire livré au mégaphone :
placez la fiche du câble microphone dans la prise
MIC (10), et fixez la connexion avec lʼécrou
moleté de la fiche.
2) Parlez dans le microphone et maintenez la tou-
che parole (12) située sur le côté gauche du
microphone, enfoncée. Le microphone devrait
être tenu le plus proche que possible à la bouche
pour parler.
Si vous poussez la touche parole dans le sens
de la flèche, la touche est enclenchée et le microphone reste allumé.
3) Avec le potentiomètre (13) sur le côté droit du
microphone vous pouvez régler le volume souhaité. En cas de sifflement dû au feedback acous tique, tournez en arrière le potentiomètre en
fonction.
4) Après le fonctionnement, placez le microphone
sur le support du microphone (2).
Si la touche prise de parole est enclenchée,
nʼoubliez pas de la relâcher après lʼopération
pour éviter une consommation inutile de courant.
6.2 Transmission sans fil
9 canaux de transmissions sont disponibles dans la
plage de fréquence 863,05 – 864,95MHz :
Si pendant le fonctionnement de ce système sans
fil, dʼautres systèmes de transmission sans fil fonctionnent simultanément, il faut régler soigneusement les fréquences de chaque système les uns par
rapport aux autres pour éviter toute interférence.
direttiva 1999/ 5/CE. Il sistema è omologato per lʼimpiego negli stati dellʼUE e dellʼEFTA, non richiede
registrazione ed è esente da tasse.
4 Alimentazione del megafono
Lʼapparecchio può essere alimentato a scelta tramite batterie o unʼalimentazione esterna a 12 V. Se
è collegata unʼalimentazione esterna, le batterie
interne vengono staccate.
Durante il funzionamento, lʼalimentazione è visua-
lizzata tramite la spia BATTERY (4):
Spia verde:
alimentazione sufficiente
Spia rossa:
alimentazione scadente (p. es. con batterie quasi
scariche)
4.1 Inserimento delle batterie
1) Spingere fortemente in basso la chiusura a
scatto (9) del vano batterie. Lo sportello si apre.
2) Togliere il contenitore di plastica dal vano batterie
e metterci dieci batterie (anche ricaricabili) del
tipo torcia (D), rispettando la corretta polarità
(→ vedi la sovrastampa sul contenitore).
3) Sistemare il porta batterie nuovamente nel vano
batterie e chiudere con forza il coperchio in modo
che chiuda ad incastro.
4.2 Alimentazione esterna
Per collegare unʼalimentazione esterna 12 V (p. es.
alimentatore 12 V, batteria 12 V) togliere il cappuccio
di protezione dalla presa DC-12 (8) e applicare la
tensione mediante un connettore per alimentazione
DC 5,5 mm /2,1 mm (diametro esterno/interno). Il
positivo devʼessere sul contatto centrale. Il cavo di
alimentazione deve essere protetto con un fusibile
di 5 A.
Anche una batteria auto con il negativo alla
massa può servire come alimentazione esterna. In
questo caso collegare il cavo adattatore in dotazione con la presa DC-12V ed inserirlo nellʼaccendisigaro della macchina (per garantire un contatto ottimale controllare che non ci sia della cenere di
sigarette sul contatto; eventualmente pulire con un
panno morbido, asciutto). Nella parte anteriore del
connettore è integrato un fusibile di 5 A. Per sostituire il fusibile svitare il dado zigrinato.
5 Alimentazione del radiomicrofono
1) Svitare il cappuccio (15) a vite.
2) Inserire due batterie (anche ricaricabili) del tipo
stilo/ AA nel vano batteria (14), rispettando la
polarità.
3) Dopo aver eseguita lʼimpostazione dei canali,
(→ cap. 6.2.2) riavvitare il cappuccio.
6 Messa in funzione
6.1 Funzionamento con microfono via cavo
1) Collegare il microfono in dotazione con il mega-
fono, inserendo il connettore del cavo del micro-
fono nella presa MIC (10) e bloccare il collega-
mento con il dado zigrinato del connettore.
2) Parlare nel microfono tenendo premuto il tasto
voce (12) sul lato sinistro del microfono. Tenere il
microfono il più vicino possibile alla bocca.
Il tasto voce può essere bloccato spingendolo
in direzione della freccia; in questo caso il microfono rimane acceso.
3) Con il regolatore (13) sul lato destro del microfono si può impostare il volume. Se si manifesta il
fischio dovuto al feedback acustico occorre
abbassare il regolatore.
4) Al termine collocare il microfono nel suo supporto
(2).
Se è stato bloccato il tasto voce non dimenticare di sbloccarlo per evitare un consumo inutile
di corrente.
6.2 Impostare il collegamento radio
Sono disponibili 9 canali di trasmissione nel range di
frequenze 863,05 – 864,95MHz.
Se usando questo sistema wireless si usano contemporaneamente altri sistemi wireless di trasmissione, le radiofrequenze dei singoli sistemi dovrebbero essere bene sintonizzati fra di loro per
escludere interferenze.
6.2.1 Impostare il canale sul megafono
Sul megafono girare il selettore CH SEL (7) in modo
tale che la sua freccia indichi il canale desiderato.
Per girarlo si può usare la chiave di regolazione (17)
del radiomicrofono.
6.2.2 Impostare il canale sul radiomicrofono
Aiutandosi della chiave di regolazione (17), girare
sul radiomicrofono il selettore canali (16) sullo
stesso canale che è impostato sul megafono.
8
I
F
B
CH
4
6
canal
0
3
5
7
8
2
1
864,05 MHz
864,55 MHz
fréquence
863,25 MHz
863,05 MHz
863,75 MHz
864,25 MHz
864,75 MHz
864,95 MHz
863,55 MHz
4
6
Canale
0
3
5
7
8
2
1
864,05 MHz
864,55 MHz
Frequenza
863,25 MHz
863,05 MHz
863,75 MHz
864,25 MHz
864,75 MHz
864,95 MHz
863,55 MHz
Page 9

6.2.1 Réglage du canal sur le mégaphone
Tournez le sélecteur de canal CH SEL (7) sur le
mégaphone de telle sorte que sa flèche indique le
canal voulu. Pour tournez utilisez la clé de réglage
(17) du micro sans fil.
6.2.2 Réglage du canal sur le micro sans fil
Sur le micro sans fil, utilisez la clé (17) pour tourner
le sélecteur de canal (16) sur le même canal que
celui réglé sur le mégaphone.
Remarque : Sur le micro sans fil, une modification
du réglage de canal pendant le fonctionnement nʼa pas dʼeffet. Cʼest pourquoi, après chaque changement de
canal, éteignez brièvement le microphone puis rallumez-le.
6.3 Fonctionnement avec le micro sans fil
1) Placez lʼantenne (3) verticalement.
2) Commutez le mégaphone sur la réception du
microphone sans fil: tournez le potentiomètre
rotatif TUNER/AUX (6) de OFF (éteint) sur ON
(allumé).
3) Allumez le microphone sans fil : poussez lʼinterrupteur (19) sur la position ON. La LED BATT.
(18) brille brièvement en rouge. Si la LED brille
pendant le fonctionnement en permanence, les
batteries insérées sont presque épuisées.
4) Tournez le potentiomètre rotatif TUNER /AUX
selon le volume souhaité, et parlez le plus près
possible dans le microphone. En cas de sifflement dû au feedback acoustique, tournez en
arrière le potentiomètre en fonction.
Si sur le mégaphone aucun signal micro nʼest
reçu, vérifiez si les appareils sont réglés sur le
même canal (voir chapitre 6.2). En cas de mauvaise réception ou de réception perturbée, vérifiez si :
a) la réception est meilleure sur un autre canal
de transmission
b) la distance entre le microphone sans fil et le
mégaphone est trop grande ou si des
obstacles se trouvent dans la voie de trans-
mission, pouvant interférer
c) la réception est meilleure si on tourne lʼan-
tenne
5) Après le fonctionnement, nʼoubliez pas de mettre
le potentiomètre rotatif sur OFF et déconnectez
le microphone avec lʼinterrupteur (19) pour éviter
une consommation inutile de courant.
6.4 Fonctionnement avec un appareil audio
1) Branchez la sortie Ligne ou la sortie casque de
lʼappareil audio (p. ex. radiocassette, lecteur CD
portable) à la prise jack 3,5 mm AUX (11).
Remarque :Si vous branchez une sortie stéréo,
utilisez un adaptateur stéréo mono
sinon seul le canal gauche est restitué.
2) Pour allumer le mégaphone tournez le potentiomètre rotatif TUNER/AUX (6) de OFF (éteint)
sur ON (allumé).
3) Allumez lʼappareil audio. Tournez le potentiomètre
rotatif TUNER/AUX selon le volume souhaité.
4) Après le fonctionnement nʼoubliez pas de
remettre le potentiomètre rotatif sur OFF pour
éviter une consommation inutile de courant.
6.5 Fonction de la sirène
Pour allumer la sirène, mettez lʼinterrupteur de la
sirène ALARM (5) sur la position SIREN. Dans la
position OFF la sirène est déconnectée.
7 Caractéristiques techniques
Equipement : . . . . . . . . . . . 1 microphone filaire,
1 micro sans fil
Puissance amplification : . . 45 W max.
Pression sonore moyenne
(1 W/ 1 m) : . . . . . . . . . . . . . 124 dB
Entrée Aux : . . . . . . . . . . . . 300 mV/ 30 kΩ
Fréquence porteuse : . . . . . 863,05 – 864,95 MHz
Dimensions : . . . . . . . . . . . ∅ 350 mm × 505 mm
Poids (sans batteries) : . . . 3,4 kg
Alimentation : . . . . . . . . . . . 10 × batterie 1,5 V
type R20 ou
12 V / 4 A externe
Microphone sans fil
Portée : . . . . . . . . . . . . . 30 m environ
Puissance émission : . . . < 10 mW (EIRP)
Alimentation : . . . . . . . . . 2 × batterie 1,5 V type
R6
Dimensions : . . . . . . . . . ∅ 48 × 235 mm
Poids (sans batteries) : . 165 g
Tout droit de modification réservé.
N. B.: Sul radiomicrofono, una modifica delle
impostazioni dei canali durante il funzionamento non ha effetto. Perciò, dopo ogni
cambio del canale occorre spegnere brevemente il microfono e riaccenderlo poi.
6.3 Funzionamento con il radiomicrofono
1) Portare lʼantenna (3) in posizione verticale.
2) Sul megafono impostare la ricezione del radiomicrofono: girare la manopola TUNER/AUX (6)
da OFF (spento) a ON (acceso).
3) Accendere il radiomicrofono: spostare in posizione ON lʼinterruttore (19). La spia BATT. (18) si
accende brevemente di rosso. Se la spia rimane
accesa durante il funzionamento, significa che le
batterie sono quasi scariche.
4) Aprire la manopola TUNER/AUX a seconda del
volume desiderato e parlare tenendo il microfono
il più vicino possibile alla bocca. Se si manifesta
il fischio dovuto al feedback acustico occorre
abbassare il regolatore.
Se il megafono non riceve nessun segnale dal
microfono, controllare se gli apparecchi sono
impostati con lo stesso canale (→ cap. 6.2). Se la
ricezione è scadente o disturbata, controllare se:
a) con un altro canale di trasmissione, la rice-
zione è migliore
b) la distanza fra radiomicrofono e megafono è
troppo grande oppure se si trovano degli osta-
coli nella via di trasmissione che possano
schermare il radiosegnale
c) la ricezione migliora muovendo lʼantenna
5) Al termine non dimenticare di riportare la manopola su OFF e di spegnere il microfono con lʼinterruttore (19) per evitare un consumo inutile di
corrente.
6.4 Funzionamento con un apparecchio audio
1) Collegare lʼuscita di linea o cuffia dellʼapparecchio audio (registratore a cassette, lettore CD
portatile ecc.) con la presa jack 3,5 mm AUX (11).
N. B.: Collegando unʼuscita stereo, usare un
adattatore stereo/mono; altrimenti viene
riprodotto solo il canale stereo di sinistra.
2) Per accendere il megafono, girare la manopola
TUNER/AUX (6) da OFF (spento) a ON
(acceso).
3) Accendere lʼapparecchio audio. Aprire la manopola TUNER/AUX a seconda del volume desiderato.
4) Al termine non dimenticare di riportare la manopola su OFF per evitare un consumo inutile di
corrente.
6.5 Sirena
Per attivare la sirena portare lʼinterruttore ALARM
(5) in posizione SIREN. In posizione OFF, la sirena
è disattivata.
7 Dati tecnici
Equipaggiamento: . . . . . . . 1 microfono collegato
via cavo
1 radiomicrofono
Potenza amplificatore: . . . . 45 W max.
Pressione med. sonora
(1 W/ 1 m): . . . . . . . . . . . . . 124 dB
Ingresso Aux: . . . . . . . . . . . 300 mV/30 kΩ
Frequenza portante: . . . . . 863,05 – 864,95 MHz
Dimensioni: . . . . . . . . . . . . ∅ 350 mm × 505mm
Peso (senza batterie): . . . . 3,4 kg
Alimentazione: . . . . . . . . . . 10 × batterie torcia
1,5 V (D) o esterna-
mente 12 V /4 A
Radiomicrofono
Portata: . . . . . . . . . . . . . ca. 30 m
Potenza di trasmissione: < 10 mW (EIRP)
Alimentazione: . . . . . . . . 2 × batterie stilo
1,5 V (AA)
Dimensioni: . . . . . . . . . . ∅ 48 × 235 mm
Peso (senza batterie): . . 165 g
Con riserva di modifiche tecniche.
9
I
F
B
CH
Notice dʼutilisation protégée par le copyright de MONACOR®INTERNATIONAL GmbH & Co. KG. Toute
reproduction même partielle à des fins commerciales est interdite.
La MONACOR
®
INTERNATIONAL GmbH & Co. KG si riserva ogni diritto di elaborazione in qualsiasi forma
delle presenti istruzioni per lʼuso. La riproduzione – anche parziale– per propri scopi commerciali è vietata.
Page 10

®
MONACOR INTERNATIONAL GmbH & Co. KG •Zum Falsch 36 •28307 Bremen •Germany
Copyright
©
by MONACOR INTERNATIONAL. All rights reserved. A-0775.99.02.06.2011
 Loading...