

Mitsubishi PLA-RP-AA, PUHZ-RP-HA, PU-P-GAA, PUH-P·GAA Operation Manual
Air-Conditioners
PLA-RP·AA / PUHZ-RP·HA
PU (H)-P·GAA
OPERATION MANUAL
For safe and correct use, please read this operation manual thoroughly before operating the air-conditioner unit.
FOR USER
English
Contents
ELV
1. Safety Precautions ...................................................................................................................................................................... 2
2. Operation..................................................................................................................................................................................... 3
3. Care and cleaning ....................................................................................................................................................................... 5
4. Troubleshooting ........................................................................................................................................................................... 6
5. Specifications .............................................................................................................................................................................. 7
1. Safety Precautions
s Before installing the unit, make sure you read all the “Safety precautions”.
s The “Safety precautions” provide very important points regarding safety. Make sure you follow them.
s This equipment may not be applicable to EN60555-2:1987/EN61000-3-2:1995+A1:1998+A2:1998 and/or EN60555-
3:1987+A1:1991/EN61000-3-3:1995.
s This equipment may cause the adverse effect on the same supply system.
s Please report to or take consent by the supply authority before connection to the system.
Symbols used in the text
Warning:
Describes precautions that should be observed to prevent danger of injury or death to the user.
Caution:
Describes precautions that should be observed to prevent damage to the unit.
Symbols used in the illustrations
: Indicates an action that must be avoided.
: Indicates that important instructions must be followed.
: Indicates a part which must be grounded.
: Indicates that caution should be taken with rotating parts.
: Indicates that the main switch must be turned off before servicing.
: Beware of electric shock.
: Beware of hot surface.
: At servicing, please shut down the power supply for both of Indoor Unit and Outdoor Unit.
Warning:
Carefully read the labels affixed to the main unit.
Warning:
• The unit should not be installed by the user. Ask the dealer or an authorized company to install the unit. If the unit is installed improperly,
water leakage, electric shock or fire may result.
• Do not stand on, or place any items on the unit.
• Do not splash water over the unit and do not touch the unit with wet hands. An electric shock may result.
• Do not spray combustible gas close to the unit. Fire may result.
• Do not place a gas heater or any other open-flame appliance where it will be exposed to the air discharged from the unit. Incomplete
combustion may result.
• Do not remove the front panel or the fan guard from the outdoor unit when it is running.
• When you notice exceptionally abnormal noise or vibration, stop operation, turn off the power switch, and contact your dealer.
• Never insert fingers, sticks etc. into the intakes or outlets.
• If you detect odd smells, stop using the unit, turn off the power switch and consult your dealer. Otherwise, a breakdown, electric shock or
fire may result.
• This air conditioner is NOT intended for use by children or infirm persons without supervision.
• Young children should be supervised to ensure that they do not play with the air conditioner.
• If the refrigeration gas blows out or leaks, stop the operation of the air conditioner, thoroughly ventilate the room, and contact your dealer.
Caution:
• Do not use any sharp object to push the buttons, as this may damage the remote controller.
• Never block or cover the indoor or outdoor unit’s intakes or outlets.
Disposing of the unit
When you need to dispose of the unit, consult your dealer.
2
min
1
2
3
4
FAN
VANE
TEST RUN
AUTO STOP
AUTO START
h
min
LOUVER
MODE
CHECK
RESETSET CLOCK
5
6
1
TIMER SET
ON/OFF
˚C
˚C
FILTER
CHECK TEST
TEMP.
1
A
1
B
2
TIMER SET
ON/OFF
˚C
˚C
FILTER
CHECK TEST
TEMP.
2
B
1
A
TIMER SET
ON/OFF
˚C
˚C
FILTER
CHECK TEST
TEMP.
A
1
1
A
2. Operation
TEMP.
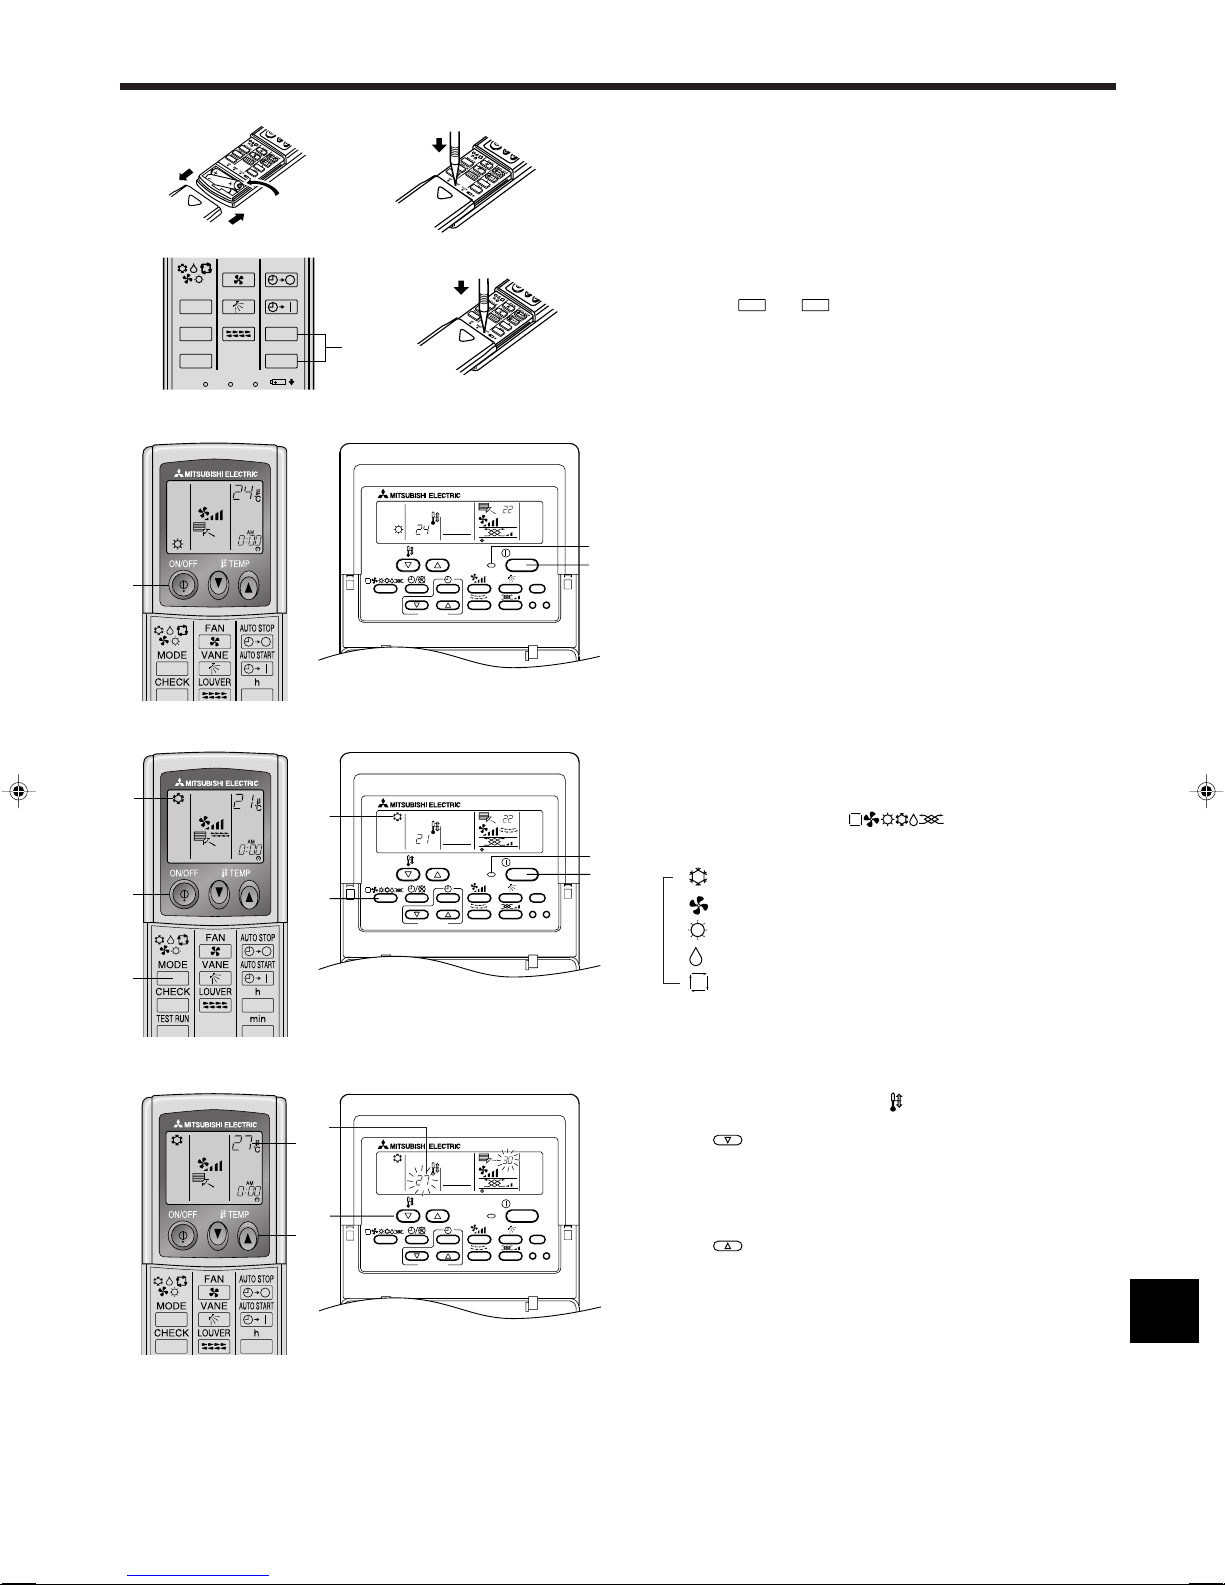
Replacing the Batteries and how to set the current time
If no signal is transmitted and the indoor unit’s lamp does not light up even
if the remote controller is operated, the batteries may have run out, so
replace them with new ones as described below.
1 Remove the front lid.
2 Replace the batteries with alkali batteries (size AAA). Make sure that
the batteries are installed in the correct direction. (Insert the minus
pole of the batteries first.)
3 Reattach the front lid.
4 Press the RESET button using a thin stick.
5 Press the h and
button to set the current time.
6 Press the CLOCK button using a thin stick and close the front lid.
If you are not going to use the unit for a long period of time, remove the
batteries to prevent damage which may occur due to leakage of electrolyte.
Check if your remote controller is the wired type or the wireless type before
referring to the illustration and text for operation procedures.
2.1. Switching the unit on/off
• The power supply should not be turned off while the air conditioner is in
use. This can cause the unit to break down.
1 Press the ON/OFF button.
AThe ON indicator should light up.
• Even if you press the ON/OFF button immediately after shutting down
the operation in progress, the air conditioner will not start for about three
minutes. This is to prevent the internal components from being dam-
aged.
• If the operation stops due to a power failure, the unit will not automati-
cally restart until the power has been restored. Press the ON/OFF but-
ton to restart.
2.2. Mode select
1 If the unit is off, press the ON/OFF button to turn it on.
AThe ON indicator should light up.
2 Press the operation mode ( ) button and select the op-
eration mode.
B
s
Cooling mode
Fan mode
Heating mode
Drying mode
Automatic (cooling/heating) mode
Note:
The heating display and the automatic display does not appear in models that
operate exclusively as cooling only air-conditioner.
2.3. Selecting a temperature
ss
sTo decrease the room temperature:
ss
1 Press button to set the desired temperature.
AThe selected temperature is displayed.
• Each time you press the button, the temperature value decreases by 1
°C.
ss
sTo increase the room temperature:
ss
1 Press button to set the desired temperature.
AThe selected temperature is displayed.
• Each time you press the button, the temperature value increases by 1
°C.
• Available temperature ranges are as follows:
Cooling & Drying: 19 - 30 °C
Heating: 17 - 28 °C
Automatic: 19 - 28 °C
Circulation: — (Not available)
• The display flashes either 8 °C - 39 °C to inform you if the room tem-
perature is lower or higher than the displayed temperature.
3
 Loading...