

Page 1

Air-Conditioners For Building Application
INDOOR UNIT
PKFY-P·VBM-E / PKFY-P·VHM-E
PCFY-P·VKM-E / PFFY-P·VKM-E
PMFY-P·VBM-E
OPERATION MANUAL
For safe and correct use, please read this operation manual thoroughly before operating the air-conditioner unit.
BEDIENUNGSHANDBUCH
Zum sicheren und einwandfreien Gebrauch der Klimaanlage dieses Bedienungshandbuch vor Inbetriebnahme
gründlich durchlesen.
MANUEL D’UTILISATION
Pour une utilisation correcte sans risques, veuillez lire le manuel d’utilisation en entier avant de vous servir du
climatiseur.
BEDIENINGSHANDLEIDING
Voor een veilig en juist gebruik moet u deze bedieningshandleiding grondig doorlezen voordat u de
airconditioner gebruikt.
MANUAL DE INSTRUCCIONES
Lea este manual de instrucciones hasta el fi nal antes de poner en marcha la unidad de aire acondicionado
para garantizar un uso seguro y correcto.
ISTRUZIONI DI FUNZIONAMENTO
Leggere attentamente questi istruzioni di funzionamento prima di avviare l’unità, per un uso corretto e sicuro
della stessa.
ΕΓΧΕΙΡΙΔΙΟ ΟΔΗΓΙΩΝ ΧΡΗΣΕΩΣ
Για ασφάλεια και σωστή χρήση, παρακαλείστε διαβάσετε προσεχτικά αυτό το εγχειρίδιο χρήσεως πριν θέσετε
σε λειτουργία τη μονάδα κλιματισμού.
MANUAL DE OPERAÇÃO
Para segurança e utilização correctas, leia atentamente o manual de operação antes de pôr a funcionar a unidade de ar condicionado.
FOR USER
FÜR BENUTZER
POUR L’UTILISATEUR
VOOR DE GEBRUIKER
PARA EL USUARIO
PER L’UTENTE
ΓΙΑ ΤΟΝ ΧΡΗΣΤΗ
PARA O UTILIZADOR
English
Deutsch
Français
Nederlands
Español
Italiano
Ελληνικά
Português
Işletme Elkitabı
Emniyetli ve doğru biçimde nasıl kullanılacağını öğrenmek için lütfen klima cihazını işletmeden önce bu
elkitabını dikkatle okuyunuz.
РУКОВОДСТВО ПО ЭКСПЛУАТАЦИИ
Для обеспечения правильного и безопасного использования следует ознакомиться с инструкциями, указанными в
данном руководстве по эксплуатации, тщательным образом до того, как приступать к использованию кондиционера.
操作说明书
在操作空调机之前,请全面阅读本操作说明书,以便安全和正确地使用本机。
KULLANICI İÇİN
ДЛЯ ПОЛЬЗОВАТЕЛЯ
用户适用(安装人员适用)
Türkçe
Русский
中文
Page 2
Contents
1. Safety Precautions .............................................................................2
2. Parts Names ....................................................................................... 3
3. Screen Confi guration .......................................................................... 6
4. Setting the Day of the Week and Time ............................................... 6
5. Operation ............................................................................................ 6
6. Timer...................................................................................................8
1. Safety Precautions
Before installing the unit, make sure you read all the “Safety
Precautions”.
The “Safety Precautions” provide very important points re-
garding safety. Make sure you follow them.
Please report to or take consent by the supply authority be-
fore connection to the system.
Warning:
• The unit must not be installed by the user. Ask the dealer or an
authorized company to install the unit. If the unit is installed improperly, water leakage, electric shock or fi re may result.
• Do not stand on, or place any items on the unit.
• Do not splash water over the unit and do not touch the unit with
wet hands. An electric shock may result.
• Do not spray combustible gas close to the unit. Fire may result.
• Do not place a gas heater or any other open-flame appliance
where it will be exposed to the air discharged from the unit. Incomplete combustion may result.
• Do not remove the front panel or the fan guard from the outdoor
unit when it is running.
• Never repair the unit or transfer it to another site by yourself.
7. Other Functions ...............................................................................11
8. Function Selection .......................................................................... 12
9. Emergency operation for wireless remote-controller ...................... 16
10. Care and Cleaning.......................................................................... 16
11. Trouble Shooting ............................................................................. 18
12. Specifi cations .................................................................................20
Symbols used in the text
Warning:
Describes precautions that should be observed to prevent danger
of injury or death to the user.
Caution:
Describes precautions that should be observed to prevent damage
to the unit.
Symbols used in the illustrations
: Indicates a part which must be grounded.
• When you notice exceptionally abnormal noise or vibration, stop
operation, turn off the power switch, and contact your dealer.
• Never insert fi ngers, sticks etc. into the intakes or outlets.
• If you detect odd smells, stop using the unit, turn off the power
switch and consult your dealer. Otherwise, a breakdown, electric
shock or fi re may result.
• This air conditioner is NOT intended for use by children or infi rm
persons without supervision.
• Young children must be supervised to ensure that they do not
play with the air conditioner.
• If the refrigeration gas blows out or leaks, stop the operation of
the air conditioner, thoroughly ventilate the room, and contact
your dealer.
Caution:
• Do not use any sharp object to push the buttons, as this may
damage the remote controller.
• Never block or cover the indoor or outdoor unit’s intakes or outlets.
• Never wipe the remote controller with benzene, thinner chemical
rags, etc.
• Do not operate the unit for a long time in high humidity, e.g. leaving a door or window open. In the cooling mode, if the unit is operated in a room with high humidity (80% RH or more) for a long
time, water condensed in the air conditioner may drop and wet or
damage furniture, etc.
• Do not touch the upper air outlet vane or the lower air outlet
damper during operation. Otherwise, condensation may form and
the unit may stop operating.
Disposing of the unit
When you need to dispose of the unit, consult your dealer.
2
Page 3
2. Parts Names
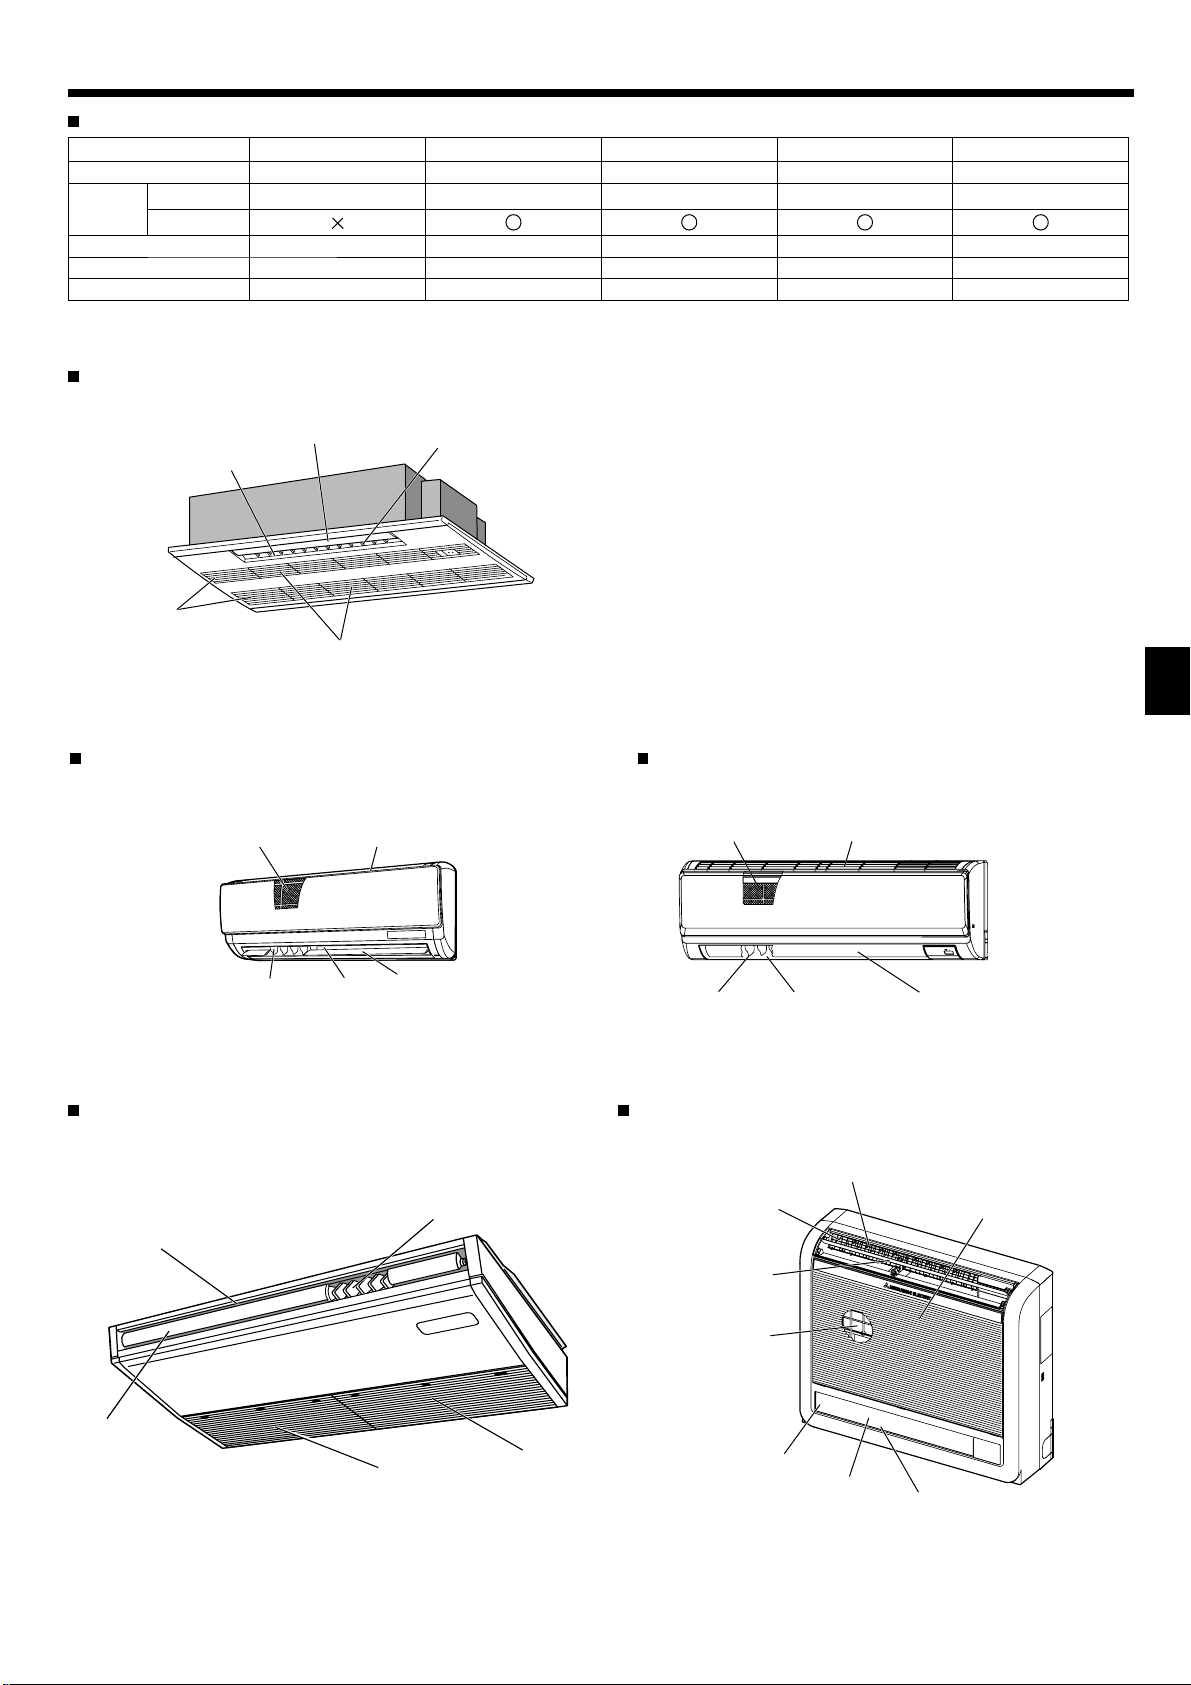
Indoor Unit
PKFY -P·VBM-E PKFY -P·VHM-E PCFY-P·VKM-E PMFY-P·VBM-E PFFY-P·VKM-E
Fan speed 4 speed 3 speed+ Auto* 4 speed+ Auto* 4 speed 4 speed
Vane
Louver Manual Manual Manual Manual Manual
Filter Normal Normal Long-life Normal Normal
Filter cleaning indication
PMFY-P·VBM-E
1-way Ceiling Cassette
Steps 4 steps 5 steps 5 steps 4 steps 4 steps
Auto swing
100 hr 100 hr 2,500 hr 100 hr 100 hr
* This operation is available only using the remote controller
that is able to set its Fan speed setting "Auto".
Filter
PKFY-P·VBM-E
Wall Mounted
Air outlet
Filter Air intake
Louver
Vane
Air inlet
Air outlet
Vane
Louver
PKFY-P·VHM-E
Wall Mounted
Filter
Louver
Air outlet
Air intake
Vane
PCFY-P·VKM-E
Ceiling Suspended
Air outlet
Vane
Louver
Air intake
PFFY-P·VKM-E
Floor Standing
Filter
(Inside of Air intake)
Louver
Air outlet Air inlet
Vane
Filter
Damper
Air outlet
Louver
3
Page 4

2. Parts Names
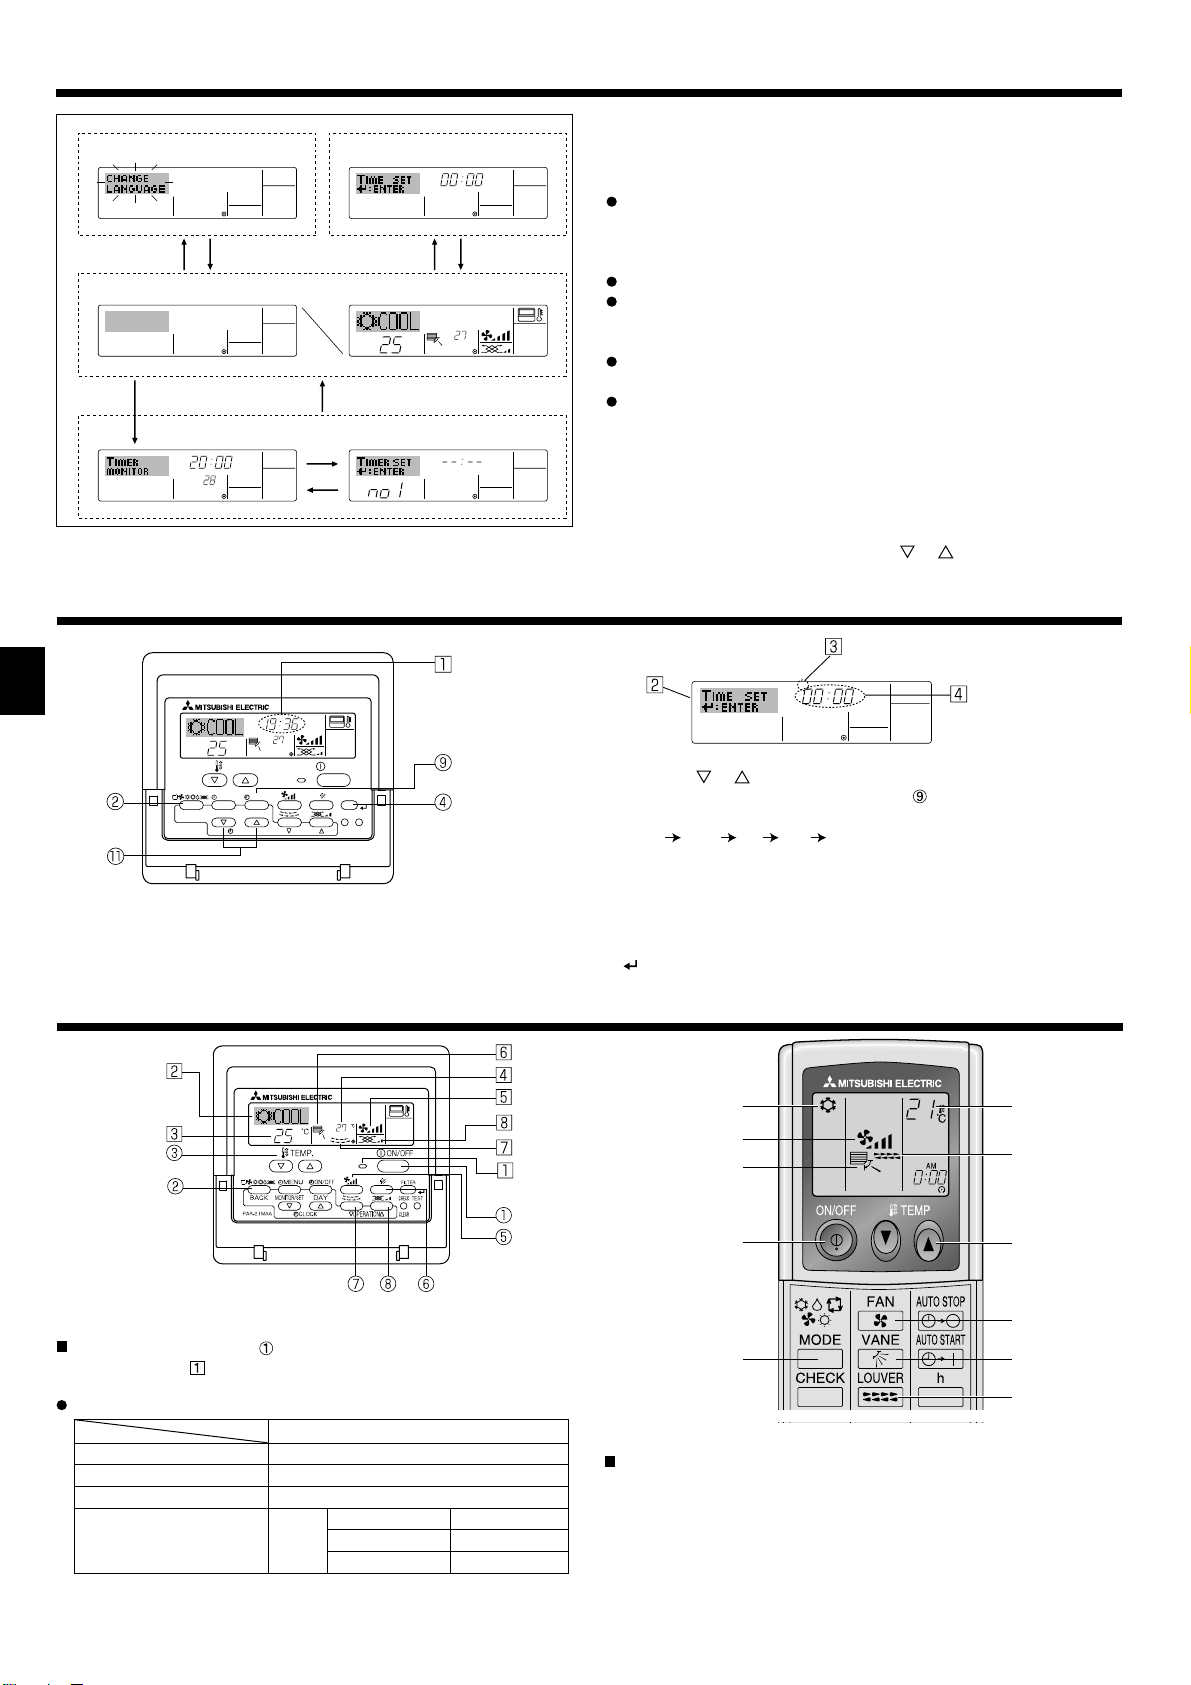
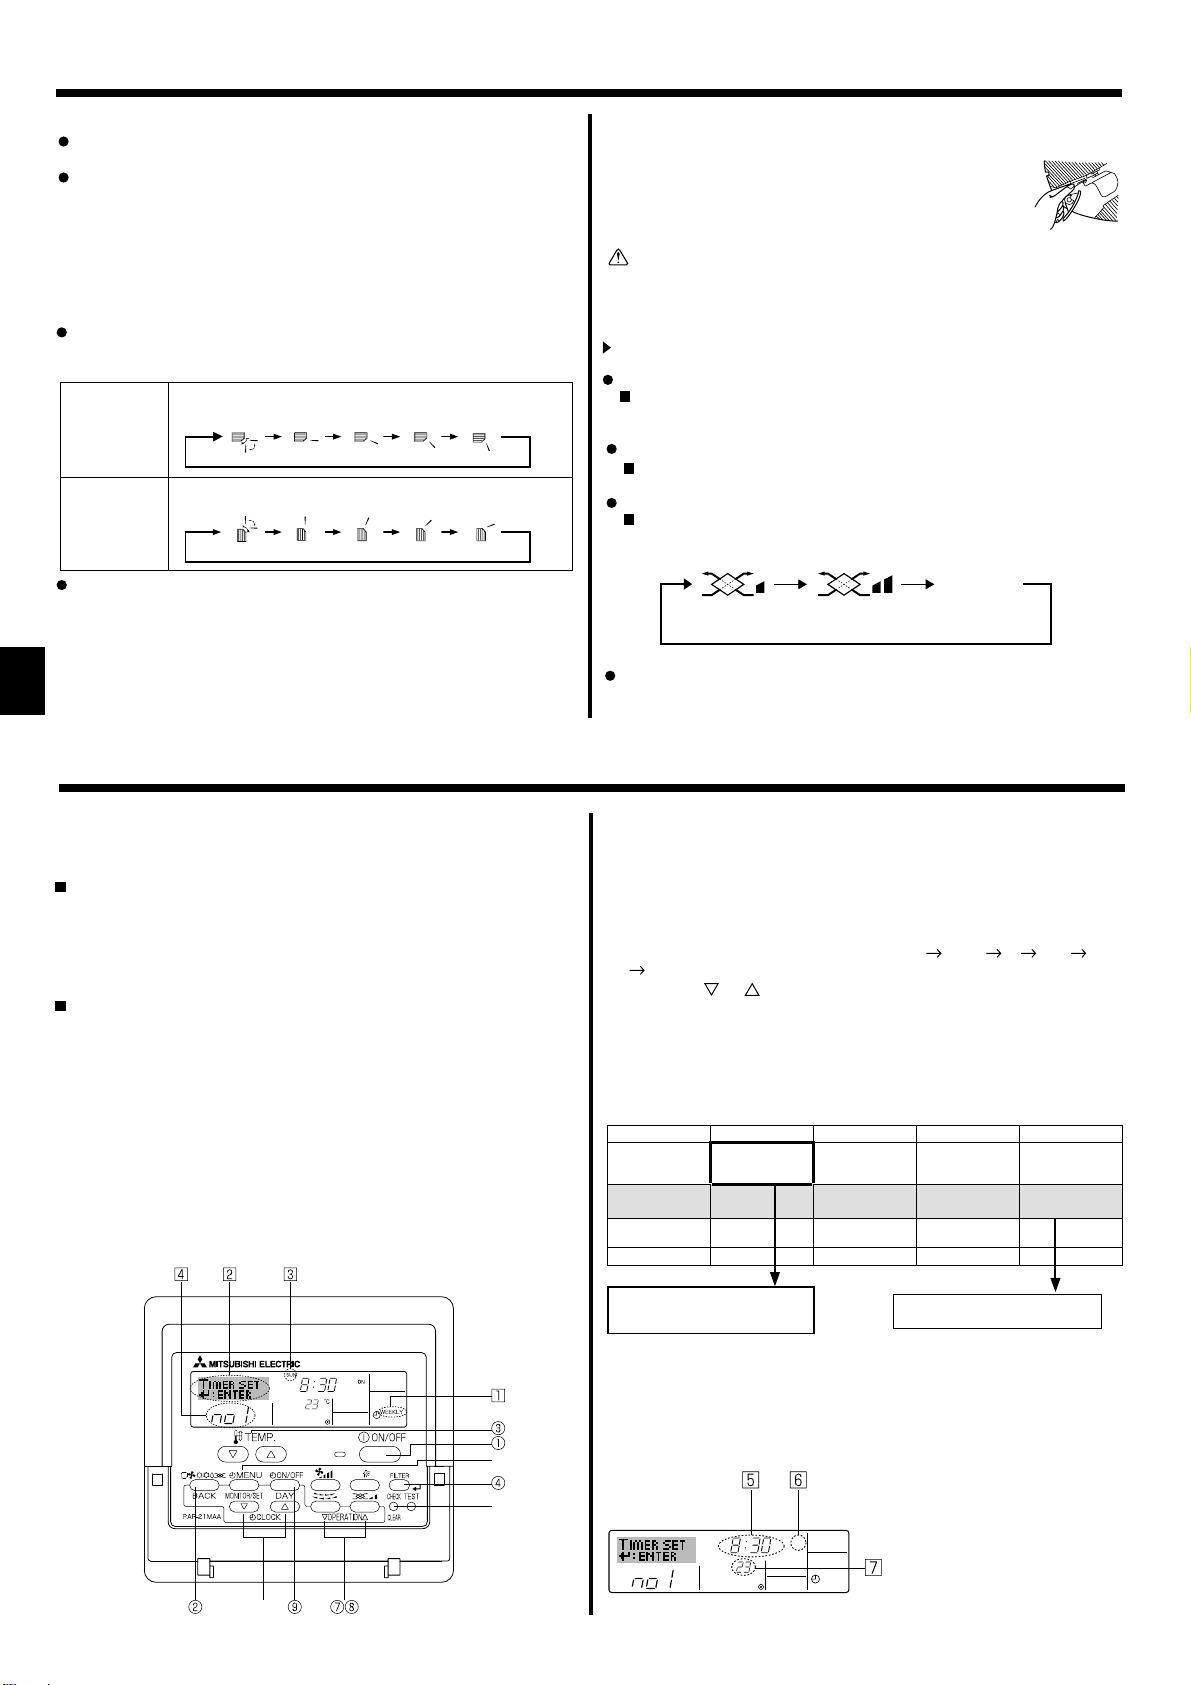
Wired Remote-Controller
Display Section
For purposes of this explanation, all parts of the display are
shown. During actual operation,
only the relevant items will be
displayed.
Identifi es the current operation
Shows the operating mode, etc.
* Multi-language display is sup-
ported.
“Centrally Controlled” indicator
Indicates that operation of the
remote controller has been prohibited by a master controller.
“Timer is Off” indicator
Indicates that the timer is off.
Temperature Setting
Shows the target temperature.
Day-of-Week
Shows the current day of the week.
Time/Timer Display
Shows the current time, unless the simple or Auto
Off timer is set.
If the simple or Auto Off timer is set, shows the
time remaining.
Up/Down Air Direction indicator
The indicator
of the airfl ow.
“One Hour Only” indicator
Displayed if the airfl ow is set to Low and
downward during COOL or DRY mode.
(Operation varies according to model.)
The indicator goes off after one hour
when the airfl ow direction also changes.
shows the direction
Room Temperature display
Shows the room temperature. The room
temperature display range is 8–39°C.
The display blinks if the temperature is
less than 8°C or 39°C or more.
Louver display
Indicates the action of the swing louver.
Does not appear if the louver is stationary.
Indicates that the power is on.
(Power On indicator)
“Sensor” indication
Displayed when the remote controller
sensor is used.
“Locked” indicator
Indicates that remote controller but-
tons have been locked.
“Clean The Filter” indicator
Comes on when it is time to clean
the fi lter.
Timer indicators
The indicator comes on if the corre-
sponding timer is set.
Fan Speed indicator
Shows the selected fan speed.
Ventilation indicator
Appears when the unit is running in
Ventilation mode.
Operation Section
Set T emperature buttons
Down
Up
Timer Menu button
(Monitor/Set button)
Mode button (Return button)
Set Time buttons
Back
Ahead
Timer On/Off button
(Set Day button)
Opening
the door
Built-in temperature sensor
ON/OFF button
Fan Speed button
Filter button
(<Enter> button)
Test Run button
Check button (Clear button)
Airfl ow Up/Down button
Louver button
Operation button)
(
To return operation
number
Ventilation button
Operation button)
(
To go to next operation number
Note:
“PLEASE WAIT” message
This message is displayed for approximately 3 minutes when power is supplied to the indoor unit or when the unit is recovering from a power failure.
Operation mode blinking display
When multiple indoor units are connected to a single outdoor unit and an operation mode is selected for one indoor unit that is different from the current
operation mode of another indoor unit, the operation mode display blinks. Select the same operation mode of the other indoor unit.
“NOT AVAILABLE” message
This message is displayed if a button is pressed to operate a function that the indoor unit does not have.
When the same remote controller is used to operate multiple indoor units, this message is displayed if the main indoor unit is not equipped with the
selected function.
Room temperature display
The indoor unit temperature sensors or the remote controller temperature sensor can be selected to measure the room temperature. The indoor unit
temperature sensors are the initial setting. When the indoor unit temperature sensors are selected to measure the room temperature, the room temperature measured at the main indoor unit is displayed on the remote controller that operates multiple indoor units.
4
Page 5

2. Parts Names
Wireless Remote-Controller
Transmission area
Remote controller display
* For explanation purposes, all of the items
that appear in the display are shown.
* All items are displayed when the Reset
button is pressed.
ON/OFF button
Set Temperature buttons
Fan Speed button (Changes fan speed)
Airfl ow button (Changes up/down airfl ow direction)
Mode button (Changes operation mode)
Check button
Test Run button
Transmission indicator
Timer indicator
Operation areas
Timer Off button
Timer On button
Hour button
Minute button
Set Time button (Sets the time)
Louver button (Changes left/right airfl ow direction)
Reset button
When using the wireless remote controller, point it towards the receiver on the indoor unit.
If the remote controller is operated within approximately two minutes after power is supplied
to the indoor unit, the indoor unit may beep twice as the unit is performing the initial automatic
check.
The indoor unit beeps to confirm that the signal transmitted from the remote controller has
been received. Signals can be received up to approximately 7 meters in a direct line from the
indoor unit in an area 45° to the left and right of the unit. However, illumination such as fl uores-
cent lights and strong light can affect the ability of the indoor unit to receive signals.
If the operation lamp near the receiver on the indoor unit is blinking, the unit needs to be in-
spected. Consult your dealer for service.
Handle the remote controller carefully! Do not drop the remote controller or subject it to strong
shocks. In addition, do not get the remote controller wet or leave it in a location with high humidity.
To avoid misplacing the remote controller, install the holder included with the remote controller
on a wall and be sure to always place the remote controller in the holder after use.
Battery installation/replacement
1. Remove the top cover, insert two AAA batteries, and then install the top cover.
1
2
Top cover
2. Press the Reset button.
3
Two AAA batteries
Insert the negative (–)
end of each battery fi rst.
Install the batteries in
the correct directions
(+, –)!
Press the Reset button
with an object that has
a narrow end.
5
Page 6
3. Screen Confi guration
Function Selection of remote controller
A
Standard Control Screens
OFF ON
BC
Timer Monitor Timer Setup
MON
TIMER
OFF
°F°C
WEEKLY
B
Set Day/Time
TIME SUN
DC
°F°C
°C
SUN MON TUE WEDTHU FRI SAT
WEEKLY
4. Setting the Day of the Week and Time
Day of the Week &
TIME SUN
°C
°C
TEMP.
MENU
MONITOR/SET
BACK DAY
PAR-21MAA
ON/OFF
CLOCK
OPERATION
ON/OFF
FILTER
CHECK
CLEAR
TEST
Note:
The day and time will not appear if clock use has been disabled at
Function Selection of remote controller.
Time display
<Screen Types>
For details on setting the language for the remote controller display, refer
to section 8. Function Selection.
The initial language setting is English.
Function Selection of remote controller:
Set the functions and ranges available to the
remote controller (timer functions, operating
restrictions, etc.)
Set Day/Time: Set the current day of the week or time.
Standard Control Screens:
View and set the air conditioning system’s op-
erating status.
Timer Monitor: View the currently set timer (weekly timer, sim-
ple timer or Auto Off timer).
Timer Setup: Set the operation of any of the timers (weekly
timer, simple timer or Auto Off timer).
<How to change the screen>
: Hold down both the Mode button and the Timer On/Off button for 2
A
seconds.
: Press the Timer Menu button.
B
: Press the Mode (Return) button.
C
: Press either of the Set Time buttons ( or ).
D
Day of the Week Setting
TIME SUN
1. Press the or
Set Time button 1 to show display 2.
2. Press the Timer On/Off (Set Day) button
* Each press advances the day shown at
Sun
Mon ... Fri Sat.
3
Time Setting
to set the day.
:
3. Press the appropriate Set Time button 1 as necessary to set the time.
* As you hold the button down, the time (at
) will increment fi rst in
4
one-minute intervals, then in ten-minute intervals, and then in onehour intervals.
4. After making the appropriate settings at Steps 2 and 3, press the Filter
button
to lock in the values.
4
5. Operation
5.1. Turning ON/OFF
<To Start Operation>
Press the ON/OFF button .
• The ON lamp and the display area come on.
Note:
When the unit is restarted, initial settings are as follows.
Remote Controller settings
Mode Last operation mode
Temperature setting Last set temperature
Fan speed Last set fan speed
Airfl ow up/down
Mode
COOL or DRY
HEAT
FAN
*1
Last setting might be applied depending on the type of the indoor unit.
*2 In case of the last setting is swing, airfl ow might be Downward 4 de-
pending on the type of the indoor unit.
Horiz. outlet
Last setting
Horiz. outlet
6
*1
*2
*1
2
3
5
6
1
7
3
5
2
6
7
<To Stop Operation>
Press the ON/OFF button
• The ON lamp
and the display area go dark.
1
Note:
Even if you press the ON/OFF button immediately after shutting
down the operation is progress, the air conditioner will not start
for about three minutes. This is to prevent the internal components
from being damaged.
1
again.
Page 7
Swing
Auto 1 2
3
4
5
5. Operation
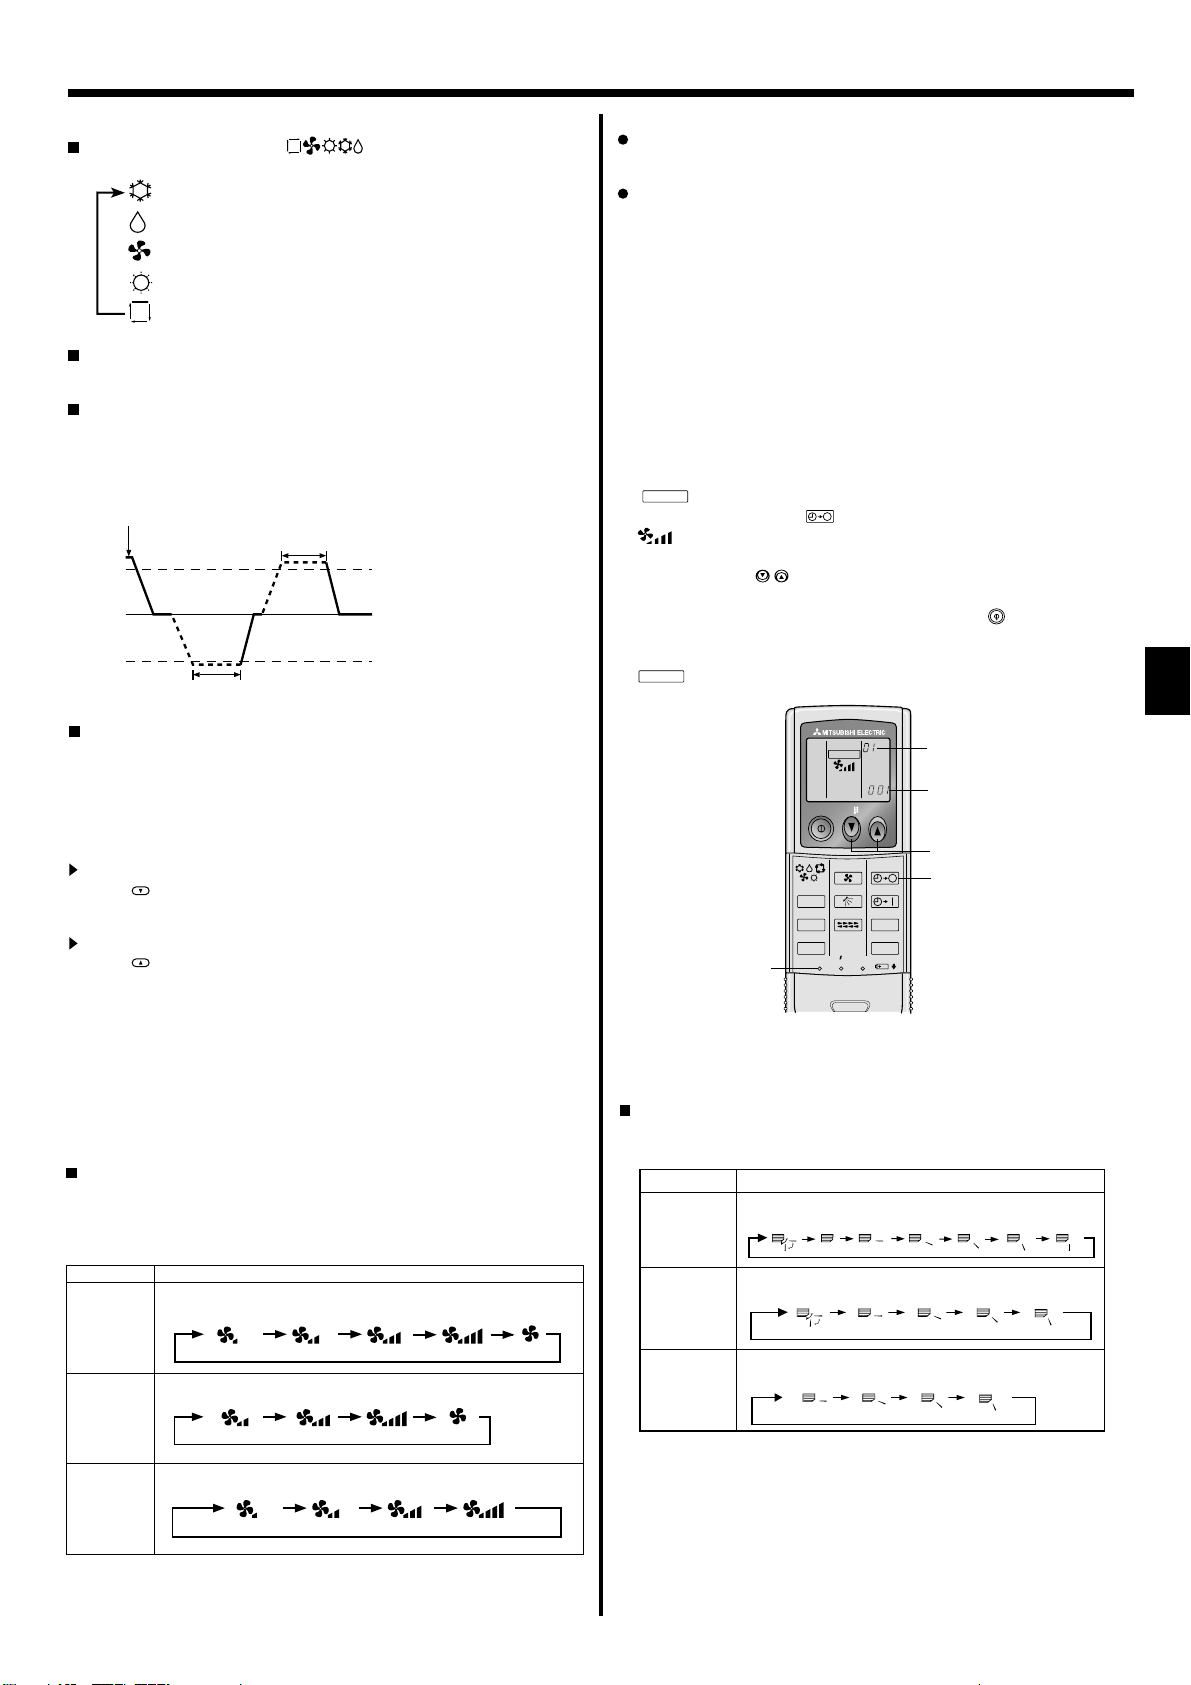
5.2. Mode select
Press the operation mode ( ) button 2 and select the operation mode
Automatic operation
According to a set temperature, cooling operation starts if the room
temperature is too hot and heating operation starts if the room temperature is too cold.
During automatic operation, if the room temperature changes and
remains 1.5 °C or more above the set temperature for 3 minutes, the
air conditioner switches to cooling mode. In the same way, if the room
temperature remains 1.5°C or more below the set temperature for 3
minutes, the air conditioner switches to heating mode.
Cooling mode
Because the room temperature is automatically adjusted in order to
maintain a fi xed effective temperature, cooling operation is performed
a few degrees warmer and heating operation is performed a few degrees cooler than the set room temperature once the temperature is
reached (automatic energy-saving operation).
.
2
Cooling mode
Drying mode
Fan mode
Heating mode
Automatic (cooling/heating) mode
3 minutes (switches from
heating to cooling)
3 minutes (switches from cooling to heating )
Set temperature +1.5°C
Set temperature
Set temperature -1.5°C
Note:
The number of available fan speeds depends on the type of unit
connected. Note also that some units do not provide an “Auto”
setting.
In the following cases, the actual fan speed generated by the unit
will differ from the speed shown the remote controller display.
1. While the display is showing “STAND BY” or “DEFROST”.
2. When the temperature of the heat exchanger is low in the heating mode. (e.g. immediately after heating operation starts)
3. In HEAT mode, when room temperature is higher than the temperature setting.
4. When the unit is in DRY mode.
■
Automatic fan speed setting (For wireless remote controller)
It is necessary to set for wireless remote controller only when
automatic fan speed is not set at default setting.
It is not necessary to set for wired remote controller with automatic
fan speed at default setting.
Press the SET button with something sharp at the end.
1
Operate when display of remote controller is off.
MODEL SELECT
blinks and Model No. is lighted
Press the AUTO STOP button.
2
blinks and setting No. is lighted
A.
B.
(Setting No.01: without automatic fan speed )
Press the temp.
3
(Setting No.02:with automatic fan speed )
If you mistook the operation, press the ON/OFF
buttons to set the setting No.02.
button and oper-
ate again from procedure 2.
Press the SET button with something sharp at the end.
4
MODEL SELECT
and Model No. are lighted for 3 seconds, then turned off.
MODEL SELECT
ON/OFF TEMP
B
A
5.3. Temperature setting
To decrease the room temperature:
Press button
The selected temperature is displayed at
to set the desired temperature.
3
.
3
To increase the room temperature:
Press button
The selected temperature is displayed at
to set the desired temperature.
3
.
3
• Available temperature ranges are as follows:
Cooling/Drying: 19 - 30 °C
Heating: 17 - 28 °C
Automatic: 19 - 28 °C
• The display blinks either 8°C - 39°C to inform you if the room temperature is lower or higher than the displayed temperature.
5.4. Fan speed setting
Press the Fan Speed button 5 as many times as necessary while the
system is running.
• Each press changes the force. The currently selected speed is
shown at
• The change sequence, and the available settings are as follows.
FAN SPEED
4-speed
+
Auto *
3-speed
+
Auto *
4-speed
model
* For MA remote controller only.
Automatic fan speed setting is necessary for wireless remote controller.
.
5
Display
Speed 1 Speed 2 Speed 3 Speed 4 Auto
Speed 1 Speed 2 Speed 3 Auto
Speed 1 Speed 2 Speed 3 Speed 4
3
2
h
min
14
MODE
CHECK
TEST RUN
FAN
VANE
LOUVER
RESETSET CLOCK
AUTO STOP
AUTO START
5.5. Airfl ow direction setting
<To Change the Airfl ow’s Up/Down Direction>
With the unit running, press the Airfl ow Up/Down button 6 as necessary.
•
Each press changes the direction. The current direction is shown at 6.
• The change sequence, and the available settings, are as follows.
Airfl ow Display
5 steps
model*1
4 steps
model
(PMFY)
4 steps
model
(PKFY-BM)
Swing
(Horiz.)
* Note that during swing operation, the directional indication on the
screen does not change in sync with the directional vanes on the unit.
* Some models do not support directional settings.
*1. For MA remote controller only, other remote controllers display the
same as 4steps model.
*2. Airfl ow direction setting <Auto>
COOL/FAN/DRY : Setting 1 (Horizontal), HEAT : Setting 5 (Downward 5)
123 4
(Horiz.)
123 4
7
Page 8
5. Operation
Note:
Available directions depend on the type of unit connected. Note
also that some units do not provide an “Auto” setting.
In the following cases, the actual air direction will differ from the
direction indicated on the remote controller display.
1. While the display is showing “STAND BY” or “DEFROST”.
2. Immediately after starting heater mode (while the system is
waiting for the mode change to take effect).
3. In heat mode, when room temperature is higher than the temperature setting.
(For PFFY-P·VKM series)
For the PFFY-P·VKM series, the airfl ow direction displayed on the
remote controller is different from the actual airflow direction.
Refer to the following table.
Display
Actual
Swing
Swing
123 4
(Horiz.)
1234
(Horiz.)
The airfl ow direction for the lower air outlet damper cannot be set.
The airfl ow direction is automatically controlled by a computer.
<[Manual] To Change the Airfl ow’s Left/Right Direction>
* The louver button 7 cannot be used.
• Stop the unit operation, hold the lever of the louver,
and
adjust to the desired direction.
* Do not set to the inside direction when the unit is
in the cooling or drying mode because there is a
risk of condensation and water dripping.
Caution:
When you operate the process above, be sure to take measures to avoid falls.
5.6. Ventillation
For LOSSNAY combination
5.6.1. For Wired Remote-controller
To run the ventilator together with the indoor unit:
Press the ON/OFF button 1.
•
The Vent indication appears on the screen (at 8). The ventilator
will now automatically operate whenever the indoor unit is running.
To run the ventilator only when the indoor unit is off:
Press the Ventilation button 8 while the indoor unit is off.
• The On lamp (at 1 ) and the Vent indication (at 8) come on.
To change the ventilator force:
Press the Ventilation button 8 as necessary.
• Each press toggles the setting as shown below.
No display
(Stop)
(Low)
(High)
Note:
With some model confi gurations, the fan on the indoor unit may
come on even when you set the ventilator to run independently.
(OFF)
6. Timer
6.1. For Wired Remote-controller
You can use Function Selection of remote controller to select which of three
types of timer to use: 1 Weekly timer, 2 Simple timer or 3 Auto Off timer.
6.1.1. Weekly Timer
The weekly timer can be used to set up to eight operations for each
day of the week.
• Each operation may consist of any of the following: ON/OFF time
together with a temperature setting, or ON/OFF time only, or temperature setting only.
• When the current time reaches a time set at this timer, the air conditioner carries out the action set by the timer.
Time setting resolution for this timer is 1 minute.
Note:
*1. Weekly Timer/Simple Timer/Auto Off Timer cannot be used at
the same time.
*2. The weekly timer will not operate when any of the following con-
ditions is in effect.
The timer feature is off; the system is in an malfunction state; a
test run is in progress; the remote controller is undergoing selfcheck or remote controller check; the user is in the process of
setting a function; the user is in the process of setting the timer;
the user is in the process of setting the current day of the week
or time; the system is under central control. (Specifically, the
system will not carry out operations (unit on, unit off, or temperature setting) that are prohibited during these conditions.)
Operation No.
Day Setting
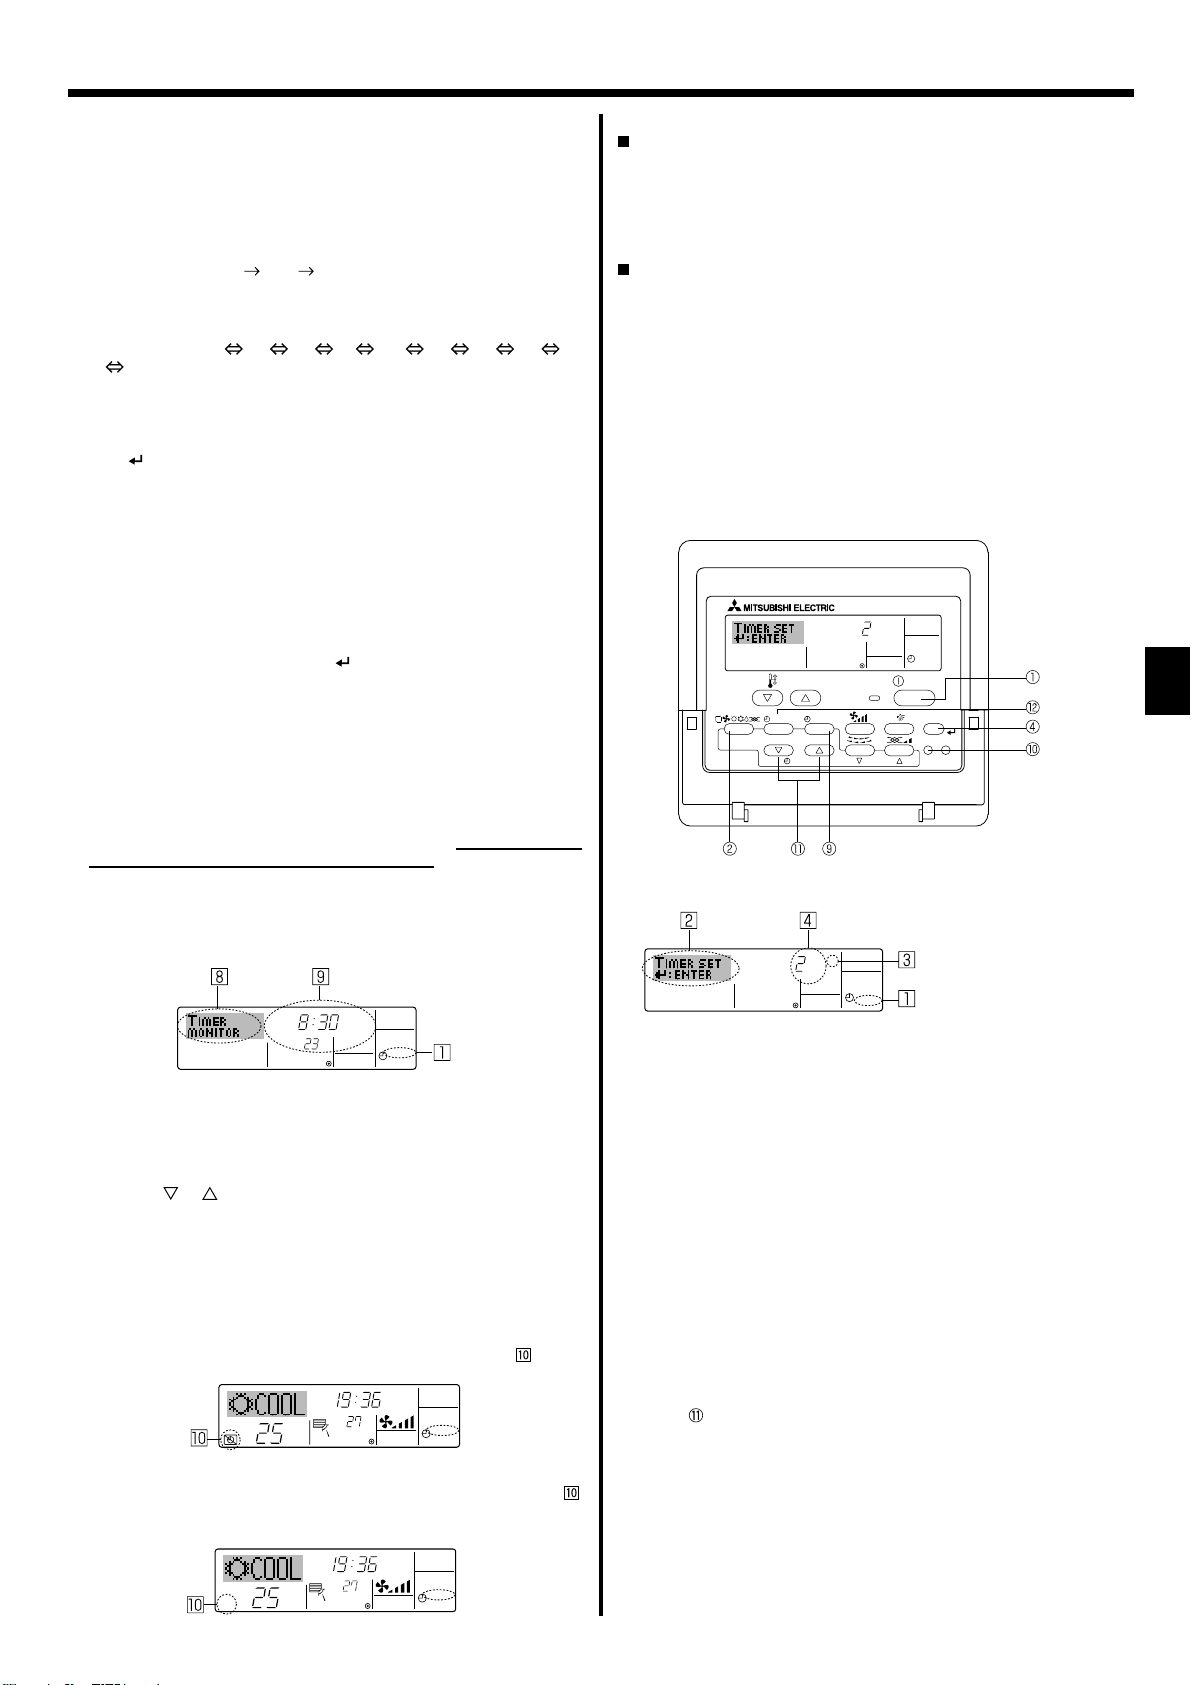
<How to Set the Weekly Timer>
1. Be sure that you are at a standard control screen, and that the weekly
timer indicator 1 is shown in the display.
2. Press the Timer Menu button 2, so that the “Set Up” appears on the
screen (at 2). (Note that each press of the button toggles the display
between “Set Up” and “Monitor”.)
3. Press the Timer On/Off (Set Day) button 9 to set the day. Each press
advances the display at 3 to the next setting, in the following sequence: “Sun Mon Tues Wed Thurs Fri Sat”
“Sun” ... “Fri” “Sat”
“Sun Mon Tues Wed Thurs Fri Sat”...
4. Press the or Operation button (7 or 8) as necessary to select
the appropriate operation number (1 to 8) 4.
* Your inputs at Steps 3 and 4 will select one of the cells from the
matrix illustrated below.
(The remote-controller display at left shows how the display would
appear when setting Operation 1 for Sunday to the values indicated
below.)
Setup Matrix
Op No. Sunday Monday … Saturday
No. 1
No. 2
…
No. 8
<Operation 1 settings for Sunday>
Start the air conditioner at 8:30, with
the temperature set to 23 °C
• 8:30
• ON
• 23°C
• 10:00
• OFF
• 10:00
• OFF
• 10:00
• OFF
<Operation 2 settings for every day>
Turn off the air conditioner at 10:00.
• 10:00
• OFF
Note:
By setting the day to “Sun Mon Tues Wed Thurs Fri Sat”, you can
set the same operation to be carried out at the same time every day.
(Example: Operation 2 above, which is the same for all days of the
week.)
Shows the time setting
Shows the selected operation (ON or OFF)
* Does not appear if operation is not set.
SUN
ON
°C
WEEKLY
Shows the temperature setting
* Does not appear if temperature is
not set.
8
Page 9
6. Timer
<Setting the Weekly Timer>
5. Press the appropriate Set Time button 1 as necessary to set the desired time (at 5).
* As you hold the button down, the time fi rst increments in minute in-
tervals, then in ten-minute intervals, and then in one-hour intervals.
6. Press the ON/OFF button 1 to select the desired operation (ON or
OFF) at 6.
* Each press changes the next setting, in the following sequence: No
display (no setting)
“ON” “OFF”
7. Press the appropriate Set Temperature button 3 to set the desired
temperature (at 7 ).
* Each press changes the setting, in the following sequence: No dis-
play (no setting) 24 25 ... 29 30 12 ... 23
No display.
(Available range: The range for the setting is 12°C to 30°C. The ac-
tual range over which the temperature can be controlled, however,
will vary according to the type of the connected unit.)
8. After making the appropriate settings at Steps 5, 6 and 7, press the
Filter button 4 to lock in the values.
To clear the currently set values for the selected operation, press and
quickly release the Check (Clear) button 0 once.
* The displayed time setting will change to “—:—”, and the On/Off
and temperature settings will all disappear.
(To clear all weekly timer settings at once, hold down the Check
(Clear) button 0 for two seconds or more. The display will begin
blinking, indicating that all settings have been cleared.)
Note:
Your new entries will be cancelled if you press the Mode (Return)
button 2 before pressing the Filter button 4.
If you have set two or more different operations for exactly the
same time, only the operation with the highest Operation No. will be
carried out.
9. Repeat Steps 3 to 8 as necessary to fi ll as many of the available cells
as you wish.
10.Press the mode (Return) button 2 to return to the standard control
screen and complete the setting procedure.
11.To activate the timer, press the Timer On/Off button 9, so that the
“Timer Off” indication disappears from the screen. Be sure that the
“Timer Off” indication is no longer displayed.
* If there are no timer settings, the “Timer Off” indication will blink on
the screen.
<How to View the Weekly Timer Settings>
Timer Settings
SUN
TIMER
ON
OFF
°C
WEEKLY
1. Be sure that the weekly timer indicator is visible on the screen (at 1).
2. Press the Timer Menu button 2 so that “Monitor” is indicated on the
screen (at 8).
3. Press the Timer On/Off (Set Day) button 9 as necessary to select the
day you wish to view.
4. Press the or Operation button (7 or 8) as necessary to change
the timer operation shown on the display (at 9 ).
* Each press will advance to the next timer operation, in order of time
setting.
5. To close the monitor and return to the standard control screen, press
the Mode (Return) button 2.
<To Turn Off the Weekly Timer>
Press the Timer On/Off button 9 so that “Timer Off” appears at .
TIME SUN
°C
°C
WEEKLY
<To Turn On the Weekly Timer>
Press the Timer On/Off button 9 so that the “Timer Off” indication (at )
goes dark.
TIME SUN
°C
°C
WEEKLY
6.1.2. Simple Timer
You can set the simple timer in any of three ways.
• Start time only:
The air conditioner starts when the set time has elapsed.
• Stop time only:
The air conditioner stops when the set time has elapsed.
• Start & stop times:
The air conditioner starts and stops at the respective elapsed times.
The simple timer (start and stop) can be set only once within a
72-hour period.
The time setting is made in hour increments.
Note:
*1. Weekly Timer/Simple Timer/Auto Off Timer cannot be used at
the same time.
*2. The simple timer will not operate when any of the following con-
ditions is in effect.
The timer is off; the system is in malfunction state; a test run is
in progress; the remote controller is undergoing self-check or
remote controller check; the user is in the process of selecting
a function; the user is in the process of setting the timer; the
system is under central control. (Under these conditions, On/Off
operation is prohibited.)
ONHr
AFTER
SIMPLE
TEMP.
MENU
ON/OFF
BACK DAY
MONITOR/SET
PAR-21MAA
CLOCK
<How to Set the Simple Timer>
Timer Setting
ONHr
AFTER
1. Be sure that you are at a standard control screen, and that the simple
timer indicator is visible in the display (at 1).
When something other than the Simple Timer is displayed, set it to
SIMPLE TIMER using the function selection of remote controller (see
8.[4]–3 (3)) timer function setting.
2. Press the Timer Menu button 2, so that the “Set Up” appears on the
screen (at 2). (Note that each press of the button toggles the display
between “Set Up” and “Monitor”.)
3. Press the ON/OFF button 1 to display the current ON or OFF simple
timer setting. Press the button once to display the time remaining to
ON, and then again to display the time remaining to OFF. (The ON/
OFF indication appears at 3).
• “ON” timer:
The air conditioner will start operation when the specifi ed number of
hours has elapsed.
• “OFF” timer:
The air conditioner will stop operation when the specifi ed number of
hours has elapsed.
4. With “ON” or “OFF” showing at 3: Press the appropriate Set Time
button as necessary to set the hours to ON (if “ON” is displayed) or
the hours to OFF (if “OFF” is displayed) at 4.
• Available Range: 1 to 72 hours
5. To set both the ON and OFF times, repeat Steps 3 and 4.
* Note that ON and OFF times cannot be set to the same value.
6. To clear the current ON or OFF setting: Display the ON or OFF setting
(see step 3) and then press the Check (Clear) button 0 so that the
time setting clears to “—” at 4. (If you want to use only an ON setting
or only an OFF setting, be sure that the setting you do not wish to use
is shown as “—”.)
OPERATION
SIMPLE
ON/OFF
FILTER
CHECK
TEST
CLEAR
Action (On or Off)
* “— —” is displayed if there is no
setting.
9
Page 10
AFTER OFF
AUTOOFF
6. Timer
7. After completing steps 3 to 6 above, press the Filter button 4 to
lock in the value.
Note:
Your new settings will be cancelled if you press the Mode (Return)
button 2 before pressing the Filter
button 4.
8. Press the Mode (Return) button 2 to return to the standard control
screen.
9. Press the Timer On/Off button 9 to start the timer countdown. When
the timer is running, the timer value is visible on the display. Be sure
that the timer value is visible and appropriate.
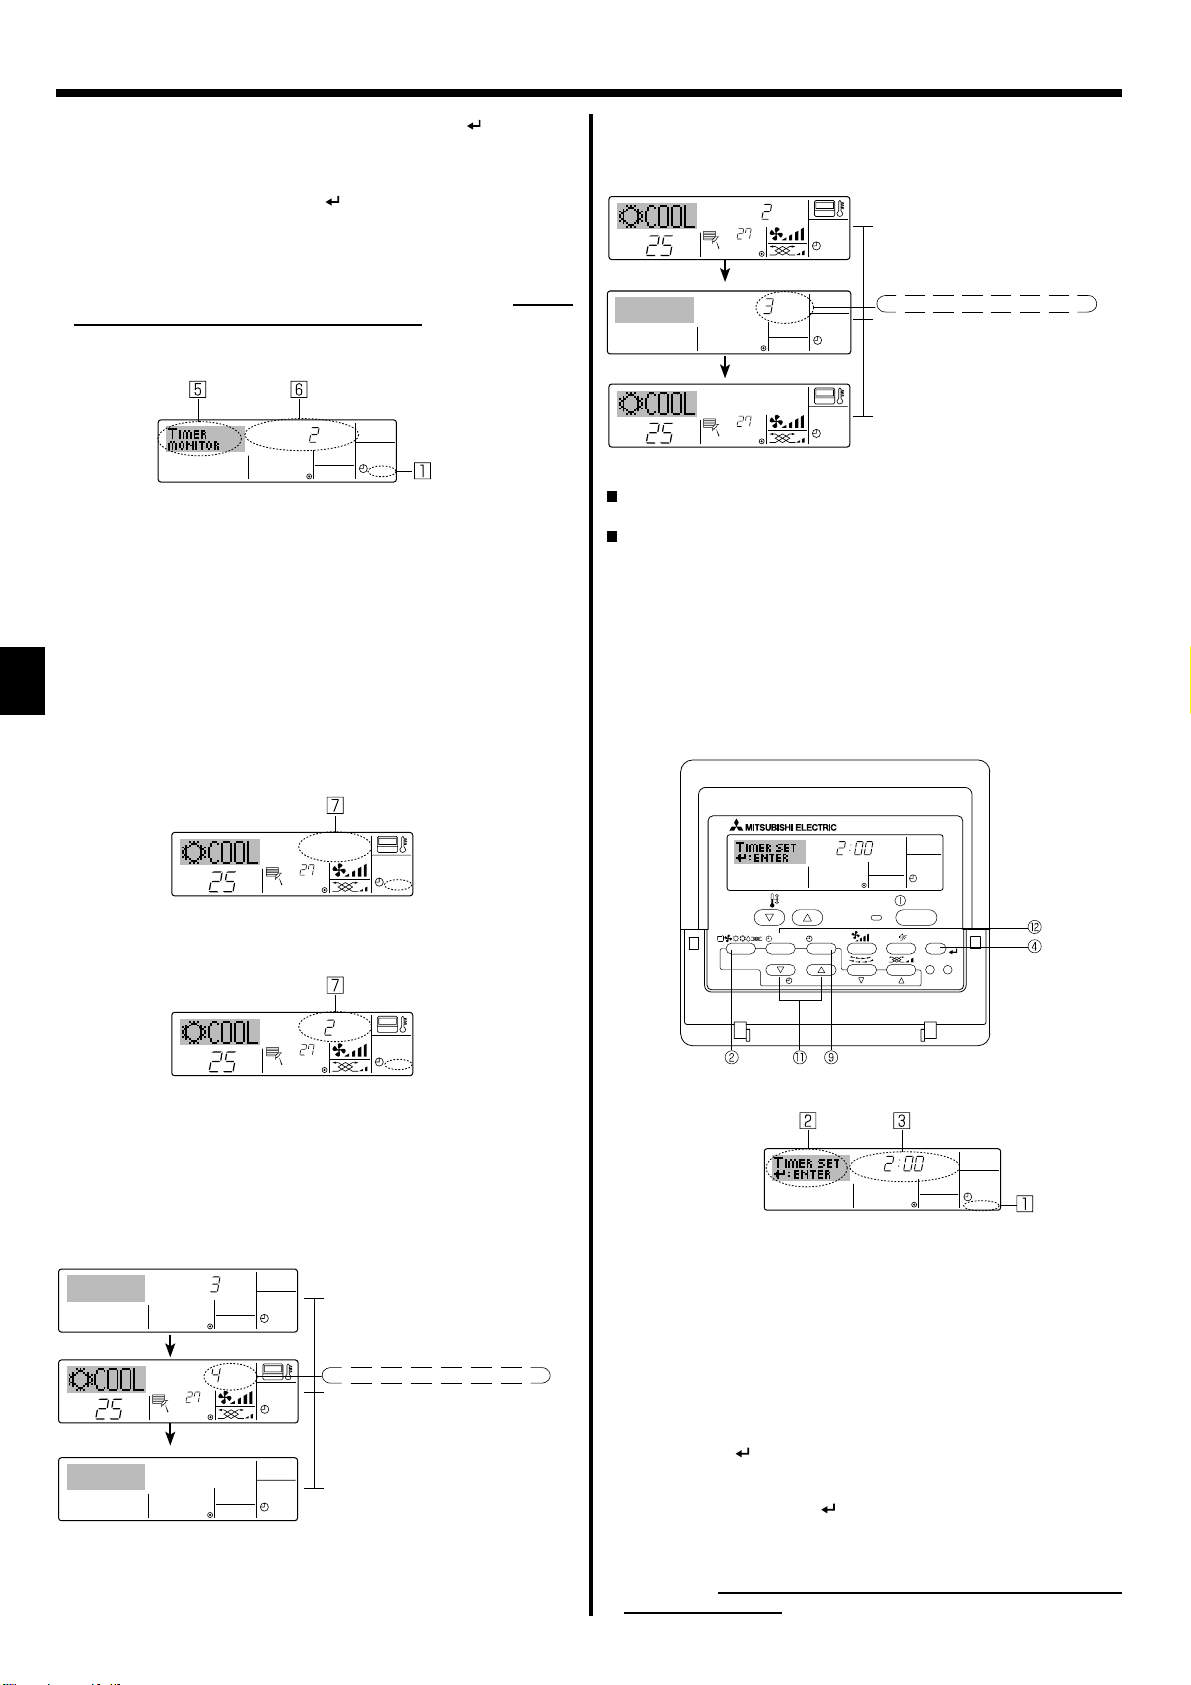
<Viewing the Current Simple Timer Settings>
Timer Setting
TIMER ON
OFFHrAFTER
SIMPLE
1. Be sure that the simple timer indicator is visible on the screen (at 1).
2. Press the Timer Menu button 2, so that the “Monitor” appears on the
screen (at 5).
• If the ON or OFF simple timer is running, the current timer value will
appear at 6.
• If ON and OFF values have both been set, the two values appear
alternately.
3. Press the Mode (Return) button 2 to close the monitor display and
return to the standard control screen.
<To Turn Off the Simple Timer...>
Press the Timer On/Off button 9 so that the timer setting no longer appears on the screen (at 7).
Example 2:
Start the timer with OFF time set earlier than ON time
ON Setting : 5 hours
OFF Setting: 2 hours
OFFHrAFTER
°C
°C
°C
ONHr
AFTER
°C
At Timer Start
Display shows the timer’s OFF setting (hours
SIMPLE
remaining to OFF).
At 3 hours after timer start
Display changes to show the timer’s ON setting
(hours remaining to ON).
SIMPLE
The time displayed is ON setting (5 hours) – OFF
setting (2 hours) = 3 hours.
At 5 hours after timer start
The air conditioner comes on and will continue to
SIMPLE
run until it is turned off.
6.1.3. Auto Off Timer
This timer begins countdown when the air conditioner starts and shuts
the air conditioner off when the set time has elapsed.
Available settings run from 30 minutes to 4 hours in 30-minute intervals.
Note:
*1. Weekly Timer/Simple Timer/Auto Off Timer cannot be used at
the same time.
*2.
The Auto Off timer will not operate when any of the following conditions is in effect
The timer is off; the system is in malfunction state; a test run is
in progress; the remote controller is undergoing self-check or
remote controller check; the user is in the process of selecting
a function; the user is in the process of setting the timer; the
system is under central control. (Under these conditions, On/Off
operation is prohibited.)
.
°C
°C
SIMPLE
<To Turn On the Simple Timer ...>
Press the Timer On/Off button 9 so that the timer setting becomes visible at 7.
ONHr
AFTER
°C
°C
SIMPLE
Examples
If ON and OFF times have both been set at the simple timer, operation
and display are as indicated below.
Example 1:
Start the timer with ON time set earlier than OFF time
ON Setting : 3 hours
OFF Setting : 7 hours
ONHr
°C
AFTER
OFFHrAFTER
°C
At Timer Start
Display shows the timer’s ON setting (hours
SIMPLE
remaining to ON).
At 3 hours after timer start
Display changes to show the timer’s OFF setting (hours remaining to OFF).
SIMPLE
The time displayed is OFF setting (7 hours) –
ON setting (3 hours) = 4 hours.
At 7 hours after timer start
The air conditioner goes off and will remain off
SIMPLE
until it is restarted.
10
AFTER OFF
OPERATION
AUTOOFF
ON/OFF
FILTER
CHECK
CLEAR
TEST
TEMP.
MENU
BACK DAY
MONITOR/SET
PAR-21MAA
CLOCK
ON/OFF
<How to Set the Auto Off Timer>
Timer Setting
1. Be sure that you are at a standard control screen, and that the Auto
Off timer indicator is visible in the display (at 1).
When something other than the Auto Off Timer is displayed, set it to
AUTO OFF TIMER using the function selection of remote controller (see
8.[4]–3 (3)) timer function setting.
2. Hold down the Timer Menu button 2 for 3 seconds so that the “Set
Up” appears on the screen (at 2).
(Note that each press of the button toggles the display between “Set
Up” and “Monitor”.)
3. Press the appropriate Set Time button 1 as necessary to set the OFF
time (at 3).
4. Press the Filter button 4 to lock in the setting.
Note:
Your entry will be cancelled if you press the Mode (Return) button
before pressing the Filter button 4.
2
5. Press the Mode (Return) button 2 to complete the setting procedure
and return to the standard control screen.
6. If the air conditioner is already running, the timer starts countdown
immediately. Be sure to check that the timer setting appears cor-
rectly on the display.
Page 11

°C
°C
FUNCTION
6. Timer
<Checking the Current Auto Off Timer Setting>
Timer Setting
TIMER
AFTER
OFF
AUTOOFF
1. Be sure that the “Auto Off” is visible on the screen (at 1).
2. Hold down the Timer Menu button 2 for 3 seconds so that “Monitor”
is indicated on the screen (at 4).
• The timer remaining to shutdown appears at 5.
3. To close the monitor and return to the standard control screen, press
the Mode (Return) button 2.
<To Turn Off the Auto Off Timer...>
Hold down the Timer On/Off button 9 for 3 seconds so that “Timer
Off” appears (at 6) and the timer value (at 7) disappears.
°C
°C
AUTOOFF
Alternatively, turn off the air conditioner itself. The timer value (at 7)
will disappear from the screen.
AUTOOFF
<To Turn On the Auto Off Timer...>
Hold down the Timer On/Off button 9 for 3 seconds. The “Timer Off”
indication disappears (at 6), and the timer setting comes on the display (at
).
7
Alternatively, turn on the air conditioner. The timer value will appear at 7.
6.2. For Wireless Remote-controller
A
13
2
1 Press the
AUTO STOP
• Time can be set while the following symbol is blinking.
OFF timer : A
ON timer : A is blinking.
2 Use the h and
3 Canceling the timer.
To cancel the OFF timer, press the
To cancel the ON timer, press the
• It is possible to combine both OFF and ON timers.
• Pressing the ON/OFF button of the remote controller during timer
mode to stop the unit will cancel the timers.
• If the current time has not been set, the timer operation cannot be
used.
AUTO START
or
button (TIMER SET).
is blinking.
min
buttons to set the desired time.
AUTO STOP
AUTO START
button.
button.
AFTER OFF
°C
°C
AUTOOFF
7. Other Functions
7.1. Locking the Remote Controller Buttons (Operation
function limit controller)
If you wish, you can lock the remote controller buttons. You can use
the Function Selection of remote controller to select which type of lock
to use. (For information about selecting the lock type, see section 8,
item [4]–2 (1)).
Specifi cally, you can use either of the following two lock types.
Lock All Buttons:
1
Locks all of the buttons on the remote controller.
Lock All Except ON/OFF:
2
Locks all buttons other than the ON/OFF button.
Note:
The “Locked” indicator appears on the screen to indicate that buttons are currently locked.
Lock Indicator
TIME SUN
FUNCTION
ON/OFF
°C
OPERATION
ON/OFF
FILTER
CHECK
CLEAR
TEST
TEMP.
MENU
BACK DAY
MONITOR/SET
PAR-21MAA
CLOCK
°C
<How to Lock the Buttons>
1. While holding down the Filter button 4, press and hold down the ON/
OFF button 1 for 2 seconds. The “Locked” indication appears on the
screen (at 1), indicating that the lock is now engaged.
* If locking has been disabled in Function Selection of remote control-
ler, the screen will display the “Not Available” message when you
press the buttons as described above.
FUNCTION
°C
°C
• If you press a locked button, the “Locked” indication (at 1) will blink
on the display.
<How to Unlock the Buttons>
1. While holding down the Filter button 4, press and hold down the ON/
OFF button 1 for 2 seconds—so that the “Locked” indication disappears from the screen (at 1).
°C
°C
11
Page 12
7. Other Functions
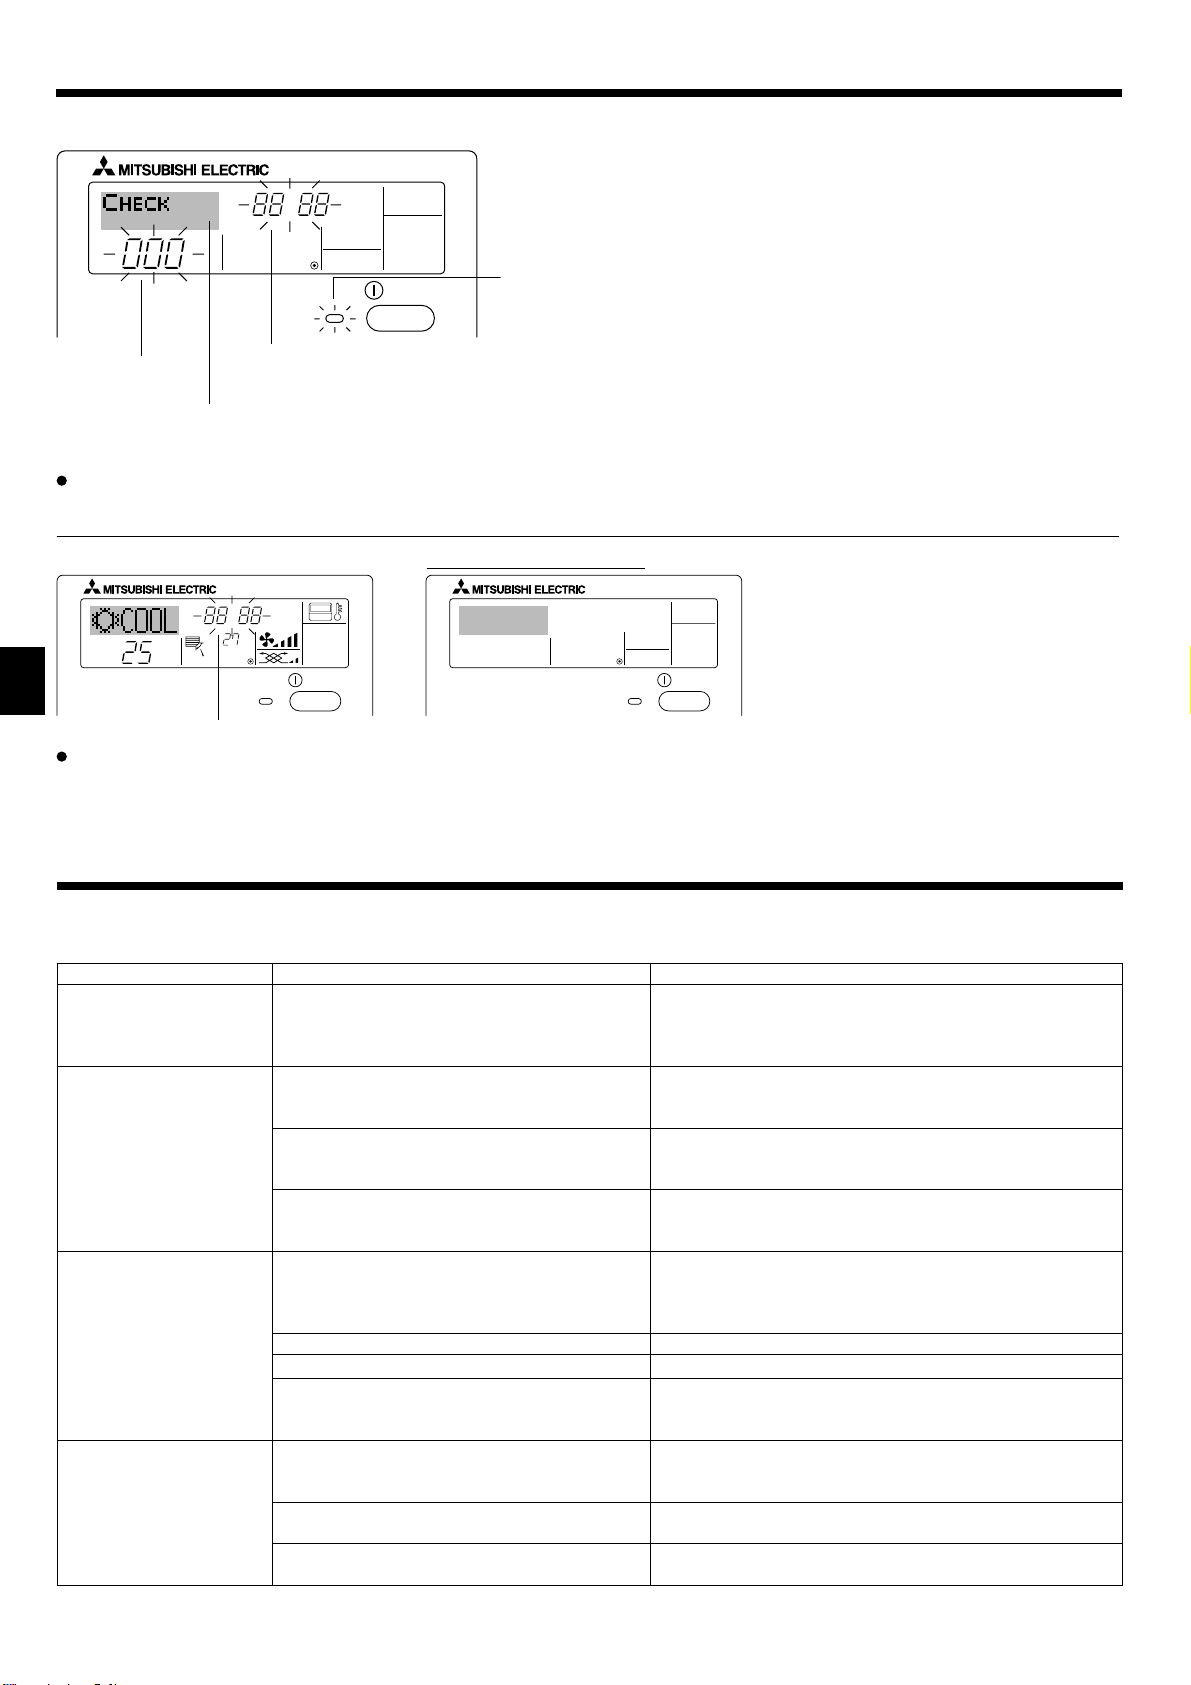
7.2. Error Codes indication
ERRORCODE
ON/OFF
ON lamp
(Blinking)
Unit No.
Error Code
If you have entered contact number to be called in the event of a problem, the screen displays this number.
(You can set this up under Function Selection of remote controller. For information, refer to section 8.)
If the ON lamp and error code are both blinking: This means that the air conditioner is out of order and operation has been stopped (and cannot
resume). Take note of the indicated unit number and error code, then switch off the power to the air conditioner and call your dealer or servicer.
When the Check button is pressed:
ERRORCODE
°C
If only the error code is blinking (while the ON lamp remains lit): Operation is continuing, but there may be a problem with the system. In this case,
°C
ON/OFF
Error Code
CALL:XXXX
XXX:XXX
ON/OFF
you should note down the error code and then call your dealer or servicer for advice.
* If you have entered contact number to be called in the event of a problem, push the Check button to display it on the screen. (You can set this up
under Function Selection of remote controller. For information, refer to section 8.)
8. Function Selection
Function selection of remote controller
The setting of the following remote controller functions can be changed using the remote controller function selection mode. Change the setting when
needed.
Item 1 Item 2 Item 3 (Setting content)
1. Change Language
(“CHANGE LAN-
GUAGE”)
Language setting to display • Display in multiple languages is possible
2. Function limit
(“FUNCTION SELEC-
TION”)
3. Mode selection
(“MODE SELECTION”)
4. Display change
(“DISP MODE SET-
TING”)
12
(1) Operation function limit setting (operation lock)
• Setting the range of operation limit (operation lock)
(“LOCKING FUNCTION”)
(2) Use of automatic mode setting (“SELECT
• Setting the use or non-use of “automatic” operation mode
AUTO MODE”)
(3) Temperature range limit setting (“LIMIT TEMP
FUNCTION”)
(1) Remote controller main/sub setting (“CON-
TROLLER MAIN/SUB”)
• Setting the temperature adjustable range (maximum, minimum)
• Selecting main or sub remote controller
* When two remote controllers are connected to one group,
one controller must be set to sub.
(2) Use of clock setting (“CLOCK”) • Setting the use or non-use of clock function
(3) Timer function setting (“WEEKLY TIMER”) • Setting the timer type
(4) Contact number setting for error situation
(“CALL.”)
(1) Temperature display °C/°F setting (“TEMP
• Contact number display in case of error
• Setting the telephone number
• Setting the temperature unit (°C or °F) to display
MODE °C/°F”)
(2) Suction air temperature display setting (“ROOM
TEMP DISP SELECT”)
(3) Automatic cooling/heating display setting
(“AUTO MODE DISP C/H”)
• Setting the use or non-use of the display of indoor (suction)
air temperature
• Setting the use or non-use of the display of “Cooling” or
“Heating” display during operation with automatic mode
Page 13

8. Function Selection
[Function selection fl owchart]
Setting language (English)
Change
Language
Function
selection
Normal display
(Display when the air conditioner is not running)
Hold down the button and press the button for 2 seconds.
Remote controller function selection mode
Item 2Item 1
English
German
Spanish
Russian
Italian
Chinese
French
Japanese
Item 3
OFF
no1
no2
ON
OFF
OFF
Hold down the button and press the button for 2 seconds.
Press the operation mode button.
Press the TIMER MENU button.
Press the TIMER ON/OFF button.
Dot display
TEMP.
MENU
BACK DAY
MONITOR/SET
PAR-21MAA
ON/OFF
CLOCK
OPERATION
ON/OFF
CHECK
CLEAR
FILTER
TEST
Operation lock setting is not used.
(Initial setting value)
Operation lock setting is except On/Off button.
Operation lock setting is All buttons.
The automatic mode is displayed when the operation
mode is selected. (Initial setting value)
The automatic mode is not displayed when the operation mode
is selected.
The temperature range limit is not active. (Initial setting value)
Mode
selection
ON
OFF
OFF
CALL-
The temperature range can be changed on cooling/dry mode.
The temperature range can be changed on heating mode.
The temperature range can be changed on automatic mode.
Automatic fi lter elevation panel up/down operation mode
Not necessary to set this mode. Refer to OPERATION MANUAL of
Optional Parts (Panel) for details on operation.
Fixed airfl ow direction mode
Not necessary to set this mode. Refer to OPERATION MANUAL of
indoor unit for details on operation.
The remote controller will be the main controller. (Initial setting value)
The remote controller will be the sub controller.
The clock function can be used. (Initial setting value)
The clock function can not be used.
Weekly timer can be used. (Initial setting value)
Auto off timer can be used.
Simple timer can be used.
Timer mode can not be used.
The set contact numbers are not displayed in case of error.
(Initial setting value)
The set contact numbers are displayed in case of error.
Display
mode setting
˚C
˚F
ON
OFF
ON
OFF
The temperature unit °C is used. (Initial setting value)
The temperature unit °F is used.
Room air temperature is displayed. (Initial setting value)
Room air temperature is not displayed.
One of “Automatic cooling” and “Automatic heating” is displayed under the automatic mode is running. (Initial setting
Only “Automatic” is displayed under the automatic mode.
13
Page 14

8. Function Selection
[Detailed setting]
[4]–1. CHANGE LANGUAGE setting
The language that appears on the dot display can be selected.
• Press the [ MENU] button G to change the language.
1 English (GB), 2 German (D), 3 Spanish (E), 4 Russian (RU),
Italian (I), 6 Chinese (CH), 7 French (F), 8 Japanese (JP)
5
Refer to the dot display table.
[4]–2. Function limit
(1) Operation function limit setting (operation lock)
• To switch the setting, press the [
no1 :Operation lock setting is made on all buttons other than
1
the [ ON/OFF] button.
no2 :Operation lock setting is made on all buttons.
2
OFF (Initial setting value): Operation lock setting is not made.
3
* To make the operation lock setting valid on the normal screen, it
is necessary to press buttons (Press and hold down the [FILTER]
and [ ON/OFF] buttons at the same time for two seconds.) on
the normal screen after the above setting is made.
(2) Use of automatic mode setting
When the remote controller is connected to the unit that has auto-
matic operation mode, the following settings can be made.
• To switch the setting, press the [ ON/OFF] button D.
ON (Initial setting value):
1
The automatic mode is displayed when the operation mode is
selected.
OFF:
2
The automatic mode is not displayed when the operation
mode is selected.
(3) Temperature range limit setting
After this setting is made, the temperature can be changed within
the set range.
• To switch the setting, press the [ ON/OFF] button D.
LIMIT TEMP COOL MODE:
1
The temperature range can be changed on cooling/dry mode.
LIMIT TEMP HEAT MODE:
2
The temperature range can be changed on heating mode.
LIMIT TEMP AUTO MODE:
3
The temperature range can be changed on automatic mode.
OFF (initial setting): The temperature range limit is not active.
4
* When the setting, other than OFF, is made, the temperature
range limit setting on cooling, heating and automatic mode is
made at the same time. However, the range cannot be limited
when the set temperature range has not changed.
• To increase or decrease the temperature, press the
[ TEMP. ( ) or ( )] button F.
• To switch the upper limit setting and the lower limit setting, press
the [ ] button H. The selected setting will blink and the temperature can be set.
• Settable range
Cooling/Dry mode:
Lower limit:19°C~30°C Upper limit:30°C~19°C
Heating mode:
Lower limit:17°C~28°C Upper limit:28°C~17°C
Automatic mode:
Lower limit:19°C~28°C Upper limit:28°C~19°C
ON/OFF] button .
[4]–3. Mode selection setting
(1) Remote controller main/sub setting
• To switch the setting, press the [ ON/OFF] button D.
Main: The controller will be the main controller.
1
Sub: The controller will be the sub controller.
2
(2) Use of clock setting
• To switch the setting, press the [ ON/OFF] button D.
ON: The clock function can be used.
1
OFF: The clock function cannot be used.
2
(3) Timer function setting
• To switch the setting, press the [
one of the following.).
WEEKLY TIMER (initial setting value):
1
The weekly timer can be used.
AUTO OFF TIMER:
2
The auto off timer can be used.
SIMPLE TIMER:
3
The simple timer can be used.
TIMER MODE OFF:
4
The timer mode cannot be used.
* When the use of clock setting is OFF, the “WEEKLY TIMER” can-
not be used.
(4) Contact number setting for error situation
• To switch the setting, press the [ ON/OFF] button D.
CALL OFF:
1
The set contact numbers are not displayed in case of error.
CALL **** *** ****:
2
The set contact numbers are displayed in case of error.
CALL_:
The contact number can be set when the display is as shown
above.
• Setting the contact numbers
To set the contact numbers, follow the following procedures.
Move the blinking cursor to set numbers. Press the [ TEMP.
( ) and ( )] button F to move the cursor to the right (left).
Press the [ CLOCK ( ) and ( )] button C to set the numbers.
[4]–4. Display change setting
(1) Temperature display °C/°F setting
• To switch the setting, press the [ ON/OFF] button D.
°C: The temperature unit °C is used.
1
°F: The temperature unit °F is used.
2
(2) Room air temperature display setting
• To switch the setting, press the [ ON/OFF] button D.
ON : The room air temperature is displayed.
1
OFF: The room air temperature is not displayed.
2
(3) Automatic cooling/heating display setting
• To switch the setting, press the [ ON/OFF] button D.
ON:
1
One of “Automatic cooling” and “Automatic heating” is dis-
played under the automatic mode is running.
OFF:
2
Only “Automatic” is displayed under the automatic mode.
ON/OFF] button D(Choose
14
Page 15

8. Function Selection
[Dot display table]
Selecting language
Waiting for start-up
Operation mode Cool
Dry
Heat
Auto
Auto(Cool)
Auto(Heat)
Fan
Ventilation
Stand by
(Hot adjust)
Defrost
Set temperature
Fan speed
Not use button
Check (Error)
Test run
Self check
Unit function selection
Setting of ventilation
English German Spanish Russian Italian Chinese French Japanese
Selecting language
CHANGE LANGUAGE
Function selection
Operation function limit setting
Use of automatic mode setting
Temperature range limit setting
Limit temperature cooling/day
mode
Limit temperature heating mode
Limit temperature auto mode
Mode selection
Remote controller setting MAIN
Remote controller setting SUB
Use of clock setting
Setting the day of the week and
time
Timer set
Timer monitor
Weekly timer
Timer mode off
Auto off timer
Simple timer
Contact number setting of error
situation
Display change
Temperature display °C/°F setting
Room air temperature display set-
ting
Automatic cooling/heating display
setting
English German Spanish Russian Italian Chinese French Japanese
15
Page 16

9. Emergency Operation for Wireless Remote-controller
When the remote-controller cannot be used
When the batteries of the remote controller run out or the remote controller malfunctions, the emergency operation can be done using the emergency buttons.
A DEFROST/STAND BY lamp
B Operation lamp
C Emergency operation switch (heating)
D Emergency operation switch (cooling)
E Receiver
Starting operation
(For PKFY-P·VHM-E)
DC
B
A
E
• To operate the cooling mode, press the
seconds.
• To operate the heating mode, press the button C for more than 2
seconds.
Note:
• Details of emergency mode are as shown below.
Details of EMERGENCY MODE are as shown below.
Operation mode COOL HEAT
Set temperature 24°C 24°C
Fan speed High High
Airfl ow direction Horizontal Downward 4 (5)
Stopping operation
• To stop operation, press the button D or the button C for more
than 2 seconds.
10. Care and Cleaning
button D for more than 2
°C
°C
TEMP.
Indicates that the fi lter needs cleaning.
Clean the fi lter.
When resetting “FILTER” display
When the [FILTER] button is pressed two times successively after
cleaning the fi lter, the display goes off and is reset.
Note:
When 2 or more different types of indoor unit are controlled, the
cleaning period differs with the type of filter. When the master
unit cleaning period arrives, “FILTER” is displayed. When the fi l-
ter display goes off, the cumulative time is reset.
“FILTER” indicates the cleaning period when the air conditioner
was used under general indoor air conditions by criteria time.
Since the degree of dirtiness depends on the environmental con-
ditions, clean the fi lter accordingly.
The fi lter cleaning period cumulative time differs with the model.
This indication is not available for wireless remote controller.
Cleaning the fi lters
• Clean the fi lters using a vacuum cleaner. If you do not have a vacuum
cleaner, tap the fi lters against a solid object to knock off dirt and dust.
• If the fi lters are especially dirty, wash them in lukewarm water. Take
care to rinse off any detergent thoroughly and allow the fi lters to dry
completely before putting them back into the unit.
FILTER
ON/OFF
Filter removal
Caution:
• In removing the fi lter, precautions must be taken to protect your
eyes from dust. Also, if you have to climb up on a stool to do the
job, be careful not to fall.
• When the fi lter is removed, do not touch the metallic parts inside
the indoor unit, otherwise injury may result.
PKFY-P·VBM-E
PKFY-P·VHM-E
Pull both the bottom corners of the intake grille to open the grille,
1
then lift the fi lter.
Caution:
• Do not dry the fi lters in direct sunlight or by using a heat source,
such as an electric heater: this may warp them.
• Do not wash the filters in hot water (above 50°C), as this may
warp them.
• Make sure that the air fi lters are always installed. Operating the
unit without air fi lters can cause malfunction.
Caution:
• Before you start cleaning, stop operation and turn OFF the power
supply.
• Indoor units are equipped with filters to remove the dust of
sucked-in air. Clean the fi lters using the methods shown in the
following sketches.
16
Page 17

10. Care and Cleaning
PCFY-P·VKM-E
A
B
D
C
Open the intake grille.
1
Hold the knob on the fi lter then pull the fi lter up in the direction of
2
an arrow. To replace the fi lter after cleaning, be sure to insert the
fi lter far enough until it fi ts into the stopper.
Filter
A
PMFY-P·VBM-E
Intake Grille
B
Knob
C
Stopper
D
PFFY-P·VKM-E
Remove the catechin air fi lter.
1
Open the front grille
A
Catechin air fi lter
B
Caution:
When the catechin air fi lter is to be removed, do not touch the metal
parts of the indoor unit.
This may cause an injury.
Install the catechin air fi lter.
2
Be sure to install its both ends into the tabs as shown.
Install
C
Securely close the front grille.
3
Pressing the PUSH button on the outer side of the intake grille
1
causes the intake grille to open.
A fi lter with an intake grille on it can be removed by pulling the fi lter
2
forward.
17
Page 18

11. Trouble Shooting
Having trouble? Here is the solution. (Unit is operating normally.)
Air conditioner does not heat or cool well.
When heating operation starts, warm air does not blow from the indoor
unit soon.
During heating mode, the air conditioner stops before the set room
temperature is reached.
Airfl ow direction changes during operation or airfl ow direction cannot
be set.
When the airfl ow direction is changed, the vanes always move up and
down past the set position before fi nally stopping at the position.
A fl owing water sound or occasional hissing sound is heard. These sounds can be heard when refrigerant is fl owing in the air condi-
A cracking or creaking sound is heard. These sounds can be heard when parts rub against each due to expan-
The room has an unpleasant odor. The indoor unit draws in air that contains gases produced from the
A white mist or vapor is emitted from the indoor unit. If the indoor temperature and the humidity are high, this condition may
Water or vapor is emitted from the outdoor unit.
The operation indicator does not appear in the remote controller display.
The air conditioner does not operate even though the ON/OFF button
is pressed. The operation mode display on the remote controller disappears.
” appears in the remote controller display. During central control, “ ” appears in the remote controller display
“
When restarting the air conditioner soon after stopping it, it does not
operate even though the ON/OFF button is pressed.
Air conditioner operates without the ON/OFF button being pressed.
Air conditioner stops without the ON/OFF button being pressed.
Remote controller timer operation cannot be set.
“PLEASE WAIT” appears in the remote controller display.
An error code appears in the remote controller display. The protection devices have operated to protect the air conditioner.
Draining water or motor rotation sound is heard. When cooling operation stops, the drain pump operates and then stops.
Clean the fi lter. (Airfl ow is reduced when the fi lter is dirty or clogged.)
Check the temperature adjustment and adjust the set temperature.
Make sure that there is plenty of space around the outdoor unit. Is the
indoor unit air intake or outlet blocked?
Has a door or window been left open?
Warm air does not blow until the indoor unit has suffi ciently warmed up.
When the outdoor temperature is low and the humidity is high, frost
may form on the outdoor unit. If this occurs, the outdoor unit performs a
defrosting operation. Normal operation should begin after approximately10 minutes.
During cooling mode, the vanes automatically move to the horizontal
(down) position after 1 hour when the down (horizontal) airfl ow direction
is selected. This is to prevent water from forming and dripping from the
vanes.
During heating mode, the vanes automatically move to the horizontal
airfl ow direction when the airfl ow temperature is low or during defrost-
ing mode.
When the airfl ow direction is changed, the vanes move to the set posi-
tion after detecting the base position.
tioner or when the refrigerant fl ow is changing.
sion and contraction from temperature changes.
walls, carpeting, and furniture as well as odors trapped in clothing, and
then blows this air back into the room.
occur when operation starts.
During defrosting mode, cool airfl ow may blow down and appear like a
mist.
During cooling mode, water may form and drip from the cool pipes and
joints.
During heating mode, water may form and drip from the heat exchang-
er.
During defrosting mode, water on the heat exchanger evaporates and
water vapor may be emitted.
Turn on the power switch. “ ” will appear in the remote controller
display.
Is the power switch of the indoor unit turned off? Turn on the power
switch.
and air conditioner operation cannot be started or stopped using the
remote controller.
Wait approximately three minutes.
(Operation has stopped to protect the air conditioner.)
Is the on timer set?
Press the ON/OFF button to stop operation.
Is the air conditioner connected to a central remote controller?
Consult the concerned people who control the air conditioner.
Does “ ” appear in the remote controller display?
Consult the concerned people who control the air conditioner.
Has the auto recovery feature from power failures been set?
Press the ON/OFF button to stop operation.
Is the off timer set?
Press the ON/OFF button to restart operation.
Is the air conditioner connected to a central remote controller?
Consult the concerned people who control the air conditioner.
Does “ ” appear in the remote controller display?
Consult the concerned people who control the air conditioner.
Are timer settings invalid?
If the timer can be set,
mote controller display.
The initial settings are being performed. Wait approximately 3 minutes.
Do not attempt to repair this equipment by yourself.
Turn off the power switch immediately and consult your dealer. Be sure
to provide the dealer with the model name and information that appeared in the remote controller display.
Wait approximately 3 minutes.
WEEKLY
,
SIMPLE
or
AUTO OFF
appears in the re-
18
Page 19

11. Trouble Shooting
Having trouble?
Noise is louder than specifi cations. The indoor operation sound level is affected by the acoustics of the par-
Nothing appears in the wireless remote controller display, the display
is faint, or signals are not received by the indoor unit unless the remote controller is close.
The operation lamp near the receiver for the wireless remote controller on the indoor unit is blinking.
Warm air blows from the indoor unit intermittently when heating mode
is off or during fan mode.
The damper opens and closes automatically.
(For PFFY-P·VKM-E series)
Air outlet control (PFFY-P·VKM series)
This unit is automatically controlled that air comes out simultaneously from the upper and lower air outlets so that the room can be cooled or heated
effectively.
Description of operation
Operation COOL DRY HEAT FAN
ticular room as shown in the following table and will be higher than the
noise specifi cation, which was measured in an echo-free room.
Location
examples
Noise levels 3 to 7 dB 6 to 10 dB 9 to 13 dB
The batteries are low.
Replace the batteries and press the Reset button.
If nothing appears even after the batteries are replaced, make sure that
the batteries are installed in the correct directions (+, –).
The self diagnosis function has operated to protect the air conditioner.
Do not attempt to repair this equipment by yourself.
Turn off the power switch immediately and consult your dealer. Be sure
to provide the dealer with the model name.
When another indoor unit is operating in heating mode, the control valve
opens and closes occasionally to maintain stability in the air conditioning
system. This operation will stop after a while.
* If this will cause an undesirable rise in the room temperature in small
rooms, etc., stop the operation of the indoor unit temporarily.
The damper is automatically controlled by a microcomputer according to
the air fl ow temperature and operation time of the air conditioner.
Here is the solution. (Unit is operating normally.)
High sound-ab-
sorbing rooms
Broadcasting
studio, music
room, etc.
Normal rooms
Reception
room, hotel
lobby, etc.
Low sound-ab-
sorbing rooms
Offi ce, hotel
room
Air fl ow
Upper and lower air fl ow
Room temperature
Conditions
• Be sure to keep the area around the damper of the lower air outlet free of any objects.
This unit can be set to blow out air from the upper air outlet only by changing the switch setting on the address board (ask the dealer).
Range of application
The range of working temperatures for both the indoor and outdoor units of the series Y, R2, Multi-S is as below.
Caution:
The use of your air conditioner outside the range of working temperature and humidity can result in serious failure.
Note: As an applicable humidity standard for both indoors and outdoors, we recommend use within a range of 30 - 80% relative humidity.
Warning:
If the air conditioner operates but does not cool or heat (depending on model) the room, consult your dealer since there may be a refrigerant leak. Be sure to ask the service representative whether there is refrigerant leakage or not when repairs are carried out.
The refrigerant charged in the air conditioner is safe. Refrigerant normally does not leak. However, if refrigerant gas leaks indoors, and
comes into contact with the fi re of a fan heater, space heater, stove, etc., harmful substances will be generated.
and set temperature
are different.
Mode Indoor unit
Cooling
Heating
15 °C - 24 °C WB –5 °C - 43 °C DB –5 °C - 43 °C DB –5 °C - 46 °C DB
15 °C - 27 °C DB –15 °C - 15.5 °C WB –12 °C - 15 °C WB –12 °C - 15.5 °C WB
Upper air fl ow Upper air fl ow only
Room temperature
is close to set temperature or thermooff.
—
PUHY PURY PUMY
Upper and lower air fl ow
(Normal condition
(in heating))
Outdoor unit
Upper air fl ow
During defrosting
operation, start of
operation, thermooff
Upper and lower air fl ow
—
19
Page 20

12. Specifi cations
PCFY-P·VKM-E Series
Model P40 P63 P100 P125
Power source (Voltage<V>/Frequency) <Hz> ~/N 220-230-240/50, 220/60
Capacity (Cooling/Heating) <kW> 4.5/5.0 7.1/8.0 11.2/12.5 14.0/16.0
Dimension (Height) <mm> 230
Dimension (Width) <mm> 960 1280 1600
Dimension (Depth) <mm> 680
Net weight <kg> 24 32 36 38
Fan Airfl ow rate (Low-Middle2-Middle1-High) <m
Noise level (Low-Middle2-Middle1-High) <dB> 29-32-34-36 31-33-35-37 36-39-41-43 36-39-42-44
*1 Cooling/Heating capacity indicates the maximum value at operation under the following condition.
Cooling: Indoor 27 °C DB/19°C WB, Outdoor 35 °C DB
Heating: Indoor 20 °C DB, Outdoor 7 °C DB/6 °C WB
PKFY-P·VBM-E Series PKFY-P·VHM-E Series
Model P15 P20 P25 P32 P40 P50
Power source (Voltage<V>/Frequency) <Hz> ~/N 220-230-240/50, 220/60
Capacity (Cooling/Heating) <kW> 1.7/1.9 2.2/2.5 2.8/3.2 3.6/4.0 4.5/5.0 5.6/6.3
Dimension (Height) <mm> 295 295
Dimension (Width) <mm> 815 898
Dimension (Depth) <mm> 225 249
Net weight <kg> 10 13
Fan Airfl ow rate (Low-Middle2-Middle1-High) <m3/min>
Noise level (Low-Middle2-Middle1-High) <dB> 29-31-32-33 29-31-34-36 34-37-41 34-38-41 34-39-43
*1 Cooling/Heating capacity indicates the maximum value at operation under the following condition.
Cooling: Indoor 27 °C DB/19°C WB, Outdoor 35 °C DB
Heating: Indoor 20 °C DB, Outdoor 7 °C DB/6 °C WB
3
/min> 10-11-12-13 14-15-16-18 21-24-26-28 21-24-27-31
4.9-5.0-5.2-5.3
4.9-5.2-5.6-5.9 9-10-11 9-10.5-11.5 9-10.5-12
PMFY-P·VBM-E Series
Model P20 P25 P32 P40
Power source (Voltage<V>/Frequency) <Hz> ~/N 220-230-240/50, 220/60
Capacity (Cooling/Heating) <kW> 2.2/2.5 2.8/3.2 3.6/4.0 4.5/5.0
Dimension (Height) <mm> 230 (30)
Dimension (Width) <mm> 854 (1000)
Dimension (Depth) <mm> 395 (470)
Net weight <kg> 14 (3.0)
Fan Airfl ow rate (Low-Middle2-Middle1-High) <m
Noise level (Low-Middle2-Middle1-High) <dB> 27-30-33-36 32-34-36-37 33-35-37-39
3
/min>
6.5-7.2-8.0-8.6
7.3-8.0-8.6-9.3
7.7-8.7-9.7-10.7
*1 Cooling/Heating capacity indicates the maximum value at operation under the following condition.
Cooling: Indoor 27 °C DB/19 °C WB, Outdoor 35 °C DB
Heating: Indoor 20 °C DB, Outdoor 7 °C DB/6 °C WB
*2 This fi gure ( ) indicates panel’s.
PFFY-P·VKM-E Series
Model P20 P25 P32 P40
Power source (Voltage<V>/Frequency) <Hz> ~/N 220-230-240/50
Capacity (Cooling/Heating) <kW> 2.2/2.5 2.8/3.2 3.6/4.0 4.5/5.0
Dimension (Height) <mm> 600
Dimension (Width) <mm> 700
Dimension (Depth) <mm> 200
Net weight <kg> 14
Fan Airfl ow rate (Low-Middle2-Middle1-High) <m
Noise level (Low-Middle2-Middle1-High) <dB> 27-31-34-37 28-32-35-38 35-38-42-44
3
/min>
5.9-6.8-7.6-8.7
6.1-7.0-8.0-9.1
8.0-9.0-9.5-10.7
*1 Cooling/Heating capacity indicates the maximum value at operation under the following condition.
Cooling: Indoor 27 °C DB/19 °C WB, Outdoor 35 °C DB
Heating: Indoor 20 °C DB, Outdoor 7 °C DB/6 °C WB
20
Page 21

Содержание
1. Меры предосторожности .............................................................173
2. Наименование деталей ................................................................174
3. Конфигурация дисплея ...............................................................177
4. Установка дня недели и времени ............................................... 177
5. Эксплуатация ................................................................................177
6. Таймер .......................................................................................... 179
1. Меры предосторожности
Перед установкой данного прибора, пожалуйста
обязательно прочитайте все “Меры предосторожности”.
В разделе “Меры предосторожности” изложены очень
важные сведения, касающиеся техники безопасности.
Обязательно следуйте этим инструкциям.
Пожалуйста уведомите соответствующий орган
электроснабжения или получите от него разрешение
перед подключением к системе электропитания.
Предупреждение:
• Данны прибор не должен устанавливаться пользователем.
Обратитесь к поставщику или в специализированное
предприятие и закажите установку прибора. При
неправильной установке может произойти утечка воды,
электрический шок или пожар.
• Никогда не занимайтесь ремонтом или переносом прибора не
кто иной место самостоятельно.
•
Не ставьте какие-либо посторонние предметы на прибор.
• Не проливайте на прибор воду и не дотрагивайтесь до
прибора мокрыми руками.
• Не разбрызгивайте вблизи от прибора горючий газ.
• Не снимайте переднюю панель или защиту вентилятора с
внешнего прибора, когда он работает.
• Запрещается самостоятельно ремонтировать устройство или
переносить его в другое место.
7. Прочие функции ............................................................................182
8. Выбор функции .............................................................................183
9.
Работа пульта дистанционного управления в аварийном режиме
10. Уход и чистка
11. Исправление неполадок .............................................................189
12. Технические характеристики...................................................... 191
.......................................................................................
........... 187
187
Символика, используемая в тексте
Предупреждение:
Описывает меры предосторожности, которые следует
выполнять, чтобы избежать травмы или гибели пользователя.
Осторожно:
Описывает меры предосторожности, которые следует выполнять,
чтобы не повредить прибор.
Символы, указанные на иллюстрациях
:Указывает, что эта часть должна быть заземлена.
• Если вы заметите ненормально сильный шум или вибрацию,
остановите прибор, отключите главный выключатель
питания и свяжитесь с вашим поставщиком.
• Никогда не вставляйте пальцы, палки и т.д. в отверстия входа
или выхода.
• Если вы почувствуете странные запахи, остановите
прибор, отключите питание и проконсультируйтесь с вашим
поставщиком. В противном случае может произойти поломка
прибора, пожар или электрошок.
• Детям и немощным людям ЗАПРЕЩАЕТСЯ самостоятельно
пользоваться данным кондиционером воздуха.
• Необходимо наблюдать за маленькими детьми с тем, чтобы
они не играли с кондиционером воздуха.
• Если происходит выброс или утечка газа хладагента,
остановите работу кондиционера, тщательно проветрите
помещение и свяжитесь с вашим поставщиком.
Осторожно:
• Не пользуйтесь острыми предметами для нажатия
кнопок, так как это может привести к повреждению пульта
дистанционного управления.
• Не закрывайте и не блокируйте входные и выпускные
отверстия внутреннего и наружного блоков.
• Запрещается протирать пульт дистанционного управления
бензином, растворителем, салфетками с химической
пропиткой и т.п.
• Не используйте устройство длительное время при высокой
влажности (например, оставив открытой дверь или окно).
Если устройство длительное время эксплуатируется в
режиме охлаждения в помещении с высокой влажностью (80%
и выше), капли конденсата из кондиционера могут намочить
или испортить мебель и т.д.
• Во время работы кондиционера не касайтесь направляющей
лопасти верхнего выходного отверстия или
заслонке. В противном случае может образоваться конденсат,
который приведет к остановке устройства.
к нижней
Утилизация прибора
Когда вам потребуется ликвидировать прибор, обратитесь к вашему
дилеру.
173
Page 22

2. Наименование деталей
Внутренний прибор
PKFY -P·VBM-E PKFY-P·VHM-E PCFY-P·VKM-E PMFY-P·VBM-E PFFY-P·VKM-E
Скорость вращения вентилятора
Лопатка
Операции 4 шага 5 шага 5 шага 4 шага 4 шага
Автоотклонение
Жалюзи Вручную Вручную Вручную Вручную Вручную
Фильтр Обычный Обычный
Индикация очистки фильтра
PMFY-P·VBM-E
1-ходовая потолочная кассета
Выходные воздушные
отверстия
Filter
Фильтр
Air outlet
4-х скоростная
3-х скоростная + Авто*4-х скоростная + Авто*
Долговечный
4-х скоростная 4-х скоростная
Обычный Обычный
100 часов 100 часов 2,500 часов 100 часов 100 часов
* Даная операция доступна только при использовании пульта дистанционного управления, с
помощью которого можно установить настройки скорости вентилятора на “Авто”.
Лопатка
Vane
Выходные воздушные
Air inlet
отверстия
Жалюзи
Louver
PKFY-P·VBM-E
Монтаж на стене
PCFY-P·VKM-E
Подвеска к потолку
Выходные воздушные
отверстия
Фильтр
Filter Air intake
Жалюзи Выходные
Louver Air outlet
Впуск воздуха
воздушные
отверстия
Жалюзи
Vane
Лопатка
PKFY-P·VHM-E
Монтаж на стене
Filter
Жалюзи
Louver
PFFY-P·VKM-E
Напольное расположение
Выходные воздушные
отверстия
Air outlet
Лопатка
Vane
Выходные
Air outlet
воздушные
отверстия
Впуск воздухаФильтр
Жалюзи
Louver
Air intake
Лопатка
Vane
Воздухозаборное
отверстие
Air inlet
Лопатка
174
Выходные
воздушные
отверстия
Фильтр
(Внутренняя часть воздухозаборника)
Фильтр
Filter
Демпфер
Damper
Выходные
Air outlet
воздушные
отверстия
Жалюзи
Louver
Page 23

2. Наименование деталей
для проводные пульты дистанционного управления
Дисплей
В целях пояснения на рисунке
показаны все элементы
дисплея. При эксплуатации
отображаются только
соответствующие элементы.
Идентификация текущего
Показывает режим работы и т.д.
* Поддержка отображения на других
языках
действия
Индикатор центрального
управления (Centrally Controlled)
Показывает, что функции пульта
дистанционного управления отключены
на главном пульте управления.
Индикатор выключения таймера
(Timer Is Off)
Показывает, что таймер отключен.
Настройка температуры
Показывает целевую температуру.
Управление
День недели
Показывает текущий день недели.
Индикатор времени/таймера (Time/Timer)
Показывает текущее время, пока не будет установлен
обычный таймер и таймер отключения.
Если выполнены установки обычного таймера или
таймера отключения, отображается оставшееся время.
°F°C
Индикатор направления воздуха
(вверх/вниз)
Индикатор показывает направление
исходящего воздушного потока.
Индикатор “One Hour Only”
(Только один час)
Отображается в случае настройки понижения
мощности исходящего воздушного потока и
направления его книзу в режиме охлаждения
(COOL) или сушки (DRY). (Работа в этом режиме
зависит от модели устройства).
Индикатор отключается через час работы во время
изменения направления воздушного потока.
TIME SUN MON TUE WED THU FRI SAT
TIMER
AFTER
ONLY1Hr.
ERROR CODE
°F°C
Hr
AFTER
ON
OFF
Индикатор окружающей температуры
Показывает температуру окружающего
воздуха. Диапазон дисплея температуры
в помещении составляет 8–39°C.
Дисплей мигает при температуре менее
8 °C или 39 °C или больше.
Индикатор жалюзи
Показывает работу жалюзи. Не отображается в
случае, если жалюзи неподвижны.
(Индикатор включения питания)
Показывает, что питание включено.
FUNCTION
FILTER
WEEKLY
SIMPLE
AUTO OFF
Индикатор датчика
Отображается в случае использования
датчика пульта дистанционного
управления.
Индикатор блокировки (Locked)
Показывает, что кнопки пульта
дистанционного управления были
блокированы.
Индикатор очистки воздушного
фильтра (Clean The Filter)
Загорается, когда необходимо
очистить фильтр.
Индикаторы таймера
Отображаются после установки
соответствующих таймеров.
Индикатор скорости вентилятора
Показывает установленную скорость
вентилятора.
Индикатор вентиляции
Отображается в случае работы
устройства в режиме вентиляции.
Кнопки установки температуры
Вниз
Вверх
Кнопка таймера “Menu”
(Меню) (Кнопка “Monitor/Set”
(Контроль/Установка))
Кнопка режима
(кнопка возврата Back)
Кнопки установки времени
Назад
Кнопка включения/
выключения таймера “On/Off”
(Кнопка установки дня“Day”)
Открытие
дверцы.
Примечание:
Вперед
TEMP.
MENU
BACK DAY
MONITOR/SET
PAR-21MAA
CLOCK
ON/OFF
ON/OFF
FILTER
CHECK
TEST
OPERATION
Встроенный датчик температуры
CLEAR
Кнопка “ON/OFF” (ВКЛ./ ВЫКЛ.)
Кнопка контроля скорости
вентилятора
Кнопка “Filter” (Фильтр)
(кнопка )
Кнопка тестирования “Test”
Кнопка проверки
(кнопка “Clear” (Очистка))
Кнопка направления
воздушного потока (вверх/вниз)
Кнопка жалюзи
(кнопка “Operation” (Операция) )
Переход к операции №.
Кнопка вентиляции
(кнопка “Operation” (Операция)
Переход к следующему
номеру операции.
Сообщение “PLEASE WAIT” (ПОЖАЛУЙСТА, ПОДОЖДИТЕ)
Это сообщение отображается в течение примерно 3 минут при подаче электропитания к внутреннему прибору или когда прибор восстанавливается после сбоя электропитания.
Мигание дисплея при работе
Если к одному наружному устройству подключено несколько внутренних, то при выборе для внутреннего устройства режима работы, отличного от текущего режима
другого внутреннего устройства, дисплей режима работы начнет мигать. Выберите одинаковый режим работы с другим внутренним устройством.
Сообщение “NOT AVAILABLE” (НЕДОСТУПНО)
Это сообщение отображается при нажатии кнопки для вызова функции, которая отсутствует во внутреннем приборе.
Если один пульт дистанционного управления используется для нескольких внутренних устройств, это сообщение появляется в том
случае, если основное внутреннее устройство не имеет выбранной функции.
Дисплей комнатной температуры
Для измерения температуры в помещении можно использовать датчики температуры внутреннего устройства или пульта дистанционного управления. Датчики
температуры внутреннего устройства – это значение по умолчанию. Если для измерения температуры в помещении выбраны датчики внутреннего устройства, то
на пульте ДУ, управляющего несколькими устройствами, будет отображаться значение температуры, измеренное основным внутренним устройством.
)
175
Page 24

2. Наименование деталей
для беспроводного пульта дистанционного управления
Область передачи
Дисплей пульта дистанционного управления
* В целях объяснения показаны все пункты,
которые появляются на дисплее.
* Все пункты отображаются при нажатии
кнопки Reset (Сброс).
Кнопка “ON/OFF” (ВКЛ./ВЫКЛ.)
Кнопки установки температуры
Кнопка контроля скорости вентилятора
(Изменяет скорость вентилятора)
Кнопка воздушного потока (Изменяет направление
воздушного потока вверх/вниз)
Кнопка режима (Изменяет режим работы)
Кнопка проверки
Кнопка тестирования “Test”
При использовании беспроводного пульта дистанционного управления направьте его к
приемнику на внутреннем приборе.
Если пультом дистанционного управления воспользоваться примерно в течение двух минут
после подачи электропитания на внутренний прибор, внутренний прибор может издать два
звуковых сигнала, так как осуществляется начальная автоматическая проверка.
Внутренний прибор издает звуковой сигнал, который подтверждает получение сигнала, посланного
с пульта дистанционного управления. Сигналы могут быть получены на расстоянии примерно 7
метров по прямой линии от внутреннего прибора под углом в 45° слева и справа прибора. Однако
такой свет, как лампы дневного света или сильное освещение могут уменьшить эффективность
приема сигналов внутренним прибором.
Если лампа работы около приемника на внутреннем приборе мигает, прибор необходимо
проверить. Свяжитесь со своим поставщиком для проведения обслуживания.
Обращайтесь с пультом дистанционного управления осторожно! Не роняйте пульт дистанционного
управления и не подвергайте его сильным ударам. Кроме того, следите за тем, чтобы пульт
дистанционного управления не попал в воду, и не оставляйте его в местах с высокой влажностью.
Во избежание неправильного местоположения пульта дистанционного управления, установите на
стене держатель, входящий в комплект поставки пульта дистанционного управления, и обязательно
устанавливайте пульт дистанционного управления в держатель после использования.
Индикатор передачи
Индикатор таймера
Области работы
Кнопка отключение таймера
Кнопка включение таймера
Кнопка установки часов
Кнопка установки минут
Кнопка установки времени (Задает
Кнопка жалюзи (Изменяет направление
воздушного потока влево/вправо)
Кнопка Reset (Сброс)
время)
Установка/замена батареек
1. Снимите верхнюю крышку, вставьте
две батарейки типа AAA и установите
верхнюю крышку на место.
1
2
Верхняя
крышка
2. Нажмите кнопку Reset (Сброс).
3
Две батарейки типа AAA
Сначала вставляйте
отрицательный (–) вывод
каждой батарейки.
Устанавливайте
батарейки с соблюдением
полярности (+, –)!
176
Нажмите кнопку Reset
(Сброс) с помощью
предмета с узким
концом.
Page 25

3. Конфигурация дисплея
Выбор функции Установка дня/времени
A
Стандартные экраны управления
OFF ON
CB
Монитор таймера Настройка таймера
MON
TIMER
OFF
˚F˚C
WEEKLY
B
TIME SUN
DC
˚F˚C
˚C
SUN MON TUE WED THU FRI SAT
WEEKLY
4. Установка дня недели и времени
Индикатор дня
Day of the week and
time display
недели и часов
TEMP.
MENU
BACK DAY
MONITOR/SET
PAR-21MAA
°C
CLOCK
TIME SUN
ON/OFF
°C
OPERATION
ON/OFF
FILTER
CHECK
CLEAR
TEST
Примечание:
День недели не будет отображаться, если функция часов отключена на
дисплее выбора функции (Function Selection).
5. Эксплуатация
<Типы экранов отображения>
Настройку языка дисплея можно изменить на русский язык при
помощи выбора функции на пульте дистанционного управления.
См. пункт [4]-1, раздела 8 для изменения установки языка.
Начальный установленный язык – английский.
Выбор функции:
Устанавливает доступные функции и диапазоны
для пульта дистанционного управления (функции
таймера, ограничения операций и т.д.)
Установка дня/времени: Настраивает текущий день недели или время.
Стандартные экраны управления:
Отображает и определяет рабочее состояние
Монитор таймера:
систем кондиционирования
Отображает текущие настройки таймера
воздуха.
(недельный таймер, простой таймер или таймер
автоматического включения или отключения).
Настройка таймера:
Настраивает работу любого таймера
(недельный таймер, простой таймер или таймер
автоматического включения или отключения).
<Изменение экрана>
Для перехода к
A
: Удерживайте в течение 2 секунд нажатыми кнопку выбора
режима и кнопку включения/выключения таймера “On/Off”.
Для перехода к
Для перехода к
Для перехода к
B
: Нажмите кнопку таймера “Menu”.
C
: Нажмите кнопку выбора режима (Return).
D
: Нажмите кнопки установки времени ( или ).
Day of the week Setting
Установка дня недели
TIME SUN
Установка времени
Time Setting
1. Нажмите кнопку настройки времени или 1 для включения
отображения на дисплее 2.
2. Нажмите кнопку включения/выключения таймера “On/Off” (установка дня)
9
для установки дня недели.
* Каждое нажатие кнопки переключает день, как показано на 3:
Sun (Вск) Mon (Пнд) ... Fri (Птн) Sat (Сбт).
3. Нажмите соответствующую кнопку настройки времени 1 для установки времени.
* Пока вы удерживаете кнопку нажатой (в 4), временные
интервалы сначала будут иметь приращение по минуте, затем
по десять минут, а после этого по одному часу.
4. После выполнения соответствующих настроек в действиях 2и 3 нажмите
4
кнопку “Filter” (Фильтр)
для сохранения значений.
°C
°C
TEMP.
MENU
MONITOR/SET
BACK DAY
PAR-21MAA
ON/OFF
CLOCK
OPERATION
ON/OFF
CHECK
CLEAR
FILTER
TEST
5.1. Включение/Выключение
<Для начала работы>
Нажмите кнопку “ON/OFF” (ВКЛ./ВЫКЛ.) 1.
• Загорится лампа включения 1 и индикатор дисплея.
Примечание:
После перезапуска устройства устанавливаются следующие параметры:
Настройки пульта дистанционного управления
Режим Последняя настройка
Настройка температуры Последняя настройка
Скорость вращения вентилятора
Воздушный поток (вверх/ вниз)
*1 В зависимости от типа внутреннего прибора могут быть применены последние настройки.
*2 В случае неустойчивости последней настройки поток воздуха может быть Вниз 4 в
зависимости от типа внутреннего прибора.
Последняя настройка
COOL или DRY
Режим
HEAT
FAN
Горизонт. выходное отверстие *1
Последняя настройка *2
Горизонт. выходное отверстие *1
2
5
6
3
7
<Для останова операции>
Нажмите еще раз кнопку “ON/OFF” (ВКЛ./ВЫКЛ.) 1.
• Будут отключены лампа включения 1 и индикатор дисплея.
Примечание:
Даже при немедленном нажатии кнопки ON/OFF (Вкл./Выкл.) после остановки
работы кондиционер воздуха не включиться в течение трех минут.
Это предотвращает повреждение внутренних деталей.
177
Page 26

5. Эксплуатация
Swing
Auto 1 2
3
4
5
5.2. Выбор режима
Нажмите кнопку выбора режима ( ) 2
эксплуатации
.
2
Режим охлаждения
Режим сушки
Режим вентилятора
Режим отопления
Автоматический режим (охлаждение/отопление)
Работа в автоматическом режиме
В соответствии с заданной температурой, работа в режиме охлаждения
включается, если температура в помещении слишком высокая, а работа
в режиме обогрева включается, если температура слишком низкая.
При работе в автоматическом режиме, если температура в помещении
изменится, и будет оставаться на 1,5 °C или больше выше заданной
температуры в течение 3 минут, кондиционер переключается в режим
охлаждения. Таким же образом, если температура в помещении будет
оставаться на 1,5 °C или больше ниже заданной температуры в течение
3 минут, кондиционер переключается в режим обогрева.
Режим охлаждения
3 минут (переключение с
охлаждения на обогрев)
3 минут( переключение с
обогрева на охлаждение)
Так как температура в помещении регулируется автоматически
для поддержания определенной эффективной температуры,
работа в режиме охлаждения осуществляется на несколько
градусов теплее, а работа в режиме обогрева на несколько
градусов холоднее заданной температуры при достижении
температуры (автоматическая экономия электроэнергии).
5.3. Настройка температуры
Чтобы понизить температуру в помещении:
Нажмите кнопку
Дисплей показывает выбранную температуру
3, чтобы установить желаемое значение температуры.
Чтобы повысить температуру в помещении:
Нажмите кнопку
Дисплей показывает выбранную температуру
3, чтобы установить желаемое значение температуры.
• Имеющиеся диапазоны температур:
Охлаждение и сушка: 19 - 30 °C
Отопление: 17 - 28 °C
Автоматический режим: 19 - 28 °C
• На дисплее мигают показания 8 °C - 39 °C, чтобы проинформировать
Вас о том, что температура в помещении ниже или выше показания
температуры на дисплее.
5.4. Настройка скорости вентилятора
Нажмите кнопку скорости вентилятора 5 столько раз, сколько
нужно для выбора необходимой скорости.
• Каждое нажатие кнопки увеличивает скорость. Текущая
выбранная скорость отображается в 5.
•
Последовательность изменения настроек и доступные параметры:
СКОРОСТЬ
ВЕНТИЛЯТОРА
4-х
скоростная
+
Авто*
3-х
скоростная
+
Авто*
4-х
скоростная
модель
Скорость 1 Скорость 2 Скорость 3 Скорость 4
Speed 1 Speed 2 Speed 3 Speed 4 Auto
Скорость 1 Скорость 2 Скорость 3
Speed 2 Speed 3 Speed 4 Auto
Скорость 1 Скорость 2 Скорость 3 Скорость 4
Индикатор
* Только для пульта дистанционного управления MA. Для
беспроводного пульта дистанционного управления необходима
автоматическая настройка скорости вентилятора.
и выберите режим
Заданная температура +1,5°C
Заданная температура
Заданная температура -1,5°C
.
3
.
3
Авто
178
Авто
Примечание:
Число доступных скоростей вращения вентилятора зависит от
типа подключенного устройства. Некоторые устройства не имеют
возможности настройки параметра “Auto” (Авто).
В следующих случаях действительная скорость вентилятора устройства
будет отличаться от скорости, отображаемой на пульте дистанционного
управления.
1. Во время отображения индикации “STAND BY” (ОБОГРEB:
или “DEFROST” (OTTAИBAHИE).
2. Когда температура теплообменника низкая в режиме обогрева.
(например, сразу же после начала работы в режиме обогрева)
3. В режиме обогрева (HEAT), когда окружающая температура в
помещении выше значений настроек температуры.
4. Во время работы устройства в режиме сушки (DRY).
■
Автоматическая настройка скорости вентилятора (для
беспроводного пульта дистанционного управления)
Настройки пульта дистанционного управления следует выполнять только
в том случае, если автоматическая настройка скорости вентилятора не
является настройкой по умолчанию.
Выполнять такую настройку для проводного пульта дистанционного
управления, если параметр автоматической настройки скорости
вентилятора используется по умолчанию, не надо.
Нажмите кнопку SET остроконечным предметом.
1
Выполняйте операцию, когда дисплей пульта дистанционного управления
выключен.
MODEL SELECT
2
3
(Настройка №02: с автоматической настройкой скорости вентилятора)
4
мигает и номер модели высвечивается как A.
Нажмите кнопку AUTO STOP .
мигает и настройка номера модели высвечивается как B.
(Настройка №01: без автоматической настройки скорости вентилятора)
Нажмите кнопки установки температуры,
При неправильном выборе операции нажмите кнопку ON/OFF
ВЫКЛ.) и вновь начните выполнение операции с пункта 2.
Нажмите кнопку SET остроконечным предметом.
и номер модели высвечиваются в течение 3 секунд, а затем гаснут.
MODEL SELECT
MODEL SELECT
ON/OFF TEMP
FAN
VANE
MODE
CHECK
LOUVER
TEST RUN
14
RESETSET CLOCK
чтобы выбрать настройку №02.
B
A
AUTO STOP
AUTO START
3
2
h
min
ПАУ
(ВКЛ./
ЗА)
5.5. Настройка направления воздушного потока
<Для изменения направления воздушного потока вверх/вниз>
Во время работы устройства нажмите кнопку направления воздушного
потока (вверх/вниз) 6 необходимое число раз.
Каждое нажатие кнопки меняет направление воздуха. Тек ущее направление
•
воздуха отображается в
• Последовательность изменения настроек и доступные параметры:
воздушного потока
модель на 5
Колебание
шага *1
модель на 4
шага
(PMFY)
модель на 4
шага
(PKFY-BM)
* Помните, что в режиме колебания воздушного потока индикация на экране
не меняется вместе с изменением положения воздушных направляющих.
В некоторых моделях возможность изменения направления воздуха недоступна.
*
*1 Только для пульта дистанционного управления MA, иной пульт
дистанционного управления отображает то же, что и модель на 4 шага.
Настройка направления воздушного потока <Авто>
*2
COOL/FAN/DRY : Настройка 1 (Горизонтальное), HEAT : Настройка 5 (Вниз 5)
Примечание:
Доступные направления воздушного потока зависят от типа подключенного устройства.
Некоторые устройства не имеют возможности выбора параметра “Auto” (Авто).
В следующих случаях действительное направление воздушного
потока будет отличаться от направления, указанного индикатором.
1. Во время отображения индикации “STAND BY” (ОБОГРEB:
или “DEFROST” (OTTAИBAHИE).
2. Сразу же после запуска режима обогрева (пока система ожидает
активизации параметров изменения режима).
3. В режиме обогрева, когда окружающая температура в помещении
выше значений настроек температуры.
.
6
Индикатор
Авто
Swing
Колебание
(Гориз.)
(Horiz.)
123 4
(Horiz.)
(Гориз.)
123 4
ПАУ
ЗА)
Page 27

5. Эксплуатация
(Для серии PFFY-P·VKM)
Для серии PFFY-P·VKM направление воздушного потока, отображаемое
на пульте дистанционного управления, отличается от фактического
направления воздушного потока. См. следующую таблицу.
Колебание
Индикатор
Фактическое
Swing
Колебание
Swing
123 4
(Гориз.)
(Horiz.)
1234
(Гориз.)
(Horiz.)
Направление воздушного потока для демпфера нижних
воздуховыпускных отверстий установить невозможно. Направление
воздушного потока автоматически контролируется компьютером.
<[Вручную] Изменить направление воздушного потока влево/вправо>
* Нельзя использовать кнопку заслонки 7.
• Остановите работу прибора, поднимите ручку
заслонки и установите ее в нужное положение.
* Не устанавливайте на положение вовнутрь,
когда прибор работает в режиме охлаждения
или сушения, поскольку это может привести к
образованию конденсата и просачиванию воды.
Осторожно
:
При выполнении вышеуказанного процесса следует
предпринимать меры, чтобы избежать падений.
5.6. Вентиляция
Для комбинации LOSSNAY
5.6.1. для проводные пульты дистанционного управления
Для начала работы вентилятора вместе с внутренним устройством:
Нажмите кнопку “ON/OFF” (ВКЛ./ВЫКЛ.) 1.
• На экране появится индикатор “Vent” (
работать автоматически во время действия внутреннего
устройства.
Для включения вентилятора, когда выключено внутреннее устройство:
Нажмите кнопку вентиляции (Ventilation) 8, пока выключено
внутреннее устройство.
• Загорится лампа включения (1) и появится индикатор вентиляции (8).
Для изменения мощности вентилятора:
Нажмите кнопку вентиляции (V entilation) 8 необходимое число раз.
• Каждое нажатие кнопки переключает настройки так, как
показано ниже.
(Малая) (Большая)
(Low)
(High)
Примечание:
В некоторых моделях вентилятор внутреннего устройства
может начать работу даже в том случае, когда он будет
настроен для автономной работы.
). Вентилятор будет
8
Нет индикации
No display
(останов)
(Stop)
(OFF)
6. Таймер
6.1.
для проводные пульты дистанционного управления
Можно использовать экран выбора функции (Function Selection) для
выбора одного из трех типов таймера: 1 Weekly timer (Недельный
таймер), 2 Simple timer (Простой таймер) или 3 Auto Off (Таймер
автоматического выключения).
6.1.1. Еженедельный таймер
Недельный таймер может использоваться для настройки до
восьми операций в день в течение недели.
• Каждая операция может состоять из: времени включения/
выключения с настройками температуры или только времени
включения/выключения, или только настроек температуры.
• Когда наступает установленное для таймера время,
кондиционер начинает выполнять действие, назначенное для
таймера.
Настройка времени таймера может быть выполнена с точностью
в 1 минуту.
Примечание:
*1. Таймеры недельный/простой/автоматического отключения не
могут использоваться одновременно.
*2. Недельный таймер не будет работать в случае наличия
следующих условий:
Функция таймера выключена; система находится в неисправном
состоянии; выполняется тест системы; пульт дистанционного
управления выполняет процедуру самотестирования или
проверку пульта дистанционного управления; пользователь
выполняет настройку таймера; пользователь выполняет
настройку
управляется из центрального пульта управления. (В частности,
система не будет выполнять действия (включать или
выключать устройство или контролировать температуру),
которые отключены в результате возникновения этих условий).
текущего дня недели или времени; система
№ операции
Day Setting
Установка дня
TEMP.
MENU
MONITOR/SET
BACK DAY
PAR-21MAA
SUN
ON/OFF
CLOCK
°C
OPERATION
ON
WEEKLY
ON/OFF
FILTER
CHECK
CLEAR
TEST
<Настройка недельного таймера>
1. Убедитесь, что отображается стандартный экран управления, а
также индикатор недельного таймера (1).
2. Нажмите кнопку таймера “Menu” 2, после чего на экране
отобразится сообщение “Set Up” (Установка) (2). (Помните, что
каждое нажатие кнопки переключает дисплей между режимами
отображения “Set Up” (Установка) и “Monitor” (Монитор)).
3. Нажмите кнопку включения/выключения таймера “On/Off”
(установка дня) 9 для установки дня недели. Каждое нажатие
кнопки отображает 3 следующий параметр настройки в
последовательности: “Вск Пнд Втр Срд Чтв Птн Сбт” “Sun” ...
“Fri” “Sat” “Sun Mon Tues Wed Thurs Fri Sat”…
4. Нажмите или кнопку операции (7 или 8) необходимое
число раз для установки нужного значения (1 - 8) 4.
* Во время выполнения действий 3 и 4 будет выбран один из
элементов показанной ниже таблицы.
(Слева на дисплее пульта дистанционного управления
показывается отображение индикации в случае установки
приведенных далее значений операции 1 для воскресенья
(Sunday)).
Таблица настройки
№ операции. Sunday Monday … Saturday
No. 1
No. 2 • 10:00
…
No. 8
Примечание:
Устанавливая день для параметра “Sun Mon Tues Wed Thurs Fri Sat”, вы
можете выполнить одно и то же действие каждый день в одно и тоже время.
(Например, приведенная выше операция 2, которая одинакова для всех
дней недели).
Показывает
установки времени
• 8:30
• ON
• 23 °C
• OFF
<Настройка операции 1 для воскресенья>
Включение кондиционера в 8:30 с
контролем температуры до 23 °C.
• 10:00
• OFF
Показывает выбранную операцию (ON
(ВКЛ.) или OFF (ВЫКЛ.))
* Не отображается, если операция не выбрана
SUN
ON
°C
WEEKLY
• 10:00
• OFF
<Настройка операции 2 на каждый день>
Отключение кондиционера в 10:00.
• 10:00
• OFF
Показывает установки температуры.
* Не отображается, если
температура не установлена.
179
Page 28

6. Таймер
<Настройка недельного таймера>
5.Нажмите соответствующую кнопку настройки времени
1
необходимое число раз для установки времени (5).
* Пока вы удерживаете кнопку нажатой, временные интервалы
сначала будут иметь приращение по минуте, затем по десять
минут, а посте этого по одному часу.
6.Нажмите кнопку “ON/OFF” (ВКЛ./ВЫКЛ.) 1 для выбора нужной
операции (ON или OFF) (
).
6
* Каждое нажатие кнопки изменяет следующую настройку в
последовательности: не отображается (нет настройки) “ON”
(ВКЛ.) “OFF” (ВЫКЛ.)
7. Нажмите соответствующую кнопку настройки температуры 3 для
установки нужного значения температуры (7).
* Каждое нажатие кнопки изменяет настройку в
последовательности: не отображается (нет настройки) 24
25 ... 29 30 12 ... 23 не отображается.
(Доступный диапазон: от 12 °C до 30 °C. Действительный
диапазон контролируемых температур может отличаться в
зависимости от типа подключенного устройства).
8. После выполнения соответствующих настроек в действиях 5, 6 и 7
нажмите кнопку “Filter” (Фильтр) 4 для сохранения значений.
Для очистки значений текущих настроек для выбранной операции
нажмите и быстро отпустите кнопку проверки (Clear) 0.
* Отображаемая настройка времени изменится на “—:—”, а
индикаторы “On/Off” и установки температуры исчезнут.
(Для одновременной очистки настроек таймера удерживайте
нажатой в течение двух или более секунд кнопку проверки
(Clear) 0 0 Индикатор начнет мигать, показывая, что все
настройки были удалены. Дисплей начнет мигать, указывая на
очистку всех настроек.)
Примечание:
Новые значения будут отменены, если перед кнопкой “Filter” (Фильтр)
4 вы нажмете кнопку выбора режима 2.
Если вы настроили две или более операции для одного и того же времени, будет
выполнена только операция с наивысшим номером операции.
9. Повторите действия с 3 по 8 для заполнения необходимого числа
ячеек.
10. Нажмите кнопку режима (Return) 2 для возврата к стандартному
экрану управления и продолжения процедуры настройки.
11.
Для активизации таймера нажмите кнопку включения/выключения
таймера “On/Off” 9, после чего индикатор “Timer Off” (Выкл. таймер)
исчезнет с экрана.
Убедитесь, что индикатор “Timer Off” более
не отображается.
* Если настроек таймера нет, на экране будет мигать надпись
“Timer Off” (Таймер Выкл.).
<Отображение настроек недельного таймера>
Настройка таймера
SUN
TIMER
ON
OFF
°C
WEEKLY
1. Убедитесь, что индикатор недельного таймера отображается на
экране (
2. Нажмите кнопку таймера “Menu” 2 , после чего на экране
отобразится сообщение “Monitor” (Монитор) (
3. Нажмите кнопку включения/выключения таймера “On/Off”
).
1
).
8
(настройка дня) 9 необходимое число раз для выбора дня.
4. Нажмите кнопку операции
отображаемой на дисплее операции таймера (
или (7 или 8) для изменения
).
9
* Каждое нажатие кнопки осуществит переход к следующей
операции таймера в порядке выполненных настроек времени.
5. Для закрытия монитора и возврата к стандартному экрану
управления нажмите кнопку режима (Return) 2.
<Для отключения недельного таймера.>
Нажмите кнопку включения/выключения таймера “On/Off” 9, после чего на
экране появится индикатор “Timer Off” (Таймер выкл.) ( ).
TIME SUN
°C
°C
WEEKLY
<Для включения недельного таймера.>
Нажмите кнопку включения/выключения таймера “On/Off” 9, после чего
индикатор “Timer Off” (Выкл. таймер) ( ) потемнеет на экране.
TIME SUN
°C
°C
WEEKLY
6.1.2. Простой таймер
Вы можете настроить простой таймер тремя способами:
• Только время включения:
кондиционер начнет работу после наступления установленного времени.
• Только время выключения:
кондиционер прекратит работу после наступления установленного времени.
• Время включения и включения:
Кондиционер начинает и прекращает работу после с наступлением
соответствующего времени.
Простой таймер (включение и выключение) может быть настроен
только для 72-х часового интервала времени.
Настройки времени могут быть сделаны с приращением в один час.
Примечание:
*1. Таймеры недельный/простой/автоматического отключения не могут
использоваться одновременно.
*2. Простой таймер не будет работать в случае наличия следующих
условий:
Таймер выключен; система находится в неисправном состоянии;
выполняется тест системы; пульт дистанционного управления выполняет
процедуру самотестирования или диагностики; пользователь пытается
выбрать режим работы; пользователь выполняет настройку таймера;
система управляется из центрального пульта управления. (В этих условиях
операции включения и отключения запрещены).
ONHr
AFTER
SIMPLE
TEMP.
MENU
BACK DAY
MONITOR/SET
PAR-21MAA
ON/OFF
CLOCK
OPERATION
ON/OFF
FILTER
CHECK
CLEAR
TEST
<Настройка простого таймера>
Настройка таймера
Действие (On (Вкл.) или Off (Выкл.))
* “— —” отображается в случае
отсутствия установок.
1. Убедитесь, что отображается стандартный экран управления, а
также индикатор простого таймера (
В случае отображения индикации, отличной от индикации
простого таймера (Simple Timer), установите ее в “SIMPLE TIM-
ER”, используя функцию настройки таймера (см. 8.[4]–3 (3)).
2. Нажмите кнопку таймера “Menu” 2 , после чего на экране
отобразится индикатор “Set Up” (Установка) (2). (Помните, что
каждое нажатие кнопки переключает дисплей между режимами
отображения “Set Up” (Установка) и “Monitor” (Монитор)).
Нажмите кнопку “ON/OFF” (ВКЛ./ВЫКЛ.) 1 для отображения текущих
3.
настроек простого таймера (ON или OFF). Нажмите кнопку один раз для
отображения оставшегося времени до включения, а затем еще раз для
отображения времени, оставшегося до выключения. (Индикатор “ON/
OFF” отображается в
• “ON” – таймер включения:
).
3
кондиционер начнет работу после прохождения установленного
числа часов.
• “OFF” – таймер отключения:
кондиционер прекратит работу после прохождения
установленного числа часов.
4.
Когда в 3 отображается “ON” или “OFF”: нажмите соответствующую
кнопку настройки времени
1
для установки необходимого числа часов
для включения (если отображается “ON”) или для выключения (если в
отображается “OFF”).
• Доступный диапазон: 1 - 72 часа
5.
Для настройки времени включения и отключения повторите действия 3 и 4.
*
Помните, что для включения и выключения не может быть установлено
одно и тоже время.
6.
Для очистки текущих настроек времени включения и выключения:
Отобразите настройки включения или выключения (см. действие 3) и
нажмите кнопку проверки (Clear) 0 для очистки настроек в значение “—”
(
). (Если нужно использовать только параметр включения или только
4
отключения, убедитесь, что необходимый параметр не имеет значения “—”.)
).
1
4
180
Page 29

6. Таймер
7. После выполнения действия с 3 по 6 нажмите кнопку “Filter” (Фильтр)
4 для сохранения значения.
Примечание:
Новые настройки будут отменены, если перед кнопкой “Filter” (Фильтр)
4 вы нажмете кнопку режима (Return) 2.
8. Нажмите кнопку режима (Return) 2 для возврата к стандартному
экрану управления.
9.
Нажмите кнопку включения/выключения таймера “On/Off” 9 для начала
работы таймера. Во время работы таймера его значение отображается
на дисплее. Проверьте, что значение таймера отображается, и оно
соответствует выполненным настройкам.
<Отображение текущих настроек простого таймера>
Настройка таймера
TIMER ON
1.
Убедитесь, что на экране отображается индикатор простого таймера (
OFFHrAFTER
SIMPLE
1
2. Нажмите кнопку таймера “Menu” 2 , после чего на экране
отобразится сообщение “Monitor” (Монитор) (5).
• Если простой таймер будет работать для включения или
выключения, его установленное текущее значение отобразится в 6.
• Если были установлены оба значения (“ON” (ВКЛ.) и “OFF”
(ВЫКЛ.)), будут отображены оба значения.
3. Нажмите кнопку режима (Return) 2 для закрытия индикатора
монитора и возврата к стандартному экрану управления.
<Для отключения простого таймера отключения...>
Нажмите кнопку включения/выключения таймера “On/Off” 9, чтобы
настройки таймера не отображались на экране (
).
7
Пример 2.
Запустите таймер (время выключения должно предшествовать времени включения)
Время включения: 5 часов
Время выключения: 2 часа
OFFHrAFTER
˚C
˚C
˚C
ONHr
AFTER
˚C
В момент запуска таймера
На дисплее отображаются настройки
SIMPLE
таймера отключения (OFF) (осталось часов
до отключения).
В 3 часа после запуска таймера
Настройки таймера на дисплее изменились
на ON (ВКЛ.) (осталось часов до включения).
SIMPLE
Отображается настройка для времени
включения (ON - 5 часов) – выключения (OFF
- 2 часа) = 3 часа.
В 5 часов после запуска таймера
Кондиционер включится и будет работать
SIMPLE
до момента выключения.
6.1.3. Таймер автоотключения
Этот таймер начинает отсчет времени после включения
).
кондиционера и выключает его в указанное в настройках время.
Можно установить значения от 30 минут до 4 часов с 30-минутным приращением.
Примечание:
*1. Таймеры недельный/простой/автоматического отключения не могут
использоваться одновременно.
*2. Таймер автоматического отключения не будет работать в случае
наличия следующих условий:
Таймер выключен; система находится в неисправном состоянии;
выполняется тест системы; пульт дистанционного управления выполняет
процедуру самотестирования или диагностики; пользователь пытается
выбрать режим работы; пользователь выполняет настройку таймера;
система управляется из центрального пульта управления.
операции включения и отключения запрещены).
(В этих условиях
°C
°C
SIMPLE
<Для запуска простого таймера…>
Нажмите кнопку включения/выключения таймера “On/Off” 9, чтобы
ONHr
AFTER
°C
на экране (7).
SIMPLE
настройки таймера начали отображаться
°C
Примеры
Если для простого таймера были установлены значения включения
и отключения, действия и информация на дисплее будут подобны
показанной далее информации.
Пример 1.
Запустите таймер (время включения должно предшествовать
времени выключения)
Время включения: 3 часа
Время выключения: 7 часов
ONHr
AFTER
OFFHrAFTER
˚C
˚C
В момент запуска таймера
На дисплее отображаются настройки
SIMPLE
таймера включения (ON) (осталось часов
до включения).
В 3 часа после запуска таймера
Настройки таймера на дисплее изменились на
SIMPLE
OFF (ВЫКЛ.) (осталось часов до включения).
Отображается настройка для времени
отключения (OFF - 7 часов) – включения (ON
- 3 часа) = 4 часа.
В 7 часов после запуска таймера
Кондиционер выключится, и будет
SIMPLE
оставаться в этом состоянии до
следующего включения.
AFTER OFF
OPERATION
AUTO OFF
ON/OFF
FILTER
CHECK
CLEAR
TEST
TEMP.
MENU
MONITOR/SET
BACK DAY
PAR-21MAA
ON/OFF
CLOCK
<Настройка таймера автоматического выключения>
Настройка таймера
AFTER OFF
AUTO OFF
1. Убедитесь, что отображается стандартный экран управления и
индикатор таймера отключения (Auto Off) (1).
В случае отображения индикации, отличной от индикации таймера
автоматического отключения (Auto Off Timer), установите ее в “AUTO
OFF TIMER”, используя функцию настройки таймера (см. 8.[4]–3 (3)).
2. Удерживайте нажатой кнопку таймера “Menu” 2 в течение 3 секунд
до появления на экране индикации “Set Up” (Установка) (
).
2
(Помните, что каждое нажатие кнопки переключает дисплей между
режимами отображения “Set Up” (Установка) и “Monitor” (Монитор)).
3. Нажмите соответствующую кнопку настройки времени 1 для
установки времени отключения (3).
4. Нажмите кнопку “Filter” (Фильтр) 4 для сохранения настроек.
Примечание:
Настройки будут отменены, если перед кнопкой “Filter” (Фильтр)
вы нажмете кнопку режима (Return) 2.
4
5. Нажмите кнопку режима (Return) 2 для продолжения процедуры
настройки и возврата к стандартному экрану управления.
6. Если кондиционер уже работает, таймер начнет немедленный
отсчет времени. Обязательно проверьте правильность
настроек, которые должны отобразиться на дисплее.
181
Page 30

6. Таймер
<Проверка текущих настроек таймера автоматического выключения>
Настройка таймера
TIMER
AFTER
1.
Убедитесь, что на экране отображается “Auto Off” (Выкл. автоматический режим) (1).
2.
Удерживайте нажатой кнопку таймера “Menu” 2 в течение 3 секунд до
появления на экране индикации “Monitor” (Монитор) (
•
Появится сообщение, что таймер отключен (
OFF
AUTO OFF
).
4
).
5
3. Для закрытия монитора и возврата к стандартному экрану управления
нажмите кнопку режима (Return) 2.
<Для отключения таймера автоматического отключения...>
Удерживайте нажатой кнопку включения/выключения таймера “On/Off ”
в течение 3 секунд, после чего появится сообщение “Timer Off” (Выкл.
9
таймер) (6), а значение настройки таймера (7) исчезнет.
°C
В качестве альтернативы для этого можно также выключить кондиционер
воздуха. Значение настройки таймера (
°C
AUTO OFF
) исчезнет с экрана.
7
AUTO OFF
<Для включения таймера автоматического выключения...>
Удерживайте нажатой кнопку включения/выключения таймера “On/
Off” 9 в течение 3 секунд. Сообщение “Timer Off” (Выкл. таймер)
исчезнет (
), а значение настройки таймера (7) появится на
6
дисплее.
В качестве альтернативы для этого можно также включить
кондиционер воздуха. Значение настройки таймера появится в 7.
6.2. Для беспроводного пульта дистанционного
управления
1 Нажмите кнопку
AUTO STOP
или кнопку
- TIMER SET).
• Время можно установить, пока мигает следующий символ.
Таймер OFF (Выкл.) : Мигает A .
Таймер ON (Вкл.) : Мигает A .
2 С помощью кнопок h и
3 Отмена таймера.
Для отмены таймера выключения (OFF) нажмите кнопку
Для отмены таймера включения (ON) нажмите кнопку
•
Вы можете комбинировать таймеры выключения (OFF) и включения (ON).
• Нажатие кнопки ON/OFF (ВКЛ./ВЫКЛ.) на пульте дистанционного
управления с целью остановки прибора во время действия режима
таймера приведет к отмене таймеров.
• Если не установлено текущее время, использование функции
таймера невозможно.
AUTO START
(УСТАНОВКА ТАЙМЕРА
min
установите желаемое время.
AUTO STOP
AUTO START
.
.
AFTER OFF
°C
°C
AUTO OFF
7. Прочие функции
7.1. Блокировка кнопок пульта дистанционного
управления (ограничение функциональности)
По желанию вы можете блокировать кнопки на пульте
дистанционного управления. Для выбора типа блокировки можно
использовать настройки выбора функций (Function Selection) пульта
дистанционного управления. (Дополнительную информацию
о выборе типа блокировки см. в пункте [4]-2 (1) раздела 8).
В особенности, можно выбрать два следующих типа блокировки:
Блокировка всех кнопок.
Блокирует все кнопки пульта дистанционного управления.
Блокировка всех кнопок, кроме “ON/OFF”.
Блокирует все кнопки кроме “ON/OFF” (ВКЛ./ВЫКЛ.).
Примечание:
Индикатор блокировки “Locked” (Блокировано) появляется на экране
после того, как кнопки будут блокированы.
Lock Indicator
Икатор
блокировки
TIME SUN
FUNCTION
ON/OFF
°C
OPERATION
ON/OFF
FILTER
CHECK
CLEAR
TEST
TEMP.
MENU
BACK DAY
MONITOR/SET
PAR-21MAA
°C
CLOCK
<Как блокировать кнопки>
1.
Удерживая нажатой кнопку “Filter” (Фильтр) 4, нажмите и удерживайте в
течение 2 секунд кнопку “ON/OFF” (ВКЛ./ВЫКЛ.) 1. Сообщение “Locked”
(Блокировано) появится на экране (
), указывая, что блокировка включена.
1
* Если функция блокировки была отключена на экране выбора
функции (Function Selection), после того, как вы выполните
нажатие описанных ранее кнопок, появится сообщение “Not
Available” (Недоступно).
FUNCTION
°C
°C
• Если вы нажмете блокированную кнопку, на дисплее начнет
мигать индикатор “Locked” (Блокировано) (
°C
°C
1
FUNCTION
).
<Как разблокировать кнопки>
1. Удерживая нажатой кнопку “Filter” (Фильтр) 4, нажмите и
удерживайте в течение 2 секунд кнопку “ON/OFF” (ВКЛ./ВЫКЛ.) 1
до исчезновения с экрана сообщения “Locked” (Блокировано) (1).
°C
°C
182
Page 31

7. Прочие функции
7.2. Индикация кодов ошибок
ERROR CODE
Лампа
включения
(Мигает)
№ устройства
ON/OFF
Код ошибки
Если вы настроили номер телефона вызова в случае возникновения проблем, этот номер
будет отображен на экране. (Вы можете выполнить установку номера телефона на экране
выбора функции (Function Selection). За дополнительной информацией обратитесь к
разделу 8).
Если одновременно мигают индикатор включения и код ошибки: Это означает, что все операции остановлены, и кондиционер воздуха
не работает (невозможно возобновить работу). Запишите номер устройства и код ошибки, затем отключите питание кондиционера и
обратитесь к своему поставщику или в обслуживающую организацию.
Когда нажата кнопка проверки (Check):
CALL:XXXX
XXX:XXX
ON/OFF
˚C
Код ошибки
ERROR CODE
˚C
ON/OFF
Если мигает только код ошибки (лампа включения продолжает гореть): Работа системы продолжается, но в ней возникли неполадки. В этом
случае необходимо записать код ошибки и обратиться к своему поставщику или в обслуживающую организацию за помощью.
* Если вы настроили номер телефона вызова обслуживающей организации в случае возникновения проблем, нажмите кнопку “Check” (Проверка)
для отображения на экране этого номера. (Вы можете выполнить установку номера телефона на экране выбора функции (Function Selection). За дополнительной информацией обратитесь к разделу 8).
8. Выбор функции
Выбор функции с помощью пульта дистанционного управления
В режиме выбора функции с помощью пульта дистанционного управления можно настраивать нижеприведенные функции. При
необходимости измените настройку.
1. Выбор языка
2. Ограничение функций
3. Выбор режима
4. Изменение индикации
Пункт 1 Пункт 2 Пункт 3 (Описание настройки)
(“CHANGE LANGUAGE”)
(“Bыбор функции”)
(“Bыбор режима”)
(“Настройка индрежима”)
Выбор языка отображения • Возможен вариант индикации на разных языках
(1) Настройка ограничений рабочей функции
(блокировка режима работы) (“функция
блoкирoвки”)
(2) Использование настройки автоматического
режима (“Bыбор режима ABTO”)
(3) Настройка ограничения диапазона
температуры (“Oграничениe чст. тeмиeрaт”)
(1) Настройка пульта дистанционного управления
(основной/ дополнительный) (“Oсновной
пульт/дополнительнын пульт”)
(2) Использование настройки часов (“часы”) • Настройка включения или отключения функции часов
(3) Настройка функции таймера (“Heдeлыйтаймера”) • Настройка типа таймера
(4) Настройка номера контакта при
возникновении ошибки(“CALL.”)
(1) Настройка индикации
(“Eдин. темпер.°C/°F”)
(2) Настройка индикации температуры
всасываемого воздуха (“Показывaть темп. в
кoмн.”)
(3) Настройка индикации режима
автоматического охлаждения/обогрева (“Nнд.
T/X в режимe ABTO”)
температуры (°C/°F)
• Настройка диапазона ограничения режима работы (блокировка режима
работы)
• Настройка включения или отключения “автоматического” режима
работы
• Настройка регулируемого диапазона температуры (максимум,
минимум)
• Выбор основного или подчиненного пульта дистанционного управления
* При подключении двух пультов дистанционного управления к
группе один из пультов необходимо настроить как дополнительный.
• Индикация номера контакта в случае возникновения ошибки
• Настройка номера телефона
• Настройка индикации единиц измерения температуры (°C или °F)
• Настройка включения или отключения индикации температуры воздуха
(всасываемого) в помещении
• Настройка включения или отключения отображения индикации
“Охлаждение
” или “Обогрев” при автоматическом режиме работы
одной
183
Page 32

8. Выбор функции
[Схема выбора функции]
Настройка языка (Английский)
Пункт 1
Выбор языка
Normal display
Нормальный режим индикации (индикация,
(Display when the air conditioner is not running)
отображаемая при выключенном кондиционере)
Удерживая нажатой кнопку E, нажмите кнопку D и удерживайте ее две секунды.
Hold down the button and press the button for 2 seconds.
Режим выбора функции с помощью пульта дистанционного управления
Remote controller function selection mode
Пункт 2
Item 2Item 1
English
German
Удерживая нажатой кнопку E, нажмите кнопку D и удерживайте ее две секунды.
Hold down the button and press the button for 2 seconds.
Press the operation mode button.
E Нажмите кнопку режима работы.
Press the TIMER MENU button.
G Нажмите кнопку TIMER MENU (МЕНЮ ТАЙМЕРА).
Press the TIMER ON/OFF button.
D Нажмите кнопку TIMER ON/OFF (ТАЙМЕР ВКЛ/ВЫКЛ).
Индикация
Dot display
Bыбор функции
Bыбор режима
Spanish
Russian
Italian
Chinese
French
Japanese
Пункт 3
Item 3
OFF
no1
no2
ON
OFF
OFF
TEMP.
MENU
ON/OFF
BACK DAY
MONITOR/SET
PAR-21MAA
CLOCK
Настройка блокировки работы не используется.
(Значение первоначальной настройки)
OPERATION
ON/OFF
CHECK
CLEAR
FILTER
TEST
Настройка блокировки работы кроме кнопок On/Off (Вкл/Выкл).
Настройка блокировки работы для всех кнопок.
При выборе режима работы отображается автоматический режим.
(Значение первоначальной настройки)
При выборе режима работы автоматический режим не отображается.
Ограничение диапазона температуры не включено. (Значение
первоначальной настройки)
Диапазон температуры
можно изменить в режиме охлаждения/ сушки.
Диапазон температуры можно изменить в режиме обогрева.
Диапазон температуры можно изменить в автоматическом режиме.
Режим автоматического подъема и опускания панели фильтра
Устанавливать этот режим необязательно. Дополнительную информацию об этой операции
см. в РУКОВОДСТВЕ ПО ЭКСПЛУАТАЦИИ, раздел Дополнительное оборудование (панель).
Режим фиксированного направления воздушного потока
Устанавливать этот режим необязательно. Дополнительную информацию об
этой операции см. в РУКОВОДСТВЕ ПО ЭКСПЛУАТАЦИИ внутреннего блока.
Пульт дистанционного управления будет основным пультом.
(Значение первоначальной настройки)
Пульт дистанционного управления будет дополнительным пультом.
Настройка
индрежима
ON
OFF
OFF
CALL-
˚C
˚F
ON
OFF
ON
OFF
Функцию часов использовать можно. (Значение первоначальной
настройки)
Функцию часов использовать нельзя.
Еженедельный таймер использовать можно. (Значение
первоначальной настройки)
Таймер автоотключения использовать можно.
Простой таймер использовать можно.
Режим таймера использовать нельзя.
Введенные контактные номера не отображаются в случае ошибки.
(Значение первоначальной настройки)
Введенные контактные номера отображаются в случае ошибки.
Используется единица температуры °C. (Значение первоначальной
настройки)
Используется единица температуры °F.
Температура воздуха в помещении отображается. (Значение
первоначальной настройки
)
Температура воздуха в помещении не отображается.
При работе в автоматическом режиме отображается либо
“Автоматическое охлаждение”, либо “Автоматический
обогрев”. (Значение первоначальной настройки)
В автоматическом режиме отображается только
“Автоматически”.
184
Page 33

8. Выбор функции
[Детальная настройка]
[4]-1 Настройка CHANGE LANGUAGE (выбор языка)
Можно выбрать язык, на котором отображаются индикации на дисплее.
• Нажмите кнопку [ MENU] G, чтобы выбрать язык.
1
См. таблицу точечного дисплея.
[4]-2 Ограничение функций
(1) Настройка ограничений рабочей функции (блокировка режима
• Чтобы включить настройку, нажмите кнопку [ ON/OFF] D.
1 no1: Настройка блокировки режима работы осуществляется
2 no2:
3 OFF (Исходное значение настройки) :
*
(2) Использование настройки автоматического режима
Если пульт дистанционного управления подключен к блоку,
• Чтобы включить настройку, нажмите кнопку [ ON/OFF] D.
1 ON (Исходное значение настройки) :
Индикация автоматического режима отображается, если
2 OFF:
Индикация автоматического режима не отображается, если
(3) Настройка ограничения диапазона температуры
После выполнения настройки можно изменить значение
• Чтобы включить настройку, нажмите кнопку [ ON/OFF] D.
1 Oграниченo oxлaждeниe:
2 Oграничен oбoгрeв:
Диапазон температуры можно изменить в режиме обогрева.
3 Oграничен режим ABTO:
4 OFF (исходная настройка) :
ограничение диапазона температуры выключено.
*
• Чтобы повысить или понизить температуру, нажмите кнопку
• Чтобы включить настройки верхнего и нижнего пределов,
• Устанавливаемый диапазон
Режим охлаждения/сушки:
Режим обогрева:
Автоматический режим:
Английский (GB)
5
Итальянский (I),
работы)
всеми кнопками, кроме кнопки [ ON/OFF].
Настройка блокировки режима работы осуществляется
всеми кнопками.
Настройка блокировки режима работы не осуществляется.
Чтобы установить правильную настройку блокировки режима работы
в нормальном режиме индикации экрана, необходимо нажать
следующие кнопки (одновременно нажмите кнопки [FILTER] и [ ON/
OFF] и удерживайте их в течение двух секунд) в нормальном режиме
индикации экрана после выполнения настройки, упомянутой выше.
который работает в автоматическом режиме, можно выполнить
следующие настройки.
выбран режим работы.
выбран режим работы.
температуры в пределах установленного диапазона.
Диапазон температуры можно изменить в режиме охлаждения/сушки.
Диапазон температуры можно изменить в автоматическом режиме.
Если установлено значение кроме OFF (выкл.), одновременно
выполняется настройка ограничения диапазона температуры
в режимах охлаждения и обогрева, а также в автоматическом
режиме. Тем не менее, диапазон невозможно ограничить, если
установленный диапазон температуры не изменялся.
[ TEMP. ( ) и ( )] F.
нажмите кнопку [ ] H. Выбранный параметр мигает, можно
установить температуру.
Нижний предел: от 19°C до 30°C Верхний предел: от 30°C до 19°C
Нижний предел: от 17°C до 28°C Верхний предел: от 28°C до 17°C
Нижний предел: от 19°C до 28°C Верхний предел: от 28°C до 19°C
, 2
Немецкий (D)
6
Китайский (CH),
, 3
Испанский (E)
7
Французский (F),
, 4
Русский (RU),
8
Японский (JP)
[4]-3 Настройка выбора режима
(1) Настройка пульта дистанционного управления (основной/
дополнительный)
• Чтобы включить настройку, нажмите кнопку [ ON/OFF] D.
1 Основной:
2 Дополнительный: контроллер будет установлен как
(2) Использование настройки часов
• Чтобы включить настройку, нажмите кнопку [ ON/OFF] D.
1 ON: Можно использовать функцию часов.
2 OFF: Функция часов использовать невозможно.
(3) Настройка функции таймера
• Чтобы включить настройку, нажмите кнопку [ ON/OFF] D
(Выберите одну из настроек, приведенных ниже.).
1 Heдeлый таймер (Исходное значение настройки):
Можно использовать еженедельный таймер.
2 ABTO от кпочy. по тaймерy :
Можно использовать таймер автоотключения.
3 Пpocтoй тaймер:
Можно использовать обычный таймер.
4 Taймер выкл.:
Режим таймера использовать невозможно.
* Если настройка часов имеет значение OFF, “Heдeлый
таймер” использовать невозможно.
(4) Настройка номера контакта при возникновении ошибки
• Чтобы включить настройку, нажмите кнопку [ ON/OFF] D.
1 CALL OFF:
2 CALL **** *** ****:
CALL_:
Контактный номер можно задать, если дисплей выглядит
• Настройка контактных номеров
Для настройки контактных номеров следуйте
[4]-4 Настройка изменения индикации
(1) Настройка индикации температуры (°C/°F)
• Чтобы включить настройку, нажмите кнопку [ ON/OFF] D.
1 °C: Используемая единица измерения температуры - °C.
2 °F: Используемая единица измерения температуры - °F.
• Чтобы включить настройку, нажмите кнопку [ ON/OFF] D.
1 ON: Температура всасываемого воздуха отображается.
2 OFF:
(3) Настройка индикации режима автоматического охлаждения/
• Чтобы включить настройку, нажмите кнопку [ ON/OFF] D.
1 ON:
При работе в автоматическом режиме отображается либо
2 OFF:
В автоматическом режиме отображается только
В случае ошибки настроенные контактные номера не отображаются.
В случае ошибки настроенные контактные номера отображаются.
как показано выше.
перечисленным процедурам. Перемещайте мигающий
курсор, чтобы вводить цифры. Нажмите кнопку [ TEMP. ( )
и ( )] F для перемещения курсора вправо (влево). Нажмите
кнопку [ CLOCK ( ) and ( )] C для настройки номеров.
(2) Настройка индикации температуры в помещении
Температура всасываемого воздуха не отображается.
обогрева
“Автоматическое охлаждение”, либо “Автоматический
обогрев”.
“Автоматический”.
контроллер будет установлен как основной.
дополнительный.
185
Page 34

8. Выбор функции
[Таблица точечного дисплея]
Настройка языка
Ожидание запуска
Режим работы
Заданная температура
Скорость вентилятора
Кнопка не используется
Проверка (ошибка)
Тестовый запуск
Самодиагностика
Выбор функции прибора
Настройка вентиляции
Режим
охлаждения
Режим сушки
Режим
отопления
Автоматический
режим
Автоматический
режим (охлаждение)
Автоматический
режим (отопление)
Режим
вентилятора
Вентиляция
Ожидание
(Горячая настройка)
Оттаивание
English German Spanish Russian Italian Chinese French Japanese
Настройка языка
Выбор языка
Bыбор функции
Настройка ограничения рабочей
функции
Использование настройки
автоматического режима
Настройка ограничения
температурного диапазона
Ограничение температуры
охлаждения/дневного режима
Ограничение температуры
режима обогрева
Ограничение температуры
автоматического режима
Выбор режима
Пульт дистанционного управления
настроен как ОСНОВНОЙ
Пульт дистанционного управления
настроен как ДОПОЛНИТЕЛЬНЫЙ
Использование настройки часов
Установка дня недели и времени
Установка таймера
Монитор таймера
Еженедельный таймер
Режим таймера выключен
Таймер автоотключения
Простой таймер
Ввод контактного номера в
случае ошибки
Изменение дисплея
Настройка дисплея температуры°C/°F
Настройка дисплея температуры
воздуха в помещении
Настройка дисплея автоматического
охлаждения/обогрева
English German Spanish Russian Italian Chinese French Japanese
186
Page 35

9. Работа пульта дистанционного управления в аварийном режиме
Если пульт дистанционного управления использовать нельзя
Если батарейки пульта дистанционного управления разрядились
или в нем имеется неисправность, аварийный режим можно
включить с помощью аварийных кнопок.
A Лампа DEFROST/STAND BY (РАЗМОРАЖИВАНИЕ/ОЖИДАНИЕ)
B Лампа работы
C Переключатель аварийной работы (обогрев)
D Переключатель аварийной работы (охлаждение)
E Приемник
Начало работы
• Чтобы включить режим охлаждения
Для
(
PKFY-P·VHM-E)
DC
B
A
E
кнопку D более 2 секунд.
• Чтобы включить режим обогрева, нажмите и удерживайте кнопку
C более 2 секунд.
Примечание:
• Подробности аварийного режима приводятся ниже.
Подробности АВАРИЙНОГО РЕЖИМА приводятся ниже.
Рабочий режим Режим охлаждения Режим отопления
Настройка температуры
Скорость вентилятора
Направление воздушного потока
Останов работы
• Для останова работы нажмите кнопку D или кнопку C более
2 секунд.
Горизонтальное Вниз 4 (5)
, нажмите и удерживайте
24°C 24°C
Высокая Высокая
10. Уход и чистка
°C
°C
TEMP.
Указывает на необходимость очистки фильтра.
Очистите фильтр.
Для сброса индикации “FILTER” (фильтр)
Если кнопку [FILTER] (фильтр) нажать быстро дважды после
чистки фильтра, данная индикация погаснет, и функция вернется
в исходное состояние.
Примечание:
Если с пульта дистанционного управления осуществляется управление
двумя или более внутренними блоками, срок действия фильтра
определяется его типом. Индикация “FILTER” (фильтр) появляется
на дисплее в случае необходимости очистки фильтра на главном
внутреннем блоке. Когда индикация фильтра гаснет на дисплее, функция
восстанавливает кумулятивное время замены фильтра.
Индикация “FILTER” (фильтр) указывает на необходимость очистки
фильтра после истечения определенного заданного срока его
использования в нормальных условиях эксплуатации внутри
помещения. Однако, ввиду того, что степень загрязненности фильтра
определяется конкретными условиями эксплуатации, необходимо
производить очистку фильтра с учетом данного фактора.
Кумулятивный срок действия фильтра зависит от модели кондиционера.
Данная индикация недоступна для пульта дистанционного управления.
Чистка фильтров
• Проводите чистку фильтров с использованием пылесоса. При
отсутствии пылесоса, легким постукиванием фильтра о твердый
предмет стряхните с него грязь или пыль.
• Если фильтры сильно загрязнены, промойте их в теплой воде.
Тщательно смойте остатки моющего средства и полностью
просушите фильтры перед их обратной установкой в прибор.
Осторожно:
•
Не сушите фильтры под прямыми солнечными лучами или с
использованием источника отопления, такого как электрообогревателя:
это может привести к деформации фильтров.
• Не промывайте фильтры в горячей воде (выше 50°C), так как
это может привести к их деформации.
•
Не забывайте устанавливать фильтры на место. Эксплуатация
прибора без фильтров воздуха может привести к его поломке.
Осторожно:
• Прежде чем начать чистку, остановите работу прибора и
отключите подачу электропитания.
• Внутренние приборы оборудованы фильтрами для удаления
пыли из засасываемого воздуха. Прочищайте фильтры с
помощью методов, обозначенных на рисунках ниже.
FILTER
ON/OFF
Снятие фильтра
Осторожно:
•
При удалении фильтра необходимо соблюдать меры предосторожности для
защиты глаз от пыли. Также если для выполнения этой работы необходимо
вставать на стул, соблюдайте осторожность, чтобы не упасть с него.
•
После снятия фильтра не дотрагивайтесь до металлических частей внутри
наружного блока, несоблюдение данного правила может привести к травме.
PKFY-P·VBM-E
PKFY-P·VHM-E
1
Потяните оба нижние угла воздухозаборной решетки, чтобы
открыть ее, затем поднимите фильтр.
187
Page 36

10. Уход и чистка
PCFY-P·VKM-E
A
B
D
C
1
Откройте воздухозаборную решетку.
2
Удерживайте рукоятку фильтра, затем потяните его вверх в
направлении стрелки. При установке фильтра после чистки
убедитесь, что он вставлен достаточно глубоко - до стопора.
Фильтр B
A
PMFY-P·VBM-E
Воздухозаборная решетка
C Рукоятка D Стопор
PFFY-P·VKM-E
1
Снимите катехиновый воздушный фильтр.
Откройте переднюю решетку
A
Катехиновый воздушный фильтр
B
Осторожно:
При снятии катехинового воздушного фильтра не прикасайтесь
к металлическим деталям внутреннего прибора.
Это может привести к травме.
2
Установите катехиновый воздушный фильтр на место.
Обязательно вставьте оба конца в фиксаторы, как показано.
Установите на место.
C
3
Плотно закройте переднюю решетку.
1
Нажатие кнопки PUSH на внешней стороне воздухозаборной решетки
приводит к открытию воздухозаборной решетки.
2
Фильтр, на котором располагается воздухозаборная решетка
может быть удален при помощи потягивания фильтра вперед.
188
Page 37

11. Исправление неполадок
Возникла проблема? Вот решение. (Прибор работает нормально.)
Кондиционер не обеспечивает должный обогрев или охлаждение. Очистите фильтр. (При загрязнении или закупорке фильтра поток
При начале работы в режиме обогрева теплый воздух из
внутреннего прибора поступает через некоторое время.
В режиме обогрева кондиционер останавливается до достижения
заданной температуры в помещении.
Направление потока воздуха изменяется при работе или
направление потока воздуха нельзя задать.
При изменении направления воздушного потока, лопатки всегда
двигаются
тем, как полностью остановиться в положении.
Слышен звук текущей воды или время от времени шипящий звук.
Слышен треск или скрип. Эти звуки могут быть слышны при трении деталей друг о друга по
В помещении неприятный запах. Внутренний прибор всасывает воздух с газами, исходящими
Из внутреннего прибора выходит белая дымка или пар.
Из наружного прибора выходит вода или пар.
Индикатор работы не появляется на дисплее пульта дистанционного
управления.
Кондиционер не работает даже после нажатия кнопки ON/OFF (ВКЛ./
ВЫКЛ.). Окно режима работы на пульте дистанционного управления
гаснет.
На дисплее пульта дистанционного управления отображается “
При перезапуске кондиционера вскоре после его останова он не
работает, несмотря на нажатие кнопки ON/OFF (ВКЛ/ВЫКЛ).
Кондиционер работает без нажатия кнопки ON/OFF (ВКЛ/ВЫКЛ). Не установлен ли таймер включения?
Кондиционер останавливается без нажатия кнопки ON/OFF (ВКЛ/
ВЫКЛ).
Невозможно задать работу по таймеру с пульта дистанционного
управления.
На дисплее пульта дистанционного управления отображается
сообщение “PLEASE WAIT” (ПОЖАЛУЙСТА, ПОДОЖДИТЕ).
На дисплее пульта дистанционного управления отображается код
ошибки.
Слышен звук дренажа воды или вращения двигателя. При останове режима охлаждения дренажный насос включается,
вверх и вниз, проходя через заданное положение, перед
воздуха уменьшается.)
Проверьте регулировку температуры и отрегулируйте заданную температуру.
Убедитесь, что вокруг наружного прибора достаточно места. Не
заблокирован ли впуск или выпуск воздуха?
Не оставлена ли открытой дверь или окно?
Теплый воздух не поступает до тех пор, пока внутренний прибор
не прогреется до достаточной степени.
Если температура наружного воздуха низка, а влажность высокая,
на наружном приборе может образоваться изморось. Если это
произойдет, наружный прибор работает в режиме размораживания.
Обычная работа должна возобновиться примерно через 10 минут.
В режиме охлаждения лопатки автоматически перемещаются в
горизонтальное
направление потока воздуха вниз (горизонтально). Это необходимо для
предотвращения образования воды и падения капель с лопаток.
В режиме обогрева лопатки автоматически перемещаются в
направление горизонтального потока воздуха, когда температура
потока воздуха низкая, или в режиме размораживания.
При изменении направления воздушного потока лопатки
перемещаются в заданное положение после определения
базового положения.
Эти звуки могут быть слышны, когда в кондиционере течет
хладагент, или при изменении потока хладагента.
причине расширения и сжатия из-за изменений температуры.
стен, ковровых настилов, мебели, а также запахи одежды, затем
выдувает этот воздух обратно в помещение.
Если температура в помещении и влажность высокие, такое
явление может наблюдаться при начале работы.
В режиме размораживания может подаваться холодный
воздушный поток, который может казаться дымкой.
В режиме охлаждения вода может образовываться и капать с
холодных труб и стыков.
В режиме обогрева вода может образовываться и капать с теплообменника.
В режиме размораживания вода на теплообменнике испаряется,
и может появиться водяной пар.
Включите питание. На дисплее пульта дистанционного управления
появится
Переключатель питания на внутреннем устройстве выключен?
Включите переключатель питания.
При центральном управлении на пульте дистанционного
”.
управления появляется
кондиционера с пульта дистанционного управления нельзя.
Подождите примерно три минуты.
(Работа остановилась для защиты кондиционера.)
Нажмите кнопку ON/OFF (ВКЛ/ВЫКЛ) для останова работы.
Не подключен ли кондиционер к центральному пульту
дистанционного управления?
Проконсультируйтесь с людьми, управляющими кондиционером.
Не отображается ли “ ”
Проконсультируйтесь с людьми, управляющими кондиционером.
Не задана ли функция автоматического восстановления после сбоев электропитания?
Нажмите кнопку ON/OFF (ВКЛ/ВЫКЛ) для останова работы.
Не установлен ли таймер отключения?
Нажмите кнопку ON/OFF (ВКЛ/ВЫКЛ) для перезапуска работы.
Не подключен ли кондиционер к центральному пульту дистанционного управления?
Проконсультируйтесь с людьми, управляющими кондиционером.
Не отображается ли “ ” на дисплее пульта дистанционного управления?
Проконсультируйтесь с людьми, управляющими кондиционером.
Действительны ли настройки таймера?
Если таймер можно задать, на дисплее пульта дистанционного
управления отображается
Осуществляются первоначальные настройки. Подождите
примерно 3 минуты.
Включились защитные устройства для защиты кондиционера.
Не пытайтесь отремонтировать данное оборудование самостоятельно.
Немедленно отключите питание и обратитесь к своему
поставщику. Обязательно сообщите поставщику наименование
модели и информацию, которая появилась на дисплее пульта
дистанционного управления.
затем останавливается. Подождите примерно 3 минуты.
(вниз) положение после 1 часа, если выбрано
“ ”.
“ ”
, и запустить или остановить работу
на дисплее пульта дистанционного управления?
WEEKLY
,
SIMPLE
или AUTO OFF .
из
189
Page 38

11. Исправление неполадок
Возникла проблема? Вот решение. (Прибор работает нормально.)
Уровень шума превышает уровень, указанный в технических
характеристиках.
На пульте дистанционного управления ничего не отображается,
дисплей тусклый, или внутренний прибор получает сигналы, если
только пульт дистанционного управления находится близко.
Лампа работы около приемника пульта дистанционного управления
на внутреннем приборе мигает.
Теплый воздух поступает из внутреннего устройства с перерывами,
когда режим отопления выключен, или в режиме вентиляции.
Демпфер открывается и закрывается автоматически.
(Для серии PFFY-P·VKM-E)
Уровень шума работающего кондиционера зависит от акустики
конкретного помещения (см. таблицу ниже). Он может быть выше,
чем указано в спецификации, поскольку тестовый замер проводился в
безэховом помещении.
Помещения с высоким
уровнем поглощения
шума
Примеры
местоположения
Уровни шума
Батарейки разряжены.
Замените батарейки и нажмите кнопку Reset (Сброс).
Если после замены батареек ничего не появляется, убедитесь,
что батарейки вставлены с соблюдением полярности (+, –).
Включилась функция самодиагностики для защиты кондиционера.
Не пытайтесь отремонтировать данное оборудование самостоятельно.
Немедленно отключите питание и обратитесь к своему поставщику.
Обязательно сообщите поставщику наименование модели.
Если другое внутреннее устройство работает в режиме отопления,
управляющий клапан периодически открывается и закрывается
для поддержания стабильного состояния кондиционера. Через
некоторое время это прекратится.
* Если это ведет к нежелательному увеличению температуры
в небольших помещениях, временно выключите внутреннее
устройство.
Демпфер контролируется автоматически микрокомпьютером в
соответствии с температурой потока воздуха и временем работы
кондиционера.
Студия
радиовещания,
музыкальная студия
и т.д.
от 3 до 7 дБ от 6 до 10 дБ от 9 до 13 дБ
Обычные
помещения
Приемная,
вестибюль
гостиницы и т.д.
Помещения с низким
уровнем поглощения
шума
Офис,
гостиничный
номер
Управление воздуховыпускными отверстиями (серия PFFY-P·VKM)
Данный прибор контролируется автоматически таким образом, что при использовании данной функции воздух выходит одновременно из
верхнего и нижнего воздуховыпускных отверстий для обеспечения эффективного охлаждения или обогрева помещения.
Описание работы
Работа ОХЛАЖДЕНИЕ СУШКА ОБОГРЕВ ВЕНТИЛЯТОР
Поток
воздуха
Верхний и нижний поток
воздуха
Температура
в помещении
Условия
• Обязательно проследите, чтобы вокруг демпфера и нижнего выходного воздушного отверстия не было каких-либо предметов.
Для прибора можно задать режим подачи воздуха из верхних воздуховыпускных отверстий всего лишь с помощью изменения настройки
переключателя на адресном щите (обратитесь
Диапазон применения
Диапазон рабочих температур внутреннего и наружного устройств серий Y, R2, Multi-S приведен ниже.
ПРЕДОСТЕРЕЖЕНИЕ:
Эксплуатация кондиционера с нарушением параметров рабочей температуры и влажности может привести к серьезной поломке.
и заданная
температура
отличаются.
Режим
Охлаждение 15 °C - 24 °C WB –5 °C - 43 °C DB –5 °C - 43 °C DB –5 °C - 46 °C DB
Отопление 15 °C - 27 °C DB –15 °C - 15,5 °C WB –12 °C - 15 °C WB –12 °C - 15,5 °C WB
Примечание: В качестве стандартных параметров влажности для внешних и внутренних устройств рекомендуется диапазон 30 -
80% относительной влажности.
Предупреждение:
Если кондиционер работает, но при этом не охлаждает или не обогревает (в зависимости от модели) помещение, обратитесь к
дилеру, так как это может свидетельствовать об утечке хладагента. После выполнения ремонтных работ обязательно спрашивайте
у представителя технической службы о наличии или отсутствии утечки хладагента.
Хладагент, заправленный в систему кондиционера, не представляет опасности для здоровья. Обычно утечки хладагента не
наблюдается, однако в случае утечки газообразного хладагента внутри помещения и его последующего контакта с раскаленными
деталями тепловентилятора, комнатного обогревателя, огнем кухонной плиты и т.п. происходит образование вредных для
здоровья веществ.
Верхний поток
воздуха
Температура в
помещении почти
соответствует
заданной
температуре или
термоотключению.
к дилеру).
Внутреннее
устройство
Только верхний
поток воздуха
—
PUHY PURY PUMY
Верхний и нижний
поток воздуха
(Нормальное
состояние (при
обогреве))
Наружное устройство
Верхний поток
воздуха
В режиме
размораживания,
в начале работы,
в режиме
термоотключения
Верхний и нижний
поток воздуха
—
190
Page 39

12. Технические характеристики
Серия PCFY-P·VKM-E
Модель P40 P63 P100 P125
Электропитание (Напряжение<В>/Частота)
Мощность (Охлаждение/Обогрев)<кВт> 4,5/5,0 7,1/8,0 11,2/12,5 14,0/16,0
Габариты (Высота)<мм> 230
Габариты (Ширина)<мм> 960 1280 1600
Габариты (Глубина)<мм> 680
Масса Нетто <кг>24323638
Скорость движения воздушного потока в вентиляторе (Низкая-Средняя2-Средняя1-Высокая)
Уровень шума (Низкая-Средняя2-Средняя1-Высокая)
*1 Мощность для режимов Охлаждения/Обогрева представляет собой максимальное занчение при работе прибора в следующих условиях:
Охлаждение: Температура в помещении 27 °С DB/19 °С WB, Температура снаружи 35 °С DB
Обогрев: Температура в помещении 20 °С DB, Температура снаружи 7 °С DB/6 °С WB
DB = шарик сухого термометра WB = шарик влажного термометра
Серия PKFY-P·VBM-E Серия PKFY-P·VHM-E
Модель P15 P20 P25 P32 P40 P50
Электропитание (Напряжение<В>/Частота)
Мощность (Охлаждение/Обогрев)<кВт> 1,7/1,9 2,2/2,5 2,8/3,2 3,6/4,0 4,5/5,0 5,6/6,3
Габариты (Высота)<мм> 295 295
Габариты (Ширина)<мм> 815 898
Габариты (Глубина)<мм> 225 249
Масса Нетто <кг>10 13
Скорость движения воздушного потока в вентиляторе (Низкая-Средняя2-Средняя1-Высокая)
Уровень шума (Низкая-Средняя2-Средняя1-Высокая)
*1 Мощность для режимов Охлаждения/Обогрева представляет собой максимальное занчение при работе прибора в следующих условиях:
Охлаждение: Температура в помещении 27 °С DB/19 °С WB, Температура снаружи 35 °С DB
Обогрев: Температура в помещении 20 °С DB, Температура снаружи 7 °С DB/6 °С WB
DB = шарик сухого термометра WB = шарик влажного термометра
Серия PMFY-P·VBM-E
Модель P20 P25 P32 P40
Электропитание (Напряжение<В>/Частота)
Мощность (Охлаждение/Обогрев) <кВт> 2,2/2,5 2,8/3,2 3,6/4,0 4,5/5,0
Габариты (Высота)<мм> 230 (30)
Габариты (Ширина)<мм> 854 (1000)
Габариты (Глубина)<мм> 395 (470)
Масса Нетто <кг> 14 (3,0)
Скорость движения воздушного потока в вентиляторе (Низкая-Средняя2-Средняя1-Высокая)
Уровень шума (Низкая-Средняя2-Средняя1-Высокая)
*1 Мощность для режимов Охлаждения/Обогрева представляет собой максимальное занчение при работе прибора в следующих условиях:
Охлаждение: Температура в помещении 27 °С DB/19 °С WB, Температура снаружи 35 °С DB
Обогрев: Температура в помещении 20 °С DB, Температура снаружи 7 °С DB/6 °С WB
*2 Значения в ( ) действительны для панелей.
DB = шарик сухого термометра WB = шарик влажного термометра
Серия PFFY-P·VKM-E
Модель P20 P25 P32 P40
Электропитание (Напряжение<В>/Частота)
Мощность (Охлаждение/Обогрев)<кВт> 2,2/2,5 2,8/3,2 3,6/4,0 4,5/5,0
Габариты (Высота)<мм> 600
Габариты (Ширина)<мм> 700
Габариты (Глубина)<мм> 200
Масса Нетто <кг>14
Скорость движения воздушного потока в вентиляторе (Низкая-Средняя2-Средняя1-Высокая)
Уровень шума (Низкая-Средняя2-Средняя1-Высокая)
*1 Мощность для режимов Охлаждения/Обогрева представляет собой максимальное занчение при работе прибора в следующих условиях:
Охлаждение: Температура в помещении 27 °С DB/19 °С WB, Температура снаружи 35 °С DB
Обогрев: Температура в помещении 20 °С DB, Температура снаружи 7 °С DB/6 °С WB
DB = шарик сухого термометра WB = шарик влажного термометра
<Гц> ~/N 220-230-240/50, 220/60
<м3/мин> 10-11-12-13 14-15-16-18 21-24-26-28 21-24-27-31
<дБ> 29-32-34-36 31-33-35-37 36-39-41-43 36-39-42-44
<Гц> ~/N 220-230-240/50, 220/60
<м3/мин>
<дБ> 29-31-32-33 29-31-34-36 34-37-41 34-38-41 34-39-43
<Гц> ~/N 220-230-240/50, 220/60
<м3/мин>
<дБ> 27-30-33-36 32-34-36-37 33-35-37-39
<Гц> ~/N 220-230-240/50
<м3/мин>
<дБ> 27-31-34-37 28-32-35-38 35-38-42-44
4,9-5,0-5,2-5,3
6,5-7,2-8,0-8,6
5,9-6,8-7,6-8,7
4,9-5,2-5,6-5,9 9-10-11 9-10,5-11,5 9-10,5-12
7,3-8,0-8,6-9,3
6,1-7,0-8,0-9,1
7,7-8,7-9,7-10,7
8,0-9,0-9,5-10,7
191
Page 40

Please be sure to put the contact address/telephone number on
this manual before handing it to the customer.
HEAD OFFICE: TOKYO BLDG., 2-7-3, MARUNOUCHI, CHIYODA-KU, TOKYO 100-8310, JAPAN
BG79U322H08
Printed in Japan
 Loading...