

Mitsubishi MSZ-FH18NA, MSZ-FH15NA, MSZ-FH12NA, MSZ-FH09NA Owner’s Manual

;HI
,0"
SPLIT-TYPE AIR CONDITIONERS
ilNDOOR UNITi
MSZ-FH09NA lVlSZ-FH12NA MSZ-FH15NA MSZ-FH18NA
OPERATING INSTRUCTIONS I For user I
• To use th=s un=tcorrectly and safely, be sure to read these operating in-
structions before use
MANUAL DE INSTRUCCIONES I Para los chentes I
• Para utlhzar esta unldad de forma correcta y segura, lea prevlamente
estas instrucclones de funclorlamleRto
NOTICE D'UTILISATION
. Pour avolr ta certitude d'utfllser cet apparefl correctement et en toute
secunt6, veufllez hre cette nobce d'mstructlons avant de mettre le chma-
tlseur sous tension
I I
i i
IA t'attentlon des clients I
,Jllllllllllll

i
• OPERAI_IN(i INSYRIr(_'I_IONS •
II
,,, ' ....... ,
[] SAFETY PRECAUTIONS 1
[] NAME OF EACH PART 3
[] PREPARATION BEFORE OPERATION 3
[] i-SEE OPERATION 5
[] SELECTING OPERATION MODES 6
[] FAN SPEED AND AIRFLOW DiRECTiON ADJUSTMENT 7
[] SMART SET OPERATION 8
[] ECONO COOL OPERATION 8
[] NATURAL FLOW OPERATION 9
[] POWERFUL OPERATION 9
[] TIMER OPERATION (ON/OFF TIMER) 9
[] WEEKLY TIMER OPERATION 10
[] CLEANING 11
[] WHEN YOU THINK THAT TROUBLE HAS OCCURRED 12
[] WHEN THE AiR CONDITIONER IS NOT GOING TO BE USED FORA LONG TiME 13
[] INSTALLATION PLACE AND ELECTRICAL WORK 13
[] SPECiFICATiONS 13
......... iw, ),,,,,,,,IIIIh,'...... " ' )_ ....................... I_11II III!,,',',' ,,,,,,,,,,,,,,..........
Since rotating parts and parts v/hich could cause an electric shock are used
m this product, be sure to read these 'Safety Precautions' before use
Since the cautionary items shown here are important for safety, be sure to
observe them
After reading tNs manual, keep it together vath the installation manual in a
handy place for easy reference
Be sure to recewe a guarantee card from your dealer and check that the
purchased date and shop name, etc are entered correctly
Marks and their meanings
/'ONWARNING
/'ONCAUTION
Incorrect handhng could cause senous hazard, such as
death, senous injury, etc vath a high probablhty
Incorrect handhng could cause senous hazard depending
on the con@t_ons
WARNING
Do not connect the power cord to an intermediate point, use
@
En-I
an extensmn cord, or connect muR_ple devices to a single
AC outlet.
* Tills may cause overheating fire, ol electric shook
Make sure the power plug Is free of d_rt and insert it securely
into the outlet.
. A dirty plug may cause fire or electric shock
Do not bundle, pull, damage, or modify the power cord, and do
not apply heat or place heavy objects on It.
. This may cause fire or electric shock
Do not turn the breaker OFF/ON or dBconnect/connect the
power plug during operation.
* This nlay create sparks \, hlcB call cause fire
. Afte_ the indoor unit [s s\, [tched OFF \, _th the remote controller,
make sure to turn the breaker OFF or drsconnect the pc\, er
plug
Do not expose your body d_rectiy to cool a_r for a prolonged
length of t_me.
. This could be det_m_ental to your heakh
The umt should not be installed, relocated, d_sassembled,
altered, or repaired by the user.
. An imploperly handled air conditioner may cause fire, electIic
shock injury, or,,,,ate_ leakage etc Consult your dealer
. If the po,.,,er supply cord is damaged it must be _eplaced by the
manufactuler ol ns service agent in order to avoid a hazard
When mstalhng, relocating, or serwcmg the umt, make sure
that no substance other than the specified refrigerant (R41OA)
enters the refrigerant c_rcmt.
. Ally presence of foreign substance such as air call cause abnor-
mal pressure use and may result in explosion or injury
. The use of any _efrigerant other than that specified for the system
\, ill cause mechanical failure system malfunction or unit break-
down In the \, o_st case, this could lead to a serious impediment
to sesu_ [ng p_oduct safety
Meanings of symbols used in this manual
Be sure not to do
@
Be sure to follow the instruction
@
®
Never insert your finger or stink, etc
Nevel step onto the indoor/outdoor unit and do not put anything on them
@
Danger of electnc shock Be careful
@
Be sure to disconnect the pov_er supply plug from the pov/er outlet
Be sure to shut off the pov_er
ThB apphance B not intended for use by persons (including
@
@@
@
children) wRh reduced physmal, sensory or mental capabd_t_es,
or lack of experience and knowledge, unless they have been
gwen superws=on or mstructmn concerning use of the apph=
ance by a person respons=ble for their safety,
Children should be supervised to ensure that they do not play
wRh the appliance.
Do not insert your finger, a stink, or other objects into the air
inlet or outlet.
• This may cause InJury, since the fan inside rotates at high speeds
during operation
In case of an abnormal condR_on (such as a burmng smell),
stop the mr condR_oner and d_sconnect the power plug or turn
the breaker OFF.
• A continued operation Ill the abnol real s_ate may cause a malfunc-
tion fire or electllc shock In this case, oonsuk yOLll dealer
When the a_r conditioner does not cool or heat, there _s a pos-
s_bdRy of refrigerant leakage, in thB case, consult your dealer.
If a repair revolves recharging the umt w_th refrigerant, ask the
service techmc_an for detads.
• The refrigerant used in the a_r conditioner is safe Normally it does
not leak Ho\, ever if refrigerant leaks and comes in contact \, _tB
a heat source such as a fan heater kerosene Beater, ol socking
stove it ,,,111create a harmful gas
The user should never attempt to wash the ms,de of the indoor
umt. Should the reside of the umt reqmre cleaning, contact
your dealer.
• Unsurtable detergent may cause damage to plastic material _nside
the unit ,,,,h_ch may _esuk in \, ater leakage Should detergent
come in contact ,,,,nh electrical parts or the nlotol, it ,,,,111lesuk in
a malfunction, smoke, ol fire
CAUTION
Do not touch the a_r inlet or the aluminum fins of the indoor/
outdoor umt.
* This may cause inlury
Do not use msectm_des or flammaMe sprays on the umt.
. This may cause a fire or deformation of the unn
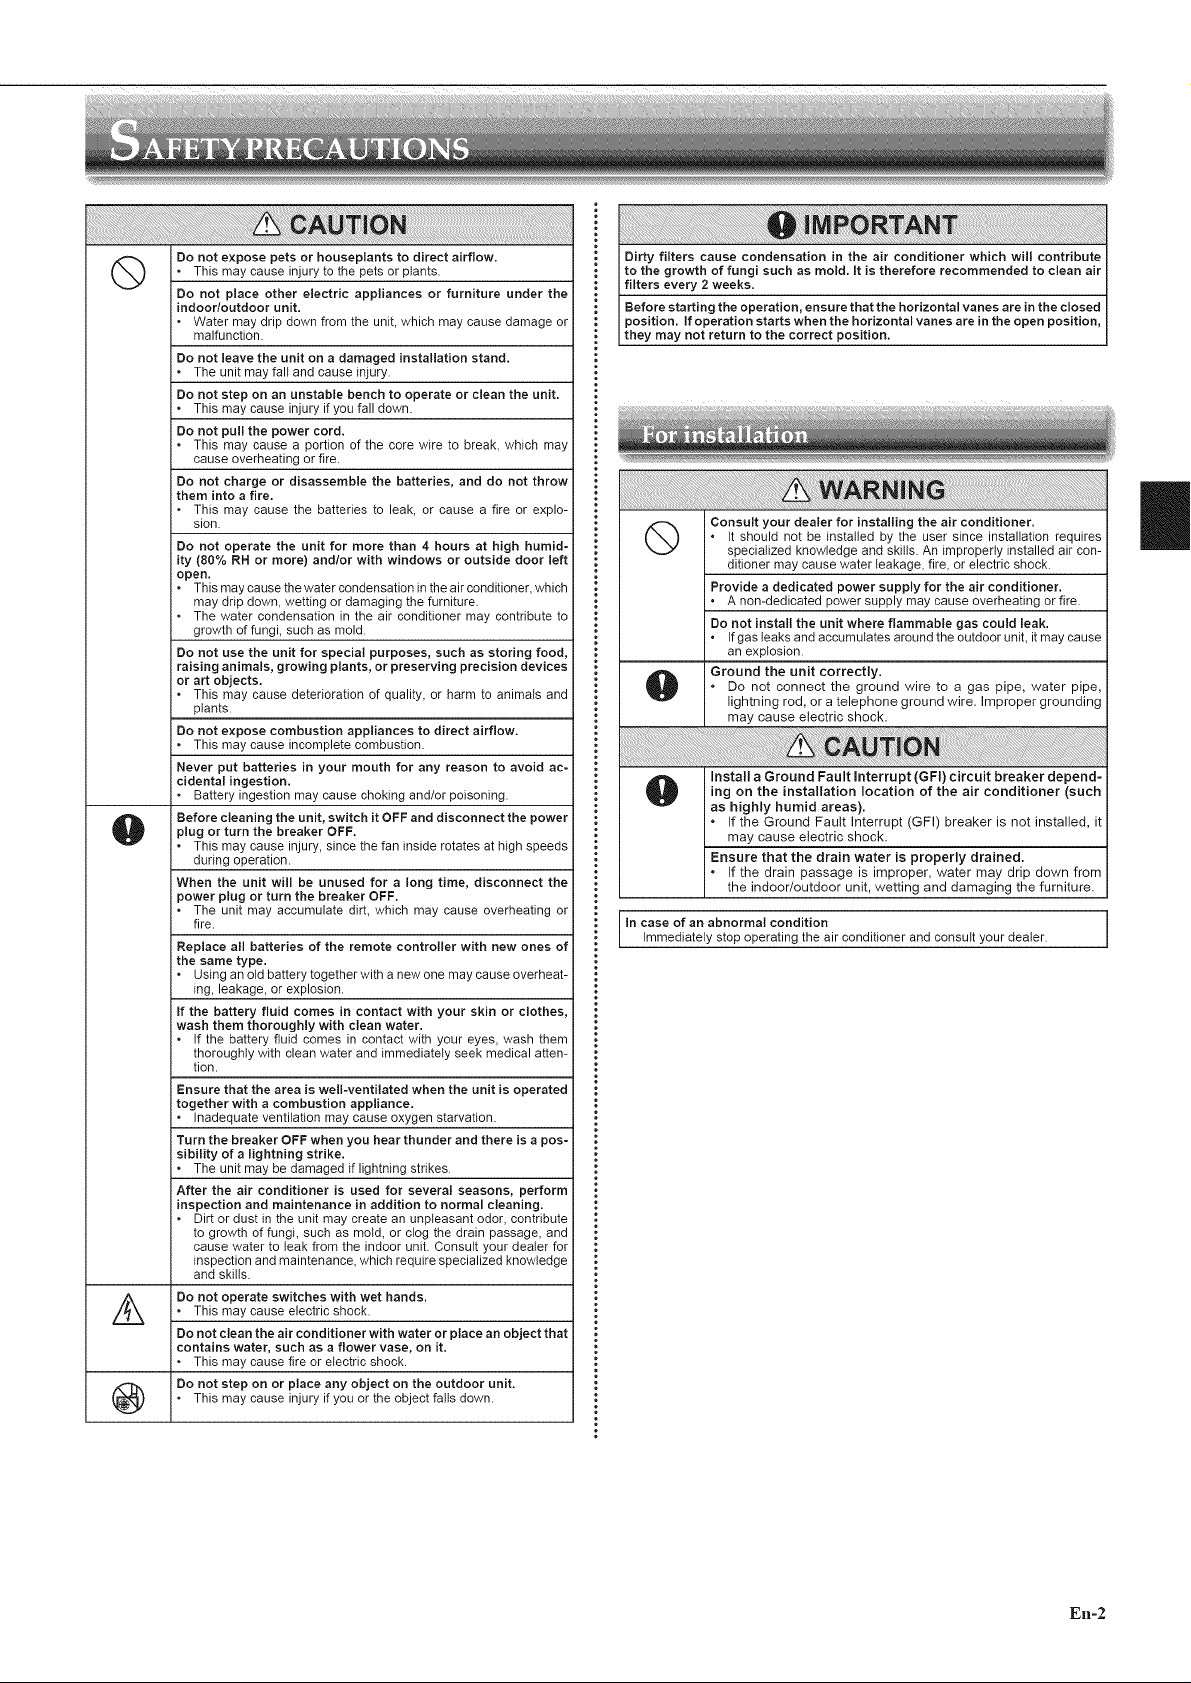
Q Do not expose pets or houseplants to direct airflow.
O Before cleaning the unit, switch it OFF and disconnect the power
* This may cause injury to the pets or plants.
Do not place other electric appliances or furniture under the
indoor/outdoor unit.
* Water may drip down from the unit, which may cause damage or
malfunction.
Do not leave the unit on a damaged installation stand.
* The unit may fall and cause injury.
Do not step on an unstable bench to operate or clean the unit.
. This may cause injury if you fall down.
Do not pull the power cord.
. This may cause a portion of the core wire to break, which may
cause overheating or fire.
Do not charge or disassemble the batteries, and do not throw
them into a fire.
. This may cause the batteries to leak, or cause a fire or explo-
sion.
Do not operate the unit for more than 4 hours at high humid-
ity (80% RH or more) and/or with windows or outside door left
open.
. This may cause the water condensation in the air conditioner, which
may drip down, wetting or damaging the furniture.
* The water condensation in the air conditioner may contribute to
growth of fungi, such as mold.
Do not use the unit for special purposes, such as storing food,
raising animals, growing plants, or preserving precision devices
or art objects.
. This may cause deterioration of quality, or harm to animals and
plants.
Do not expose combustion appliances to direct airflow.
. This may cause incomplete combustion.
Never put batteries in your mouth for any reason to avoid ac-
cidental ingestion.
. Battery ingestion may cause choking and/or poisoning.
plug or turn the breaker OFF.
. This may cause injury, since the fan inside rotates at high speeds
during operation.
When the unit will be unused for a long time, disconnect the
power plug or turn the breaker OFF.
. The unit may accumulate dirt, which may cause overheating or
fire.
Replace all batteries of the remote controller with new ones of
the same type.
. Using an old battery together with a new one may cause overheat-
ing, leakage, or explosion.
If the battery fluid comes in contact with your skin or clothes,
wash them thoroughly with clean water.
. If the battery fluid comes in contact with your eyes, wash them
thoroughly with clean water and immediately seek medical atten-
tion.
Ensure that the area is well-ventilated when the unit is operated
together with a combustion appliance.
. Inadequate ventilation may cause oxygen starvation.
Turn the breaker OFF when you hear thunder and there is a pos-
sibility of a lightning strike.
. The unit may be damaged if lightning strikes.
After the air conditioner is used for several seasons, perform
inspection and maintenance in addition to normal cleaning.
. Dirt or dust in the unit may create an unpleasant odor, contribute
to growth of fungi, such as mold, or clog the drain passage, and
cause water to leak from the indoor unit. Consult your dealer for
inspection and maintenance, which require specialized knowledge
and skills.
Dirty filters cause condensation in the air conditioner which will contribute
to the growth of fungi such as mold. It is therefore recommended to clean air
filters every 2 weeks.
Before starting the operation, ensure that the horizontal vanes are in the closed
position. If operation starts when the horizontal vanes are in the open position,
they may not return to the correct post on.
Q Consult your dealer for installing the air conditioner.
O Ground the unit correctly.
O Install a Ground Fault Interrupt (GFI) circuit breaker depend-
• Itshould not be installed by the user since installation requires
specialized knowledge and skills. An improperly installed air con-
ditioner may cause water leakage, fire, or electric shock.
Provide a dedicated power supply for the air conditioner.
• A non-dedicated power supply may cause overheating or fire.
Do not install the unit where flammable gas could leak.
• Ifgas leaks and accumulates around the outdoor unit, it may cause
an explosion.
. Do not connect the ground wire to a gas pipe, water pipe,
lightning rod, or a telephone ground wire. improper grounding
may cause electric shock.
ing on the installation location of the air conditioner (such
as highly humid areas).
. If the Ground Fault Interrupt (GFI) breaker is not installed, it
may cause electric shock.
Ensure that the drain water is properly drained.
. If the drain passage is improper, water may drip down from
the indoor/outdoor unit, wetting and damaging the furniture.
In case of an abnormal condition
mmed ate y stop operat ng the a rcond toner and consult your dealer.
II
/,_ Do not operate switches with wet hands.
. This may cause electric shock.
Do not clean the air conditioner with water or place an object that
contains water, such as a flower vase, on it.
. This may cause fire or electric shock.
. This may cause injury if you or the object fails down.
Do not step on or place any object on the outdoor unit.
En-2

• OPERATING INSTRUCTIONS •
I
Indoor unit
Front panel
Air filter --
(Nano platinum
filter)
Air cleaning filter
(Electrostatic
anti-allergy Horizontal
enzyme filter and vane
deodorizing filter)
Outdoor unit
Outdoor units may be different in appearance.
Air outlet //
////
/ /
-- Piping
-- Drainage hose
inlet
Emergency
switch
.... i-see sensor
i=
L_ emote control receiving
section
Air inlet (back and side)
Air outlet
Drain outlet
Remote controller
Battery replacement indicator
Operation
display section
Temperature
buttons _
Operation
ECONO COOL
button
POWERFUL
button
SMART SET
button
NATURAL
FLOW button
SENSOR
(i-see) button
CLOCK button--
Remote controller holder
• Install the remote con-
troller holder in a place t
where the signal can be I
received by the indoor I
unit. I
° When the remote con-
troller is not used, place I
it in this holder. /
nal transmitting
section
Distance of signal :
About 20 ft. (6 m)
Beep(s) is (are) heard from
the indoorunit when the
signal is received.
ON/OFF
(operate/stop) button
FAN speed control
WIDE VANE
VANE control
button
INDIRECT/DIRECT
button
TIME, TIMER set buttons
Increase time
Decrease time
WEEKLY TIMER
set buttons
button
Lid
Slide the lid down
to open the remote
N
Only use the remote controller provid-
ed with the unit.
Do not use other remote controllers.
If two or more indoor units are installed
in proximity to one another, an indoor
unit that is not intended to be operated
may respond to the remote controller.
controller. Slide it down
further to get to the
weekly timer buttons.
Before operation: Insert the power supply plug into the power outlet and/or turn the breaker on.
Installing the remote controller batteries
Press RESET. '_lv__
], Remove th "/_',_£_._ _'_
e_n__£_
Setting current time
], Press CLOCK.
_CLOCK_'_,'M
__'% 2_ Insert the negative
_1_ _, Install the front lid.
• Make sure the polarity of the batteries is correct.
• Do not use manganese batteries and leaking batteries. The remote controller
could malfunction.
• Do not use rechargeable batteries.
• The battery replacement indicator lights up when the battery is running low. In
7 days after the indicator starts lights up, the remote controller stops working.
• Replace all batteries with new ones of the same type.
• Batteries can be used for approximately 1 year. However, batteries with
expired shelf lives last shorter.
• Press RESET gently using a thin instrument.
If the RESET button is not pressed, the remote controller may not operate
correctly.
En-3
P/k:li°feAAatle ries first.
. Press CLOCK again. CLOCK
Press CLOCK gently using a thin instrument.
Press the DAY button
to set the day.
_g:uu
Press either the TIME button
or the TIMER buttons to set
the time.
PM Each press increases/decreas-
I-UU es the time by 1 minute (10
minutes when pressed longer).

Changing temperature units (°F--PC)
Unit is preset with °F.
]I Press RESET while
the temperature but-
tons are pressed.
. Press RESET gently using a thin instrument.
To change temperature unit from °C to °F, press RESET.
II
Setting the installation position
Be sure to set the remote controller in accordance with the installed position of
the indoor unit.
Installation position:
Left: Distance to objects (wall, cabinet, etc.) is less than 19-11/16 in. (50 cm)
to the teft
Center: Distance to objects (wall, cabinet, etc.) is more than 19-11/16 in. (50
cm) to the left and right
Right: Distance to objects (wall, cabinet, etc.) is less than 19-11/16 in. (50 cm)
to the right
(Left) (Center) (Right)
WIDEVANE
...........Hold down _ on the remote controller for 2 sec-
onds to enter the position setting mode,
............ WIDEVANE
_ Select the target installation position by pressing _.
WIDEVANE
(Each press of the _ displays the positions in
order:)
(Center) (Right) (Left)
_ Press _ to complete the position setting.
Note:
The installation position can be set only when all the following conditions are met:
. The remote controller is powered off.
. Weekly timer is not set.
. Weekly timer is not being edited.
En-4
• OPERATING INSTRUCTIONS •
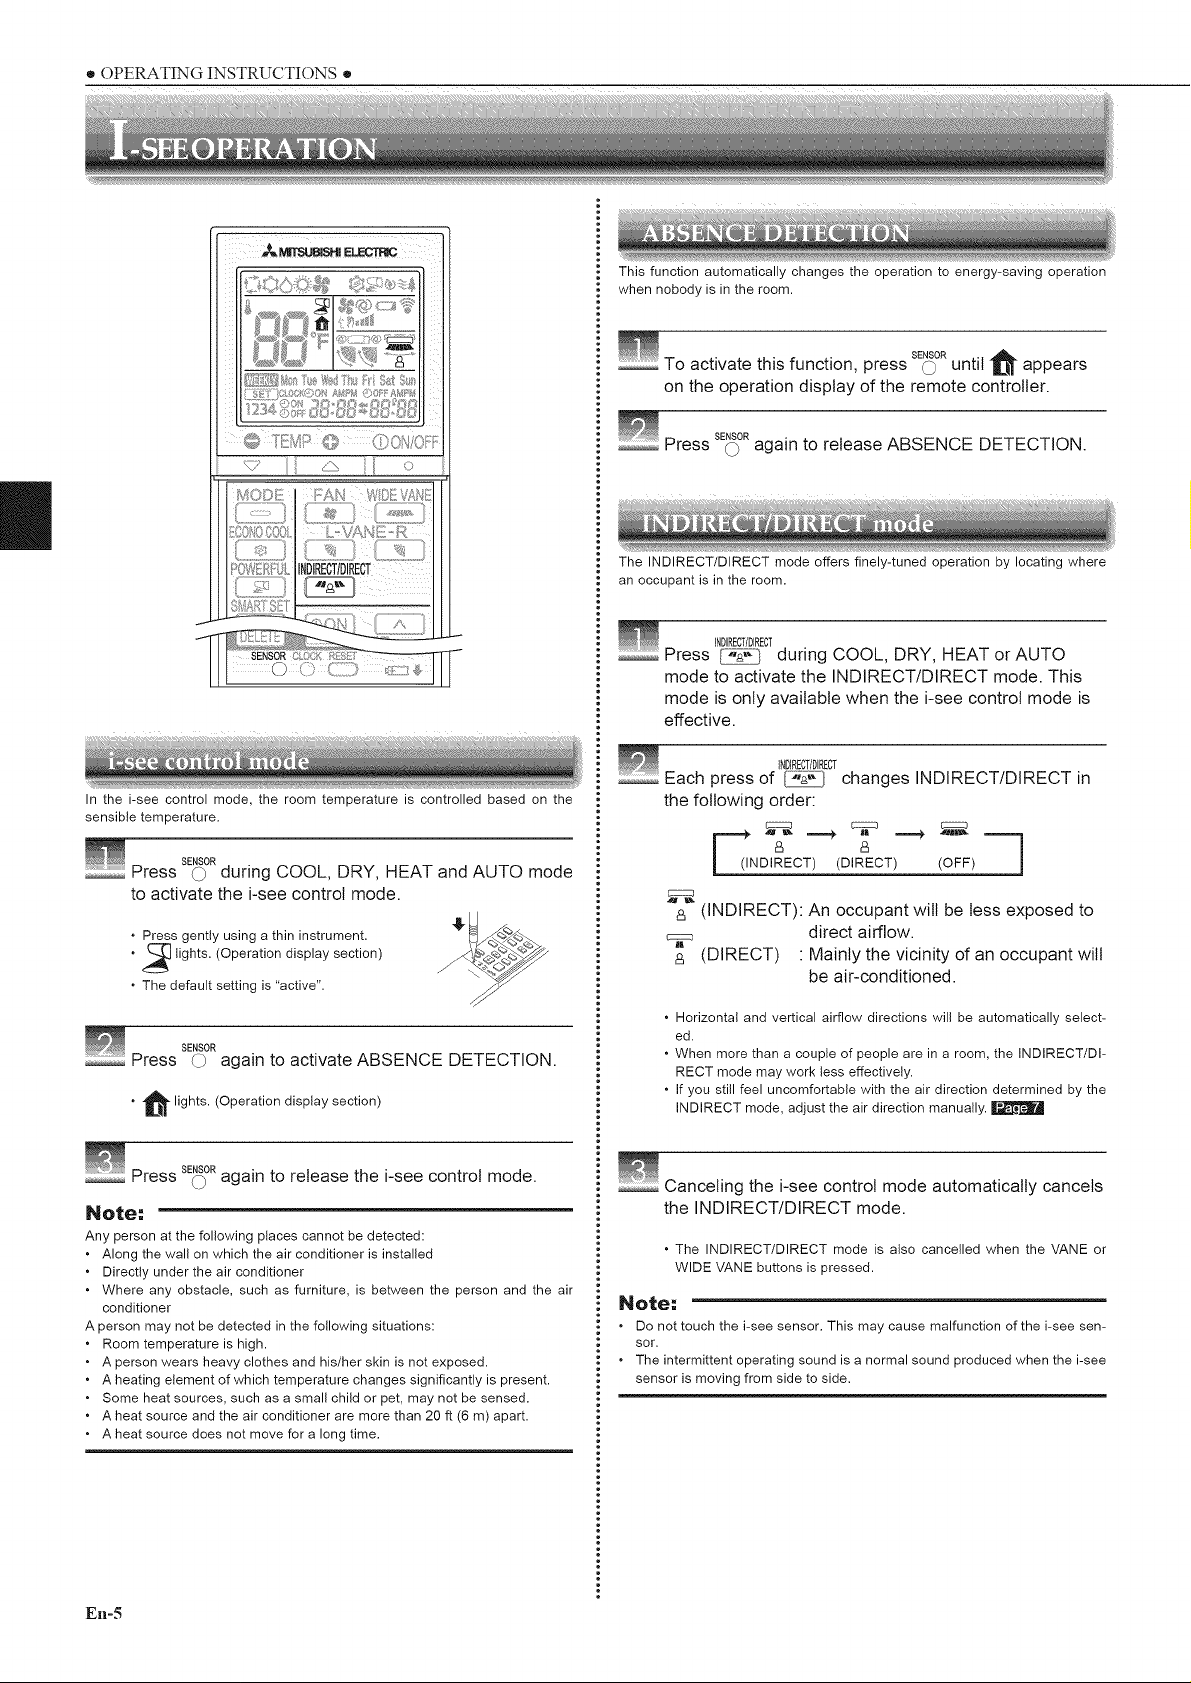
This function automatically changes the operation to energy-saving operation
when nobody is in the room.
this function, press Sg_ORuntil _1_ appears
on the operation display of the remote controller.
I
In the i-see control mode, the room temperature is controlled based on the
sensible temperature.
_ Press O during COOL, DRY, HEAT and AUTO mode
SENSOR
to activate the i-see control mode.
, Press gently using a thin instrument.
, _ lights. (Operation display section)
, The default setting is "active".
SENSOR
.......... Press O again to activate ABSENCE DETECTION.
, _ lights. (Operation display section)
...... Press _-) again to release ABSENCE DETECTION.
SENSOR
The INDIRECT/DIRECT mode offers finely-tuned operation by locating where
an occupant is in the room.
INDIRECT/DIRECT
.......... Press during COOL, DRY, HEAT or AUTO
mode to activate the INDIRECT/DIRECT mode. This
mode is only available when the i-see control mode is
effective.
......... __i_t-_
Each press of {_i_¢,] changes INDIRECT/DIRECT in
INDIRECTIDIRECT
the following order:
g:::::::3 g::::::3 g:::::::3
,_ _ n _ ._ ._
& &DIRECT) (DIRECT) (OFF)
C::ZZ3
_'_ (INDIRECT): An occupant will be tess exposed to
direct airflow.
& (DIRECT) " Mainly the vicinity of an occupant wilt
be air-conditioned.
• Horizontal and vertical airflow directions will be automatically select-
ed.
• When more than a couple of people are in a room, the INDIRECT/DI-
RECT mode may work tess effectively.
• If you still feel uncomfortable with the air direction determined by the
INDIRECT mode, adjust the air direction manually.
_ Press SE_ORagain to release the i-see control mode.
Note;
Any person at the following places cannot be detected:
• Along the wall on which the air conditioner is installed
• Directly under the air conditioner
• Where any obstacle, such as furniture, is between the person and the air
conditioner
A person may not be detected in the following situations:
Room temperature is high.
A person wears heavy clothes and his/her skin is not exposed.
A heating element of which temperature changes significantly is present.
Some heat sources, such as a small child or pet, may not be sensed.
A heat source and the air conditioner are more than 20 ft (6 m) apart.
A heat source does not move for a long time.
En-5
_ anceling the i-see control mode automatically cancels
the INDIRECT/DIRECT mode.
• The INDIRECT/DIRECT mode is also cancelled when the VANE or
WIDE VANE buttons is pressed.
Note;
Do not touch the i-see sensor. This may cause malfunction of the i-see sen-
sor.
, The intermittent operating sound is a normal sound produced when the i-see
sensor is moving from side to side.
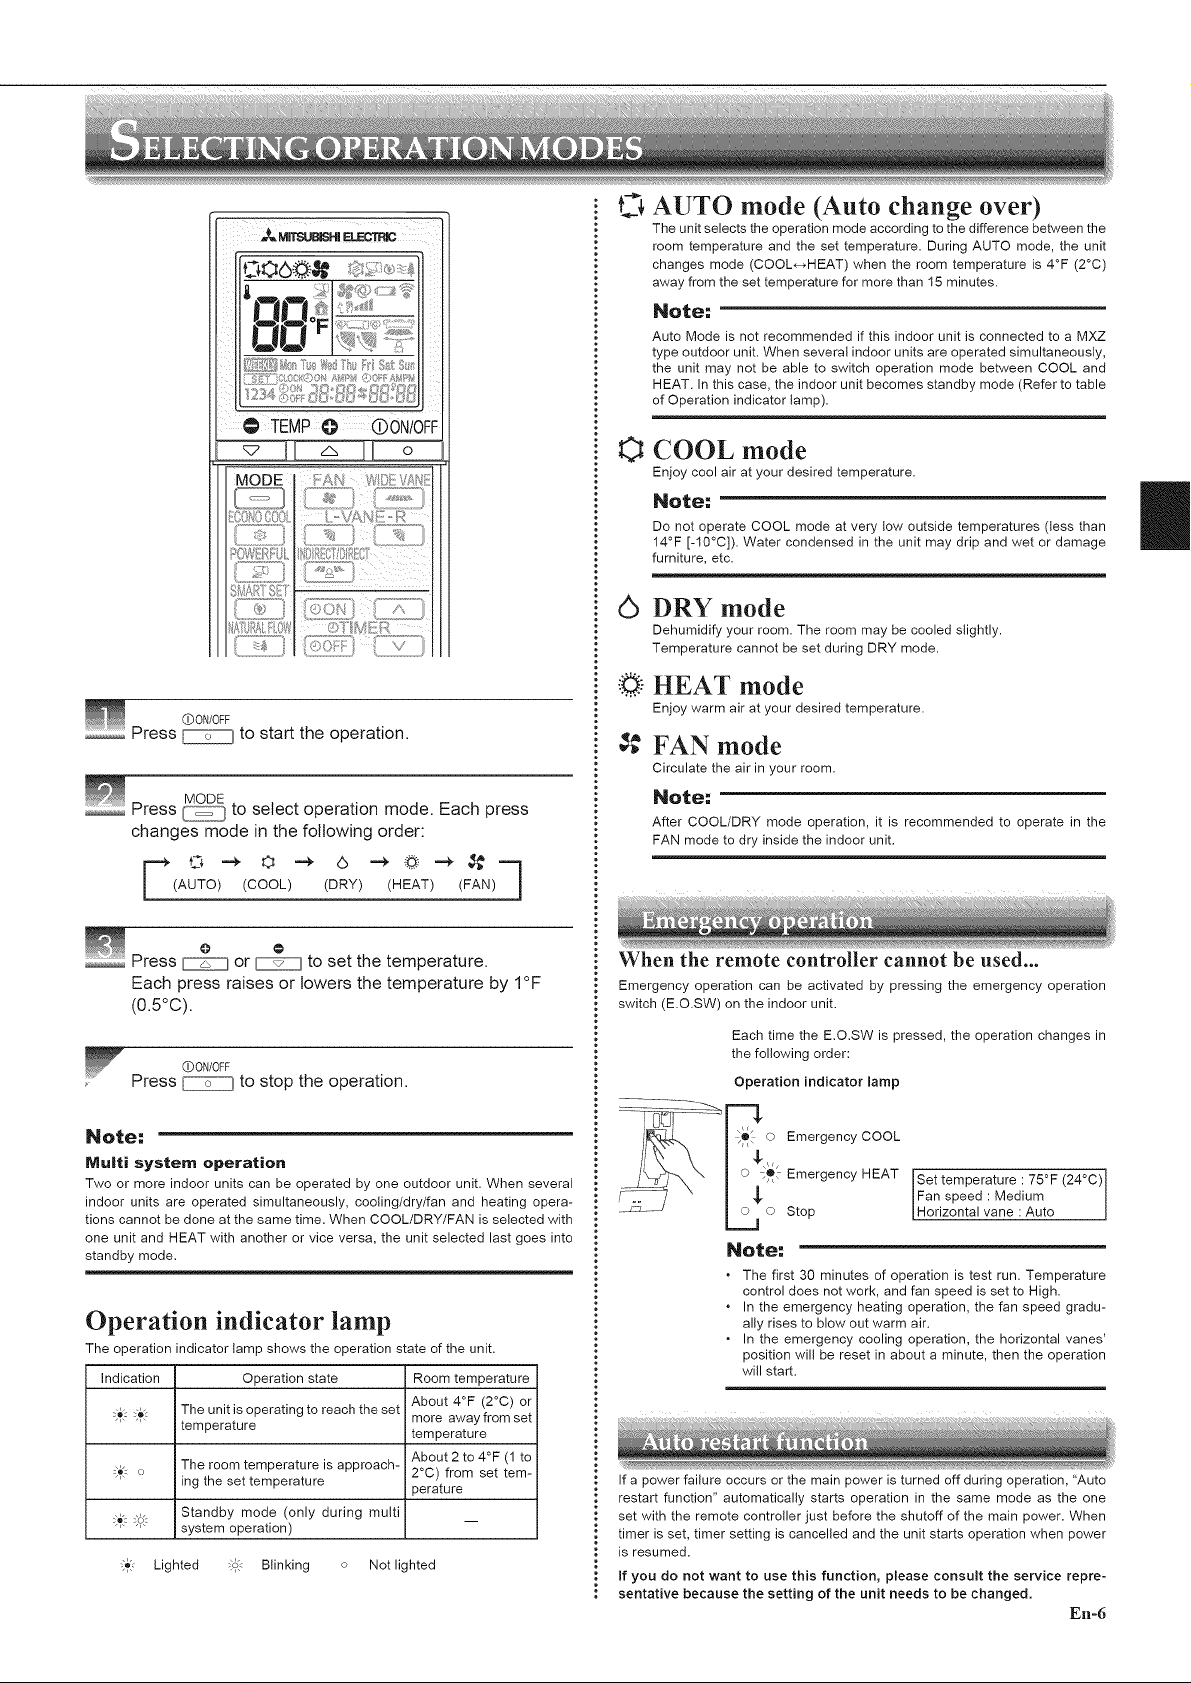
0 TEMP@ (DON/OFF
_ Press _ to start the operation.
.......... Press [[_ to select operation mode. Each press
OON/OFF
MODE
changes mode in the following order:
O
AUTO mode (Auto change over)
The unit selects the operation mode according to the difference between the
room temperature and the set temperature. During AUTO mode, the unit
changes mode (COOL_-_HEAT) when the room temperature is 4°F (2°C)
away from the set temperature for more than 15 minutes.
Note:
Auto Mode is not recommended if this indoor unit is connected to a MXZ
type outdoor unit. When several indoor units are operated simultaneously,
the unit may not be able to switch operation mode between COOL and
HEAT. In this case, the indoor unit becomes standby mode (Refer to table
of Operation indicator lamp).
COOL mode
O
Enjoy cool air at your desired temperature.
Do not operate COOL mode at very tow outside temperatures (tess than
Note: /
14°F [-10°C]). Water condensed in the unit may drip and wet or damage
furniture, etc.
6
DRY mode
Dehumidify your room. The room may be cooled slightly.
Temperature cannot be set during DRY mode.
HEAT mode
Enjoy warm air at your desired temperature.
FAN mode
Circulate the air in your room.
Note:
After COOL/DRY mode operation, it is recommended to operate in the
FAN mode to dry inside the indoor unit.
F O _ O _ O _ ,_, --_ ,!¢ q(AUTO) (COOL) (DRY) (HEAT) (FAN)
............Press _ or _ to set the temperature.
Each press raises or lowers the temperature by I°F
(0.5°C).
OON/OFF
Press _ to stop the operation.
Note:
Multi system operation
Two or more indoor units can be operated by one outdoor unit. When several
indoor units are operated simultaneously, cooling/dry/fan and heating opera-
tions cannot be done at the same time. When COOL/DRY/FAN is selected with
one unit and HEAT with another or vice versa, the unit selected last goes into
standby mode.
Operation indicator lamp
The operation indicator lamp shows the operation state of the unit.
indication Operation state Room temperature
_'o :o', The unit is operating to reach the set About 4°F (2°C) or
...... more away from set
•_: o The room temperature is approach- 2oc) from set tem-
"" ing the set temperature perature
:_ ._c{_ system operation)
temperature temperature
About 2 to 4°F (1 to
Standby mode (only during multi
"-.'_ Lighted _d Blinking o Not lighted
When the remote controller cannot be used...
Emergency operation can be activated by pressing the emergency operation
switch (E.O.SW) on the indoor unit.
Each time the E.O.SW is pressed, the operation changes in
the following order:
Operation indicator lamp
.... _........ {'o{ o Emergency COOL
/__'--,_ _,_{ Emergency HEAT
h_ o Stop
Set temperature : 75°F (24°C)]
Fan speed : Medium
Horzonta vane :Auto |
Note:
. The first 30 minutes of operation is test run. Temperature
control does not work, and fan speed is set to High.
. In the emergency heating operation, the fan speed gradu-
ally rises to blow out warm air.
. In the emergency cooling operation, the horizontal vanes'
position will be reset in about a minute, then the operation
will start.
If a power failure occurs or the main power is turned off during operation, "Auto
restart function" automatically starts operation in the same mode as the one
set with the remote controller just before the shutoff of the main power. When
timer is set, timer setting is cancelled and the unit starts operation when power
is resumed.
If you do not want to use this function, please consult the service repre-
sentative because the setting of the unit needs to be changed,
En-6
• OPERATING INSTRUCTIONS •
I
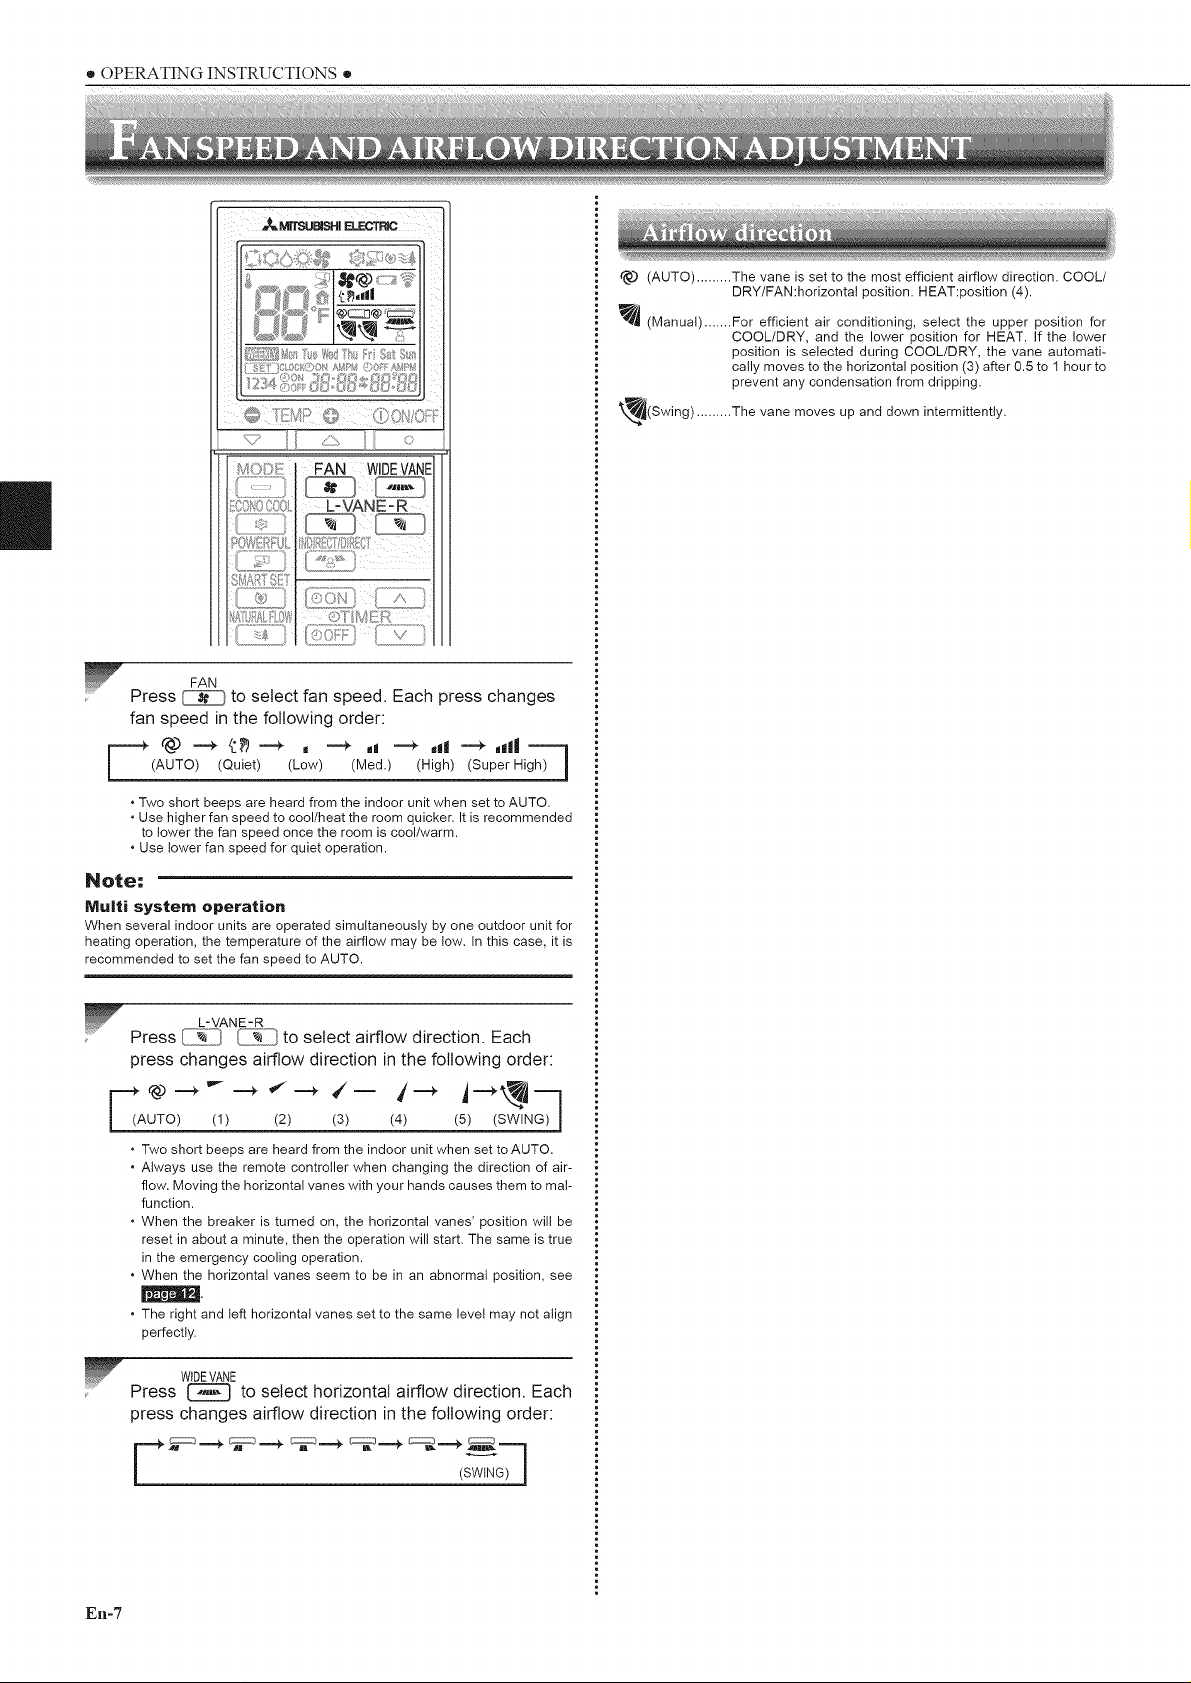
FAN
Press _ to select fan speed. Each press changes
fan speed in the following order:
,-=,-_ @ .=-+ _:>_-==+ _ _ ,i _ dl .-=+ ,ill ---I
(AUTO) (Quiet) (Low) (Med.) (High) (Super High) I
. Two short beeps are heard from the indoor unit when set to AUTO.
. Use higher fan speed to cool/heat the room quicker. It is recommended
to lower the fan speed once the room is cool/warm.
. Use lower fan speed for quiet operation.
Note:
Multi system operation
When several indoor units are operated simultaneously by one outdoor unit for
heating operation, the temperature of the airflow may be low. In this case, it is
recommended to set the fan speed to AUTO.
¢_.) (AUTO) ......... The vane is set to the most efficient airflow direction. COOL/
_ (Manual) ....... For efficient air conditioning, select the upper position for
_(Swing) ......... vane moves up intermittently.
DRY/FAN:horizontal position. HEAT:position (4).
COOL/DRY, and the lower position for HEAT. If the lower
position is selected during COOL/DRY, the vane automati-
cally moves to the horizontal position (3) after 0.5 to 1 hour to
prevent any condensation from dripping.
The and down
Press I___l ( _ to select airflow direction. Each
L-VANE-R
press changes airflow direction in the following order:
F_(A ¢_) _- _ _ ,==,=+_'__ _ _ _""_'_,_ --_
UTO) (1) (2) (3) (4) (5) (SWING) ]
. Two short beeps are heard from the indoor unit when set to AUTO.
. Always use the remote controller when changing the direction of air-
flow. Moving the horizontal vanes with your hands causes them to mal-
function,
. When the breaker is turned on, the horizontal vanes' position will be
reset in about a minute, then the operation will start, The same is true
in the emergency cooling operation,
. When the horizontal vanes seem to be in an abnormal position, see
mull,
. The right and left horizontal vanes set to the same level may not align
perfectly,
WIDEVANE
Press _ to select horizontal airflow direction, Each
press changes airflow direction in the following order:
_::::::_...-_,,_ff..-_ ,_:::::_...-__::::__._ _:::::_..-_--]
(SWING)I
En-7
FAN W_E
SMARTSET
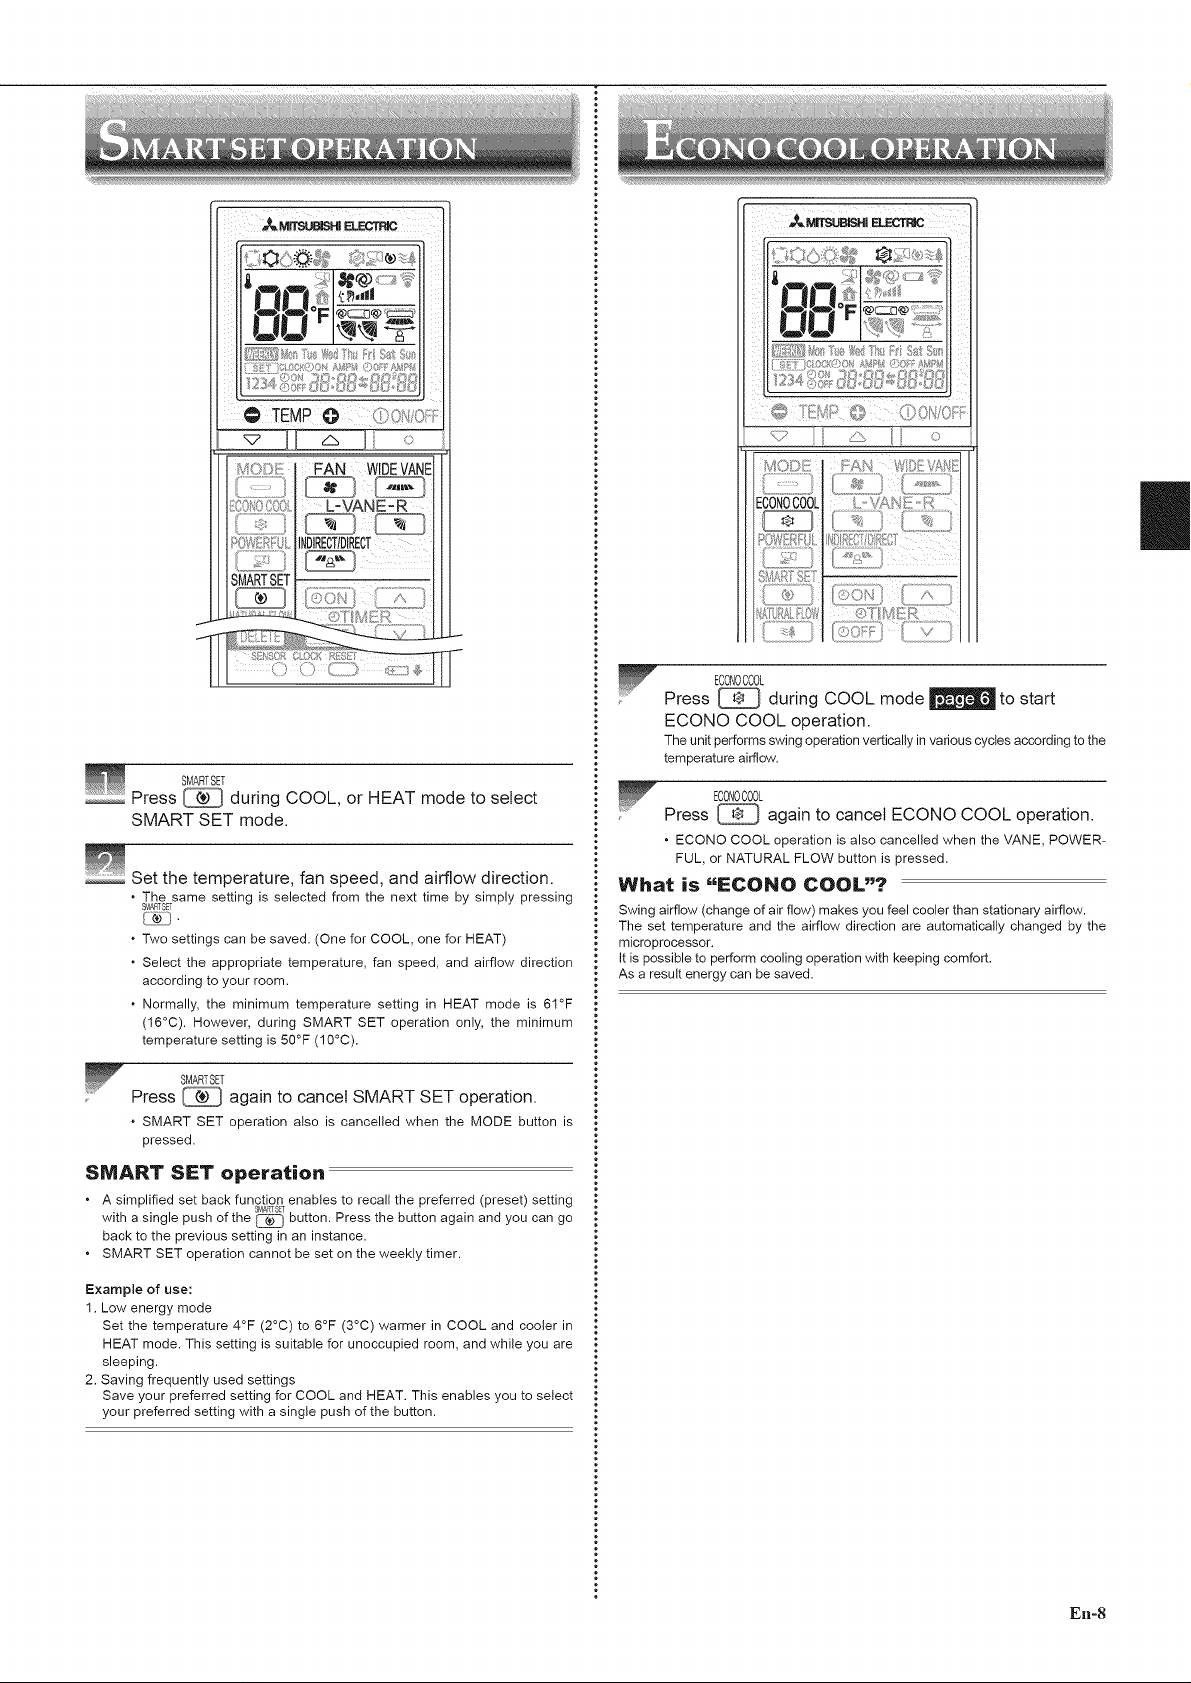
Press _ during COOL, or HEAT mode to select
SMART SET mode.
Set the temperature, fan speed, and airflow direction.
. The same setting is selected from the next time by simply pressing
SMARTSET
. Two settings can be saved. (One for COOL, one for HEAT)
. Select the appropriate temperature, fan speed, and airflow direction
according to your room.
. Normally, the minimum temperature setting in HEAT mode is 61°F
(16°C). However, during SMART SET operation only, the minimum
temperature setting is 50°F (10°C).
t :']::::::D .....
I _,:Jr >I i ,...........................+
ECONOCOOL
Press _ during COOL mode | to start
ECONO COOL operation.
The unit performs swing operation vertically in various cycles according to the
temperature airflow.
ICONOCOOL
Press _ again to cancel ECONO COOL operation.
• ECONO COOL operation is also cancelled when the VANE, POWER-
FUL, or NATURAL FLOW button is pressed.
What is _EECONO COOL"?
Swing airflow (change of air flow) makes you feel cooler than stationary airflow.
The set temperature and the airflow direction are automatically changed by the
microprocessor.
It is possible to perform cooling operation with keeping comfort.
As a result energy can be saved.
I
SMARTSET
Press _ again to cancel SMART SET operation.
. SMART SET operation also is cancelled when the MODE button is
pressed.
SMART SET operation
• A simplified set back function enables to recall the preferred (preset) setting
with a single push of the _ button. Press the button again and you can go
back to the previous setting in an instance.
• SMART SET operation cannot be set on the weekly timer.
Example of use:
1. Low energy mode
Set the temperature 4°F (2°C) to 6°F (3°C) warmer in COOL and cooler in
HEAT mode. This setting is suitable for unoccupied room, and while you are
sleeping.
2. Saving frequently used settings
Save your preferred setting for COOL and HEAT. This enables you to select
your preferred setting with a single push of the button.
SMARTSEY
En-8
II
• OPERATING INSTRUCTIONS •
NATURALFLOW
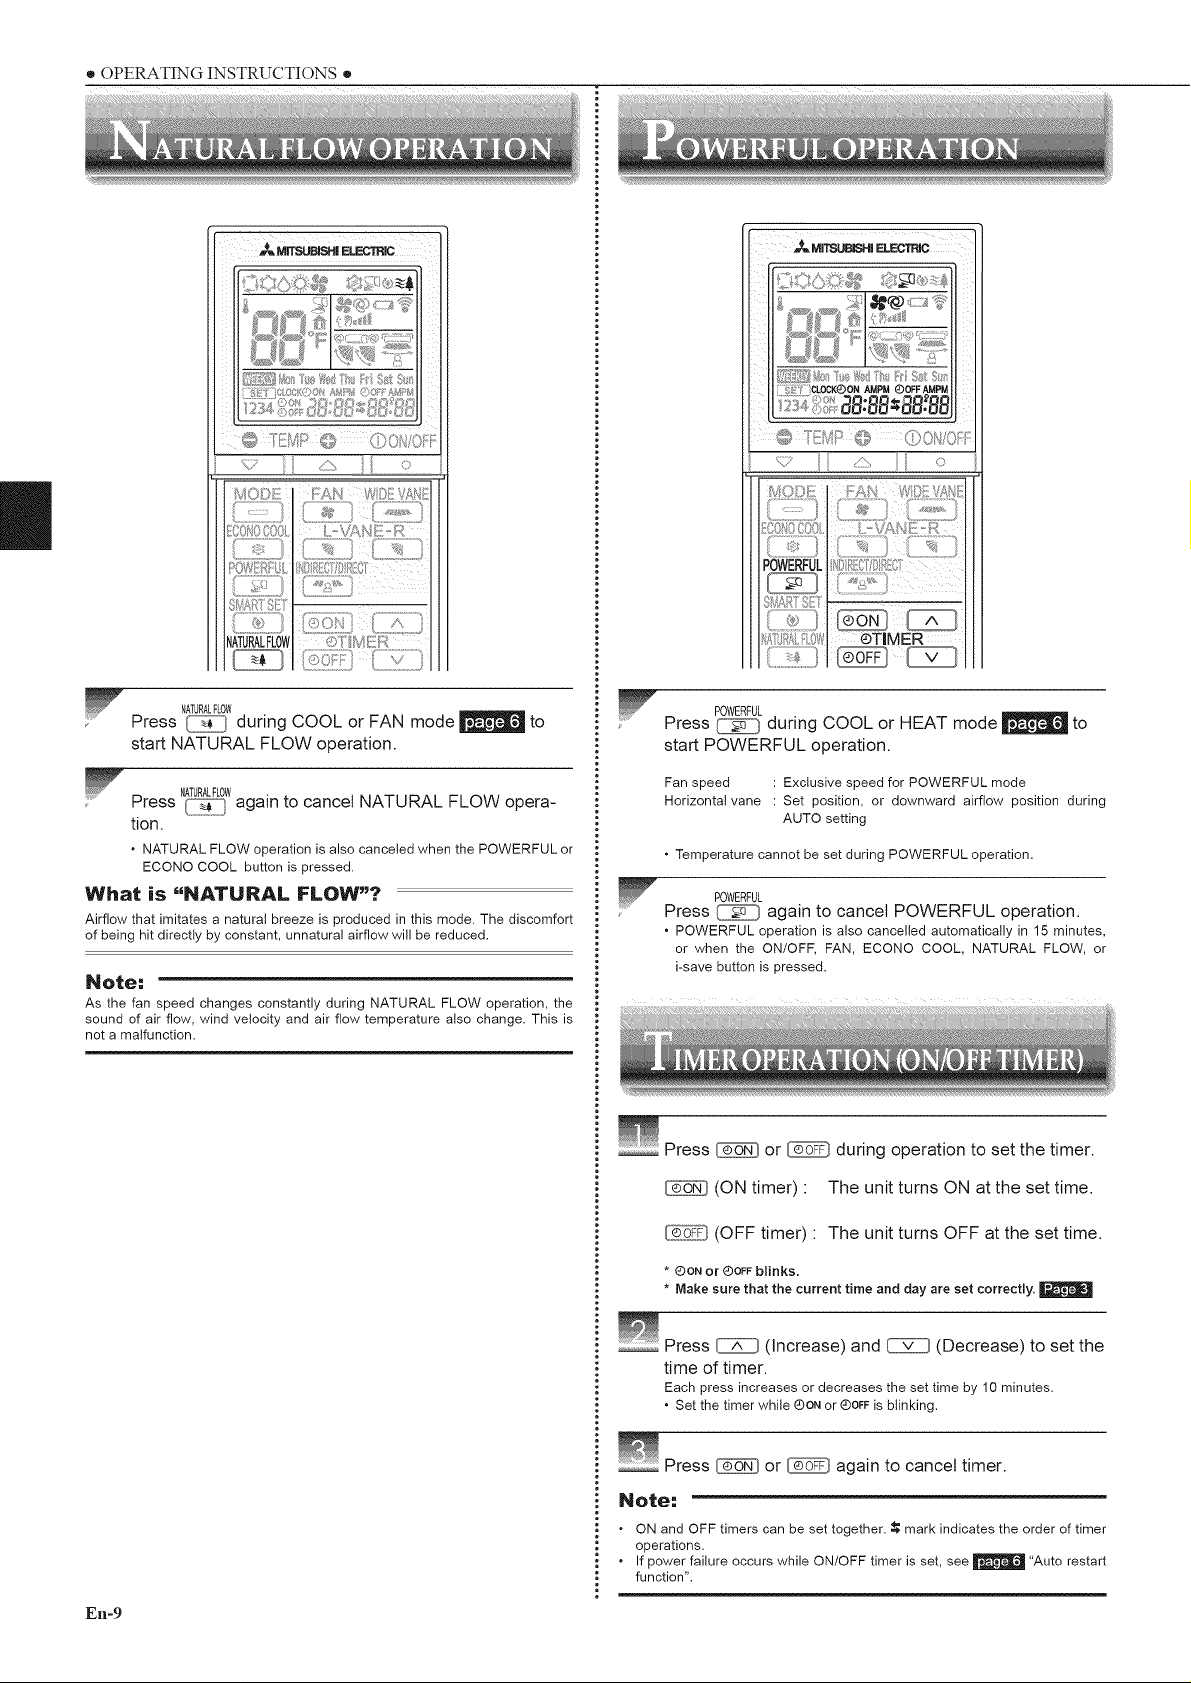
Press _I during COOL or FAN mode | to
start NATURAL FLOW operation.
NATURALFLOW
Press _ again to cancel NATURAL FLOW opera-
tion.
. NATURAL FLOW operation is also canceled when the POWERFUL or
ECONO COOL button is pressed.
What is "NATURAL FLOW"?
Airflow that imitates a natural breeze is produced in this mode. The discomfort
of being hit directly by constant, unnatural airflow will be reduced.
Note:
As the fan speed changes constantly during NATURAL FLOW operation, the
sound of air flow, wind velocity and air flow temperature also change. This is
not a malfunction.
POWERFUL
Press _ during COOL or HEAT mode _ to
start POWERFUL operation.
Fan speed : Exclusive speed for POWERFUL mode
Horizontal vane : Set position, or downward airflow position during
AUTO setting
• Temperature cannot be set during POWERFUL operation.
POWERFUL
Press _ again to cancel POWERFUL operation.
• POWERFUL operation is also cancelled automatically in 15 minutes,
or when the ON/OFF, FAN, ECONO COOL, NATURAL FLOW, or
i-save button is pressed.
_ Press _ or _ during operation to set the timer.
(ON timer) " The unit turns ON at the set time.
_] (OFF timer) " The unit turns OFF at the set time.
* OON or (_)OFF blinks.
* Make sure that the current time and day are set correctly.
En-9
_ Press _ (Increase) and _ (Decrease) to set the
time of timer.
Each press increases or decreases the set time by 10 minutes.
. Set the timer while ®ON or ®OFFis blinking.
_ Press _ or _ again to cancel timer.
Note:
ON and OFF timers can
. be set together. ,_ mark indicates the order of timer
operations.
. If power failure occurs while ON/OFF timer is set, see _ "Auto restart
function".
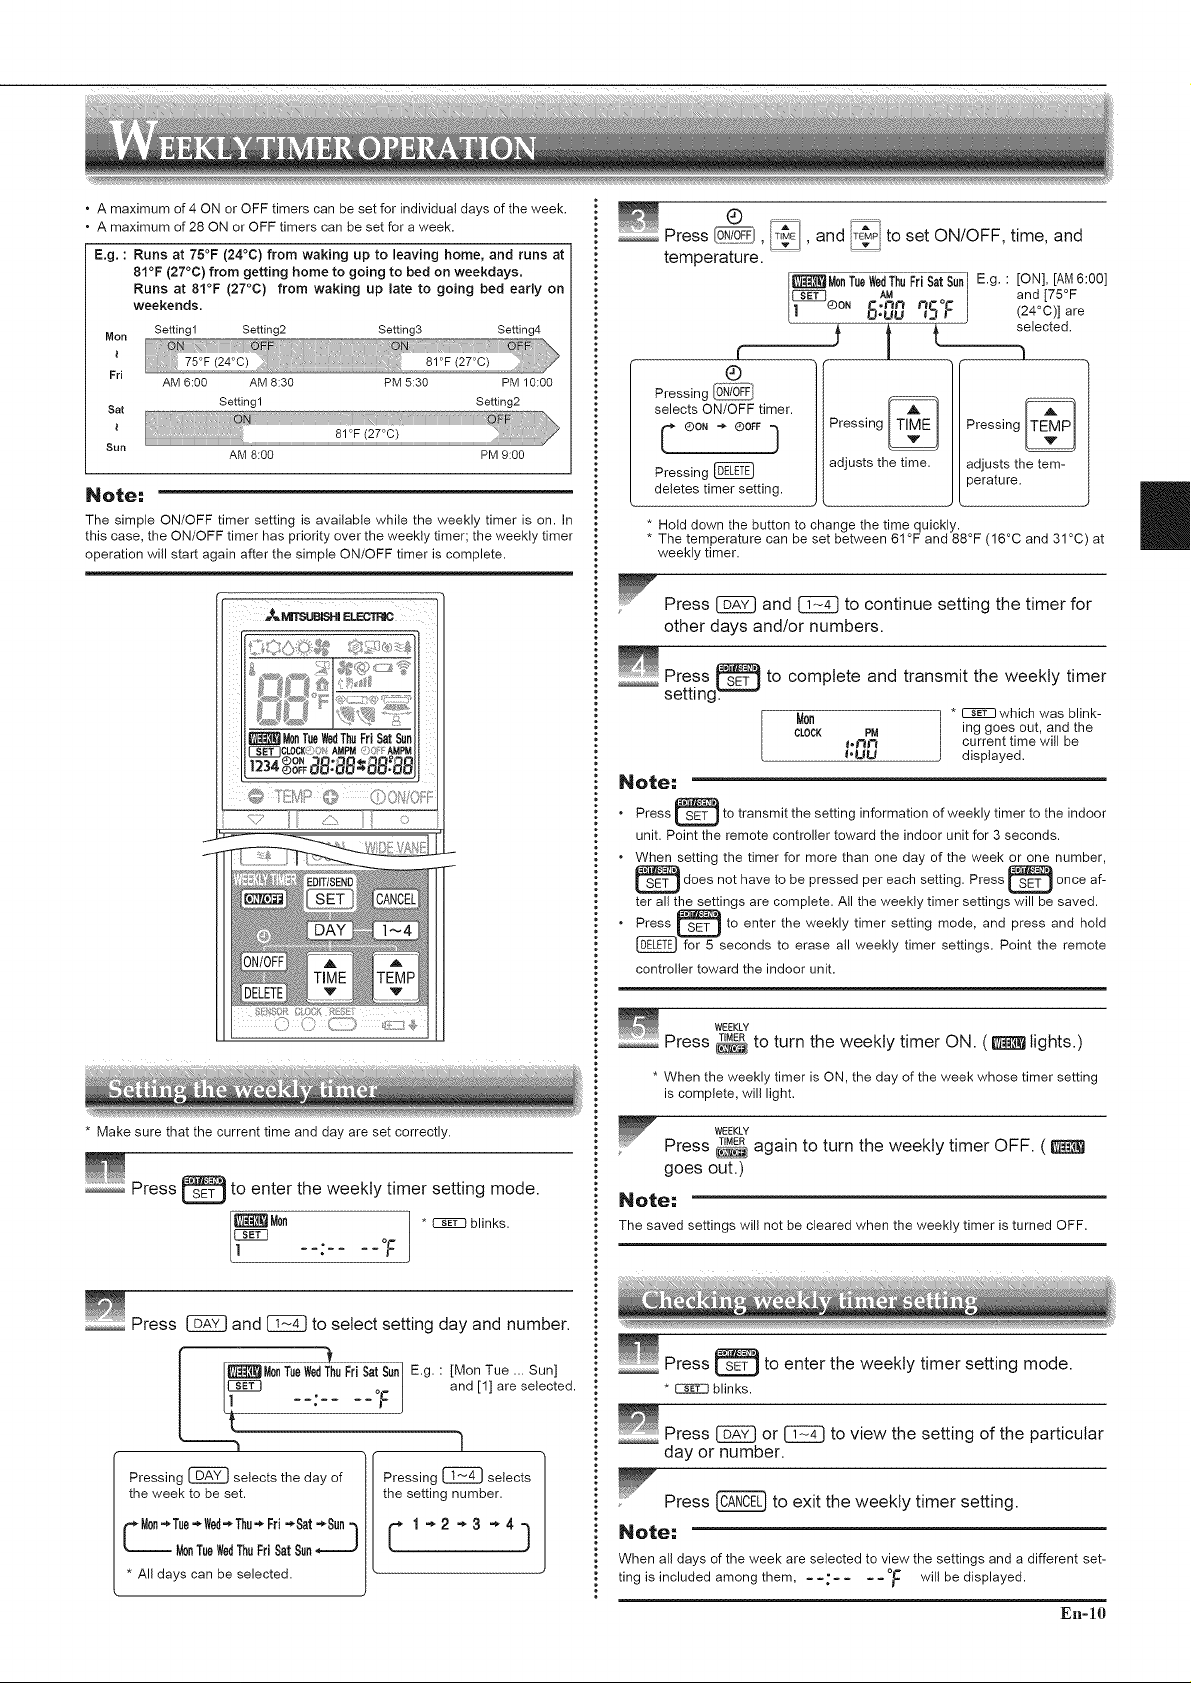
• A maximum of 4 ON or OFF timers can be set for individual days of the week.
• A maximum of 28 ON or OFF timers can be set for a week.
E.g. : Runs at 75°F (24°C) from waking up to leaving home, and runs at
81°F (27°C) from getting home to going to bed on weekdays.
Runs at 81°F (27°C) from waking up late to going bed early on
weekends.
Setting1 Setting2 Setting3 Setting4
Men
Fri
AM6:00 AM 8:30 PM5:30 PM10:00
Sat
Sun
Setting1 Setting2
AM 8:00 PM9:00
Note:
The simple ON/OFF timer setting is available while the weekly timer is on. In
this case, the ON/OFF timer has priority over the weekly timer; the weekly timer
operation will start again after the simple ON/OFF timer is complete.
Press @, T,ME_and l_i to set ON/OFF, time, and
temperature. ' _ "
_Men TueWedThuFri SatSun] E.g. : [ON], [AM6:go]
[| 8"UU 12J_ J (24 C)] are
AM o | and [75°F
QON --,l_l"_ J_J: #: o
t t selected.
t I 1
®
Pressing @
selects ON/OFF timer.
Pressing
Pressing
deletes timer setting.
* Hold down the button to change the time quickly.
* The temperature can be set between 61°F and 88°F (16°C and 31 °C) at
weekly timer.
adjusts the time.
Press @ and @ to continue setting the timer for
other days and/or numbers.
to complete and transmit the weekly timer
M0n * !:_ which was blink-
CLOCK PM ing goes out, and the
t.Vh'3 current time will be
I.UU displayed.
Pressing
adjusts the tem-
perature.
* Make sure that the current time and day are set correctly.
_ Press _ to enter the weekly timer setting mode.
Men * I:_ blinks.
• T
_ Press _ and _ to select setting day and number.
E.g. :[Mon Tue ... Sun]
and [1] are selected.
LSL_ MenTueWedThuFri Sat Sunl
• -TJl
!
the week to be set.
Tue"* Wed-_Thu-_Fri "*Sat -'Sun "_
M0nTueWedThuFriSatSun
Pressing _ selects the day of I
• All days can be selected.
Pressing [_ selects
the setting number.
Press _ to transmit the setting information of weekly timer to the indoor
I
unit. Point the remote controller toward the indoor unit for 3 seconds.
When setting the timer for more than one day of the week or one number,
_does not have to be each Press _ af-
ter all the settings are complete. All the weekly timer settings will be saved.
Press _ to enter the weekly timer setting mode, and press and hold
for 5 seconds to erase all weekly timer settings. Point the remote
controller toward the indoor unit.
WEEKLY
pressed per setting.
once
...........Press _ to turn the weekly timer ON. ( _ lights.)
* When the weekly timer is ON, the day of the week whose timer setting
is complete, will light,
WEEKLY
Press _ again to turn the weekly timer OFF. (
goes out.)
Note:
The saved settings will not be cleared when the weekly timer is turned OFF.
_ Press _ to enter the weekly timer setting mode.
* _ blinks.
_ Press _ or _ to view the setting of the particular
day or number.
Press _ to exit the weekly timer setting.
Note:
When all days of the week are selected to view the settings and a different set-
ting is included among them, - -: .... oF will be displayed.
En-lO

II
• OPERATING INSTRUCTIONS •
|nstructions:
. Switch off the power supply or turn off the breaker before cleaning. . Use only diluted mild detergents.
. Be careful not to touch the metal parts with your hands. . Do not expose parts to direct sunlight, heat, or fire to dry.
. Do not use benzine, thinner, polishing powder, or insecticide. . Do not use water hotter than 122°F (50°C).
Air cleaning filter
Air filter (Nano platinum filter)
. Remove dirt by a vacuum cleaner, or rinse with water.
. After washing with water, dry it well in shade.
What is _ENano platinum filter"?
Nano platinum is a ceramic particle that includes a platinum nanoparticle.
The particles are incorporated into the filter material, which results in pro-
viding semi-permanent antibacterial and deodorizing characteristics for the
filter. Nano platinum surpasses the catechin (a bioflavonoid that is found
in green tea) in performance. Nano platinum filter uses this compound not
only to improve air quality but also to eliminate bacteria and viruses. This air
filter has a semi-permanent lasting effect even after washing it with water.
(Electrostatic anti-allergy enzyme filter,
blue)
Every 3 months:
. Remove dirt by a vacuum cleaner.
When dirt cannot be removed by vacuum cleaning:
. Soak the filter and its frame in lukewarm water before rinsing it.
. After washing, dry itwelt in shade. Install all tabs of the air filter.
Every year:
. Replace it with a new air cleaning
filter for best performance.
. Parts Number_
and
Pull to remove from the air filter
Front panel
Hinge
Hole
1. Lift the front panel until a "click" is heard.
2. Hold the hinges and pull to remove as shown in the illustration above.
. Wipe with a soft dry cloth or rinse it with water.
. Do not soak it in water for more than two hours.
. Dry it well in shade.
procedure in reverse. Close the front panel se- r.................................. "
cureiy and press the positions indicated by the ". J
3. Install the front panel by following the removal J i
arrows.
(Deodorizing filter, black)
Every 3 months:
. Remove dirt by a vacuum cleaner, or soak the framed filter in lukewarm
water 86 to 104°F [30 to 40°C] for about 15 minutes. Rinse well.
. After washing, dry it well in shade.
. Deodorizing feature recovers by cleaning the filter.
When dirt or smell cannot be removed by cleaning:
. Replace it with a new air cleaning filter.
. Parts Number_
* Clean the filters regularly for best performance and to
reduce power consumption,
* Dirty filters cause condensation in the air conditioner
which will contribute to the growth of fungi such as
mold. it is therefore recommended to clean air filters
every 2 weeks.
En-ll
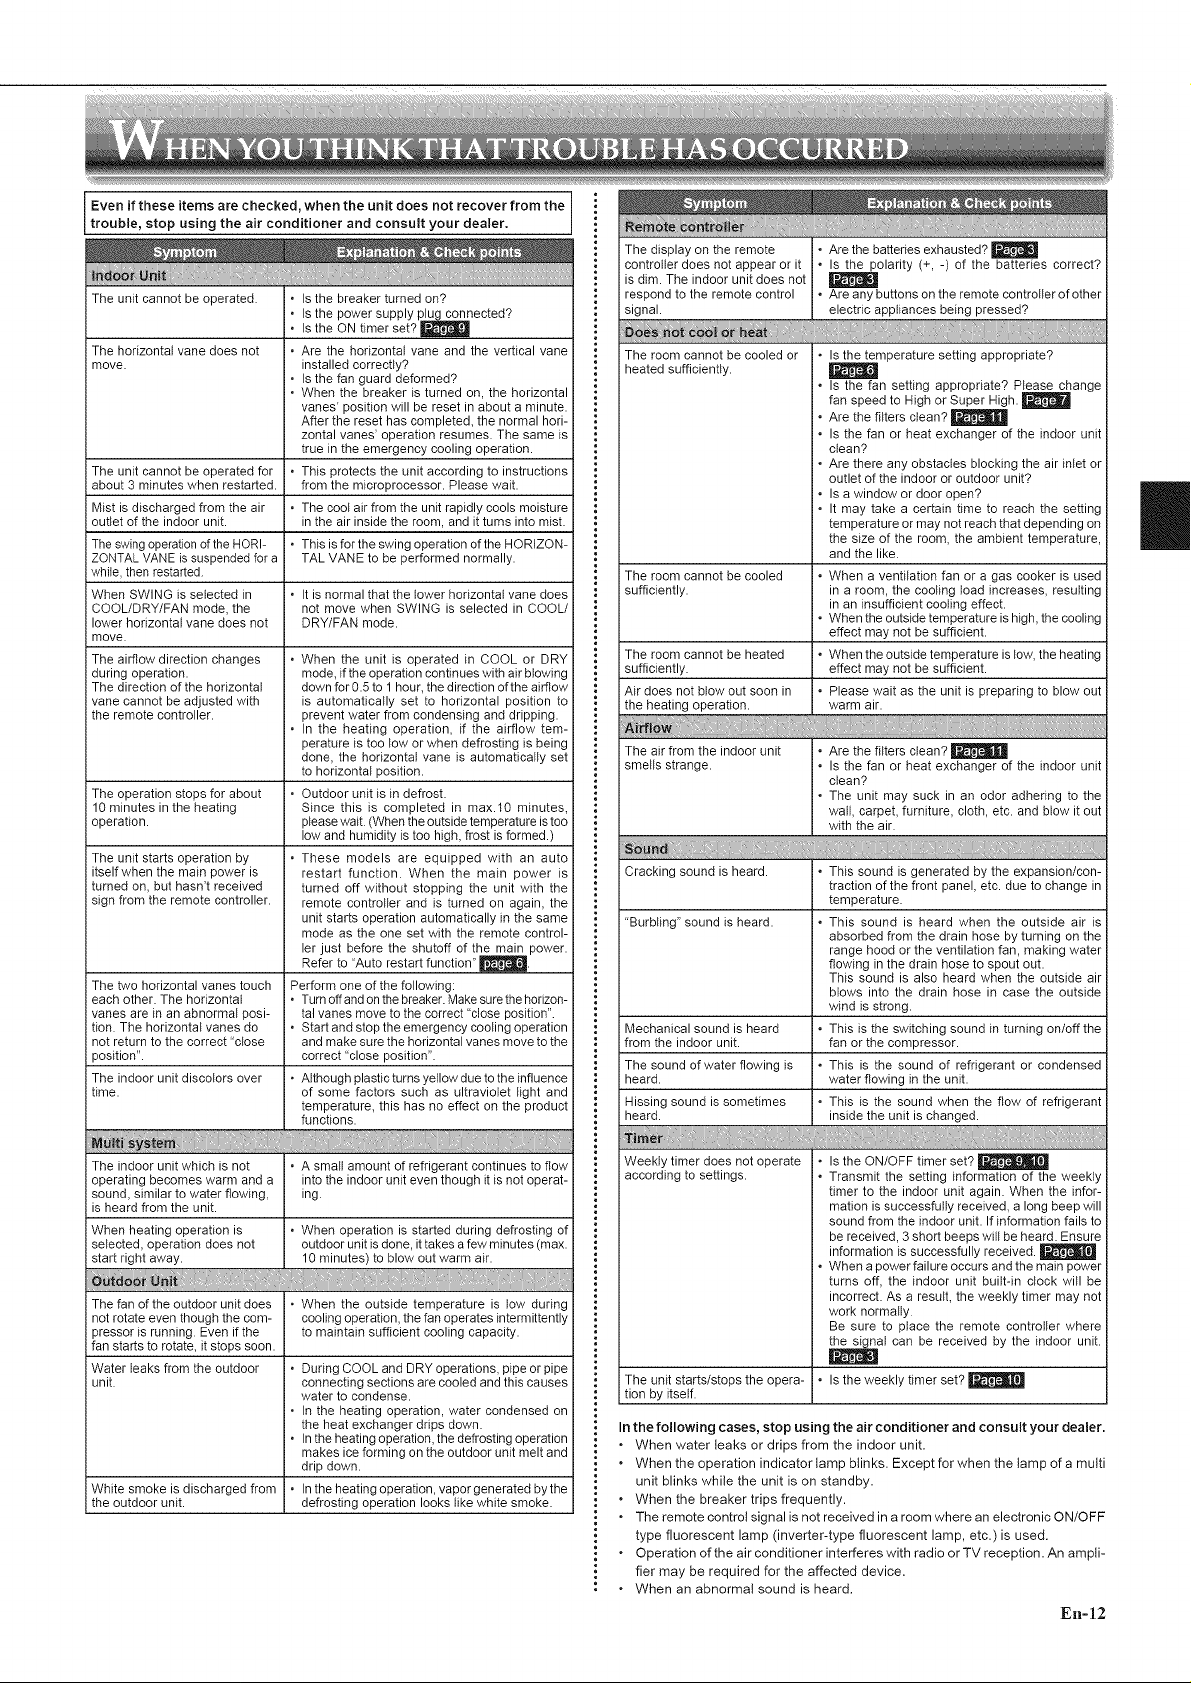
Even if these items are checked, when the unit does not recover from the
trouble, stop using the air conditioner and consult your dealer.
The unit cannot be operated, i • Is the breaker turned on?
I,
Is the power supply plug connected?
Is the ON timer set? |
The horizontal vane does not
move.
The unit cannot be operated for
about 3 minutes when restarted.
Mist is discharged from the air
outlet of the indoor unit.
The swing operationofthe HORI-
ZONTAL VANE is suspended for a
while, then restarted.
When SWING is selected in
COOL/DRY/FAN mode, the
lower horizontal vane does not
move.
The airflow direction changes
during operation.
The direction of the horizontal
vane cannot be adjusted with
the remote controller.
The operation stops for about
10 minutes in the heating
operation.
The unit starts operation by
itself when the main power is
turned on, but hasn't received
sign from the remote controller.
i.
Are the horizontal vane and the vertical vane
installed correctly?
Is the fan guard deformed?
When the breaker is turned on, the horizontal
vanes' position will be reset in about a minute.
After the reset has completed, the normal hori-
zontal vanes' operation resumes. The same is
true in the emergency cooling operation.
This protects the unit according to instructions
from the microprocessor. Please wait.
i.
The coot air from the unit rapidly cools moisture
in the air inside the room, and it turns into mist.
i.
This is for the swing operation of the HORIZON-
TAL VANE to be performed normally.
It is normal that the lower horizontal vane does
not move when SWING is selected in COOL/
DRY/FAN mode.
i" When the unit is operated in COOL or DRY
mode, if theoperation continues with air blowing
down for0.5 to 1hour, the direction of the airflow
is automatically set to horizontal position to
prevent water from condensing and dripping.
,. In the heating operation, if the airflow tem-
perature is too tow or when defrosting is being
done, the horizontal vane is automatically set
to horizontal position.
i • Outdoor unit is in defrost.
Since this is completed in max.10 minutes
please wait. (When the outside temperature is too
low and humidity is too high, frost is formed.)
i" These models are equipped with an auto
restart function. When the main power is
turned off without stopping the unit with the
remote controller and is turned on again, the
unit starts operation automatically in the same
mode as the one set with the remote control-
ler just before the shutoff of the main power.
Refer to "Auto restart function" _L_.
The two horizontal vanes touch
each other. The horizontal
vanes are in an abnormal posi-
tion. The horizontal vanes do
not return to the correct "close
position".
The indoor unit discolors over
time.
Perform one of the following:
i" Turn off and on thebreaker.Make sure the horizon-
tal vanes move to the correct "close position".
i • Start and stop the emergency cooling operation
and make sure the horizontal vanes move to the
correct "close position".
i " Although plastic turns yellow dueto theinfluence
of some factors such as ultraviolet light and
temperature, this has no effect on the product
functions.
The display on the remote • Are the batteries exhausted?
controller does not appear or it • Is the polarity (+, -) of the batteries correct?
is dim. The indoor unit does not
respond to the remote control • Are any buttons on the remote controller of other
signal, electric appliances being pressed?
The room cannot be cooled or • Is the temperature setting appropriate?
heated sufficiently.
• Is the fan setting appropriate? Please change
fan speed to High or Super High.
• Are the filters clean?
• Is the fan or heat exchanger of the indoor unit
clean?
• Are there any obstacles blocking the air inlet or
outlet of the indoor or outdoor unit?
• Is awindow or door open?
• It may take a certain time to reach the setting
temperature or may not reach that depending on
the size of the room, the ambient temperature,
and the like.
The room cannot be cooled • When a ventilation fan or a gas cooker is used
sufficiently, in a room, the cooling toad increases, resulting
The room cannot be heated • When the outside temperature is low, the heating
sufficiently, effect may not be sufficient.
Air does not blow out soon in • Please wait as the unit is preparing to blow out
the heating operation, warm air.
in an insufficient cooling effect.
• When theoutside temperature ishigh, the cooling
effect may not be sufficient.
The air from the indoor unit • Are the filters clean?
smells strange. • Is the fan or heat exchanger of the indoor unit
clean?
• The unit may suck in an odor adhering to the
wall, carpet, furniture, cloth, etc. and blow it out
with the air.
Cracking sound is heard. • This sound is generated by the expansion/con-
traction of the front panel, etc. due to change in
temperature.
"Burbling" sound is heard. • This sound is heard when the outside air is
absorbed from the drain hose by turning on the
range hood or the ventilation fan, making water
flowing in the drain hose to spout out.
This sound is also heard when the outside air
blows into the drain hose in case the outside
wind is strong.
Mechanical sound is heard • This is the switching sound in turning on/off the
from the indoor unit. fan or the compressor.
The sound of water flowing is • This is the sound of refrigerant or condensed
heard, water flowing in the unit.
Hissing sound is sometimes • This is the sound when the flow of refrigerant
heard, inside the unit is changed.
The indoor unit which is not
operating becomes warm and a
sound, similar to water flowing,
is heard from the unit.
When heating operation is
selected, operation does not
start right away. _ 10 minutes) to blow out warmair:
The fan of theoutdoor unit does
not rotate even though the com-
pressor is running. Even ifthe
fan starts to rotate, it stops soon.
Water leaks from the outdoor
unit.
White smoke is discharged from
the outdoor unit.
i • A small amount of refrigerant continues to flow
into the indoor unit even though it is not operat-
ing.
i " When operation is started during defrosting of
outdoor unit isdone, ittakes a few minutes (max.
i" When the outside temperature is tow during
cooling operation, the fan operates intermittently
to maintain sufficient cooling capacity.
i " During COOL and DRY operations, pipe or pipe
connecting sections are cooled and this causes
water to condense.
• In the heating operation, water condensed on
the heat exchanger drips down.
_. Inthe heating operation, the defrosting operation
makes ice forming on the outdoor unit melt and
drip down.
i" Inthe heating operation, vapor generated by the
defrosting operation looks like white smoke.
Weekly timer does not operate • Is the ON/OFF timer set?
according to settings. • Transmit the setting information of the weekly
timer to the indoor unit again. When the infor-
mation is successfully received, a long beep will
sound from the indoor unit. If information fails to
be received, 3 short beeps will be heard. Ensure
information is successfully received.
• When apower failure occurs and the main power
turns off, the indoor unit built-in clock will be
incorrect. As a result, the weekly timer may not
work normally.
Be sure to place the remote controller where
the signal can be received by the indoor unit.
tion by itself.
• Is the weekly timer set?The unit starts/stops the opera-
In the following cases, stop using the air conditioner and consult your dealer.
. When water leaks or drips from the indoor unit.
. When the operation indicator tamp blinks. Except for when the lamp of a multi
unit blinks while the unit is on standby.
. When the breaker trips frequently.
. The remote control signal is not received in aroom where an electronic ON/OFF
type fluorescent lamp (inverter-type fluorescent lamp, etc.)is used.
. Operation of the air conditioner interferes with radio or TV reception. An ampli-
fier may be required for the affected device.
. When an abnormal sound is heard.
En-12
 Loading...