

Page 1
SPLIT-TYPE AIR CONDITIONERS
INDOOR UNIT
MSZ-AP60VG MSZ-AP71VG
MSZ-AP60VGK MSZ-AP71VGK
OPERATING INSTRUCTIONS
English
ИНСТРУКЦИИ ПО ЭКСПЛУАТАЦИИ
Русский
ПАЙДАЛАНУ БОЙЫНША НҰСҚАУЛЫҚ
Қазақ
ՇԱՀԱԳՈՐԾՄԱՆ ՁԵՌՆԱՐԿ
Հայերեն
ІНСТРУКЦІЇ З ЕКСПЛУАТАЦІЇ
Українська
Page 2
EN
● OPERATING INSTRUCTIONS ●
ENGLISH IS ORIGINAL
CONTENTS
■ SAFETY PRECAUTIONS 1
■ DISPOS
■ NAME OF EACH PART 4
■ PREPARATION BEFORE OPERATION 5
■ SELECTING OPERATION MODES 6
■ FAN SPEED AND AIRFLOW DIRECTION ADJUSTMENT 7
■ LONG OPERATION 8
■ POWERFUL OPERATION 8
■ I-SAVE OPERATION 8
■ ECONO COOL OPERATION 9
■ NIGHT MODE OPERATION 9
■ TIMER OPERATION (ON/OFF TIMER) 10
■ EMERGENCY OPERATION 10
■ AUTO RESTART FUNCTION 10
■ WEEKLY TIMER OPERATION 11
■ CLEANIN
■ Wi-Fi INTERFACE SETTING UP (VGK TYPE ONLY) 13
■ WHEN YOU THINK THAT TROUBLE HAS OCCURRED 14
■ WHEN THE AIR CONDITIONER IS NOT GOING TO BE USED FOR A LONG TIME 15
■ INSTALLATION PLACE AND ELECTRICAL WORK 15
■ SPECIFICATIONS 16
AL 3
G 12
SAFETY PRECAUTIONS
Meanings of symbols displayed on indoor unit and/or outdoor unit
WARNING
(Risk of fi re)
Read the OPERATING INSTRUCTIONS carefully before operation.
Service personnel are required to carefully read the OPERATING INSTRUCTIONS and INSTALLATION MANUAL before operation.
Further information is available in the OPERATING INSTRUCTIONS, INSTALLATION MANUAL, and the like.
• Since rotating parts and parts which could cause an electric shock are used
in this product, be sure to read these “Safety Precautions” before use.
• Since the cautionary items shown here are important for safety, be sure to
observe them.
• After reading this manual, keep it together with the installation manual in a
handy place for easy reference.
Marks and their meanings
WARNING :
CAUTION :
Incorrect handling could cause serious hazard, such as
death, serious injury, etc. with a high probability.
Incorrect handling could cause serious hazard depending
on the conditions.
This unit uses a fl ammable refrigerant.
If refrigerant leaks and comes in contact with fi re or heating part, it will create harmful gas and there is risk of fi re.
Meanings of symbols used in this manual
: Be sure not to do.
: Be sure to follow the instruction.
: Never insert your fi nger or stick, etc.
: Never step onto the indoor/outdoor unit and do not put anything on
them.
: Danger of electric shock. Be careful.
: Be sure to disconnect the power supply plug from the power outlet.
: Be sure to shut off the power.
: Risk of fi re.
: Never touch with wet hand.
: Never splash water on the unit.
EN-1
WARNING
Do not connect the power cord to an intermediate point, use an
extension cord, or connect multiple devices to a single AC outlet.
• This may cause overheating, fi re, or electric shock.
Make sure the power plug is free of dirt and insert it securely into
the outlet.
• A dirty plug may cause fi re or electric shock.
Do not bundle, pull, damage, or modify the power cord, and do not
apply heat or place heavy objects on it.
• This may cause fi re or electric shock.
Do not turn the breaker OFF/ON or disconnect/connect the power
plug during operation.
• This may create sparks, which can cause fi re.
• After the indoor unit is switched OFF with the remote controller, make
sure to turn the breaker OFF or disconnect the power plug.
Do not expose your body directly to cool air for a prolonged length
of time.
• This could be detrimental to your health.
Page 3
To use this unit correctly and safely, be sure to read these operating instructions before use.
SAFETY PRECAUTIONS
The unit should not be installed, relocated, disassembled, altered,
or repaired by the user.
• An improperly handled air conditioner may cause fi re, electric shock,
injury, or water leakage, etc. Consult your dealer.
• If the power supply cord is damaged, it must be replaced by the manufacturer or its service agent in order to avoid a hazard.
When installing, relocating, or servicing the unit, make sure that
no substance other than the specifi ed refrigerant (R32) enters the
refrigerant circuit.
• Any presence of foreign substance such as air can cause abnormal
pressure rise and may result in explosion or injury.
• The use of any refrigerant other than that specifi ed for the system will
cause mechanical failure, system malfunction, or unit breakdown. In the
worst case, this could lead to a serious impediment to securing product
safety.
This appliance is not intended for use by persons (including children)
with reduced physical, sensory or mental capabilities, or lack of experience and knowledge, unless they have been given supervision or
instruction concerning use of the appliance by a person responsible
for their safety.
Children should be supervised to ensure that they do not play with
the appliance.
Do not insert your fi nger, a stick, or other objects into the air inlet
or outlet.
• This may cause injury, since the fan inside rotates at high speeds during
operation.
In case of an abnormal condition (such as a burning smell), stop the
air conditioner and disconnect the power plug or turn the breaker OFF.
• A continued operation in the abnormal state may cause a malfunction,
fi re, or electric shock. In this case, consult your dealer.
When the air conditioner does not cool or heat, there is a possibility of
refrigerant leakage. If any refrigerant leakage is found, stop operations
and ventilate the room well and consult your dealer immediately. If a
repair involves recharging the unit with refrigerant, ask the service
technician for details.
• The refrigerant used in the air conditioner is not harmful. Normally, it
does not leak. However, if refrigerant leaks and comes in contact with
fi re or heating part of such a fan heater, kerosene heater, or cooking
stove, it will create harmful gas and there is risk of fi re.
The user should never attempt to wash the inside of the indoor unit.
Should the inside of the unit require cleaning, contact your dealer.
• Unsuitable detergent may cause damage to plastic material inside
the unit, which may result in water leakage. Should detergent come in
contact with electrical parts or the motor, it will result in a malfunction,
smoke, or fi re.
• The appliance shall be stored in a room without continuously operating
ignition sources (for example: open fl ames, an operating gas appliance
or an operating electric heater).
• Be aware that refrigerants may not contain an odour.
• Do not use means to accelerate the defrosting process or to clean the
appliance, other than those recommended by the manufacturer.
• Do not pierce or burn.
The indoor unit must be installed in rooms which exceed the fl oor
space specifi ed. Please consult your dealer.
This appliance is intended to be used by expert or trained users in
shops, in light industry and on farms, or for commercial use by lay
persons.
CAUTION
Do not touch the air inlet or the aluminum fi ns of the indoor/outdoor
unit.
• This may cause injury.
Do not use insecticides or fl ammable sprays on the unit.
• This may cause a fi re or deformation of the unit.
Do not expose pets or houseplants to direct airfl ow.
• This may cause injury to the pets or plants.
Do not place other electric appliances or furniture under the indoor/
outdoor unit.
• Water may drip down from the unit, which may cause damage or
malfunction.
Do not leave the unit on a damaged installation stand.
• The unit may fall and cause injury.
Do not step on an unstable bench to operate or clean the unit.
• This may cause injury if you fall down.
Do not pull the power cord.
• This may cause a portion of the core wire to break, which may cause
overheating or fi re.
Do not charge or disassemble the batteries, and do not throw them
into a fi re.
•
This may cause the batteries to leak, or cause a fi re or explosion.
Do not operate the unit for more than 4 hours at high humidity (80%
RH or more) and/or with windows or outside door left open.
• This may cause the water condensation in the air conditioner, which
may drip down, wetting or damaging the furniture.
• The water condensation in the air conditioner may contribute to growth
of fungi, such as mold.
Do not use the unit for special purposes, such as storing food,
raising animals, growing plants, or preserving precision devices
or art objects.
• This may cause deterioration of quality, or harm to animals and plants.
Do not expose combustion appliances to direct airfl ow.
• This may cause incomplete combustion.
Never put batteries in your mouth for any reason to avoid accidental
ingestion.
• Battery ingestion may cause choking and/or poisoning.
Before cleaning the unit, switch it OFF and disconnect the power plug
or turn the breaker OFF.
• This may cause injury, since the fan inside rotates at high speeds during
operation.
When the unit will be unused for a long time, disconnect the power
plug or turn the breaker OFF.
• The unit may accumulate dirt, which may cause overheating or fi re.
Replace all batteries of the remote controller with new ones of the
same type.
• Using an old battery together with a new one may cause overheating,
leakage, or explosion.
If the battery fl uid comes in contact with your skin or clothes, wash
them thoroughly with clean water.
•
If the battery fl uid comes in contact with your eyes, wash them thoroughly
with clean water and immediately seek medical attention.
Ensure that the area is well-ventilated when the unit is operated
together with a combustion appliance.
• Inadequate ventilation may cause oxygen starvation.
Turn the breaker OFF when you hear thunder and there is a possibility
of a lightning strike.
• The unit may be damaged if lightning strikes.
After the air conditioner is used for several seasons, perform inspection and maintenance in addition to normal cleaning.
• Dirt or dust in the unit may create an unpleasant odor, contribute to
growth of fungi, such as mold, or clog the drain passage, and cause
water to leak from the indoor unit. Consult your dealer for inspection
and maintenance, which require specialized knowledge and skills.
Do not operate switches with wet hands.
• This may cause electric shock.
Do not clean the air conditioner with water or place an object that
contains water, such as a fl ower vase, on it.
• This may cause fi re or electric shock.
Do not step on or place any object on the outdoor unit.
• This may cause injury if you or the object falls down.
IMPORTANT
Dirty fi lters cause condensation in the air conditioner which will contribute to the
growth of fungi such as mold. It is therefore recommended to clean air fi lters every
2 weeks.
Before starting the operation, ensure that the horizontal vanes are in the closed position. If operation starts when the horizontal vanes are in the open position, they may
not return to the correct position.
EN
EN-2
Page 4
● OPERATING INSTRUCTIONS ●
SAFETY PRECAUTIONS
EN
For installation
WARNING
Consult your dealer for installing the air conditioner.
• It should not be installed by the user since installation requires specialized
knowledge and skills. An improperly installed air conditioner may cause
water leakage, fi re, or electric shock.
Provide a dedicated power supply for the air conditioner.
• A non-dedicated power supply may cause overheating or fi re.
Do not install the unit where fl ammable gas could leak.
• If gas leaks and accumulates around the outdoor unit, it may cause an
explosion.
Earth the unit correctly.
• Do not connect the earth wire to a gas pipe, water pipe, lightning rod, or
a telephone earth wire. Improper earthing may cause electric shock.
CAUTION
Install an earth leakage breaker depending on the installation location
of the air conditioner (such as highly humid areas).
• If an earth leakage breaker is not installed, it may cause electric shock.
Ensure that the drain water is properly drained.
• If the drain passage is improper, water may drip down from the indoor/
outdoor unit, wetting and damaging the furniture.
In case of an abnormal condition
Immediately stop operating the air conditioner and consult your dealer.
For Wi-Fi interface
WARNING
(Improper handling may have serious consequences, including serious
injury or death.)
This appliance can be used by children aged from 8 years and above
and persons with reduced physical, sensory or mental capabilities or
lack of experience and knowledge if they have been given supervision or instruction concerning use of the appliance in a safe way and
understand the hazards involved.
Children shall not play with the appliance. Cleaning and user maintenance shall not be made by children without supervision.
Do not use the Wi-Fi interface nearby the medical electrical equipment
or people who have a medical device such as a cardiac pacemaker
or an implantable cardioverter-defi brillator.
• It can cause an accident due to malfunctions of the medical equipment
or device.
Do not install the Wi-Fi interface nearby the automatic control devices
such as automatic doors or fi re alarms.
• It can cause accidents due to malfunctions.
Do not touch the Wi-Fi interface with wet hands.
• It can cause damage to the device, electric shock, or fi re.
Do not splash water on the Wi-Fi interface or use it in a bathroom.
• It can cause damage to the device, electric shock, or fi re.
When the Wi-Fi interface is dropped, or the holder or cable is damaged, disconnect the power supply plug or turn the breaker OFF.
• It may cause fi re or electric shock. In this case, consult your dealer.
CAUTION
(Improper handling may have consequences, including injury or damage
to building.)
Do not step on unstable stepstool to set up or clean the Wi-Fi interface.
• It may cause injury if you fall down.
Do not use the Wi-Fi interface nearby other wireless devices, microwaves, cordless phones, or facsimiles.
• It can cause malfunctions.
DISPOSAL
To dispose of this product, consult your dealer.
Note:
This symbol mark is for EU countries only.
This symbol mark is according to the directive 2012/19/
EU Article 14 Information for users and Annex IX, and/
or to the directive 2006/66/EC Article 20 Information for
end-users and Annex II.
Fig. 1
Your MITSUBISHI ELECTRIC product is designed and manufactured with high
quality materials and components which can be recycled and/or reused.
This symbol means that electrical and electronic equipment, batteries and
accumulators, at their end-of-life, should be disposed of separately from your
household waste.
If a chemical symbol is printed beneath the symbol (Fig. 1), this chemical symbol means that the battery or accumulator contains a heavy metal at a certain
concentration. This will be indicated as follows:
Hg: mercury (0.0005%), Cd: cadmium (0.002%), Pb: lead (0.004%)
In the European Union there are separate collection systems for used electrical
and electronic products, batteries and accumulators.
Please, dispose of this equipment, batteries and accumulators correctly at your
local community waste collection/recycling centre.
Please, help us to conserve the environment we live in!
EN-3
Page 5
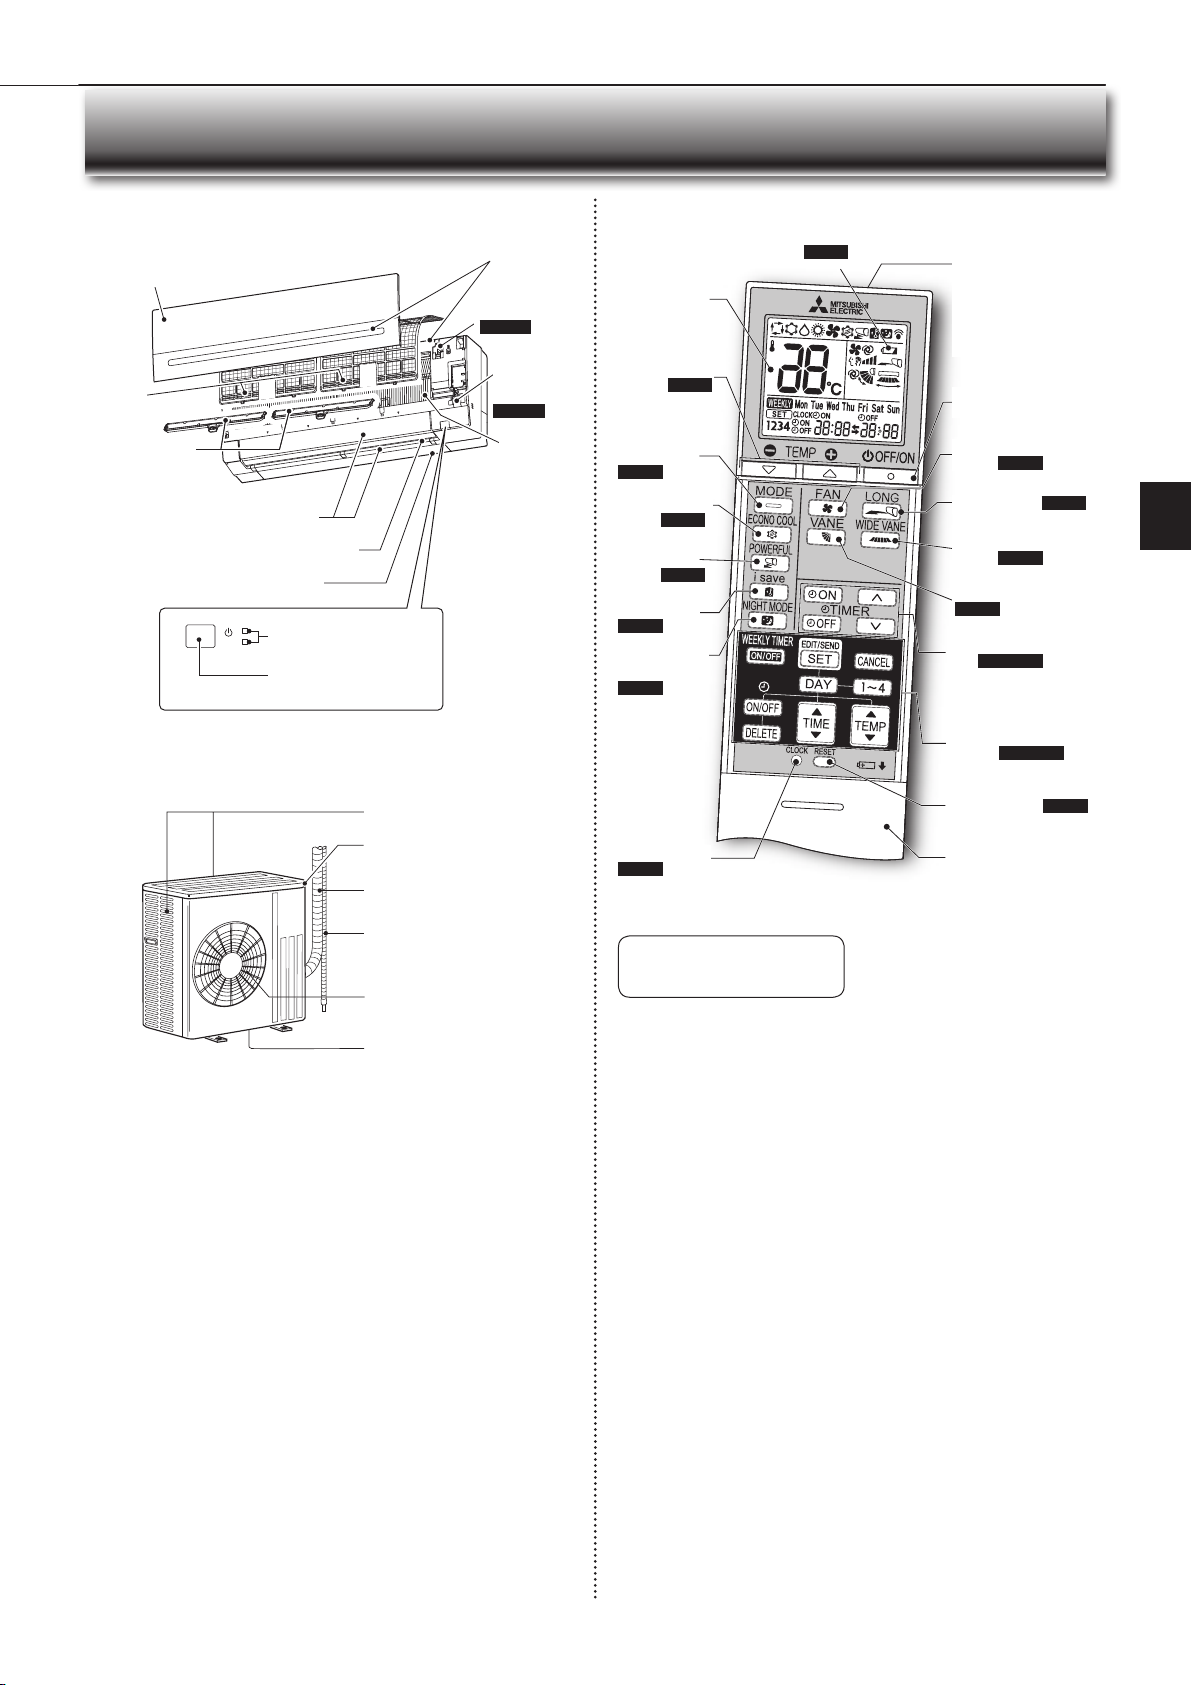
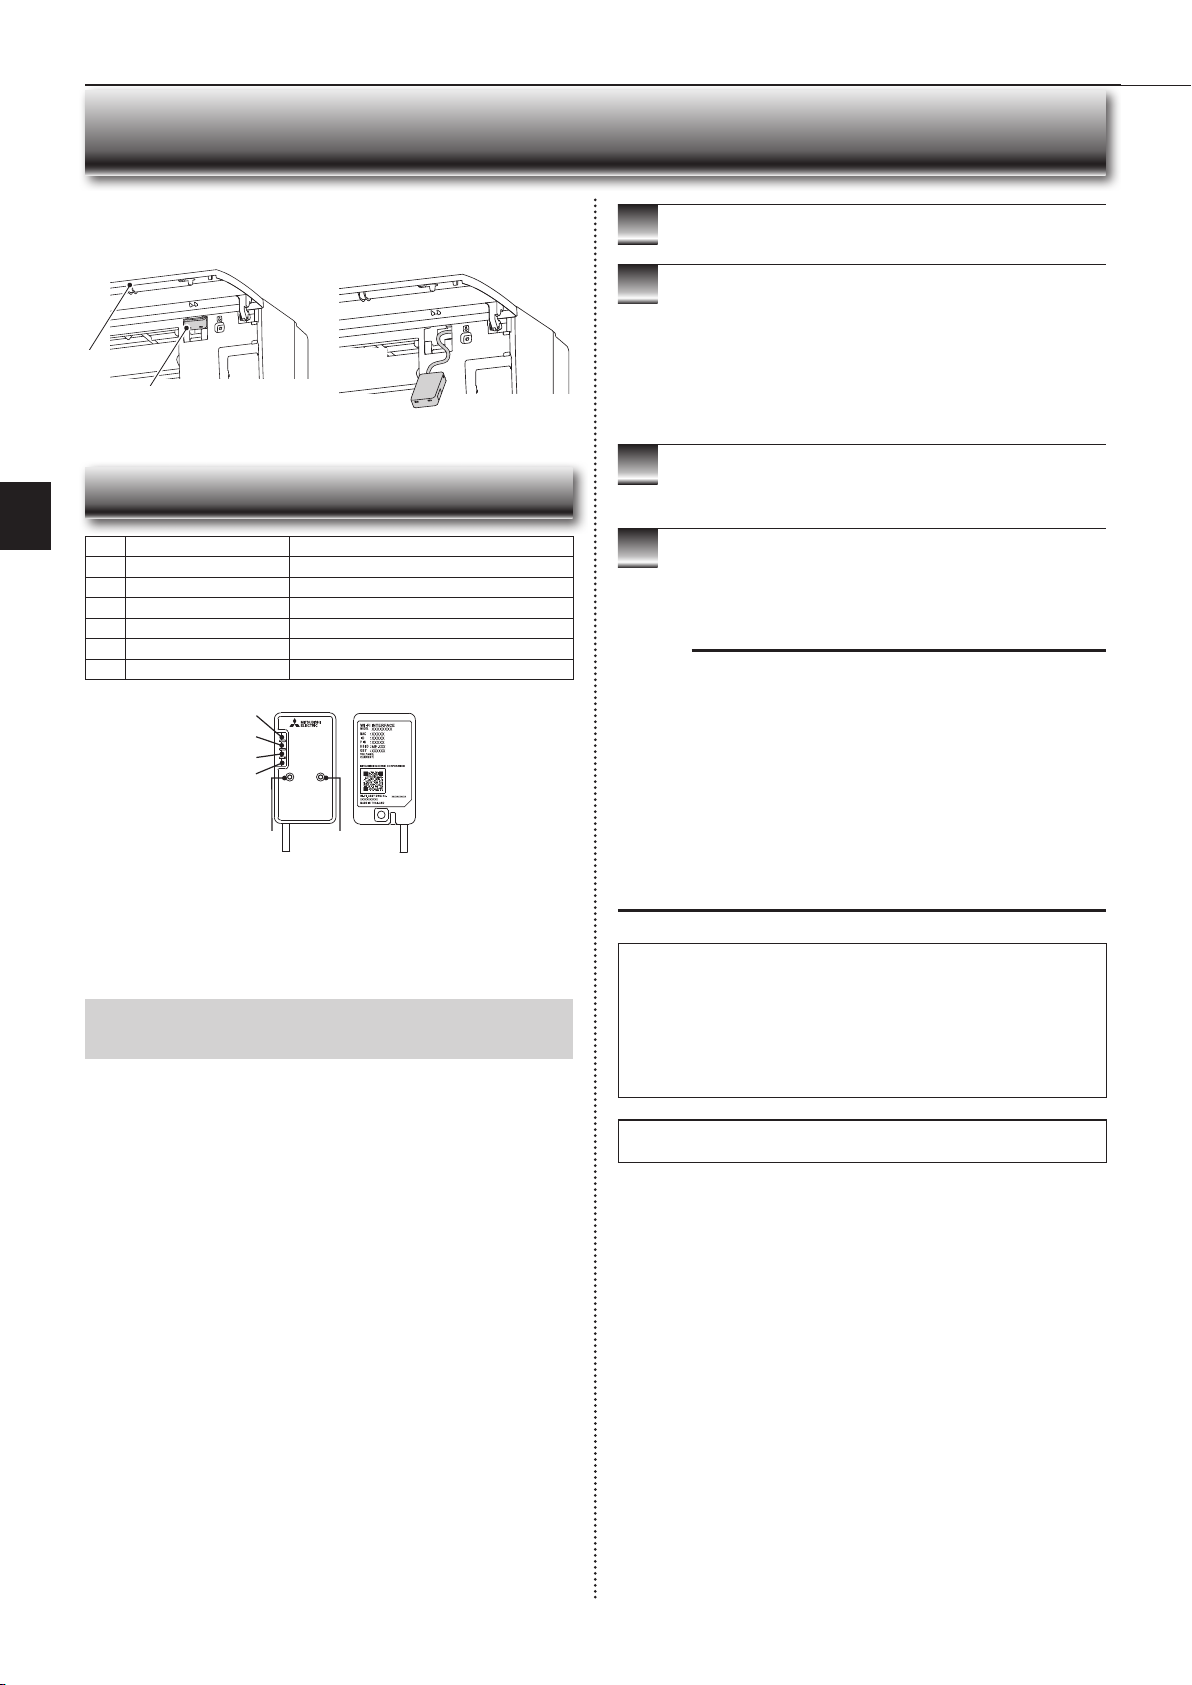
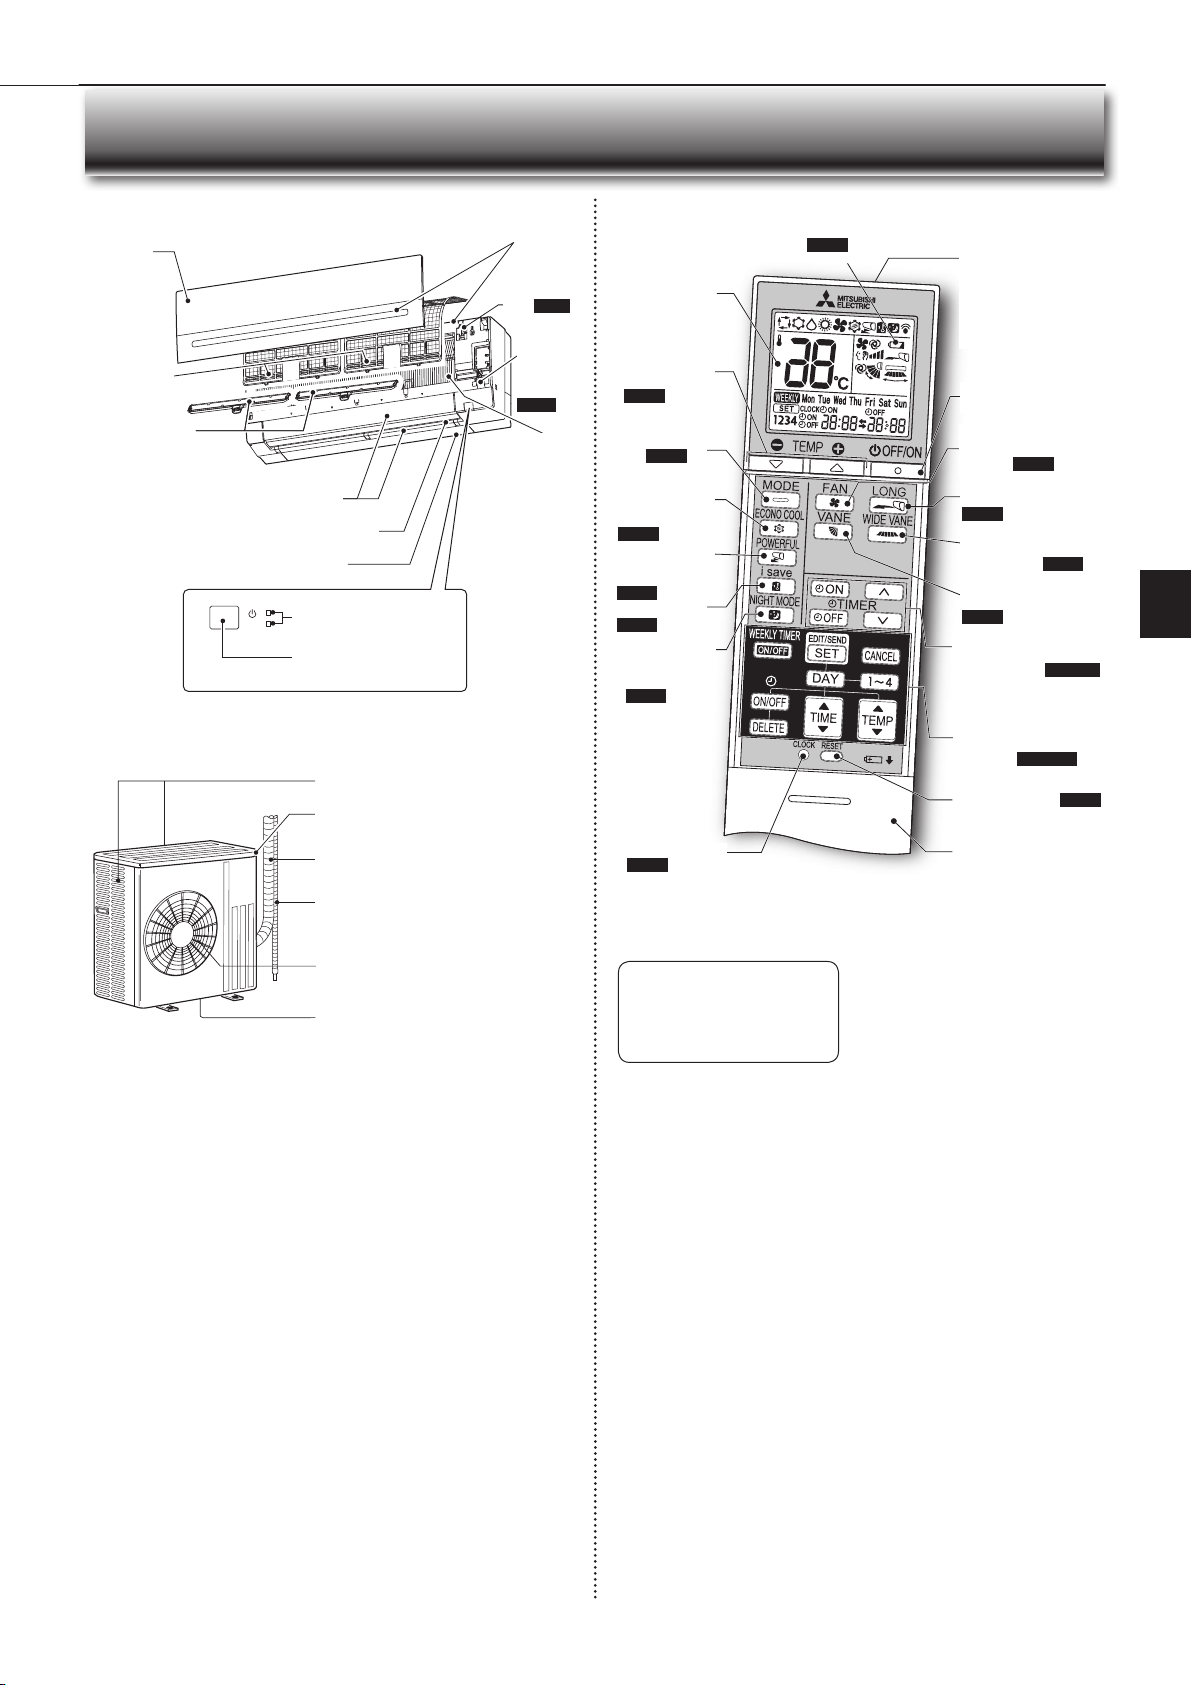
NAME OF EACH PART
Indoor unit Remote controller
Front panel
Air fi lter
Air cleaning fi lter
(Silver-ionized
air purifi er fi lter,
option)
Horizontal vane
Air outlet
Spec name plate *1
Operation indicator lamp
Remote control receiving
section
Outdoor unit
Outdoor units may be different in appearance.
Air inlet
Wi-Fi interface
Page 13
Emergency
operation
switch
Page 10
Air inlet (back and side)
Spec name plate *1
Refrigerant piping
Drainage hose
Air outlet
Drain outlet
Heat
exchanger
Battery replacement indicator Page 5
Operation dis-
play section
Temperature
Page 6
buttons
Operation
select button
Page 6
ECONO COOL
Page 9
button
POWERFUL
Page 8
button
i-save button
Page 8
NIGHT MODE
button
Page 9
CLOCK button
Page 5
Remote controller
When the remote controller is not used,
place it near this unit.
Signal transmitting
section
Distance of signal :
About 6 m
Beep(s) is (are) heard from
the indoor unit when the
signal is received.
OFF/ON (stop/operate)
button
FAN speed control
Page 7
button
LONG button Page 8
WIDE VANE
Page 7
button
VANE control button
Page 7
TIME, TIMER set but-
tons
Page 5, 10
Increase time
Decrease time
WEEKLY TIMER set
Page 5, 11
buttons
RESET button Page 5
Lid
Slide the lid down
to open the remote
controller. Slide it down
further to get to the
weekly timer buttons.
Only use the remote controller provided
with the unit.
Do not use other remote controllers.
If 2 or more indoor units are installed in
proximity to one another, an indoor unit
that is not intended to be operated may
respond to the remote controller.
EN
*1 The manufacturing year and month is indicated on the spec name plate.
EN-4
Page 6
● OPERATING INSTRUCTIONS ●
PREPARATION BEFORE OPERATION
EN
Before operation: Insert the power supply plug into the power outlet and/or
turn the breaker on.
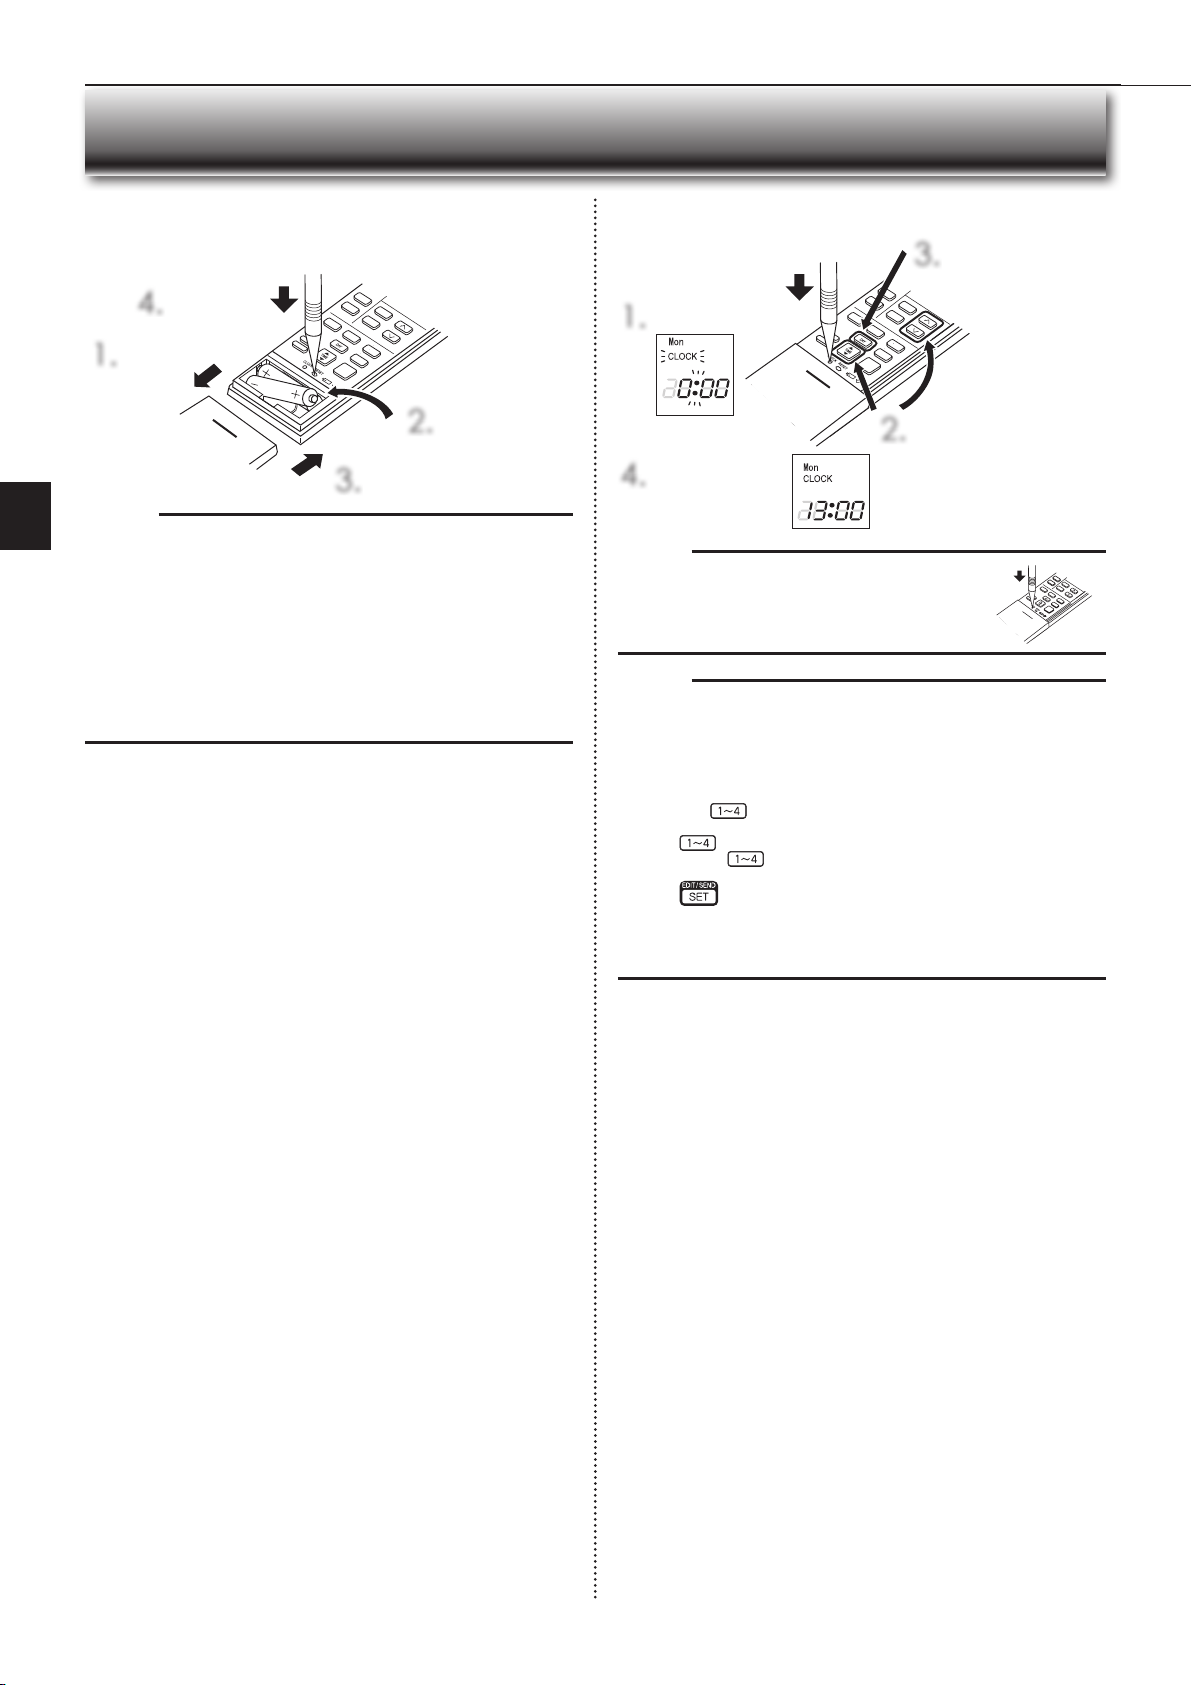
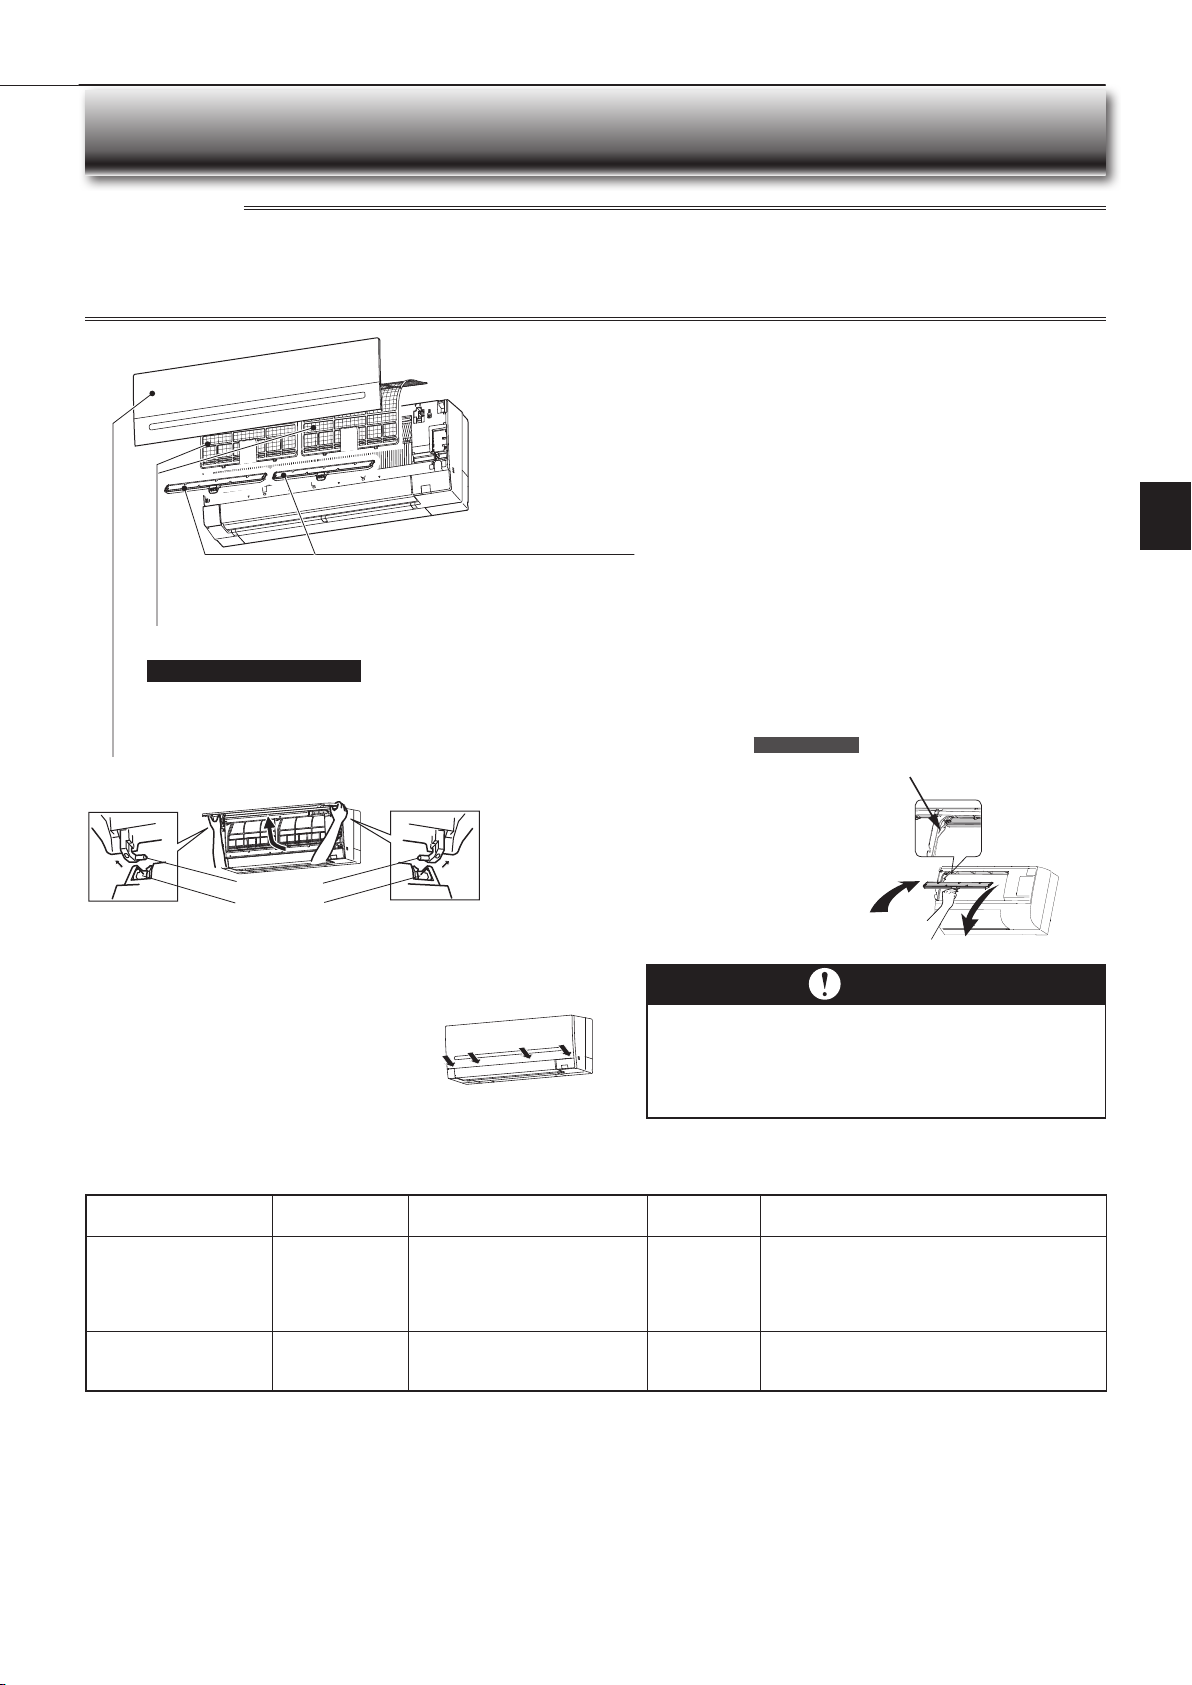
Installing the remote controller batteries
Press RESET.
4.
Remove the front lid.
1.
Insert the negative
2.
pole of AAA alkaline
batteries fi rst.
Install the front lid.
3.
Note:
• Make sure the polarity of the batteries is correct.
• Do not use manganese batteries and leaking batteries. The remote controller
could malfunction.
• Do not use rechargeable batteries.
• The battery replacement indicator lights up when the battery is running low.
In about 7 days after the indicator starts lights up, the remote controller stops
working.
• Replace all batteries with new ones of the same type.
• Batteries can be used for approximately 1 year. However, batteries with expired shelf lives last shorter.
• Press RESET gently using a thin instrument.
If the RESET button is not pressed, the remote controller may not operate
correctly.
Setting current time
Press the DAY button
3.
to set the day.
Press CLOCK.
1.
Press either the TIME button
2.
or the TIMER buttons to set
Press CLOCK again.
4.
Note:
• Press CLOCK gently using a thin instrument.
Note:
How to set remote controller exclusively for a particular indoor unit
A maximum of 4 indoor units with wireless remote controllers can be used in
a room.
To operate the indoor units individually with each remote controller, assign a
number to each remote controller according to the number of the indoor unit.
This setting can be set only when all the following conditions are met:
• The remote controller is powered OFF.
(1) Hold down
pairing mode.
(2) Press
Each press of
2 → 3 → 4.
(3) Press
After you turn the breaker ON, the remote controller that fi rst sends a signal
to an indoor unit will be regarded as the remote controller for the indoor unit.
Once they are set, the indoor unit will only receive the signal from the as-
signed remote controller afterwards.
button on the remote controller for 2 seconds to enter the
button again and assign a number to each remote controller.
button advances the number in the following order: 1 →
button to complete the pairing setting.
the time.
Each press increases/decreas-
es the time by 1 minute (10
minutes when pressed longer).
EN-5
Page 7
S
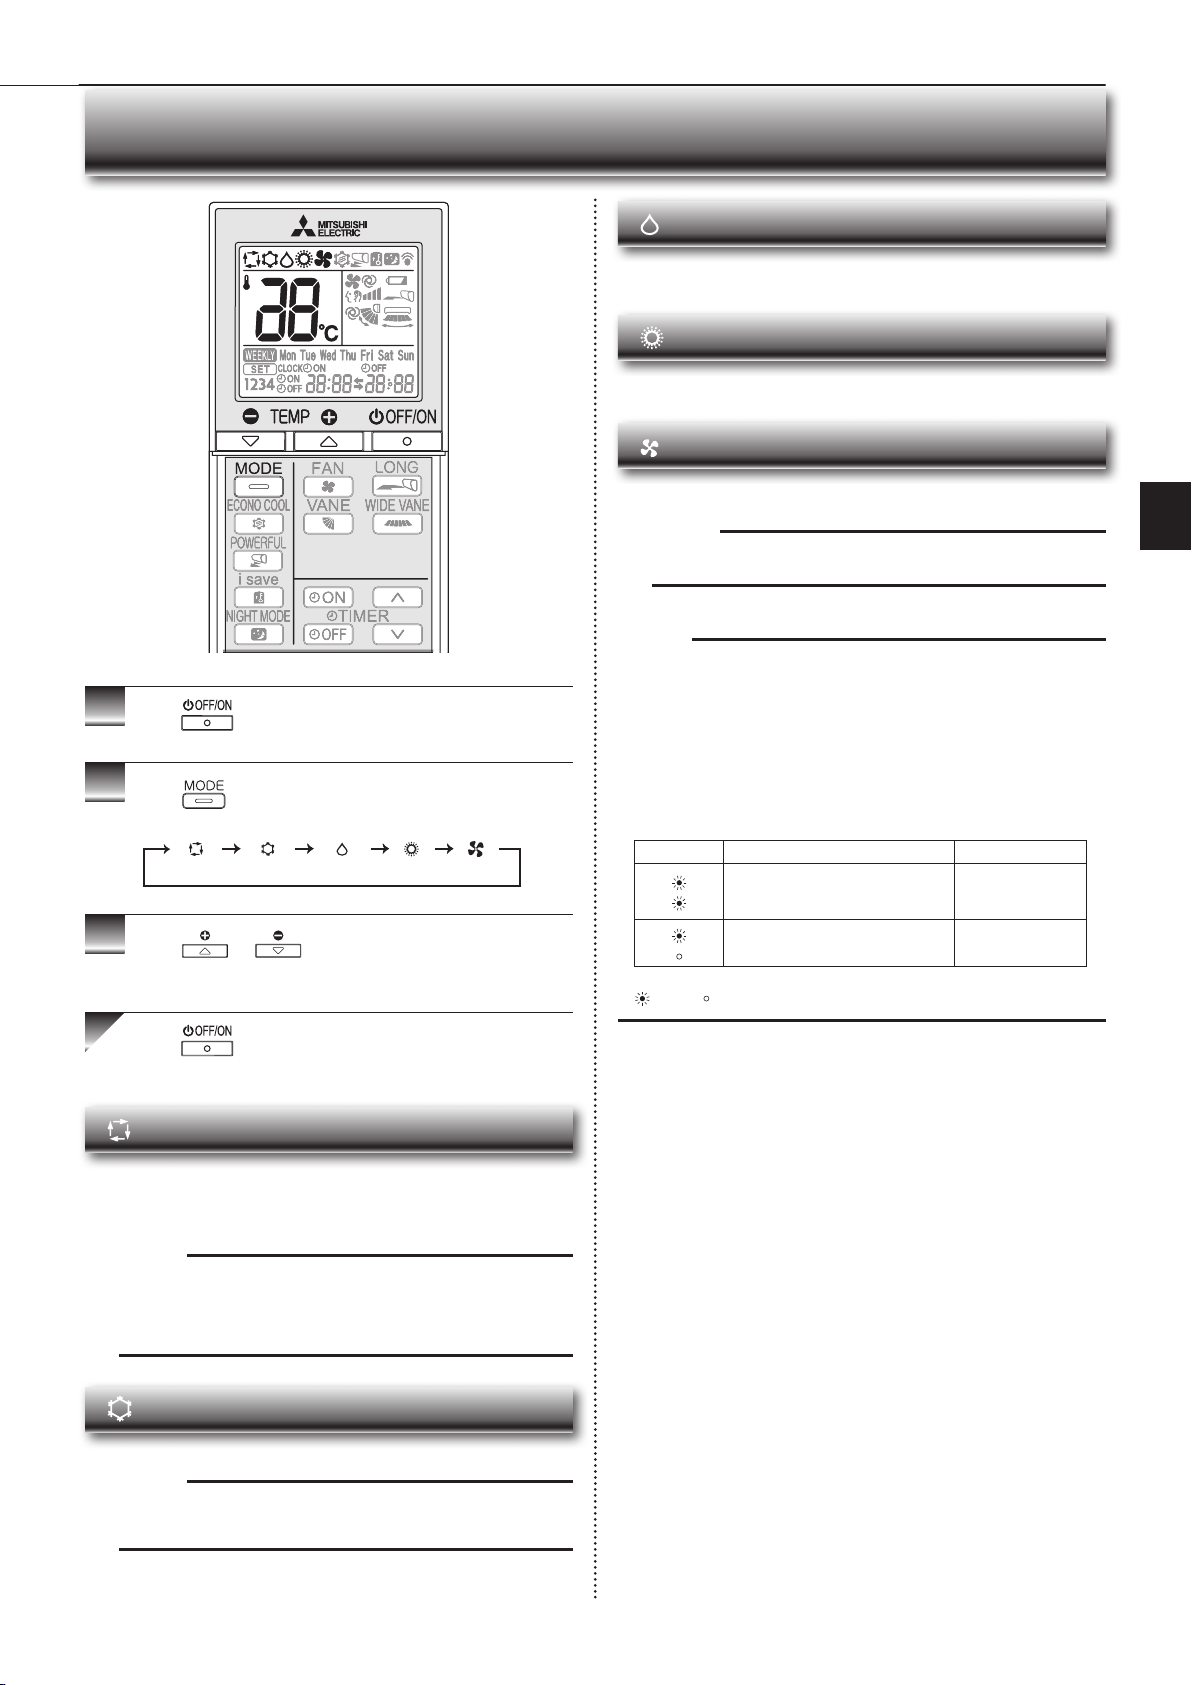
ELECTING OPERATION MODES
1
Press
2
Press to select operation mode. Each press
to start the operation.
changes mode in the following order:
DRY mode
Dehumidify your room. The room may be cooled slightly.
Temperature cannot be set during DRY mode.
HEAT mode
Enjoy warm air at your desired temperature.
FAN mode
Circulate the air in your room.
EN
Note:
After COOL/DRY mode operation, it is recommended to operate in the
FAN mode to dry inside the indoor unit.
Note:
Multi system operation
Two or more indoor units can be operated by one outdoor unit. When several
indoor units are operated simultaneously, cooling/dry/fan and heating operations cannot be done at the same time. When COOL/DRY/FAN is selected with
one unit and HEAT with another or vice versa, the unit selected last goes into
standby mode.
Operation indicator lamp
The operation indicator lamp shows the operation state of the unit.
(AUTO) (COOL) (DRY) (HEAT) (FAN)
3
Press or to set the temperature.
Each press raises or lowers the temperature by 1°C.
Press to stop the operation.
AUTO mode (Auto change over)
The unit selects the operation mode according to the difference between the
room temperature and the set temperature. During AUTO mode, the unit
changes mode (COOL↔HEAT) when the room temperature is about 2°C
away from the set temperature for more than 15 minutes.
Note:
Auto Mode is not recommended if this indoor unit is connected to a MXZ
type outdoor unit. When several indoor units are operated simultaneously,
the unit may not be able to switch operation mode between COOL and
HEAT. In this case, the indoor unit becomes standby mode (Refer to table
of Operation indicator lamp).
COOL mode
Indication Operation state Room temperature
The unit is operating to reach the set
temperature
The room temperature is approaching the set temperature
Lit Not lit
About 2°C or more
away from set temperature
About 1 to 2°C from
set temperature
Enjoy cool air at your desired temperature.
Note:
Do not operate COOL mode at very low outside temperatures (less than
-10°C). Water condensed in the unit may drip and wet or damage furniture, etc.
EN-6
Page 8
EN
● OPERATING INSTRUCTIONS ●
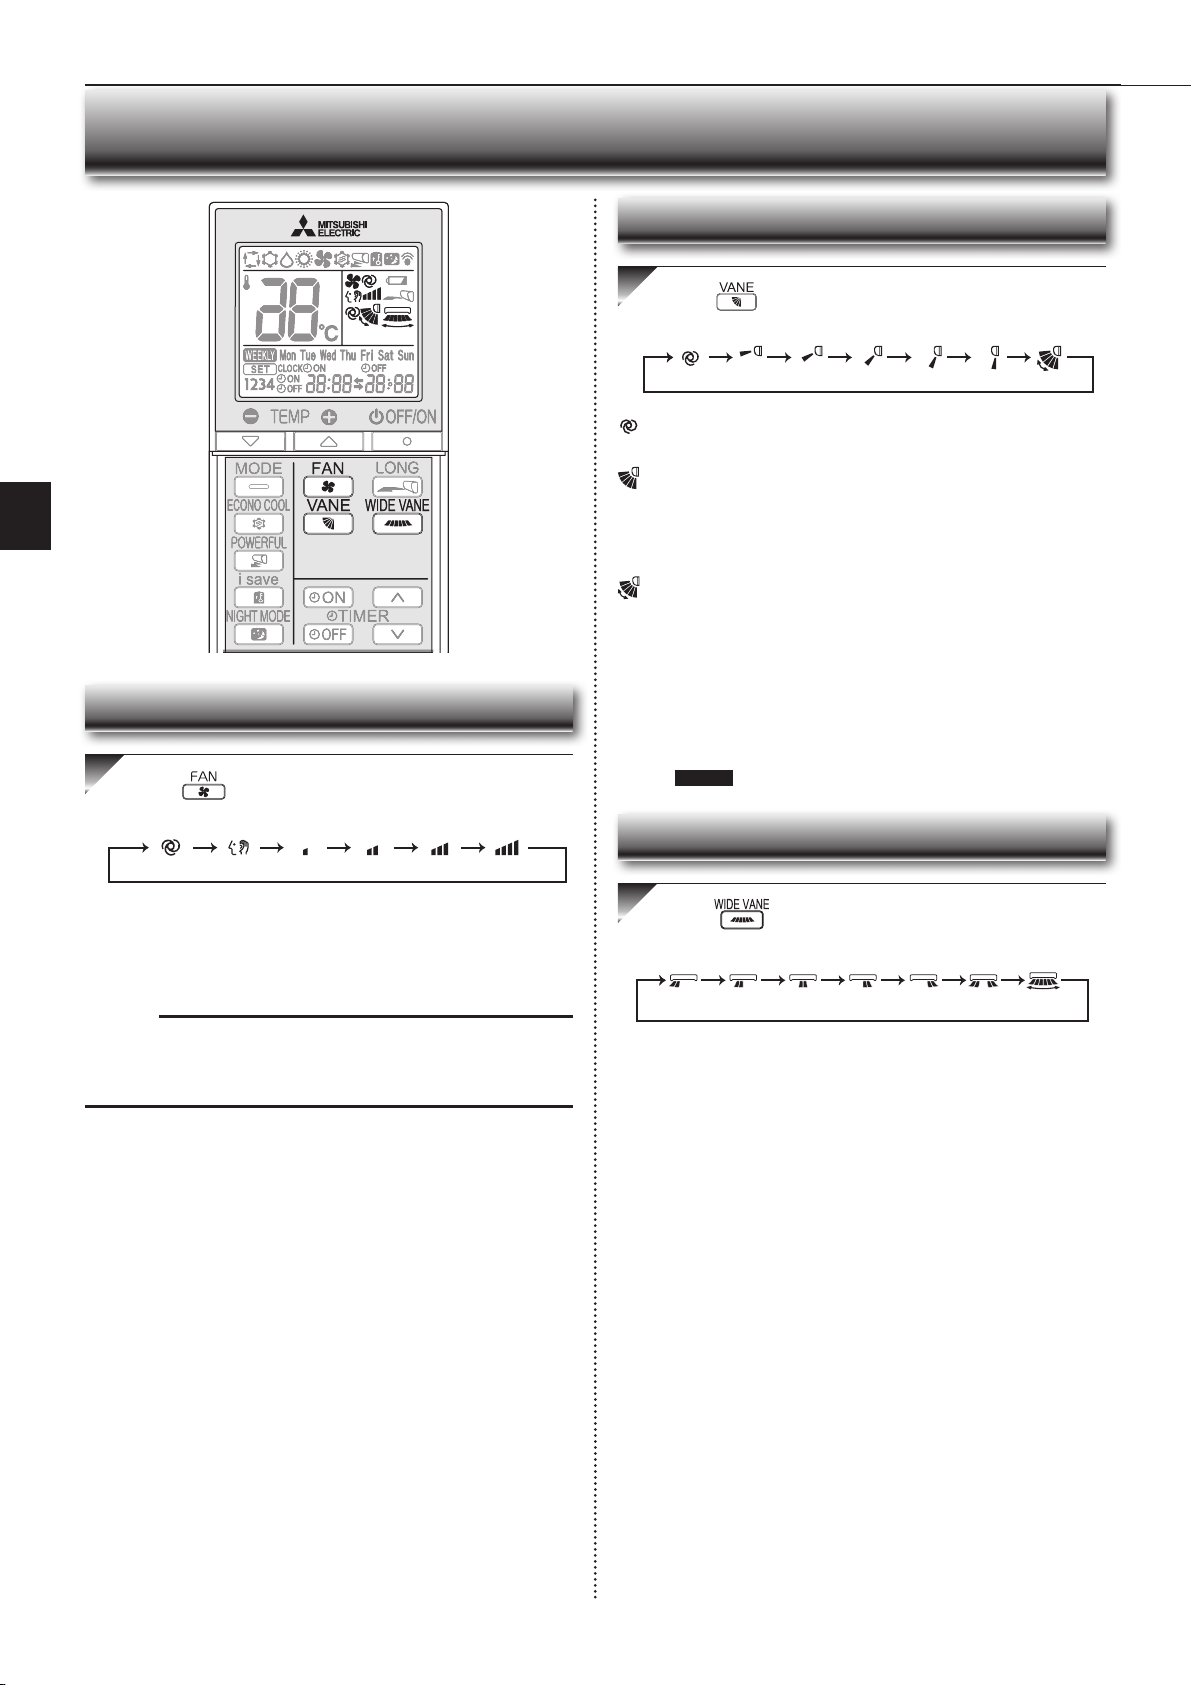
FAN SPEED AND AIRFLOW DIRECTION ADJUSTMENT
Up-down Airflow direction
Press to select airfl ow direction. Each press
changes airfl ow direction in the following order:
(AUTO) (1) (2) (3) (4) (5) (SWING)
(AUTO) .........The vane is set to the most effi cient airfl ow direction. COOL/
DRY/FAN: horizontal position. HEAT: position (4).
(Manual) .......For efficient air conditioning, select the upper position for
COOL/DRY, and the lower position for HEAT. If the lower
position is selected during COOL/DRY, the vane automatically
moves to the upward position after 0.5 to 1 hour to prevent
any condensation from dripping.
(Swing) .........The vane moves up and down intermittently.
• Two short beeps are heard from the indoor unit when set to AUTO.
• Always use the remote controller when changing the direction of airflow. Moving the horizontal vanes with your hands causes them to malfunction.
Fan speed
Press to select fan speed. Each press changes
fan speed in the following order:
(AUTO) (Silent) (Low) (Med.) (High) (Super High)
• When the breaker is turned on, the horizontal vanes’ position will be
reset in about a minute, then the operation will start. The same is true
in the emergency cooling operation.
• When the horizontal vanes seem to be in an abnormal position, see
page 14 .
Left-right Airflow direction
• Two short beeps are heard from the indoor unit when set to AUTO.
• Use higher fan speed to cool/heat the room quicker. It is recommended to lower the fan speed once the room is cool/warm.
• Use lower fan speed for quiet operation.
Note:
Multi system operation
When several indoor units are operated simultaneously by one outdoor unit for
heating operation, the temperature of the airfl ow may be low. In this case, it is
recommended to set the fan speed to AUTO.
Press to select airfl ow direction. Each press
changes airfl ow direction in the following order:
(
SWING
)
EN-7
Page 9
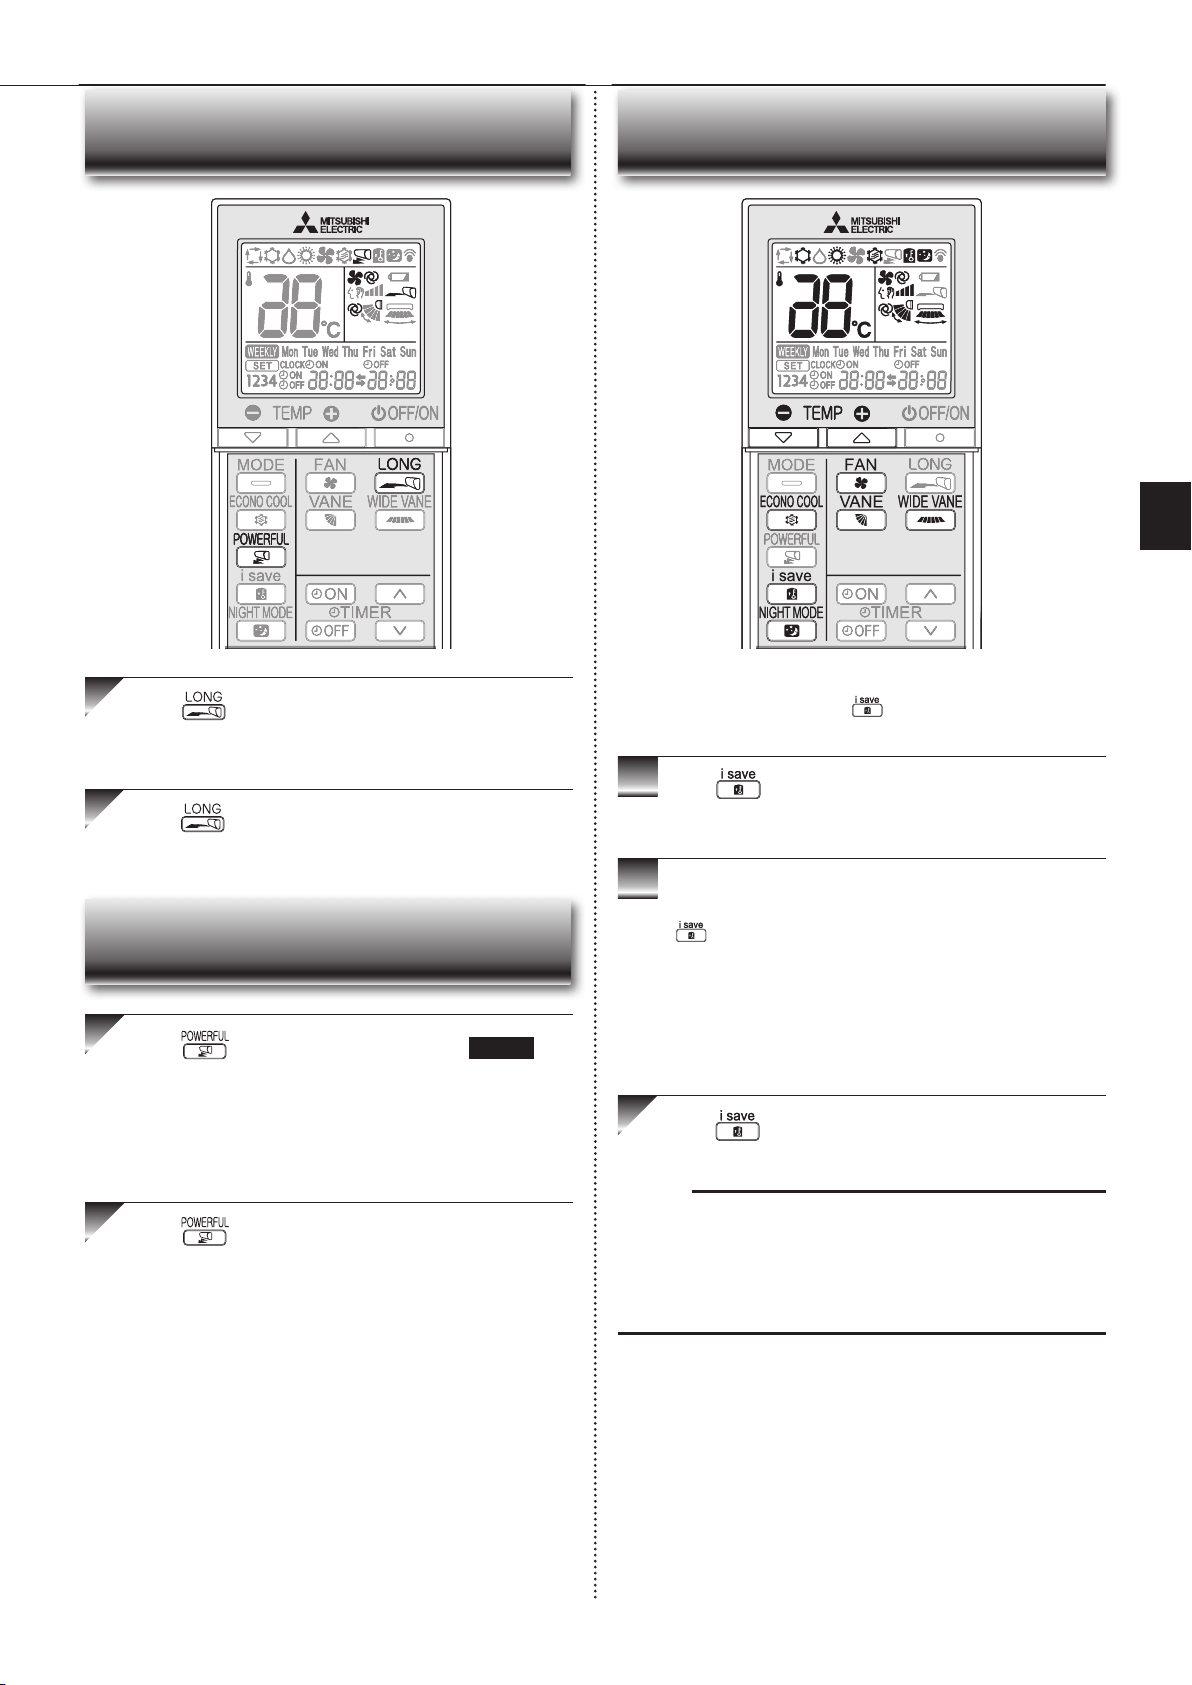
LONG OPERATION
Press to start LONG operation.
• Fan speed increases and the horizontal vane moves to the position for
LONG mode.
• Air reaches to longer distance.
Press again to cancel LONG operation.
• LONG operation is cancelled when the OFF/ON, VANE, or ECONO
COOL button is pressed.
POWERFUL OPERATION
Press
start POWERFUL operation.
during COOL or HEAT mode page 6 to
I-SAVE OPERATION
A simplifi ed set back function enables to recall the preferred (preset)
setting with a single push of the button. Press the button again
and you can go back to the previous setting in an instance.
1
Press during COOL, ECONO COOL, NIGHT
MODE operation, or HEAT mode to select i-save
mode.
2
Set the temperature, fan speed, and airfl ow direction.
• The same setting is selected from the next time by simply pressing
.
• Two settings can be saved. (One for COOL/ECONO COOL, one for
HEAT)
• Select the appropriate temperature, fan speed, and airflow direction
according to your room.
• Normally, the minimum temperature setting in HEAT mode is 16°C.
However, during i-save operation only, the minimum temperature setting is 10°C.
EN
Fan speed : Exclusive speed for POWERFUL mode
Horizontal vane : Set position, or downward airflow position during
AUTO setting
• Temperature cannot be set during POWERFUL operation.
Press again to cancel POWERFUL operation.
• POWERFUL operation also is cancelled automatically in 15 minutes,
or when the OFF/ON, FAN, ECONO COOL or i-save button is pressed.
Press again to cancel i-save operation.
• i-save operation also is cancelled when the MODE button is pressed.
Note:
Example of use:
1. Low energy mode
Set the temperature 2°C to 3°C warmer in COOL and cooler in HEAT mode.
This setting is suitable for unoccupied room, and while you are sleeping.
2. Saving frequently used settings
Save your preferred setting for COOL/ECONO COOL and HEAT. This ena-
bles you to select your preferred setting with a single push of the button.
EN-8
Page 10
● OPERATING INSTRUCTIONS ●
EN
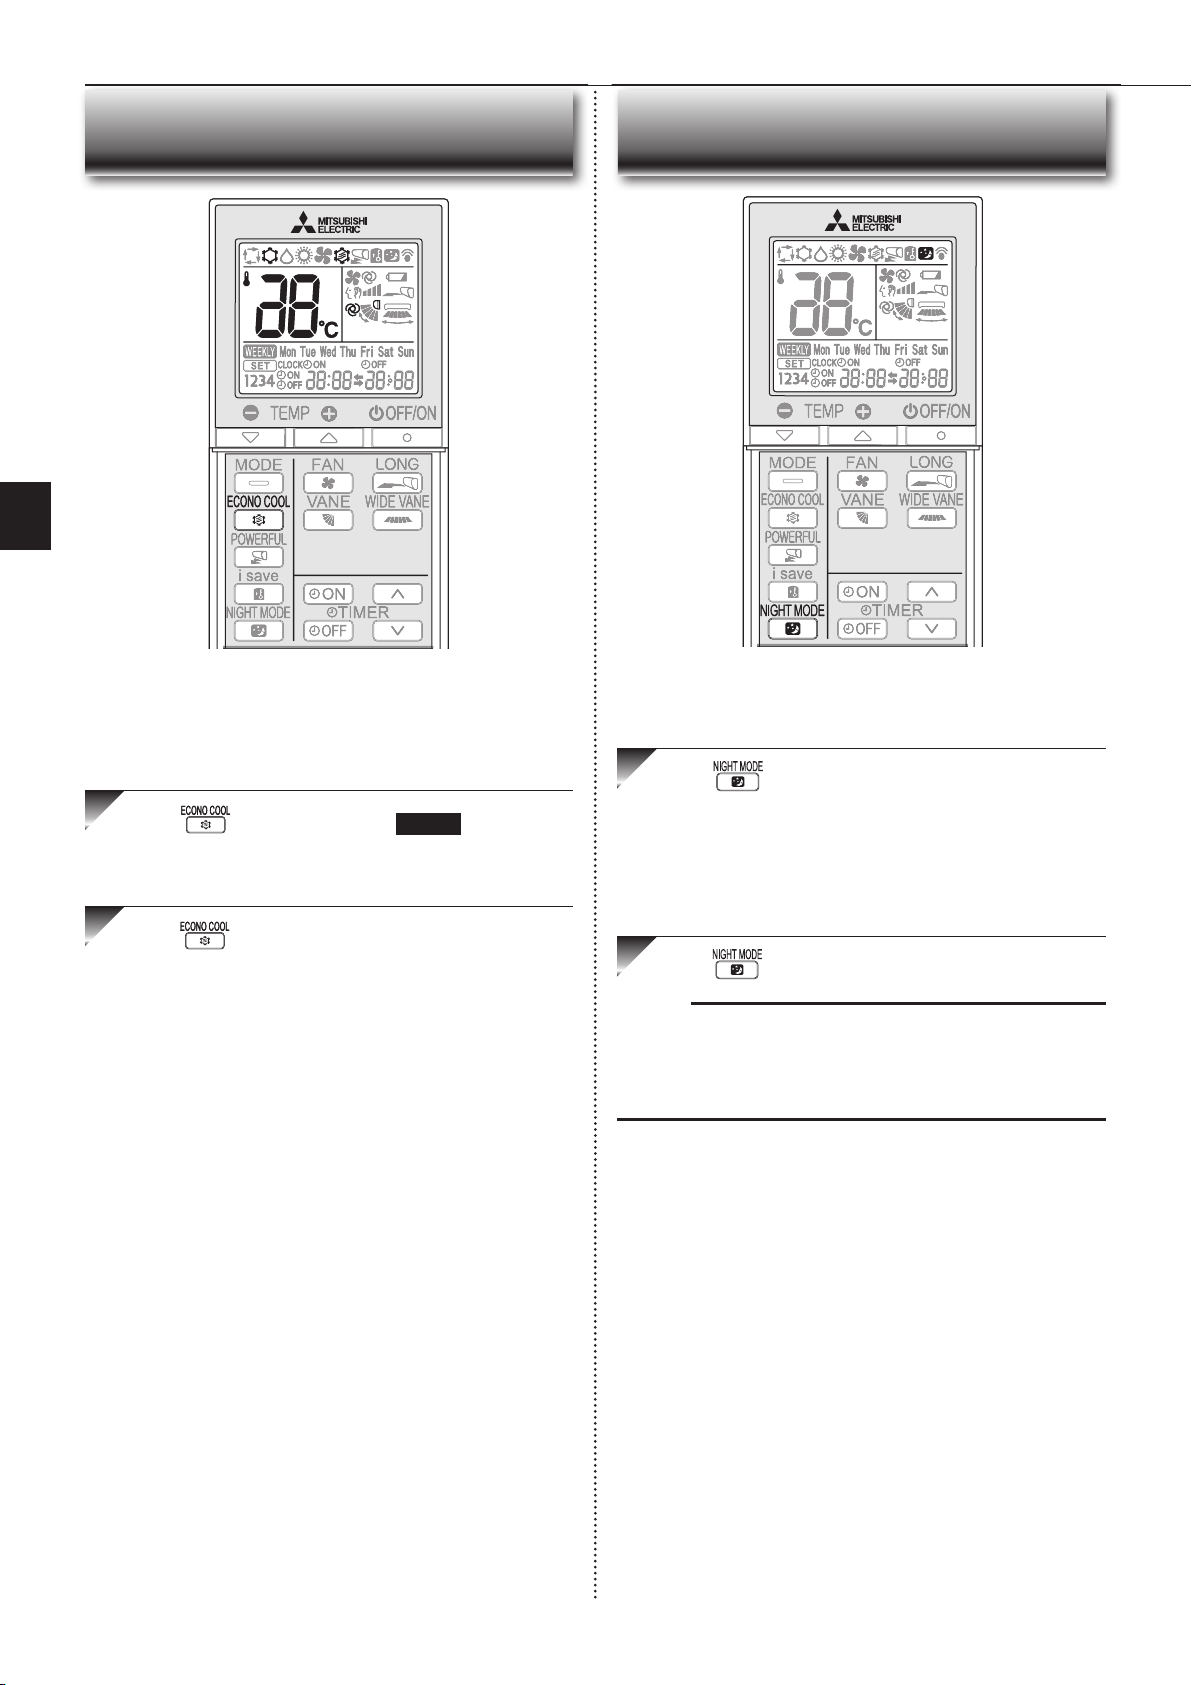
ECONO COOL OPERATION
Swing airfl ow (change of airfl ow) makes you feel cooler than stationary airfl ow.
The set temperature and the airfl ow direction are automatically changed
by the microprocessor. It is possible to perform cooling operation with
keeping comfort. As a result energy can be saved.
Press during COOL mode page 6 to start
ECONO COOL operation.
The unit performs swing operation vertically in various cycles according to the
temperature airflow.
Press again to cancel ECONO COOL operation.
• ECONO COOL operation is also cancelled when the VANE button is
pressed.
NIGHT MODE OPERATION
NIGHT MODE operation changes the brightness of the operation
indicator, disables the beep sound and limits the noise level of the
outdoor unit.
Press during operation to activate NIGHT MODE
operation.
• The operation indicator lamp dims.
• The beep sound will be disabled except that emitted when the operation is started or stopped.
• Noise level of the outdoor unit will be lower than that mentioned in
SPECIFICATIONS.
Press again to cancel NIGHT MODE operation.
Note:
• The cooling/heating capacity may drop.
• Noise level of the outdoor unit may not change after start-up of the unit, during the protection operation, or depending on other operating conditions.
• The fan speed of the indoor unit will not change.
The operation indicator lamp will be hard to be seen in a bright room.
•
•
Noise level of the outdoor unit will not decrease during Multi system operation.
EN-9
Page 11
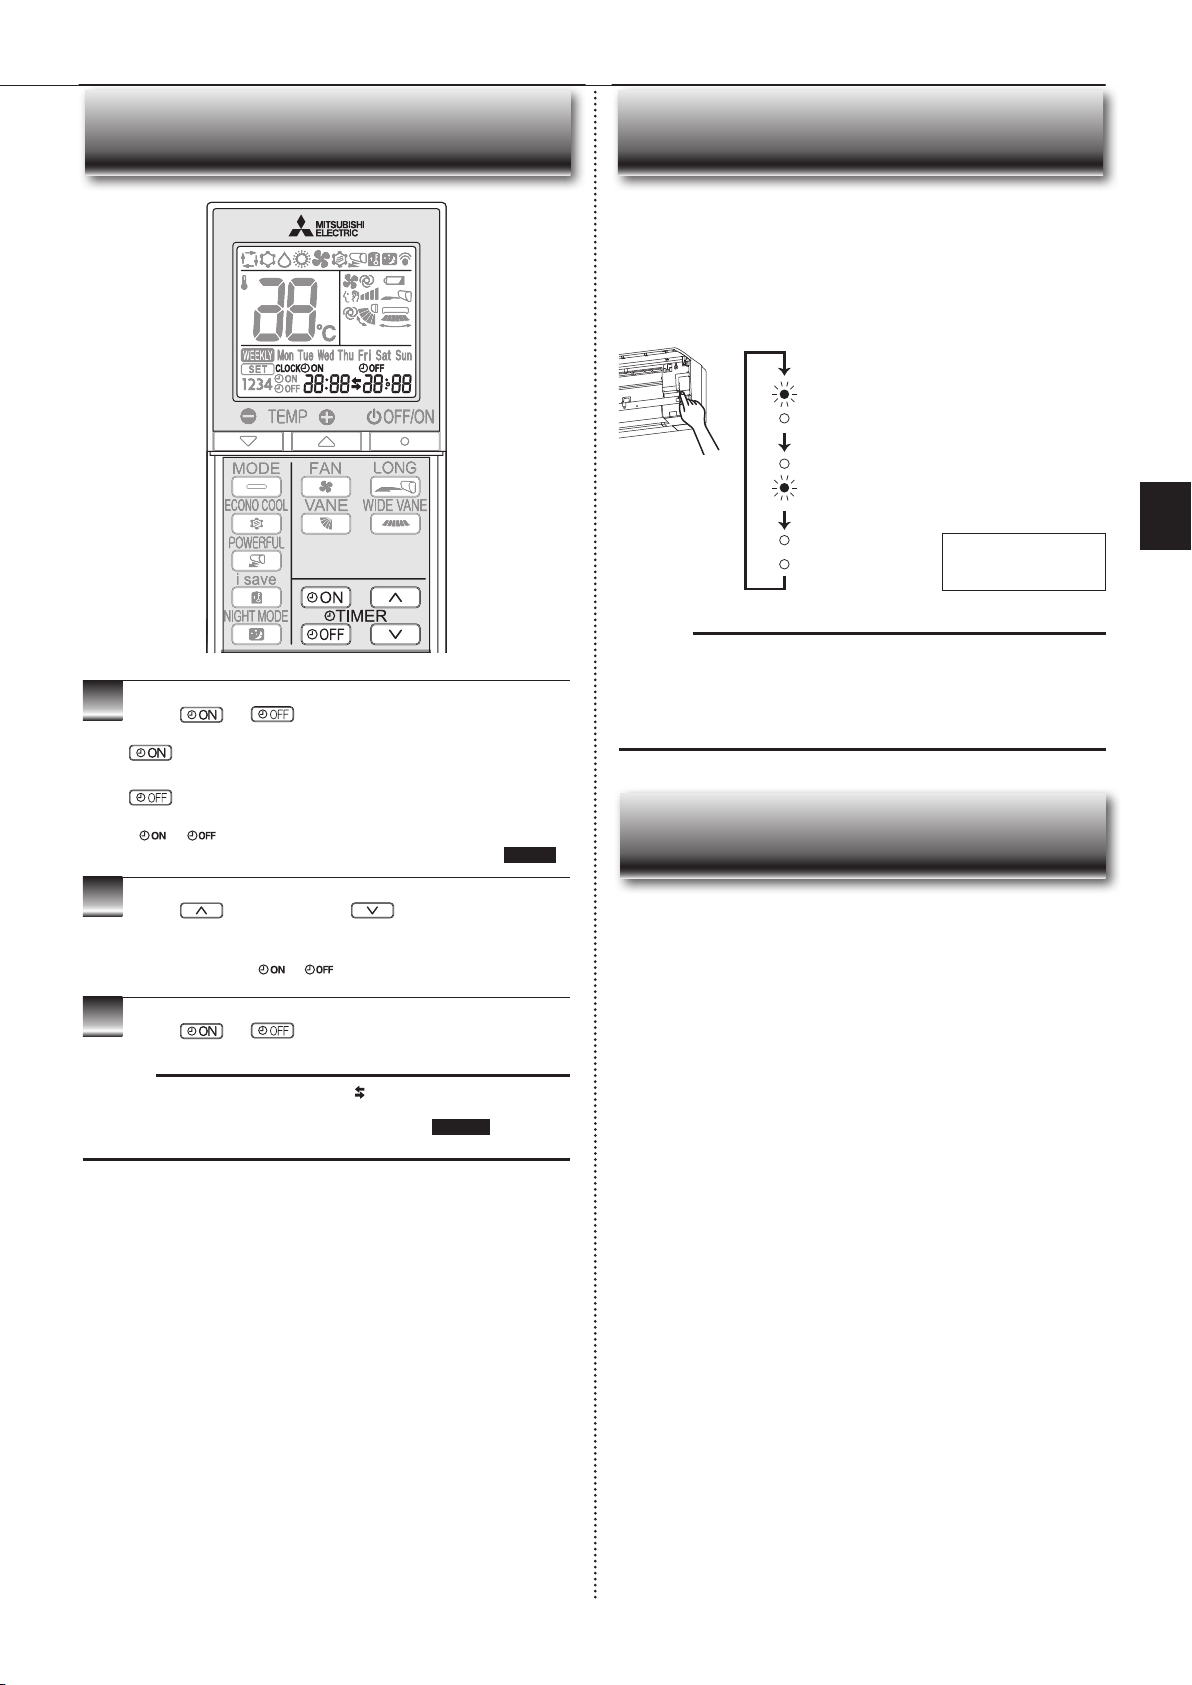
TIMER OPERATION (ON/OFF TIMER)
1
Press or during operation to set the timer.
(ON timer) : The unit turns ON at the set time.
EMERGENCY OPERATION
When the remote controller cannot be used...
Emergency operation can be activated by pressing the emergency operation
switch (E.O. SW) on the indoor unit.
Each time the E.O. SW is pressed, the operation changes in
the following order:
Operation indicator lamp
Emergency COOL
Emergency HEAT
Stop
Note:
• The fi rst 30 minutes of operation is test run. Temperature control does not
work, and fan speed is set to High.
• In the emergency heating operation, the fan speed gradually rises to blow out
warm air.
• In the emergency cooling operation, the horizontal vanes’ position will be
reset in about a minute, then the operation will start.
Set temperature : 24°C
Fan speed : Medium
Horizontal vane : Auto
EN
(OFF timer) : The unit turns OFF at the set time.
* or blinks.
Make sure that the current time and day are set correctly.
*
2
Press (Increase) and (Decrease) to set the
time of timer.
Each press increases or decreases the set time by 10 minutes.
• Set the timer while
3
Press
or
or is blinking.
again to cancel timer.
Page 5
Note:
• ON and OFF timers can be set together. mark indicates the order of timer
operations.
• If power failure occurs while ON/OFF timer is set, see page 10 “Auto restart
function”.
AUTO RESTART FUNCTION
If a power failure occurs or the main power is turned off during operation, “Auto
restart function” automatically starts operation in the same mode as the one set
with the remote controller just before the shutoff of the main power. When timer is
set, timer setting is cancelled and the unit starts operation when power is resumed.
If you do not want to use this function, please consult the service representative because the setting of the unit needs to be changed.
EN-10
Page 12

● OPERATING INSTRUCTIONS ●
WEEKLY TIMER OPERATION
• A maximum of 4 ON or OFF timers can be set for individual days of the week.
• A maximum of 28 ON or OFF timers can be set for a week.
E.g. : Runs at 24°C from waking up to leaving home, and runs at 27°C from
getting home to going to bed on weekdays.
Runs at 27°C from waking up late to going bed early on weekends.
Setting1 Setting2 Setting3 Setting4
Mon
Sun
ON OFF ON OFF
~
Fri
Sat
~
24°C 27°C
6:00 8:30 17:30 22:00
Setting1 Setting2
ON OFF
8:00 21:00
27°C
3
Press , , and to set ON/OFF, time, and
temperature.
E.g. : [ON], [6:00]
Pressing
ON/OFF timer.
selects
Pressing
Pressing
and [24°C] are
selected.
EN
Note:
The simple ON/OFF timer setting is available while the weekly timer is on. In
this case, the ON/OFF timer has priority over the weekly timer; the weekly timer
operation will start again after the simple ON/OFF timer is complete.
Setting the weekly timer
Pressing
timer setting.
* Hold down the button to change the time quickly.
deletes
adjusts the time.
adjusts the tem-
perature.
Press and to continue setting the timer for
other days and/or numbers.
4
Press to complete and transmit the weekly timer
setting.
which was blink-
*
ing goes out, and the
current time will be
displayed.
Note:
• Press to transmit the setting information of weekly timer to the indoor
unit. Point the remote controller toward the indoor unit for 3 seconds.
• When setting the timer for more than one day of the week or one number,
does not have to be pressed per each setting. Press once
after all the settings are complete. All the weekly timer settings will be saved.
• Press
controller toward the indoor unit.
5
* When the weekly timer is ON, the day of the week whose timer setting
to enter the weekly timer setting mode, and press and hold
for 5 seconds to erase all weekly timer settings. Point the remote
Press to turn the weekly timer ON. ( lights.)
is complete, will light.
* Make sure that the current time and day are set correctly.
1
Press to enter the weekly timer setting mode.
*
2
Press and to select setting day and number.
E.g. : [Mon Tue ... Sun]
and [1] are selected.
Pressing selects the day of
the week to be set.
* All days can be selected.
Pressing selects
the setting number.
EN-11
blinks.
Press again to turn the weekly timer OFF. (
goes out.)
Note:
The saved settings will not be cleared when the weekly timer is turned OFF.
Checking weekly timer setting
1
Press to enter the weekly timer setting mode.
* blinks.
2
Press or to view the setting of the particular
day or number.
Press to exit the weekly timer setting.
Note:
When all days of the week are selected to view the settings and a different set-
ting is included among them,
will be displayed.
Page 13
CLEANING
Instructions:
• Switch off the power supply or turn off the breaker before cleaning.
• Be careful not to touch the metal parts with your hands.
• Do not use benzine, thinner, polishing powder, or insecticide.
• Use only diluted mild detergents.
• Do not use a scrubbing brush, a hard sponge, or the like.
Air fi lter (Air purifying fi lter)
• Clean every 2 weeks
• Remove dirt by a vacuum cleaner, or rinse with water.
• After washing with water, dry it well in shade.
Front panel
• Do not soak or rinse the horizontal vane.
• Do not use water hotter than 50°C.
• Do not expose parts to direct sunlight, heat, or fi re to dry.
• Do not apply excessive force on the fan as it may cause cracks or breakage.
Air cleaning fi lter
(Silver-ionized air purifi er fi lter, option)
Every 3 months:
• Remove dirt by a vacuum cleaner.
When dirt cannot be removed by vacuum cleaning:
•
Soak the fi lter and its frame in lukewarm water before rinsing it.
•
After washing, dry it well in shade.
Every year:
• Replace it with a new air cleaning fi lter for best performance.
• Parts Number MAC-2360FT-E
Filter guide
EN
Hinge
Hole
1. Lift the front panel until a “click” is heard.
2. Hold the hinges and pull to remove as shown in the illustration above.
• Wipe with a soft dry cloth or rinse it with water.
• Do not soak it in water for more than two hours.
• Dry it well in shade before installing it.
3. Install the front panel by following the removal procedure in reverse. Close the front panel securely and
press the positions indicated by the arrows.
This information is based on REGULATION (EU) No 528/2012
MODEL NAME
MSZ-AP60/71VG FILTER
MAC-2360FT-E FILTER
Treated Article
(Parts name)
Active Substances
(CAS No.)
Silver sodium hydrogen zirconium
phosphate
(265647-11-8)
2-octyl-2H-isothiazol-3-one (OIT)
(26530-20-1)
Silver zinc zeolite
(130328-20-0)
Push to install
into the unit along
the fi lter guide.
Pull to remove from the unit.
Important
• Clean the fi lters regularly for best performance and to
reduce power consumption.
• Dirty fi lters cause condensation in the air conditioner
which will contribute to the growth of fungi such as
mold. It is therefore recommended to clean air fi lters
every 2 weeks.
Property
Antibacterial
Antimold
Antibacterial
• Use this product in line with the instruction manual
indications and for the intended purpose only.
• Do not put into mouth. Keep away from children.
• Use this product in line with the instruction manual
indications and for the intended purpose only.
• Do not put into mouth. Keep away from children.
Instruction for Use
(Safe handling information)
EN-12
Page 14
● OPERATING INSTRUCTIONS ●
Wi-Fi INTERFACE SETTING UP (VGK TYPE ONLY)
This Wi-Fi interface, communicates the status information and controls
the commands from the server by connecting to the indoor unit.
Front panel
Front panel
1
Open the front panel and remove the Wi-Fi interface.
2
Set up a connection between the Wi-Fi interface and
the Router. Refer to the SETUP MANUAL and SETUP
QUICK REFERENCE GUIDE provided with the unit.
EN
Wi-Fi interface
Wi-Fi interface
Wi-Fi interface introduction
No. Item Description
1 MODE switch It selects modes.
2 RESET switch It resets the system and ALL settings.
3 ERR LED (Orange) It shows the network error state.
4 NET LED (Green) It shows the network state.
5 MODE LED (Orange) It shows the Access point mode state.
6 UNIT LED (Green) It shows the indoor unit state.
3
ERR
4
NET
MODE
5
UNIT
6
RESET
MODE
2
(1) MODE switch
• The MODE switch is used for selecting modes in confi gurations.
(2) RESET switch
• Hold down the RESET switch for 2 seconds to reboot the system.
• Hold down the RESET switch for 14 seconds to initialize the Wi-Fi interface
to the factory default.
When the Wi-Fi interface is reset to the factory default, ALL the con-
fi guration information will be lost. Take great care in implementing this
operation.
1
For SETUP MANUAL, please go to the website below.
http://www.melcloud.com/Support
3
Put the Wi-Fi interface back and close the front panel
after the setup is completed.
4
For MELCloud User Manual, please go to the website
below.
http://www.melcloud.com/Support
Note:
• Ensure that the Router supports the WPA2-AES encryption setting before
starting the Wi-Fi interface setup.
• The End user should read and accept the terms and conditions of the Wi-Fi
service before using this Wi-Fi interface.
• To complete connection of this Wi-Fi interface to the Wi-Fi service, the Router may be required.
• This Wi-Fi interface will not commence transmission of any operational data
from the system until the End user registers and accepts the terms and conditions of the Wi-Fi service.
• This Wi-Fi interface should not be installed and connected to any Mitsubishi
Electric system which is to provide application critical cooling or heating.
• Please write down the information regarding the Wi-Fi interface setting on the
last page of this manual, when you set up this Wi-Fi interface.
• At the time of relocation or disposal, reset the Wi-Fi interface to the factory
default.
Mitsubishi Electric’s Wi-Fi interface is designed for communication to
Mitsubishi Electric’s MELCloud Wi-Fi service.
Third party Wi-Fi interfaces cannot be connected to MELCloud.
Mitsubishi Electric is not responsible for any (i) underperformance of a
system or any product;
(ii) system or product fault; or (iii) loss or damage to any system or product;
which is caused by or arises from connection to and/or use of any third
party Wi-Fi interface or any third party Wi-Fi service with Mitsubishi Electric
equipment.
EN-13
For the latest information regarding MELCloud from Mitsubishi Electric
Corporation, please visit www.melcloud.com.
Page 15
WHEN YOU THINK THAT TROUBLE HAS OCCURRED
Even if these items are checked, when the unit does not recover from the
trouble, stop using the air conditioner and consult your dealer.
Symptom Explanation & Check points
Indoor Unit
The unit cannot be operated. • Is the breaker turned on?
The horizontal vane does not
move.
The unit cannot be operated for
about 3 minutes when restarted.
Mist is discharged from the air
outlet of the indoor unit.
The swing operation of the HORI-
ZONTAL VANE is suspended for a
while, then restarted.
When SWING is selected in
COOL/DRY/FAN mode, the
lower horizontal vane does not
move.
The airfl ow direction changes
during operation.
The direction of the horizontal
vane cannot be adjusted with
the remote controller.
The operation stops for about
10 minutes in the heating
operation.
The unit starts operation by
itself when the main power is
turned on, but hasn’t received
sign from the remote controller.
The two horizontal vanes touch
each other. The horizontal
vanes are in an abnormal position. The horizontal vanes do
not return to the correct “close
position”.
In COOL/DRY mode, when the
room temperature reaches near
the set temperature, the outdoor
unit stops, then the indoor unit
operates at low speed.
The indoor unit discolors over
time.
The operation indicator lamp is
dim. The unit does not beep.
• Is the power supply plug connected?
• Is the ON timer set? Page 10
• Are the horizontal vane and the vertical vane
installed correctly?
• Is the fan guard deformed?
• When the breaker is turned on, the horizontal
vanes’ position will be reset in about a minute.
After the reset has completed, the normal horizontal vanes’ operation resumes. The same is
true in the emergency cooling operation.
• This protects the unit according to instructions
from the microprocessor. Please wait.
The cool air from the unit rapidly cools moisture
•
in the air inside the room, and it turns into mist.
• This is for the swing operation of the HORIZONTAL VANE to be performed normally.
• It is normal that the lower horizontal vane does
not move when SWING is selected in COOL/
DRY/FAN mode.
• When the unit is operated in COOL or DRY
mode, if the operation continues with air blowing down for 0.5 to 1 hour, the direction of the
airfl ow is automatically set to upward position
to prevent water from condensing and dripping.
• In the heating operation, if the airfl ow temperature is too low or when defrosting is being
done, the horizontal vane is automatically set
to horizontal position.
• Outdoor unit is in defrost.
Since this is completed in max. 10 minutes,
please wait. (When the outside temperature is
too low and humidity is too high, frost is formed.)
• These models are equipped with an auto
restart function. When the main power is
turned off without stopping the unit with the
remote controller and is turned on again, the
unit starts operation automatically in the same
mode as the one set with the remote controller just before the shutoff of the main power.
Refer to “Auto restart function”. Page 10
Perform one of the following:
Turn off and on the breaker. Make sure the hori-
•
zontal vanes move to the correct “close position”.
• Start and stop the emergency cooling operation
and make sure the horizontal vanes move to the
correct “close position”.
• When the room temperature deviates from the
set temperature, the indoor fan starts running
according to the settings on the remote controller.
• Although plastic turns yellow due to the infl uence
of some factors such as ultraviolet light and
temperature, this has no effect on the product
functions.
• Is the NIGHT MODE operation set? Page 9
Multi system
The indoor unit which is not
operating becomes warm and a
sound, similar to water fl owing,
is heard from the unit.
When heating operation is
selected, operation does not
start right away.
• A small amount of refrigerant continues to fl ow
into the indoor unit even though it is not operat-
ing.
• When operation is started during defrosting of
outdoor unit is done, it takes a few minutes (max.
10 minutes) to blow out warm air.
Outdoor Unit
The fan of the outdoor unit does
not rotate even though the com-
pressor is running. Even if the
fan starts to rotate, it stops soon.
Water leaks from the outdoor
unit.
White smoke is discharged from
the outdoor unit.
• When the outside temperature is low during
cooling operation, the fan operates intermittently
to maintain suffi cient cooling capacity.
• During COOL and DRY operations, pipe or pipe
connecting sections are cooled and this causes
water to condense.
• In the heating operation, water condensed on
the heat exchanger drips down.
• In the heating operation, the defrosting operation
makes ice forming on the outdoor unit melt and
drip down.
• In the heating operation, vapor generated by the
defrosting operation looks like white smoke.
Symptom Explanation & Check points
Remote controller
The display on the remote
controller does not appear or it
is dim. The indoor unit does not
respond to the remote control
signal.
• Are the batteries exhausted? Page 5
• Is the polarity (+, -) of the batteries correct?
Page 5
• Are any buttons on the remote controller of other
electric appliances being pressed?
Does not cool or heat
The room cannot be cooled or
heated suffi ciently.
The room cannot be cooled
suffi ciently.
The room cannot be heated
suffi ciently.
Air does not blow out soon in
the heating operation.
• Is the temperature setting appropriate?
Page 6
• Is the fan setting appropriate? Please change
fan speed to High or Super High. Page 7
• Are the fi lters clean? Page 12
Is the fan or heat exchanger of the indoor unit
•
clean?
• Are there any obstacles blocking the air inlet or
outlet of the indoor or outdoor unit?
• Is a window or door open?
• It may take a certain time to reach the setting
temperature or may not reach that depending on
the size of the room, the ambient temperature,
and the like.
• Is the NIGHT MODE operation set? Page 9
• When a ventilation fan or a gas cooker is used
in a room, the cooling load increases, resulting
in an insuffi cient cooling effect.
• When the outside temperature is high, the cooling
effect may not be suffi cient.
• When the outside temperature is low, the heating
effect may not be suffi cient.
• Please wait as the unit is preparing to blow out
warm air.
Airfl ow
The air from the indoor unit
smells strange.
• Are the fi lters clean? Page 12
• Is the fan or heat exchanger of the indoor unit
clean?
• The unit may suck in an odor adhering to the
wall, carpet, furniture, cloth, etc. and blow it out
with the air.
Sound
Cracking sound is heard. • This sound is generated by the expansion/con-
“Burbling” sound is heard. • This sound is heard when the outside air is
Mechanical sound is heard
from the indoor unit.
The sound of water fl owing is
heard.
Hissing sound is sometimes
heard.
traction of the front panel, etc. due to change in
temperature.
absorbed from the drain hose by turning on the
range hood or the ventilation fan, making water
fl owing in the drain hose to spout out.
This sound is also heard when the outside air
blows into the drain hose in case the outside
wind is strong.
• This is the switching sound in turning on/off the
fan or the compressor.
• This is the sound of refrigerant or condensed
water fl owing in the unit.
• This is the sound when the fl ow of refrigerant
inside the unit is changed.
Timer
Weekly timer does not operate
according to settings.
The unit starts/stops the opera-
tion by itself.
• Is the ON/OFF timer set? Page 10
• Transmit the setting information of the weekly
timer to the indoor unit again. When the information is successfully received, a long beep will
sound from the indoor unit. If information fails to
be received, 3 short beeps will be heard. Ensure
information is successfully received. Page 11
• When a power failure occurs and the main power
turns off, the indoor unit built-in clock will be
incorrect. As a result, the weekly timer may not
work normally.
Be sure to place the remote controller where
the signal can be received by the indoor unit.
Page 5
• Is the weekly timer set? Page 11
Wi-Fi interface
When error occurs during con-
nection setup or operation.
Refer to the SETUP MANUAL.
For SETUP MANUAL, please go to the website
below.
http://www.melcloud.com/Support
EN
EN-14
Page 16
● OPERATING INSTRUCTIONS ●
EN
WHEN
YOU THINK THAT
TROUBLE HAS OCCURRED
In the following cases, stop using the air conditioner and consult your dealer.
• When water leaks or drips from the indoor unit.
• When the operation indicator lamp blinks.
• When the breaker trips frequently.
• The remote control signal is not received in a room where an electronic ON/
OFF type fl uorescent lamp (inverter-type fl uorescent lamp, etc.) is used.
• Operation of the air conditioner interferes with radio or TV reception. An amplifi er may be required for the affected device.
• When an abnormal sound is heard.
• When any refrigerant leakage is found.
WHEN THE AIR CONDITIONER IS NOT
GOING TO BE USED FOR A LONG TIME
1
Operate by COOL mode with the highest temperature
set or FAN mode for 3 to 4 hours. Page 6
• This dries the inside of the unit.
• Moisture in the air conditioner contributes to favorable conditions for
growth of fungi, such as mold.
2
Press
3
Turn off the breaker and/or disconnect the power supply plug.
4
Remove all batteries from the remote controller.
When using the air conditioner again:
1
Clean the air fi lter. Page 12
2
Check that the air inlet and outlet of the indoor and
outdoor units are not blocked.
to stop the operation.
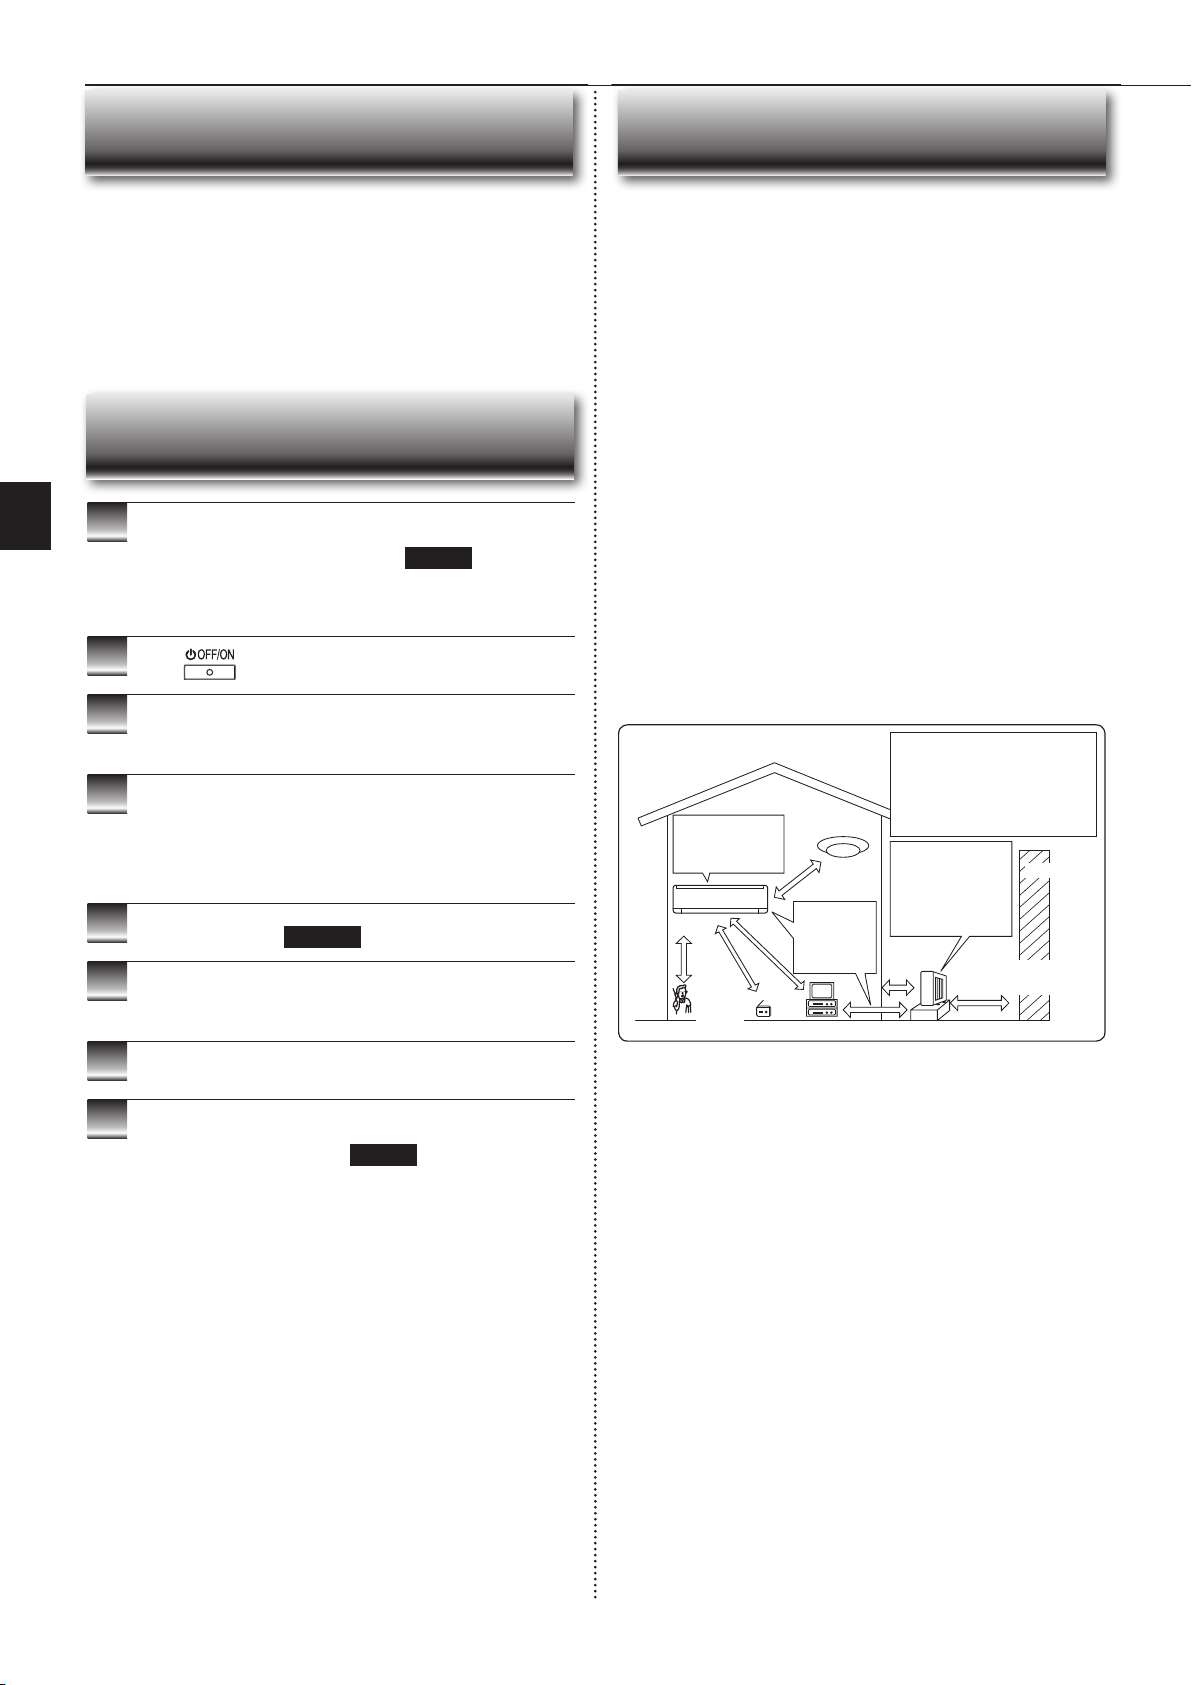
INSTALLATION PLACE AND
ELECTRICAL WORK
Installation place
Avoid installing the air conditioner in the following places.
• Where there is much machine oil.
• Salty places such as the seaside.
• Where sulfi de gas is generated such as hot spring, sewage, waste water.
• Where oil is splashed or where the area is fi lled with oily smoke (such as cooking areas and factories, in which the properties of plastic could be changed
and damaged).
• Where there is high-frequency or wireless equipment.
• Where the air from the outdoor unit air outlet is blocked.
• Where the operation sound or air from the outdoor unit bothers the house next
door.
• The mounting height of indoor unit 1.8 m to 2.3 m is recommended. If it is
impossible, please consult your dealer.
• The indoor unit must be installed in rooms which exceed the fl oor space
specifi ed. Please consult your dealer.
• Do not operate the air conditioner during interior construction and fi nishing
work, or while waxing the fl oor. Before operating the air conditioner, ventilate
the room well after such work is performed. Otherwise, it may cause volatile
elements to adhere inside the air conditioner, resulting in water leakage or
scattering of dew.
• Do not use the Wi-Fi interface nearby the medical electrical equipment or
people who have a medical device such as a cardiac pacemaker or an implantable cardioverter-defi brillator.
It can cause an accident due to malfunctions of the medical equipment or
device.
• This equipment should be installed and operated with a minimum distance of
20 cm between the device and the user or bystanders.
• Do not use the Wi-Fi interface nearby other wireless devices, microwaves,
cordless phones, or facsimiles.
It can cause malfunctions.
The installation location of the outdoor
unit should be at least 3 m away from
the antennas for TV sets, radios, etc. In
areas where the reception is weak, pro-
vide greater space between the outdoor
unit and the antenna of the affected
device if operation of the air conditioner
interferes with radio or TV reception.
For the optimum ef-
fi ciency and to extend
the life time of using,
the outdoor unit
should be installed in
a well-ventilated dry
place.
100 mm or
more
TV
3 m or more
(AP60/AP71)
200/500 mm or more
wall, etc.
To prevent the effects
of a fl uorescent lamp,
keep as far apart as
possible.
1 m
or more
Cordless
phone or
Portable
phone
1 m
or
more
Radio
Inverter-type
fl uorescent lamp
Keep a space
to prevent
the picture
distortion or
the noise.
3
Check that the earth is connected correctly.
4
Refer to the “PREPARATION BEFORE OPERATION”,
and follow the instructions. Page 5
EN-15
Electrical work
• Provide an exclusive circuit for the power supply of the air conditioner.
• Be sure to observe the breaker capacity.
If you have any questions, consult your dealer.
Page 17
SPECIFICATIONS
Model
Function Cooling Heating Cooling Heating
Power supply ~ /N, 230 V, 50 Hz
Capacity kW 6.1 6.8 7.1 8.1
Input kW 1.59 1.67 2.01 2.12
Weight
Refrigerant fi lling capacity (R32) kg 1.05 1.50
IP code
Permissible excessive
operating pressure
Noise level (SPL)
Indoor MSZ-AP60VG(K) MSZ-AP71VG(K)
Outdoor MUZ-AP60VG MUZ-AP71VG
Indoor kg 16 17
Outdoor kg 40 55
Indoor IP 20
Outdoor IP 24
LP ps MPa 2.77
HP ps MPa 4.17
Indoor (Super High/
High/Med./Low/Silent)
Outdoor dB(A) 56 57 56 55
dB(A) 48/45/41/37/29 48/45/41/37/30 49/45/41/37/30 51/45/41/37/30
Guaranteed operating range
Cooling
Heating
Upper limit
Lower limit
Upper limit
Lower limit
Indoor Outdoor
32°C DB
23°C WB
21°C DB
15°C WB
27°C DB
—
20°C DB
—
46°C DB
—
-10°C DB
—
24°C DB
18°C WB
-15°C DB
-16°C WB
DB: Dry Bulb
WB: Wet Bulb
Note:
Rating condition
Cooling — Indoor: 27°C DB, 19°C WB
Outdoor: 35°C DB
Heating — Indoor: 20°C DB
Outdoor: 7°C DB, 6°C WB
Wi-Fi interface
Model MAC-567IFB2-E
Input Voltage DC12.7 V (from indoor unit)
Power consumption MAX. 2 W
Size H×W×D (mm) 79×44×18.5
Weight (g) 60 (including cable)
Transmitter power level (MAX.) 17.5 dBm @IEEE 802.11b
RF channel 1ch ~ 13ch (2412~2472 MHz)
Radio protocol IEEE 802.11b/g/n (20)
Encryption AES
Authentication WPA2-PSK
Software Version XX.00
For Declaration of Conformity, please go to the website below.
http://www.melcloud.com/Support
EN
EN-16
Page 18
RU
● ИНСТРУКЦИИ ПО ЭКСПЛУАТАЦИИ ●
ПЕРЕВОД ОРИГИНАЛА
СОДЕРЖАНИЕ
■ МЕРЫ ПРЕДОСТОРОЖНОСТИ 1
■ УТИЛИЗАЦИЯ 3
■ НАЗВАНИЯ ОТДЕЛЬНЫХ ЧАСТЕЙ ПРИБОРА 4
■ ПОДГОТОВКА ПРИБОРА К ЭКСПЛУАТАЦИИ 5
■ ВЫБОР РЕЖИМОВ РАБОТЫ 6
■ НАСТРОЙКА СКОРОСТИ ВЕНТИЛЯТОРА И НАПРАВЛЕНИЯ ВОЗДУШНОГО ПОТОКА 7
■ РЕЖИМ LONG (ДЛИННАЯ СТРУЯ) 8
■ РЕЖИМ POWERFUL 8
■ OПЕРАЦИЯ I-SAVE 8
■ ФУНКЦИЯ ECONO COOL 9
■ РЕЖИМ NIGHT MODE 9
■ РАБОТА С ИСПОЛЬЗОВАНИЕМ ТАЙМЕРА (ТАЙМЕР ВКЛЮЧЕНИЯ/ВЫКЛЮЧЕНИЯ) 10
■ АВАРИЙНАЯ ЭКСПЛУАТАЦИЯ 10
■ ФУНКЦИЯ ПОВТОРНОГО АВТОЗАПУСКА 10
■ ИСПОЛЬЗОВАНИЕ НЕДЕЛЬНОГО ТАЙМЕРА 11
■ ЧИСТКА 12
■ НАСТРОЙКА ИНТЕРФЕЙСА Wi-Fi (ТОЛЬКО ТИП VGK) 13
■ ЕСЛИ ВАМ КАЖЕТСЯ, ЧТО ПРИБОР НЕИСПРАВЕН 14
■ КОГДА ВЫ НЕ СОБИРАЕТЕСЬ ПОЛЬЗОВАТЬСЯ КОНДИЦИОНЕРОМ ДЛИТЕЛЬНОЕ ВРЕМЯ 15
■ МЕСТО УСТАНОВКИ И ЭЛЕКТРОМОНТАЖНЫЕ РАБОТЫ 15
■ ТЕХНИЧЕСКИЕ ХАРАКТЕРИСТИКИ 16
МЕРЫ ПРЕДОСТОРОЖНОСТИ
Значения символов, отображаемых на внутреннем и/или наружном блоке
ПРЕДУПРЕЖДЕНИЕ
(опасность возгорания)
Внимательно прочтите настоящие ИНСТРУКЦИИ ПО ЭКСПЛУАТАЦИИ перед началом использования кондиционера.
Обслуживающий персонал обязан внимательно прочитать ИНСТРУКЦИИ ПО ЭКСПЛУАТАЦИИ и РУКОВОДСТВО ПО УСТАНОВКЕ перед началом работ.
Дополнительную информацию можно найти в ИНСТРУКЦИЯХ ПО ЭКСПЛУАТАЦИИ, РУКОВОДСТВЕ ПО УСТАНОВКЕ и аналогичных документах.
• Ввиду того, что в конструкции данного изделия использованы вращающиеся детали, а также детали, способные привести к поражению
электрическим током, обязательно прочитайте данный раздел “Меры
предосторожности” перед использованием прибора.
• Так как предостерегающая информация, содержащаяся в данном разделе, касается вашей безопасности, обязательно следуйте изложенным
инструкциям.
• После прочтения храните данное руководство вместе с руководством
по установке прибора в легкодоступном месте и пользуйтесь ими для
справок.
Символы и их значения
ПРЕДУПРЕЖ-
ДЕНИЕ:
ОСТОРОЖНО :
Неправильное обращение с прибором представляет
собой серьезную угрозу для здоровья или с большой
степенью вероятности может привести к смертельному исходу или получению тяжелой травмы и т.д.
Неправильное обращение с прибором представляет
собой серьезную угрозу в зависимости от конкретных
обстоятельств.
В данном устройстве используется воспламеняющийся хладагент.
В случае утечки хладагента и его контакта с огнем или источником тепла образуется вредный газ и возникнет опасность возгорания.
Значение символики, используемой в тексте руководства
: Строго воспрещается.
: Тщательно следуйте инструкциям.
: Запрещается вставлять пальцы или палки и т.д.
: Запрещается вставать на внутренний/наружный прибор или
ставить на них какие-либо предметы.
: Опасность поражения электрическим током. Будьте осторожны.
: Обязательно отсоедините вилку шнура питания от розетки электро-
питания.
: Обязательно отключите электропитание.
: Опасность возгорания.
: Не касайтесь влажными руками.
: Не допускается расплескивание воды на блок.
RU-1
ПРЕДУПРЕЖДЕНИЕ
Подсоединяйте шнур питания непосредственно к розетке. Не
пользуйтесь удлинителем и не подсоединяйте к розетке переменного тока одновременно несколько устройств.
• Это может привести к перегреву, возникновению пожара или поражению электрическим током.
Убедитесь, что вилка чистая, и надежно вставьте ее в розетку.
• При загрязнении вилки может возникнуть пожар, или возможно
поражение электрическим током.
Не скручивайте, не тяните, не повреждайте и не изменяйте шнур
питания. Не подвергайте его воздействию тепла и не ставьте на
него тяжелые предметы.
• Это может привести к возникновению пожара или поражению
электрическим током.
Во время эксплуатации не выполняйте включения/выключения
выключателя или не отсоединяйте/подсоединяйте вилку.
• Это может привести к образованию искровых разрядов, которые
могут стать причиной пожара.
• После выключения внутреннего блока с помощью пульта дистанционного управления обязательно установите выключатель
в положение OFF или выньте вилку.
Не подвергайте тело воздействию холодного воздуха в течение
длительного времени.
• Это может отрицательно сказаться на здоровье.
Page 19
В целях правильной и безопасной эксплуатации данного устройства обязательно перед его использованием прочтите
настоящее руководство по эксплуатации.
МЕРЫ ПРЕДОСТОРОЖНОСТИ
Установка блока, изменение его положения, внесение изменений, разборка или ремонт блока не должны осуществляться
пользователем.
• Неправильное обращение с кондиционером может привести к
возникновению пожара, поражению электротоком, травмам и подтеканию воды. Проконсультируйтесь с дилером.
• При наличии повреждения в шнуре питания его следует заменить
у производителя или его сервисного представителя во избежание
опасной ситуации.
При установке, перемещении или техобслуживании прибора
следите за тем, чтобы в охлаждающий контур не попало другое
вещество, за исключением указанного хладагента (R32).
• Присутствие какого-либо инородного вещества, например, воздуха,
может привести к аномальному повышению давления, следствием
которого может стать взрыв или травма.
• Использование любого иного хладагента, кроме указанного для
системы, приведет к механическому отказу, неисправности системы или поломке прибора. В худшем случае это может привести к
серьезному препятствию для обеспечения безопасности изделия.
Данное устройство не предназначено для использования людьми
(включая детей) с ограниченными физическими, сенсорными или
психическими возможностями. При недостатке опыта и знаний
разрешается пользоваться данным устройством только под
наблюдением лица, ответственного за безопасность, или после
инструктажа по использованию прибора.
Дети должны быть под присмотром и не играть с устройством.
Запрещается вставлять пальцы, палки или другие предметы в
воздухозаборные или воздуховыпускные отверстия.
• Это может привести к получению травмы, поскольку во время эксплуатации вентилятор вращается с высокой скоростью.
В случае возникновения ненормальных условий (например, запах
горения) выключите кондиционер и выньте вилку или установите
выключатель в положение OFF.
• При продолжении эксплуатации в ненормальных условиях может
произойти неисправность, возникнуть пожар, а также возможно поражение электрическим током. В этом случае обратитесь к дилеру.
Если кондиционером не осуществляется охлаждение или обогрев,
возможно, имеется утечка хладагента. Если произошла утечка
хладагента, остановите работу устройства, хорошо проветрите
помещение и обратитесь к дилеру. Если во время ремонта необходима заправка блока хладагентом, обратитесь за подробными
сведениями к специалисту по обслуживанию.
•
Хладагент, используемый в системе кондиционера, не представляет
опасности для здоровья. Как правило, утечка не происходит. Тем не
менее при утечке хладагента и его соприкосновении с источником тепла, например с тепловентилятором, керосиновым обогревателем или
духовкой, образуется вредный газ и возникнет опасность возгорания.
Пользователю запрещается предпринимать попытки очистки внутренней части внутреннего блока. При необходимости в очистке
внутренней части этого блока обратитесь к дилеру.
• Применение ненадлежащих чистящих средств может привести к
повреждению пластиковых материалов внутренней части прибора,
которое может привести к утечке воды. Попадание чистящего вещества на электрические детали двигателя приведет к неисправности,
выделению дыма или возгоранию прибора.
• Устройство должно храниться в помещении без непрерывно работающих источников воспламенения (например, открытого пламени,
работающего газового прибора или электрического обогревателя).
• Имейте в виду, что хладагенты могут не иметь запаха.
• Не используйте средства для ускорения размораживания или
очистки прибора, если они не рекомендованы производителем.
• Не прокалывайте устройство и не сжигайте его.
Внутренний блок должен устанавливаться в помещениях, площадь которых превышает указанное далее значение. Обратитесь за консультацией к дилеру.
Данное устройство предназначено для использования специалистами или обученным персоналом в магазинах, на предприятиях
легкой промышленности и фермах или для коммерческого применения непрофессионалами.
Запрещается тянуть за шнур питания.
• Это может привести к разрыву части провода с жилами, что, в свою
очередь, может вызвать перегрев или пожар.
Запрещается заряжать и разбирать батарейки и бросать их в огонь.
• Это может привести к утечке электролита или возникновению пожара, а также взрыву.
Запрещается использовать блок в течение более 4 часов при
высокой влажности (80% относительной влажности или выше) и
(или) при открытой наружной двери или окнах.
• Это может привести к тому, что конденсат в кондиционере может
капать, промачивая или повреждая мебель.
• Водный конденсат в кондиционере может способствовать появлению грибков и плесени.
Блок запрещается использовать в специальных целях, например
для хранения продуктов, разведения животных, выращивания растений или сохранения точных устройств или предметов искусства.
• Это может привести к снижению качества или причинить вред
животным и растениям.
Не подвергайте легковоспламеняющиеся приборы воздействию
прямого потока воздуха.
• Это может привести к неполному сгоранию горючих веществ.
Запрещается класть элементы питания в рот по каким бы то ни
было причинам во избежание случайного проглатывания.
• Попадание элемента питания в пищеварительную систему может
стать причиной удушья и/или отравления.
Перед очисткой блока выключите его и выньте вилку или установите выключатель в положение OFF.
• Это может привести к получению травмы, поскольку во время эксплуатации вентилятор вращается с высокой скоростью.
Если блок не планируется использовать в течение продолжительного времени, выньте вилку питания из розетки и установите
выключатель в положение OFF.
• На блоке может скопиться грязь, которая, в свою очередь, может
вызвать перегрев или пожар.
При замене всех батареек пульта дистанционного управления
заменяйте их новыми батарейками одинакового типа.
• При использовании старой батарейки с новой может произойти
перегрев, утечка или взрыв.
Если электролит попадет на вашу кожу или одежду, тщательно
смойте его чистой водой.
• Если электролит попадет в глаза, тщательно промойте их чистой
водой и сразу же обратитесь к врачу.
Убедитесь, что место хорошо вентилируется при работе блока с
легковоспламеняющимися приборами.
• Недостаточная вентиляция может привести к кислородному голоданию.
Установите выключатель в положение OFF во время грозы и при
вероятности удара молнии.
• Удар молнии может привести к повреждению блока.
После использования кондиционера в течение нескольких сезонов выполните осмотр и обслуживание в дополнение к обычной
очистке.
• Скопление грязи или пыли внутри блока может привести к появлению неприятного запаха, грибков и плесени, засорению дренажного
канала и вытеканию воды из внутреннего блока. Обратитесь к дилеру по вопросам осмотра и обслуживания, для которых требуются
специальные знания и умения.
Запрещается прикасаться к выключателям мокрыми руками.
• Это может привести к поражению электрическим током.
Запрещается выполнять очистку кондиционера водой или помещать на него предметы, содержащие воду, например вазу.
• Это может привести к возникновению пожара или поражению электрическим током.
Не вставайте на наружный блок и не ставьте на него никаких
предметов.
• При падении предметов возможно получение травм.
RU
ОСТОРОЖНО
Запрещается касаться воздухозаборного отверстия или алюминиевого оребрения внутреннего/наружного блока.
• Это может привести к травмам.
На блоке запрещается использовать инсектициды или легковоспламеняющиеся аэрозоли.
• Это может привести к пожару или деформации блока.
Под прямым потоком воздуха не должны находиться домашние
животные или растения.
• Это может привести к травмам животных и повреждениям растений.
Запрещается ставить другие электроприборы или мебель под
внутренний/наружный прибор.
• С блока может капать вода, что может привести к их повреждению
или неисправностям.
Запрещается оставлять данный блок на поврежденном установочном основании.
• Блок может упасть и нанести травмы.
Для эксплуатации или очистки блока не вставайте на неустойчивую скамью.
• При падении можно получить травмы.
ВАЖНО
Загрязненные фильтры являются причиной образования конденсата в кондиционере, что может способствовать появлению грибков и плесени. Поэтому
рекомендуется очищать воздушные фильтры каждые 2 недели.
Перед началом эксплуатации убедитесь, что горизонтальные заслонки находятся в закрытом положении. Если горизонтальные заслонки будут находиться в открытом положении в начале эксплуатации, они могут не вернуться
в правильное положение.
RU-2
Page 20
● ИНСТРУКЦИИ ПО ЭКСПЛУАТАЦИИ ●
МЕРЫ ПРЕДОСТОРОЖНОСТИ
RU
При установке прибора
ПРЕДУПРЕЖДЕНИЕ
Для установки кондиционера воздуха обратитесь к своему дилеру.
• Установка не должна осуществляться пользователем, поскольку
для этого требуются специальные знания и умения. Неправильная
установка кондиционера может привести к утечке воды, возникновению пожара или поражению электрическим током.
Обеспечьте для кондиционера отдельный источник питания.
• В противном случае может произойти перегрев или возникнуть
пожар.
Запрещается устанавливать прибор в местах возможной утечки
воспламеняющегося газа.
• При утечке и скоплении газа рядом с наружным блоком может произойти взрыв.
Правильно заземлите блок.
• Запрещается подсоединять провод заземления к газовым и водопроводным трубам, молниеотводам или проводу телефонного заземления. Неправильное заземление может привести к поражению
электрическим током.
ОСТОРОЖНО
Устанавливайте выключатель утечки на землю в зависимости от
места установки кондиционера (например, в местах с высокой
влажностью).
• Если выключатель утечки тока на землю не установлен, возможно
поражение электрическим током.
Убедитесь, что слив воды осуществляется надлежащим образом.
• При неправильном использовании дренажного канала вода из внутреннего/наружного блока может капать, промачивая или повреждая
мебель.
В случае возникновения ненормальных условий
Сразу же выключите кондиционер и обратитесь к дилеру.
Краткая информация об интерфейсе Wi-Fi
(Ненадлежащее обращение может привести к серьезным последствиям,
включая тяжелые травмы или смертельный исход.)
(Ненадлежащее обращение может стать причиной серьезных последствий, включая нанесение травм и повреждение здания.)
ПРЕДУПРЕЖДЕНИЕ
Данным устройством могут пользоваться дети старше 8 лет
и лица с ограниченными физическими, сенсорными или умственными способностями либо с недостаточным опытом или
знаниями, находясь под наблюдением или после инструктажа
по безопасному использованию устройства и при условии понимания ими сопутствующих опасностей.
Не позволяйте детям играть с данным устройством. Очистка и
техническое обслуживание устройства не должны осуществляться детьми без соответствующего контроля.
Запрещается использовать интерфейс Wi-Fi вблизи электрического оборудования медицинского назначения или рядом с
людьми с имплантированными медицинскими устройствами,
такими как кардиостимуляторы или вживляемые кардиовертеры-дефибрилляторы.
• Это может привести к несчастным случаям вследствие неправильного функционирования медицинского оборудования или
устройства.
Не допускается установка интерфейса Wi-Fi вблизи устройств с
автоматическим управлением, таких как автоматические двери
или пожарная сигнализация.
• Это может привести к несчастным случаям вследствие нарушения
функционирования.
Не касайтесь интерфейса Wi-Fi влажными руками.
• Это может привести к повреждению устройства, поражению электрическим током или пожару.
Не допускается разбрызгивание воды на интерфейс Wi-Fi либо
его эксплуатация в ванной комнате.
• Это может привести к повреждению устройства, поражению электрическим током или пожару.
В случае падения интерфейса Wi-Fi либо повреждения держателя
или кабеля извлеките из розетки вилку электропитания либо
разомкните контакты автомата защиты электрической цепи.
• Это может привести к возникновению пожара или поражению
электрическим током. В этом случае обратитесь к дилеру.
ОСТОРОЖНО
При выполнении настройки либо чистки интерфейса Wi-Fi запрещается ступать на стремянку, находящуюся в неустойчивом
положении.
• При падении можно получить травму.
Не допускается эксплуатация интерфейса Wi-Fi вблизи других
беспроводных устройств, микроволновых печей, беспроводных
телефонов или аппаратов факсимильной связи.
• Это может привести к нарушениям его функционирования.
УТИЛИЗАЦИЯ
По вопросам утилизации данного изделия обратитесь
к своему дилеру.
Примечание:
Данный символ применяется только в странах ЕС.
Символ наносится в соответствии со статьей 14 директивы 2012/19/EU “Информация для пользователя” и Приложением IX, и/или статьей 20 директивы
Fig. 1
RU-3
2006/66/EC “Информация для конечного пользователя” и Приложением II.
Page 21
НАЗВАНИЯ ОТДЕЛЬНЫХ ЧАСТЕЙ ПРИБОРА
Внутренний прибор
Передняя
панель
Воздушный
фильтр
Фильтр очистки
воздуха
(Воздухоочистительный фильтр
с использованием
ионизированного
серебра, не входит в поставку)
Горизонтальная
заслонка
Воздуховыпускное
Заводская табличка с
паспортными данными *1
отверстие
Индикаторная лампочка
работы
Зона приема сигналов с
пульта дистанционного
управления
Воздухозаборное
отверстие
Интерфейс
Стр. 13
Wi-Fi
Переключатель
аварийной
эксплуатации
Стр. 10
Теплообменник
Наружный прибор
Воздухозаборные отверстия (сзади и сбоку)
Заводская табличка с паспортными
данными *1
Трубопровод хладагента
Дренажный шланг
Воздуховыпускное
отверстие
Выходное дренажное отверстие
Внешний вид устройств, предназначенных для использования на улице,
может отличаться.
*1 На заводской табличке с паспортными данными указаны год и месяц
изготовления.
Пульт дистанционного управления
Индикатор замены батарей Стр. 5
Сектор рабочего дисплея
Кнопки регулирования
температуры
Стр. 6
Кнопка выбора режи-
Стр. 6
ма
Кнопка ECONO
COOL (ЭНЕРГОСБЕРЕЖЕНИЕ ПРИ
ОХЛАЖДЕНИИ)
Стр. 9
Кнопка управления мощностью
POWERFUL
Стр. 8
Кнопка i-save
Стр. 8
Кнопка NIGHT
MODE (НОЧ-
НОЙ РЕЖИМ)
Стр. 9
Кнопка CLOCK
Стр. 5
Пульт дистанционного
управления
Когда пульт дистанционного управления не используется, держите
его рядом с кондиционером.
Пользуйтесь только пультом дистанционного управления, поставляемым
с прибором.
Не используйте другие пульты дистанционного управления.
Если 2 или более внутренних блока
установлены близко друг к другу, то
один из внутренних блоков может
ошибочно принять сигнал пульта дистанционного управления, направленного на другой блок.
Излучатель
сигналов
Расстояние сигнала:
приблизительно 6 м
Звук воспроизводится
внутренним блоком при
получении сигнала.
Кнопка OFF/ON
(останов/работа)
Кнопка управления
скоростью вентилято-
Стр. 7
ра FAN
Кнопка LONG
(ДЛИННАЯ струя)
Стр. 8
Кнопка управления
шириной заслонки
WIDE VANE
Кнопка управления
заслонкой VANE
Стр. 7
Кнопки TIME, TIMER
(установка времени, уста-
новка таймера)
Увеличение времени
Уменьшение времени
Кнопки WEEKLY TIMER
(установка недельного
таймера)
Кнопка RESET Стр. 5
Крышка
Сдвиньте крышку вниз,
чтобы получить доступ к
пульту дистанционного
управления. Сдвиньте
крышку далее вниз,
чтобы получить доступ
к кнопкам настройки недельного таймера.
Стр. 7
Стр. 5, 10
Стр. 5, 11
RU
RU-4
Page 22
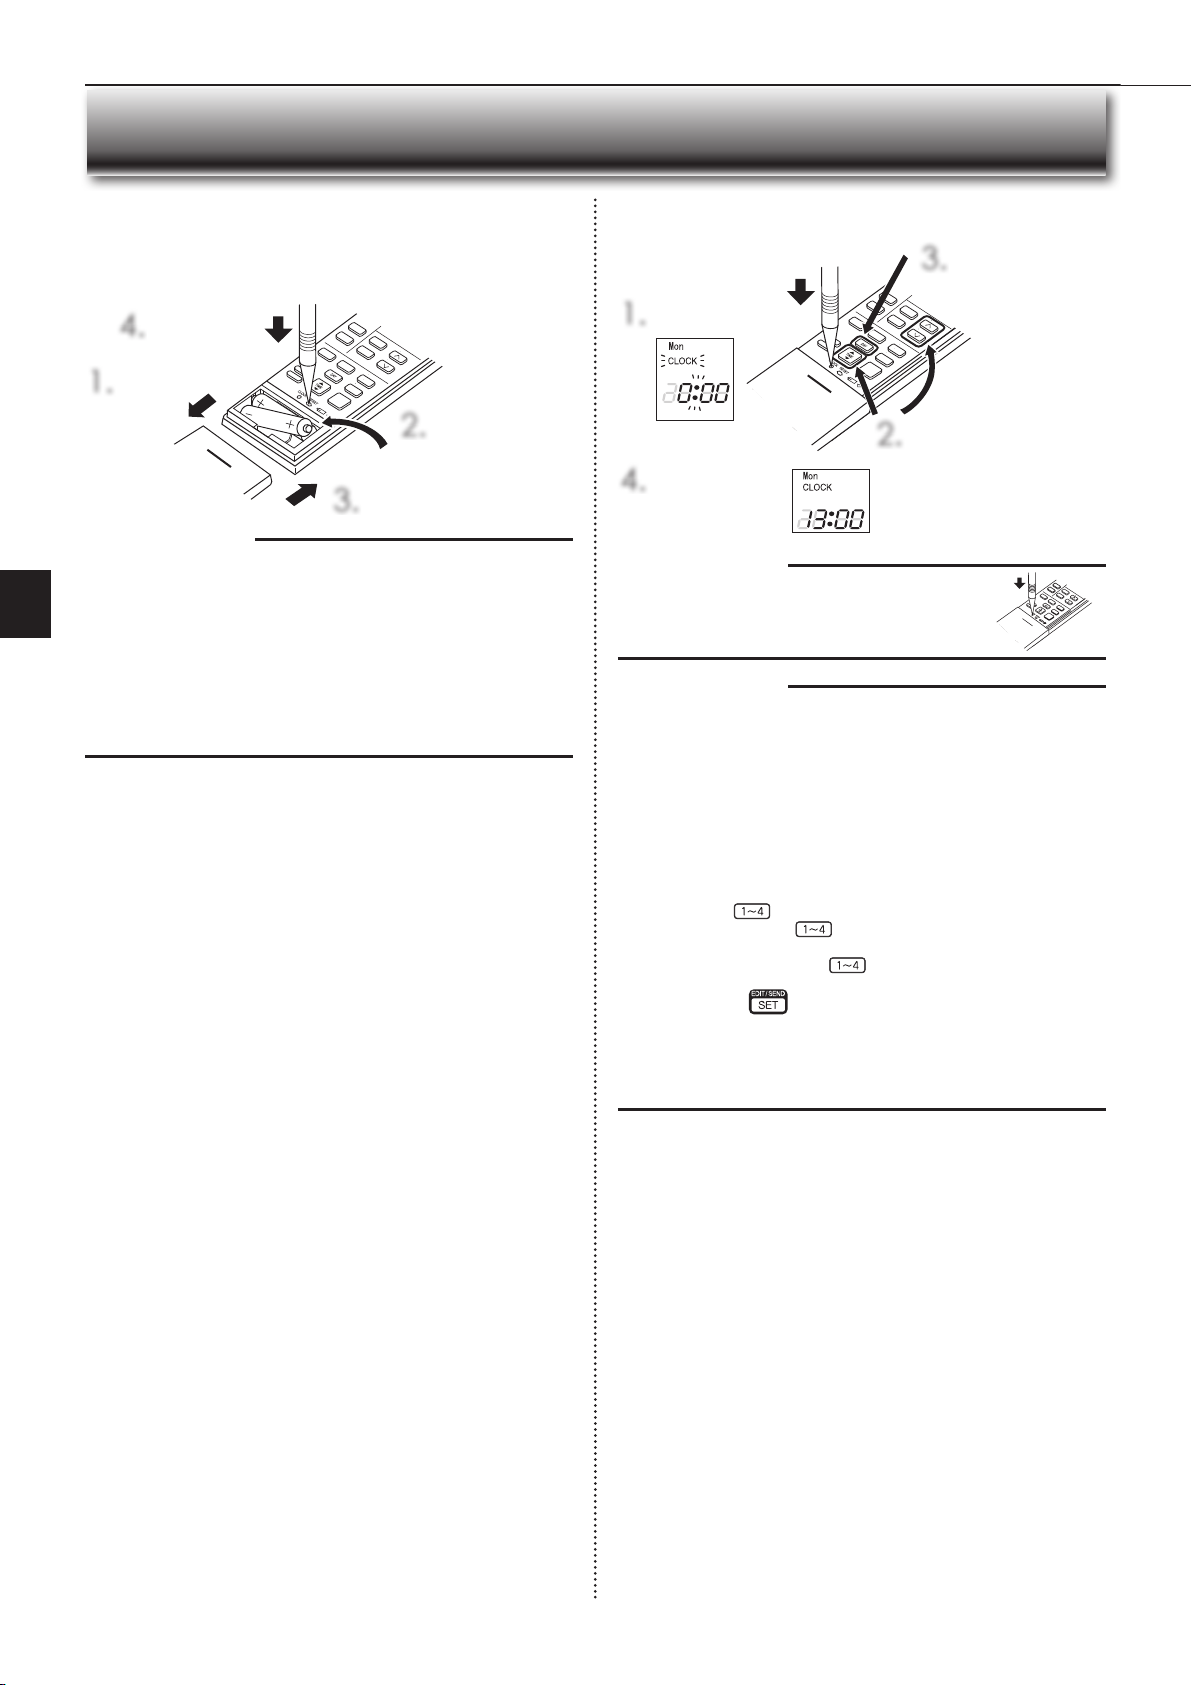
● ИНСТРУКЦИИ ПО ЭКСПЛУАТАЦИИ ●
ПОДГОТОВКА ПРИБОРА К ЭКСПЛУАТАЦИИ
RU
Перед эксплуатацией: Вставьте вилку шнура питания в розетку электросети и/или установите выключатель в положение ON.
Установка батареек пульта дистанционного управления
Нажмите кнопку
4.
RESET.
Снимите переднюю
1.
крышку.
Вставляйте щелоч-
2.
ные батареи ААА
вначале отрицательным полюсом.
Установите переднюю крышку.
3.
Примечание:
• Убедитесь, что полярность соблюдена правильно.
• Запрещается использовать марганцевые батарейки. Это может привести к неисправности пульта дистанционного управления.
• Не пользуйтесь аккумуляторными батарейками.
• Индикатор замены батарей загорается, когда батареи разряжены. Примерно через 7 дней после того, как загорится индикатор, пульт дистанционного управления перестанет работать.
• Заменяйте все батарейки на новые батарейки одинакового типа.
• Батарейки можно использовать в течение приблизительно 1 года. Тем
не менее батарейки с истекшим сроком хранения работают меньше.
• Осторожно нажмите RESET (сброс) остроконечным предметом.
Если не нажать кнопку RESET, кондиционер может работать неправильно.
Установка текущего времени
Нажмите кнопку
3.
DAY (ДЕНЬ),
чтобы задать
Нажмите кнопку
1.
CLOCK.
2.
Еще раз нажмите
4.
кнопку CLOCK.
Примечание:
• Осторожно нажмите CLOCK (часы) остроконечным
предметом.
Примечание:
Настройка пульта дистанционного управления для отдельного внутреннего блока
В одной комнате можно использовать не более 4 внутренних блоков с беспроводными пультами дистанционного управления.
Для управления внутренними блоками при помощи отдельного пульта
дистанционного управления каждому пульту следует назначить номер в
соответствии с номером внутреннего блока.
Данная настройка может применяться только при соблюдении следующих
условий:
• Пульт дистанционного управления ВЫКЛЮЧЕН.
(1) Для входа в режим сопряжения нажмите и удерживайте в течение 2
секунд кнопку
(2) Снова нажмите кнопку
танционного управления.
При каждом нажатии кнопки
порядке: 1 → 2 → 3 → 4.
(3) Нажмите кнопку
После установки выключателя в положение ON пульт дистанционного
управления, первым отправивший сигнал на внутренний блок, считается пультом дистанционного управления для этого внутреннего блока.
После установки внутренний блок будет получать сигнал только от на-
значенного ему пульта дистанционного управления.
на пульте дистанционного управления.
и назначьте номер каждому пульту дис-
номер увеличивается в следующем
, чтобы завершить настройку сопряжения.
день.
Нажмите либо кнопку TIME
(ВРЕМЯ) или кнопки TIMER
(ТАЙМЕР), чтобы задать время.
При каждом нажатии происходит увеличение/уменьшение
времени на 1 минуту (10 минут
при длительном нажатии).
RU-5
Page 23
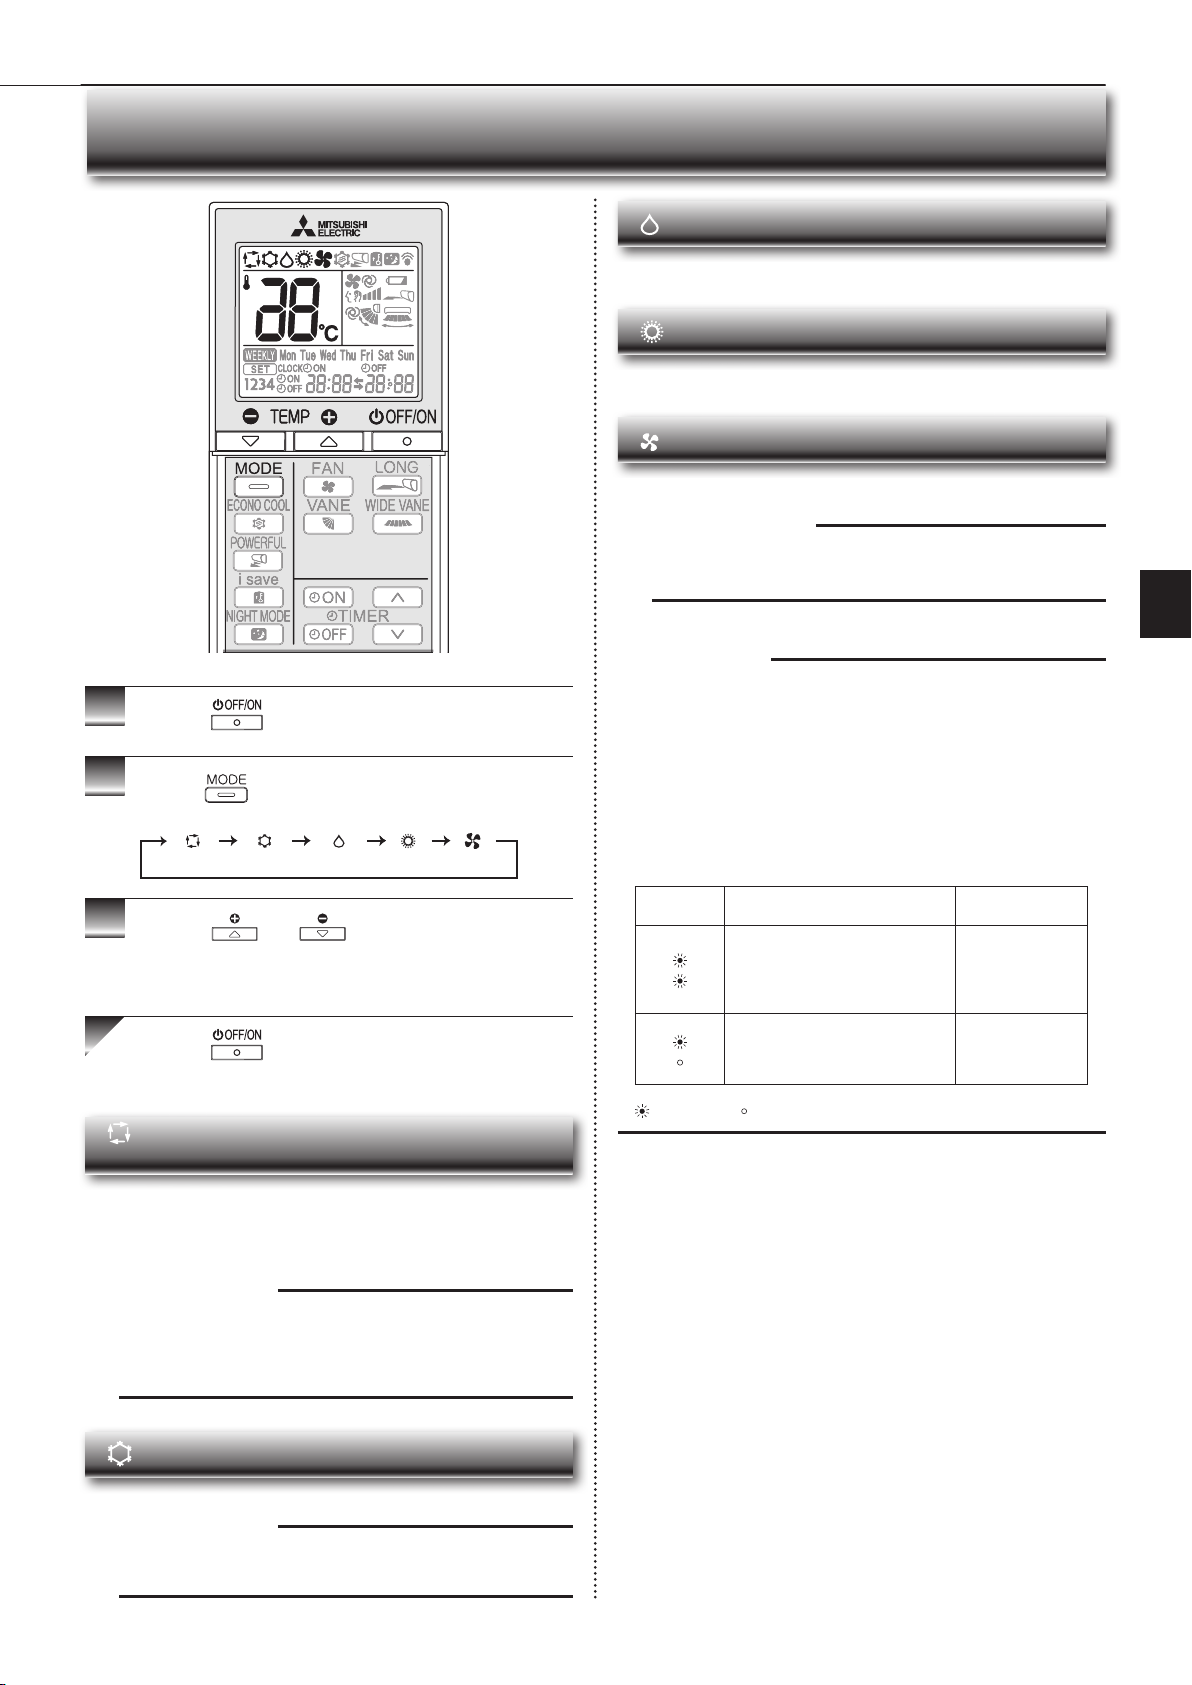
ВЫБОР РЕЖИМОВ РАБОТЫ
1
Нажмите
2
Нажмите , чтобы выбрать режим работы. При каждом нажатии режимы изменяются в следующем порядке:
3
Нажмите или , чтобы установить температуру.
При каждом нажатии температура повышается или
понижается на 1°C.
Нажмите , чтобы остановить работу.
, чтобы начать работу.
(AUTO) (ОХЛАЖДЕНИЕ) (СУШКА) (ОБОГРЕВ)
(ВЕНТИЛЯТОР)
Режим сушки DRY
Осушение воздуха в комнате. Воздух в комнате можно немного охладить.
Во время работы в режиме DRY температуру нельзя установить.
Режим обогрева HEAT
Теплый воздух подается при необходимой температуре.
Режим вентиляции FAN
Обеспечивает циркуляцию воздуха в комнате.
Примечание:
После работы в режиме COOL/DRY (ОХЛАЖДЕНИЕ/СУШКА) рекомендуется перейти в режим FAN (ВЕНТИЛЯТОР), чтобы высушить
внутренний прибор изнутри.
Примечание:
Работа мультисистемной модели
Один наружный блок может управлять двумя и более внутренними блоками.
При одновременной работе нескольких внутренних блоков операции охлаждения/сушки/вентиляции и обогрева не могут выполняться единовременно.
При выборе режима COOL/DRY/FAN на одном блоке и режима HEAT на
другом (или наоборот) блок, на котором режим выбран позднее, переходит
в режим ожидания.
Индикаторная лампочка работы
Индикаторной лампочкой работы обозначается состояние блока.
Индикация Режим работы Комнатная
Блок работает для достижения
установленной температуры
Комнатная температура достигает установленной темпера-туры
температура
Приблизительно
2°C или больше
ниже/выше установленной температуры
Приблизительно
1–2°C выше/ниже
установлен-ной
температуры
RU
Автоматический режим AUTO
(Автоматическое переключение)
Блоком выбирается рабочий режим в соответствии с разницей комнатной и установленной температуры. В режиме AUTO блоком переключается режим (COOL↔HEAT) при разнице комнатной температуры
приблизительно в 2°C по сравнению с установленной температурой,
которая сохраняется дольше 15 минут.
Примечание:
Не рекомендуется использовать Auto Mode (автоматический режим), если
данный внутренний блок подключен к наружному прибору типа MXZ. При
одновременной эксплуатации нескольких внутренних блоков переключение
режима эксплуатации прибора между COOL (охлаждение) и HEAT (обогрев)
может быть невозможным. В этом случае внутренний блок перейдет в режим ожидания (См. таблицу “Индикаторная лампочка работы”).
Режим охлаждения COOL
Холодный воздух подается при необходимой температуре.
Примечание:
Не включайте режим COOL (охлаждение) при очень низкой температуре окружающего воздуха (ниже -10°C). С блока может капать кон-
денсат, который может промочить или повредить мебель и т.д.
Горит Не горит
RU-6
Page 24
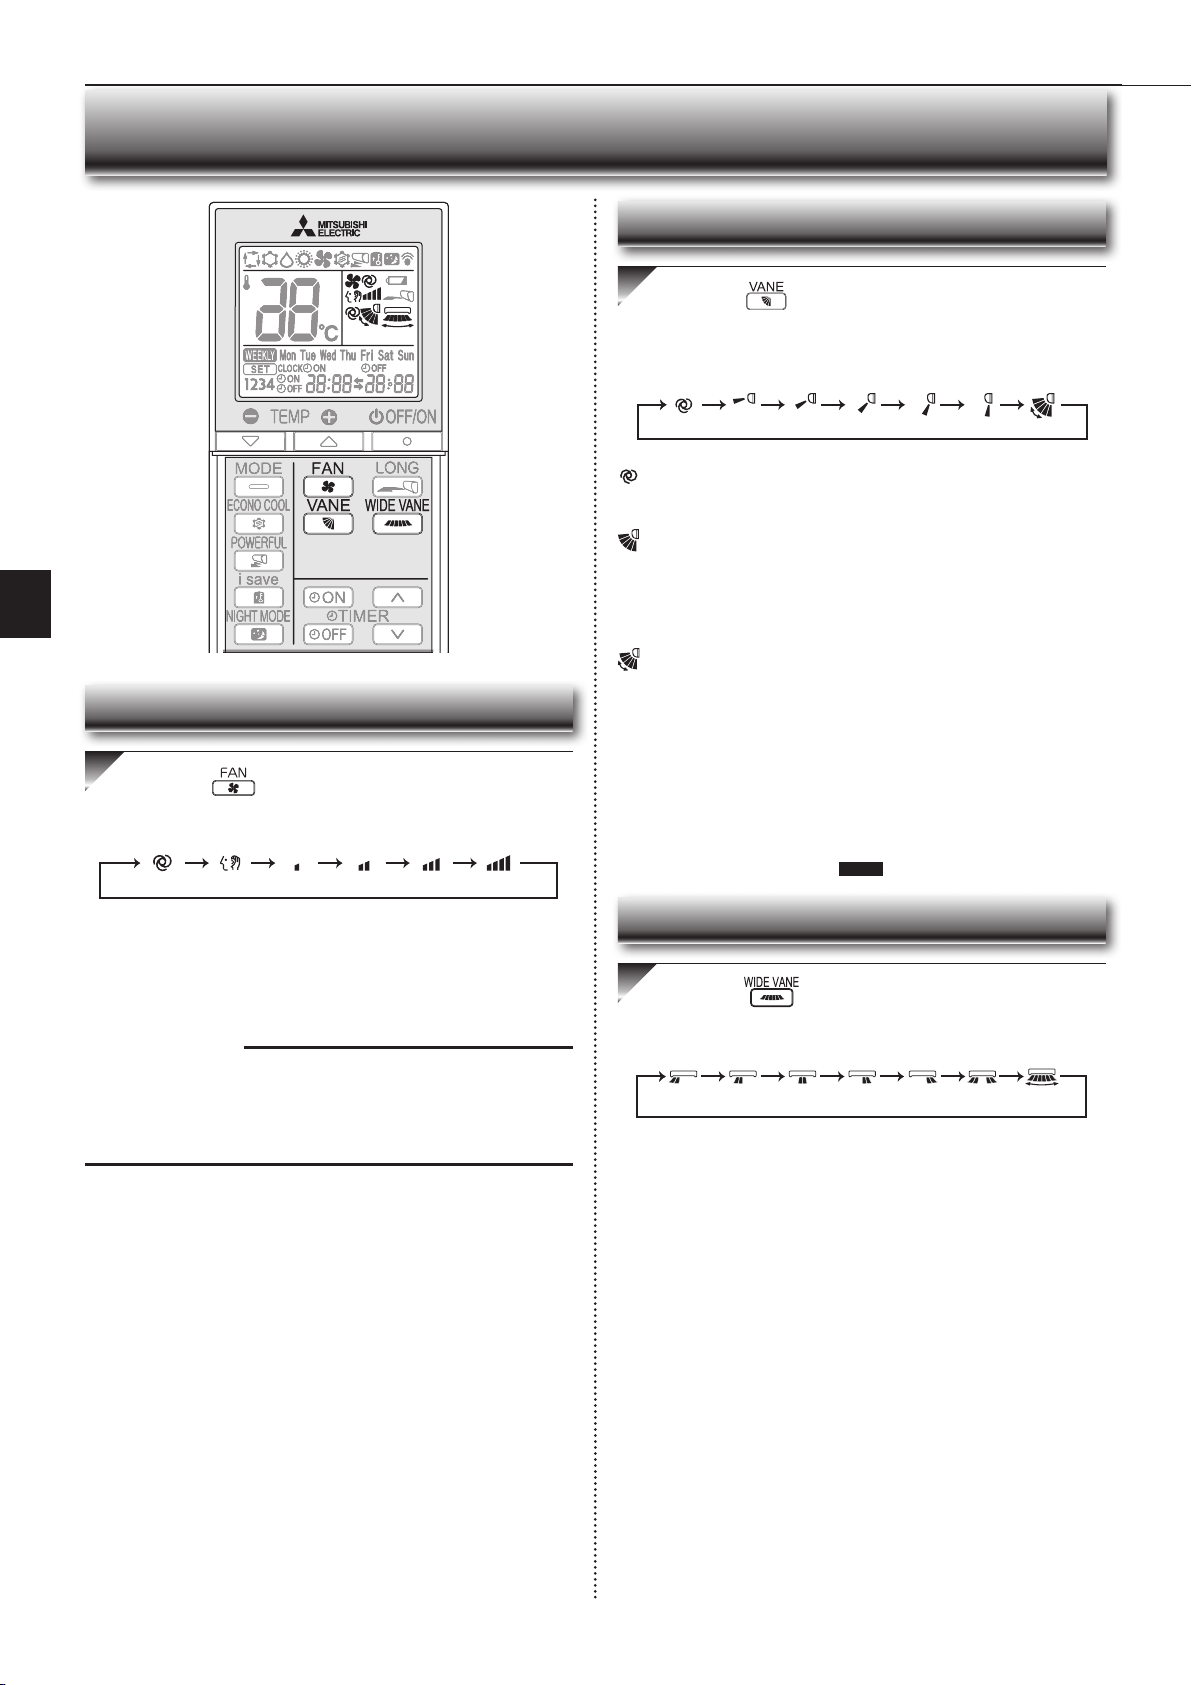
● ИНСТРУКЦИИ ПО ЭКСПЛУАТАЦИИ ●
Н
АСТРОЙКА СКОРОСТИ ВЕНТИЛЯТОРА И НАПРАВЛЕНИЯ ВОЗДУШНОГО ПОТОКА
Вертикальное направление воздушного потока
Нажмите , чтобы выбрать направление воздушного потока. При каждом нажатии направление
воздушного потока изменяется в следующем порядке:
(AUTO) (1) (2) (3) (4) (5) (SWING)
RU
Скорость вентилятора
Нажмите , чтобы выбрать скорость вентилятора. При каждом нажатии скорость вентилятора
изменяется в следующем порядке:
(
AUTO
) (
Бесшумный режим
• При установке функции AUTO из внутреннего прибора раздаются
два коротких звуковых сигнала.
• Используйте большую скорость вентилятора для более быстрого
охлаждения/нагрева помещения.
• Меньшую скорость вентилятора используют для бесшумной работы устройства.
Примечание:
Работа мультисистемной модели
Когда несколько внутренних блоков управляются одновременно одним наружным прибором в режиме нагрева, температура потока воздуха может
быть низкой. В этом случае рекомендуется задавать скорость вентилятора
в режиме AUTO.
) (Низкий) (
Средний
) (
Высокий
) (Очень высокий)
(AUTO) ........Заслонка установлена в положение для более эффектив-
(Вручную) ...Для эффективного кондиционирования воздуха установите
(Swing) ........Заслонка периодически перемещается вверх и вниз.
• При установке функции AUTO из внутреннего прибора раздаются
• При изменении направления потока воздуха обязательно исполь-
• При установке в положение включения выключателя положение
• Если горизонтальные заслонки находятся в положении, которое
ной подачи воздушного потока. COOL/DRY/FAN: горизонтальное положение. HEAT:положение (4).
COOL/DRY в верхнее положение, а HEAT — в нижнее.
Если в режиме COOL/DRY выбрано нижнее положение,
заслонка автоматически перемещается в верхнее положение через 0,5—1 ч для предотвращения капанья и
просачивания конденсата.
два коротких звуковых сигнала.
зуйте пульт дистанционного управления. Перемещение горизонтальных заслонок вручную приводит к их неисправности.
горизонтальных заслонок будет сброшено приблизительно через
минуту, после чего они начнут работу. Заслонки функционируют
аналогичным образом и в режиме аварийного охлаждения.
кажется необычным, см.
стр. 14 .
Горизонтальное направление воздушного потока
Нажмите , чтобы выбрать направление воздушного потока. При каждом нажатии направление
потока воздуха изменяется в следующем порядке:
(
SWING
)
RU-7
Page 25
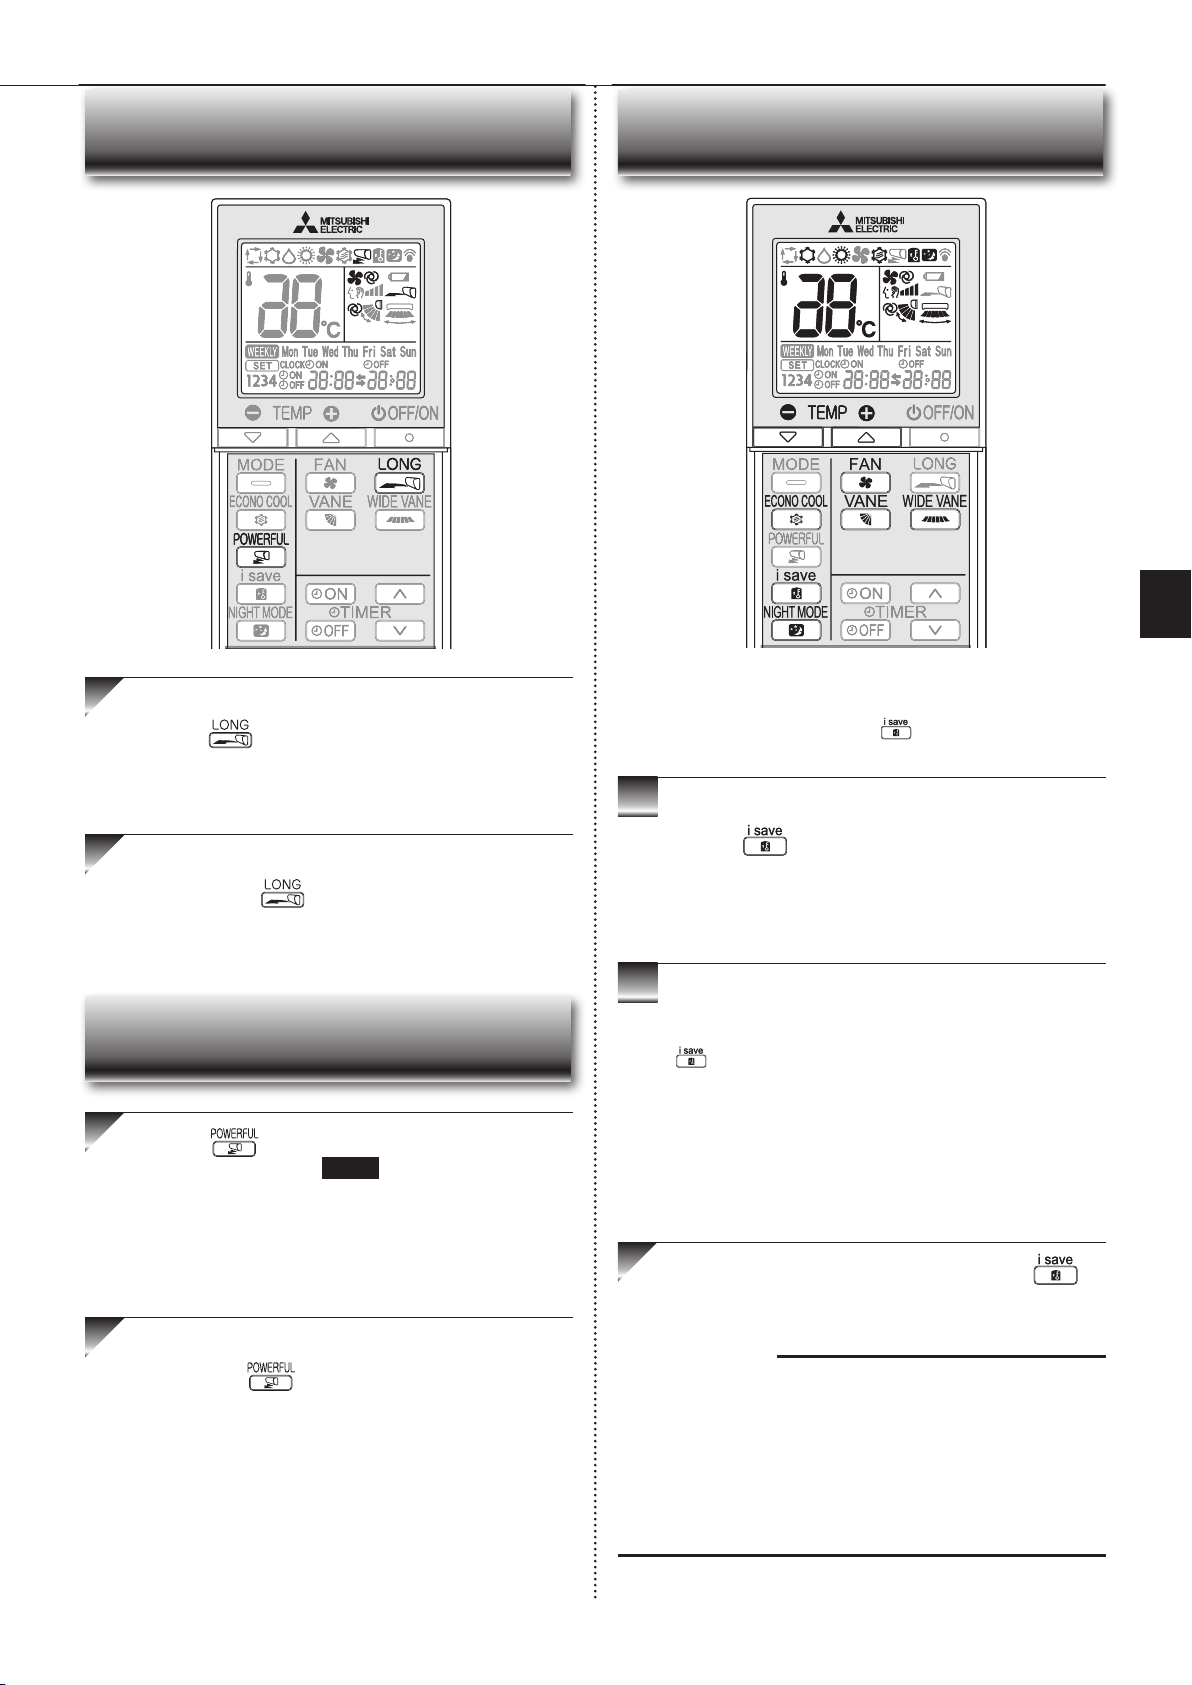
РЕЖИМ LONG (ДЛИННАЯ СТРУЯ)
Функция упрощенного повторного ввода настроек позволяет
Чтобы включить режим LONG (ДЛИННАЯ струя),
нажмите
• Скорость вращения вентилятора увеличится, а горизонтальная
заслонка переместится в положение для режима LONG (ДЛИННАЯ струя).
• Воздух подается на большее расстояние.
.
воспроизводить предпочтительные (предварительно заданные)
настройки одним нажатием кнопки . Повторное нажатие этой
кнопки возвращает предыдущие настройки.
Чтобы отменить режим LONG (ДЛИННАЯ струя),
опять нажмите
• Режим LONG (ДЛИННАЯ струя) отменяется, когда нажата кнопка
OFF/ON (ВЫКЛ./ВКЛ.), VANE (УПРАВЛЕНИЕ ЗАСЛОНКОЙ) или
ECONO COOL (ЭНЕРГОСБЕРЕЖЕНИЕ ПРИ ОХЛАЖДЕНИИ).
.
РЕЖИМ POWERFUL
Нажмите в режиме COOL (ОХЛАЖДЕНИЕ)
или HEAT (ОБОГРЕВ) стр. 6 для запуска режима
POWERFUL (ИНТЕНСИВНОЕ).
Скорость вентилятора : специальная скорость для режима
Горизонтальная заслонка : установите положение заслонки или по-
• В режиме POWERFUL невозможно задать температуру.
POWERFUL
ложение нисходящего воздушного потока во время действия настройки AUTO
OПЕРАЦИЯ I-SAVE
1
Для выбора режима i-save (ЭНЕРГОСБЕРЕЖЕНИЕ)
нажмите
режимах COOL (ОХЛАЖДЕНИЕ), ECONO COOL
(ЭНЕРГОСБЕРЕЖЕНИЕ ПРИ ОХЛАЖДЕНИИ),
NIGHT MODE (НОЧНОЙ режим) или HEAT (ОБОГРЕВ).
2
Задайте температуру, скорость вентилятора и направление воздушного потока.
• Эта же настройка выбирается в следующий раз путем нажатия
.
• Пользователь может сохранить две настройки. (Одну - для режи-
ма COOL/ECONO COOL, а вторую - для режима HEAT)
• Выберите температуру, скорость вентилятора и направление воз-
душного потока с учетом параметров помещения.
• Обычно уставка минимальной температуры в режиме HEAT
(ОБОГРЕВ) — 16°C.
Однако только во время режима i-save (ЭНЕРГОСБЕРЕЖЕНИЕ)
уставка минимальной температуры — 10°C.
Для отмены операции i-save снова нажмите .
• Операция i-save отменяется и при нажатии на кнопку MODE (ВЫ-
БОР РЕЖИМА).
во время работы кондиционера в
RU
Чтобы отменить режим POWERFUL, повторно нажмите кнопку
• Кроме того, отмена режима POWERFUL выполняется автоматически через 15 минут либо при нажатии кнопок OFF/ON, FAN,
ECONO COOL или i-save.
.
Примечание:
Пример использования:
1. Режим малой мощности
Задавайте температуру на 2-3°C теплее в режиме COOL и прохладнее
в режиме HEAT.
Такая настройка используется для помещений, где нет людей, а также
во время сна.
2. Сохранение часто используемых настроек
Сохраняйте свои предпочтительные настройки для режимов COOL/
ECONO COOL и HEAT. Это позволит выбрать свои предпочтительные
настройки одним нажатием кнопки.
RU-8
Page 26
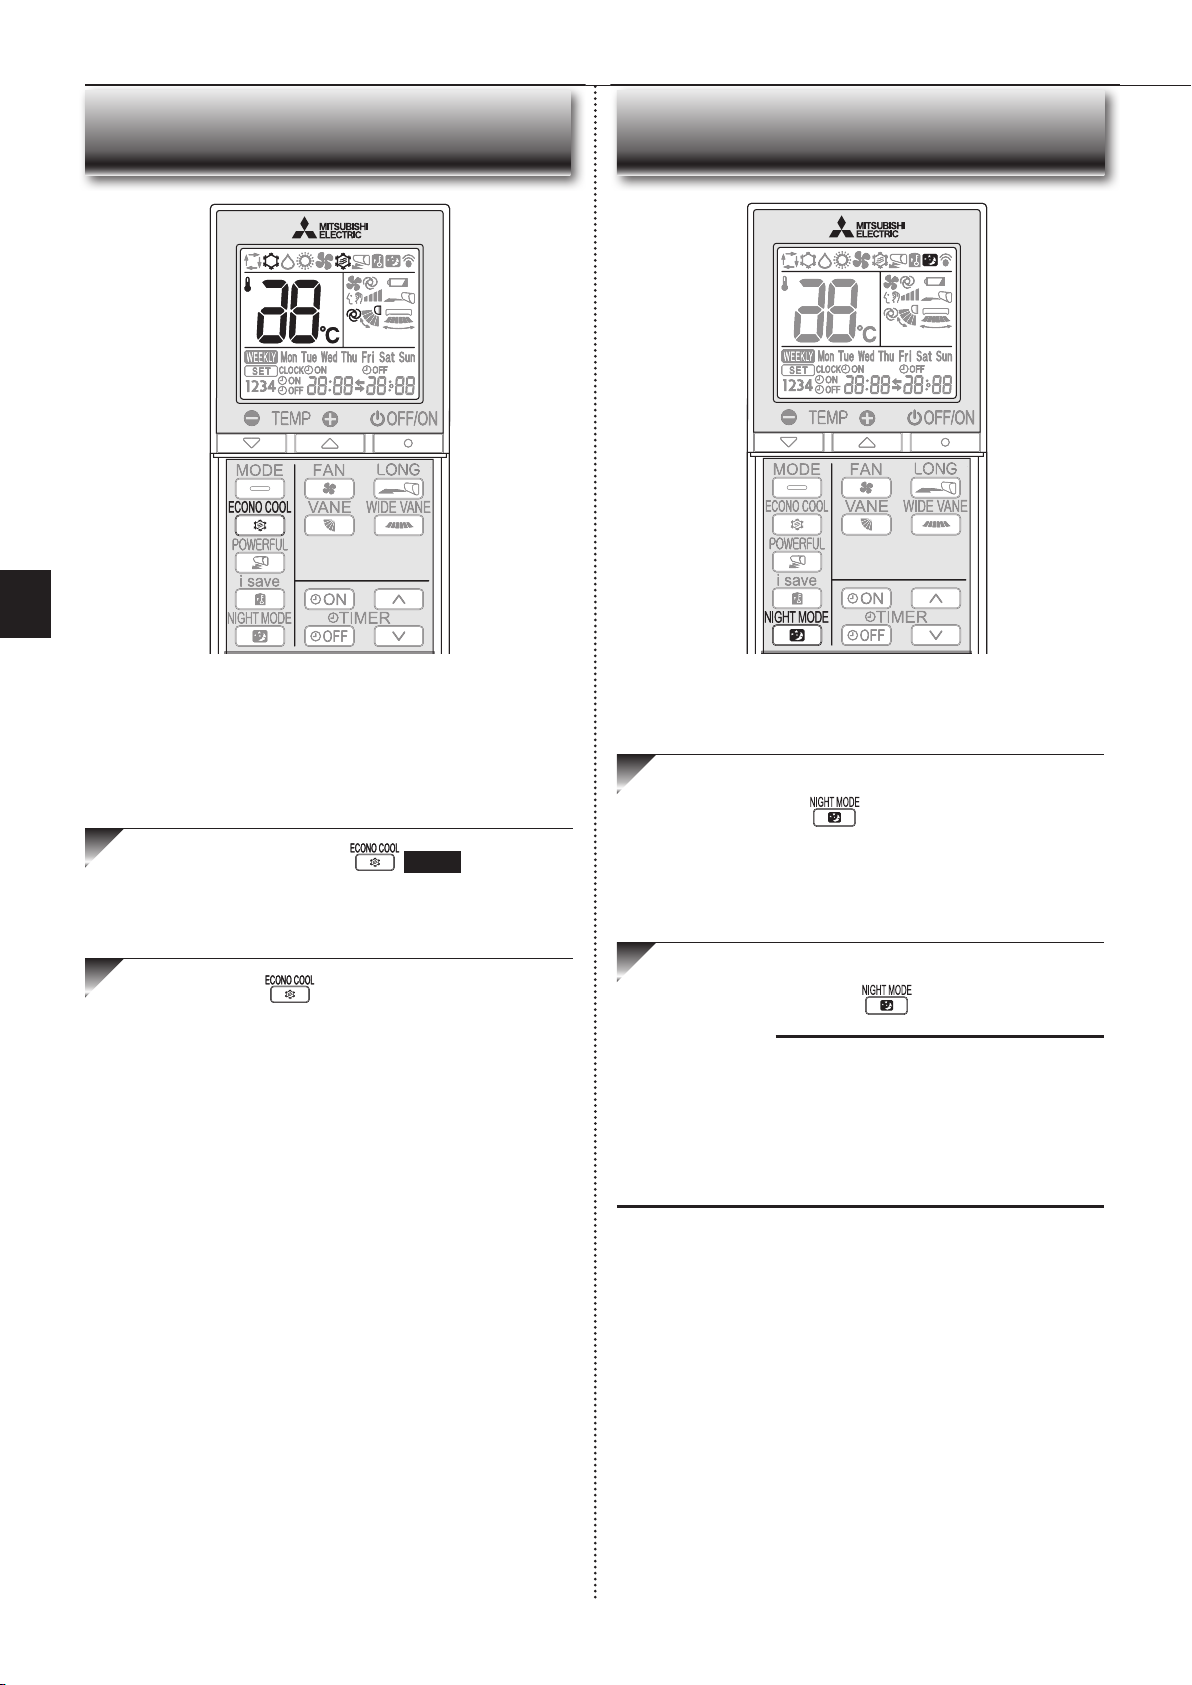
● ИНСТРУКЦИИ ПО ЭКСПЛУАТАЦИИ ●
RU
ФУНКЦИЯ ECONO COOL
Изменяемое направление воздушного потока дает ощущение
большей прохлады по сравнению с постоянным потоком.
Заданная температура и направление воздушного потока изменяются автоматически микропроцессором управления. Можно
выполнять операцию охлаждения воздуха, поддерживая при этом
комфортный режим. Таким образом можно экономить электроэнергию.
РЕЖИМ NIGHT MODE
В режиме NIGHT MODE (НОЧНОЙ режим) изменяется яркость
индикатора режима работы, отключается звуковой сигнал и ограничивается уровень шума наружного блока.
Чтобы включить режим NIGHT MODE (НОЧНОЙ
режим), нажмите
во время работы.
В режиме COOL нажмите cтр. 6 , чтобы запустить функцию ECONO COOL.
В соответствии с температурой потока воздуха в различных циклах
прибор будет работать в режиме вертикального качания.
Снова нажмите , чтобы отменить функцию
ECONO COOL.
• Режим ECONO COOL выключается при нажатии кнопки VANE.
• Индикаторная лампочка работы потускнеет.
• Звуковой сигнал будет отключен для всех случаев, кроме запуска
и остановки работы.
• Уровень шума наружного блока будет ниже значения, указанного
в разделе ТЕХНИЧЕСКИЕ ХАРАКТЕРИСТИКИ.
Чтобы выключить режим NIGHT MODE (НОЧНОЙ
режим), опять нажмите
.
Примечание:
• Мощность охлаждения/обогрева может снизиться.
• Уровень шума внешнего блока может не измениться после запуска прибора, во время срабатывания защиты или в зависимости от других условий эксплуатации.
• Скорость вращения вентилятора внутреннего блока не изменится.
Индикаторную лампочку работы будет сложно увидеть в ярко освещен-
•
ной комнате.
• Уровень шума внешнего блока не будет снижаться во время работы
мультисистемной модели.
RU-9
Page 27

РАБОТА С ИСПОЛЬЗОВАНИЕМ ТАЙМЕРА
(ТАЙМЕР ВКЛЮЧЕНИЯ/ВЫКЛЮЧЕНИЯ)
АВАРИЙНАЯ ЭКСПЛУАТАЦИЯ
Когда использование пульта дистанционного
управления невозможно...
Аварийную эксплуатацию можно включить путем нажатия переключателя
аварийной эксплуатации (E.O. SW) на внутреннем блоке.
При каждом нажатии E.O. SW режимы работы переключаются в следующем порядке:
Индикаторная
лампочка работы
Аварийное охлаждение COOL
Аварийный обогрев HEAT
1
Чтобы настроить таймер, во время работы нажмите
кнопку
(таймер ВКЛЮЧЕНИЯ) : в заданное время прибор
(таймер ВЫКЛЮЧЕНИЯ) : в заданное время прибор
* Мигание кнопки или .
*
Убедитесь, что текущее время и день заданы правильно. Стр. 5
2
Чтобы задать время таймера, используйте кнопки
При каждом нажатии заданное время увеличивается или уменьшается на 10 минут.
• Настраивать таймер следует, когда мигает значок или .
3
Чтобы отменить таймер, снова нажмите кнопку
или .
ВКЛЮЧИТСЯ.
ВЫКЛЮЧИТСЯ.
(увеличить) и (уменьшить).
или .
Примечание:
• Таймеры ON (ВКЛ.) и OFF (ВЫКЛ.) можно установить вместе. Значок
показывает очередность работы таймера.
• Если при установленном таймере ON/OFF произошел сбой в подаче
питания, см. раздел “Функция повторного автозапуска” на стр. 10 .
Стоп
Установленная температура: 24°C
Скорость вентилятора: средняя
Горизонтальная заслонка: авто
Примечание:
•
Первые 30 минут работы являются тестовым прогоном. Управление температурой не работает, а для скорости вентилятора установлено значение High (Высокая)
•
В режиме аварийного обогрева скорость вентилятора постепенно увеличивается
для обеспечения выдувания теплого воздуха.
• В режиме аварийного охлаждения положение горизонтальных заслонок
будет сброшено приблизительно через минуту, после чего они начнут
работу.
.
ФУНКЦИЯ ПОВТОРНОГО
АВТОЗАПУСКА
Если произошел сбой питания или электропитание прибора было выключено
во время его работы, функция повторного автозапуска автоматически настраивает прибор на работу в том режиме, который был задан с помощью
пульта дистанционного управления до отключения электропитания. Когда
таймер установлен, настройка таймера отменяется и блок начинает работу
при возобновлении подачи питания.
Если вы не хотите пользоваться этой функцией, обратитесь к представителю сервисной службы, так как потребуется изменить настройки
данного прибора.
RU
RU-10
Page 28

● ИНСТРУКЦИИ ПО ЭКСПЛУАТАЦИИ ●
ИСПОЛЬЗОВАНИЕ НЕДЕЛЬНОГО ТАЙМЕРА
•
Для каждого отдельного дня недели можно задать до 4 таймеров ON (ВКЛЮЧЕНИЕ) или OFF (ВЫКЛЮЧЕНИЕ).
•
Для одной недели можно задать до 28 таймеров ON (ВКЛЮЧЕНИЕ) или OFF (ВЫКЛЮЧЕНИЕ).
Например : Устройство работает при 24°C с момента пробуждения пользователя до его ухода из дома и при 27°C с
момента возвращения пользователя домой и до отхода ко сну в рабочие дни. Устройство работает при
27°C с момента позднего пробуждения пользователя и до раннего отхода ко сну в выходные дни.
Настройка1 Настройка2 Настройка3 Настройка4
Mon
Sun
ON OFF ON OFF
~
Fri
Sat
~
24°C 27°C
6:00 8:30 17:30 22:00
Настройка1 Настройка2
ON OFF
8:00 21:00
27°C
Примечание:
Простая настройка таймера ON/OFF (ВКЛЮЧЕНИЯ/ВЫКЛЮЧЕНИЯ)
доступна, если включен недельный таймер. В этом случае таймер ON/
OFF (ВКЛЮЧЕНИЯ/ВЫКЛЮЧЕНИЯ) имеет более высокий приоритет, чем
недельный таймер; работа недельного таймера возобновляется после
окончания работы таймера ON/OFF (ВКЛЮЧЕНИЯ/ВЫКЛЮЧЕНИЯ).
3
Нажмите , и , чтобы задать ON/OFF
(ВКЛЮЧЕНИЕ/ВЫКЛЮЧЕНИЕ), время и температуру.
Путем нажатия выберите таймер
ON/OFF (ВКЛЮЧЕНИЯ/ВЫКЛЮЧЕНИЯ).
При нажатии настройка таймера удаляется.
* Нажмите и удерживайте кнопку, чтобы быстро изменить время.
Нажмите и , чтобы перейти к настройке таймера для других дней недели и (или) номеров дней недели.
Путем нажатия
настройте время.
Например:
Выберите
[ON (ВКЛ.)],
[6:00] и [24°C].
Путем нажатия
настройте температуру.
RU
Настройка недельного таймера
* Убедитесь, что текущее время и день заданы правильно.
1
Нажмите , чтобы перейти в режим настройки
недельного таймера.
*
мигает.
4
Нажмите , чтобы завершить и сохранить настройку недельного таймера.
* Мигающая пикто-
грамма
и отображается
текущее время.
гаснет,
Примечание:
• Нажмите
таймера во внутренний блок. Направьте пульт дистанционного управле-
ния на внутренний блок и удерживайте в течение 3 секунд.
• При настройке таймера для более чем одного дня недели или одного номера, нет необходимости нажимать
все настройки завершены. Все настройки недельного таймера будут сохранены.
•
Нажмите
и удерживайте в течение 5 секунд, чтобы удалить все настройки недельного
таймера. Направьте пульт дистанционного управления на внутренний блок.
5
Нажмите , чтобы ВКЛЮЧИТЬ (ON) недельный
таймер. (Загорается
* При ВКЛЮЧЕННОМ (ON) недельном таймере будет светиться индика-
тор дня недели, для которого полностью задана настройка таймера.
Снова нажмите , чтобы ВЫКЛЮЧИТЬ (OFF)
недельный таймер. (
, чтобы передать информацию о настройках недельного
для каждой настройки. Нажмите один раз после того, как
, чтобы перейти в режим настройки недельного таймера, нажмите
.)
гаснет.)
Примечание:
Сохраненные настройки не удаляются при ВЫКЛЮЧЕННОМ (OFF) недельном таймере.
Проверка настройки недельного таймера
2
Нажмите и , чтобы перейти к настройке дня и номера.
Например: [Mon (Пн) Tue
Путем нажатия можно выбрать день недели для настройки.
* Можно выбрать все дни недели.
Путем нажатия
можно выбрать номер
дня для настройки.
RU-11
(Вт)... Sun (Вс)]
и [1] выбраны.
1
Нажмите , чтобы перейти в режим настройки
недельного таймера.
* мигает.
2
Нажмите или , чтобы просмотреть настройки для конкретного дня или номера дня недели.
Нажмите , чтобы выйти из режима настроек
недельного таймера.
Примечание:
Если выбраны все дни недели для просмотра настроек и задается другая
настройка для дня недели, отображается
.
Page 29

ЧИСТКА
Инструкции:
•
Перед чисткой отключите источник питания или выключите прерыватель тока в сети.
• Не дотрагивайтесь до металлических деталей руками.
• Запрещается использовать растворитель, бензин, полировочный порошок или инсектициды.
• Используйте только мягкие очищающие средства.
• Не используйте грубую щетку, жесткую губку и аналогичные средства.
Воздушный фильтр
тельный фильтр)
• Чистите каждые 2 недели
• Загрязненные участки очищайте с помощью пылесоса или промывайте
водой.
• После мытья высушите его в тени.
Передняя панель
(Воздухоочисти-
• Не погружайте в воду и не промывайте в ней горизонтальную заслонку.
• Запрещается использовать воду, температура которой выше 50°C.
• Для сушки запрещается подвергать детали воздействию прямого солнечного света, источникам тепла или пламени.
• Не применяйте к вентилятору излишнюю силу, поскольку это может
привести к образованию трещин или поломке.
Фильтр очистки воздуха
(Воздухоочистительный фильтр с
использованием ионизированного
серебра, не входит в поставку)
Каждые 3 месяца:
• Удаляйте загрязнения при помощи пылесоса.
Если при помощи пылесоса загрязнения удалить невозможно:
Поместите фильтр вместе с рамой в теплую воду, а затем промойте его.
•
• После мытья высушите его в тени.
Каждый год:
• Для улучшения производительности заменяйте фильтр для очистки
воздуха новым.
• Номер детали MAC-2360FT-E
Направляющая фильтра
RU
Петля
Отверстие
1. Поднимайте переднюю панель до тех пор, пока она не зафиксируется
на месте со щелчком.
2. Придерживайте петли и тяните, чтобы снять, как показано на иллюстрации выше.
• Протирайте мягкой сухой тканью или промывайте водой.
• Не держите ее в воде более двух часов.
• Перед установкой тщательно высушите в тени.
3. Устанавливайте переднюю панель, выполняя
инструкции по ее снятию в обратном порядке. Надежно закройте переднюю панель и нажмите на
области, указанные стрелками.
Эта информация составлена с учетом требований Регламента (ЕС) № 528/2012
НАЗВАНИЕ МОДЕЛИ
MSZ-AP60/71VG ФИЛЬТР
MAC-2360FT-E ФИЛЬТР
Обрабатываемое изделие
(название частей)
Активные вещества
(номер CAS)
Фосфат серебра-натрия-водорода-циркония
(265647-11-8)
2-октил-2H-изотиазол-3-он (OIT)
(26530-20-1)
Цеолит цинка с содержанием серебра
(130328-20-0)
Втолкните,
чтобы установить в блок по
направляющей
фильтра.
Потяните, чтобы снять с блока.
Важно
•
Для улучшения производительности и сокращения уровня потребления энергии регулярно чистите фильтры.
•
Загрязненные фильтры являются причиной образования конденсата в кондиционере, что может способствовать появлению грибков и плесени. Поэтому рекомендуется очищать воздушные фильтры каждые 2 недели.
Свойства
Антибактериальный
Предотвращающий
размножение плесени и грибка
Антибактериальный
Инструкция по использованию
(информация о безопасном обращении)
• Используйте этот продукт в соответствии с указаниями инструкции по эксплуатации и только
по назначению.
• Не берите в рот. Храните в недоступном для
детей месте.
• Используйте этот продукт в соответствии с указаниями инструкции по эксплуатации и только
по назначению.
• Не берите в рот. Храните в недоступном для
детей месте.
RU-12
Page 30

● ИНСТРУКЦИИ ПО ЭКСПЛУАТАЦИИ ●
НАСТРОЙКА ИНТЕРФЕЙСА Wi-Fi (ТОЛЬКО ТИП VGK)
RU
Данный интерфейс Wi-Fi обеспечивает обмен информацией о
состоянии и управляет выполнением команд, поступающих с
сервера, посредством соединения с внутренним блоком.
Передняя
панель
Интерфейс Wi-Fi
Передняя
панель
Интерфейс Wi-Fi
Вводная часть по интерфейсу Wi-Fi
№ Элемент Описание
Переключатель MODE
1
(РЕЖИМ)
Переключатель RESET
2
(СБРОС)
Светодиодный инди-
3
катор ERR (ОШИБКА)
(оранжевый)
Светодиодный ин-
4
дикатор NET (СЕТЬ)
(зеленый)
Светодиодный инди-
5
катор MODE (РЕЖИМ)
(оранжевый)
Светодиодный инди-
6
катор UNIT (ПРИБОР)
(зеленый)
Обеспечивает выбор режима.
Обеспечивает сброс системы и ВСЕХ
настроек.
Отображает состояние ошибки сети.
Отображает состояние сети.
Отображает состояние точки доступа.
Отображает состояние внутреннего прибора.
3
ERR
4
NET
MODE
5
UNIT
6
RESET
MODE
2
1
1
Откройте переднюю панель и извлеките интерфейс
Wi-Fi.
2
Настройте соединение между интерфейсом Wi-Fi
и маршрутизатором. См. РУКОВОДСТВО ПО НАСТРОЙКЕ и SETUP QUICK REFERENCE GUIDE
(КРАТКОЕ СПРАВОЧНОЕ ПОСОБИЕ ПО НАСТРОЙКЕ), прилагаемые к блоку.
Что касается РУКОВОДСТВА ПО НАСТРОЙКЕ,
перейдите на указанный ниже веб-сайт.
http://www.melcloud.com/Support
3
После настройки соединения установите назад
интерфейс Wi-Fi и закройте переднюю панель.
4
Что касается Руководства пользователя MELCloud,
перейдите на указанный ниже веб-сайт.
http://www.melcloud.com/Support
Примечание:
• Прежде чем приступить к настройке интерфейса Wi-Fi, убедитесь в том,
что маршрутизатор поддерживает настройку шифрования WPA2-AES.
• Перед использованием данного интерфейса Wi-Fi конечный пользователь должен прочитать и принять условия предоставления услуги Wi-Fi.
• Для завершения подключения данного интерфейса Wi-Fi к услуге Wi-Fi
может потребоваться маршрутизатор.
Данный интерфейс Wi-Fi не начнет передачу эксплуатационных данных
•
из системы до тех пор, пока конечный пользователь не зарегистрируется
и не примет условия предоставления услуги Wi-Fi.
•
Данный интерфейс Wi-Fi не должен подключаться к каким-либо системам Mitsubishi Electric, предназначенным для обеспечения охлаждения
или обогрева критически важных объектов.
•
Во время настройки данного интерфейса Wi-Fi запишите информацию,
относящуюся к настройке интерфейса Wi-Fi, на последней странице данного руководства.
•
При смене места расположения или утилизации оборудования выполните сброс настроек интерфейса Wi-Fi до заводских установок.
(1) Переключатель MODE (РЕЖИМ)
• Переключатель MODE (РЕЖИМ) используется для выбора режима
в различных конфигурациях.
(2) Переключатель RESET (СБРОС)
• Для перезагрузки системы нажмите и удерживайте переключатель
RESET (СБРОС) в течение 2 секунд.
• Для сброса настроек интерфейса Wi-Fi до заводских значений по
умолчанию нажмите и удерживайте переключатель RESET (СБРОС)
в течение 14 секунд.
В случае сброса настроек интерфейса Wi-Fi до заводских значений
по умолчанию ВСЯ информация о конфигурации будет утеряна.
Выполнять данную операцию следует с особой осторожностью.
RU-13
Интерфейс Wi-Fi, изготовленный компанией Mitsubishi Electric, предназначен для обмена данными только со службой Wi-Fi MELCloud компании Mitsubishi Electric.
Интерфейсы Wi-Fi, выпущенные сторонними организациями, нельзя
подключить к MELCloud.
Mitsubishi Electric не несет ответственности за какие-либо (i) пониженные эксплуатационные характеристики системы или других изделий;
(ii) отказ системы или изделия; или (iii) утрату либо повреждение какойлибо системы или изделия; причиненные использованием или возникшие в результате эксплуатации интерфейса Wi-Fi или какой-либо службы Wi-Fi сторонней организации совместно с оборудованием Mitsubishi
Electric.
Чтобы получить обновленные сведения о MELCloud от Mitsubishi
Electric Corporation, посетите веб-сайт www.melcloud.com.
Page 31

ЕСЛИ ВАМ КАЖЕТСЯ, ЧТО ПРИБОР НЕИСПРАВЕН
Если даже после выполнения этих проверок прибор не возобновит нормальную
работу, прекратите его эксплуатацию и обратитесь к своему дилеру.
Симптом Объяснение и точки проверки
Внутренний прибор
Прибор не функционирует. • Возможно, выключен прерыватель тока в сети?
Горизонтальная заслонка не
двигается.
При повторном запуске прибор не
реагирует на команды управления
в течение приблизительно 3 минут.
Из воздуховыпускного отверстия
внутреннего прибора выходит
легкий туман.
Режим качания ГОРИЗОНТАЛЬНОЙ ЗАСЛОНКИ приостанавливается на некоторое время,
после чего возобновляется.
При выборе SWING (КАЧАНИЕ)
в режиме COOL/DRY/FAN
(ОХЛАЖДЕНИЕ/СУШКА/ВЕНТИЛЯТОР) нижняя горизонтальная
лопасть неподвижна.
Во время работы изменяется направление движения воздушного
потока.
Направление горизонтальной
заслонки нельзя отрегулировать
с помощью пульта дистанционного управления.
При работе в режиме обогрева
прибор останавливается примерно на 10 минут.
При включении питания прибор
автоматически начинает работу,
даже не получая сигнала от
пульта дистанционного управления.
Две горизонтальные заслонки
соприкасаются. Горизонтальные
заслонки в необычном положении. Горизонтальные заслонки
не возвращаются в правильное
“положение закрывания”.
Если в режиме COOL/DRY
комнатная температура почти
достигает заданной, наружный
блок останавливается, а внутренний блок продолжает работу
на низкой скорости.
Со временем внутренний блок
может изменить цвет.
Индикаторная лампочка работы
светится тускло. Устройство не
выдает звуковой сигнал.
• Проверьте, подключен ли шнур питания?
• Проверьте, установлен ли таймер ВКЛЮЧЕНИЯ? Стр. 10
• Проверьте, правильно ли установлена горизонтальная и вертикальная заслонка?
• Не деформирована ли защитная решетка вентилятора?
• При установке в положение включения выключателя положение горизонтальных заслонок будет
сброшено приблизительно через минуту. По
завершении сброса положения возобновляется
нормальная работа горизонтальных заслонок.
Заслонки функционируют аналогичным образом
и в режиме аварийного охлаждения.
• Это защитная функция прибора, которая включается в соответствии с инструкциями микропроцессора. Пожалуйста, подождите.
• Прохладный воздух, поступающий из прибора,
быстро охлаждает влагу воздуха внутри помещения, и образовывается дымка.
• Это необходимо для обеспечения нормальной
работы ГОРИЗОНТАЛЬНОЙ ЗАСЛОНКИ в режиме качания.
• Неподвижность нижней горизонтальной области
при выборе SWING (КАЧАНИЕ) в режиме COOL/
DRY/FAN (ОХЛАЖДЕНИЕ/СУШКА/ВЕНТИЛЯТОР) — нормальное явление.
Для предотвращения капанья и просачивания
•
конденсата направление потока воздуха автоматически изменяется на верхнее через 30—60
минут работы блока в режиме COOL или DRY с
воздушным потоком, направленным вниз.
• При работе в режиме обогрева, если температура воздушного потока слишком низкая,
или во время размораживания горизонтальная
заслонка автоматически устанавливается в
горизонтальное положение.
• Происходит оттаивание наружного прибора.
Эта операция длится максимум 10 минут, по-
жалуйста, подождите. (При слишком низкой
температуре наружного воздуха и слишком
высокой влажности образуется изморось.)
•
Кондиционеры данных моделей оснащены функцией
повторного автозапуска. При выключении питания
без остановки работы прибора с помощью пульта дистанционного управления и последующем включении
питания прибор автоматически начнет работу в том
режиме, который был установлен с помощью пульта
дистанционного управления до отключения питания.
См. раздел “Функция повторного автозапуска”
Стр. 10
Выполните какое-либо из следующих действий:
• Выключите и включите выключатель. Убедитесь
в том, что горизонтальные заслонки переходят
в правильное “положение закрывания”.
• Запустите и остановите работу в режиме аварийного охлаждения и убедитесь в том, что горизонтальные заслонки переходят в правильное
“положение закрывания”.
• Если комнатная температура отклоняется от
заданной, внутренний вентилятор начинает работу согласно параметрам, заданным на пульте
дистанционного управления.
Под воздействием различных факторов, например
•
ультрафиолетового излучения и температуры, пластиковый корпус может пожелтеть, что не отразится
на функциональных характеристиках устройства.
• Установлен ли режим NIGHT MODE (НОЧНОЙ
режим)? Стр. 9
Мультисистемная модель
Если в мультисистемной модели
один из внутренних приборов не
используется, он нагревается, при
этом может быть слышен звук,
похожий на звук текущей воды.
Если выбран режим обогрева,
функционирование сразу не
начинается.
• Небольшое количество хладагента продолжает
подаваться во внутренний прибор, даже если он
в этот момент не работает.
Если во время разморозки наружного прибора на-
•
чинается операция, на выдувание теплого воздуха
потребуется несколько минут (макс. 10 минут).
Наружный прибор
Вентилятор наружного прибора
не вращается, даже когда компрессор работает. Даже когда
вентилятор начинает вращаться,
он быстро останавливается.
Из наружного прибора вытекает
вода.
• В режиме охлаждения при низкой температуре
наружного воздуха вентилятор может включаться и выключаться, чтобы поддерживать
достаточную мощность охлаждения.
При работе в режимах COOL (ОХЛАЖДЕНИЕ) и DRY
•
(СУШКА) происходит охлаждение труб и трубных
соединений, что вызывает конденсацию влаги.
•
При работе в режиме обогрева конденсат, образовавшийся на теплообменнике, стекает вниз.
• При работе в режиме обогрева во время операции размораживания замерзшая на наружном
приборе вода тает и стекает вниз.
Симптом Объяснение и точки проверки
Наружный прибор
Из наружного прибора выходит
белый дым.
• При работе в режиме обогрева пар, который появляется в результате размораживания, выглядит
как белый дым.
Пульт дистанционного управления
на дисплее пульта дистанционного управления нет изображения, или дисплей потускнел.
Внутренний прибор не реагирует на сигналы с пульта.
• Проверьте, не разрядились ли батареи?
• Возможно, не соблюдена полярность (+, -) при
установке батарей?
Возможно, нажаты какие-либо кнопки на пульте дис-
•
танционного управления других электроприборов?
Стр. 5
Не охлаждает и не греет
Недостаточное охлаждение или
обогрев помещения.
Помещение охлаждается недостаточно.
Помещение обогревается недостаточно.
При работе в режиме обогрева
воздух выдувается не сразу.
•
Проверьте, правильно ли задана температура?
• Правильно ли настроен вентилятор? Измените
скорость вращения вентилятора на уровень “Высокий” или “Очень высокий”.
Чисты ли фильтры?
•
•
Проверьте, чистый ли вентилятор или теплообменник внутреннего прибора?
• Возможно, заблокировано воздухозаборное или
воздуховыпускное отверстие внутреннего или
наружного прибора?
• Возможно, открыто окно или дверь?
• Достижение заданной температуры может потребовать определенного времени и зависит от
размеров помещения, температуры окружающей
среды и других факторов.
Установлен ли режим NIGHT MODE (НОЧНОЙ
•
режим)?
Стр. 9
При использовании в помещении вентилятора или
•
газовой плиты нагрузка на кондиционер, работающий в режиме охлаждения, возрастает, в результате чего эффективность охлаждения снижается.
•
При высокой температуре наружного воздуха эффективность охлаждения может быть недостаточной.
• При низкой температуре наружного воздуха
эффективность обогрева может снизиться.
• Подождите, пока прибор готовится к выдуванию
теплого воздуха.
Стр. 12
Поток воздуха
Воздух, выходящий из внутреннего прибора, имеет специфический запах.
• Чисты ли фильтры?
• Проверьте, чистый ли вентилятор или теплообменник внутреннего прибора?
• Прибор всасывает запахи стен, ковра, мебели,
ткани и выдувает их вместе с воздухом.
Стр. 12
Звук
Слышно потрескивание. • Потрескивание объясняется расширением/сжа-
Слышен “булькающий” звук. •
.
Из внутреннего прибора слышен механический звук.
Слышен звук текущей воды. • Это звук водяного хладагента или водяного
Иногда слышен шипящий звук. • Этот звук слышен при изменении потока хлада-
тием передней панели и других деталей прибора
вследствие изменения температуры.
Этот звук слышен, когда наружный воздух всасывается из дренажного шланга при включении
вытяжного устройства или вентилятора, что и вызывает выброс струи воды из дренажного шланга.
Этот звук также слышен при сильном ветре, когда наружный воздух с силой проникает в дренажный шланг.
• Этот звук появляется при включении/выключении
вентилятора или компрессора.
конденсата, протекающего по трубам прибора.
гента внутри прибора.
Таймер
Недельный таймер не работает
в соответствии с настройками.
Блок начинает/заканчивает
работу произвольно.
• Заданы ли настройки для таймера ВКЛЮЧЕНИЯ/
ВЫКЛЮЧЕНИЯ (ON/OFF)?
• Снова передайте данные о настройке недельного
таймера на внутренний блок. При успешном получении информации внутренний блок издаст протяжный гудок. 3 коротких гудка указывают на то,
что информация не была получена. Убедитесь,
что информация успешно получена.
При сбое в сети электропитания и при отключении
•
электропитания показания встроенных часов внутреннего блока будут неправильными. Соответственно,
недельный таймер может работать неверно.
Непременно размещайте пульт дистанционного управления в месте, где обеспечивается прием сигнала
внутренним блоком. Стр. 5
•
Заданы ли настройки недельного таймера?
Интерфейс Wi-Fi
Ошибка во время настройки
соединения или работы
блока.
См. РУКОВОДСТВО ПО НАСТРОЙКЕ.
Что касается РУКОВОДСТВА ПО НАСТРОЙКЕ,
перейдите на указанный ниже веб-сайт.
http://www.melcloud.com/Support
Стр. 7
Стр. 10
Стр. 5
Стр. 6
Стр. 11
Стр. 11
RU-14
RU
Page 32

● ИНСТРУКЦИИ ПО ЭКСПЛУАТАЦИИ ●
RU
ЕСЛИ ВАМ КАЖЕТСЯ, ЧТО
ПРИБОР НЕИСПРАВЕН
В следующих случаях необходимо остановить работу кондиционера
и обратиться к своему дилеру.
• Если из внутреннего прибора просачивается вода.
• Если мигает индикаторная лампочка работы.
• Если часто срабатывает прерыватель тока в сети.
• Сигнал с пульта дистанционного управления не принимается в помещении, где установлены люминесцентные лампы, ВКЛЮЧЕНИЕ/ВЫКЛЮЧЕНИЕ которых производится с помощью электронного устройства
(люминесцентные лампы инверторного типа и т.д.).
• При работе кондиционера воздуха возникают помехи при приеме радиоили телевещания. Для нормального приема теле- и радиовещания может
потребоваться усилитель.
• При поступлении необычного звука.
• Если обнаружена протечка хладагента.
КОГДА ВЫ НЕ СОБИРАЕТЕСЬ ПОЛЬЗОВАТЬ-
СЯ КОНДИЦИОНЕРОМ ДЛИТЕЛЬНОЕ ВРЕМЯ
1
Дайте ему поработать в режиме COOL при самой
высокой температуре или в режиме FAN в течение
3–4 часов. Стр. 6
• При этом внутренние части прибора просушатся.
• Влага в кондиционере создает благоприятные условия для роста
грибков и плесени.
2
Нажмите
3
Выключите прерыватель тока в сети и/или отсоеди-
, чтобы остановить операцию.
МЕСТО УСТАНОВКИ И ЭЛЕК-
ТРОМОНТАЖНЫЕ РАБОТЫ
Место установки
Следует избегать установки кондиционера воздуха в следующих местах.
• В местах, где много машинного масла.
• В местах, где много соли, например, на морском побережье.
• В местах образования сероводородного газа, например рядом с горячим
природным источником, канализацией, сточными водами.
• Там, где разбрызгано масло, или на участке с масляным дымом (например, в местах приготовления пищи и на фабриках, где пластик может
изменить свои характеристики или повредиться).
• В местах с наличием высокочастотного или беспроводного оборудования.
• В местах блокировки воздуха наружного прибора.
• В местах, где шум работы устройства или выходящий из наружного
блока воздух доставляет беспокойство соседям.
• Рекомендуемая высота установки внутреннего блока составляет от 1,8
м до 2,3 м. Если это невозможно, проконсультируйтесь с продавцом.
• Внутренний блок должен устанавливаться в помещениях, площадь которых превышает указанное далее значение. Обратитесь за консультацией к дилеру.
• Не используйте кондиционер во время проведения внутренних строительных или отделочных работ или во время натирания пола воском.
По завершении таких работ хорошо провентилируйте помещение, прежде чем включать кондиционер. В противном случае это может привести к налипанию частиц летучих элементов внутри кондиционера, в
результате чего будет происходить подтекание воды или разбрызгивание конденсата.
• Запрещается использовать интерфейс Wi-Fi вблизи электрического
оборудования медицинского назначения или рядом с людьми с имплантированными медицинскими устройствами, такими как кардиостимуляторы или вживляемые кардиовертеры-дефибрилляторы.
Это может привести к несчастным случаям вследствие неправильного
функционирования медицинского оборудования или устройства.
• Данное оборудование должно устанавливаться и эксплуатироваться
с соблюдением расстояния между устройством и пользователем либо
посторонним человеком не менее 20 см.
• Не допускается эксплуатация интерфейса Wi-Fi вблизи других беспроводных устройств, микроволновых печей, беспроводных телефонов
или аппаратов факсимильной связи.
Это может привести к нарушениям его функционирования.
ните вилку шнура питания от розетки.
4
Выньте все батарейки из пульта дистанционного
управления.
Устанавливайте
как можно дальше
для защиты от
воздействия люми-
При повторном использовании кон-
несцентных ламп.
диционера воздуха:
1
Очистите воздушный фильтр. Стр. 12
2
Убедитесь в том, что воздухозаборные и воздуховыпускные отверстия внутреннего/наружного приборов не заблокированы.
Не
менее
1 м
Беспроводный
телефон
или портативный
телефон
Не
менее
1 м
Радиоприемник
Электромонтажные работы
3
Проверьте правильность подключения заземления.
4
Обратитесь к разделу “ПОДГОТОВКА К НАЧАЛУ
ЭКСПЛУАТАЦИИ” и следуйте указаниям. Стр. 5
• Обеспечьте отдельный контур сети для питания кондиционера.
Обязательно соблюдайте допустимую мощность прерывателя тока в сети.
•
При возникновении каких-либо вопросов обращайтесь к своему
дилеру.
Люминесцентная лампа
инверторного
типа
Обеспечьте
достаточное
расстояние для
предотвращения
искажения изображения и звука.
Телевизор
Не менее 3 м
Наружный прибор должен устанавливаться на расстоянии не менее 3 м от
антенн телевизоров, радиоприемников
и т.д. В регионах со слабыми радиоволнами требуется большее расстояние между наружным прибором и
антенной, если при работе кондиционера воздуха возникают помехи при
приеме радио- или телевещания.
Для получения
оптимальных рабочих
характеристик и продления срока службы
наружный блок следует устанавливать в хорошо проветриваемом
сухом месте.
Не менее
100 мм
(AP60/AP71)
Не менее
стена и т.п.
200/500
мм
RU-15
Page 33

ТЕХНИЧЕСКИЕ ХАРАКТЕРИСТИКИ
Модель
Функция
Электропитание
Мощность кВт
Мощность на входе кВт
Масса
Объем хладагента (R32) кг
Код IP
Разрешенное максимальное рабочее давление
Уровень шума (SPL)
Внутренний MSZ-AP60VG(K) MSZ-AP71VG(K)
Наружный MUZ-AP60VG MUZ-AP71VG
Внутренний кг
Наружный кг
Внутренний
Наружный
Низ. давл. МПа
Выс. давл. МПа
Внутренний (очень
высокий/высокий/
средний/низкий/
Бесшумный режим)
Наружный
дБ(А)
дБ(А)
Гарантированный рабочий диапазон
Внутренний Наружный
32°C DB
23°C WB
21°C DB
15°C WB
27°C DB
—
20°C DB
—
Охлаждение
Обогрев
Верхний
предел
Нижний
предел
Верхний
предел
Нижний
предел
Охлаждение Обогрев Охлаждение Обогрев
~ /N, 230 В, 50 Гц
6,1 6,8 7,1 8,1
1,59 1,67 2,01 2,12
16 17
40 55
1,05 1,50
IP 20
IP 24
2,77
4,17
48/45/41/37/29 48/45/41/37/30 49/45/41/37/30 51/45/41/37/30
56 57 56 55
Примечание:
46°C DB
—
-10°C DB
—
24°C DB
18°C WB
-15°C DB
-16°C WB
DB: сухой термометр
WB: влажный термометр
Расчетные условия эксплуатации
Охлаждение — Внутренний: 27°C DB, 19°C WB
Наружный: 35°C DB
Обогрев — Внутренний: 20°C DB
Наружный: 7°C DB, 6°C WB
RU
Интерфейс Wi-Fi
Модель
Напряжение на входе
Энергопотребление МАКС. 2 Вт
Размер В×Ш×Г (мм) 79×44×18,5
Вес (г) 60 (с учетом кабеля)
Уровень мощности передатчика
(МАКС.)
Радиоканал Каналы 1–13 (2412–2472 МГц)
Протокол радиообмена IEEE 802.11b/g/n (20)
Шифрование AES
Аутентификация WPA2-PSK
Версия программного обеспечения XX.00
Что касается Декларации о соответствии, перейдите на указанный ниже веб-сайт.
http://www.melcloud.com/Support
12,7 В постоянного тока (от внутрен-
MAC-567IFB2-E
него прибора)
17,5 дБм при использовании
IEEE 802.11b
RU-16
Page 34

RU
Технические характеристики
Модель
Режим Охлаждение Нагрев Охлаждение Нагрев
Производительность кВт 6,1 6,8 7,1 8,1
Класс энергетической эффективности А А А А
Ежегодный расход электроэнергии в ре-
жиме охлаждения
Коэффициент энергетической эффективности в
режиме охлаждения при полной нагрузке
Охлаждение/ Нагрев
Воздушное охлаждение
Корректированный уровень звуковой
мощности внутреннего блока
Корректированный уровень звуковой
мощности наружного блока
Наименование блока MSZ-AP60VG(K) MSZ-AP71VG(K)
Внутренний MSZ-AP60VG(K) MSZ-AP71VG(K)
Наружный MUZ-AP60VG MUZ-AP71VG
кВтч 795 — 1005 —
3,84 — 3,53 —
дБа 65 — 65 —
дБа 69 — 69 —
RU-17
Page 35

БАСТАПҚЫ ТІЛІ — АҒЫЛШЫН
МАЗМҰНЫ
■ ҚАУІПСІЗДІК ШАРАЛАРЫ 1
■ УТИЛИЗАЦИЯЛАУ 3
■ ƏРБІР БӨЛШЕКТІҢ АТАУЫ 4
■ ЖҰМЫС АЛДЫНДА ДАЙЫНДАУ 5
■ ЖҰМЫС РЕЖИМДЕРІН ТАҢДАУ 6
■ ЖЕЛДЕТКІШ ЖЫЛДАМДЫҒЫН ЖƏНЕ АУА АҒЫНЫНЫҢ БАҒЫТЫН РЕТТЕУ 7
■ ҰЗАҚ ЖҰМЫС 8
■ ҚУАТТЫ ЖҰМЫС 8
■ I-SAVE ЖҰМЫСЫ 8
■ ҮНЕМДІ САЛҚЫНДАТУ ЖҰМЫСЫ 9
■ ТҮН РЕЖИМІНІҢ ЖҰМЫСЫ 9
■ ТАЙМЕР ЖҰМЫСЫ (ҚОСУ/ӨШІРУ ТАЙМЕРІ) 10
■ АПАТТЫҚ ЖҰМЫС 10
■ АВТОМАТТЫ ҚАЙТА ІСКЕ ҚОСУ ФУНКЦИЯСЫ 10
■ АПТАЛЫҚ ТАЙМЕР ЖҰМЫСЫ 11
■ ТАЗАЛАУ 12
■ Wi-Fi ИНТЕРФЕЙСІН РЕТТЕУ (ТЕК VGK ТҮРІ) 13
■ АҚАУ ПАЙДА БОЛДЫ ДЕП ОЙЛАСАҢЫЗ 14
■ АУА САЛҚЫНДАТҚЫШ ҰЗАҚ УАҚЫТ ПАЙДАЛАНЫЛМАЙТЫН КЕЗДЕ 15
■ ОРНАТЫЛАТЫН ОРЫН ЖƏНЕ ЭЛЕКТРЛІК ЖҰМЫС 15
■ ТЕХНИКАЛЫҚ СИПАТТАМАЛАР 16
ҚАУІПСІЗДІК ШАРАЛАРЫ
Ішкі жəне/немесе сыртқы жабдықта көрсетілетін белгілердің мағыналары
ЕСКЕРТУ
(Өрт қаупі бар)
Жұмысты бастаудан бұрын, ПАЙДАЛАНУ БОЙЫНША НҰСҚАУЛЫҚ құжатын мұқият оқып шығыңыз.
Жұмыс істеуден бұрын, қызмет көрсету персоналы ПАЙДАЛАНУ БОЙЫНША НҰСҚАУЛЫҚ жəне ОРНАТУ БОЙЫНША НҰСҚАУЛЫҚ
құжатын мұқият оқып шығуы керек.
Қосымша ақпарат ПАЙДАЛАНУ БОЙЫНША НҰСҚАУЛЫҚ, ОРНАТУ БОЙЫНША НҰСҚАУЛЫҚ сияқты құжаттарда қолжетімді.
• Бұл өнімде айналмалы бөлшектер мен электр тогының соғуына əкелуі
мүмкін бөлшектер пайдаланылатындықтан, пайдаланудан бұрын, осы
«Қауіпсіздік шаралары» құжатын оқып шығыңыз.
• Мұнда көрсетілген сақтық шаралары туралы бөлімдер қауіпсіздік үшін
маңызды болғандықтан, оларды міндетті түрде орындаңыз.
• Осы нұсқаулықты оқып шыққаннан кейін, пайдалануда ыңғайлы болуы
үшін, оны орнату бойынша нұсқаулық құжатымен бірге қолжетімді орында
сақтаңыз.
Белгілер мен олардың мағыналары
ЕСКЕРТУ:
САҚ БОЛЫҢЫЗ
Дұрыс пайдаланбау өлім жағдайлары, ауыр жарақат
жəне т.б. сияқты жоғары ықтималдылықтағы елеулі
қауіптердің туындауына себеп болады.
Дұрыс пайдаланбау жағдайға қарай елеулі дəрежеде
:
қауіп туындауына себеп болуы мүмкін.
Бұл жабдықта жанғыш хладагент пайдаланылады.
Хладагент ағып, отқа немесе қызып тұрған бөлшекке тисе, одан зиянды газ шығып, өртену қаупіне əкеледі.
Осы нұсқаулықта пайдаланылатын белгілердің
мағыналары
: Келесі əрекеттерді міндетті түрде орындамаңыз.
: Нұсқауды міндетті түрде орындаңыз.
: Ешқашан саусағыңызды немесе таяқ, т.б. секілді заттарды
салмаңыз.
: Ешқашан ішкі/сыртқы жабдықтың үстін баспаңыз жəне олардың
үстіне ештеңе қоймаңыз.
: Электр тогының соғу қаупі бар. Абайлаңыз.
: Қуат ашасын розеткадан міндетті түрде ажыратыңыз.
: Қуатты міндетті түрде өшіріңіз.
: Өрт қаупі бар.
: Ешқашан ылғал қолмен ұстамаңыз.
: Жабдықтың үстіне ешқашан су бүркімеңіз.
KK
ЕСКЕРТУ
Қуат сымын аралық нүктеге жалғамаңыз, ұзартқыш сымды
пайдаланбаңыз немесе бір айнымалы ток шығысына бірнеше
құрылғыны жалғамаңыз.
• Бұл шамадан тыс қызуға, өртке немесе электр тогының соғуына
себеп болуы мүмкін.
Қуат ашасының ластанбағанына көз жеткізіп, оны розеткаға
берік енгізіңіз.
•
Ластанған аша өртке немесе электр тогының соғуына себеп болуы мүмкін.
Қуат сымын бумаңыз, тартпаңыз, зақымдамаңыз немесе
өзгертпеңіз жəне оны қыздырмаңыз немесе оның үстіне ауыр
заттарды қоймаңыз.
• Бұл өртке немесе электр тогының соғуына себеп болуы мүмкін.
Жұмыс барысында ажыратқышты ӨШІРМЕҢІЗ/ҚОСПАҢЫЗ
немесе қуат ашасын ажыратпаңыз/жалғамаңыз.
• Бұл ұшқын шығарып, өртке себеп болуы мүмкін.
• Ішкі жабдықты қашықтан басқару пультімен ӨШІРГЕННЕН кейін
ажыратқышты ӨШІРІҢІЗ немесе қуат ашасын ажыратыңыз.
Салқын ауа денеңізге ұзақ уақыт бойы тікелей əсер етпеуі тиіс.
• Бұл денсаулығыңызға зиян келтіруі мүмкін.
KK-1
Page 36

Бұл жабдықты дұрыс əрі қауіпсіз пайдалану үшін пайдалану алдында осы пайдалану бойынша нұсқаулық құжатын
міндетті түрде оқыңыз.
ҚАУІПСІЗДІК ШАРАЛАРЫ
KK
Пайдаланушы жабдықты орнатпауы, қайта орналастырмауы,
бөлшектемеуі, өзгертпеуі немесе жөндемеуі керек.
•
Ауа салқындатқышын дұрыс қолданбау өртке, ток соғуға, жарақаттануға
немесе су ағуға, т.б. жағдайларға əкелуі мүмкін. Дилермен кеңесіңіз
• Егер қуат сымы зақымдалса, қауіптің алдын алу мақсатында,
өндіруші немесе оның қызмет көрсету агенті оны ауыстыруы керек.
Жабдықты орнатқанда, қайта орналастырғанда немесе қызмет
көрсеткенде, хладагент контурына көрсетілген хладагенттен (R32)
басқа ешқандай заттектің кірмейтінін тексеріңіз.
• Ауа сияқты қандай да бір бөгде заттектің болуы қалыпты емес
қысымның артуына жəне жарылыс пен жарақаттануға əкелуі мүмкін.
• Жүйе үшін көрсетілгеннен басқа қандай да бір хладагентті
пайдалану механикалық ақаулыққа, жүйе ақаулығына немесе
жабдықтың бұзылып қалуына əкеледі. Ең болмағанда, ол өнімнің
қауіпсіздігіне елеулі шамада қатер төндіруі мүмкін.
Егер қауіпсіздікке жауапты тұлғаның бақылауында болмаса немесе одан
құрылғыны пайдалануға қатысты нұсқау алмаған болса, бұл құрылғы физикалық,
сезу немесе ақыл-ой мүмкіндіктері шектеулі немесе тəжірибесі мен білімі
жеткіліксіз тұлғалар (балаларды қоса) тарапынан пайдаланылуға арналмаған
Балалардың құрылғымен ойнамауын қадағалау керек.
Ауаның кіріс немесе шығыс саңылауына с аусағыңызды, таяқ
немесе басқа заттарды тықпаңыз.
• Жұмыс барысында ішіндегі желдеткіш жоғары жылдамдықта
айналатындықтан, ол жарақаттануға əкелуі мүмкін.
Егер қалыпты емес жағдай (мысалы, күйік иісі) болса, ауа салқындатқышты
өшіріп, қуат ашасын ажыратыңыз немесе ажыратқышты ӨШІРІҢІЗ
•
Қалыпты емес жағдайда жұмысты жалғастыру ақаулыққа, өртке
немесе ток соғуға əкелуі мүмкін. Мұндай жағдайда дилермен кеңесіңіз
Ауа салқындатқыш салқындатпағанда немесе жылытпағанда,
хладагенттің ағып кету ықтималдылығы бар. Егер хладагенттің
ағып кетуі анықталса, жұмысты тоқтатып, бөлмені жақсылап
желдетіп, дереу дилерге хабарласыңыз. Егер жөндеу үшін
жабдықтың хладагентін толтыру керек болса, мəліметтерді
қызмет көрсету маманынан сұраңыз.
•
Ауа салқындатқышта пайдаланылатын хладагент қауіпті емес. Қалыпты
күйде, ол ақпайды. Дегенмен, хладагент ағып, отқа немесе желдеткіш
қыздырғышы, керосинді қыздырғыш немесе асханалық пеш сияқты қызып
тұрған бөлшекке тисе, одан зиянды газ шығып, өртену қаупіне əкеледі
Пайдаланушы ешқашан ішкі жабдықтың ішін жумауы қажет. Егер
жабдықтың ішін тазалау қажет болса, дилерге хабарласыңыз.
•
Үйлесімді емес жуу құралы жабдықтың ішіндегі пластик материалын
зақымдап, судың ағуына əкелуі мүмкін. Жуу құралы электрлік бөлшектерге
немесе моторға тисе, ақаулыққа, түтінденуге немесе өртке əкелуі мүмкін
• Құрылғы тұрақты түрде жанып тұратын көздер (мысалы: ашық
жалын, газ құрылғысы немесе электр жылытқышы) жоқ бөлмеде
сақталуы керек.
• Хладагенттің иісі болмауы керек екенін ескеріңіз.
• Мұзды еріту процесін тездету немесе құрылғыны тазалау үшін
өндіруші ұсынғаннан басқа құралды пайдаланбаңыз.
• Теспеңіз немесе күйдірмеңіз.
Ішкі жабдық көрсетілген бөлме кеңістігінен асатын бөлмелерде
орнатылуы керек. Дилермен кеңесіңіз.
Бұл құрылғы дүкендерде, жеңіл өнеркəсіпте жəне фермаларда тəжірибелі
немесе біліктілігі бар пайдаланушылардың немесе коммерциялық
мақсатта кəсіби емес пайдаланушылардың пайдалануына арналған
САҚ БОЛЫҢЫЗ
Ішкі/сыртқы жабдықтың ауа кірісін немесе алюминий
қалақшаларын ұстамаңыз.
• Бұл жарақаттануға əкелуі мүмкін.
Жабдықта жəндіктерге қарсы құралдарды немесе тұтанғыш
спрейлерді пайдаланбаңыз.
• Бұл өртке немесе жабдықтың деформациясына əкелуі мүмкін.
Үй жануарларына немесе үй өсімдіктеріне ауа ағынын тікелей
бағыттамаңыз.
• Бұл үй жануарларын немесе өсімдіктерді жарақаттауы мүмкін.
Ішкі/сыртқы құрылғының астына басқа электрлік құрылғыларды
немесе жиһаз қоймаңыз.
• Жабдықтан су ағып, зақымдалуға немесе ақаулыққа əкелуі мүмкін.
Жабдықты зақымдалған орнату тұғырында қалдырмаңыз.
• Жабдық құлап кетіп, жарақаттануға əкелуі мүмкін.
Жабдықты пайдалану немесе тазалау үшін тұрақсыз орындықты
пайдаланбаңыз.
• Егер құлап кетсеңіз, жарақаттануыңыз мүмкін.
Қуат сымын тартпаңыз.
• Бұл электродтық сымның бір бөлігін үзіп, қызып кетуге немесе өртке
əкелуі мүмкін.
Батареяларды зарядтамаңыз немесе бөлшектемеңіз жəне оларды
отқа тастамаңыз.
•
.
.
.
.
.
.
.
Лас сүзгілер ауа салқындатқышта судың конденсациясына себепші болып, зеңнің
көбеюіне əкеледі. Сондықтан ауа сүзгілерін əр 2 аптада тазалап тұру ұсынылады.
Жұмысты бастау алдында, көлденең қалақшалардың ж абық күйде екенін
тексеріңіз. Егер жабдықты көлденең қалақшалар ашық күйде болғанда іске
қоссаңыз, олар дұрыс күйге оралмай қалуы мүмкін.
Бұл батареялардың ағуына немесе өртке не жарылысқа əкелуі мүмкін
Жабдықты жоғары ылғалдылықта (салыстырмалы ылғалдылығы
80% немесе одан жоғары) жəне/немесе терезелері не шығатын есігі
ашық қалдырылған жерлерде 4 сағаттан артық пайдаланбаңыз.
• Бұл ауа салқындатқыштың ішінде су конденсациясын тудырып, ол
тамуы,жиһазды ылғалдауы немесе зақымдауы мүмкін.
• Ауа салқындатқыштағы су конденсациясы зеңнің көбеюіне əкелуі
мүмкін.
Жабдықты азық-түліктерді сақтау, жануарларды бағу, өсімдіктерді
өсіру немесе өлшем құрылғыларын не өнер т уындыларын сақтау
сияқты арнайы мақсаттарға пайдаланбаңыз.
• Бұл сапаның төмендеуіне немесе жануарлар мен өсімдіктерге зиян
келтіруі мүмкін.
Жағу құрылғыларына ауа ағынын тікелей бағыттамаңыз.
• Бұл жағуға кедергі келтіруі мүмкін.
Байқаусыз жұтып қоймау үшін ешқашан ешбір себеппен
батареяларды аузыңызға салмаңыз.
• Батареяны жұту тұншығуға жəне/немесе улануға əкелуі мүмкін.
Жабдықты тазалау алдында оны ӨШІРІП, қуат ашасын
ажыратыңыз немесе ажыратқышты ӨШІРІҢІЗ.
• Жұмыс барысында ішіндегі желдеткіш жоғары жылдамдықта
айналатындықтан, ол жарақаттануға əкелуі мүмкін.
Жабдық ұзақ уақыт пайдаланылмайтын кезде қуат ашасын
ажыратыңыз немесе ажыратқышты ӨШІРІҢІЗ.
• Жабдықта кір жиналып, қызып кетуге немесе өртке əкелуі мүмкін.
Қашықтан басқару пультінің барлық батареяларын дəл сондай
түрдегі жаңа батареялармен ауыстырыңыз.
• Ескі батареяны жаңасымен бірге пайдалану қызып кетуге, ағып
кетуге немесе жарылысқа əкелуі мүмкін.
Егер батарея сұйықтығы теріңізге немесе киімдеріңізге тисе,
оларды таза сумен əбден жуыңыз.
•
Егер батарея сұйықтығы көзіңізге тисе, оны таза сумен əбден жуып,
дереу дəрігерге көрініңіз.
Жабдық жағу құрылғысымен бірге пайдаланылғанда, аймақтың
жақсы желдетілетінін тексеріңіз.
• Жеткіліксіз желдету оттектің жетіспеушілігіне əкелуі мүмкін.
Күннің күркірегенін естігенде, ажыратқышты ӨШІРІҢІЗ, себебі
найзағай түсуі мүмкін.
• Егер найзағай түссе, жабдық зақымдалып қалуы мүмкін.
Ауа салқындатқыш бірнеше маусым пайдаланылғаннан кейін
қалыпты тазалау жұмыстарына қосымша түрде тексеріс жəне
техникалық қызмет көрсету жұмыстарын орындаңыз.
• Жабдықтағы кір немесе шаң жағымсыз иіс шығарып, зеңнің пайда
болуына немесе ағызу арнасының бітелуіне жəне ішкі жабдықтан
судың ағуына əкелуі мүмкін. Арнайы білім мен біліктілікті қажет
ететін тексеріс пен техникалық қызмет көрсету жұмыстары бойынша
дилерге хабарласыңыз.
Қосқыштарды су қолмен ұстамаңыз.
• Бұл ток соғуға əкелуі мүмкін.
Ауа салқындатқышты сумен тазаламаңыз немесе оның үстіне гүл
сауыты сияқты ішінде су бар затты қоймаңыз.
• Бұл өртке немесе электр тогының соғуына себеп болуы мүмкін.
Сыртқы жабдықты аяқпен баспаңыз немесе оған ешқандай зат
қоймаңыз.
• Егер сіз құласаңыз немесе бір зат құлап кетсе, жарақаттануға əкелуі
мүмкін.
МАҢЫЗДЫ
.
KK-2
Page 37

ҚАУІПСІЗДІК ШАРАЛАРЫ
Орнату үшін
ЕСКЕРТУ
Ауа салқындатқышты орнату туралы дилерге хабарласыңыз.
• Арнайы білім мен біліктілікті қажет ететіндіктен, оны пайдаланушы
орнатпауы керек. Ауа салқындатқыш дұрыс орнатылмаса, судың
ағуына, өртке немесе токтың соғуына əкелуі мүмкін.
Ауа салқындатқышқа арнайы қуат көзін қамтамасыз етіңіз.
• Арнайы емес қуат көзі қызып кетуге немесе өртке əкелуі мүмкін.
Жабдықты тұтанғыш газ шығатын жерге орнатпаңыз.
• Егер газ шықса, ол сыртқы жабдықта жиналып, жарылысқа əкелуі
мүмкін.
Жабдықты жерге дұрыс тұйықтаңыз.
• Жерге тұйықтау сымын газ құбырына, су құбырына, найзағай
тартқышқа немесе телефонның жерге тұйықтау сымына жалғамаңыз.
Дұрыс емес жерге тұйықтау ток соғуға əкелуі мүмкін.
САҚ БОЛЫҢЫЗ
Жерге ағу ажыратқышын ауа салқындатқыш орнатылатын орынға
сəйкес орнатыңыз (мысалы, жоғары ылғалдылықты аймақтар).
• Егер жерге ағу ажыратқышы орнатылмаса, ол ток соғуға əкелуі
мүмкін.
Ағызу суы дұрыс ағатынын тексеріңіз.
• Егер ағызу арнасы дұрыс емес болса, су ішкі/сыртқы жабдықтан
тамып, жиһазды ылғалдауы немесе зақымдауы мүмкін.
Қалыпты емес жағдай болғанда
Ауа салқындатқышты пайдалануды дереу тоқтатып, дилерге хабарласыңыз.
Wi-Fi интерфейсі үшін
ЕСКЕРТУ
(Дұрыс қолданбау ауыр жарақатты немесе өлімді қоса, ауыр жағдайларға
əкелуі мүмкін.)
Егер қауіпсіздікке жауапты тұлғаның бақылауында болса немесе
одан құрылғыны пайдалануға қатысты нұсқау алған болса, бұл
құрылғыны 8 жастан асқан балалар жəне физикалық, сезу немесе
ақыл-ой мүмкіндіктері шектеулі немесе тəжірибесі мен білімі
жеткіліксіз тұлғалар пайдалана алады.
Балалар құрылғымен ойнамауы керек. Балалар бақылаусыз
тазалау жəне пайдаланушылық техникалық қызмет көрсету
əрекеттерін орындамауы керек.
Wi-Fi интерфейсін медициналық электрлік жабдықтың
немесе жүрекширатқышы не имплантталатын кардиовертердефибриллятор сияқты медициналық құрылғысы бар
адамдардың қасында пайдаланбаңыз.
• Бұл медициналық жабдықтың немесе құрылғының ақаулануы
себебінен қайғылы жағдайға əкелуі мүмкін.
Wi-Fi интерфейсін автоматты есіктер немесе өрт дабылдары
сияқты автоматты басқару құрылғыларының қасына орнатпаңыз.
• Бұл ақаулар себебінен қайғылы жағдайларға əкелуі мүмкін.
Wi-Fi интерфейсін су қолмен ұстамаңыз.
• Бұл құрылғының зақымдалуына, ток соғуға немесе өртке əкелуі
мүмкін.
Wi-Fi интерфейсіне су шашыратпаңыз немесе оны жуыну
бөлмесінде пайдаланбаңыз.
• Бұл құрылғының зақымдалуына, ток соғуға немесе өртке əкелуі
мүмкін.
Wi-Fi интерфейсі құлағанда немесе ұстағыш не кабель
зақымдалғанда, қуат көзінің ашасын ажыратыңыз немесе
ажыратқышты ӨШІРІҢІЗ.
• Ол өртке немесе электр тогының соғуына себеп болуы мүмкін.
Мұндай жағдайда дилермен кеңесіңіз.
САҚ БОЛЫҢЫЗ
(Дұрыс қолданбау жарақаттануды немесе ғимараттың зақымдалуын қоса,
ауыр жағдайларға əкелуі мүмкін.)
Wi-Fi интерфейсін орнату немесе тазалау үшін тұрақсыз сатыға
шықпаңыз.
• Егер құлап кетсеңіз, ол жарақаттануға əкелуі мүмкін.
Wi-Fi интерфейсін басқа сымсыз құрылғылардың, қысқа
толқынды пештердің, сымсыз телефондардың немесе факс
құрылғыларының қасында пайдаланбаңыз.
• Бұл ақаулықтарға əкелуі мүмкін.
KK
УТИЛИЗАЦИЯЛАУ
Бұл өнімді утилизациялау үшін дилерге хабарласыңыз.
Ескертпе:
Бұл таңба белгісі тек ЕО елдеріне арналған.
Бұл таңба белгісі 2012/19/ЕО директивасының
14-бабына, пайдаланушыларға арналған
ақпарат жəне IX қосымшасына жəне/немесе
2006/66/ЕО директивасының 20-бабына, соңғы
Fig. 1
пайдаланушыларға арналған ақпарат жəне II
қосымшасына сəйкес келеді.
MITSUBISHI ELECTRIC өнімі қайта өңдеуге жəне/немесе қайта пайдалануға
болатын сапасы жоғары материалдармен жəне компоненттермен жобаланып
өндірілген.
Бұл таңба электрлік жəне электрондық жабдық, батареялар мен
аккумуляторлар мерзімі біткенде тұрмыстық қоқыстан бөлек утилизациялануы
керектігін білдіреді.
Егер таңбаның астында таңба (Fig. 1) басылса, бұл химиялық таңба
батареяда немесе аккумуляторда белгілі бір концентрациядағы ауыр
металл бар екенін білдіреді. Бұл келесідей көрсетіледі:
Hg: сынап (0,0005%), Cd: кадмий (0,002%), Pb: қорғасын (0,004%)
Еуропалық Одақта пайдаланылған электрлік жəне электрондық өнімдер,
батареялар мен аккумуляторлар үшін бөлек жинау жүйесі бар.
Осы жабдықты, батареяларды жəне аккумуляторларды жергілікті қоқыс
жинау/қайта өңдеу орталығында утилизациялаңыз.
Біз тұратын қоршаған ортаны сақтауға көмектесіңіз!
KK-3
Page 38

● ПАЙДАЛАНУ БОЙЫНША НҰСҚАУЛЫҚ ●
ƏРБІР БӨЛШЕКТІҢ АТАУЫ
Ішкі жабдық Қашықтан басқару пульті
KK
Алдыңғы
панель
Ауа сүзгісі
Ауа тазалау
сүзгісі
(Күміс-иондалған
ауа тазалау
сүзгісі, қосымша)
Сипаттамалар тақтасы *1
Көлденең қалақша
Ауа шығысы
Жұмыс индикаторы
шамы
Қашықтан басқару
сигналын қабылдау
бөлімі
Ауа кірісі
Wi-Fi
интерфейсі
13-бет
Төтенше
басқару
қосқышы
10-бет
Жылу
алмастырғыш
Сыртқы жабдық
Ауа кірісі (артқы жəне бүйірлік)
Сипаттамалар тақтасы *1
Хладагент түтігі
Ағызу шлангісі
Ауа шығысы
Ағызу шығысы
Сыртқы жабдықтардың көрінісі өзгеше болуы мүмкін.
*1 Жасалып шығарылған жылы мен айы техникалық деректері бар зауыттық
тақтайшада көрсетілген.
Батареяны ауыстыру индикаторы 5-бет
Басқару
дисплейі
бөлімі
Температура
түймелері
6-бет
Жұмыс
таңдау
6-бет
түймесі
ECONO COOL
(Үнемді суыту)
9-бет
түймесі
POWERFUL
(ҚУАТТЫ)
8-бет
түймесі
i-save
8-бет
түймесі
NIGHT MODE
(Түнгі режим)
түймесі
9-бет
CLOCK (Сағат)
5-бет
түймесі
Қашықтан басқару
пульті
Қашықтан басқару пульті
пайдаланылмайтын кезде, оны осы
жабдықтың жанына қойыңыз.
Сигнал жіберу бөлімі
Сигнал қашықтығы:
Шамамен 6 м
Сигнал алынғанда,
дыбыстық сигнал(дар)
ішкі жабдықтан естіледі.
OFF/ON (Өшіру/
Қосу) (тоқтату/жұмыс)
түймесі
FAN (Желдеткіш)
жылдамдығын басқару
7-бет
түймесі
LONG (ҰЗАҚ)
8-бет
түймесі
WIDE VANE (Кең
қалақ) түймесі
VANE (Қалақ) басқару
түймесі
TIME (Уақыт), TIMER
(Таймер) орнату
түймелері
Уақытты арттыру
Уақытты азайту
WEEKLY TIMER
(Апталық таймер)
орнату түймелері
5, 11-бет
RESET (Қалпына
келтіру) түймесі
Қақпағы
Қашықтан басқару
пультін ашу үшін
қақпақты төмен
сырғытыңыз. Апталық
таймер түймелеріне
өту үшін оны төмен
сырғытыңыз.
Жабдықпен бірге берілген қашықтан
басқару пультін ғана пайдаланыңыз.
Басқа қашықтан басқару пульттерін
пайдаланбаңыз.
Егер 2 немесе бірнеше ішкі жабдық
бір-біріне жақын орнатылған
болса, қашықтан басқару пультіне
пайдаланылмайтын ішкі жабдық
жауап беруі мүмкін.
7-бет
7-бет
5, 10-бет
5-бет
KK-4
Page 39

ЖҰМЫС АЛДЫНДА ДАЙЫНДАУ
Жұмыс алдында: Қуат көзі ашасын қуат розеткасына салыңыз жəне/немесе
ажыратқышты қосыңыз.
Қашықтан басқару пультінің
батареяларын орнату
4.
RESET түймесін
басыңыз.
1.
Алдыңғы қақпақты
алыңыз.
2.
Алдымен AAA сілтілі
батареялардың теріс
полюсін салыңыз.
3.
Алдыңғы қақпақты
орнатыңыз.
Ескертпе:
• Батареялардың полярлығы дұрыс екенін тексеріңіз.
• Марганецтік батареяларды жəне ағып жатқан батареяларды
пайдаланбаңыз. Қашықтан басқару пульті бұзылып қалуы мүмкін.
• Қайта зарядталатын батареяларды пайдаланбаңыз.
• Батареяның қуаты біткенде батареяны ауыстыру индикаторы жанады.
Индикатор жана бастағаннан кейін шамамен 7 күн ішінде қашықтан
басқару пульті жұмыс істеуін тоқтатады.
• Барлық батареяларды дəл сондай түрдегі жаңа батареялармен
ауыстырыңыз.
• Батареяларды шамамен 1 жыл пайдалануға болады. Дегенмен,
жарамдылық мерзімі біткен батареялардың мерзімі қысқа болуы
мүмкін.
• Жіңішке құрал арқылы RESET түймесін басыңыз.
Егер RESET түймесі басылмаса, қашықтан басқару пульті дұрыс жұмыс
істемеуі мүмкін.
Ағымдағы уақытты орнату
3.
Күнді орнату үшін
DAY түймесін
1.
CLOCK түймесін
басыңыз.
2.
4.
CLOCK түймесін
қайта басыңыз.
Ескертпе:
• Жіңішке құрал арқылы CLOCK түймесін басыңыз.
Ескертпе:
Қашықтан басқару пультін тек нақты бір ішкі жабдыққа орнату əдісі
Бөлмеде қашықтан басқару пульттерімен ең көбі 4 ішкі жабдықты
пайдалануға болады.
Ішкі жабдықты əр қашықтан басқару пультімен жеке басқару үшін, əрбір
қашықтан басқару пультін ішкі жабдықтың нөміріне сəйкес тағайындаңыз.
Барлық келесі шарттар сақталғанда осы параметрді орнатуға болады:
• Қашықтан басқару пульті ӨШІРІЛГЕН.
(1) Жұптастыру режиміне өту үшін қашықтан басқару пультіндегі
түймесін 2 секунд басып тұрыңыз.
түймесін қайта басып, əрбір қашықтан басқару пультіне нөмір
(2)
тағайындаңыз.
түймесін əр басқан сайын нөмірді келесі ретпен арттырады: 1 →
2 → 3 → 4.
(3) Жұптастыру параметрін аяқтау үшін
Ажыратқышты ҚОСҚАННАН кейін, сигналды ішкі жабдыққа бірінші
жіберетін қашықтан басқару пульті ішкі жабдық үшін қашықтан басқару
пульті ретінде тағайындалады.
Орнатқаннан кейін, ішкі жабдық сигналды тек тағайындалған қашықтан
басқару пультінен алады.
Түймені əр басқан сайын
басыңыз.
Уақытты орнату үшін TIME
түймесін немесе TIMER
түймесін басыңыз.
уақыт 1 минутқа артады/
кемиді (ұзақ басқанда 10
минут).
түймесін басыңыз.
KK
KK-5
Page 40

KK
● ПАЙДАЛАНУ БОЙЫНША НҰСҚАУЛЫҚ ●
ЖҰМЫС РЕЖИМДЕРІН ТАҢДАУ
1
Жұмысты бастау үшін
2
Жұмыс режимін таңдау үшін түймесін
басыңыз. Əр басқан сайын режим келесі ретпен
өзгереді:
түймесін басыңыз.
DRY режимі
Бөлмені ылғалсыздандыру. Бөлмені сəл салқындатуға болады.
DRY режимі барысында температураны орнату мүмкін емес.
HEAT режимі
Ауаны қажетті температураға дейін жылытыңыз.
FAN режимі
Бөлмедегі ауаны желдетіңіз.
Ескертпе:
COOL/DRY режимінің жұмысынан кейін, ішкі жабдықтың ішін құрғату
үшін FAN режимінде пайдалану ұсынылады.
Ескертпе:
Көп жүйелі жұмыс
Бір сыртқы жабдық арқылы екі немесе одан көп ішкі жабдықты басқаруға
болады. Бірнеше ішкі жабдықты бір уақытта пайдаланғанда, салқындату/
құрғату/желдету жəне жылыту операцияларын бір уақытта орындау мүмкін
емес. Бір жабдықпен COOL/DRY/FAN режимін таңдап, басқасымен HEAT
режимін немесе керісінше таңдағанда, соңғы таңдалған жабдық ұйқы
режиміне өтеді.
Жұмыс индикаторы шамы
Жұмыс индикаторының шамы жабдықтың жұмыс күйін көрсетеді.
(AUTO) (COOL) (DRY) (HEAT) (FAN)
3
Температураны орнату үшін немесе
түймесін басыңыз.
Əр басқан сайын температура 1°C-қа көтеріледі
немесе төмендейді.
Жұмысты тоқтату үшін түймесін басыңыз.
AUTO режимі (автоматты ауысу)
Жабдық жұмыс режимін бөлме температурасы мен орнатылған
температура арасындағы айырмашылыққа сəйкес таңдайды. AUTO
режимі барысында, бөлме температурасы орнатылған температурадан
15 минуттан артық уақыт бойы шамамен 2°C дəрежеге артық болған
кезде жабдық (COOL↔HEAT) режимін ауыстырады.
Ескертпе:
Егер осы ішкі жабдық MXZ түріндегі сыртқы жабдыққа жалғанса, авто
режимін пайдалану ұсынылмайды. Бірнеше ішкі жабдық бір уақытта
пайдаланылған кезде жабдық жұмыс режимін COOL жəне HEAT
режимінің арасында ауыстыра алмауы мүмкін. Мұндай жағдайда,
ішкі жабдық ұйқы режимінде болады (жұмыс индикаторы шамының
кестесін қараңыз).
COOL режимі
Индикация Жұмыс күйі
Жабдық бөлме температурасына
жеткенше жұмыс істейді
Бөлме температурасы орнатылған
температураға жақын
Жану Жанып тұрған жоқ
Бөлме
температурасы
Орнатылған
температурадан
шамамен 2°C
немесе одан
артық градусқа
ауытқу
Орнатылған
температурадан
шамамен 1–2°C
градусқа ауытқу
Қажетті температурадағы салқын ауаны алыңыз.
Ескертпе:
COOL режимін өте төмен сыртқы температурада (-10°C-тан төмен)
пайдаланбаңыз. Жабдықтағы конденсацияланған су тамшылап,
жиһазды немесе т.б. заттарды ылғалдауы нез зақымдауы мүмкін.
KK-6
Page 41

ЖЕЛДЕТКІШ ЖЫЛДАМДЫҒЫН ЖƏНЕ АУА АҒЫНЫНЫҢ БАҒЫТЫН РЕТТЕУ
Ауа ағынының бағытын көтеру/түсіру
Ауа ағынының бағытын таңдау үшін түймесін
басыңыз. Əр басқан сайын ауа ағынының бағыты
келесі ретпен өзгереді:
(AUTO) (1) (2) (3) (4) (5) (SWING)
(AUTO) .........Қалақша ең тиімді ауа ағынының бағытына орнатылады.
COOL/DRY/FAN: көлденең күй. HEAT: күй (4).
Желдеткіш жылдамдығы
Желдеткіш жылдамдығын таңдау үшін
түймесін басыңыз. Əр басқан сайын желдеткіш
жылдамдығы келесі ретпен өзгереді:
(Қолмен) ......Ауа температурасын тиімді түрде қалыпқа келтіру
(Тербеліс) ....Қалақша мерзімді түрде жоғары жəне төмен жылжиды.
• AUTO режимі орнатылғанда ішкі жабдықтан екі қысқа сигнал
• Ауа ағынының бағытын өзгерткенде əрқашан қашықтан басқару
• Ажыратқыш қосылғанда, көлденең қалақшаның күйі шамамен бір
• Көлденең қалақшалар қалыпты емес күйде болып көрінгенде,
мақсатында COOL/DRY режимі үшін жоғарғы күйді жəне
HEAT режимі үшін төменгі күйді таңдаңыз. Егер COOL/DRY
режимі барысында төменгі күй таңдалса, тамшылаудан
болатын конденсацияны болдырмау үшін қалақша 0,5-1
сағаттан кейін автоматты түрде жоғарғы күйге жылжиды.
естіледі.
KK
пультін пайдаланыңыз. Көлденең қалақшаларды қолмен жылжыту
оларды бұзуы мүмкін.
минут ішінде қайта орнатылады, содан соң жұмыс басталады. Дəл
осындай əрекет апаттық салқындату жұмысында да орындалады.
14-бетті қараңыз.
(AUTO) (Silent) (Low) (Med.) (High) (Super High)
• AUTO режиміне орнатылғанда ішкі жабдықтан екі қысқа сигнал
естіледі.
• Бөлмені жылдам салқындату/жылыту үшін жоғарырақ желдеткіш
жылдамдығын пайдаланыңыз. Бөлме салқын/ыстық болғанда,
желдеткіш жылдамдығын төмендету ұсынылады.
• Тыныш жұмыс үшін төменірек желдеткіш жылдамдығын
пайдаланыңыз.
Ескертпе:
Көп жүйелі жұмыс
Жылыту операциясы үшін бір сыртқы жабдық бірнеше ішкі жабдықты бір
уақытта басқарғанда, ауа ағынының температурасы төмен болуы мүмкін.
Мұндай жағдайда, желдеткіш жылдамдығын AUTO режиміне орнату
ұсынылады.
Ауа ағынының бағытын солға/оңға бұру
Ауа ағынының бағытын таңдау үшін түймесін
басыңыз. Əр басқан сайын ауа ағынының бағыты
келесі ретпен өзгереді:
(
SWING
)
KK-7
Page 42

● ПАЙДАЛАНУ БОЙЫНША НҰСҚАУЛЫҚ ●
KK
ҰЗАҚ ЖҰМЫС
LONG (ҰЗАҚ) жұмысты бастау үшін түймесін
басыңыз.
• Желдеткіш жылдамдығы артады да, көлденең қалақша LONG
(ҰЗАҚ) режим күйіне өтеді.
• Ауа ұзағырақ қашықтыққа жетеді.
LONG (ҰЗАҚ) жұмысын тоқтату үшін түймесін
қайта басыңыз.
• LONG (ҰЗАҚ) жұмысы OFF/ON (ӨШІРУ/ҚОСУ), VANE (ҚАЛАҚША)
немесе ECONO COOL (ҮНЕМДІ СУЫТУ) түймесін басқан кезде
тоқтатылады.
ҚУАТТЫ ЖҰМЫС
POWERFUL (ҚУАТТЫ) жұмысты бастау үшін
6-беттегі COOL (СУЫТУ) немесе HEAT (ЖЫЛЫТУ)
режимінде
Желдеткіш жылдамдығы : POWERFUL (ҚУАТТЫ) режимі үшін
Көлденең қалақша : AUTO (АВТОМАТТЫ) реттеу кезінде
• POWERFUL (ҚУАТТЫ) жұмыс барысында температураны орнату
мүмкін емес.
POWERFUL (ҚУАТТЫ) жұмысын тоқтату үшін
түймесін қайта басыңыз.
• POWERFUL (ҚУАТТЫ) жұмысы автоматты түрде 15 минут ішінде
немесе OFF/ON (ӨШІРУ/ҚОСУ), FAN (ЖЕЛДЕТКІШ), ECONO
COOL (ҮНЕМДІ СУЫТУ) немесе i-save түймесі басылған кезде
тоқтатылады.
түймесін басыңыз.
ерекше жылдамдық
күйді немесе төмен ауа ағыны күйін
орнату
I-SAVE ЖҰМЫСЫ
Қарапайымдатылған кері орнату функциясы түймесін бір басу
арқылы қажетті (алдын ала орнату) параметрді қайта шақыруға
мүмкіндік береді. Түймені қайта басып, алдыңғы орнатылған
параметрге қайта оралуға болады.
1
COOL (СУЫТУ), ECONO COOL (ҮНЕМДІ СУЫТУ),
NIGHT MODE (ТҮНГІ РЕЖИМ) жұмысы кезінде
белгішесін басыңыз немесе i-save режимін
таңдау үшін HEAT (ЖЫЛЫТУ) режимін басыңыз.
2
Температураны, желдеткіш жылдамдығын жəне ауа
ағынының бағытын орнатыңыз.
• түймесін жай ғана басу арқылы келесіде дəл сол параметр
таңдалады.
• Екі параметрді сақтауға болады. (Біреуін COOL/ECONO COOL
режимі үшін, ал екіншісін HEAT режимі үшін)
• Бөлмеге сəйкес тиісті температураны, желдеткіш жылдамдығын
жəне ауа ағынының бағытын таңдаңыз.
• Əдетте, HEAT (ЖЫЛЫТУ) режимінде минималды температура
параметрі 16 °C.
Дегенмен, тек i-save жұмысы кезінде минималды температура
параметрі 10 °C.
I-save режимінің жұмысынан бас тарту үшін
түймесін басыңыз.
• Сондай-ақ, MODE түймесін басқанда i-save режимінің жұмысы
тоқтатылады.
Ескертпе:
Пайдалану мысалы:
1. Төмен энергия режимі
COOL режимінде температураны 2–3°C аралығына, ал HEAT режимінде
салқынырақ орнатыңыз. Бұл параметр бос бөлмеде жəне ұйықтап
жатқанда үйлесімді.
2. Жиі пайдаланылатын параметрлерді сақтау
COOL/ECONO COOL жəне HEAT режимі үшін өзіңіз қалайтын параметрді
сақтаңыз. Бұл түймені бір рет басу арқылы өзіңіз қалайтын параметрді
таңдауға мүмкіндік береді.
KK-8
Page 43

ҮНЕМДІ САЛҚЫНДАТУ ЖҰМЫСЫ
ТҮН РЕЖИМІНІҢ ЖҰМЫСЫ
Тербеліп тұрған ауа ағыны (ауа ағынының өзгеруі) тұрақты ауа
ағынына қарағанда, салқын сезінуге мүмкіндік береді.
Микропроцессор орнатылған температура мен ауа ағынының
бағытын автоматты түрде өзгертеді. Ыңғайлылықты сақтап,
салқындату операциясын орындауға болады. Нəтижесінде,
энергияны үнемдеуге болады.
ECONO COOL жұмысын бастату үшін COOL режимі
6-бет барысында
Жабдық температураның ауа ағынына қарай тербелу əрекетін
əртүрлі циклдерде тігінен орындайды.
түймесін басыңыз.
ECONO COOL жұмысынан бас тарту үшін
түймесін басыңыз.
• Сондай-ақ, VANE түймесін басқанда ECONO COOL режимінің
жұмысы тоқтатылады.
NIGHT MODE (ТҮНГІ РЕЖИМ) режимі жұмыс индикаторының
жарықтығын өзгертеді, дыбыстық сигналды өшіреді жəне сыртқы
жабдықтың шу деңгейін шектейді.
NIGHT MODE (ТҮНГІ РЕЖИМ) режимін белсендіру
үшін, жұмыс кезінде
• Жұмыс индикаторының шамы көмескіленеді.
• Дыбыстық сигнал өшеді, бірақ жұмыс іске қосылғанда немесе
тоқтағанда шығады.
• Сыртқы жабдықтың шу деңгейі ТЕХНИКАЛЫҚ СИПАТТАМАЛАР
бөлімінде көрсетілгеннен төмен болады.
белгішесін басыңыз.
NIGHT MODE (ТҮНГІ РЕЖИМ) режимінен бас тарту
үшін
белгішесін қайта басыңыз.
Ескертпе:
• Салқындату/жылыту күші төмендеуі мүмкін.
• Жабдықты іске қосудан кейін, қорғау операциясы барысында немесе
басқа жұмыс шарттарына байланысты сыртқы жабдықтың шу деңгейі
өзгермеуі мүмкін.
• Ішкі жабдықтың желдеткіш жылдамдығы өзгермейді.
Жұмыс индикаторының шамы жарық бөлмеде дұрыс көрінбейді.
•
•
Көп жүйелі жұмыс барысында сыртқы жабдықтың шу деңгейі төмендемейді.
KK
KK-9
Page 44

● ПАЙДАЛАНУ БОЙЫНША НҰСҚАУЛЫҚ ●
KK
ТАЙМЕР ЖҰМЫСЫ (ҚОСУ/ӨШІРУ ТАЙМЕРІ)
АПАТТЫҚ ЖҰМЫС
Қашықтан басқару пультін пайдалану мүмкін
болмағанда...
Ішкі жабдықтағы апаттық жұмыс қосқышын (E.O. SW) басу арқылы апаттық
жұмысты іске қосуға болады.
E.O. SW түймесі əр басылған сайын жұмыс келесі ретпен
өзгереді:
Жұмыс индикаторы шамы
Ескертпе:
• Жұмыстың бірінші 30 минуты — сынақтық іске қосу. Температура
1
Таймерді орнату үшін, жұмыс барысында
немесе
(ҚОСУ таймері): Жабдық орнатылған
түймесін басыңыз.
уақытта ҚОСЫЛАДЫ.
басқаруы жұмыс істемейді жəне желдеткіш жылдамдығы «Жоғары»
күйге орнатылады.
• Апаттық жылыту жұмысында, ыстық ауаны үрлеп шығару үшін желдеткіш
жылдамдығы біртіндеп артады.
• Апаттық салқындату жұмысында, көлденең қалақшаның күйі шамамен
бір минут ішінде қайта орнатылады, содан соң жұмыс басталады.
Апаттық САЛҚЫНДАТУ
Апаттық ЖЫЛЫТУ
Тоқтату
Орнатылған температура: 24°C
Желдеткіш жылдамдығы
Көлденең қалақша: Авто
: Орташа
(ӨШІРУ таймері): Жабдық орнатылған
уақытта ӨШЕДІ.
* немесе түймесі жыпылықтайды.
Ағымдағы уақыт пен күннің дұрыс орнатылғанын тексеріңіз.
*
5-бет
2
Таймердің уақытын орнату үшін түймесін
(арттыру) жəне
Əр басу орнатылған уақытты 10 минутқа арттырады немесе
кемітеді.
немесе түймесі жыпылықтап тұрғанда таймерді
•
орнатыңыз.
3
Таймерден бас тарту үшін
түймесін қайта басыңыз.
түймесін (кеміту) басыңыз.
немесе
Ескертпе:
• ҚОСУ жəне ӨШІРУ таймерлерін бірге орнатуға болады. белгісі таймер
жұмысының ретін көрсетеді.
• Егер ҚОСУ/ӨШІРУ таймері орнатылғанда қуат өшіп қалса, 10-бет
«Автоматты қайта іске қосу функциясы» бөлімін қараңыз.
АВТОМАТТЫ ҚАЙТА ІСКЕ ҚОСУ ФУНКЦИЯСЫ
Егер жұмыс барысында қуат өшіп қалса немесе негізгі қуат өшсе, «Автоматты
қайта іске қосу функциясы» негізгі қуат өшу алдында қашықтан басқару
пультімен орнатылған режимде автоматты түрде іске қосылады. Таймер
орнатылғанда, таймер параметрі жойылып, қуат қосылғанда жабдық жұмысы
іске қосылады.
Егер осы функцияны пайдалану қажет болмаса, қызмет көрсету өкіліне
хабарласыңыз, себебі жабдықтың параметрін өзгерту қажет.
KK-10
Page 45

АПТАЛЫҚ ТАЙМЕР ЖҰМЫСЫ
•
Аптаның жеке күндеріне ең көбі 4 ҚОСУ немесе ӨШІРУ таймерін орнатуға болады
• Бір аптаға ең көбі 28 ҚОСУ немесе ӨШІРУ таймерін орнатуға болады.
Мыс.:
Жұмыс күндері ұйқыдан оянып, үйден шыққанға дейін 24°C температурада
істейді жəне үйге келгеннен бастап ұйықтағанша 27°C температурада істейді
Демалыс күндері кеш тұрғаннан бастап ерте жатқанға дейін 27°C температурада істейді
1-параметр 2-параметр 3-параметр 4-параметр
Дүй
Жұм
Сен
Жек
ҚОСУ ӨШІРУ ҚОСУ
~
~
24°C 27°C
6:00 8:30 17:30 22:00
1-параметр 2-параметр
ҚОСУ ӨШІРУ
8:00 21:00
27°C
Ескертпе:
Апталық таймер қосулы болғанда қарапайым ҚОСУ/ӨШІРУ таймерінің
параметрі қолжетімді болады. Мұндай жағдайда, апталық таймерге қарағанда
ҚОСУ/ӨШІРУ таймері басымдырақ болады; қарапайым ҚОСУ/ӨШІРУ таймері
аяқталғаннан кейін апталық таймер жұмысы қайта іске қосылады
.
.
ӨШІРУ
.
.
3
ҚОСУ/ӨШІРУ, уақыт пен температураны орнату үшін
, , жəне түймесін басыңыз.
Мыс.: [ON], [6:00]
жəне [24°C]
параметрі
таңдалады.
түймесін бассаңыз,
ҚОСУ/ӨШІРУ таймері таңдалады.
түймесін бассаңыз,
таймер параметрі жойылады.
* Уақытты жылдам өзгерту үшін түймені басып тұрыңыз.
түймесін
бассаңыз, уақыт
реттеледі.
түймесін
бассаңыз, температура
.
реттеледі
Таймерді басқа күндер жəне/немесе нөмірлер үшін орнатуды
жалғастыру үшін
4
Апталық таймер параметрін орнатуды аяқтап, оны
тасымалдау үшін
жəне түймесін басыңыз
түймесін басыңыз.
жыпылықтауы
*
өшіп, ағымдағы уақыт
көрсетіледі.
.
Ескертпе:
•
Апталық таймердің параметр ақпаратын ішкі жабдыққа тасымалдау үшін
түймесін басыңыз. Қашықтан басқару пультін ішкі жабдыққа 3 секунд бойы қаратыңыз
•
Таймерді аптаның бірнеше күніне немесе бірнеше нөмірге орнатқанда, əрбір параметр
үшін түймесін басу қажет емес. Барлық параметрлерді орнатып болғаннан кейін
түймесін бір рет басыңыз. Барлық апталық таймер параметрлері сақталады
Апталық таймер параметрі режимін енгізу үшін түймесін басыңыз
•
жəне барлық апталық таймер параметрін өшіру үшін
бойы басып тұрыңыз. Қашықтан басқару пультін ішкі жабдыққа қаратыңыз
түймесін 5 секунд
KK
.
.
.
Апталық таймерді орнату
* Ағымдағы уақыт пен күннің дұрыс орнатылғанын тексеріңіз.
1
Апталық таймер параметрі режимін енгізу үшін түймесін басыңыз
*
түймесі
жыпылықтайды.
2
Параметр күнін жəне нөмірін таңдау үшін жəне түймесін басыңыз
Мыс.: [Дүй Сей ... Жек]
жəне [1] таңдалған.
түймесін бассаңыз,
орнатылатын апта күні таңдалады.
* Барлық күнді таңдауға болады.
түймесін
бассаңыз, орнату
нөмірі таңдалады.
5
Апталық таймерді ҚОСУ үшін түймесін
басыңыз. (
*
Апталық таймер ҚОСЫЛҒАНДА, таймер параметрі орнатылып болған апта күні жанады
түймесі жанады.)
Апталық таймерді ӨШІРУ үшін түймесін қайта
.
басыңыз. (
түймесі өшеді.)
Ескертпе:
Апталық таймер ӨШКЕНДЕ сақталған параметрлер жойылмайды.
.
Апталық таймер параметрін тексеру
1
Апталық таймер параметрі режимін енгізу үшін түймесін басыңыз
* түймесі жыпылықтайды.
2
Белгілі бір күннің немесе нөмірдің параметрін көру
үшін немесе түймесін басыңыз.
Апталық таймер параметрінен шығу үшін түймесін басыңыз
Ескертпе:
Параметрлерді көру үшін аптаның барлық күні таңдалғанда жəне оған
параметр қосылғанда, түймесі көрсетіледі.
басқа
.
.
.
KK-11
Page 46

KK
● ПАЙДАЛАНУ БОЙЫНША НҰСҚАУЛЫҚ ●
ТАЗАЛАУ
Нұсқаулар:
• Тазалау алдында қуат көзін ажыратыңыз немесе ажыратқышты өшіріңіз.
• Металл бөлшектерді қолмен ұстамаңыз.
• Бензинді, еріткішті, жылтырату ұнтағын немесе жəндіктерге қарсы
құралды пайдаланбаңыз.
• Тек сұйытылған жұмсақ жуу құралдарын ғана пайдаланыңыз.
• Қатты щетка, қатты губка немесе соған ұқсас заттарды пайдаланбаңыз.
Ауа сүзгісі (Aya тазалау сүзгісі)
• 2 апта сайын тазалау
• Кірді шаңсорғышпен кетіріңіз немесе сумен шайыңыз.
• Сумен жуғаннан кейін оны көлеңкеде құрғатыңыз.
Алдыңғы панель
• Көлденең қалақшаны суға батырмаңыз немесе шаймаңыз.
• 50°C температурадан асатын ыстық суды пайдаланбаңыз.
• Бөлшектерді құрғату үшін тікелей түсетін күн сəулесіне, ыстыққа немесе
отқа шығармаңыз.
• Желдеткішке артық күш салмаңыз, себебі жарықтың пайда болуына
немесе бұзылуға əкелуі мүмкін.
Ауа тазалау сүзгісі
(Күміс-иондалған ауа тазалау
сүзгісі, қосымша)
3 ай сайын:
• Шаңсорғыш арқылы ласты кетіріңіз.
Ласты шаңсорғышпен кетіру мүмкін болмаса:
•
Сүзгіні жəне оның жақтауын шаю алдында оларды жылы суға салып
қойыңыз.
•
Жуғаннан кейін, оны көлеңкеде құрғатыңыз.
Жыл сайын:
• Жақсы өнімділік үшін оны жаңа ауа тазалау сүзгісіне ауыстырыңыз.
• Бөлшек нөмірі MAC-2360FT-E
Сүзгі бағыттауышы
Топса
Саңылау
1. Алдыңғы панельді «шерту дыбысы» естілгенше көтеріңіз.
2. Топсаларды шешу үшін суретте көрсетілгендей ұстап, тартыңыз.
• Жұмсақ, құрғақ шүберекпен сүртіңіз немесе сумен шайыңыз.
• Оны суға екі сағаттан артық салмаңыз.
• Оны орнату алдында көлеңкеде əбден
құрғатыңыз.
3. Алу процедурасының кері ретімен алдыңғы
панельді орнатыңыз. Алдыңғы панельді мықтап
жауып, нұсқарлар арқылы көрсетілген орындарды
басыңыз.
Бұл ақпарат №528/2012 РЕГЛАМЕНТ (ЕО) негізінде жасалған
МОДЕЛЬ АТАУЫ
MSZ-AP60/71VG СҮЗГІ
MAC-2360FT-E СҮЗГІ
Өңделген мақала
(Бөлшектер
атауы)
Белсенді заттектер
(CAS №)
Күміс натрий сутек цирконий
фосфат
(265647-11-8)
2-октил-2Н-изотиазол-3-бір (OIT)
(26530-20-1)
Күміс мырыш цеолит
(130328-20-0)
Блокты сүзгі
бағыттауышының
бойымен орнату
үшін итеріңіз.
Блоктан шығару үшін тартыңыз.
Маңызды
• Өнімділікті жақсарту жəне қуат тұтынуын азайту үшін
сүзгілерді жиі тазалап тұрыңыз.
• Лас сүзгілер ауа салқындатқышта судың конденсациясына
себепші болып, зеңнің көбеюіне əкеледі. Сондықтан ауа
сүзгілерін əр 2 аптада тазалап тұру ұсынылады.
Мүлік
Бактерияға
қарсы
Зеңге қарсы
Бактерияға
қарсы
• Бұл өнімді пайдалану нұсқауларына сəйкес
жəне мақсаты бойынша ғана пайдаланыңыз.
• Аузыңызға салмаңыз. Балалардан алыс
сақтаңыз.
• Бұл өнімді пайдалану нұсқауларына сəйкес
жəне мақсаты бойынша ғана пайдаланыңыз.
• Аузыңызға салмаңыз. Балалардан алыс
сақтаңыз.
Пайдалану нұсқаулығы
(Қауіпсіз пайдалану ақпараты)
KK-12
Page 47

Wi-Fi ИНТЕРФЕЙСІН РЕТТЕУ (ТЕК VGK ТҮРІ)
Бұл Wi-Fi интерфейсі ішкі жабдыққа жалғану арқылы күй ақпаратын
беріп, серверден пəрмендерді басқарады.
Алдыңғы
панель
Wi-Fi
интерфейсі
Алдыңғы
панель
Wi-Fi интерфейсі
Wi-Fi интерфейсінің кіріспесі
№ Элемент Сипаттама
1 MODE қосқышы Режимдерді таңдайды.
2 RESET қосқышы
ERR LED
3
(қызғылт сары)
4 NET LED (жасыл) Желі күйін көрсетеді.
MODE LED
5
(қызғылт сары)
6 UNIT LED (жасыл) Ішкі жабдық күйін көрсетеді.
(1) MODE қосқышы
• Конфигурацияларда режимдерді таңдау үшін MODE қосқышы
пайдаланылады.
(2) RESET қосқышы
• Жүйені қайта іске қосу үшін RESET қосқышын 2 секунд басып тұрыңыз.
• Wi-Fi интерфейсін əдепкі зауыттық параметрге орнату үшін RESET
қосқышын 14 секунд басып тұрыңыз.
Wi-Fi интерфейсі зауыттық параметрге қайта орнатылған кезде
БАРЛЫҚ конфигурация ақпараты жоғалады. Бұл операцияны
орындаған кезде абай болыңыз.
Жүйені жəне БАРЛЫҚ параметрлерді
қайта орнатады.
Желі қатесінің күйін көрсетеді.
Кіру нүктесі режимінің күйін көрсетеді.
3
ERR
4
NET
MODE
5
UNIT
6
RESET
MODE
2
1
1
Алдыңғы панельді ашып, Wi-Fi интерфейсін
алыңыз.
2
Wi-Fi интерфейсі мен маршрутизатор арасында
байланыс орнатыңыз. Жабдықпен бірге берілетін
РЕТТЕУ НҰСҚАУЛЫҒЫ жəне SETUP QUICK
REFERENCE GUIDE (РЕТТЕУ БОЙЫНША ЖЫЛДАМ
АНЫҚТАМАЛЫҚ НҰСҚАУЛЫҒЫ) құжатын қараңыз.
РЕТТЕУ НҰСҚАУЛЫҒЫ құжатын алу үшін төмендегі
веб-сайтқа өтіңіз.
http://www.melcloud.com/Support
3
Реттеу аяқталғаннан кейін Wi-Fi интерфейсін
орнына қойып, алдыңғы панельді жабыңыз.
4
MELCloud пайдаланушы нұсқаулығы құжатын алу
үшін төмендегі веб-сайтқа өтіңіз.
http://www.melcloud.com/Support
Ескертпе:
• Wi-Fi интерфейсін реттеуді бастау алдында, Маршрутизатордың WPA2AES шифрлау параметрін қолдайтынына көз жеткізіңіз.
• Соңғы пайдаланушы осы Wi-Fi интерфейсін пайдалану алдында Wi-Fi
қызметінің шарттары мен талаптарын оқып, қабылдауы қажет.
• Бұл Wi-Fi интерфейсін Wi-Fi қызметіне жалғауды аяқтау үшін
маршрутизатор қажет болуы мүмкін.
• Соңғы пайдаланушы тіркеліп, Wi-Fi қызметінің шарттары мен талаптарын
қабылдамайынша, осы Wi-Fi интерфейсі жүйеден ешқандай жұмыс
деректерін тасымалдамайды.
• Бұл Wi-Fi интерфейсі критикалық салқындатуды немесе жылытуды
қамтамасыз ететін ешбір Mitsubishi Electric жүйесіне орнатылмауы
немесе оған жалғанбауы қажет.
• Бұл Wi-Fi интерфейсін реттеген кезде осы нұсқаулықтың соңғы бетіне
Wi-Fi интерфейсінің параметріне қатысты ақпаратты жазып алыңыз.
Орнын ауыстыру немесе утилизациялау кезінде, Wi-Fi интерфейсін
•
əдепкі зауыттық параметрлерге қайта орнатыңыз.
Mitsubishi Electric компаниясының Wi-Fi интерфейсі Mitsubishi Electric
компаниясының MELCloud Wi-Fi қызметімен байланысуға арналған.
Үшінші тараптың Wi-Fi интерфейстерін MELCloud қызметіне жалғау
мүмкін емес.
Mitsubishi Electric компаниясы Mitsubishi Electric жабдығына үшінші
тараптың Wi-Fi интерфейсін жалғау жəне/немесе Mitsubishi Electric
жабдығымен үшінші тараптың Wi-Fi интерфейсін немесе үшінші
тараптың Wi-Fi қызметін пайдалану нəтижесіндегі (i) жүйенің немесе
қандай да бір өнімнің жеткіліксіз өнімділігіне;
(ii) жүйе немесе өнім ақаулығына немесе (iii) қандай да бір кез келген
жүйенің немесе өнімнің жоғалуына немесе зақымдалуына жауапты
болмайды.
KK
Mitsubishi Electric Corporation компаниясының MELCloud қызметіне
қатысты ең жаңа ақпаратты www.melcloud.com веб-сайтынан
алыңыз.
KK-13
Page 48

● ПАЙДАЛАНУ БОЙЫНША НҰСҚАУЛЫҚ ●
АҚАУ ПАЙДА БОЛДЫ ДЕП ОЙЛАСАҢЫЗ
KK
Осы бөлімдер бойынша тексеріс орындалып, жабдық ақаудан кейін əлі де қалпына
келмесе, ауа салқындатқышты пайдалануды тоқтатып, дилерге хабарласыңыз
Белгілері Түсіндірме жəне тексеру орындары
Ішкі жабдық
Жабдық жұмыс істемейді. • Ажыратқыш қосылған ба?
Көлденең қалақша
қозғалмайды.
Қайта іске қосылғаннан кейін жабдық
шамамен 3 минут жұмыс істемейді
Ішкі жабдықтың ауа
шығысынан тұман шығады.
КӨЛДЕНЕҢ ҚАЛАҚШАНЫҢ
тербелісі аз уақытқа тоқтап,
содан соң қайта іске қосылады.
COOL/DRY/FAN режимінде
SWING параметрі
таңдалғанда, төменгі көлденең
қалақша қозғалмайды
Жұмыс барысында ауа
ағынының бағыты өзгереді.
Қашықтан басқару пульті
арқылы көлденең қалақшаны
тікелей реттеу мүмкін емес.
Жылыту жұмысында жұмыс
шамамен 10 минутқа
тоқтайды.
Негізгі қуат қосылып, бірақ
қашықтан басқару пультінен
белгі алмаған кезде жабдық
өзімен өзі іске қосылады.
Екі көлденең қалақша
бір-біріне тиеді. Көлденең
қалақшалар қалыпты емес
күйде. Көлденең қалақшалар
дұрыс «жабық күй»
параметріне оралмайды.
COOL/DRY режимінде бөлме
температурасы орнатылған
температураға жақындағанда,
сыртқы жабдық өз жұмысын
тоқтатып, ішкі жабдық төмен
жылдамдықта жұмыс істей бастайды
Ішкі жабдықтың түсі уақыт өте
өзгереді.
Жұмыс индикаторының шамы көмескі.
Жабдықтан дыбыстық сигнал шықпайды
.
• Қуат көзінің ашасы жалғанған ба?
• ҚОСУ таймері орнатылған ба? 10-бет
• Көлденең қалақша мен тік қалақша дұрыс
орнатылған ба?
• Желдеткіш қабы зақымдалған ба?
Ажыратқыш қосылғанда, көлденең
•
қалақшалардың күйі шамамен бір минут ішінде
қайта орнатылады. Қайта орнату аяқталғаннан
кейін, көлденең қалақшалардың қалыпты
жұмысы қалпына келеді. Дəл осындай əрекет
апаттық салқындату жұмысында да орындалады
• Бұл микропроцессордың нұсқауларына
.
сəйкес жабдықты қорғайды. Күтіңіз.
•
Жабдықтан шығатын салқын ауа бөлмедегі
ауаны жылдам салқындатып, тұманға айналады
• Бұл КӨЛДЕНЕҢ ҚАЛАҚШАНЫҢ тербелу
жұмысының қалыпты орындалуына қажет.
• COOL/DRY/FAN режимінде SWING параметрі
таңдалғанда төменгі көлденең қалақшаның
қозғалмауы қалыпты жағдай болып
табылады.
• Жабдық COOL немесе DRY режимінде
тұрғанда, 0,5–1 сағат бойы ауа үрлеп жұмыс
істеп тұрса, су конденсацияланбауы жəне
тамшыламауы үшін ауа ағынының бағыты
жоғарғы күйге автоматты түрде орнатылады.
Жылыту жұмысында ауа ағынының
•
температурасы тым төмен болса немесе мұзды
еріту орындалып жатқан кезде көлденең қалақша
көлденең күйге автоматты түрде орнатылады
• Сыртқы жабдық мұз еріту режимінде.
Бұл ең көбі 10 минут уақыт алады, күтіңіз. (Сыртқы
температура тым төмен жəне ылғалдылық тым
жоғары болса, қырау пайда болады.)
•
Бұл модельдер автоматты іске қосу
функциясымен жабдықталған. Қашықтан
басқару пультімен жабдықты тоқтатпастан
негізгі қуат өшіп, қайта қосылған кезде жабдық
негізгі қуат өшу алдында қашықтан басқару
пультімен орнатылған режимде автоматты
түрде іске қосылады. «Автоматты қайта іске
қосу функциясы» бөлімін қараңыз. 10-бет
Келесі əрекеттердің бірін орындаңыз:
Ажыратқышты өшіріп, қосыңыз. Көлденең
•
қалақшалар дұрыс «жабық күй» параметрінде
екенін тексеріңіз.
•
Апаттық салқындату жұмысын іске қосып,
тоқтатыңыз, содан соң көлденең қалақшалар дұрыс
«жабық күйі» параметріне жылжитынын тексеріңіз
• Бөлме температурасы орнатылған
температурадан ауытқыған кезде ішкі
желдеткіш қашықтан басқару пультіндегі
параметрлерге сəйкес іске қосылады.
.
• Пластик ультракүлгін жарығының немесе
температураның əсерінен сарғайғанымен,
ол өнімнің функцияларына əсер етпейді.
• NIGHT MODE (ТҮНГІ РЕЖИМ) жұмысы
.
орнатылған ба? 9-бет
Көп жүйе
Істеп тұрмаған ішкі жабдық
қызып, жабдықтан су ағынына
ұқсайтын дыбыс шығады.
Жылыту жұмысы таңдалғанда,
жұмыс дереу басталмайды.
• Жұмыс істеп тұрмаса да, хладагент аз
мөлшерде ішкі жабдыққа аға береді.
• Жұмыс сыртқы жабдықтың мұзын еріткеннен
кейін басталса, жылы ауаның шығуына
бірнеше минут (ең көбі 10 минут) кетеді.
Сыртқы жабдық
Компрессор істеп тұрса да, сыртқы
жабдықтың желдеткіші айналмайды.
Желдеткіш айнала бастаса да, ол
көп ұзамай тоқтайды
Сыртқы жабдықтан су ағады. •
Сыртқы жабдықтан ақ түтін
шығады.
.
• Салқындату жұмысы барысында сыртқы
температура төмен болса, жеткілікті
салқындату өнімділігін сақтап тұру үшін
желдеткіш үзіліспен жұмыс істеп тұрады.
COOL жəне DRY режимдері барысында түтік немесе
түтіктің қосылым бөліктері салқын болады жəне бұл
судың конденсациялануына себеп болады
• Жылыту режимінде, жылу алмастырғыштағы
конденсацияланған су төмен тамшылайды.
• Жылыту режимінде, мұз еріту операциясы
сыртқы жабдықта пайда болатын мұздың
еруіне жəне төмен тамшылауына əкеледі.
• Жылыту режимінде, мұз еріту операциясынан
пайда болатын бу ақ түтінге ұқсас.
.
KK-14
Белгілері Түсіндірме жəне тексеру орындары
.
Қашықтан басқару пульті
Қашықтан басқару пультіндегі
дисплей көрсетілмейді
немесе ол көмескі. Ішкі
жабдық қашықтан басқару
пультінің сигналына жауап
бермейді.
• Батареялардың қуаты біткен бе? 5-бет
• Батареялардың полярлығы (+, -) дұрыс па?
5-бет
• Басқа электрлік құрылғылардың қашықтан
басқару пультіндегі түймелер басылып жатыр
ма?
Салқындатпайды немесе жылытпайды
Бөлме жеткілікті түрде
салқындамайды немесе
жылымайды.
.
.
Бөлме жеткілікті түрде
салқындамайды.
Бөлме жеткілікті түрде
жылымайды.
Жылыту режимінде ауа тез
.
шықпайды.
Ауа ағыны
Ішкі жабдықтан шығатын
ауаның иісі жағымсыз.
• Орнатылған температура параметрі дұрыс
па? 6-бет
• Орнатылған желдеткіш параметрі дұрыс па?
Желдеткіш температурасын High немесе
Super High режиміне өзгертіңіз. 7-бет
• Сүзгілер таза ма? 12-бет
Ішкі жабдықтың желдеткіші немесе жылу
•
алмастырғышы таза ма?
• Ішкі немесе сыртқы жабдықтың ауа кірісі
немесе шығысы бітелмеген бе?
• Терезе немесе есік ашық па?
• Орнатылған температураға жету үшін біршама
уақыт кетуі мүмкін немесе бөлменің өлшеміне,
қоршаған орта температурасына жəне басқа
жағдайларға қарай орнатылған температураға
жетпеуі мүмкін.
• NIGHT MODE (ТҮНГІ РЕЖИМ) жұмысы
орнатылған ба? 9-бет
• Бөлмеде желдету желдеткішін немесе
газ пешін пайдаланған кезде салқындату
жүктемесі артып, салқындату əсерінің
жеткіліксіздігіне əкеледі.
• Сыртқы температура жоғары болса,
салқындату əсері жеткілікті болмауы мүмкін.
• Сыртқы температура төмен болған кезде
жылыту əсері жеткілікті болмауы мүмкін.
• Күте тұрыңыз, жабдық жылы ауаны шығаруға
дайындалуда.
• Сүзгілер таза ма? 12-бет
• Ішкі жабдықтың желдеткіші немесе жылу
алмастырғышы таза ма?
• Жабдық қабырғаға, кілемге, жиһазға, киімге,
т.б. заттарға жабысқан иісті сорып, оны ауамен
бірге шығаруы мүмкін.
Дыбыс
Сатырлаған дыбыс естіледі. • Бұл дыбыс температура өзгерісінен болатын
«Сақырлаған» дыбыс
шығады.
.
Ішкі жабдықтан механикалық
дыбыс шығады.
Ағынды судың дыбысы
шығады.
Кейде быжылдаған дыбыс
шығады.
алдыңғы панельдің, т.б. заттардың кеңеюінен/
қысылуынан болады.
• Бұл дыбыс сору шкафын немесе желдеткішті
қосу арқылы сыртқы ауаны ағызу шлангісінен
жұтқан кезде естіледі, бұл ағызу шлангісіндегі
судың сыртқа ағуына себеп болады.
Сондай-ақ, қатты желден сыртқы ауа ағызу
шлангісіне қарай соққан кезде осындай дыбыс
шығады.
• Бұл желдеткішті немесе компрессорды қосу/
өшіру дыбысы.
• Бұл жабдықта ағып жатқан хладагенттің
немесе конденсацияланған судың дыбысы.
• Жабдықтың ішіндегі хладагенттің ағыны
өзгергенде осындай дыбыс шығады.
Таймер
Апталық таймер
параметрлерге сəйкес жұмыс
істемейді.
Жабдық жұмысты өзімен өзі
бастайды/тоқтатады.
•
ҚОСУ/ӨШІРУ таймері орнатылған ба? 10-бет
• Апталық таймердің параметр ақпаратын ішкі
жабдыққа қайта тасымалдаңыз. Ақпарат сəтті
алынғанда, ішкі жабдықтан ұзақ дыбыстық
сигнал шығады. Егер ақпарат алынбаса, қысқа
3 дыбыстық сигнал шығады. Ақпарат сəтті
алынғанын тексеріңіз. 11-бет
• Қуат өшіп қалса жəне негізгі қуат өшсе, ішкі
жабдықтың кірістірілген сағаты қате болады.
Нəтижесінде, апталық таймер дұрыс жұмыс
істемейді.
Қашықтан басқару пультін ішкі жабдық ала
алатын жерге қойыңыз. 5-бет
• Апталық таймері орнатылған ба? 11-бет
Wi-Fi интерфейсі
Қосылым орнату немесе
жұмыс барысында қате пайда
болғанда.
РЕТТЕУ НҰСҚАУЛЫҒЫ құжатын қараңыз.
РЕТТЕУ НҰСҚАУЛЫҒЫ құжатын алу үшін
төмендегі веб-сайтқа өтіңіз.
http://www.melcloud.com/Support
Page 49

АҚАУ ПАЙДА БОЛДЫ ДЕП
ОЙЛАСАҢЫЗ
ОРНАТЫЛАТЫН ОРЫН
ЖƏНЕ ЭЛЕКТРЛІК ЖҰМЫС
Келесі жағдайларда, ауа салқындатқышты пайдалануды тоқтатып,
дилерге хабарласыңыз.
• Ішкі жабдықтан су аққанда немесе тамшылағанда.
• Жұмыс индикаторының шамы жыпылықтағанда.
• Ажыратқыш жиі іске қосылғанда.
• Электрондық ҚОСУ/ӨШІРУ түріндегі флуоресценттік шам (инвертер
түріндегі флуоресценттік шам, т.б.) пайдаланылатын бөлмеде қашықтан
басқару пультінің сигналы қабылданбайды.
• Ауа салқындатқыштың жұмысы радио немесе теледидар қабылдауына
кедергі келтіреді. Кедергі келтірілген құрылғыға күшейткіш қажет болуы
мүмкін.
• Қалыпты емес дыбыс шыққанда.
• Хладагенттің ағуы анықталғанда.
АУА САЛҚЫНДАТҚЫШ ҰЗАҚ УАҚЫТ
ПАЙДАЛАНЫЛМАЙТЫН КЕЗДЕ
1
COOL режимін орнатылған ең жоғарғы
температурада немесе FAN режимінде 3–4 сағат
пайдаланыңыз. 6-бет
• Бұл жабдықтың ішін құрғатады.
• Ауа салқындатқыштағы ылғал зеңнің көбеюіне себеп болады.
2
Жұмысты тоқтату үшін
3
Ажыратқышты өшіріңіз жəне/немесе қуат ашасын
түймесін басыңыз.
Орнату орны
Ауа салқындатқышты келесі орындарға орнатпаңыз.
• Машина майы көп жер.
• Жағажай сияқты тұзды жерлер.
• Ыстық бұлақ, ағын сулар, қалдық су сияқты сульфидтік газ түзілетін
жерлер.
• Май шашырайтын немесе май түтіні толған жерлер (мысалы, пластиктің
қасиеті өзгеріп, зақымдалуы мүмкін болған тамақ дайындайтын жерлер
мен фабрикалар).
• Жиілігі жоғары немесе сымсыз жабдық орналасқан жер.
• Сыртқы жабдықтың ауа шығысынан шығатын ауа бітелген жер.
• Сыртқы жабдықтың жұмыс істеу дыбысы немесе одан шығатын ауа
көршілерге кедергі келтіретін жер.
• Ішкі жабдықты 1,8–2,3 м биіктікте монтаждау ұсынылады. Егер ол мүмкін
болмаса, дилерге хабарласыңыз.
• Ішкі жабдық көрсетілген бөлме кеңістігінен асатын бөлмелерде орнатылуы
керек. Дилермен кеңесіңіз.
• Ауа салқындатқышты бөлме ішін əрлеу жəне жөндеу жұмыстары кезінде
немесе еденге балауыз жағып жатқан кезде пайдаланбаңыз. Осындай
жұмыстар орындалғаннан кейін ауа салқындатқышты пайдалану алдында
бөлмені желдетіңіз. Өзге жағдайда, ауа салқындатқыштың ішіне ұшпа
элементтер жабысып қалып, судың ағуына немесе шықтың пайда болуына
əкелуі мүмкін.
• Wi-Fi интерфейсін медициналық электрлік жабдықтың немесе
жүрекширатқышы немесе имплантталатын кардиовертер-дефибриллятор
сияқты медициналық құрылғысы бар адамдардың қасында пайдаланбаңыз.
Бұл медициналық жабдықтың немесе құрылғының ақаулануы себебінен
қайғылы жағдайға əкелуі мүмкін.
• Бұл жабдық құрылғы мен пайдаланушы немесе бөгде адамдардың
арасында кемінде 20 см аралықта орнатылуы жəне пайдаланылуы керек.
• Wi-Fi интерфейсін басқа сымсыз құрылғылардың, қысқа толқынды
пештердің, сымсыз телефондардың немесе факс құрылғыларының
қасында пайдаланбаңыз.
Бұл ақаулықтарға əкелуі мүмкін.
ажыратыңыз.
4
Қашықтан басқару пультінен барлық батареяны
алыңыз.
Ауа салқындатқышты қайта
пайдаланғанда:
1
Ауа сүзгісін тазалаңыз. 12-бет
Флуоресценттік шамның
əсерлерін болдырмау
үшін, бір-бірінен
барынша алыс ұстаңыз.
1 м немесе
одан көп
Сымсыз
телефон немесе
портативті
телефон
1 м
немесе
одан көп
Радио
Инвертер түріндегі
флуоресценттік шам
Суреттің
немесе шудың
бұрмалануын
болдырмау үшін
орын қалдырыңыз.
ТД
3 м немесе одан көп
Сыртқы жабдық орнатылатын орын
теледидарлардың, радиолардың, т.б.
құрылғылардың антенналарынан кемінде 3 м
алыс болуы керек. Сигнал қабылдауы нашар
аймақтарда, ауа салқындатқыштың жұмысы радио
немесе теледидар сигналының қабылдауына
кедергі келтірсе, сыртқы жабдық пен тиісті
құрылғының арасындағы аралықты арттырыңыз.
Оңтайлы тиімділік
үшін жəне пайдалану
мерзімін ұзарту
үшін сыртқы жабдық
жақсы желдетілетін
əрі құрғақ жерде
сақталуы керек.
100 мм
немесе одан
көп
(AP60/AP71)
200/500 мм немесе одан көп
қабырға,
т.б.
KK
2
Ішкі жəне сыртқы жабдықтардың ауа кірісі мен
шығысы бітелмегенін тексеріңіз.
3
Жерге тұйықтау дұрыс жалғанғанын тексеріңіз.
4
«ЖҰМЫС АЛДЫНДА ДАЙЫНДАУ» бөлімін қарап,
нұсқауларды орындаңыз. 5-бет
Электрлік жұмыс
• Ауа салқындатқышқа жеке қуат көзін қамтамасыз етіңіз.
• Ажыратқыштың сыйымдылығын сақтаңыз.
Қандай да бір сұрақтар болса, дилерге хабарласыңыз.
KK-15
Page 50

● ПАЙДАЛАНУ БОЙЫНША НҰСҚАУЛЫҚ ●
ТЕХНИКАЛЫҚ СИПАТТАМАЛАР
KK
Модель
Функция Салқындату Жылыту Салқындату Жылыту
Қуат көзі ~ /Н, 230 В, 50 Гц
Сыйымдылық кВт 6,1 6,8 7,1 8,1
Кіріс кВт 1,59 1,67 2,01 2,12
Салмақ
Хладагент толтыру сыйымдылығы (R32) кг 1,05 1,50
IP коды
Рұқсат етілген артық
жұмыс қысымы
Шу деңгейі (SPL)
Ішкі MSZ-AP60VG(K) MSZ-AP71VG(K)
Сыртқы MUZ-AP60VG MUZ-AP71VG
Ішкі кг 16 17
Сыртқы кг 40 55
Ішкі IP 20
Сыртқы IP 24
LP ps МПа 2,77
HP ps МПа 4,17
Ішкі (Super High/High/
Med./Low/Silent)
Сыртқы дБ (А) 56 57 56 55
дБ (А) 48/45/41/37/29 48/45/41/37/30 49/45/41/37/30 51/45/41/37/30
Кепілдікті жұмыс ауқымы
Салқындату
Жылыту
Жоғарғы шегі
Төменгі шегі
Жоғарғы шегі
Төменгі шегі
Ішкі Сыртқы
32°C DB
23°C WB
21°C DB
15°C WB
27°C DB
—
20°C DB
—
46°C DB
-10°C DB
24°C DB
18°C WB
-15°C DB
-16°C WB
—
—
DB: Құрғақ термометр
WB: Ылғалды термометр
Ескертпе:
Номиналды шарты
Салқындату — Ішкі: 27°C DB, 19°C WB
Сыртқы: 35°C DB
Жылыту — Ішкі: 20°C DB
Сыртқы: 7°C DB, 6°C WB
Wi-Fi интерфейсі
Модель MAC-567IFB2-E
Кіріс кернеу 12,7 В ТТ (ішкі жабдықтан)
Қуат тұтынуы МАКС. 2 Вт
Өлшем Б×Е×Қ (мм) 79×44×18,5
Салмақ (г) 60 (кабельді қоса)
Таратқыштың қуат деңгейі (МАКС.) 17,5 дБм @IEEE 802.11b
РЖ арнасы 1 ар ~ 13 ар (2412~2472 МГц)
Радио протоколы IEEE 802.11b/g/n (20)
Шифрлау AES
Аутентификация WPA2-PSK
Бағдарламалық құрал нұсқасы XX.00
Сəйкестік декларациясы туралы ақпаратты төмендегі веб-сайттан алыңыз.
http://www.melcloud.com/Support
KK-16
Page 51

ԲՆՕՐԻՆԱԿԸ ԱՆԳԼԵՐԵՆ Է
ԲՈՎԱՆԴԱԿՈՒԹՅՈՒՆ
■ ԱՆՎՏԱՆԳՈՒԹՅԱՆ ՆԱԽԱԶԳՈՒՇԱՑՈՒՄՆԵՐ 1
■ ՀԵՌԱՑՈՒՄ 3
■ ՄԱՍԵՐԻ ԱՆՎԱՆՈՒՄՆԵՐԸ 4
■ ՇԱՀԱԳՈՐԾՄԱՆ ՆԱԽԱՊԱՏՐԱՍՏՈՒԹՅՈՒՆՆԵՐ 5
■ ՇԱՀԱԳՈՐԾՄԱՆ ՌԵԺԻՄԻ ԸՆՏՐՈՒԹՅՈՒՆԸ 6
■ ՕԴԱՓՈԽԻՉԻ ԱՐԱԳՈՒԹՅՈՒՆԸ ԵՎ ՕԴԻ ՀՈՍՔԻ ԿԱՌԱՎԱՐՈՒՄԸ 7
■ LONG (ԵՐԿԱՐ) ՕԳՏԱԳՈՐԾՈՒՄ 8
■ POWERFUL (ՀԶՈՐ) ՇԱՀԱԳՈՐԾՈՒՄ 8
■ I-SAVE ՇԱՀԱԳՈՐԾՈՒՄ 8
■ ECONO COOL ՇԱՀԱԳՈՐԾՈՒՄ 9
■ ԳԻՇԵՐԱՅԻՆ ՌԵԺԻՄԻ ՇԱՀԱԳՈՐԾՈՒՄ 9
■ ԹԱՅՄԵՐԻ ՕԳՏԱԳՈՐԾՈՒՄ (ON/OFF ԹԱՅՄԵՐ) 10
■ ՇԱՀԱԳՈՐԾՈՒՄ ԱՐՏԱԿԱՐԳ ՌԵԺԻՄՈՒՄ 10
■ ԱՎՏՈՄԱՏ ՎԵՐԱԳՈՐԾԱՐԿՄԱՆ ԳՈՐԾԱՌՈՒՅԹ 10
■ ՇԱԲԱԹԱԿԱՆ ԹԱՅՄԵՐԻ ՕԳՏԱԳՈՐԾՈՒՄ 11
■ ՄԱՔՐՈՒՄ 12
■ Wi-Fi ՄԻՋԵՐԵՍԻ ԿԱՐԳԱՎՈՐՈՒՄՆԵՐ (ՄԻԱՅՆ VGK ՏԻՊ) 13
■ ԵՐԲ ԿԱՐԾՈՒՄ ԵՔ, ՈՐ ՈՐԵՎԷ ԽՆԴԻՐ Է ԱՌԱՋԱՑԵԼ 14
■ ԵՐԲ ՕԴՈՐԱԿԻՉԸ ՉԻ ՕԳՏԱԳՈՐԾՎԵԼՈՒ ԵՐԿԱՐ ԺԱՄԱՆԱԿ 15
■ ՏԵՂԱԴՐՄԱՆ ՎԱՅՐԸ ԵՎ ԷԼԵԿՏՐԱԿԱՆ ԱՇԽԱՏԱՆՔ 15
■ ԲՆՈՒԹԱԳՐԵՐ 16
ԱՆՎՏԱՆԳՈՒԹՅԱՆ ՆԱԽԱԶԳՈՒՇԱՑՈՒՄՆԵՐ
Ներքին բլոկի և/կամ արտաքին բլոկի վրա ցուցադրված նշանների նշանակությունը
ՈՒՇԱԴՐՈՒԹՅՈՒՆ
(Հրդեհի վտանգ)
Շահագործելուց առաջ ուշադրությամբ կարդացեք ՇԱՀԱԳՈՐԾՄԱՆ ՁԵՌՆԱՐԿ:
Սպասարկող անձնակազմից պահանջվում է շահագործելուց առաջ ուշադրությամբ կարդալ ՇԱՀԱԳՈՐԾՄԱՆ ՁԵՌՆԱՐԿ և
ՏԵՂԱԴՐՄԱՆ ՁԵՌՆԱՐԿ:
Լրացուցիչ տեղեկություններ կարող եք ստանալ ՇԱՀԱԳՈՐԾՄԱՆ ՁԵՌՆԱՐԿ, ՏԵՂԱԴՐՄԱՆ ՁԵՌՆԱՐԿ և այլ տեղեկատու նյութերում:
• Քանի որ այս արտադրանքի մեջ օգտագործվում են պտտվող մասեր և մասեր,
որոնք կարող են հանգեցնել էլեկտրահարման, օգտագործելուց առաջ
անպայման կարդացեք այս «Անվտանգության նախազգուշացումները»:
• Քանի որ այստեղ ցուցադրված նախազգուշական միջոցները կարևոր են
անվտանգության համար, անպայման հետևեք դրանց:
• Այս ձեռնարկը կարդալուց հետո պահեք այն տեղադրման ձեռնարկի հետ
միասին հեշտ հասանելի վայրում՝ հետագայում անդրադառնալու համար:
Նշանները և դրանց նշանակությունը
Ոչ ճիշտ գործածությունը կարող է մեծ
ՈՒՇԱԴՐՈՒԹՅՈՒՆ.
ԶԳՈՒՇԱՑՈՒՄ.
հավանականությամբ հանգեցնել լուրջ վտանգի,
ինչպես օրինակ՝ մահվան, լուրջ վնասվածքի և այլն:
Ոչ ճիշտ գործածությունը կարող է հանգեցնել լուրջ
վտանգի՝ կախված պայմաններից:
Այս բլոկում օգտագործվում է բռնկվող սառեցուցիչ:
Եթե սառեցուցիչն արտահոսի և շփման մեջ մտնի կրակի կամ տաքացնող մասի հետ, կգոյանա վնասակար
գազ և կառաջանա հրդեհի վտանգ:
Այս ձեռնարկում օգտագործված նշանների
նշանակությունը
: Արգելվում է:
: Հետևեք հրահանգին:
: Երբեք մի՛ մտցրեք մատը, փայտիկ և այլն:
: Երբեք մի՛ կանգնեք ներքին/արտաքին բլոկի վրա և դրանց վրա ոչինչ
մի դրեք:
: Էլեկտրահարման վտանգ: Զգույշ եղեք:
: Անպայման անջատեք էլեկտրասնուցման խրոցը հոսանքի
վարդակից:
: Անպայման անջատեք էլեկտրասնուցումը:
: Հրդեհի վտանգ:
: Երբեք մի՛ դիպչեք խոնավ ձեռքով:
: Երբեք բլոկի վրա ջուր մի՛ ցայտեցրեք:
HY
ՈՒՇԱԴՐՈՒԹՅՈՒՆ
Հոսանքի լարը մի՛ միացրեք միջանկյալ կետի, մի՛ օգտագործեք
երկարացման լար և փոփոխական հոսանքի մեկ վարդակից մի՛ միացրեք
մի քանի սարք:
• Դա կարող է առաջացնել գերտաքացում, հրդեհ կամ էլեկտրահարում:
Համոզվեք, որ հոսանքի խրոցը աղտոտված չէ և այն ապահով կերպով
մտցրեք վարդակի մեջ:
• Աղտոտված խրոցը կարող է հանգեցնել հրդեհի կամ էլեկտրահարման:
Մի՛ ամրակապեք, քաշեք, վնասեք կամ փոփոխեք հոսանքի լարը, դրա
նկատմամբ մի՛ կիրառեք ջերմություն և վրան մի՛ դրեք ծանր առարկաներ:
• Դա կարող է հանգեցնել հրդեհի կամ էլեկտրահարման:
Շահագործման ընթացքում մի՛ շրջեք OFF/ON (ՄԻԱՑՆԵԼ/ԱՆՋԱՏԵԼ)
անջատիչը և մի՛ անջատեք/միացրեք հոսանքի խրոցը:
• Դա կարող է կայծեր առաջացնել՝ հանգեցնելով հրդեհի:
• Հեռակառավարման վահանակից ներքին բլոկը ԱՆՋԱՏԵԼՈՒՑ հետո
անպայման ԱՆՋԱՏԵՔ անջատիչը կամ հանեք հոսանքի խրոցը:
Երկար ժամանակի ընթացքում մի՛ մնացեք սառը օդի անմիջական
ազդեցության տակ:
• Դա կարող է վնասել ձեր առողջությանը:
HY-1
Page 52

Այս ﬕ ավորը ճիշտ և անվտանգ օգտագործել համար՝ կարդացեք շահագործման այս հրահանգները:
ԱՆՎՏԱՆԳՈՒԹՅԱՆ ՆԱԽԱԶԳՈՒՇԱՑՈՒՄՆԵՐ
HY
Սարքը չպետք է տեղադրվի, տեղափոխվի, ապամոնտաժվի, փոխվի կամ
վերանորոգվի օգտագործողի կողմից:
• Օդորակչի անպատսշաճ օգտագործումը կարող է հանգեցնել հրդեհի,
էլեկտրական հարվածի, վնասվածքի կամ ջրի արտահոսքի և այլնի:
Խորհրդակցեք ձեր մատակարարի հետ:
• Եթե հոսանքի լարը վնասվել է, այն պետք է փոխարինվի արտադրողի
կամ սպասարկող գործակալի կողմից՝ վտանգներից խուսափելու
համար:
Սարքի տեղադրման, տեղափոխման կամ սպասարկման ժամանակ
համոզվեք, որ բացի նշված (R32) սառնագենտից ոչ մի այլ նյութ չի մտնում
սառնագենտի շրջանառության համակարգ:
• Օդի կամ ցանկացած այլ օտար նյութի առկայությունը կարող է
ճնշման արտառոց բարձրացման պատճառ հանդիսանալ և հանգեցնել
պայթյունի կամ վնասվածքի:
• Համակարգի համար նշվածից բացի այլ սառնագենտի օգտագործումը
կհանգեցնի մեխանիկական վնասվածքի, համակարգի անսարքության
կամ սարքի խափանման: Վատագույն դեպքում, այն կարող
է հանգեցնել ապրանքի անվտանգության ապահովման լուրջ
խոչընդոտների:
Այս սարքը նախատեսված չէ ցածր ֆիզիկական, զգայական կամ մտավոր
կարողություններով, կամ փորձի և գիտելիքների պակասով (ներառյալ
երեխաներին) անձանց կողմից շահագործման համար, եթե միայն
նրանք չեն ուղղորդվում կամ սարքի օգտագործման մասին հրահանգներ
ստանում նրանց անվտանգության համար պատասխանատու անձանցից:
Երեխաները պետք է ուղղորդվեն, որպեսզի չխաղան սարքի հետ:
Մատ, փայտիկ կամ այլ իրեր մի՛ մտցրեք օդի ներթող և բացթող անցքերի
մեջ:
• Դա կարող է հանգեցնել վնասվածքի, քանի որ աշխատանքի
ընթացքում ներսում գտնվող օդափոխիչը պտտվում է բարձր
արագությամբ:
Ոչ նորմալ իրավիճակում (օրինակ՝ այրման հոտի առկայություն)
կանգնեցրեք օդորակիչը և անջատեք հոսանքի լարը կամ OFF անջատիչը:
• Ոչ նորմալ իրավիճակում օգտագործման շարունակումը կարող
է հանգեցնել անսարքության, հրդեհի կամ էլեկտրահարման: Այս
դեպքում կապ հաստատեք ձեր մատակարարի հետ:
Երբ օդորակիչը չի սառեցնում կամ չի տաքացնում, հնարավոր է, որ
կա սառնագենտի արտահոսք: Եթե նկատեք սառնագենտի արտահոսք,
անմիջապես անջատեք օդորակիչը և օդափոխեք սենյակը, և կապ
հաստատեք մատակարարի հետ: Եթե նորոգումը ներառում է սարքի
սառնագենտի վերալիցքավորում, հարցրեք սպասարկման տեխնիկին
մանրամասների մասին:
• Օդորակչում օգտագործվող սառնագենտը անվնաս է: Սովորական
պայմաններում արտահոսք չի լինում: Այնուամենայնիվ, եթե
սառնագենտն արտահոսի և շփման մեջ մտնի կրակի կամ , օրինակ,
օդաջեռուցիչի, նավթավառի կամ վառարանի տաքացնող մասի հետ,
կգոյանա վնասակար գազ, և կառաջանա հրդեհի վտանգ:
Օգտագործողը երբևէ չպետք է փորձի լվանալ ներքին բլոկի ներսը:
Եթե ներսի հատվածը մաքրման կարիք ունենա՝ կապ հաստատեք
մատակակարի հետ:
• Անհամապատասխան մաքրող միջոցի օգտագործումը կարող է
հանգեցել ներսում գտնվող պլաստիկ մասերի վնասմանը, ինչը կարող
է բերել ջրի արտահոսքի: Եթե մաքրող միջոցը կպչի էլեկտրական
մասերին կամ շարժիչին, այն կհանգեցնի անսարքության, ծխի կամ
հրդեհի:
• Սարքը պետք է պահվի այնպիսի սենյակում, որտեղ չկան անընդմեջ
շահագործվողբոցավառման աղբյուրներ (օրինակ՝ բաց կրակ,
շահագործվող գազային սարքեր կամ էլեկտրական տաքացուցիչներ):
• Իմացեք, որ սառնագենտները կարող են հոտ չունենալ:
• Մի՛ օգտագործեք հալեցման գործընթացն արագացնող կամ
սարքի մաքրման այլ ձևեր, բացի արտադրողի կողմից խորհուրդ
տրվողներից:
• Մի՛ վնասեք կամ վառեք:
Ներսի սարքը պետք է տեղադրվի այնպիսի սենյակում, որի մակերեսը
գերազանցում է նշված հատակային մակերեսը: Խնդրում ենք կապ
հաստատել մատակարարի հետ:
Այս սարքը նախատեսված է փորձագետների կամ պատրաստված
օգտագործողների կողմից օգտագործման համար խանութներում,
թեթև արդյունաբերությունում և տնտեսություններում, կամ ուղղակի
անհատների կողմից առևտրային օգտագործման համար:
ԶԳՈՒՇԱՑՈՒՄ
Ձեռք մի՛ տվեք ներսի/դրսի սարքի օդի ներթող անցքին կամ ալյումինե
կողերին:
• Դա կարող է հանգեցնել վնասվածքի:
Մի՛ օգտագործեք միջատասպան կամ դյուրավառ փչվող միջոցներ
սարքի վրա:
• Դա կարող է հանգեցնել սարքի բռնկման կամ դեֆորմացիայի:
Տնային կենդանիներին և սենյակային բույսերը մի՛ պահեք անմիջական
օդային հոսքի տակ:
• Դա կարող է հանգեցնել կենդանիների կամ բույսերի վնասվածքներին:
Ներսի/դրսի սարքի տակ մի տեղադրեք այլ էլեկտրական սարքեր կամ
կահույք:
• Սարքից կարող է ջուր կաթալ, ինչը կարող է բերել վնասման կամ
անսարքության:
Սարքը տեղադրված մի՛ թողեք վնասված հենարանի վրա:
• Սարքը կարող է ընկնել և հանգեցնել վնասվածքների:
Սարքը գործարկելու կամ մաքրելու համար մի՛ կանգնեք անկայուն
նստարանի վրա:
• Ընկնելու դեպքում կարող եք վնասվել:
Մի՛ քաշեք հոսանքի լարից:
• Դա կարող է բերել հիմնական մետաղալարի կոտրմանը և
արդյունքում հանգեցնել տաքացման կամ հրդեհի:
Մի՛ լիցքավորեք կամ ապամոնտաժեք մարտկոցները և մի՛ նետեք
դրանք կրակի մեջ:
•
Դա կարող է հանգեցնել մարտկոցների արտահոսքի, հրդեհի կամ
պայթյունի:
Մի՛ շահագործեք սարքը 4 ժամից ավել բարձր խոնավության (80% RH
և ավելին) և/կամ բաց պատուհանների և դրսի դռան պայմաններում:
• Դա կարող է հանգեցնել ջրի կոնդենսացմանը օդորակչում,
առաջացնել կաթոց և խոնավեցնել կամ վնասել կահույքը:
• Օդորակչում ջրի կոնդենսացումը կարող է նպաստել սնկերի, օրինակ՝
բորբոսի աճին:
Մի՛ օգտագործեք սարքը հատուկ նպատակներով՝ սննդամթերքի
պահպանման, կենդանիների խնամքի, բույսերի աճեցման, ճշգրիտ
սարքերի կամ արվեստի գործերի պահպանման համար:
• Դա կարող է հանգեցնել որակի վատթարացման կամ վնաս հասցնել
կենդանիներին և բույսերին:
Մի՛ ենթարկեք վառվող սարքերը անմիջական օդի հոսանքին:
• Դա կարող է հանգեցնել թերի այրման:
Երբեք մի՛ դրեք մարտկոցները բերանի մեջ որևէ պատճառով՝
պատահաբար կուլ տալուց խուսափելու համար:
• Մարտկոցների կուլ տալը կարող է հանգեցնել խեղդվելուն և/կամ
թունավորվելուն:
Սարքի մաքրումից առաջ անջատեք այն կամ անջատեք միացման լարը
կամ անջատիչը փոխեք OFF:
• Դա կարող է հանգեցնել վնասվածքի, քանի որ աշխատանքի
ընթացքում ներսում գտնվող օդափոխիչը պտտվում է բարձր
արագությամբ:
Եթե սարքը չի օգտագործվելու երկար ժամանակ, անջատեք հոսանքի
լարը կամ անջատիչը փոխեք OFF:
• Սարքը կարող է կեղտ կուտակել, ինչը կարող է հանգեցնել
գերտաքացման կամ հրդեհի:
Փոխարինեք հեռակառավարման վահանակի բոլոր մարտկոցները
նորերով՝ բոլորը նույն տեսակի:
• Հին մարտկոցների օգտագործումը նորերի հետ մեկտեղ կարող է
հանգեցնել գերտաքացման, արտահոսքի կամ պայթյունի:
Եթե մարտկոցի հեղուկը հոսել է ձեր մաշկի կամ շորերի վրա,
մանրակրկիտ կերպով լվացեք դրանք մաքուր ջրով:
Եթե մարտկոցի հեղուկը քսվել է ձեր աչքերին, մանրակրկիտ կերպով
•
լվացեք մաքուր ջրով և անմիջապես դիմեք բժշկական օգնության:
Սարքը այլ այրման սարքերի հետ միաժամանակ օգտագործման դեպքում
համոզվեք, որ տարածքը լավ օդափոխություն ունի:
• Ոչ պատշաճ օդափոխությունը կարող է հանգեցնել թթվածնային
քաղցի:
ԱՆՋԱՏԵՔ սարքը, երբ ամպրոպի ձայն եք լսում, և կա կայծակի
հավանականություն:
• Կայծակի հարվածի դեպքում սարքը կարող է վնասվել:
Օդորակիչը մի քանի սեզոն օգտագործելուց հետո, սովորական մաքրման
հետ միաժամանակ՝ անց կացրեք ստուգում և սպասարկում:
• Սարքի մեջ կուտակված կեղտը կամ փոշին կարող են տհաճ հոտի
աղբյուր հանդիսանալ, հանգեցնել սնկերի, օրինակ՝ բորբոսի աճին,
կամ խցանել ջրահեռացման հատվածը, և առաջացնել կաթոց
ներքին բլոկից: Զննման և սպասարկման համար խորհրդակցեք ձեր
մատակարարի հետ, քանի որ դա պահանջում է հատուկ գիտելիքներ
և հմտություններ:
Մի գործարկեք անջատիչները թաց ձեռքերով:
• Դա կարող է հանգեցնել էլեկտրական ցնցման:
Մի՛ մաքրեք օդորակիչը ջրով և մի տեղադրեք դրա վրա ջուր պարունակող
իրեր, օրինակ՝ ծաղկաման:
• Դա կարող է հանգեցնել հրդեհի կամ էլեկտրահարման:
Մի՛ կանգնեք դրսի սարքի վրա, և դրա վրա ոչ մի իր մի՛ տեղադրեք:
• Դա կարող է հանգեցնել վնասվածքների, եթե դուք կամ իրը ընկնի:
ԿԱՐԵՎՈՐ
Կեղտոտ ֆիլտրերը կարող են հանգեցնել օդորակչի մեջ կոնդենսատի առաջացմանը, որն
իր հերթին կարող է նպաստել սնկերի, օրինակ՝ բորբոսի աճին: Այդ պատճառով, խորհուրդ
է տրվում մաքրել օդի ֆիլտրերը 2 շաբաթը մեկ անգամ:
Գործարկելուց առաջ համոզվեք, որ հորիզոնական թիակները փակ դիրքում են:
Գործարկումը հորիզոնական թիակները բաց դիրքով սկսելու դեպքում դրանք կարող են
չվերադառնալ ճիշտ դիրք:
HY-2
Page 53

ԱՆՎՏԱՆԳՈՒԹՅԱՆ ՆԱԽԱԶԳՈՒՇԱՑՈՒՄՆԵՐ
Տեղադրման համար
ՈՒՇԱԴՐՈՒԹՅՈՒՆ
Խորհրդակցեք ձեր մատակարարի հետ օդորակչի տեղադրման համար:
• Այն չպետք է տեղադրվի օգտագործողի կողմից, քանի որ տեղադրման
համար պահանջվում են հատուկ գիտելիքներ և հմտություններ: Ոչ
պատշաճ տեղադրված օդորակիչը կարող է ջրի արտահոսքի, հրդեհի
կամ էլեկտրական ցնցման պատճառ դառնալ:
Ապահովեք օդորակչի համար անհրաժեշտ էներգասնուցում:
• Անհամապատասխան էներգասնուցումը կարող է հանգեցնել
գերտաքացման կամ հրդեհի:
Մի՛ տեղադրեք սարքը այնպիսի վայրում, որտեղ դյուրավառ գազի
արտահոսք կարող է տեղի ունենալ:
• Եթե գազ արտահոսի և կուտակվի դրսի սարքի շուրջ, դա կարող է
հանգեցնել պայթյունի:
Ճիշտ հողակցեք սարքը:
• Մի՛ միացրեք հողակցման լարը գազի խողովակին, ջրի խողովակին,
շանթարկման ձողին կամ հեռախոսի հողակցման լարին: Ոչ պատշաճ
հողակցումը կարող է հանգեցնել էլեկտրական ցնցման:
ԶԳՈՒՇԱՑՈՒՄ
Հողակցման անջատիչ տեղադրեք՝ կախված օդորակչի տեղադրման
վայրից (օրինակ՝ բարձր խոնավությամբ տարածքները):
• Հողակցման աջատիչի չտեղադրումը կարող է հանգեցնել էլեկտրական
ցնցման:
Համոզվեք, որ արտահոսող ջուրը ըստ պատշաճի հեռացվում է:
• Եթե ջուրը չի հեռացվում պատշաճ կերպով, այն կարող է կաթել ներսի/
դրսի սարքից՝ թրջել և վնասել կահույքը:
Ոչ նորմալ պայմաններում
Ամնիջապես դադարեցրեք օդորակչի շահագործումը և խորհրդակցեք մատակարարի
հետ:
Wi-Fi միջերեսի համար
ՈՒՇԱԴՐՈՒԹՅՈՒՆ
(Ոչ պատշաճ օգտագործումը կարող է հանգեցնել լուրջ հետևանքների, այդ
թվում՝ լուրջ վնասվածքների կամ մահվան:)
Այս սարքը կարող է օգտագործվել 8 տարեկանից բարձր երեխաների
կողմից, և սահմանափակ ֆիզիկական, զգայական կամ մտավոր
կարողություններով, կամ փորձի և գիտելիքների պակասով անձանց
կողմից, եթե նրանք ուղղորդվում են կամ սարքի անվտանգ օգտագործման
մասին հրահանգներ են ստանում և հասկանում են հնարավոր
վտանգները:
Երեխաները չպետք է խաղան սարքի հետ: Մաքրումը և սպասարկումը
չպետք է իրականացվի երեխաների կողմից առանց ուղղորդման:
Մի օգտագործեք Wi-Fi միջերեսը բժշկական էլեկտրասարքավորումների
կողքին կամ այն անձանց կողքին, որոնց մոտ տեղադրված է
բժշկական սարք, ինչպես օրինակ սրտախթանիչ կամ իմպլանտացվող
կարդիովերտեր դեֆիբրիլյատոր:
• Դա կարող է պատահարի հանգեցնել՝ բժշկական սարքավորման կամ
սարքի խափանման արդյունքում:
Մի օգտագործեք Wi-Fi միջերեսը ավտոմատ կառավարման սարքերի
կողքին, ինչպիսին են ավտոմատ դռները կամ հրդեհի ահազանգման
համակարգերը:
• Դա կարող է վթարի հանգեցնել անսարքության հետևանքով:
Թաց ձեռքերով մի դիպչեք Wi-Fi միջերեսին:
• Դա կարող է հանգեցնել սարքի վնասման, էլեկտրական ցնցման կամ
հրդեհի:
Wi-Fi միջերեսի վրա ջուր մի՛ ցայտեցրեք և այն մի օգտագործեք
լոգասենյակում:
• Դա կարող է հանգեցնել սարքի վնասման, էլեկտրական ցնցման կամ
հրդեհի:
Wi-Fi միջերեսը գցելու կամ բռնիչի կամ մալուխի վնասման դեպքում
անջատեք հոսանքի լարը կամ անջատիչը փոխեք OFF:
• Դա կարող է հանգեցնել հրդեհի կամ էլեկտրական ցնցման: Այս
դեպքում կապ հաստատեք ձեր մատակարարի հետ:
ԶԳՈՒՇԱՑՈՒՄ
(Ոչ պատշաճ օգտագործումը կարող է հետևանքներ ունենալ, այդ թվում
մարմնական վնասվածքներ կամ շենքի վնասում:)
Մի՛ կանգնեք անկայուն աթոռակի վրա՝ Wi-Fi միջերեսը տեղադրելիս
կամ մաքրելիս:
• Ընկնելու դեպքում կարող եք ստանալ վնասվածքներ:
Մի՛ օգտագործեք Wi-Fi միջերեսը այլ հեռակառավարվող սարքերի,
միկրոալիքային վառարանի, անլար հեռախոսների կամ ֆաքսիմիլային
սարքերի մոտակայքում:
• Դա կարող է առաջացնել աշխատանքի խափանում:
HY
ՀԵՌԱՑՈՒՄ
Այս ապրանքը հեռացնելու համար խորհրդակցեք
մատակարարի հետ:
Նշում.
Այս նշանը միայն ԵՄ երկրների համար է:
Այս նշանը համապատասխանում է 2012/19/EU
Հոդված 14 Տեղեկություններ օգտագործողների համար
հոդվածին և Լրացում IX, և/կամ 2006/66/EC Հոդված
Fig. 1
20 Տեղեկություններ վերջնական օգտագործողների
համար և Լրացում II հոդվածին:
Ձեր MITSUBISHI ELECTRIC ապրանքը նախագծվել և արտադրվել է
բարձրորակ նյութերից և բաղադրիչներից, որոնք կարող են վերամշակվել և/
կամ վերօգտագործվել:
Այս նշանը նշանակում է, որ էլեկտրական և էլեկտրոնային սարքավորումները,
մարտկոցները և կուտակիչները իրենց կյանքի վերջում պետք է ուտիլիզացվեն
ձեր կենցաղային աղբից առանձին:
Եթե քիմիական նշան կա այս նշանի տակ (Fig. 1), ապա այդ քիմիական նշանը
նշանակում է, որ մարտկոցը կամ կուտակիչը պարունակում են որոշակի
քանակությամբ ծանր մետաղներ: Դա նշված կլինի հետևյալ կերպ.
Hg: սնդիկ (0,0005%), Cd: կադմիում (0,002%), Pb: արճիճ (0,004%)
Եվրամիությունում կան առանձնացված հավաքման համակարգեր՝
նախատեսված էլեկտրական և էլեկտրոնային ապրանքների, մարտկոցների
և կուտակիչների համար:
Խնդրում ենք ճիշտ ազատվել այս սարքավորումից, մարտկոցներից և
կուտակիչներից՝ ձեր համայնքի աղբահանության/աղբավերամշակման
կանոններին համապատասխան:
Խնդրում ենք՝ օգնեք մեզ պահպանել բոլորիս շրջակա միջավայրը:
HY-3
Page 54

HY
● ՇԱՀԱԳՈՐԾՄԱՆ ՁԵՌՆԱՐԿ ●
ՄԱՍԵՐԻ ԱՆՎԱՆՈՒՄՆԵՐԸ
Ներքին բլոկ Հեռակառավարման վահանակ
Առջևի
վահանակ
Օդի զտիչ
Օդը մաքրող
զտիչ
(Օդի մաքրման
արծաթե
իոններով զտիչ,
ընտրանքային)
Տեխնիկական բնութագրերի վահանակ *1
Հորիզոնական թիակ
Օդի արտաթող անցք
Շահագործման
ցուցիչ լույս
Հեռակառավարման
վահանակի ազդանշանը
ստացող հատված
Օդի ներթող
անցք
Wi-Fi
միջերես
էջ 13
Վթարային
շահագործման
անջատիչ
էջ 10
Ջերմափոխանակիչ
Արտաքին բլոկ
Օդի ներթող անցք (հետև և կողամաս)
Տեխնիկական բնութագրերի վահանակ *1
Սառեցուցիչի խողովակներ
Ջրահեռացման խողովակ
Օդի արտաթող անցք
Ջրահեռացման անցք
Արտաքին բլոկերի արտաքին տեսքը կարող է տարբեր լինել:
*1 Արտադրման տարին և ամիսը նշված են տեխնիկական բնութագրերի
վահանակի վրա:
Մարտկոցի փոխարինման ցուցիչ Էջ 5
Աշխատանքի
ցուցադրման
հատված
Ջերմաստիճանի
կոճակներ
Գործարկման
ընտրության
կոճակ
ECONO COOL
(ԷԿՈՆՈՄ ԶՈՎ)
կոճակ
POWERFUL
(ՀԶՈՐ) կոճակ
էջ 8
i-save (խելացի
հիշում)
կոճակ
NIGHT MODE
(ԳԻՇԵՐԱՅԻՆ
ՌԵԺԻՄ)
կոճակ
CLOCK
(ԺԱՄԱՑՈՒՅՑ)
կոճակ
Էջ 6
էջ 6
Էջ 9
էջ 8
էջ 9
էջ 5
Հեռակառավարման
վահանակ
Երբ հեռակառավարման վահանակը
չի օգտագործվում, դրեք այն այս բլոկի
մոտ:
Օգտագործեք միայն բլոկի հետ
տրամադրված հեռակառավարման
վահանակը:
Մի՛ օգտագործեք այլ
հեռակառավարման վահանակներ:
Եթե միմյանց մոտ տեղադրվում են 2
կամ ավելի ներքին բլոկեր, ապա այն
ներքին բլոկը, որը նախատեսված
չէ շահագործման համար, կարող է
արձագանքել հեռակառավարման
վահանակին:
Ազդանշանի
հաղորդման հատված
Ազդանշանի
հեռավորությունը՝
մոտ 6 մ
Ազդանշանի ընդունման
ժամանակ ներքին բլոկում
լսվում է (են) ձայնային
ազդանշան(ներ):
OFF/ON (դադարեցնել/
գործարկել) կոճակ
FAN (ՕԴԱՓՈԽԻՉ)
արագության
կարգաբերման կոճակ
LONG (ԵՐԿԱՐ)
կոճակ
WIDE VANE (ԼԱՅՆ
ԹԻԱԿ) կոճակ
VANE (ԹԻԱԿ)
կարգաբերման կոճակ էջ 7
TIME, TIMER (ԺԱՄ,
ԺԱՄԱՆԱԿԱՉԱՓ)
կարգաբերման
կոճակներ
Ավելացնել ժամանակը
Պակասեցնել
ժամանակը
WEEKLY TIMER
(ՇԱԲԱԹԱԿԱՆ
ԺԱՄԱՆԱԿԱՉԱՓ)
կարգաբերման
կոճակներ Էջ 5, 11
RESET (ՎԵՐԱԿԱՅՈՒՄ)
կոճակ
Կափարիչ
Հեռակառավարման
վահանակը բացելու
համար ցած սահեցրեք
կափարիչը: Ավելի
ցած սահեցրեք՝
շաբաթական
ժամանակաչափի
կոճակները բացելու
համար:
էջ 7
էջ 8
էջ 7
էջ 5, 10
Էջ 5
HY-4
Page 55

ՇԱՀԱԳՈՐԾՄԱՆ ՆԱԽԱՊԱՏՐԱՍՏՈՒԹՅՈՒՆՆԵՐ
Շահագործումից առաջ. Մտցրեք էլեկտրասնուցման խրոցը հոսանքի վարդակի
մեջ և/կամ միացրեք անջատիչը:
Հեռակառավարման վահանակի
մարտկոցների տեղադրումը
4.
Սեղմեք RESET:
1.
Հեռացրեք առջևի
կափարիչը:
2.
Առաջինը տեղադրեք
AAA ալկալիական
մարտկոցի
բացասական բևեռը:
3.
Տեղադրեք առջևի կափարիչը:
Նշում.
• Համոզվեք, որ մարտկոցների բևեռները ճիշտ են տեղադրված:
• Մի՛ օգտագործեք մանգանե կամ արտահոսող մարտկոցներ:
Հեռակառավարման վահանակը կարող է փչանալ:
• Մի՛ օգտագործեք վերալիցքավորվող մարտկոցներ:
• Մարտկոցի փոխարինման ինդիկատորը վառվում է, երբ մարտկոցը
պարպվում է: Ինդիկատորի վառման պահից մոտավորապես 7 օր անց
հեռակառավարման վահանակը կդադարի աշխատել:
• Փոխարինեք բոլոր մարտկոցները նույն տիպի նոր մարտկոցներով:
• Մարտկոցները կարող են օգտագործվել մոտավորապես 1 տարվա
ընթացքում: Այնուամենայնիվ, ժամկետանց մարտկոցների կյանքն ավելի
կարճ է:
• Բարակ գործիքի օգնությամբ զգույշ սեղմեք RESET:
Եթե չսեղմեք RESET կոճակը, հեռակառավարման վահանակը կարող է
ճիշտ չաշխատել:
Ընթացիկ ժամի կարգավորումը
3.
Սեղմեք DAY կոճակը՝
օրը կարգավորելու
1.
Սեղմեք CLOCK:
2.
4.
Նորից սեղմեք
CLOCK:
Նշում.
• Բարակ գործիքի օգնությամբ զգույշ սեղմեք CLOCK:
Նշում.
Ինչպես կարգավորել հեռակառավարման վահանակը միայն տվյալ ներքին
բլոկի համար:
Սենյակում հեռակառավարման վահանակներով կարող են օգտագործվել
մինչև 4 ներքին բլոկեր:
Ամեն ներքին բլոկ իր առանձին հեռակառավարման վահանակով
կառավարելու համար համարակալեք հեռակառավարման վահանակները՝
ներքին բլոկի համարին համապատասխան:
Կարգավորումները կարելի է անել, միայն եթե բավարարվում են հետևյալ
պահանջները.
• Հեռակառավարման վահանակը OFF ռեժիմում է:
(1) Սեղմած պահեք հեռակառավարման վահանակի
վայրկյան, որպեսզի ակտիվացնեք կցորդման ռեժիմը:
(2) Նորից սեղմեք
վահանակները:
կոճակի յուրաքանչյուր սեղմում մեծացնում է թիվը հետևյալ
հերթականությամբ՝ 1 → 2 → 3 → 4:
(3) Կցորդման կարգավորումն ավարտելու համար սեղմեք
Երբ անջատիչը միացնեք ON, այն հեռակառավարման վահանակը, որը
առաջինը ազդանշան կուղարկի ներքին բլոկին, կլինի տվյալ ներքին բլոկի
հեռակառավարման վահանակը:
Այն պահից, երբ դրանք կարգավորված լինեն, ներքին բլոկը ազդանշաններ
կստանա միայն նշանակված հեռակառավարման վահանակից:
կոճակը և համարակալեք հեռակառավարման
Յուրաքանչյուր սեղմում
համար:
Սեղմեք TIME կամ
TIMER կոճակները՝ ժամը
կարգավորելու համար:
երկարացնում է/կարճացնում
է ժամանակը 1 րոպեով
(10 րոպեով՝ երկար սեղմելու
դեպքում):
կոճակը 2
կոճակը:
HY
HY-5
Page 56

HY
● ՇԱՀԱԳՈՐԾՄԱՆ ՁԵՌՆԱՐԿ ●
ՇԱՀԱԳՈՐԾՄԱՆ ՌԵԺԻՄԻ ԸՆՏՐՈՒԹՅՈՒՆԸ
DRY ռեժիմ
Նվազեցրեք օդի խոնավությունը սենյակում: Սենյակը կարող է մի փոքր
սառել:
DRY ռեժիմի ժամանակ ջերմաստիճանը չի կարող կարգավորվել:
HEAT ռեժիմ
Վայելեք տաք օդը՝ ձեր նախընտրած ջերմաստիճանով:
FAN ռեժիմ
Օդափոխեք սենյակը:
Նշում.
COOL/DRY ռեժիմի գործարկումից հետո խորհուրդ է տրվում միացնել
FAN ռեժիմը՝ ներքին բլոկի ներսի հատվածը չորացնելու համար:
Նշում.
Բազմահամակարգ շահագործում
1
Սեղմեք
2
Սեղմեք շահագործման ռեժիմն ընտրելու
շահագործումը սկսելու համար:
համար: Յուրաքանչյուր սեղմում փոխում է ռեժիմը
հետևյալ հերթականությամբ.
(AUTO) (COOL) (DRY) (HEAT) (FAN)
3
Սեղմեք կամ ջերմաստիճանը
կարգավորելու համար:
Ամեն սեղմում բարձրացնում կամ իջեցնում է
ջերմաստիճանը 1°C-ով:
Սեղմեք շահագործումը դադարեցնելու համար:
Երկու կամ ավելի ներքին բլոկեր կարող են շահագործվել մեկ արտաքին
բլոկով: Մի քանի ներքին բլոկերի միաժամանակյա շահագործման դեպքում
սառեցումը/չորացումը/օդափոխումն ու ջեռուցումըչեն կարող կատարվել
միաժամանակ: Երբ ընտրված է COOL/DRY/FAN մեկ բլոկի վրա և HEAT՝
մյուսի վրա, կամ հակառակը, վերջին ընտրված բլոկը անցնում է սպասման
ռեժիմի:
Շահագործման ցուցիչ լույս
Շահագործման ցուցիչ լույսը ցույց է տալիս բլոկի շահագործման վիճակը:
Ցուցիչ Շահագործման վիճակ Սենյակի ջերմաստիճան
Ցուցիչը Լուսավորում չկա
Բլոկը աշխատում է
ընտրված ջերմաստիճանին
հասնելու համար
Սենյակի ջերմաստիճանը
մոտենում է ընտրված
ջերմաստիճանին
ընտրված
ջերմաստիճանիցմոտավորապես
2°C կամ ավելի աստիճան
տարբերությամբ
Մոտավորապես 1-ից 2°C՝
ընտրված ջերմաստիճանից
AUTO ռեժիմ (Auto փոփոխություն)
Սարքն ընտրում է շահագործման ռեժիմը սենյակի և ընտրված
ջերմաստիճանների տարբերության հիման վրա: AUTO ռեժիմի ժամանակ
սարքը փոխում է ռեժիմը (COOL ↔ HEAT), երբ սենյակի ջերմաստիճանը
2°C-ով տարբերվում է ընտրված ջերմաստիճանից 15 րոպեից ավելի:
Նշում.
Auto ռեժիմը խորհուրդ չի տրվում, եթե ներքին բլոկը միացված է MXZ
տիպի արտաքին բլոկի: Երբ միաժամանակ գործարկվում են մի քանի
ներքին բլոկեր, հնարավոր է, սարքը չկարողանա փոխել շահագործման
ռեժիմը COOL և HEAT միջև: Այդ դեպքում ներքին բլոկն անցնում է
սպասման ռեժիմի (տես Շահագործման ցուցիչ լույսերի աղյուսակը):
COOL ռեժիմ
Վայելեք զով օդը՝ ձեր նախընտրած ջերմաստիճանով:
Նշում.
Մի՛ գործարկեք COOL ռեժիմը շատ ցածր դրսի ջերմաստիճանի
պայմաններում (-10°C-ից ցածր): Սարքում կոնդենսացված ջուրը կարող
է կաթել և թրջել կամ վնասել կահույքը և այլն:
HY-6
Page 57

ՕԴԱՓՈԽԻՉԻ ԱՐԱԳՈՒԹՅՈՒՆԸ ԵՎ ՕԴԻ ՀՈՍՔԻ ԿԱՌԱՎԱՐՈՒՄԸ
Օդի հոսքի ուղղությունը վերևից ներքև
Սեղմեք օդի հոսքի ուղղությունը ընտրելու
համար: Ամեն սեղմում փոխում է օդի հոսքի
ուղղությունը հետևյալ հերթականությամբ.
(AUTO) (1) (2) (3) (4) (5) (SWING)
Օդափոխիչի արագությունը
Սեղմեք օդափոխիչի արագությունն ընտրելու
համար: Ամեն սեղմում փոխում է օդափոխիչի
արագությունը հետևյալ հերթականությամբ.
(AUTO) (Կամաց) (Ցածր) (Միջին) (Բարձր) (Շատ բարձր)
• Երկու կարճ ձայնային ազդանշանէ լսվում ներքին բլոկից, երբ
միացվում է AUTO ռեժիմը:
• Օգտագործեք օդափոխիչի ավելի բարձր արագություն՝ սենյակը
ավելի արագ սառեցնելու/տաքացնելու համար: Խորհուրդ է
տրվում իջեցնել օդափոխիչի արագությունը, երբ սենյակը զովանա/
տաքանա:
• Կամաց աշխատանքի համար օգտագործեք ավելի ցածր
արագություն:
Նշում.
Բազմահամակարգ շահագործում
Երբ մեկ արտաքին բլոկի օգնությամբ ջեռուցման համար միաժամանակ
շահագործվում են մի քանի ներքին բլոկեր, օդի հոսքի ջերմաստիճանը
կարող է ցածր լինել: Այս դեպքում խորհուրդ է տրվում օգտագործել AUTO
օդափոխիչի արագությունը:
(AUTO) ..........Թիակը ուղղված է օդի հոսքի ամենաարդյունավետ
(Manual) ........Արդյունավետ օդորակման համար ընտրեք վերևի COOL/DRY
(Swing)...........Թիակը պարբերաբար շարժվում է վերև և ներքև:
• Երկու կարճ ձայնային ազդանշան էլսվում ներքին բլոկից, երբ
• Միշտ օգտագործեք հեռակառավարման վահանակը՝ օդի հոսքի
• Երբ անջատիչը միացված է, հորիզոնական թիակների դիրքը
• Երբ թվում է, թե հորիզոնական թիակները ոչ նորմալ դիրքում են,
ուղղությամբ: COOL/DRY/FAN՝ հորիզոնական դիրք: HEAT՝
դիրք (4):
դիրքը և ներքևի դիրքը HEAT համար: COOL/DRY ժամանակ
ընտրված ներքևի դիրքի դեպքում թիակը ավտոմատ կերպով
շարժվում է դեպի վերևի դիրքը 0,5-ից 1 ժամից հետո՝
կոնդենսատի կաթոցից խուսափելու համար:
միացվում է AUTO ռեժիմը:
ուղղությունը կարգավորելու համար: Ձեռքերով հորիզոնական
թիակները տեղաշարժելը կարող է վնասել դրանք:
վերականգնվում է մոտավորապես մեկ րոպեի ընթացքում, հետո
սկսվում է շահագործումը: Նույնը վերաբերում է նաև արտակարգ/
վթարային սառեցման գործառույթին:
էջ 14 :
տես
Օդի հոսքի ուղղությունը աջից ձախ
Սեղմեք օդի հոսքի ուղղությունը ընտրելու
համար: Ամեն սեղմում փոխում է օդի հոսքի
ուղղությունը հետևյալ հերթականությամբ.
(
SWING
)
HY
HY-7
Page 58

● ՇԱՀԱԳՈՐԾՄԱՆ ՁԵՌՆԱՐԿ ●
HY
LONG (ԵՐԿԱՐ) ՕԳՏԱԳՈՐԾՈՒՄ
Սեղմեք ՝ LONG (ԵՐԿԱՐ) շահագործումը
սկսելու համար:
• Օդափոխիչի արագությունը բարձրանում է և հորիզոնական թիակը
շարժվում է դեպի LONG (ԵՐԿԱՐ) ռեժիմի դիրքը։
• Օդը տարածվում է ավելի մեծ հեռավորության վրա։
Նորից սեղմեք ՝ LONG (ԵՐԿԱՐ) շահագործումը
չեղարկելու համար:
• LONG (ԵՐԿԱՐ) շահագործումը չեղառկվում է, երբ սեղմվում է OFF/
ON, VANE կամ ECONO COOL կոճակը։
POWERFUL (ՀԶՈՐ) ՇԱՀԱԳՈՐԾՈՒՄ
Սեղմեք
ժամանակ
սկսելու համար:
Օդափոխիչի արագությունը՝ Բացառիկ արագություն POWERFUL
Հորիզոնական թիակ՝ Ընտրեք դիրքը կամ իջեցրեք օդի հոսքի
• POWERFUL (ՀԶՈՐ) ռեժիմի ժամանակ ջերմաստիճանը չի կարող
Նորից սեղմեք ՝ POWERFUL (ՀԶՈՐ)
շահագործումը չեղարկելու համար:
• POWERFUL (ՀԶՈՐ) շահագործումը նաև ավտոմատ կերպով
COOL կամ HEAT ռեժիմի
էջ 6 ՝ POWERFUL (ՀԶՈՐ) շահագործումը
(ՀԶՈՐ) ռեժիմի համար
ուղղությունը AUTO ռեժիմի ժամանակ
կարգավորվել:
չեղարկվում է 15 րոպեից կամ երբ սեղմվում է OFF/ON, FAN, ECONO
COOL կամ i-save կոճակը։
I-SAVE ՇԱՀԱԳՈՐԾՈՒՄ
Պարզեցված հետադարձ գործառույթը հնարավորություն է տալիս
վերադառնալ ընտրված (ցանկալի) կարգավորումներին՝ կոճակի
մեկ սեղմումով: Նորից սեղմեք կոճակը, և դուք կարող եք վերադառնալ
նախկին կարգավորմանը:
1
i-save ռեժիմը ընտրելու համար, COOL, ECONO COOL,
NIGHT MODE կամ HEAT ռեժիմների ժամանակ
սեղմեք
2
Կարգավորեք ջերմաստիճանը, օդափոխիչի
արագությունը և օդի հոսքի ուղղությունը:
• Հաջորդ անգամ նույն կարգավորումը ընտրվում է ուղղակի սեղմելով
:
• Երկու կարգավորումներ կարող են պահպանվել: (Մեկը՝ COOL/
ECONO COOL համար, մյուսը՝ HEAT համար)
• Ընտրեք համապատասխան ջերմաստիճանը, օդափոխիչի
արագությունը և օդի հոսքի ուղղությունը՝ ձեր սենյակին
համապատասխան:
Սովորաբար HEAT ռեժիմում նվազագույն ջերմաստիճանը 16°C է։
•
Եվ միայն i-save ռեժիմի օգտագործման ժամանակ նվազագույն
ջերմաստիճանը 10°C է։
Նորից սեղմեք ՝ i-save շահագործումը
չեղարկելու համար:
• i-save շահագործումը նաև չեղարկվում է, երբ սեղմվում է MODE
կոճակը:
Նշում.
Օգտագործման օրինակ.
1. Ցածր էներգիայի ռեժիմ
Ընտրեք ջերմաստիճանը 2°C-ից 3°C ավելի բարձր COOL ռեժիմի համար
և ավելի ցածր՝ HEAT ռեժիմի համար: Այս կարգավորումը հարմար է
դատարկ սենյակի համար, և երբ քնած եք:
2. Հաճախ օգտագործվող կարգավորումների պահպանում
Պահպանեք ձեր նախընտրելի կարգավորումները COOL/ECONO COOL
և HEAT ռեժիմների համար: Սա թույլ կտա ձեզ ընտրել նախընտրած
կարգավորումները կոճակի մեկ հպումով:
:
HY-8
Page 59

ECONO COOL ՇԱՀԱԳՈՐԾՈՒՄ
ԳԻՇԵՐԱՅԻՆ ՌԵԺԻՄԻ ՇԱՀԱԳՈՐԾՈՒՄ
Օդային հոսքի տատանումը (ուղղության փոփոխությունը)
թույլ է տալիս ձեզ ավելի զով զգալ, քան օդային հոսքի կայուն
ուղղվածության դեպքում:
Ընտրված ջերմաստիճանը և օդի հոսքի ուղղությունը ավտոմատ
կերպով փոխվում են միկրոպրոցեսորի կողմից: Հնարավոր է
իրականացնել սառեցման գործընթացը հարմարավետության
պայմաններում: Արդյունքում կարելի է էներգիա խնայել:
Սեղմեք COOL ռեժիմի ժամանակ էջ 6 ECONO
COOL շահագործումը սկսելու համար:
Սարքը կատարում է ուղղահայաց շարժման տարբեր ցիկլեր՝ կախված
օդի հոսքի ջերմաստիճանից:
Նորից սեղմեք ECONO COOL շահագործումը
չեղարկելու համար:
• ECONO COOL շահագործումը նաև չեղարկվում է VANE կոճակի
սեղմումով:
NIGHT MODE (ԳԻՇԵՐԱՅԻՆ ՌԵԺԻՄ) ռեժիմը փոխում է
շահագործման ցուցիչի պայծառությունը, անջատում ազդանշանի
ձայնը և սահմանափակում արտաքին բլոկի աղմուկը:
Շահագործման ժամանակ սեղմեք ՝ NIGHT
MODE (ԳԻՇԵՐԱՅԻՆ ՌԵԺԻՄ) ռեժիմը ակտիվացնելու
համար:
• Շահագործման ցուցիչ լույսը թույլ է:
• Ազդանշանի ձայնը կանջատվի, բացառությամբ այն դեպքերի, երբ
շահագործումը սկսվում է կամ կանգնեցվում է:
• Արտաքին բլոկի աղմուկի մակարդակը կլինի ավելի ցածր, քան
ԲՆՈՒԹԱԳՐԵՐՈՒՄ նշվածը:
Նորից սեղմեք ՝ NIGHT MODE (ԳԻՇԵՐԱՅԻՆ
ՌԵԺԻՄ) ռեժիմը չեղարկելու համար:
Նշում.
• Սառեցման/տաքացման հզորությունը կարող է ընկնել:
• Արտաքին բլոկի աղմուկի մակարդակը կարող է չփոխվել սարքի
գործարկումից հետո, պահպանման գործընթացի ժամանակ կամ կախված
շահագործման այլ պայմաններից:
• Ներքին բլոկի օդափոխիչի արագությունը չի փոխվի:
Շահագործման ցուցիչ լույսը դժվար կլինի տեսնել լուսավոր սենյակում:
•
•
Բազմահամակարգ շահագործման դեպքում արտաքին բլոկի աղմուկի
մակարդակը չի իջնի:
HY
HY-9
Page 60

● ՇԱՀԱԳՈՐԾՄԱՆ ՁԵՌՆԱՐԿ ●
HY
ԹԱՅՄԵՐԻ ՕԳՏԱԳՈՐԾՈՒՄ (ON/OFF ԹԱՅՄԵՐ)
ՇԱՀԱԳՈՐԾՈՒՄ ԱՐՏԱԿԱՐԳ ՌԵԺԻՄՈՒՄ
Երբ հեռակառավարման վահանակը չի կարող
օգտագործվել...
Կարելի է ակտիվացնել արտակարգ ռեժիմը՝ սեղմելով արտակարգ ռեժիմում
շահագործման կոճակը (E.O. SW) նեքին բլոկի վրա:
Ամեն անգամ, երբ սեղմվում է E.O. SW կոճակը,
շահագործումը փոխվում է հետևյալ հերթականությամբ:
Շահագործման ցուցիչ լույս
Նշում.
1
Շահագործման ընթացքում սեղմեք կամ
թայմերը կարգավորելու համար:
(ON թայմեր) : Սարքը ՄԻԱՆՈՒՄ է
սահմանված ժամին:
(OFF թայմեր) : Սարքը ԱՆՋԱՏՎՈՒՄ է
սահմանված ժամին:
• Շահագործման առաջին 30 րոպեները փորձնական են: Ջերմաստիճանի
կարգավորումը չի աշխատում, և օդափոխիչի արագությունը դրված է
ուժեղի վրա:
• Վթարային տաքացման ժամանակ օդափոխիչի արագությունը
աստիճանաբար աճում է՝ տաք օդ փչելու համար:
• Վթարային սառեցման ժամանակ հորիզոնական թիակի դիրքը
վերականգնվում է մոտավորապես մեկ րոպեի ընթացքում, հետո սկսվում
է շահագործումը:
Վթարային COOL
Վթարային HEAT
Stop
Ընտրել ջերմաստիճանը՝ 24°C
Օդափոխիչի արագությունը՝ Միջին
Հորիզոնական թիակ՝ Auto
* կամ թարթում է:
Համոզվեք, որ ընթացիկ ժամը և օրը ճիշտ են սահմանված:
*
2
Սեղմեք (Բարձրացնել) և (Իջեցնել)
էջ 5
թայմերի ժամը կարգավորելու համար:
Յուրաքանչյուր սեղմում ավելացնում կամ պակասեցնում է
սահմանվող ժամանակը 10 րոպեով:
• Կարգավորեք թայմերը, երբ
3
Կրկին սեղմեք
կամ թարթում է:
կամ
թայմերը չեղարկելու
համար:
Նշում.
• ON և OFF կարող են սահմանվել միաժամանակ: նշանը ցույց է տալիս
թայմերի գործառույթների հերթականությունը:
• Եթե ON/OFF թայմերի միացած լինելու ժամանակ հոսանքի խափանում է
տեղի ունենում, տես
էջ 10 «Ավտոմատ վերագործարկման գործառույթ»:
ԱՎՏՈՄԱՏ ՎԵՐԱԳՈՐԾԱՐԿՄԱՆ ԳՈՐԾԱՌՈՒՅԹ
Եթե շահագործման ընթացքում տեղի է ունենում էլեկտրաէներգիայի
անջատում կամ հիմնական հոսանքի անջատում, ապա ավտոմատ կերպով
միանում է «Ավտոմատ վերագործարկման գործառույթ»-ն այն նույն ռեժիմով,
որը սահմանված էր հեռակառավարման վահանակի միջոցով՝ նախքան
հիմնական հոսանքի անջատումը: Եթե կանթայմերի կարգավորումներ, դրանք
չեղարկվում են, և բլոկը սկսում է աշխատանքը, երբ հոսանքը կրկին միանում է:
Եթե դուք չեք ցանկանում օգտագործել այս գործառույթը, խնդրում
ենք խորհրդակցել ծառայության ներկայացուցիչի հետ, քանի որ բլոկի
կարգավորումները պետք է փոխվեն:
HY-10
Page 61

ՇԱԲԱԹԱԿԱՆ ԹԱՅՄԵՐԻ ՕԳՏԱԳՈՐԾՈՒՄ
• Շաբաթվա ամեն օրվա համար կարող է միացվել առավելագույնը 4 ON կամ
OFF թայմեր:
• Շաբաթվա համար կարող է միացվել առավելագույնը 28 ON կամ OFF թայմեր:
Օրինակ՝ Շահագործվում է 24°C արթնացման պահից մինչև տնից դուրս
Երկուշաբթի
Շաբաթ
Կիրակի
գալը, և օգտագործվում է 27°C տուն հասնելու պահից մինչև քնելը՝
աշխատանքային օրերին: Շահագործվում է 27°C ուշ արթնացումից
մինչև վաղ քուն ընթացքում՝ հանգստյան օրերին:
Կարգավորում1 Կարգավորում2 Կարգավորում3 Կարգավորում4
ON OFF ON OFF
~~
Ուրբաթ
24°C 27°C
6:00 8:30 17:30 22:00
Կարգավորում1 Կարգավորում2
ON OFF
8:00 21:00
27°C
Նշում.
Հասարակ ON/OFF թայմերի կարգավորումը հասանելի է, երբ շաբաթական
թայմերը միացված է: Այս դեպքում, ON/OFF թայմերը առավելություն ունի
շաբաթական թայմերի հանդեպ; շաբաթական թայմերի գործարկումը նորից
կարվի՝ սովորական ON/OFF թայմերի ավարտից հետո:
3
Սեղմեք , և ON/OFF, ժամի և
ջերմաստիճանի կառավարման համար:
Սեղմելով
ընտրել ON/OFF թայմերը:
Սեղմելով կչեղարկեք
թայմերի կարգավորումները:
* Սեղմեք և պահեք կոճակը՝ ժամը արագ փոխելու համար:
Սեղմեք և , որպեսզի շարունակեք
կարգավորել թայմերը մյուս օրերի համար և/կամ թվերը:
Սեղմեք ավարտելու և շաբաթական թայմերի
4
կարգավորումները փոխանցելու համար:
կարող եք
Օրինակ՝ [ON], [6:00]
Սեղմելով
կարող եք
կարգավորել
ժամը:
* թարթումն անջատվում է, և
ցուցադրվում է ընթացիկ ժամը:
Սեղմելով
կարող եք
կարգավորել
ջերմաստիճանը:
և [24°C]
ընտրված
են:
Շաբաթական թայմերի կարգավորում
* Համոզվեք, որ ընթացիկ ժամը և օրը ճիշտ են սահմանված:
1
Սեղմեք շաբաթական թայմերի կառավարման
ռեժիմը բացելու համար:
* թարթում է:
Նշում.
• Սեղմեք շաբաթական թայմերի տեղեկությունները ներքին բլոկին
փոխանցելու համար: Ուղղեք հեռակառավարման վահանակը ներքին
բլոկին 3 վայրկյանների ընթացքում:
Թայմերի կարգավորման ժամանակ շաբաթական մեկ օրից կամ մեկ թվից
•
ավելի սահմանման դեպքում, հարկ չկա սեղմել
համար: Սեղմեք
Շաբաթական թայմերի բոլոր կարգավորումները կպահպանվեն:
• Սեղմեք շաբաթական թայմերի կարգավորումների ռեժիմ մուտք
գործելու համար, և սեղմեք և պահեք
շաբաթական թայմերի բոլոր կարգավորումները ջնջելու համար: Ուղղեք
հեռակառավարման վահանակը դեպի ներքին բլոկը:
5
Սեղմեք շաբաթական թայմերը ՄԻԱՑՆԵԼՈՒ
համար: (
* Երբ շաբաթական թայմերը ՄԻԱՑՎԱԾ է, այն շաբաթվա օրը, որի
թայմերի կարգավորումն արդեն արված է, կլուսավորվի:
բոլոր կարգավորումները ավարտելուց հետո:
վառվում է:)
ամեն կարգավորման
5 վայրկյանների ընթացքում՝
Կրկին սեղմեք շաբաթական թայմերը OFF
անջատելու համար: (
անջատվում է:)
Նշում.
Պահպանված կարգավորումները չեն մաքրվում, երբ շաբաթական թայմերը
ԱՆՋԱՏՎՈՒՄ է:
Շաբաթական թայմերի կարգավորումների ստուգում
HY
2
Սեղմեք և օրը և թիվը կարգավորելու համար:
Օրինակ՝ [Երկ Երք ... Կիր] և
[1] ընտրված են:
Սեղմելով կարող եք ընտրել
շաբաթվա օրը:
* Բոլոր օրերը կարող են ընտրվել:
Սեղմելով
կարող եք ընտրել
թիվը:
1
Սեղմեք շաբաթական թայմերի կառավարման
ռեժիմը բացելու համար:
* թարթում է:
2
Սեղմեք կամ հատուկ օրվա կամ համարի
կարգավորումները տեսնելու համար:
Սեղմեք շաբաթական թայմերի
կարգավորումներից դուրս գալու համար:
Նշում.
Երբ կարգավորումները դիտելու համար ընտրված են շաբաթվա բոլոր օրերը,
և դրանց մեջ
կա տարբերբող կարգավորում, կցուցադրվի:
HY-11
Page 62

HY
● ՇԱՀԱԳՈՐԾՄԱՆ ՁԵՌՆԱՐԿ ●
ՄԱՔՐՈՒՄ
Հրահանգներ.
• Նախքան մաքրելը անջատեք էլեկտրասնուցումը կամ անջատեք անջատիչը:
• Ուշադի՛ր եղեք, որպեսզի ձեռքով չդիպչեք մետաղական մասերին:
• Մի՛ օգտագործեք բենզին, լուծիչ նյութ, փայլեցնող փոշի և միջատասպան
միջոցներ:
• Օգտագործե'ք միայն նոսրացված մեղմ լվացող միջոցներ:
• Մի՛ օգտագործեք կոշտ խոզանակ, կոշտ սպունգ կամ նմանատիպ այլ միջոց:
Օդի ֆիլտր (Օդազտիչ ֆիլտր)
• Մաքրե՛ք 2 շաբաթը մեկ անգամ
• Հեռացրեք կեղտը փոշեկուլի օգնությամբ կամ լվացեք այն ջրով:
• Ջրով լվանալուց հետո պատշաճ կերպով չորացրեք այն ստվերում:
Առջևի վահանակ
• Մի՛ թրջեք կամ լվացեք հորիզոնական թիակը:
• Ջրի ջերմաստիճանը չպետք է գերազանցի 50°C-ը:
• Հեռու պահեք մասերը արևի ուղիղ ճառագայթներից, ջերմությունից կամ
կրակից:
• Մի՛ կիրառեք ավելորդ ուժային ներգործություն օդափոխիչի վրա, քանի որ
դա կարող է առաջացնել ճաքեր կամ վնասվածք:
Օդը մաքրող զտիչ
(Օդի մաքրման արծաթե իոններով
զտիչ, ընտրանքային)
Յուրաքանչյուր 3 ամիսը մեկ.
• Մաքրեսք կեղտը փոշեկուլի օգնությամբ:
Եթե կեղտը հնարավոր չէ մաքրել փոշեկուլով, ապա
Թրջեք ֆիլտրը և վերջինիս շրջանակը գոլ ջրի մեջ նախքան լվանալը:
•
•
Լվանալուց հետո լավ չորացրեք այն ստվերում:
Ամեն տարի.
• Փոխարինեք այն նոր օդի մաքրման ֆիլտրով առավել գոհացուցիչ
աշխատանքի համար:
• Մասերի համար MAC-2360FT-E
Զտիչի ուղեցույց
.
Ծխնի
Անցք
1. Բարձրացրեք առջևի վահանակը, մինչև «ձայն» լսվի:
2.
Բռնե՛ք ծխնիները և քաշե՛ք այն հանելու համար, ինչպես ցուցադրված է վերևի նկարում:
• Մաքրեք փափուկ չոր կտորով կամ լվացեք այն ջրով:
• Մի՛ պահեք այն ջրի մեջ երկու ժամից ավելի:
• Նախքան տեղադրելը, պատշաճ կերպով չորացրեք այն:
3. Տեղադրեք առջևի վահանակը՝ այն հանելու կարգին
հակառակ հերթականությամբ: Հուսալիորեն փակեք
առջևի վահանակը և սեղմեք սլաքներով նշված
դիրքերը:
Այս տեղեկությունները հիմնված են REGULATION (EU) No 528/2012 վրա
ՄՈԴԵԼԻ
ԱՆՎԱՆՈՒՄԸ
MSZ-AP60/71VG
MAC-2360FT-E
Համապատասխան
հոդվածներ
(Մասերի
անվանումը)
ՖԻԼՏՐ
ՖԻԼՏՐ
Ակտիվ նյութեր
(Համարը Քիմիական
ռեֆերատիվ ծառայության
ռեեստրում (CAS))
Արծաթ նատրիումի հիդրիդ
ցիրկոնիում ֆոսֆատ
(265647-11-8)
2-օքթիլ-2H-իզոթիազոլ-3-մեկ
(OIT)
(26530-20-1)
Արծաթ ցինկ ցեոլիտ
(130328-20-0)
Սեղմեք՝ սարքի մեջ
զտիչի ուղեցույցի
երկայնքով տեղադրելու
համար։
Քաշեք՝ սարքից անջատելու համար:
Կարևոր
• Առավել լավ աշխատանքի և էլեկտրախնայողության համար
պարբերաբար մաքրեք ֆիլտրերը:
• Աղտոտված ֆիլտրերը հանգեցնում են կոնդենսատի
առաջացմանը օդորակչում, որը կարող է նպաստել սնկերի,
օրինակ՝ բորբոսի աճին: Այդ պատճառով, խորհուրդ է տրվում
մաքրել օդի ֆիլտրերը 2 շաբաթը մեկ անգամ:
Հատկանիշներ
Հակամանրէային
հակաբորբոսային
Հակամանրէային
• Օգտագործեք սույն ապրանքը համաձայն
• Մի՛ դրեք բերանի մեջ: Հեռու՛ պահեք
• Օգտագործեք սույն ապրանքը համաձայն
• Մի՛ դրեք բերանի մեջ: Հեռու՛ պահեք
Օգտագործման հրահանգներ
(Անվտանգ օգտագործման տեղեկատվություն)
հրահանգների ձեռնարկի ցուցումների և միայն
նախատեսված նպատակով:
երեխաներից:
հրահանգների ձեռնարկի ցուցումների և միայն
նախատեսված նպատակով:
երեխաներից:
HY-12
Page 63

Wi-Fi ՄԻՋԵՐԵՍԻ ԿԱՐԳԱՎՈՐՈՒՄՆԵՐ (ՄԻԱՅՆ VGK ՏԻՊ)
Այս Wi-Fi միջերեսը հաղորդում է կարգավիճակի մասին տվյալները
և վերահսկում է սերվերից ստացվող հրահանգները`միանալով
ներքին բլոկին:
Առջևի
վահանակ
Wi-Fi միջերես
Առջևի
վահանակ
Wi-Fi միջերես
Wi-Fi միջերեսի վերաբերյալ ծանոթություն
Համար Կետ Նկարագրություն
MODE (ՌԵԺԻՄ)
1
անջատիչ
RESET (վերակայում)
2
անջատիչ
ERR LED
3
(Նարնջագույն)
4 NET LED (Կանաչ) Այն ցույց է տալիս ցանցի վիճակը:
MODE LED
5
(Նարնջագույն)
6 UNIT LED (Կանաչ)
3
4
5
6
(1) MODE (ՌԵԺԻՄԻ) անջատիչ
• MODE (ՌԵԺԻՄԻ) անջատիչն օգտագործվում է ռեժիմների
կոնֆիգուրացիաներ ընտրելուհամար:
(2) RESET (վերակայում) անջատիչ
• Սեղմած պահել RESET անջատիչը 2 վայրկյան՝ համակարգի
վերագործարկման նպատակով:
• Սեղմած պահել RESET անջատիչը 14 վայրկյան՝ Wi-Fi միջերեսի
գործարանային կարգավորումներին վերադառնալու նպատակով:
Wi-Fi միջերեսի՝ գործարանային վերակայման ժամանակ ԲՈԼՈՐ
կոնֆիգուրացիոն տեղեկություններն անհետանալու են: Սույն
գործողությունն իրականացնելիս՝ եղե՛ք հնարավորինս ուշադիր:
Այն ընտրում է ռեժիմը:
Այն վերակայում է համակարգը և
ԲՈԼՈՐ կարգավորումները:
Այն ցույց է տալիս ցանցի սխալային
վիճակը:
Այն ցույց է տալիս Մուտքի կետի
ռեժիմի վիճակը:
Այն ցույց է տալիս ներքին բլոկի
վիճակը:
ERR
NET
MODE
UNIT
RESET
MODE
2
1
1
Բացեք առջևի վահանակը և հեռացրե՛ք Wi-Fi
միջերեսը:
2
Կարգավորեք Wi-Fi միջերեսի և Ուղղորդչի հետ
կապը: Նայեք ՏԵՂԱԴՐՄԱՆ ՈՒՂԵՑՈՒՅՑԸ և
SETUP QUICK REFERENCE GUIDE (ՏԵՂԱԿԱՅՄԱՆ
ՀԱՄԱՌՈՏ ՈՒՂԵՑՈՒՅՑ), որը տրամադրվել է բլոկի
հետ միասին:
ՏԵՂԱԴՐՄԱՆ ՈՒՂԵՑՈՒՅՑԸ համար խնդրում ենք
այցելել ներքոնշյալ ինտերնետային կայք:
http://www.melcloud.com/Support
3
Ե՛տ տարեք Wi-Fi միջերեսը և փակեք առջևի
վահանակը կարգավորումների ավարտից հետո:
4
MELCloud Օգտագործման ձեռնարկի համար խնդրում
ենք այցելել ներքոնշյալ ինտերնետային կայքը:
http://www.melcloud.com/Support
Նշում.
• Նախքան Wi-Fi միջերեսի կարգավորումները սկսելը համոզվեք,
որ Ուղղորդիչն ունի WPA2-AES կոդավորման կարգավորումների
աջակցություն:
• Նախքան Wi-Fi միջերեսի օգտագործումը վերջնական օգտագործողը
պետք է կարդա և ընդունի Wi-Fi ծառայության պայմանները:
• Սույն Wi-Fi միջերեսը Wi-Fi ծառայությանը միացնելու համար հնարավոր
է Ուղղորդչի անհրաժեշտություն:
• Սույն Wi-Fi միջերեսը չի իրականացնի համակարգից որևէ օպերացիոն
տվյալի հաղորդում այնքան ժամանակ, մինչև վերջնական օգտագործողը
չգրանցվի և չընդունի Wi-Fi ծառայության պայմանները:
• Սույն Wi-Fi միջերեսը չպետք է տեղադրվի և միացվի այնպիսի Mitsubishi
Electric համակարգի, որը նախատեսված է խիստ սառեցման կամ
ջեռուցման համար:
• Wi-Fi միջերեսի կարգավորումները կատարելու ժամանակ խնդրում
ենք գրանցել Wi-Fi միջերեսի կարգավորումների վերաբերյալ
տեղեկությունները սույն ձեռնարկի վերջին էջում:
Տեղափոխման կամ հեռացման դեպքում խնդրում ենք վերակայել Wi-Fi
•
միջերեսը՝ գործարանային կարգավորումներով:
Mitsubishi Electric-ի Wi-Fi միջերեսը նախատեսված է Mitsubishi Electric-ի
MELCloud Wi-Fi ծառայության հետ կապի համար:
Երրորդ անձանց Wi-Fi միջերեսները չեն կարող միացվել MELCloud-ին:
Mitsubishi Electric-ը պատասխանատվություն չի կրում (i) համակարգի
կամ որևէ արտադրանքի ցածր արդյունավետության համար;
(ii) համակարգի կամ արտադրանքի խափանման համար; կամ (iii)
համակարգի կամ որևէ արտադրանքի կորստի կամ վնասի համար;
որն առաջացել է կամ ծագել է որևէ երրորդ անձի Wi-Fi միջերեսի հետ
միացումից և/կամ օգտագործումից կամ Mitsubishi Electric սարքավորման՝
որևէ երրորդ անձի Wi-Fi ծառայությանը միանալու արդյունքում:
HY
Mitsubishi Electric Կորպորացիայի կողմից MELCloud-ին առնչվող
ամենավերջին տեղեկատվությանը կարող եք ծանոթանալ՝ այցելելով
www.melcloud.com:
HY-13
Page 64

● ՇԱՀԱԳՈՐԾՄԱՆ ՁԵՌՆԱՐԿ ●
ԵՐԲ ԿԱՐԾՈՒՄ ԵՔ, ՈՐ ՈՐԵՎԷ ԽՆԴԻՐ Է ԱՌԱՋԱՑԵԼ
HY
Անգամ եթե այս կետերը ստուգված են, երբ բլոկում ծագած խնդիրը չի
լուծվում, դադարեցրե՛ք օդորակչի օգտագործումը և խորհրդակցե՛ք ձեր
մատակարարի հետ:
Նշաններ Պարզաբանման և ստուգման կետեր
Ներքին Բլոկ
Բլոկը չի կարող գործարկվել:
Հորիզոնական թիակը չի շարժվում:
Վերսկսման ժամանակ բլոկը չի
կարող աշխատել մոտ 3 րոպե:
Գոլորշին հեռացվում է ներքին
բլոկի օդահեռ արտաթող անցքից:
ՀՈՐԻԶՈՆԱԿԱՆ ԹԻԱԿԻ պտտեցումը
որոշակի ժամանակահատվածով
դադարեցվում է, այնուհետև
վերսկսվում:
COOL/DRY/FAN (ՍԱՌԸ/ՉՈՐ/
ՕԴԱՓՈԽՈՒՄ) ռեժիմներում
SWING ընտրելու դեպքում ստորին
հորիզոնական թիակը չի շարժվում:
Օդային հոսքի ուղղությունը
փոխվում է աշխատանքի
ընթացքում:
Հորիզոնական թիակի
ուղղությունը չի կարող փոխվել
հեռակառավարման վահանակի
միջոցով:
Ջեռուցման ռեժիմում աշխատանքը
դադարեցվում է մոտ 10 րոպեով:
Երբ հիմնական
էլեկտրամատակարարումը
միացվում է, բլոկն ինքնուրույն
գործարկվում է, անգամ եթե նշան
չի ստացել հեռակառավարման
վահանակից:
Երկու հորիզոնական թիակները
հպվում են միմյանց: Հորիզոնական
թիակները գտնվում են ոչ նորմալ
դիրքում: Հորիզոնական թիակները
չեն վերադառնում ճիշտ «փակ
դիրքին»:
COOL/DRY (ՍԱՌԸ/ՉՈՐ) ռեժիմում,
երբ սենյակի ջերմաստիճանը
հասնում է սահմանվածին մոտ
ջերմաստիճանի, արտաքին բլոկը
կանգ է առնում, հետո ներքին բլոկը
շարունակում է աշխատանքը արդեն
ցածր արագությամբ:
Ներքին բլոկը ժամանակի
ընթացքում գունազրկվում է:
Շահագործման ցուցիչ լույսը թույլ
է: Բլոկը ձայնային ազդանշան չի
հանում:
• Արդյո՞ք անջատիչը միացված է:
• Արդյո՞ք էլեկտրասնուցման խրոցը միացված է:
• Արդյո՞ք կարգավորված է ON թայմերը:
• Արդյո՞ք հորիզոնական և ուղղաձիգ թիակները
պատշաճ կերպով են տեղադրված:
• Օդափոխիչի ճաղավանդակը դեֆորմացվա՞ծ է:
• Երբ անջատիչը միացված է, հորիզոնական թիակների
դիրքը կվերականգնվի մոտավորապես մեկ րոպեում:
Վերականգնման ավարտից հետո կշարունակվի
հորիզոնական թիակների նորմալ աշխատանքը:
Նույնը վերաբերում է նաև արտակարգ/վթարային
սառեցման գործառույթին:
• Սա պաշտպանում է բլոկը՝ համաձայն
միկրոպրոցեսորից ստացված ցուցումների:
Խնդրում ենք սպասել:
Բլոկից ներթափանցող սառը օդը արագորեն
•
սառեցնում է սենյակի ներսում առկա խոնավ օդը, և
այն վերածում ջրային գոլորշու:
• Դա նրա համար է, որպեսզի ՀՈՐԻԶՈՆԱԿԱՆ ԹԻԱԿԻ
պտտեցումը նորմալ կերպով իրականացվի:
• Սովորական է, երբ COOL/DRY/FAN (ՍԱՌԸ/ՉՈՐ/
ՕԴԱՓՈԽՈՒՄ) ռեժիմներում SWING-ն ընտրելու
դեպքում ստորին հորիզոնական թիակը չի
շարժվում:
• Երբ բլոկը գործարկվում է COOL (ՍԱՌԸ) կամ DRY
(ՉՈՐ) ռեժիմներում և եթե օդը շարունակվում է
ներքև փչել 0,5-ից 1 ժամ շարունակ, ապա օդային
հոսքի ուղղությունը ավտոմատ կերպով փոխվում է
վերին դիրք՝ կոնդենսացիան և կաթոցը բացառելու
նպատակով:
•
Ջեռուցման ռեժիմում, երբ օդային հոսքի ջերմաստիճանը
շատ ցածր է լինում կամ երբ ապասառեցում է
իրականացվում, հորիզոնական թիակը ավտոմատ
կերպով բերվում է հորիզոնական դիրքի:
• Արտաքին բլոկը ապասառեցման ռեժիմում է:
Խնդրում ենք սպասել՝սա կարող է տևել
առավելագույնը 10 րոպե: (Երբ դրսի ջերմաստիճանը
շատ ցածր է, իսկ խոնավությունը՝ շատ բարձր,
առաջանում են սառցաշերտեր):
• Այս մոդելները զինված են ավտոմատ
վերսկսման գործառույթով: Երբ հիմնական
էլեկտրամատակարարումը դադարեցվում է
առանց հեռակառավարման վահանակի միջոցով
բլոկի անջատման, և հետո այն վերականգնվում
է, ապա բլոկը ավտոմատ կերպով սկսում է
աշխատանքն այն նույն ռեժիմով, ինչ սահմանված
էր հեռակառավարման վահանակի միջոցով նախքան
էլեկտրասնուցման դադարեցումը: Տե՛ս «Ավտոմատ
վերագործարկման գործառույթը»:
Կատարեք հետևյալ գործողություններից մեկը.
•
Անջատեք և միացրեք անջատիչը: Համոզվեք, որ
հորիզոնական թիակները շարժվում են դեպի ճիշտ
«
փակ դիրքը»:
• Սկսեք և դադարեցրեք արտակարգ սառեցման
գործառույթը և համոզվեք, որ հորիզոնական
թիակները շարժվում են դեպի ճիշտ «փակ դիրքը»:
• Երբ սենյակի ջերմաստիճանը շեղվում է սահմանված
ջերմաստիճանից, ներքին օդափոխիչը սկսում
է աշխատել հեռակառավարման վահանակի
կարգավորումներին համապատասխան:
• Թեև պլաստմասսան դեղնում է՝ պայմանավորված
այնպիսի գործոններով, ինչպիսիք են
ուլտրամանուշակագույն ճառագայթները և
ջերմաստիճանը, այնուամենայնիվ, սաչի ազդում
սարքի գործառույթների վրա:
• NIGHT MODE (ԳԻՇԵՐԱՅԻՆ ՌԵԺԻՄ) ռեժիմը
միացվա՞ծ է։
էջ 9
էջ 10
էջ 10
Բազմակի համակարգ
Եթե ներքին բլոկը չի
շահագործվում, այն սկսում է
տաքանալ, իսկ բլոկի միջից լսվում
է ջրի հոսքի ձայնին նման ձայն:
Երբ ընտրվում է տաքացման
գործարկումը, այն չի սկսվում
անմիջապես:
• Սառեցուցիչի մի փոքր քանակ շարունակում է
հոսել դեպի ներքին բլոկ, անգամ եթե այն այլևս չի
շահագործվում:
• Երբ շահագործումն իրականացվում է արտաքին
բլոկի ապասառեցման ընթացքում, տաք օդ դուրս
փչելու համար կպահանջվի մոտ մի քանի րոպե
(առավելագույնը՝ 10 րոպե):
Արտաքին բլոկ
Արտաքին բլոկի օդափոխիչը
չի պտտվում, թեև կոմպրեսորը
շարունակում է աշխատել: Անգամ
եթե օդափոխիչը սկսում է պտտվել,
այն քիչ անց կանգ է առնում:
• Դրսի ցածր ջերմաստիճանի դեպքում սառեցման
ռեժիմում օդափոխիչն աշխատում է ընդմիջումներով,
որպեսզի ապահովի սառեցման բավարար
հզորություն:
HY-14
Նշաններ Պարզաբանման և ստուգման կետեր
Արտաքին բլոկ
Ջուր է կաթում արտաքին բլոկից:
Սպիտակ ծուխը հեռացվում է
արտաքին բլոկից:
Հեռակառավարման վահանակ
Հեռակառավարման վահանակի
դիսփլեյը չի հայտնվում կամ թույլ
է: Ներքին բլոկը չի արձագանքում
հեռակառավարման վահանակի
ազդանշանին:
Չի սառեցնում կամ չի տաքացնում
Սենյակը հնարավոր չէ բավարար
կերպով սառեցնել կամ տաքացնել:
Սենյակը հնարավոր չէ բավարար
կերպով սառեցնել:
Սենյակը չի տաքանում բավարար
կերպով:
Ջեռուցման ռեժիմում օդը շուտ
դուրս չի մղվում:
Օդի հոսք
Ներքին բլոկի օդից տարօրինակ
հոտ է գալիս:
Ձայն
Ճաքճքոցի ձայներ են լսվում:
«Շառաչուն» ձայներ են լսվում:
Մեխանիկական ձայներ են գալիս
ներքին բլոկից:
Լսվում է հոսող ջրի ձայն:
Երբեմն լսվում են թշշացող ձայներ:
Թայմեր
Շաբաթական թայմերը չի
աշխատում կարգավորումներին
համապատասխան:
Բլոկն ինքնուրույն սկսում է/
դադարում է աշխատանքը:
Wi-Fi միջերես
Երբ սխալ է առաջանում
ցանցի կարգավորումների կամ
աշխատանքի ընթացքում:
• COOL(ՍԱՌԸ) և DRY(ՉՈՐ) ռեժիմներում աշխատանքի
ընթացքում խողովակը կամ կցամասերը հովացվում
են, որն առաջացնում է ջրի կոնդենսացիա:
• Ջեռուցման ռեժիմում աշխատանքի ընթացքում
ջերմափոխանակիչում կուտակված ջուրը կաթում է:
Ջեռուցման ռեժիմում աշխատանքի ընթացքում
•
ապասառեցման գործարկումը հանգեցնում է արտաքին
բլոկում գոյացող սառույցի հալմանն ու կաթոցին:
• Ջեռուցման ռեժիմում աշխատանքի ընթացքում
ապասառեցման հետևանքով առաջացած գոլորշին
սպիտակ ծխի է նման:
Էջ 12
Էջ 12
էջ 5
էջ 7
էջ 10
Էջ 11
Էջ 11
• Արդյո՞՛ք մարտկոցները պարպված են:
• Արդյո՞ք մարտկոցների բևեռները (+, -) ճիշտ են
տեղադրված:
• Այլ էլեկտրական տեխնիկայի հեռակառավարման
վահանակի որևէ կոճա՞կ է սեղմվել:
• Արդյո՞ք ջերմաստիճանի կարգավորումները ճիշտ
են:
• Արդյո՞ք օդափոխիչի կարգավորումները ճիշտ են:
Փոխեք օդափոխիչի արագությունը՝ դարձնելով այն
High (Բարձր) կամ Super High (Գերբարձր):
• Արդյո՞ք ֆիլտրերը մաքուր են:
Արդյո՞ք ներքին բլոկի օդափոխիչը կամ
•
ջերմափոխանակիչը մաքուր են:
• Արդյո՞ք առկա է որևէ խոչընդոտ, որն արգելափակում
է ներքին կամ արտաքին բլոկերի օդի ներթող և
արտաթող անցքերը:
• Արդյոք կա՞ բաց սպատուհան կամ դուռ:
• Հնարավոր է, որ որոշակի ժամանակ պահանջվի
սահմանված ջերմաստիճանին հասնելու համար
կամ հնարավոր չլինի հասնել սահմանված
ջերմաստիճանին` կախված սենյակի չափից, շրջակա
միջավայրի ջերմաստիճանից և այլնից:
• NIGHT MODE (ԳԻՇԵՐԱՅԻՆ ՌԵԺԻՄ) ռեժիմը
միացվա՞ծ է։
•
Երբ սենյակում օգտագործվում է օդափոխիչ կամ գազի
վառարան, սառեցման բեռնվածքն ավելանում է, որը
կարող է ոչ բավարար սառեցման պատճառ հանդիսանալ:
• Երբ դրսի ջերմաստիճանը բարձր է, սառեցման
արդյունքը կարող է լինել ոչ բավարար:
• Երբ դրսի ջերմաստիճանը ցածր է, ջեռուցման
արդյունքը կարող է լինել ոչ բավարար:
• Սպասեք, մինչև բլոկը սկսի դուրս մղել տաք օդ:
• Արդյո՞ք ֆիլտրերը մաքուր են:
• Արդյո՞ք ներքին բլոկի օդափոխիչը կամ
ջերմափոխանակիչը մաքուր են:
• Բլոկը կարող է ներքաշել պատի, գորգի, կահույքի,
հագուստի և այլ իրերի բույրերը՝ դուրս փչելով դրանք
օդի հետ միասին:
• Այս ձայնը կարող է առաջանալ առջևի վահանակի
լայնացման/նեղացման կամ այլ պատճառով՝ կապված
ջերմաստիճանի փոփոխության հետ:
•
Այս ձայնը լսվում է, երբ դրսի օդը ջրահեռացման խողովակից
ներծծվում է՝ միացնելով օդաքաշը կամ օդափոխիչը, դուրս
մղելով ջրահեռացման խողովակով հոսող ջուրը:
Այս ձայնը լսվում է նաև, երբ դրսի օդը փչում է
ջրահեռացման խողովակի մեջ այն դեպքում, երբ
դրսում ուժեղ քամի է:
Սա անջատման ձայներն են այն դեպքում, երբ
•
միացնում/անջատում են օդափոխիչը կամ կոմպրեսորը:
• Սա բլոկի միջով հոսող սառեցուցիչի կամ ջրի
կոնդենսատի ձայնն է:
• Սա այն ձայնն է, երբ սառեցուցիչի հոսքը բլոկի
ներսում փոխվում է:
• Արդյո՞ք միացված է ON/OFF timer-ը:
Կրկին փոխանցել շաբաթական թայմերի
•
կարգավորման տվյալները ներքին բլոկ: Երբ տվյալները
հաջողությամբ փոխանցվում են, ներքին բլոկից լսվում
է երկար ազդանշանային ձայն: Երբ տեղեկությունների
փոխանցումը ձախողվում է, ներքին բլոկից լսվում
են 3 կարճ ազդանշանային ձայներ: Համոզվեք, որ
տվյալները հաջողությամբ փոխանցվել են:
•
Երբ էլեկտրամատակարարումը անջատվում է և
հիմնական էլեկտրասնուցումը դադարեցվում է, ներքին
բլոկի ներկառուցված ժամացույցի ցուցմունքը սխալ կլինի:
Արդյունքում շաբաթական թայմերը նորմալ չի աշխատի:
Համոզվեք, որ հեռակառավարման վահանակը
այնպիսի տեղում է, որտեղից ներքին բլոկը կարող է
ստանալ ազդանշան:
• Արդյո՞ք միացված է շաբաթական թայմերը:
Տե՛ս ՏԵՂԱԴՐՄԱՆ ՈՒՂԵՑՈՒՅՑԸ:
ՏԵՂԱԴՐՄԱՆ ՈՒՂԵՑՈՒՅՑԸ համար խնդրում ենք
այցելել ներքոնշյալ ինտերնետային կայք:
http://www.melcloud.com/Support
էջ 5
էջ 6
էջ 9
էջ 5
Page 65

ԵՐԲ ԿԱՐԾՈՒՄ ԵՔ, ՈՐ ՈՐԵՎԷ ԽՆԴԻՐ
Է ԱՌԱՋԱՑԵԼ
ՏԵՂԱԴՐՄԱՆ ՎԱՅՐԸ ԵՎ
ԷԼԵԿՏՐԱԿԱՆ ԱՇԽԱՏԱՆՔ
Հետևյալ դեպքեր
ձեր մատակարարի հետ:
• Երբ ներքին բլոկից ջուր է արտահոսում կամ կաթում:
• Երբ շահագործման ցուցիչ լույսը թարթում է:
• Երբ հաճախակի է անջատիչի խափանումը:
• Հեռակառավարման ազդանշանը չի հասնում այն սենյակ, որտեղ
օգտագործվում է էլեկտրական ON/OFF տիպի ֆլյուրեսցենտային լամպ
(ինվերտերային տիպի ֆլյուրեսցենտային լամպ և այլն):
• Օդորակչի շահագործմանը խոչընդոտում են ռադիո- կամ հեռուստաընդունիչները: Ազդակիր սարքի համար կարող է պահանջվել ուժեղարար:
• Երբ լսվում են ոչ նորմալ ձայներ:
• Երբ սառեցուցիչի արտահոսք է նկատվում:
ԵՐԲ ՕԴՈՐԱԿԻՉԸ ՉԻ ՕԳՏԱԳՈՐԾՎԵԼՈՒ
ԵՐԿԱՐ ԺԱՄԱՆԱԿ
1
Գործարկել COOL ռեժիմով ամենաբարձր
ջերմաստիճանային կարգավորումներով կամ FAN
ռեժիմով 3-ից 4 ժամվա ընթացքում:
• Սա չորացնում է բլոկի ներսը:
• Օդորակիչի մեջ խոնավությունը նպաստավոր պայմաններ է
2
Սեղմեք
3
Անջատեք անջատիչը և/կամ հանեք
էլեկտրամատակարարման խրոցը:
4
Հանեք բոլոր մարտկոցները հեռակառավարման
վահանակի միջից:
ում դադարեցրե՛ք օդորակչի օգտագործումը և խորհրդակցեք
էջ 6
ստեղծում սնկերի, օրինակ՝ բորբոսի առաջացման համար:
շահագործումը դադարեցնելու համար:
Տեղադրման վայրը
Մի՛ տեղադրեք օդորակիչը հետևյալ վայրերում.
• Վայրեր, որտեղ առկա են մեքենայի յուղեր:
• Աղերով հարուստ վայրեր, օրինակ՝ ծովափնյա վայրեր:
• Վայրեր, որտեղ կուտակվում են ծծմբային գազեր, օրինակ՝ տաք աղբյուրներ,
կոյուղի, կեղտաջրեր:
• Վայրեր, որտեղ յուղ է թափված կամ որտեղ տարածված են յուղային
ամպիկներ (գոլորշի, ծուխ) (օրինակ՝ կերակուր պատրաստելու տարածքներ,
գործարաններ, որտեղ պլաստմասսայի հատկանիշները կարող են
փոփոխվել կամ վնասվել):
• Վայրեր, որտեղ առկա են բարձր հաճախականություն կամ անլար
սարքավորումներ:
• Վայրեր, որտեղ արտաքին բլոկի օդի արտաթող անցքը խցանված է:
• Վայրեր, որտեղ աշխատանքի ձայնը կամ արտաքին բլոկից դուրս մղվող
օդը կարող է խանգարել հարևանությամբ գտնվող տներին:
• Խորհուրդ է տրվում ներքին բլոկը տեղադրել 1,8 մ-ից 2,3 մ բարձրության
վրա: Հնարավորության դեպքում խորհրդակցեք մատակարարի հետ:
• Ներսի սարքը պետք է տեղադրվի այնպիսի սենյակում, որի մակերեսը
գերազանցում է նշված հատակային մակերեսը: Խնդրում ենք կապ
հաստատել մատակարարի հետ:
• Մի՛ շահագործեք օդորակիչը ներքին շինարարական աշխատանքների և
ներքին հարդարման աշխատանքների ընթացքում, ինչպես նաև հատակի
լաքապատման աշխատանքների ընթացքում: Նման աշխատանքների
ավարտից հետո պատշաճ կերպով օդափոխեք սենյակը՝ նախքան օդորակչի
գործարկումը: Այլապես, դա կարող է նպաստել ցնդող մասնիկների
կուտակմանը օդորակչի ներսում, որն էլ կբերի ջրի արտահոսքի կամ
գոլորշու ցողման:
• Մի՛ օգտագործեք Wi-Fi միջերեսը բժշկական էլեկտրասարքավորումների
մոտակայքում կամ այն մարդկանց մոտ, ովքեր կրում են այնպիսի բժշկական
սարքեր, ինչպիսիք են սրտախթանիչը և իմպլանտացված կարդիովերտերդեֆիբրիլյատորը:
Դա կարող է պատահարի հանգեցնել՝ բժշկական սարքավորման կամ սարքի
խափանումների հետևանքով:
• Այս սարքավորումը պետք է տեղադրվի և օգտագործվի` օգտագործողից
կամ դիտորդներից նվազագույնը 20 սմ հեռավորության վրա:
• Մի՛ օգտագործեք Wi-Fi միջերեսը այլ հեռակառավարվող սարքերի,
միկրոալիքային վառարանի, անլար հեռախոսների կամ ֆաքսիմիլային
սարքերի մոտակայքում:
Դա կարող է առաջացնել աշխատանքի խափանումներ:
Օդորակիչը նորից օգտագործելիս.
1
Մաքրեք օդի ֆիլտրերը: Էջ 12
2
Ստուգե՛ք, որ ներքին և արտաքին բլոկերի օդի
ներթող և արտաթող անցքերը փակ չեն:
3
Ստուգե՛ք՝ արդյոք հողակցումը կատարված է
պատշաճ կերպով:
4
Տե՛ս «ՇԱՀԱԳՈՐԾՄԱՆ
ՆԱԽԱՊԱՏՐԱՍՏՈՒԹՅՈՒՆՆԵՐ»՝ հետևելով
հրահանգներին:
էջ 5
Էլեկտրական աշխատանք
• Օդորակչի համար ապահովեք առանձին հոսանքամատակարարում:
• Համոզվեք, որ պահպանում եք անջատիչի հզորությունը:
Եթե հարցեր ունեք, կապ հաստատեք ձեր մատակարարի հետ:
Ֆլյուրեսցենտային լամպի
ազդեցություններից խուսափելու
համար անհրաժեշտ է այն
հնարավորինս հեռու պահել:
1 մ կամ
ավելին
Անլար
հեռախոս
կամ
շարժական
հեռախոս
Ինվերտերային տիպի
ֆլյուրեսցենտային
լամպ
Տարածություն
թողեք՝
խուսափելու
համար պատկերի
խաթարումից կամ
աղմուկից:
1 մ
կամ
ավելին
Ռադիո
Հեռուստացույց
3 մ կամ ավելին
Տեղադրման վայրը պետք է առնվազն
3 մ հեռու գտնվի հեռուստացույցից,
ռադիոյից և այլն: Այն վայրերում,
որտեղ կապը թույլ է, ավելի մեծ
տարածություն թողեք դրսի սարքի և
ազդակիր սարքի ընդունիչի միջև, եթե
օդորակիչը խանգարում է ռադիո- կամ
հեռուստա- ընդունիչներին:
Օպտիմալ
արդյունավետության,
ինչպես նաև սարքի
երկարակեցության
համար արտաքին բլոկը
պետք է տեղադրել լավ
օդափոխվող չոր վայրում:
100 մմ կամ
ավելին
(AP60/AP71)
200/500 մմ
կամ ավելին
պատ և այլն
HY
HY-15
Page 66

● ՇԱՀԱԳՈՐԾՄԱՆ ՁԵՌՆԱՐԿ ●
ԲՆՈՒԹԱԳՐԵՐ
HY
Մոդել
Ֆունկցիա Սառեցում Տաքացում Սառեցում Տաքացում
Էլեկտրամատակարարում
Հզորություն կՎ
Ներմուծում կՎ
Քաշ
Սառնագենտի տարողությունը (R32) կգ
IP կոդ
Թույլատրելի չափից բարձր
աշխատանքային ճնշում
Աղմուկի աստիճան (SPL)
Ներսի
Դրսի
Ներսի կգ
Դրսի կգ
Ներսի
Դրսի
LP ps ՄՊա
HP ps ՄՊա
Ներսի (Գերհզոր/
Հզոր/Միջին/Ցածր/
Կամաց)
Դրսի դԲ (Ա)
դԲ (Ա)
MSZ-AP60VG(K) MSZ-AP71VG(K)
MUZ-AP60VG MUZ-AP71VG
~ /Ն, 230 В, 50 Հ
6,1 6,8 7,1 8,1
1,59 1,67 2,01 2,12
16 17
40 55
1,05 1,50
IP 20
IP 24
2,77
4,17
48/45/41/37/29 48/45/41/37/30 49/45/41/37/30 51/45/41/37/30
56 57 56 55
Երաշխավորված շահագործման ամպլիտուդա
Նշում.
Վարկանիշի վիճակը
Սառեցում — Ներսի՝ 27°C DB, 19°C WB
Դրսի՝ 35°C DB
Տաքացում — Ներսի՝ 20°C DB
Դրսի՝ 7°C DB, 6°C WB
Սառեցում
Տաքացում
Վերին շեմ
Ստորին շեմ
Վերին շեմ
Ստորին շեմ
Ներսի Դրսի
32°C DB
23°C WB
21°C DB
15°C WB
27°C DB
—
20°C DB
—
46°C DB
-10°C DB
24°C DB
18°C WB
-15°C DB
-16°C WB
—
—
DB՝ Չոր լամպ
WB՝ Թաց լամպ
Wi-Fi միջերես
Մոդել MAC-567IFB2-E
Ներածման լարումը պ. տ. 12,7 В (ներսի սարքից)
Էլեկտրաէներգիայի սպառում ԱՌԱՎ. 2 Վտ
Չափերը Բարձրութ × լայն × խորութ (մմ) 79×44×18,5
Քաշ (գ) 60 (ներառյալ մալուխը)
Հաղորդիչի հզորության մակարդակը
(ԱՌԱՎ.)
RF ալիք 1 կ ~ 13 կ (2412~2472 ՄՀ)
Ռադիո արձանագրություն IEEE 802.11b/g/n (20)
Կոդավորումը AES
Նույնականացումը WPA2-PSK
Ծրագրի տարբերակը XX.00
Համապատասխանության հռչակագրի համար այցելեք ստորև բերված կայքը:
http://www.melcloud.com/Support
17,5 դԲ/մՎտ @IEEE 802.11b
HY-16
Page 67

ПЕРЕКЛАД ОРИГІНАЛУ
ЗМІСТ
■ ПРАВИЛА ТЕХНІКИ БЕЗПЕКИ 1
■ УТИЛІЗАЦІЯ 3
■ НАЗВИ ОКРЕМИХ ЧАСТИН ПРИЛАДУ 4
■ ПІДГОТОВКА ПРИЛАДУ ДО ЕКСПЛУАТАЦІЇ 5
■ ВИБІР РЕЖИМІВ ЕКСПЛУАТАЦІЇ 6
■ РЕГУЛЮВАННЯ ШВИДКОСТІ ВЕНТИЛЯТОРА ТА НАПРЯМКУ ПОВІТРЯНОГО ПОТОКУ 7
■ РОБОТА В РЕЖИМІ LONG (ДОВГИЙ СТРУМІНЬ) 8
■ РЕЖИМ POWERFUL 8
■ РОБОТА В РЕЖИМІ I-SAVE 8
■ РОБОТА ECONO COOL 9
■ РЕЖИМ NIGHT MODE (НІЧНИЙ РЕЖИМ) 9
■ РОБОТА ТАЙМЕРА (ТАЙМЕР ON/OFF) 10
■ АВАРІЙНА ЕКСПЛУАТАЦІЯ 10
■ ФУНКЦІЯ АВТОМАТИЧНОГО ПОВТОРНОГО ЗАПУСКУ 10
■ РОБОТА ТИЖНЕВОГО ТАЙМЕРА 11
■ ЧИЩЕННЯ 12
■ НАЛАШТУВАННЯ ІНТЕРФЕЙСУ Wi-Fi (ТІЛЬКИ ТИП VGK) 13
■ ЯКЩО ЗДАЄТЬСЯ, ЩО ПРИЛАД НЕСПРАВНИЙ 14
■ ЯКЩО КОНДИЦІОНЕР ПЛАНУЄТЬСЯ НЕ ВИКОРИСТОВУВАТИ ТРИВАЛИЙ ЧАС 15
■ МІСЦЕ ВСТАНОВЛЕННЯ І ЕЛЕКТРОМОНТАЖНІ РОБОТИ 15
■ ТЕХНІЧНІ ХАРАКТЕРИСТИКИ 16
ПРАВИЛА ТЕХНІКИ БЕЗПЕКИ
Значення символів на внутрішньому та зовнішньому блоці
УВАГА!
(небезпека займання)
Уважно прочитайте ці ІНСТРУКЦІЇ З ЕКСПЛУАТАЦІЇ перед початком використання кондиціонера.
Персонал обслуговування зобов’язаний уважно прочитати ІНСТРУКЦІЇ З ЕКСПЛУАТАЦІЇ та ПОСІБНИК З УСТАНОВЛЕННЯ перед початком робіт.
Додаткову інформацію можна знайти в ІНСТРУКЦІЯХ З ЕКСПЛУАТАЦІЇ, ПОСІБНИКУ З УСТАНОВЛЕННЯ та подібних документах.
• Оскільки цей виріб містить деталі, що обертаються або здатні уразити
електричним струмом, обов'язково прочитайте ці «Правила техніки
безпеки» перед початком використання.
• Обов'язково дотримуйтеся інструкцій, що позначено позначкою «Обережно», оскільки вони містять інформацію, важливу для вашої безпеки.
• Після ознайомлення з цим посібником зберігайте його разом із посібником з монтажу в зручному місці, де його легко можна буде знайти у
випадку потреби.
Позначки та їхнє значення
УВАГА!
ОБЕРЕЖНО!
У разі неправильного поводження з приладом є високий ризик
серйозної небезпеки, наприклад загибелі, важких травм тощо.
Неправильне поводження може призвести за певних
обставин до серйозної небезпеки.
У цьому пристрої використовується займистий холодоагент.
У разі витоку холодоагенту та його контакту з вогнем або джерелом тепла утворюється шкідливий газ і виникає небезпека займання.
Значення символів, що використовуються в цьому посібнику
: Суворо забороняється.
: Ретельно дотримуйтесь інструкцій.
: Забороняється встромляти пальці або палички тощо.
: Забороняється ставати на внутрішній/зовнішній прилад або
ставити на них будь-які предмети.
: Небезпека ураження електричним струмом. Будьте обережні!
: Обов'язково від'єднайте штепсель шнура живлення від мере-
жевої розетки.
: Обов'язково вимкніть живлення.
: Небезпека займання.
: Забороняється торкатися вологими руками.
: Не допускається розпліскування води на блок.
UK
УВАГА!
Підключіть шнур живлення безпосередньо до розетки. Не користуйтеся подовжувачем і не підключайте до розетки змінного
струму одночасно декілька пристроїв.
• Це може призвести до перегріву, пожежі або ураження електричним
струмом.
Переконайтеся, що штепсель чистий, і надійно вставте його в
мережеву розетку.
• Забруднення штепселя може призвести до пожежі або ураження
електричним струмом.
Не скручуйте, не тягніть, не ушкоджуйте і не змінюйте шнур
живлення. Не піддавайте його дії тепла і не ставте на нього
важкі предмети.
• Це може призвести до пожежі або ураження електричним струмом.
Під час експлуатації не виконуйте вмикання/вимикання вимикача
та не від'єднуйте/під’єднуйте штепсель.
• Це може призвести до утворення іскрових розрядів, які здатні
спричинити пожежу.
• Після вимикання внутрішнього блока за допомогою пульта дистанційного керування, обов'язково встановіть вимикач на «OFF»
або вийміть штепсель.
Не знаходьтеся під потоком холодного повітря протягом тривалого часу.
• Це може бути шкідливим для вашого здоров'я.
UK-1
Page 68

З метою правильної та безпечної експлуатації даного пристрою, обов’язково перед його використанням прочитайте дану
інструкцію з експлуатації.
ПРАВИЛА ТЕХНІКИ БЕЗПЕКИ
UK
Користувач не повинен монтувати, переміщувати, розбирати,
модифікувати або ремонтувати блок.
• Неправильне поводження з кондиціонером може призвести до виникнення пожежі, ураження електрострумом, травм або витікання
води. Проконсультуйтеся з дилером.
• У разі пошкодження кабелю живлення його слід замінити у виробника або його сервісного представника задля уникнення
небезпечної ситуації.
Під час монтажу, переміщення або техобслуговування приладу
стежте, щоб в охолоджувальний контур не потрапила інша речовина, окрім зазначеного холодоагенту (R32).
• Присутність будь-якої чужорідної речовини, наприклад повітря,
може призвести до аномального підвищення тиску, наслідком
якого може бути вибух або травма.
• Використання будь-якого іншого холодоагенту, крім призначеного
для системи, призведе до механічної відмови, несправності системи або поломки блока. У найгіршому випадку це може створити
серйозну загрозу небезпеки, пов'язану з виробом.
Пристрій не призначений для використання людьми (включаючи
дітей) з обмеженими фізичними, сенсорними або психічними
можливостями та відсутністю досвіду й знань. Таким людям
можна користуватися пристроєм лише під наглядом особи, відповідальної за безпеку, або після інструктажу з користування.
Діти повинні бути під наглядом і не гратися з пристроєм.
Забороняється встромляти пальці, палички або інші предмети
в повітрозабірні або повітровипускні отвори.
• Невиконання цієї вимоги може призвести до отримання травми,
оскільки під час експлуатації вентилятор обертається з високою
швидкістю.
У разі виникнення підозрілих факторів (наприклад, запах горіння)
вимкніть кондиціонер і вийміть штепсель із розетки або встановіть вимикач у положення «OFF».
• При продовженні експлуатації в таких умовах може статися несправність, пожежа або ураження електричним струмом. У такому
випадку зверніться до дилера.
Якщо кондиціонер не здійснює охолодження або обігрів, можливо, стався витік холодоагенту. У разі витоку холодоагенту
зупиніть роботу пристрою, добре провітріть приміщення й зверніться до дилера. Якщо під час ремонту необхідне заправлення
блока холодоагентом, зверніться за детальними відомостями
до спеціаліста з обслуговування.
• Холодоагент, що використовується в системі кондиціонера, не
становить небезпеки для здоров’я. Зазвичай витік холодоагенту
не відбувається. Проте в разі витоку холодоагенту та його контакту
з вогнем або джерелом тепла, наприклад з тепловентилятором,
парафіновим нагрівачем або духовою піччю, утворюється шкідливий газ і виникає небезпека займання.
Користувачеві забороняється робити спроби очищення внутрішньої частини внутрішнього блока. У разі необхідності очищення
блока зверніться до дилера.
• Застосування неналежних очисних засобів може призвести до
пошкодження пластикових матеріалів усередині блока, що у свою
чергу загрожує витоком води. Потрапляння очисного засобу на
електричні деталі двигуна призведе до несправності, виділення
диму або пожежі.
• Пристрій слід зберігати в приміщенні без безперервно працюючих
джерел займання (наприклад, відкритого полум’я, працюючого
газового приладу або електричного обігрівача).
• Пам’ятайте, що холодоагенти можуть не мати запаху.
• Не використовуйте засоби для прискорення розморожування або
очищення приладу, якщо їх не рекомендовано виробником.
• Не проколюйте пристрій та не спалюйте його.
Внутрішній блок має встановлюватися в приміщеннях, площа
яких перевищує вказане далі значення. Зверніться за консультацією до дилера.
Цей прилад призначається для використання спеціалістами або
особами, що пройшли відповідне навчання, у крамницях, легкій
промисловості та сільськогосподарських підприємствах, а також
для комерційного використання неспеціалістами.
Забороняється тягнути за шнур живлення.
• Це може призвести до розриву частин дротів, що, у свою чергу,
може викликати перегрів або пожежу.
Забороняється заряджати та розбирати елементи живлення й
кидати їх у вогонь.
• Це може призвести до витоку електроліту, виникнення пожежі або
вибуху.
Забороняється використовувати блок протягом більше 4 годин
за високої вологості (80% відносної вологості або вище) і (або)
коли відчинено зовнішні двері чи вікна.
• Це може призвести до витоку водного конденсату з кондиціонера,
який, у свою чергу, може намочити та пошкодити меблі.
• Водний конденсат у кондиціонері може сприяти появі грибків,
наприклад плісняви.
Забороняється використовувати блок в особливих цілях,
наприклад для зберігання продуктів, розведення тварин, вирощування рослин, зберігання прецизійних пристроїв або
предметів мистецтва.
• Це може призвести до зниження якості або зашкодити тваринам
і рослинам.
Не піддавайте прилади спалювання впливу прямого потоку
повітря.
• Це може призвести до неповного згоряння.
Забороняється класти елементи живлення в рот із будь-яких
причин, оскільки є ризик випадково їх проковтнути.
• Попадання елемента живлення в травну систему може стати причиною задухи та/або отруєння.
Перед очищенням блока вимкніть його та вийміть штепсель із
розетки або встановіть вимикач у положення «OFF».
• Невиконання цієї вимоги може призвести до отримання травми,
оскільки під час експлуатації вентилятор обертається з високою
швидкістю.
Якщо блок планується не використовувати впродовж тривалого
часу, вийміть штепсель живлення з розетки та встановіть вимикач у положення «OFF».
• На блоці може накопичуватися бруд, що може спричинити перегрів
або пожежу.
Замініть усі елементи живлення пульта дистанційного керування
новими, однакового типу.
• Використання старого елемента живлення разом із новим може
призвести до перегріву, витоків або вибуху.
Якщо електроліт потрапить на шкіру або одяг, ретельно змийте
його чистою водою.
•
Якщо електроліт потрапить в очі, ретельно промийте їх чистою
водою та негайно зверніться до лікаря.
Забезпечте достатню вентиляцію під час роботи блока разом із
приладами спалювання.
• Недостатня вентиляція може призвести до кисневого голодування.
Установлюйте вимикач у положення «OFF» під час грози та в
разі ризику удару блискавкою.
• Удар блискавки може пошкодити блок.
Після використання кондиціонера протягом декількох сезонів
виконайте огляд і обслуговування окрім звичайного очищення.
• Скупчення бруду або пилу всередині блока може призвести до
появи неприємного запаху, грибків (наприклад, плісняви), засмічення дренажного каналу та витікання води з внутрішнього
блока. Зверніться до дилера з питань огляду та обслуговування,
що потребують спеціальних знань і навичок.
Не торкайтеся до вимикачів мокрими руками.
• Це може призвести до ураження електричним струмом.
Забороняється виконувати очищення кондиціонера водою або
встановлювати на нього предмети, що містять воду, наприклад
вази з квітами.
• Це може призвести до пожежі або ураження електричним струмом.
Не ставайте на зовнішній блок і не ставте на нього ніякі
предмети.
• При падінні (або падінні предметів) можна отримати травми.
UK-2
ОБЕРЕЖНО
Забороняється торкатися повітрозабірного отвору або алюмінієвих пластин внутрішнього/зовнішнього блока.
• Це може призвести до травм.
Забороняється наносити на блок інсектициди або легкозаймисті
аерозолі.
• Це може призвести до пожежі або деформації блока.
Під прямим потоком повітря не повинні знаходитися домашні
тварини чи рослини.
Це може призвести до травмування тварин або пошкодження рослин.
•
Забороняється ставити інші електроприлади або меблі під
внутрішній/зовнішній блок.
• На них можуть потрапити краплі води з блока та призвести до
пошкодження чи несправності.
Забороняється залишати блок на пошкодженій підставці.
• Блок може впасти та завдати травми.
Під час експлуатації чи очищення блока не слід знаходитися на
нестійкому предметі.
• При падінні можна отримати травми.
ВАЖЛИВО
Забруднені фільтри є причиною утворення конденсату в кондиціонері, що
сприяє появі грибків, наприклад плісняви. Тому рекомендується очищати
повітряні фільтри кожні 2 тижні.
Перед початком експлуатації переконайтеся, що горизонтальні заслінки
закриті. У разі початку роботи за відкритих горизонтальних заслінок вони
можуть не повернутися в правильне положення.
Page 69

ПРАВИЛА ТЕХНІКИ БЕЗПЕКИ
Інформація про інтерфейс Wi-FiВстановлення
УВАГА!
Для встановлення кондиціонера повітря зверніться до свого дилера.
• Установку не повинен здійснювати користувач, оскільки для цього
потрібні спеціальні знання та вміння. Неправильне встановлення
кондиціонера може призвести до витоків води, виникнення пожежі
або ураження електричним струмом.
Забезпечте для кондиціонера окреме джерело живлення.
• Недотримання цієї вимоги може призвести до перегріву або пожежі.
Забороняється встановлювати прилад у місцях можливого витоку
займистого газу.
• Витік і накопичення газу поруч із зовнішнім блоком може призвести
до вибуху.
Забезпечте правильне заземлення блока.
•
Забороняється приєднувати дріт заземлення до газових та водопровідних труб, громовідводів чи дротів телефонного заземлення. Неправильне заземлення може призвести до ураження електричним струмом.
ОБЕРЕЖНО
Установлюйте вимикач із захистом від витоків на землю з урахуванням місця встановлення кондиціонера (наприклад, у місцях із
високою вологістю).
• Якщо вимикач із захистом від витоків на землю не встановлено, існує
ризик ураження електричним струмом.
Переконайтеся, що злив води здійснюється належним чином.
• У разі неправильного використання дренажного каналу вода з
внутрішнього/зовнішнього блока може капати, намочуючи або пошкоджуючи меблі.
Виникнення незвичайних умов
Негайно вимкніть кондиціонер і зверніться до дилера.
(Неналежне поводження з пристроями може призвести до серйозних
наслідків, зокрема тяжких травм або смерті.)
Цим пристроєм можуть користуватися діти віком від 8 років та
особи зі зниженою фізичною, сенсорною чи розумовою спроможністю, а також ті, хто не має достатнього досвіду й знань, за умови,
що вони знаходяться під наглядом або проінструктовані щодо
користування пристроєм у безпечний спосіб та усвідомлюють
небезпеку, пов’язану з таким користуванням.
Не допускайте гри дітей з цим пристроєм. Чищення й технічне обслуговування на рівні користувача не може проводиться дітьми
без нагляду дорослих.
Не використовуйте інтерфейс Wi-Fi поблизу електричного обладнання медичного призначення або поруч із людьми, які
використовують медичні пристрої, як-от кардіостимулятори чи
імплантовані кардіовертери-дефібрилятори.
• Це може призвести до нещасного випадку в разі несправності
медичного обладнання або пристрою.
Не допускається монтаж інтерфейсу Wi-Fi поряд із пристроями,
що керуються в автоматичному режимі, як то автоматичні двері
чи пристрої пожежної сигналізації.
• Це може призвести до нещасних випадків внаслідок несправності
обладнання.
Не торкайтеся інтерфейсу Wi-Fi вологими руками.
• Це може призвести до пошкодження пристрою, ураження електричним струмом або пожежі.
Не допускається розпліскування води на інтерфейс Wi-Fi або його
експлуатація в ванній кімнаті.
• Це може призвести до пошкодження пристрою, ураження електричним струмом або пожежі.
У випадку падіння інтерфейсу Wi-Fi або пошкодження тримача
чи кабелю витягніть з розетки вилку живлення або розімкніть
контакти автомата захисту електричного кола.
• Це може призвести до пожежі або ураження електричним струмом.
У такому випадку зверніться до дилера.
ОБЕРЕЖНО
(Неналежне поводження з пристроями може призвести до серйозних
наслідків, як-от травм або нанесення шкоди будівлі.)
Забороняється ступати на ненадійно встановлену драбинку при
виконанні настройки чи чищення інтерфейсу Wi-Fi.
• При падінні можна отримати травми.
Не допускається експлуатація інтерфейсу Wi-Fi поруч з іншими
бездротовими пристроями, мікрохвильовими печами, бездротовими телефонами чи апаратами факсимільного зв’язку.
• Це може призвести до несправностей.
УВАГА!
UK
УТИЛІЗАЦІЯ
З питань утилізації цього виробу зверніться до дилера.
Примітка.
Ця позначка дійсна виключно для країн ЄС.
Цю позначку надруковано відповідно до Директиви
2012/19/EU, стаття 14 «Інформація для користувачів» та додаток IX, та/або до Директиви 2006/66/EC,
стаття 20 «Інформація для кінцевих користувачів» та
Fig. 1
додаток II.
Цей виріб MITSUBISHI ELECTRIC розроблено та виготовлено з матеріалів та
компонентів найвищої якості, які придатні для переробки та/або повторного
використання.
Ця позначка означає, що електричне та електронне обладнання, елементи
живлення та акумулятори після завершення терміну експлуатації потрібно
утилізувати окремо від побутових відходів.
Якщо під позначкою надруковано хімічний символ (Fig. 1), це означає, що
елемент живлення або акумулятор містять важкі метали в певній концентрації. Ця концентрація позначається таким чином:
Hg: ртуть (0,0005%), Cd: кадмій (0,002%), Pb: свинець (0,004%)
У країнах ЄС існують системи окремого збирання використаних електричних
та електронних виробів, елементів живлення та акумуляторів.
Будь ласка, утилізуйте своє обладнання, елементи живлення й акумулятори
належним чином у місцевих центрах збирання/переробки відходів.
Допоможіть зберегти наше спільне навколишнє середовище!
UK-3
Page 70

● ІНСТРУКЦІЇ З ЕКСПЛУАТАЦІЇ ●
НАЗВИ ОКРЕМИХ ЧАСТИН ПРИЛАДУ
Внутрішній блок Пульт дистанційного керування
Передня
панель
Повітряний фільтр
Фільтр очищення повітря
(Фільтр з іонами срібла для
очищення повітря, не входить
у комплектацію)
Заводська табличка *1
Горизонтальна
заслінка
Повітровипускний отвір
Індикаторна лампочка
роботи
Зона прийому сигналів
із пульта дистанційного
керування
Повітрозабірний отвір
Інтерфейс Wi-Fi
С. 13
Перемикач
аварійної
експлуатації
С. 10
Теплообмінник
Індикатор необхідності заміни
елемента живлення
Зона робочого дисплея
Кнопки
регулювання
температури
С. 6
Кнопка
вибору ре-
С. 6
жиму
Кнопка енергозбереження під
час охолодження
ECONO COOL
С. 9
Кнопка управління потужністю
POWERFUL
Кнопка
збереження
i-save
Кнопка NIGHT
MODE (нічний
режим)
С. 8
С. 8
С. 9
С. 5
Зона випромінювання
сигналу
Радіус дії сигналу:
прибл. 6 м
Під час отримання сигналу внутрішній блок подає
звуковий сигнал.
Кнопка OFF/ON
(зупинка/робота)
Кнопка керування
швидкістю вентиля-
С. 7
тора
Кнопка LONG (довгий
струмінь)
Кнопка управління шириною заслінки WIDE
С. 7
VANE
Кнопка управління
заслінкою VANE
Кнопки налаштування часу й
таймера TIME, TIMER
Збільшення часу
Зменшення часу
С. 8
С. 7
С. 5, 10
UK
Зовнішній блок
Повітрозабірні отвори (ззаду та збоку)
Заводська табличка *1
Охолоджувальні труби
Дренажний шланг
Повітровипускний отвір
Вихідний дренажний отвір
Вигляд зовнішніх блоків може відрізнятися.
*1 Рік та місяць виготовлення вказано на заводській табличці.
Кнопка годинника CLOCK
С. 5
Пульт дистанційного керування
Коли пульт дистанційного керування
не використовується, тримайте його
поруч із кондиціонером.
Кнопки налаштування
тижневого таймера
WEEKLY TIMER
Кнопка скидання
RESET
Кришка
Щоб відкрити пульт дистанційного керування,
зсуньте кришку вниз. Щоб
отримати доступ до кнопок тижневого таймера,
зсуньте кришку ще далі.
Користуйтеся тільки пультом дистанційного керування, що постачається
в комплекті з приладом.
Не використовуйте інші пульти дистанційного керування.
Якщо 2 або більше внутрішніх блоків
установлено близько один до одного, то один із внутрішніх блоків може
помилково прийняти сигнал пульта
дистанційного керування, спрямованого на інший блок.
С. 5, 11
С. 5
UK-4
Page 71

ПІДГОТОВКА ПРИЛАДУ ДО ЕКСПЛУАТАЦІЇ
Підготовка до експлуатації: Вставте штепсель шнура живлення в мережеву
розетку та (або) увімкніть вимикач.
Установлення елементів живлення в
пульт дистанційного керування
Натисніть
4.
кнопку скидання
RESET.
Зніміть передню
1.
кришку.
Спочатку встановіть
2.
негативний полюс
лужних елементів
живлення AAA.
Установіть передню кришку.
3.
Примітка.
• Перевірте полярність елементів живлення.
• Не застосовуйте елементи живлення з марганцю та такі, що протікають.
Це може призвести до несправності пульта дистанційного керування.
• Не користуйтеся акумуляторними елементами живлення.
• Індикатор необхідності заміни елементів живлення починає світитися,
коли рівень заряду елемента живлення знижується. Приблизно через
7 днів після того, як цей індикатор почав світитися, пульт дистанційного
керування припиняє працювати.
• Замінюйте всі елементи живлення новими однакового типу.
• Елементи живлення можна використовувати приблизно 1 рік. Проте елементи живлення, термін зберігання яких вийшов, служитимуть менше.
• Обережно натисніть кнопку скидання RESET тонким предметом.
Якщо кнопку скидання RESET не буде натиснуто, пульт дистанційного
керування може працювати неправильно.
Установка поточного часу
Щоб указати день,
3.
натисніть кнопку
Натисніть кнопку
1.
годинника CLOCK.
2.
Ще раз натисніть
4.
кнопку годинника
CLOCK.
Примітка.
• Обережно натисніть кнопку годинника CLOCK тонким
предметом.
Примітка.
Як налаштувати пульт дистанційного керування тільки для конкретного
внутрішнього блока
В одній кімнаті можна використовувати максимум 4 внутрішні блоки з безпровідними пультами дистанційного керування.
Щоб внутрішні блоки працювали окремо з кожним пультом дистанційного
керування, призначте кожному пульту номер відповідно до номера внутрішнього блока.
Це налаштування можна встановити виключно за таких умов:
• Пульт дистанційного керування ВИМКНЕНО.
(1) Щоб увійти в режим сполучення, на пульті дистанційного керування на-
тисніть кнопку
(2) Знову натисніть кнопку
танційного керування.
Кожне натискання кнопки змінює номер у такому порядку:
1 → 2 → 3 → 4.
(3) Натисніть кнопку , щоб завершити налаштування сполучення.
Після встановлення вимикача в положення «ON» (Увімкнуто) пульт дис-
танційного керування, який першим надіслав сигнал на внутрішній блок,
вважається пультом дистанційного керування для цього внутрішнього
блока.
Після встановлення внутрішній блок отримує сигнал лише з призначеного
йому пульта дистанційного керування.
та утримуйте протягом 2 секунд.
Кожне натискання збільшує/
і призначте номер кожному пульту дис-
DAY.
Щоб налаштувати час, натис-
ніть кнопку TIME або кнопку
TIMER.
зменшує час на 1 хвилину
(10 хвилин, якщо натискати й
утримувати довше).
UK
UK-5
Page 72

UK
● ІНСТРУКЦІЇ З ЕКСПЛУАТАЦІЇ ●
ВИБІР РЕЖИМІВ ЕКСПЛУАТАЦІЇ
1
Щоб розпочати роботу, натисніть .
2
Щоб обрати робочий режим, натисніть . Кожне
натискання змінює режим у наступному порядку.
(AUTO) (COOL) (DRY) (HEAT) (FAN)
3
Щоб настроїти температуру, натисніть або .
Кожне натискання збільшує або зменшує температуру на 1°C.
Режим DRY (сушіння)
Осушення повітря в приміщенні. При цьому температура в приміщенні
може трохи зменшитися.
У режимі DRY (сушіння) не можна настроювати температуру.
Режим HEAT (обігрів)
Насолоджуйтеся теплим повітрям бажаної температури.
Режим FAN (вентиляція)
Забезпечує циркуляцію повітря в приміщенні.
Примітка.
Після експлуатації в режимах COOL/DRY (охолодження/сушіння) рекомендується перемикнути пристрій у режим вентиляції FAN, щоб
просушити внутрішній блок зсередини.
Примітка.
Мультисистемна робота
З одним зовнішнім блоком можуть працювати два та більше внутрішніх
блоків. Якщо кілька внутрішніх блоків працюють разом, то охолодження/
сушіння/вентиляція й обігрів не можуть виконуватися одночасно. Якщо на
одному блоці вибрано режим COOL (охолодження)/DRY (сушка)/FAN (вентиляція), а на іншому HEAT (обігрів) або навпаки, то той блок, що було
вибрано пізніше, перейде в режим очікування.
Індикаторна лампочка роботи
Індикаторна лампочка роботи відображає робочий стан блока.
Індикація Робочий стан
Прилад працює в режимі досягнення заданої температури
Кімнатна температура наближається до заданої
Кімнатна темпе-
ратура
Відхилення від заданої температури
складає приблизно
2°C або більше
Відхилення від заданої температури
складає приблизно
1–2°C
Щоб припинити роботу, натисніть .
Режим AUTO (автоматичне перемикання)
Пристрій обирає режим роботи відповідно до різниці між температурою в
приміщенні та заданою температурою. У режимі AUTO пристрій змінює режим
(COOL (охолодження) ↔ HEAT (обігрів)), коли температура приміщення протягом більш 15 хвилин відрізняється від заданої більше ніж на приблизно 2°C.
Примітка.
Не радимо використовувати режим Auto, якщо цей внутрішній блок підключено до зовнішнього блока типу MXZ. Якщо одночасно працюють кілька внутрішніх блоків, пристрій може бути не здатний перемкнути режим роботи між
COOL (охолодження) та HEAT (обігрів). У цьому випадку внутрішній блок переходить у режим очікування (див. таблицю індикаторної лампочки роботи).
Режим COOL (охолодження)
Насолоджуйтесь прохолодним повітрям бажаної температури.
Примітка.
Не користуйтеся режимом COOL (охолодження) за наднизької температури ззовні (менше –10°C). Водний конденсат у блоці може капати
й замочувати та пошкоджувати меблі тощо.
UK-6
Горить Не горить
Page 73

РЕГУЛЮВАННЯ ШВИДКОСТІ ВЕНТИЛЯТОРА ТА НАПРЯМКУ ПОВІТРЯНОГО ПОТОКУ
Вертикальний напрямок повітряного потоку
Щоб вибрати напрямок повітряного потоку, натисніть
тряного потоку в такому порядку.
. Кожне натискання змінює напрямок пові-
Швидкість вентилятора
Щоб вибрати швидкість вентилятора, натисніть
. Кожне натискання змінює швидкість вентиля-
тора в такому порядку.
(AUTO) (
Безшумний режим
•
Коли задано AUTO, внутрішній блок подає два короткі звукові сигнали.
• Щоб прискорити охолодження/обігрів приміщення, збільште швидкість вентилятора. Рекомендується зменшити швидкість вентилятора, коли приміщення охолоне/нагріється.
•
Для зменшення шуму використовуйте низькі швидкості вентилятора.
) (
Hизький
) (Cередній) (Bисокий) (Hадвисокий)
(AUTO) (1) (2) (3) (4) (5)
(AUTO) ............ Заслінки встановлено в положення, в якому напрямок
(Вручну) .......... Для ефективного кондиціювання повітря встановіть
(Гойдання) ...... Заслінка періодично рухається вгору та вниз.
• Коли задано AUTO, внутрішній блок подає два короткі звукові сигнали.
• Щоб змінити напрямок повітряного потоку, обов'язково скористайтеся пультом дистанційного керування. Пересування горизонтальних заслінок вручну призведе до їх несправності.
• Якщо ввімкнути перемикач, положення горизонтальних заслінок
буде скинуто приблизно за хвилину, після чого вони почнуть рухатися. Те саме відбувається під час аварійного охолодження.
• Якщо здається, що горизонтальні заслінки знаходяться в незвичайному положенні, див. с. 14 .
повітряного потоку є найефективнішим. COOL/DRY/
FAN: горизонтальне положення. HEAT: положення (4).
COOL/DRY у верхнє положення, а HEAT — в нижнє.
Якщо вибрати нижнє положення під час COOL/DRY,
заслінка автоматично перейде у верхнє положення
після 0,5—1 год., щоб запобігти капанню конденсату.
(ГОЙДАННЯ)
Горизонтальний напрямок повітряного потоку
Щоб вибрати напрямок повітряного потоку, натисніть
повітряного потоку в такому порядку.
. Кожне натискання змінює напрямок
UK
Примітка.
Мультисистемна робота
Якщо кілька внутрішніх блоків разом працюють з одним зовнішнім блоком
у режимі обігріву, температура повітряного потоку може бути низькою. У
цьому випадку радимо встановити швидкість вентилятора на AUTO.
(ГОЙДАННЯ)
UK-7
Page 74

● ІНСТРУКЦІЇ З ЕКСПЛУАТАЦІЇ ●
РОБОТА В РЕЖИМІ LONG
(ДОВГИЙ СТРУМІНЬ)
Щоб розпочати роботу в режимі LONG, натисніть
• Швидкість вентилятора збільшиться та горизонтальна заслінка
перейде у положення для режиму LONG.
• Повітря розповсюджується на більшу відстань.
РОБОТА В РЕЖИМІ I-SAVE
Функція спрощеного повторного введення дозволяє викликати
.
бажані (задані раніше) значення параметрів єдиним натисканням
кнопки . Повторне натиснення цієї кнопки повертає попереднє
значення параметра.
UK
Щоб припинити роботу в режимі LONG, ще раз натисніть
• Режим LONG (довгий струмінь) скасовується, якщо натиснути кнопку ON/OFF (вкл./викл.), VANE (керування заслінкою) або
ECONO COOL (енергозбереження при охолодженні).
.
РЕЖИМ POWERFUL
Щоб розпочати роботу в інтенсивному режимі
POWERFUL, натисніть
HEAT с. 6 .
Швидкість вентилятора: спеціальна швидкість для режиму POWERFUL
Горизонтальна заслінка: встановіть положення заслінки або спрямуйте по-
•
В інтенсивному режимі POWERFUL не можна настроювати температуру.
Щоб припинити роботу в режимі POWERFUL, ще
раз натисніть
• Також робота в режимі POWERFUL автоматично припиняється
за 15 хвилин або після натискання кнопок OFF/ON, FAN, ECONO
COOL або i-save.
вітряний потік униз під час настроювання AUTO
.
у режимі COOL або
1
Щоб вибрати режим i-save (енергозбереження), на-
тисніть
дження), ECONO COOL (охолодження з енергозбереженням), NIGHT MODE (нічний режим) або HEAT
(обігрів).
2
Налаштуйте температуру, швидкість вентилятора та
напрямок повітряного потоку.
• Щоб обрати те саме значення параметра наступного разу, просто
натисніть
• Можна зберегти два значення параметра. (Одна для COOL/
ECONO COOL, інша для HEAT.)
• Виберіть потрібну температуру, швидкість вентилятора та напрямок повітряного потоку для приміщення.
Звичайно мінімальна температура в режимі HEAT (обігрів) —16
•
Проте лише під час роботи в режимі i-save (енергозбереження)
мінімальна температура —10 °C.
Щоб припинити роботу в режимі i-save, ще раз натисніть
• Режим i-save також припиняє роботу, якщо натиснути кнопку
MODE.
під час роботи в режимі COOL (охоло-
.
°C.
.
Примітка.
Приклад використання
1. Режим із низьким енергоспоживанням
Задавайте температуру на 2–3°C тепліше в режимі COOL та прохолодні-
ше в режимі HEAT. Таке значення параметра використовується для приміщень, де немає людей, а також під час сну.
2. Збереження часто використовуваних значень параметрів
Зберігайте улюблені значення параметрів для режимів COOL/ECONO
COOL та HEAT. Це дозволить вибрати потрібні значення параметрів одним натисканням кнопки.
UK-8
Page 75

РОБОТА ECONO COOL
РЕЖИМ NIGHT MODE (НІЧНИЙ РЕЖИМ)
Змінний напрямок потоку повітря створює відчуття більшої прохолоди, ніж незмінний.
Мікропроцесор автоматично змінює задану температуру та напрямок повітряного потоку. Можна виконувати охолодження та одночасно забезпечувати комфорт. Так можна заощаджувати енергію.
Щоб розпочати охолодження в режимі енергозбереження ECONO COOL, натисніть
у режимі
COOL с. 6 .
Блок виконує гойдання у вертикальному напрямку за різними
циклами відповідно до температури потоку повітря.
Щоб вимкнути режим ECONO COOL, ще раз натисніть
• Вимкнути режим ECONO COOL можна також натисканням кнопки
VANE.
.
В режимі NIGHT MODE (нічний режим) змінюється яскравість індикатора режиму роботи, вимикається звуковий сигнал і обмежується
рівень шуму зовнішнього блока.
Щоб увімкнути режим NIGHT MODE (нічний режим),
натисніть
• Індикаторна лампочка роботи потьмяніє.
• Звуковий сигнал буде вимкнено для всіх випадків, окрім запуску та
зупинки роботи.
• Рівень шуму зовнішнього блока буде нижче значення, вказаного в
розділі «ТЕХНІЧНІ ХАРАКТЕРИСТИКИ».
під час роботи.
Щоб скасувати режим NIGHT MODE (нічний режим),
ще раз натисніть
.
Примітка.
• Потужність охолодження/нагрівання може зменшитись.
• Рівень шуму зовнішнього блока може не змінитися після запуску пристрою, під час спрацьовування захисту або в залежності від інших умов
експлуатації.
• Швидкість обертання вентилятора внутрішнього блока не зміниться.
Індикаторну лампочку роботи буде складно побачити в яскраво освітленій
•
кімнаті.
• Рівень шуму зовнішнього модуля не знижуватиметься під час роботи
комплексної системи.
UK
UK-9
Page 76

● ІНСТРУКЦІЇ З ЕКСПЛУАТАЦІЇ ●
РОБОТА ТАЙМЕРА (ТАЙМЕР ON/OFF)
АВАРІЙНА ЕКСПЛУАТАЦІЯ
Ситуації, в яких не можна користуватися пультом дистанційного керування
Щоб активувати аварійну експлуатацію, можна натиснути перемикач аварійної експлуатації (E.O. SW) на внутрішньому блоці.
Примітка.
• Перші 30 хвилин роботи є тестовим прогоном. Керування температурою
1
Щоб настроїти таймер, натисніть під час роботи
або .
(таймер ВВІМКНЕННЯ): Пристрій вмикається в заданий час.
(таймер ВИМКНЕННЯ): Пристрій вимикається в заданий час.
не працює, а для швидкості вентилятора встановлено значення High
(Висока).
• У режимі аварійного обігріву швидкість вентилятора поступово збільшується для забезпечення видування теплого повітря.
• У режимі аварійного охолодження положення горизонтальних заслінок
буде скинуто приблизно за хвилину, після чого вони почнуть роботу.
Кожне натискання перемикача E.O. SW змінює роботу в
такому порядку.
Індикаторна лампочка роботи
Аварійне охолодження COOL
Аварійний обігрів HEAT
Стоп
Задана температура: 24°C
Швидкість вентилятора: середня
Горизонтальна заслінка: авто
* Блимає або .
Переконайтеся, що поточний час і дата встановлені правильно. С. 5
UK
*
2
Щоб настроїти час таймера, натисніть (збільшення) та
Кожне натискання збільшує або зменшує заданий час на 10 хвилин.
• Настройте таймер, поки блимають
3
Щоб скасувати дію таймера, ще раз натисніть
або
(зменшення).
або .
.
Примітка.
• Таймери ввімкнення та вимкнення можна настроювати разом. Позначка
відображає порядок операцій таймера.
• Якщо живлення відмовить, коли налаштовано таймер увімкнення/ви-
мкнення, див. с. 10 , «Функція автоматичного повторного запуску».
ФУНКЦІЯ АВТОМАТИЧНО-
ГО ПОВТОРНОГО ЗАПУСКУ
Якщо стався збій живлення або електроживлення приладу було вимкнено
під час його роботи, функція повторного автозапуску автоматично налаштовує прилад на роботу в тому режимі, який було задано за допомогою
пульта дистанційного керування до відключення електроживлення. Якщо
установлено таймер, ця установка скасовується і блок починає роботу при
відновленні подачі живлення.
Якщо ця функція не потрібна, зверніться до представника сервісної
служби, оскільки буде потрібно змінити параметри цього приладу.
UK-10
Page 77

РОБОТА ТИЖНЕВОГО ТАЙМЕРА
• Для окремих днів тижня можна налаштувати максимум 4 таймери ввімкнення або вимкнення.
• Для тижня можна налаштувати максимум 28 таймерів вимикання або вмикання.
Приклад Підтримує 24°C у період від прокидання до виходу з дому та 27°C у період з повернення
додому до лягання спати у робочі дні.
Підтримує 27°C у період від пізнього прокидання до раннього лягати спати у вихідні дні.
Значення1 Значення2 Значення3 Значення4
Пн
ON OFF ON OFF
~
Пт
Сб
~
Нд
Примітка.
Коли ввімкнено тижневий таймер, доступний параметр простого таймера
ON/OFF. У цьому випадку таймер ON/OFF має пріоритет перед тижневим
таймером. Робота тижневого таймера відновиться після завершення роботи
простого таймера ON/OFF.
24°C 27°C
6:00 8:30 17:30 22:00
Значення1 Значення2
ON OFF
8:00 21:00
27°C
3
Щоб задати вимкнення/увімкнення, час та температуру, натисніть
У разі натискання буде вибрано
таймер ON/OFF (ввімкнення/вимкнення).
Натискання скасовує
значення параметра таймера.
* Щоб швидко змінити час, натисніть і утримуйте кнопку.
, та .
Натискання
регулює час.
Приклад Вибрано
[ON], [6:00]
та [24°C].
Натискання
регулює температуру.
Натисніть та , щоб продовжити настроювання таймера для інших днів та/або номерів.
4
Натисніть , щоб завершити й передати значення параметра тижневого таймера.
* Значок
блимав, гасне, і відображається поточний
час.
, що
Примітка.
•
Натисніть , щоб передати значення параметрів тижневого таймера на внутрішній блок.
Спрямуйте пульт дистанційного керування на внутрішній блок та утримуйте його протягом 3 с.
•
Під час настроювання таймера для більш ніж одного дня тижня або
більш ніж одного номера не треба натискати
ки. Після настроювання всіх параметрів один раз натисніть
дуть збережені всі значення параметрів тижневого таймера.
•
Натисніть , щоб увійти в режим настроювання тижневого таймера, а тоді
натисніть і утримуйте
тижневого таймера. Спрямуйте пульт дистанційного керування на внутрішній блок.
упродовж 5 с, щоб стерти всі значення параметрів
для кожної настрой-
. Бу-
UK
Настроювання тижневого таймера
* Переконайтеся, що поточний час і дата встановлені правильно.
1
Щоб увійти в режим настроювання тижневого таймера, натисніть .
* Блимає .
2
Щоб вибрати день та номер параметра, натисніть та .
При натисканні буде вибрано
день тижня, який треба налаштувати.
* Можна вибрати всі дні.
Приклад Вибрано [Mon Tue
Для вибору номера
параметра натискайте
... Sun] та [1].
.
5
Щоб увімкнути тижневий таймер, натисніть .
(Спалахує .)
* Якщо тижневий таймер увімкнено, світиться той день тижня, для
якого настроєно таймер.
Щоб вимкнути тижневий таймер, ще раз натисніть . ( гасне.)
Примітка.
Після вимкнення тижневого таймера збережені значення параметрів не стираються.
Перевірка значень параметрів тижневого таймера
1
Щоб увійти в режим настроювання тижневого таймера, натисніть .
* Блимає .
2
Щоб переглянути значення параметрів конкретного
дня або номера, натисніть
Щоб вийти з режиму настроювання тижневого таймера, натисніть
.
Примітка.
Якщо для перегляду значень параметрів вибрано всі дні тижня і додано ще
одне значення, відображатиметься
або .
.
UK-11
Page 78

● ІНСТРУКЦІЇ З ЕКСПЛУАТАЦІЇ ●
ЧИЩЕННЯ
Інструкції
• Перед очищенням вимкніть живлення або перемикач.
• Не торкайтеся руками металевих частин.
Не використовуйте для чищення бензин, розріджувач, полірувальний порошок або інсектицид.
•
• Використовуйте виключно розріджені м'які миючі засоби.
Не використовуйте жорсткі щітки, губки або інше абразивне приладдя.
•
Повітряний фільтр
(Повітроочисний фільтр)
• Очищайте кожні 2 тижні
• Видаліть бруд пилососом або змийте водою.
• Після промивання ретельно висушіть фільтр у затінку.
Передня панель
• Не намочуйте і не промивайте горизонтальну заслінку.
• Не використовуйте воду гарячіше за 50°C.
Бережіть деталі й вузли від прямих сонячних променів, тепла або вогню під час сушіння.
•
• Не застосовуйте до вентилятора надмірної сили, оскільки це може призвести до утворення тріщин або поломки.
Фільтр очищення повітря
(Фільтр з іонами срібла для очищення
повітря, не входить у комплектацію)
Кожні 3 місяці
• Видаліть бруд за допомогою пилососа.
Якщо бруд неможливо видалити за допомогою пилососа
• Перед миттям на деякий час помістіть фільтр разом із його рамою в теплу воду.
• Після промивання як слід висушіть їх у затінку.
Щороку
• Щоб забезпечити оптимальну ефективність, заміняйте його
новим фільтром очищення повітря.
• Номер деталі за каталогом MAC-2360FT-E
Напрямна фільтра
UK
Петля
Отвір
1. Піднімайте передню панель, доки не почуєте клацання.
2. Притримуйте петлі та тягніть, щоб зняти, як показано на ілюстрації вище.
• Протирайте м'якою сухою тканиною або промивайте водою.
• Не залишайте у воді довше ніж на дві години.
• Перед установленням ретельно висушіть його, уникаючи прямого сонячного проміння.
3. Установіть передню панель назад, для цього виконайте процедуру зняття у зворотному порядку.
Надійно закрийте передню панель і натисніть у
місцях, позначених стрілками.
Ця інформація основана на Директиві ЄС № 528/2012
НАЙМЕНУВАННЯ МОДЕЛІ
MSZ-AP60/71VG ФІЛЬТР
MAC-2360FT-E ФІЛЬТР
Оброблений компонент
(Найменування деталі)
Активні речовини
(Номер CAS)
Фосфат срібла-натру-водню-цирконію
(265647-11-8)
2-октил-2H-ізотіазол-3-он (OIT)
(26530-20-1)
Цеоліт, збагачений сріблом та
цинком
(130328-20-0)
Заштовхніть,
щоб установити
в блок по напрямній фільтра.
Потягніть, щоб вийняти з блока.
Важливо
• Щоб забезпечити оптимальну ефективність та змен-
шити споживання електроенергії, регулярно очищуйте фільтри.
• Забруднені фільтри є причиною утворення конденса-
ту в кондиціонері, що сприяє появі грибків, наприклад
плісняви. Тому рекомендується очищати повітряні
фільтри кожні 2 тижні.
Властивість
Антибактеріальна
Засіб захисту від
плісняви
Антибактеріальна
Інструкція з використання
(Інформація про безпечне використання)
• Використовуйте цей виріб лише за його призначенням та згідно з вказівками, викладеними
в настанові з експлуатації.
• Не допускайте проковтування. Зберігайте в
місцях, недоступних для дітей.
• Використовуйте цей виріб лише за його призначенням та згідно з вказівками, викладеними
в настанові з експлуатації.
• Не допускайте проковтування. Зберігайте в
місцях, недоступних для дітей.
UK-12
Page 79

НАЛАШТУВАННЯ ІНТЕРФЕЙСУ Wi-Fi (ТІЛЬКИ ТИП VGK)
Цей інтерфейс Wi-Fi здійснює обмін інформацією про стан і керує
виконанням команд з сервера через установлене з’єднання з
внутрішнім блоком.
Передня панель
Інтерфейс Wi-Fi
Передня панель
Інтерфейс Wi-Fi
Знайомство з інтерфейсом Wi-Fi
№ Поз. Опис
Перемикач MODE (РЕ-
1
ЖИМ)
Перемикач RESET
2
(СКИДАННЯ)
ERR LED (СВІТЛОДІ-
ОДНИЙ ІНДИКАТОР
3
ПОМИЛКИ) (помаранчевий)
NET LED (СВІТЛОДІ-
4
ОДНИЙ ІНДИКАТОР
МЕРЕЖІ) (зелений)
MODE LED (СВІТЛОДІОДНИЙ ІНДИКАТОР
5
РЕЖИМУ) (помаранчевий)
UNIT LED (СВІТЛОДІ-
6
ОДНИЙ ІНДИКАТОР
БЛОКУ) (зелений)
Забезпечує вибір режиму.
Забезпечує скидання ВСІХ настройок.
Відображає стан помилки мережі.
Відображає стан мережі.
Відображає стан режиму точки доступу.
Відображає стан внутрішнього блоку.
3
ERR
4
NET
MODE
5
UNIT
6
RESET
MODE
2
1
1
Відкрийте передню панель і вийміть інтерфейс WiFi.
2
Налаштуйте з’єднання між інтерфейсом Wi-Fi і
маршрутизатором. Див. ПОСІБНИК З НАСТРОЙКИ
та SETUP QUICK REFERENCE GUIDE (КОРОТКИЙ
ДОВІДКОВИЙ ПОСІБНИК З НАСТРОЙКИ), які постачаються в комплекті з модулем.
Стосовно ПОСІБНИКА З НАСТРОЙКИ, перейдіть на
вказаний нижче веб-сайт.
http://www.melcloud.com/Support
3
Після налаштування знову встановіть інтерфейс WiFi і закрийте передню панель.
4
Стосовно Посібника користувача MELCloud, перейдіть на вказаний нижче веб-сайт.
http://www.melcloud.com/Support
Примітка.
• Перш ніж розпочати настройку цього інтерфейсу Wi-Fi, переконайтеся в
тому, що маршрутизатор підтримує шифрування WPA2-AES.
• Перед використанням цього інтерфейсу Wi-Fi кінцевий користувач повинен прочитати умови надання послуги Wi-Fi та погодитися з ними.
• Для завершення підключення цього інтерфейсу Wi-Fi до послуги Wi-Fi
може знадобитися маршрутизатор.
• Даний інтерфейс Wi-Fi не розпочне передачу даних щодо функціонування з системи, поки кінцевий користувач не пройде реєстрацію й не погодиться з умовами надання послуги Wi-Fi.
• Не допускається монтаж і підключення даного інтерфейсу Wi-Fi до будьяких систем Mitsubishi Electric, що забезпечують охолодження чи обігрів
критично важливих об’єктів.
• Настроївши інтерфейс Wi-Fi, запишіть інформацію про його параметри
на останній сторінці цього посібника.
• Перед переміщенням або утилізацією скиньте параметри інтерфейсу
Wi-Fi до заводських значень.
UK
(1) Перемикач MODE (РЕЖИМ)
• Перемикач MODE (РЕЖИМ) використовується для вибору режимів
у конфігураціях.
(2) Перемикач RESET (СКИДАННЯ)
• Щоб перезавантажити систему, натисніть та утримуйте перемикач
RESET (СКИДАННЯ) протягом 2 секунд.
• Щоб скинути налаштування інтерфейсу Wi-Fi до заводських настройок за замовчуванням, натисніть та утримуйте перемикач RESET
(СКИДАННЯ) протягом 14 секунд.
При скиданні інтерфейсу Wi-Fi до заводських настройок за замовчуванням УСЮ інформацію щодо настройки конфігурації буде втрачено. Виконувати цю операцію слід із особливою обережністю.
Інтерфейс Wi-Fi Mitsubishi Electric призначений для забезпечення обміну
даними з послугою Wi-Fi Mitsubishi Electrics MELCloud.
Пристрої інтерфейсу Wi-Fi сторонніх виробників не можна підключити до
MELCloud.
Mitsubishi Electric не несе відповідальності за (i) недостатній рівень продуктивності будь-якої системи чи виробу;
(ii) несправності системи чи виробу; або (iii) втрату чи пошкодження
будь-якої системи чи виробу; які були спричинені підключенням до інтерфейсу Wi-Fi виробництва сторонньої організації чи виникли внаслідок
цього та/або через використання послуги Wi-Fi стороннього оператора з
обладнанням Mitsubishi Electric.
Для отримання найновіших відомостей щодо MELCloud від Mitsubishi
Electric Corporation завітайте на веб-сторінку www.melcloud.com.
UK-13
Page 80

● ІНСТРУКЦІЇ З ЕКСПЛУАТАЦІЇ ●
ЯКЩО ЗДАЄТЬСЯ, ЩО ПРИЛАД НЕСПРАВНИЙ
UK
Якщо навіть після виконання цих перевірок прилад не поновить нормальну роботу, припиніть його експлуатацію та зверніться до дилера.
Симптом Пояснення та пункти для перевірки
Внутрішній блок
Блок не працює. • Чи увімкнено вимикач?
Горизонтальна заслінка не
рухається.
Після повторного запуску блок
не може працювати впродовж
приблизно 3 хвилин.
З повітровипускних отворів
внутрішнього приладу виходить
легкий туман.
Режим гойдання ГОРИЗОНТАЛЬНОЇ ЗАСЛІНКИ призупиняється на
деякий час, після чого поновлюється.
Коли в режимі COOL/DRY/FAN
вибрано SWING (гойдання), нижня
горизонтальна заслінка не рухається.
Під час роботи змінюється напрямок повітряного потоку.
Напрямок горизонтальної заслінки неможливо регулювати за
допомогою пульта дистанційного
керування.
У режимі обігріву прилад зупиняється приблизно на 10 хвилин.
Після подачі живлення прилад
автоматично починає роботу
навіть без сигналу від пульта
дистанційного керування.
Дві горизонтальні заслінки стикаються. Горизонтальні заслінки
знаходяться в незвичному положенні. Горизонтальні заслінки
не повертаються в правильне
«положення закривання».
У режимі COOL/DRY, коли температура в приміщенні наближається
до встановленої, зовнішній блок
зупиняється, потім внутрішній
блок починає працювати на малій
швидкості.
Внутрішній блок згодом змінює
колір.
Індикаторна лампочка роботи тьмяна.
Пристрій не видає звуковий сигнал.
• Чи вставлено штепсель шнура живлення в мережеву розетку?
• Чи задано таймер увімкнення? С. 10
• Чи встановлено горизонтальну й вертикальну
заслінки правильно?
• Чи деформована захисна решітка вентилятора?
• Якщо ввімкнено перемикач, положення горизонтальних заслінок буде скинуто приблизно за
хвилину. Після скидання відновиться нормальна
робота горизонтальних заслінок. Те саме відбувається під час аварійного охолодження.
• Це захищає прилад згідно з інструкціями мікропроцесора. Зачекайте.
•
Прохолодне повітря, що надходить із приладу,
швидко охолоджує вологу повітря всередині приміщення, і утворюється туман.
• Це необхідно для нормального гойдання ГОРИЗОНТАЛЬНОЇ ЗАСЛІНКИ.
• Коли в режимі COOL/DRY/FAN обрано SWING
(гойдання), є цілком нормальним, що нижня
горизонтальна заслінка не рухається.
• Якщо в режимах COOL або DRY видування повітря триває 0,5–1 год., напрямок повітряного
потоку автоматично встановлюється у верхнє
положення, щоб запобігти утворенню конденсату
та його капанню.
• Якщо під час нагрівання температура повітряного
потоку занизька або виконується розморожування, горизонтальна заслінка автоматично приймає
горизонтальне положення.
• Зовнішній блок виконує розморожування.
Оскільки ця операція триватиме не більше
10 хвилин, зачекайте. (Якщо температура назовні
занизька, а вологість зависока, утворюється іній.)
•
Ці моделі обладнано функцією повторного автозапуску. Якщо вимкнути живлення та не зупиняти прилад за допомогою пульта дистанційного керування,
то після наступного ввімкнення живлення прилад
автоматично почне роботу в тому режимі, який
був установлений за допомогою пульта дистанційного керування на момент вимкнення живлення.
Див. «Функція автоматичного повторного за-
пуску». С. 10
Виконайте будь-яку з таких дій.
•
Вимкніть і ввімкніть вимикач. Переконайтеся, що
горизонтальні заслінки встановлено в правильне
«положення закривання».
• Активуйте та припиніть аварійне охолодження та
переконайтеся, що горизонтальні заслінки встановлено в правильне «положення закривання».
• Коли температура в приміщенні відрізняється від
заданої температури, вентилятор внутрішнього
блока починає працювати згідно зі значеннями
параметрів пульта дистанційного керування.
• Хоча через вплив деяких факторів, наприклад
ультрафіолету та температури, пластик жовтіє,
це не впливає на функціонування виробу.
• Чи встановлено режим NIGHT MODE (нічний
режим)? С. 9
Мультисистема
Один із внутрішніх блоків, що не
використовується, нагрівається,
при цьому може бути чути звук,
схожий на звук потоку води.
Коли вибрано режим обігріву,
функціонування починається не
відразу.
• Невелика кількість холодоагенту продовжує надходити у внутрішній блок, навіть якщо він у цей
момент не працює.
• Якщо розпочати роботу, коли виконується розморожування зовнішнього блока, до початку
видування теплого повітря може пройти кілька
хвилин (максимум 10 хвилин).
Зовнішній блок
Вентилятор зовнішнього блока
не обертається, хоча компресор
працює. Навіть якщо вентилятор
починає обертатися, він швидко
зупиняється.
З зовнішнього блока витікає
вода.
З зовнішнього блока виходить
білий дим.
• Якщо під час охолоджування температура ззовні
буде низькою, вентилятор працює з перервами,
щоб зберегти належну потужність охолодження.
• Під час охолодження та сушки труби та трубні
сполуки охолоджуються, що призводить до
створення конденсату.
• Під час нагрівання водний конденсат, що утворився в теплообміннику, капає вниз.
• Під час нагрівання виконується розморожування,
при цьому лід, що утворився в зовнішньому
блоці, тане та капає.
• Під час нагрівання пара, що утворюється в результаті розморожування, має вигляд білого диму.
UK-14
Симптом Пояснення та пункти для перевірки
Пульт дистанційного керування
Дисплей пульта дистанційного
керування не вмикається або
потьмянів. Внутрішній блок не
реагує на сигнал пульта дистанційного керування.
• Перевірте, чи не розряджені елементи живлення.
С. 5
• Чи дотримано полярність (+, –) елементів живлення?
С. 5
• Чи натиснуто якісь кнопки на пультах дистанційного керування інших електричних приладів?
Не охолоджує або не гріє
Неможливо належним чином
охолодити чи прогріти приміщення.
Неможливо належним чином
охолодити приміщення.
Неможливо належним чином
прогріти приміщення.
При роботі в режимі обігріву повітря видувається не відразу.
• Чи правильно вказано температуру? С. 6
• Чи правильно налаштовано вентилятор? Змініть
швидкість вентилятора з високої на надвисоку.
С. 7
• Чи чисті фільтри? С. 12
Чи чисті вентилятор і теплообмінник внутрішнього блока?
•
• Чи не заблоковані повітрозабірний або повітровипускний отвори внутрішнього або зовнішнього
блоків чужорідними предметами?
• Чи не відкриті вікно або двері?
Для досягнення заданої температури може потребувати-
•
ся певний час; окрім того досягнення заданої температури може бути неможливим через розмір приміщення,
температуру навколишнього середовища тощо.
•
Чи встановлено режим NIGHT MODE (нічний режим)?
С. 9
• Якщо в приміщенні використовується вентилятор
або газова плита, навантаження під час охолодження збільшується, в результаті охолодження
виявляється недостатнім.
• Якщо температура ззовні висока, охолодження
може виявитися недостатнім.
• Якщо температура ззовні низька, обігрів може
виявитися недостатнім.
• Зачекайте, доки прилад підготується до видування
теплого повітря.
Потік повітря
Повітря, що виходить з внутрішнього блока, має дивний запах.
• Чи чисті фільтри? С. 12
Чи чисті вентилятор і теплообмінник внутрішнього блока?
•
•
Прилад може всмоктувати запах стін, килима, меблів, тканин тощо і видувати його разом із повітрям.
Звук
Чути потріскування. • Потріскування пояснюється розширенням/звужен-
Чути «булькотіння». • Цей звук виникає, коли зовнішнє повітря всмокту-
З внутрішнього блока чути
механічний звук.
Чути звук потоку води. • Це звук холодоагенту або водяного конденсату,
Іноді чути шиплячий звук. • Цей звук чути під час зміни потоку холодоагенту
ням передньої панелі та інших деталей приладу
внаслідок зміни температури.
ється з дренажного шланга після ввімкнення витяжного пристрою або вентилятора, що викликає
викид струменя води з дренажного шланга.
Цей звук також чути при сильному вітрі, коли зовнішнє повітря з силою потрапляє в дренажний шланг.
• Цей звук з'являється при вмиканні/вимиканні
вентилятора або компресора.
що тече всередині приладу.
всередині приладу.
Таймер
Тижневий таймер не працює
так, як його було настроєно.
Прилад довільно починає/припиняє працювати.
• Чи налаштовано таймер увімкнення/вимкнення?
С. 10
•
Ще раз передайте значення параметрів тижневого
таймера на внутрішній блок. Коли відомості будуть
успішно отримані, внутрішній блок подасть довгий
звуковий сигнал. Якщо відомості не було отримано,
пролунають 3 короткі звукові сигнали. Переконайтеся, що відомості отримано успішно.
• Коли відмовляє та вимикається живлення, показання вбудованого годинника внутрішнього блока
стають хибними. У результаті тижневий таймер
може не працювати належним чином.
Пульт дистанційного керування повинен знаходи-
тися в місці, де внутрішній блок може сприймати
його сигнал. С. 5
• Чи налаштовано тижневий таймер? С. 11
С. 11
Інтерфейс Wi-Fi
Помилка під час налаштування
чи роботи модуля.
Див. ПОСІБНИК З НАСТРОЙКИ.
Стосовно ПОСІБНИКА З НАСТРОЙКИ, перейдіть
на вказаний нижче веб-сайт.
http://www.melcloud.com/Support
Page 81

ЯКЩО ЗДАЄТЬСЯ, ЩО ПРИ-
ЛАД НЕСПРАВНИЙ
МІСЦЕ ВСТАНОВЛЕННЯ І
ЕЛЕКТРОМОНТАЖНІ РОБОТИ
У випадках, описаних нижче, необхідно припинити користуватися
кондиціонером і звернутися до дилера.
• Спостерігається витік або капання води з внутрішнього блока.
• Блимає індикаторна лампочка роботи.
• Часто спрацьовує вимикач.
Сигнал пульта дистанційного керування не приймається в приміщенні, де працює
•
флуоресцентна лампа типу ВИМК./УВІМК. (інверторна флуоресцентна лампа).
• Робота кондиціонера перешкоджає прийому радіо або ТБ. Можливо, для
такого радіо- або ТБ-приймача знадобиться підсилювач.
• Чути незвичайні звуки.
• Коли виявлено витік холодоагенту.
ЯКЩО КОНДИЦІОНЕР ПЛАНУЄТЬСЯ НЕ ВИ-
КОРИСТОВУВАТИ ТРИВАЛИЙ ЧАС
1
Встановіть режим COOL на найвищий температурі
або режим FAN на 3–4 години.
• Це дозволить висушити блок зсередини.
• Волога всередині кондиціонера сприяє розмноженню грибків, наприклад плісняви.
2
Щоб припинити роботу, натисніть .
3
Вимкніть вимикач та/або від'єднайте від мережевої
С. 6
Місце установки
Намагайтеся не встановлювати кондиціонер у таких місцях.
• У місцях, де багато машинного масла.
• У місцях, де багато солі, наприклад на морському узбережжі.
• У місцях, де утворюється сульфідний газ, наприклад біля гарячих джерел,
каналізації, рідких відходів.
• У місцях, де розбризкане масло, або на ділянці з масляним димом (наприклад, у місцях приготування їжі та на фабриках, де пластик може змінити
свої властивості або пошкодитися).
• У місцях, де знаходиться обладнання, яке випромінює високі частоти, або
обладнання бездротового зв'язку.
• У місцях блокування повітровипускного отвору зовнішнього блока.
• У місцях, де звук роботи або повітря зовнішнього блока створює проблеми
для мешканців сусіднього будинку.
• Рекомендована висота встановлення внутрішнього блока складає 1,8—2,3
м. Якщо встановити блок на такій висоті неможливо, зверніться до свого
дилера.
• Внутрішній блок має встановлюватися в приміщеннях, площа яких перевищує вказане далі значення. Зверніться за консультацією до дилера.
• Не користуйтеся кондиціонером повітря під час будівельних і оздоблювальних робіт всередині приміщення, а також під час вощення підлоги.
Після таких робіт добре провітріть приміщення, перш ніж вмикати кондиціонер. В противному разі леткі елементи можуть налипнути всередині
кондиціонера, що призведе до витікання або розбризкування води.
• Не використовуйте інтерфейс Wi-Fi поблизу електричного обладнання
медичного призначення або поруч із людьми, які використовують медичні пристрої, як-от кардіостимулятори чи імплантовані кардіовертеридефібрилятори.
Це може призвести до нещасного випадку в разі несправності медичного обладнання або пристрою.
• Це обладнання слід монтувати й експлуатувати з урахуванням мінімальної
відстані 20 см між пристроєм і користувачем чи сторонньою особою.
• Не допускається експлуатація інтерфейсу Wi-Fi поруч з іншими бездротовими пристроями, мікрохвильовими печами, бездротовими телефонами чи апаратами факсимільного зв’язку.
Це може призвести до несправностей.
розетки штепсель шнура живлення.
4
Витягніть усі елементи живлення з пульта дистанційного керування.
Встановлюйте пристрій
якомога далі для
захисту від впливу флуоресцентних ламп.
Під час повторного використання кондиціонера
1
Очистьте повітряний фільтр. С. 12
2
Переконайтеся, що повітрозабірний та повітровипускний
отвори внутрішнього та зовнішнього блоків не заблоковано.
1 м і
більше
Бездротовий
телефон або
портативний
телефон
1 м і
більше
Радіо
Електромонтажні роботи
3
Переконайтеся, що заземлення підключено належним чином.
• Забезпечте окремий контур для живлення кондиціонера.
• Обов'язково дотримуйтеся допустимої потужності вимикача.
У разі виникнення запитань зверніться до дилера.
Інверторна флуоресцентна лампа
Забезпечте достатню відстань
для запобігання
спотворення
зображення і
звуку.
ТБ
3 м та більше
Зовнішній блок треба встановлювати на
відстані не менше 3 м від антен телевізорів, радіоприймачів тощо. У регіонах
зі слабким прийомом треба забезпечити більшу відстань між зовнішнім
блоком і антеною, якщо під час роботи
кондиціонера виникають перешкоди
при прийомі радіо- або телемовлення.
Для забезпечення
оптимальної ефективності
та продовження терміну
використання пристрою
зовнішній блок слід встановлювати в сухому місці з
достатньою вентиляцією.
100 мм і
більше
(AP60/AP71)
200/500 мм і
більше
стіна тощо.
UK
4
Див. «ПІДГОТОВКА ПРИЛАДУ ДО ЕКСПЛУАТАЦІЇ»
та виконуйте наведені інструкції. С. 5
UK-15
Page 82

● ІНСТРУКЦІЇ З ЕКСПЛУАТАЦІЇ ●
ТЕХНІЧНІ ХАРАКТЕРИСТИКИ
Модель
Функція
Живлення
Потужність кВт
На вході кВт
Маса
Місткість холодоагенту (R32) кг
Код IP
Дозволений максимальний робочий тиск
Рівень шуму (SPL)
Внутрішній
Зовнішній
Внутрішній кг
Зовнішній кг
Внутрішній
Зовнішній
Низький тиск МПа
Високий тиск МПа
Внутрішній (надвисокий/високий/
середній/низький/
безшумний режим)
Зовнішній дБ(А)
дБ(А)
Гарантований робочий діапазон
Охо-
ло-
джен-
ня
Об-
ігрів
Верхня
межа
Нижня
межа
Верхня
межа
Нижня
межа
Внутрішній Зовнішній
32°C DB
23°C WB
21°C DB
15°C WB
27°C DB
—
20°C DB
—
MSZ-AP60VG(K) MSZ-AP71VG(K)
MUZ-AP60VG MUZ-AP71VG
Охолодження
6,1 6,8 7,1 8,1
1,59 1,67 2,01 2,12
48/45/41/37/29 48/45/41/37/30 49/45/41/37/30 51/45/41/37/30
56 57 56 55
Обігрів
~ /N, 230 В, 50 Гц
16 17
40 55
1,05 1,50
Охолодження
IP 20
IP 24
2,77
4,17
Обігрів
Примітка.
46°C DB
—
-10°C DB
—
24°C DB
18°C WB
-15°C DB
-16°C WB
DB: сухий термометр
WB: вологий термометр
Номінальні умови експлуатації
Охолодження — Внутрішній блок: 27°C DB, 19°C WB
Зовнішній блок: 35°C DB
Обігрів — Внутрішній блок: 20°C DB
Зовнішній блок: 7°C DB, 6°C WB
UK
Інтерфейс Wi-Fi
Модель
Напруга на вході
Енергоспоживання МАКС. 2 Вт
Розмір В×Ш×Г (мм) 79×44×18,5
Вага (г) 60 (разом із кабелем)
Рівень потужності передавача
(MAKC.)
Радіоканал Канали 1–13 (2412–2472 МГц)
Протокол радіообміну IEEE 802.11b/g/n (20)
Шифрування AES
Автентифікація WPA2-PSK
Версія програмного забезпечення XX.00
Стосовно Декларації про відповідність, перейдіть на вказаний нижче веб-сайт.
http://www.melcloud.com/Support
MAC-567IFB2-E
12,7 В постійного струму
(від внутрішнього блоку)
17,5 дБм при використанні
IEEE 802.11b
UK-16
Page 83

Wi-Fi interface setting information
Indoor unit model name
Indoor unit serial number
Outdoor unit model name
Outdoor unit serial number
Wi-Fi interface MAC address (MAC)
Wi-Fi interface serial number (ID)
Wi-Fi interface PIN (PIN)
Wi-Fi interface SSID (SSID)
Wi-Fi interface KEY (KEY)
System commissioning date
Wi-Fi interface installation date
Installer contact details
Name
Telephone number
MEMO
Page 84

MADE IN THAILAND
ИЗГОТОВЛЕНО В ТАИЛАНДЕ
ТАИЛАНДТА ЖАСАЛҒАН
ԱՐՏԱԴՐՎԱԾ Է ԹԱԻԼԱՆԴՈՒՄ
ВИГОТОВЛЕНО В ТАЇЛАНДІ
ООО «Мицубиси Электрик (РУС)»: 115114, Российская Федерация, г. Москва, ул. Летниковская, д. 2, стр. 1, 5 этаж
HEAD OFFICE: TOKYO BUILDING, 2-7-3, MARUNOUCHI, CHIYODA-KU, TOKYO 100-8310, JAPAN
Контактный номер телефона: +7-495-721-20-70
JG79Y567H02
 Loading...